

Page 1

IRIScan™ Book 5
PDF
You slide, it scan.
for Windows® and Mac® Portable scanner & OCR software
Page 2

Quick User Guide – IRIScan™ Book 5
This Quick User Guide helps you get started with the IRIScan™ Book 5 scanner.
This scanner is supplied with the software applications Readiris™ Pro, IRISCompressor™ Pro and
InstantResult™ (Windows only).
The descriptions in this guide are based on the Windows® 7, Mac® OS Sierra and iOS 8 Operating Systems.
Please read this guide before operating this scanner and its software. All information is subject to change
without prior notice.
To make sure you have the latest version of this documentation, to consult the Frequently Asked questions
or to contact Technical Support visit www.irislink.com/support.
Table of Contents
1. Prepare the Scanner .................................................................................................................. 4
2. Buttons & Settings Overview ....................................................................................................... 5
2.1 Overview of the Scanner Buttons ............................................................................................ 5
2.2 Overview of the Scanner Settings ........................................................................................... 6
3. Choose the Scanner Settings ...................................................................................................... 9
3.1 Scanner Settings .................................................................................................................. 9
3.2 Modify the settings ............................................................................................................... 9
3.2.1 Modify the resolution and the output file format by using the buttons ..................................... 9
3.2.2 Modify the settings within the menu ................................................................................... 9
4. Scan Documents ...................................................................................................................... 11
4.1 Create multi-page PDF's ....................................................................................................... 11
4.2 Check your scanned documents ............................................................................................. 12
4.3 Scan documents while using the micro USB cable ..................................................................... 12
5. Transfer Scanned Documents to your Computer ........................................................................... 15
5.1 Using the provided micro USB cable (Windows and Mac OS) ...................................................... 15
5.2 Using the microSD card adapter (Windows, Mac OS and Tablet) ................................................. 15
6. Scan, Edit and Convert Images into Editable Text with InstantResult™ (Windows only) ...................... 17
6.1 Install InstantResult ............................................................................................................. 17
6.2 Using InstantResult to scan ................................................................................................... 18
6.3 Using InstantResult to convert your scanned files into editable text ............................................. 19
6.4 Using InstantResult to edit your scanned files .......................................................................... 19
6.5 Using InstantResult to save your (recognized) scanned files ....................................................... 20
7. Technical Info .......................................................................................................................... 21
7.1 Minimum System Requirements Windows PC ........................................................................... 21
7.2 Minimum System Requirements Mac OS.................................................................................. 21
7.3 Scanner Specifications .......................................................................................................... 21
8. Troubleshooting Info ................................................................................................................. 22
9. Legal Notices ........................................................................................................................... 23
10. Compliance ........................................................................................................................... 25
3
Page 3

Quick User Guide – IRIScan™ Book 5
1. Prepare the Scanner
Insert the included microSD card
Insert the microSD card gently into the card slot until the card is latched.
Note: on a Windows PC, the IRIScan Book 5 can also be used without microSD card with the
InstantResult™ software. See section 6 Scan, Edit and Convert Images into Editable Text with
InstantResult™ (Windows only).
4
Page 4
Quick User Guide – IRIScan™ Book 5
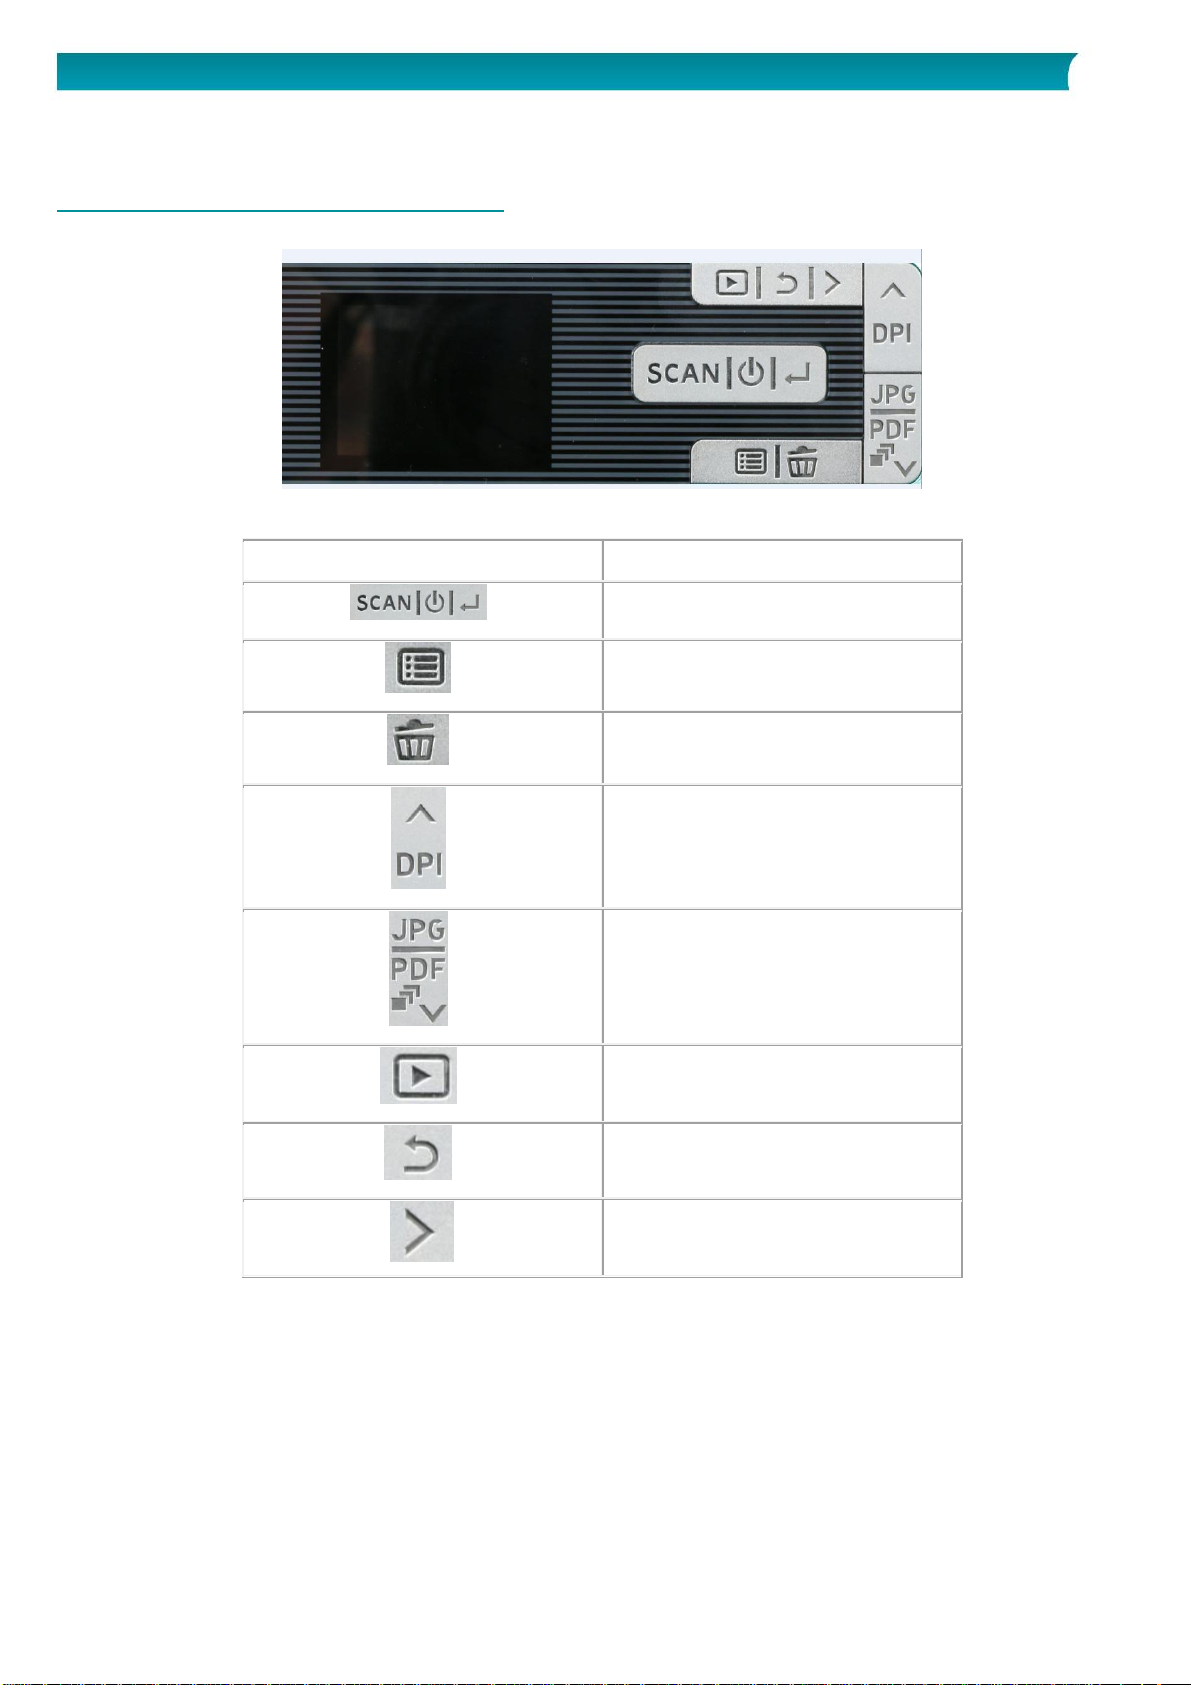
2. Buttons & Settings Overview
Button
Button Name
Scan/Power/Enter
Menu
Delete
Up/DPI
JPG/PDF/Multi-PDF/Down
Playback
Back
Right
2.1 Overview of the Scanner Buttons
5
Page 5
Quick User Guide – IRIScan™ Book 5
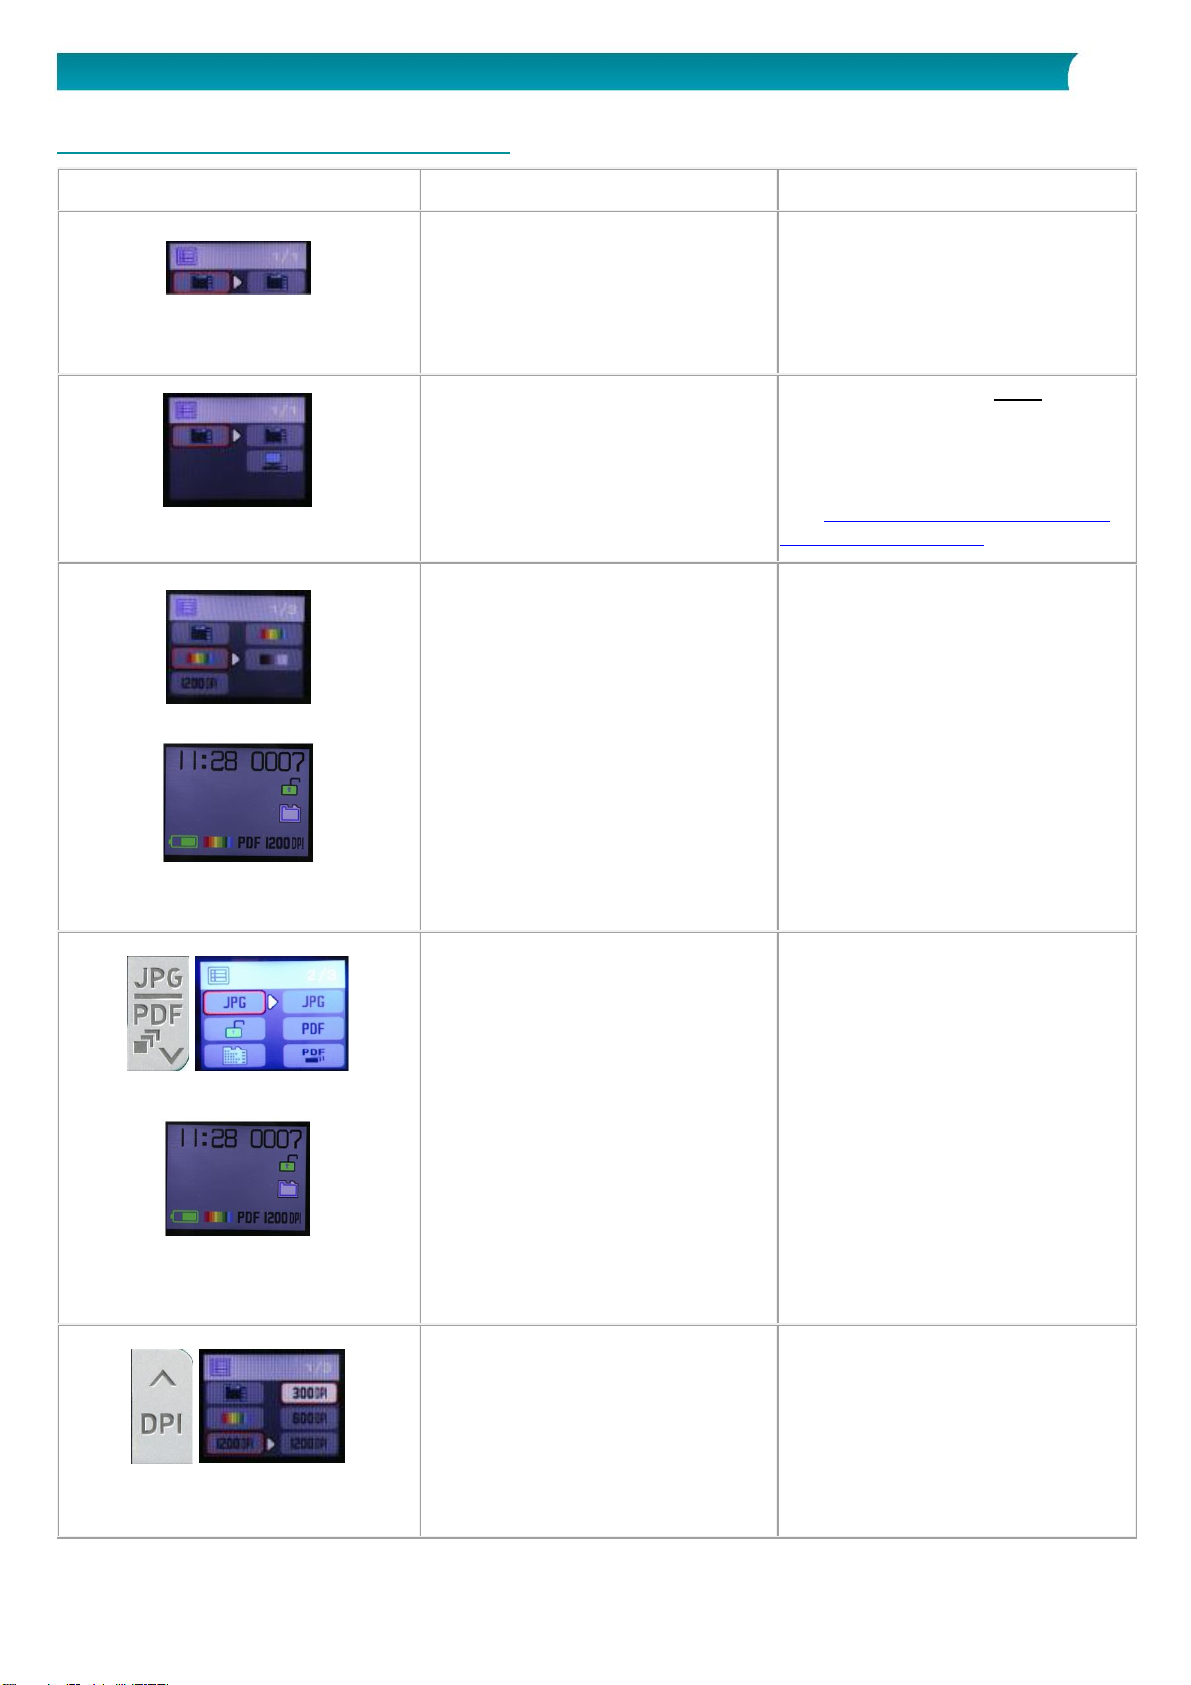
2.2 Overview of the Scanner Settings
Icon/Menu Option
Settings
Description
MicroSD card
Transfer your scans via the
provided micro SD card.
You can also transfer them via the
provided micro USB cable.
PC mode
PC mode is available only when
you connect the micro USB cable
to your computer.
See Scan documents while using
the micro USB cable.
Color choice on the display
Color
Color
B&W
Scan images in color or black-andwhite (grey levels).
Button and output format choice
on the display
Output format of your scanned file
JPG
PDF
Multi-page PDF
Save your images as JPG images,
PDF files or multi-page PDF files.
Resolution
300 DPI
600 DPI
1200 DPI
Scan images in a resolution of
300, 600 or 1200 DPI.
300 dpi is ideal if you want to
convert your scans into editable
text on PC with the
InstantResult software.
6
Page 6
Quick User Guide – IRIScan™ Book 5
Button and resolution choice on
the display
600 and 1200 dpi are mostly used
to scan photos.
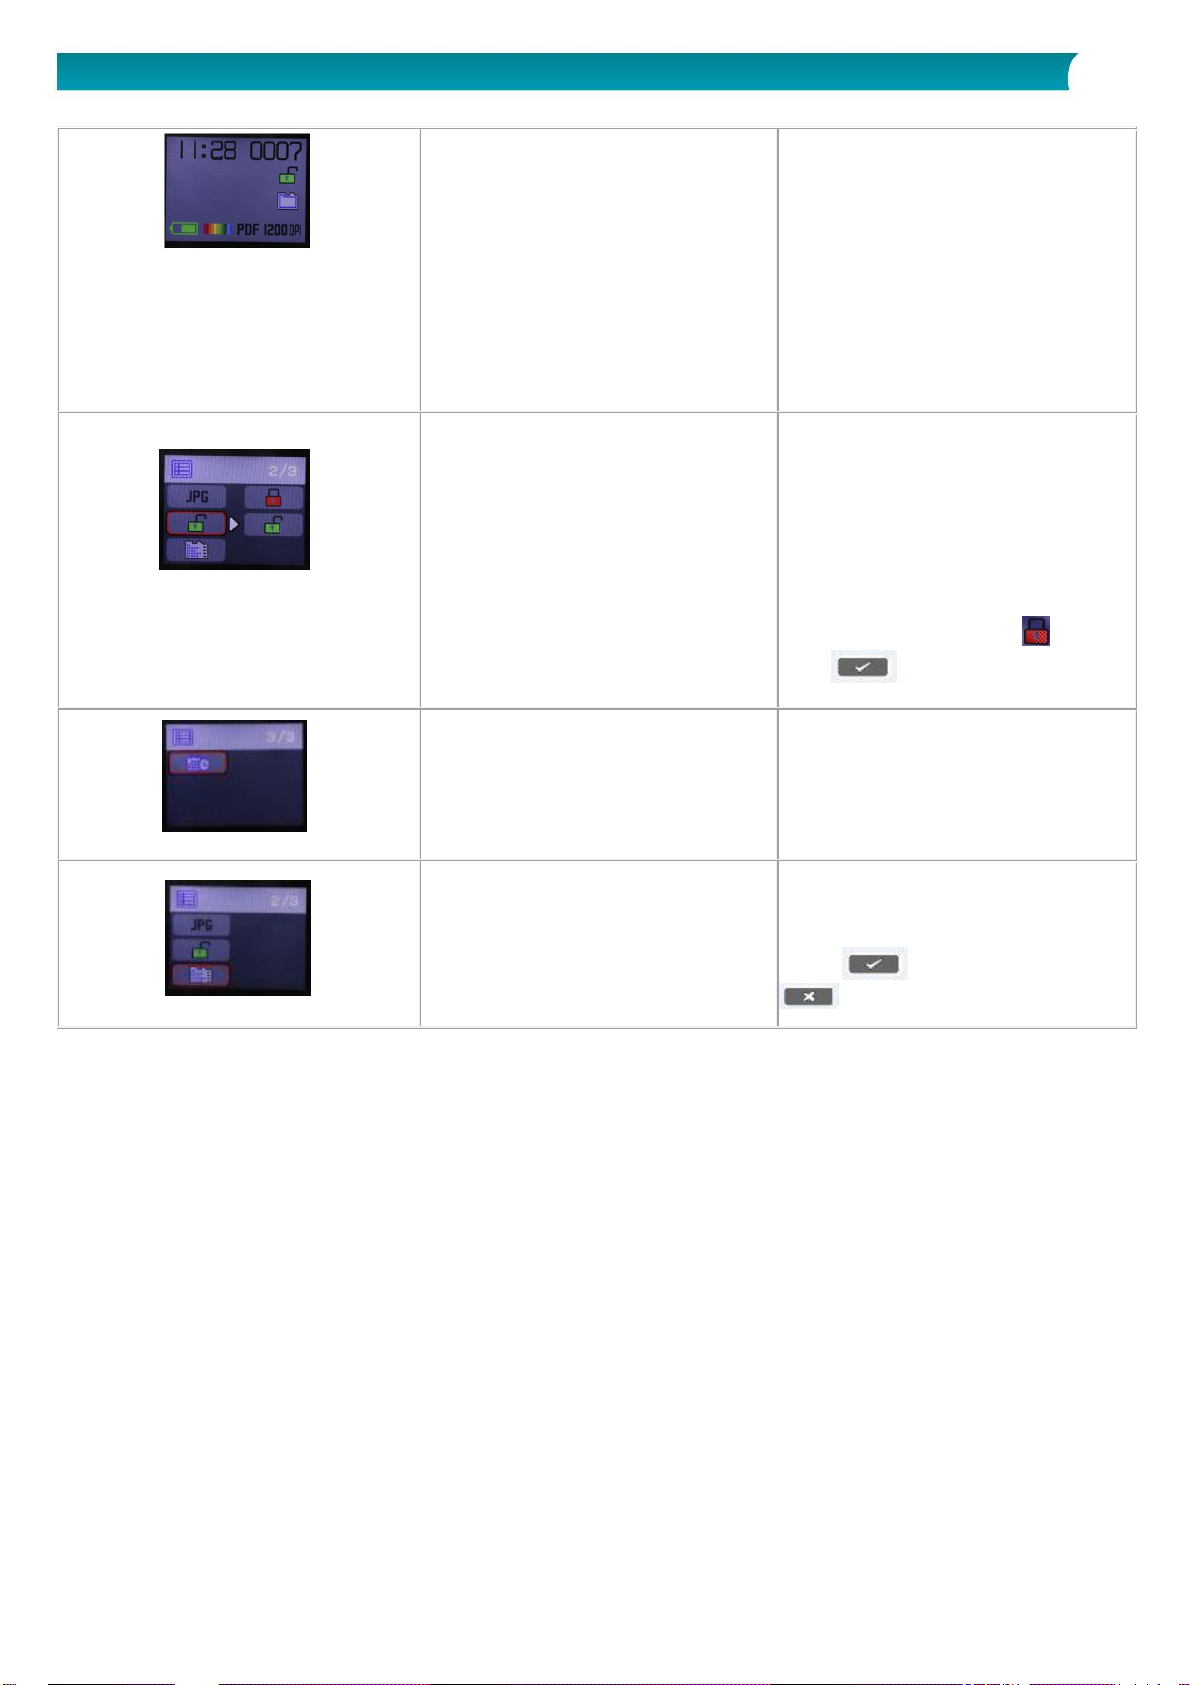
Encryption
IRIScan Book can save images
as encrypted files. That way the
files can only be read on a
computer if you connect the
scanner to it. The files will not be
readable directly on the microSD
card.
By default, files are not encrypted.
To encrypt a file, select and
then .
Date and Time
With this setting you can add date
and time info to your scans.
The date and time are also shown
on the display.
Card formatting
With this setting you can format
the microSD card and delete its
content when the card is full.
Note: formats the card.
does not format the card.
7
Page 7
Quick User Guide – IRIScan™ Book 5
3. Choose the Scanner Settings
Note: before you try to access the scanner settings, make sure the provided microSD card is inserted in
the card slot.
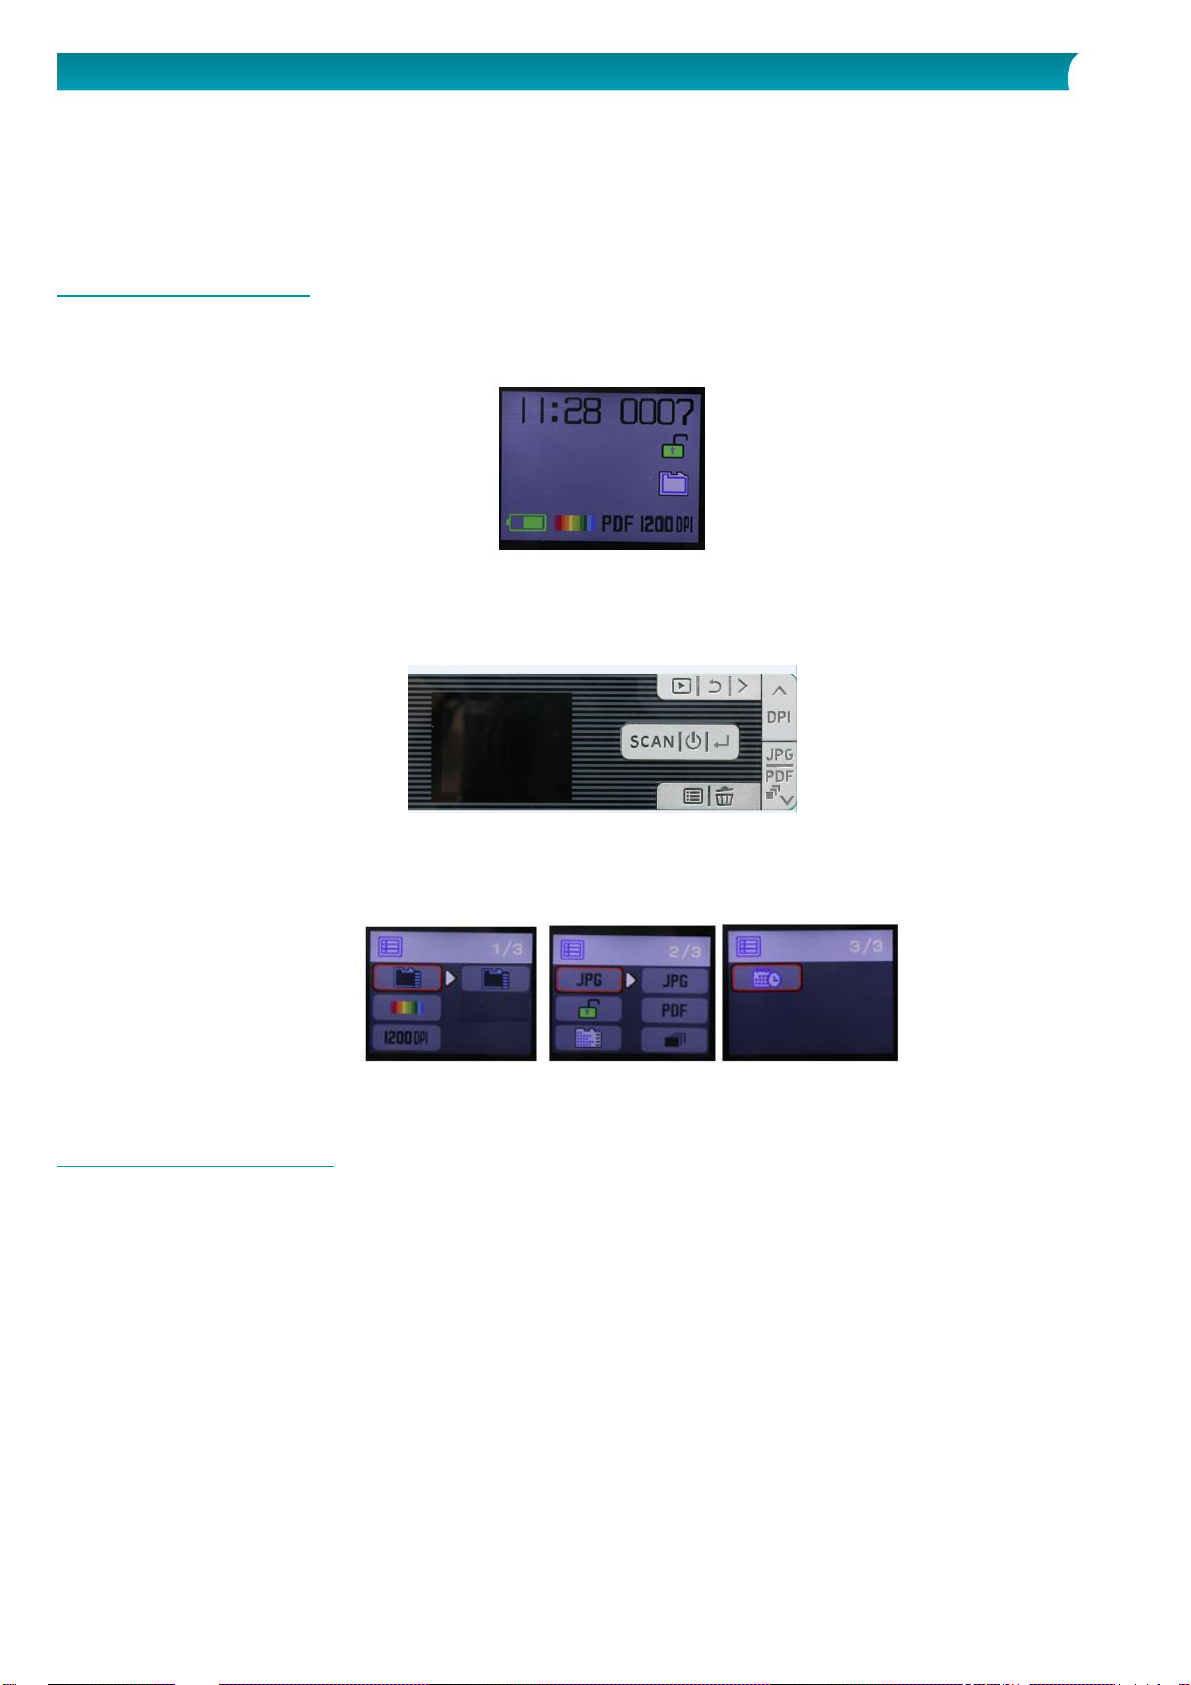
3.1 Scanner Settings
To access the scanner settings:
1. Press the Scan/Power/Enter button for 2 seconds to power on the scanner. The display lights up.
2. The scanner settings are available through
the Up/DPI, JPG/PDF/Multi-PDF/Down buttons
and/or
the Menu button
Menu Options
3.2 Modify the settings
3.2.1 Modify the resolution and the output file format by using the buttons
Press the corresponding buttons repeatedly to select the desired option.
The change is displayed each time.
3.2.2 Modify the settings within the menu
Press the Menu button.
Navigate through the option groups with the Up/DPI and JPG/PDF/Multi-PDF/Down arrows and
press the Scan/Power/Enter button.
To select an option, press the Scan/Power/Enter button again.
To go back to the display, press the Menu button.
9
Page 8

Quick User Guide – IRIScan™ Book 5
4. Scan Documents
1. Press the Scan/Power/Enter button for 2 seconds to power on the scanner.
2. Place your scanner at the top of the page you want to scan.
3. Press the Scan/Power/Enter button once. The word Scan appears on the display.
4. Slide the scanner slowly and steadily over the page.
Tip: hold the document steady with one hand while scanning.
5. When you have reached the bottom of the page, press the Scan/Power/Enter button again to stop
scanning.
Note: in case an error occurs during scanning - when scanning too fast or not levelly for instance the word ERROR appears on the display. See the section Troubleshooting Info for help.
4.1 Create multi-page PDF's
1. Press the JPG/PDF/Multi-PDF/Down button until the multi-page PDF format is displayed.
2. Press the Scan/Power/Enter button.
3. Scan your page.
4. Press the Scan/Power/Enter button again to stop scanning.
5. Repeat steps 2-4 for any additional pages you want to add in your multi-page PDF.
The number of your scanned images in your multi-page PDF is displayed next to the Scan
indication.
6. When finished scanning, exit the multi-page PDF mode by pressing the JPG/PDF/Multi-
PDF/Down button until JPG or PDF mode is displayed.
7. A quick preview of the document is displayed for a few seconds.
11
Page 9

Quick User Guide – IRIScan™ Book 5
Scanning Tip:
The provided micro USB cable can be used to
Charge your scanner
Transfer your scans to your computer/tablet
Use the InstantResult software (Windows only)
When you're scanning a small, thick book it may occur that the margin is too narrow and you're not able to
scan the entire text.
To solve this problem, place the scanner at the bottom of the page, turn it upside down and scan upwards.
You'll notice that the scanner's right margin is smaller than the left.
4.2 Check your scanned documents
1. Press the Playback button.
2. Press the Up/DPI and JPG/PDF/Multi-PDF/Down arrows to find the scanned image you want to
check.
3. Press the Scan/Power/Enter button to confirm your choice and zoom the scanned image.
4. To navigate through the zoomed image, use the Up/DPI and JPG/PDF/Multi-PDF/Down arrows
and the Right button.
Note that each time you press the Scan/Power/Enter button, you increase the zoom levels (up to
x8).
5. To go back to the menu, press the Scan/Power/Enter button.
4.3 Scan documents while using the micro USB cable
Scanning documents is possible even when your scanner battery is empty and you charge it with the
provided micro USB cable.
When you connect the micro USB cable to your computer, your scanner enters into the PC mode.
To start the scanning process:
1. Press the Menu button.
2. Press the Scan/Power/Enter button.
3. Use the Up/DPI and JPG/PDF/Multi-PDF/Down arrows to select the SD card option.
12
Page 10

Quick User Guide – IRIScan™ Book 5
4. Press the Scan/Power/Enter button.
5. Press the Scan/Power/Enter button and start scanning.
6. When finished, press the Scan/Power/Enter button again.
13
Page 11

Quick User Guide – IRIScan™ Book 5
5. Transfer Scanned Documents to your Computer
There are two ways to transfer scanned documents to your computer: by using the micro USB cable or by
using the microSD card adapter.
5.1 Using the provided micro USB cable (Windows and Mac OS)
1. Power on the IRIScan Book.
2. Plug in the provided micro USB cable in both the IRIScan Book and your computer.
3. The card memory containing your documents is displayed on your computer.
Example image for Windows
4. Open the card memory and move your documents to your computer. The documents are located in
the folder DCIM\100Media of the removable disk.
5.2 Using the microSD card adapter (Windows, Mac OS and Tablet)
1. Press the microSD card to unlatch it. Then remove it from the card slot.
2. Insert it in the provided microSD card adapter.
15
Page 12

Quick User Guide – IRIScan™ Book 5
3. Insert the adapter into the SD card slot on your computer. If you cannot use the microSD card
adapter, you can insert it in a memory card reader (not included) to connect it to your device.
4. The card memory containing your documents is displayed on your device.
Example image for iOS
5. Open the card memory and move your documents to your device. The documents are located in the
folder DCIM\100Media of the removable disk.
Once you've transferred your documents to your Windows PC or Mac, they can be processed with
Readiris™ Pro. For information on how to process your documents with Readiris Pro see the complete
User Guides on www.irislink.com/support.
16
Page 13

Quick User Guide – IRIScan™ Book 5
6. Scan, Edit and Convert Images into Editable Text with InstantResult™ (Windows only)
With InstantResult you can use the IRIScan Book 5 even without microSD card. You simply connect it
to a Windows PC using the included micro USB cable.
More importantly, you can
convert your scanned documents into editable text;
perform editing actions such as image rotation, cropping, etc.;
save them as non-editable (image files) or editable files (Word, PDF, etc.).
6.1 Install InstantResult
1. Open your internet browser and go to http://www.irislink.com/start.
2. Scroll down to IRIScan Book 5.
3. Click Download to download the software.
4. Go to the location where you downloaded the software and run the installation file.
5. Click InstantResult and follow the on-screen instructions.
6. Click Finish to complete the installation.
17
Page 14
Quick User Guide – IRIScan™ Book 5
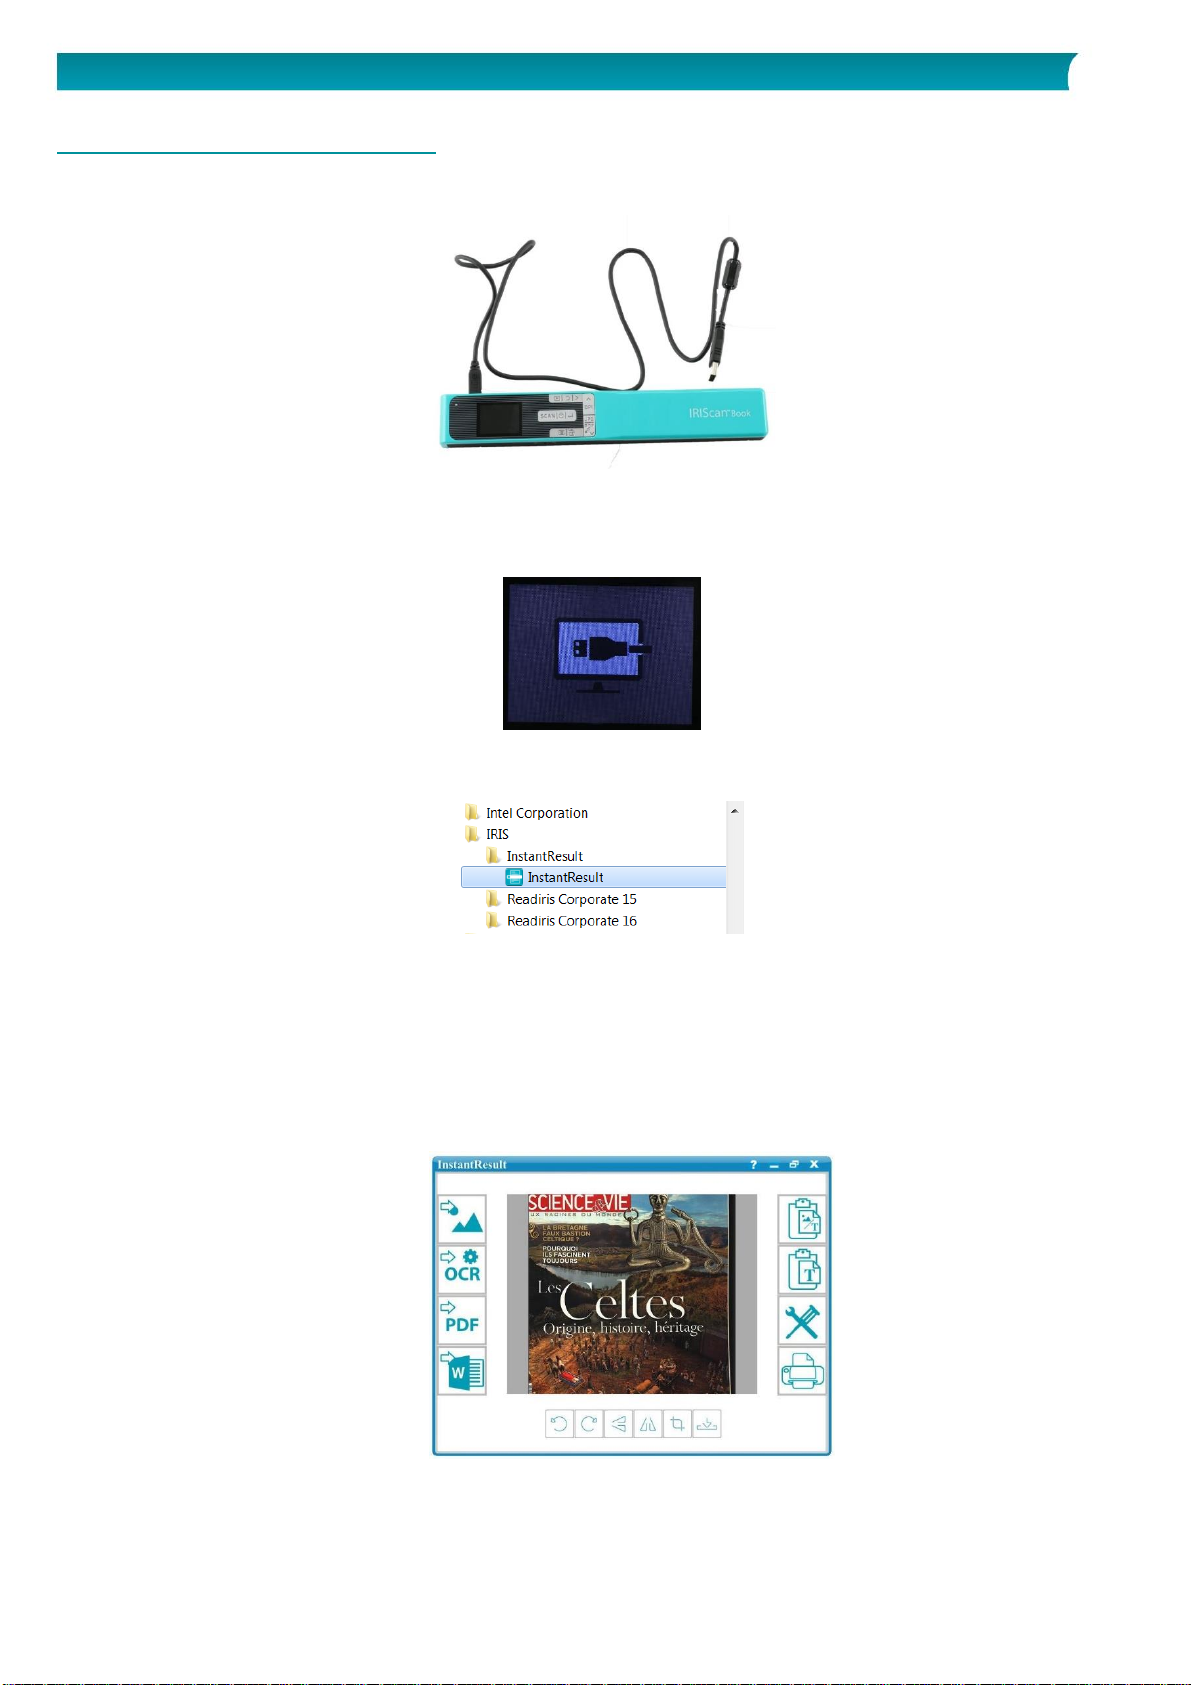
6.2 Using InstantResult to scan
Connect the IRIScan Book 5 to your Windows PC using the included micro USB cable.
Press the Scan/Power/Enter button for 2 seconds to power on the scanner.
Make sure the following icon appears on the display:
Start InstantResult from the Windows Start menu.
Place the scanner at the top of the document to scan.
Press the Scan/Power/Enter button once. The word Scan appears on the display.
Slide the scanner slowly and steadily over the page.
Your scanned image is instantly displayed in the InstantResult screen.
When you have reached the bottom of the page, press the Scan/Power/Enter button again to stop
scanning.
18
Page 15

Quick User Guide – IRIScan™ Book 5
6.3 Using InstantResult to convert your scanned files into editable text
Before scanning an image, select the language of the text in your image.
1. Click the Settings button.
2. Click the OCR tab:
Select the language(s) of the text to recognize (you can select up to 8 languages).
Click OK.
3. To scan your images, follow the steps 4-7 of the section Using InstantResult to scan.
6.4 Using InstantResult to edit your scanned files
Edit the image file you've just scanned with the editing toolbar.
Import existing image files (.TIF, .TIFF, .JPG, .JPEG, .BMP, .PNG, .J2K, .J2C) by clicking the
button
Note: multi-page files and PDFs are not supported with this button.
19
Page 16

Quick User Guide – IRIScan™ Book 5
6.5 Using InstantResult to save your (recognized) scanned files
Save your scanned image as a .JPG or .Bmp
image file.
Copy both images and recognized text from your
scanned image to the clipboard.
You can, then, paste them elsewhere.
Save your recognized scanned image as a
.DOCX, .PDF, .XLSX or .TXT file.
Copy only the recognized text from your scanned
image to the clipboard.
You can, then, paste it elsewhere.
Save your recognized scanned image as a
.PDF file.
Access the Scan and recognition (OCR) settings.
Save your recognized scanned image as a
.DOCX file.
Print your scanned image.
Once you've transferred your documents to your Windows PC or Mac, they can be processed with Readiris
Pro.
For information on how to process your documents with Readiris Pro see the complete User Guide on
www.irislink.com/support
20
Page 17

Quick User Guide – IRIScan™ Book 5
7. Technical Info
Operating System
Windows 10, 8, 7 (no driver installation required)
CPU
1 GHz processor or higher
RAM
2 GB
HD space
1 GB
Hardware
1 free USB port
Operating System
Mac OS Yosemite 10.10, El Capitan 10.11 and Sierra 10.12 (no driver installation
required)
CPU
1 GHz processor or higher
RAM
2 GB
HD space
1 GB
Hardware
1 free USB port
Image sensor
A4 Color Contact Image Sensor
Resolution
300 dpi (default), 600 dpi, 1200 dpi
Maximum scanning speed
+- 3 seconds for A4 300 dpi color
Capacity (based on 2 GB microSD card*)
*The number of scans may vary depending on the
content complexity.
300 dpi
600 dpi
1200 dpi
Color
1600
600
190
Mono
2000
800
190
Scan width
216mm
Scan length
1200mm
File format
JPG / PDF / Multi-page PDF
Display panel
1.5" color LCD
USB Port
USB 2.0 high speed
External memory
MicroSD card (TF Card) up to 32 GB
Integrated battery
(800mA) Li-iON battery
Certifications
1. For unit: CE/LVD/EMC/RoHS/FCC/MIC Japan Radio
law
2. For Lithium-iON battery:
CE/38.3/FCC/UL/IEC62133
7.1 Minimum System Requirements Windows PC
7.2 Minimum System Requirements Mac OS
7.3 Scanner Specifications
21
Page 18

Quick User Guide – IRIScan™ Book 5
8. Troubleshooting Info
Problem
Cause
Solution
I cannot turn on the
scanner.
Low battery power.
Connect the scanner to a PC.
Charge the scanner with an external power adapter.
Pictures cannot be saved
after I've scanned them.
There's no microSD card
in the card slot.
The microSD card is full.
Insert a microSD card.
Move the images from the microSD card to your
computer to clear storage space on the card.
To format the card and delete its content:
1. Press the Scan/Power/Enter button for 2
seconds to power on the scanner.
2. Press the Menu button.
3. Go to the 2/3 option group and select the SD
formatting option to delete the content
of the microSD card.
My computer does not
recognize the scanner
when I connect it.
Connection failure.
Make sure both ends of the USB cable are connected
securely.
Use only the provided micro USB cable.
My scanner generates
blurry images.
The scanner lens is
probably dirty.
Clean the lens with a soft dry cloth.
ERROR is displayed when
scanning a document.
You're sliding the scanner
too quickly over your
documents.
Press the Scan/Power/Enter button to scan your
document again, steadily and slowly.
All the scanner buttons
are blocked.
Multi-page PDF mode
Press the JPG/PDF/Multi-PDF/Down button until
JPG or PDF mode is displayed.
NO CALIB error appears
on the display of my
scanner.
Calibration issue
Please contact Technical Support.
Should you experience issues when using IRIScan Book 5, consult the Frequently Asked Questions on our
website or contact Technical Support at www.irislink.com/support.
22
Page 19

Quick User Guide – IRIScan™ Book 5
9. Legal Notices
ISB5_pko_20170330_06
Copyrights
Copyrights © 2012-2017 I.R.I.S. All Rights Reserved.
I.R.I.S. owns the copyrights to all documentation regarding IRIScan Book.
The information contained in this document is the property of I.R.I.S. Its content is subject to change
without notice and does not represent a commitment on the part of I.R.I.S. The software described in this
document is furnished under a license agreement which states the terms of use of this product. The
software may be used or copied only in accordance with the terms of that agreement. No part of this
publication may be reproduced, transmitted, stored in a retrieval system, or translated into another
language without the prior written consent of I.R.I.S.
This documentation uses fictitious names as examples; references to actual persons, companies or
organizations are strictly coincidental.
Trademarks
The IRIScan Book logo and IRIScan Book are trademarks of Image Recognition Integrated Systems S.A.
OCR technology by I.R.I.S.
AutoFormat and Linguistic technology by I.R.I.S.
Windows is a registered trademark of Microsoft Corporation in the United States and other countries.
All other products mentioned in this documentation are trademarks or registered trademarks of their
respective owners.
Patents
IRIScan Book is patent-protected. See the Release Note for more information.
23
Page 20

Quick User Guide – IRIScan™ Book 5
10. Compliance
RoHS and WEEE Compliance
This product is compliant with RoHS Regulations of the European Parliament and Council Directive on the
Restrictions of the Use of Certain Hazardous Substances in Electrical and Electronic Equipment
(2011/65/EU), and with the Waste Electrical and Electronic Equipment (WEEE) Directive (2012/19/EU).
FCC Radio Frequency Interference Statement
This equipment has been tested and found to comply with the limits for the class B digital device, pursuant
to part 15c of the FCC Rules. These limits are designed to provide reasonable protection against
interference in a residential installation. This equipment generates, uses and can radiate radio frequency
energy and if not installed, and used in accordance with the instructions, may cause harmful interference to
radio communications. However, there is no guarantee that interference will not occur in a particular
installation. If this equipment does cause harmful interference to radio or television reception, which can be
determined by turning the equipment off and on, the user is encouraged to try and correct the interference
by one or more of the following measures:
Reorient or relocate the receiving antenna.
Increase the separation between the equipment and receiver.
Connect the equipment into an outlet on a circuit different from that to which the receiver is
connected.
Consult the dealer or an experienced radio/TV technician for help.
This equipment has been certified to comply with the limits for a class B computing device, pursuant to FCC
Rules. In order to maintain compliance with FCC regulations, shielded cables must be used with this
equipment. Operation with non-approved equipment or unshielded cables is likely to result in interference
to radio and TV reception. The user is cautioned that changes and modifications made to the equipment
without the approval of manufacturer could void the user's authority to operate this equipment. This device
complies with part 15c of the FCC Rules. Operation is subject to the following two conditions: (1) This
device may not cause harmful interference, and (2) this device must accept any interference received,
including interference that may cause undesired operation.
25
 Loading...