

Page 1

IRIS MODEL 700/800 APPLICATION MANUAL
FLAME MONITORING SYSTEM
MODEL 700 / 800 SIGNAL PROCESSOR AND VIEWING HEAD
APPLICATION MANUAL
PAGE 1
Page 2

IRIS MODEL 700/800 APPLICATION MANUAL
TABLE OF CONTENTS
GENERAL DESCRIPTION ............................................................................................. 4
IR DETECTOR ................................................................................................................ 5
UV DETECTOR .............................................................................................................. 5
SELF-CHECKING........................................................................................................... 5
INTERNAL PARAMETER STORAGE ............................................................................ 5
MODEL 700 POWER CONNECTIONS .......................................................................... 6
VIEWING HEAD CONNECTOR AND WIRING............................................................... 6
PROTECTING THE VIEWING HEAD CABLE................................................................ 7
GREEN AND RED LED INDICATORS ........................................................................... 7
VIEWING HEAD MOUNTING BLOCK............................................................................ 7
SETTING THE VIEWING HEAD GAIN ........................................................................... 7
ADJUSTMENT OF VH SIGHTING AND GAIN................................................................ 8
ORIFICING ...................................................................................................................... 8
MANUAL SETUP OF SET POINTS – MODELS 700 & 800 ........................................... 8
AUTOMATIC SETUP – MODEL 700 ONLY ................................................................... 9
FILTER SELECTION FOR IR VIEWING HEAD............................................................ 10
LOADING FACT ORY DEFAULTS................................................................................. 10
SETTING FFRT – MODELS 700 AND 800................................................................... 11
0-20 MA/4-20 MA OPTION – MODELS 700 & 800........................................................ 1 1
LOCKOUT OR FAULTY VH INDICATION .................................................................... 11
PANEL LOCK ............................................................................................................... 11
PANEL LOCK WITH NO VH CONNECTED................................................................. 11
WORKING WITH OLDER UV VIEWING HEADS ......................................................... 11
MODEL 700 COMMUNICATIONS ................................................................................ 12
MODEL 800 COMMUNICATIONS ................................................................................ 12
APPROVALS ................................................................................................................ 12
CONTACT INFORMATION ........................................................................................... 12
FIGURES 1-16 AND FLOW CHARTS 1-9 ............................................................... 13-33
SPECIFICATIONS FOR SERIES 700 AND 800 VIEWING HEADS ............................. 34
SPECIFICATIONS FOR MODEL 700AC & MODEL 700DC SIGNAL
PROCESSORS ......................................................................................................... 35
SPECIFICATIONS FOR MODEL 800 SIGNAL PROCESSOR..................................... 35
PAGE 2
Page 3

IRIS MODEL 700/800 APPLICATION MANUAL
FIGURE AND FLOW CHART INDEX
FIGURE 1 - MODEL 700AC SIGNAL PROCESSOR ................................................... 13
FIGURE 2 - MODEL 700AC SIGNAL PROCESSOR WIRING ..................................... 14
FIGURE 3 - MODEL 700DC SIGNAL PROCESSOR ................................................... 15
FIGURE 4 - MODEL 700DC SIGNAL PROCESSOR WIRING ..................................... 16
FIGURE 5 - MODEL 800 SIGNAL PROCESSOR ON DIN RAIL .................................. 17
FIGURE 6 - MODEL 800 SIGNAL PROCESSOR WIRING .......................................... 17
FIGURE 7 - MODEL S702 AND S706 VIEWING HEADS............................................. 18
FIGURE 8 - MODEL S802 AND S806 VIEWING HEADS............................................. 19
FIGURE 9 - MOLDED CONNECTOR AND CONNECTOR CLIP................................. 20
FIGURE 10 - VIEWING HEAD CABLE AND WIRING .................................................. 20
FIGURE 11 - MODEL 700 VIEWING HEAD CABLE WITH 1/2” NPT FITTING............ 21
FIGURE 12 - MODEL 700/800 VIEWING HEAD CABLE FIELD MAKE UP WIRING .. 21
FIGURE 13 - WIRING OF RS-422 TO RS-232 CONVERTER TO MODEL 700 SIGNAL
PROCESSOR ............................................................................................................. 22
FIGURE 14 - COMMUNICATIONS CABLE FOR MODEL 800 SP ............................... 23
FIGURE 15 - MODEL 700/800 PROGRAMMER AND 800 CABLE ............................. 24
FLOW CHART 1 - SETTING F ACTORY DEFAULTS.................................................... 25
FLOW CHART 2 - AUTO SETUP PAGE 1.................................................................... 26
FLOW CHART 3 - AUTO SETUP PAGE 2.................................................................... 27
FLOW CHART 4 - AUTO SETUP PAGE 3.................................................................... 28
FLOW CHART 5 - MANUAL FLAME ON SETUP......................................................... 29
FLOW CHART 6 - MANUAL FLAME OFF SETUP....................................................... 30
FLOW CHART 7 - FLAME F AILURE RESPONSE TIME (FFRT) SETUP.................... 31
FLOW CHART 8 - 0-20/4-20MA ANALOG OUTPUT SETUP....................................... 32
FLOW CHART 9 - VIEWING HEAD GAIN SETTING ................................................... 33
PAGE 3
Page 4

IRIS MODEL 700/800 APPLICATION MANUAL
GENERAL DESCRIPTION
The IRIS Model 700AC, Model 700DC and Model 800
are single-channel, fail-safe, flame monitoring systems.
They offer easy setup, excellent discrimination, and
high reliability.
Components are interchangeable between the 700 and
800 families. Any viewing head in the two families will
work with any of the signal processors.
Three signal processor models are available:
Model 700AC Universal AC powered
Model 700DC 24VDC powered
Model 800 Universal AC powered
The two Model 700 signal processors are very similar,
with 12 push-buttons, a two-digit numeric display , and
four LED status indicators to communicate with the
operator. The only difference between the two is that
one accepts AC power and the other accepts DC power .
Most of the signal processor connections are made
through high quality, Phoenix plug-in connectors. Communications connections are made through modular
phone jacks at the top of the signal processors (Figures 1 - 4).
lar to those used to lock the legs of camera tripods.
The IR/flicker sensitive viewing heads have a high pass-
filter that passes flicker frequencies above 33 Hz, but
an alternative high-frequency filter that passes only frequencies above 155 Hz is available. These models are
identified by adding “-HF” to the model number. The
UV models respond to the absolute level of UV radiation - not UV flicker - so there is no filter option.
The standard connector supplied with both the 700 and
800 viewing head models has two indicator LEDs inside it: the green one to indicate signal pulses (helpful in
alignment), and an orange one to indicate activity on
the self-check line (Figure 12). The green LED also
flashes once per second when the orange LED is pulsed
as the viewing head sends an ID code back to the signal processor. Figures 9 and 10 show, for reference, a
molded connector with cable which has been discontinued. Model 700 viewing heads are also available with
a ½” pipe fitting for connecting to electrical conduits.
The four connecting wires exit through an epoxy seal in
the ½” pipe fitting (Figure 11). The LED indicators are
not present in the pipe-fitting option.
The available models are as follows:
The Model 800 signal processor is quite small (Figure
5), having only one push-button and two LED indicators.
Setup is achieved by using a computer running the supplied application software, or with the IRIS programmer
and cable, available separately . An RS-232 communications cable, also available separately, is connected from
the computer to the input labelled PROGRAM on the
front of the Model 800. Using the software, you can set
gains, adjust set points, and perform other setup and monitoring functions. The other signal processor connections
to the Model 800 are made through 12 Phoenix screw
terminals. (Figure 6)
All three signal processor models mount on a standard
35 mm DIN rail. They snap into place and may be released from the rail using a flat screwdriver.
There are basically two types of viewing heads -IR/
flicker-sensitive and UV-sensitive- but the various features offered result in nine different models due to packaging variations.
The S702 and S706 viewing head housings are larger
in diameter, are made of aluminum, and are secured
with over-center latches to their mounting blocks (Figure 7). In contrast, the S802 and S806 viewing head
housings are smaller in diameter and are made of stainless steel (Figure 8). An 800 series viewing head is secured in its mounting block by a friction twist-lock simi-
S702 Basic IR/flicker model
S702-HF IR/flicker with high frequency
filter
S702-PF IR/flicker with pipe fitting
S702-HF-PF IR/flicker with HF filter & pipe
fitting
S706 Basic UV model
S706-PF UV with pipe fitting
S802 Basic IR/flicker model
S802-HF IR/flicker with high frequency
filter
S806 Basic UV model
The viewing heads, the viewing head connector, and the
cable provided are watertight, and have NEMA 4 and
4X ratings when the connector is tightened with pliers
and the cable is protected from UV.
The availability of both UV-sensing and IR/flickersensing viewing heads ensures that the Model 700 and
Model 800 flame monitoring systems can provide good
discrimination in virtually any application. UV sensing is appropriate for monitoring the burning of light
oil and especially for the burning of natural gas. IR/
flicker sensing is appropriate for monitoring heavy oil
and coal flames.
PAGE 4
Page 5

IRIS MODEL 700/800 APPLICATION MANUAL
IR DETECTOR
The models S702 and S802 viewing heads use the same
InGaAs (Indium Gallium Arsenide) photodiode used in
our S511, S550, and S552 viewing head models. This
IR photodiode responds to IR in the 950nm to 1710nm
range (1/2 intensity points). The use of IR flicker instead
of IR intensity in the viewing head has many advantages
- one being that the viewing head does not respond to
glowing refractory in the furnace. The main advantage
comes from the fact that high frequency flicker is produced in the turbulent part of the burner flame, close to
the root where combustion takes place. When this part
of the flame is monitored, and when the viewing head
responds only to the high frequency flicker, the turbulent
part of the flame stands out from bright, but less turbulent, portions of other flames. The standard S702, S702PF and S802 viewing heads respond to flicker frequencies above 33 Hz; the S702-HF, S702-HF-PF and the
S802-HF viewing heads respond to flicker frequencies
above 155 Hz.
UV DETECTOR
The S706, S706-PF and S806 viewing heads use the
same UVtron tube for UV sensing that we have been
using on our other UV-sensitive viewing heads. The
UVtron responds only to short wavelength ultraviolet
radiation in the 185-260nm range. This radiation is a
direct result of the combustion process as oxygen combines with hydrocarbons in the fuel in the blue part of
the flame. The yellow part of flames, and the background radiation from tubes or firebrick, do not emit
UV radiation. So, where viewing heads can be aimed
at the root of burner flames, UV monitoring provides
excellent discrimination between flames in adjacent
burners in multiburner applications.
SELF-CHECKING
There is a small processor in both the IR and UV viewing heads, so it is possible that this processor could fail
and produce erroneous viewing-head pulses. The selfcheck circuitry guards against this. There are several
tasks that require intelligent interaction between the viewing heads and the signal processor. If all of these inter actions do not occur properly , the viewing head will not
send pulses back to the signal processor and the flame
relay will open.
Verifying the validity of the gain code received is one of
the tasks performed by the processor in the IR and in the
UV viewing heads. The self-check pulse from the signal
processors is a 100ms-wide, 20V to 24V pulse with two
“notches” or breaks in it. The position of each of the two
notches communicates a gain code of one to nine plus
parity to the viewing head. The viewing head sends
back an ID pulse in the first half of the 100ms selfcheck time. One viewing head expects to receive data
with one parity and the other expects to receive data
with the other parity. If a viewing head does not receive its correct parity plus the gain code once per second, it produces no output pulses.
There is also intelligent interaction between the older S706
viewing heads, which did not have the gain-change feature from the signal processor. The processor in the S706
viewing head monitors the 100ms width of the self-check
pulse coming from the signal processor. If the pulse is
not the correct width the viewing head produces no output pulses. Also, if the signal processor receives any pulses
back from the viewing head during the last half of the
100ms self-check time, it assumes that a processor failure
has occurred in the viewing head, opens both relays, and
displays “LO” (lockout).
INTERNAL PARAMETER STORAGE
Set point values and other parameters plus error- checking codes are stored in EEPROM (Electrically Erasable Programmable Read Only Memory) in both the
Model 700 and Model 800 signal processors. This data
is then error-checked when it is read at power up. For
the Model 700AC and Model 700DC, if the data does
not match exactly what was stored, the signal processor discards all data, displays “EE”, and loads factory
defaults. The RELAY ON SET POINT is set to 31.
Since the display cannot go this high, the flame relay
cannot be energized. The signal processor can be reset
by changing the RELAY ON SET POINT to a reasonable value or by pressing LOAD FACTORY DEFAULTS. For the Model 800, an internal EEPROM
failure is indicated by a rapidly blinking green LED.
Pressing the RESET button will clear the rapidly blinking LED but the Relay-on set point will remain set at
31. The Relay-on set point can only be changed by connecting a programmer or computer to the model 800
signal processor and loading factory defaults, or changing the relay on set point of 31 to a reasonable value. In
any event, one should be suspicious of a signal processor that has failed in this way.
Note that information about the type of viewing
head which was last used is also stored in
EEPROM. If a Model 700 signal processor
is powered up with a different type of viewing
head, the signal processor discards the
previous set-point data and loads factory
defaults, except the RELAY ON SET POINT
PAGE 5
Page 6

IRIS MODEL 700/800 APPLICATION MANUAL
is set to 31. To enable the Flame Relay to
energize, change this set point to a
reasonable value, or press LOAD FACTORY
DEFAULTS. If a Model 800 signal processor
is powered up with a different type of viewing
head, the green LED will blink rapidly. The
RESET button will clear the rapid blinking.
Connect a programmer or a computer and
change the RELAY ON SET POINT from 31 to
a reasonable value.
MODEL 700 POWER CONNECTIONS
The Model 700AC power and relay connections are
shown in Figure 2. The AC power supply in the Model
700AC Signal Processor is connected to input AC
power through a 2A fuse and an inrush current limiter.
Model 700DC power and relay connections are shown in
Figure 4. The nameplate current rating of 250mA maximum per signal processor with the viewing head plugged
in is conservative; there is no need to install more power
supply capacity than this.
In the Model 700 signal processors the flame relay (RF)
has two sets of FORM C (SPDT) contacts and the selfcheck relay (SC) has one set (Figures 2 and 4). These
power contacts are all rated at 5A at 125 VAC, 277
VAC, or 30 VDC. The self-check relay is on whenever
the signal processor is on and is operating normally,
whether the flame relay is energized or not. It is not
necessary to wire the contacts of the self-check relay
in series with the contacts of the flame relay because
the actuating coil of the flame relay is wired in series
with other contacts of the self-check relay (not shown).
So the flame relay can only pull in if the self-check
relay already has.
In the Model 800 signal processor the flame relay has
two FORM A (SPST) contacts brought out to three terminals and one FORM A (SPST) contact brought out
to two terminals (Figure 6). The flame relay is rated
5A at 125 V AC, 277 VAC or 30 VDC. The Self-Checking relay has one set of FORM A (SPST-NO) contacts
rated .4A at 110 VDC or 125 VAC and 2A at 30 VDC.
In all Model 700 and 800 signal processors, special
fail-safe circuitry is used to drive the coils of the selfcheck relay and the flame relay. This circuitry is designed so that any component failure will cause the
flame relay to open. Also note that if the processor
output which drives this circuitry sticks high or low , both
relays will open.
Some of the internal power wiring of the Model 700AC
and Model 700DC signal processors is shown in Figures 2 and 4. Rectifier diodes separate the battery backup
input from the main power bus until the battery voltage
exceeds the internal DC voltage plus a diode voltage
drop. Resettable fuses (shown as resistors with slashes)
and conventional fuses prevent internal failures from
loading the power sources. With the Model 700DC, if a
backup battery is to be used with a main power supply ,
the two power sources would be wired as shown in
Figure 4. If no backup battery is to be installed, the
main power supply can be connected at +26V PWR
and GND as shown in Figure 4, or it can be connected
to the +24V BATT input and GND. It is preferable, in
fact, to use the battery connections because this takes
advantage of the resettable fuse at the battery input.
(Resettable fuses recover automatically from a fault
within a few seconds after power is removed.) At the
+26V PWR input and its associated GND, conventional
1A fuses are used because they are able to protect
against 240VAC being applied by accident (this could
happen if a Model 700DC is installed in a cabinet wired
for a Model 700AC).
VIEWING HEAD CONNECTOR AND WIRING
Connectors and cables are shown in Figures 9 through
12. The molded connector , cable, and adapter shown in
Figures 9 and 10 have been discontinued in favor of a
cable with a shield. (They are shown for reference
only.) Figure 1 1 shows the viewing head cable with the
½” NPT pipe fitting for use in a conduit. This gray
cable is labeled: LAPP USA UNITRONIC 190CY
B (UL) TYPE CMG 105C 22AWG/4C SHIELDED
E130334 –- CSA CMG 105C or AWM II A/B 300V
LL74246. The standard pigtail length is 20", but it can
be supplied in longer lengths if requested. This same
gray cable is shown in Figure 12 for regular viewing
head service. Because it must be used with a conduit
in hazardous locations, it is not normally supplied except
when requested. It may be ordered commercially as
Olflex 602204S.
The recommended cable for hazardous locations, C330, is shown in the lower part of Figure 12 with the
right-angle connector. It is supplied as standard in a 15
ft. length. This cable does not have to be used in a
conduit. It is labeled: IRIS SYSTEMS INC. C-330
E193849 (UL) TYPE ITC 4/C 18 AWG 90C 300V
OR c(UL) CIC 90C 600V FT4 SUNLIGHT
RESISTANT. If a cable longer than 15 ft. is needed,
PAGE 6
Page 7

IRIS MODEL 700/800 APPLICATION MANUAL
custom cable lengths up to 4000 ft. may be ordered. This
custom cable C-330 may also be purchased from IRIS.
The customer may also supply his own cable; IRIS will
supply the mating viewing head connector along with
the LED indicator assembly which goes inside the
connector
either an overall shield or a cable with a shield for the
signal line. The shield should be connected to GND at
the processor end and to the ground wire at the viewing
head end. The cable diameter should not exceed .307"
in order for it to go through the hex bushing in the
connector. But note that wiring the cable to the
connector is not easy because of the limited space.
Also, the LED indicator assembly must be mounted
inside the connector and, preferably, soldered in place.
NOTE: FOR CLASS I, DIV 2 RATING,
CABLING
MUST COMPLY WITH NEC ARTICLE 500
REQUIREMENTS.
In particular, in the US, cables should have UL’s ITC
rating; in Canada, cables should have CSA ’ s CIC rating.
The recommended C-330 cable has both ratings.
Note: To obtain a NEMA 4X seal between the
connector and the viewing head, tighten the metal
connector ring securely using a pair of pliers.
. The use of shielded cable is recommended,
IN HAZARDOUS LOCATIONS
NPT thread. Note that when the wiring needs to meet
Class I, Division 2 requirements for use in hazardous
locations and when conduit is used, the conduit must be
sealed where the cable passes from the hazardous location to the non-hazardous location in order to keep
potentially hazardous gases from being conducted into
the non-hazardous area.
GREEN AND ORANGE LED INDICATIONS
The connector has orange and green LEDs which can
be viewed from the rear of the connector. The green
LED displays the pulses out of the viewing head and
an orange LED shows that the self-checking signal from
the signal processor is reaching the viewing head. If
power is on at the signal processor, the orange LED
should flash at one pulse per second, even if the viewing
head is not plugged in. This is helpful in trouble-shooting.
With no flame signal present, the green LED will flash
one pulse per second in step with the self-checking
signal. The viewing head is sending back an ID pulse;
this is part of the self-checking system. When a flame
is present, the green LED will blink at a rate proportional
to the flame signal, except that the pulses are interrupted
once per second when the self-check pulse arrives at the
viewing head. The pulse rate of the green LED flashes
can be used for aiming the viewing head.
PROTECTING THE VIEWING HEAD CABLE
It is usually desirable to mechanically protect the cable
going to the viewing head. Flexible conduit and adapters can be supplied for this purpose. See Figure 12.
The 700 L
plied by IRIS; it screws into the right-angle connector
in place of the standard hex bushing. Con74 is a Thomas and Betts T AB5330 Liquatite Fitting which is designed to give a watertight seal for Cdt02 Flexible
Liquatite Conduit, part number L T -516 by Electra-Flex.
These components have internal dimensions to clear a
5/16" diameter cable. For each viewing head a 700 L T A,
a Cdt02 flexible conduit, and two Con74s will be needed.
IRIS will supply the 700 L T A. IRIS can also supply the
Cdt02 and Con74s, or these parts can be purchased
commercially. The customer can fit the Liquatite flexible conduit over the cable supplied with the viewing
head by first unscrewing the hex bushing from the connector and removing it from the cable and then sliding
the 700 L T A, Con74 and Cdt02 assembly over the cable
and screwing the assembly into the right-angle connector. The Cdt02 flexible conduit is terminated with
the second Con74 Liquatite fitting which ends with a 3/8"
T A (Liquatite Adapter) is a custom part sup-
VIEWING HEAD MOUNTING BLOCK
The viewing head is held firmly in place in its mounting block
by two galvanized steel latches. The mounting block is made
from a hard Delrin rated for continuous service to 82°C
(180°F). An alternative mounting block made from Ultem
1000 is available, rated for continuous service up to 160°C
(320°F).
Both mounting blocks have a 1/4-18 NPT female thread
for a purge air connection. While it is true that the
viewing head is rated for operation to 85°C (185°F),
this temperature is still much lower than the temperature in a boiler or furnace, so continuous purge air must
be provided.
SETTING THE VIEWING HEAD GAIN
The gain of the new intelligent IR and UV viewing heads
can be adjusted. At power-up, Model 700 signal processors display codes to tell the operator what type of viewing head and what gain is being used. Typical displays
are “r7” for the IR VH, “u3” for the UV VH and “U5”
for an older UV viewing head. The numeric digit indicates gain. For the intelligent UV and IR viewing heads,
the gain can be adjusted from 1 to 9 with a gain of 5
being the factory default gain. T o change the gain, press
PAGE 7
Page 8

IRIS MODEL 700/800 APPLICATION MANUAL
the button labeled SET GAIN for two seconds and use
the INCREASE and DECREASE buttons. The gain is
live; changes are effective immediately, but if the displayed gain value is not stored (by pressing STORE),
and no other buttons are pressed, the processor returns
to the previous setting after four seconds. The older UV
viewing head always has a gain of 5, so “U5” is always
displayed. When an older UV viewing head is plugged
in, there is no response to a two second press of the
SET GAIN button.
The gain steps have a ratio of 1:1.19. Going from a gain of
5 to a gain of 9 doubles the gain; going from a gain of 5 to a
gain of 1 halves the gain.
If you have a Model 800 signal processor, then with a
programmer or a computer running the appropriate software, the same functions as above are available, except
that “r7”, “u3” or “U5” are not displayed at power up.
ADJUSTMENT OF VH SIGHTING AND GAIN
The viewing head should be properly sighted in before
the set points are adjusted. Adjustment can be made
easier by a 1/2” swivel joint, which IRIS can supply if
one is not available. While the burner is firing, vary
the viewing angle while observing the green LED on
the connector at the rear of the viewing head. Adjust
the viewing angle for the maximum pulse rate, then
lock the swivel joint to preserve this mechanical setting. If the LED pulse rate is very high or very low , see
the two paragraphs below . The locked mechanical setting should still be correct when Model 700 viewing
heads are interchanged, because inside each Model 700
viewing head the optical axis is aligned with the mechanical axis within ±1/4 degree. Also, the reading
shouldn’t change when a viewing head is rotated in the
mount.
For the above sighting adjustments to work properly,
the blinking rate of the green LED in the connector at
the rear of the viewing head must be reasonable. If the
displayed count is above 25, the pulses begin to blur
together, making changes in the pulse rate difficult to
observe. If the count is higher (29 or 30), then the viewing head is in saturation. Saturation means that the count
would like to be even higher, possibly 50 or more, but it
is internally clamped. With count rates in saturation or
close to saturation, an operator will not be able to
“wiggle” the viewing head in the swivel mount and maximize the count rate properly. It should be possible to
bring high count rates down to a useable level by decreasing the gain. If the gain is set to 1 and the count is
still 25 or higher, orificing is needed. See the section on
orificing below .
If the displayed count is less than 8 or 10, it will be difficult to maximize the count by aiming the viewing head,
because the pulses come through too infrequently . In this
case the gain should be increased. A count rate of around
16 to 20 is recommended. If the gain is set to a maximum and the count rate is still down around 5 or 6, the
system can still be made to work reliably as long as the
count rate drops significantly when the flame is removed.
Nevertheless, you should question the setup. Is the viewing head aimed properly? Is it seeing flame directly?
ORIFICING
If the displayed count is 25 or higher when the gain is
set to 1, an orificing disc inserted in the back end of
the mounting block is recommended. An orifice kit is
available as an inexpensive accessory from IRIS,
part number M-702-6s, for Model 700 and Model 800
viewing heads. Each kit contains a selection of
orifice discs and a snap ring to hold the selected disc
in place. Try to choose a disc that gives a reading of
12 to 24 at a low fire firing rate. The discs have a
range of orifice sizes; each size step results in about
a 2:1 change in the counts displayed.
MANUAL SETUP OF SET POINTS –
MODELS 700 & 800
The keypad of the Model 700 signal processor is used to
set the RELAY ON and RELAY OFF set points. The
following section describes this process. The following
section applies to the Model 800 signal processor as
well because it works like the Model 700 signal processor.
T o change the RELA Y ON and RELA Y OFF set points,
the keypad functions are still needed. These functions
are achieved using RS-232 serial communications
through the stereo phone jack on the front of the Model
800. You can use a remote keypad in one of two ways:
1)By using a setup programmer available from
IRIS Systems. This programmer looks and works
like the keypad on a Model 700 signal processor.
(Figure 15). A special cable is supplied with the
programmer .
2)By connecting the Model 800 signal processor
to a computer. The supplied software graphically simulates a keypad for the Model 800 on
the computer screen. Another special cable is
available to connect between the stereo phone
jack of the Model 800 and a male DB9 (9 pin)
serial port connector on the computer (Figure 13).
PAGE 8
Page 9

IRIS MODEL 700/800 APPLICATION MANUAL
A desktop or notebook computer may be used.
Both remote keypad approaches permit the set points to
be adjusted, but they differ slightly in some details from
the actual Model 700 keypad. For example, neither of
the two approaches shows the keys for automatic setup,
because the Model 800 does not support this feature.
Once the addresses of Model 800s have been set to
different values, up to 32 Model 800s can be interconnected on the same RS-232 bus in a multi-drop hookup.
The IRIS programmer could be mounted nearby and
permanently connected to the same RS-232 bus; it can
then easily address any of the Model 800s (using the
DEVICE SELECT key) and check each units settings.
For more specific information on setting up the Model
800 signal processor by using a computer to simulate
the keypad, install the Model 800 Setup software on
the computer, plug the special RS-232 cable both into
the computer and the Model 800, and run the software.
Changing the set points for the Model 700 and 800 signal processors is straightforward. The two numeric
digits on the Model 700 signal processor (or the equivalent on the remote display for the Model 800) normally
display the incoming count; that is, the number of pulses
that arrive between self-check pulses. This count ranges
from 00 to 29.
After the RELAY ON SET POINT key is pressed for
two seconds, the RELAY ON SET POINT will be displayed. If no further keys are pressed, this display will
disappear in four seconds and the incoming count will
again be displayed. If the RESET key is pressed, the
display will return immediately to displaying the incoming count.
While the RELAY ON SET POINT is displayed, you
may increase or decrease the setting by using the INCREASE and DECREASE arrow keys. The displayed
value of the RELAY ON SET POINT is live; that is, if
the relay is off and the adjusted value crosses the current flame signal count, the relay will turn on immediately (FFRT settings are ignored). This immediate response can be seen if the count is low and the RELAY
ON SET POINT is set above it; if the RELAY ON SET
POINT is then adjusted down to the count level, the
FLAME ON relay will turn on. You may press the
STORE key and store the displayed RELAY ON SET
POINT value, or return to displaying the incoming count
(without storing the displayed value) by pressing RESET . Or, you may simply wait for four seconds without
pressing any keys, and the signal processor will then
return to displaying the count without storing the changed
RELAY ON SET POINT value. If you wish to extend
the display time, you can press the RELAY ON SET
POINT key again; the display will time out four seconds after this key is released if the INCREASE and
DECREASE keys are not used.
The key labeled RATIO (%) RELAY OFF/RELAY ON
is used to set the RELAY OFF SET POINT at some
percentage of the RELAY ON SET POINT. This percentage is adjustable from 20% to 80%. For example, if
the RELA Y ON SET POINT is set to 16 and the RATIO
(%) is set to 50% (the factory default values) the relay
will close if the displayed count goes to 16 or higher and
open when the count drops to 08 or less for one to three
seconds, depending on the FFRT (Flame Failure Response Time) setting. The adjustment of this RATIO is
live also. Adjustments will cause the Flame Relay to
open immediately , ignoring FFRT settings.
You may store the displayed RATIO by pressing the
STORE key . If there is no up or down activity from the
INCREASE or DECREASE keys for four seconds, and
no further presses of the RATIO key to keep the RA TIO
displayed, the RA TIO display will disappear and the old
ratio set point will take effect.
AUTOMATIC SETUP – MODEL 700 ONLY
With this feature, the Model 700 sets the RELAY ON
SET POINT, the RATIO, and the VIEWING HEAD
GAIN automatically . Calculations for these settings are
carried out in the Model 700 as the operator takes the
system through BURNER ON and BURNER OFF sequences. The Model 800 does not have this feature.
First, adjust the RELAY ON SET POINT to get the
FLAME ON relay to turn on.
Press BNR-ON SEQ START/END key for two seconds. If the FLAME ON relay is not on, the display will
show “bo” (burner off); press RESET to clear this. If
the FLAME ON relay is on, the ON SEQ LED will start
flashing slowly and the numeric display will start counting down from 59 while the processor takes data at one
reading per second. The FLAME ON relay will remain
pulled in if the flame is present, according to the current
settings, until valid new values are obtained. Y ou can press
the same button, BNR-ON SEQ START/END, to end
the data sampling as soon as you wish, but you should
ensure that an adequate number of data samples has
been taken. At least 30 seconds of BNR-ON data sampling is recommended; ten seconds is a minimum. The
software will not respond to a second press of the button
for 10 seconds. You may also press RESET while the
data sampling is occurring; the data sampling process
will be aborted and the old values will remain in effect.
PAGE 9
Page 10

IRIS MODEL 700/800 APPLICATION MANUAL
After BNR-ON data sampling is complete, the OFF
SEQ LED flashes. You should turn off the burner and
immediately press the BNR-OFF SEQ START/END
key (a two-second press is not required). The displayed
timer then counts down from 29. You may interrupt
this process, but at least 15 seconds of BNR-OFF data
sampling is recommended. The data sampling process
can be aborted by pressing RESET, in which case the
data for both BNR-ON and BNR-OFF will be discarded
and the previous values will remain in effect.
If the data is good, that is, the computed ratio is 71% or
less when BNR-OFF data sampling is complete, the display shows the ratio in % for one second, followed by “- ” to indicate a successful setup. The signal processor then
turns on the AUTO SET LED to verify that the values
stored internally were derived from the BNR-ON/BNROFF data sampling sequence.
If the data received is marginal, with the computed ratio
ranging from 72% to 80%, the display alternates between “AC” and the computed ratio, for example, “AC”
and “75”. You can press either the ACCEPT RATIO or
RESET keys. If you press ACCEPT RATIO, the display responds with “- -”, the ratio is stored, and the
AUTO SET LED is turned on. If you press RESET , the
display returns to the counts, both of the AUT O SETUP
LEDs are turned off, and the old set points are used.
If the ratio computed as a result of BNR-ON and BNROFF data sampling is higher than 80%, the display will
show “UA” (unacceptable), alternating with the unacceptable ratio. For example, if the computed ratio was
93%, the display would alternate between “UA” and
“93”. You must press RESET to clear this; the old values for RELAY ON and RATIO will remain in effect.
The values can be worse than just unacceptable. If the
flame relay drops out while reading BNR-ON values,
the display will show “bo”, and data- taking will be
aborted. Other faults, such as a BNR-ON flame signal
that is too low to use, or BNR-OFF readings that are
too close to the BNR-ON readings, can result in “rE”
being displayed. You should then press RESET .
The signal processor also adjusts the viewing head gain
during the BNR-ON and BNR-OFF data sampling sequence, except when an older UV viewing head is being used. Normally, after the sequence, the display
should read about 20, because the gain has been adjusted to give this reading. If it is less than about 18,
you should find that the gain has been set to 9; if it is
more than about 22, you should find that the gain has
been set to 1.
RELAY O N SET- POINT 16
RATIO ( % ) RELAY O F F /REL AY ON 50 %
FF RT (F LAM E FAIL RES P TIM E) 1 S EC
0-20mA/4-20mA OPTION 4-20mA
Table 1
Once the values have been stored through this sequence, you can check the RELAY ON SET POINT,
the RATIO, or the GAIN by pressing the appropriate
key for two seconds. However, if you attempt to change
these values by pressing the INCREASE or DECREASE keys, the display will show “CF” (confirm),
and the AUT O SET LED will flash rapidly . To confirm
the desired change, press the RELA Y ON SET-POINT
key, the RATIO key, or the SET GAIN key a second
time. Alternatively, you may press the RESET key to
discontinue your attempt to make changes, or just wait
four seconds for the time out to occur.
If you confirm that you wish to make changes, the values
will change when you use the INCREASE or DECREASE
keys. Meanwhile, the AUTO SET LED will be flashing.
The AUTO SET LED will go out only if you store the
changed values; if you did not store the changed values,
the AUTO SET LED will light and the old values will
remain in effect.
If values were obtained automatically, -that is, if the
AUTO SET LED is on and you press the BNR-ON
SEQ START/END key- the display will also show
“CF”. If you then press the BNR-ON SEQ START/
END key again, the signal processor will begin the
BNR-ON data sampling sequence.
FILTER SELECTION FOR IR
VIEWING HEAD
If a good count ratio between BNR-ON and BNR-OFF
cannot be obtained when using an IR viewing head particularly when monitoring oil flames- an IR viewing
head with the High Frequency (-HF) filter option is recommended. The standard IR viewing head responds to
flicker frequencies above 33 Hz; with the -HF option,
the IR viewing head responds to flicker frequencies above
155 Hz.
LOADING FACT ORY DEFAULTS
If the AUTOSET LED is not on, pressing the LOAD
FACTORY DEFAULTS key will result in the values
PAGE 10
Page 11

IRIS MODEL 700/800 APPLICATION MANUAL
shown in T able 1 being loaded and stored in EEPROM:
In the Model 700, if the AUTO SET LED is on when
the LOAD FACTORY DEFAULTS key is pressed,
“CF” will be displayed. Press the LOAD FACTORY
DEF AUL TS key again to confirm your request, or press
RESET to abort your request. If you load factory defaults, the AUTO SET LED will be turned off.
The Model 800 does not have an automatic mode in
which it calculates set points, so confirming an overwrite of calculated set points is not part of the Model
800 applications software.
SETTING FFRT – MODELS 700 AND 800
Y ou may press the FFR T key to change the Flame Failure Response Time over the range one to three seconds, using the increase and decrease keys on the Model
700, or from the application software or setup programmer available for the Model 800. These changes, however, are not live; they take effect only if the STORE
key is pressed. FFRT values do not relate to the RELAY ON SET POINT and RATIO values, so if the
AUTOSET LED is on in the Model 700, confirmation
is not needed to change the FFRT setting.
0-20 MA/4-20 MA OPTION –
MODELS 700 & 800
An analog output current is provided for operating a
remote meter or other instrumentation. The load resistance should not exceed 360 Ohms for the Model 700
or 100 Ohms for the Model 800. The resistance can be
chosen to give the desired voltage swing. For example,
if 2V is desired for a 20 mA output, a 100 Ohm resistor
would be used.
The analog current output can range from 0 to 20
milliamps, or from 4 to 20 milliamps. A change can be
made by pressing the 0-20 MA/4-20 MA OPTION key
and using the INCREASE and DECREASE keys. This
change can also be made from the setup programmer
or application software for the Model 800. The display
will show “02” or “42” as appropriate. This function is
live; the operative range changes as soon as the displayed selection is changed. But, as with the other functions, you should press STORE for a change to be stored
in the signal processor’s EEPROM.
The analog current output is scaled according to the
RELAY ON setting. It is scaled so that, if the counts
coming in are at a count rate equal to the RELAY ON
setting, the current output is approximately 13 MA when
the range selected is 0-20 MA, and about 14.6 MA when
the range selected is 4-20 MA.
Note that the actual maximum level for the current output is 19.8 MA. It is slightly less than 20 MA so that a
data sampling system will not switch ranges when the
current reaches a maximum.
Confirmation is not requested if the 0-20/4-20 setting
is changed when the AUTOSET LED is on.
LOCKOUT OR FAULTY VH INDICATION
If the viewing head produces any pulses during the last
one third of the self-check time, the relay will immediately drop out, the display will show “LO” (lockout), and
the FAULT LED will flash on and off rapidly. On th e
Model 800, this will be indicated by the green LED
flashing rapidly. Exit lockout by pressing RESET. If a
pulse or pulses come in during the last one third of the
self-check time while the automatic data sampling is taking place, the automatic process will be aborted, the relay
will be opened if it was closed, the display will show “LO”
)lockout), and the FAULT LED will flash on and off rapidly. Press RESET to exit this. If a viewing head is disconnected, the display will show “L1.” Reconnect the
viewing head and press RESET .
PANEL LOCK
A pattern of key presses will result in the panel being
locked so as to block the storage of any changes to the
values stored in the signal processor. With the panel
locked, values may be examined, but the signal processor will not respond to the STORE key.
The panel should be locked after the set points are set.
Contact the factory to obtain the procedure to lock or
unlock the panel.
The Model 800 processor does not allow any values to
be changed other than by using the setup programmer
or application software.
PANEL LOCK WITH NO VH CONNECTED
When the signal processor is working with an intelligent viewing head, it expects to have continuous communication with the viewing head. If the viewing head
is disconnected, communication is lost, the display is
made inoperative, and no settings can be examined or
changed. Reconnect the viewing head and cycle power
to correct this condition.
WORKING WITH OLDER UV VIEWING
HEADS
When the signal processor has been set up with an older
UV viewing head without communications, the settings
may be viewed and changed whether or not the viewing head is connected. But, if the viewing head is
PAGE 11
Page 12

IRIS MODEL 700/800 APPLICATION MANUAL
MAINTENANCE
IRIS products have been designed to be fail-safe. Field
preventive maintenance checks should be performed as a
precautionary measure to check for anomalies. We
recommend to periodically check for false readings by
blocking the light source from the sensor and observe the
Signal Processor for a zero output. Our recommended
frequency of this check would be before each start up
and at least monthly during continuous operation.
The manufacturer of the UV Sensor states the normal life
of their Sensor is approximately 10,000 hours of
continuous operation. It is recommended that it is
replaced at that time to maintain optimal operation.
changed from a new intelligent type to an older UV
type without communications, the display panel will remain inoperative until pulses start coming in from the
old UV viewing head. Then the signal processor will
recognize the older UV viewing head, make the appropriate changes, and begin responding to the keys pressed
on the front panel.
MODEL 700 COMMUNICATIONS
The Model 700 Signal Processor has two modular phone
jacks for RS-422 communications. The jacks are wired in
parallel so that point-to-point cables can be jumped from
unit to unit to interconnect multiple Model 700 signal processors. The RS-422 interface IC is a MAX489. These
ICs can drive up to 32, Model 700 signal processors on
the same bus.
IRIS supplies FlameTools application software for setting up, monitoring and logging the readings from Model
700 signal processors. This software for PCs is available from IRIS on a CD ROM at no charge. However, to
interface from a PC to the RS-422 bus, an RS-232 to
RS-422 converter is needed. One converter that can be
used is made by B & B Electronics Manufacturing Company in Ottawa, IL 61350. Their Model 422NOIC converter plugs into a standard DB25 serial port connector
on a PC hookup for this converter to the RS-422 bus is
shown in Figure 13.
Caution: Before Model 700 Signal Processors
are connected to the RS-422 bus their
individual addresses must be set to differing
values. This is easily done from the front panel
on the Model 700. The RESET button is used
to set the address, even though it is not
labeled to indicate this. Press the RESET
button for two seconds and the current
address will appear. Change this with the up
and down arrow keys, then store the new
address.
The serial communications jack on the Model 800 signal
processor can be used for manual setup of set points,
as well as for data acquisition. IRIS data acquisition
software is available which permits multiple Model 800
signal processors to communicate with a host PC. Con-
tact sales for further information about this.
APPROVALS
The Model 700 signal processors and Models S702,
S702-HF , S702-PF , S702-HF-PF , S706, S706-PF , S802,
S802-HF, and S806 viewing heads have Factory Mutual (FM) Approval for Combustion Safety and Canadian Standards Association (CSA) Certification with
added National Recognized Testing Laboratories
(NRTL/C) Certification.
As well, the above viewing heads are approved and
certified by Factory Mutual and CSA for use in hazardous locations, Class I, Division 2, Groups A, B, C
and D, temerature code T4A. The viewing heads are
approved as sealed and corrosion resistant to NEMA 4
and NEMA 4X by Factory Mutual.
CONTACT INFORMATION
For further information contact:
Sales and applications support:
IRIS SYSTEMS INC.
7583 V antage Place
Delta, BC, Canada V4G 1A6
Ph. 800-667-IRIS, FAX 604-581-9790
email: flame@iris-systems.com
Factory and repairs:
IRIS SYSTEMS INC.
(JB Systems, Inc.)
4944 113th A venue N
Clearwater, FL 33760
Ph. 727-545-3900, FAX 727-547-9589
MODEL 800 COMMUNICATIONS
The section on MANUAL SETUP OF SET POINTS
– MODELS 700 AND 800 explains that the stereo
phone jack on the front panel of the Model 800 can be
connected to a computer , a PDA or to a setup programmer. The cable for the computer or PDA connection is
shown in Figure 14 and is available from IRIS; the setup
programmer and cable for it, also available from IRIS,
are shown in Figure 15.
PAGE 12
Page 13
IRIS MODEL 700/800 APPLICATION MANUAL
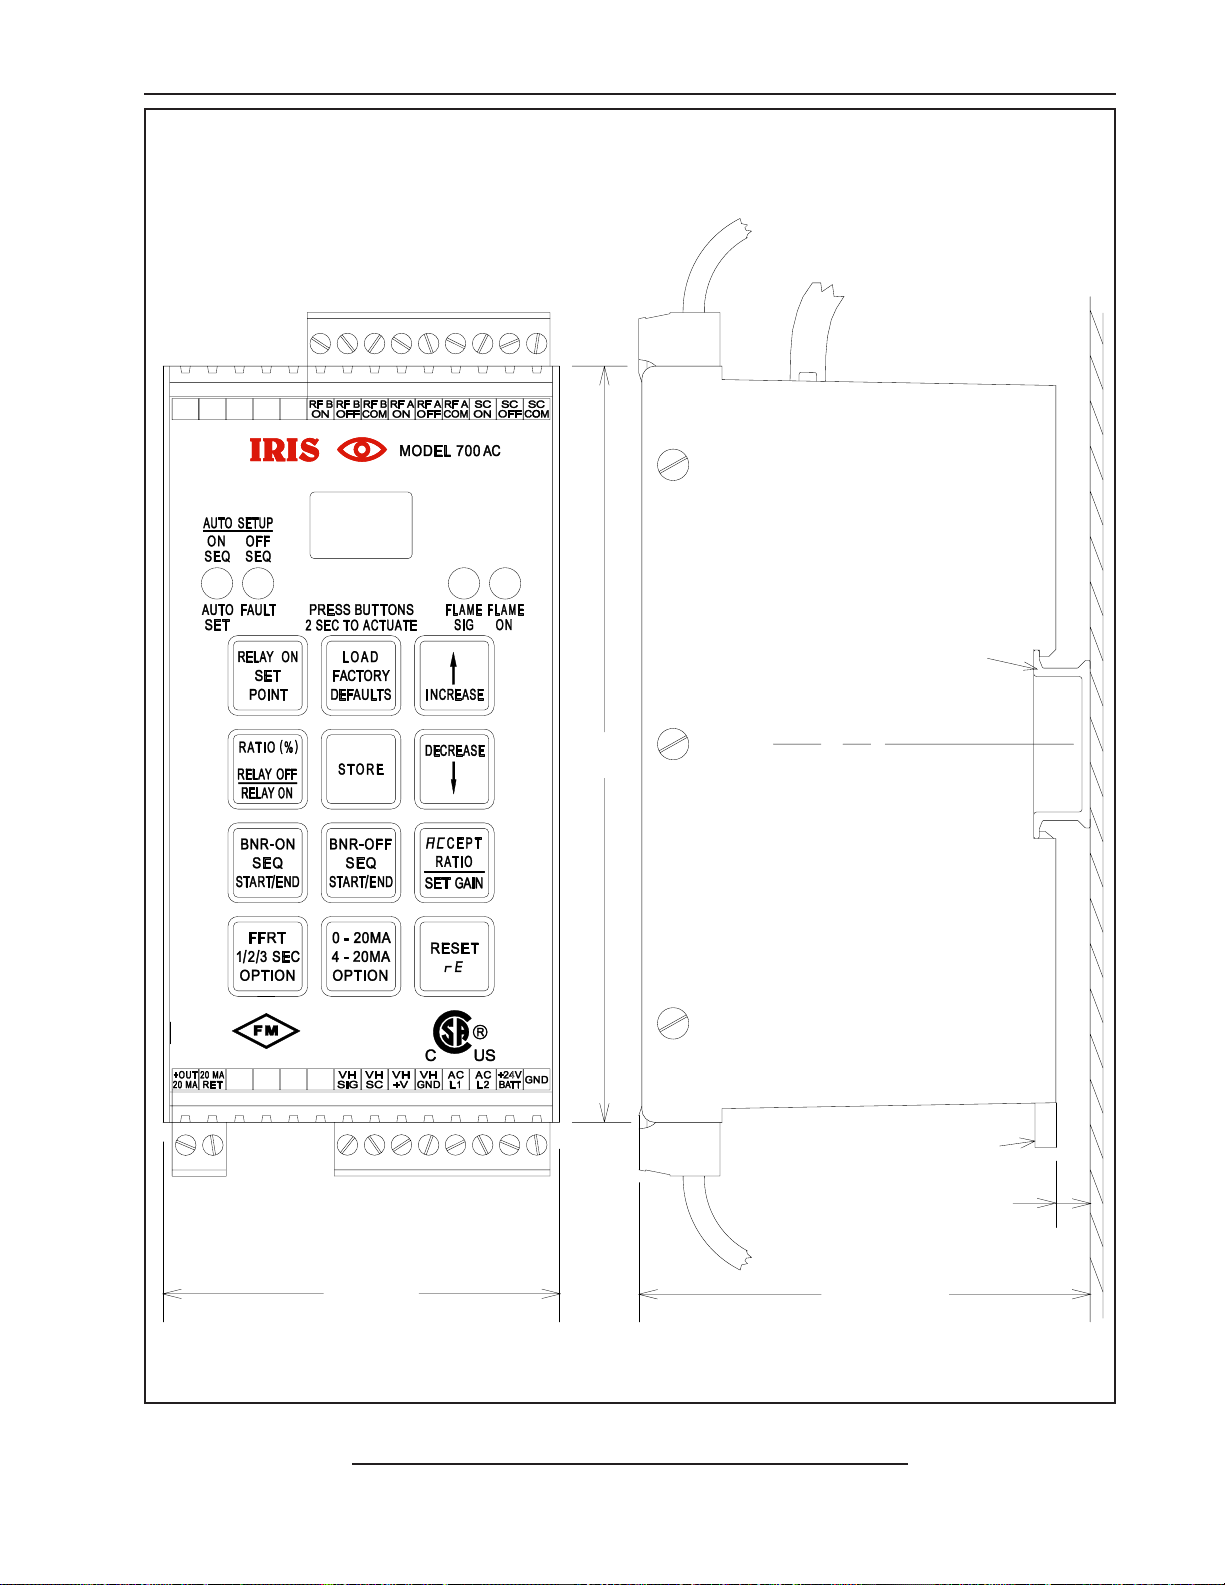
2.90"
3.25"
5.49"
.25"
35mm DIN RAIL
DIN RAIL RELEASE
C
L
RS422 WIRING
RELAY CONNECTIONS
APPROVED
FIGURE 1 - MODEL 700AC SIGNAL PROCESSOR
PAGE 13
Page 14

IRIS MODEL 700/800 APPLICATION MANUAL
0-20 OR 4-20 MA
FOR INDICATOR OR
INSTRUMENTATION
360 OHMS MAX
AC IN
GROUND
APPROVED
+26VDC
GND
.125 A
LIM
AC POWER
SUPPLY
-t°
+
.4A
2
A
CHASSIS,
+
-
TO VIEWING
EARTH, OR
SYSTEM GND
HEAD
-
+
24 V BACKUP BATTERY
(OPTIONAL)
PAGE 14
FIGURE 2 - MODEL 700AC SIGNAL PROCESSOR WIRING
Page 15

IRIS MODEL 700/800 APPLICATION MANUAL
RELAY CONNECTIONS
RS-422 WIRING
35mm DIN RAIL
APPROVED
2.90"
5.49"
C
L
DIN RAIL RELEASE
.25"
3.25"
FIGURE 3 - MODEL 700DC SIGNAL PROCESSOR
PAGE 15
Page 16

IRIS MODEL 700/800 APPLICATION MANUAL
0-20 OR 4-20 MA
FOR INDICATOR OR
INSTRUMENTATION
360 OHMS MAX
APPROVED
+26VDC
GND
.125 A
LIM
+
.4A1A 1A
+
-
TO VIEWING
HEAD
-
+
DC POWER SUPPLY
250 MA
CHASSIS,
EARTH, OR
SYSTEM GND
24 V BACKUP BATTERY
-
+
(OPTIONAL)
PAGE 16
FIGURE 4 - MODEL 700DC SIGNAL PROCESSOR WIRING
Page 17

IRIS MODEL 700/800 APPLICATION MANUAL
04 05 06 07 0803
SN
Ja
FeMaApMyJu
Jy
Au SeOcNo
oo
3.10"
SC
mA OUT
POWER
& FAULT
M O D E L
80 0
FLAME
MONITOR
85-265VAC
50-60 Hz
AC L1
AC L2
SC NO
PROGRAM
VH +V
1.56"
RF
RFB NO
FLAME
ON
RESET
VH SIG
VH SC
RFA NO
MO D EL 8 00
FL A ME M O NI T OR
SENSING IR FLICKER
OR UV INTENSITY
INPUT POWER: 85-265VAC, 50-60 HZ, 0.1A
OPER. AMBIENT: 0 C - 60 C ENCL. TYPE 12
SELF-CHECK RELAY CONTACT:
FLAME RELAY CONTACTS:
0.4A: 110VDC, 125VAC; 2A: 30VDC
5A: 125VAC, 250VAC, 30VDC
IRIS SYSTEMS DELTA, BC, CANADA 800-667-IRIS
MFG: JB SYSTEMS, INC. LARGO, FL 727-545-3900
GND
3.48"
FIGURE 5 - MODEL 800 SIGNAL PROCESSOR ON DIN RAIL
TO B M S
10001
De
.58"
AC IN
G R O U N D
SC
mA OUT
M O D E L
800
FLAME
MONITOR
85-265VAC
50-60 Hz
AC L2
AC L1
SC NO
RFB NO
PROGRAM
RESET
VH +V
VH SIG
RF
RFA NO
0-20 mA OR 4 -2 0 mA
METER O R B M S
10 0 OHM S MAX
VH SC
GND
SH I E L D
G R E E N
BLACK
WH I T E
MO D EL 700 OR 80 0
VI E WING H E A D
FL A M E
R E D
FIGURE 6 - MODEL 800 SIGNAL PROCESSOR WIRING
PAGE 17
Page 18

IRIS MODEL 700/800 APPLICATION MANUAL
1/2" - 14 NPT FOR SIGHTING PIPE
HEX 1.50" ACROSS FLATS
1.76" DIA MOUNTING BLOCK
1/4" - 18 NPT FOR PURGE AIR
8.30"
6.41"
1.42"
0.33"
PAGE 18
1.48" DIA
FIGURE 7 - MODELS S702 AND S706 VIEWING HEADS
Page 19

IRIS MODEL 700/800 APPLICATION MANUAL
1/2" - 14 NPT FOR SIGHTING PIPE
HEX 1.50" ACROSS FLATS
1.76" DIA MOUNTING BLOCK
1/4" - 18 NPT FOR PURGE AIR
7.72"
0.40"
6.01"
1.50"
1.13"
DIA
FIGURE 8 - MODEL S802 AND S806 VIEWING HEADS
PAGE 19
Page 20

TERMINAL
VIEWING HEAD
Electri-Flex FLEXIBLE
T
M
GREEN LED
5 METER CABLE
ASY757
IRIS MODEL 700/800 APPLICATION MANUAL
ORANGE LED
CONNECTOR CLIP
OLDED CONNECTOR
T & B ADAPTE R
LIQUIDTIGHT CONDUI
CONNECTOR
FIGURE 9 - “DISCONTINUED”
(16.4 FT.)
WIRE COLOR
BROWN
VH SIG
BLACK
VH SC
WHITE
VH +V
BLUE
VH GND
PAGE 20
FIGURE 10 - “DISCONTINUED”
Page 21
CONDUIT
F
ENCLOSURE
IRIS MODEL 700/800 APPLICATION MANUAL
S702 -PF, S702-HF-P F o r S 706- P
STANDARD "PIGTAIL" LENTH = 20 INCHES
GRAY CABLE
WITH OVERALL SHIELD
RED
BLACK
WHITE
GREEN
SHIELD
TERMINAL
VH SIG
VH SC
VH +V
VH GND
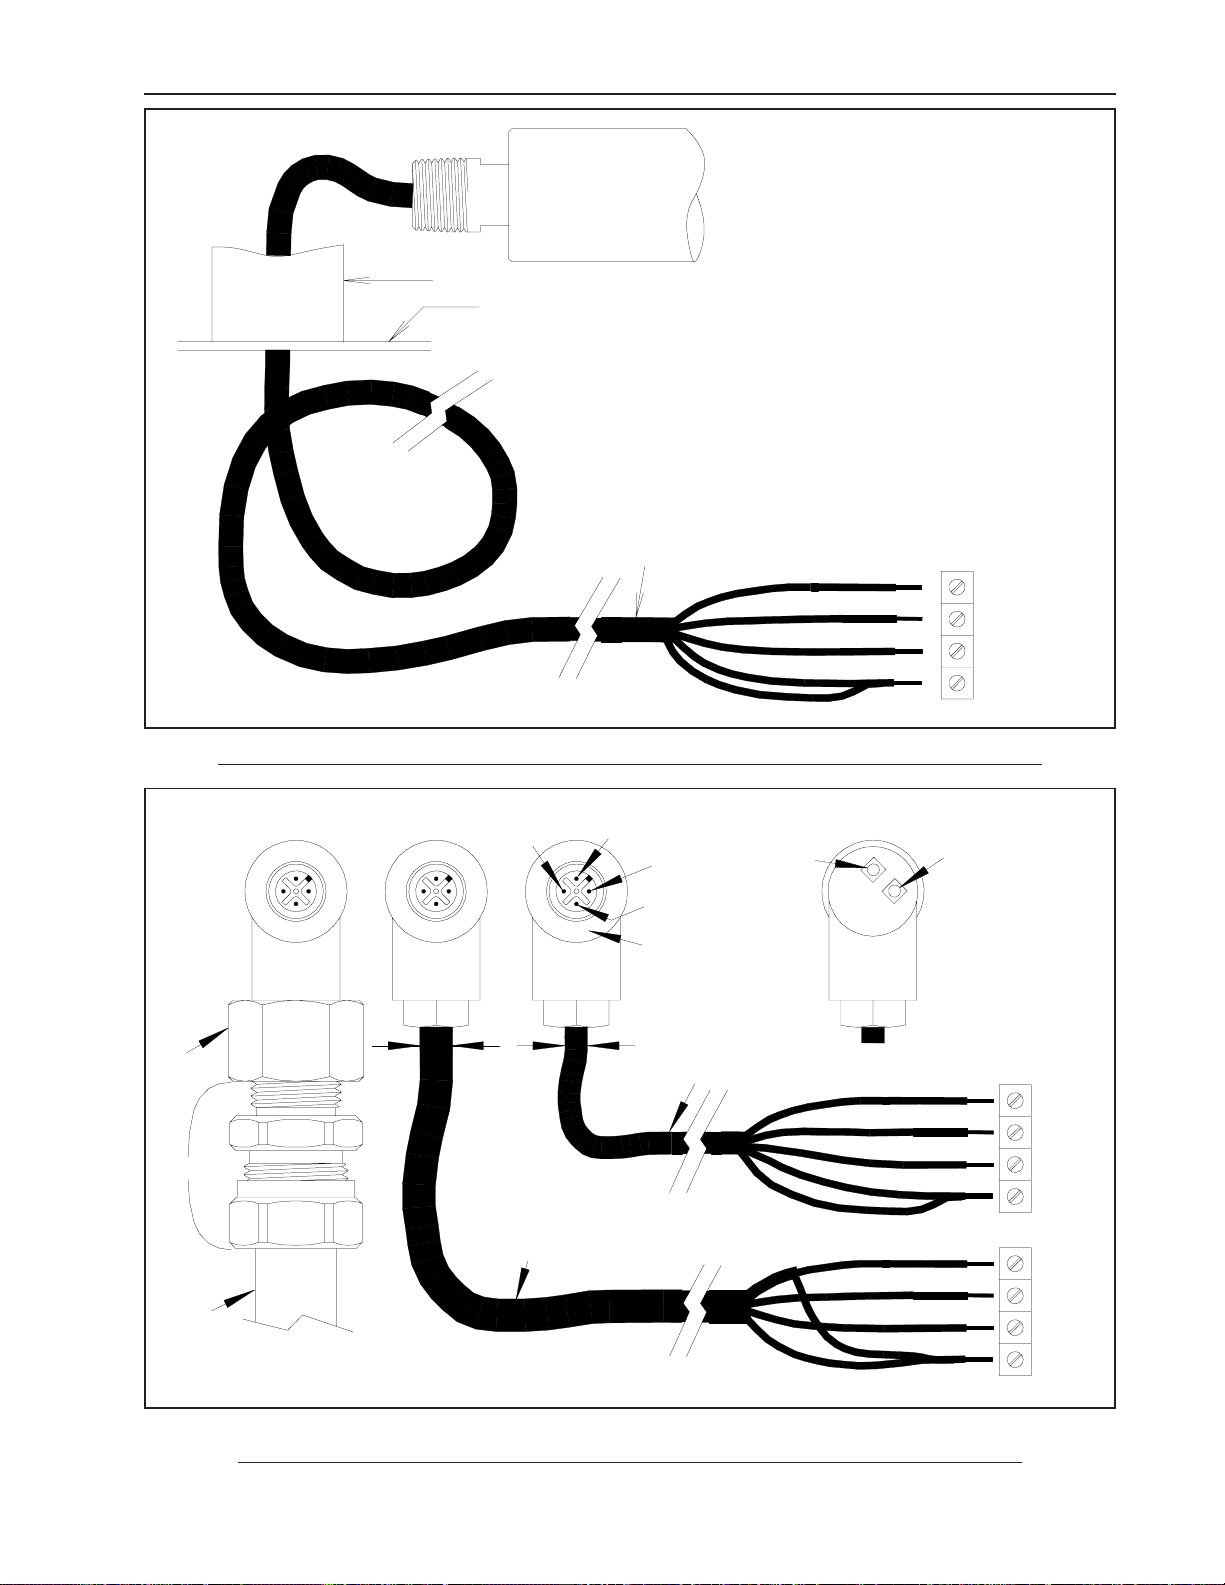
FIGURE 1 1 - MODEL 700 VIEWING HEAD CABLE WITH 1/2” NPT FITTING
VH SIG
VH +V
VH GND/SHIELD
METAL
CONNECTOR RING
VIEWING HEAD
CONNECTOR
LOOKING AT PINS
.250"
MAX
WITH OVERALL SHIELD
GREEN
LED
GRAY CABLE
SHIELD
WHITE
BLACK
SHIELD
GREEN
700 LTA
Con74
Cdt02
VH SC
.307"
MAX
C-330 LIGHT BLUE CABLE
WITH SHIELDED WHITE CONDUCTOR
(RATED ITC BY UL & CIC BY CSA)
ORANGE
LED
VIEWING HEAD
CONNECTOR
LOOKING AT BACK
TERMINAL
RED
BLACK
WHITE
GREEN
VH SIG
VH SC
VH +V
VH GND
TERMINAL
VH SIG
RED
VH SC
VH +V
VH GND
FIGURE 12 - MODEL 700/800 VIEWING HEAD CABLE CONNECTIONS
PAGE 21
Page 22

IRIS MODEL 700/800 APPLICATION MANUAL
BOTTOM VIEW
RS-232/RS-422
MODEL 422IRIS
RS-232/RS-4 2 2 CONV ER T ER
+12 VDC POWE R SUPPLY
NC
3
12456
SIDE VIEW
MODULAR CONNECTOR
3
12456
TD (A)
TD (B)
RD (A)
RS-232
RD (B)
+12VDC
SG. GND
RS-422
CONVERTER
TD (A)
TD (B)
RD (A)
RD (B)
+12VDC
SG. GND
WIRING
MODULAR
CONN.
1NCWHIBLUNC NC -
2 TX- BLK Y EL RD (A)
3 TX+ RED GRN RD (B)
4 RX- GRN RED TD (A)
5 RX+ YEL BLK TD (B)
SCHEM
LABEL
COLOR
TYP E A
COLOR
TYP E B
INTE R FA C E
LABEL
DESCRIPTIO N
FROM
M700
FROM
M700
TO
M700
TO
M700
POW ER
SUPPLY
-
-
-
-
6 GND BLU WHI GND GRO UND GND
CAUTION: The order of the colors in the cable can be TYPE A or TYPE B. Check colors at
FIGURE 13 - WIRING OF RS-422 TO RS-232 CONVERTER TO MODEL 700 SIGNAL
PAGE 22
the connector.
PROCESSOR
+12VDC PO W ER +12VDC
Page 23

IRIS MODEL 700/800 APPLICATION MANUAL
5 4 3 2 1
MOLDED FEMALE CONNECTOR
9 PIN D- SUB WIT H RETAINING SCREWS
TO PIN 3
TO PIN 2
TO PIN 5
LENGTH = 6 FT.
9 8 7 6
FIGURE 14 - COMMUNICATIONS CABLE FOR MODEL 800 SP
PAGE 23
Page 24

IRIS MODEL 700/800 APPLICATION MANUAL
PLUG INTO
EITHER JACK
24563
1
BOTTOM VIEW
OF MODULAR CONNECTOR
124563
2.98"
5.52"
6 FT.
TO PIN 6
TO PIN 4
TO PIN 2
(TO PINS ON MODULAR CONNECTOR)
PAGE 24
FIGURE 15 - PROGRAMMER AND CABLE
Page 25

IRIS MODEL 700/800 APPLICATION MANUAL
FLOWCHART OF MODEL 700
R
LOAD
DEFAULTS
OR
cancel changing the AUTO SET values
again to confirm you want to change
NORMAL OPERATION
Display shows ‘PL ’
meaning the panel is locked
NORMAL OPERATION
16
50%
4-20mA
ESTORING EFAULT ALUES
LOAD
FACTORY
DEFAULTS
2 SECS
D V
Press LOAD F ACT O R Y
DEFAULTS for 2 seconds
Y
Is the panel locked?
N
Is the AUTO SET
Y
light lit?
N
Display shows ‘CF’,
meaning Confirm
RESET
rE
FACTORY
Press reset or wait 4 seconds to
Press LOAD F ACT O RY D EFAULTS
the AUTO SET values
RELAY ON
RATIO
0-20/4-20mA OPTION
FFRT
1 sec
FLOW CHART 1 - SETTING F ACTORY DEFAULTS
PAGE 25
Page 26

FLOWCHART OF MODEL 700
NORMAL OPERATION
A
Is the panel
Display shows ‘PL ’
until key released
OR
Press reset or wait 4 seconds
Press BNR-ON SEQ again to confirm you
want to begin taking data for auto setup
RESET
BNR-ON
START/END
Display shows ‘bo’,
Press reset to
cancel auto setup
RESET
IRIS MODEL 700/800 APPLICATION MANUAL
S
UTO ETUP
BNR-ON
SEQ
START/END
2 SECS
Press BNR-ON SEQ
for 2 seconds
Y
locked?
N
Is the AUTO SET
light lit?
N
Is the FLAME ON
light lit?
Y
Y
Display shows ‘CF’,
meaning Confirm
rE
SEQ
to cancel auto setup
N
meaning Burner Off
CONTINUED NEXT PAGE
FLOW CHART 2 - AUT O SETUP PAGE 1
PAGE 26
rE
Page 27

burner off data or wait until the count reaches zero
A S - P 2
UTO ETUP AGE
Press BNR-OFF SEQ to
begin taking burner off data
Display begins counting
Press reset at any time during this
RESET
NOTE:
burner on data or wait until the count reaches zero
Turn burner off
Display begins counting
Ratio is acceptable
Display
‘- -’ for one second
and new values are saved
CONTINUED NEXT PAGE
IRIS MODEL 700/800 APPLICATION MANUAL
down from 59 seconds
BNR-ON
SEQ
START/END
and AUTO SETUP OFF SEQ light flashes
rE
procedure to cancel auto setup
Press BNR-ON SEQ again to end taking
(30 seconds minimum recommended)
Display returns to current flame signal
BNR-OFF
SEQ
START/END
BNR-OFF
SEQ
START/END
Is the auto setup
ratio acceptable?
RATIO < 72%
N
down from 29 seconds
Press BNR-OFF SEQ again to end taking
(15 seconds minimum recommended)
Y
shows new ratio
setting for one second,
then
NORMAL OPERATION
FLOW CHART 3 - AUT O SETUP PAGE 2
PAGE 27
Page 28

IRIS MODEL 700/800 APPLICATION MANUAL
A S - P 3
Ratio is unacceptable
NORMAL OPERATION
Is the auto setup
71% < RATIO < %81
Ratio may be
Display ‘- -’ for one second
NORMAL OPERATION
ACCEPT
MARGINAL
Press ACCEPT MARGINAL RATIO
to accept the ratio displayed
Press reset at any time during this
RESET
NOTE:
Display alternates
and the new ratio setting
Press reset to cancel auto setup
RESET
Display alternates
YNY
UTO ETUP AGE
ratio marginal?
RATIO
rE
procedure to cancel auto setup
acceptable
showing ‘AC’
shows
and new values are saved
Is the auto setup
ratio unacceptable?
RATIO > 80%
PAGE 28
showing
‘UA’ and ratio
rE
FLOW CHART 4 - AUT O SETUP PAGE 3
Page 29

RELAY ON
FLOWCHART OF MODEL 700
Use INCREASE OR DECREASE
Press reset or wait 4 seconds
Press RELAY ON SET POINT again to
confirm you want to change the auto setting
Use INCREASE OR DECREASE
NORMAL OPERATION
INCREASE
DECREASE
RESET
STORE
S R O V
Display sh ow s ‘PL’
until key released
ETTING ELAY N ALUE
RELAY ON
SET
POINT
2 SECS
Press RELAY ON
for 2 seconds
IRIS MODEL 700/800 APPLICATION MANUAL
Display sh ow s curren t
relay setting
INCREASE
DECREASE
keys to adjust setting
Is the panel
locked?
N
Is the AUTO SET
light lit?
N
Y
Y
Display s how s ‘CF’ ,
meaning Confirm
RESET
rE
OR
SET
POINT
Press reset or wait 4 seconds to
cancel changing the auto setting
Press Store to save
the new setting
keys to adjust setting
FLOW CHART 5 - MANUAL FLAME ON SETUP
OR
rE
to restore old setting
PAGE 29
Page 30

IRIS MODEL 700/800 APPLICATION MANUAL
FLOWCHART OF MODEL 700
Use INCREASE OR DECREASE
Press reset or wait 4 seconds
Press R ATIO (%) ag ai n to c onf ir m
you want to change the auto setting
Use INCREASE OR DECREASE
NORMAL OPERATION
INCREASE
DECREASE
RESET
STORE
Display sh ow s ‘PL’
until key released
S R P
ETTING ATIO ERCENTAGE
RATIO (%)
RATIO OFF
RATIO ON
2 SECS
Press RATIO (%)
for 2 seconds
Is the panel
locked?
N
Is the AUTO SET
light lit?
N
Display sh ow s curren t
ratio setting in percent
INCREASE
DECREASE
keys to adjust setting
Y
Y
Display s how s ‘CF’ ,
meaning Confirm
RESET
rE
OR
RATIO (%)
RATIO OFF
RATIO ON
Press reset or wait 4 seconds to
cancel changing the auto ratio
Press Store to save
the new setting
OR
keys to adjust setting
rE
to restore old setting
FLOW CHART 6 - MANUAL FLAME OFF SETUP
PAGE 30
Page 31

IRIS MODEL 700/800 APPLICATION MANUAL
FLOWCHART OF MODEL 700
Use INCREASE OR DECREASE
Press reset or wait 4 seconds
NORMAL OPERATION
DECREASE
DECREASE
RESET
STORE
Display sh ows ‘PL’
until key released
S F F R T
ETTING LAME AILURE ESPONSE IME
(FFRT)
FFRT
1/2/3 SE C
OPTION
2 SECS
Press FFRT
for 2 seconds
INCREASE
Display shows current
setting in seconds
keys to adjust setting
INCREASE
Is the panel
Y
locked?
N
Use INCREASE OR DECREASE
keys to adjust setting
Press Store to save
the new setting
OR
rE
to restore old setting
FLOW CHART 7 - FLAME F AILURE RESPONSE TIME (FFRT) SETUP
PAGE 31
Page 32

IRIS MODEL 700/800 APPLICATION MANUAL
NORMAL OPERATION
DECREASE
DECREASE
RESETrESTORE
Display sh ow s ‘PL’
until key released
FLOWCHART OF MODEL 700
S
ETTING ANALOG OUTPUT LEVELS
(0-20/4-20 MA)
INCREASE
0-20 mA
4-20 mA
OPTION
2 SECS
Press 0-20/4-20mA
OPTION for 2 seconds
Is the panel
Y
locked?
N
Use INCREASE OR DECREASE
keys to adjust setting
INCREASE
Display s how s :
‘02’ for 0-20mA
‘42’ for 4-20mA
Use INCREASE OR DECREASE
keys to adjust setting
Press Store to save
the new setting
OR
Press reset or wait 4 seconds
to restore old setting
FLOW CHART 8 - 0-20/4-20mA ANALOG OUTPUT SETUP
PAGE 32
Page 33

Use INCREASE OR DECREASE
S
ETTING VIEWING HEAD GAIN
Display shows ‘PL’
until key released
Press Store to save
Press reset or wait 4 seconds
NORMAL OPERATION
FLOWCHART OF MODEL 700
IRIS MODEL 700/800 APPLICATION MANUAL
ACCEPT
RATIO
SET GAIN
2 SECS
Is the panel
locked?
Press ACCEPT
RATIO /
SET GAIN
for 2 seconds
N
Display shows current
gain se ttin g
INCREASE
DECREASE
keys to ad ju s t se ttin g
Y
STORE
RESET
FLOW CHART 9 - VIEWING HEAD GAIN SETTING
the new setting
OR
rE
to restore old setting
PAGE 33
Page 34

IRIS MODEL 700/800 APPLICATION MANUAL
SPECIFICATIONS FOR SERIES 700 AND 800 VIEWING HEADS
MODELS S702, S702-PF, S702-HF, S702-HF-PF, S706, S706-PF,
AND MODELS S802, S802-HF, AND S806
ELECTRICAL
Input Power - 22VDC to 26VDC, 150 mA MAX from Model 700AC,
Model 700DC or Model 800 Signal Processor
ENVIRONMENTAL
Viewing Head Sealing - NEMA TYPE 4/4X rated when the molded connector
ring is tightened with pliers and a UV protection is
provided for the cable.
Ambient T emperature - -40°C to 85°C (-40°F to 185°F)
IR DETECTOR SPEC
(S702, S702-PF, S702-HF,
S702-HF-PF, S802, S802-PF) - InGaAs (Indium Gallium Arsenide) photodiode with
spectral response 950nm to 1710nm
(1/2 intensity points)
High Pass Filter Pickup - 33 Hz standard, 155 Hz High Freq. option (-HF)
IR OPTICAL
Angle of View - 1 degree (1.45” dia. at 6 ft.)
UV DETECTOR SPEC
(S706 & S706-PF, S806) - UVtron with spectral response 185nm to 260nm
UV OPTICAL
Angle of View - 5 degrees (1 inch per foot)
CABLE & CONNECTOR
(Signal Proc. to V .H.) - (Standard) IRIS SYSTEMS C-330, 4 Conductor , 18
ga., shielded, 90C, Sunlight Resistant, 15 ft. long,
with ITC rating for US and CIC rating for Canada.
(This rating permits use in hazardous locations
without a conduit.)
PAGE 34
- With PF option 4 conductor, 22 ga. or larger with
overall braided shield, 95% coverage, or with
shield over the signal line. Tie shield to ground at
viewhead end and signal processor end of cable.
(Cable must be protected by a conduit in
hazardous locations.)
Page 35

IRIS MODEL 700/800 APPLICATION MANUAL
SPECIFICATIONS FOR MODEL 700AC & MODEL 700DC SIGNAL PROCESSORS
ELECTRICAL – MODEL 700AC
Primary Input Power - 85-265VAC, 50-60 HZ, 0.07A MAX. fused (with
either V.H. connected)
Battery Backup Voltage - 22VDC to 26VDC, 0.2A DC MAX. fused (with either
V.H. connected)
ELECTRICAL – MODEL 700DC
Primary Input Power - 22VDC to 26VDC, 250 mA MAX, fused (with either
V.H. connected)
Battery Backup Voltage - 22VDC to Input Voltage -.5VDC, fused (with either
V.H. connected)
OUTPUTS
Flame Relay - 2 form C contacts
Self-Checking Relay - 1 form C contact
Relay Contact Ratings - 5A at 125 VAC, 277 VAC, & 30 VDC; 1/8 HP 125 &
250 VAC
Analog Flame Signal - isolated 0 to 20 mA or 4 to 20 mA output for remote
meters or DCS, 360 ohms maximum resistance
ENVIRONMENTAL
Ambient T emperature - 0°C to 50°C (32°F to 122°F)
MODEL 800 SIGNAL PROCESSOR SPECIFICATIONS
ELECTRICAL
Primary Input Power - 85-265VAC, 50-60 HZ, 0.10A MAX. fused (with
either V.H. connected)
OUTPUTS
Flame Relay - 2 form A contacts
Flame Relay Contact Ratings - 5A at 125 VAC, 250 VAC, and 30 VDC
Self-Checking Relay - 1 form A contact
Self-Check Relay
Contact Ratings - 0.4A: 110 VDC, 125 VAC; 2A: 30VDC
Analog Flame Signal - 0 to 20 mA or 4 to 20 mA output for remote meters
or DCS, non-isolated, 100 ohms maximum
resistance
ENVIRONMENTAL
Ambient Temperature - 0°C to 60°C (32°F to 140°F)
Rev 01/05
PAGE 35
 Loading...