

Page 1

The iOptron® handheld microscope
#6730, #6732, #6750, or #6752
Introduction
Congratulations on your purchase of an iOptron
handheld microscope. Your microscope is a
precision optical instrument made of high quality
materials to ensure durability and long life. It is
designed to give you a lifetime of pleasure with a
minimal amount of maintenance. Before
attempting to use your microscope, please read
through instructions to familiarize yourself with
the functions and operations to make usage
easier for you. See the microscope diagram to
locate the parts discussed in this manual. The
microscope provides powers from 10x to 200x
powers. It is ideally suited for examining
specimen objects such as coins, stamps, rocks,
relics, insects, plants, skin, gems, circuit boards,
various materials, and many other objects. Also,
you can examine specimen slides at low and
high powers. With the included digital camera
and the software, you can observe the magnified
images or capture video or take snapshots.
Note: This product was designed and
intended for ages 13 and older! Under 13
requires adult supervision.
Items included:
USB-powered handheld digital microscope
#6705 table stand (included with products #6730 and #6750)
CD with Imaging Software
Instruction Manual
Magnification/
Focus
Adjustment Dial
8-LED ring
Illuminator
USB cable Metal Table
Stand
(Included with #6730
and #6750)
LED Light
Dimmer
Dial
Handheld
Digital Microscope
Features:
2.0 USB-powered handheld digital
microscope
Built-in 0.3MP (#6732) or 2MP
(#6752) digital camera
Use the included software to capture
images or video of your discoveries
Measure your specimens with built-
in measurement tools
8 LED ring illuminator with dimmer
switch
Works with Windows 7/8, Vista, XP,
and MAC OS 10 or higher
Includes adjustable metal stand for
hands-free use.
Figure 1
Page 2
Setting Up Your Microscope and Table Stand
(Table stand included with mo de ls #6730 and #6750)
1. Carefully remove the microscope and
other parts from the box and set them
on a table, desk, or other flat surface.
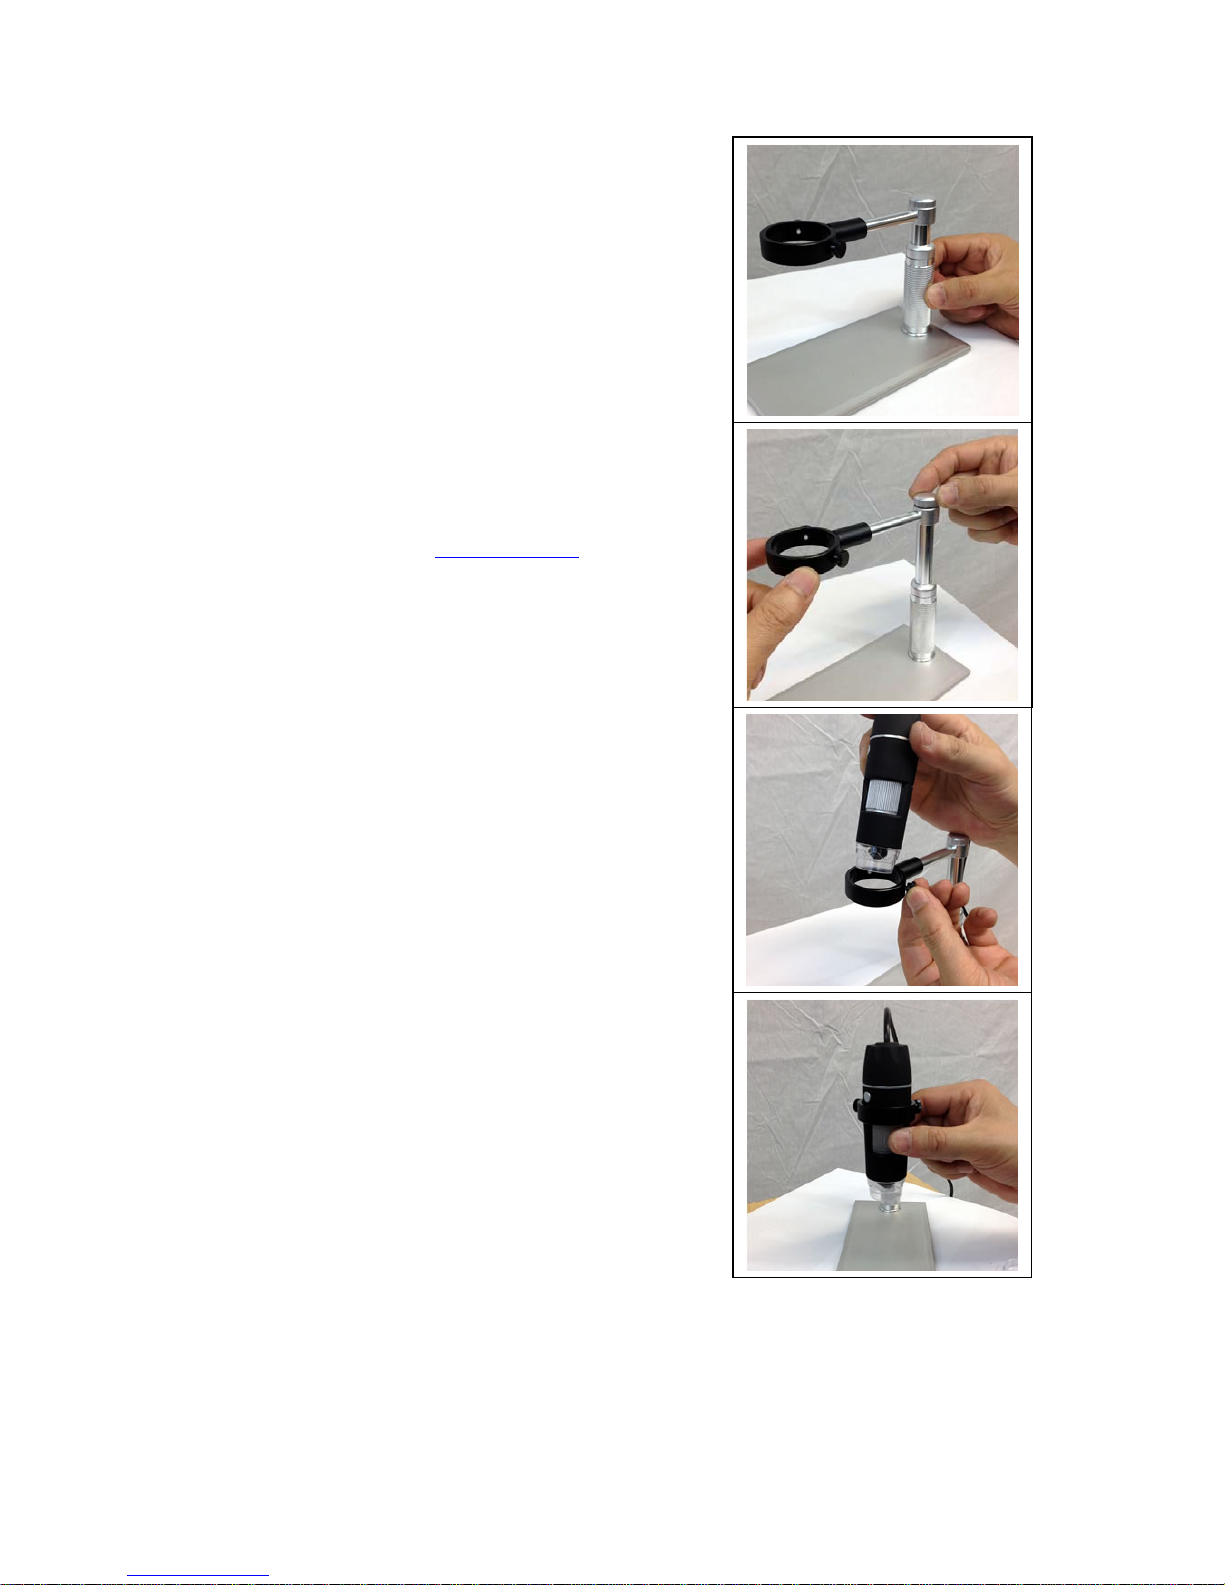
2. To adjust the height of the stand, rotate
the base of the stand (Figure 2).
3. To swivel the ring arm, loosen the knob
at top of stand, reposition ring arm, then
tighten knob again (Figure 3).
4. Attach handheld microscope to table
stand by sliding it into the plastic ring on
arm of table stand (Figure 4).
5. Remove the clear cap on the end of the
handheld microscope before each use.
Replace cap after use to keep out dust.
6. Plug the USB cable into your computer.
7. Open imaging software on your
computer (see CD or www.iOptron.com
for software installation).
Microscope Operation
Viewing Objects You can view coins, stamps,
currency, gems, plants, foods, circuit boards,
specimen slides, and many other things. Please
read the information about focusing and power
below before proceeding. Adjust Dimmer Dial to
change LED brightness.
Focusing & Changing Power (Magnification)
When the microscope is placed directly over the
object or slide, use the focus ring (Figure 5) to
obtain a sharp focus. The focus ring takes some
getting used to – rotate past the focus and then
back to focus to find the best focus position.
After some practice the sharp focus position will
be easy to find.
When the microscope is positioned directly on or
over an object, this will be 10x magnification. If
you hold the microscope slightly above the
object the power will decreased as you move
further away (about ½” or 13mm). Moving the
microscope up or down either decreases or
increases the magnification. However, focus will
need to be re-adjusted. Attaching it to the metal
stand allows you to more easily control the
image by simply adjusting the focus knob.
However, the stand is not necessary to enjoy
using the handheld microscope.
Figure 2
Figure 3
Figure 4
Figure 5
Page 3

Installing the Viewing and Imaging Software
(Please read the full manual for installation and use. The manual can be found on the CD or at
www.iOptron.com
)
Installing software found on the CD is optional. Your computer may have a default software that will open
automatically.
Connect Camera to your computer
Connect the USB cable into a free USB slot on your computer (Requires USB 2.0 interface).
“New Hardware Found” or “Installing device driver software” displays at the bottom right of your
PC screen. The camera is recognized.
The found new hardware wizard will start, Select “Install the software automatically”
Finish. (If unidentified publisher/ Windows Logo Testing appears, select continue
anyway)
Install and Open Imaging Software on your computer.
Insert the CD into a DVD driver, or download the software from
website
If the CD does not autorun, browser the CD and click on
“autorun.exe” to open software
Select “Install Software” and follow on screen instruction to finish the
installation.
Select the camera type of your microscope. For the iHCAM300,
select HCAM00350KPA. You should see the video on your screen.
Refer to online full manual and software user manual for more
information. (www.iOptron.com support user manuals )
To take still photos, press the button on the side of the handheld microscope
(Figure 6).
You are now ready to begin your digital adventure!
Figure 6
Page 4

Care, Maintenance, and Warranty
Your handheld microscope & camera is a precision optical instrument and should be treated with care at
all times. Follow these care and maintenance suggestions and your microscope will need very little
maintenance throughout its lifetime.
Always place the plastic dust cap on the end of the eyepiece when not in use or when being
stored.
Store the microscope in a dry and clean place.
Be very careful if using your microscope in direct sun light to prevent damage to the microscope
or your eyes.
Never point the sensor on the camera towards the sun or the camera can be damaged and cease
working.
Clean the outside surfaces with a moist cloth.
Never clean optical surfaces with cloth or paper towels as they can scratch optical surfaces easily.
Blow off dust with a camel’s hair brush or air blower off optical surfaces.
To clean fingerprints off of optical surfaces, use a lens cleaning agent and lens tissue available at
most photo outlets and when cleaning do not rub in circles as this may cause streaks or
scratches to occur.
Never disassemble or clean internal optical surfaces. This should be done by qualified
technicians at the factory or other authorized repair facilities.
Do not disassemble or take apart the digital camera or damage can occur.
When handling glass specimen slides, use care as the edges can be sharp
Warranty
Your microscope has a one year limited warranty. Please see the iOptron website for detailed information
on all iOptron microscopes at www.iOptron.com
.
Need help?
If you need technical support please email us at support@ioptron.com
 Loading...