

ION Audio ISP80 User Manual

Solar Stone Glow
Quickstart Guide English ( 3 – 5 )
Guía de inicio rápido Español ( 6 – 8 )
Guide d’utilisation rapide Français ( 9 – 11 )
Guida rapida Italiano ( 12 – 14 )
Schnellstart-Anleitung Deutsch ( 15 – 17 )
Snelstartgids Nederlands ( 18 – 20 )
Appendix English ( 22 )

2

Quickstart Guide (English)
Introduction
Thank you for purchasing the ION Audio Solar Stone Glow! Solar Stone Glow simulates a natural
rock finish that blends into your landscaping, with a solar-rechargeable battery-powered, waterresistant speaker. Equipped with Bluetooth® technology, you can listen to your favorite music
wirelessly while working in the garden, hosting a dinner party, or relaxing by the pool.
1. Make sure all items listed in the Box Contents are included in the box.
2. Read the Safety & Warranty Manual before using the product
3. Make sure that you have completely charged the battery prior to first use for maximum battery
life.
Box Contents
If an individual speaker is purchased: If purchased as a boxed pair:
1 Solar Stone Glow 2 Solar Stone Glows
1 Charging Adapter 2 Charging Adapters
Quickstart Guide Quickstart Guide
Safety & Warranty Manual Safety & Warranty Manual
Support
For the latest information about this product (documentation, technical specifications, system
requirements, compatibility information, etc.) and product registration, visit ionaudio.com.
For additional product support, visit ionaudio.com/support.
Rechargeable Batteries
Rechargeable lead-acid batteries are the same type used in automobiles. As with your car battery,
how you use this battery has a significant impact on its lifespan. With proper use and treatment, a
lead-acid battery can last for years. Here are some recommendations for getting the longest life from
the internal battery.
General Usage
Storage
Repair If the battery fails to charge, contact ION Audio at ionaudio.com.
Disposal
Fully charge the battery before using it.
Charge the battery completely after each use.
For best product longevity, do not store at exceedingly hot (greater than
90°F/32°C) or exceedingly cold (less than 32°F/0°C) temperatures.
It is acceptable to leave your sound system plugged in. This will not overcharge
the battery.
If you leave the battery level low and do not charge it for 6 months, it may
permanently lose capacity.
Bring the unit to a recycling center or dispose of in accordance with local
ordinances.
3
Outdoor Use and Care
Though Solar Stone Glow is water-resistant and able to tolerate splashing water, please
review the tips below to get the best performance from Solar Stone Glow:
• Bring Solar Stone Glow indoors during extreme cold, heavy rain, or melting snow.
• Please do not place Solar Stone Glow in standing water.
• Please do not connect the charging adapter to Solar Stone Glow in a wet environment.
• WARNING: Keep any non-water-resistant devices (phones, music players, etc.) in a dry
Make sure the charging adapter input, charging adapter, and power outlet are all
completely dry before making any connections.
place where they will not be affected by water and cause a risk of electric shock.
Features
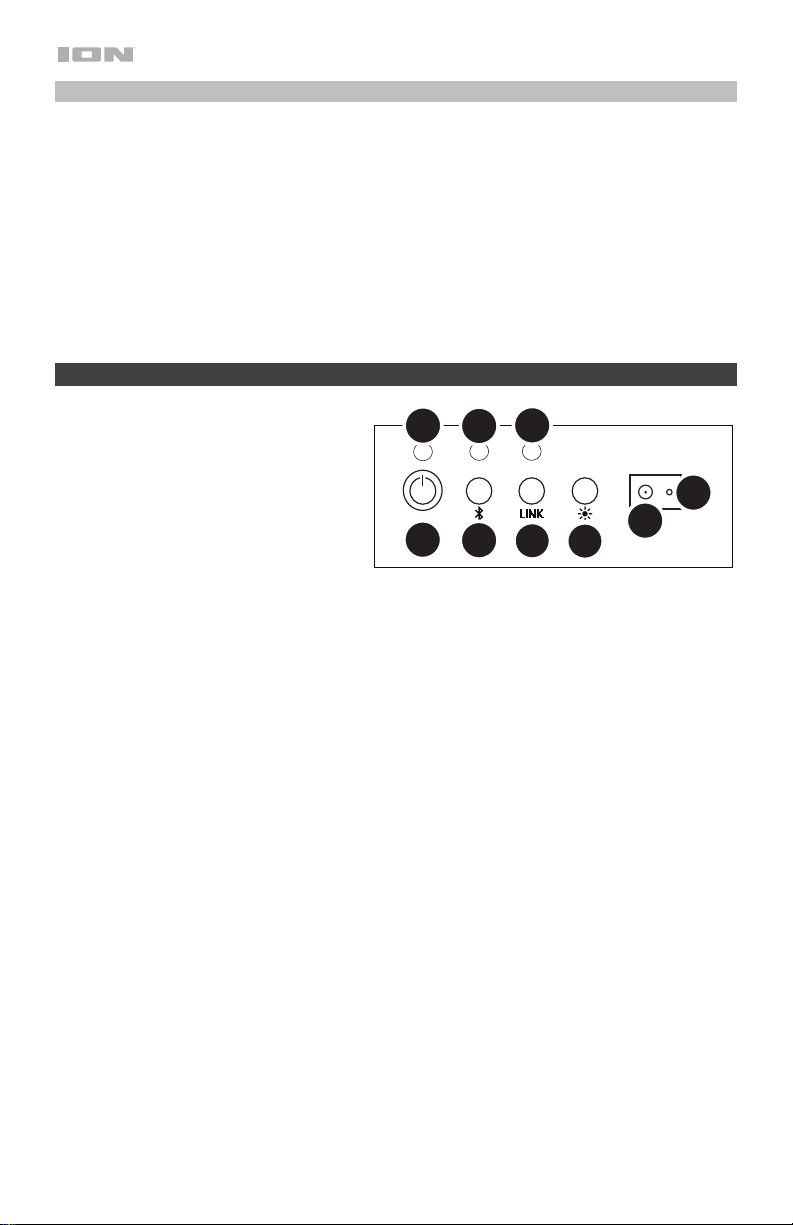
1. Power: Hold this button to power
Solar Stone Glow on and off.
2. Bluetooth Connect: Press this button
briefly to begin Bluetooth connecting.
Note: Solar Stone Glow will
automatically power off after 30
minutes if no audio is playing and the
rear LEDs are not on.
3. Link: Press this button to link two Solar Stone Glow units together.
4. Light Control: Press this button to adjust the brightness settings for the lights: LED low,
LED high, and off.
5. Charging Adapter Input: Insert the included charging adapter here to charge the Solar
Stone Glow battery.
Solar Stone Glow should be fully charged prior to first use for maximum battery life. Once
fully charged, Solar Stone Glow’s solar panel can provide suitable power for typical daily
use without the need to connect the charging adapter. Results will vary depending on daily
number of hours Solar Stone Glow is exposed to direct sunlight.
6. Reset: If Solar Stone Glow is working abnormally, shutdown the unit by placing a
paperclip into the Reset hole located on the back of Solar Stone Glow, and gently push
until the unit turns off. Try this only after you have first attempted to reboot Solar Stone
Glow using the power button.
7. Charging LED: This LED is solid red when the battery is charging and turns off when the
battery is fully charged/no adapter is connected.
8. Bluetooth LED: This LED slowly blinks blue when the speaker is powered on, blinks fast
while Bluetooth searching, and is solid when Bluetooth connected.
9. Link LED: This LED blinks fast when searching for another Solar Stone Glow and is solid
when linked to another Solar Stone Glow.
7
1
8
2
9
3
6
5
4
4

Bluetooth Connecting with Solar Stone Glow
Connecting to One Solar Stone Glow
1. Power on Solar Stone Glow by holding down the power button. You will hear “Power On” for
confirmation. *
2. Press the Bluetooth Connect button briefly to enter Connecting Mode—the Bluetooth LED will
blink fast, and you will hear “Pairing” to indicate this. *
3. Navigate to your device’s Bluetooth setup screen, find Solar Stone Glow, and connect.
Bluetooth LED will light up solid when it is connected and you will hear “Pairing successful,
connected” for confirmation. *
Note: If you experience trouble in connecting, select “Forget this Device” on your Bluetooth
device and try to connect again.
4. To disconnect, hold the Bluetooth Connect button on Solar Stone Glow. You will hear
“Disconnected” for confirmation. *
5. If your Bluetooth device is not able to connect to Solar Stone Glow, hold the Bluetooth Connect
button on the speaker to break previous Bluetooth connections and reset the Bluetooth module.
Linking Two Solar Stone Glows to Each Other for Stereo Sound
Note: Ensure that the speakers are not already Bluetooth connected in single mode. If either of them
is connected, hold the Bluetooth Connect button to disconnect and then follow the steps below.
1. Power on each Solar Stone Glow by holding down their power buttons. You will hear “Power
On” for confirmation. *
2. Press the Link button on each Solar Stone Glow. The speakers will search for each other while
playing an intermittent tone. Once the stereo pair is successfully linked, you will hear “Pairing
successful, connected” followed by “Left channel” and “Right channel” on the respective
speakers. *
This process may take up to 2 minutes the first time two speakers are linked. Speakers that were
previously linked will relink automatically in a few seconds if powered on in range of one another.
Note: Solar Stone Glows should be within 30 ft. (9 m) of each other to Link properly.
3. On the Left speaker, the Bluetooth LED will blink. Press the Bluetooth Connect button briefly
to enter Bluetooth Pairing mode.
Note: The Left speaker will be the “master” speaker, and the unit from which the Bluetooth
range will be determined.
4. Navigate to your device’s Bluetooth setup screen, find Solar Stone Glow, and connect. You will
hear “Connected” for confirmation. *
Note: If you experience trouble in connecting, select “Forget this Device” for Solar Stone Glow
on your Bluetooth device and try to connect again.
5. To disconnect linking, hold the Link button on the “master” Solar Stone Glow for 2 seconds. You
will hear “Disconnected” for confirmation. *
6. If your Bluetooth device is not able to connect to Solar Stone Glow, hold the Bluetooth Connect
button on the speaker to break previous Bluetooth connections and reset the Bluetooth module.
Note: When two speakers are linked, hold the power button on the “master” speaker to turn
both speakers off. If you want to only turn off the “slave” speaker, press and hold the power
button on that speaker. The speakers will relink automatically the next time they are both
powered on.
* Tip: If you would like to disable (or enable) the voice prompts, simultaneously press the Bluetooth
Connect and Link buttons briefly.
FCC Statement
Warning: This product shall be installed and operated with a minimum distance of 20 cm between the radiator and user body.
5

Guía de inicio rápido (Español)
Introducción
¡Gracias por adquirir el Solar Stone Glow de ION Audio! El Solar Stone Glow simula el acabado
natural de una roca que se mezcla con su paisaje, con un altavoz resistente al agua, alimentado por
baterías que se recargan con energía solar. Equipado con tecnología Bluetooth, usted puede
escuchar su música favorita en forma inalámbrica mientras trabaja en el jardín, es el anfitrión de una
cena o se relaja al costado de la piscina.
1. Asegúrese de que estén presentes todos los elementos enumerados en Contenido de la caja
estén incluidos en la caja.
2. Lea el manual sobre la seguridad y garantía antes de utilizar el producto.
3. Para asegurar una máxima vida útil de la batería, cárguela completamente antes de usarla por
primera vez.
Contenido de la caja
Si se adquirió un altavoz individual: Si se adquirió una caja con dos unidades:
1 Solar Stone Glow 2 Solar Stone Glow
1 adaptador de carga 2 adaptadores de carga
Guía de inicio rápido Guía de inicio rápido
Manual sobre la seguridad y garantía Manual sobre la seguridad y garantía
Soporte
Para obtener la información más reciente acerca de este producto (documentación, especificaciones
técnicas, requisitos de sistema, información de compatibilidad, etc.) y registrarlo, visite
ionaudio.com.
Para obtener soporte adicional del producto, visite ionaudio.com/support.
Baterías recargables
Las baterías de plomo-ácido recargables son del mismo tipo que se usa en los automóviles. Al igual
que con la batería del vehículo, la forma en que se usa tiene una influencia significativa en la
duración de su vida útil. Con un uso y tratamiento correctos, una batería de plomo-ácido puede
durar varios años. He aquí algunas recomendaciones para prolongar la vida útil de la batería interna.
Uso general
Almacenamiento
Reparación
Disposición final
Cargue completamente la batería antes de usarla.
Cargue la batería completamente después de cada uso.
Para lograr la mayor longevidad del producto, no lo almacene a temperaturas
muy altas (superiores 32°C/90°F) o muy frías (inferiores a 0°C/32°F).
Es aceptable dejar su sistema de sonido enchufado. No sobrecargará la
batería.
Si deja que el nivel de la batería baje y no la carga durante 6 meses, puede
perder permanentemente su capacidad.
Si la batería no se carga, póngase en contacto con ION Audio en
ionaudio.com.
Lleve la unidad a un centro de reciclaje o deséchela de acuerdo a las
ordenanzas locales.
6
Uso y cuidado a la intemperie
Aunque el Solar Stone Glow es resistente al agua y capaz de tolerar salpicaduras, lea las
sugerencias que se incluyen a continuación para obtener el mejor rendimiento del Solar Stone Glow:
• El Solar Stone Glow sólo puede usarse en exteriores con tomas de corriente o cables de
prolongación aptos para el uso en exteriores.
• Traiga a los Solar Stone Glow bajo techo durante condiciones meteorológicas extremas.
• No coloque el Solar Stone Glow sobre agua estancada.
• No conecte el adaptador de carga al Solar Stone Glow en un ambiente húmedo. Asegúrese de
que la entrada para la entrada del adaptador de carga, el adaptador de carga y la toma de
corriente estén completamente secos antes de realizar cualquier conexión.
• ADVERTENCIA: Coloque los dispositivos no resistentes al agua (teléfonos, reproductores de
música, etc.) en un lugar seco donde no sean afectados por el agua y causen un riesgo de
electrocución.
Características
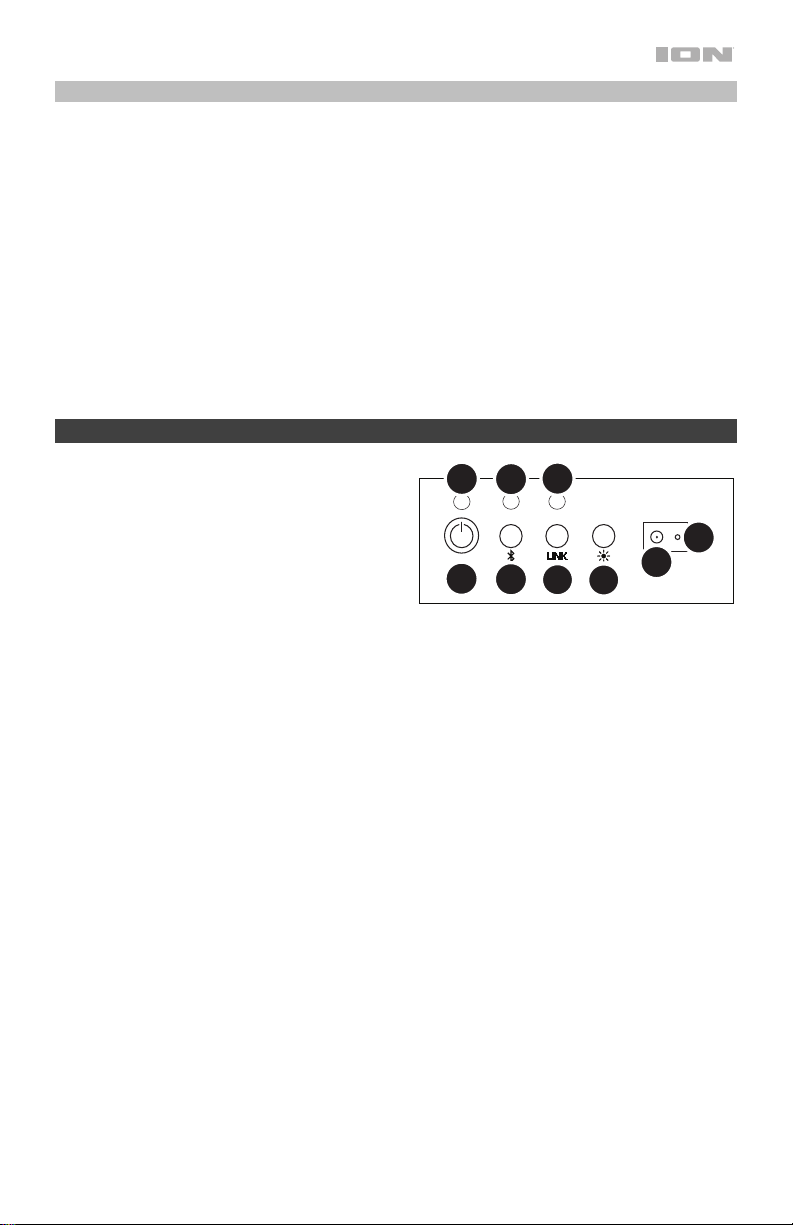
1. Encendido: Mantenga pulsado este botón para
encender y apagar el Solar Stone Glow.
2. Conexión Bluetooth: Pulse este botón para
comenzar la conexión Bluetooth.
Nota: El Solar Stone Glow se apagará
automáticamente tras 30 minutos si no se
reproduce ningún audio o si los LED trasero no
se encienden.
3. Enlace: Pulse este botón para enlazar dos unidades Solar Stone Glow.
4. Control de luces: Pulse este botón para configurar los ajustes de brillo de las luces: LED tenue,
LED intenso y apagado.
5. Entrada del adaptador de carga: Inserte aquí el adaptador de carga incluido para cargar la
batería del Solar Stone Glow.
El Solar Stone Glow debe recargarse en su totalidad antes del primer uso para maximizar la vida
útil de la batería. Una vez cargado completamente, el panel solar del Solar Stone Glow puede
brindar la potencia apropiada para el uso diario típico sin tener que conectar el adaptador de
carga. Los resultados pueden variar dependiendo de la cantidad de horas diarias en las que el
Solar Stone Glow se expone a la luz solar directa.
6. Reinicio: Si el Solar Stone Glow está funcionando de manera anormal, apague la unidad
colocando un clip de papel dentro del agujero Reset (Reinicio) ubicado en la parte inferior del
Solar Stone Glow y presione suavemente hasta que se apague la unidad. Intente esto
únicamente después de probar rearrancar el Solar Stone Glow con el botón de encendido.
7. LED de carga: Este LED se enciende con luz roja permanente cuando se está cargando la
batería y se apaga cuando esta está totalmente cargada/no hay adaptadores conectados.
8. LED Bluetooth: Este LED parpadea lentamente con luz azul cuando el altavoz está encendido,
rápidamente durante la búsqueda Bluetooth y se enciende permanentemente cuando el
Bluetooth se conecta.
9. LED de enlace: Este LED parpadea rápidamente cuando busca otro Solar Stone Glow y se
enciende permanentemente cuando se enlaza con él.
7
1
9
8
6
5
2
3
4
7

Conexión Bluetooth con Solar Stone Glow
Cómo conectarse a un Solar Stone Glow
1. Encienda el Solar Stone Glow manteniendo pulsado el botón de encendido. Escuchará “Power On”
(Unidad encendida) como confirmación. *
2. Pulse el botón Bluetooth Connect (conexión Bluetooth) para entrar al modo de conexión—el LED
Bluetooth parpadeará rápidamente y escuchará “Pairing” (Apareando) como indicación de esto. *
3. Navegue a la pantalla de configuración Bluetooth de su dispositivo, busque Solar Stone Glow, y
conéctelo. El LED Bluetooth quedará permanentemente encendido una vez conectado y escuchará
“Pairing successful, connected” (Apareamiento exitoso, conectado) como confirmación. *
Nota: Si tiene problemas para conectarse, seleccione “Forget this Device” (Olvidar este dispositivo) en
su dispositivo Bluetooth e intente conectarse nuevamente.
4. Para desconectarlo, mantenga pulsado el botón Bluetooth Connect. Escuchará “Disconnected”
(Desconectado) como confirmación.
5. Si su dispositivo Bluetooth no es capaz de conectarse al Solar Stone Glow, mantenga pulsado el botón
Bluetooth Connect en el altavoz para cortar las conexiones Bluetooth anteriores y reinicie el módulo
Bluetooth.
Enlace de dos Solar Stone Glows entre sí para obtener un sonido estéreo
Nota: Asegúrese de que los altavoces no estén previamente conectados por Bluetooth en modo único. Si
alguno de ellos está conectado, mantenga pulsado el botón Bluetooth Connect para desconectarlos y siga
los pasos que se indican a continuación.
1. Encienda cada Solar Stone Glow manteniendo pulsados sus botones de encendido. Escuchará “Power
On” (Unidad encendida) como confirmación. *
2. Pulse el botón Link (Enlace) de cada Solar Stone Glow. Los altavoces se buscarán mutuamente
mientras reproducen un tono intermitente. Una vez que el par estéreo se enlaza exitosamente,
escuchará “Pairing successful, connected” (Apareamiento exitoso, conectado) seguido por “Left
channel” (Canal izquierdo) y “Right channel” (Canal derecho) en los altavoces respectivos. *
Este proceso puede llevar hasta 2 minutos la primera vez que se realiza el enlace. Los altavoces que
estuvieron enlazados previamente volverán a enlazarse automáticamente en unos pocos segundos si
se encienden estando dentro de sus mutuos alcances.
Nota: Los Solar Stone Glow deben encontrarse a menos de 9 m (30 pies) de cada uno para enlazarse
correctamente.
3. En el altavoz izquierdo, el LED Bluetooth parpadeará. Pulse el botón Bluetooth Connect para entrar al
modo de apareamiento Bluetooth.
Nota: El altavoz izquierdo será el altavoz “maestro” y la unidad desde la cual se determinará el rango
del Bluetooth.
4. Navegue a la pantalla de configuración Bluetooth de su dispositivo, busque Solar Stone Glow y
conéctelo. Escuchará “Connected” (Conectado) como confirmación. *
Nota: Si experimenta problemas para conectarse, seleccione “Forget this Device” (Olvidar este
Dispositivo) para el Solar Stone Glow en su dispositivo Bluetooth e intente conectarse nuevamente.
5. Para desconectar el enlace, mantenga pulsado el botón Link del Solar Stone Glow “maestro” durante 2
segundos. Escuchará “Disconnected” (Desconectado) como confirmación. *
6. Si su dispositivo Bluetooth no es capaz de conectarse al Solar Stone Glow, mantenga pulsado el botón
Bluetooth Connect en el altavoz para cortar las conexiones Bluetooth anteriores y reinicie el módulo
Bluetooth.
Nota: Cuando están enlazados dos altavoces, mantenga pulsado el botón de encendido en el altavoz
“maestro” para apagar ambos. Si sólo desea apagar el altavoz “esclavo”, mantenga pulsado el botón
de encendido en ese altavoz. Los altavoces vuelven a enlazarse automáticamente la próxima vez que
se enciendan.
* Consejo: Si desea desactivar (o activar) los avisos de voz, pulse simultáneamente los botones Bluetooth
Connect y Link.
8
 Loading...