

ION Audio ISP45 Users manual

Mega Party Express
Quickstart Guide
English ( 2 – 5 )
Guía de inicio rápido
Español ( 6 – 10 )
Guide d'utilisation rapide
Français ( 11 – 15 )
Guida rapida
Italiano ( 16 – 20 )
Kurzanleitung
Deutsch ( 21 – 25 )
Snelstartgids
Nederlands ( 26 – 30 )
Appendix
English ( 31 )
Quickstart Guide (English)
g
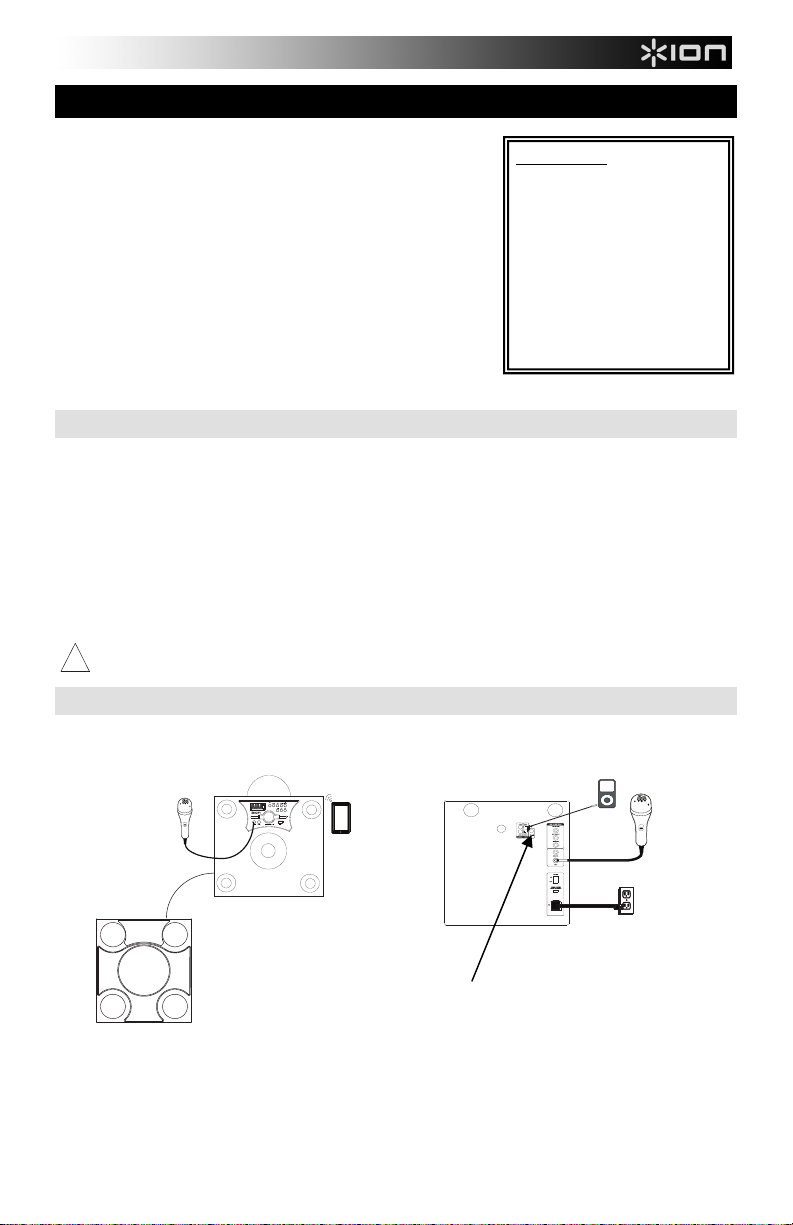
1. Make sure all items listed in the Box Contents are included in the
box.
2. READ SAFETY INSTRUCTION BOOKLET BEFORE USING
THE PRODUCT.
3. Study the connection diagram.
4. Make sure all input devices such as microphones, CD players, or
digital media players are turned off and volume settings are set
at "zero."
5. Connect all devices as shown.
6. Switch everything on in the following order:
• audio input sources (i.e. microphones, instruments, CD
players)
• Mega Party Express
7. When turning off, always reverse this operation:
• Mega Party Express
• any input devices
Support
For complete system requirements, compatibility information, and product registration, visit the ION website:
ionaudio.com.
For the latest information about this product, visit ionaudio.com/mega-party-express.
For additional product support, visit ionaudio.com/support.
For safety/warranty information, visit ionaudio.com/warranty.
WARNING: Do not look directly into the dome light. Do not sit, stand, or apply pressure on the dome light.
!
Caution: Do not expose Mega Party Express to rain or stand in water.
Connection Diagram
Microphone
Left Front
Right Front
POWER
Tablet*
Speaker Link Cable
2
Box Contents
Mega Party Express
Microphone
Remote Control
Speaker Link Cable
Antenna Cable
Power Cable (standard IEC)
Quickstart Guide
Safety Instructions &
Warranty Information
Booklet
ht Rear
Ri
iPod*
Power
Antenna
Cable
Connector
Microphone
*not included
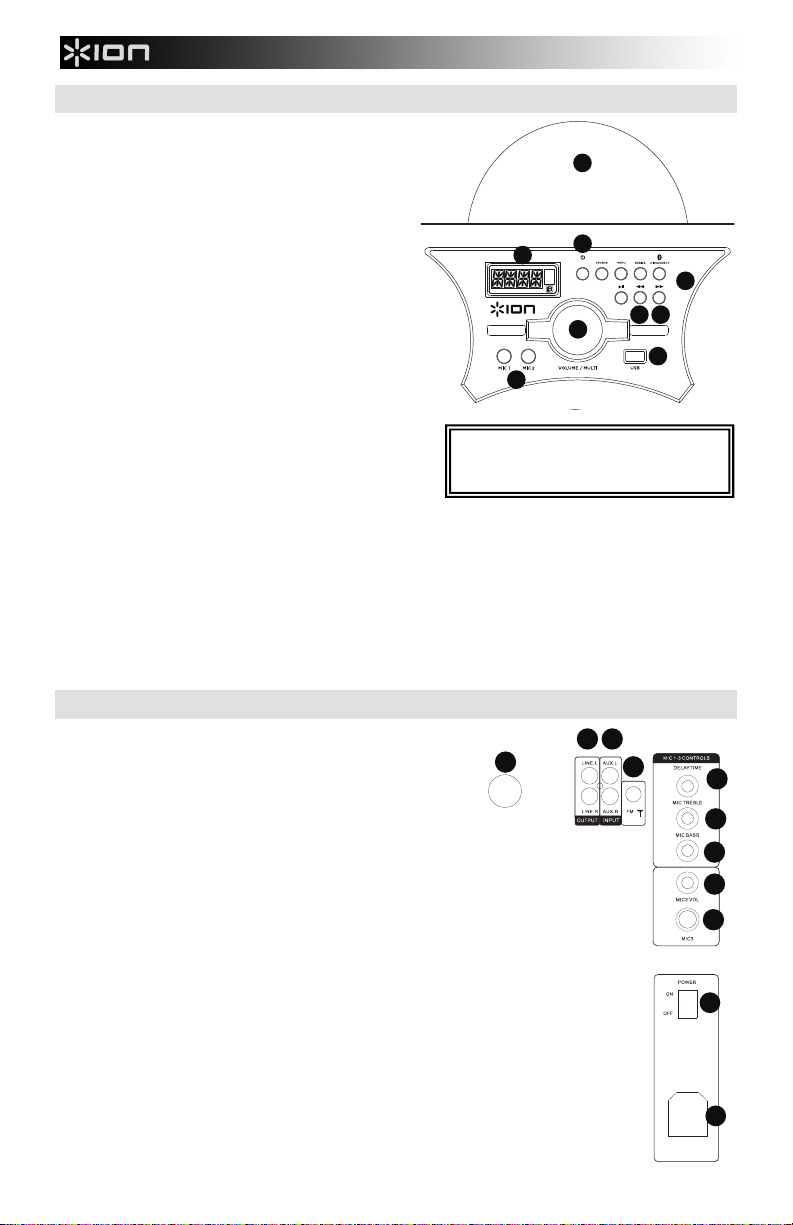
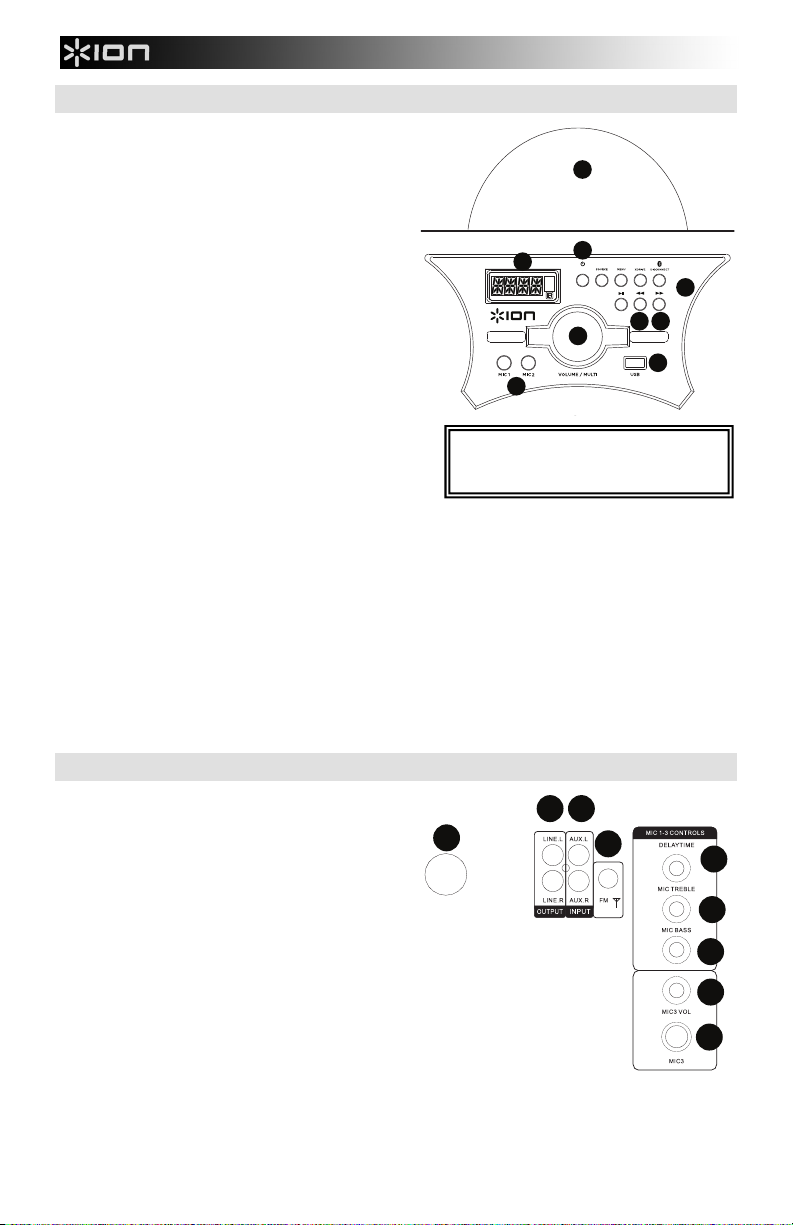
Front Panel Description
5
6
7
1
2 3
4
8
9
5
6
7
8
9
1
2
6
7
8
9
POWER
3
4 5
1. Dome: The dome light can react to the music playing
(depending on the Dome Mode that is selected).
There are three modes to select from for how the
dome lights react to the music.
• M1 = In Auto mode, the dome lights spin and
change color with a predetermined pattern
regardless of the beat of the music playing.
• M2 = In Beat Sync mode, the dome lights spin
and change color to the beat of the music
playing.
• Off = the dome lights are off.
2. Power Button: Turns the Media Panel on or off.
Ensure the rear panel power switch is in the “On”
position.
3. Media Panel: Controls for the Bluetooth, USB, and
FM radio sources as well as the accessing the Menu
functions. See the Remote Control section for details
on using additional controls.
4. Prev: Press to go to the previous USB track. When
listening to Bluetooth sources, pressing Prev in some
apps may go to another playlist or music genre. When
listening to the FM radio, press the Prev button once to
skip back through the FM stations and hold the button
down to seek back through the channel presets.
5. Next: Press to advance to the next USB track. When
listening to Bluetooth sources, pressing Next in some apps may go to another playlist or music genre. When
listening to the FM radio, press the Next button once to skip forward through the FM stations and hold the
button down to seek forward through the channel presets.
6. LCD: Displays the Media Panel modes for Bluetooth, FM radio, USB and Aux. Aim the included remote control
here to adjust the settings.
Note: The LCD comes with a plastic protector on it. Remove this for optimal viewing of the LCD.
7. Mic Input 1 and 2: Connect a dynamic microphone to these 1/4” inputs. Control the volume of the 1/4” inputs
using the Menu option “MI__”.
8. Volume/Multi: Adjust to control the overall volume of the speakers. When navigating through the Menu, this is
used to adjust the different functions.
9. USB Port: Connect your USB flash drive to play music.
WARNING: Do not look directly into the dome
light. Do not sit, stand, or apply pressure on
the dome light.
Rear Panel Description
1. Speaker Link: For stereo output, connect the speaker link cable
from the right speaker to the left speaker using the included
Speaker Link cable. Turn the ring clockwise on both ends of the
cable to secure the cable.
2. Aux Input: Connect a CD player, digital media player, or other
audio source to this RCA stereo auxiliary input.
3. Line Output: Connect these RCA outputs to another active
(powered) speaker.
4. Antenna Connector: Connect the included antenna cable here
to get the best FM radio reception.
5. Delay Time: Adjusts the amount of the delay effect on
microphone inputs 1-3.
6. Mic Treble: Adjusts the treble frequencies on microphone inputs
1-3.
7. Mic Bass: Adjusts the bass frequencies on microphone inputs
1-3.
8. Mic 3 Volume: Adjusts the volume for the Mic 3 input.
9. Mic 3 Input: Connect a 1/4” microphone here.
10. Power On/Off: Adjust this switch to power the unit on or off. The Media Panel Power button
or the remote control Power button will still need to be pressed to power on the Media Panel.
11. Power Input: Insert the included power cable here to power the unit.
3
1010
1111
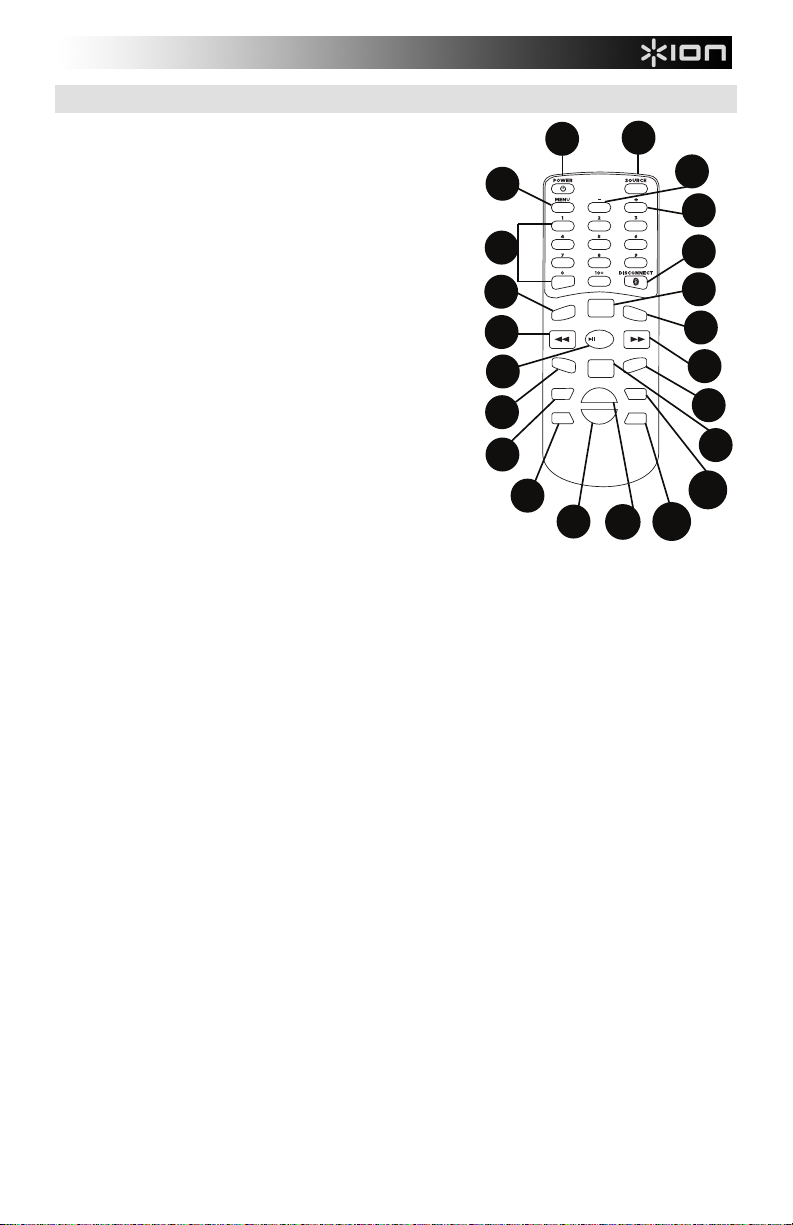
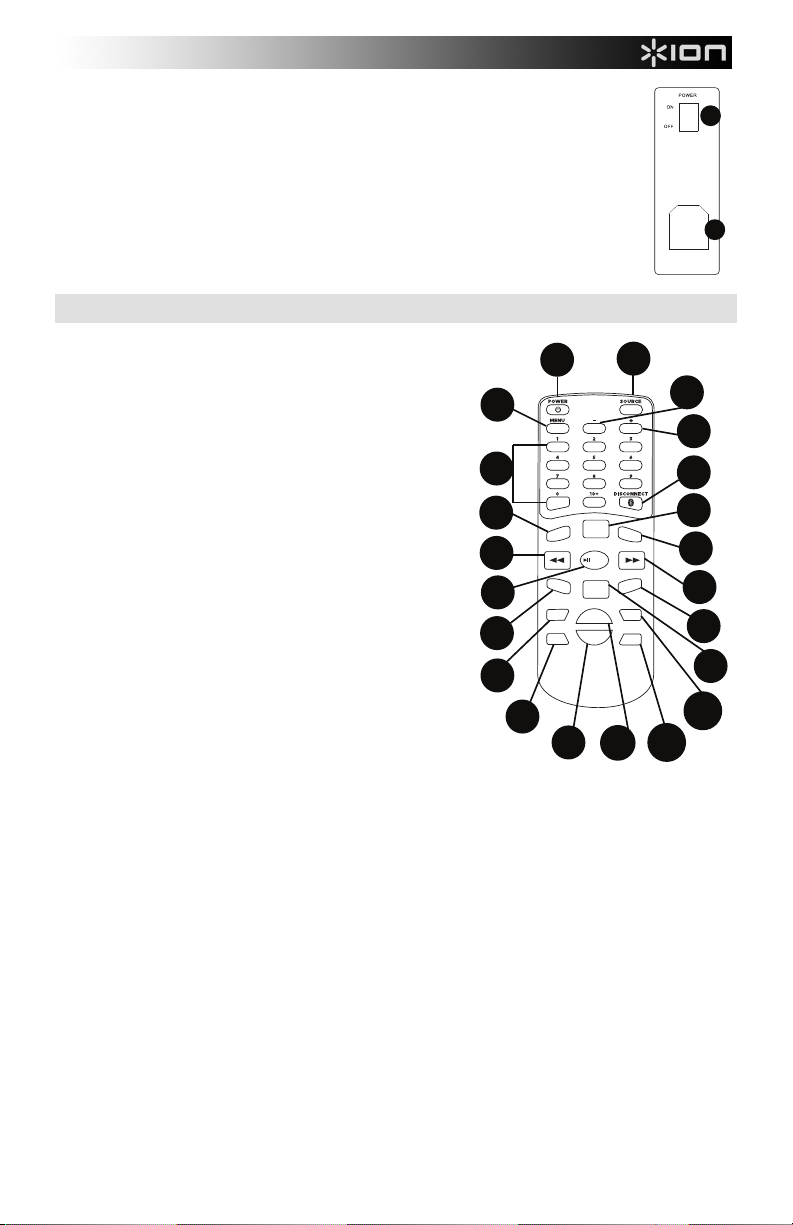
Remote Control
1
2
3
4
5
6
7
8
9
10
11
12
13
14
15
16
17
18
19
20
21
22
Note: In order to use the remote control for the first time, first pull
out the tab attached to the battery compartment. To change the
remote battery, follow the diagram located on the back of the
remote. Use a 3V DC CR2025 lithium button cell battery for
replacement.
Note: Aim the remote straight at the front of the speaker woofer.
Room lighting and battery life can affect the operating range of
the remote control.
1. Power Button: Press this button to power on the unit or to
put it into low power mode. Ensure the rear panel Power
switch is in the “On” position.
2. Source: Press this to select one of the modes: BT
(Bluetooth), USB, Radio, or Aux.
3. Menu: Cycles through the menu options. Use the
Volume/Multi knob to change the selected parameter:
• B = Bass adjustment
• T = Treble adjustment
• MI = Microphone level adjustment (a microphone will
need to be plugged into the unit in order for this option
to appear in the Menu.)
• E = Echo amount (a microphone will need to be
plugged into the unit in order for this option to appear
4. -: This acts like the Volume/Multi knob to adjust the Menu
5. +: This acts like the Volume/Multi knob to adjust the Menu options.
6. Number keys: Provides Preset channel selection for FM radio stations, and track selection for USB
7. Disconnect: Press to disconnect from a Bluetooth source.
8. Preset: Saves a radio station preset. Press this button and then enter a number from 01-40 to save the
9. Light: Controls the light modes coming from the speaker panels.
10. Stereo Mono: This function is used when listening to a radio station. Select mono if the FM radio signal
11. Prev: Goes to the previous USB track. When listening to Bluetooth sources, pressing Prev in some
12. Next: Advances to the next USB track. When listening to Bluetooth sources, pressing Next in some
13. Play/Pause/Auto: Plays or pauses the USB, or Bluetooth Media Panel source.
14. Mute: Silences the music playback on Media Panel sources.
15. Dome: The dome light can react to the music playing (depending on the Dome Mode that is selected).
16. XDrive: Turn this on to increase the bass response.
17. Tu-: Press and release this button to skip backward through the radio channels. Press and hold this
in the Menu.)
options.
sources. Press 10+ to jump 10 tracks on the USB source or through the radio station presets.
current radio station to a preset to quickly recall.
• R = red lights flash
• G = green lights flash
• B = blue lights flash
• RG = red and green lights flash
• RB = red and blue lights flash
• GB = green and blue lights flash
RGB = red, green, and blue lights flash
•
• Auto = the various color combinations cycle through and flash.
• Demo = lights flash and change color as if they were responding to the beat of the music.
4
is weak to improve the quality.
apps may go to another playlist or music genre.
apps may go to another playlist or music genre.
Note: Files are played from the USB source first by alphabetical order of what is on the root level, then
alphabetical by folder, and then alphabetical by the track name.
There are three modes to select from for the dome lights to react to the music.
• M1 = In Auto mode, the dome lights spin and change color with a predetermined pattern
regardless of the beat of the music playing.
• M2 = In Beat Sync mode, the dome lights spin and change color to the beat of the music playing.
• Off = the dome lights are off.
button for 2 seconds to travel through the FM band to find the next strongest station.
11
13
14
17
18
LIGHT
PRESET
AUTO
M
UTE
DOME
--
TU
VOL+
-
VOL
TU+
19
20
ST
XDRIVE
E
REO
MONO
10
12
CH
CH+
16
15
21
22

18. Tu+: Press and release this button to skip forward through the radio channels. Press and hold this
button for 2 seconds to travel through the FM band to find the next strongest station.
19. Vol –: Decreases the Media Panel source volume.
20. Vol +: Increases the Media Panel source volume.
Note: The remote volume only affects the Media Panel source and works together with the physical
Media Panel volume knob on the unit’s rear panel.
21. Ch-: Scroll backward through the saved radio station presets.
22. Ch+: Scroll forward through the saved radio station presets.
Pairing a Bluetooth Device
1. Turn on your Bluetooth device.
2. Power on Mega Party Express.
3. Use the Source button to select Bluetooth Mode which appears as “BT” (flashing) and Mega Party
Express will go into pairing mode to search for Bluetooth devices.
4. Navigate to your Bluetooth device’s setup screen, find “ION Mega Party X”, and connect. “BT” will now
be lit solid.
Note: Users should consider updating their device’s OS if experiencing trouble with pairing or playing
music.
5. To disconnect pairing, turn off Bluetooth on your device or select “forget this device” from your device.
Note: Maximum range will be achieved when using devices with Bluetooth 4.0.
Troubleshooting
If the sound is distorted: Try lowering the volume control of your sound source.
Also, try to reduce the overall volume of Mega Party Express.
If there is too much bass: Try adjusting the tone or EQ control from Mega Party Express or your sound
source to lower the bass level. This will allow you to play the music louder before clipping (distortion) occurs.
If there is a high-pitched whistling noise when using a microphone: This is probably feedback. Point the
microphone away from the speaker.
If you can’t hear the microphone over the music volume: Turn down the music volume from your source.
If Mega Party Express will not power on: Ensure the rear panel Power switch is in the “On” position, then
use the Power button on the front panel or remote.
If you can’t hear the microphone: Adjust the microphone volume by using the Menu button on the front
panel or the remote. This control is only available when the microphone is plugged in.
I can't adjust the Echo level on the microphone: The microphone must be plugged in to adjust the
microphone volume. Adjust the Echo level using the Menu button on the front panel or the remote.
I'm having trouble playing back material on my flash drive: If you continue to have this issue, try
reformatting your USB media and re-adding your music to your USB media storage device.
When I hit mute I still hear music out of the RCA line output: Mute/Volume 00 does not mute the audio
going to the Line Out.
5

Guía de inicio rápido (Español)
1. Asegúrese de que todos los artículos indicados en “Contenido
de la caja" estén incluidos en ella.
2. LEA EL FOLLETO DE INSTRUCCIONES DE SEGURIDAD
ANTES DE UTILIZAR EL PRODUCTO.
3. Estudie el diagrama de conexión.
4. Asegúrese de que todos los dispositivos de entrada tales como
micrófonos y reproductores de CD o reproductores de otros
medios digitales estén apagados y con el control de volumen
en “cero”.
5. Conecte todos los dispositivos como se muestra.
6. Encienda todo en el siguiente orden:
• fuentes de entrada de audio (por ejemplo, micrófonos,
instrumentos, reproductores de CD)
• Mega Party Express
7. Al apagar, realice siempre esta operación en forma inversa:
• Mega Party Express
• cualquier otro dispositivo de entrada
Soporte
Para obtener información completa sobre requisitos del sistema, compatibilidad y registro del producto, visite
el sitio web de ION: ionaudio.com.
Para obtener la información más completa acerca de este producto, visite ionaudio.com/mega-party-
express.
Para soporte adicional del producto, visite ionaudio.com/support.
Para información acerca de la seguridad y la garantía, visite ionaudio.com/warranty.
ADVERTENCIA: No mire directamente a la luz del domo. No se siente, se pare o aplique presión sobre la
luz del domo.
!
Precaución: No exponga el Mega Party Express a la lluvia ni lo coloque sobre el agua.
Diagrama de conexión
Micrófono
Delantero
izquierdo
Cable de enlace entre altavoces
Delantero
derecho
POWER
Tableta*
Conector del cable
de la antena
Contenido de la caja
Mega Party Express
Micrófono
Control remoto
Cable de enlace entre
altavoces
Cable de la antena
Cable de corriente (IEC
estándar)
Guía de inicio rápido
Folleto de instrucciones de
seguridad e información
sobre la garantía
Trasero
derecho
Micrófono
iPod*
Suministro
eléctrico
* no incluido
6
Descripción del panel frontal
5
6
7
1
2 3
4
8
9
1
2
6
7
8
9
POWER
3
4 5
1. Domo: La luz del domo puede reaccionar a la
música que se reproduce (en función del modo del
domo seleccionado). Es posible seleccionar entre
tres modos de reacción de la luz del domo a la
música.
• M1 = En el modo Automático las luces del
domo giran y cambian de color con un patrón
predeterminado sin importar el ritmo de la
música en reproducción.
• M2 = En el modo Beat Sync (Sincronización
con el ritmo) = las luces del domo giran y
cambian de color al ritmo de la música en
reproducción.
• Off (Apagado) = las luces del domo se
2. Botón de encendido: Activa y desactiva la función
3. Panel de medios: Controles para las fuentes de
4. Prev (Anterior): Pulse este botón para regresar a la
5. Next (Siguiente): Pulse este botón para avanzar a la siguiente pista USB. Al escuchar de fuentes Bluetooth,
6. LCD: Muestra los modos del Media Panel (Panel de medios) para Bluetooth, radio FM, USB y auxiliar. Apunte
7. Entradas de micrófono 1 y 2: Conecte un micrófono dinámico a estas entradas de 1/4 pulg. Controle el
8. Volume/Multi (Volumen/Multi): Ajuste para controlar el volumen general de los altavoces. Al navegar por el
9. Puerto USB: Conecte su unidad flash USB para reproducir música.
apagan.
de relé. Asegúrese de que el interruptor de
encendido del panel trasero esté en posición "ON".
Bluetooth, USB, y radio FM así como también para
acceder a las funciones del menú. Consulte la sección
Control Remoto para más detalles sobre el uso de los
controles adicionales.
pista USB anterior. Al escuchar de fuentes Bluetooth,
pulsar Prev (Anterior) en algunas aplicaciones puede hacer que vaya a otra lista de reproducción o género
musical. Cuando escucha radio FM, pulse el botón Prev una vez para saltar por las estaciones de radio FM
hacia atrás y mantenga este botón pulsado para recorrer los presets de canales hacia atrás.
pulsar Next (Siguiente) en algunas aplicaciones puede hacer que vaya a otra lista de reproducción o género
musical. Cuando escucha radio FM, pulse el botón Next una vez para saltar por las estaciones de radio FM
hacia adelante y mantenga este botón pulsado para recorrer los presets de canales hacia adelante.
el control remoto incluido hacia aquí para cambiar los ajustes.
Nota: El LCD viene con un protector de plástico adherido. Quítelo para visualizar el LCD de manera óptima.
volumen de las entradas de 1/4 pulg. mediante la opción del menú “MI__”.
menú, esto se utiliza para ajustar las diferentes funciones.
ADVERTENCIA: No mire directamente a la
luz del domo. No se siente, se pare o aplique
presión sobre la luz del domo.
Descripción del panel posterior
1. Enlace de altavoces: Para obtener una salida
estéreo, conecte el cable de enlace entre altavoces
desde el altavoz derecho hacia el altavoz izquierdo
utilizando el cable de enlace entre altavoces incluido.
Gire el anillo en sentido horario en ambos extremos
del cable para asegurarlo.
2. Entrada auxiliar: Conecte a esta entrada RCA
auxiliar estéreo un reproductor de CD, un
reproductor de medios digitales u otra fuente de
audio.
3. Salida de línea: Conecte estas salidas RCA a otro
4. Conector de la antena: Conecte el cable de la
5. Tiempo de decaimiento: Ajusta la cantidad de
6. Agudos de micrófono: Ajusta las frecuencias de los
7. Graves de micrófono: Ajusta las frecuencias de los graves en las entradas de micrófono 1-3.
8. Volumen del micrófono 3: Ajusta el volumen de la entrada de micrófono 3.
9. Entrada de micrófono 3: Conecte aquí un micrófono de 1/4 pulg.
altavoz activo (alimentado).
antena incluido aquí para lograr la mejor recepción
de radio FM.
efecto delay (retardo) en las entradas de micrófono
1-3.
agudos en las entradas de micrófono 1-3.
7
10. Encendido/apagado: Ajuste este interruptor para encender y apagar la unidad. Deberá
5
6
7
8
9
pulsarse el botón de encendido del panel de medios o el botón de encendido del control
remoto para encender el panel de medios.
11. Entrada de corriente: Inserte aquí el cable de corriente incluido para alimentar la unidad.
1010
1111
Control remoto
Nota: A fin de usar el control remoto por primera vez, extraiga
primero la lengüeta fijada al compartimiento de las pilas. Para
cambiar la batería del control remoto, siga el diagrama ubicado
en el reverso del mismo. Utilice una pila de celda tipo botón de
litio CR2025 de 3V CC como reemplazo.
Nota: Apunte el control remoto hacia el frente del woofer del
altavoz. La iluminación de la sala y la vida útil de la pila pueden
afectar al alcance operacional del control remoto.
1. Botón de encendido: Pulse este botón para encender la
unidad o colocarla en un modo de bajo consumo de
energía. Asegúrese de que el interruptor de encendido del
panel trasero esté en posición "ON".
2. Fuente: Pulse este botón para seleccionar uno de los
siguientes modos: BT (Bluetooth), USB, radio, o auxiliar.
3. Menú: Alterna las opciones del menú. Utilice la perilla
Volume/Multi para modificar el parámetro seleccionado:
• B = Ajuste de graves
• T = Ajuste de agudos
• MI = Nivel de ajuste del micrófono (deberá
conectarse un micrófono a la unidad para que
aparezca esta opción en el menú).
• E = Cantidad de eco (deberá conectarse un
micrófono a la unidad para que aparezca esta opción
4. -: Esto actúa como la perilla Volume/Multi para ajustar las
5. +: Esto actúa como la perilla Volume/Multi para ajustar las opciones del menú.
6. Teclas numéricas: Permite la selección de presets para estaciones de radio FM y la selección de
7. Desconectar: Pulse este botón para desconectar la fuente Bluetooth.
8. Preset: Guarda un preset de estación de radio. Pulse este botón y después introduzca un número
9. Luz: Controla el modo de luz proveniente de los paneles del altavoz.
10. Estéreo Mono: Esta función se utiliza cuando se escucha una estación de radio. Seleccione mono si
en el menú).
opciones del menú.
pistas para fuentes USB. Pulse 10+ para saltear de a 10 pistas en la fuente USB o los presets de
estaciones de radio.
entre 01-40 para guardar la estación de radio actual como un preset para su rápida recuperación.
• R = parpadean las luces rojas
• G = parpadean las luces verdes
• B = parpadean las luces azules
• RG = parpadean las luces rojas y verdes
• RB = parpadean las luces rojas y azules
• GB = parpadean las luces verdes y azules
•
RGB = parpadean las luces rojas, verdes y azules
• Auto = las diferentes combinaciones de colores se alternan y parpadean.
• Demo = las luces parpadean y cambian de color como si estuvieran respondiendo al ritmo de la
música.
la señal de radio FM es débil para mejorar la calidad.
1111
1313
1414
1717
3
6
8
1
PRESET
M
UTE
--
TU
TU+
1818
1919
LIGHT
DOME
VOL+
VOL
AUTO
-
2020
ST
XDRIVE
2
4
5
7
9
E
REO
MO
NO
1010
1212
CH
CH+
1616
1515
2121
2222
8

11. Prev (Anterior): Regresa a la pista USB anterior. Al escuchar de fuentes Bluetooth, pulsar Prev
(Anterior) en algunas aplicaciones puede hacer que vaya a otra lista de reproducción o género
musical.
12. Next (Siguiente): Avanza a la siguiente pista USB. Al escuchar de fuentes Bluetooth, pulsar Next
(Siguiente) en algunas aplicaciones puede hacer que vaya a otra lista de reproducción o género
musical.
13. Reproducir/Pausa/Auto: Reproduce o hace pausa en la fuente de USB o Bluetooth del panel de
medios.
Nota: Los archivos se reproducen desde la fuente USB primero alfabéticamente según el contenido de
la raíz, luego alfabéticamente según la carpeta y luego alfabéticamente según el nombre de la pista.
14. Silencio: Silencia la reproducción de música de las fuentes del panel de medios.
15. Domo: La luz del domo puede reaccionar a la música que se reproduce (en función del modo del
domo seleccionado). Es posible seleccionar entre tres modos de reacción de la luz del domo a la
música.
• M1 = En el modo Automático las luces del domo giran y cambian de color con un patrón
predeterminado sin importar el ritmo de la música en reproducción.
• M2 = En el modo Beat Sync (Sincronización con el ritmo) = las luces del domo giran y cambian
de color al ritmo de la música en reproducción.
• Off (Apagado) = las luces del domo se apagan.
16. XDrive: Encienda esto para aumentar la respuesta a los graves.
17. Tu-: Pulse y suelte este botón para saltar hacia atrás por los canales de radio. Mantenga pulsado este
botón durante 2 segundos para recorrer la banda FM a fin de encontrar la siguiente estación con
buena recepción.
18. Tu+: Pulse y suelte este botón para saltar hacia adelante por los canales de radio. Mantenga pulsado
este botón durante 2 segundos para recorrer la banda FM a fin de encontrar la siguiente estación con
buena recepción.
19. Vol –: Disminuye el volumen de la fuente del panel de medios.
20. Vol +: Aumenta el volumen de la fuente del panel de medios.
Nota: El volumen del control remoto solo afecta la fuente del panel de medios y funciona junto con la
perilla de volumen físico del panel de medios en el panel trasero de la unidad.
21. Ch-: Desplaza los presets con las estaciones de radio guardadas hacia atrás.
22. Ch+: Desplaza los presets con las estaciones de radio guardadas hacia adelante.
Apareamiento de un dispositivo Bluetooth
1. Encienda su dispositivo Bluetooth.
2. Encienda el Mega Party Express.
3. Utilice el botón Source (Fuente) para seleccionar el modo Bluetooth que aparece como “BT”
(parpadeando) y el Mega Party Express entrará en modo de apareamiento para buscar dispositivos
Bluetooth.
4. Navegue hasta la pantalla de configuración Bluetooth en su dispositivo, busque “ION Mega Party X”, y
conéctese. “BT” quedará encendido.
Nota: Los usuarios deben considerar la actualización del sistema operativo (OS) de su dispositivo si
experimentan problemas con el apareamiento o la reproducción de música.
5. Para desconectar el apareamiento, apague el Bluetooth de su dispositivo o seleccione "olvidar este
dispositivo" en su dispositivo.
Nota: El alcance máximo se logra cuando se utilizan dispositivos con Bluetooth 4.0.
9

Solución de problemas
Si el sonido está distorsionado: Trate de disminuir el control de volumen de su fuente de sonido.
Pruebe también reduciendo el volumen general del Mega Party Express.
Si los graves son demasiado fuertes: Intente ajustando el control de tono o ecualización de su Mega Party
Express o fuente de sonido para reducir el nivel de graves. De esta forma podrá reproducir la música con
más volumen antes de que se produzca el recorte (distorsión).
Si hay un silbido agudo cuando se usa un micrófono: Probablemente sea realimentación. Apunte el
micrófono apartándolo del altavoz.
Si no puede oír el micrófono por arriba del volumen de la música: Disminuya el volumen de la música
en su fuente.
Si el Mega Party Express no se enciende: Asegúrese de que el interruptor de encendido del panel trasero
se encuentre en la posición "On", después utilice el botón de encendido del panel delantero o control
remoto.
Si no puede escuchar el micrófono: Ajuste el volumen del micrófono utilizando el botón Menú del panel
delantero o control remoto. Este control solo está disponible cuando hay un micrófono conectado.
No puedo ajustar el nivel de eco del micrófono: El micrófono debe estar conectado para poder ajustar su
volumen. Ajuste el nivel de eco utilizando el botón Menú del panel delantero o control remoto.
Tengo problemas para reproducir material desde mi unidad flash: Si continua experimentando este
problema, intente reformatear sus medios USB y agregar nuevamente su música a su dispositivo de
almacenamiento de medios USB.
Al pulsar el botón Silencio aún escucho música por la salida de línea RCA: El botón Silencio/volumen
00 no silencian el audio que sale por la salida de línea.
10
 Loading...