

ION Audio ISP34 User Manual
Clipster Active
ionaudio.com/support
For technical support.
Para soporte técnico.
Pour obtenir de l’assistance technique.
Per assistenza tecnica.
Für technischen Support.
Voor technische ondersteuning.
ionaudio.com/warranty
For complete warranty information.
Para información completa sobre la garantía.
Pour obtenir toutes les informations relatives à la garantie.
Per informazioni complete in merito alla g aranzia.
Für komplette Garantieinformationen.
Voor volledige informatie over de garantie.
Manual Version 1.0
Box Contents: Clipster Active, Active Mount, Mounting Strap, USB
Charging Cable, Quickstart Guide.
Charging Clipster Active: Use the included micro-USB cable to
connect Clipster Active to (A) a USB power adapter connected to a
power outlet or (B) your computer (powered on) for 2.5 hours.
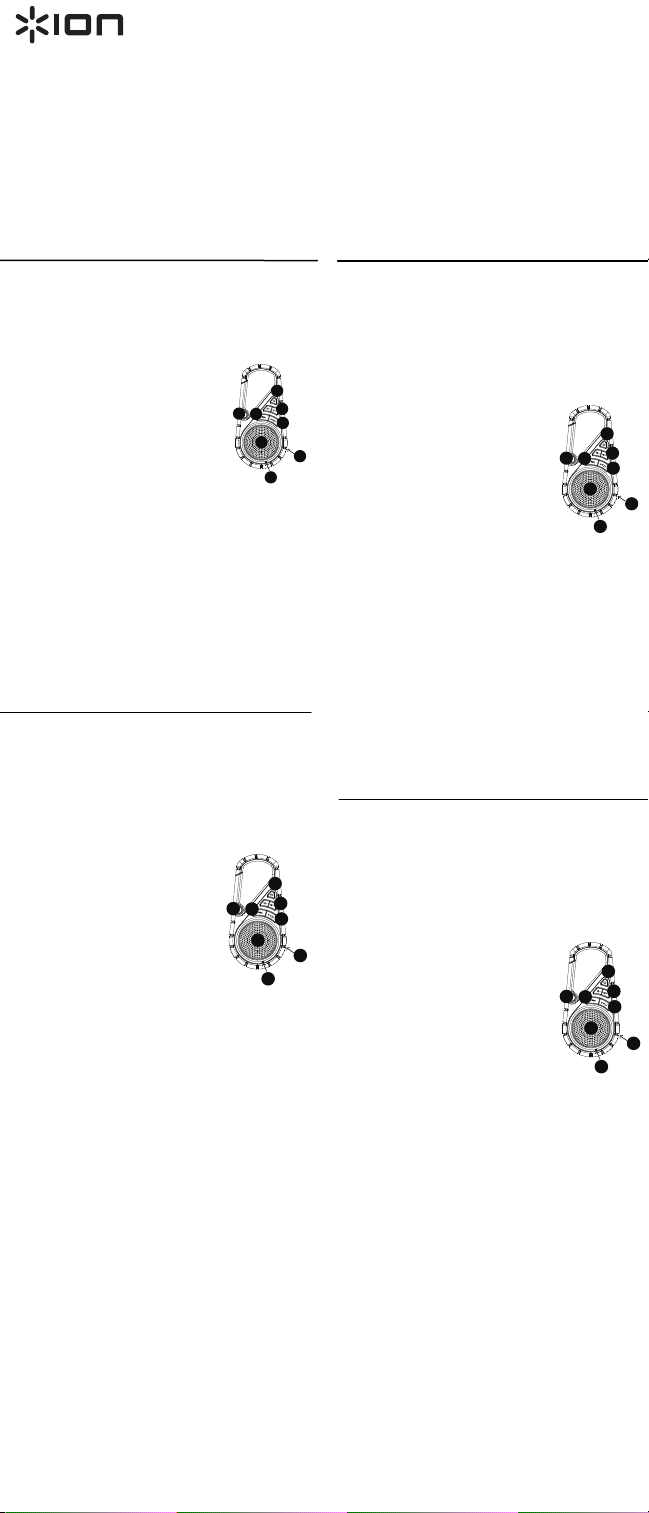
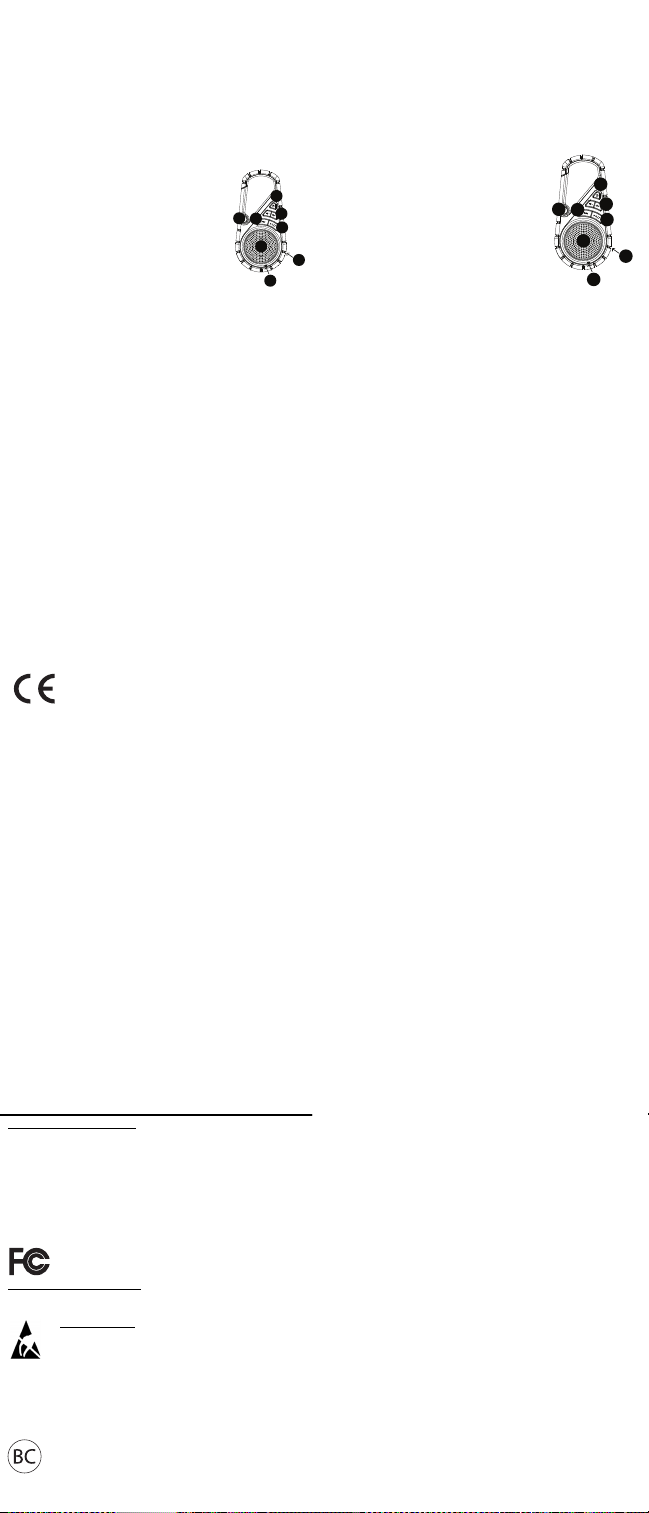
Controls: (1) Power, (2) Volume Down/Up Controls, (3) Next Track,
(4) micro-USB Charging Port, (5) Play/Pause/Call- Answer, (6)
Speaker, (7) Clip, (8) Microphone.
LED Activity:
Blinking Blue LED = Bluetooth pairing mode
Solid Blue LED = Connected to a Bluetooth
device
Blinking Red LED = Battery is low and needs to
be recharged
Solid Red LED = The Battery Charging LED will
be lit while the unit is charging and the red LED
will turn off when charging has completed.
Getting Started: (1) Press and hold the Power button for 3 seconds
to power on Clipster Active. (2) Open Bluetooth settings on your
music device (smartphone, tablet, etc.). (3) Connect to Clipster
Active. (4) If your device requires a passcode or PIN, enter the
number zero (“0”) four times. (5) Play music and adjust Clipster
Active volume buttons. (6) Attach the active mount to the location of
your choice, adjusting the mounting strap length and tightness. (7)
To disconnect the Bluetooth connectio n, hold the Play/Pause/CallAnswer button for 2 seconds.
Answering Phone Calls: (1) Press and release the
Play/Pause/Call-Answer button. (2) Adjust volume with the Volume
Down/Up controls. (3) To disconnect a phone call, press and
release the Play/Pause/Call-Answer button.
Standby Mode: Clipster Active will power off after 15 min utes if no
audio is playing, whether or not there is a Bluetooth connection.
For the Safety and Warranty manual, visit ionaudio.com/warranty.
Contenido de la caja: Clipster Active, Mo ntaje activo, correa de
montaje cable USB de carga, guía de inicio rápido.
Cómo cargar el Clipster Active: Cuando la luz de carga de la
batería comience a atenuarse, cargue el Clipster Active. Use el
cable micro USB incluido para conectar el Clipster Active a (A) un
adaptador de alimentación USB conectado a un tomacorriente o (B)
su ordenador (encendido) durante 2.5 hora s.
Controles: (1) Encendido, (2) Controles de subir/bajar volumen, (3)
Pista siguiente, (4) puerto micro-USB de carga, (5)
Reproducir/pausa/atender-llamada, (6) Altavoz, (7) Presilla, (8)
Micrófono.
LED de actividad:
LED azul parpadeante = Modo de
apareamiento de Bluetooth
LED con luz azul permanente = Conectado
a un dispositivo Bluetooth
LED rojo parpadeante = La batería tiene
poca carga y debe recargarse
LED con luz rojo permanente = El rojo LED de
batería en carga se enciende cuando la unidad se
está cargando y se apaga cuando la carga está completa.
Para comenzar: (1) Mantenga pulsado el botón de encendido
durante 3 segundos para encender el Clips ter Active. (2) Abra la
configuración Bluetooth en su dispositivo musical (teléfono
inteligente, tableta, etc.). (3) Conéctelo al Clipster Active. (4) Si su
dispositivo solicita un código de contraseña o PIN, ingrese el
número ("0") cuatro veces. (5) Reproduzca la música y ajuste el
botónes de volumen del Clipster Active. (6) Fije el mo ntaje activo en
el lugar que elija, ajustando la longitud y tensión de la correa de
montaje. (7) Para desconectar la conexión Bluetooth, mantenga
pulsado el botón de reproducir/pausa/atender-llamada durante 2
segundos.
Cómo contestar llamadas: (1) Pulse y suelte el botón
reproducir/pausa/atender-llamada. (2) Ajuste el volumen con los
controles de subir/bajar volumen. (3) Para fina lizar una llamada,
pulse y suelte el botón reproducir/pausa/atender-llamada.
Modo de espera: El Clipster Active se apagará después de 15
minutos sin reproducir audio, haya una conexión Bluetooth o no.
Para obtener el manual sobre la seguridad y garantía visite
ionaudio.com/warranty.
Quickstart Guide
The Bluetooth word mark and logo are owned by the
Bluetooth SIG, Inc. and any use of such marks by ION
Audio is under license.
1
2
7
3
5
6
4
8
1
2
7
3
5
6
4
8
Contenu de la boîte : Clipster Active, Support, courroie, câble de
rechargement USB, guide de démarrage rapide.
Rechargement de la batterie du Clipster Active : Lorsque
l’intensité du voyant d’indication de charge de la batterie diminue, la
batterie doit être rechargée. Utilisez le câb le micro-USB inclus afin
de brancher le Clipster Active à (A) un adaptateur d’alimentation
USB branché à une prise secteur, ou (B) à un ordinateur (sous
tension) pendant 2.5 heures.
Commandes : (1) interrupteur d’alimentation, (2) Commandes
volume, (3) Piste suivante, (4) port de recharge ment micro-USB,
(5) Touche de lecture/pause/d'appel-réponse,
(6) haut-parleurs, (7) mousqueton, (8) microphone.
Légende des indicateurs:
DEL bleue clignotante = Jumelage Bluetooth
DEL bleue fixe = Appareil Bluetooth jumelé
DEL rouge clignotante = Pile faible, doit être
Recharge
DEL rouge fixe = La DEL rouge de
rechargement s'allume lors du Rechargement
et s'éteint lorsque la batterie est entièrement
rechargée.
Mise en route : (1) Maintenez l’interrupteur d’alimentation enfoncé
pendant 3 secondes afin de mettre le Clipster Active sous tension.
(2) Accédez aux paramètres Bluetooth de votre lecteur de musique
(smartphone, tablette, etc.). (3) Connectez-le au Clipster Active.
(4) Si votre appareil vous demande un mot de passe ou un NIP,
saisissez le numéro zéro (« 0 ») quatre fois. (5) Faites jouer de la
musique et réglez la boutons volume du Clipster Active. (6) Fixer le
support sur l'emplacement de votre choix, en ajustant la longueur et
la tension de la courroie. (7) Maintenez enfoncée la touche de
lecture/pause/d'appel-réponse pendant 2 secon des afin de
supprimer la connexion à l’appareil Bluetooth.
Répondre à un appel : (1) Enfoncez puis relâchez la touche de
lecture/pause/d'appel-réponse. (2) Réglez le volume avec les
commandes de volume. (3) Enfoncez puis relâchez la touch e de
lecture/pause/d'appel-réponse afin de mettre fin à un appel.
Mode veille : Le Clipster Active s’éteint automatiquement après 15
minutes d’inutilisation, qu’un appareil Bluetooth soit jumelé ou non.
Pour de plus amples informations concernant les consignes de
sécurité ou la garantie, veuillez visiter le site
ionaudio.com/warranty.
Contenuti della confezione: Clipster Active, Supporto attivo,
fascetta di montaggio, cavo di ricarica USB, Guida rapida.
Ricarica del Clipster Active: quando la spia della batteria diventa
fioca, caricare il Clipster Active. Servirsi del cavo micro-USB in
dotazione per collegare il Clipster Active a (A) un adattatore USB
collegato ad una presa di alimentazione o (B) al computer (acceso)
per 2.5 ore.
Comandi: (1) Accensione, (2) Comandi volume giù/su, (3) Traccia
Successive, (4) Porta di ricarica micro-USB, (5) Play/Pause/CallAnswer (riproduzione, pausa, risposta alle c hiamate), (6)
Altoparlante, (7) Clip, (8) Microfono.
Attività del LED:
LED blu lampeggiante = Modalità di
accoppiamento Bluetooth
LED blu fisso = Collegato a un dispositivo
Bluetooth
LED rosso lampeggiante = La batteria è
scarica, deve essere ricaricata
LED rosso fisso = il rosso LED di ricarica della
batteria sarà acceso mentre l'apparecchio si sta
caricando e si spegnerà quando la ricarica è completa.
Per iniziare: (1) Premere e tenere premuto il tasto Pitch per 3
secondi per accendere il Clipster Active. (2) Aprire le impostazioni
Bluetooth sul dispositivo musicale (smartphone, tablet, ecc.). (3)
Collegarlo allo Clipster Active. (4) Se il dispositivo chiede un codice
o PIN, inserire il numero zero ("0") quattro volte. (5) Suonare la
musica e regolare ilvolume servendosi dell’apposita pulsanti del
Clipster Active. (6) Fissare il supporto attivo nella sede prescelta,
regolando la lunghezza della fascetta di montaggio e stringendola a
piacere. (7) Per annullare i l collegamento Bluetooth, tenere premuto
il tasto Play/Pause/Call-Answer per 2 secondi.
Come rispondere alle telefonate: (1) Premere e rilasciare il tasto
Play/Pause/Call-Answer. (2) Regolare il volume servendosi dei
comandi Volume giù/su. (3) Per scollegare una chiamata, premere e
rilasciare il tasto Play/Pause/Call-Answer.
Modalità Standby: il Clipster Active si spegnerà dopo 15 minuti se
non viene riprodotto alcun audio, che ci sia un collegamento
Bluetooth o meno.
Per ottenere il manuale di sicurezza e garanzia, recar si alla pagina
ionaudio.com/warranty.
1
2
7
3
5
6
4
8
1
2
7
3
5
6
4
8
y
j
Lieferumfang: Clipster Active, Aktivhalterung, Montagebügel,
USB-Ladekabel, Schnellstart-Anleitung.
Aufladen des Clipster Active: Wenn die Batterieleuchte
schwächer wird, muss der Clipster Active aufgeladen werden.
Verwenden Sie das mitgelieferte Micro-USB-Kabel, um den
Clipster Active (A) mit einem USB-Netzteil zu verbinden, das in
einer Steckdose eingesteckt ist oder (B) mit Ihrem
(eingeschalteten) Computer für einen Zeitr aum von 2.5 Stunden
zu verbinden.
Bedienelemente: (1) Leistung, (2) Steuerelemente für Lautstärke
Reduzieren/Erhöhen, (3) Nächster Titel, (4) Micro-USBLadeanschluss, (5) Wiedergabe/Pause/Anruf entgegennehmen,
(6) Lautsprecher, (7) Clip, (8) Mikrofon.
LED-Aktivität:
Blau blinkende LED = Bluetooth-Koppelmodus
Durchgehend blau leuchtende LED = Mit
Einem Bluetooth-Gerät verbunden
Rot blinkende LED = Der Akku hat einen
niedrigen Ladestand und muss aufgeladen
werden
Durchgehend rot leuchtende LED = Die rot
Akkulade-LED leuchtet, während das Gerät aufge laden wird und
erlischt, wenn der Ladevorgang abgeschlos sen ist.
Erste Schritte: (1) Halten Sie den Ein-/Ausschalter 3 Sekunden
lang gedrückt, um Clipster Active einzuschalten. (2) Öffnen Sie
die Bluetooth-Einstellungen auf Ihrem Musikgerät ( Smartphone,
Tablet etc.). (3) Stellen Sie eine Verbindung zum Clipster Active
her. (4) Wenn Ihr Gerät nach einem Passwort oder einer PIN fragt,
geben Sie viermal die Zahl Null ("0") ein. (5) Spielen Sie Ihre
Musik und stellen den Lautstärkeregler am Clipster Active Rocker
nach Wunsch ein. (6) Bringen Sie die Aktivhalterung an der
gewünschten Stelle an und passen Sie Länge und Straffheit des
Montagebügels an. (7) Um die Bluetooth-Verbindung zu trennen,
halten Sie die Taste Wiedergabe/Pause/Anruf ent gegennehmen 2
Sekunden lang gedrückt.
Anrufe entgegennehmen: (1) Drücken Sie die Taste
Wiedergabe/Pause/Anruf entgegennehmen. (2) Stellen Sie die
Lautstärke mit den Lautstärkereglern ein. (3) Um einen Anruf zu
trennen, drücken Sie die Taste Wieder gabe/Pause/Anruf
entgegennehmen.
Standby-Modus: Clipster Active schaltet sich nach 15 Minuten
aus, wenn kein Audiosignal wiederge geben wird, egal ob eine
Bluetooth-Verbindung besteht oder nicht.
Für die Sicherheits-und Garantieinformationen besuchen Sie
ionaudio.com/warranty.
1
2
7
3
5
6
4
8
Allgemeinhinweis zur Konformitätserklärung: Hiermit erklären
wir, daß sich das Gerät Clipster Active in Übereinstimmung mit den
grundlegenden Anforderungen der europäischen Richtlinie
1999/5/EG befindet. Die vollständige EG Konformitätserklärung kann
unter folgender Adresse angefordert werden:
inMusic GmbH
Halskestrasse 16-18
D – 47877 Willich
GERMANY
Notice Concerning FCC Regulations: You are cautioned that changes or modifications not
expressly approved by the part responsible for com pliance could void the user's authority to
operate the equipment. This equipme nt has been tested and found to comply with the limits for a
Class B digital device, pursuant to part 15 of the FCC rules. These limits are designed to provide
reasonable protection against harmf ul interference in a residential instal lation. This equipment
generates uses and can radiate r adio frequency energy and, if not i nstalled and used in
accordance with the instructions, may cause h armful interference to radio communic ations.
However, there is no guarantee that interference will not occur in a particular installation. If this
equipment does cause harmful int erference to radio or television r eception, which can be
determined by turning the equipm ent off and on, the user is enco uraged to try to correct the
interference by one or more of the following measures: (a) reorient or relocate the receiving
antenna; (b) move this unit; (c) inc rease the separation between the equipment and receiver; ( d)
connect the equipment into an outl et on a circuit different from t hat to which the receiver is
connected; (e) be sure that all c ables are properly shielded, using a choke or ferrite wher e
appropriate; (f) consult the dealer or an experienced radio/t elevision technician for help.
FCC RF Radiation Exposure S tatement: This equipment complies with FCC ra diation exposure
limits set forth for an uncontrolled environme nt. End users must follow the specific op erating
instructions for satisfying RF expos ure compliance. This transmitter must not be co-located or
operating in conjunction with any other antenna or transmitter.
In an environment with radio frequency interfer ence, the unit may malfunction and resume normal
operation after removal of the interfer ence. For best audio quality, avoid using this d evice in a
high RF-radiated environment. T his unit does not exceed the Class B limits for radio noise
emission from digital apparatus set out in the radi o interference regulations of the Canadian
Department of Communications.
The Bluet ooth word mark and logo are owned by t he Bluetooth SIG, Inc. and any use of suc h
marks by ION Audio is under license.
This device complies with part 15 of the FCC rule s. Operation is subject to the
following two conditions: (1) this d evice may not cause harmful interference, and
(2) this device must accept any inte rference received, including interference that
ma
cause undesired operation.
ESD / EFT Warning: This unit may contain a microcomputer for sig nal
processing and control functions. In very rare situations, severe interfere nce,
noise from an external source, or static electrici ty may cause it to lock up. In the
unlikely event that this should happe n, turn off the unit, wait at least five seconds,
and then turn it back on again.
Inhoud van de doos: Clipster Active, Actieve cl ip, monteerband,
USB-oplaadkabel, snelstartgids.
Clipster Active: Wanneer het batteri
Clipster Active opladen. Gebruik de meegelev erde micro-USBkabel om Clipster Active gedurende 2.5 uur te verbinden met (A)
een USB-stroomadapter, aangesloten op een st opcontact, of (B)
uw pc (ingeschakeld).
Bedieningsknoppen (1) uitknop, (2) Knoppen Volume
verlagen/verhogen, (3) Volgend nummer, (4) micro-USBoplaadpoort, (5) (5) Afspelen/Pauzeren/ Bellen-Beantwoorden, (6)
Luidpsreker, (7) Clip, (8) Microfoon.
LED-activiteit:
Knipperende Blauwe LED = koppelmodus
Bluetooth
Effen Blauwe LED = verbonden met een
Bluetooth-apparaat
Knipperende rode LED = de batterij is bijna
leeg en moet herladen worden.
Effen rode LED = De batterij rode-LEDgaat
branden wanneer het toestel aan het laden is en
de LED gaat uit wanneer het laden is voltooid.
Aan de slag: (1) Druk en houd de aan/uit-knop 3 seconden lang
ingedrukt om de Clipster Active aan te zetten.
(2) Open de Bluetooth -instellingen op uw muziekapparaat
(smartphone, tablet, enz.) (3) Maak verbinding met de Clipster
Active. (4) Als uw apparaat een wachtwoordcode of pincode
vereist, voer dan vier keer het nummer nul ('0') in. (5) Speel muziek
af en Pas de volumeknop Clipster Active aan. (6) Verbind de
actieve clip op de plaats naar keuze en regel de lengte en spanning
van de monteerband. (7) Houd de knop Afspelen/Pauzeren/Bellenbeantwoorden 2 seconden lang ingedrukt om de Bluetoothverbinding te verbreken.
Een oproep beantwoorden: (1) De knop
Afspelen/Pauzeren/Bellen-beantwoorden indrukken en loslaten. (2)
Regel het volume met de bedieningsk nop Volume omlaag/omhoog.
(3) Druk de knop Afspelen/Pauzeren/Bellen-beantwoorden in om
een oproep af te breken.
Standby-modus: Clipster Active gaat uit na 15 minuten als er geen
audio wordt afgespeeld, of er nu al dan niet een Bluetoothverbinding is.
Bezoek voor de handleiding Veiligheid en Garantie
ionaudio.com/warranty.
lampje donker wordt, moet u
1
2
7
3
5
6
4
8

IMPORTANT SAFETY INSTRUCTIONS
WARRANTY INFORMATI
ENGLISH ( 3 – 13 )
ON
INSTRUCCIONES IMPORTANTES DE SEGURIDAD
INFORMACIÓN DE LA GA
ESPAÑOL ( 14 – 21 )
RANTÍA
INSTRUCTIONS IMPORTANTES DE SÉCURITÉ
INFORMATIONS DE G
FRANÇAIS ( 22 – 29 )
ARANTIE
ISTRUZIONI IMPORTANTI DI SICUREZZA E
INFORMAZIONI DELLA
ITALIANO ( 30 – 37 )
GARANZIA
WICHTIGE SICHERHEITSANWEISUNGEN UN
GARANTIEINFORMATIONEN
DEUTSCH ( 38 – 45 )
&
E
ET
LE
D

1. What is covered and for how long?
ALL PRODUCTS: inMusic Brands, Inc. ("inMusic") warrants to the original
purchaser that ION Audio products and all other accessories are free
from defects in material and workmanship under normal use and service
for the period commencing upon the date of purchase from an authorized
ION Audio dealer and continuing for the following period of time after that
date for ninety (90) days. ION Audio warrants factory-refurbished
merchandise to be free of material and operational defects for a period of
ninety (90) days from the original date of retail sale. This refurbished
merchandise warranty is not transferable.
2. What is not covered? This Limited Warranty is conditioned upon proper use of
the product by the purchaser. This Limited Warranty does not cover:
ƒ Damage caused by improper installation or improper connection to
any peripheral
ƒ Damage caused by an external electrical fault
ƒ Damage from use of parts not manufactured or sold by ION Audio
ƒ Product purchased from anyone other than an ION Audio
authorized dealer
ƒ Modifications to product not approved in writing by ION Audio
ƒ Equipment that has the serial number removed or made illegible
ƒ Normal cosmetic and mechanical wear
ƒ Damage or loss during transit to an Authorized ION Audio Repair Center
ƒ Units that are purchased and/or located outside of the continental USA
PRODUCT WARRANTY (U.S.A.)
3

3. What are inMusic's obligations? During the applicable warranty period, ION
Audio will repair or replace, at ION Audio's sole option, without charge to the
purchaser, any defective component part of the product. To obtain service
under this Limited Warranty, purchaser must first contact ION Audio and obtain
a return authorization number ("RA#"). Purchaser must then return the product
to ION Audio in an adequate container for shipping, accompanied by
purchaser's sales receipt or comparable proof of sale showing the date
of purchase, the serial number of the product, and the seller's name and
address. To obtain an RA# and assistance on where to return the product,
contact ION Audio customer service at 401-658-3743. Upon receipt, ION Audio
will repair or replace the defective products. ION Audio may, at ION Audio's
sole option, use rebuilt, reconditioned, or new parts or components when
repairing any product or replace a product with a rebuilt, reconditioned, new or
comparable product. Repaired products will be warranted for a period equal to
the remainder of the original Limited Warranty on the original product or for
90 days, whichever is longer. All replaced parts, components, boards, and
equipment become the property of ION Audio. If ION Audio determines that
any product is not covered by this Limited Warranty, purchaser must pay all
parts, shipping, and labor charges for the repair or return of such product.
4. What are the limits on inMusic's liabilities? THE WARRANTIES GIVEN IN
THIS LIMITED WARRANTY, TOGETHER WITH ANY IMPLIED WARRANTIES
COVERING ION AUDIO PRODUCTS, INCLUDING WITHOUT LIMITATION
ANY WARRANTIES OF MERCHANTABILITY OR FITNESS FOR A
PARTICULAR PURPOSE, ARE LIMITED TO THE DURATION OF THIS
LIMITED WARRANTY. EXCEPT TO THE EXTENT PROHIBITED BY
APPLICABLE LAW, INMUSIC OR ION AUDIO SHALL NOT BE LIABLE FOR
ANY SPECIAL, INCIDENTAL, CONSEQUENTIAL, INDIRECT OR SIMILAR
DAMAGES, LOSS OF PROFITS, DAMAGES TO PURCHASER'S PROPERTY,
OR INJURY TO PURCHASER OR OTHERS ARISING OUT OF THE USE,
MISUSE OR INABILITY TO USE ANY ION AUDIO PRODUCT, BREACH
OF WARRANTY, OR NEGLIGENCE, INCLUDING BUT NOT LIMITED TO
INMUSIC'S OR ION AUDIO'S OWN NEGLIGENCE, EVEN IF INMUSIC,
ION
4

AUDIO, OR THEIR AGENTS HAVE BEEN ADVISED OF SUCH
DAMAGES, OR FOR ANY CLAIM BROUGHT AGAINST PURCHASER BY
ANY OTHER PARTY. THIS LIMITED WARRANTY IS THE COMPLETE
WARRANTY FOR ION AUDIO PRODUCTS, AND IS GIVEN IN LIEU OF ALL
OTHER EXPRESS WARRANTIES. THIS LIMITED WARRANTY SHALL
NOT EXTEND TO ANYONE OTHER THAN THE ORIGINAL PURCHASER
OF THIS PRODUCT AND STATES PURCHASER'S EXCLUSIVE REMEDY.
IF ANY PORTION OF THIS LIMITED WARRANTY IS ILLEGAL OR
UNENFORCEABLE BY REASON OF ANY LAW, SUCH PARTIAL ILLEGALITY
OR UNENFORCEABILTY SHALL NOT AFFECT THE ENFORCEABILITY
OF THE REMAINDER OF THIS LIMITED WARRANTY WHICH
PURCHASER ACKNOWLEDGES IS AND WILL ALWAYS BE CONSTRUED
TO BE LIMITED BY ITS TERMS OR AS LIMITED AS THE LAW PERMITS.
This Limited Warranty allocates risk of product failure between purchaser and
ION Audio, and ION Audio's product pricing reflects this allocation of risk and
the limitations of liability contained in this Limited Warranty. The agents,
employees, distributors, and dealers of ION Audio are not authorized to make
modifications to this Limited Warranty, or make additional warranties binding on
ION Audio or inMusic. Accordingly, additional statements such as dealer
advertising or presentation, whether oral or written, do not constitute warranties
by ION Audio or inMusic and should not be relied upon.
5. How does state law apply to this warranty? SOME STATES DO
NOT ALLOW THE EXCLUSION OR LIMITATIONS OF INCIDENTAL
OR CONSEQUENTIAL DAMAGES OR HOW LONG AN IMPLIED
WARRANTY LASTS, SO THE ABOVE LIMITATIONS OR EXCLUSIONS MAY
NOT APPLY TO PURCHASER.
This Limited Warranty gives you specific legal rights. You may also have other rights,
which vary from one jurisdiction to another.
5

1. inMusic Brands, Inc. ("inMusic") warrants to the original purchaser that ION Audio products
are free from defects in material and workmanship under normal use and service for
the period commencing upon the date of purchase from an authorized ION Audio
dealer and continuing for the following period of time after that date for (1) Year.
2. This Limited Warranty is conditioned upon proper use of the product by the purchaser.
This Limited Warranty does not cover: (a) defects or damage resulting from accident, misuse,
abuse, neglect, unusual physical or electrical stress, modification of any part of the product,
or cosmetic damage; (b) equipment that has the serial number removed or made illegible; (c)
all plastic surfaces and other externally exposed parts that are scratched or damaged due to
normal use; (d) defects or damage from improper testing, operation, maintenance,
installation, adjustment, or service of the products.
3. During the applicable warranty period, ION Audio will repair or replace, at ION Audio's sole
discretion, without charge to the purchaser, any defective component part of the product. ION
Audio may, at ION Audio's sole discretion, use rebuilt, reconditioned, or new parts or
components when repairing any product or replace a product with a rebuilt,
reconditioned, new or comparable product.
4. THE WARRANTIES GIVEN IN THIS LIMITED WARRANTY, TOGETHER WITH ANY
IMPLIED WARRANTIES COVERING ION AUDIO PRODUCTS, INCLUDING WITHOUT
LIMITATION ANY WARRANTIES OF MERCHANTABILITY OR FITNESS FOR A
PARTICULAR PURPOSE, ARE LIMITED TO THE DURATION OF THIS LIMITED
WARRANTY. EXCEPT TO THE EXTENT PROHIBITED BY APPLICABLE LAW,
INMUSIC OR ION AUDIO SHALL NOT BE LIABLE FOR ANY SPECIAL,
INCIDENTAL, CONSEQUENTIAL, INDIRECT OR SIMILAR DAMAGES, LOSS OF
PROFITS, DAMAGES TO PURCHASER'S PROPERTY, OR INJURY TO PURCHASER
OR OTHERS ARISING OUT OF THE USE, MISUSE OR INABILITY TO USE ANY ION
AUDIO PRODUCT, BREACH OF WARRANTY, OR NEGLIGENCE, INCLUDING BUT
NOT LIMITED TO INMUSIC'S OR ION AUDIO'S OWN NEGLIGENCE, EVEN IF
INMUSIC, ION AUDIO, OR ITS AGENTS HAVE BEEN ADVISED OF SUCH DAMAGES,
OR FOR ANY CLAIM BROUGHT AGAINST
PRODUCT WARRANTY
(NON-U
.S.A.)
6

PURCHASER BY ANY OTHER PARTY. THIS LIMITED WARRANTY IS THE
COMPLETE WARRANTY FOR ION AUDIO'S PRODUCTS, AND IS GIVEN IN LIEU
OF ALL OTHER EXPRESS WARRANTIES. THIS LIMITED WARRANTY SHALL NOT
EXTEND TO ANYONE OTHER THAN THE ORIGINAL PURCHASER OF THIS
PRODUCT AND STATES PURCHASER'S EXCLUSIVE REMEDY. IF ANY PORTION OF
THIS LIMITED WARRANTY IS ILLEGAL OR UNENFORCEABLE BY REASON OF
ANY LAW, SUCH PARTIAL ILLEGALITY OR UNENFORCEABILTY SHALL NOT
AFFECT THE ENFORCEABILITY OF THE REMAINDER OF THIS LIMITED
WARRANTY WHICH PURCHASER ACKNOWLEDGES IS AND WILL ALWAYS BE
CONSTRUED TO BE LIMITED BY ITS TERMS OR AS LIMITED AS THE LAW PERMITS.
This Limited Warranty allocates risk of product failure between purchaser and ION Audio, and
ION Audio's product pricing reflects this allocation of risk and the limitations of liability
contained in this Limited Warranty. The agents, employees, distributors, and dealers of ION
Audio are not authorized to make modifications to this Limited Warranty, or make additional
warranties binding on ION Audio or inMusic. Accordingly, additional statements such as
dealer advertising or presentation, whether oral or written, do not constitute warranties by
ION Audio or inMusic and should not be relied upon. Some jurisdictions do not allow
limitations on how long an implied warranty lasts, so the above limitation may not apply to
you. This warranty gives you specific legal rights, and you may also have other rights which
vary under local laws.
Please record the serial number of your unit as shown on the back of the chassis as well as the
name of the dealer from whom you purchased the unit. Retain this information and your
original purchase receipt for your records. Go to our web site ionaudio.com to register your product
with us.
MODEL: PURCHASED FROM:
SERIAL NUMBER: DATE OF PURCHASE:
7

RETURN INFORMATION
•
A Return Authorization number must be obtained from your local ION
Audio
Representative. For your representative go to ionaudio.com.
•
A copy of the original sales receipt must also be included for the equipment to
be repaired under warranty.
•
The faulty equipment must be packed in its original packaging.
•
One additional outer layer of packaging must be included to ensure
product safety. Failures to do so may inadequately protect the equipment in
transit and, therefore, jeopardize the customer's warranty.
•
ION Audio will not accept C.O.D. shipments and no call tags will be issued for
merchandise return.
•
ION Audio will not return repaired merchandise to customers by priority service,
unless by written request at the customer's cost. Requests must be submitted in
writing with merchandise returned.
•
The defective ION Audio equipment should be sent, FREIGHT PREPAID with
Return Authorization number clearly printed on the outer packaging and original
sales receipt enclosed to your local service center
8

1. Read these instructions.
2. Keep these instructions.
3. Heed all warnings.
4. Follow all Instructions.
5. Do not use this apparatus near water.
6. Clean only with dry cloth.
7. Do not block any ventilation openings. Install in accordance with the
manufacturer's instructions.
8. Do not install near any heat sources such as radiators, heat registers, stoves, or
other apparatus (including amplifiers) that produce heat.
9. Do not defeat the safety purpose of the polarized or grounding-type plug. A polarized plug
has two blades with one wider than the other. A grounding type plug has two blades and a
third grounding prong. The wide blade or the third prong is provided for your safety. If the
provided plug does not fit into your outlet, consult an electrician for replacement
of the obsolete outlet.
10. Protect the power cord from being walked on or pinched particularly at plugs, convenience
receptacles, and the point where they exit from the apparatus.
11. Only use attachment/accessories specified by the manufacturer.
12. Use only the cart, stand, tripod, bracket or table specified by the
manufacturer, or sold with the apparatus. When a cart is used,
use caution when moving the cart/apparatus combination to avoid
injury from tip-over.
13. Unplug this apparatus during lightning storms or when unused for long
periods of time.
14. Refer all servicing to qualified service personnel. Servicing is required when the apparatus
has been damaged in any way, such as power-supply cord or plug is damaged, liquid has
been spilled or objects have fallen into the apparatus, the apparatus has been exposed to
rain or moisture, does not operate normally, or has been dropped.
15. Power Sources - This product should be connected to a power supply only of the
type described in these operating instructions, or as marked on the unit.
16. Internal/External Voltage Selectors - Internal or external voltage selector switches, if
any,should only be reset and re-equipped with a proper plug for alternative voltage by a qualified
service technician. Do not attempt to alter this yourself.
17. Water and Moisture - This product should be kept away from direct contact with liquids. The
apparatus shall not be exposed to dripping or splashing and that no objects filled with liquids,
such as vases, shall be placed on the apparatus.
IMPORTANT SAFETY INSTRUCTIONS
9

18. CAUTION – Danger of explosion if battery is incorrectly replaced. Replace only with
the same or equivalent type. Batteries (a battery pack or an installed battery) shall
not be exposes to excessive heat such as sunshine, fire, etc.
19. Where the ma ins plug or an appliance coupler is used as the disconnect device, the
disconnect device shall remain readily operable.
20. Protective earthing terminal: The apparatus should be connected to a
mains socket outlet with a protective earthing connection.
a. Finland (Suomi): Laite on liitettävä suojamaadoituskoskettimilla
varustettuun pistorasiaan.
b. Norway (Norge): Apparatet må tilkoples jordet stikkontakt.
c. Sweden (Sverige): Apparaten skall anslutas till jordat uttag.
21. This symbol means the equipment is a Class II or double-insulated electrical appliance. It
has been designed in such a way that it does not require a safety connection to electrical
earth.
22. Do not install this equipment in a confined or "boxed-in" space such as a bookcase or similar
unit, and maintain good ventilation conditions. The ventilation should not be impeded
by covering the ventilation openings with items such as newspaper, tablecloths, curtains, etc.
23. This apparatus is for professional use only.
24. When moving or not using the appliance, secure the power cord (e.g., wrap it with a cable
tie). Be careful not to damage the power cord. Before using it again, make sure the power
cord has not been damaged. If the power cord has been damaged at all, bring the unit and
cord to a qualified service technician for repair or replacement as specified by
the manufacturer.
25. WARNING: Excessive sound pressure (high volumes) from headphones can cause hearing
loss.
26. WARNING: Please refer to any important information (e.g., electrical, safety, etc.) printed on
the exterior bottom enclosure or rear panel before installing or operating the product.
SERVICE INSTRUCTIONS
•
Disconnect power cord before servicing.
•
Replace critical components only with factory parts or recommended equivalents.
•
For AC line powered units – Before returning repaired unit to user, use an ohmmeter to
measure from both AC plug blades to all exposed metal parts. The resistance should
be more than 2,000,000 ohms.
10
SAFETY NO
CAUTION: TO REDUCE THE RISK OF
ELECTRIC SHOCK, DO NOT
REMOVE ANY
SERVICEABLE
PARTS INSIDE. REFER SERVICING TO QUALIFIED SERVICE PERSONNEL ONLY.
DANGEROUS VOLTAGE: The lightning flash with arrowhead symbol
within the equilateral triangle is intended to alert the user to the presence of
un- insulated "dangerous voltage" within the product's enclosure that may
be of sufficient magnitude to constitute a risk of electric shock.
INSTRUCTIONS: The exclamation point within the equilateral triangle is
intended to alert the user to the presence of important operating
and maintenance (servicing) instructions in the literature accompanying this
appliance.
WARNING: To reduce the risk of fire or electrical shock, do not expose this appliance to
rain or moisture. Electrical equipment should NEVER be kept or stored in damp environments.
CAUTION (for U.S.A. & CANADIAN models only): TO PREVENT ELECTRIC SHOCK DO
NOT USE THIS (POLARIZED) PLUG WITH AN EXTENSION CORD, RECEPTACLE OR
OTHER OUTLET UNLESS THE BLADES CAN BE FULLY INSERTED TO PREVENT BLADE
EXPOSURE.
NOTICE CONCERNING LASER PRODUCTS: DANGER: INVISIBLE LASER RADIATION WHEN
OPEN AND INTERLOCK FAILED OR DEFEATED. AVOID DIRECT EXPOSURE TO BEAM. USE
OF CONTROLS OR ADJUSTMENTS OTHER THAN THOSE SPECIFIED HEREIN MAY RESULT
IN HAZARDOUS RADIATION EXPOSURE.
NOTICE CONCERNING FCC REGULATIONS: You are cautioned that changes or modifications
not expressly approved by the part responsible for compliance could void the user's
authority to operate the equipment.
This equipment has been tested and found to comply with the limits for a Class B digital device,
pursuant to part 15 of the FCC rules. These limits are designed to provide reasonable protection
against harmful interference in a residential installation. This equipment generates uses and can
radiate radio frequency energy and, if not installed and used in accordance with the instructions,
may cause harmful interference to radio communications. However, there is no guarantee that
interference will not occur in a particular installation. If this equipment does cause harmful
COVER. NO
USER-
11
TICES
SA 1965
SA 1966
interference to radio or television reception, which can be determined by turning the equipment off
and on, the user is encouraged to try to correct the interference by one or more of the following
measures:
a) Reorient or relocate the receiving antenna.
b) Move this unit.
c) Increase the separation between the equipment and receiver.
d) Connect the equipment into an outlet on a circuit different from that to which the receiver
is connected.
e) Be sure that all cables are properly shielded, using a choke or ferrite where appropriate.
f) Consult the dealer or an experienced radio/television technician for help.
This device complies with Industry Canada licence-exempt RSS standard(s).Operation is subject to the
following two conditions: (1) this device may not cause interference, and (2) this device must accept any
interference, including interference that may cause undesired operation of the device.
Changes or modifications not expressly approved by the party responsible for
compliance could void the user’s authority to operate the equipment.
FCC RF Radiation Exposure Statement: This equipment complies with FCC radiation exposure
limits set forth for an uncontrolled environment. This equipment should be installed and operated
with minimum distance 20cm between the radiator & your body.
.
In an environment with radio frequency interference, the unit may malfunction and resume normal
operation after removal of the interference.
For best audio quality, avoid using this device in a high RF-radiated environment.
This unit does not exceed the Class B limits for radio noise emission from digital apparatus set out
in the radio interference regulations of the Canadian Department of Communications.
For 240-volt use in U.K., use NEMA-style 240-volt plug. For other countries use proper plug for local
outlet.
THIS DEVICE COMPLIES WITH PART 15 OF THE FCC RULES. OPERATION IS
SUBJECT TO THE FOLLOWING TWO CONDITIONS: (1) THIS DEVICE
MAY NOT CAUSE HARMFUL INTERFERENCE, AND (2) THIS DEVICE
MUST ACCEPT ANY INTERFERENCE RECEIVED, INCLUDING
INTERFERENCE THAT MAY CAUSE UNDESIRED OPERATION.
ESD / EFT Warning: This unit may contain a microcomputer for signal processing
and control functions. In very rare situations, severe interference, noise from an
external source, or static electricity may cause it to lock up. In the unlikely event
that this should happen, turn off the unit, wait at least five seconds, and then turn it
back on again.
12

DOUBLE INSULATED – When servicing use only identical replacement parts.
Correct Disposal of this product: This marking indicates that this product should
not be disposed with other household wastes throughout the EU. To
prevent possible harm to the environment or human health from uncontrolled
waste disposal, recycle it responsibly to promote the sustainable reuse of
material resources. To return your used device, please use the return and
collection systems or contact the retailer where the product was purchased. They
can take this product for environmentally safe recycling.
DISPOSING OF GENERAL PURPOSE & ALKALINE BATTERIES
ƒ Alkaline batteries can be safely disposed of with normal household waste. Never
dispose of
batteries in fire because they could explode.
ƒ Alkaline batteries are composed primarily of common metals—steel, zinc, and manganese—
and
do not pose a health or environmental risk during normal use or disposal.
ƒ It is important not to dispose of large amounts of alkaline batteries in a group. Used batteries
are
often not completely "dead." Grouping used batteries together can bring these "live"
batteries into contact with one another, creating safety risks.
ƒ Proven cost-effective and environmentally safe recycling processes are not yet
universally
available for alkaline batteries. Some communities offer recycling or collection of
alkaline batteries. Contact your local government for disposal practices in your area.
13

1. inMusic Brands, Inc. ("inMusic") garantiza al comprador original que todos los productos de
ION Audio están libres de defectos de ma terial y de mano de obra bajo su uso y servicio
normal por el período que comienza en la fecha de compra en un vendedor autorizado por
ION Audio y que continúa durante el tiempo que sigue a esa fecha por (1) Año.
2. Esta Garantía Limitada está condicionada al uso adecuado del producto por parte del
comprador.
Esta Garantía Limitada no cubre: (a) defectos o daños que resultan de accidentes, el uso
incorrecto, abuso, negligencia, estrés físico o eléctrico fuera de lo común, modificación de
cualquier parte del producto o daño cosmético; (b) equipos que tienen el número de serie
retirado o ilegible; (c) todas las superficies de plástico y otras partes expuestas externamente
que han sido rayadas o dañadas debido a su uso normal; (d) defectos o daños
debido a pruebas, operación, mantenimiento, instalación, ajustes o reparación incorrectos
de los productos.
3. Durante el período de garantía aplicable, ION Audio reparará o cambiará, a su sola
discreción, sin costo para el comprador, cualquier componente defectivo del producto. ION
Audio puede, bajo su sola discreción, usar repuestos o componentes nuevos, reconstruidos
o renovados al reparar cualquier producto o cambiar un producto con un producto
nuevo, reconstruido, renovado o comparable.
4. LAS GARANTÍAS OTORGADAS EN ESTA GARANTÍA LIMITADA, JUNTO
CON CUALQUIER OTRA GARANTÍA IMPLÍCITA QUE CUBRA LOS PRODUCTOS DE
ION AUDIO, INCLUYENDO PERO NO LIMITANDO NINGUNA GARANTÍA DE COMERCIO
O DE UTILIDAD PARA UN PROPÓSITO EN PARTICULAR, ESTÁN LIMITADAS A LA
DURACIÓN DE ESTA GARANTÍA LIMITADA. SALVO EN LA MEDIDA EN QUE LO
PROHÍBAN LAS LEYES APLICABLES, INMUSIC O ION AUDIO NO SERÁ
RESPONSABLE POR NINGÚN DAÑO ESPECIAL, ACCIDENTAL, CONSECUENTE,
INDIRECTO O SIMILAR, PÉRDIDA DE GANANCIAS, DAÑOS A LA PROPIEDAD
DEL COMPRADOR O LESIONES AL COMPRADOR Ó A OTROS RESULTANTES
DEL USO, EL USO INCORRECTO O LA INCAPACIDAD DE USAR UN
PRODUCTO DE ION AUDIO, INCUMPLIMIENTO DE
GARANTÍA DEL PRODUCTO (NO U.S.A.)
14
 Loading...