

j
ionaudio.com/support
prop
Manual Version 1.1
Go Rocker
Quickstart Guide
Guia de inicio rapido
Guide d'utilisation rapide
For technical support.
Para soporte técnico.
Pour obtenir de l’assistance technique.
Box Contents:
Go Rocker, Micro USB Charging Cable, Quickstart Guide.
Charging Go Rocker:
Use the included micro USB cable to connect Go Rocker to (A) a USB power adapter connected to a power outlet or (B)
your computer (powered on) for 2 hours.
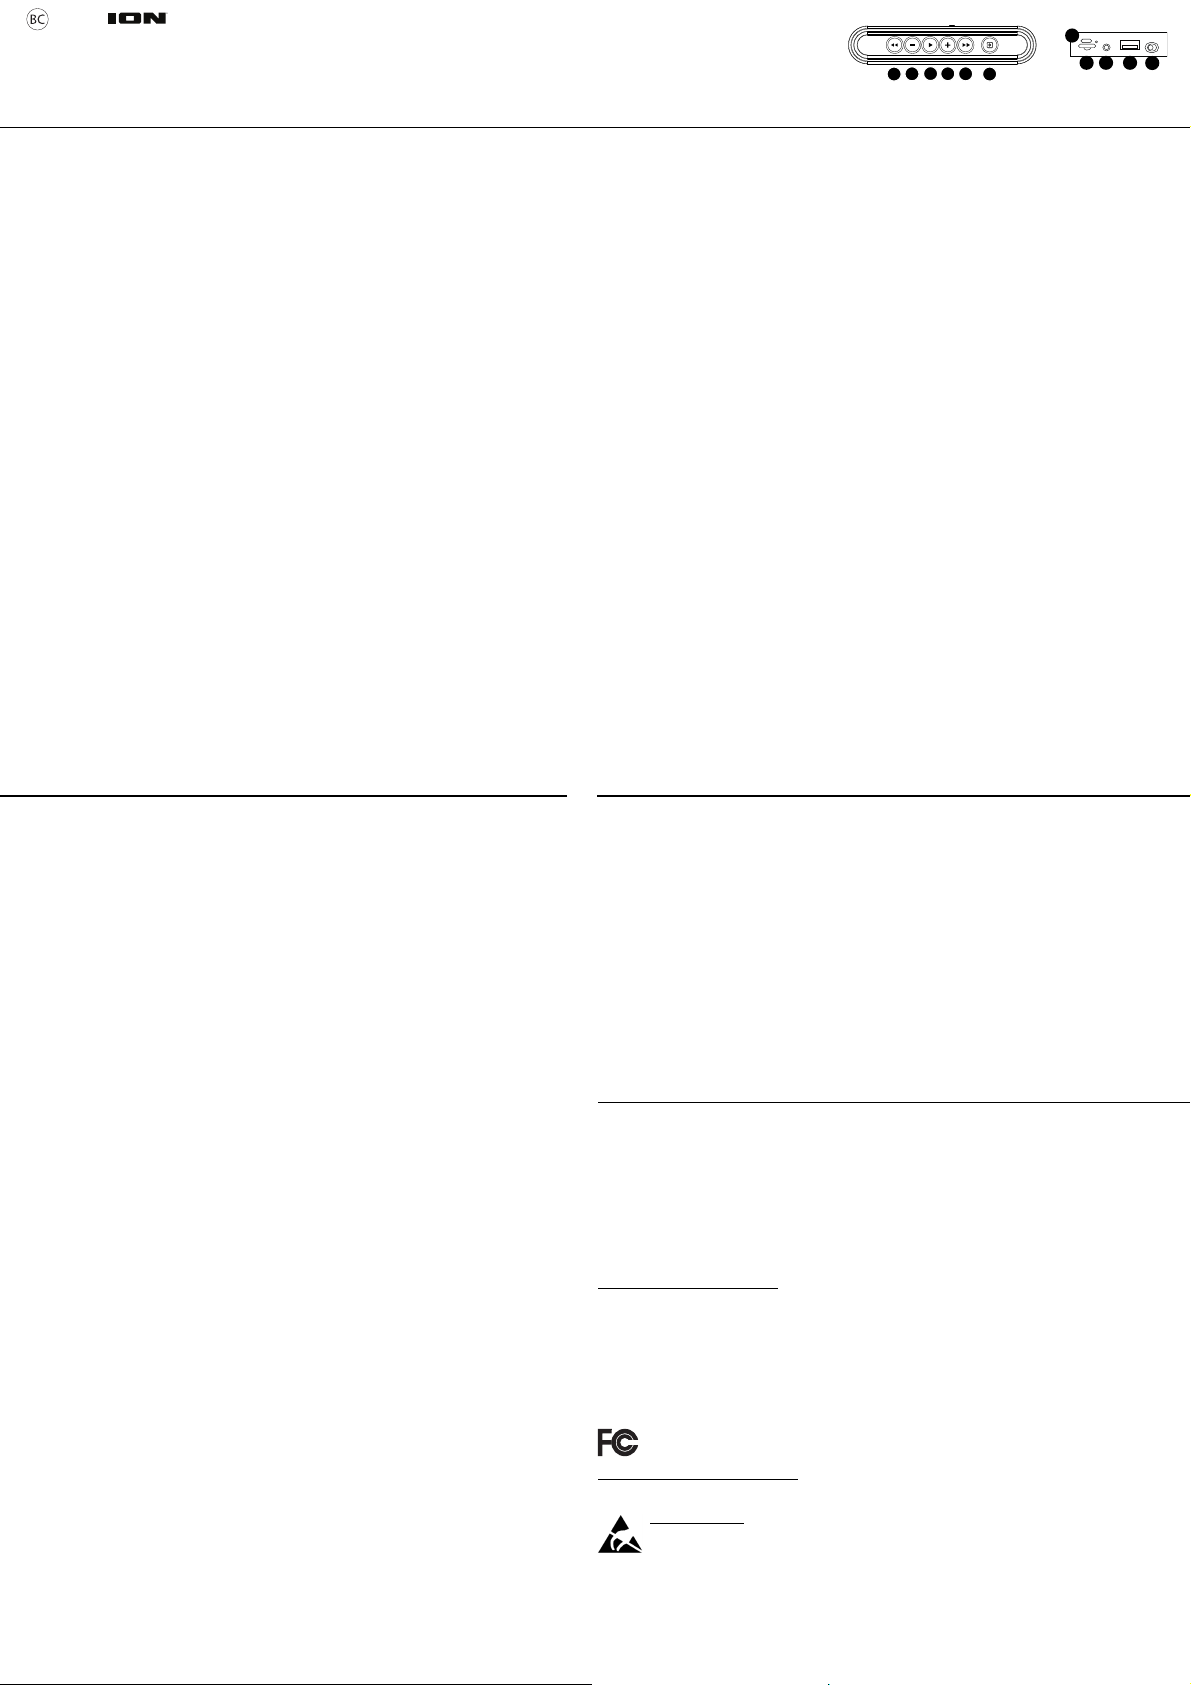
Controls:
1. Previous Track: Press this button to skip to the beginning of the play ing track (or the previous track de pending on the
2. Volume Down (-): Press this button to decrease the volume.
3. Play/Pause: Press to play or pause a track from a connected Bluetooth device.
4. Volume Up (+): Press this button to increase the volume.
5. Next Track: Press and hold this button to skip to the next tr ack.
6. Input: Press this button to switch betwe en Bluetooth and Aux Input.
7. Micro USB Charge Port: Use the included micro USB cable to connect this port to a DC 5V charger or computer USB
8. Micro SD Card Slot: Insert your micro SD card here to play music.
9. Aux Input: Use a stereo 1/8" (3.5 mm) stereo audio cable to connect this input to a CD player, digital media player, or
10. USB port: Connect your USB flash drive here to play music.
11. Power Switch: Use this switch to power Go Rocker on and off.
Bluetooth Pairing:
1. Turn on your Bluetooth device.
2. Power on Go Rocker and it will automatically go into pairing mode to search for Bluetooth devices.
3. Navigate to your Bluetooth device’s setup screen, find GO ROCKER and connect.
Using the Phone:
Note: You must power on and pair Go Rocker with your Bluetooth device before using it to listen to music or as a
speakerphone.
When you have an incoming call, Go Rocker’s speaker will play a ringtone.
1. To answer the call, press Go Rocker's Play/Pause button. To reject an incoming call, press and hold the Play/Pause
2. Speak into the microphone and adjust the call volume using the Volume buttons.
3. To end the call, press the Play/Pause button.
LED feedback:
Contenu de la boîte :
Go Rocker, câble de rechargement USB, guide d’utilisation rapide.
Rechargement de la batterie de du Go Rocker : Utilisez le câble micro-USB inclus afin de brancher le Go Rocker à (A) un
adaptateur d’alimentation USB branché à une prise secteur, ou (B) à un ordinateur (sous tension) pendant 2 heures.
Commandes :
1. Piste précédente : Appuyez sur cette touche pour revenir au début de la piste (ou à la piste précédente selon le lecteur
2. Volume – : Appuyez sur cette touche pour diminuer le volume.
3. Lecture / Arrêt de lecture : Appuyez sur cette touche pour lancer la lecture ou interrompre une piste sur un
4. Volume + : Appuyez sur cette touche pour a ugmenter le volume.
5. Piste suivante : Appuyez sur cette touche pour passer à la piste suivante.
6. Entrée: Appuyez sur cette touche pour basculer entre les d’entrée Bluetooth et Aux.
7. Port de rechargement micro-USB : Utilisez le câble micro USB fourni pour connecter ce port à un chargeur DC 5V ou
8. Emplacement pour carte mémoire micro-SD : Insérez une carte micro-SD dans cet emplacement pour écouter de la
9. Entrée auxiliaire 3,5 mm (1/8 po) : Cette entrée stéréo 3,5 mm permet de brancher un lecteur de disques compacts,
10. Port USB : Ce port permet de brancher une clé USB pour écouter de la musique.
11. Interrupteur d'alimentation : Utilisez cet interrupteur pour allumer et éteindre Go Rocker.
Jumelage Bluetooth :
1. Mettez votre périphérique Bluetooth sous tension.
2. Mettez le Go Rocker sous tension et il passera automatiquement en mode jumelage afin de rechercher les
3. Accédez à l'écran de configuration de votre périphérique Bluetooth, recherchez « GO ROCKER » et lancez le jumelage.
Prendre des appels :
Remarque : Vous devez mettre le Go Rocker sous tension et le jumeler avec votre appareil Bluetooth avant de pouvoir
écouter de la musique ou de prendre des appels.
Lorsque vous recevez un appel, le haut-parleur du Go Rocker fera jouer la sonnerie de votre téléphone.
1. Pour prendre l’appel, appuyez sur la touche Lecture/Arrêt du Go Rocker. Pour re
2. Parlez dans le microphone et réglez le volume à l’aide des touches Volume.
3. Pour mettre fin à l’appel, appuyez sur la touche Lecture/Arrêt.
Indicateurs DEL :
player or position in the song).
port to charge Go Rocker.
other audio sources.
Note: If your Bluetooth device prompts for a pairing code, enter “0000”.
Press and hold the Volume + and Volume - buttons to disconnect a paired Bluetooth device. To connect to another
Bluetooth device, repeat step 3.
button.
Note: If you get an incoming call during music playback, the music will pause until you end the call.
• Bluetooth: In pairing mode, the blue LED will blink fast. Once a device is connected, the blue LED will be lit solid.
• Charging: During charging, the red LED will be solid red. After fully charged, the red LED will turn off. When the
battery is low, the unit will prompt o n the display to remind you.
ou la position dans la piste).
périphérique Bluetooth connecté.
au port USB de l'ordinateur pour charger le Go Rocker.
musique.
un lecteur multimédia ou autres sources audio.
périphériques Bluetooth.
Remarque : Si votre périphérique Bluetooth vous demande d’entrer un code de jumelage, entrez « 0000 ».
Enfoncez puis relâchez la maintenez les touches Volume + et Volume – de lecture pour déconnecter le périphérique
Bluetooth branché. Pour jumeler un autre périphérique Bluetooth, répétez les étape 3.
touche Lecture/Arrêt enfoncée.
Remarque : Si vous recevez un appel alors que la musique joue, la musique s’arrête jusqu’à ce que vous mettiez fin à
l’appel.
• Bluetooth : En mode jumelage, la DEL bleue clignote rapidement. Une fois l'enceinte connectée à un appareil, la
DEL bleue reste allumée.
• Rechargement de la batterie : Pendant le rechargement de la batterie, la DEL rouge reste allumée. Lorsque la
batterie est complètement rechargée, la DEL rouge s’éteint. Lorsque la batterie est faible, l’appareil vous invite à
vous le rappeler.
ionaudio.com/warranty
For complete warranty information.
Para información completa sobre la garantía.
Pour obtenir toutes les informations relatives à la garantie.
eter un appel entrant, maintenez la
Controls Diagram
Controles Diagram
Contrôles Diagramme
Contenido de la caja:
Go Rocker, cable USB de carga, guía de inic io rápido.
Cómo cargar el Go Rocker:
Use el cable micro USB incluido para conectar el Go Rocker a (A) un adaptador de alimentación USB conectado a un tomacorriente
o (B) su ordenador (encendido) durante 2 horas.
Controles:
1. Pista anterior: Pulse este botón para saltar al principio de la pista en reproducción (o la pista anterior dependiendo del
reproductor o la posición dentro del tema).
2. Volumen –: Pulse este botón par a disminuir el volumen.
3. Reproducir / Hacer pausa: Pulse para reproducir o hacer pausa en una pista de un dispositivo Bluetooth conectado.
4. Volumen +: Pulse este botón para aumentar el volumen.
5. Pista siguiente: Pulse este botón para pasar a la siguiente pista.
6. Entrada: Presione este botón para cambiar entre los de entrada de Bluetooth y Aux.
7. Puerto de carga micro USB: Use el cable micro USB incluido para conectar este puerto a un cargador de CC de 5 V o al
puerto USB de la computadora para cargar Go Rocker.
8. Ranura para tarjeta micro SD: Inserte su tarjeta micro SD aquí para reproducir música.
9. Entrada auxiliar de 3,5 mm (1/8 pulg.): Conecte a esta entrada auxiliar estéreo de 3,5 mm (1/8 pulg.) un reproductor de CD, un
reproductor de medios digitales u otra fuente de audio.
10. Puerto USB: Conecte su unidad flash USB para reproducir música.
11. Interruptor de encendido: use este interruptor para encender y apagar el Go Rocker.
Apareamiento Bluetooth:
1. Encienda su dispositivo Bluetooth.
2. Encienda el Go Rocker, que pasará automáticamente al modo de apareamiento para buscar dispositivos Bluetooth.
3. Navegue a la pantalla de configura ción de su dispositivo Bluetooth, bus que GO ROCKER y conecte.
Nota: Si su dispositivo Bluetooth solicita un código de apareamiento, ingrese “0000”.
Pulse manteniendo pulsados Volume – y Volume + para desconectar un dispositivo Bluetooth apareado. Para conectarse a otro
dispositivo Bluetooth, repita los paso 3.
Cómo utilizar el teléfono:
Nota: Debe encender y aparear el Go Rocker con su dispositivo Bluetooth a fin de poder utilizarlo para escuchar música o como
teléfono manos libres.
Cuando tiene una llamada entrante, el altavoz del Go Rocker reproduce un tono de llamada.
Para contestar la llamada, pulse el botón Reproducir / Hacer Pausa del Go Rocker. Para rechazar una llamada entrante,
1.
mantenga pulsado el botón de Reproducir / Hacer Pausa.
Nota: Si recibe una llamada entrante durante la reproducción de música, ésta se pondrá en pausa hasta que termine la llamada.
2. Hable frente al micrófono y ajuste el volumen de la llamada con los botones Volume (Volumen).
3. Para terminar la llamada, puls e el botón Reproducir / Hacer Pausa.
Significado de los parpadeos del LED:
• Bluetooth: En el modo de apareamiento, el LED azul parpadeará rápidamente. Una vez conectado un dispositivo, el LED
azul quedará encendido permanentemente.
• Carga: Durante la carga, el LED rojo quedará encendido permanentemente. Una vez completa la carga, el LED rojo se
apagará. Cuando la batería está baja, la unidad le indicará en la pantalla que le recuerde.
Technical Specifications
Dimensions: 3.75” x 3.75” x 1.25”; 95 x 95 x 50 mm
Weight: 0.66 lbs.; 0.30 kg
Output Power: 2 x 3W stereo
Frequency Range: 2.4 - 2.4835 GHz ISM band
Bluetooth Profile: Version 4.2, A2DP, HFP, AVRCP
Bluetooth Range: Up to 33 ft. / 10 m
Connections: 3.5 mm (1/8”) aux input (line-level), micro-USB port, USB-A port, SD card slot
Micro SD Card Compatibilit y: Up to 32 GB supported
Micro SD Card Compatible Playback Files: .MP3, .WAV
Battery: 3.7 V, 1200 mAh rechargea ble Li-Polymer
Up to 2 hours playing/talking time; Up to 2 ho urs to fully recharge
Operating Temperature Range: 14°F to 131°F / -10°C to 55°C
Power: Micro-USB port (5 VDC, 1 A)
Read and follow these instructions, heed all warnings, and keep this document in a safe place for future reference. Clean only
with dry cloth. Refer all servicing to qualified service personnel. Servicing is required when the apparatus has been damaged in
any way, such as power cord or plug is damaged, does not operate normally, or has been dropped. Connect this product to a
power supply only of the type described in these operating instructions, or as marked on the unit. Keep this product away from
direct contact with liquids.
Caution: To reduce the risk of electric shock, do not remove any cover. No user-serviceable parts inside. Refer servicing to
qualified service personnel o nly.
Note: This product contains a lithium-ion battery. Never dispose of any types of batteries in fire or near excessive heat or direct
sunlight. Overheated batteries can rupture or explode. If you are unsure of how or where to dispose of a battery, refer to your
local ordinances for the
Notice Concerning FCC Regulations: You are cautioned that changes or modifications not expressly approved by the part
responsible for compliance could void the user's authority to operate the equipment. This equipment has been tested and found
to comply with the limits for a Class B digital device, pursuant to part 15 of the FCC rules. These limits are designed to provide
reasonable protection against harmful interference in a residential installation. This equipment generates uses and can radiate
radio frequency energy and, if not installed and used in accordance with the instructions, may cause harmful interference to
radio communications. Howev er, there is no guarantee that inte rference will not occur in a particular installation. If th is
equipment does cause harmful interference to radio or television reception, which can be determined by turning the equipment
off and on, the user is encouraged to try to correct the interference by one or more of the following measures: (a) reorient or
relocate the receiving antenna; (b) move this unit; (c) increase the separation between the equipment and receiver; (d) connect
the equipment into an outlet on a circuit different from that to which the receiver is connected; (e) be sure that all cables are
properly shielded, using a choke or ferrite where appropriate; (f) consult the dealer or an experienced radio/television technician
for help.
This device complies with part 15 of the FCC rules. Operation is subject to the following two conditions: (1) this
device may not cause harmful interference, and (2) this device must accept any interference received, including
interference that may cause undesired operation.
FCC RF Radiation Exposure Statement: This equipment complies with FCC radiation exposure limits set forth for an
uncontrolled environment. End users must follow the specific operating instructions for satisfying RF exposure compliance. This
transmitter must not be co-located or operating in conjunction with any other antenna or transmitter.
ESD / EFT Warning: This unit may contain a microcomputer for signal processing and control functions. In very rare
situations, severe interference, noise from an external source, or static electricity may cause it to lock up. In the
unlikely event that this should happen, turn off the unit, wait at least five seconds, and then turn it back on again.
In an environment with radio frequency interference, the unit may malfunction and resume normal operation after removal of the
interference. For best audio quality, avoid using this device in a high RF-radiated environment. This unit does not exceed the
Class B limits for radio noise emission from digital apparatus set out in the radio interference regulations of the Canadian
Department of Communications.
ION Audio is a trademark of inMusic Brands, Inc., registered in the U.S. and other countries. The Bluetooth word mark and logo
are owned by the Bluetooth SIG, Inc. and any use of such marks by ION Audio is under license. SD is a registered trademark of
SD-3C, LLC. All other product names, company names, trademarks, or trade names are those of their respective owners.
Safety Instructions
er location, method, etc.
3 4
2
Panneau avant
5
6
1
Front Panel Panel frontal
AUX USB OFF/ON
DC 5V
7
TF
8 9
Rear Panel Panel trasero
Panneau arrière
11
10
 Loading...