

ION Audio IPA98A User Manual
2019-05-24 GM19355
IPA98A IPA98A
A0
周霞
说明书
280*210mm
140*210mm
100g书写纸
单黑印刷
骑马钉装订
18页

Quickstart Guide English ( 3 – 12 )
Guía de inicio rápido Español ( 13 – 22 )
Guide d’utilisation rapide Français ( 23 – 32 )
Guida rapida Italiano ( 33 – 42 )
Schnellstart-Anleitung Deutsch ( 43 – 52 )
Snelstartgids Nederlands ( 53 – 62 )
Appendix English ( 63 )

Quickstart Guide (English)
Introduction
Thank you for purchasing the Tailgater Smart. At ION, your entertainment is as important to us as it
is to you. That’s why we design our products with one thing in mind—to make your life more fun and
more convenient.
Box Contents
Tailgater Smart
Remote Control
Microphone with Cable
Power/Charging Cable
1/8” (3.5 mm) Stereo Aux Cable
USB-A to Micro-USB Cable
(2) Form-Fitted Rubber Inserts for Amazon Echo devices
Quickstart Guide
Safety & Warranty Manual
Support
For the latest information about this product (documentation, technical specifications, system
requirements, compatibility information, etc.) and product registration, visit ionaudio.com.
For additional product support, visit ionaudio.com/support.
Rechargeable Batteries
Note: Before you first use the product, please fully charge the battery. Your unit was purposely
shipped with a reduced battery charge to ensure safe transit.
Use the included power cable to connect the unit to a power outlet and let it charge. This helps
ensure the longest life for your battery.
Rechargeable lead-acid batteries are the same type used in automobiles. As with your car battery,
how you use this battery has a significant impact on its lifespan. With proper use and treatment, a
lead-acid battery can last for years. Here are some recommendations for getting the longest life from
the internal battery.
General Usage
Storage
Repair If the battery fails to charge, contact ION Audio at ionaudio.com.
Disposal
Fully charge the battery before using the speaker.
Charge the battery completely after each use.
For best product longevity, do not store at exceedingly hot (greater than 90 °F /
32 °C) or exceedingly cold (less than 32 °F / 0 °C) temperatures.
It is acceptable to leave your speaker plugged in. This will not overcharge the
battery.
If you leave the battery level low and do not charge it for 3 months, it may
permanently lose capacity.
Bring the unit to a recycling center or dispose of it in accordance with local
ordinances.
3
Setup
1. Make sure all items listed in the Box Contents are included in the box.
2. Read the Safety & Warranty Manual before using the product.
3. Make sure the battery is completely charged prior to first use for maximum battery life.
4. Study the Connection Diagrams.
5. Ensure the Master Volume on Tailgater Smart is at the minimum level.
6. Connect your devices.
7. Power on Tailgater Smart. Begin playing music from a connected device and raise the
Master Volume on Tailgater Smart to a comfortable level.
8. When you are finished using Tailgater Smart, return the Master Volume to the minimum
level and then power off the unit.
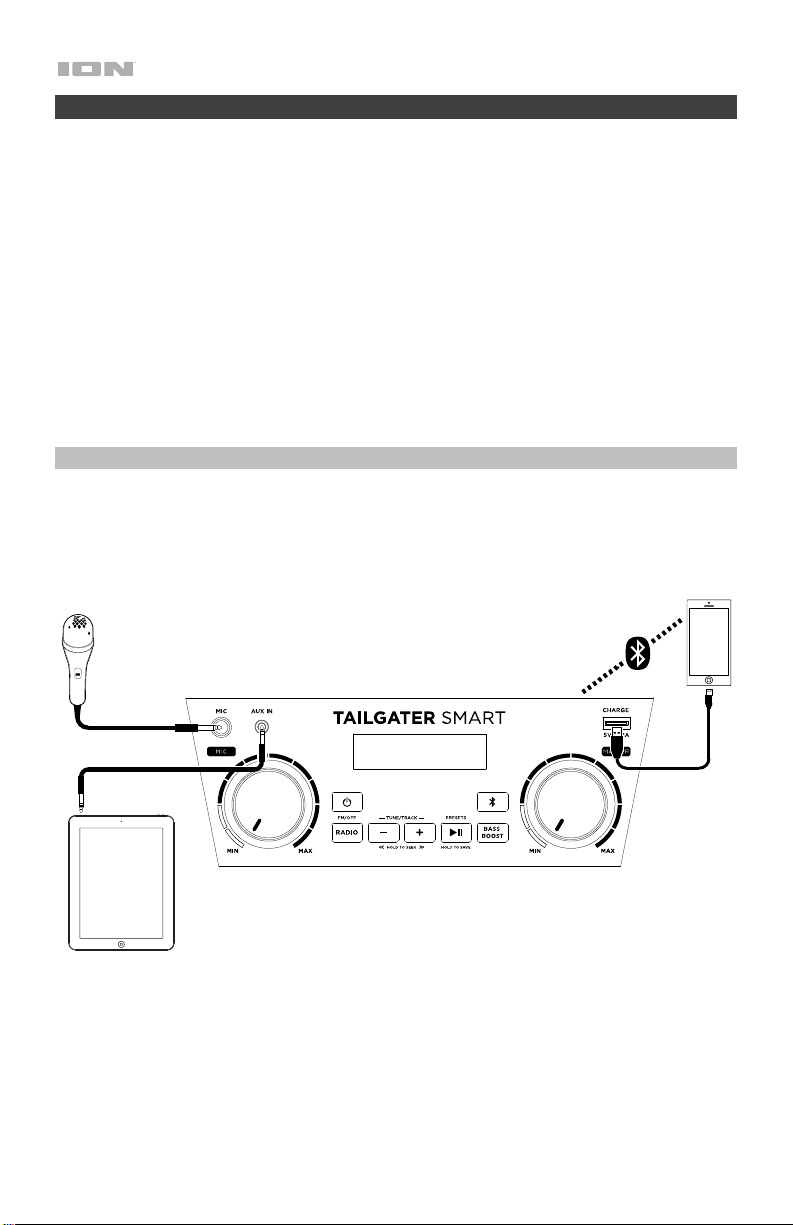
Connection Diagrams
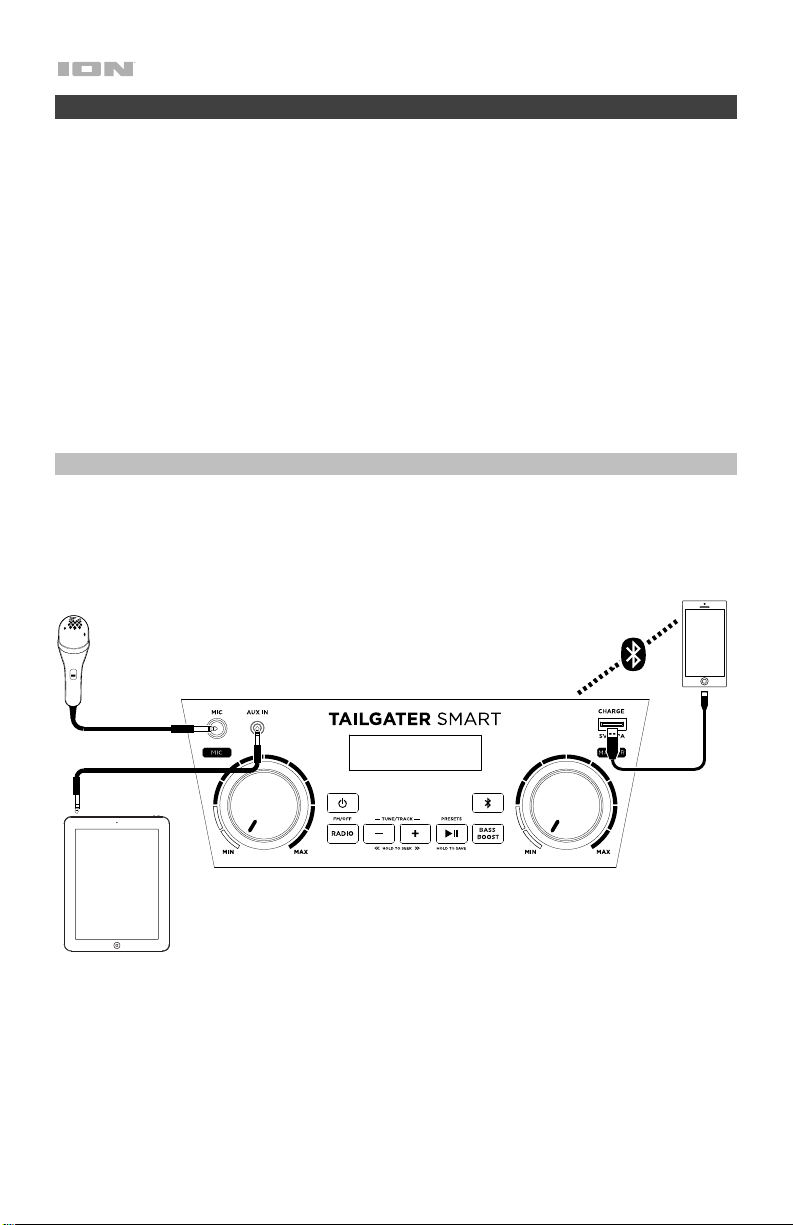
Items not listed under the Box Contents are sold separately.
Front Panel
Microphone
Bluetooth Device
Tablet, smartphone, etc.
4
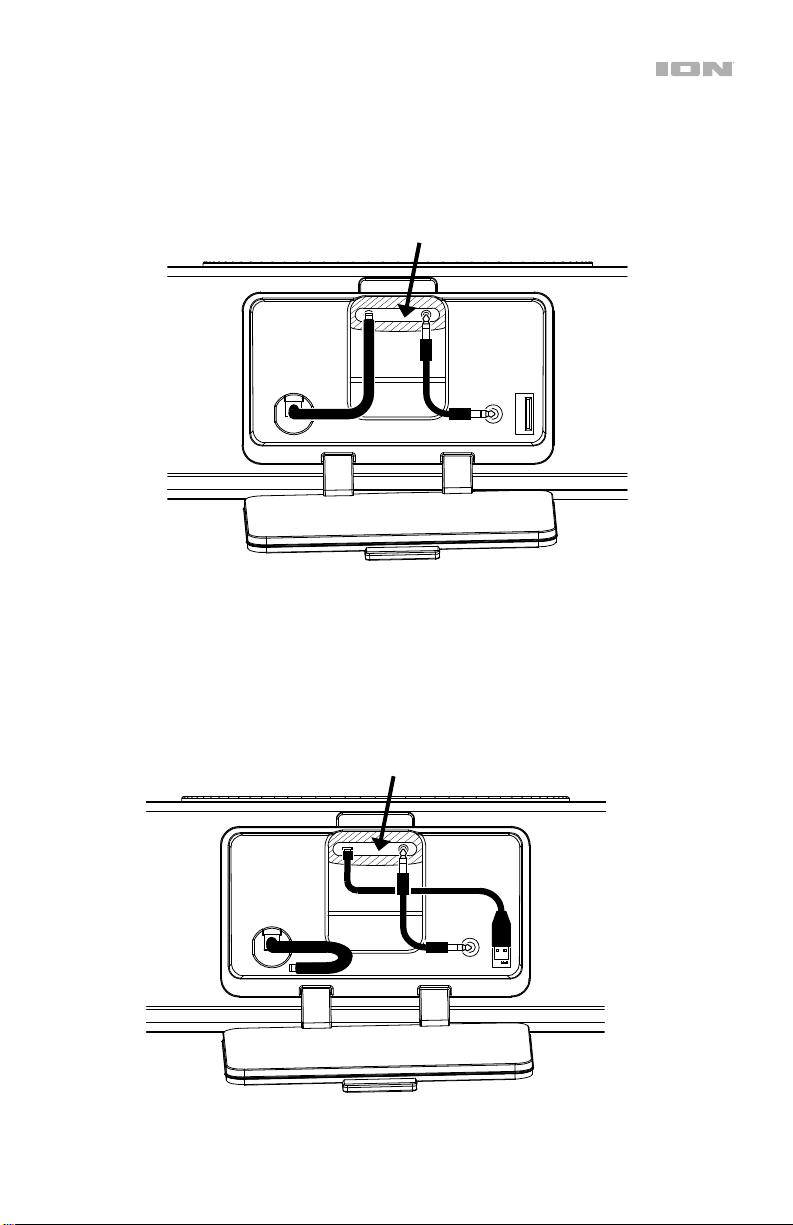
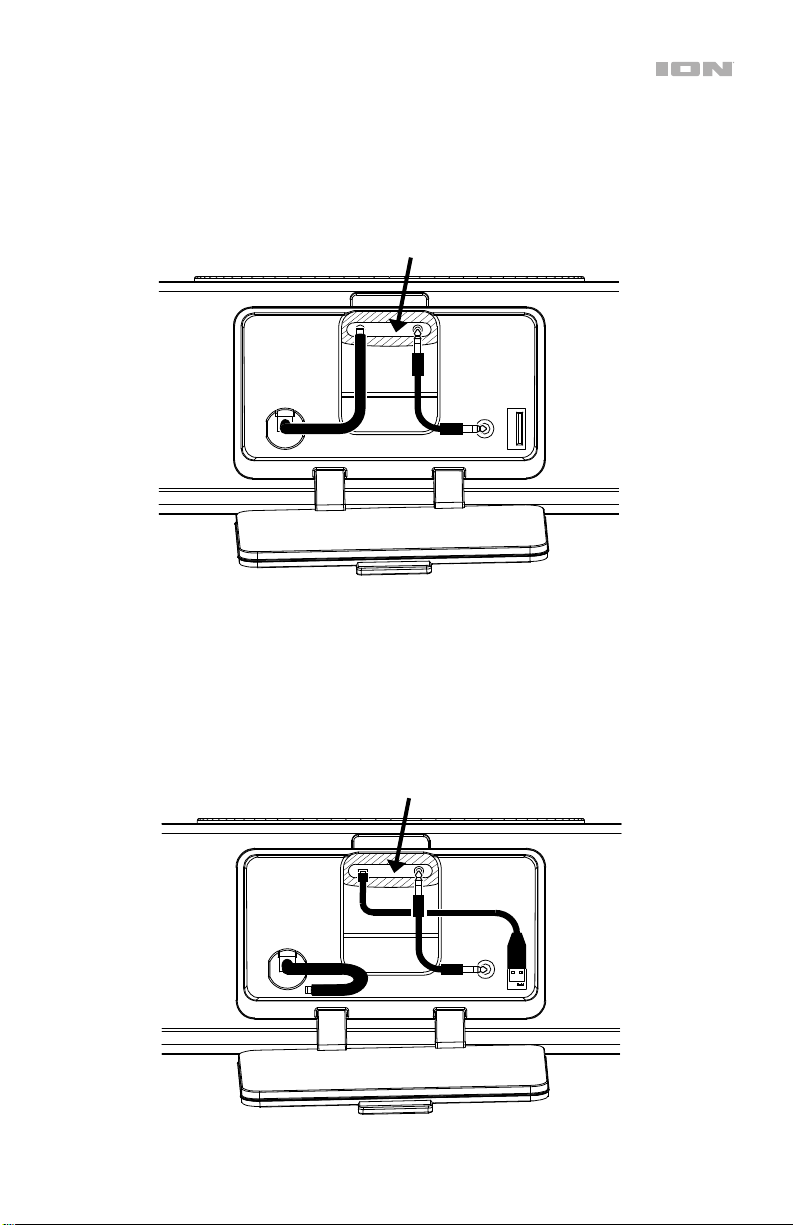
Rear Panel Recess (Example 1)
When connecting a 3rd generation Amazon Echo Dot, use the DC power cable attached to the
Rear Panel Recess for charging the unit. If you are not paired via Bluetooth, use the included
1/8” (3.5 mm) aux cable to transmit audio. See the Features section for more information.
Amazon device (positioned in
the holder on the Top Panel)
Rear Panel Recess (Example 2)
When connecting a 1st/2nd generation Amazon Echo Dot or an Amazon Echo Input, use the
included USB cable for charging the unit. If you are not paired via Bluetooth, use the included
1/8” (3.5 mm) aux cable to transmit audio. See the Features section for more information.
Amazon device (positioned in
the holder on the Top Panel)
5
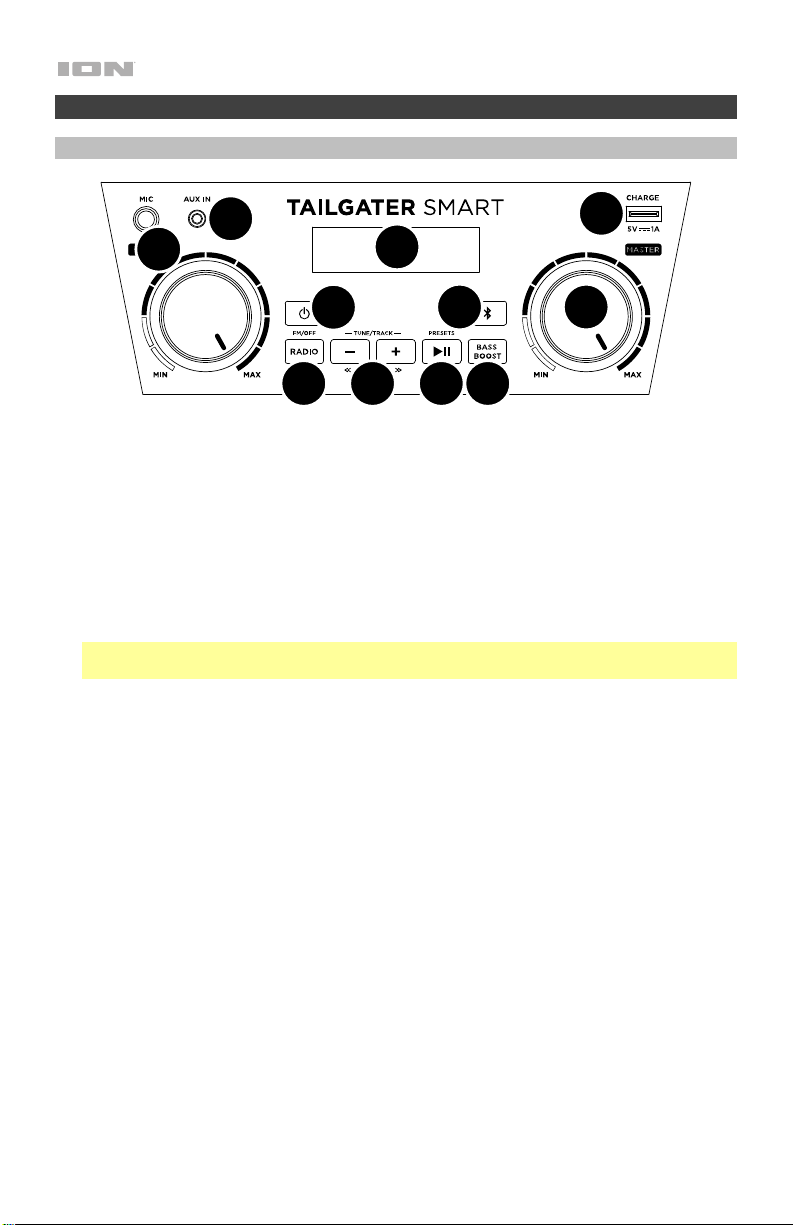
Features
Front Panel
10
11
1
7
2
3 4 5 6
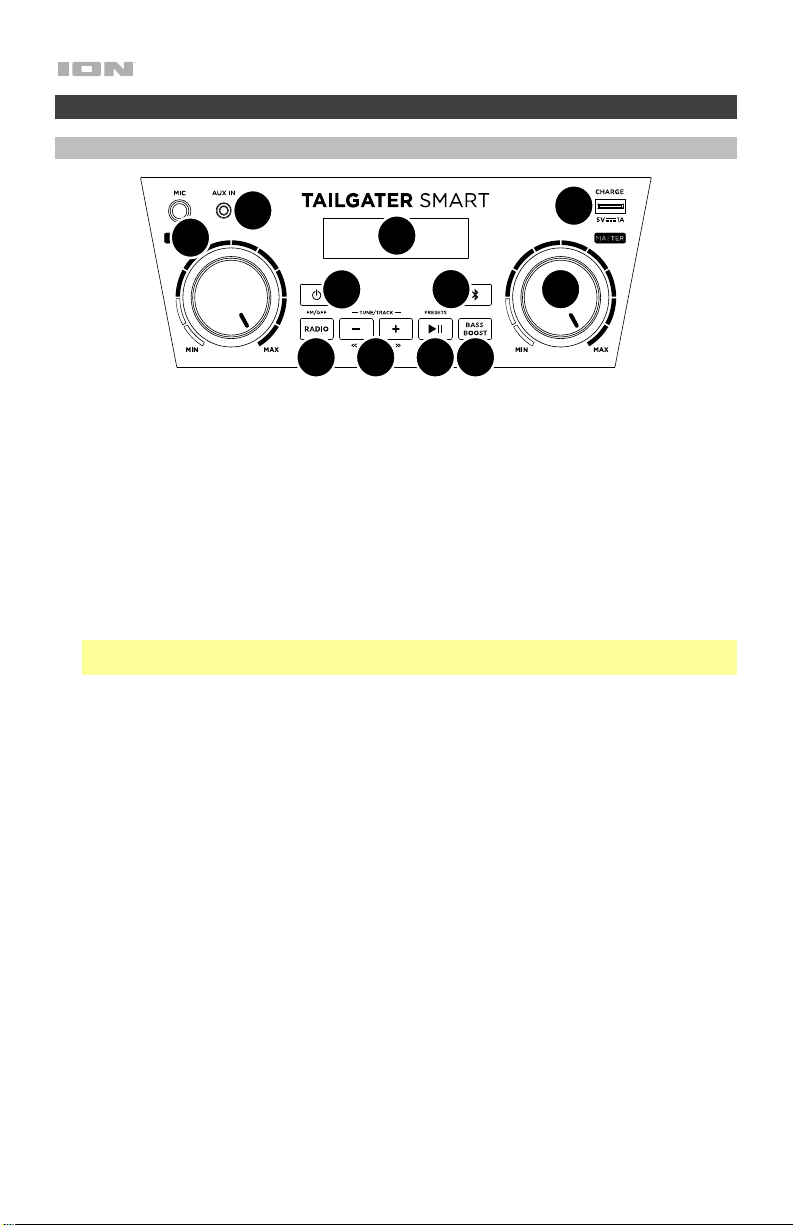
1. Power Button: Press and hold this button for one second to power Tailgater Smart on or
off. After powering on, Tailgater Smart will automatically enter pairing mode and search for
a Bluetooth device within range.
2. Bluetooth Button: Press this button to make Tailgater Smart unpair from a connected
Bluetooth device and automatically search for another Bluetooth device to pair with.
3. Radio (FM/Off): Press this button to toggle the FM radio on and off.
4. Tune/Track Buttons: Tap these buttons to tune in to a radio station or go to the
previous/next track on a Bluetooth-connected device. To “seek” (skip to the next radio
station with a clear signal), hold either button down for a few seconds. The unit will
remember the last station it was on and start at that station when powered off and on again.
Note: With some apps on Bluetooth-connected devices, pressing these buttons may go to
another playlist or music genre instead of another track.
5. Play/Pause/Presets: If paired with a Bluetooth device, press to play or pause a track from
the connected device. If listening to the radio, press this button to cycle through the preset
stations or press and hold this button to save the currently selected station as a preset.
See Using the Radio for more details on saving and recalling presets.
6. Bass Boost: Press this button to enhance the overall bass frequency response.
7. Display: This screen shows information relevant to Tailgater Smart’s current operation:
• Battery Indicator: When the power cable is connected, movement of the battery
segments shows the battery is charging. When fully charged, all battery segments will
be lit without blinking. When the power cable is disconnected, the battery segment
shows the level of the battery. If a front panel button is not pressed within 60 seconds,
the battery level indicator will turn off (to save energy). The battery level indicator will
reappear when any button is pressed. Also, when the battery gets to the lowest battery
icon segment, the battery level indicator will turn back on.
• Power Icon: The power icon will be lit when Tailgater Smart is powered on.
• Lightning Bolt Icon: The lightning bolt icon will illuminate when the power cable is
connected to wall power.
• Bluetooth Icon: The Bluetooth icon will be lit when a device is paired to Tailgater Smart.
• Bass Boost Indicator: The Bass Boost indicator will be on when the Bass Boost
function is activated.
• FM Indicator: When listening to the radio, this indicator will appear next to the current
station number on the right.
6
9
8
8. Master Volume Control: This adjusts the speaker’s main mix volume, which includes the
Microphone Input, Auxiliary Input, Radio, and the audio of a paired Bluetooth device.
9. USB Charging Port: Connect a device’s charge-cable here to charge it. USB charging
only functions when the unit’s power is turned on.
Note: To charge smartphones and tablets faster, put the smartphone or tablet’s screen to
sleep.
10. Auxiliary Input (1/8"): This stereo 1/8" (3.5 mm) input can be used to connect a CD player,
MP3 player, or other audio source.
11. Microphone Input with Volume Control (1/4"): Connect a 1/4" (6.35 mm) microphone to
this input.
Top Panel
1
2
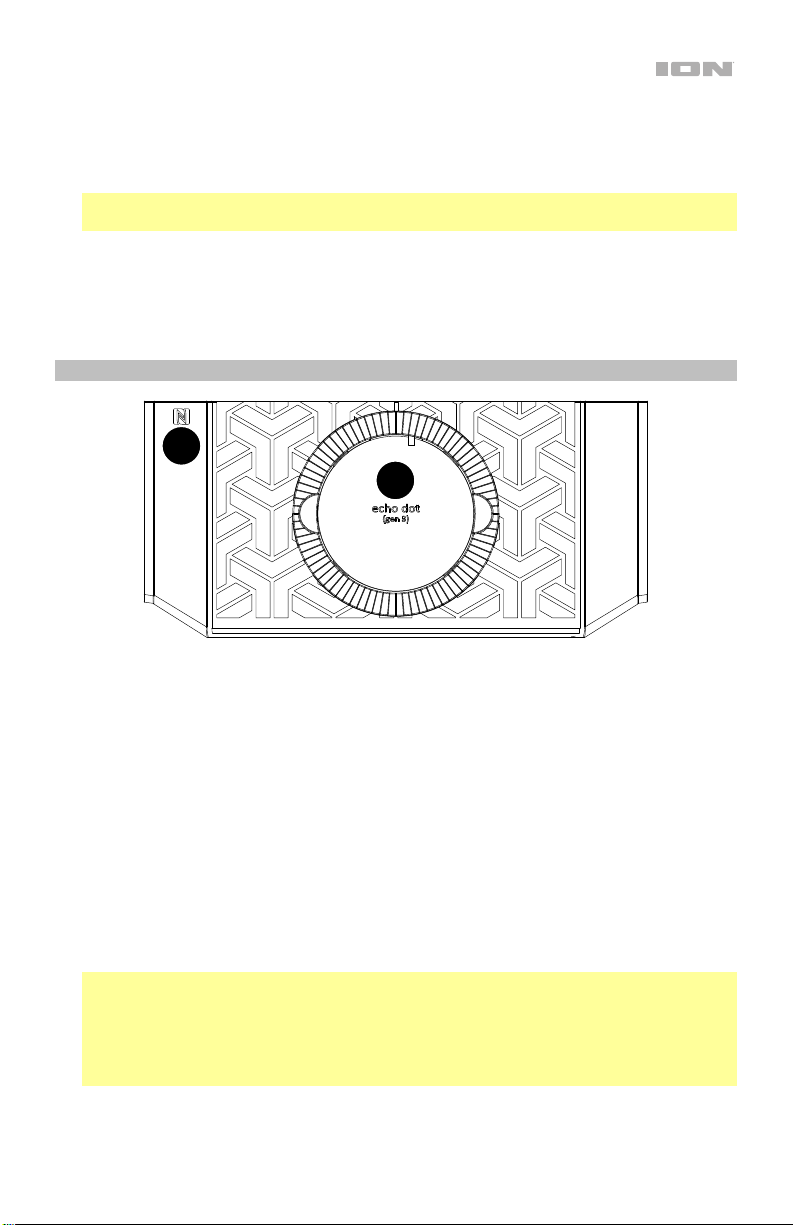
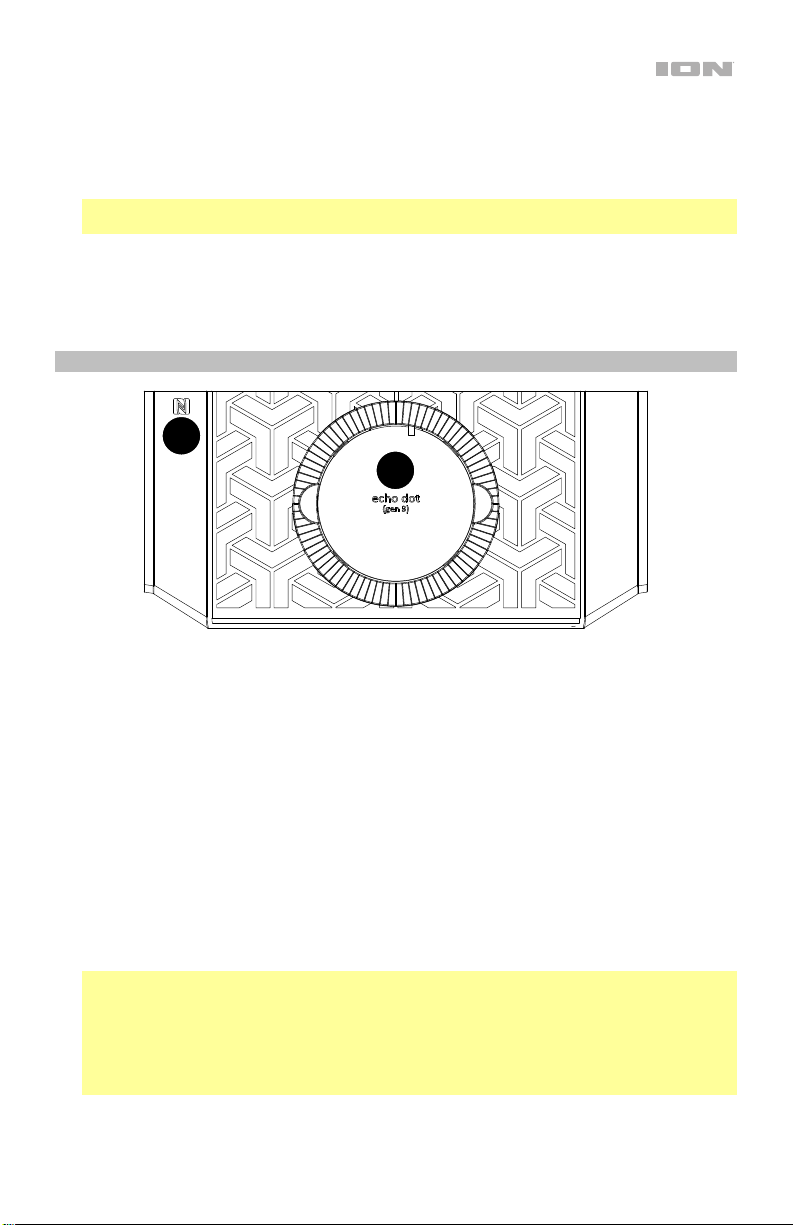
1. NFC (near-field communication): Touch and briefly hold an NFC-enabled audio device to
the NFC logo here in order to pair the device with Tailgater Smart. See Pairing to a
Device Using NFC for more information.
2. Amazon Echo Holder: Keep your Amazon Echo here while listening to it through the
Tailgater Smart speaker.
The holder is designed to fit the 3rd generation Amazon Echo. If you would like to listen to
a 1st/2nd generation Amazon Echo Dot or to an Amazon Echo Input, use the
corresponding rubber insert (included). You will know which of the two included inserts is
correct because it will match the size of your Amazon device (one is designed for the
1st/2nd generation Amazon Echo Dot, while the other is designed for the Amazon Echo
Input). Place the insert into the holder, and then place your Amazon Echo into the insert.
Make sure to position your Amazon Echo in the holder such that the Echo’s ports are
facing the window to Tailgater Smart’s Rear Panel Recess. This way, you can connect
wires from Tailgater Smart to your Amazon Echo through this window (for a neater setup).
See Connection Diagram for an example.
Note: Alexa may not be able to hear voice commands while playing music through the
Tailgater Smart speaker. To avoid this issue, press and hold the Mute button on the
remote control while giving a command to Alexa. Be aware that muting the speaker will
silence not just the music but also Alexa’s voice reply to your command. In order to hear
Alexa’s reply, make sure to unmute Tailgater Smart by letting go of the Mute button
shortly after you give your voice command.
7

Rear Panel
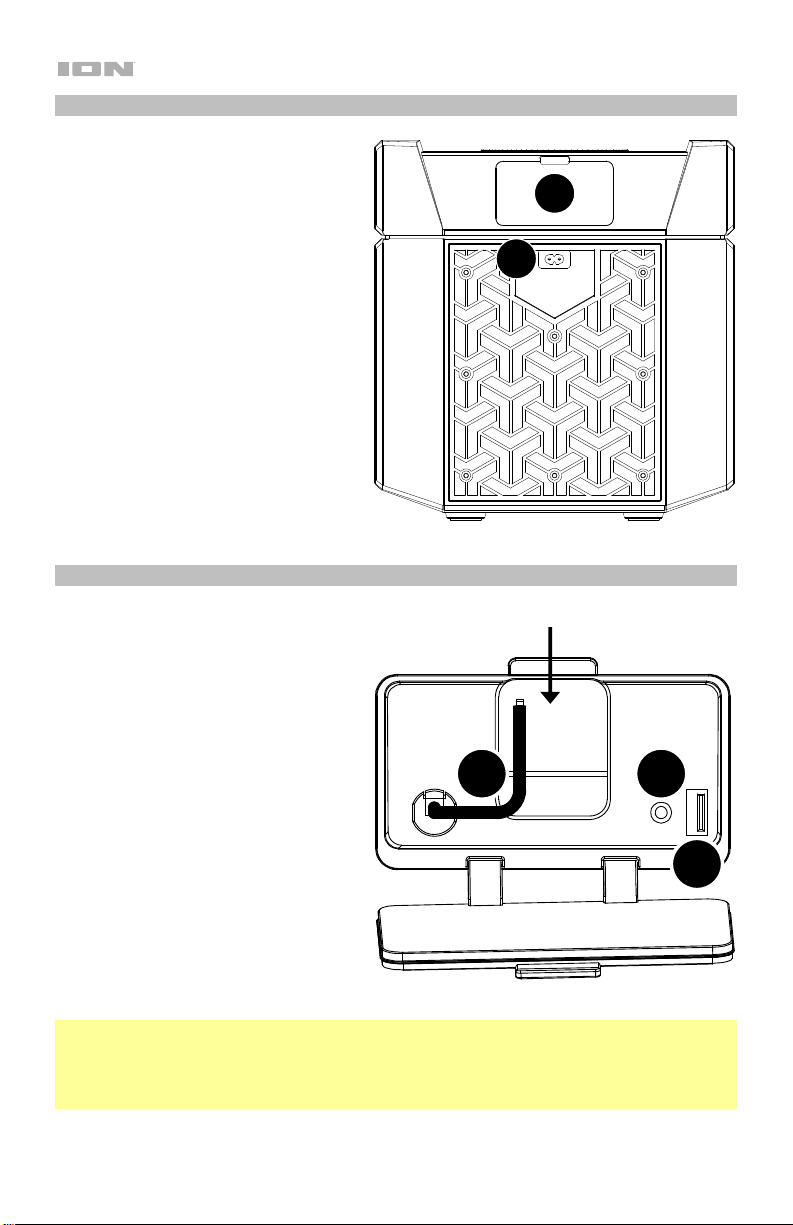
1. Power Cable Input (rear panel):
Insert the included power cable here
to charge the unit. The Lightning Bolt
Icon will illuminate on the Display if
the power cable is connected. When
Tailgater Smart is connected to a
power source, it does not need to be
powered on to charge the battery. If it
is powered on and in use while
connected to a power source, the
battery will still charge.
2. Rear Panel Recess Door: Pull the
tab at the top of this door toward you
in order to access the Rear Panel
Recess, which contains the hook-ups
for an Amazon Echo device. When
finished connecting your Amazon
Echo, you can push this door closed
to hide the wires.
2
1
Rear Panel Recess
1. Aux Input: If your Amazon Echo is
not connected to Tailgater Smart via
Bluetooth, use the included 1/8” (3.5
mm) aux cable to connect your
Amazon Echo’s auxiliary output to
this input. This connection will send
the audio signal from your Amazon
Echo to the Tailgater Smart speaker.
2. USB Port: If you are using a 1st/2nd
generation Amazon Echo Dot or an
Amazon Echo Input, connect the
included USB cable from this port to
the device in order to charge it.
Connect the USB-A end of the able
to this port and the micro-USB end
of the cable to your Amazon Echo.
3. DC Cable: If you are using a 3rd
generation Amazon Echo Dot,
connect this cable to the device in
order to charge it.
Note: For the best setup, connect cables from the Rear Panel Recess to your Amazon Echo
through the window in the Rear Panel Recess (instead of making the connections over the top
panel of the unit). After making the necessary connections, you should be able to close the
Rear Panel Recess Door and hide the wires.
8
Window to the Amazon Echo Holder
3
1
2
Remote Control
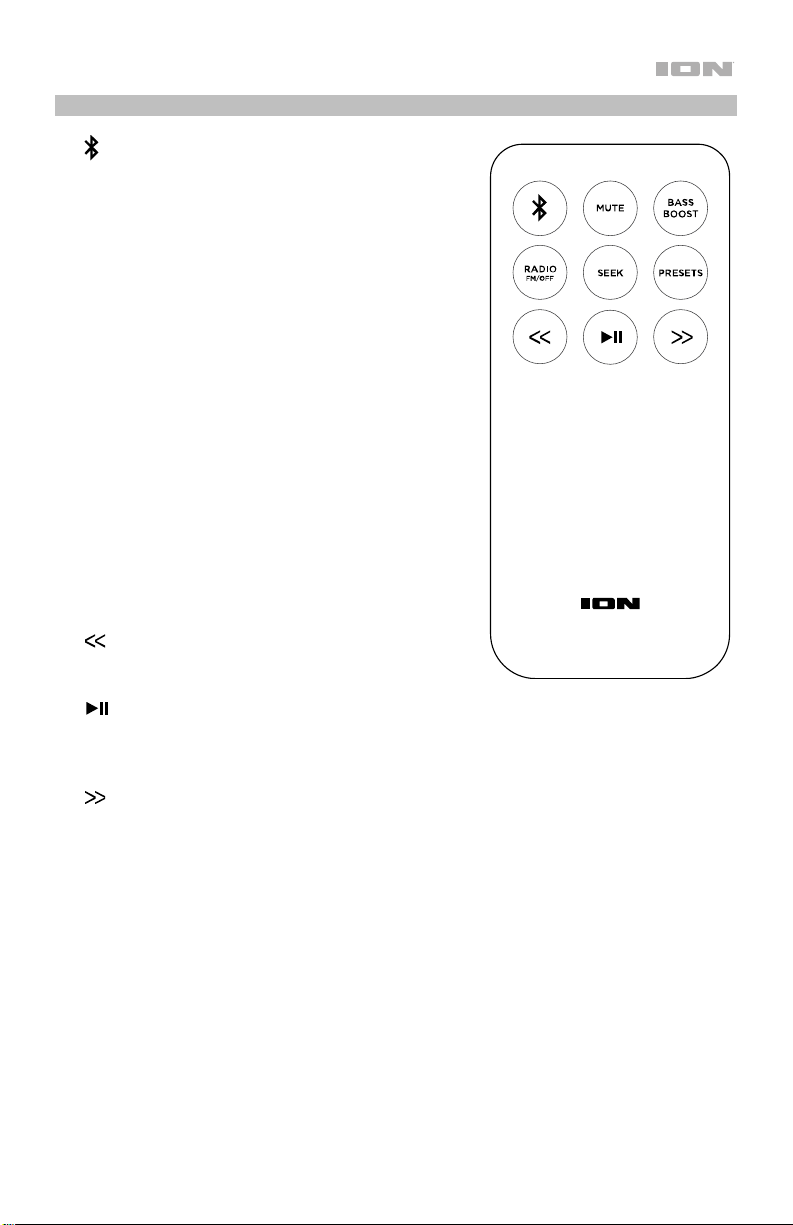
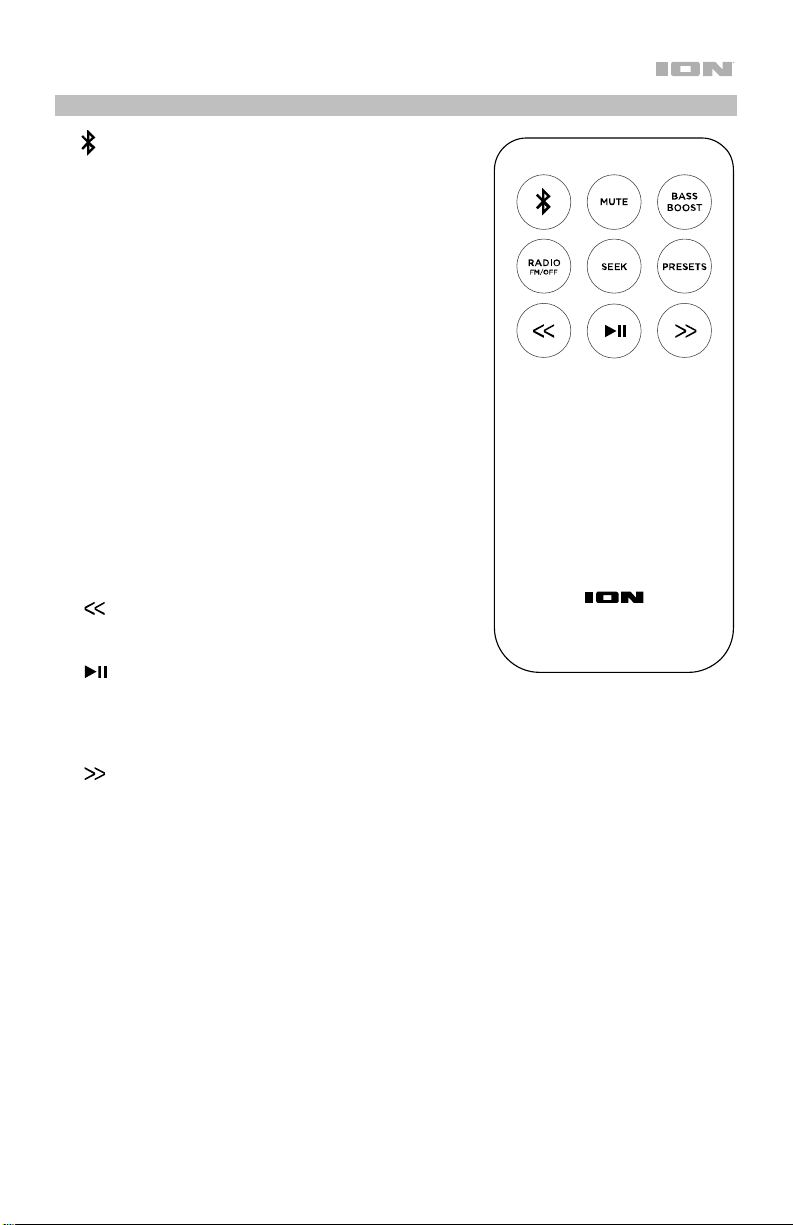
• (Bluetooth): P
Sm
art unpair from a connected Bluetooth device
ress this button to make Tailgater
and automatically search for another Bluetoot
ce to pair with.
devi
• Mute: Press and hold this button to mute all audi
output f
Display screen will flash to indicate that the
i
rom the Tailgater Smart speaker. The
audio
s muted. Release the button to unmute the audio
output. This feature could be useful when giving
voi
ce command to Alexa, since a connected
Amazon device may not be able to hear voic
co
mmands while playing music through the
r.
speake
• Ba
ss Boost: Press this button to enhance th
ov
erall bass frequency response.
• Radio (FM/Off): Press this button to toggle the FM
radio on and off.
• Seek: Press this button to skip to the next radi
on with a clear signal
stati
• Preset
s: Press and hold this button to save th
rently selected radio station as a preset. See
cur
Using the Radio to learn
• (Previous): P
.
more.
ress this button to go to the
previous radio station or to the previous
track/playlist/genre on your Bluetooth device.
• (Play/Pau
se): When using a Bluetooth device,
this button plays or pauses audio. When listening
to the radio, this button cycles through your preset
radio stations.
• (Next):
Press this button to go to the next radio
station or to the next track/playlist/genre on your
Bluetooth device.
h
o
a
e
e
o
e
9

Operation
Pairing to a Bluetooth Device
To pair to a Bluetooth device (such as your Amazon Echo):
1. Turn on your Bluetooth device and power on Tailgater Smart, which will automatically
begin the pairing process. You will know Tailgater Smart is searching for Bluetooth devices
if the Bluetooth icon is not yet illuminated on the Display screen.
2. Navigate to the Bluetooth device’s setup screen.* Then find and select Tailgater Smart.
The Bluetooth icon will illuminate on Tailgater Smart’s Display once your Bluetooth device
is successfully paired.
Note: If your Bluetooth device prompts for a pairing code, enter “0000”.
Note: If you have previously paired to the Bluetooth device, you may be able to skip Step
2 and simply wait for it to connect with Tailgater Smart after powering on.
*The setup screen for your Amazon Echo can be found in the Alexa app. After opening the
app, go to Settings. Select your Echo from the list of Amazon devices and then select
Bluetooth to see a list of speakers available for pairing.
To disconnect the paired Bluetooth device, press the Bluetooth button on the unit or
remote control.
To pair with a different Bluetooth device, repeat step 2 after disconnecting from the first
device. During the pairing process, it may help to move the first device out of range or to
disable its Bluetooth capacity.
Note: Maximum range will be achieved when using devices with Bluetooth 4.0.
Note: Users should consider updating their Bluetooth device’s operating system if
experiencing trouble with pairing or playing music.
Tip: If you would like to disable (or enable) the voice prompts, press and hold the Bluetooth
button on the unit or remote control.
10

Pairing to a Device Using NFC
With NFC (near-field communication), you can initiate wireless data transmission from an
audio device to your Tailgater Smart speaker (i.e. pairing) by gently bumping the device into
the speaker. Check your device’s manual to see if it supports NFC.
To use NFC to pair with Tailgater Smart:
1. Your device must be turned on and unlocked.
2. Enter your device’s Settings menu and check that NFC is turned On (one-time step).
3. Power on Tailgater Smart.
4. Touch and briefly hold your device to the NFC logo located on Tailgater Smart’s top panel.
5. Follow the pairing instructions that appear on your phone. If a passcode is required, enter
“0000”.
6. To unpair, gently bump your device against the NFC logo.
Using the Radio
Selecting a Radio Station:
1. Press the Radio button on the unit or remote control to turn on the radio.
2. Tune in to a radio station using the Tune/Track (-/+) buttons on the unit or the
buttons on the remote control. To “seek” (skip to the next station with a clear signal),
press and hold one of the Tune/Track (-/+) buttons on the unit or press the Seek button
on the remote control.
Saving a preset:
1. Tune in to the radio station that you want to save as a preset.
2. Press and hold the Play/Pause/Presets button on the unit or the Presets button on the
remote control for two seconds. A preset number will appear on the Display.
3. Use the Tune/Track buttons on the unit or the
/ buttons on the remote control to
adjust which preset number you want to save to. The number will update on the Display.
4. Press Play/Pause/Presets on the unit or Presets on the remote control to confirm. “SAV”
will appear on the Display.
Selecting a preset station:
While the radio is on, press the Play/Pause/Presets button on the unit or the Play/Pause
button on the remote control to cycle through the saved presets.
/
11

Troubleshooting
If the unit is not charging: Make sure the power cable is properly connected to the power
input and the power outlet.
If the sound is distorted: Try lowering the volume control of your sound source, musical
instrument, or microphone. Also, try to reduce the overall volume of Tailgater Smart using the
Master Volume knob.
If there is too much bass: Try adjusting the tone or EQ control on your sound source to lower
the bass level. This will allow you to play the music louder before clipping (distortion) occurs.
If there is a high-pitched whistling noise when using microphones: This is probably
feedback. Point the microphone away from the speaker.
If you can’t hear the microphone over the music volume: Turn down the music volume
from your source.
If you can’t play music from a flash drive: The USB port is only for charging USB devices.
If Alexa is not recognizing voice commands while your Amazon device is connected to
Tailgater Smart: Mute any audio coming out of Tailgater Smart by pressing and holding the
Mute button on the remote control while giving Alexa a voice command. In order to hear
Alexa’s voice reply to your command, release the Mute button to unmute the speaker shortly
after you give the command. You will know the speaker is muted if the Display is flashing.
If you cannot connect your audio device to Tailgater Smart via Bluetooth:
• Have your audio device (e.g., smartphone or tablet) and Tailgater Smart as close together
as possible while trying to connect. Make sure both the audio device and Tailgater Smart
are unobstructed by walls, furniture, etc.
• Reset the Bluetooth connection on Tailgater Smart by disconnecting Tailgater Smart from
any other audio device and restarting the search process. If this does not work right away,
power off Tailgater Smart and then power it back on.
• Reset the Bluetooth connection on your audio device by turning Bluetooth off and back
on. You can find this under the Bluetooth menu in the Settings for your phone or other
audio device.
If this does not work, and you have connected to Tailgater Smart before, find Tailgater
Smart in the list of available or previously connected devices in your audio device's
Bluetooth menu, tap the "gear" or “i” icon located next to it and then select Unpair or
Forget. Turn Tailgater Smart off and back on and try pairing again once it reappears in
your available devices list.
Note: If Tailgater Smart has been paired to another audio device recently that is still within
range, you may need to repeat this process with that audio device to fully disconnect.
12

Guía de inicio rápido (Español)
Introducción
Gracias por comprar el Tailgater Smart. En ION, su entretenimiento es tan importante para nosotros como para
usted. Por eso es que diseñamos nuestros productos con una sola cosa en mente—hacer que su vida sea más
divertida y cómoda.
Contenido de la caja
Tailgater Smart
Control remoto
Micrófono y cable
Cable de alimentación / carga
Cable auxiliar estéreo de 3,5 mm (1/8 pulg.)
Cable USB-A a micro USB
(2) Insertos de goma con la forma de los dispositivos Amazon Echo
Guía de inicio rápido
Manual sobre la seguridad y garantía
Soporte
Para obtener la información más reciente acerca de este producto (documentación, especificaciones
técnicas, requisitos de sistema, información de compatibilidad, etc.) y registrarlo, visite ionaudio.com.
Para obtener soporte adicional del producto, visite ionaudio.com/support.
Baterías recargables
Nota: Antes de utilizar por primera vez el producto, cargue completamente la batería. Su unidad se
despachó intencionalmente con una carga reducida de la batería por razones de seguridad en el tránsito.
Utilice el cable de alimentación incluido para conectar la unidad a una toma de corriente y permita que la
unidad se cargue. Esto contribuye a asegurar la vida útil más larga de su batería.
Las baterías de plomo-ácido recargables son del mismo tipo que se usa en los automóviles. Al igual que
con la batería del vehículo, la forma en que se usa tiene una influencia significativa en la duración de su vida
útil. Con un uso y tratamiento correctos, una batería de plomo-ácido puede durar varios años. He aquí
algunas recomendaciones para prolongar la vida útil de la batería interna.
Uso general
Almacenamiento
Reparación Si la batería no se carga, póngase en contacto con ION Audio en ionaudio.com.
Disposición final
Cargue completamente la batería antes de utilizando el altavoz.
Cargue la batería completamente después de cada uso.
Para lograr la mayor longevidad del producto, no lo almacene a temperaturas
muy altas (superiores 32 °C / 90 °F) o muy frías (inferiores a 0 °C / 32 °F).
Es aceptable dejar su altavoz enchufado. No sobrecargará la batería.
Si deja que el nivel de la batería baje y no la carga durante 3 meses, puede perder
permanentemente su capacidad.
Lleve la unidad a un centro de reciclaje o deséchela de acuerdo a las ordenanzas
locales.
13
Instalación
1. Asegúrese de que todos los artículos indicados en Contenido de la caja estén incluidos en ella.
2. Lea el manual sobre la seguridad y la garantía antes de utilizar el producto.
3. Para asegurar una máxima vida útil de la batería, asegúrese de que esté completamente
cargada antes de utilizarla por primera vez.
4. Estudie el Diagramas de conexión.
5. Asegúrese de que el volumen maestro del Tailgater Smart se encuentre al nivel mínimo.
6. Conecte sus dispositivos.
7. Encienda el Tailgater Smart. Comience a reproducir música desde un dispositivo conectado y
suba el volumen maestro del Tailgater Smart hasta un nivel que le sea cómodo.
8. Una vez que haya terminado de usar el Tailgater Smart, regrese el volumen maestro al nivel
mínimo y luego apague la unidad.
Diagramas de conexión
Los elementos que no se enumeran en Introducción > Contenido de la caja se venden por separado.
Panel frontal
Micrófono
Dispositivo Bluetooth
Tableta, reproductor de MP3, etc.
14
Cavidad del panel trasero (ejemplo 1)
Al conectar un Amazon Echo Dot de 3era generación, utilice el cable de corriente continua (CC)
sujeto a la cavidad del panel trasero para cargar la unidad. Si no está apareado mediante Bluetooth,
utilice el cable auxiliar de 3,5 mm (1/8 pulg.) incluido para transmitir audio. Consulte la sección
Características para obtener más información.
Dispositivo Amazon (ubicado en el
soporte del panel superior)
Cavidad del panel trasero (ejemplo 2)
Al conectar un dispositivo Amazon Echo Dot de 1era o 2da generación o un Amazon Echo Input,
utilice el cable USB incluido para cargar la unidad. Si no está apareado mediante Bluetooth, utilice el
cable auxiliar de 3,5 mm (1/8 pulg.) incluido para transmitir audio. Consulte la sección
Características para obtener más información.
Dispositivo Amazon (ubicado en el
soporte del panel superior)
15
Características
Panel frontal
10
1
7
2
11
3 4 5 6
1. Interruptor de encendido/apagado: Mantenga pulsado este botón durante un segundo para
encender o apagar el Tailgater Smart. Luego de encenderlo, el Tailgater Smart entrará
automáticamente al modo de apareamiento y buscará un dispositivo Bluetooth que esté dentro
del alcance.
2. Botón de Bluetooth: Pulse este botón para que el Tailgater Smart se desaparee de un
dispositivo Bluetooth conectado y busque otro dispositivo Bluetooth con el cual aparearse
automáticamente.
3. Radio: Pulse este botón para encender y apagar la radio.
4. - / + (Botones de sintonizador/pista): Toque ligeramente estos botones para sintonizar una
emisora de radio o pasar a la pista anterior/siguiente de un dispositivo Bluetooth conectado.
Para "buscar" (pase a la siguiente emisora con buena señal), mantenga pulsado cualquier botón
durante unos segundos. La unidad recuerda la última emisora que estaba sintonizada y
comienza en esa emisora cuando la apaga y enciende nuevamente.
Nota: En algunas aplicaciones en dispositivos conectados mediante Bluetooth, al pulsar estos
botones es posible que se pase a otra lista de reproducción o género musical en lugar de otra pista.
5. Reproducir/Pausa/Presets: Si se encuentra apareado con un dispositivo Bluetooth, pulse este
botón para reproducir una pista o ponerla en pausa en el dispositivo conectado. Si está
escuchando radio, pulse este botón para recorrer los presets de estaciones o manténgalo
pulsado para guardar la estación actualmente seleccionada como un preset. Consulte la sección
Uso de la radio para obtener más detalles sobre cómo guardar y recuperar presets.
6. Bass Boost: Pulse este botón para mejorar la respuesta en frecuencia general de los graves.
7. Pantalla: Esta área muestra información relevante para las funciones de Tailgater Smart.
• Indicador de batería: Cuando el cable de corriente está conectado, el movimiento de los
segmentos de la batería muestra que se está cargando. Una vez completamente cargada,
todos los segmentos de la batería estarán encendidos sin parpadear. Cuando se
desconecta el cable de corriente, el segmento de la batería muestra en nivel de la misma. Si
no se pulsa ningún botón del panel delantero en los siguientes 60 segundos, el indicador de
nivel de batería se apagará (para ahorrar energía). El indicador de nivel de la batería volverá
a aparecer cuando se pulse algún botón. Además, cuando la batería llegue al segmento más
bajo del icono de la batería, el indicador de nivel de la batería volverá a encenderse.
• Icono de encendido: El icono de encendido se encenderá cuando el Tailgater Smart se
encienda.
• Icono del relámpago: El icono del relámpago se encenderá cuando el cable de corriente
esté conectado a una toma de corriente de pared.
• Icono de Bluetooth: El icono de Bluetooth se enciende cuando hay un dispositivo apareado
al Tailgater Smart.
• Indicador de Bass Boost: El indicador de Bass Boost se iluminará cuando la función esté
activada.
• Indicador de FM: cuando escuche la radio, este indicador aparecerá junto al número de la
estación actual a la derecha.
16
9
8
8. Volumen maestro: Este control ajusta el volumen de la mezcla principal del altavoz, que incluye
la entrada de micrófono, la entrada auxiliar, el sintonizador y el audio de un dispositivo Bluetooth
apareado.
9. Puerto de carga USB: Conecte aquí el cable de carga de su dispositivo para cargarlo. La carga
por USB funciona solamente cuando la unidad está encendida.
Nota: Para cargar teléfonos inteligentes (smartphones) y tabletas más rápido, ponga la pantalla
del teléfono inteligente o la tableta en estado de reposo.
10. Entrada auxiliar (1/8 pulg.): Esta entrada de 3,5 mm (1/8 pulg.) estéreo se puede usar para
conectar un reproductor de CD, MP3 u otra fuente de audio.
11. Entrada para micrófono con control de volumen (1/4 pulg.): Conecte un micrófono de 6,35
mm (1/4 pulg.) a esta entrada.
Panel superior
1
2
1.
NFC (comunicación de campo cercano): Toque y momentáneamente sostenga un dispositivo
de audio compatible con NFC junto al logo de NFC aquí a fin de aparear el dispositivo con el
Tailgater Smart. Consulte la sección Cómo aparear un dispositivo Bluetooth usando NFC
para más información.
2. Soporte para Amazon Echo: Mantenga su Amazon Echo aquí mientras lo escucha a través del
altavoz del Tailgater Smart.
El soporte está diseñado para Amazon Echo de 3era generación. Si desea escuchar un Amazon
Echo Dot de 1era o 2da generación o un Amazon Echo Input, utilice el inserto de goma
correspondiente (incluido). Sabrá cuál de los dos insertos incluidos es el correcto ya que
coincidirá con el tamaño de su dispositivo Amazon (uno está diseñado para el Amazon Echo Dot
de 1era/2da generación, mientras que el otro está diseñado para el Amazon Echo Input).
Coloque el inserto en el soporte y luego coloque su Amazon Echo en el inserto.
Asegúrese de colocar su Amazon Echo en el soporte de manera que los puertos del Echo
queden orientados hacia la ventanilla que da a la cavidad del panel trasero del Tailgater Smart.
De esta forma podrá conectar los cables desde el Tailgater Smart a su Amazon Echo a través de
esta ventanilla (para una instalación más prolija). Consulte el ejemplo de Diagramas de
conexión.
Nota: Es posible que Alexa no sea capaz de escuchar los comandos de voz mientras reproduce
música a través del altavoz del Tailgater Smart. Para evitar este problema, mantenga pulsado el
botón Mute (silenciamiento) que se encuentran el control remoto mientras darle un comando a
Alexa. Tenga en cuenta que al silenciar el altavoz no sólo se silenciará la música sino también la
respuesta de voz de Alexa a sus comandos. Para escuchar la respuesta de Alexa, asegúrese de
anular el silenciamiento del Tailgater Smart soltando el botón Mute al terminar de dar su
comando de voz.
17
V
Panel trasero
1. Entrada del cable de corriente: Inserte
aquí el cable de alimentación incluido
para cargar la unidad. El icono del
relámpago se ilumina en la pantalla si
el cable de corriente está conectado.
Siempre que el Tailgater Smart esté
conectado a una fuente de energía
eléctrica, no es necesario encenderlo
para que cargue la batería. Si se
encuentra encendido y en uso
conectado a una fuente de energía, la
batería se cargará de todas formas.
2. Tapa de la cavidad del panel trasero:
Tire de la lengüeta que se encuentra en
la parte superior de esta tapa hacia
usted para acceder a la cavidad del
panel trasero, la cual contiene
conexiones para dispositivos Amazon
Echo. Una vez que haya terminado de
conectar su Amazon Echo, puede
empujar esta etapa para cerrarla y
ocultar los cables.
2
1
Cavidad del panel trasero
1. Entrada auxiliar: Si su Amazon Echo
no se conecta a su Tailgater Smart
mediante Bluetooth, utilice el cable
auxiliar de 3,5 mm (1/8 pulg.) incluido
para conectar a esta entrada a la salida
auxiliar del Amazon Echo. Esta
conexión enviará la señal de audio
desde el Amazon Echo al altavoz del
Tailgater Smart.
2. Puerto USB: Si está utilizando un
Amazon Echo Dot de 1era o 2da
generación o un Amazon Echo Input,
conecte el cable USB incluido desde
este puerto al dispositivo a fin de
cargarlo. Conecte el extremo del cable
que tiene el conector USB-A a este
puerto y el extremo con el conector
micro- USB a su Amazon Echo.
3. Cable de CC: Si está utilizando un
Amazon Echo Dot de tercera
generación, conecte el cable al
dispositivo a fin de cargarlo.
Nota: Para lograr una mejor instalación, conecte los cables que van desde la cavidad del panel
trasero a su Amazon Echo a través de la ventanilla que se encuentra la cavidad del panel trasero (en
lugar de realizar las conexiones por encima del panel superior de la unidad). Una vez realizadas las
conexiones necesarias, debería ser capaz de cerrar la tapa de la cavidad del panel trasero y
ocultar los cables.
18
entanilla que da al Soporte para Amazon Echo
3
1
2
Control remoto
• (Botón de Bluetooth): Pulse este botón para que el
Tailgater Smart se desaparee de un dispositivo Bluetooth
conectado y busque otro dispositivo Bluetooth con el
cual aparearse automáticamente.
• Mute (Silencio): Manténgalo pulsado este botón para
silenciar toda la salida de audio del altavoz del Tailgater
Smart. La pantalla parpadeará para indicar que el audio
está silenciado. Suelte el botón para anular el
silenciamiento de la salida de audio. Esta característica
podría ser de utilidad al dar comandos de voz a Alexa,
dado que un dispositivo Amazon conectado podría no
ser capaz de escuchar los comandos de voz mientras
reproduce música a través del altavoz.
• Bass Boost: Pulse este botón para mejorar la respuesta
en frecuencia general de los graves.
• Radio (FM/Off): Pulse este botón para encender y
apagar la radio.
• Seek (Explorar): Pulse este botón nuevamente para
pasar a la siguiente estación de radio con señal fuerte.
• Presets: Manténgalo pulsado este botón para guardar la
estación de radio actualmente seleccionada como un
preset. Consulte Uso de la radio para aprender más.
• : Pulse este botón para pasar a la estación de radio
anterior o a la pista/lista de reproducción/género anterior
en su dispositivo Bluetooth.
• (Reproducción/Pausa): Si se encuentra apareado
con un dispositivo Bluetooth, pulse este botón para
reproducir una pista o ponerla en pausa en el dispositivo
conectado. Si está escuchando radio, pulse este botón
para recorrer los presets de estaciones.
• : Pulse este botón para pasar a la estación de radio
siguiente o a la pista/lista de reproducción/género
siguiente en su dispositivo Bluetooth.
19

Funcionamiento
Apareamiento de un dispositivo Bluetooth
Cómo aparear un dispositivo Bluetooth (como, por ejemplo, un Amazon Echo):
1. Encienda su dispositivo Bluetooth y el Tailgater Smart, el cual comenzará el proceso de
apareamiento automáticamente. Se dará cuenta de que el Tailgater Smart está buscando
dispositivos Bluetooth si el icono Bluetooth aún no se encendió en la pantalla.
2. Acceda a la pantalla de configuración Bluetooth de su dispositivo*. Luego busque y seleccione
Tailgater Smart. El icono Bluetooth se encenderá en la pantalla del Tailgater Smart una vez
que su dispositivo Bluetooth se aparee exitosamente.
Nota: Si su dispositivo Bluetooth solicita un código de apareamiento, ingrese “0000”.
Nota: Si ya había apareado anteriormente ese dispositivo Bluetooth, podrá pasar directamente
al paso 2 y simplemente esperar a que se conecte con el Tailgater Smart luego de encenderlo.
*La pantalla de configuración de su Amazon Echo se encuentra en la aplicación de Alexa. Una
vez abierta la aplicación, acceda a Settings. Seleccione su Echo de la lista de dispositivos de
Amazon y luego seleccione Bluetooth para ver una lista de los altavoces disponibles para el
apareamiento.
Para desconectar un dispositivo Bluetooth, pulse el botón Bluetooth en la unidad o en el control
remoto.
Para aparear un dispositivo Bluetooth diferente, repita el paso 2 tras desconectarse del primer
dispositivo. Durante el proceso de apareamiento, puede ser de utilidad alejar el primer dispositivo
para que quede fuera del alcance o desactivar su función de Bluetooth.
Nota: El alcance máximo se logra cuando se utilizan dispositivos con Bluetooth 4.0 o superior.
Nota: Los usuarios deben considerar la actualización de su sistema operativo (OS) si experimentan
problemas con el apareamiento o la reproducción de música.
Consejo: Si desea desactivar (o activar) los avisos de voz, presione dos veces el botón Bluetooth.
Cómo aparear un dispositivo Bluetooth usando NFC
Con NFC (Comunicación de campo cercano, según sus siglas en inglés), puede iniciar una
transmisión de datos inalámbrica desde un dispositivo de audio a su altavoz Tailgater Smart (es
decir, aparear) tocando con delicadeza el altavoz con el dispositivo. Consulte en el manual de su
dispositivo si soporta esta característica.
Cómo usar NFC para aparearse con el Tailgater Smart:
1. Su dispositivo debe estar encendido y desbloqueado.
2. Abra el menú Settings (Configuración) de su dispositivo y verifique que NFC esté On (Activado)
(este paso solo se realiza una vez).
3. Encienda el Tailgater Smart.
4. Toque y acerque brevemente su dispositivo del logo de NFC ubicado en el panel superior del
Tailgater Smart.
5. Siga las instrucciones de apareamiento que aparecen en su teléfono. Si se requiere una
contraseña, ingrese “0000”.
6. Para desaparear, toque suavemente con su dispositivo el logo de NFC.
20
 Loading...