

ION Audio IPA98 User Manual

Tailgater Plus
Quickstart Guide English ( 3 – 7 )
Guía de inicio rápido Español ( 8 – 12 )
Guide d’utilisation rapide Français ( 13 – 17 )
Guida rapida Italiano ( 18 – 22 )
Schnellstart-Anleitung Deutsch ( 23 – 27 )
Snelstartgids Nederlands ( 28 – 32 )
Appendix English ( 33 )

2

Quickstart Guide (English)
Introduction
Thank you for purchasing the Tailgater Plus. At ION, your entertainment is as important to us
as it is to you. That’s why we design our products with one thing in mind—to make your life
more fun and more convenient.
Box Contents
Tailgater Plus
Microphone with Cable
Power/Charging Cable
Quickstart Guide
Safety & Warranty Manual
Support
For the latest information about this product (documentation, technical specifications, system
requirements, compatibility information, etc.) and product registration, visit ionaudio.com.
For additional product support, visit ionaudio.com/support.
Rechargeable Batteries
Rechargeable lead-acid batteries are the same type used in automobiles. As with your car
battery, how you use this battery has a significant impact on its lifespan. With proper use and
treatment, a lead-acid battery can last for years. Here are some recommendations for getting
the longest life from the internal battery.
General Usage
Fully charge the battery before using it.
Charge the battery completely after each use.
Storage
Repair
Disposal
For best product longevity, do not store at exceedingly hot (greater than
90°F/32°C) or exceedingly cold (less than 32°F/0°C) temperatures.
It is acceptable to leave your sound system plugged in. This will not
overcharge the battery.
If you leave the battery level low and do not charge it for 6 months, it may
permanently lose capacity.
If the battery fails to charge, check your fuse near the power cable input. If your
fuse is intact and it still will not charge, contact ION Audio at ionaudio.com.
Bring the unit to a recycling center or dispose of in accordance with local
ordinances.
3
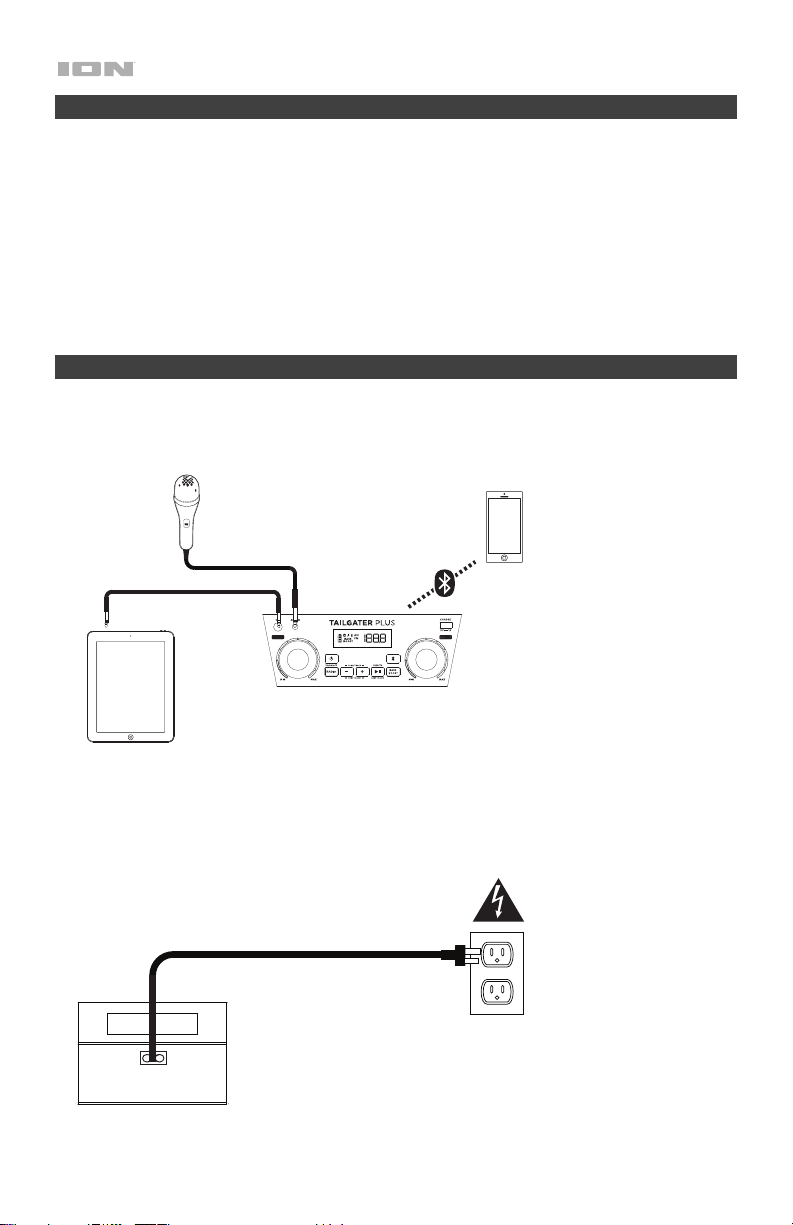
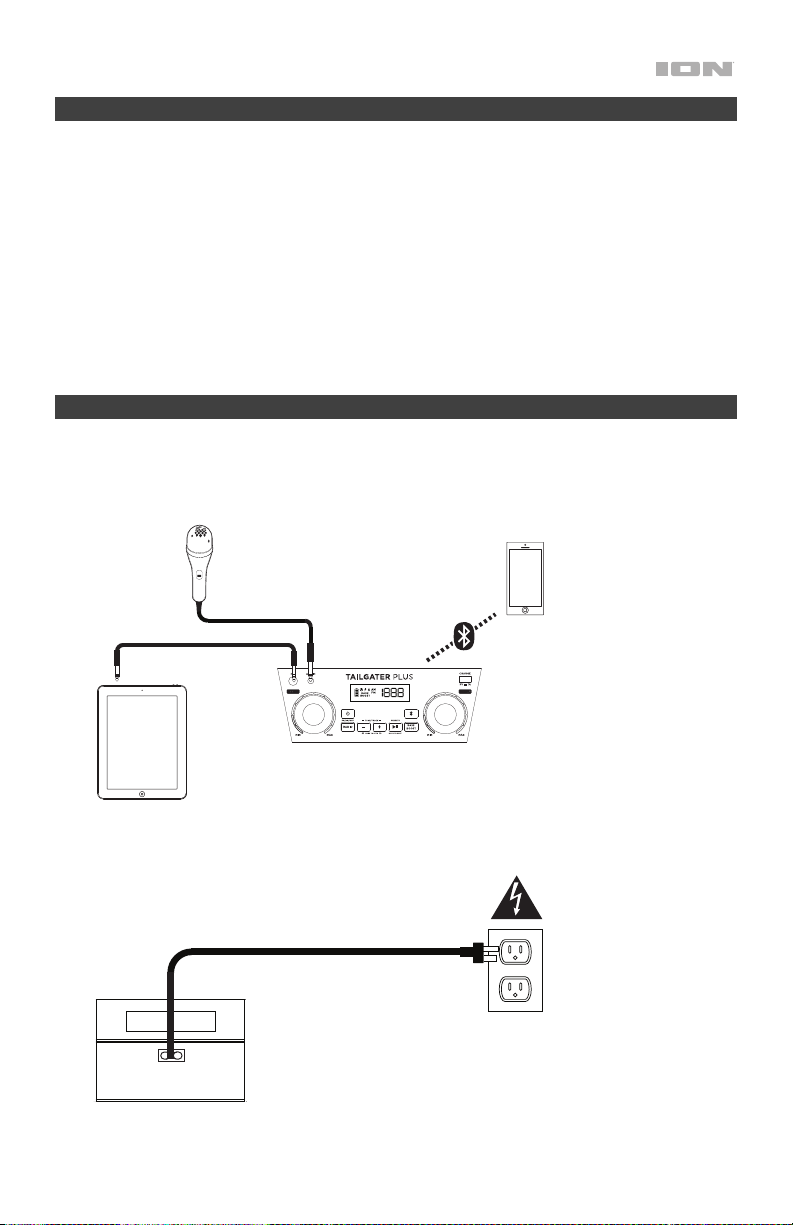
Quick Setup
1. Make sure all items listed in the Box Contents are included in the box.
2. Read the Safety & Warranty Manual before using the product.
3. Make sure the battery is completely charged prior to first use for maximum battery life.
4. Study the Connection Diagram.
5. Ensure the Master Volume on Tailgater Plus is at zero.
6. Connect your devices.
7. Raise the volume to a comfortable level.
8. Return the Master Volume to zero when you are finished using Tailgater Plus.
Setup
Items not listed under Introduction > Box Contents are sold separately.
Front Panel
Microphone
Bluetooth Device
Tablet, MP3
player, etc.
Rear Panel
4
Power
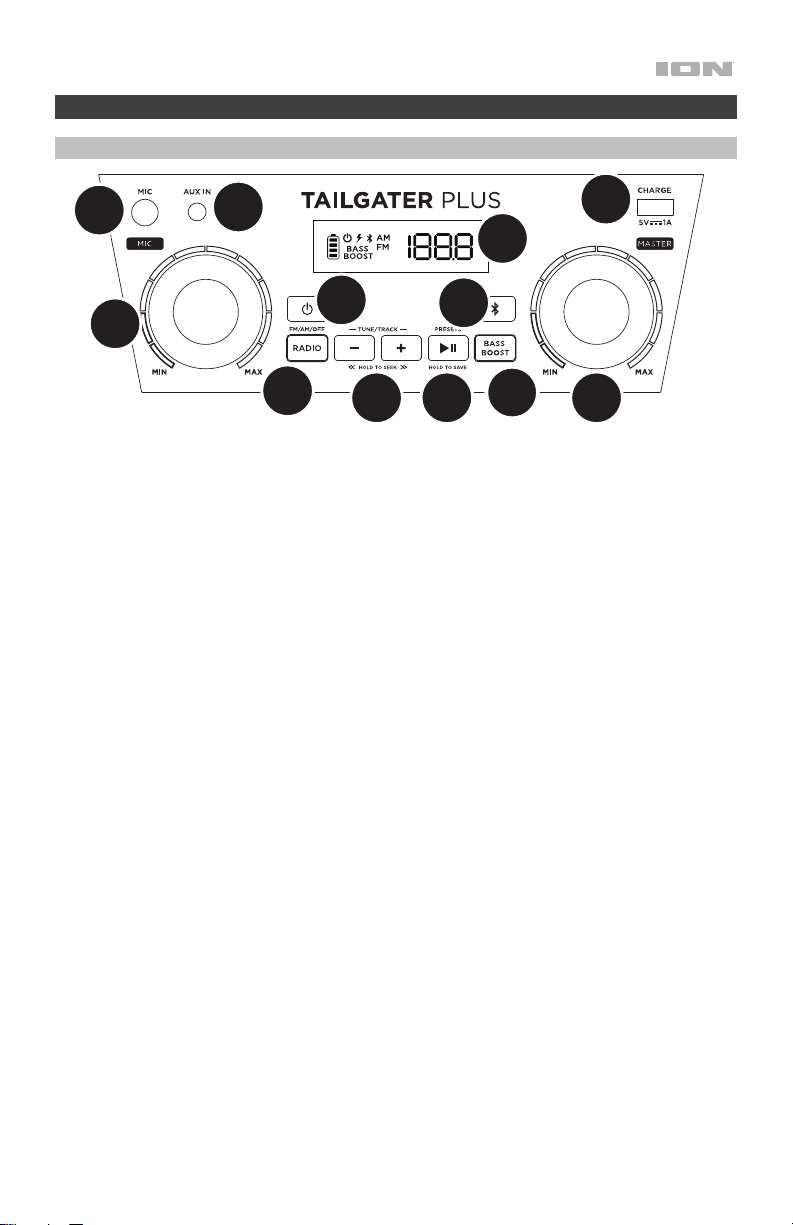
Features
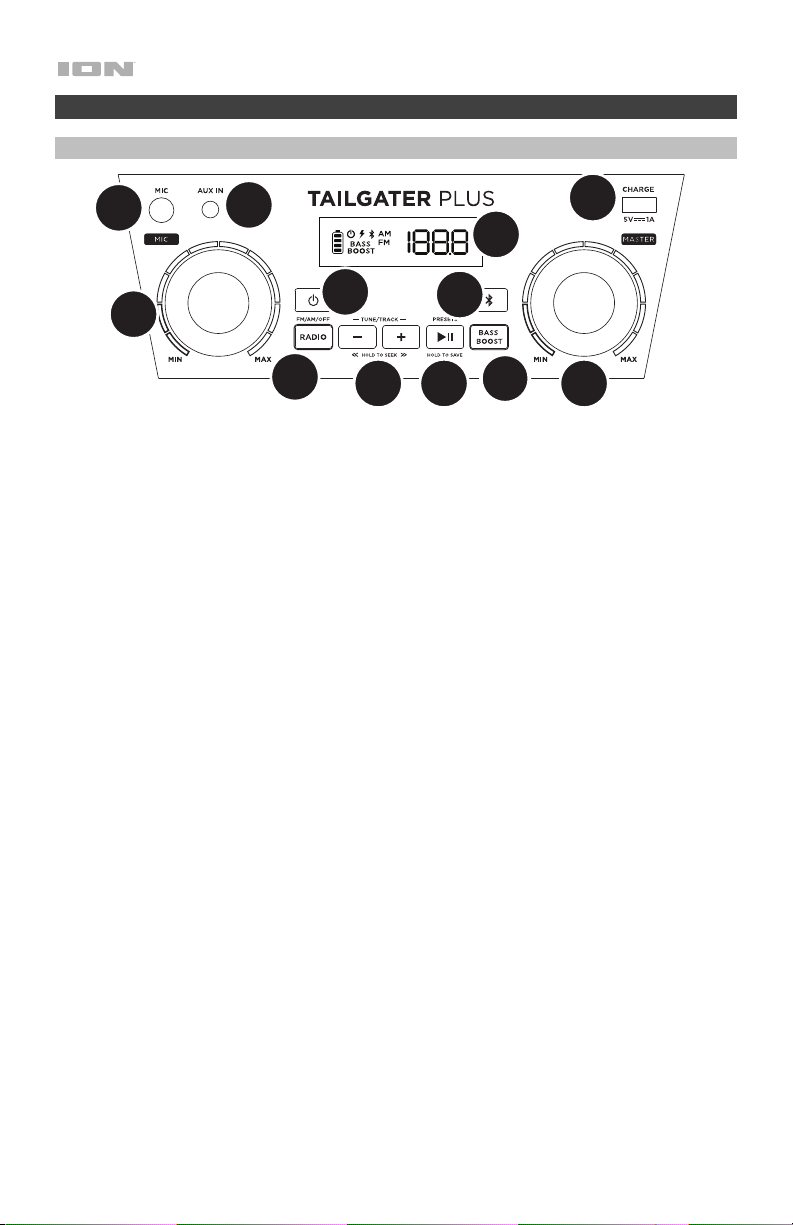
Front Panel
9
10
11
7
1
9
4
1. Power Button: Turns Tailgater Plus on or off. Please note that while Tailgater Plus is connected to a
power source, it does not need to be powered on to charge the battery. When the power is on, the
display will show the power indicator.
2. Bluetooth Button: Press the Bluetooth button to disconnect a paired Bluetooth device.
3. Bass Boost: Press this button to enhance the overall bass frequency response.
4. Radio Selector: This button sets the Radio to AM, FM, or turns the radio off.
5. Tune/Track Buttons: Tap these buttons to tune in a radio station or go to the previous/next track on a
Bluetooth connected device. To “seek” (jump to the next available station), hold either button down for
a few seconds until it starts to seek a station. The unit will remember the last station it was on and start
at that station when powered off and on again.
6. Play/Pause: Press to play or pause a track from a connected Bluetooth device. When in Radio mode,
press and hold this button to save a station as a preset. Press and release this button repeatedly to go
through saved station presets. See the section Operation > Using the Radio
7. Display: Displays the current radio station, battery status, and Bluetooth status.
• Charging Indicator: When the power cable is connected, movement of the battery segments
shows the battery is charging. When fully charged, all battery segments will be lit without blinking.
When the power cable is disconnected, the battery segment shows the level of the battery.
• Lightning Bolt Icon: The lightning bolt icon will illuminate when the power cable is connected to
wall power.
• Bluetooth Icon: The Bluetooth icon will be lit solid when a device is paired to Tailgater Plus.
• Power Indicator: The power indicator (radio display decimal point) will be lit when Tailgater Plus
is powered on. The power indicator will not be lit when Tailgater Plus is powered off.
8. Master Volume Control: This adjusts the speaker’s main mix volume, which includes the Microphone
Input, Auxiliary Input, Radio, and the audio of a paired Bluetooth device.
9. Microphone Input with Volume Control (1/4”): This mono input accepts a 1/4” (6.35 mm) input such
as a microphone, guitar, or other musical instrument.
10. Auxiliary Input: This stereo 1/8” (3.5 mm) input can be used to connect a CD player, MP3 player, or
other audio source.
11. USB Charging Port: Connect your device’s charge cable here to charge it. USB charging only
functions when the unit’s power is turned on.
5
6
2
3
8
for more information.
5
1
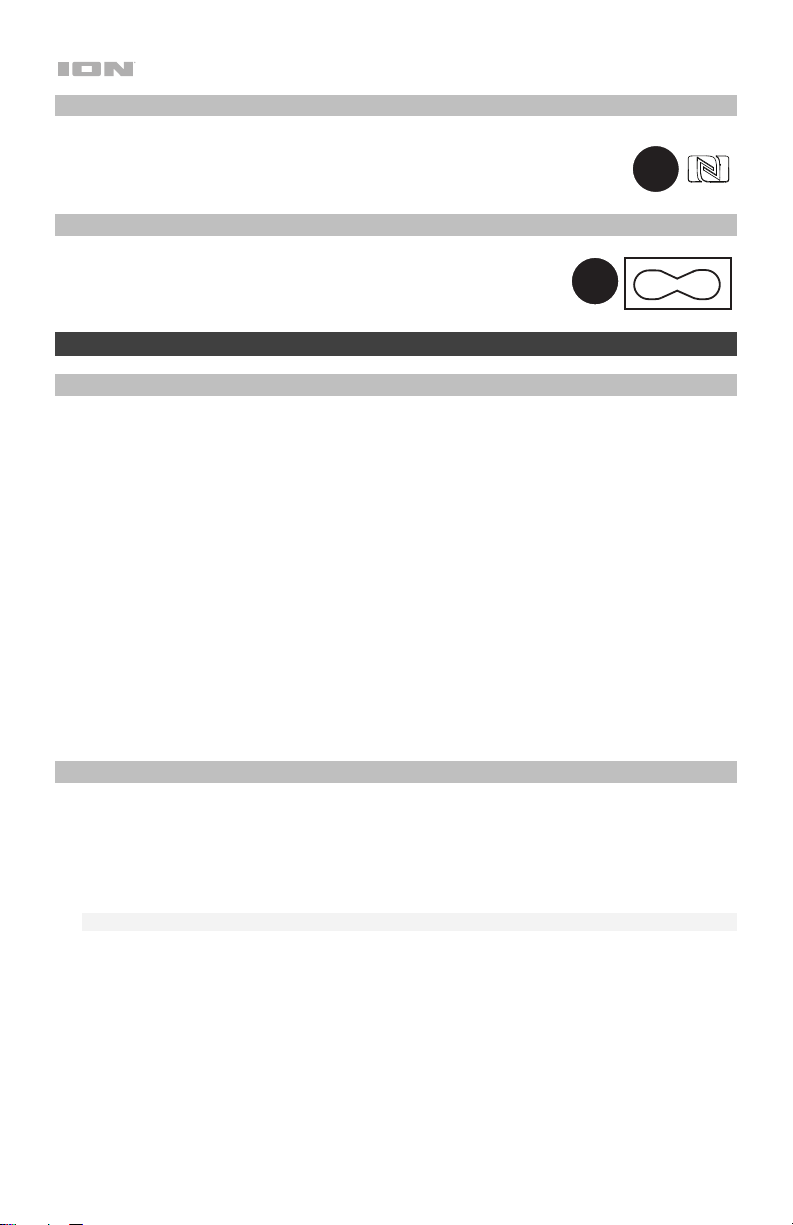
Top Panel
1. NFC: Tap your NFC (near-field communication) supported and enabled
device here to pair your phone by gently bumping on the ‘N’ logo.
1
Rear Panel
1. Power Cable Input: Insert the included power cable here to charge
the unit. Note that the Tailgater Plus can be used with the power
cable while it simultaneously charges the battery.
Operation
Using the Radio
Selecting a radio station:
1. Press the Radio button to select AM or FM.
2. Press either of the Tune/Track buttons to select a radio station. To “seek” (jump to the next
available station), hold either button down for a few seconds until it starts to seek a station.
Saving a radio station as a preset:
1. Press the Radio button to select AM or FM.
2. Press either of the Tune/Track buttons to select a radio station.
3. Press and hold the Presets button for two seconds to enter Preset mode.
4. Press either of the Tune/Track buttons to select a preset location.
5. Press the Presets button to save to the selected location.
Recalling a saved radio station preset:
1. Press the Radio button to select AM or FM.
2. Press the Presets button repeatedly to cycle though the saved presets.
Pairing a Bluetooth Device
1. Turn on your Bluetooth device.
2. Power on Tailgater Plus. If you have previously connected to another Bluetooth device, Tailgater
Plus will reconnect. To disconnect pairing if the Bluetooth icon is lit solid, press and release the
Bluetooth button.
3. Navigate to your Bluetooth device’s setup screen, find “Tailgater Plus” and connect.
Note: If your Bluetooth device prompts for a pairing code, enter “0000”.
4. To disconnect pairing while the Bluetooth icon is lit solid, press and release the Bluetooth
button.
5. To connect to another Bluetooth device, repeat step 3.
6

Pairing a Bluetooth Device Using NFC
NFC (near-field communication) allows data exchange from devices, such as pairing, by gently
bumping them together. Check in your device’s manual to see if this feature is supported.
To use NFC to pair with Tailgater Plus:
1. In order to use NFC, your device must be turned on and unlocked.
2. Enter your device’s Settings menu and check that NFC is turned On (one-time step).
3. Power on Tailgater Plus.
4. Touch and briefly hold your device to the NFC logo.
5. Follow the pairing instructions that appear on your phone. If a passcode is required, enter
“0000”.
6. To unpair, gently bump your device against the NFC logo located on Tailgater Plus’s top panel.
Troubleshooting
If the sound is distorted: Try lowering the volume control of your sound source, musical instrument,
or microphone. Also, try to reduce the overall volume of Tailgater Plus using the Master Volume
knob.
If there is too much bass: Try adjusting the tone or EQ control on your sound source to lower the
bass level. This will allow you to play the music louder before clipping (distortion) occurs.
If there is a high-pitched whistling noise when using microphones: This is probably feedback.
Point the microphone away from the speaker.
If there is poor AM reception: To adjust AM reception, move entire unit.
If you can’t hear the microphone over the music volume: Turn down the music volume from your
source.
If you can’t play music from a flash drive: The USB port is only for charging USB devices.
7

A
Guía de inicio rápido (Español)
Introducción
Gracias por comprar el Tailgater Plus. En ION, su entretenimiento es tan importante para
nosotros como para usted. Por eso es que diseñamos nuestros productos con una sola cosa en
mente—hacer que su vida sea más divertida y cómoda.
Contenido de la caja
Tailgater Plus
Micrófono y cable
Cable de alimentación / carga
Guía de inicio rápido
Manual sobre la seguridad y garantía
Soporte
Para obtener la información más reciente acerca de este producto (documentación,
especificaciones técnicas, requisitos de sistema, información de compatibilidad, etc.) y
registrarlo, visite ionaudio.com.
Para obtener soporte adicional del producto, visite ionaudio.com/support.
Baterías recargables
Las baterías de plomo-ácido recargables son del mismo tipo que se usa en los automóviles.
Al igual que con la batería del vehículo, la forma en que se usa tiene una influencia significativa
en la duración de su vida útil. Con un uso y tratamiento correctos, una batería de plomo-ácido
puede durar varios años. He aquí algunas recomendaciones para prolongar la vida útil de la
batería interna.
Uso general
lmacenamiento
Reparación
Disposición final
Cargue completamente la batería antes de usarla.
Cargue la batería completamente después de cada uso.
Para lograr la mayor longevidad del producto, no lo almacene a temperaturas
muy altas (superiores 32°C/90°F) o muy frías (inferiores a 0°C/32°F).
Es aceptable dejar su sistema de sonido enchufado. No sobrecargará la
batería.
Si deja que el nivel de la batería baje y no la carga durante 6 meses,
puede perder permanentemente su capacidad.
Si la batería no se carga, compruebe su fusible cerca de la entrada del
cable de alimentación. Si el fusible está intacto y la batería sigue sin
cargarse, póngase en contacto con ION Audio en ionaudio.com.
Lleve la unidad a un centro de reciclaje o deséchela de acuerdo a las
ordenanzas locales.
8
Instalación rápida
1. Asegúrese de que todos los artículos indicados en Contenido de la caja estén incluidos
en ella.
2. Lea el manual sobre la seguridad y la garantía antes de utilizar el producto.
3. Para asegurar una máxima vida útil de la batería, asegúrese de que esté completamente
cargada antes de utilizarla por primera vez.
4. Estudie el Diagrama de conexión.
5. Asegúrese de que el volumen maestro del Tailgater Plus esté en cero.
6. Conecte sus dispositivos.
7. Suba el volumen hasta un nivel confortable.
8. Regrese el volumen maestro a cero cuando termine de usar el Tailgater Plus.
Instalación
Los elementos que no se enumeran en Introducción > Contenido de la caja se venden por separado.
Panel frontal
Micrófono
Dispositivo
Bluetooth
Tableta,
reproductor
de MP3, etc.
Panel trasero
Suministro
eléctrico
9
Características
Panel frontal
9
10
11
7
1
9
4
1. Botón de encendido: Enciende y apaga el Tailgater Plus. Tenga en cuenta que mientras el Tailgater
Plus está conectado a un suministro eléctrico, no es necesario encenderlo para que cargue la batería.
Cuando el altavoz está encendido, la pantalla mostrará el indicador de encendido.
2. Botón de Bluetooth: Pulse el botón Bluetooth para desconectar un dispositivo Bluetooth apareado.
3. Bass Boost: Pulse este botón para mejorar la respuesta en frecuencia general de los graves.
4. Selector de radio: Este botón ajusta la radio a AM, FM, o la apaga.
5. Botones de sintonizador/pista: Toque ligeramente estos botones para sintonizar una emisora de radio
o pasar a la pista anterior/siguiente de un dispositivo Bluetooth conectado. Para "buscar" (saltar a la
siguiente emisora disponible), mantenga pulsado cualquier botón durante unos segundos hasta que
empieza a buscar la emisora. La unidad recuerda la última emisora que estaba sintonizada y comienza
en esa emisora cuando la apaga y enciende nuevamente.
6. Reproducir/Pausa: Pulse para reproducir o hacer pausa en una pista de un dispositivo Bluetooth
conectado. Estando en modo de radio, mantenga pulsado este botón para guardar la estación como
un preset. Mantenga pulsado este botón repetidamente para recorrer los presets de estaciones
guardadas. Consulte la sección Funcionamiento > Uso de la radio para mayor información.
7. Pantalla: Muestra la emisora de radio actual, el estado de la batería, el estado del Bluetooth y el estado
del enlace.
• Indicador de carga: Con el indicador de carga de la batería, cuando el cable de alimentación
está conectado, el movimiento de los segmentos de la batería muestra que se está cargando.
Una vez completamente cargada, todos los segmentos de la batería estarán encendidos sin
parpadear. Cuando se desconecta el cable de corriente, el segmento de la batería muestra en
nivel de la misma.
• Icono del relámpago: El icono del relámpago se encenderá cuando el cable de corriente esté
conectado a una toma de corriente de pared.
• Icono de Bluetooth: El icono de Bluetooth se enciende con luz azul continua cuando hay un
dispositivo apareado al Tailgater Plus.
• Indicador de encendido: El indicador de encendido (punto decimal de la pantalla de la radio) se
encenderá cuando el Tailgater Plus se encienda. Este indicador de encendido no se encenderá
8. Control de volumen maestro: Este control ajusta el volumen de la mezcla principal del altavoz, que
9. Micrófono con control de volumen (6,35 mm): Esta entrada mono admite una entrada de 6,35 mm
10. Entrada auxiliar: Esta entrada de 3,5 mm (1/8 pulg.) estéreo se puede usar para conectar un
11. Puerto de carga USB: Conecte aquí el cable de carga de su dispositivo para cargarlo. La carga por
10
cuando Tailgater Plus está apagado.
incluye la entrada de micrófono, la entrada auxiliar, el sintonizador y el audio de un dispositivo
Bluetooth apareado.
(1/4 pulg.) tal como un micrófono, una guitarra u otro instrumento musical.
reproductor de CD, MP3 u otra fuente de audio.
USB funciona solamente cuando la unidad está encendida.
5
6
2
3
8

1
Panel superior
1. NFC: Toque ligeramente aquí su dispositivo NFC (comunicación de campo
cercano) soportado y habilitado para aparear su teléfono tocando
suavemente el logo de la ‘N’.
1
Panel trasero
1. Entrada del cavo de alimentación: Inserte aquí el cable de
alimentación incluido para alimentación la unidad. Tenga en cuenta
que el Tailgater Plus puede funcionar con el adaptador de potencia
mientras se carga simultáneamente la batería.
Funcionamiento
Cómo usar la radio
Selección de una estación de radio:
1. Pulse el botón Radio para elegir entre AM y FM.
2. Pulse cualquiera de los botones Tune/Track para seleccionar una estación de radio. Para
"buscar" (saltar a la siguiente emisora disponible), mantenga pulsado cualquier botón durante
unos segundos hasta que empieza a buscar la emisora.
Cómo guardar una emisora de radio como preset:
1. Pulse el botón Radio para elegir entre AM y FM.
2. Pulse cualquiera de los botones Tune/Track para seleccionar una estación de radio.
3. Mantenga pulsado el botón Presets durante dos segundos para entrar al modo de presets.
4. Pulse cualquiera de los botones Tune/Track para seleccionar una ubicación para el preset.
5. Pulse el botón Presets para guardar en la ubicación seleccionada.
Recuperación de un preset de estación de radio guardado.
1. Pulse el botón Radio para elegir entre AM y FM.
2. Pulse el botón Presets repetidamente para recorrer los presets guardados.
Cómo aparear un dispositivo Bluetooth
1. Encienda su dispositivo Bluetooth.
2. Encienda el Tailgater Plus. Si ya lo había conectado a otro dispositivo Bluetooth previamente, el
Tailgater Plus se reconectará. Para desconectar el apareamiento si el icono de Bluetooth está
encendido permanentemente, mantenga pulsado el botón de Bluetooth.
3. Navegue a la pantalla de configuración de su dispositivo Bluetooth, busque “Tailgater Plus” y
conéctelo a él.
Nota: Si su dispositivo Bluetooth solicita un código de apareamiento, ingrese 0000.
4. Para desconectar el apareamiento cuando el icono de Bluetooth esté encendido
permanentemente, mantenga pulsado el botón de Bluetooth.
5. Para conectarse a otro dispositivo Bluetooth, repita el paso 3.
11
 Loading...