

ION Audio IPA78E User Manual

Quickstart Guide English ( 3 – 6 )
Guía de inicio rápido Español ( 7 – 10 )
Guide d’utilisation rapide Français ( 11 – 14 )
Appendix English ( 15 )

2

Quickstart Guide (English)
Introduction
Thank you for purchasing the Party Rocker Effects. At ION, your entertainment is as important
to us as it is to you. That’s why we design our products with one thing in mind—to make your
life more fun and more convenient.
Box Contents
Party Rocker Effects
Microphone with Cable
Power Adapter
1/8” (3.5 mm) Stereo Aux Cable
Quickstart Guide
Safety & Warranty Manual
Support
For the latest information about this product (documentation, technical specifications, system
requirements, compatibility information, etc.) and product registration, visit ionaudio.com.
For additional product support, visit ionaudio.com/support.
WARNING: DO NOT splash or immerse in water or other liquids. Not for use in rain. Use only
in dry locations.
WARNING: DO NOT look directly into the dome light. Do not sit, stand, or apply pressure on
the dome light.
3
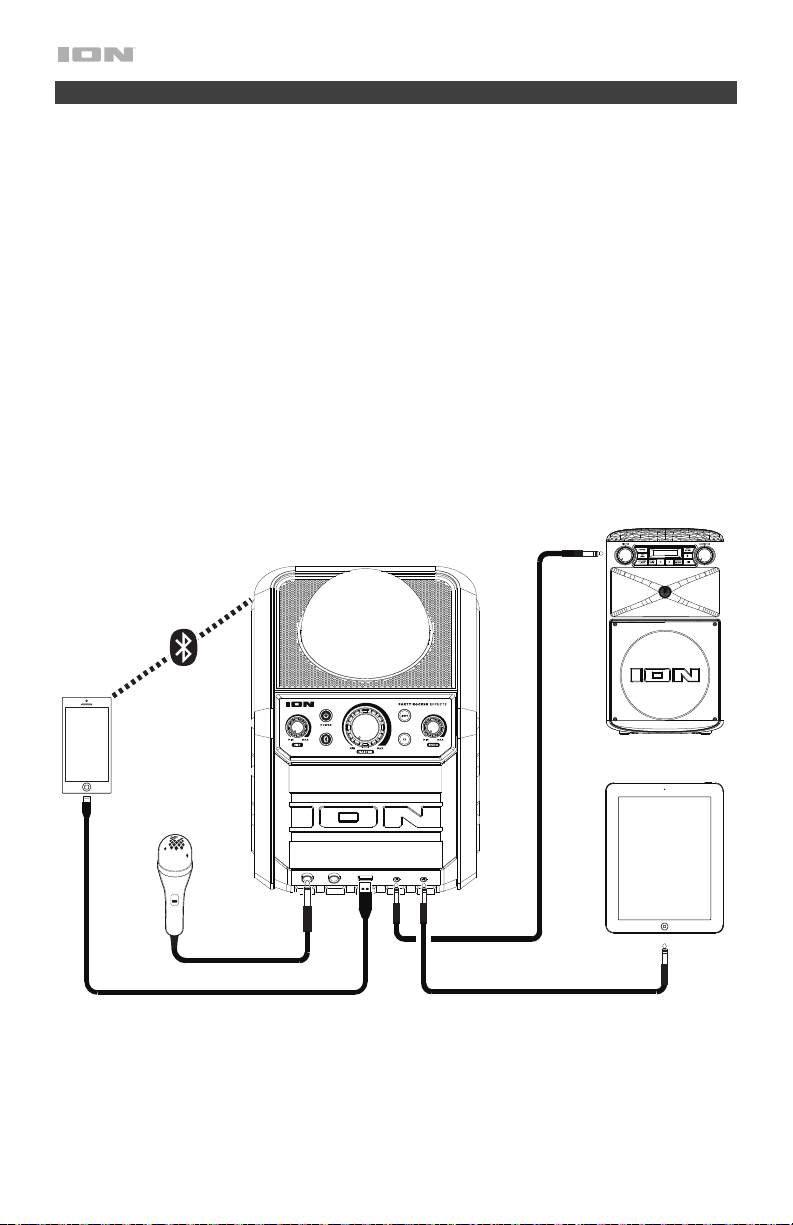
Setup
Items not listed under Introduction > Box Contents are sold separately.
1. For optimal performance, place Party Rocker Effects in the center of the room so it is
unobstructed by walls, furniture, etc.
2. Turn down the Master Volume on the Party Rocker Effects.
3. Connect the included power adapter from the power input to a power outlet, or install 8
"C" size batteries.
4. Connect the included microphone to one of the microphone inputs.
5. Turn on Party Rocker Effects.
6. Connect your music player with an audio cable or Bluetooth (see Connecting with a
Bluetooth Device for more details on this).
7. Adjust the volume on your music player and on Party Rocker Effects as needed.
8. Press the Light Mode button on Party Rocker Effects to turn the dome and grille party
lights on and off.
9. Turn off Party Rocker Effects when not in use.
External Speaker
Bluetooth
Device
4
Microphone
Tablet, MP3
Player, etc.
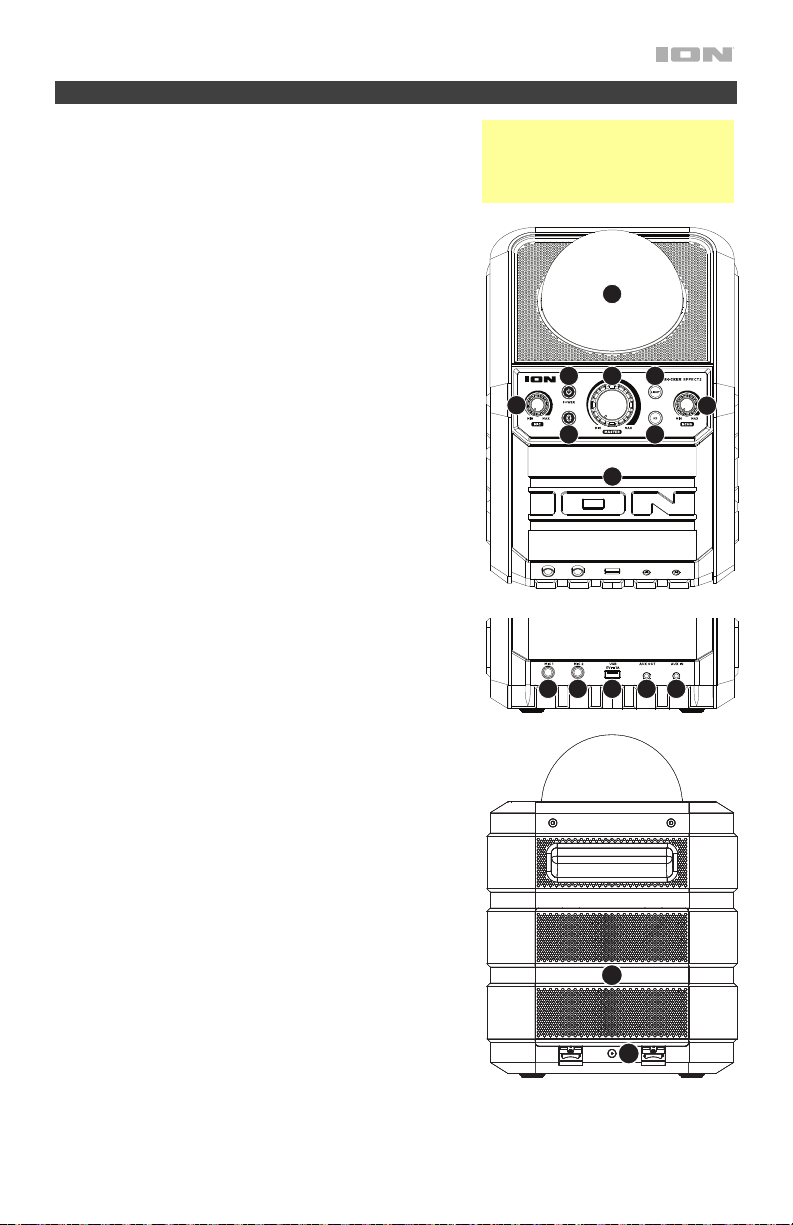
Features
1. Dome*: The lights in the dome can spin and react to
the music playing (depending on the Light Mode that is
selected).
2. Microphone Volume Control: Adjust this knob to
control the volume for microphone inputs 1 and 2.
3. Power On/Off: Press this button for one second to
turn Party Rocker Effects on or off.
4. Bluetooth Button: When the unit is first powered on, it
will automatically enter Pairing mode.
The Paired LED will be lit when a device is paired to
Party Rocker Effects. This LED will not be lit when
Party Rocker Effects is first powered on (unless it was
previously paired with a device).
Press and hold the Bluetooth button for 3 seconds to
disconnect a paired Bluetooth device.
5. Master Volume Control: This adjusts the speaker’s
main mix volume, which includes the microphone
inputs, auxiliary input, and the audio of a paired
Bluetooth device.
6. Light Mode Button: Press and release this button to
turn the dome and grille party lights on and off. When
the lights are activated, press and release this button
to cycle to the next light mode.
Play through all individual pattern loops or select from
one of the 8 individual pattern loops.
The lights follow a mode-selected pattern and will
react to the music playback.
7. FX: Press this button to cycle through the 4 vocal
effects for the microphone inputs.
8. Echo: Now you can sound like a rock star in a huge
arena! Adjust this knob to control the amount of echo
applied to the mic inputs, making your voice
reverberate and sound spacious.
9. Speaker Grille: The audio playback is heard through
here. Also, the illuminated party lights are seen here.
10. Micr
11. USB Port: Connect a smartphone or tablet here to
12. Auxiliary Output: Connect this output to a home
13. Auxiliary Input: This stereo 1/8” (3,5 mm) input can be
14. Battery Compartment: If powering with batteries,
15. Power Input: If powering with the power adapter,
ophone Inputs: Connect 1/4" (6.35 mm)
microphones to these inputs.
charge.
stereo or external speaker to increase the overall
volume.
used to connect a smartphone, MP3 player or other
audio sources.
install 8 “C” size batteries here.
connect the included power adapter here.
*WARNING: Do not look directly
into the dome light. Do not sit,
stand, or apply pressure on the
dome light.
1
5
3
2
4
6
8
7
9
1110
14
1310
12
15
5
 Loading...