

Page 1

Air CD Pro
Quickstart Guide English ( 3 – 15 )
Guía de inicio rápido Español ( 16 – 26 )
Guide d’utilisation rapide Français ( 27 – 37 )
Appendix English ( 43 )
Page 2

2
Page 3

Quickstart Guide (English)
Introduction
Thank you for purchasing the Air CD Pro. At ION, your entertainment is as important to us as it is to
you. That’s why we design our products with one thing in mind—to make your life more fun and
more convenient.
Box Contents
Air CD Pro
Power Adapter
Quickstart Guide
Safety & Warranty Manual
Support
For the latest information about this product (documentation, technical specifications, system
requirements, compatibility information, etc.) and product registration, visit ionaudio.com.
For additional product support, visit ionaudio.com/support.
3
Page 4
y
Setup
When setting up your Air CD Pro, please consider the following precautions:
• Make sure all items listed in Introduction > Box Contents are included in the box.
• Avoid positioning your Air CD Pro in areas where there is high humidity, high heat, poor ventilation,
excessive dust, or where there will be excessive vibration (which can cause a CD to skip).
• If you are going to use headphones, lower the volume before you plug in your headphones and wear
them.
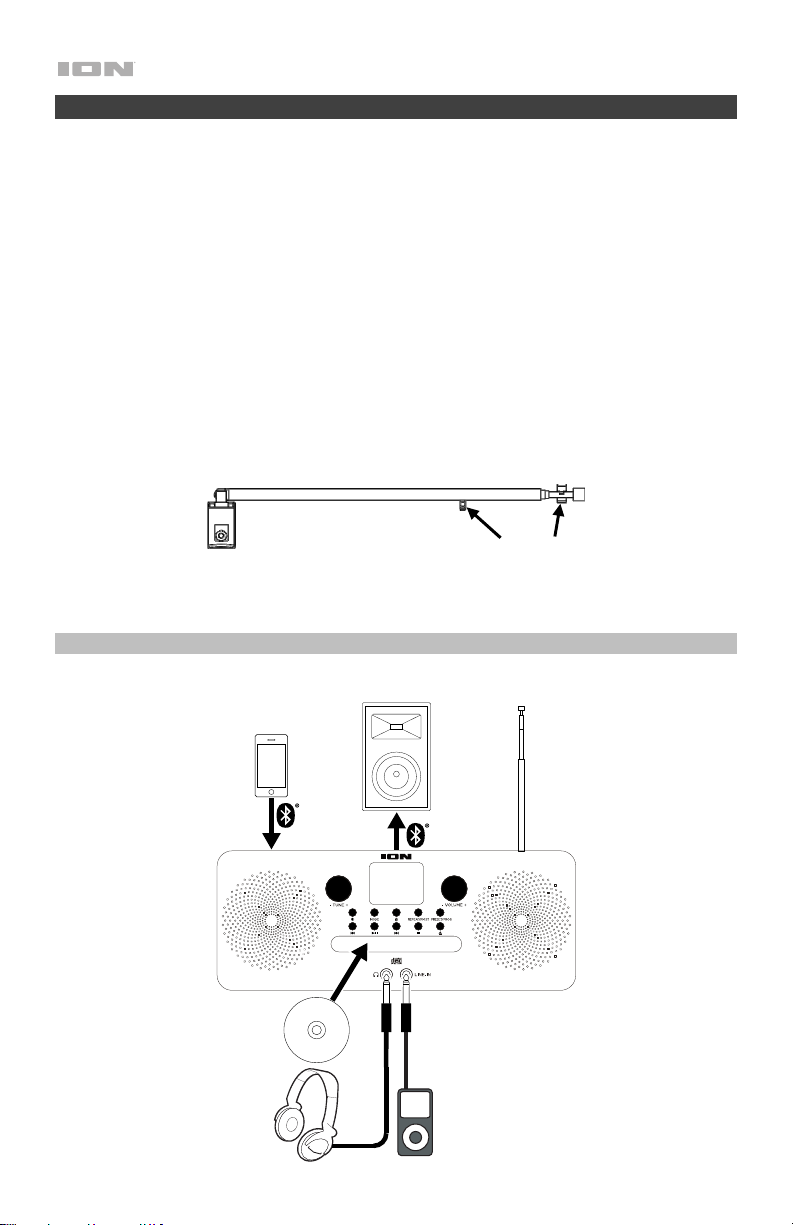
• If you would like to use a diagram as a reference while connecting your devices to Air CD Pro, see the
Connection Diagram on this page.
Using the Antenna
If you are using the built-in FM radio, the Antenna will help Air CD Pro obtain a strong signal.
To use the antenna:
1. Remove the Antenna from the clips that fasten it to the rear panel. Use two fingers to pull the antenna
away from the rear panel; do not pull up or push down on the antenna while it is clipped in.
2. After removing the Antenna from the clips, bend it to the right so that it can stand up straight (as
pictured in the Connection Diagram). Extend the Antenna by pulling the top of it upward.
3. While listening to the radio, adjust the Antenna to the left and right as needed for good reception.
When you are done with the radio, shorten the Antenna by pressing the top of it down as far as it will go.
Then position the shortened Antenna so that it is lined up between the clips and push it toward the rear
panel until it locks in between the clips.
Antenna Clips
Connection Diagram
Items not listed under Introduction > Box Contents are sold separately.
Audio Source
Air CD Pro
Front Panel
4
Bluetooth Speaker
Bluetooth
Headphones
CD
Auxiliar
Antenna
Device
Page 5
Features
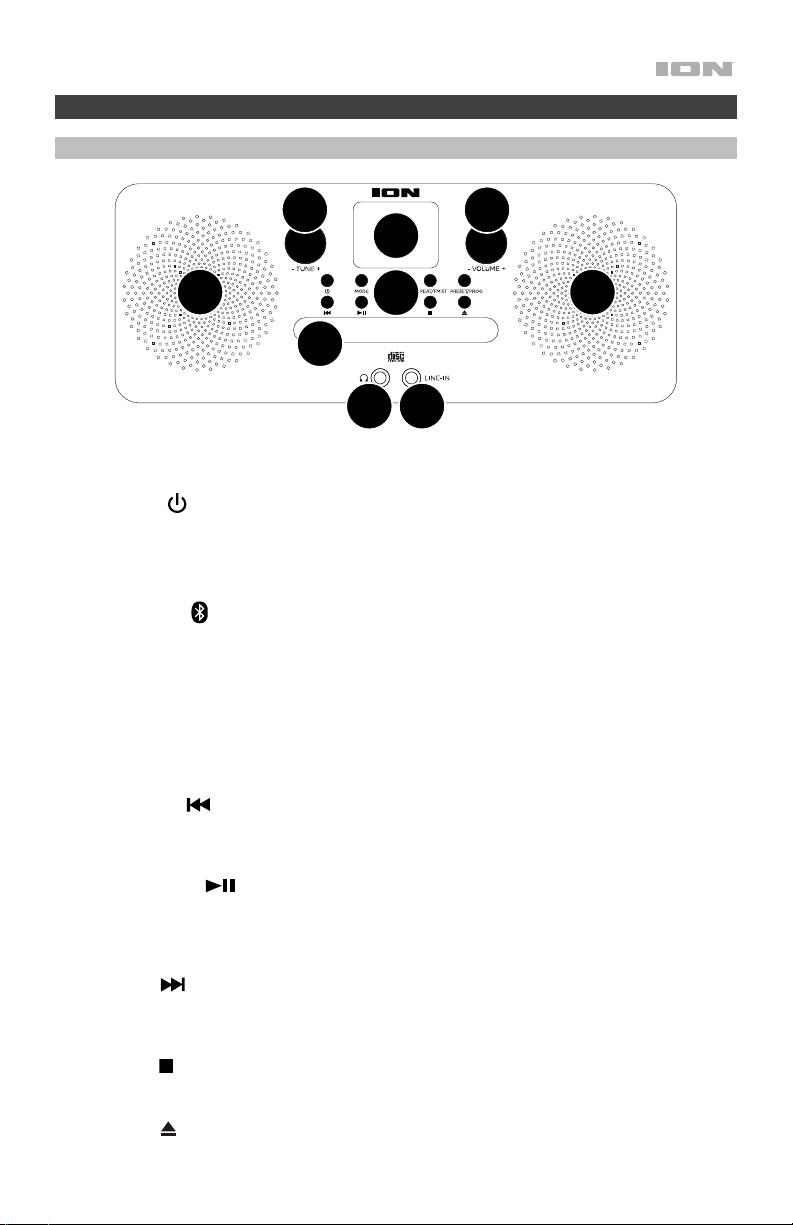
Front Panel
4 5
3
8 8
1
2
6 7
1. Main Controls: Use the buttons located here to operate Air CD Pro. The following buttons are
included:
• Power ( ): Press this button to power on Air CD Pro or put it in standby. When in standby,
a clock will show on the Display. To learn how to adjust the clock so that it shows the
correct time, see Setting the Clock.
• Mode: Press this button to toggle between Air CD Pro’s four audio input modes: Aux, Radio,
Bluetooth, and CD. See Selecting the Audio Input Mode for more information.
• Bluetooth ( ): Press this button to initiate pairing with a Bluetooth speaker. See Pairing Air
CD Pro with a Bluetooth Speaker for more information.
• Repeat/FM ST: In CD Mode, press this button to cycle through the Repeat options. See
Listening to a CD for more information. In Radio Mode, use this button to switch the FM
radio between stereo and mono. See Listening to the Radio for more information.
• Preset/Prog: In CD Mode, use this button to create a custom playlist consisting of up to 20
tracks off the current CD. See Listening to a CD for more information. In Radio Mode, use
this button to save the currently selected station as a preset. See Listening to the Radio for
more information.
• Previous ( ): In CD Mode, press this button to go to the previous track or press and hold
this button to rewind the current track. In Radio Mode, press this button to go to the
previous preset station or press and hold this button to seek backward. In Bluetooth Mode,
press this button to go to the previous track, genre, or playlist on your paired device.
• Play/Pause ( ): In CD Mode, press this button to play/pause a CD. In Bluetooth Mode,
press this button to play/pause the currently selected track on your paired device or press
and hold this button to restart the pairing process. See Listening to a Bluetooth Device for
more information. In Radio Mode, press this button to initiate the preset auto-store process.
See Listening to the Radio for more information.
• Next ( ): In CD Mode, press this button to go to the next track or press and hold this
button to fast forward the current track. In Radio Mode, press this button to go to the next
preset station or press and hold this button to seek forward. In Bluetooth Mode, press this
button to go to the next track, genre, or playlist on your paired device.
• Stop ( ): In CD Mode, press this button to stop playing a disc. While Air CD Pro is in
standby, press and hold this button to change the time. See Setting the Clock for more
information.
• Eject ( ): In CD Mode, press this button to open or close the Disc Tray.
5
Page 6
2. Disc Tray: Place a CD in this tray in order to listen to it when Air CD Pro is in CD Mode. Use the
Eject button to open the tray when you want to insert a CD. Use the same button to close the
tray before playing the CD.
3. Display: The central area of this screen indicates which audio input mode is currently selected
as well as the status of the corresponding audio source. Additionally, a column of seven icons on
the left side of the screen turn on and off according to Air CD Pro’s current operation. From top
to bottom, this column includes the following icons:
• Stereo Symbol: This will illuminate when the radio is set to stereo.
• Play Symbol: This will be solidly lit when a CD is playing, flash while a CD is paused, and
turn off when a CD is stopped.
• Repeat Symbol: This will be solidly lit when a CD is set to Repeat All, flash when a CD is set
to Repeat One, and turn off when Repeat is deactivated.
• Aux Icon: This will illuminate when Aux Mode is selected.
• CD Icon: This will illuminate when CD Mode is selected.
• Prog Icon: In Radio Mode, this will illuminate while saving a preset station. In CD Mode, this
will be solidly lit after a custom playlist is programmed, flash while a custom playlist is in the
process of being programmed, and turn off when there is no custom playlist.
4. Tune Knob: Rotate this knob to manually change the radio station number.
5. Volume Knob: Rotate this knob to adjust the Air CD Pro’s volume (shown on the Display as L -
00–30).
6. Headphone Output: Connect headphones to this 1/8” / 3.5 mm output if you would like to listen
to Air CD Pro through the headphones.
7. Line-In: If you would like to listen to an auxiliary device (such as an iPod or other MP3 player)
through Air CD Pro, use a cable with a standard 1/8” / 3.5 mm connector to plug the device into
this input. See Listening to an Auxiliary Device for more information.
8. Internal Speakers: These speakers produce Air CD Pro’s audio output.
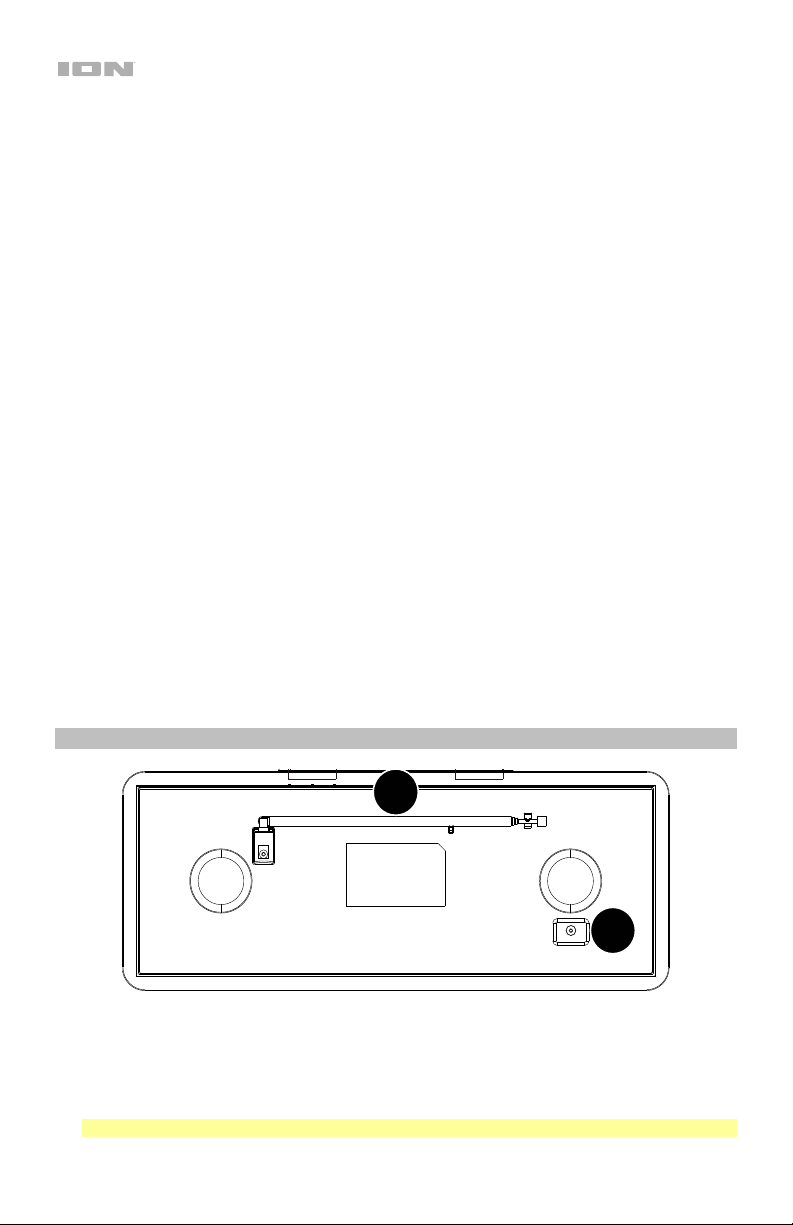
Rear Panel
1
2
1. Antenna: When listening to the radio, adjust the Antenna for better reception as needed. When
not using the antenna, keep it as pictured in the diagram above. See Setup for more details on
using the Antenna.
2. Power Input: To power Air CD Pro, connect the included power adapter from this port to a
power outlet. To turn off the unit, unplug the power adapter from the port or the power outlet.
Note: Powering off Air CD Pro will reset the clock that displays when the unit is in standby.
6
Page 7
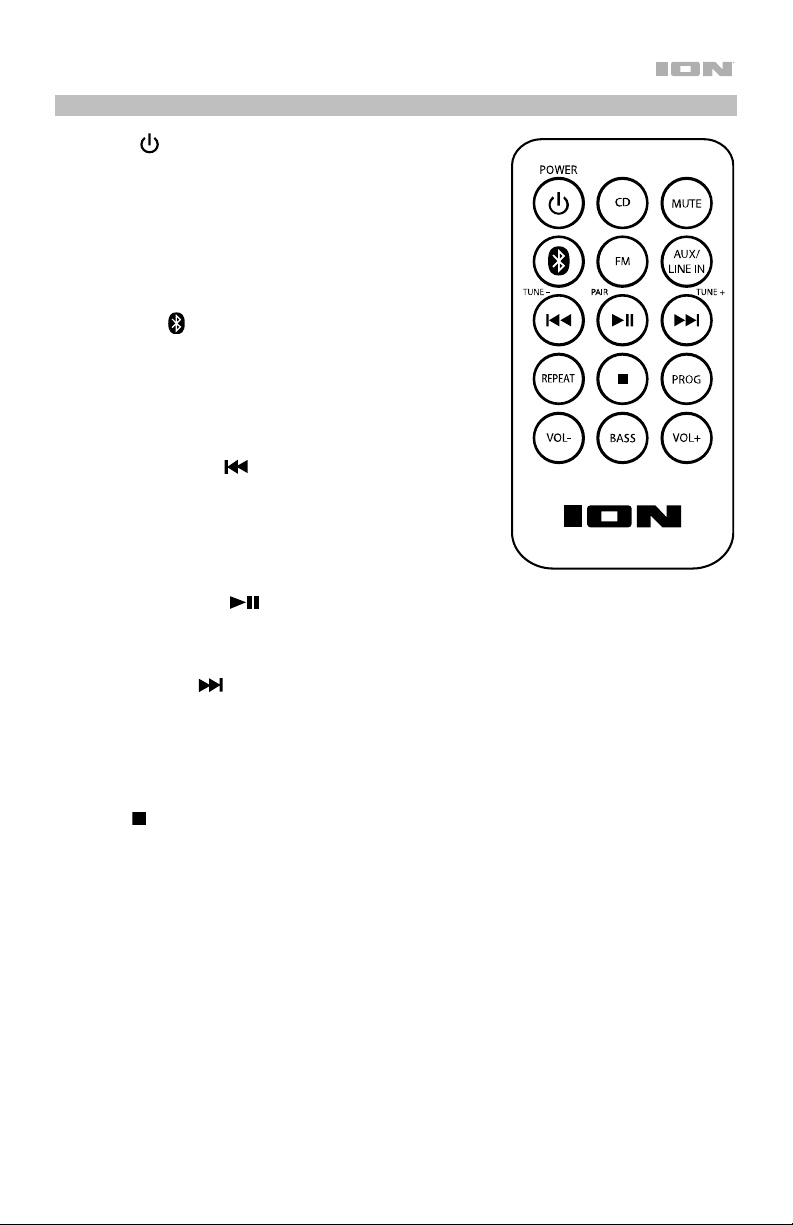
Remote Control
• Power ( ): Press this button to power on Air CD Pro or put
it in standby.
• CD: Press this button to enter Air CD Pro in CD mode.
• Mute: Press this button to mute Air CD Pro’s audio output.
When the audio is muted, the Display screen will flash L -
00. Pressing the mute button again or adjusting the volume
will unmute the speaker. In Radio Mode, you will not be able
to change stations while Air CD Pro is muted.
• Bluetooth (
Bluetooth speaker. See Pairing Air CD Pro with a
Bluetooth Speaker for more information.
• FM: Press this button to enter Air CD Pro in Radio Mode.
• Aux/Line In: Press this button to enter Air CD Pro in Aux
Mode.
• Previous / Tune - ( ): In CD Mode, press this button to
go to the previous track or press and hold this button to
rewind the current track. In Radio Mode, press this button to
go to the previous preset station or press and hold this
button to seek backward. In Bluetooth Mode, press this
button to go to the previous track, genre, or playlist on your
paired device.
• Play/Pause / Pair ( ): In CD Mode, press this button to play/pause a CD. In Bluetooth
Mode, press this button to play/pause the currently selected track on your paired device or press
and hold this button to restart the pairing process. See Listening to a Bluetooth Device for
more information.
• Next / Tune + ( ): In CD Mode, press this button to go to the next track or press and hold
this button to fast forward the current track. In Radio Mode, press this button to go to the next
preset station or press and hold this button to seek forward. In Bluetooth Mode, press this
button to go to the next track, genre, or playlist on your paired device.
• Repeat: In CD Mode, press this button to cycle through the Repeat options. See Listening to a
CD for more information.
• Stop ( ): In CD Mode, press this button to stop playing a disc. While Air CD Pro is in standby,
press and hold this button to change the time. See Setting the Clock for more information.
• Prog: In CD Mode, use this button to create a custom playlist consisting of up to 20 tracks off
the current CD. See Listening to a CD for more information.
• Vol -: Press this button to turn down Air CD Pro’s volume.
• Bass: Press this button to toggle the bass boost on and off. Turning this feature on increases the
bass frequencies output by Air CD Pro. When you turn the bass boost on, the Display will
temporarily read bASS. When you turn the bass boost off, the Display will temporarily read NOr.
• Vol +: Press this button to turn up Air CD Pro’s volume.
): Press this button to initiate pairing with a
7
Page 8

Operation
Selecting the Audio Input Mode
Air CD Pro comes with four audio input modes. When you change the mode, you determine the
source of audio played by Air CD Pro. You can know which mode Air CD Pro is in by looking at the
Display.
The four audio input modes are the following:
• Aux: In this mode, the audio source will be the Line-In jack on the front panel. The Display will
read AUX when this mode is selected, and the Aux Icon will illuminate on the left side of the
Display. See Listening to an Auxiliary Device to learn more about how to use this mode.
• Radio: In this mode, the audio source will be the built-in FM Radio. The Display will show the
current station number when this mode is selected. See Listening to the Radio to learn more
about how to use this mode.
• Bluetooth: In this mode, the audio source will be the Bluetooth device paired with Air CD Pro.
The Display will read BT when this mode is selected. See Listening to a Bluetooth Device to
learn more about how to use this mode.
• CD: In this mode, the audio source will be the built-in CD player. The CD Icon will illuminate on
the left side of the Display when this mode is selected. See Listening to a CD to learn more
about how to use this mode.
To change the audio input mode, press the Mode button on the front panel. Pressing this button
will toggle through the modes, and you can look at the Display to see which mode is selected.
Alternatively, you can change the audio input mode by pressing the button for the desired mode on
the remote control.
8
Page 9

Listening to a CD
The built-in CD player allows you to play a CD on Air CD Pro.
To begin playing a CD:
1. Make sure that Air CD Pro is in CD Mode (see Selecting the Audio Input Mode for more details
if needed).
2. Open the Disc Tray by pressing the Eject button. The Display will temporarily show OP.
3. Place a CD in the tray.
4. Close the Disc Tray by pressing the Eject button again. The Display will show CL while the
Disc Tray is closing, and then Air CD Pro will read the CD. After Air CD Pro reads the CD, the
CD will be stopped and the total number of tracks will be shown on the Display.
5. Press the Play/Pause button to begin playing the CD. While a track is playing, the Display will
show the track time in minutes and seconds.
To pause a track, press the Play/Pause button on the unit or remote control. The Display will flash
to indicate that the track is paused.
To change the track, press and release the Previous or Next button. As you scroll through tracks
with these buttons, the Display will update with the current track number.
To rewind or fast-forward a track, press and hold the Previous or Next button. As you rewind or
fast-forward, the Display will update with the current track time.
To stop a CD, press the Stop button on the unit or remote control. When a CD is stopped, the
Display will show its total track number, and the CD will start from the beginning when it is played
again.
Programming a Custom Playlist
You can make a custom playlist of up to 20 tracks off the current CD, arranging the tracks in any
order you would like.
To program and play a custom playlist:
1. Make sure that CD Mode is selected and that the Disc Tray is closed with a CD in it.
2. Make sure that the CD is stopped. You will know the disc is stopped if you can see the total
track number on the Display. If the CD is not stopped, press the Stop button.
3. Press the Preset/Prog button on the front panel or the Prog button on the remote control to
initiate the programming process. After you press it, the Display will flash P01 (the first slot
number in the playlist). The Prog Icon will also begin flashing on the left side of the Display.
4. After the playlist slot number starts flashing on the Display, use the Previous and Next buttons
to scroll through the tracks on the CD. As you scroll through the tracks, the currently selected
CD track number will update on the Display.
5. Once you’ve identified the CD track that you want to assign to the playlist slot number, press the
Preset/Prog button on the front panel or the Prog button on the remote control.
6. The Display will now flash P02, and you can choose the second track for the playlist. Repeat
steps 4–5 for P02 and any subsequent playlist slot numbers. The playlist can contain up to 20
tracks, and you can assign the same CD track to multiple playlist slots if desired.
7. When you have finished assigning all tracks that you want in the playlist, press the Play/Pause
button to play the customized list of tracks. The Prog Icon will be solidly lit on the left side of
the Display to indicate that the playlist is programmed.
9
Page 10

To pause the playlist, press the Play/Pause button. The Display will flash to indicate that the
current track is paused.
To change the track, press the Previous or Next button. As you scroll through the tracks in the
playlist, the Display will update with the current track number.
To stop the playlist, press the Stop button. The Display will show the total number of tracks on the
CD. After a playlist is stopped, you can press the Play/Pause button to restart the playlist from the
beginning.
To erase a programmed playlist, first press the Stop button to stop the playlist. Then press the
Stop button again. The Prog Icon will turn off to indicate that no playlist is currently programmed.
Note: If you exit CD Mode or put Air CD Pro in standby, this will also cause Air CD Pro to erase the
playlist from its memory.
Repeat Play
Whether listening to a CD’s tracks in their standard order or to a custom playlist, you can use the
Repeat options (Repeat One and Repeat All). When Repeat One is activated, the currently selected
track will play on a loop. When Repeat All is activated, the current tracklist will play on a loop.
To turn Repeat on, press the Repeat/FM ST button on the front panel or the Repeat button on the
remote control. Pressing this button will toggle between Repeat One, Repeat All, and Repeat Off.
When Repeat One is selected, the Repeat Symbol on the left side of the Display will flash. When
Repeat All is selected, the Repeat Symbol will be solidly lit. When Repeat is off, the Repeat Symbol
will not be lit.
10
Page 11

Listening to a Bluetooth Device
When Air CD Pro is paired with a Bluetooth device (such as a smartphone), it can play music from
the device through its internal speakers.
To pair with a Bluetooth device:
1. Make sure that Air CD Pro is in Bluetooth Mode (see Selecting the Audio Input Mode for more
details if needed). When you enter Bluetooth Mode, BT will flash on the Display to indicate that
Bluetooth mode is selected and that Air CD Pro is searching for a Bluetooth device to pair with.
2. Go to your Bluetooth device’s settings menu and find the list of available devices to pair with.
Then select Air CD Pro from this list. When the pairing process is complete, you will hear a tone
from Air CD Pro’s speakers, and BT will be solidly lit on the Display.
Note: If your Bluetooth device prompts for a pairing code, enter “0000”.
Note: If you have previously paired Air CD Pro with the same Bluetooth device, you may be able
to skip Step 2 and simply wait for the pairing process to complete after entering Bluetooth
mode.
To play/pause and skip tracks from your Bluetooth device, press the Play/Pause button or
Previous/Next buttons on Air CD Pro or on the Bluetooth device.
To pair Air CD Pro with a different Bluetooth device, press and hold the Play/Pause button on
Air CD Pro, which will disconnect the currently paired Bluetooth device and restart the pairing
process. BT will flash on the Display to indicate that Air CD Pro is searching for a Bluetooth device
to pair with. You should move the Bluetooth device you were previously paired to out of range,
disable its Bluetooth capacity, or choose to “Forget” Air CD Pro in its settings menu.
To stop using Bluetooth for Air CD Pro’s audio source, change the audio input mode by pressing
the Mode button on Air CD Pro.
Note: Maximum range will be achieved when using devices with Bluetooth 4.0.
Note: Users should consider updating their Bluetooth device’s operating system if experiencing
trouble with pairing or playing music.
Listening to an Auxiliary Device
You can play music from an auxiliary device (such as an iPod or other MP3 player) through Air CD
Pro.
To play an auxiliary device through Air CD Pro:
1. Use a standard 1/8” / 3.5 mm cable to connect the output jack on your aux device to the Line-in
on Air CD Pro.
2. Make sure that Air CD Pro is in Aux Mode (see Selecting the Audio Input Mode for more details
if needed).
3. Use the controls on your auxiliary device to play/pause a track, skip tracks, etc. (you cannot use
the buttons on Air CD Pro to control your auxiliary device).
Note: If the sound from your auxiliary device is distorted, try lowering the volume on the device.
The volume on your auxiliary device should not be at full level.
11
Page 12

Listening to the Radio
Air CD Pro comes with a built-in FM radio.
To turn on the radio and select a station:
1. Remove the Antenna from the clips on the rear panel and extend it (see Setup for more details if
needed).
2. Make sure that Air CD Pro is in Radio Mode (see Selecting the Audio Input Mode for more
details if needed). The Display will show the currently selected radio station number.
3. Adjust the radio station number by doing one of the following:
• Turn the Tune Knob left or right to manually change the station number in increments of .1
MHz.
• Press and hold the Previous or Next button to seek forward or backward. When “seeking,”
Air CD Pro will skip to the nearest station number with a clear signal.
• Press and release the Previous or Next button to go to the previous or next preset station.
See Presets below to learn more about saving preset stations.
If you are having trouble getting a clear signal from the radio, try moving the Antenna. Alternatively,
you can try switching the radio from stereo to mono, which may reduce static interference for some
radio stations.
To switch the radio signal between stereo and mono, press the Repeat/FM ST button. When
you set the radio to stereo, the Display will temporarily read StEr, and the Stereo Symbol will be lit.
When you set the radio to mono, the Display will temporarily read Off, and the Stereo Symbol will
not be lit.
Presets
With the radio presets feature, you can assign a radio station one of 20 preset numbers on Air CD
Pro, allowing you to easily access the station at the touch of the Previous and Next buttons.
To save a radio station as a preset:
1. Enter Radio Mode and select a radio station (as described above).
2. Press and hold the Preset/Prog button. The Prog Icon on the left side of the Display will be
solidly lit, and the Display will flash one of the preset numbers (shown as P01–P20) to indicate
that the presets are being edited.
3. Use the Tune Knob or the Previous/Next buttons to change the preset number that you would
like to save the station to. The preset numbers will update on the Display as you scroll through
them. There are 20 preset numbers that you can choose between (P01–P20).
4. When you’ve identified the preset number to which you’d like to save the station, press and
release the Preset/Prog button. The Prog Icon will turn off and the Display will return to
showing the radio station number.
To automatically store the 20 radio stations with the strongest signals as presets, press and
hold the Play/Pause button while Air CD Pro is in Radio Mode. Air CD Pro will then travel through
the entire FM band and assign the station numbers with the strongest signals to each of the 20
available presets. The Display will update as Air CD Pro seeks through the stations. Once the
scanning is complete, the Display will return to showing the currently selected station number.
12
Page 13

Pairing Air CD Pro with a Bluetooth Speaker
When paired with a Bluetooth speaker, Air CD Pro can send audio to the speaker from the radio, a
CD, or an auxiliary device.
Note: Air CD Pro cannot send audio from a Bluetooth device to a Bluetooth speaker. If you are
paired with a Bluetooth speaker and you switch the audio input mode to Bluetooth, Air CD Pro will
unpair from the speaker.
To pair Air CD Pro with a Bluetooth speaker:
1. Make sure that Air CD Pro is in Radio, CD, or Aux Mode, depending on what you would like to
listen to (see Selecting the Audio Input Mode for more details if needed).
2. Power on your Bluetooth speaker and make sure that it is ready to pair with Air CD Pro.
3. Press the Bluetooth button. bLUE will begin flashing on the Display to indicate that Air CD Pro
is searching for a speaker to pair with. Once Air CD Pro successfully pairs with the speaker, the
Display will alternate between showing bLUE and showing the default information for the
selected audio input mode.
Note: It may take up to 30 seconds for the pairing to complete. The closer the speaker is to Air
CD Pro during the pairing process, the more quickly the two items will pair.
4. Once Air CD Pro and the speaker are paired, you can initiate playback of the CD, auxiliary
device, or radio station that you would like to hear. If you do not hear anything and your
Bluetooth speaker has a play/pause button, try pressing the play/pause button on the Bluetooth
speaker. To control the output level, adjust the volume on your Bluetooth speaker (if applicable)
or on Air CD Pro.
To pair with a different Bluetooth speaker, repeat steps 3–4. You should take the speaker with
which Air CD Pro was previously paired and power it off, move it out of range, disable its Bluetooth
capacity, or go to its settings menu and select to “Forget” Air CD Pro.
To unpair a Bluetooth speaker and/or stop Air CD Pro from searching for a Bluetooth speaker
to pair with, press and hold the Bluetooth button.
Setting the Clock
When Air CD Pro is in standby, the Display will show the time.
To set the clock on the Display:
1. Make sure that Air CD Pro is in standby. If it is powered on, press the Power button to put it in
standby.
2. Press and hold the Stop button. The Display will flash the currently selected time notation
setting (24-hour clock or 12-hour clock).
3. Use the Previous or Next button to select between a 24-hour clock (24) and a 12-hour clock
(12). When the setting you want is selected, press and release the Stop button to confirm your
selection. The Display will then show the time with the hours counter flashing.
4. Adjust the hours counter with the Previous and Next buttons. Once you’ve selected the correct
number of hours, press and release the Stop button to confirm your selection. The Display will
then show the time with the minutes counter flashing.
5. Adjust the minutes counter with the Previous and Next buttons. Once you’ve selected the
correct number of minutes, press and release the Stop button to confirm your selection. This
step will complete the process of setting the clock, and the Display will show the current time.
Note: When you disconnect Air CD Pro from power, the clock will reset.
13
Page 14

Troubleshooting
The unit will not turn on:
• Make sure that the power adapter is connected properly.
The sound is distorted:
• Try reducing the overall volume of Air CD Pro with the Volume knob or the volume buttons on
the remote control.
• If Air CD Pro is in Aux Mode, try reducing the volume of the auxiliary device.
There is too much bass:
• See if the bass boost is on by pressing the EQ button on the remote control. The Display will
indicate whether the feature is on or off. If it is on, try turning it off.
• If Air CD Pro is in Aux Mode, try adjusting the EQ on your auxiliary device.
The CD will not playback properly:
• Ensure the CD compartment is closed.
• Press the Stop button before trying to play the CD.
• Reinsert the disc, make sure the disc is clean, or try another disc.
The radio is getting poor reception / the unit cannot find any radio stations when seeking:
• Make sure the Antenna is fully extended and try adjusting it for a better signal.
• Try setting the radio to mono by pressing the Repeat/FM ST button. The Display will
temporarily read Off when you set the radio to mono, and the Stereo Symbol will not be lit.
The Bluetooth speaker that I want to use is not pairing with Air CD Pro:
• Turn off any other Bluetooth speakers or move the other nearby Bluetooth speakers more than
50’ (15.2 m) away.
Air CD Pro is paired with a Bluetooth speaker, but I do not hear any audio:
• Make sure that audio is playing on Air CD Pro.
• Use the Volume knob or volume buttons on the remote control to turn up Air CD Pro’s output
level.
• If the Bluetooth speaker has a play/pause button, try pressing this button.
• Press and release Air CD Pro’s Bluetooth button to restart the process of pairing with a
Bluetooth speaker. Once Air CD Pro and the speaker are paired again, try playing audio. See
Pairing Air CD Pro with a Bluetooth Speaker for more information on how to pair with a
speaker.
• Put Air CD Pro in standby and then turn it on again. Then pair it with your Bluetooth speaker and
try playing audio again.
14
Page 15

If you cannot connect an audio source to Air CD Pro via Bluetooth:
• Have your audio device (e.g. smartphone or tablet) and Air CD Pro as close together as possible
while trying to connect. Make sure both the audio device and Air CD Pro are unobstructed by
walls, furniture, etc.
• Reset the Bluetooth connection on Air CD Pro to disconnect Air CD Pro from any other audio
device and restart the search process. If this does not work right away, power off Air CD Pro and
then power it back on.
• Reset the Bluetooth connection on your audio device by turning Bluetooth off and back on. You
can find this under the Bluetooth menu in the Settings for your phone or other audio device.
If this does not work, and you have connected to Air CD Pro before, find Air CD Pro in the list of
available or previously connected devices in your audio device's Bluetooth menu, tap the "gear"
or “i” icon located next to it and then select Unpair or Forget. Turn Air CD Pro off and back on
and try pairing again once it reappears in your available devices list.
Note: If Air CD Pro has been paired to another audio device recently that is still within range, you
may need to repeat this process with that audio device to fully disconnect.
15
Page 16

Guía de inicio rápido (Español)
Introducción
Gracias por comprar el Air CD Pro. En ION, su entretenimiento es tan importante para nosotros como
para usted. Por eso es que diseñamos nuestros productos con una sola cosa en mente—hacer que su
vida sea más divertida y cómoda.
Contenido de la caja
Air CD Pro
Adaptador de alimentación
Guía de inicio rápido
Manual sobre la seguridad y garantía
Soporte
Para obtener la información más reciente acerca de este producto (documentación, especificaciones
técnicas, requisitos de sistema, información de compatibilidad, etc.) y registrarlo, visite
ionaudio.com.
Para obtener soporte adicional del producto, visite ionaudio.com/support.
16
Page 17

Instalación
Cuando instale su Air CD Pro, tenga en consideración las siguientes precauciones:
• Asegúrese de que todos los artículos indicados en Introducción > Contenido de la caja estén
incluidos en ella.
• Evite colocar su Air CD Pro en áreas de humedad o temperatura elevadas, escasa ventilación,
abundante polvo o en lugares con vibraciones excesivas (que pueden hacer que los CD salten).
• Si planea utilizar auriculares, disminuya el volumen antes de enchufarlos y usarlos.
• Si desea consultar un diagrama como referencia al conectar sus dispositivos al Air CD Pro, vea el
diagrama de conexión en esta página.
Uso de la antena
Si está utilizando la radio FM integrada, la antena ayudará al Air CD Pro a captar una señal clara.
Cómo usar la antena:
1. Retire la antena de las abrazaderas que la sujetan al panel trasero. Utilice dos dedos para extraer la
antena del panel trasero; no tire de ella hacia arriba ni hacia abajo mientras esté sujeta.
2. Una vez extraída la antena de las abrazaderas, dóblela hacia la derecha para que quede de manera
vertical (tal como se muestra en el diagrama de conexión). Extienda la antena tirando desde su
extremo hacia arriba.
3. Mientras escucha la radio, ajuste la antena hacia la izquierda y la derecha según se requiera para
lograr una buena recepción.
Una vez que haya terminado de escuchar la radio, acorte la antena presionando la punta hacia abajo hasta
que haga tope. Luego acomode la antena de manera que quede alineada entre las abrazaderas y
presiónela hacia el panel trasero hasta que quede encajada a presión entre las abrazaderas.
Abrazaderas de la antena
Diagrama de conexión
Los elementos que no se enumeran en Introducción > Contenido de la caja se venden por separado.
Fuente de audio Bluetooth
Panel Frontal
del Air CD Pro
Altavoz Bluetooth
Antena
CD
Dispositivo auxiliar
Auriculares
17
Page 18

Características
Panel frontal
4 5
3
8 8
1
2
6 7
1. Controles principales: Utilice los botones ubicados aquí para operar el Air CD Pro. Los controles
principales incluyen los siguientes botones:
• Encendido ( ): Pulse este botón para encender o poner en espera el Air CD Pro. En el modo de
espera, aparecerá un reloj en la pantalla. Para aprender ajustar el reloj de manera que muestre la
hora correcta, vea Cómo ajustar el reloj.
• Mode: Pulse este botón para alternar entre los cuatro modos de entrada de audio del Air CD Pro
Auxiliar, radio, Bluetooth y CD. Consulte Selección del modo de entrada de audio para obtener
más información.
• Bluetooth ( ): Pulse este botón para iniciar el apareamiento con un dispositivo Bluetooth.
Consulte Apareamiento del Air CD Pro con un altavoz Bluetooth para obtener más información.
• Repeat/FM ST: En modo de CD, pulse este botón para alternar las opciones de repetición.
Consulte Cómo escuchar un CD para obtener más información. En modo de radio, utilice este
botón para conmutar la radio FM entre estéreo y mono Consulte Cómo escuchar la radio para
aprender más.
• Preset/Prog: En modo de CD, utilice este botón para crear una lista de reproducción
personalizada de hasta 20 pistas del CD actual. Consulte Cómo escuchar un CD para obtener
más información. Mantenga pulsado este botón para guardar la estación actual como un preset.
Consulte Cómo escuchar la radio para obtener más información.
• Anterior (
pulsado para rebobinar la pista actual. En modo de radio, pulse este botón para volver al preset de
estación de radio anterior o manténgalo pulsado para realizar una búsqueda hacia atrás. En modo
Bluetooth, pulse este botón para pasar a la pista, género o lista de reproducción anterior de su
dispositivo apareado.
• Reproducir/Pausa (
pausa. En modo Bluetooth, pulse el botón para reproducir/poner en pausa la pista actualmente
seleccionada en su dispositivo apareado o mantenga pulsado el botón para reiniciar el proceso de
apareamiento. Consulte Cómo escuchar un dispositivo Bluetooth para obtener más información.
En modo de radio, pulse el botón para iniciar el proceso de guardado automático de preset.
Consulte Cómo escuchar la radio para obtener más información.
• Siguiente (
pulsado para realizar un avance rápido por la pista actual. En modo de radio, pulse este botón para
pasar al siguiente preset de estación de radio o manténgalo pulsado para realizar una búsqueda
hacia adelante. En modo Bluetooth, pulse este botón para pasar a la pista, género o lista de
reproducción siguiente de su dispositivo apareado.
• Detener (
el Air CD Pro se encuentra en modo de espera, mantenga pulsado este botón para modificar la
hora. Consulte Cómo ajustar el reloj para obtener más información.
• Expulsar (
18
): En modo de CD, pulse este botón para volver a la pista anterior o manténgalo
): En modo de CD, pulse este botón para reproducir un CD o ponerlo en
): En modo de CD, pulse este botón para pasar a la pista siguiente o manténgalo
): En modo de CD, pulse este botón para detener la reproducción de un CD. Mientras
): En modo de CD, pulse este botón para abrir o cerrar la bandeja para discos.
Page 19

2. Bandeja para discos: Coloque un CD en esta bandeja para escucharlo cuando el Air CD Pro se
encuentre en modo de CD. Utilice el botón Eject para abrir la bandeja cuando desee insertar un CD.
Utilice el mismo botón para cerrar la bandeja antes de reproducir el CD.
3. Pantalla: El área central de esta pantalla indica el modo de entrada de audio que está actualmente
seleccionado, así como el estado de la fuente de audio correspondiente. Adicionalmente, una columna
de siete íconos del lado izquierdo de la pantalla se enciende y apaga en base al funcionamiento actual
del Air CD Pro. Desde arriba hacia abajo, esta columna incluye los siguientes íconos:
• Símbolo de estéreo: Se enciende cuando la radio se ajusta a estéreo.
• Símbolo de reproducción: Este símbolo permanece encendido cuando se está reproduciendo un
CD, parpadea cuando hay un CD en pausa y se apaga cuando el CD se encuentra detenido.
• Símbolo de repetición: Este símbolo permanece encendido cuando el CD está configurado para
repetir todas las pistas, parpadea cuando está configurado para repetir una pista y se apaga
cuando la repetición esta desactivada.
• Icono Aux: Se enciende cuando se selecciona el modo auxiliar.
• Icono de CD: Se enciende cuando se selecciona el modo de CD.
• Icono Prog: En modo de radio, se enciende al grabar un preset de estación En modo de CD,
permanece encendido luego de programar una lista de reproducción personalizada, parpadea
mientras dicha lista se esté programando y se apaga cuando no existe ninguna de dichas listas.
4. Perilla Tune: Gire esta perilla para cambiar manualmente el número de estación de radio.
5. Perilla de volumen: Gire esta perilla para ajustar el volumen del Air CD Pro (tal como se muestra en la
pantalla como L - 00–30).
6. Salida para auriculares: Conecte auriculares a esta salida de 1/8 pulg. / 3,5 mm si desea escuchar al
Air CD Pro mediante auriculares.
7. Line-In: Si desea escuchar a un dispositivo auxiliar (como, por ejemplo, un iPod u otro reproductor
mp3) a través del Air CD Pro, utilice un cable con conector estándar de 1/8 pulg / 3,5 mm para
conectar este dispositivo a esta entrada. Consulte Cómo escuchar un dispositivo auxiliar para
obtener más información.
8. Altavoces internos: Estos altavoces emiten la salida de audio del Air CD Pro audio output.
Panel trasero
1
2
1. Antena: Al escuchar la radio, ajuste la antena para lograr una mejor recepción según sea necesario.
Cuando no utilice la antena, manténgala como se indica en el diagrama anterior. Consulte Instalación
para obtener más detalles sobre el uso de la antena.
2. Alimentación: Para encender el Air CD Pro, conecte el adaptador de alimentación incluido desde este
puerto a una toma de corriente. Para pagar la unidad, desenchufe el adaptador de alimentación del
puerto o la toma de corriente.
Nota: Al apagar el Air CD Pro se reinicializará el reloj que se observa cuando la unidad se encuentra en
modo de espera.
19
Page 20

Control remoto
• Encendido ( ): Pulse este botón para encender o poner en
espera el Air CD Pro.
• CD: Pulse este botón para entrar al modo de CD del Air CD Pro.
• Mute: Pulse este botón para silenciar la salida de audio del Air
CD Pro. Cuando se silencia el audio, parpadea L - 00 en la
pantalla. Al pulsar el botón de silenciamiento nuevamente o al
ajustar el volumen, se anulará el silenciamiento del altavoz. En
modo de radio, no se podrá cambiar de estación mientras el Air
CD Pro se encuentre silenciado.
• Bluetooth ( ) : Pulse este botón para iniciar el apareamiento
con un dispositivo Bluetooth. Consulte Apareamiento del Air
CD Pro con un altavoz Bluetooth para obtener más
información.
• FM: Pulse este botón para entrar al modo de radio del Air CD
Pro.
• Aux/Line In (entrada auxiliar/de línea): Pulse este botón para
entrar al modo auxiliar del Air CD Pro.
• Anterior / Tune - (
volver a la pista anterior o manténgalo pulsado para rebobinar la
pista actual. En modo de radio, pulse este botón para volver al
preset de estación de radio anterior o manténgalo pulsado para
realizar una búsqueda hacia atrás. En modo Bluetooth, pulse
este botón para pasar a la pista, género o lista de reproducción
anterior de su dispositivo apareado.
• Reproducción/Pausa/Pair (
en pausa. En modo Bluetooth, pulse el botón para reproducir/poner en pausa la pista actualmente
seleccionada en su dispositivo apareado o mantenga pulsado el botón para reiniciar el proceso de
apareamiento. Consulte Cómo escuchar un dispositivo Bluetooth para obtener más información.
• Siguiente / Tune + (
manténgalo pulsado para realizar un avance rápido por la pista actual. En modo de radio, pulse este
botón para pasar al siguiente preset de estación de radio o manténgalo pulsado para realizar una
búsqueda hacia adelante. En modo Bluetooth, pulse este botón para pasar a la pista, género o lista de
reproducción siguiente de su dispositivo apareado.
• Repeat (repetir): En modo de CD, pulse este botón para alternar las opciones de repetición. Consulte
Cómo escuchar un CD para aprender más.
• Detener (
Air CD Pro se encuentra en modo de espera, mantenga pulsado este botón para modificar la hora.
Consulte Cómo ajustar el reloj para obtener más información.
• Prog: En modo de CD, utilice este botón para crear una lista de reproducción personalizada de hasta
20 pistas del CD actual. Consulte Cómo escuchar un CD para obtener más información.
• Vol -: Pulse este botón para bajar el volumen del Air CD Pro.
• Bass: Pulse este botón para activar y desactivar el refuerzo de graves Al activar esta característica se
incrementa la salida de frecuencias graves del Air CD Pro. Al activarse el refuerzo de graves, se verá
temporalmente bASS en la pantalla. Al desactivarse el refuerzo de graves, se verá temporalmente NOr
en la pantalla.
• Vol +: Pulse este botón para subir el volumen del Air CD Pro.
): En modo de CD, pulse este botón para detener la reproducción de un CD. Mientras el
): En modo de CD, pulse este botón para
): En modo de CD, pulse este botón para reproducir un CD o ponerlo
): En modo de CD, pulse este botón para pasar a la pista siguiente o
20
Page 21

Funcionamiento
Selección del modo de entrada de audio
El Air CD Pro viene con cuatro modos de entrada de audio. Al cambiar el modo, se determina la fuente de
audio reproducida por el Air CD Pro. Se puede saber en qué modo se encuentra el Air CD Pro observando
la pantalla.
Los cuatro modos de entrada de audio son los siguientes:
• Auxiliar: En este modo, la fuente de audio será el conector Line-In del panel delantero. Se verá AUX
en la pantalla cuando se seleccione este modo y el icono Aux se encenderá del lado izquierdo de la
pantalla. Consulte Cómo escuchar un dispositivo auxiliar para aprender más sobre cómo utilizar
este modo.
• Radio: En este modo, la fuente de audio será la radio FM integrada. La pantalla mostrará el número de
estación actual cuando este modo se encuentre seleccionado. Consulte Cómo escuchar la radio para
aprender más sobre cómo utilizar este modo.
• Bluetooth: En este modo, la fuente de audio será el dispositivo Bluetooth que se encuentre apareado
con el Air CD Pro. Aparecerá BT en la pantalla cuando este modo se encuentre seleccionado. Consulte
Cómo escuchar un dispositivo Bluetooth para aprender más sobre cómo utilizar este modo.
• CD: En este modo, la fuente de audio será el reproductor de CD integrado. El icono CD se encenderá
al costado izquierdo de la pantalla cuando este modo se encuentre seleccionado. Consulte Cómo
escuchar un CD para aprender más sobre cómo utilizar este modo.
Para cambiar el modo de entrada de audio, pulse el botón Mode del panel delantero. Pulsar este botón
permite alternar los modos y podrá ver en la pantalla el modo seleccionado. Como alternativa, puede
cambiar el modo de entrada de audio pulsando el botón correspondiente al modo deseado en el control
remoto.
Cómo escuchar un CD
El reproductor de CD integrado permite reproducir un CD en el Air CD Pro.
Cómo comenzar a reproducir un CD:
1. Asegúrese de que el Air CD Pro se encuentre en el modo CD (consulte Selección del modo de
entrada de audio para obtener más detalles si se requieren).
2. Abra la bandeja para discos pulsando el botón Eject. La pantalla mostrará brevemente OP.
3. Coloque un CD en la bandeja.
4. Cierre la bandeja para discos pulsando nuevamente el botón Eject. La pantalla mostrará CL mientras
se cierra la bandeja para discos y luego el Air CD Pro comenzará a leer el CD. Una vez que el Air CD
Pro lee el CD, el mismo dejará de girar y la cantidad total de pistas aparecerá en la pantalla.
5. Pulse el botón Play/Pause para comenzar a reproducir el CD. Mientras se esté reproduciendo una
pista, la pantalla mostrará el tiempo de la misma expresado en minutos y segundos.
Para poner una pista en pausa, pulse el botón Play/Pause en la unidad o control remoto. La pantalla
parpadeará para indicar que el audio está silenciado.
Para cambiar de pista, pulse y suelte el botón Previous o Next. A medida que recorre las pistas con
estos botones, la pantalla se actualizará con el número de la pista actual.
Para rebobinar o avanzar rápidamente por una pista, mantenga pulsado el botón Previous o Next. A
medida que rebobina o realiza un avance rápido, la pantalla se actualizará con el tiempo de la pista actual.
Para detener un CD, pulse el botón Stop de la unidad o control remoto. Cuando un CD se encuentra
detenido, la pantalla mostrará el número de pista total y el CD comenzará desde el principio al reproducirlo
nuevamente.
21
Page 22

Programación de una lista de reproducción personalizada
Puede hacer una lista de reproducción personalizada de hasta 20 pistas provenientes del CD actual,
organizando las pistas en cualquier orden que desee.
Cómo programar y reproducir una lista de reproducción personalizada:
1. Asegúrese de que esté seleccionado el modo de CD y que la bandeja para discos esté cerrada con un
CD en su interior.
2. Asegúrese de que el CD esté detenido. Sabrá si el disco está detenido o no si se puede ver el número
de pista total en la pantalla. Si el CD no está detenido, pulse el botón Stop.
3. Pulse el botón Preset/Prog del panel delantero o el botón Prog del control remoto para iniciar el
proceso de programación. Una vez pulsado, aparecerá P01 de forma intermitente en la pantalla (el
número de la primera posición de la lista de reproducción). El icono Prog también comenzará a
parpadear en el lado izquierdo de la pantalla.
4. Una vez que el número de posición de la lista de reproducción comience a parpadear en la pantalla,
utilice los botones Previous y Next para recorrer las pistas del CD. A medida que recorre las pistas, el
número de pista del CD actualmente seleccionada se actualizará en la pantalla
5. Una vez que haya identificado la pista del CD que desea asignar al número de posición de la lista de
reproducción, pulse el botón Preset/Prog del panel delantero o el botón Prog del control remoto.
6. Luego, parpadeará P02 en la pantalla y podrá seleccionar la segunda pista para la lista de
reproducción. Repita los pasos 4–5 para P02 y para cualquier otro número de posición subsiguiente en
la lista de reproducción. La lista de reproducción puede contener hasta 20 pistas y se puede asignar
una misma pista del CD a múltiples posiciones en la lista de reproducción si se desea.
7. Una vez que haya terminado de asignar todas las pistas que desea incluir en la lista de reproducción,
pulse el botón Play/Pause para reproducir la lista de pistas personalizada. El icono Prog se
encenderá permanentemente del lado izquierdo de la pantalla para indicar que la lista de reproducción
se encuentra programada.
Para poner en pausa la lista de reproducción, pulse el botón Play/Pause. La pantalla parpadeará para
indicar que la pista actual está en pausa.
Para cambiar de pista, pulse el botón Previous o Next. A medida que recorre las pistas de la lista de
reproducción, la pantalla se actualizará con el número de la pista actual.
Para detener la lista de reproducción, pulse el botón Stop. La pantalla mostrará el número total de
pistas en el CD. Una vez detenida la lista de reproducción, puede pulsar el botón Play/Pause para reiniciar
la lista desde el principio.
Para borrar una lista de reproducción programada, primero pulse el botón Stop para detener la lista.
Luego pulse nuevamente el botón Stop. El icono Prog se apagará para indicar que no hay ninguna lista de
reproducción actualmente programada.
Nota: Si sale del modo de CD o deja al Air CD Pro en modo de espera, esto también hará que el Air CD Pro
borre la lista de reproducción de su memoria.
Repetir reproducción
Ya sea al escuchar las pistas de un CD en su orden estándar o en el orden de una lista de reproducción
personalizada, se pueden utilizar las opciones de repetición (repetir una y repetir todas). Cuando la opción
Repetir una está activada, la pista actualmente seleccionada se repite indefinidamente. Cuando la opción
Repetir todas está activada, la lista de reproducción actual se repetirá indefinidamente.
Para activar la repetición, pulse el botón Repeat/FM ST del panel delantero o el botón Repeat del
control remoto. Pulsar este botón permite alternar entre los modos Repetir una, Repetir todas y Repetición
desactivada. Cuando se selecciona Repetir una, parpadea el símbolo de repetición del lado izquierdo de
la pantalla. Cuando se selecciona Repetir todas, el símbolo de repetición permanecerá encendido.
Cuando la repetición se desactiva, el símbolo de repetición se apaga.
22
Page 23

Cómo escuchar un dispositivo Bluetooth
Cuando el Air CD Pro se encuentra apareado con un dispositivo Bluetooth (tal como un teléfono inteligente
o smartphone), puede reproducir música desde el dispositivo a través de sus altavoces internos.
Cómo aparear un dispositivo Bluetooth:
1. Asegúrese de que el Air CD Pro se encuentre en el modo Bluetooth (consulte Selección del modo de
entrada de audio para obtener más detalles si se requieren). Al entrar en modo Bluetooth, parpadeará
BT en la pantalla para indicar que está seleccionado el modo Bluetooth y que el Air CD Pro está
buscando dispositivos Bluetooth con los cuales aparearse.
2. Vaya a los ajustes de Bluetooth de su dispositivo y abre la lista de dispositivos disponibles con los que
se pueda aparear. Luego seleccione Air CD Pro de dicha lista. Una vez completado el proceso de
apareamiento, escuchará un tono proveniente de los altavoces del Air CD Pro y quedará BT encendido
permanentemente en la pantalla.
Nota: Si su dispositivo Bluetooth solicita un código de apareamiento, ingrese “0000”.
Nota: Si ya había apareado el Air CD Pro con el mismo dispositivo Bluetooth, es posible que sea capaz
de omitir el Paso 2 y simplemente esperar a que se complete el proceso de apareamiento luego entrar
al modo Bluetooth.
Para reproducir/hacer pausa y saltear pistas de su dispositivo Bluetooth pulse el botón Play/Pause o
los botones Previous/Next del Air CD Pro o el dispositivo Bluetooth.
Para aparear el Air CD Pro con un dispositivo Bluetooth diferente, mantenga pulsado el botón
Play/Pause del Air CD Pro o el control remoto, el cual desconectará el dispositivo Bluetooth actualmente
apareado y reiniciará el proceso de apareamiento. Parpadeará BT en la pantalla para indicar que el Air CD
Pro está buscando dispositivos Bluetooth con los cuales aparearse. Deberá alejar al dispositivo Bluetooth
que estaba previamente apareado fuera del alcance, desactivar su función Bluetooth o seleccionar
"Olvidar" Air CD Pro en su menú de ajustes.
Para detener el uso del Bluetooth como fuente de audio del Air CD Pro, cambie el modo de entrada de
audio pulsando el botón Mode del Air CD Pro.
Nota: El alcance máximo se logra cuando se utilizan dispositivos con Bluetooth 4.0.
Nota: Los usuarios deben considerar actualizar el sistema operativo de sus dispositivos Bluetooth si
experimentan problemas con el apareamiento o la reproducción de música.
Cómo escuchar un dispositivo auxiliar
Se puede reproducir música desde un dispositivo auxiliar (tal como un iPod u otro reproductor mp3) a
través del Air CD Pro.
Como reproducir un dispositivo auxiliar a través del Air CD Pro:
1. Utilice un cable estándar de 1/8 pulg. / 3,5 mm para conectar el conector de salida de su dispositivo
auxiliar con la entrada de línea Line-in del Air CD Pro.
2. Asegúrese de que el Air CD Pro se encuentre en modo Aux (consulte Selección del modo de entrada
de audio para obtener más detalles si se requieren).
3. Utilice los controles de su dispositivo auxiliar para reproducir/poner pausa una pista, saltear pistas, etc.
(no se pueden utilizar los botones del Air CD Pro para controlar su dispositivo auxiliar).
Nota: Si el sonido que proviene su dispositivo auxiliar suena distorsionado, prueben bajando el
volumen en su dispositivo. El volumen de su dispositivo auxiliar no debería estar al máximo.
23
Page 24

Cómo escuchar la radio
El Air CD Pro viene con una radio FM integrada.
Como encender la radio y seleccionar una estación:
1. Extraiga la antena de las abrazaderas del panel trasero y extiéndala (consulte más detalles en
Instalación).
2. Asegúrese de que el Air CD Pro se encuentre en modo Aux (consulte Selección del modo de entrada
de audio para obtener más detalles si se requieren). La pantalla mostrará el número de la estación de
radio actualmente seleccionada.
3. Ajuste el número de la estación de radio llevando a cabo una de las siguientes acciones:
• Gire la perilla Tune a la izquierda o a la derecha para cambiar el número de estación de forma
manual de a incrementos de 0,1 MHz.
• Mantenga pulsado el botón Previous o Next para buscar estaciones con buena señal hacia
adelante o atrás. Mientras lo hace, el Air CD Pro se detendrá en el número de estación más
cercana que tenga buena señal.
• Pulse y suelte el botón Previous o Next para pasar al preset de estación anterior o siguiente.
Consulte Presets a continuación para aprender más sobre cómo guardar presets de estaciones.
Si está experimentando problemas para recibir una señal clara de la radio, pruebe moviendo la antena.
Como alternativa, puede probar pasar la radio de estéreo a mono, lo cual puede reducir la interferencia
estática en algunas estaciones de radio.
Para cambiar la señal de radio entre estéreo y mono, pulse el botón Repeat/FM ST. Cuando coloque la
radio en estéreo, aparecerá momentáneamente StEr en la pantalla y se encenderá el símbolo estéreo.
Cuando coloque la radio en mono, aparecerá momentáneamente Off en la pantalla y el símbolo estéreo
se apagará.
Presets (Valores predeterminados)
Con la característica de presets de radio, se puede asignar a una estación de radio uno de los 20 números
de preset del Air CD Pro, lo que le permite acceder a la estación fácilmente con sólo tocar los botones
Previous y Next.
Para guardar una emisora de radio como preset:
1. Entre al modo de radio y seleccione una estación de radio (como se describe anteriormente).
2. Mantenga pulsado el botón Preset/Prog. El icono Prog que se encuentra del lado izquierdo de la
pantalla quedará encendido permanentemente y en la pantalla parpadeará uno de los números de
preset (mostrados como P01–P20) para indicar que se están editando los presets.
3. Utilice la perilla Tune o los botones Previous/Next para cambiar el número de preset en el cual desea
guardar la estación de radio. Los números de presets se actualizarán en la pantalla a medida que los
recorre. Existen 20 números de preset para elegir (P01–P20).
4. Una vez que haya identificado el número de preset en el cual desea guardar la estación de radio, pulse
y suelte el botón Preset/Prog. El icono Prog se apagará y la pantalla volverá a mostrar el número de
estación de radio.
Para asignar automáticamente como presets las 20 estaciones de radio con las señales más fuertes,
mantenga pulsado el botón Scan/Repeat mientras el Air CD Pro se encuentre en modo de radio. El Air CD
Pro recorrerá todo el espectro FM y asignará los números de estación a las señales más fuertes a cada uno
de los 20 presets disponibles. La pantalla se actualizará a medida que el Air CD Pro recorre las estaciones.
Una vez que la exploración se haya completado, la pantalla volverá a mostrar el número de estación de
radio actualmente seleccionado.
24
Page 25

Apareamiento del Air CD Pro con un altavoz Bluetooth
Una vez apareado con un altavoz Bluetooth, el Air CD Pro puede enviar el audio proveniente de la radio, un
CD o un dispositivo auxiliar a dicho altavoz.
Nota: El Air CD Pro no puede enviar audio desde un dispositivo Bluetooth hacia un altavoz Bluetooth. Si se
encuentra apareado con un altavoz Bluetooth y cambia el modo de entrada de audio a Bluetooth, el Air CD
Pro se desapareará del altavoz.
Cómo aparear el Air CD Pro con un altavoz Bluetooth:
1. Asegúrese de que el Air CD Pro se encuentre en modo de radio, CD o Aux, en función de la fuente que
desea escuchar (consulte Selección del modo de entrada de audio para obtener más detalles si se
requieren).
2. Encienda su altavoz Bluetooth y asegúrese de que esté listo para aparearse con el Air CD Pro.
3. Pulse el botón Bluetooth. Comenzará a parpadear bLUE en la pantalla para indicar que el Air CD Pro
está buscando un altavoz Bluetooth con el cual aparearse. Una vez que el Air CD Pro se aparea
exitosamente con el altavoz, la pantalla alternará entre mostrar bLUE y la información predeterminada
del modo de entrada de la radio seleccionada.
Nota: El apareamiento puede tardar hasta 30 segundos en completarse. Mientras más cerca se
encuentre el altavoz del Air CD Pro durante el proceso de apareamiento, más rápidamente se
aparearán ambos dispositivos.
4. Una vez apareados el altavoz y el Air CD Pro, se puede iniciar la reproducción del CD, dispositivo
auxiliar o estación de radio que desea escuchar. Si no escuche nada y su altavoz Bluetooth cuenta con
un botón de reproducción/pausa, pruebe pulsando dicho botón. Para controlar el nivel de salida, ajuste
el volumen de su dispositivo Bluetooth (si corresponde) o del Air CD Pro.
Para conectarse a un dispositivo Bluetooth diferente, repita los pasos 3–4. Debe tomar el altavoz que
estaba previamente apareado con el Air CD Pro y apagarlo, llevarlo fuera del alcance, desactivar su
capacidad Bluetooth o acceder a su menú de opciones y seleccionar "Olvidar" el Air CD Pro.
Para desaparear un altavoz Bluetooth y/o detener la búsqueda que lleva a cabo el Air CD Pro de un
altavoz Bluetooth con el cual aparearse, mantenga pulsado el botón Bluetooth.
Cómo ajustar el reloj
Cuando el Air CD Pro está en modo de espera, la pantalla mostrará la hora.
Cómo ajustar la hora de la pantalla:
1. Asegúrese de de que el Air CD Pro se encuentre en modo de espera. Si se encuentra encendido, pulse
el botón Encendido para ponerlo en modo de espera.
2. Mantenga presionado el botón Stop. En la pantalla parpadeará el ajuste de notación horaria
actualmente seleccionada (24 o 12 horas).
3. Utilice el botón Previous o Next para seleccionar entre un formato de reloj de 24 horas (24) y uno de
12 horas (12). Una vez seleccionado el ajuste deseado, pulse y suelte el botón Stop para confirmar su
selección. La pantalla mostrará entonces la hora con el contador de horas parpadeando.
4. Ajuste el contador de horas con los botones Previous y Next. Una vez seleccionada la cantidad
correcta de horas, pulse y suelte el botón Stop para confirmar su selección. La pantalla mostrará
entonces la hora con el contador de minutos parpadeando.
5. Ajuste el contador de minutos con los botones Previous y Next. Una vez seleccionada la cantidad
correcta de minutos, pulse y suelte el botón Stop para confirmar su selección. Este paso completará el
proceso de ajuste del reloj, y la pantalla mostrará la hora actual.
Nota: Cuando desconecte el Air CD Pro del suministro, el reloj se reiniciará.
25
Page 26

Solución de problemas
La unidad no se enciende:
• Asegúrese de que el adaptador de alimentación esté conectado correctamente.
El sonido está distorsionado:
• Pruebe disminuyendo el volumen general del Air CD Pro con la perilla Volume o los botones de
volumen del control remoto.
• Si el Air CD Pro se encuentra en modo auxiliar, pruebe reduciendo el volumen del dispositivo auxiliar.
Los graves son demasiado fuertes:
• Revise si el refuerzo de graves se encuentra activado pulsando el botón EQ del control remoto. La
pantalla indicará si dicha característica se encuentra activada o no. Si lo está, pruebe desactivándola.
• Si el Air CD Pro se encuentra en modo auxiliar, pruebe ajustando la ecualización del dispositivo auxiliar.
El CD no se reproduce correctamente:
• Asegúrese de que el compartimiento del CD este cerrado.
• Pulse el botón Stop antes de intentar reproducir el CD.
• Vuelva insertar el disco, asegurándose de que el mismo esté limpio, o intente con otro disco.
La radio tiene mala recepción / la unidad no puede encontrar ninguna estación de radio al realizar
una exploración:
• Asegúrese de que la antena se encuentre completamente extendida y pruebe ajustarla para lograr una
mejor señal.
• Pruebe colocando la radio en mono pulsando el botón Repeat/FM ST. La pantalla mostrará Off
brevemente cuando ajuste la radio a mono y el símbolo estéreo se apagará.
El altavoz Bluetooth que deseo utilizar no se aparea con el Air CD Pro:
• Apague todos los demás altavoces Bluetooth o aléjelos a más de 50 pies (15,2 m) de distancia.
El Air CD Pro está apareado con mi altavoz Bluetooth, pero no escucho el audio:
• Asegúrese de que el Air CD Pro esté reproduciendo audio.
• Utilice la perilla Volume o los botones de volumen del control remoto para aumentar el nivel de la
salida del Air CD Pro.
• Si el altavoz Bluetooth cuenta con un botón de reproducción/pausa, intente pulsar este botón.
• Mantenga pulsado el botón Bluetooth del Air CD Pro para reiniciar el proceso de apareamiento con un
altavoz Bluetooth. Una vez que el Air CD Pro y el altavoz estén apareados nuevamente, intente
reproducir audio. Consulte Apareamiento del Air CD Pro con un altavoz Bluetooth para obtener más
información sobre cómo realizar el apareamiento.
• Coloque el Air CD Pro en modo de espera y luego enciéndalo nuevamente. Luego aparéelo con su
altavoz Bluetooth intente reproducir audio nuevamente.
Si no puede conectar una fuente de audio al Air CD Pro mediante Bluetooth:
• Mantenga su dispositivo de audio (por ej., teléfono inteligente [smartphone] o tableta) y el Air CD Pro lo
más cerca posible entre sí al realizar la conexión. Asegúrese que tanto el dispositivo de audio como el
Air CD Pro no estén obstruidos por paredes, muebles, etc.
• Reinicie la conexión Bluetooth del Air CD Pro para desconectarlo Air CD Pro de cualquier otro
dispositivo de audio y reinicie el proceso de búsqueda. Si esto no funciona en seguida, apague el Air
CD Pro y luego vuelva a encenderlo.
• Reinicie la conexión Bluetooth de su dispositivo de audio apagando el Bluetooth y luego volviendo a
encenderlo. Puede encontrar esta opción dentro del menú Bluetooth en los ajustes de su teléfono o
dispositivo de audio.
Si esto no funciona y ya se había conectado al Air CD Pro anteriormente, busque Air CD Pro en la lista
de dispositivos disponibles o previamente conectados en el menú Bluetooth de su dispositivo de audio,
toque el icono de engranaje o "i" ubicado junto a él y luego seleccione Desaparear u Olvidar. Apague
el Air CD Pro, luego vuelva a encenderlo e intente aparearlo nuevamente una vez que vuelva a aparecer
en su lista de dispositivos disponibles.
Nota: Si Air CD Pro ya ha sido recientemente apareado con otro dispositivo de audio que aún se
encuentre dentro del alcance, es posible que tenga que repetir este proceso con ese dispositivo de
audio para desconectarlo completamente.
26
Page 27

Guide d’utilisation rapide (Français)
Présentation
Merci d’avoir fait l’acquisition de l’enceinte Air CD Pro. Chez ION, votre divertissement est aussi
important pour nous qu’il l’est pour vous. C’est pourquoi nous concevons nos produits avec une seule
chose en tête — rendre la vie plus amusante et plus pratique.
Contenu de la boîte
Air CD Pro
Adaptateur d’alimentation
Guide d’utilisation rapide
Consignes de sécurité et informations concernant la garantie
Assistance
Pour les toutes dernières informations concernant la documentation, les spécifications techniques, la
configuration requise, la compatibilité et l’enregistrement du produit, veuillez visiter ionaudio.com.
Pour de l’assistance supplémentaire, veuillez visiter ionaudio.com/support.
27
Page 28

Installation
Lors de la configuration de l’Air CD Pro, veuillez prendre en compte ce qui suit :
• Veuillez vous assurer que tous les articles énumérés dans la section Contenu de la boîte de ce guide
sont inclus dans la boîte.
• Évitez de placer l’Air CD Pro dans des endroits où la température, l’humidité et la poussière sont
excessives, où la ventilation est inadéquate et où il y a des vibrations excessives pouvant faire sauter le CD.
• Si vous souhaitez utiliser un casque d’écoute, veillez à diminuer le volume avant de le brancher.
• Veuillez consulter la section Schéma de connexion sur cette page afin de relier vos appareils à l'Air CD Pro.
Utilisation de l'antenne
L’antenne permet à l'Air CD Pro d’obtenir un signal plus puissant lors de l’utilisation de la radio FM intégrée.
Pour utiliser l'antenne :
1. Retirez l’antenne des clips de fixation du panneau arrière. Utilisez deux doigts pour écarter l’antenne
du panneau arrière; ne tirez pas et n’appuyez pas sur l’antenne lorsqu’elle est retenue par les clips de
fixation.
2. Après avoir retiré l’antenne des clips de fixation, pliez-la vers la droite afin qu’elle puisse se tenir droite,
comme illustré sur le schéma de connexion. Déployez l’antenne en tirant le haut de celle-ci.
3. Tout en écoutant la radio, ajustez l'antenne vers la gauche ou vers la droite afin d’obtenir une bonne
réception.
Lorsque vous avez terminé d’écouter la radio, repliez l’antenne en appuyant sur le haut de celle-ci afin
qu’elle redescendre aussi loin que possible. Ensuite, replacez l’antenne de manière à ce qu’elle s’aligne
entre les clips et poussez-la jusqu’à ce qu’elle se verrouille entre les clips de fixation.
Clips de fixation pour l’antenne
Schéma de connexion
Les éléments qui ne figurent pas dans la section Contenu de la boîte sont vendus séparément.
Source audio Bluetooth
Panneau avant
de l’Air CD Pro
28
Casque d'écoute
Enceinte Bluetooth
Antenne
CD
Appareil auxiliaire
Page 29

Caractéristiques
Panneau avant
4 5
3
8 8
1
2
6 7
1. Commandes principales : Ces touches permettent de faire fonctionner l’Air CD Pro. Celles-ci
comprennent les touches suivantes :
• Touche d’alimentation ( ) : Cette touche permet de mettre l’Air CD Pro sous tension et de le
mettre en veille. En mode veille, une horloge s’affiche à l’écran. Pour savoir comment régler
l'horloge de manière à afficher l'heure exacte, veuillez consulter la section Réglage de l'horloge.
• Mode : Cette touche permet de commuter entre les quatre modes d’entrée audio de l’Air CD Pro :
auxiliaire, radio, Bluetooth et CD. Veuillez consulter la section Sélection du mode d’entrée audio
afin d’en savoir plus.
• Bluetooth ( ) : Cette touche permet de lancer le processus de jumelage avec une enceinte
Bluetooth. Veuillez consulter la section Jumelage de l’Air CD Pro avec une enceinte Bluetooth
afin d’en savoir plus.
• Repeat/FM ST : En mode CD, cette touche permet de parcourir les modes de lecture répétée.
Veuillez consulter la section Lecture d’un CD afin d’en savoir plus. En mode radio, cette touche
permet de basculer la radio FM entre les modes stéréo et mono. Veuillez consulter la section Faire
l’écoute de la radio afin d’en savoir plus.
• Preset/Prog : En mode CD, cette touche permet de créer une liste de lecture personnalisée
comprenant jusqu'à 20 pistes du CD. Veuillez consulter la section Lecture d’un CD afin d’en savoir
plus. En mode radio, cette touche permet de mémoriser la station radio sélectionnée comme
préréglage. Veuillez consulter la section Faire l’écoute de la radio afin d’en savoir plus.
• Piste précédente (
précédente et la maintenir enfoncée permet de faire un retour arrière sur une piste. En mode radio,
appuyer sur cette touche permet de retourner au préréglage précédent et la maintenir enfoncée
permet de faire une recherche arrière. En mode Bluetooth, cette touche permet de revenir à la
piste, à la liste d'écoute ou au genre de musique précédent sur l’appareil jumelé.
• Lancer et interrompre la lecture (
d’interrompre la lecture d’un CD. En mode Bluetooth, appuyer sur cette touche permet de lancer et
d’interrompre la lecture de la piste sélectionnée sur l’appareil jumelé et la maintenir enfoncer
permet de relancer le processus de jumelage. Veuillez consulter la section Lecture d’un appareil
Bluetooth afin d’en savoir plus. En mode radio, cette touche permet de lancer le processus de
programmation des préréglages. Veuillez consulter la section Faire l’écoute de la radio afin d’en
savoir plus.
• Piste suivante (
suivante et la maintenir enfoncée permet de faire une avance rapide sur la piste sélectionnée. En
mode radio, appuyer sur cette touche permet de passer au préréglage suivant et la maintenir
enfoncée permet de faire une recherche avant. En mode Bluetooth, cette touche permet de passer
à la piste, à la liste d'écoute ou au genre de musique suivant sur l’appareil jumelé.
• Arrêt de lecture (
CD Pro est en veille, maintenir cette touche enfoncée permet de modifier l'heure. Veuillez consulter
la section Réglage de l’horloge afin d’en savoir plus.
• Touche d’éjection (
) : En mode CD, appuyer sur cette touche permet de retourner à la piste
) : En mode CD, cette touche permet de lancer ou
) : En mode CD, appuyer sur cette touche permet de passer à la piste
) : En mode CD, cette touche permet d’arrêter la lecture du CD. Lorsque l’Air
) : En mode CD, cette touche permet d’ouvrir et de fermer le plateau à disque.
29
Page 30

2. Plateau à disque : Ce plateau permet de placer un CD dans le lecteur CD afin de pouvoir l'écouter en
3. Écran : La zone centrale de l’écran indique le mode d'entrée audio sélectionné ainsi que l'état de la
4. Bouton de syntonisation : Tourner ce bouton permet de changer manuellement le numéro de la
5. Bouton du volume : Tourner ce bouton permet de modifier le volume de l'Air CD Pro et s’affiche
6. Sortie casque : Cette sortie permet de brancher un casque d’écoute 3,5 mm stéréo.
7. Line-In : Cette entrée permet de brancher un appareil auxiliaire, tel un iPod ou autre lecteur MP3, en
8. Haut-parleurs intégrés : Ces haut-parleurs reproduisent l’audio de l’Air CD Pro.
mode CD. Appuyer sur la touche d’éjection permet d’ouvrir le plateau afin de placer un CD. Appuyer
de nouveau sur la touche d’éjection permet de refermer le plateau.
source audio correspondante. De plus, à gauche de l'écran se trouve une colonne avec sept icônes qui
s'allument et s'éteignent selon le fonctionnement de l'Air CD Pro. De haut en bas, cette colonne
comprend les icônes suivantes :
• Symbole stéréo : Cette icône s’allume lorsque la radio est réglée sur le mode stéréo.
• Symbole de lecture : Cette icône reste allumée pendant la lecture d’un CD, clignote lorsque la
lecture du CD est interrompue et s’éteint lorsque la lecture du CD est arrêtée.
• Symbole de lecture répétée : Cette icône reste allumée lorsque la lecture répétée de toutes les
pistes du CD est sélectionnée, clignote lorsque la lecture répétée d’une piste du CD est
sélectionnée et s'éteint lorsque la lecture répétée est désactivée.
• Icône auxiliaire : Cette icône s’allume lorsque le mode auxiliaire est sélectionné.
• Icône CD : Cette icône s’allume lorsque le mode CD est sélectionné.
• Icône de programmation : En mode radio, cette icône s’allume lorsqu’une station de radio est
mémorisée comme préréglage. En mode CD, elle reste allumée après la programmation d'une liste
de lecture personnalisée, clignote lorsqu'une liste de lecture personnalisée est en cours de
programmation et s'éteint lorsqu'il n'y a pas de liste de lecture personnalisée.
station de radio.
comme L - 00–30.
utilisant un câble avec un connecteur standard de 3,5 mm, afin d’en faire la lecture par le biais de l’Air
CD Pro. Veuillez consulter la section Lecture d’un appareil auxiliaire afin d’en savoir plus.
Panneau arrière
1
2
1. Antenne : Tout en écoutant la radio, ajustez l'antenne afin d’obtenir une bonne réception. Lorsque
l’antenne n’est pas utilisée, fixez-la en place comme indiqué dans le schéma ci-dessus. Veuillez
consulter la section Installation pour plus d'informations sur l’utilisation de l’antenne.
2. Entrée d'alimentation : Pour alimenter l’Air CD Pro, branchez le adaptateur d’alimentation CC à cette
entrée puis à une prise secteur. Pour mettre l’Air CD Pro hors tension, débranchez le adaptateur
d’alimentation de l’entrée ou de la prise secteur.
Remarque : La mise hors tension de l’Air CD Pro réinitialisera l'horloge qui s'affiche lorsque l'appareil
est en veille.
30
Page 31

Télécommande
• Touche d’alimentation ( ) : Cette touche permet de mettre
l’Air CD Pro sous tension et de le mettre en veille.
• CD : Cette touche permet de mettre l’Air CD Pro en mode CD.
• Mute : Cette touche permet la mise en sourdine de la sortie
audio de l’Air CD Pro. Lorsque le son est en sourdine, L - 00
clignote à l’écran. Appuyer de nouveau sur la touche Mute ou
régler le volume permet de réactiver les haut-parleurs. En mode
radio, vous ne pouvez changer de station tant que l’Air CD Pro
est en sourdine.
• Bluetooth ( ): Cette touche permet de lancer le processus de
jumelage avec une enceinte Bluetooth. Veuillez consulter la
section Jumelage de l’Air CD Pro avec une enceinte
Bluetooth afin d’en savoir plus.
• FM : Cette touche permet de mettre l’Air CD Pro en mode radio.
• Aux/Line In : Cette touche permet de mettre l’Air CD Pro en
mode auxiliaire.
• Piste précédente/Tune - (
permet de retourner à la piste précédente et la maintenir
enfoncée permet de faire un retour arrière sur une piste. En
mode radio, cette touche permet de retourner au préréglage
précédent et la maintenir enfoncée permet de faire une
recherche arrière. En mode Bluetooth, cette touche permet de
revenir à la piste, à la liste d'écoute ou au genre de musique
précédent sur l’appareil jumelé.
• Lancer et interrompre la lecture/Pair (
d’interrompre la lecture d’un CD. En mode Bluetooth, cette touche permet de lancer et d’interrompre la
lecture de la piste sélectionnée sur l’appareil jumelé, et la maintenir enfoncer permet de relancer le
processus de jumelage. Veuillez consulter la section Lecture d’un appareil Bluetooth afin d’en savoir
plus.
• Piste suivante/Tune + (
suivante et la maintenir enfoncée permet de faire une avance rapide sur la piste sélectionnée. En mode
radio, appuyer sur cette touche permet de passer au préréglage suivant et la maintenir enfoncée
permet de faire une recherche avant. En mode Bluetooth, cette touche permet de passer à la piste, à la
liste d'écoute ou au genre de musique suivant sur l’appareil jumelé.
• Repeat : En mode CD, cette touche permet de parcourir les modes de lecture répétée. Veuillez
consulter la section Lecture d’un CD afin d’en savoir plus.
• Arrêt de lecture (
Pro est en veille, maintenir cette touche enfoncée permet de modifier l'heure. Veuillez consulter la
section Réglage de l’horloge afin d’en savoir plus.
• Prog : En mode CD, cette touche permet de créer une liste de lecture personnalisée comprenant
jusqu'à 20 pistes du CD. Veuillez consulter la section Lecture d’un CD afin d’en savoir plus.
• Vol - : Cette touche permet de diminuer le volume de l’Air CD Pro.
• Bass : Cette touche permet d’activer et de désactiver la fonction d’amplification des basses.
L'activation de cette fonction augmente les basses fréquences émises par l’Air CD Pro. Lorsque vous
activez l'amplification des basses, bASS s’affiche temporairement. Lorsque vous désactivez
l'amplification des basses, NOr s’affiche temporairement.
• Vol + : Cette touche permet d’augmenter le volume de l’Air CD Pro.
) : En mode CD, cette touche permet d’arrêter la lecture du CD. Alors que l’Air CD
) : En mode CD, cette touche
) : En mode CD, cette touche permet de lancer ou
) : En mode CD, appuyer sur cette touche permet de passer à la piste
31
Page 32

Fonctionnement
Sélection du mode d’entrée audio
L’Air CD Pro dispose de quatre modes d’entrée audio. Lorsque vous changez de mode, vous déterminez la
source audio jouée par l’Air CD Pro. Vous pouvez savoir dans quel mode l’Air CD Pro se trouve en
regardant l'écran.
Les quatre modes d'entrée audio sont les suivants :
• Auxiliaire : La source audio pour ce mode est branchée à l’entrée Line-In sur le panneau avant. AUX
s’affiche lorsque ce mode est sélectionné et l’icône auxiliaire à gauche de l’écran s’allume. Veuillez
consulter la section Lecture d’un appareil auxiliaire afin d’en savoir plus sur ce mode.
• Radio : La source audio pour ce mode est la radio FM intégrée. Le numéro de la station en cours de
lecture s’affiche lorsque le mode radio est sélectionné. Veuillez consulter la section Faire l’écoute de la
radio afin d’en savoir plus sur ce mode.
• Bluetooth : La source audio pour ce mode est l’appareil Bluetooth jumelé à l’Air CD Pro. BT s’affiche
lorsque le mode Bluetooth est sélectionné. Veuillez consulter la section Lecture d’un appareil
Bluetooth afin d’en savoir plus sur ce mode.
• CD : La source audio pour ce mode est le lecteur CD intégré. L’icône CD à gauche de l’écran s’allume
lorsque ce mode est sélectionné. Veuillez consulter la section Lecture d’un CD afin d’en savoir plus sur
ce mode.
Pour changer le mode d’entrée audio, appuyez sur la touche Mode sur le panneau avant. Cette touche
permet de parcourir les différents modes d’entrée audio. Le mode sélectionné s’affiche à l’écran. Vous
pouvez également sélectionner le mode d’entrée audio en appuyant sur la touche correspondante sur la
télécommande.
Lecture d’un CD
Le lecteur CD intégré vous permet de faire la lecture d’un CD sur l’Air CD Pro.
Pour lancer la lecture d’un CD :
1. Veuillez vous assurer que l’Air CD Pro est en mode CD. Consultez la section Sélection du mode
d’entrée audio au besoin.
2. Ouvrez le plateau à disque en appuyant sur la touche d'éjection. OP s’affichera temporairement à
l'écran.
3. Insérez un CD dans le plateau à disque.
4. Appuyez de nouveau sur la touche d’éjection afin de fermer le plateau à disque. L'écran affiche CL
lorsque le plateau à disque se referme, puis le l’Air CD Pro lit le CD. Une fois que l’Air CD Pro a lu le
CD, le CD s’arrête et le nombre total de pistes s’affiche.
5. Appuyez sur la touche pour lancer et interrompre la lecture afin de lancer la lecture du CD. Pendant
la lecture d'une piste, l'écran affiche la durée de la piste en minutes et en secondes.
Pour interrompre la lecture d'une piste, appuyez sur la touche pour lancer et interrompre la lecture de
l'appareil ou de la télécommande. L’écran clignote afin d’indiquer que la lecture est interrompue.
Pour sélectionner une autre piste, appuyez sur la touche piste précédente ou piste suivante. Lorsque
vous faites défiler les pistes avec ces touches, l’écran met à jour le numéro de la piste sélectionné.
Pour faire un retour arrière ou une avance rapide sur une piste, maintenez la touche piste précédente
ou piste suivante enfoncée. Lorsque vous faites un retour arrière ou une avance rapide, l’écran met à jour
la position du curseur de lecture de la piste sélectionné.
Pour arrêter la lecture d’un CD, appuyez sur la touche d’arrêt de lecture de l'appareil ou de la
télécommande. Lorsque la lecture du CD est arrêtée, l'écran affiche le nombre total de pistes, puis le CD
recommence depuis le début lorsque la lecture est de nouveau lancée.
32
Page 33

Programmation d'une liste de lecture personnalisée
Vous pouvez créer une liste de lecture personnalisée comprenant jusqu'à 20 pistes du CD, en organisant les
pistes dans l'ordre de votre choix.
Pour programmer et jouer une liste de lecture personnalisée :
1. Veuillez vous assurer que le mode CD est sélectionné, que le plateau de disque contient un CD et qu’il
est bien refermé.
2. Veuillez vous assurer que la lecture du CD est arrêtée. Lorsque la lecture du CD est arrêtée, l'écran
affiche le nombre total de pistes. Si la lecture du CD n’est pas arrêtée, appuyez sur la touche d’arrêt de
lecture.
3. Appuyez sur la touche Preset/Prog sur le panneau avant de l’appareil ou sur la touche Prog de la
télécommande afin de lancer le processus de programmation. Après avoir appuyé sur la touche, P01
clignote à l'écran (le premier numéro d’emplacement de la liste de lecture). L’icône de programmation
sur le côté gauche de l’écran clignote également.
4. Une fois que le numéro d’emplacement de la liste de lecture clignote à l’écran, utilisez la touche piste
précédente ou piste suivante pour faire défiler les pistes du CD. Lorsque vous faites défiler les pistes,
l’écran met à jour le numéro de la piste sélectionné.
5. Une fois que vous avez identifié la piste du CD que vous souhaitez assigner au numéro d’emplacement
de la liste de lecture, appuyez sur la touche Preset/Prog sur le panneau avant ou sur la touche Prog de
la télécommande.
6. P02 clignote alors à l’écran et vous pouvez sélectionner la deuxième piste de la liste de lecture.
Répétez les étapes 4 et 5 pour P02 et pour les numéros d’emplacement de la liste de lecture
subséquents. La liste de lecture peut contenir jusqu'à 20 pistes et vous pouvez, si vous le souhaitez,
assigner la même piste à plusieurs emplacements de la liste de lecture.
7. Lorsque vous avez fini d’assigner toutes les pistes à la liste de lecture, appuyez sur la touche pour
lancer et interrompre la lecture pour faire jouer la liste de lecture personnalisée. L’icône de
programmation sur le côté gauche de l’écran s'allume afin d’indiquer que la liste de lecture est
programmée.
Pour interrompre la lecture de la liste de lecture, appuyez sur la touche pour lancer et interrompre la
lecture. L’écran clignote afin d’indiquer que la lecture de la piste est interrompue.
Pour sélectionner une autre piste, appuyez sur la touche piste précédente ou
vous faites défiler les pistes de la liste de lecture, l’écran met à jour le numéro de la piste sélectionné.
Pour arrêter la lecture, appuyez sur la touche pour lancer et interrompre la lecture. Le nombre total des
pistes sur le CD s’affiche. Une fois la liste de lecture arrêtée, vous pouvez appuyer sur la touche pour
lancer et interrompre la lecture pour relancer la lecture depuis le début.
Pour supprimer la liste de lecture, appuyer d’abord sur la touche d’arrêt de lecture. Puis appuyez de
nouveau sur la touche d’arrêt de lecture. L’icône de programmation sur le côté gauche de l’écran
s'éteint afin d’indiquer qu’aucune liste de lecture n’est programmée.
Remarque : Si vous quittez le mode CD ou mettez l’Air CD Pro en veille, la liste de lecture sera également
supprimée.
piste suivante. Lorsque
Lecture répétée
Que vous écoutiez les pistes d'un CD dans l’ordre ou dans une liste de lecture personnalisée, vous pouvez
utiliser les modes de lecture répétée (lecture répétée d’une piste et lecture répétée de toutes les pistes).
Lorsque la lecture répétée d’une piste est activée, uniquement la piste sélectionnée est lue en boucle.
Lorsque la lecture répétée de toutes les pistes est activée, la liste de lecture est lue en boucle.
Pour activer la lecture répétée, appuyez sur la touche Repeat/FM ST sur le panneau avant ou sur la
touche Repeat de la télécommande. Appuyer sur cette touche permet d’activer la lecture répétée d’une
piste, de toutes les pistes et de désactiver la lecture répétée. Lorsque la lecture répétée d’une piste est
activée, le symbole de lecture répétée à gauche de l’écran clignote. Lorsque la lecture répétée de toutes
les pistes est activée, le symbole de lecture répétée à gauche de l’écran reste allumé. Lorsque la lecture
répétée est désactivée, le symbole de lecture répétée à gauche de l’écran est éteint.
33
Page 34

Lecture d'un appareil Bluetooth
Lorsque l’Air CD Pro est jumelé à un appareil Bluetooth (tel qu'un smartphone), il peut diffuser la
musique de l'appareil par l’entremise de ses haut-parleurs internes.
Pour jumeler un appareil Bluetooth :
1. Veuillez vous assurer que l’Air CD Pro est en mode Bluetooth. Consultez la section Sélection du
mode d’entrée audio au besoin. En mode Bluetooth, BT clignote à l'écran pour indiquer que le
mode Bluetooth est sélectionné et que l’Air CD Pro est à la recherche d’appareils Bluetooth.
2. Accédez au menu des réglages Bluetooth de votre appareil, recherchez les appareils
disponibles. Sélectionnez ensuite Air CD Pro dans cette liste. Une fois le processus de jumelage
terminé, une tonalité provenant des haut-parleurs de l’Air CD Pro se fait entendre et BT reste
allumé à l’écran.
Remarque : Si l’appareil Bluetooth vous demande un code de jumelage, saisissez « 0000 ».
Remarque : Si l’appareil Bluetooth a déjà été jumelé à l’Air CD Pro, il est possible que vous
puissiez sauter l'étape 2 et attendre simplement qu’ils se reconnectent après avoir sélectionné le
mode Bluetooth.
Pour lancer et interrompre la lecture et changer de piste sur un appareil Bluetooth connecté,
appuyer sur la touche pour lancer et interrompre la lecture ou la touche piste précédente ou
piste suivante sur l’Air CD Pro ou sur l’appareil Bluetooth.
Pour jumeler l’Air CD Pro à un autre appareil Bluetooth, maintenez la touche pour lancer et
interrompre la lecture de l'Air CD Pro ou de la télécommande enfoncée, afin de déjumeler l’appareil
Bluetooth jumelé et relancer le processus de jumelage. BT clignote à l'écran pour indiquer que l’Air
CD Pro est à la recherche d’appareils Bluetooth. Au cours du processus de jumelage, il est
préférable de déplacer l’appareil précédemment jumelé hors de portée, de désactiver sa fonction
Bluetooth, ou encore, d’« oublier » l’Air CD Pro à partir de son menu Bluetooth.
Pour arrêter d'utiliser la connexion Bluetooth comme source audio, modifiez le mode d’entrée
audio en appuyant sur la touche Mode de l’Air CD Pro.
Remarque : La plage maximale peut être atteinte avec l’utilisation d’appareils dotés de Bluetooth
4.0.
Remarque : Veuillez mettre à jour le système d'exploitation de votre appareil Bluetooth si vous
éprouvez des problèmes durant le jumelage ou lors de la lecture de musique.
Lecture d'un appareil auxiliaire
Vous pouvez écouter de la musique à partir d'un appareil auxiliaire, tel un iPod ou autre lecteur MP3,
par l’intermédiaire de l’Air CD Pro.
Pour écouter de la musique à partir d'un appareil auxiliaire par l’intermédiaire de l’Air CD Pro :
1. Utilisez un câble standard de 3,5 mm afin de relier la sortie de l’appareil auxiliaire à l’entrée Linein de l’Air CD Pro.
2. Vérifiez que l’Air CD Pro est en mode auxiliaire. Consultez la section Sélection du mode
d’entrée audio au besoin.
3. Utilisez les commandes de l’appareil auxiliaire pour lancer et interrompre la lecture d'une piste,
changer de piste, etc. (vous ne pouvez pas utiliser les touches de l’Air CD Pro pour commander
l’appareil auxiliaire).
Remarque : Si le son de l’appareil auxiliaire est déformé, essayez de diminuer le volume sur
l’appareil. Le volume de l’appareil auxiliaire ne doit pas être au maximum.
34
Page 35

Faire l’écoute de la radio
L’Air CD Pro dispose d’une radio FM.
Pour activer la radio et syntoniser une station radio :
1. Retirez l’antenne des clips de fixation du panneau arrière et déployez-la. Consultez la section
Installation au besoin.
2. Veuillez vous assurer que l’Air CD Pro est en mode radio. Consultez la section Sélection du mode
d’entrée audio au besoin. L’écran affiche le numéro de la station de radio sélectionnée.
3. Réglez le numéro de la station de radio en effectuant l'une des opérations suivantes :
• Tournez le bouton de syntonisation vers la gauche ou la droite pour changer manuellement le
numéro de la station de radio par incréments de 0,1 MHz.
• Maintenez la touche piste précédente ou piste suivante enfoncée pour effectuer une recherche
avant ou arrière. Lorsque l’Air CD Pro fait une recherche avant ou arrière, il passe directement à la
prochaine station de radio ayant un signal clair.
• Appuyez et relâchez la touche piste précédente ou piste suivante pour passer au préréglage
précédent ou suivant. Veuillez consulter la section Préréglages ci-dessous afin d’en savoir plus sur
la programmation des préréglages.
Si vous ne parvenez pas à obtenir un signal radio clair, essayez de déplacer l’antenne. Vous pouvez
également essayer de basculer la radio du mode stéréo au mode mono, ce qui peut réduire les
interférences statiques pour certaines stations de radio.
Pour basculer la radio entre les modes stéréo et mono, appuyez sur la touche Repeat/FM ST. Lorsque
vous réglez la radio en mode stéréo, StEr s’affiche temporairement et le symbole stéréo s’allume. Lorsque
vous réglez la radio en mode mono, Off s’affiche temporairement et le symbole stéréo s’éteint.
Préréglages
Grâce aux préréglages, vous pouvez assigner une station de radio à l’un des 20 numéros de préréglage de
l’Air CD Pro, ce qui vous permet d’accéder facilement à une station de radio en appuyant simplement sur la
touche piste précédente ou piste suivante.
Pour programmer une station radio à un numéro de préréglage :
1. Sélectionnez le mode radio et sélectionnez une station de radio (comme décrit ci-dessus).
2. Maintenez la touche Preset/Prog enfoncée. L'icône de programmation sur le côté gauche de l'écran
reste allumée et l'un des numéros de préréglage (P01–P20) clignote afin d’indiquer que les préréglages
sont en cours de modification.
3. Utilisez le bouton de syntonisation ou les touches piste précédente ou piste suivante pour changer
le numéro de préréglage assigné à la station. Les numéros de préréglage sont mis à jour à l'écran au
fur et à mesure que vous les parcourez. Vous pouvez choisir parmi 20 numéros de préréglages (P01–
P20).
4. Une fois que vous avez trouvé le numéro auquel vous souhaitez assigner la station, appuyez sur la
touche Preset/Prog. L’icône de programmation s’éteint et l’écran indique le numéro de la station de
radio.
Pour mémoriser automatiquement les 20 stations de radio avec les signaux les plus puissants en tant
que préréglages, maintenez la touche Scan/Repeat enfoncée pendant que l’Air CD Pro est en mode radio.
L’Air CD Pro balaye ensuite toute la bande FM et assigne les numéros de station avec les signaux les plus
puissants à chacun des 20 préréglages disponibles. L’écran met à jour les numéros au fur et à mesure que
l’Air CD Pro balaye les stations. Une fois le balayage terminé, l'écran affiche de nouveau le numéro de la
station de radio sélectionné.
35
Page 36

Jumelage de l’Air CD Pro à une enceinte Bluetooth
Lorsqu'il est jumelé à une enceinte Bluetooth, l’Air CD Pro peut lui transmettre le signal audio depuis la
radio, le CD ou l’appareil auxiliaire.
Remarque : L’Air CD Pro ne peut transmettre le signal audio d'un appareil Bluetooth à une enceinte
Bluetooth. Si l’Air CD Pro est jumelé avec une enceinte Bluetooth et que vous modifiez le mode d'entrée
audio sur Bluetooth, l’Air CD Pro se déconnectera de l’enceinte.
Pour jumeler l’Air CD Pro à une enceinte Bluetooth :
1. Veuillez vous assurer que l’Air CD Pro est en mode radio, CD ou auxiliaire selon le mode que vous
souhaitez utiliser. Consultez la section Sélection du mode d’entrée audio au besoin.
2. Mettez l’enceinte Bluetooth sous tension et assurez-vous qu’elle est prête pour se jumeler à l’Air CD
Pro.
3. Appuyez sur la touche Bluetooth. bLUE clignote à l'écran pour indiquer que l’Air CD Pro est à la
recherche d’une enceinte. Une fois que l’Air CD Pro est jumelé avec l’enceinte, l’écran affiche
alternativement bLUE et les informations par défaut pour le mode d’entrée audio sélectionné.
Remarque : Le processus de jumelage peut prendre jusqu'à 30 secondes. Plus l’enceinte est proche
de l’Air CD Pro, plus le processus de jumelage se fera rapidement.
4. Une fois que l’Air CD Pro et l’enceinte sont jumelés, vous pouvez lancer la lecture du CD, de l’appareil
auxiliaire ou de la station de radio que vous souhaitez écouter. Si vous n'entendez aucun son et que
l’enceinte Bluetooth est dotée d'une touche pour lancer et interrompre la lecture, essayez d'appuyer sur
la touche. Pour ajuster le volume de sortie, réglez le volume de l’enceinte Bluetooth (le cas échéant) ou
de l’Air CD Pro.
Pour jumeler une autre enceinte Bluetooth, répétez les étapes 3 et 4. Au cours du processus de
jumelage, il est préférable de déplacer l’appareil précédemment jumelé à l’Air CD Pro hors de portée, de
désactiver sa fonction Bluetooth, ou encore, d’« oublier » l’Air CD Pro à partir de son menu Bluetooth.
Pour déjumeler une enceinte Bluetooth et/ou empêcher l’Air CD Pro de rechercher une enceinte
Bluetooth, maintenez la touche Bluetooth enfoncée.
Réglage de l’horloge
Lorsque l’Air CD Pro est en mode veille, une horloge s’affiche à l’écran.
Pour régler l'horloge sur l'écran :
1. Veuillez vous assurer que l’Air CD Pro est en mode veille. S'il est sous tension, maintenez la touche
d’alimentation enfoncée pour le mettre en veille.
2. Enfoncez et maintenez la touche d’arrêt de lecture. Le système de notation de l’heure sélectionné
devrait clignoter à l’écran (soit 24 heures ou 12 heures).
3. Utilisez les touches piste précédente ou piste suivante pour sélectionner le système de notation de
24 heures (24) ou de 12 heures (12). Lorsque le système de notation est réglé, appuyez sur la touche
d’arrêt de lecture pour confirmer votre sélection. L'heure s’affiche et le compteur pour l’heure clignote.
4. Utilisez les touches piste précédente et piste suivante pour régler l’heure. Lorsque l'heure est réglée,
appuyez sur la touche d’arrêt de lecture pour confirmer votre sélection. L'heure s’affiche et le
compteur pour les minutes clignote.
5. Utilisez les touches piste précédente et piste suivante pour régler les minutes. Lorsque les minutes
sont réglées, appuyez sur la touche d’arrêt de lecture pour confirmer votre sélection. Cette étape
termine le réglage de l'horloge et l'écran affiche l'heure actuelle.
Remarque : Lorsque vous débranchez l’Air CD Pro de l’alimentation secteur, l’horloge se réinitialise.
36
Page 37

Dépannage
L’appareil ne s’allume pas :
• Vérifiez que le adaptateur d’alimentation est correctement branché.
Il y a de la distorsion :
• Essayez de réduire le volume global de l'Air CD Pro en utilisant le bouton du volume ou les boutons de
volume sur la télécommande.
• Si l’Air CD Pro est en mode auxiliaire, essayez de réduire le volume de l’appareil auxiliaire.
Il y a trop de basses fréquences :
• Vérifiez si l’amplification des basses est activée en appuyant sur la touche Bass de la télécommande.
L'écran affichera si la fonctionnalité est activée ou désactivée. Si elle est activée, essayez de la
désactiver.
• Si l’Air CD Pro est en mode auxiliaire, essayez d’ajuster l’égalisation sur l’appareil auxiliaire.
La lecture du CD ne se fait pas correctement :
• Vérifiez que le compartiment du disque est fermé.
• Appuyez sur la touche d’arrêt de lecture avant de lancer la lecture du CD.
• Réinsérez le disque, vérifiez si le disque est propre, ou essayez un autre disque.
La réception de la radio est mauvaise/l’appareil ne trouve aucune station de radio lors du balayage :
• Vérifiez que l'antenne est entièrement déployée et essayez de l’ajuster de façon à obtenir un meilleur
signal.
• Essayez de régler la radio en mode mono en appuyant sur la touche Repeat/FM ST. Lorsque vous
réglez la radio en mode mono, Off s’affiche temporairement et le symbole stéréo s’éteint.
L’enceinte Bluetooth que je désire utiliser ne parvient pas à se connecter à l’Air CD Pro :
• Désactivez ou déplacez toutes les autres enceintes Bluetooth à plus de 15,2 m afin que seulement
l’enceinte Bluetooth que vous souhaitez utiliser puisse se jumeler au lecteur.
L’Air CD Pro est jumelé à une enceinte Bluetooth, mais il n’y a aucun signal audio :
• Vérifiez que l'audio est en cours de lecture sur l’Air CD Pro.
• Utilisez le bouton de volume ou les touches de volume de la télécommande afin d’augmenter le
niveau de sortie de l’Air CD Pro.
• Si l’enceinte Bluetooth est dotée d'une touche pour lancer et interrompre la lecture, essayez d'appuyer
sur la touche.
• Enfoncez puis relâchez la touche Bluetooth de l’Air CD Pro afin de relancer le processus de jumelage
de l’enceinte Bluetooth. Une fois que l’Air CD Pro et l’enceinte sont de nouveau jumelés, essayez de
relancer la lecture. Veuillez consulter la section
Bluetooth afin d’en savoir plus sur le processus de jumelage.
• Mettez l'Air CD Pro en mode veille, puis rallumez-le. Ensuite, rejumelez-le avec l’enceinte Bluetooth et
essayez de relancer la lecture.
Jumelage de l’Air CD Pro avec une enceinte
37
Page 38

Si vous ne parvenez pas à connecter une source audio à l’Air CD Pro via Bluetooth :
• Veillez à ce que votre appareil audio (p. ex., smartphone ou tablette) et la Air CD Pro soient le plus près
• Réinitialisez la connexion Bluetooth sur la Air CD Pro afin de supprimer toute connexion à la Air CD Pro
• Réinitialisez la connexion Bluetooth sur l’appareil audio en désactivant et réactivant la connexion
possible l’un de l’autre lors du jumelage. Veillez également à ce qu’aucun obstacle ne se trouve entre
l’appareil audio et la Air CD Pro, comme des murs, des meubles, etc.
et recommencer le processus de recherche d’appareil. Si cela ne fonctionne pas immédiatement,
mettez la Air CD Pro hors tension et de nouveau sous tension.
Bluetooth. Vous pouvez effectuer ceci à partir du menu Bluetooth dans les Réglages de votre
smartphone ou autre appareil audio.
Si cela ne fonctionne pas et que vous avez déjà connecté votre appareil à la Air CD Pro auparavant,
veuillez rechercher la Air CD Pro dans la liste des appareils disponibles ou précédemment connectés
dans le menu Bluetooth de votre appareil audio, puis appuyer sur l'icône engrenage ou « i » située à
côté de « Oublier cet appareil ». Mettez la Air CD Pro hors tension et de nouveau sous tension et
réessayez de la jumeler une fois qu’elle apparaît dans la liste des appareils disponibles.
Remarque : Si la Air CD Pro a été récemment jumelée à un autre appareil audio qui est toujours dans
son champ de portée, il se peut que vous deviez répéter ce processus avec cet appareil audio afin de
supprimer la connexion.
38
Page 39

Appendix (English)
Technical Specifications
Output Power
12 W (6 W x 2)
Disc Drive Compatible Formats: CD, CD-R, CD-RW
Bluetooth Profile: A2DP
Range: Up to 100 feet / 30.5 meters
Remote Control Range: Up to 100 feet / 30.5 meters
Radio Frequency Range
Display Type
Power
87.5–108 MHz (FM)
LCD
Via power cable (12 VDC, 1 A, center-positive, included)
Connection: Barrel
Input Voltage: 100–240 VAC, 50/60 Hz
Consumption: 18 W
Dimensions
(width x depth x height)
Weight
8.5” x 14.4” x 5.5”
21.6 x 36.5 x 14 cm
6.5 lb.
2.95 kg
Specifications are subject to change without notice. Bluetooth and wireless reception and range are
affected by walls, obstructions, and movement. For optimal performance, place the product in the center of
the room so it is unobstructed by walls, furniture, etc.
Trademarks & Licenses
ION Audio is a trademark of inMusic Brands, Inc., registered in the U.S. and other countries. The Bluetooth
word mark and logos are owned by the Bluetooth SIG, Inc. and any use of such marks by ION Audio is
under license. All other product names, company names, trademarks, or trade names are those of their
respective owners.
39
Page 40

ionaudio.com
Manual Version 1.0
 Loading...