

Page 1

AUDACITY
SOFTWARE GUIDE
Page 2

TABLE OF CONTENTS
GENERAL SOFTWARE NOTES ...................................................................................... 2
AUDACITY SOFTWARE INSTALLATION.......................................................................3
CONFIGURING WINDOWS VISTA TO WORK WITH THE USB TURNTABLE ............. 4
CONFIGURING WINDOWS XP TO WORK WITH THE USB TURNTABLE................... 6
AUDACITY CONFIGURATION ON PC............................................................................ 8
CONFIGURING AUDACITY FOR MAC OS 10.4 AND ABOVE.................................... 10
RECORDING INTO THE COMPUTER........................................................................... 14
ADJUSTING YOUR AUDIO LEVEL (optional)..............................................................15
CLEANING YOUR AUDIO (optional) ............................................................................ 16
HIGH-SPEED RECORDING OF YOUR VINYL (optional) ............................................19
DIVIDING YOUR ALBUM INTO TRACKS ..................................................................... 20
EXPORTING TRACKS TO SEPARATE FILES .............................................................23
LISTENING AND EXPORTING TO WAV/MP3 ..............................................................24
RECORDING 78RPM RECORDS .................................................................................. 24
TROUBLESHOOTING .................................................................................................... 25
1
Page 3

GENERAL SOFTWARE NOTES
Your USB turntable is compatible with any recording software that
supports USB Audio devices. We have included Audacity, however you
may prefer to use one of a variety of the 3
that are also available.
Audacity is free software, distributed under the General Public License
(GPL). More information, as well as open source code, can be found on
the included CD or on the web at http://audacity.sourceforge.net.
Audacity works on both Windows (98 and greater) as well as Mac OS (X
and 9.2+). Software for Linux can be found on the Audacity website.
Go to http://audacity.sourceforge.net/help/tutorials for additional
tutorials.
The website also has information for separate add-ons to Audacity to
enhance performance and features.
rd party software packages
2
Page 4

AUDACITY SOFTWARE INSTALLATION
Before Starting the Software
Make sure that your USB turntable is plugged into the computer with the supplied USB cable,
and both the computer and the turntable are plugged in and on. Refer to the included USB
turntable quick start instruction manual before proceeding with software installation.
REMOVE THE CLEAR PLASTIC CARTRIDGE (NEEDLE) COVER
For your first recording, we recommend that you test your settings on
short section (a minute or less) of recorded audio so you can become familiar with the the
process before recording a full LP.
To Install Software (PC)
1. Plug your turntable into an AC power outlet and use the included USB cable to
connect the USB port on your turntable to the USB port on your computer.
2. Turn your computer on if it is not on already. Allow it to boot fully.
3. Turn on the turntable by pressing the power button near the base of the
tonearm.
4. Your computer might display a message saying that it has detected a new device,
and that it is available to use. Depending on your system, this message may or
may not appear. This is normal.
5. Insert the CD that came with your USB turntable into your computer’s CD drive.
6. A window will pop up automatically. Click on the [INSTALL] icon next to
“Audacity”.
To Install Software (MAC)
1. Plug your turntable into an AC power outlet and use the included USB cable to
connect the USB port on your turntable to the USB port on your computer.
2. Turn your computer on if it is not on already. Allow it to boot fully.
3. Insert the included CD into your computer’s CD drive.
4. Open the CD icon on the desktop.
5. Drag the installation folder for Audacity to your hard drive. We recommend that
you move the folder to your Applications folder.
6. A window will come up which shows the files copying.
7. Once the files are done copying, EJECT the CD.
SELECTING YOUR LANGUAGE
Before you begin using the software, note
that Audacity’s controls and menus can be
displayed in a variety of different languages.
Go to Edit | Preferences and click on the
Interface tab. Under the Language pulldown tab, you can select your preferred
language.
3
Page 5

CONFIGURING MICROSOFT WINDOWS VISTA TO
1. Close all programs that
are open on your
computer.
2. On the bottom left of
your screen, select the
Start menu.
3. Select Settings then
Control Panel.
4. In the window that
opens, find and doubleclick the Sound control
panel. (If you don’t see
a choice called “Sound”,
choose the Switch to
Classic View option in
the panel on the left of
the window, and the
Sound Control Panel
should become available
on the right.)
5. Select the Recording
tab at the top of the
Sound Control Panel.
6. Under the Recording
tab, choose
Microphone - USB
Audio Codec as the
default device. The USB
Audio Codec represents
your Turntable.
7. Click on the Set Default
button to confirm your
choice.
WORK WITH THE USB TURNTABLE
4
Page 6

8. Now select the Playback tab at the top of the Sound control
panel.
9. Under the Playback
tab, choose the
device that you
would like your
computer’s audio to
come out of.
Your computer’s
audio outputs may
appear as:
Speakers – High
Definition Audio
Device
or
Headphones –
High Definition
Audio Device
or both, depending
on the hardware
installed in your
computer.
Click on the device that best matches your desired audio setup
and click Set Default to confirm your selection.
Note: Do NOT choose “Speakers - USB Audio Codec” as your
playback device. USB Audio Codec represents your turntable,
and can only be used as recording input, not a playback output.
10. Click Set Default to confirm your choice.
11. Click Apply if possible, then click OK to close the Control Panel.
12. Click Apply (if possible), then click OK.
13. Make sure that your computer’s speakers (if not built-in) are
plugged into your computer’s audio output and turned on so you
can hear your recording. If your computer has a headphone
output, you can use headphones in-place of speakers.
5
Page 7

CONFIGURING MICROSOFT WINDOWS XP
TO WORK WITH THE USB TURNTABLE
1. Close all programs that are
open on your computer.
2. On the bottom left of your
screen, select the Start
menu.
3. Select Settings then
Control Panel.
4. In the window that opens,
find and double-click the
Sounds and Audio
Devices control panel. (If
you don’t see a choice
called Sounds and Audio
Devices, choose the Switch
to Classic View option in the
panel on the left of the
window, and the Sounds
and Audio Devices should
become available on the
right.
5. Select the Voice tab at the
top of the Sounds and Audio
Devices control panel.
6. Under Voice Playback,
choose your internal sound
card as the default device.
This varies by computer but
should not be set to “USB
Audio Codec, Modem, or
Microsoft Sound Mapper.”
7. Under Voice Recording,
select USB Audio Codec for
your default device – this is
the USB truntable.
6
Page 8

8. Select the Audio tab at the
top of the Sounds and Audio
Devices control panel.
9. Under Sound Playback,
choose your internal sound
card as the default device.
This varies by computer but
should not be set to “USB
Audio Codec, Modem, or
Microsoft Sound Mapper.”
10. Under Sound Recording,
select USB Audio Codec
for your default device –
this is the USB turntable.
11. Check the box titled Use
only default devices.
12. Click Apply (if possible), then click OK.
13. Make sure that your computer’s speakers (if not built-in) are
plugged into your computer’s audio output and turned on so you
can hear your recording. If your computer has a headphone
output, you can use headphones in-place of speakers.
7
Page 9

AUDACITY CONFIGURATION ON PC
1. Launch Audacity: Click on the Start menu on the bottom left of
your screen. Select All Programs, then Audacity.
2. In Audacity, click on the Edit menu at the top of the screen.
3. Select Preferences from the Edit menu.
Figure 1: Select Preferences
The Audacity Preferences window will come up (Figure 2).
Choose the Audio I/O tab from the top of the Preferences
screen.
4. Set your Playback Device to your internal sound card. Since
different computers have different internal sound cards, your
selection may be different from the image below (Figure 2). The
correct selection, however, will NOT be USB Audio Codec,
Microsoft Sound Mapper or Modem.
5. Set your Recording Device to USB Audio Codec. This
represents your turntable.
Note: The USB turntable may show up with a different name in
the Preferences window. This may depend on your computer
model and operating system. 99% of the time it will contain
“USB” in the Name.
6. Set Channels to 2 (Stereo).
7. Check the box labeled Software Playthrough.
8
Page 10

Figure 2: Select USB Audio Device from Preferences
8. Under the Quality tab, set the Default Sample Format to 16-
bit.
9. Select OK to save your settings and close the Preferences
window.
10. At the top of the main Audacity window, to the right of the play
control buttons, you will see the input and output level meters
(labeled L and R). Under the output level meter, is an icon that
looks like a microphone. Next to the microphone is a black
arrow that points down. Click this arrow and select Monitor
Input. (If you don't see the input and output level meters, open
your Preferences again as described above, select the Interface
tab, and make sure that Enable Mixer Toolbar is checked.)
You should be all ready to record.
These settings will be saved when you exit. However, you will need to
select Monitor Input from the input meter’s drop-down menu each
time you launch Audacity.
9
Page 11

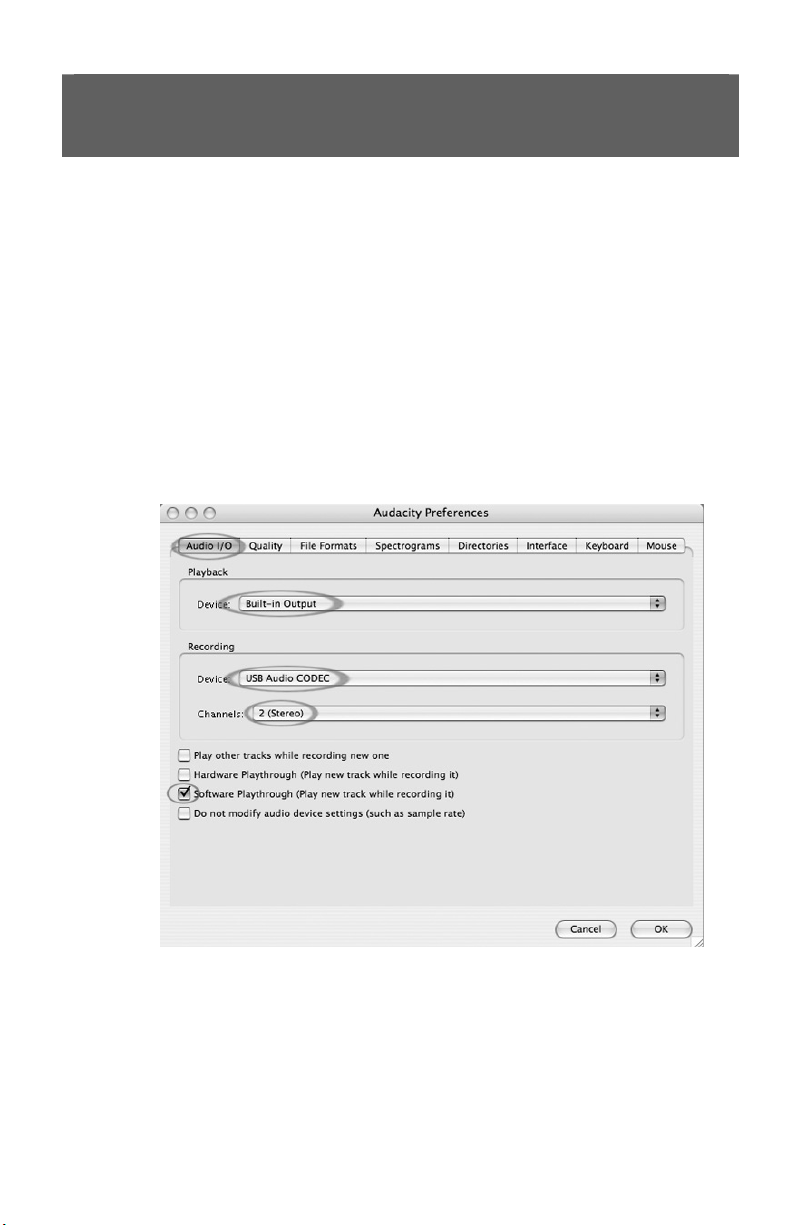
CONFIGURING AUDACITY FOR MAC OS
1. With the Audacity program open, click on the Audacity menu at
the top of the screen.
2. Select Preferences from the Audacity menu.
3. Under the Audio I/O tab, set your Playback Device to Built-
In Audio.
4. Under the Audio I/O tab, set your Recording Device to USB
Audio Codec.
5. Under the Audio I/O tab, set your Channels to 2 (Stereo).
6. Check the box labeled Software Playthrough.
10.4 AND ABOVE
7. Under the Quality Tab, set the Default Sample Format to 16-
bit.
10
Page 12

8. Select OK to save your settings and close the Preferences
window.
9. At the top of the main Audacity window, to the right of the play
control buttons, you will see the input and output level meters
(labeled L and R). Under the output level meter, is an icon that
looks like a microphone. Next to the microphone is a black
arrow that points down. Click this arrow and select Monitor
Input. (If you don't see the input and output level meters, open
your Preferences again as described above, select the Interface
tab and make sure that Enable Mixer Toolbar is checked.)
These settings will be saved when you exit. However, you will need to
select Monitor Input from the input meter’s drop-down menu each
time you launch Audacity.
11
Page 13

Other Important Macintosh Settings:
We have set up Audacity’s separate playback and record preferences,
but your Mac also has its own audio playback and record settings. When
you first connect the turntable, the Macintosh will often select the “USB
Audio Codec” as the audio input and output for your entire system.
Since your turntable does not have speakers, audio will not be heard
from your other programs until you tell your Mac not to use the
turntable as an output device.
Here’s how to change these settings so that your internal sound card will
always be used for playback, whether or not your turntable is connected
via USB:
The Audio Midi Setup Utility:
1. Open your Finder.
2. Open your Applications folder.
3. In the Applications folder, open the Utilities folder.
4. In the Utilities folder, open the Audio MIDI Setup.
5. In the Audio MIDI Setup under Audio Devices, set:
The Default Input to USB Audio Codec
The Default Output to Built-in Audio or Built-in Output
The System Output to Built-in Audio or Built-in Output
12
Page 14

Now, programs other than Audacity will only use your internal sound
card for audio output.
13
Page 15

RECORDING INTO THE COMPUTER
Note: We recommend that the first time you use the
software you test with a small (1min or less) section of
audio while recording. Once you feel comfortable with
recording, then record a full song or LP.
1. Press the Record Button
2. Start playback on the USB Turntable. You will see the waveform of
the audio on the screen as it is recording. You will hear the audio
coming from the output of your computer’s soundcard.
No Audio? - go back to the preference menu (Figure 2) and make
sure you have “Software Playthrough” selected and the speaker
volume up on your computer. See troubleshooting at the end of this
manual for more help.
3. Play through the entire track/album you desire to record.
4. Press Stop
5. SAVE YOUR FILE NOW
by clicking on File -> Save Project.
Select the destination and file name for the project and click Save.
6. You have completed the recording process. The file you just saved
to your computer is an Audacity Project file. This file can only be
opened by Audaity. The following sections will guide you through
some optional editing that may be performed, as well as how to
divide this Audacity Project into separate Wav files which may be
burned to CD or played in music programs such as iTunes and
Windows Media Player.
Figure 3: Recording Sample
14
Page 16

ADJUSTING YOUR AUDIO LEVEL (optional)
1. Select your entire recording by selecting Edit, then Select…, then
click All. You can also use Ctrl+A on a PC or APPLE+A on a
Macintosh to quickly select all.
Figure 4: Select All
2. Select the Effect menu and choose the desired effect.
a. There are various types of effects which are described
further in the software’s help section as well as on the web
(See Figure 5).
b. Normalize should be used to have the correct volume on
the recording. (See Figure 6)
Please note:
It is a good idea to place the needle on the record, while it is
stopped, before you begin the recording and press ‘Play’ on
the turntable after you begin recording. If you place the
needle down while the record is spinning and after you have
began recording, there might be audible clicks and pops.
These clicks on pops might not allow the Normalize effect to
bring the volume of the recording to the level that it should
be.
15
Page 17

Figure 6: Normalize
Figure 5: Effect Drop Down List
CLEANING YOUR AUDIO (optional)
1. Drag the cursor over a portion of the audio track which contains
noise. We recommend using the beginning or the end of a track
where there is no music and only vinyl noise. (See Figure 7)
2. Select Noise Removal from the Effect drop down menu to bring up
the Noise Removal window. (See Figure 8)
3. Click Get Noise Profile. The Noise Removal window will now close
automatically.
4. Select the entire track of audio you wish to remove noise from. If
you wish to clean up the entire recording use Select All under the
Edit Menu. (See Figure 4)
5. Repeat Step 2 to bring up the Noise Removal Window.
6. Adjust the amount of audio that you would like to filter by moving
the slider in the Noise Removal window. We recommend using the
minimum noise removal for optimum sound.
Note: you can preview the audio before removing the noise by
clicking on Previe’.
7. Click on Remove Noise.
16
Page 18

Figure 7: Selecting Noise in Track
Figure 8: Noise Removal Window
17
Page 19

Additional Editing Notes:
Audio levels may vary based on the cartridge (needle), tone arm
counter weight, vinyl, and computer set up. We recommend always
normalizing your audio.
Similar to word processing, you may delete unwanted audio by
dragging over the section, which will highlight, then pressing
Delete. This may include excessive hiss, silence before/after songs,
or skips/scratches.
You must select the noise profile before you can remove the noise
from a track. If you select actual audio for the noise profile, the
computer may remove all of your audio. See Step 1.
Once the Noise Profile is set, it will save the profile until you restart
the application. In other words, the software must learn what the
noise profile is only when you first start the software. You do not
need to get the noise profile for every recording once it is set up.
18
Page 20

HIGH-SPEED RECORDING OF YOUR VINYL
(optional)
Using the USB turntable with Audacity software, you are able to quickly
record your 33 1/3 speed vinyl into the computer and use the software
to adjust the faster speed back to normal playback. This feature is
useful for recording multiple records. For example, you can record 10
minutes of audio in as little as 7 minutes when recording at 45RPM.
Saving three minutes isn’t a large saving for one record, but if you are
recording multiple LPs, you can record 4 hours of music in under 3
hours.
Instructions:
1. Record your 33 1/3 RPM vinyl at 45RPM by pressing the 45RPM of
the turntable.
2. You will hear the audio recording at an unusual pitch due to its high
speed.
3. When you finish recording stop the recording.
4. Go to Edit and Select All (See Figure 4).
5. Go to Effect and then the Change Speed Menu.
Select from 45 to 33 1/3 and your vinyl will be adjusted to the
correct speed as shown in Figure 9.
Figure 9: Change Speed
19
Page 21

DIVIDING YOUR ALBUM INTO TRACKS
Note: You must finish all cleaning and
editing, including removing unwanted
silence before/after songs, before
dividing your album into tracks.
1. Select the Fit Project in Window
tool as shown in Figure 10.
2. After zooming out to see all of the
tracks, you can see the separation
between tracks by the gaps as shown with 1,2,3 below (Figure 11).
The next steps show how to split and label these tracks and export
them to WAV (CD quality) format.
Figure 10: Fit Project in
Window
Figure 11: Identifying Separate Audio Tracks
There are two ways to split your recording into separate tracks:
automatically, and manually. If your record is in good condition, and
has a distinct silence between the songs, automatically splitting the
tracks may be faster and easier. If your record is in poor condition or
does not have silence separating the songs, manually splitting the album
will work better for you.
Automatically Dividing Your Album (Windows Only):
1. Select your entire recording by selecting Edit, then Select…, then
click All. You can also use Ctrl+A on a PC or APPLE+A on a
Macintosh to quickly select all. (See Figure 4)
2. Select the Analyze menu from the top of the screen and choose
Silence Finder.
3. The Silence Finder will attempt to detect the silence between each
song in the recording. With most recordings, you only need to set
the
Silence Level field in Silence Finder’s window. Type 15 into
the Silence Level field and hit OK (Figure 12).
20
Page 22

Figure 12: Silence Finder
4. Your recording will then be analyzed, and a Label Track will appear
underneath your recording. It will contain markers representing the
beginning of each new song. (Figure 13). When you export your
recording (see: Exporting Your Tracks To Separate Files), these markers
will be used to create separate audio files for each song on your album.
Figure 13: Track Labels
5. If you notice that the markers placed by the Silence Finder do not
match up with the songs correctly, or that there were too few or too
many markers added, you may undo the operation and try again with
different settings. If your markers appear to be correct, proceed to the
Exporting Your Tracks To Separate Files Section below.
6. To undo, select the Edit menu from the top of the screen and choose
Undo.
7. Repeat steps 1-3 above, and try a different setting in the Silence Level
field. If there were too few markers added in your previous attempt, use
a lower number in the Silence Level Field, such as 10. If there were
too many markers added in your previous attempt, try a higher number
in the Silence Level Field, such as 20. Certain records and types of
music may not work well automatic track separation. If you cannot get
good results with the Silence Finder you may need to manually devide
your album into tracks (see below).
21
Page 23

Manually Dividing Your Album:
1. Press the Skip to Start button to move to the beginning of the
recording.
2. Select the Project menu and then select
Add Label At Selection. This will set
the starting point of the first track.
3. Type in the name of the first track, the
text will show at the label marker. (See
14)
4. Select the space between tracks (where
there is no audio) by clicking once.
(vertical circle below)
5. You will see a line where you clicked.
6. Then repeat Step 4: Add Label At
Selection.
7. Note: you can add or edit any track name
(circled).
8. Repeat this process for adding labels for
all tracks. You may need to zoom in to
select the tracks and track separation.
You may also want
to hear the part of
the track before
you add a label for
the track. Use the
space bar to easily
start and stop
playback.
Note: the label is
placed at the START of
Figure 14: Track Separation and Labels
the track. For example, in 15, TRACK 1 is labeled at the beginning of audio
recording. Track 2 is the label between the first and second track. You can
also edit track names after they have been exported from Audacity.
In this three track example, the final break up is shown in Figure 15:
Figure 12: Adding Track Label
Figure 15: Completed Track Names Example
Additional Notes:
There are many different ways to edit your file. Dividing your file into separate
tracks by adding labels is one way to accomplish this. You can always undo any
mistakes in editing. Make sure to save your file regularly.
22
Page 24

EXPORTING TRACKS TO SEPARATE FILES
This section explains how to export your separated files to WAV format to
burn to a CD. You may also choose to convert to MP3 requiring 3
software downloaded from the Internet. Refer to the software help section
for more information.
1. Now that you have divided up your tracks into labels from the master
recording file, you are going to export the files into separate files.
2. Select the File menu and then select
Export Multiple… as shown in Figure
16.
3. The Export Multiple window will come up
(see Figure 17).
a. Select WAV as the export format
and choose the Export location.
b. Select the Export Location. This is
where you will save your files. You
may want to create a special folder
on your Desktop with the Album
Name to store the files.
c. Select Using Label/Track Name
as shown. Note: You may want to
export using consecutive
numbering and change the names
later. In this case you can select
the other option, Numbering
consecutively.
rd
party
d. Click Export.
Figure 16: Export Multiple
Figure 17: Export Options Menu
23
Page 25

LISTENING AND EXPORTING TO WAV/MP3
To listen to your digitized audio, you will need a third party application that can play
WAV files. You can also use any standard audio CD burning software to burn your WAV
files to an audio CD.
If you would like to save your vinyl as an MP3 file after you have recorded it using
Audacity, you will need to obtain and install the optional "LAME MP3 Encoder" plug-in.
Once a file is in MP3 format it can be placed on any MP3 compatible mobile digital
device.
• To download the LAME MP3 Encoder plug-in, please visit www.ion-
audio.com/ttusb_audacity.php. There, you may also find additional information
about the Audacity software, as well as Frequently Asked Questions.
• Click on the link to the LAME MP3 Encoder plug-in to transfer the file to your
computer.
Note: It is advised that you save the downloaded .zip file to your desktop
temporarily. You must then extract and save the LAME MP3 Encoder plug-in onto
your computer in a location where you WILL NOT DELETE IT. Saving these
individual plug-in files to your desktop is NOT recommended!!!
Windows users:
1. Create a new folder in [My Documents] called Lame MP3 Plugin.
2. Find the downloaded .zip file and open it.
3. Select ALL of the contents and copy them to the Lame MP3 Plugin folder you just
created in [My Documents].
4. Now...delete the DOWNLOADED .zip file which is still on your desktop.
Mac users:
1. Create a new folder in your [Home] directory called Lame MP3 Plugin.
2. Find the downloaded .sit or .zip file and double-click it...this will extract the
contents and create a new file on the desktop with the same name (it should show
without the .sit or .zip extension).
3. Copy or move this new file to the Lame MP3 Plugin folder you just created in your
[Home] directory.
4. Now...trash the DOWNLOADED .sit or .zip file which is still on your desktop.
In Audacity, when you attempt to Export As MP3… for the first time after
installing the LAME MP3 Encoder plug-in, you will be asked for the location of the
plug-in file. Browse to the Lame MP3 Plugin folder you copied the plug-in file to
and select the file. Subsequently, Audacity will remember the location of this file.
RECORDING 78RPM RECORDS
If you want to record a 78 RPM album, you can record it at 33.3 or 45 RPM and convert
it to 78 RPM in the Audacity software! After you have recorded the album, open the
Edit menu then click Select then click All. Next, open the Effect menu and choose
Change Speed. Then select the speed that you recorded at (33 or 45), as well as the
speed you would like it to be (78). Then press OK.
24
Page 26

TROUBLESHOOTING
Please contact Ion Audio or your retailer before returning
this product. See the Safety Guide for more information.
• NO SOUND:
• If you are not getting any sound into the software application, go back to the
preferences as shown above and make sure you have selected the USB input
for the recording device.
• If you can not hear the music but you do see the music on the screen, open
your preferences (Figure 2) and make sure that your Playback Device is set
to your internal computer soundcard.
• Power Cycle: Close Audacity, turn off the turntable, unplug the USB Cable.
Then plug in the USB Cable, turn on the turntable, and reopen Audacity.
• If you are not able to hear any audio
as you play the record, please click on
the microphone drop-down arrow and
select Monitor Input. This will
enable you to hear the audio from the
turntable, even if you have not
record-enabled the Audacity application.
If you are not seeing the microphone slider, please go to the Preferences
menu in Audacity, click on the Interface tab and make sure that the Enable
Mixer Toolbar and Enable Meter Toolbar options are checked. If they are
not, please check them and then press OK.
• Check the microphone slider to make sure
that it is at full volume, all the way to the
right as shown in Figure 20:
If you are not seeing the microphone slider,
please go to the Preferences menu in
Audacity, click on the Interface tab and
make sure that the Enable Mixer
Toolbar and Enable Meter Toolbar
options are checked. If they are
not, please check them and then
press OK.
Figure 19: Monitor Input
Figure 20: Input Level
25
Page 27

POOR SOUND Quality:
• If a recording sounds distorted or garbled during playback, you may
need to adjust the input volume from the turntable. Try moving the
Input Level slider in Audacity to the left to lower the input volume (See
Figure 17). You can use the Normalize effect, as described in the
Adjusting Your Audio Level section, to bring the volume back up to
normal after the recording.
• Check your cartridge connection to make sure it is secured to the tone
arm. The cartridge must be connected to the tone arm whenever using
the turntable.
• Make sure that your RCA plugs are plugged into a source or not touching
bare metal. If you are experiencing noise through the USB, you may
have interference from the RCA plugs. Ensure the USB cable is not
touching or near any other cables.
• If you experience any odd sounds coming from the recording, try closing
all applications, restarting the computer, and only run Audacity while
recording.
• If you are using the RCA plugs and your turntable is equipped with a
PHONO/LINE switch, make sure that you have the switch on the
bottom panel set to the correct position. Refer to the Quick Start guide
for more information.
• Make sure that you have properly installed and calibrated the tone arm
of the turntable – please refer to the TONE ARM SETUP section of your
USB turntable’s Quick Start Guide.
For additional information, frequently asked
questions and troubleshooting, please visit
www.ion-audio.com/ttusb_audacity.php
For technical support, please contact
Ion-Audio at (401) 658-3743
Manual Version 5.3
26
Page 28

Instalación del software
Software de grabación Audacity
ÍNDICE
NOTAS GENERALES SOBRE EL SOFTWARE..........................................28
INSTALACIÓN DEL SOFTWARE AUDACITY............................................. 29
CÓMO CONFIGURAR MICROSOFT WINDOWS VISTA PARA
FUNCIONAR CON EL GIRADISCOS USB ..................................................30
CÓMO CONFIGURAR WINDOWS XP PARA FUNCIONAR CON
EL GIRADISCOS USB..................................................................................32
CONFIGURACIÓN DE AUDACITY EN PC ..................................................34
CÓMO CONFIGURAR AUDACITY PARA MAC OS 10.4 Y
SUPERIORES ...............................................................................................36
GRABACIÓN EN LA COMPUTADORA.......................................................40
AJUSTE DEL NIVEL DE AUDIO (OPCIONAL)............................................41
AJUSTE DEL NIVEL DE AUDIO (OPCIONAL)............................................42
GRABACIÓN DE SU VINILO EN ALTA VELOCIDAD
(OPCIONAL) .................................................................................................44
CÓMO DIVIDIR SU ÁLBUM EN PISTAS .....................................................45
EXPORTACIÓN DE PISTAS A ARCHIVOS POR SEPARADO ..................49
CÓMO ESCUCHAR Y EXPORTAR A WAV/MP3 ........................................ 50
CÓMO GRABAR DISCOS DE 78 RPM........................................................50
SOLUCIÓN DE PROBLEMAS......................................................................51
27
Page 29

NOTAS GENERALES SOBRE EL SOFTWARE
El giradiscos USB es compatible con cualquier software de grabación que
soporte dispositivos de audio USB. Hemos incluido a Audacity, pero no
obstante ello usted puede preferir usar una variedad de paquetes de
software de terceros.
Audacity es un software gratuito, distribuido bajo General Public License
(Licencia pública general, GPL). Puede encontrar más información, así
como el código fuente abierto, en el CD incluido o en la web en
http://audacity.sourceforge.net
Audacity funciona tanto en Windows (98 y superiores) como en Mac OS
(X y 9.2+). El software para Linux se puede encontrar en el sitio web de
Audacity.
Visite http://audacity.sourceforge.net/help/tutorials para obtener
tutoriales adicionales.
El sitio web tiene también información de agregados (“add-ons” de
Audacity para mejorar su funcionamiento y características.
28
Page 30

INSTALACIÓN DEL SOFTWARE AUDACITY
Antes de arrancar el software
Asegúrese de que su giradiscos USB esté enchufado a la computadora con el cable USB
provisto y que tanto la computadora como el giradiscos estén enchufados y encendidos.
Consulte el manual de instrucciones para inicio rápido del giradiscos USB antes de proceder a
la instalación del software.
RETIRE LA CUBIERTA DEL CARTUCHO PLÁSTICO TRANSPARENTE (PÚA)
Para realizar su primera grabación, le recomendamos que haga una prueba de audio de
alrededor de un minuto o menos para familiarizarse con el proceso antes de grabar un LP
completo.
Para instalar el software (PC)
1. Enchufe el giradiscos en un tomacorriente de CA y use el cable USB incluido para
conectar el puerto USB de su giradiscos al puerto USB de la computadora.
2. Encienda su computadora si no estaba encendida. Permita que arranque
completamente.
3. Encienda el giradiscos pulsando el botón de encendido cercano a la base del brazo.
4. En la computadora puede aparecer un mensaje que diga que detectó un nuevo
dispositivo y que está disponible para usar. Según sea su sistema, este mensaje puede
aparecer o no. Esto es normal.
5. Inserte el CD que viene con su giradiscos USB en la unidad de CD de la computadora.
6. Emerge automáticamente una ventana. Haga clic en el icono [INSTALL] que está junto
a “Audacity”.
Para instalar el software (MAC)
1. Enchufe el giradiscos en un tomacorriente de CA y use el cable USB incluido para
conectar el puerto USB de su giradiscos al puerto USB de la computadora.
2. Encienda su computadora si no estaba encendida. Permita que arranque
completamente.
3. Inserte el CD incluido en la unidad de CD de su computadora.
4. Abra el icono del CD del escritorio.
5. Arrastre la carpeta de instalación de Audacity a su disco duro. Recomendamos que
transfiera la carpeta a su carpeta Applications (Aplicaciones).
6. Aparece una ventana que muestra que los archivos se están copiando.
7. Una vez que se hayan copiado los archivos, EXPULSE el CD.
Antes de comenzar a usar el software, tenga en
cuenta que los controles y menús de Audacity se
pueden mostrar en una variedad de idiomas
diferentes. Vaya Edit | Preferences (Editar |
Preferencias) y haga clic en la pestaña Interface
(Interfaz). En la ficha desplegable Language
(Idioma), puede seleccionar su idioma preferido.
SELECCIÓN DEL IDIOMA
29
Page 31

CÓMO CONFIGURAR MICROSOFT WINDOWS
VISTA PARA FUNCIONAR CON EL GIRADISCOS
1. Cierre todos los programas
que estén abiertos en su
computadora.
2. En la esquina inferior izquierda
de la pantalla, seleccione el
menú Start (Inicio).
3. Seleccione Settings
(Configuración), y Control
Panel (Panel de control).
4. En la ventana que se abre,
busque y haga doble clic en el
panel de control Sound
(Sonido). (Si no ve una opción
llamada “Sound”, seleccione la
opción Switch to Classic View
(Conmutar a vista clásica) en
el panel de la izquierda de la
ventana y el panel de control
Sound debe aparecer
disponible a la derecha).
5. Seleccione la pestaña
Recording (Grabación) de la
parte superior de Sound
Control Panel.
6. Bajo la ficha Recording,
seleccione Microphone - USB
Audio Codec (Micrófono
– Códec de audio USB)
como dispositivo
predeterminado. El
códec de audio USB
representa a su
giradiscos.
7. Haga clic en Set
Default (Configurar
opción predeterminada)
para confirmar su
elección.
USB
30
Page 32

8. Seleccione la pestaña
Playback (Reproducción) de
la parte superior de Sound
Control Panel.
9. Bajo la ficha Playback,
seleccione el dispositivo por
el que desea que salga el
audio proveniente de su
computadora.
Las salidas de audio de la
computadora pueden
aparecer como:
Speakers – High
Definition Audio Device
(Altavoces - Dispositivo de
audio de alta definición)
o
Headphones – High Definition Audio Device (Altavoces –
Dispositivo de audio de alta definición)
o ambos, según sea el hardware instalado en su computadora.
Haga clic en el dispositivo que se adapte mejor a la configuración
de audio que desea y en Set Default para confirmar su selección.
Nota: NO elija “Speakers - USB Audio Codec” (Altavoces –
Dispositivo de audio códec) como dispositivo de reproducción. USB
Audio Codec representa a su giradiscos, y sólo se puede usar como
entrada de grabación, no como salida de reproducción.
10. Haga clic en Set Default para confirmar su opción.
11. Haga clic en Apply (Aplicar) si es posible y luego en OK (Aceptar)
para cerrar el panel de control.
12. Haga clic en Apply (si es posible) y luego en OK.
13. Asegúrese de que los altavoces de la computadora (si no están
incorporados) estén enchufados a la salida de audio de la misma y
encendidos, de modo que pueda oír su grabación. Si su
computadora tiene una salida para auriculares, puede usar
auriculares en lugar de altavoces.
31
Page 33

CÓMO CONFIGURAR WINDOWS XP PARA
FUNCIONAR CON EL GIRADISCOS USB
1. Cierre todos los programas
que estén abiertos en su
computadora.
2. En la esquina inferior
izquierda de la pantalla,
seleccione el menú Start
(Inicio).
3. Seleccione Settings
(Configuración), y Control
Panel (Panel de control).
4. En la ventana que se abre,
busque y haga doble clic en
el panel de control Sounds
and Audio Devices
(Dispositivos de sonido y
audio). (Si no ve una opción
llamada “Sounds and Audio
Devices”, seleccione la
opción Switch to Classic View
(Conmutar a vista clásica)
en el panel de la izquierda
de la ventana y Sounds and
Audio Devices debe
aparecer disponible a la
derecha).
5. Seleccione la pestaña Voice
(Voz) en la parte superior
del panel de control de
dispositivos de sonido y
audio.
6. Bajo Voice Playback
(Reproducción de voz) elija
su tarjeta de sonido interna
como dispositivo
predeterminado. Esto varía
según la computadora pero
no se debe configurar a
“USB Audio Codec” ni
“Modem” ni “Microsoft Sound
Mapper”.
32
Page 34

7. Bajo Voice Recording,
seleccione USB Audio
Codec (Códec de audio
USB) como dispositivo
predeterminado —éste es
su giradiscos USB.
8. Seleccione la pestaña
Audio (Audio) en la parte
superior del panel de
control de dispositivos de
sonido y audio.
9. Bajo Sound Playback
(Reproducción de sonido)
elija su tarjeta de sonido
interna como dispositivo
predeterminado. Esto varía
según la computadora pero
no se debe configurar a
“USB Audio Codec” ni
“Modem” ni “Microsoft
Sound Mapper”.
10. Bajo Sound Recording, seleccione USB Audio Codec (Códec de
audio USB) como dispositivo predeterminado —éste es su
giradiscos USB.
11. Marque la casilla llamada Use only default devices (Usar sólo los
dispositivos predeterminados).
12. Haga clic en Apply (si es posible) y luego en OK.
13. Asegúrese de que los altavoces de la computadora (si no están
incorporados) estén enchufados a la salida de audio de la misma y
encendidos, de modo que pueda oír su grabación. Si su
computadora tiene una salida para auriculares, puede usar
auriculares en lugar de altavoces.
33
Page 35

CONFIGURACIÓN DE AUDACITY EN PC
1. Inicie Audacity: Haga clic en el
menú Start (Inicio) de la esquina
inferior izquierda de su pantalla.
Seleccione All Programs (Todos
los programas) y luego Audacity.
2. En Audacity, haga clic en el menú
Edit (Edición) de la parte superior
de la pantalla.
3. Seleccione Preferences
(Preferencias) en el menú de
edición.
Aparece la ventana Audacity
Preferences (Preferencias de
Audacity (Figura 2). Elija la
pestaña Audio I/O (E/S de
audio) de la parte superior de la
pantalla de preferencias.
4. Configure Playback Device
(Dispositivo de reproducción) como su tarjeta de sonido interna.
Puesto que las diferentes computadoras tienen distintas tarjetas
de sonido internas, su selección puede ser distinta de la imagen
de abajo (Figura 2). No obstante, la selección correcta NO es
USB Audio Codec ni Microsoft Sound Mapper ni Modem.
5. Configure Recording Device como USB Audio Codec (Códec
de audio SUB). Esto representa a su giradiscos.
Nota: El giradiscos USB puede aparecer con un nombre diferente
en la ventana de preferencias. Esto puede depender del modelo
y el sistema operativo de la computadora. El 99% de las veces
contendrá “USB” en el nombre.
6. Configure Channels (Canales) como 2 (estéreo).
7. Marque la casilla llamada Software Playthrough (Reproducción
pasante por software).
34
Page 36
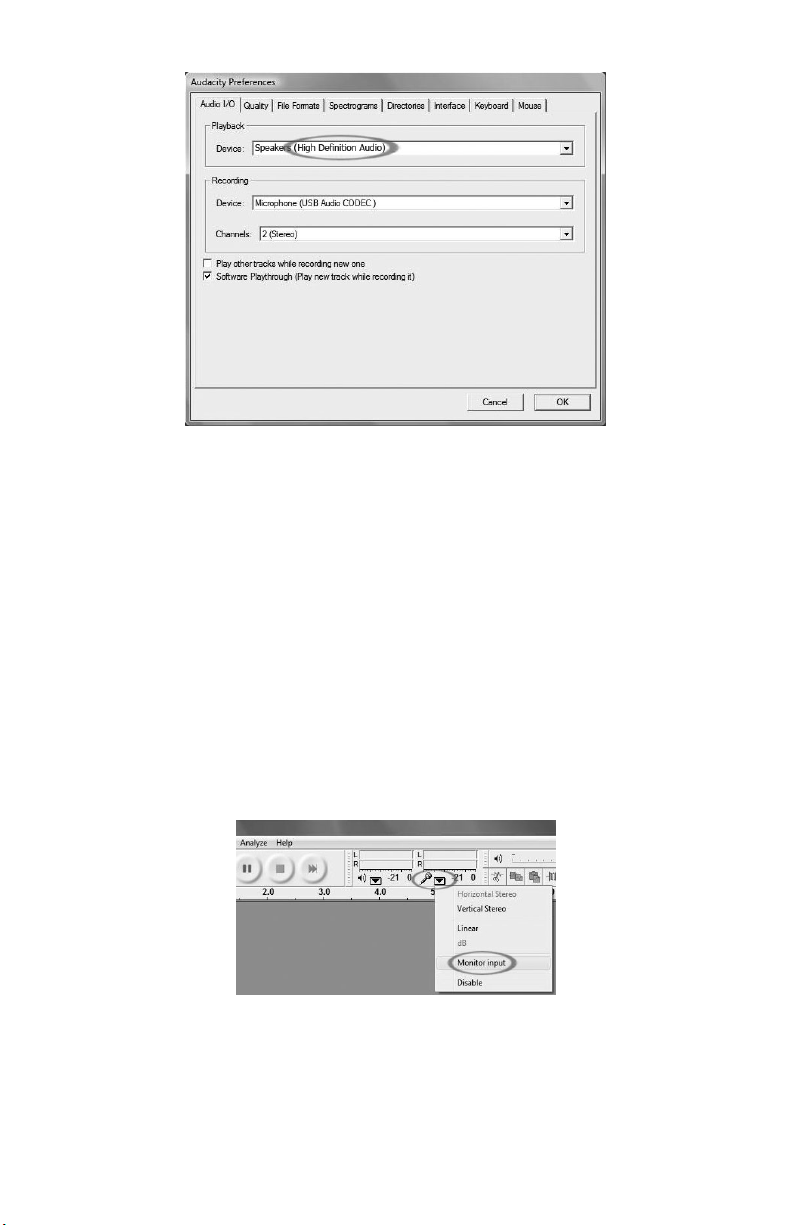
Figura 2: Selección del dispositivo de audio USB entre las preferencias
8. En la ficha Quality (Calidad), configure Default Sample
Format (Formato de muestras predeterminado) como 16 bits.
9. Seleccione OK (Aceptar) para guardar sus valores y cierre la
ventana de preferencias.
10. En la parte superior de la ventana principal de Audacity, a la
derecha de los botones de control de reproducción, verá los
medidores de nivel de entrada y salida (rotulados L (Izq) y R
(Der)). Debajo del medidor de nivel de salida, hay un icono que
parece un micrófono. Junto al micrófono hay una flecha negra
que apunta hacia abajo. Haga clic en esta flecha y seleccione
Monitor Input (Entrada al monitor) (Si no ve los medidores de
nivel de entrada y salida, abra sus preferencias nuevamente
como se explicó arriba, seleccione la pestaña Interface (Interfaz)
y asegúrese de que esté marcado Enable Mixer Toolbar
(Activar barra de herramientas del mezclador).
De esta forma, debe quedar todo listo para grabar.
Estos parámetros se guardan cuando usted sale. No obstante, debe
seleccionar Monitor Input en el menú desplegable del medidor de
entrada cada vez que inicie Audacity.
35
Page 37
CÓMO CONFIGURAR AUDACITY PARA MAC
1. Con el programa Audacity abierto, haga clic en el menú
Audacity de la parte superior de la pantalla.
2. Seleccione Preferences (Preferencias) en el menú Audacity.
3. Bajo la ficha Audio I/O (E/S de audio), configure Playback
Device (Dispositivo de reproducción) como Built- In Audio
(Audio incorporado).
4. Bajo la ficha Audio I/O, configure Recording Device
(Dispositivo de grabación) como USB Audio Codec (Códec de
audio USB).
5. Bajo la ficha Audio I/O, configure Channels (Canales) como 2
(estéreo).
6. Marque la casilla llamada Software Playthrough (Reproducción
pasante por software).
OS 10.4 Y SUPERIORES
7. En la ficha Quality (Calidad), configure Default Sample
Format (Formato de muestras predeterminado) como 16 bits.
36
Page 38

8. Seleccione OK (Aceptar) para guardar sus valores y cierre la
ventana de preferencias.
9. En la parte superior de la ventana principal de Audacity, a la
derecha de los botones de control de reproducción, verá los
medidores de nivel de entrada y salida (rotulados L (Izq) y R
(Der)). Debajo del medidor de nivel de salida, hay un icono que
parece un micrófono. Junto al micrófono hay una flecha negra
que apunta hacia abajo. Haga clic en esta flecha y seleccione
Monitor Input (Entrada al monitor) (Si no ve los medidores de
nivel de entrada y salida, abra sus preferencias nuevamente
como se explicó arriba, seleccione la pestaña Interface (Interfaz)
y asegúrese de que esté marcado Enable Mixer Toolbar
(Activar barra de herramientas del mezclador).
Estos parámetros se guardan cuando usted sale. No obstante,
debe seleccionar Monitor Input en el menú desplegable del
medidor de entrada cada vez que inicie Audacity.
37
Page 39

Otros parámetros importantes de Macintosh:
Hemos configurado las preferencias de reproducción y grabación de
Audacity por separado, pero la Mac tiene también sus propios
parámetros de reproducción y grabación. Cuando conecta el giradiscos
por primera vez, la Macintosh con frecuencia selecciona “USB Audio
Codec” (Códec de audio USB) como la entrada y salida de audio de su
sistema completo. Puesto que su giradiscos no tiene altavoces, no se
oye el audio de sus demás programas hasta que le indique a la Mac no
usar el giradiscos como dispositivo de salida.
He aquí como cambiar estos parámetros de modo que se use siempre
para reproducción la tarjeta de sonido interna, ya sea que su giradiscos
esté conectado o no por USB:
Utilidad Audio Midi Setup:
1. Abra el Finder (Buscador).
2. Abra la carpeta Applications (Aplicaciones).
3. En la carpeta de aplicaciones, abra la carpeta Utilities
(Utilidades).
4. En la carpeta de utilidades, abra Audio MIDI Setup
(Configuración MIDI de audio).
38
Page 40

5. En Audio MIDI Setup, Audio Devices (Dispositivos de audio),
configure:
Default Input (Entrada predeterminada) como USB Audio
Codec
Default Output (Salida predeterminada), como Built-in Audio
(Audio incorporado) o Built-in Output (Salida incorporada)
System Output (Salida del sistema), como Built-in Audio o
Built-in Output
Ahora, los programas que no sean Audacity sólo usan su tarjeta
de sonido interna para la salida de audio.
39
Page 41

GRABACIÓN EN LA COMPUTADORA
Nota: Recomendamos que la primera vez que use el software pruebe con
una sección de audio breve (1 min o menos) mientras graba. Una vez
que se sienta cómodo con la grabación, grabe una canción o LP completo.
1. Pulse el botón Record (Grabar)
2. Comience la reproducción en el giradiscos USB. Verá la forma de
onda del audio en la pantalla a medida que se graba. Oirá el audio
proveniente de la salida de la tarjeta de sonido de la computadora.
¿No hay audio? - vuelva al menú de preferencias (Figura 2) y
asegúrese de tener seleccionado “Software Playthrough” y que el
volumen del altavoz de la computadora esté alto. Si necesita más
ayuda, vea la solución de problemas al final de este manual.
3. Reproduzca la pista o álbum completo que desea grabar.
4. Pulse Stop (Parar)
5. GUARDE SU ARCHIVO AHORA haciendo clic en ‘File’ -> ‘Save
Project’ (Archivo -> Guardar proyecto). Seleccione el destino y el
nombre de archivo del proyecto y haga clic en ‘Save’ (Guardar).
6. De esta forma se completa el proceso de grabación. El archivo que
acaba de guardar en su computadora es un archivo Audacity Project
(Proyecto de Audacity). Este archivo puede ser abierto sólo por
Audacity. En las secciones siguientes se le guiará a través de cierta
edición opcional que puede realizarse, como también acerca de cómo
dividir este proyecto de Audacity en archivos Wav por separado que
se pueden grabar en CD o reproducir en programas musicales tales
como iTunes y Windows Media Player.
Figura 3: Muestra de grabación
40
Page 42

AJUSTE DEL NIVEL DE AUDIO (OPCIONAL)
1. Seleccione su grabación
completa con “Edit” (Editar),
luego “Select…”
(Seleccionar) y finalmente
haga clic en “All” (Todo).
También puede usar Ctrl+A
en una PC o APPLE+A en
una Macintosh para
seleccionar todo
rápidamente.
Figura 4: Seleccionar todo
2. Seleccione el menú “Effect” (Efectos) y elija el efecto deseado.
a. Hay diversos tipos de efectos que se describen con más detalle
en la sección de ayuda del software y en la web (vea la Figure
5).
b. Debe usarse Normalize (Normalizar) para tener volumen
correcto en la grabación. (Vea la Figura 6)
Para tener en cuenta:
Es una buena idea colocar la púa en el disco, mientras está detenido,
antes de comenzar a grabar y pulsar ‘Play’ en el giradiscos después
de comenzar a grabar. Si baja la púa cuando el disco está girando y
después de comenzar a grabar, pueden producirse clics y chasquidos
audibles. Estos clics y chasquidos pueden no permitir que el efecto
Normalize lleve el volumen de la grabación al nivel apropiado.
Figura 5: Lista desplegable de efectos
Figura 6: Efecto Normalize
(Normalizar)
41
Page 43

AJUSTE DEL NIVEL DE AUDIO (OPCIONAL)
1. Arrastre el cursor sobre la porción de la pista de audio que contiene
ruido. Recomendamos usar el comienzo o el final de una pista
donde no haya música sino sólo ruido de vinilo. (Vea la Figura 7)
2. Seleccione “Noise Removal” (Eliminación de ruido) del menú
desplegable “Effect” para activar la ventana “Noise Removal”. (Vea
la Figure 8)
3. Haga clic en “Get Noise Profile” (Obtener perfil de ruido). La
ventana Noise Removal se cierra automáticamente ahora.
Seleccione la pista completa de audio de la que desea eliminar el
ruido. Si desea limpiar la grabación completa, use “Select All” bajo
el menú “Edit” (Vea la Figura 4)
4. Repita el paso 2 para activar la ventana “Noise Removal”.
5. Ajuste la cantidad de audio que desea filtrar moviendo el cursor en
la ventana “Noise Removal”. Recomendamos usar la mínima
eliminación de ruido para obtener un sonido óptimo. Nota: puede
previsualizar el audio antes de eliminar el ruido haciendo clic en
‘Preview’.
6. Haga clic en ‘Remove Noise’ (Eliminar ruido).
Figura 7: Selección del ruido en la pista
Figura 8: Ventana de eliminación de ruido
42
Page 44

Notas adicionales sobre la edición:
Los niveles de audio pueden variar en función del cartucho
(púa), el contrapeso del brazo de lectura, el vinilo y la
configuración de la computadora. Recomendamos
normalizar siempre el audio.
Análogamente al procesador de texto, puede eliminar el
audio no deseado arrastrando sobre la sección, que se
resalta, y pulsando luego “Delete” (Eliminar). Esto puede
incluir el siseo excesivo, los silencios antes y después de
los temas o los saltos y rayaduras.
Debe seleccionar el perfil de ruido para poder eliminar el
ruido de una pista. Si selecciona el audio real como perfil
de ruido, la computadora puede eliminar todo su audio.
Vea el paso 1.
Una vez establecido Noise Profile (Perfil de ruido), la
computadora lo guarda hasta que usted reinicie la
aplicación. En otras palabras, el software debe aprender
cuál es el perfil de ruido antes de que usted arranque el
software por primera vez. No es necesario obtener el
perfil de ruido para cada grabación una vez que está
establecido.
43
Page 45

GRABACIÓN DE SU VINILO EN ALTA
Usando el giradiscos USB con el software Audacity, es posible grabar
rápidamente sus discos de vinilo de 33 1/3 RPM en la computadora y
emplear el software para ajustar la mayor velocidad nuevamente a la de
reproducción normal. Esta función es útil para grabar muchos discos.
Por ejemplo, puede grabar 10 minutos de audio en sólo 7 minutos
cuando graba a 45 RPM con un aumento adicional del 10% usando el
fader de pitch.
Ahorrar tres minutos no es mucho para un solo disco, pero si está
grabando varios LP, puede grabar 4 horas de música en menos de 3
horas.
Instrucciones:
1. Grabe su disco de vinilo de 33 1/3 RPM a 45 RPM pulsando el botón
de 45 RPM del panel superior.
2. Oirá la grabación de audio con un pitch inusual debido a su alta
velocidad.
3. Cuando termine de grabar, detenga la grabación.
4. Vaya a “Edit” y “Select All” (Vea la Figura 4).
5. Vaya a “Effect” y luego al menú “Change Speed” (Cambiar
velocidad).
Seleccione de “45” a “33 1/3” y su disco de vinilo se ajustará a la
velocidad correcta como se muestra.
VELOCIDAD (OPCIONAL)
Figura 9: Cambio de velocidad
44
Page 46

CÓMO DIVIDIR SU ÁLBUM EN PISTAS
Nota: Antes de dividir su álbum en
pistas, debe finalizar toda la limpieza y
edición, incluida la eliminación de todos
los silencios no deseados antes y
después de los temas.
1. Seleccione la herramienta Fit
Project in Window (Ajustar
proyecto en ventana) como se
muestra en la Figura 10.
2. Después de alejar el zoom para ver todas las pistas, puede ver la
separación entre las mismas por las brechas mostradas en 1, 2 y 3
de abajo (Figura 11). En los próximos pasos se muestra cómo dividir
y rotular estas pistas y exportarlas a formato WAV (calidad de CD).
Figura 20: Ajustar proyecto en
ventana
Figura 11: Identificación de las distintas pistas de audio
Hay dos maneras de dividir su grabación en pistas separadas: automática y
manualmente. Si su grabación está en buen estado y tiene un silencio definido
entre los temas, es más rápido y fácil dividir las pistas automáticamente. Si su
grabación no está en buen estado o no tiene silencios que separen los temas, es
mejor que use la división manual.
Cómo dividir su álbum automáticamente:
1. Seleccione su grabación completa con Edit (Editar), luego Select…
(Seleccionar) y finalmente haga clic en All (Todo). También puede
usar Ctrl+A en una PC o APPLE+A en una Macintosh para seleccionar
todo rápidamente. (Vea la Figura 4).
2. Seleccione el menú Analyze (Analizar) de la parte superior de la
pantalla y elija Silence Finder (Buscador de silencios).
3. El buscador de silencios intenta detectar el silencio entre los temas
de la grabación. Para la mayoría de las grabaciones, sólo es
necesario que configure el campo Silence Level (Nivel de silencio)
en la ventana de Silence Finder. Escriba 15 en el campo Silence
Level y luego toque OK (Figura 12).
45
Page 47

Figura12: Buscador de silencios
4. Se analizará su grabación y aparecerá el rótulo de pista debajo de la
misma. Contiene los marcadores que representan el comienzo de cada
nuevo tema. (Figura 13). Cuando exporte su grabación (vea: Cómo
exportar sus pistas a archivos por separado), estos marcadores se usan
para crear archivos de audio por separado para cada tema de su álbum.
5. Si nota que los marcadores colocados por Silence Finder no coinciden
Figura 13: Rótulos de pistas
correctamente con los temas o que se agregaron demasiados o
demasiado pocos marcadores, puede deshacer la operación y probar
nuevamente con valores de parámetros diferentes. Si sus marcadores
parecen correctos, continúe con la sección
a archivos por separado de más abajo.
Cómo exportar sus pistas
6. Para deshacer, seleccione el menú Edit (Edición) de la parte superior de
la pantalla y elija Undo (Deshacer).
7. Repita los pasos 1 a 3 precedentes y pruebe con un valor diferente en el
campo Silence Level. Si había demasiado pocos marcadores agregados
en su intento anterior, use un número más bajo en el campo Silence
Level, tal como 10. Si había demasiado marcadores agregados en su
intento anterior, pruebe un número más alto en dicho campo, tal como
20. Ciertas grabaciones y tipos de música pueden no funcionar bien
para la separación automática de pistas. Si no puede obtener buenos
resultados con el buscador de silencios, es posible que necesite dividir su
álbum en pistas manualmente (lea a continuación).
46
Page 48

Cómo dividir su álbum manualmente:
1. Pulse el botón Skip to Start (Saltar
al comienzo)
comienzo de la grabación.
2. Seleccione el menú Project
(Proyecto) y luego Add Label At
Selection (Agregar rótulo en la
selección). De esta forma se
establece el punto inicial de la
primera pista.
3. Escriba el nombre de la primera
pista, el texto aparecerá en el
marcador del rótulo. (Vea la Figura
14)
4. Seleccione el espacio entre pistas
(donde no hay audio) haciendo clic
una vez (círculo vertical de abajo).
5. Verá una línea donde hizo clic.
6. Entonces, repita el paso 4. Agregar rótulo en la selección.
7. Nota: puede agregar o editar el nombre de cualquier pista
(circundado).
para moverse al
Figura 12: Cómo agregar el
rótulo a la pista
47
Page 49

8. Repita este proceso para agregar rótulos a todas las pistas. Es
posible que deba acercar el zoom para seleccionar las pistas y la
separación. También es conveniente que oiga la parte de la pista
antes de
agregarle un
rótulo. Use la
barra
espaciadora para
arrancar y parar
fácilmente la
reproducción.
Nota: el rótulo se coloca en el INICIO de la pista. Por ejemplo, en
la Figura 15, la PISTA 1 está rotulada al comienzo de la grabación de
audio. La pista 2 es el rótulo entre la primera y la segunda pista.
También es posible editar nombres de pistas después de haber sido
exportados de Audacity.
En este ejemplo de tres pistas, la división final se muestra en la
Figura 15:
Figura 14: Separación y rótulos de pistas
Figura 15: Ejemplo de nombres de pistas terminado
Notas adicionales:
Hay muchas maneras diferentes de editar el archivo. Una
manera de hacerlo es dividir el archivo en pistas separadas
agregando rótulos. Siempre puede deshacer los errores de
edición. Asegúrese de guardar su archivo regularmente.
48
Page 50

EXPORTACIÓN DE PISTAS A ARCHIVOS POR
SEPARADO
Esta sección explica cómo exportar sus archivos por separado a formato
WAV para grabarlos en un CD. Puede elegir también convertirlos a MP3,
lo que requiere descargar de Internet un software de terceros. Para más
información, consulte la sección de ayuda del software.
1. Una vez divididas sus pistas en rótulos del archivo maestro de
grabación, debe exportar los archivos a archivos por separado.
2. Seleccione el menú “File” (Archivo) y luego “Export Multiple…”
(Exportación múltiple…”) como se muestra en la Figura 15.
3. Aparece la ventana “Export multiple” (vea la Figura 16).
a. Seleccione “WAV” como
formato de exportación
y elija la ubicación
Export (Exportación).
b. Seleccione la ubicación
Export. Aquí es donde
guardará sus archivos.
Es conveniente crear
una carpeta especial en
su escritorio, con el
nombre del álbum
donde guardará los
archivos.
c. Seleccione “Using
Label/Track Name”
(Usar rótulo/nombre de
pista) como se
muestra. Nota: Es
conveniente exportar
usando numeración
consecutiva y cambiar
los nombres
posteriormente. En
este caso, puede
seleccionar la otra
opción, ‘Numbering
consecutively’
(Numeración
consecutiva).
d. Haga clic en ‘Export’.
Figura 15: Exportación múltiple
49
Page 51

CÓMO ESCUCHAR Y EXPORTAR A WAV/MP3
Para escuchar su audio digitalizado, necesita una aplicación de terceros que puede
reproducir archivos WAV. Puede usar también cualquier software de grabación de CD
de audio estándar para grabar sus archivos WAV en un CD.
Si desea guardar su vinilo como archivo MP3 después de grabarlo con Audacity, es
necesario que obtenga e instale el plug-in opcional "LAME MP3 Encoder"-in. Una vez
que un archivo está en formato MP3, se puede colocar en cualquier dispositivo digital
móvil compatible con MP3.
• Para descargar el plug-in LAME MP3, visite www.ionaudio.com/ttusb_audacity.php. Es posible que allí encuentre también información
adicional acerca del software Audacity, como también las preguntas frecuentes.
• Haga clic en el vínculo al plug-in del codificador MP3 LAME Encoder para transferir
el archivo a su computadora.
Nota: Le recomendamos guardar el archivo .zip descargado temporalmente en su
escritorio. Luego, debe extraer y guardar el plug-in MP3 LAME Encoder en su
computadora en un lugar donde NO LO ELIMINE. ¡¡¡NO se recomienda guardar
estos archivos plug-in individuales en su escritorio!!!
Usuarios de Windows:
1. Cree una nueva carpeta en [My Documents] (Mis documentos) llamada Lame
MP3 Plugin.
2. Busque el archivo .zip descargado y ábralo.
3. Selecciones TODO el contenido y cópielo en la carpeta Lame MP3 Plugin que acaba
de crear en [My Documents].
4. Ahora... elimine el archivo .zip DESCARGADO que está todavía en su escritorio.
Usuarios de Mac:
1. Cree una carpeta en su directorio [Home] (Inicio) llamada Lame MP3 Plugin.
2. Busque el archivo .sit o .zip descargado y haga doble clic en él. De esta forma
se extrae el contenido y se crea un nuevo archivo en el escritorio con el mismo
nombre (debe aparecer sin la extensión .sit o .zip).
3. Copie o mueva este nuevo archivo a la carpeta Lame MP3 Plugin que acaba de
crear en su directorio [Home].
4. Ahora... elimine el archivo .sit o .zip DESCARGADO que está todavía en su
escritorio.
En Audacity, cuando intente Export As MP3… (Exportar como MP3) por primera vez
después de instalar el plug-in MP3 LAME Encoder, se le preguntará la ubicación de
dicho archivo plug-in. Navegue a la carpeta Lame MP3 Plugin donde copió el archivo
plug-in y selecciónelo. Después de esto, Audacity recuerda la ubicación del archivo.
CÓMO GRABAR DISCOS DE 78 RPM
¡Si desea grabar un álbum de 78 RPM, puede hacerlo a 33.3 ó 45 RPM y convertirlo a
78 RPM en el software Audacity! Después de grabar el álbum, abra el menú Edit
(Edición), haga clic en Select (Seleccionar) y luego en All (Todos). A continuación,
abra el menú Effect (Efecto) y elija Change Speed (Cambiar velocidad). Luego,
seleccione la velocidad a la que grabó (33 ó 45), como también la velocidad a la que
desea que esté (78).
Finalmente, pulse OK.
50
Page 52

SOLUCIÓN DE PROBLEMAS
Antes de devolver este producto, comuníquese con su
vendedor minorista. Para más información, vea la Guía de
seguridad.
• NO HAY SONIDO:
• Si no obtiene sonido en la aplicación de software, vuelva a las
preferencias como se muestra arriba y asegúrese de haber seleccionado
la entrada USB correspondiente al dispositivo de grabación.
• Si no puede oír la música pero la ve en la pantalla, abra sus preferencias
(Figura 2) y asegúrese de que Playback Device (Dispositivo de
reproducción) esté configurado como la tarjeta de sonido interna de su
computadora.
• Ciclo de encendido: Cierre Audacity, apague el giradiscos y desenchufe
el cable USB. Luego, enchufe el cable USB, encienda el giradiscos y
vuelva a abrir Audacity.
• Si no puede oír ningún audio
cuando reproduce la grabación,
haga clic en la flecha desplegable
del micrófono y seleccione
Monitor Input (Entrada al
monitor). De esta forma podrá
oír el audio del giradiscos, aunque
no haya habilitado la aplicación
Audacity para grabación.
Si no ve el cursor del micrófono, vaya al menú Preferences de
Audacity, haga clic en la pestaña Interface y asegúrese de que estén
marcadas las opciones Enable Mixer Toolbar y Enable Meter
Toolbar. Si no lo están, márquelas y pulse luego OK.
• Verifique el cursor del micrófono para
asegurarse de que esté a máximo
volumen, totalmente hacia la derecha,
como se muestra en la Figura 20:
Si no ve el cursor del micrófono, vaya al
menú Preferences de Audacity, haga
clic en la pestaña Interface y
asegúrese de que estén marcadas las
opciones Enable Mixer Toolbar y
Enable Meter Toolbar. Si no
lo están, márquelas y pulse
luego OK.
Figura 19: Entrada al monitor
Figura 20: Nivel de entrada
51
Page 53

• MALA CALIDAD DE SONIDO:
o Si una grabación suena distorsionada o ininteligible
durante la reproducción, es posible que deba ajustar el
nivel de entrada proveniente del giradiscos. Trate
moviendo el cursor Input Level (Nivel de entrada) en
Audacity a la izquierda para reducir el volumen (vea la
Figura 17). Puede usar el efecto de normalización
como se explicó más arriba para llevar el volumen de
vuelta al normal después de la grabación.
o Verifique la conexión del cartucho para asegurarse de
que esté firmemente fijado al brazo de lectura. Es
necesario que el cartucho esté instalado aunque use la
entrada de línea del dispositivo, para evitar la
realimentación.
o Asegúrese de que sus enchufes RCA estén enchufados
a una fuente o que no toquen metal desnudo. Si
experimenta ruido a través del USB, es posible que
haya interferencias provenientes de los enchufes RCA.
Asegúrese de que el cable USB no toque ni esté cerca
de ningún otro cable.
o Si experimenta sonidos anormales provenientes de la
grabación, pruebe cerrando todas las aplicaciones,
rearrancando la computadora y ejecute Audacity sólo
mientras graba.
o Si está usando los enchufes RCA, asegúrese de tener
el conmutador PHONO/LINE del panel trasero colocado
en la posición correcta. Para más información,
consulte la Guía de inicio rápido.
Para solicitar soporte técnico, comuníquese con
Ion Audio al (401) 658-3743
Versión 5.3 del Manual
52
Page 54

Installation du logiciel
Logiciel d’enregistrement Audacity
TABLE DES MATIÈRES
REMARQUES GÉNÉRALES CONCERNANT LE LOGICIEL ...................54
INSTALLATION DU LOGICIEL AUDACITY ..............................................55
CONFIGURATION DE MICROSOFT WINDOWS VISTA POUR
UTILISER LE TOURNE-DISQUE USB.......................................................56
CONFIGURATION DU LOGICIEL AUDACITY POUR PC .........................60
CONFIGURATION DU LOGICIEL AUDACITY POUR MAC OS
10.4 ET VERSIONS SUPÉRIEURES..........................................................62
ENREGISTREMENT SUR L’ORDINATEUR ..............................................66
RÉGLAGE DU NIVEAU DE L’AUDIO (FACULTATIF) ..............................67
RÉGLAGE DU NIVEAU DE L’AUDIO (FACULTATIF) ..............................68
ENREGISTREMENT DU VINYLE À HAUTE VITESSE
(FACULTATIF) ............................................................................................71
DIVISER L’ALBUM EN PISTES .................................................................72
EXPORTATION DES PISTES À DIFFÉRENTS FICHIERS .......................75
FAIRE L’ÉCOUTE ET L’EXPORTATION DES FICHIERS WAV
ET MP3........................................................................................................76
ENREGISTREMENT DES DISQUES 78 TOURS.......................................76
GUIDE DE DÉPANNAGE ...........................................................................77
53
Page 55

REMARQUES GÉNÉRALES CONCERNANT LE LOGICIEL
Le tourne-disque USB est compatible avec tout logiciel d’enregistrement
qui prend en charge les appareils audio USB. Le logiciel Audacity est
inclus, cependant il est possible d’utiliser un logiciel tiers.
Audacity est un logiciel libre, distribué sous licence GPL (General Public
License). Vous pouvez trouver plus d’information, en plus du code
source sur le CD inclus ou sur le Web au
http://audacity.sourceforge.net.
Audacity fonctionne sous les systèmes d’exploitation Windows (98 et
ultérieure) et Mac OS (X, 9.2 et ultérieure). Le logiciel pour Linux est
disponible sur le site de Audacity.
Allez au http://audacity.sourceforge.net/help/tutorials pour des tutoriels
supplémentaires.
Le site contient également des informations concernant des logiciels
compagnons pour améliorer la performance et ajouter des
fonctionnalités.
54
Page 56

INSTALLATION DU LOGICIEL AUDACITY
Avant de lancer l’installation
Assurez-vous que le tourne-disque USB soit branché à l’ordinateur à l’aide du câble USB
fourni, et que les deux appareils soient branchés et sous tension. Veuillez lire le guide
d’utilisation simplifié du tourne disque USB avant de procéder à l’installation du logiciel.
RETIREZ LE PROTÈGE CARTOUCHE (AUGUILLE) EN PLASTIQUE TRANSPARENT
Nous vous recommandons de faire un essai d’enregistrement d’environ une minute pour vous
familiariser avec le processus avant de faire un LP.
Installation PC
1. Branchez le tourne-disque à une prise secteur et utilisez le câble USB fourni pour
2. Mettez l’ordinateur sous tension s’il ne l’est pas déjà. Laissez-le se réinitialiser
3. Appuyez sur la touche d'alimentation près de la base du bras de lecture.
4. Il se peut que l’ordinateur affiche le message de détection de nouveau matériel et
5. Insérez le CD fourni avec le tourne-disque USB dans le lecteur CD-ROM de votre
6. Une fenêtre s’affichera automatiquement. Cliquez sur l'icône [INSTALL] située
Installation Mac
1. Branchez le tourne-disque à une prise secteur et utilisez le câble USB fourni pour
2. Mettez l’ordinateur sous tension s’il ne l’est pas déjà. Laissez-le se réinitialiser
3. Veuillez insérer le CD fourni dans le lecteur CD-ROM de votre ordinateur.
4. Cliquez sur l’icône CD sur le bureau.
5. Glissez le dossier d’installation du logiciel Audacity sur votre disque dur. Nous vous
6. Une fenêtre s’ouvrira indiquant que les fichiers sont en cours de copie.
7. Une fois la copie des fichiers terminée, éjectez le CD.
Avant de commencer à utiliser le logiciel,
sachez que les commandes et les menus
peuvent être affichés dans plusieurs langues.
Allez à Edit | Preferences et cliquez sur
l’onglet Interface. Sous l’onglet déroulant
Language, vous pouvez sélectionner votre
langue de préférence.
relier le port USB du tourne-disque au port USB de l’ordinateur.
complètement.
qu’il est prêt à être utilisé. Selon votre système, ce message peut apparaître. Ceci
est normal.
ordinateur.
près de « Audacity ».
relier le port USB du tourne-disque au port USB de l’ordinateur.
complètement.
recommandons de déplacer le dossier dans le dossier Applications.
SÉLECTION DE LA LANGUE
55
Page 57

CONFIGURATION DE MICROSOFT WINDOWS
VISTA POUR UTILISER LE TOURNE-DISQUE USB
1. Fermer toutes les
applications ouvertes sur
l’ordinateur.
2. Sélectionnez le menu
Démarrer, situé dans le
coin inférieur gauche de
l’écran.
3. Sélectionnez la rubrique
Paramètres, puis
Panneau de
configuration.
4. Dans la fenêtre qui
s’affiche, double-cliquez
sur Paramètres audio.
(Si vous ne pouvez voir
la rubrique « Paramètres
audio », sélectionnez
l’option mode Classique
sur le panneau à gauche
de l’écran et la rubrique
Paramètres audio devrait
apparaître à droite.)
5. Sélectionnez l’onglet
Enregistrement dans le
haut du panneau des
Paramètres audio.
6. Sous l’onglet
Enregistrement,
sélectionnez
Microphone - USB
Audio Codec comme
l'appareil par défaut.
L’appareil USB audio
codec représente le
tourne-disque.
7. Cliquez sur le bouton
Régler par défaut afin de
confirmer votre choix.
56
Page 58

8. Sélectionnez l’onglet Lecture dans le haut du panneau des
Paramètres audio.
9. Sous l’onglet
Lecture,
sélectionnez
l’appareil que vous
désirez utiliser pour
l’audio.
Les choix de sortie
audio pour
l’ordinateur peuvent
s’afficher tel que :
Haut-parleurs –
Appareil audio
haute définition
ou Casque
d'écoute –
Appareil audio
haute définition ou
les deux, selon le
matériel installé sur
votre ordinateur.
Cliquez sur l’appareil le plus approprié pour votre installation
audio et cliquez sur Régler par défaut.
Note : Ne pas choisir « Haut-parleurs - USB Audio Codec »
comme appareil de lecture. L’appareil USB Audio Codec
représente le tourne-disque, et peut être utilisé seulement
comme source d’entrée d’enregistrement, non pas pour la
lecture.
10. Cliquez sur le bouton Régler par défaut afin de confirmer votre
choix.
11. Cliquez sur Appliquer si possible, puis sur OK pour fermer le
Panneau de configuration.
12. Cliquez sur Appliquer (si possible), puis sur OK.
13. Assurez-vous que les haut-parleurs externes de l’ordinateur
soient branchés à la sortie audio de l’ordinateur à l’aide du câble
USB fourni, et qu’ils soient branchés et sous tension. Si votre
ordinateur est doté d’une sortie casque d’écoute, vous pouvez
utiliser le casque au lieu des haut-parleurs.
57
Page 59

CONFIGURATION DE MICROSOFT WINDOWS
XP POUR UTILISER LE TOURNE-DISQUE USB
1.
Fermer toutes les
applications ouvertes sur
l’ordinateur.
2. Sélectionnez le menu
Démarrer, situé dans le coin
inférieur gauche de l’écran.
3. Sélectionnez Paramètres,
puis Configuration des
paramètres.
4. Dans la fenêtre qui s’affiche,
double-cliquez sur Sons et
périphériques audio. (Si
vous ne pouvez voir la
rubrique Sons et
périphériques audio,
sélectionnez l’option mode
Classique sur le panneau à
gauche de l’écran et la
rubrique Sons et
périphériques audio devrait
apparaître à droite.)
5. Sélectionnez l’onglet Voix
dans la partie supérieure du
panneau Son et
périphériques audio.
6. Sous Lecture de voix,
sélectionnez la carte de son
intégrée par défaut. Cette
option varie en fonction de
l’ordinateur, mais ne doit
pas être réglée sur « USB
Audio Codec, Modem, ou
Microsoft Sound Mapper ».
7. Sous Enregistrement de
voix, sélectionnez USB
Audio Codec par défaut –
ceci représente le tournedisque USB.
58
Page 60

8. Sélectionnez l’onglet Audio
dans la partie supérieure du
panneau Son et
périphériques audio.
9. Sous Lecture audio,
sélectionnez la carte de son
intégrée par défaut. Cette
option varie en fonction de
l’ordinateur, mais ne doit
pas être réglée sur « USB
Audio Codec, Modem, ou
Microsoft Sound Mapper ».
10. Sous Enregistrement
audio, sélectionnez USB
Audio Codec par défaut –
ceci représente le tournedisque USB.
11. Cochez l’option Utiliser
uniquement les appareils
par défaut.
12. Cliquez sur Appliquer (si possible), puis sur OK.
13. Assurez-vous que les haut-parleurs externes de l’ordinateur soient
branchés à la sortie audio de l’ordinateur à l’aide du câble USB
fourni, et qu’ils soient branchés et sous tension. Si votre
ordinateur est doté d’une sortie casque d’écoute, vous pouvez
utiliser le casque au lieu des haut-parleurs.
59
Page 61

CONFIGURATION DU LOGICIEL AUDACITY
POUR PC
1. Lancez Audacity : Cliquez sur le menu Démarrer dans le coin inférieur
gauche de l’écran. Sélectionnez Tous programmes, puis Audacity.
2. Dans Audacity, cliquez sur le menu Edit dans la partie supérieure de
l’écran.
3. Sélectionnez Preferences à parti du menu Edit.
Figure 1 : Sélectionnez Preferences
3. La fenêtre Audacity Preferences s’affiche (Figure 2).
Sélectionnez l’onglet Audio I/O en haut de l’écran Preferences.
4. Sélectionnez votre carte de son intégrée comme Playback Device.
Comme différents ordinateurs peuvent avoir différentes cartes de son,
votre sélection peut être différente de celle de l’image ci-dessous (Figure
2).Cependant, la sélection ne doit pas être USB Audio Codec, Microsoft
Sound Mapper ou Modem.
5. Réglez l’option Recording Device à USB Audio Codec. Ceci
représente votre tourne-disque.
Note : Il se peut que le tourne-disque USB apparaisse dans la fenêtre
des préférences sous un nom différent. Le nom varie selon le modèle de
votre ordinateur et la version du système d’exploitation. Mais dans
99 % des cas, le nom contient le sigle « USB ».
6. Réglez Channels à 2 (Stereo).
7. Cochez l’option Software Playthrough.
60
Page 62

Figure 2 : Sélection de l’appareil audio USB du menu des préférences
8. Sous l’onglet Quality, réglez Default Sample Format à 16 bits.
9. Sélectionnez OK pour sauvegarder vos réglages et fermer la fenêtre des
préférences.
10. Dans le haut de la fenêtre principale de Audacity, à droite des boutons
de commande, se trouvent les vumètres pour les niveaux d'entrée et de
sortie (étiquettes L et R). Sous le vumètre des niveaux de sortie, il y a
une icône qui ressemble à un microphone. À côté du microphone il y a
une flèche noire qui pointe vers le bas. Cliquez sur la flèche et
sélectionnez Monitor Input. (Si vous ne voyez pas les vumètres des
niveaux d’entrée et de sortie, ouvrez la fenêtre des préférences à
nouveau comme il est indiqué ci-dessus, sélectionnez l’onglet Interface,
et assurez-vous que l’option Enable Mixer Toolbar est cochée.)
Vous devriez être prêt pour procéder à l’enregistrement.
Ces réglages seront sauvegardés lorsque vous quitterez l’application. Cependant,
vous devrez sélectionner Monitor Input à partir du menu défilant du vumètre
des niveaux d'entrée chaque fois que vous lancerez Audacity.
61
Page 63

CONFIGURATION DU LOGICIEL AUDACITY POUR
MAC OS 10.4 ET VERSIONS SUPÉRIEURES
1. Avec l'application Audacity ouverte, cliquez sur le menu Audacity dans
la partie supérieure de l’écran.
2. Sélectionnez Preferences à parti du menu Audacity.
3. Sous l’onglet Audio I/O, réglez le Playback Device à Built- In Audio.
4. Sous l’onglet Audio I/O, réglez l’option Recording Device à USB
Audio Codec.
5. Sous l’onglet Audio I/O, réglez Channels à 2 (Stereo).
6. Cochez l’option Software Playthrough.
7. Sous l’onglet Quality, réglez Default Sample Format à 16 bits.
62
Page 64

8. Sélectionnez OK pour sauvegarder vos réglages et fermer la fenêtre des
préférences.
9. Dans le haut de la fenêtre principale de Audacity, à droite des boutons
de commande, se trouvent les vumètres pour les niveaux d'entrée et de
sortie (étiquettes L et R). Sous le vumètre des niveaux de sortie, il y a
une icône qui ressemble à un microphone. À côté du microphone il y a
une flèche noire qui pointe vers le bas. Cliquez sur la flèche et
sélectionnez Monitor Input. (Si vous ne voyez pas les vumètres des
niveaux d’entrée et de sortie, ouvrez la fenêtre des préférences à
nouveau comme il est indiqué ci-dessus, sélectionnez l’onglet Interface,
et assurez-vous que l’option Enable Mixer Toolbar est cochée.)
Ces réglages seront sauvegardés lorsque vous quitterez l’application. Cependant,
vous devrez sélectionner Monitor Input à partir du menu défilant du vumètre
des niveaux d’entrée chaque fois que vous lancerez Audacity.
63
Page 65

Autres réglages Macintosh importants :
Nous avons réglé les préférences de lecture et d’enregistrement de Audacity
séparément, mais votre Mac a également ses propres réglages de lecture et
d’enregistrement audio. Lorsque vous branchez le tourne-disque la première fois,
le Macintosh sélectionne l’appareil « USB Audio Codec » comme l'entrée et la
sortie audio pour tout votre système. Comme le tourne-disque n’est pas doté de
haut-parleurs, l’audio ne pourra être entendue lorsque vous utilisez d’autres
programmes jusqu’à ce que vous indiquiez à l’ordinateur de ne pas utiliser le
tourne-disque comme appareils de sortie audio.
Voici comment faire pour modifier les réglages afin que la carte de son soit
toujours utilisée pour la lecture audio, que le tourne-disque soit branché ou non
via le port USB :
Utilitaire des configurations audio et midi :
1. Ouvrez le Finder.
2. Ouvrez le dossier Applications.
3. Dans le dossier Applications, ouvrez le dossier Utilitaires.
4. Dans le dossier Utilitaires, ouvrez le dossier Configuration audio et
midi.
5. Dans le dossier Configuration audio et midi sous Périphériques audio,
réglez :
Réglez Entrée par défaut à USB Audio Codec.
Réglez Sortie par défaut à Audio intégré ou Sortie intégrée.
Réglez Sortie système à Audio intégré ou Sortie intégrée.
64
Page 66

Maintenant, les autres programmes pourront utiliser la carte de son pour leur
sortie audio.
65
Page 67

ENREGISTREMENT SUR L’ORDINATEUR
Remarque : Lors de la première utilisation du logiciel, nous vous
recommandons de faire une pré-écoute de moins d’une minute d’une des
sections de l’audio durant l’enregistrement. Lorsque vous vous sentirez
plus à l’aise, vous pourrez commencer l’enregistrement d’une chanson
complète ou d’un LP.
1. Appuyer sur le bouton d'enregistrement .
2. Permet de lancer la lecture sur le tourne-disque USB. Vous
verrez la forme d’onde du signal audio sur l’écran durant
l’enregistrement. Vous entendrez le signal audio provenant de la
carte de son de votre ordinateur.
Aucun signal audio? - Si l’application logicielle ne reçoit aucun
son, retournez au menu préférence (Figure 2), et assurez-vous
que vous avez bien sélectionné l’option « Software Playthrough »
et que le volume des haut-parleurs de votre ordinateur est au
maximum. Vous trouverez plus d’information dans la section
dépannage à la fin de ce guide.
3. Faites la lecture complète de la piste/l’album que vous désirez
enregistrer.
4. Cliquez sur le bouton d’arrêt
.
5. SAUVEGARDEZ VOTRE FICHIER MAINTENANT en cliquant
sur « File » -> « Save Project ». Sélectionnez la destination et
le nom du fichier pour le projet et cliquez sur « Save ».
6. Vous avez terminé le processus d’enregistrement. Le fichier que
vous venez de sauvegarder est un fichier de projet Audacity
(Audacity Project). Ce fichier ne peut être ouvert que par
l’application Audacity. Les sections suivantes vous guideront à
travers les différentes options d’édition et vous indiqueront
comment faire pour diviser les fichiers de projet Audacity en
fichiers WAV séparés qui pourront être gravés sur CD ou utiliser
avec des programmes tels que iTunes ou Windows Media Player
Figure 3 : Échantillon d’un enregistrement
66
Page 68

RÉGLAGE DU NIVEAU DE L’AUDIO (FACULTATIF)
1. À partir du menu « Edit », choisissez « Select... », puis cliquez sur
« All » pour sélectionner tout votre enregistrement. Vous pouvez
également utiliser Ctrl+A sur un PC ou APPLE+A sur un Macintoch
pour sélectionner tout.
Figure 4 : Sélectionner tout
2. À partir du menu « Effect », sélectionnez les effets désirés.
a. Il y a plusieurs types d’effet sur lesquels vous trouverez plus
d’information dans la section d’aide du guide d’utilisation du
logiciel, ou encore sur le Web (Figure 5).
b. L’effet « Normalize » devrait être utilisé pour corriger le
volume de l’enregistrement. (Figure 6)
Remarque :
Il est préférable de placer l’aiguille sur le disque lorsque
celui-ci est arrêté et d’activer le tourne-disque seulement
après que l’enregistrement soit lancé. Si vous abaissez
l’aiguille lorsque le disque tourne et après que vous ayez
lancé l’enregistrement, il pourrait y avoir des bruits
indésirables. Ces bruits pourraient ne pas permettre à la
fonction d’effet « Normalize » d’augmenter le volume de
l’enregistrement au niveau désiré.
67
Page 69

Figure 6 : Effet « Normalize »
Figure 5 : Liste déroulante des effets
RÉGLAGE DU NIVEAU DE L’AUDIO (FACULTATIF)
1. Faites glisser le curseur sur la portion de la piste audio qui
contient du bruit parasite. Nous vous recommandons de
commencer au début ou à la fin de la piste où il n’y a pas de
musique et que du bruit provenant du vinyle. (Figure 7)
2. Sélectionnez « Noise Removal » du menu déroulant « Effect »
pour accéder à la fenêtre « Noise Removal ». (Figure 8)
3. Cliquez sur « Get Noise Profile ». La fenêtre « Noise Removal »
devrait se fermer automatiquement.
4. Sélectionnez entièrement la piste audio de laquelle vous désirez
retirer le bruit. Si vous désirez retirer le bruit sur tout
l’enregistrement, sélectionnez « Select All » du menu « Edit
Menu ». (Figure 4)
5. Répétez l’étape 2 pour faire apparaître la fenêtre « Noise
Removal ».
6. Ajustez le niveau d’audio que vous désirez filtrer en déplaçant le
potentiomètre de la fenêtre « Noise Removal ». Nous vous
recommandons de le régler au minimum pour une meilleure
sonorité. Remarque : Il est possible de faire la pré-écoute de
l’audio avant d’éliminer le bruit parasite en cliquant sur
« Preview ».
7. Cliquez sur « Remove Noise ».
68
Page 70

Figure 7 : Sélectionner le bruit parasite dans la piste
Figure 8 : Fenêtre « Noise Removal »
69
Page 71

Remarques supplémentaires :
Les niveaux du signal audio peuvent varier en fonction de
la cartouche (aiguille), du contrepoids du bras de lecture,
du vinyle et de la configuration de l’ordinateur. Nous vous
recommandons de toujours faire une normalisation du
signal audio.
Sensiblement similaire au traitement de texte, il est
possible d’éliminer le bruit parasite en sélectionnant la
section contenant le bruit et en cliquant sur « Delete ».
Ces bruits peuvent être des sifflements, des silences
placés avant et après les chansons, ou encore des sauts
ou des stries.
Vous devez sélectionner le profil de bruit avant de pouvoir
l’éliminer de la piste. Si vous sélectionnez l’audio au lieu
du bruit parasite comme profil de bruit, l’ordinateur
pourrait éliminer tout le signal audio. Voir l’étape 1.
Une fois le « Noise Profile » (profil de bruit) configuré, le
logiciel le gardera en mémoire. C’est à dire, qu’il faut
programmer le logiciel lors de l’installation initiale. Il n’est
pas nécessaire de reprogrammer le logiciel pour chaque
enregistrement.
70
Page 72

ENREGISTREMENT DU VINYLE À HAUTE
VITESSE (FACULTATIF)
Lorsque vous utilisez le tourne disque USB avec Audacity, vous pouvez
enregistrer vos disques vinyle 33 1/3 dans votre ordinateur à une
vitesse plus rapide, et ensuite utiliser le logiciel pour réajuster la vitesse
de lecture à la normale. Cette fonction est très utile pour faire
rapidement l’enregistrement de plusieurs albums. Par exemple, vous
pouvez enregistrer 10 minutes d’audio en 7 minutes avec une vitesse
d’enregistrement de 45 tr/min et en ajoutant une augmentation
supplémentaire de 10 % à l’aide du potentiomètre de variation de la
vitesse de lecture.
Une économie de trois minutes peut paraître insignifiante lorsque vous
enregistrez un album, mais lorsque vous en avez plusieurs cela
commence à s’additionner; enregistrer 4 heures de musique en 3
heures, cela compte.
Instructions :
1. Enregistrez vos albums 33 1/3 t/min à 45 t/min en cliquant sur
le bouton 45RPM situé su le panneau supérieur.
2. Vous entendrez le signal audio s’enregistrer à une hauteur tonale
plus élevée en raison de la vitesse de lecture plus élevée.
3. Lorsque vous aurez terminé l’enregistrement, appuyez sur le
bouton Stop.
4. Cliquez sur « Edit », puis sur « Select All » (Figure 4).
5. Cliquez sur « Effect », puis sur le menu « Change Speed ».
6. Modifiez le réglage de vitesse
de « 45 » à « 33 1/3 » et le
pourcentage afin que la
vitesse de lecture de
l’enregistrement revienne à
la normale.
71
Page 73

DIVISER L’ALBUM EN PISTES
Note : Avant de diviser l’album en pistes,
vous devez avoir fait toutes les modifications
désirées et avoir fait le nettoyage du signal
audio, incluant, avoir éliminer les silences
avant et après les chansons.
1. Sélectionnez l’outil Fit Project in
Window tel qu’indiqué dans la
Figure 10.
2. Après avoir fait un zoom arrière afin
de voir toutes les pistes, vous verrez les espaces qui séparent les pistes,
indiquées ci-dessous par 1, 2, 3 (Figure 11). L’étape suivante montre
comment diviser et étiqueter ces pistes et comment les exporter au
format WAV (qualité CD).
Figure 10 : Outil Fit Project in
Window
Figure 11 : Identifier séparément les pistes audio
Il y a deux façons de diviser les enregistrements en pistes séparées :
automatiquement et manuellement. Si votre enregistrement est en bonne
condition, et contient des silences distincts entre les chansons, la division
automatique des pistes peut être la solution la plus rapide et facile. Si votre
enregistrement est en mauvaise condition, et ne contient pas des silences
distincts entre les chansons, la division manuelle des pistes est la solution la plus
appropriée.
Diviser l’album automatiquement :
1. À partir du menu Edit, choisissez Select..., puis cliquez sur All pour
sélectionner tout votre enregistrement. Vous pouvez également utiliser
Ctrl+A sur un PC ou APPLE+A sur un Macintoch pour sélectionner tout.
(Voir la Figure 4)
2. Sélectionnez le menu Analyze du haut de l'écran, puis Silence Finder.
3. Le Silence Finder va tenter de détecter les silences entre chaque chanson
de l’enregistrement. Avec la plupart des enregistrements, vous n’aurez
qu’à régler le champ Silence Level dans la fenêtre du Silence Finder.
Entrez 15 dans le champ Silence Level et cliquez OK (Figure 12).
72
Page 74

Figure 12 : Le Silence Finder
4. L’enregistrement sera analysé, puis une étiquette de piste (Label Track)
s’affichera sous l’enregistrement. Elle contiendra des marqueurs
représentant le début de chaque nouvelle chanson (Figure 13). Lors de
l’exportation de l’enregistrement (voir : Exportation des pistes en fichiers
séparés), ces marqueurs seront utilisés pour créer des fichiers audio
séparés pour chaque chanson de l’enregistrement.
Figure 13 : Étiquettes de piste
5. Si vous remarquez que les marqueurs placés par le Silence Finder ne
correspondent pas aux chansons, ou qu’il y a trop ou peu de marqueurs
ajouté, vous pouvez reprendre l’opération avec des réglages différents.
Si les marqueurs semblent corrects, procédez à la section Exportation
des pistes en fichiers séparés, ci-dessous.
6. Pour annuler, sélectionnez le menu Edit dans la partie supérieure de
l’écran, puis Undo.
7. Répétez les étapes 1 à 3 ci-dessus, est essayez des réglages différents
pour le champ Silence Level. S’il y avait trop peu de marqueurs
d’ajoutés la première fois, utilisez un chiffre moindre dans le champ
Silence Level, tel que 10. S’il y avait trop de marqueurs d’ajoutés la
première fois, utilisez un chiffre plus élevé dans le champ Silence Level,
tel que 20. Certains enregistrements et certains types de musique
peuvent ne pas bien fonctionner avec la séparation des pistes
automatique. Si vous ne pouvez obtenir de bons résultats avec le
Silence Finder, vous devrez séparer les pistes manuellement (voir cidessous).
73
Page 75

Diviser l’album manuellement :
p
1. Appuyez sur le bouton Skip to Start pour vous déplacez au début de
l’enregistrement.
2. Sélectionnez le menu Project puis Add
Label At Selection. Ceci règle le point
de départ de la première piste.
3. Tapez le nom de la première piste; les
données apparaissent dans le champ
d’identification (voir 14)
4. Sélectionnez l’espace entre les pistes (où
il n’y a pas d’audio) en cliquant une fois.
(cercle vertical ci-dessous)
5. Vous verrez une ligne apparaître où vous
avez cliqué.
6. Répétez ensuite l’étape 4 : Add Label At
Selection.
7. Note : vous pouvez ajouter ou modifier
le nom de la piste (encerclé).
8. Répétez ce processus afin d’identifier
toutes les pistes. Il est possible que
vous ayez à faire un zoom avant pour sélectionner les pistes et les espaces entre
les pistes. Vous pourriez également vouloir entendre une section de la piste avant
de lui mettre une
étiquette.
Utilisez la barre
d’espace pour
lancer et arrêter
la lecture.
Note :
L’étiquette est
placée au DÉBUT
de la piste. Par exemple, dans la Figure 15, l’étiquette TRACK 1 est placée au
début de l’enregistrement audio. L’étiquette « TRACK 2 » est placée entre la
première et la seconde piste. Vous pouvez modifier le nom des pistes après les
avoir exportées du logiciel Audacity.
Dans cet exemple avec trois pistes, la division finale des pistes est indiquée à la
Figure 15 :
Figure 12 : Ajouter l’étiquette de
la
iste
Figure 15 : Exemple d’identification des pistes complétée
Remarques supplémentaires :
Il y a plusieurs façons de modifier le fichier. Diviser le fichier en pistes différentes
en ajoutant des étiquettes en est une. Vous pouvez toujours supprimer les erreurs
en mode édition. Assurez-vous de sauvegarder le fichier durant les modifications.
74
Page 76

EXPORTATION DES PISTES À DIFFÉRENTS FICHIERS
Cette section vous montre comment exporter les différents fichiers en
format WAV afin de les graver sur un CD. Vous pouvez également les
convertir en format MP3 à l’aide de logiciels tiers que vous pouvez
télécharger du Web. Pour de plus amples renseignements, veuillez
vous référer au guide d’utilisation du logiciel.
1. Maintenant que vous avez divisé les pistes du fichier
d’enregistrement avec des étiquettes, vous devez les exporter
dans des fichiers différents.
2. Sélectionnez le menu « File » puis
« Export Multiple… », tel qu’indiqué
dans la Figure 15.
3. La fenêtre « Export Multiple »
s’ouvrira (Figure 16).
a. Sélectionnez « WAV » comme
format d’exportation et
sélectionnez la destination de
sauvegarde.
b. Sélectionnez la destination de
sauvegarde. C’est dans ce
dossier que vos fichiers seront
sauvegardés. Vous pourriez
également créer un dossier
spécial sur le bureau identifié
avec le nom de l’album pour
mettre vos fichiers.
c. Sélectionnez l’option
« Using Label/Track
Name » tel qu’indiqué. Remarque : Vous pourriez les
exporter en les numérotant consécutivement puis les
modifier par la suite. Si tel est le cas, sélectionnez l’option
« Numbering consecutively ».
d. Cliquez sur « Export ».
Figure 15: Exportation multiple
Figure 16 : Menu des options d’exportation
75
Page 77

FAIRE L’ÉCOUTE ET L’EXPORTATION DES
FICHIERS WAV ET MP3
Pour écouter vos fichiers numérisés, vous aurez besoin d’un logiciel tiers qui peut faire la
lecture de fichiers WAV. Vous pouvez également utiliser un logiciel de gravure standard pour
graver vos fichiers WAV sur un CD audio.
Si vous désirez sauvegarder un vinyle en tant que fichier MP3 après l’avoir enregistré à l’aide
de Audacity, vous devez télécharger et installer le plugiciel « LAME MP3 Encoder ». Une fois
que le fichier est converti en format MP3 il peut être lu par tout appareil numérique portable
compatible avec le format MP3.
• Pour télécharger l’encodeur MP3 LAME, veuillez visiter le site www.ion-
audio.com/ttusb_audacity.php. Vous y trouverez également de l’information
supplémentaire concernant le logiciel Audacity, tel que la section Foire aux questions.
• Cliquez sur le lien de l’encodeur MP3 LAME pour transférer le plugiciel à votre
ordinateur.
Note : Il est recommandé de télécharger le fichier .zip à votre bureau temporairement.
Vous devez ensuite extraire et sauvegarder l'encodeur MP3 LAME sur votre ordinateur
dans endroit où vous NE LE SUPPRIMEREZ PAS. La sauvegarde des fichiers individuels
sur votre bureau N’EST PAS recommandée!
Utilisateurs Windows :
1. Créez un dossier dans [Mes documents] et nommez-le « Lame MP3 Plugin ».
2. Trouvez le fichier .zip et ouvrez-le.
3. Sélectionnez tout son contenu et copiez-le dans le dossier « Lame MP3 Plugin » que
vous venez de créer dans [Mes documents].
4. Maintenant... supprimez le fichier .zip que vous avez téléchargé sur votre bureau.
Utilisateurs Mac :
1. Créez un dossier dans le répertoire [Home] et nommez-le Lame MP3 Plugin.
2. Trouvez le fichier .sit ou .zip téléchargé et double-cliquez dessus... ceci permettra
d’extraire son contenu et de créer un nouveau fichier sur le bureau avec le même nom
(il devrait apparaître sans l’extension .sit ou .zip).
3. Copiez et déplacez ce nouveau fichier dans le dossier Lame MP3 Plugin que vous venez
de créer dans votre répertoire [Home].
4. Maintenant... supprimez le fichier .sit ou .zip que vous avez téléchargé sur votre
bureau.
Lorsque vous tenterez d'exporter un fichier en tant que MP3 (Export As MP3…) à partir du
logiciel Audacity pour la première fois après avoir fait l’installation de l’encodeur MP3 LAME,
vous serez invité à donner l’emplacement du plugiciel. Recherchez le dossier nommé Lame
MP3 Plugin dans lequel vous avez placé le fichier du plugiciel et sélectionnez le fichier.
Subséquemment, Audacity se souviendra de l’emplacement de ce fichier.
ENREGISTREMENT DES DISQUES
Si vous désirez enregistrer un album 78 tours, vous pouvez l’enregistrer à 33,3 t/min ou à
45 t/min puis le convertir à 78 t/min ensuite avec le logiciel Audacity. Une fois l’album
enregistré, ouvrez le menu Edit, cliquez sur Select, puis sur All. Ensuite, ouvrez le menu
Effect et sélectionnez Change Speed. Sélectionnez la vitesse à laquelle vous l’avez
enregistrée (33 ou 45), puis la vitesse à laquelle vous désirez que la piste soit lue (78).
Appuyez ensuite sur OK.
78 TOURS
76
Page 78

GUIDE DE DÉPANNAGE
Veuillez contacter Ion Audio ou votre détaillant avant de retourner ce
produit. Voir les Consignes de sécurité pour plus d’information.
• AUCUN SON :
• Si l’application logicielle ne reçoit aucun son, retournez au menu
préférence, tel qu’indiqué ci-dessus, et assurez-vous que vous avez bien
sélectionné l’option USB pour l’appareil d’enregistrement.
• Si vous ne pouvez entendre la musique, mais que vous pouvez la voir à
l’écran, retournez au menu préférence (Figure 2) et assurez-vous que
l’option Playback Device soit bien réglée sur la carte de son de votre
ordinateur.
• Période d’alimentation : Fermez Audacity, mettez le tourne-disque hors
tension et débranchez le câble USB. Rebranchez le câble USB, mettez le
tourne-disque sous tension et relancez Audacity.
• Si vous ne pouvez entendre d'audio lorsque vous faites la lecture d’un
enregistrement, cliquez sur le menu déroulant du microphone (flèche) et
sélectionnez Monitor Input.
Ceci a pour effet de vous
permettre d'entendre l'audio du
tourne-disque, même si vous
n'avez pas activé la fonction
enregistrement de l'application
Audacity.
(Si vous ne voyez pas le potentiomètre du microphone, ouvrez le menu
Preferences dans Audacity, sélectionnez l’onglet Interface, et assurezvous que les options Enable Mixer Toolbar et Enable Meter Toolbar
sont cochées.) Si elles ne le sont pas, cochées-les et cliquez sur OK.
• Vérifiez que le potentiomètre du
microphone est au maximum, c’est à
dire, complètement à la droite, tel
qu’indiqué à la Figure 20 :
Si vous ne voyez pas le potentiomètre du
microphone, ouvrez le menu
Preferences dans Audacity,
sélectionnez l’onglet Interface, et
Figure 20 : Niveau d’entrée
assurez-vous que les options
Enable Mixer Toolbar et
Enable Meter Toolbar sont
cochées. Si elles ne le sont pas,
cochées-les et cliquez sur OK.
77
Page 79

• MAUVAISE QUALITÉ SONORE :
o Si l’enregistrement semble être déformé ou qu’il y a
du gargouillement durant la lecture, il se peut que
vous ayez à ajuster les niveaux du tourne-disque.
Dans Audacity, déplacez le potentiomètre vers la
gauche pour diminuer les niveaux (Figure 17).Vous
pouvez utiliser l’effet de normalisation, tel que décrit
plus haut, pour ramener les niveaux à la normale
après l’enregistrement.
o Vérifiez la cartouche afin de vous assurer qu’elle est
correctement fixée au bras de lecture. Il se peut que
la cartouche doive être fixée même lorsque l’entrée
ligne est utilisée sur l’appareil pour éviter qu’il y ait de
la rétroaction.
o Assurez-vous que les fiches RCA sont branchées
correctement à une source et qu’elles ne sont pas en
contact avec du métal à nu. Si vous avez du bruit
parasite par le bus USB, il se peut que les fiches RCA
causent de l’interférence. Assurez-vous que le câble
USB n’est pas près ou en contact avec d’autres câbles.
o Si vous avez des sons bizarres provenant de vos
enregistrements, essayez de fermer toutes les
applications et de redémarrer l’ordinateur, et en
ouvrant uniquement Audacity durant l’enregistrement.
o Si vous utilisez les fiches RCA, assurez-vous que
l’interrupteur PHONO/LINE sur le panneau inférieur
soit réglé à la bonne position. Pour plus de
renseignements, veuillez consulter le Guide
d’utilisation simplifié.
Pour du soutien technique, veuillez contacter
Ion Audio au (401) 658-3743
Guide, Version 5.3
78
Page 80

Installazione software
Software di registrazione Audacity
INDICE
NOTE GENERALI SUL SOFTWARE .........................................................80
INSTALLAZIONE DEL SOFTWARE AUDACITY ......................................81
CONFIGURAZIONE DI MICROSOFT WINDOWS VISTA PER
L’USO CON IL GIRADISCHI USB..............................................................82
CONFIGURAZIONE DI MICROSOFT WINDOWS XP PER L’USO
CON IL GIRADISCHI USB..........................................................................84
CONFIGURAZIONE DI AUDACITY SU PC................................................86
CONFIGURAZIONE DI AUDACITY IN MAC OS 10.4 E
SUCCESSIVI ...............................................................................................88
REGISTRAZIONE SU COMPUTER ...........................................................92
REGOLAZIONE DEL LIVELLO AUDIO (OPZIONALE).............................93
PULIZIA DELL’AUDIO (OPZIONALE) .......................................................94
REGISTRAZIONE AD ALTA VELOCITÀ DEL VINILE
(OPZIONALE) .............................................................................................97
SUDDIVIDERE L’ALBUM IN TRACCE ......................................................98
ESPORTARE TRACCE IN FILE DISTINTI...............................................102
ASCOLTARE ED ESPORTARE SU WAV/MP3.......................................104
REGISTRAZIONE DI DISCHI A 78 GIRI ..................................................104
RISOLUZIONE DI PROBLEMI..................................................................105
79
Page 81

NOTE GENERALI SUL SOFTWARE
Il giradischi USB è compatibile con qualsiasi software di registrazione
che supporti dispositivi audio USB. Noi abbiamo incluso Audacity al
pacchetto, ma potreste desiderare di servirvi di una serie di pacchetti
software di terzi.
Audacity è un software gratuito, distribuito dietro GPL (General Public
License, ossia licenza pubblica generica). Ulteriori informazioni, oltre al
codice open source, si trovano nel CD incluso o in rete all’indirizzo
http://audacity.sourceforge.net
Audacity funziona sia con Windows (98 e superiori) che con Mac OS (X e
9.2+). Software for Linux can be found on the Audacity website.
Recarsi alla pagina http://audacity.sourceforge.net/help/tutorials per
ulteriori tutorial.
Il sito presenta inoltre informazioni in merito ad aggiunte separate di
Audacity per migliorare prestazioni e funzioni.
80
Page 82

INSTALLAZIONE DEL SOFTWARE AUDACITY
Prima di avviare il software
Assicurarsi che il giradischi USB sia collegato al computer tramite il cavo USB in dotazione, e
che sia il computer che il giradischi siano collegati e accesi. Fare riferimento al manuale di
istruzioni del giradischi USB prima di procedere all’installazione del software.
RIMUOVERE LA PROTEZIONE TRASPARENTE DELLA CARTUCCIA (PUNTINA)
Per la prima registrazione, si raccomanda di eseguire un test di circa un minuto o meno di
audio per prendere confidenza con il processo prima di registrare un LP completo.
Per installare il software (PC):
1. Inserire il giradischi in una presa di alimentazione CA e servirsi del cavo USB in
dotazione per collegare la porta USB del giradischi stesso alla porta USB del computer.
2. Se non è ancora acceso, accendere il computer. Lasciare che si carichi completamente.
3. Accendere il giradischi premendo il tasto di alimentazione posto vicino alla base del
braccio.
4. Il computer potrebbe mostrare un messaggio a indicare che è stato localizzato un nuovo
dispositivo e che è pronto per l’uso. A seconda del sistema, il messaggio potrebbe non
apparire. Ciò è normale.
5. Inserire il CD in dotazione con il giradischi USB nel lettore CD del computer.
6. Apparirà automaticamente una finestra. Cliccare sull’icona [INSTALL] vicino ad
“Audacity”.
Per installare il software (MAC):
1. Inserire il giradischi in una presa di alimentazione CA e servirsi del cavo USB in
dotazione per collegare la porta USB del giradischi stesso alla porta USB del computer.
2. Se non è ancora acceso, accendere il computer. Lasciare che si carichi completamente.
3. Inserire il CD in dotazione nel lettore CD del computer.
4. Aprire l’icona del CD sul desktop.
5. Trascinare la cartella d’installazione di Audacity sul disco fisso. Si consiglia di trasferire
la cartella nella cartella Applicazioni.
6. Apparirà una finestra che mostra lo stato di copia dei file.
7. Una volta che i file siano stati copiati, ESPELLERE il CD.
Prima di iniziare a utilizzare il software, va
notato che i comandi e i menu di Audacity
possono essere visualizzati a display in tutta
una serie di lingue diverse. Recarsi su Modifica
| Opzioni e cliccare sulla linguetta
Interfaccia. In corrispondenza della linguetta a
discesa Lingua, è possibile selezionare la
lingua preferita.
SCELTA DELLA LINGUA
81
Page 83

CONFIGURAZIONE DI MICROSOFT WINDOWS
VISTA PER L’USO CON IL GIRADISCHI USB
1. Chiudere tutti i
programmi aperti sul
computer.
2. Sulla parte inferiore
sinistra dello schermo,
selezionare Start.
3. Selezionare
Impostazioni e
Pannello di Controllo.
4. Nella finestra che si
apre, localizzare il
pannello di controllo
Suoni e farvi doppio
clic. (Se non appare
un’opzione chiamata
“Suoni”, scegliere Passa
alla visualizzazione
classica nel pannello a
sinistra della finestra, e
il pannello di controllo
Suoni dovrebbe
apparire sulla destra.)
5. Scegliere la linguetta
Registrazione in cima
al pannello di controllo
Suoni.
6. Sotto alla linguetta
Registrazione,
scegliere Microfono -
Codec Audio USB come
dispositivo predefinito.
Il Codec Audio USB
rappresenta il giradischi.
7. Cliccare sul pulsante Set
Default (Imposta
predefinito) per
confermare la scelta.
82
Page 84

8. Scegliere ora la linguetta Riproduzione in cima al pannello di
controllo Suoni.
9. Sotto alla linguetta Riproduzione, scegliere il dispositivo da cui
si desidera che provenga l’audio del computer.
Le uscite audio del
computer possono
apparire come:
Altoparlanti Dispositivi audio
ad alta definizione
oppure
Cuffie Dispositivi audio
ad alta definizione
o entrambi, a
seconda
dell’hardware
installato sul vostro
computer.
Cliccare sul dispositivo che meglio si adatta all’impostazione
audio desiderata e cliccare su Set Default (Imposta
predefinita).
Nota bene: NON scegliere “Altoparlanti - Codec Audio USB”
come periferica di riproduzione. Codec Audio USB rappresenta il
giradischi e può essere utilizzato unicamente come periferica di
registrazione, non come uscita di riproduzione.
10. Cliccare su Set Default (Imposta predefinito) per confermare la
scelta.
11. Se possibile, cliccare su Applica, quindi su OK per chiudere il
Pannello di Controllo.
12. Se possibile, cliccare su Applica, quindi su OK.
13. Assicurarsi che gli altoparlanti del computer (se non incorporati)
siano collegati all’uscita audio del computer e accesi in modo da
poter ascoltare la registrazione. Se il computer presenta
un’uscita cuffie, si possono utilizzare queste ultime al posto degli
altoparlanti.
83
Page 85

CONFIGURAZIONE DI MICROSOFT WINDOWS XP
PER L’USO CON IL GIRADISCHI USB
1. Chiudere tutti i programmi
aperti sul computer.
2. Sulla parte inferiore sinistra
dello schermo, selezionare
Start.
3. Selezionare Impostazioni e
Pannello di Controllo.
4. Nella finestra che si apre,
localizzare il pannello di
controllo Suoni e
periferiche audio e farvi
doppio clic. (Se non appare
un’opzione chiamata “Suoni
e periferiche audio”,
scegliere Passa alla
visualizzazione classica nel
pannello a sinistra della
finestra, e il pannello di
controllo Suoni e periferiche
audio dovrebbe apparire
sulla destra.)
5. Scegliere la linguetta Voce
in cima al pannello di
controllo Suoni e periferiche
audio.
6. Sotto Riproduzione voce,
scegliere la propria scheda
audio interna come
dispositivo predefinito.
Questo varia da computer a
computer, ma non deve
essere impostato su “Codec
Audio USB, Modem o
Microsoft Sound Mapper”.
7. Sotto Registrazione voce,
selezionare Codec audio
USB per il dispositivo
predefinito: questo è il
giradischi USB.
84
Page 86

8. Scegliere la linguetta
Audio in cima al pannello
di controllo Suoni e
periferiche audio.
9. Sotto Riproduzione
suoni, scegliere la propria
scheda audio interna come
dispositivo predefinito.
Questo varia da computer a
computer, ma non deve
essere impostato su “Codec
Audio USB, Modem o
Microsoft Sound Mapper”.
10. Sotto Registrazione
suoni, selezionare Codec
audio USB per il
dispositivo predefinito:
questo è il giradischi USB.
11. Selezionare la casella
Utilizza solo periferiche
predefinite.
12. Se possibile, cliccare su Applica, quindi su OK.
13. Assicurarsi che gli altoparlanti del computer (se non incorporati)
siano collegati all’uscita audio del computer e accesi in modo da
poter ascoltare la registrazione. Se il computer presenta un’uscita
cuffie, si possono utilizzare queste ultime al posto degli altoparlanti.
85
Page 87

CONFIGURAZIONE DI AUDACITY SU PC
1. Lanciare Audacity: cliccare su Start sulla parte inferiore sinistra
dello schermo. Selezionare Tutti i programmi, quindi
Audacity.
2. In Audacity, cliccare sul menu Edit (Modifica) in cima alla
finestra.
3. Selezionare Preferences (Opzioni) dal menu Edit (Modifica).
Figura 1: Selezionare opzioni
Appare la finestra Audacity Preferences (Opzioni Audacity –
Figura 2). Scegliere la linguetta Audio I/O sulla parte superiore
della finestra Preferences.
4. Impostare il Playback Device (Dispositivo di riproduzione)
sulla scheda audio interna. Poiché computer diversi presentano
schede audio diverse, la scelta può differire dall’immagine
seguente (Figura 2). La scelta corretta, tuttavia, NON è Codec
Audio USB, Microsoft Sound Mapper o Modem.
5. Impostare il Dispositivo di registrazione su Codec Audio
USB. Questo rappresenta il vostro giradischi.
Nota bene: il giradischi USB può apparire con un nome diverso
nella finestra Preferences (Opzioni). Questo dipende dal modello
di computer e dal tipo di sistema operativo. Nel 99% dei casi, il
nome conterrà “USB”.
6. Impostare i Channels (Canali) su 2 (Stereo).
7. Selezionare la casella Software Playthrough.
86
Page 88

Figura 2: Selezionare Dispositivo Audio USB da Opzioni
8. Sotto Quality (Qualità), impostare il Default Sample Format
(Formato campione predefinito) su 16-bit.
9. Selezionare OK per salvare le impostazioni e chiudere la finestra
Preferences.
10. In cima alla finestra principale di Audacity, sulla destra dei
pulsanti di controllo della riproduzione, si trovano i misuratori di
ingresso e di uscita (contrassegnati L e R). Sotto al misuratore di
livello delle uscite è presente un’icona a forma di microfono. Di
fianco al microfono è presente una freccia nera che punta verso
il basso. Cliccare su questa freccia e selezionare Monitor Input
(Ingresso monitor). (Se non vengono visualizzati i misuratori di
livello d’ingresso e di uscita, aprire nuovamente Preferences
come indicato in precedenza, selezionare la linguetta Interface
(Interfaccia) e assicurarsi che sia selezionato Enable Mixer
Toolbar.)
Ora dovreste essere pronti a registrare.
Queste impostazioni verranno salvate all’uscita. Tuttavia, sarà
necessario selezionare Monitor Input (ingresso monitor) dal menu a
cascata del misuratore d’ingressi ogni volta che si lancia Audacity.
87
Page 89

CONFIGURAZIONE DI AUDACITY IN MAC
1. Con il programma di Audacity aperto, cliccare sul menu
Audacity posto sulla parte alta dello schermo.
2. Selezionare Preferences (Opzioni) dal menu Audacity.
3. Sotto la linguetta Audio I/O, impostare la Periferica di
riproduzione su Built-In Audio.
4. Sotto la linguetta Audio I/O, impostare la Periferica di
registrazione su Codec Audio USB.
5. Sotto la linguetta Audio I/O, impostare i Canali (Channels) su 2
(Stereo).
6. Selezionare la casella Software Playthrough.
OS 10.4 E SUCCESSIVI
7. Sotto Quality (Qualità), impostare il Default Sample Format
(Formato campione predefinito) su 16-bit.
88
Page 90

8. Selezionare OK per salvare le impostazioni e chiudere la finestra
Preferences.
9. In cima alla finestra principale di Audacity, sulla destra dei
pulsanti di controllo della riproduzione, si trovano i misuratori di
ingresso e di uscita (contrassegnati L e R). Sotto al misuratore di
livello delle uscite è presente un’icona a forma di microfono. Di
fianco al microfono è presente una freccia nera che punta verso
il basso. Cliccare su questa freccia e selezionare Monitor Input
(Ingresso monitor). (Se non vengono visualizzati i misuratori di
livello d’ingresso e di uscita, aprire nuovamente Preferences
come indicato in precedenza, selezionare la linguetta Interface
(Interfaccia) e assicurarsi che sia selezionato Enable Mixer
Toolbar.)
Queste impostazioni verranno salvate all’uscita. Tuttavia, sarà
necessario selezionare Monitor Input (ingresso monitor) dal menu a
cascata del misuratore d’ingressi ogni volta che si lancia Audacity.
89
Page 91

Altre impostazioni importanti Macintosh:
Abbiamo impostato distinte opzioni di riproduzione e registrazione in
Audacity, ma il Mac presenta a sua volta specifiche impostazioni di
riproduzione e registrazione audio. Quando il giradischi viene collegato
per la prima volta, il Macintosh spesso selezionerà il “Codec Audio USB”
come ingresso e uscita audio dell’intero sistema. Poiché il giradischi non
è dotato di altoparlanti, l’audio non verrà sentito dagli altri programmi, a
meno che non si dica al Mac di non utilizzare il giradischi come
dispositivo di uscita.
Ecco come modificare queste impostazioni in modo che la scheda audio
interna venga sempre utilizzata per la riproduzione, che il giradischi sia
collegato o meno tramite USB:
Utility Audio Midi Setup:
1. Aprire il Finder.
2. Aprire la cartella Applicazioni.
3. Nella cartella Applicazioni, aprire la cartella Utility.
4. Nella cartella Utility, aprire Audio MIDI Setup.
90
Page 92

5. In Audio MIDI Setup, sotto Audio Devices (dispositivi audio),
impostare:
Default Input (Ingresso predefinito) su Codec Audio USB.
Default Output (Uscita predefinita) su Built-in Audio o Built-in
Output
System Output (Uscita di sistema) su Built-in Audio o Built-in
Output
Ora, programmi diversi da Audacity si serviranno unicamente della
scheda audio interna come uscita audio.
91
Page 93

REGISTRAZIONE SU COMPUTER
Nota: la prima volta in cui si usa il software, si raccomanda di fare una
prova con un piccolo brano (1 min o meno) audio durante la
registrazione. Una volta fatto pratica, registrare una canzone o un LP
completi.
1. Premere il tasto Record
2. Avviare la riproduzione sul giradischi USB. Durante la
registrazione sullo schermo verrà visualizzata l’onda audio. Si
sentirà l’audio provenire dall’uscita della scheda audio del
computer.
Non c’è audio? – tornare al menu “ preference” (Figura 2) e
assicurarsi di aver spuntato l’opzione “Software Playthrough” e
che il volume del computer sia aperto. Per ulteriori suggerimenti,
vedi il paragrafo relativo alla risoluzione di problemi in fondo al
manuale.
3. Riprodurre l’intera traccia/album che si desidera registrare.
4. Premere Stop
5. SALVARE ORA IL FILE cliccando su ‘File’ -> ‘Save Project’.
(salva progetto) Selezionare la destinazione e il nome del file e
cliccare su ‘Save’.
6. Il processo di registrazione è completo. Il file appena salvato sul
computer è un file Audacity Project. Questo file può essere
aperto solo da Audacity. Le seguenti sezioni vi guideranno in
alcune modifiche opzionali che possono essere apportate, oltre a
fornire indicazioni su come dividere questo Audacity Project in
file Wav distinti che possono essere masterizzati su CD o
riprodotti in programmi musicali quali iTunes e Windows Media
Player
Figura 3: campione di registrazione
92
Page 94

REGOLAZIONE DEL LIVELLO AUDIO (OPZIONALE)
1. Selezionare l’intera registrazione scegliendo “Edit”, quindi
“Select…”, quindi cliccare su “All” (tutti). Si può anche utilizzare
Ctrl+A su un PC o APPLE+A su un Macintosh per selezionare
tutto rapidamente.
Figura 4: seleziona tutto
2. Selezionare il menu “Effect” e scegliere l’effetto desiderato.
a. Vi sono vari tipi di effetti descritti ulteriormente nella
sezione di aiuto del software oltre che in rete (vedi
Figura 5).
b. “Normalize” (normalizzare) va usato per ottenere il
giusto volume della registrazione. (Vedi Figura 6)
Nota bene:
È una buona idea quella di porre la puntina sul disco,
mentre è fermo, prima di iniziare la registrazione e
premere ‘Play’ sul giradischi dopo aver iniziato a
registrare. Appoggiando la puntina mentre il disco sta
girando e dopo aver iniziato la registrazione, si
potrebbero verificare scatti e suoni udibili. Questi
potrebbero non permettere all’effetto Normalize di
portare il volume della registrazione al livello cui
dovrebbe essere.
93
Page 95

Figura 6: normalizzare
Figura 5: elenco a tendina degli effetti
PULIZIA DELL’AUDIO (OPZIONALE)
1. Trascinare il cursore su una porzione della traccia audio che
contiene rumore. Si raccomanda di utilizzare l’inizio o la fine di
una traccia, laddove non c’è musica, ma solo il rumore del vinile.
(Vedi Figura 7)
2. Selezionare “Noise Removal” (rimozione rumori) dal menu
“Effect” per far apparire la finestra “Noise Removal”. (Vedi
Figura 8)
3. Cliccare su “Get Noise Profile” (profilo rumore). La finestra Noise
Removal si chiuderà ora automaticamente.
4. Selezionare l’intera traccia audio da cui si desidera rimuovere
rumore. Se si desidera pulire l’intera registrazione, selezionare
“Select All” nel menu “Edit” (Vedi Figura 4)
5. Ripetere la fase 2 per richiamare la finestra “Noise Removal”.
6. Fissare la quantità di audio che si desidera filtrare spostando il
cursore nella finestra “Noise Removal”. Si raccomanda di
utilizzare la minima rimozione di rumore per un suono ottimale.
Nota: si può ascoltare preventivamente l’ audio prima di
rimuovere il rumore cliccando su ‘Preview’.
7. Cliccare su ‘Remove Noise’ (rimuovi rumore).
94
Page 96

Figura 7: selezione di rumore nella traccia
Figura 8: finestra di rimozione dei rumori
95
Page 97

Ulteriori note sull’Editing:
I livelli audio possono variare a seconda della cartuccia
(puntina), del contrappeso del braccio, del vinile e
dell’impostazione del computer. Si raccomanda di
normalizzare sempre l’audio.
Così come avviene nella normale scrittura, si può
cancellare l’audio indesiderato selezionando la sezione,
che verrà evidenziata, quindi premendo “Delete”
(cancella). Questo può includere eccessivo sibilo, silenzi
prima/dopo le canzoni o salti/grattate.
Prima di cancellare il rumore da una traccia, bisogna
selezionare il profilo del rumore. Se si seleziona “actual
audio” per il profilo del rumore, il computer potrebbe
rimuovere l’intero audio. Vedi fase 1.
Una volta impostato il Noise Profile (profilo rumori), il
profilo verrà salvato fino a quando non si riavvia
l’applicazione. In altre parole, il software deve imparare il
profilo rumori solo quando il software viene avviato. Una
volta impostato, non è necessario farlo per ogni
registrazione, una volta impostato.
96
Page 98

REGISTRAZIONE AD ALTA VELOCITÀ DEL
VINILE (OPZIONALE)
Servendosi del giradischi USB con il software Audacity, è possibile
registrare rapidamente i vinili a 33 1/3 sul computer e servirsi del
software per regolare la velocità eccessiva per tornare alla riproduzione
normale. Questa funzione è utile per registrare più dischi. Ad esempio, è
possibile registrare 10 minuti di audio in appena 7 minuti registrando a
45 giri con un ulteriore 10% di aumento servendosi del fader del pitch.
Tre minuti risparmiati non sono molti per un disco, ma se si registrano
più LP è possibile registrare 4 ore di musica in meno di 3 ore.
Istruzioni:
1. Registrare il vinile a 33 1/3 giri a 45 giri premendo il tasto 45
giri (45RPM) sul pannello superiore.
2. Si sentirà l’audio registrare ad un pitch insolito, per via della sua
alta velocità.
3. Una volta finito di registrare, interrompere la registrazione.
4. Recarsi su “Edit” e “Select All” (Vedi Figura 4).
5. Recarsi su “Effect” e quindi al menu “Change Speed” (cambia
velocità).
Selezionare da “45” a “33
1/3” ed il vinile verrà
regolato alla velocità giusta
come illustrato.
Figura 9: Change Speed: modifica
97
velocità
Page 99

SUDDIVIDERE L’ALBUM IN TRACCE
Nota bene: prima di dividere l’album in
tracce, bisogna terminare tutte le
operazioni di pulizia e di modifica,
inclusa la rimozione di eventuali silenzi
prima/dopo le canzoni.
1. Selezionare lo strumento Fit
Project in Window come
illustrato nella Figura 10.
2. Dopo aver zoomato fuori per vedere tutte le tracce, le
separazioni tra le tracce stesse vengono visualizzate tramite gli
spazi illustrati di seguito con 1, 2, 3 (Figura 11). Le fasi
successive mostrano come dividere ed etichettare le tracce ed
esportarle in formato WAV (qualità da CD).
Figura 30: Adatta il progetto
alla finestra
Figura 11: Identificazione di distinte tracce audio
Vi sono due modi di dividere la registrazione in tracce distinte:
automaticamente e manualmente. Se il disco è in buone condizioni e
presenta silenzi ben distinti tra le canzoni, la divisione automatica delle
tracce può essere più veloce e più semplice. Se il disco è in cattive
condizioni o non presenta silenzi che separano le canzoni, la divisione
manuale dell’album sarà quella migliore.
Suddivisione automatica dell’album:
1. Selezionare l’intera registrazione selezionando Edit (Modifica),
quindi Select (Seleziona), e infine All (Tutto). Si può inoltre
utilizzare Ctrl+A su un PC o APPLE+A su un Macintosh per
selezionare tutto rapidamente. (Vedi Figura 4)
2. Selezionare il menu Analyze nella parte superiore dello schermo
e scegliere Silence Finder.
3. Il Silence Finder cercherà di localizzare il silenzio tra ciascuna
canzone presente nella registrazione. Per la maggior parte delle
registrazioni, basta semplicemente impostare il campo Silence
Level nella finestra del
Silence Level e cliccare su OK (Figura 12).
Silence Finder. Digitare 15 nel campo
98
Page 100

Figura 12: Silence Finder
4. La registrazione verrà quindi analizzata, e sotto alla registrazione
apparirà un’etichetta di traccia (Label Track). Questa conterrà segni
che rappresentano l’inizio di ciascuna nuova canzone. (Figura 13).
Quando si esporta la registrazione (vedi: Esportazione delle tracce
su file distinti), tali segni verranno utilizzati per creare file audio
separati per ciascuna canzone presente sull’album.
Figura 13: Etichette di traccia
5. Se si notasse che i segni posti dal Silence Finder non
corrispondono adeguatamente alla canzone o che ce ne sono troppo
pochi o troppi, si può annullare l’operazione e riprovare con
impostazioni diverse. Se i segni sembrano corretti, passare alla
successiva parte, Esportazione delle tracce su file distinti.
6. Per annullare, selezionare il menu Edit nella parte superiore dello
schermo e scegliere Undo.
7. Ripetere i passaggi 1-3 di cui sopra e provare una diversa
impostazione nel campo Silence Level. Nel caso in cui ci fossero
troppo pochi segni nel tentativo precedente, servirsi di un numero
inferiore nel campo Silence level, ad esempio 10. Nel caso in cui
ne siano stati aggiunti troppi, provare a impostare un numero più
elevato nel campo Silence level, quale 20. Determinati dischi o tipi
di musica potrebbero non funzionare bene con la distinzione
automatica delle tracce. Se non si ottengono buoni risultati con il
Silence Finder, si dovrà dividere manualmente l’album in tracce
(vedi sotto).
99
 Loading...