

Page 1
Page 2

Copyrights & Trademarks
©2001 Iomega® Corporation. All Rights Reserved. Iomega is a registered
trademarks of Iomega Corporation.
DataSafe™ and
QuikSync™ are trademarks
of Iomega Corporation. Other product, company names and logos are trademarks or registered trademarks of their respective owners. Part Number:
000001564
Revisions: Iomega reserves the right to revise this publication and to make changes in the content
hereof without the obligation of Iomega to notify any person of such revision or changes.
Printed in the U.S.A. 02/01
Technical Support is available at 1-888-4-IOMEGA
(1-888-446-6342) and at www.iomega.com/support/nav_techemail.html
Page 3

Contents
About This Guide......................................................... 1
Who Should Use This Guide ....................................1
Overview ................................................................ 1
Equipment Required for Administration ................... 1
Placement Requirements ........................................2
Server Placement ..............................................3
Safety Requirement ................................................4
Familiarizing Yourself with Your DataSafe NAS .........4
Front Panel .......................................................4
Back Panel .......................................................5
Typographical Conventions .....................................6
Related Documents .................................................6
1 Getting Started ...................................................... 9
Navigation of the DataSafe NAS Administration UI . 10
Initial DataSafe NAS Configuration ........................13
Using Help ........................................................... 13
Home Page ........................................................... 15
2 Network Setup ......................................................17
Identification ........................................................18
Server Appliance Name ...................................20
DNS Name Resolution .....................................21
DNS Suffixes ...................................................23
Workgroup .....................................................24
Domain ..........................................................26
Interfaces: Network Settings .................................27
IP Settings ......................................................28
DNS Settings .................................................. 31
WINS Settings .................................................33
Global Settings: Network Configuration .................35
LMHOSTS Files ................................................38
Change Administrator Password ...........................43
DataSafe NAS User’s Manual iii
Page 4

Administration Web Server ....................................44
NIC Configuration .................................................46
Adaptive Load Balancing .................................46
NIC Team Configuration ...................................47
Breaking and Restoring Team Configuration .....48
3 Disks and Volumes ...............................................51
Configure Disk and Volume Properties ................... 51
Disk Quotas ..........................................................54
Quota Management ........................................55
Quota Entries .................................................. 57
Adding Quota Entries.................................59
Removing Quota Entries.............................60
Modifying Quota Properties........................ 61
4 Manage Services .................................................63
Enable Services ....................................................64
Disable Services ...................................................65
Configure Service Properties .................................65
NFS Service ....................................................66
Network Protocol Overview: NFS.................67
NFS Client Groups......................................69
Adding NFS Client Groups.....................69
Editing NFS Client Groups.....................70
Removing NFS Client Groups ................72
NFS Locks..................................................72
User and Group Mappings..........................73
General Tab.........................................74
Simple Maps........................................76
Explicit User Maps ............................... 77
Explicit Group Maps.............................80
FTP Service .....................................................83
Network Protocol Overview: FTP..................83
FTP Logging...............................................84
FTP Anonymous Access..............................85
FTP Messages............................................87
DataSafe NAS User’s Manual iv
Page 5

Web (HTTP) Service .........................................88
World-Wide Web Server.............................89
Network Protocol Overview: HTTP...............90
HTTPS Creating a Secure Connection...........91
NetWare Service .............................................94
Indexing Service ............................................. 94
Mac Service .................................................... 95
Telnet Service ................................................. 95
SNMP Service ................................................. 95
Network Protocol Overview: SNMP ............. 95
SNMP Service Configuration ...................... 97
5 Users and Groups ................................................ 99
Manage Local Users .............................................99
Adding a User Account ...................................100
Removing a User Account ...............................103
Setting a User Password ................................104
Modifying User Properties .............................105
Manage Local Groups ..........................................106
Adding a Group Account ................................107
Removing a Group Account ............................109
Modifying Group Properties ...........................110
6 Folders and Shares ............................................. 113
Manage Folders ...................................................114
Opening a Folder ........................................... 117
Adding a Folder ............................................. 117
Removing a Folder .........................................118
Modifying Folder Properties ........................... 119
Navigating Among Folders .............................121
Manage Windows and UNIX Shares ......................121
Adding a Windows or UNIX Share ...................122
Removing a Windows or UNIX Share ...............124
Modifying Windows or UNIX Share Properties .126
CIFS Share Properties...............................127
NFS Share Properties................................129
v
Page 6

FTP Share Properties.................................131
HTTP Share Properties...............................133
Manage Macintosh and NetWare Shares ...............133
Adding a Macintosh or NetWare Share ........... 136
Removing a Macintosh or Netware Share .......138
Modifying Macintosh or NetWare Share Properties .139
7 Maintenance ...................................................... 141
Date and Time .....................................................141
Shutdown Appliance ...........................................142
Back-up and Restore Tool .................................... 143
Logs ....................................................................145
Application Log ..............................................145
System Log ................................................... 146
Security Log ...................................................147
Manage Logs ................................................ 148
Clear Log Files ......................................... 149
Download Log Files.................................. 149
Modify Log Properties...............................151
View Log Details .......................................152
Terminal Services Client .................................153
Alerts ............................................................155
DataSafe NAS Administration UI Alerts...... 156
E-mail Alerts.............................................157
LED Alerts.................................................159
Appendix A: Status Alerts ........................................161
Appendix B: CIFS Overview ......................................163
Manual caching for documents ............................ 163
Automatic caching for documents ....................... 163
Automatic caching for programs ..........................164
Index .......................................................................167
DataSafe NAS User’s Manual vi
Page 7

About This Guide
Who Should Use This Guide
This DataSafe NAS User’s Manual is intended to help
setup, configure, and maintain DataSafe NAS. It
assumes that you are somewhat familiar with
networking and system administration basics.
Overview
Your DataSafe NAS comes ready to install with all the
required software. It works in a 10/100 Mbps Ethernet
network (or Gigabit Ethernet network when so
equipped), and is administered using an Internet
Explorer web browser. It includes DataSafe Wizard,
Iomega’s software utility that helps you locate the unit
on your network, configure DataSafe NAS network
settings, and launch the web user interface.
Equipment Required for Administration
To connect, install and administer your DataSafe NAS,
you will need an available 10/100 Ethernet network
hub or switch. It will also be necessary for your
workstation to have the following capabilities:
n Windows 95/98/Me/NT (SP5)/2000
n Internet Explorer v4.01 SP1 or newer - support for
Netscape is not currently available.
n Client for Microsoft Networks enabled over TCP/IP.
n Network Interface Card (NIC)
n CD-ROM Drive
DataSafe NAS User’s Manual 1
Page 8

Placement Requirements
When placing your DataSafe NAS, you will want to
consider requirements for power and network
availability, as well as a space with well regulated
temperature and humidity that is relatively free of
dust and other air-born contaminants.
The following tables are designed to help you plan
your DataSafe NAS installation.
Table 2-1. Size &Weight
Item Quantity
Weight 27 pounds (12.3 kg)
Size 17 x 20 x 1.75 inches (43.2 x 50.8 x 4.5
CAUTION: When placing your DataSafe NAS in
rack mount mode, make sure you
maintain proper mechanical load
leveling to avoid a hazardous
condition.
Table 2-2. Electrical Requirements
Item Quantity
Voltage Range 95 ~ 135 VAC or 180 ~ 265 VAC
Frequency 47 ~ 63 Hz
WARNING: Make sure your site has the necessary
capacity to handle your DataSafe NAS
unit(s). Overloading electrical supply
circuits is extremely hazardous. Care
should also be taken to properly
ground all rack mounted equipment.
2
Page 9

Table 2-3. Operating Environment Requirements
Item Quantity
Temperature - Operating
Temperature - NonOperating
Humidity - Operating
Humidity - Non-Operating
CAUTION: When mounting your DataSafe NAS in
41º to 104ºF (5ºC to 40º C) external operating temperature range
-4º to 140º F (-20ºC to +60ºC)
5% to 85% humidity non-condensing
5% to 95% humidity non-condensing
a rack system, make sure that the air
vents do not become blocked. Also,
care must be taken to insure that
DataSafe NAS is installed in an
enviroment compatible with the
ambient temperatures stated in the
table above (maximum of 40º C).
Server Placement
If you install your DataSafe NAS into a rack, use the
enclosed rack mount ears and screws for secure
mounting. If your installation calls for placement on a
table top, apply the enclosed rubber feet to the
bottom of the chassis.
DataSafe NAS User’s Manual 3
Page 10

Safety Requirement
Replace battery with model CR2032 only. Use of
another battery may present a risk of fire or explosion.
A model CR2032 battery can be purchased at your
local retail electronics supply source.
WARNING: Battery may explode if mistreated. Do
not recharge, disassemble or dispose
of in fire.
Familiarizing Yourself with Your DataSafe
NAS
Front Panel
The DataSafe NAS front panel has four LEDs. Three are
grouped together on the right side, one on the left.
The LEDs indicate the following:
n Far left LED (soft power switch). Solid LED
indicates power on. This LED will blink during
boot-up, and will also blink to indicate error
conditions (See Chapter 7 - Maintenance for alert
codes).
n Network Link 1 for LAN 1. Flashing indicates
network activity.
n Network Link 2 for LAN 2. Flashing indicates
network activity.
n Hard disk drive LED indicates read/write activity.
4
Page 11
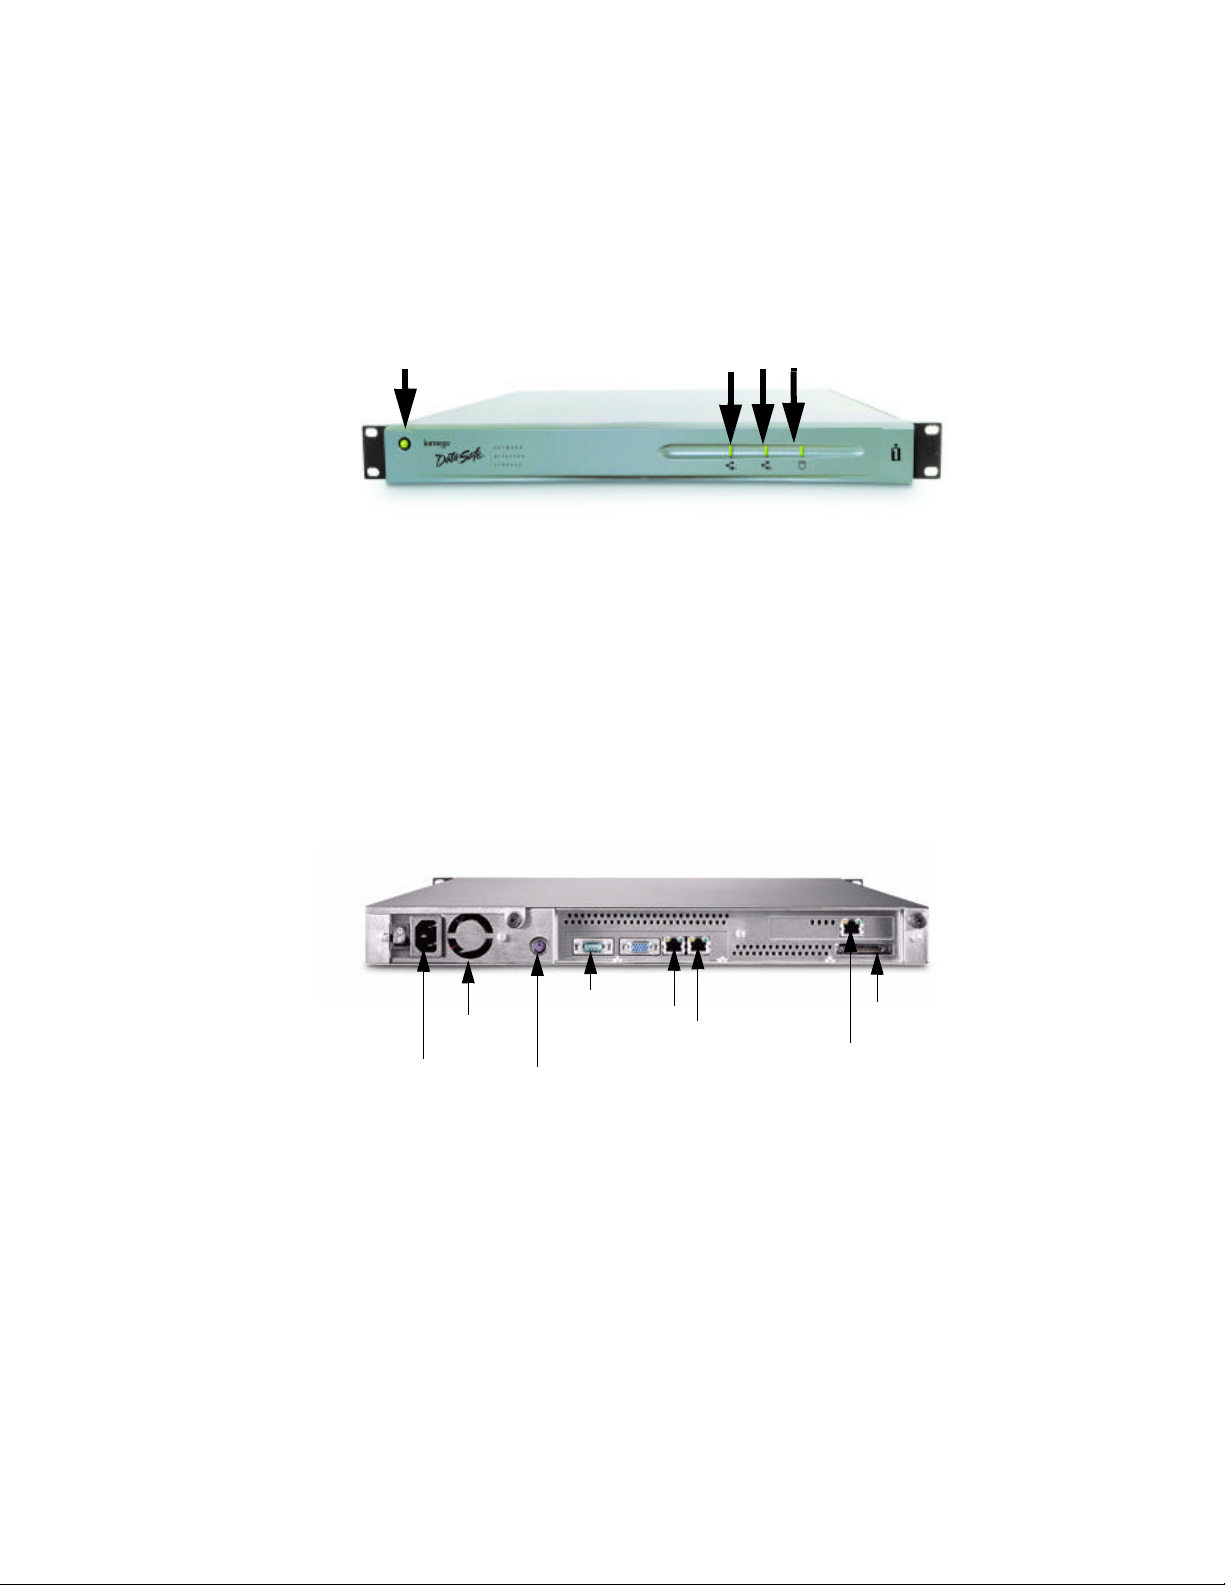
SOFT POWER SWITCH
LAN 1
LAN 2
HARD DISK
DRIVE
Figure 1 LEDs
Back Panel
Each Ethernet Port has two LEDs. One indicates link
and the other activity.
Note: On units with a Gigabit Ethernet option
installed, additional LEDs will be present.
FAN
POWER
CONNECTION
UPS
LAN 1
LAN 2
CONNECTIONS
FOR Field Service Personnel ONLY
SCSI
PORT
Gigabit
Option
Figure 2 NIC connections, Back Panel
DataSafe NAS User’s Manual 5
Page 12

Typographical Conventions
The following typographical conventions are used in
this guide to help you locate and identify information:
Item Symbol Description
Italic text is used for emphasis and book
titles.
Bold text
Courier
font
NOTE:
CAUTION:
WARNING:
identifies menu names, menu
options, items you can click on
the screen, and keyboard
keys.
identifies file names, folder
names, and text that either
appears on the screen or that
you are required to type in.
Notes provide extra information, tips, and hints regarding
the topic.
Cautions identify important
information about actions that
could result in damage to or
loss of data or could cause the
system to behave in unexpected ways.
Warnings identify critical information about actions that
could result in unexpected
equipment failure, loss of critical operating
system files or potential bodily
injury
6
Page 13

Related Documents
Following is a list of related publications for
background and additional information:
n DataSafe NAS Installation and Configuration
Guide
n Quick Install Guide
n DataSafe NAS End User License Agreement (EULA)
n Warranty Statement
n Also see our Web site at:
http://www.iomega.com for latest Release Notes.
DataSafe NAS User’s Manual 7
Page 14

1 Getting Started
The DataSafe NAS Network Attached Storage (NAS) is
a Microsoft® Windows® Powered server appliance
that attaches directly to the computer network. The
DataSafe NAS is optimized to perform a single
function: provide storage to other computers attached
to the network. A potentially headless device with no
monitor or input devices (keyboard and mouse, for
example) of its own, the DataSafe NAS is managed
and monitored via a Web user interface (UI), and can
be managed remotely from a client computer attached
to the network. Because the DataSafe NAS is based on
the same code as Microsoft Windows® 2000, any
remote management methods available on the
Windows 2000 platform can also be used to manage
this unit.
The DataSafe NAS requires the NTFS file system. If file
allocation table (FAT) partitions are configured on the
DataSafe NAS, aspects of the UI will not perform
properly, including but not limited to:
n Folders and Shares
n Disks and Volumes
Chapter Sections
This chapter contains the following sections:
n “Navigation of the DataSafe NAS Administration
UI" —which describes the Web user interface (Web
UI) of your DataSafe NAS
n “Initial DataSafe NAS Configuration"—which
references the steps for configuring your DataSafe
NAS before first use
n “Using Help"—How to use the help system
DataSafe NAS User’s Manual 9
Page 15

n “Home Page"—Information on the default page
that displays when you connect to the DataSafe
NAS
Navigation of the DataSafe NAS
Administration UI
At the top of the DataSafe NAS Administration UI are
the status area and the primary and secondary menu
bars. The body of each page of the DataSafe NAS
Administration UI is the content area.
Following is a description of these sections:
Status Area
The top band of the window, the status area (Figure 1)
displays (from left to right):
n DataSafe NAS logo
n DataSafe NAS hostname above status
n Microsoft Windows Powered logo
Figure 1 Status Area
There are four possible Status displays:
n Normal (green text)
n Informational (grey text)
n Warning (yellow text)
n Critical (red text)
Click on Status: <status type> to get detailed
information about the status of the DataSafe NAS. For
more information, see “Status Alerts” on page 161.
Menu Bars
Immediately below the status area is the primary
menu bar, which lists the available DataSafe NAS
DataSafe NAS User’s Manual 10
Page 16

tasks by type. The secondary menu bar lists subtasks
that users can perform for each task group identified
in the primary menu bar. The secondary menu bar is
dynamic, and the available task types change
depending upon the task group selected.
Figure 2 Primary and secondary menu bars
Roll-over text for items in the menu bar provides even
more information. Move the mouse cursor over the
object to display the rollover text.
Content Area
Page information is displayed in the content area,
located below the menu bars. Text in this section of
the DataSafe NAS Administration UI describes the
management activities you can perform on that page.
This text may also provide instructions about how to
accomplish the available tasks.
Many of the task pages include an Object Selection
table. The Object Selection table is simply a table
listing the objects you can manage or configure, their
descriptions, and the tasks you can perform. The
column on the far left of the Object Selection table
contains a radio button you click to select a given
object. The right-most column lists the tasks you can
perform.
To navigate through the DataSafe NAS
Administration UI
1. On the primary menu bar, click the general type of
task you want to perform.
2. On the secondary menu bar or in the list of tasks,
click the specific type of task you want to perform.
DataSafe NAS User’s Manual 11
Page 17

3. In the content area:
a. If an Object Selection table is available, se-
lect the object you want to manage or configure by clicking the radio button to the left of
the object name. Then select the task you
want to perform from the Tasks list on the
right.
b. If an Object Selection table is not available,
enter the data in the fields indicated to accomplish the chosen task.
When you are finished with each task, you must click
OK to confirm your changes, or Cancel to retain the
previous settings. Once the change or cancellation
has processed, the previous page will display.
If you are on a property page and click another tab, a
pop-up window displays with the message “Click OK
to discard any changes.” This gives you the chance to
either commit to or reject the changes before moving
to the next selected page.
Related Topics
“Status Alerts” on page 161
DataSafe NAS User’s Manual 12
Page 18

Initial DataSafe NAS Configuration
Follow the steps listed below to configure your
DataSafe NAS before first use.
1. Change the DataSafe NAS identity (see
“Identification” on page 17).
2. Change the Administrator password (see “Change
Administrator Password” on page 41).
3. Set the date and time (see “Date and Time” on
page 132).
4. If necessary, change the drive configuration (see
“Configure Disk and Volume Properties” on page
48).
5. Reboot (see “Shutdown Appliance” on page 133).
6. Close your browser session.
For information on other configuration settings, see
the following:
n Set up local users (“Manage Local Users” on page
93).
n Set up local groups (“Manage Local Groups” on
page 99).
n Set up shares and permissions (“Folders and
Shares” on page 106).
Using Help
You can locate information in Help by using any of
the following procedures:
To browse through topics by category
DataSafe NAS User’s Manual 13
Page 19

1. Click the Contents tab.
2. To browse through the topics, click the book
icons.
To use the Index
1. Click the Index tab.
2. Scroll through the alphabetical list and click a
topic.
Note: You can move backwards in Help by clicking
the Previous Topic link in the upper right
corner of each help page. However, if no
previous topic has been visited, clicking the
Previous Topic link will back you out of the
Help system altogether.
To invoke context-sensitive Help
n From the page for which you want assistance,
click on the ? icon at the right end of the primary
menu bar.
Note: When context sensitive help is not available
for the page you are viewing, help will open to
the main page.
In addition to the online help specific to your DataSafe
NAS, you can also access help for Microsoft Windows
2000 via the Terminal Services Client feature
found on the Maintenance page.
To invoke Windows 2000 Help
1. On the primary menu, click Maintenance.
2. On the Maintenance page, click Terminal
Services Advanced Client.
DataSafe NAS User’s Manual 14
Page 20

3. Log in.
4. Click the Start button, then select Help from the
Start menu.
Home Page
This default page (Figure 3) displays when you
connect to the DataSafe NAS from a client computer
on the network.
Figure 3 Home page
From the Home page, you can choose which task to
perform or which DataSafe NAS attribute to manage or
configure. For more information, see the following
topics:
n “Network Setup” on page 16
n “Disks and Volumes” on page 48
n “Manage Services” on page 59
n “Users and Groups” on page 93
n “Folders and Shares” on page 106
n “Maintenance” on page 132
n “Using Help” on page 13
DataSafe NAS User’s Manual 15
Page 21

2 Network Setup
From the Network Setup page, you can choose
which network-related properties of the DataSafe NAS
to configure:
n Identification—Set the name and domain
membership of the DataSafe NAS. (See
“Identification” on page 17.)
n Interfaces—Configure the local network settings
on the DataSafe NAS. (See “Interfaces: Network
Settings” on page 26.)
n Global Settings—Configure network settings
that apply to all network adapters on the DataSafe
NAS. (See “Global Settings: Network
Configuration” on page 34.)
n Change Administrator Password—Change
your password, or change the password of a user
who is also a member of the Administrators group
account. (See “Change Administrator Password”
on page 41.)
Note: The second component of this task applies to
the user currently accessing the DataSafe
NAS, not to members of the “Administrator”
account.
n SNMP Service Configuration—Configure the
properties of the SNMP service on the DataSafe
NAS. This topic is covered in the Manage Services
chapter. (See “SNMP Service Configuration” on
page 90.)
n NIC Configuration—Configure the properties
of the NIC on the DataSafe NAS. (See “NIC
Configuration” on page 43.)
DataSafe NAS User’s Manual 16
Page 22

Identification
The DataSafe NAS must be given a name. Clients use
this name to access the file shares that reside on the
unit.
The DataSafe NAS can be configured as a member of
one of the following:
n A Microsoft NT 4 domain
n A Microsoft Active Directory domain
n A Workgroup.
If no workgroups exist on the network (for example, if this is a Unix environment), this option
should be selected and any arbitrary name used.
User accounts may also be created locally on the
DataSafe NAS; however, using a domain or directory
eliminates the need to create local user accounts for
every user of the DataSafe NAS.
A good practice after joining a domain is to add one or
more domain users to the local administrators group,
then login under those user names to administer the
DataSafe NAS.
To set the name and domain membership of
the DataSafe NAS
1. On the primary menu bar, click Network Setup.
2. On the Network Setup page, click Identification.
The Server Appliance Identity page (Figure 4)
displays.
DataSafe NAS User’s Manual 17
Page 23
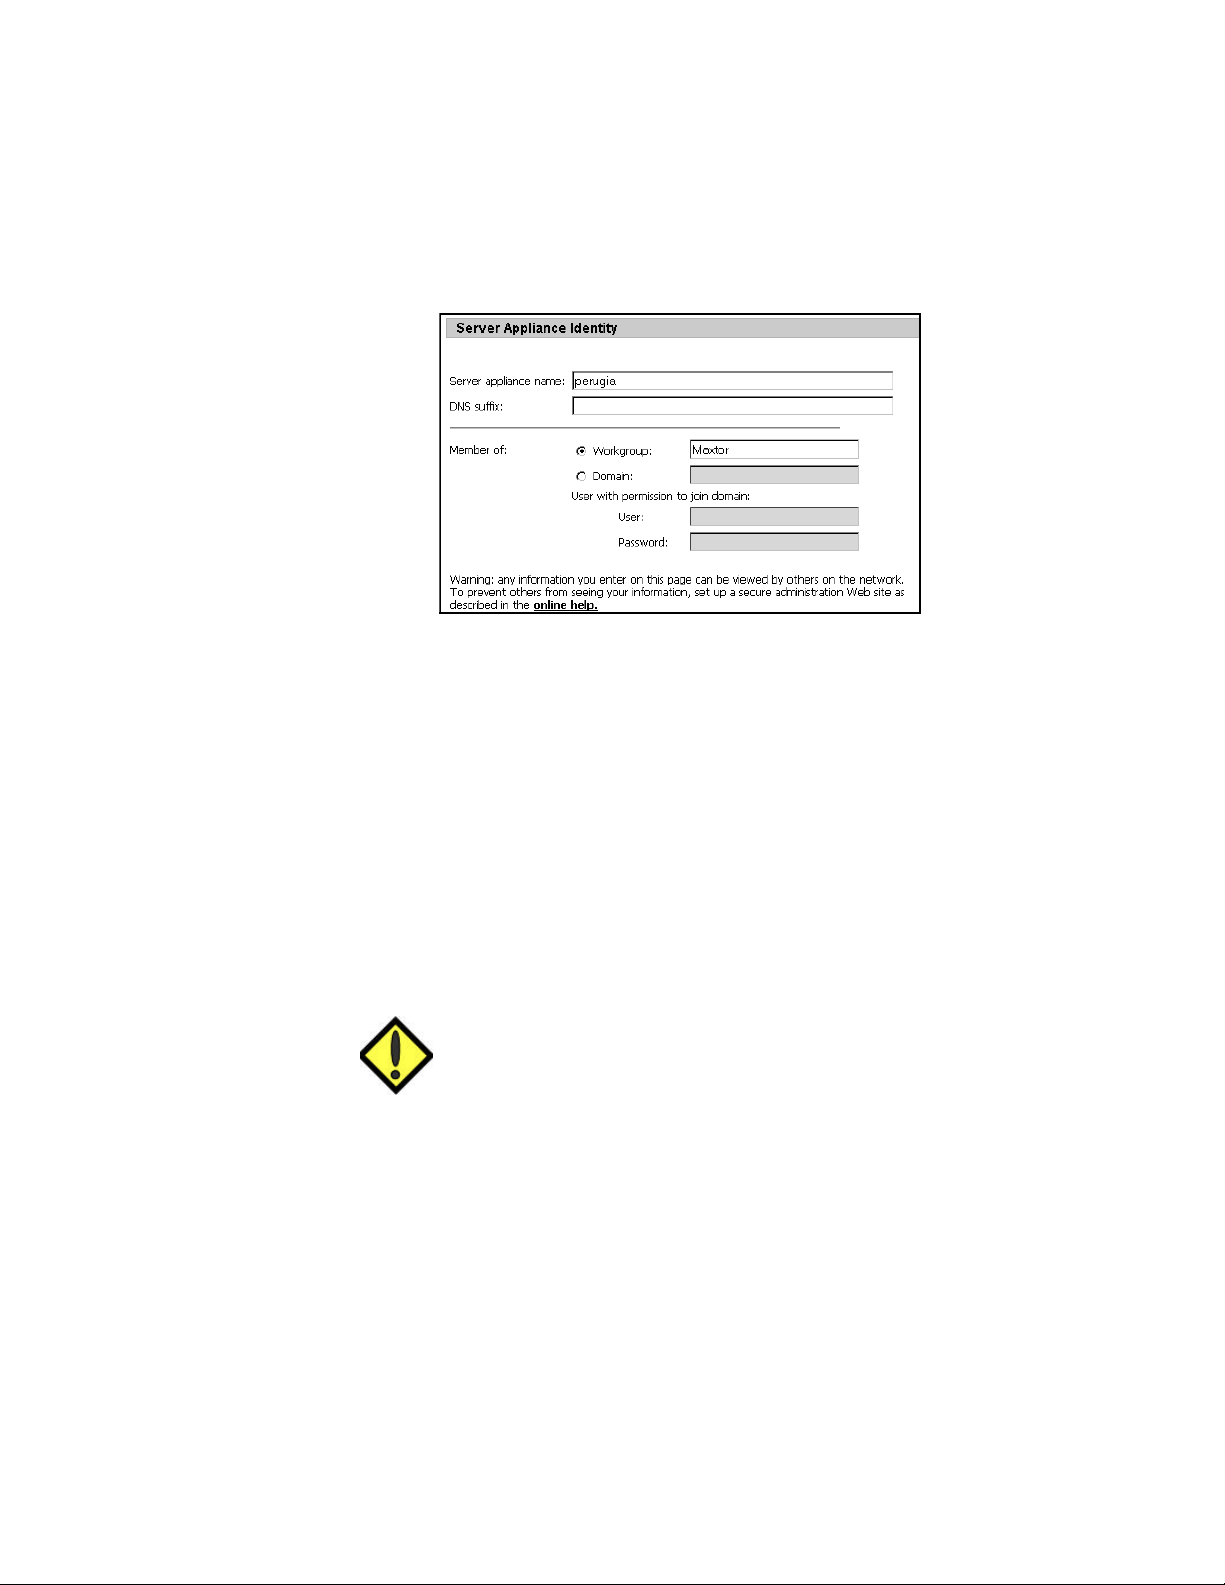
Figure 4 Server Appliance Identity page
3. In the text boxes provided, enter the appropriate
Server appliance name (DataSafe NAS name)
and domain-name system (DNS) suffix.
4. The DNS suffix is appended to the host name to
create the fully-qualified machine name.
5. Specify whether the client computer will be part of
a Workgroup or a Domain.
6. If the machine will be part of a domain, enter the
User name and Password of the person who has
permission to add client computers to the domain.
CAUTION: Enter the user name as
domainname\username and the
password as domainname\password.
7. Click OK to save your changes.
8. When prompted to reboot the DataSafe NAS, you
may either accept or cancel the reboot.
DataSafe NAS User’s Manual 18
Page 24

¨ If you click OK, the DataSafe NAS will reboot
and the Restarting page will appear. When
the DataSafe NAS is back online, the Home
Page of the Web UI will display and your
changes will be in effect.
¨ If you click Cancel, the changes to the
DataSafe NAS identity will not take effect until
the next reboot.
Section Topics
For more details on the above instructions, see the
following topics in this section:
n “Server Appliance Name” on page 19
n “DNS Name Resolution” on page 20
n “DNS Suffixes” on page 22
n “Workgroup” on page 23
n “Workgroup” on page 23
Related Topics
n “Initial DataSafe NAS Configuration” on page 13
Server Appliance Name
The server appliance name is the name of the
DataSafe NAS on a network. The appliance name must
be unique and must meet certain requirements. The
new server appliance name cannot be the same as
another computer, or the name of a Microsoft
Windows domain.
It is recommended that you use names that are 15
characters or fewer. The server appliance name can be
up to 63 characters long but should only contain the
numbers 0-9, the uppercase letters A-Z and the
lowercase a-z, and hyphens. You may use other
characters, but doing so may prevent other users from
finding your computer on the network. If your network
is using the Microsoft DNS server, you can use any
DataSafe NAS User’s Manual 19
Page 25

characters except periods. If other networking
protocols are installed without TCP/IP, the server
appliance name is limited to 15 characters.
If you specify a server appliance name longer than 15
characters and you want longer names to be
recognized by the Microsoft Active Directory domain,
the domain administrator must enable registration of
DNS names that are 16 bytes or longer.
DNS Name Resolution
When DNS name resolution begins, the DNS resolver
first checks what type of name was submitted.
Three types of DNS names can be submitted:
n Fully qualified domain names (FQDN) —
These names are terminated with a period. For
example:
host.reskit.com.
n Single-label, unqualified domain names —
These names contain no periods. For example:
host
n Multiple-label, unqualified domain names
— These names contain one or more periods but
are not terminated with a period. For example:
host.reskit.com
- Or host.reskit
When a user enters an FQDN, the resolver queries DNS
using that name. Likewise, when a user enters a
multiple-label, unqualified name, the DNS resolver
DataSafe NAS User’s Manual 20
Page 26

adds a terminating period and then queries DNS using
that name.
However, if you enter a single-label, unqualified
name, or a multiple-label, unqualified name, and the
name fails to resolve as an FQDN, the resolver
systematically appends different DNS suffixes to the
name that you entered, adding periods to make them
FQDNs. The resolver then resubmits the name to DNS.
If you have not entered a domain suffix search list, the
DNS resolver appends the following names:
1. The primary DNS suffix.
2. If the DNS suffix does not successfully resolve
after you enter the DNS name, the resolver
appends each connection-specific DNS suffix.
This suffix can be dynamically assigned by the
DHCP server. You can also specify suffixes on the
DNS tab in the Global Network Settings.
From the primary menu bar, select Network
Setup, then click Global Network Settings.
If DNS name resolution is still unsuccessful, the DNS
resolver devolves the FQDN by appending the parent
suffix of the primary DNS suffix name, and the parent
of that suffix, and so on, until only two labels are left
On the other hand, if you have entered a list of specific
DNS suffixes, both the primary DNS suffix and the
connection-specific domain name are ignored. In such
a case, neither is appended to the host name before
the FQDN are submitted to DNS. Instead, the resolver
appends each suffix from the search list in order, and
then submits the name to the DNS server until the
resolver finds a match or reaches the end of the list.
For example, if you enter the name client, and the
primary DNS suffix is eu.reskit.com, the resolver will
first try client.eu.reskit.com, and then
client.reskit.com.
DataSafe NAS User’s Manual 21
Page 27

DNS Suffixes
Domain-name system (DNS) suffixes have two primary
purposes:
1. When appended to the server appliance host
name, (DataSafe NAS name) DNS suffixes
comprise the fully-qualified server appliance
name.
2. DNS suffixes are used to resolve IP addresses. If
your DataSafe NAS is a member of a Microsoft
Windows NT 4 domain, a Microsoft Active
Directory, or a workgroup, the DNS suffix is
dependent upon the domain environment.
The default setting for the local primary DNS suffix is
the same as the Active Directory domain name.
Changing the DNS suffix will not affect your domain
membership, but it can prevent other users from
locating your DataSafe NAS on the network. If you
rename the primary DNS suffix to something other
than the Active Directory domain name, the domain
administrator must enable registration of the new full
computer name in the Active Directory domain.
DataSafe NAS User’s Manual 22
Page 28

If you switch to a new Active Directory and select
Change primary DNS suffix when domain
membership changes, the DNS suffix is updated to
match the new Active Directory domain that you are
joining. For example, suppose your current DNS suffix
is MyMachine, and you join a new Active Directory
domain called example.microsoft.com. The new DNS
suffix, (example.microsoft.com), is displayed under
the Primary DNS suffix of this computer, replacing the
DNS suffix (MyMachine) previously created for
membership under the old domain.
If your computer belongs to a group with a group
policy enabled on the primary DNS suffix of the
DataSafe NAS, the string specified in the group policy
is used as the primary DNS suffix. The local setting is
used only if a group policy is disabled or unspecified.
Including hyphens and periods, a DNS suffix may
contain up to 155 characters.
Related Topics
n “DNS Settings” on page 29
n “DNS Name Resolution” on page 20
Workgroup
A workgroup is a simple grouping of computers,
intended only to help users find such things as
printers and shared folders within that group.
Workgroups in Microsoft Windows 2000 do not offer
the centralized user accounts and authentication
offered by domains.
n A workgroup name must not duplicate the
computer name. A workgroup name can have as
many as 15 characters, but cannot contain any of
the following characters: ; : " < > * + = \ | ? ,
DataSafe NAS User’s Manual 23
Page 29
To set or change the workgroup membership
of the DataSafe NAS
1. On the primary menu bar, click Network Setup.
2. On the Network Setup page, click Identification.
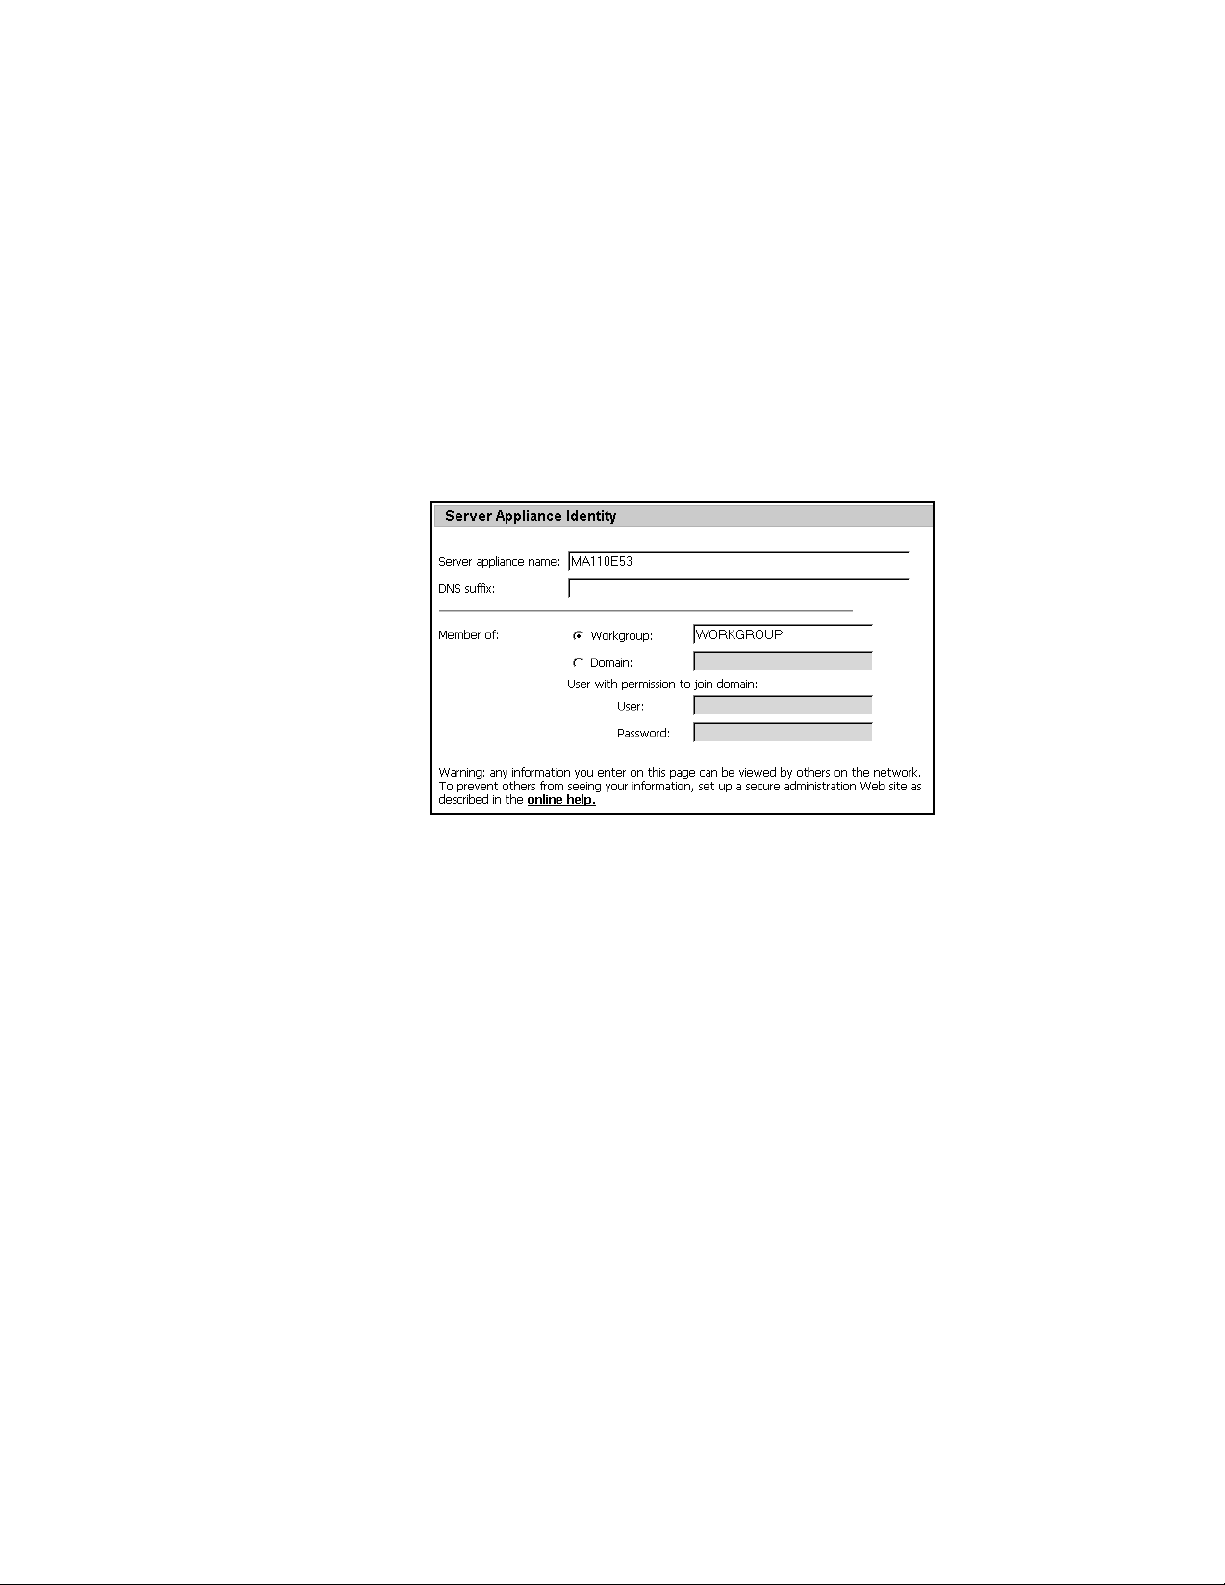
The Server Appliance Identity page (Figure 5) dis-
plays.
Figure 5 Server Appliance Identity
3. Select the Workgroup radio button and enter
the name of the workgroup to join.
4. If the DataSafe NAS belonged to a domain before
you joined the workgroup, the DataSafe NAS will
be disjoined from the domain and the computer
account will be disabled.
5. Click OK.
6. You will be asked to reboot the DataSafe NAS. You
may accept the reboot, or cancel it.
n If you click OK, the DataSafe NAS will reboot and
a page will appear indicating that the unit is
restarting. After the DataSafe NAS is back online,
you must reinitiate your browser, then return to
DataSafe NAS User’s Manual 24
Page 30

the Home Page of the Web UI to see your
changes in effect.
n If you click Cancel, the changes to the server
appliance (DataSafe NAS) identity will not take
effect until the next reboot.
Domain
In Microsoft Windows NT 4 and Microsoft Active
Directory environments, a domain is a collection of
computers defined by the administrator of a network
that share a common directory database.
A domain has a unique name and provides access to
the centralized user accounts and group accounts
maintained by the domain administrator. Each
domain has its own security policies and security
relationships with other domains, and each domain
represents a single security boundary of a Windows
computer network. Active Directory is made up of one
or more domains, each of which can span more than
one physical location.
For DNS, a domain is any tree or subtree within the
DNS namespace. Although the names for DNS
domains often correspond to Active Directory
domains, DNS domains should not be confused with
Microsoft Windows and Active Directory networking
domains.
CAUTION: When setting the name and domain
membership of the DataSafe NAS and
specifying the user with permission to
join domain, you must enter the user
name as domainname\username and
the password as
domainname\password.
DataSafe NAS User’s Manual 25
Page 31

Interfaces: Network Settings
Network Protocol Settings allow your computer to
connect to other computers on a network in order to
share information.
For NIC Configurations go to page 44
From the Network Adapters page (Figure 6) of the
DataSafe NAS Web UI, you can:
n Set or change the Internet Protocol (IP) and
Gateway addresses, subnet masks, and metrics.
n Set or change the configuration of the DNS clients.
n Set or change the configuration of the WINS
clients.
Figure 6 Network Adapters on Server Appliance
DataSafe NAS User’s Manual 26
Page 32

IP Settings
Each computer on the network must have a unique IP
address to send and receive data. You can use the IP
Address Configuration screen to have your
DataSafe NAS automatically obtain the IP address
configuration from the Dynamic Host Configuration
Protocol (DHCP) server. You can also configure the
address(es) manually.
In addition, you can use the IP Address
Configuration screen to specify one or more
gateway addresses. (A gateway address is the
address of a local IP router on the same network as
the DataSafe NAS that is used to forward traffic to
destinations beyond the local network.) The value in
each field must be a number from 0 through 255.
Note: Changing the IP address may cause the client
to lose its connection with the DataSafe NAS.
To reconnect, the user must either use the new
IP address or wait until the DNS server is
updated.
To automatically set or change the IP settings
1. On the primary menu bar, click Network Setup.
2. On the Network Setup page, click Interfaces.
3. On the Object Selection table, select the
network connection to modify.
4. On the Tasks list, select IP.
The IP Address Configuration page (Figure 7) dis-
plays.
DataSafe NAS User’s Manual 27
Page 33

Figure 7 IP Address Configuration
5. Next to the Configuration option, select whether
to obtain the configuration automatically from the
DHCP server, or to manually configure the IP
address(es).
If you choose to obtain the configuration from the
DHCP server, click OK to save your changes and
finish this task.
To manually set or change the IP settings
1. In the IP address text box, type the IP address,
then click Add.
The metric indicates the cost of using the routes
associated with this connection and becomes the
value in the Metric column for those routes in the
IP routing table. If there are multiple routes to a
destination in the IP routing table, the route with
the lowest metric is used. The default value is 1.
DataSafe NAS User’s Manual 28
Page 34

2. For a local area connection, in the Subnet mask
text boxes, type the appropriate mask
information.
A subnet mask is a 32-bit number that is notated
by using four numbers from 0 through 255, separated by periods. Typically, default subnet mask
numbers use either 0 or 255 as values (such as
255.255.255.0). However, other numeric values
can appear, indicating that subnetting is configured for a single TCP/IP network. This number
(with a value other than 0 or 255) is combined with
the IP address number to identify which network
your computer resides on.
3. Repeat steps 1 – 3 for any other IP addresses you
wish to add.
To set or change the Gateway address settings
1. In the Gateway and Metric text boxes, type the
IP address of both the default gateway and the
metric, then click Add.
2. Repeat step 1 for each default gateway you want to
add.
3. When you are finished modifying the
configurations on this screen, click OK to save the
changes and finish this task.
DNS Settings
The domain-name system (DNS) is a static,
hierarchical name service for TCP/IP hosts. The
network administrator configures the DNS with a list
of host names and IP addresses. This allows users on
the network to query the DNS to specify remote
systems by host names rather than IP addresses.
DataSafe NAS User’s Manual 29
Page 35

Note: The purpose of this property page is to allow
you to enter the addresses of EXTERNAL DNS
servers. The DataSafe NAS does not contain a
DNS server.
For example, a workstation configured to use DNS
name resolution could use the command ping
remotehost rather than ping 1.2.3.4 if the mapping
for the system named remotehost was contained in
the DNS database. DNS domains should not be
confused with Microsoft Windows domains.
In the DNS client-server model, the server containing
information about a portion of the DNS database (the
portion that makes computer names available to
clients) queries for name resolution across the
Internet.
To set the DataSafe NAS to automatically
obtain DNS information from a DHCP server
1. On the primary menu bar, click Network Setup.
2. On the Network Setup page, click Interfaces.
3. On the Object Selection table, select the
network connection to modify.
4. On the Tasks list, select DNS.
The DNS Configuration page (Figure 8) displays.
DataSafe NAS User’s Manual 30
Page 36

Figure 8 DNS Configuration
5. Next to the Configuration option, select the
Obtain configuration from DHCP server
radio button.
6. Click OK.
To manually set the DNS servers to be used by
the DataSafe NAS
1. On the primary menu bar, click Network Setup.
2. On the Network Setup page, click Interfaces.
3. From the Object Selection table, select the
network connection to modify.
4. On the Tasks list, select DNS.
5. Next to the Configuration option (see Figure 8
on page 31), select the Configure manually
radio button.
6. Enter the appropriate server name in the box next
to the Add button, then click Add.
7. To add another DNS server, repeat step 5.
8. When you are finished adding DNS servers, click
OK.
Note: If the IP address is set to be obtained from
DHCP, and you set DNS manually, the system
will accept the manual input, and the
properties on the DataSafe NAS will
automatically be set to Configure
manually. However the Current
Configuration column of the Object
Selection table on the Network Adapters
page will still show DHCP as the source of the
IP address. You can go back into the DNS
settings properties page to confirm that the
manual configuration has been saved.
DataSafe NAS User’s Manual 31
Page 37

WINS Settings
WINS clients attempt to register their names with a
WINS server when they start or join the network.
Thereafter, WINS clients query the WINS server as
needed to resolve remote names.
Note: The purpose of this property page is to allow
you to enter the addresses of EXTERNAL WINS
servers. The DataSafe NAS does not contain a
WINS server.
WINS-enabled clients are computers that can be
configured to make direct use of a WINS server. Most
WINS clients typically have more than one NetBIOS
name that they must register for use with the network.
These names are used to publish various types of
network service, such as the Messenger or
Workstation Service, that each computer can use in
various ways to communicate with other computers
on the network.
WINS-enabled clients communicate with the WINS
server to:
n Register client names in the WINS database.
n Renew client names with the WINS database.
n Release client names from the WINS database.
n Resolve names by obtaining mappings from the
WINS database for user names, NetBIOS names,
DNS names, and IP addresses.
Clients that are not WINS-enabled can use WINS
proxies to participate in these processes in a limited
way. If you are using a DHCP server to allocate WINS
server IP addresses, you do not need to add WINS
server addresses.
Keep in mind that the Web UI only allows you to
manipulate two WINS addresses, and even then only if
DataSafe NAS User’s Manual 32
Page 38

you statically assign the IP address for the adapter. If
you have DHCP enabled, you can remove one or two
existing addresses and add different addresses, but
you will not be able to remove all WINS servers from a
DHCP-enabled adapter. If you remove two WINS
addresses and do not add at least one, DHCP will
automatically assign WINS addresses.
To change the WINS settings of the DataSafe
NAS
1. On the primary menu bar, click Network Setup.
2. On the Network Setup page, click Interfaces.
3. On the Object Selection table, select the network
connection to modify.
4. On the Tasks list, select WINS.
The WINS Configuration page (Figure 9) displays.
Figure 9 WINS Configuration
5. In the text box next to the Add button, type the IP
address of the WINS server, then click Add.
6. Repeat steps 4 and 5 for each WINS server IP
address you want to add.
7. Click OK.
DataSafe NAS User’s Manual 33
Page 39

Global Settings: Network Configuration
From this page, you can change the overall network
settings for your DataSafe NAS by specifying the DNS
suffixes and the LMHOSTS file to use. LMHOSTS can
be used to resolve the names of any computer or
device. Note that the DNS suffix used here applies
when the DataSafe NAS is trying to resolve a host or
domain name.
To automatically set or change DNS suffixes
1. On the primary menu bar, click Network Setup.
2. On the Network Setup page, click Global
Settings.
The Global Network Settings page (Figure 10) displays.
Figure 10 Global Network Settings
3. Under DNS suffixes to use, select Append
primary DNS suffix.
DataSafe NAS User’s Manual 34
Page 40

4. Additionally, you may choose to Append
primary DNS suffix and parent suffixes by
marking the check box next to this option.
5. Click OK.
To manually add specific DNS suffixes
1. On the Network Setup page, click Global
Network Settings (see Figure 10).
2. Under DNS suffixes to use, select Append
specific DNS suffixes.
3. In the text box next to the Add button, enter the
DNS suffix you wish to add, then click Add.
4. The new entry will appear in the list box to the left
of the Add button.
5. Click OK.
To manually remove specific DNS suffixes
1. On the Network Setup page, click Global
Network Settings (see Figure 10).
2. Under DNS Suffixes to use, select Append
specific DNS suffixes.
3. In the list box, highlight the suffix to delete, then
click Remove.
4. Click OK.
To edit the LMHOSTS file
1. On the Network Setup page, click Global Network
Settings (see Figure 10).
2. Enable the LMHOSTS file lookup by checking the
Enabled LMHOST lookup box.
By default, the text box in this portion of the
screen contains the current LMHOSTS configuration.
3. Edit the LMHOSTS file.
DataSafe NAS User’s Manual 35
Page 41

4. Click OK.
LMHOSTS Files
About Name Resolution
In order for people to reach your site on an intranet,
you must have a unique IP address that identifies your
computer on the network. This address takes the form
of a long string of numbers separated by dots (for
example, 172.16.255.255). Because a numeric address
is difficult for people to remember, text names or
“friendly names” are used to provide visitors with an
easy-to-remember address, such as \\MyStoredFiles.
Name resolution involves interpreting the correct
numerical address from the friendly name that was
typed into a client browser. This section describes
different name resolution systems.
The use of an LMHOSTS file is optional. If an LMHOSTS
file is not used, users cannot use “friendly” text
names instead of IP addresses. This can be a
disadvantage because Web sites on the Internet
usually use the Domain Name System. If you register a
domain name for your site, users can type your site's
domain name in a browser to contact your site.
The LMHOSTS file is read when WINS or broadcast
name resolution fails, and resolved entries are stored
in a system cache for later access. When the computer
uses the replicator service and does not use WINS,
LMHOSTS entries are required on import and export
servers for any computers on different subnetworks
participating in the replication.
You can use Microsoft Notepad or any other text editor
to edit the sample LMHOSTS.sam file that is
automatically installed in the \Windows directory. The
following rules apply for entries in the LMHOSTS file:
n Each entry should be placed on a separate line.
DataSafe NAS User’s Manual 36
Page 42

n The IP address should begin in the first column,
followed by the corresponding computer name
(entries in the LMHOSTS file are not casesensitive).
n The address and the computer name should be
separated by at least one space or tab.
n The number sign (#) character is typically used to
mark the start of a comment. However, this
character can also be used to designate special
keywords, as described in this section.
The keywords listed in the following table can be used
in the LMHOSTS file. Notice, however, that LAN
Manager 2.x treats these keywords as comments.
Keyword Definition
#PRE Added after an entry to cause
that entry to be preloaded into
the name cache. #PRE entries in
the LMHOSTS file are looked up
and cached prior to WINS lookup. #PRE must be appended for
entries that also appear in
#INCLUDE statements;
otherwise, the entry in
#INCLUDE is ignored.
#DOM:domain Added after an entry to
associate that entry with the
domain specified by domain.
This keyword affects how the
Browser and Logon services
behave in routed TCP/IP
environments. To preload a
#DOM entry, you must also add
the #PRE keyword to the line.
DataSafe NAS User’s Manual 37
Page 43

#INCLUDE filename Forces the system to seek the
specified filename and parse it
as if it were local. Specifying a
universal naming convention
(UNC) filename allows you to
use a centralized LMHOSTS file
on a server. You must map the
server before its entry in the
#INCLUDE section, and also
append #PRE to ensure that it is
preloaded (otherwise the
#INCLUDE will be ignored).
#BEGIN_ALTERNATE Used to group multiple
#INCLUDE statements. Any
single successful #INCLUDE
statement causes the group to
succeed.
DataSafe NAS User’s Manual 38
Page 44

#END_ALTERNATE Used to mark the end of an
#INCLUDE grouping.
\0xnn Support for nonprinting
characters in NetBIOS names.
Enclose the NetBIOS name in
quotation marks and use \0xnn
hexadecimal notation to specify
a hexadecimal value for the
character. This allows custom
applications that use special
names to function properly in
routed topologies. However,
LAN Manager TCP/IP does not
recognize the hexadecimal
format, so you surrender
backward compatibility if you
use this feature.
Notice that the hexadecimal
notation applies only to one
character in the name. The
name should be padded with
blanks so the special character
is placed as the last character
in the string (character 16).
The following example shows how all of these
keywords are used:
102.54.94.98 localsrv #PRE
102.54.94.97 trey #PRE
#DOM:networking #net group's PDC
102.54.94.102 "appname \0x14" #special
app server
102.54.94.123 popular #PRE
#source server
#BEGIN_ALTERNATE
#INCLUDE \\localsrv\public\LMHOSTS #adds
LMHOSTS from this server
DataSafe NAS User’s Manual 39
Page 45

#INCLUDE \\trey\public\LMHOSTS #adds
LMHOSTS from this server
#END_ALTERNATE
In the preceding example:
n The servers named localsrv and trey are
preloaded so they can be used later in an
#INCLUDE statement in a centrally maintained
LMHOSTS file.
n The server named "appname \0x14" contains a
special character after the 15 characters (including
blanks) in its name, so its name is enclosed in
quotation marks.
n The server named popular is preloaded, based on
the #PRE keyword.
Guidelines for LMHOSTS files
When you use a host table file, be sure to keep it upto-date and organized. Follow these guidelines:
n Update the LMHOSTS file whenever a computer is
changed or removed from the network.
n Use #PRE statements to preload popular entries
into the local computer's name cache. Also use
#PRE statements to preload servers that are
included with #INCLUDE statements.
n Because LMHOSTS files are searched from the
beginning one line at a time, you can increase the
search speed for the most commonly used entries
by placing statements for the most frequently
used servers near the top of the file. Follow these
with statements for less frequently used servers,
and then follow these server statements with
remote #INCLUDE statements. Enter the #PRE
entries at the end of the file (because these
statements are preloaded into the cache at system
startup time and are not accessed later).
Remember that comment lines add to the parsing
time, because each line is processed individually.
DataSafe NAS User’s Manual 40
Page 46

Change Administrator Password
The DataSafe NAS comes with a set of default
accounts. Only the Administrator account has
administrative privileges. The default User Name is:
Admnistrator, and the Password is blank (none).
Note: If an administrator adds a domain account to
the local Administrators group, the domain
user may access and administer the DataSafe
NAS. However, the administrator cannot use
the Change Administrator Password
page to change his or her (domain account)
password. This page can only be used to
change the local administrator's account
password.
WARNING: If you change the user name and
password, be certain that you keep a
record of the changes. If you forget
and cannot locate the new user name
or password, neither you nor Iomega
Technical Support will be able to
administer your DataSafe NAS.
To change the Administrator password for the
DataSafe NAS
1. On the primary menu bar, click Network Setup.
2. On the Network Setup page, click Change
Administrator Password.
3. Enter the current administrator password in the
Current password box.
4. Enter the new administrator password in the New
password box.
DataSafe NAS User’s Manual 41
Page 47

Note: The new administrator password must
conform to any password complexity rules in
effect for the domain to which the DataSafe
NAS belongs.
5. Re-type the new administrator password in the
Confirm new password box.
6. Click OK.
Related Topics
n “Initial DataSafe NAS Configuration” on page 13
Administration Web Server
This feature allows you to change the IP address(es)
and port that can be used to access the administration
site on the DataSafe NAS.
The default IP address to which the DataSafe NAS
responds or “listens” is typically changed in cases
where the DataSafe NAS is only managed on a certain
subnet or a separate management network.
The default listen port can be modified as needed to
work with existing network software and
configurations— for example, in the event that no
traffic above a given port number is allowed.
To change the Administration Web Site
properties
1. On the primary menu bar, click Network Setup.
2. On the Network Setup page, click Administration
Web Server.
The Administration Site Properties page (Figure 11)
displays.
DataSafe NAS User’s Manual 42
Page 48

Figure 11 Administration Site Properties
3. On the General tab of the Administration Site
Properties page:
a. Specify whether to use All IP Addresses or
Just this IP Address.
b. If you choose to use Just this IP Address¸ use
the drop-down list to select the IP address to
use.
c. If changing the port, enter the new port num-
ber in the Port text box.
4. Click OK.
NIC Configuration
CAUTION: The DataSafe NAS comes with default
NIC Configuration settings, designed
for optimum use. Iomega Corporation
highly recommends that these setting
not be changed.
DataSafe NAS User’s Manual 43
Page 49

Adaptive Load Balancing
The default setting for your NIC configuration is Team
with Adaptive Load Balancing. This design ensures
optimum performance in NIC failover support, when
both network ports are connected to the same subnet.
However, if you find it necessary to change your
configuration to access the DataSafe NAS from more
than one subnet, the NIC configuration can be
changed to have each NIC port connected to a
different subnet. Please note that if you change the
NIC configuration, the NIC failover feature is not
provided.
Refer to the following representation of the Network
Component Tree, which appears on the left side of the
PROSet dialog box.
Figure 12 PROSet
NIC Team Configuration
The Adapters in a Team status box (Figure 13)
provides the following details:
DataSafe NAS User’s Manual 44
Page 50

n Adapter: Lists each adapter by name.
n Priority: Lists the priority status for the adapters
in a team (if you have specified a priority). You can
specify that an adapter serve as the Primary or
Secondary adapter within the Adapter Fault
Tolerance function of a team.
The Status column lists the following states:
n Active: The currently active adapter(s) in a team.
Adapters in FEC or GEC mode display this status to
show they are always active.
n Standby: The current standby adapter In a team.
n Disabled: The adapter has been removed or is
defective, or the driver has failed to load.
Figure 13 Adapters in a team
The Team Information section lists the following
details:
n IP Address: Lists the IP Address for the adapter.
n Team Type: Lists the team type for the adapter
highlighted in the Adapters in a Team status box.
DataSafe NAS User’s Manual 45
Page 51

Note: When you add a new team or if you delete a
team from the Network Control Panel, the
frame type for each adapter in the team
reverts to Auto. This is important only if you
need to manually set the frame type on your
adapters.
Breaking and Restoring Team
Configuration
CAUTION: To allow two different subnets to
access the DataSafe NAS, you must
break team configuration. In this case
the NIC failover feature will not be
provided.
To break team configuration
1. On the primary menu bar, click Network Setup.
2. On the Network Setup page, click NIC
Configuration.
3. Follow the prompts and re-enter your password.
The Adapters in a team window displays (see Figure 13 on page 45).
4. Select the Team adapter in the component tree.
5. From the Action menu, select the Remove
command.
6. Click OK to commit the new configuration.
To restore team configuration
1. On the primary menu bar, click Network Setup.
2. On the Network Setup page, click NIC
Configuration.
3. Follow the prompts and reenter your password.
DataSafe NAS User’s Manual 46
Page 52

The Adapters in a team window displays (see Figure 13 on page 45).
4. Select the first server adapter in the component
tree.
5. From the Action menu, select the Add to team
then Create new team.
6. In the Teaming Wizard that opens, choose
Adaptive Load Balancing, then click Next.
7. In the next screen of the wizard, select both of the
10/100 Server Adapters and click Next.
8. Click Finish, then OK to exit.
DataSafe NAS User’s Manual 47
Page 53

3 Disks and Volumes
From this page you can perform the following tasks on
the DataSafe NAS:
n Configure the properties of individual disks and
volumes. (See “Configure Disk and Volume
Properties” on page 48.)
n Configure disk quotas. (See “Disk Quotas” on
page 51.)
Configure Disk and Volume Properties
Your DataSafe NAS is pre-configured in RAID5 for
optimum use in most environments, and it is
recommended that you maintain this default
configuration.
WARNING: The first 3GB on each disk drive is
reserved. Modification of any system
partition may cause your DataSafe
NAS unit to function improperly.
If you are an advanced user, and your system requires
a different configuration, such as JBOD, RAID0 or
RAID1, it is recommended you make this change prior
to beginning normal operations. If you later decide to
change the drive configuration, the drive will be
reformatted and all data will be erased.
Note: Changes to Disks and Volumes, Backup, NIC
Configuration, SNMP Configuration, and
Macintosh and NetWare Shares, are all
operations that are completed within Terminal
Services. In these cases, the user is limited to
2 concurrent connections. If the user attempts
DataSafe NAS User’s Manual 48
Page 54

to open more than 2 connections, a message
will be displayed.
To manage disks and volumes on the DataSafe
NAS
1. On the primary menu bar, select Disks and
Volumes.
2. On the secondary menu, select Disks and
Volumes.
3. Log in to the Terminal Services Client (TSC).
The Disk Management page (Figure 14) displays.
Figure 14 Disk Management
4. Delete any existing shares on any disk you wish to
modify. (See “Manage Windows and UNIX Shares”
on page 113 and “Manage Macintosh and NetWare
Shares” on page 125.)
DataSafe NAS User’s Manual 49
Page 55

5. Delete the existing volume(s) on the disk. (Right
click the volume and select Delete Volume.) Do
not delete the first 3 GB volume.
6. Confirm the deletion.
The volume changes to “Unallocated.”
7. Right click the unallocated space and create a new
volume with the configuration you desire.
The supported configurations are:
¨ Simple--not fault tolerant
¨ Spanned (JBOD)--not fault tolerant
¨ Striped (RAID-0)--not fault tolerant
¨ Mirrored (RAID-1)--fault tolerant
¨ RAID5--fault tolerant
Fore each of these options except Simple, a volume can be comprised of more than one disk.
8. Choose the Quick Format option to save time.
Configuration time depends on the configuration
type:
¨ Simple: within one minute, regardless of disk
size
¨ Spanned: within one minute, regardless of
disk size
¨ Striped: within one minute, regardless of disk
size
¨ Mirrored: about two minutes for a pair of
1000MB disk spaces
¨ RAID5: about five minutes for a group of four
1000MB disk spaces
The status area at the bottom of the Disk Management window shows the progress of the new configuration. When complete the status will be
“Healthy.”
DataSafe NAS User’s Manual 50
Page 56

9. When you are finished, close the application and
log out of TSC.
Note: It may take a few moments for the Terminal
Services session to log off when closing the
application.
Terminal Services Client
TSC is the tool used to manage disks and volumes on
your DataSafe NAS. TSC supports only two concurrent
connections. Additionally, if you navigate to another
page during an open session, the client will be
disconnected but the session will be preserved.
Related Topics
n “Terminal Services Client” on page 144
Disk Quotas
Disk quotas track and control disk space use for
volumes. You can configure the volumes on your
DataSafe NAS to:
n Prevent further disk space use and log an event
when a user exceeds a specified disk space limit.
n Log an event when a user exceeds a specified disk
space warning level.
When you enable disk quotas, you can set both
values: the disk quota limit and the disk quota
warning level. The disk quota limit specifies the
amount of disk space a user is allowed to use. The
warning level specifies the point at which a user is
nearing his or her quota limit. For example, you can
set a user's disk quota limit to 50 megabytes (MB),
and the disk quota warning level to 45 MB. In this
case, the user can store no more than 50 MB of files
on the volume. If the user stores more than 45 MB on
DataSafe NAS User’s Manual 51
Page 57

the volume, you can have the disk quota system log a
system event
You also can specify that users can exceed their quota
limit. Enabling quotas and not limiting disk space use
is useful when you do not want to deny users access
to a volume, but want to track disk space use on a peruser basis. You can also specify whether or not to log
an event when users exceed either their quota
warning level or their quota limit.
When you enable disk quotas for a volume, volume
usage is automatically tracked for new users from that
point on. However, existing volume users have no disk
quotas applied to them. You can apply disk quotas to
existing volume users by adding new quota entries in
the Quota Entries window.
Section Topics
n “Quota Management” on page 52— Enable or
disable quota management
n “Quota Entries” on page 53— Set quotas for
specific users
Quota Management
When you enable disk quotas on a volume, users with
write access to the volume who have not exceeded
their quota limit can store data on the volume. The
first time a user writes data to a quota-enabled
volume, default values for disk space limit and
warning level are automatically assigned by the quota
system.
This page is used to configure default quota values.
To enable or disable quota management on a
volume
1. On the primary menu bar, click Disks and
Volumes.
DataSafe NAS User’s Manual 52
Page 58

2. On the secondary menu, select Quota
Management.
The Volumes on Server Appliance page (Figure 15) displays.
Figure 15 Volumes on Server Appliance
3. From the Object Selection table on the Disk
Quota page, select the volume to manage.
4. On the Tasks list, select Quota.
5. On the Quota for Volume page, click the
appropriate check box to enable or disable quota
management.
Quota Entries
The Quota Entries page allows you to add, delete, or
configure disk quotas for any user of the DataSafe
NAS. Quotas are managed using the Object
Selection table, which has the following parts:
n Logon Name — This column displays the logon
name of each user with registered access to the
DataSafe NAS.
DataSafe NAS User’s Manual 53
Page 59

n Status — This column indicates whether or not the
user has exceeded the assigned quota limit.
Amount Used — This column indicates the
amount of disk space currently being used by a
given user.
n Quota Limit — This column indicates the
maximum amount of disk space that a user can
occupy on a volume.
How the DataSafe NAS behaves when this amount
is exceeded depends on the settings on the Vol-
ume Quotas property page. If the Deny disk
space to users exceeding quota limit option
is checked, the user will not be able to exceed this
limit. If the Log event when a user exceeds
their quota limit option is checked, an event log
message will be logged. If neither option is
checked, nothing will happen.
n Warning Level — This column indicates the
maximum amount of disk space that a particular
user can use before a warning appears indicating
that the quota has nearly been reached.
Note: A warning will only be generated if the user
exceeds the warning limit specified on the
Quota Management page AND if Log
event is checked on the Quota Entries
property page. If the Log event option is not
checked, no warning will be generated and
this column will remain empty. Typically the
Warning Limit value is set slightly below
the Quota Limit value.
Use the Object Selection table to select a user, then
click the task you want to perform from the Tasks list.
DataSafe NAS User’s Manual 54
Page 60

To set or change quota entries on the DataSafe
NAS
1. On the primary menu bar, click Disks and
Volumes.
2. On the Disks and Volumes page, select Disk
Quota.
3. From the Object Selection table on the Disk Quota
page (see Figure 15 on page 53), select the volume
to manage.
4. From the Tasks list, select Quota Entries.
The Quota Entries for Volume page (Figure
16) displays.
Figure 16 Quota Entries for Volume
Adding Quota Entries
To add a new quota entry
1. On the Tasks list, select New….
The New Quota Entry page (Figure 17) displays.
DataSafe NAS User’s Manual 55
Page 61

Figure 17 New Quota Entry
2. Select a local user from the list box, or type the
name of a domain account in the text box (using
the <domain name\user name>).
To allow unlimited disk usage
¨ Click the Do not limit disk usage radio button.
— OR —
To limit disk space
¨ Click the Limit disk space to radio button.
¨ In the text box, enter a numerical value to
specify the amount of disk space to assign to a
particular user or group. Use the drop-down
box to indicate kilobytes (KB), megabytes
(MB), gigabytes (GB), terabytes (TB),
petabytes (PB), or exabytes (EB).
¨ Enter the amount of disk space which, when
filled, will trigger a warning to the user or
group member that she is near her disk
capacity limit. Use the drop-down box to
indicate kilobytes (KB), megabytes (MB),
gigabytes (GB), terabytes (TB), petabytes (PB),
or exabytes (EB).
3. Click OK.
DataSafe NAS User’s Manual 56
Page 62

Removing Quota Entries
To remove a quota entry
1. From the Object Selection table on the Quota
Entries page, select the Logon name from
which you want to remove the quota entry.
2. On the Tasks list, select Delete.
3. Click OK.
Modifying Quota Properties
To modify the properties of a quota entry
1. On the Quota Entries page for the selected
volume, select a user account from the Logon
name field of the Object Selection table.
2. On the Tasks list, click Properties.
The Quota Entry for User page (Figure 18) displays.
Figure 18 Quota Entry for User
3. On the Quota entry for user page, do one of the
following:
To allow unlimited disk use
¨ Click the Do not limit disk use radio
button.
— OR —
To limit disk space
a. Click the Limit disk space to radio button.
DataSafe NAS User’s Manual 57
Page 63

b. In the text box, enter a numerical value to
specify the amount of disk space to assign to a
particular user or group. Use the drop-down
box to indicate kilobytes (KB), megabytes
(MB), gigabytes (GB), terabytes (TB),
petabytes (PB), or exabytes (EB).
c. Enter the amount of disk space which, when
filled, will trigger a warning to the user or
group member that she is near her disk capacity limit. Use the drop-down box to indicate kilobytes (KB), megabytes (MB), gigabytes (GB),
terabytes (TB), petabytes (PB), or exabytes
(EB).
d. Click OK.
DataSafe NAS User’s Manual 58
Page 64

4 Manage Services
The service management page allows you to enable
and start, disable and stop, or configure relevant
network services. The Manage Services page
displays the Object Selection table. The Object
Selection table has the following parts:
n Name — This column lists each service by name.
To enable, disable, or change the properties of a
given service, click the radio button next to the
service you want to modify.
n Status — This column indicates that the service is
Running, or is Paused. The column remains blank
if the service is not stopped.
n Startup Type — This column indicates whether
the service should: 1) start automatically when the
DataSafe NAS boots, 2) be invoked manually, or 3)
be disabled.
n Description — This column displays a brief
description of the service.
The Tasks list is located next to the Object
Selection table. Use the Object Selection table to
select a service. To perform a task, click the
appropriate task from the Tasks list.
Chapter Sections
This chapter contains the following Sections:
n “Enable Services” on page 61
n “Disable Services” on page 61
n “Configure Service Properties” on page 61
DataSafe NAS User’s Manual 59
Page 65

Enable Services
Microsoft recommends that you enable only the
necessary network components. Limiting the number
of enabled network components will enhance the
performance of other network services. Additionally, if
a problem is encountered with a network or dial-up
connection, the system will attempt to establish
connectivity by using every network protocol that is
installed and enabled. By only enabling the services
that your system can use, the DataSafe NAS can
conserve resources and perform better.
To enable a network service
1. On the primary menu bar, click Services.
The Manage Services page (Figure 19) displays.
Figure 19 Manage Services
2. On the Object Selection table, select the service
to enable.
3. On the Tasks list (adjacent to the Object
Selection table), click Enable.
DataSafe NAS User’s Manual 60
Page 66

4. Click OK to confirm your choice.
Disable Services
To disable a network service
1. On the primary menu bar, click Services.
2. On the Object Selection table, select the service
to disable.
3. On the Tasks list (adjacent to the Object
Selection table), click Disable.
4. Click OK.
Configure Service Properties
Use the property page of the designated service to
configure the desired network services.
To configure network service properties
1. On the primary menu bar, click Services.
2. On the Object Selection table, select the service
to configure.
3. On the Tasks list (adjacent to the Object
Selection table), click Properties….
The Service Properties page displays. (Figure
20 shows the HTTP Service Properties page.)
DataSafe NAS User’s Manual 61
Page 67

Figure 20 HTTP Service Properties
For instructions about configuring a specific service,
see the appropriate topic:
n “NFS Service” on page 62
n “FTP Service” on page 77
n “Web (HTTP) Service” on page 83
n “NetWare Service” on page 88
n “Indexing Service” on page 88
n “Mac Service” on page 89
n “Telnet Service” on page 89
NFS Service
You can use the NFS Service option to configure the
DataSafe NAS to act as an NFS server. The NFS
Service allows users to share files in a mixed
environment of computers, operating systems, and
networks. When the DataSafe NAS is configured as an
NFS server, file access and administrative tasks are
performed through the Web UI.
The NFS Service uses the NFS protocol, which is
based on the Open Network Computing Remote
Procedure Call (ONC-RPC). Remote calls from clients
appear to run locally, but remote calls actually run on
DataSafe NAS User’s Manual 62
Page 68

the NFS server. The Open Network Computing External
Data Representation (ONC-XDR) protocol ensures
portable data transmission between NFS clients and
the NFS server.
You can use the NFS Service to manage NFS
Client Groups, NFS Locking, and NFS User
and Group mappings. NFS Shares, however, are
created from the Folders and Shares section of the
Web UI. See the following topics for more information:
n “NFS Client Groups” on page 64
n “NFS Locks” on page 67
n “User and Group Mappings” on page 69
n “Folders and Shares” on page 106
Section topics:
This section contains the following topics:
n “Network Protocol Overview: NFS” on page 63
n “NFS Client Groups” on page 64
n “NFS Locks” on page 67
n “User and Group Mappings” on page 69
Network Protocol Overview: NFS
With the NFS Service, a DataSafe NAS can act as a
Network File System (NFS) server. Users can then
share files in a mixed environment of computers,
operating systems, and networks.
Users on computers running NFS client software can
gain access to files (called shares) on the DataSafe
NAS by connecting (mounting) those files to their
computers. From the viewpoint of the user on a client
computer, the mounted files are indistinguishable
from local files.
The NFS Service uses the Open Network Computing
remote procedure call (ONC RPC) protocol to
implement the NFS protocol. The NFS Service also
DataSafe NAS User’s Manual 63
Page 69

uses the external data representation (XDR) protocol
to ensure portable data transmission between NFS
clients and the DataSafe NAS.
UNIX computers follow advisory locking for all lock
requests. This means that the operating system does
not enforce lock semantics on a file, and applications
that check for the existence of locks can use these
locks effectively. However, the NFS Service
implements mandatory locks even for those locking
requests that are received through NFS. This ensures
that locks acquired through NFS are visible through
the server message block (SMB) protocol and to
applications accessing the files locally. Mandatory
locks are enforced by the operating system.
Related Topics
n “NFS Share Properties” on page 121
n “Adding a Windows or UNIX Share” on page 114
n “Removing a Windows or UNIX Share” on page 116
n “Modifying Windows or UNIX Share Properties” on
page 118
n “NFS Service” on page 62
n “Initial DataSafe NAS Configuration” on page 13
NFS Client Groups
From the NFS Client Group page, you can create,
delete, or edit NFS client groups. See the following
subjects:
n “Adding NFS Client Groups” on page 64
n “Editing NFS Client Groups” on page 66
n “Removing NFS Client Groups” on page 67
Adding NFS Client Groups
To add an NFS client group
1. On the primary menu bar, select Services.
DataSafe NAS User’s Manual 64
Page 70

2. On the secondary menu bar, select NFS.
3. On the NFS Service page, click Client Groups.
The NFS Client Groups page (Figure 21) displays.
Figure 21 NFS Client Groups
4. On the Tasks list, click New….
The New NFS Client Group page (Figure 22)
displays.
Figure 22 New NFS Client Group
5. On the New NFS Client Group page, enter the
group name to add in the Group name text box.
DataSafe NAS User’s Manual 65
Page 71

6. In the text box next to the Add button, enter the
IP address or computer name you want to add to
the group.
7. Click Add.
8. Click OK.
Editing NFS Client Groups
To add members to an NFS client group
1. On the primary menu bar, select Services.
2. On the secondary menu bar, select NFS.
3. On the NFS Service page, click Client Groups.
(See Figure 21 on page 65.)
4. On the Object Selection table, select the group
to edit.
5. On the Tasks list, click Edit.
The Edit NFS Client Group page (Figure 23)
displays.
Figure 23 Edit NFS Client Group
6. On the Edit NFS Client Group page, enter the
IP address or computer name of the member to
add to the group.
7. Click Add.
8. Click OK.
DataSafe NAS User’s Manual 66
Page 72

To remove members from an NFS client
group
1. On the primary menu bar, select Services.
2. On the secondary menu bar, select NFS.
3. On the NFS Service page, click Client Groups.
(See Figure 21 on page 65.)
4. On the Object Selection table, select the group
to edit.
5. From the Tasks list, click Edit. (See Figure 23 on
page 66.)
6. On the Edit NFS Client Group page, select the
IP address or computer name of the member to
remove from the group.
7. Click Remove.
8. Click OK.
Removing NFS Client Groups
To remove an NFS client group
1. On the primary menu bar, select Services.
2. On the secondary menu bar, select NFS.
3. On the NFS Service page, click Client Groups.
(See Figure 21 on page 65.)
4. On the Tasks list, click Delete.
5. On the Delete NFS Client Group page, click
OK to confirm the deletion.
NFS Locks
NFS locks allow a process to have exclusive access to
all or part of a file. File locking is implemented both on
the DataSafe NAS and the client. When a file is locked,
the buffer cache is not used for that file, and each
write request is immediately sent to the server.
DataSafe NAS User’s Manual 67
Page 73

After a system failure, when the DataSafe NAS is
restarted the DataSafe NAS attempts to restore the file
lock status to the previous condition. If the client fails,
the DataSafe NAS releases the file lock. However,
after the client restarts it has a short period of time to
reclaim the file lock.
To manage NFS locks
1. On the primary menu bar, select Services.
2. In the Object Selection table of the Manage
Services screen, select NFS Service, then
select Properties in the Task column.
3. On the NFS Service page, click Locks.
The NFS Locks page (Figure 24) displays.
Figure 24 NFS Locks
4. On the NFS Locks page, from the Current
locks list box, select the client for which you want
to release the NFS locks.
5. In the Wait period text box, enter the number of
seconds after restarting that the DataSafe NAS
waits to re-establish a file lock with a client.
6. Click OK.
DataSafe NAS User’s Manual 68
Page 74

User and Group Mappings
In order to provide security for DataSafe NAS files
accessed from a UNIX environment, the NFS service
requires the system administrator to map UNIX user or
group accounts to their twin accounts on the DataSafe
NAS. Users then have equivalent access rights under
UNIX as they have under Microsoft Windows.
Alternatively, sites with less stringent security needs
can bypass the mapping procedure and treat all UNIX
users as anonymous users.
User And Group Mappings lets you create maps
between Windows and UNIX user and group accounts
even though the user and group names in both
environments may not be identical. Perhaps most
important, User and Group Mappings lets you
maintain a single mapping database for the entire
enterprise.
In addition to one-to-one mapping between Windows
and UNIX user and group accounts, User and Group
Mappings permits one-to-many mapping. This lets
you associate multiple UNIX accounts with a single
Windows account, or multiple Windows accounts with
a single UNIX account. This can be useful, for
example, when you do not need to maintain separate
UNIX accounts for individuals and would rather use a
few accounts to provide different classes of access
permissions.
You can use simple maps, which map Windows and
UNIX accounts with identical names. You can also
create advanced maps to associate Windows and
UNIX accounts with different names, which you can
use in conjunction with simple maps. Furthermore,
with User and Group Mappings, you can obtain
UNIX user, password, and group information from one
or more NIS servers, or from imported password and
group files.
DataSafe NAS User’s Manual 69
Page 75

Section Topics
This section contains the following topics
n “General Tab” on page 70
n “Simple Maps” on page 71
n “Explicit User Maps” on page 73
n “Explicit Group Maps” on page 75
General Tab
To map NFS users and groups
1. On the primary menu bar, select Services.
2. On the Manage Services screen, select NFS
Service radio button, then click on Properties in
the Tasks column.
3. On the NFS Service page, click User and
Group Mappings.
4. On the NFS Service page, click User and
Group Mappings.
The User and Group Mappings page (Figure
25) displays.
DataSafe NAS User’s Manual 70
Page 76

Figure 25 User and Group Mappings
To configure for using a Network Information Service (NIS) server
a. On the General tab, select the Use NIS
server radio button.
b. In the NIS domain text box, enter the name
of the domain from which UNIX user and group
information is obtained.
c. Optionally, in the NIS server (optional) text
box, enter the name of the server to map.
d. To specify the length of time the DataSafe NAS
waits to refresh the user and group information, enter the time in the Hours and Min-
utes text boxes.
e. Click OK.
To configure for using password and group
files
a. Select the Use password and group files
radio button.
b. In the Password file text box, enter the name
of the password file to use. (This is a 'passwd'
format file from a UNIX system containing all
the UNIX user accounts that could be
mapped).
c. In the Group file text box, enter the name of
the group file to use. (This is a 'passwd' format
file from a UNIX system containing all the UNIX
user accounts that could be mapped).
d. Click OK.
Simple Maps
DataSafe NAS User’s Manual 71
Page 77

If enabled, simple maps create automatic mappings
between Unix users and Microsoft Windows users that
both share the same user name. In a simple user map,
users in a Windows domain are implicitly mapped
one-to-one to UNIX users on the basis of user name.
When the Windows domain and the UNIX 'passwd' and
group files or Network Information Services (NIS)
domain are identified, the simple maps function maps
users who have the same name in both the Windows
and UNIX or NIS domain. If no match exists for a user
name in either place, that user is not mapped.
Note: To access this page you must have entered a
valid NIS server name on the General tab.
To enable simple maps
1. On the primary menu bar, select Services.
2. On the secondary menu bar, select NFS.
3. On the NFS Service page, click User and
Group Mappings.
4. Click the Simple Maps tab (Figure 26).
Figure 26 Simple Maps tab
5. Check the Enable simple maps check box.
6. On the Windows domain drop-down list, select
the local machine, or the domain to which the
local machine belongs.
If you select the DataSafe NAS name, the local
users and groups will be mapped.
DataSafe NAS User’s Manual 72
Page 78

7. Click OK.
Explicit User Maps
User and Group mapping lets you create inter-
and cross-platform maps among Microsoft Windows
and UNIX user and group accounts, even when the
user and group names in both environments are not
identical.
User and Group mapping also let you set up one-
to-one, one-to-many, or many-to-one inter- and crossplatform mappings among Windows and UNIX users
and groups. For example, a Windows user name could
be mapped to several UNIX user names, or a UNIX
group could be mapped to one or more Windows user
accounts. Explicit user maps can also be used when
the same person has different user names on
Windows and UNIX accounts. Using the Explicit User
Maps option lets you maintain a single mapping
database for the entire enterprise.
To create explicit user maps
1. On the primary menu bar, select Services.
2. On the secondary menu bar, select NFS.
3. On the NFS Service page, click User and
Group Mappings.
4. Click the Explicit User Maps tab (Figure 27).
DataSafe NAS User’s Manual 73
Page 79

Figure 27 Explicit User Maps
5. From the Windows domain drop-down list,
select the Windows domain containing the user to
be mapped.
6. In the NIS Domain text box, enter either the
specific NIS domain to map, or leave the default
NIS domain name.
7. Optionally, enter the name of the NIS server to
map in the NIS Server (optional) text box.
8. Click the list Windows Users button to populate
the Windows users list box.
9. Click the list UNIX Users button to populate the
Unix users list box.
10. Select a user from each group, then click Add.
The mapped users will appear in the Explicitly
mapped users list box.
Note: You can map users from one Windows domain
to more than one UNIX domain, and vice versa.
DataSafe NAS User’s Manual 74
Page 80

To set one of the mappings as primary for a
given user:
11. Select the mapping from the Explicitly mapped
users list box.
12. Click Set primary.
13. Click OK.
To delete explicit user maps
1. Follow steps 1-4 above to navigate to the Explicit
User Maps page.
2. In the Explicitly mapped users list box, select
the user mapping to delete.
3. Click Remove.
4. Click OK.
Explicit Group Maps
User and Group mapping lets you create inter-
and cross-platform maps among Microsoft Windows
and UNIX user and group accounts even when the user
and group names in both environments are not
identical.
User and Group mapping also let you set up one-
to-one, one-to-many, or many-to-one mappings
between Windows users and UNIX users and groups.
For example, a Windows user name could be mapped
to several UNIX user names, or a UNIX group could be
mapped to one or more Windows user accounts.
Explicit maps can also be used when the same person
has different user names on Windows and UNIX
accounts. Using the Explicit Group Maps option
lets you maintain a single mapping database for the
entire enterprise.
To create explicit group maps
1. From the primary menu bar, select Services.
DataSafe NAS User’s Manual 75
Page 81

2. From the secondary menu bar, select NFS.
3. From the NFS Service page, click Group and
Group Mappings.
4. Click the Explicit Group Maps tab (Figure 28).
Figure 28 Explicit Group Maps
5. From the Windows domain drop-down list,
select the Windows domain to map.
6. In the NIS Domain text box, leave the default
NIS domain name, or enter the specific NIS
domain to map.
7. Optionally, enter the name of the NIS server to
map in the NIS Server (optional) text box.
8. To populate the Windows groups list box, click
the List Windows Groups button.
9. To populate the Unix groups list box, click the
List UNIX Groups button.
10. Select a group from each group, then click Add.
DataSafe NAS User’s Manual 76
Page 82

The mapped groups will appear in the Explicitly
mapped groups list box.
Note: You can map groups from one Windows
domain to more than one UNIX domain, and
vice versa. For example, if a UNIX group is
mapped to multiple Windows groups, when
that UNIX group creates a file on the DataSafe
NAS, the file will be owned by the Windows
group marked as the primary group.
To set one of the mappings as the primary
maps for a given group
1. Select the mapping from the Explicitly mapped
groups list box.
2. Click Set Primary.
3. Click OK.
To delete explicit group maps
1. Follow steps 1-4 above to navigate to the Explicit
Group Maps page.
2. In the Explicitly mapped groups list box,
select the group mapping to delete.
3. Click Remove.
4. Click OK.
FTP Service
Because the FTP server service supports all Microsoft
Windows FTP client commands, when a Windows
Powered DataSafe NAS is running the FTP server
service, other computers using the FTP utility can
connect to the server and transfer files. On the other
hand, non-Microsoft versions of FTP clients might
DataSafe NAS User’s Manual 77
Page 83

contain commands that are not supported by the FTP
server service.
The FTP server service is integrated with the Windows
security model. Users connecting to the FTP server
service are authenticated based on their Windows
Powered user accounts, and receive access based on
their user profiles. Keep in mind, however, that the
FTP Server protocol relies on the ability to pass user
passwords over the network without data encryption.
As a result, a user with physical access to the network
could examine user passwords during the FTP
validation process.
Section Topics:
This section contains the following topics:
n “Network Protocol Overview: FTP” on page 78
n “FTP Logging” on page 79
n “FTP Anonymous Access” on page 79
n “FTP Messages” on page 81
Network Protocol Overview: FTP
The File Transfer Protocol (FTP) can be used
interactively. FTP is a service that, once started,
creates a sub-environment in which you can use FTP
commands, and from which you can return to the
Windows command prompt by typing the quit
subcommand. When the FTP sub-environment is
running, it is indicated by the FTP command prompt.
Related Topics
n “FTP Share Properties” on page 122
n “Adding a Windows or UNIX Share” on page 114
n “Removing a Windows or UNIX Share” on page 116
n “Modifying Windows or UNIX Share Properties” on
page 118
n “Initial DataSafe NAS Configuration” on page 13
DataSafe NAS User’s Manual 78
Page 84

FTP Logging
You can log incoming FTP connections in to the FTP log
by enabling FTP Logging. By default, FTP logs are
stored in %WinDir%\System32\LogFilesMSFTPSVC1.
Administrators can access these files from their
workstation by either accessing an administrative
share (for example,
\\appliancename\C$\winnt\system32\logfiles\msftp
svc1) or by creating a new share for this folder.
To enable FTP Logging
1. On the primary menu bar, select Services.
2. On the secondary menu bar, select FTP.
—OR—
Select the FTP Service option from the Object
Selection table, then click Properties.
The FTP Service Properties page (Figure 29)
displays.
Figure 29 FTP Service Properties
3. Select the Logging tab.
4. Check the Enable logging check box, then click
OK.
FTP Anonymous Access
Allowing anonymous access to the FTP server enables
users to connect with the user name anonymous (or
ftp, which is a synonym for anonymous). A password
is not necessary, but the user is prompted to supply
DataSafe NAS User’s Manual 79
Page 85

an e-mail address as the password. By default,
anonymous connections are not allowed.
Note: You cannot access the FTP server from a
Microsoft Windows Powered user account with
the name anonymous. The anonymous user
name is reserved in the FTP server for the
anonymous logon function. Users logging on
to the server with the user name anonymous
receive permissions based on the FTP server
configuration for anonymous logons.
After the FTP server service software is installed on
your computer, you must configure the software to
operate.
To configure FTP anonymous access
1. On the primary menu bar, select Services.
2. On the secondary menu bar, select FTP.
—OR—
Select the FTP Service option from the Object
Selection table, then click Properties.
The FTP Service Properties dialog box (Figure 29
on page 79) opens.
3. Select the Anonymous Access tab (Figure 31).
Figure 30 Anonymous Access tab of FTP Service
Properties
4. Choose settings according to the following
considerations then click OK:
DataSafe NAS User’s Manual 80
Page 86

¨ When anonymous FTP connection to the server
is not allowed, each user must provide a valid
Windows user name and password. To
configure the FTP server service for this
setting, make sure the Enable anonymous
connection check box is cleared.
¨ When both anonymous and Windows users
can connect to the FTP server, users can use
either: 1) an anonymous connection, or 2) a
Windows user name and password. To
configure the FTP server service for this
setting, make sure only the Enable
anonymous connection check box is
selected.
¨ When only anonymous FTP connections to the
server can be made, users cannot connect to
the FTP server using a Windows user name and
password. To configure the FTP Server service
for this setting, make sure both the Enable
anonymous connections and the Allow
anonymous access only boxes are selected.
If anonymous connections are allowed, you must
supply the Windows user name and password that will
provide anonymous access to the FTP server. When an
anonymous FTP transfer occurs, Windows checks the
user name assigned in this dialog box to determine
whether access is allowed to the files.
FTP Messages
You can create customized greeting and exit
messages that are sent to users when they connect or
disconnect from the DataSafe NAS. When you create
custom messages, you can add your own text.
To add custom messages
1. On the primary menu bar, select Services.
DataSafe NAS User’s Manual 81
Page 87

2. On the secondary menu bar, select FTP.
—OR—
1. On the secondary menu bar, select the FTP
Service option from the Object Selection table,
then click Properties.
2. The FTP Service Properties dialog box (Figure 29
on page 79) opens.
3. Select the Messages tab (Figure 31).
Figure 31 Messages tab of FTP Service Properties
4. In the Welcome message memo box, type the
message that will greet users when they connect
to the DataSafe NAS.
5. In the Exit message memo box, type the
message that will appear when users disconnect
from the DataSafe NAS.
6. Click OK.
Related Topics
n “FTP Anonymous Access” on page 79
n “FTP Logging” on page 79
DataSafe NAS User’s Manual 82
Page 88

Web (HTTP) Service
The hypertext transfer protocol (HTTP) is a
communications protocol designed to transfer
hypertext documents between computers over the
World Wide Web (the Web). HTTP defines what actions
Web servers and browsers should take in response to
various commands.
Section Topics
This section contains the following topics:
n “World-Wide Web Server” on page 83
n “Network Protocol Overview: HTTP” on page 84
n “HTTPS Creating a Secure Connection” on page 85
World-Wide Web Server
The Web is a network within the Internet consisting of:
1) servers that provide information in hypertext
format, and 2) clients that relay user input to the
server, which displays information on the servers in
the user-specified format. While the FTP server and
Gopher server present information in a hierarchical
directory structure, Web information is presented in
pages. A page can be an index or a document. Pages
have hypertext entries, like those in Microsoft
Windows Help files, that are linked to other Web
pages. (A link can connect users to a page on any of
the thousands of WEB servers, and can also connect
users to other kinds of Internet resources.) Users
access information, or navigate through the Internet,
by selecting highlighted words (links) in the
documents, including indexes, that are shared on
WEB servers.
The commands used by the Web are defined in the
Hypertext Transfer Protocol (HTTP).
DataSafe NAS User’s Manual 83
Page 89

To specify the location of a resource, HTTP uses
Uniform Resource Locators (URLs). URLs follow a
naming convention that uniquely identify the location
of a computer, directory, or file on the Internet. The
URL also specifies the Internet protocol (FTP, HTTP,
etc.) needed to retrieve the resource. If you know the
URL of a resource, you can provide the URL, or you can
link to it from a document you make available to Web
users.
The HTTP server service supports anonymous access,
as well as basic and Windows authentication.
Related Topics
n “HTTP Share Properties” on page 124
Network Protocol Overview: HTTP
The Hypertext Transfer Protocol (HTTP) is the Internet
protocol used by World Wide Web browsers and
servers to exchange information. The protocol defines
what actions Web servers and browsers should take in
response to various commands, thus making it
possible for a user to use a client program to enter a
URL (or click a hyperlink) and retrieve text, graphics,
sound, and other digital information from a Web
server. URLs of files on Web servers begin with
http://
HTTP is stateless, meaning the connection to the
server does not remain open.
HTTP commands have the following syntax and
parameters:
Syntax
http://sDomain
Possible Values
n sDomain
DataSafe NAS User’s Manual 84
Page 90

n Required. Specifies the fully qualified domain
name or IP address to the site.
Related Topics
n “HTTP Share Properties” on page 124
n “Adding a Windows or UNIX Share” on page 114
n “Removing a Windows or UNIX Share” on page 116
n “Modifying Windows or UNIX Share Properties” on
page 118
n “Initial DataSafe NAS Configuration” on page 13
HTTPS Creating a Secure Connection
There are several administrative tasks you can
perform via the Web UI (such as setting administrative
and user passwords) for which you will want a secure
connection. You can establish a secure connection
quite easily for your Windows Powered DataSafe NAS
using the Terminal Services feature.
To create a secure connection
1. On the primary menu bar, select Maintenance.
2. On the Maintenance page, select Terminal
Services Advanced Client (TSC).
3. Log in.
The Terminal Services Client window (Figure
32) opens.
DataSafe NAS User’s Manual 85
Page 91

Figure 32 Terminal Services Client window
4. On the TSC desktop, right-click My Computer,
and select the Manage item from the pop-up
menu.
The Computer Management window opens
(Figure 33).
DataSafe NAS User’s Manual 86
Page 92

Figure 33 Computer Management
5. In the left column of the Computer
Management window, expand the Services and
Applications node.
6. Expand the Internet Information Services
node.
7. Select the site for which you want a secure
connection, and right-click. Select Properties
from the pop-up menu.
The Default FTP Site Properties window
opens.
8. Select the Directory Security tab (Figure 34).
DataSafe NAS User’s Manual 87
Page 93

Figure 34 Directory Security tab of Web Site Properties
9. In the Secure Communications portion at the
bottom of the dialog box, click the Server
Certificate button.
10. Follow the instructions of the Web Server
Certificate Wizard.
NetWare Service
For Netware Service Help see file, fnpw.chm in
Terminal Services mode, in control panel.
Indexing Service
There are no configurable properties for the Indexing
Service.
DataSafe NAS User’s Manual 88
Page 94

Mac Service
There are no configurable properties for the Mac
Service.
Telnet Service
There are no configurable properties for the Telnet
Service.
SNMP Service
Network Protocol Overview: SNMP
The simple network management protocol (SNMP)
service supports computers running TCP/IP and IPX
protocols. It is an optional service that can be
installed after the TCP/IP protocol has been
successfully configured.
CAUTION: The SNMP service provides an SNMP
agent that allows remote, centralized
management of computers running
Microsoft Windows-based operating
systems. Do not alter values other
than those specified in these
instructions.
Using SNMP requires two components:
n An SNMP management system.
The management system, also called management console, sends information and update
requests to an SNMP agent. Any computer running
SNMP management software is an SNMP management system. The management software application does not need to run on the same host as the
SNMP agent.
DataSafe NAS User’s Manual 89
Page 95

The SNMP management system requests information from a managed computer (called an SNMP
agent) such as the amount of hard disk space
available or the number of active sessions. The
SNMP management system can also initiate a
change to the configuration of an SNMP agent.
However, this is rare because most clients have
read-only access.
n An SNMP agent.
The SNMP agent responds to SNMP management
system requests for information. Any computer
running SNMP agent software is an SNMP agent.
The Windows 2000 SNMP service, which is agent
software, responds to information requests from
one or more management systems. The SNMP service can be configured to determine which statistics are tracked and which management systems
are authorized to request information.
In general, SNMP agents do not originate messages, but only respond to them. A trap message
is the only agent-initiated SNMP communication.
A trap is an alarm-triggering event on an agent,
such as a system reboot or illegal access, which
provides enhanced security.
Management hosts and agents belong to an SNMP
community, which is a collection of hosts grouped
together for administrative purposes. Defining
communities provides security by allowing only
management systems and agents within the same
community to communicate.
SNMP Service Configuration
This feature opens the Windows 2000 Services
window from which you can configure the SNMP
service.
DataSafe NAS User’s Manual 90
Page 96

To configure the SNMP service
1. On the primary menu bar, select Network
Setup.
2. Select the SNMP Service Configuration
option.
3. Follow the prompts and re-enter your User name
and Password.
The Services window (Figure 35) opens.
Figure 35 Services window
4. Double-click SNMP Service in the list of
services.
The SNMP Service Properties dialog (Figure
36) opens.
DataSafe NAS User’s Manual 91
Page 97

Figure 36 SNMP Service Properties
5. Edit values as needed on the Agent, Traps, and
Security tabs.
CAUTION: Do not alter values on the other tabs.
For information on specific fields in the tabs, rightclick a field to view “What's This?” help (or select a
field and press F1).
6. Click OK.
7. Close the Services window to close the Terminal
Services Client Session.
DataSafe NAS User’s Manual 92
Page 98

5 Users and Groups
From this page, you can create, edit, and delete local
users and groups on the DataSafe NAS. You can also
change the members of each group. If the DataSafe
NAS is a member of a domain, you will not want to
create any users on the DataSafe NAS itself. The
primary purpose of this page is to add one or more
domain members to the local administrators group.
You may also want to use domain user and group
accounts to control access to resources on the
DataSafe NAS. You may also want to use domain
management tools to manage domain users and
domain groups.
Chapter sections:
This chapter contains the following main sections:
n “Manage Local Users” on page 93
n “Manage Local Groups” on page 99
Manage Local Users
A local user or group account is an account that exists
on the DataSafe NAS itself and can be granted
permissions from your computer. The DataSafe NAS
can also be configured to grant access to domain
users and groups. Domain users and groups are those
that exist in a Microsoft Windows NT 4 or Microsoft
Active Directory domain. You can add local users,
domain users, and domain groups to local groups.
However, you cannot add local users and groups to
domain groups.
Users and groups are important in Microsoft Windows
Powered security because you can assign permissions
to limit the ability of users and groups to perform
DataSafe NAS User’s Manual 93
Page 99

certain actions. A permission is a rule associated with
an object (usually a file, folder, or share) that
regulates which users, and in what manner those
users, can access the object. Any local or domain user
who is a member of the local Administrator group on
the DataSafe NAS has administrative privileges on the
DataSafe NAS. Likewise, any user who is a member of
a group that has been assigned to the Administrator
group on the local computer has administrative
privileges for that computer. For example, you could
assign the TeamLeads groups, consisting of Tom,
Mary, Hazel and Jim to the Administrative group on the
DataSafe NAS. Each of the TeamLeads group members
would then have administrative privileges on the
DataSafe NAS.
Section topics
This section contains the following topics:
n “Adding a User Account” on page 94
n “Removing a User Account” on page 96
n “Setting a User Password” on page 97
n “Modifying User Properties” on page 98
Adding a User Account
When you add a user account, you should include a
user name, the user's full name, a brief description of
the account, and an account password.
Keep in mind that user names must be unique, and
must not duplicate the name of any existing group.
A user name cannot be identical to any other user or
group name on the computer being administered. A
user name can contain up to 20 uppercase or
lowercase characters except for the following: " / \ [ ] :
; | = , + * ? < >. Additionally, a user name cannot consist
solely of periods (.) or spaces.
DataSafe NAS User’s Manual 94
Page 100

In the Password and Confirm password text
boxes, you can type a password containing up to 127
characters. However, if you are using Microsoft
Windows 2000 on a network that also has computers
using Microsoft Windows 95 or Microsoft Windows 98,
consider using passwords that contain fewer than 14
characters. (Windows 95 and Windows 98 support
passwords that contain up to 14 characters.) If your
password is longer, you may not be able to log on to
your network from those computers.
The only new users you should add to the
Administrators group are those that will be solely
performing administrative tasks.
To add a user account
1. On the primary menu bar, select Users and
Groups
2. Select the Users option.
The Local Users on Server Appliance window
opens (Figure 37).
Figure 37 Local Users on Server Appliance
3. On the Tasks list, click New.
The Create New User dialog (Figure 38) opens.
DataSafe NAS User’s Manual 95
 Loading...