

Page 1

ENGLISH
Table of contents
Part 1: Warnings: ....................................................................................................................... 2!
1.1.! Overview of the meaning of symbols and signal words: ............................................ 2!
1.2 Safety instructions: ........................................................................................................... 3!
1.3 Intended use: .................................................................................................................... 4!
Part 2: Installation: ..................................................................................................................... 4!
Part 3: Functions and operation: ................................................................................................ 4!
3.1 Operation: ........................................................................................................................ 4!
3.2 Operating modes and setting of the on-board menu: ....................................................... 5!
3.3 Assignment of the DMX channels in the overview: ........................................................ 8!
3.4 Connections in "DMX" mode: ....................................................................................... 13!
3.5 Connections in "Master / Slave" mode: ......................................................................... 14!
3.6 Stand-Alone-Operation: ................................................................................................. 14!
3.7 Infrared remote control (included): ................................................................................ 15!
Part 4: Troubleshooting: .......................................................................................................... 16!
Part 5: Maintenance: ................................................................................................................ 16!
Part 6: Technical specifications: .............................................................................................. 16!
Part 7: Environmental pRedection: .......................................................................................... 17!
Part 8: Warranty conditions: .................................................................................................... 17!
EC Declaration of Conformity ................................................................................................. 17!
Destilan Deutschland GmbH
Senefelder Ring 91
21465 Reinbek
Page 2

We congratulate you on the purchase of an INVOLIGHT "PAINTBAR HEX12P"!
With this device you are owner of a high-quality and professional LED
wallwasher with the latest technology. In order to make your "PAINTBAR
HEX12P" a pleasure for you, please read this manual carefully before using it.
If you have any questions, please contact your local INVOLIGHT dealer. Have
fun with your INVOLIGHT product!
Part 1: Warnings:
1.1. Overview of the meaning of symbols and signal words:
DANGER!
This combination of symbol and signal word indicates an imminently hazardous situation which leads to death or serious injury if
not avoided.
WARNING!
This combination of symbol and signal word indicates a potentially hazardous situation that can result in death or serious injury if
not avoided.
ATTENTION!
This combination of symbol and signal word indicates a potentially dangerous situation, which can lead to minor injuries if not
avoided.
NOTE!
This combination of symbol and signal word indicates a potentially dangerous situation, which can lead to material and
environmental damage if not avoided.
Warning of a hazard.
.
Warning of dangerous voltage.
Ground before use
General prohibition sign
Disconnect the mains plug before opening
Page 3
1.2 Safety instructions:
This information sheet contains important information on the safe operation of the device.
Ensure that this information is available to all persons using this device.
The type plate is located on the underside of the unit.
Please read all warnings and operating instructions carefully before operating this unit. Please keep
this manual for future reference. Please follow all instructions in this manual.
DANGER!
Electric shock due to improper mains connection.
This product corresponds to the pRedection class I in its design and may only be operated at a socket with
pRedective contact. Use only the supplied power cord to connect. Do not modify the power cord or plug and
check the insulation of the cable regularly for damage. Failure to do so may result in electric shock, fire or life
danger. In case of uncertainties, contact an authorized electrician.
DANGER!
Electric shock due to high voltages inside the device.
The device contains components that are subject to a high electrical voltage. Do not modify or disassemble the
unit. There are no user-serviceable components inside the device. Failure to do so may result in electric shock,
fire or danger to life.
NOTE!
Disconnection from the mains.
The mains plug is the main element for electrical power. Unplug the power cord (mains plug) from the power
source. Make sure that the outlet is near the unit and is easily accessible.
WARNING!
Operating conditions.
This product is designed for indoor use only. To prevent damage, do not expose the unit to liquid or moisture. If
there is a suspicion that liquid may have penetrated into the device, the device must be immediately
disconnected from the mains. This also applies if the unit is exposed to high humidity. Even if the device still
seems to work, it must be checked by an expert whether the liquid penetration could possibly impair the
insulation. Reduced insulation can cause fatal electric shocks. Avoid direct sunlight, dirt and strong vibrations.
WARNING!
Eye injuries due to high light intensity.
Never look directly into the light source. A direct view into the beam can lead to retinal burns and must be
avoided at all circumstances.
WARNING!
Risk of epileptic seizure.
Avoid long periods of continuous flashing and, in particular, flash frequencies between 1 and 20 flashes /
second, as epileptic seizures can be triggered in susceptible individuals (especially for epileptics).
NOTE!
Risk of fire
Never cover the device or the ventilation slots. Do not mount the device directly next to a heat source. Keep the
device away from fire.
Page 4

1.3 Intended use:
This device is an effect emitter with which decorative light effects can be generated. The INVOLIGHT
"PAINTBAR HEX12PP" can be operated in AUTO mode or music mode. The product is intended for
professional applications, e.g. on stages, in discos, theaters, etc. and is not suitable for room lighting
in households. This product is only approved for connection to 100-240 VAC, 50 / 60Hz alternating
voltage and has been designed for indoor use only. The device must not be used or stored in an
environment in which splash water, rain, moisture or mist can be expected. Moisture or very high
humidity can reduce the insulation and lead to fatal electric shocks. When using fog machines, please
ensure that the unit is never directly exposed to the fog and is operated at least 0.5 m away from a
fogger. Do not use the unit during a thunderstorm. Overvoltage could destroy the device. Disconnect
the appliance from the mains at all poles. Make sure there are no cables around. You endanger your
own and the safety of third parties! The ambient temperature must be between -5 ° C and + 45 ° C.
Keep the unit away from direct sunlight and radiators. Do not operate the unit until after you have
familiarized yourself with its functions. Do not allow the appliance to be used by persons who are not
familiar with the appliance. Please note that unauthorized modifications to the device are prohibited for
safety reasons. If the device is used in a different way than described in this manual, this can lead to
damage to the product and to the warranty claim. In addition, any other use is associated with hazards
such as short circuit, fire, electric shock, crashes, etc.
Part 2: Installation:
Unpack the unit and carefully check it for damage before using it. Place the unit in a suitable location
or hang it on a suitable crossmember. The device must be secured with an approved safety cable
when the mounting is suspended. In addition, the mounting bracket must be screwed and tightened
with the enclosed screws! Then connect the device to the power supply.
The appliance must not be operated directly after it has been brought from a cold to a warm room. The
resulting condensation may destroy your unit. Leave the unit switched off until it has reached room
temperature!
During installation, the provisions of BGV C1 (formerly VBG 70) and DIN 15560 have to be
observed! The installation may only be carried out by authorized specialists!
IMPORTANT! Overhead mounting requires a high degree of experience. This includes knowledge of
the load-bearing capacity, the installation material used and the safety inspections of the material and
the projector used, but the required experience is not limited to this alone. Under no circumstances
should you try to perform the installation yourself if you do not have the appropriate qualification.
Instead, commission a professional installer. Incorrect installation may result in personal injury and / or
damage to property.
Part 3: Functions and operation:
The device is connected to the power supply via the mains cable. You can adjust and influence the
different operating modes via the on-board menu.
3.1 Operation:
The INVOLIGHT "PaintBAR HEX12PP" is a DMX 512 controllable LED effect light. It can be controlled
via 5, 6 or 41 DMX channels, automatically or music and used as master or slave. The device is
connected to the power supply via the mains cable. A powercon extension (optional) allows the
current to be routed from one to the next device. This allows multiple devices to be powered from a
wall outlet. You can set and influence the different operating modes and via the on-board menu. The
"PaintBAR HEX12PP" can be controlled with any commercially available DMX controller.
Page 5
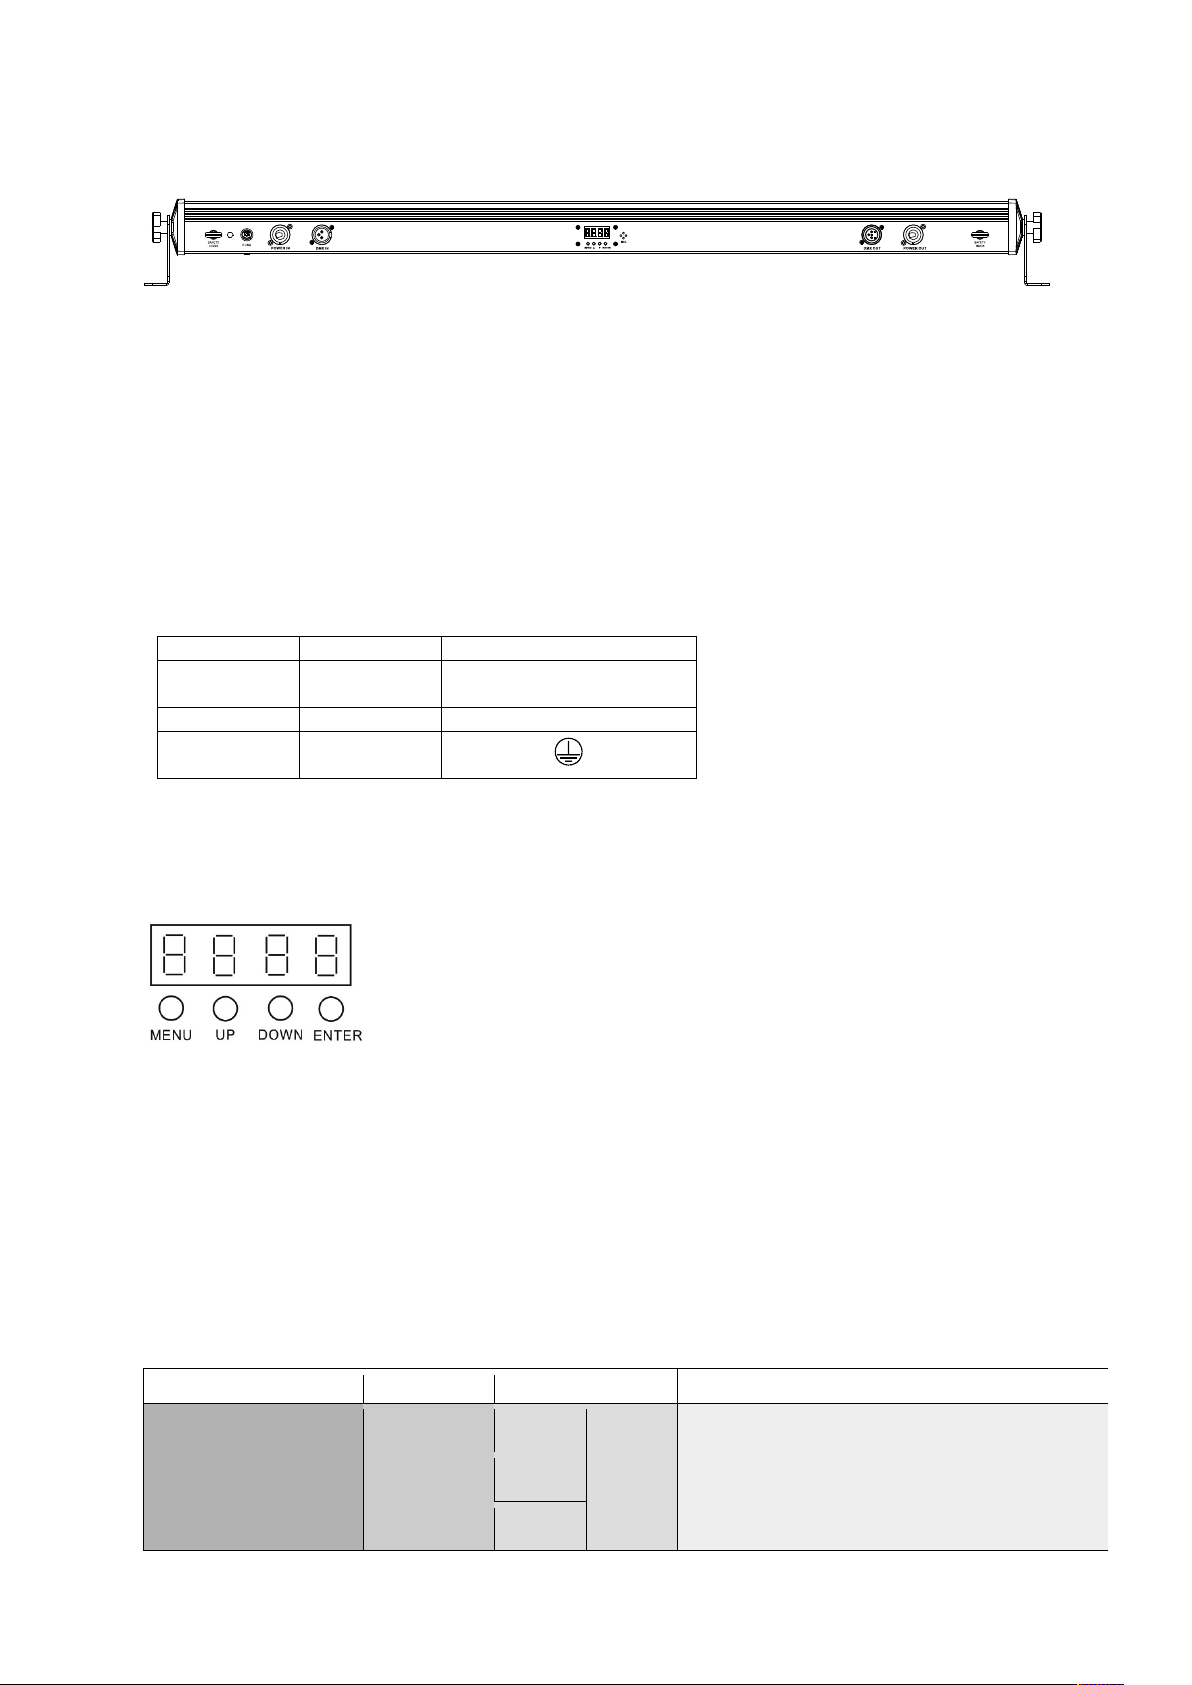
Picture 1 (backside):
1. Fuse holder for F1A 250V fuse.
2. Power In - Powercon compatible network input jack.
3. DMX In - 3-pin DMX input.
4. On-board menu - LED display with control buttons. Displays operating mode and other system
settings.
5. MIC - Microphone for music control.
6. DMX Out - 3-pin DMX output.
7. Power Out - Powercon compatible power outlet socket.
8. Catch eyelet - The device must be secured with a suitable safety cable against dropping.
The assignment of the connection leads is as follows:
Line
Pin
International
Brown
Outer
conductor
L
Blue
Neutral
N
Yellow/Green
PRedective
conductor
The pRedective conductor must be connected!
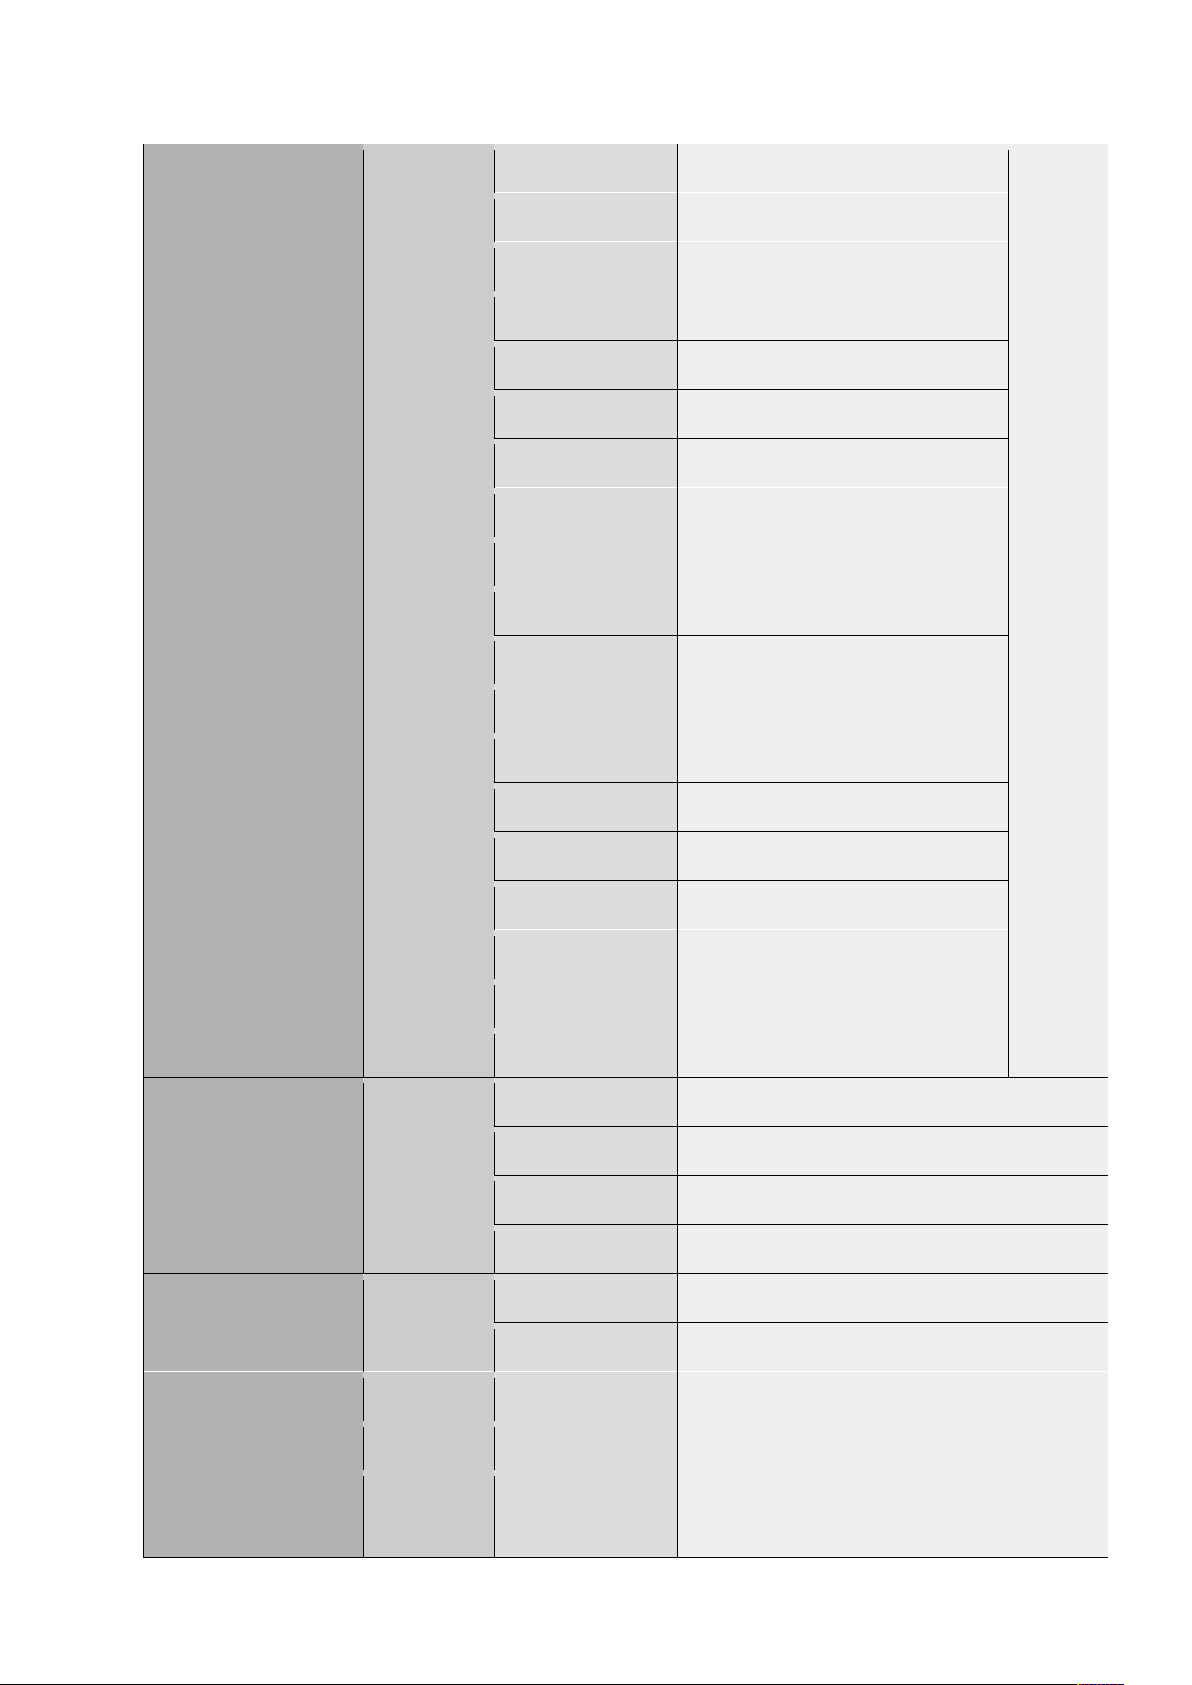
3.2 Operating modes and setting of the on-board menu:
MENU - To select the operating mode
ENTER - Activates the setting process of a menu point or saves a setting
UP - To increase a value
DOWN - To decrease a value
The "PaintBAR HEX12P" has various operating modes, all of which can be set via the on-board menu
(see fig.1 housing back). Always press "Menu" repeatedly until the function to be set is reached. With
"Enter" you get to the individual, adjustable values. Then use "Up" and "Down" to set the desired
values. These can be confirmed with "Enter". Familiarize yourself with these settings in order to be
able to operate the unit optimally.
You can set the following modes and functions:
Mode
Menu
Sub Menu
Beschreibung
DMX
Addr
5CH
d001
-
d512
Select DMX channel mode and set DMX start
address.
6CH
77CH
2.
3.
4.
5.
6.
7.
8.
1.
Page 6
Static Colors
Stat
S 01
RED
COLOR PRESETS
S 02
GREEN
S 03
BLUE
S 04
WHITE
S 05
AMBER
S 06
UV
S 07
YELLOW
S 08
MAGENTA
S 09
CYAN
S 10
DARK ORANGE
S 11
GREEN YELLOW
S 12
SALMON
S 13
TURQUISE
S 14
LIGHT GREEN
S 15
ORANGE
S 16
LAVENDER
S 17
LIGHT BLUE
S 18
DARK BLUE
S 19
PINK
Auto Programs
Auto
Au 1
Auto Program 1
Au 2
Auto Program 2
Au 3
Auto Program 3
Au 4
Auto Program 4
Music-Controlled
Soun
So 1
Sound Program 1
So 2
Sound Program 2
So 3
Sound Program 3
So 4
Sound Program 4
Speed
SPEE
SP 1
-
Internal programs can be set in running speed
in 9 steps each. "1" stands for the slowest, "9"
for the fastest speed.
Page 7

SP 9
Microphone sensivity
SEnS
SE 1
-
SE 9
SENS:1 = min. sensitivity,
SENS:9 = max. sensitivity
Colormixing.
This mode offers the
possibility to separately
control each of the 6
colors of the LEDs (R,
G, B, W, A and UV) in
intensity and thus to
produce an unlimited
number of different
colors
CoLo
R000
-
R255
Red,
Intensity 0% - 100%
G000
-
G255
Green,
Intensity 0% - 100%
B000
-
B255
Blue,
Intensity 0% - 100%
U000
-
U255
White,
Intensity 0% - 100%
A000
-
A255
Amber,
Intensity 0% - 100%
U000
-
U255
UV,
Intensity 0% - 100%
Master Dimmer
dIMM
dI 1
-
dI 9
Master dimmer for static colors and Internal
programs.
Silent-Mode
SILE
on
If the silent mode is activated "ON", the light
beams of the unit switch off (BLACKOUT) if no
further music signals (bass impulses) are
received.
oFF
If the silent mode is deactivated "OFF" - the
current program of the device will continue
slowly if no further music signals (bass
impulses) are received.
Slave Mode
SLAV
Master / Slave operation. Define the device as
"Slave".
Control via IR remote
control
InFr
on
IR remote control activated.
oFF
IR remote control de-activated.
Page 8

3.3 Assignment of the DMX channels in the overview:
NOTE: Basic knowledge of the DMX512 control standard is required so that the device can be
correctly operated and Programed with a DMX controller.
5 Channel Mode:
DMX Mode
Channel
Value
Description
Comments
5 CH
1
000 - 255
Master Dimmer 0 - 100%
Influences all
functions of CH3 and
CH4
2
000 - 009
No Function
Influences all
functions of CH3 and
CH4
010 - 255
Stroboscope: slow → fast
3
000 - 009
No Function
010 - 019
RED
COLOR PRESETS
020 - 029
GREEN
030 - 039
BLUE
040 - 049
WHITE
050 - 059
AMBER
060 - 069
UV
070 - 079
YELLOW
080 - 089
MAGENTA
090 - 099
CYAN
100 - 109
DARK ORANGE
110 - 119
GREEN YELLOW
120 - 129
SALMON
130 - 139
TURQUISE
140 - 149
LIGHT GREEN
150 - 159
ORANGE
160 - 169
LAVENDER
170 - 179
LIGHT BLUE
180 - 189
DARK BLUE
190 - 199
PINK
200 - 255
No Function
4
000 - 009
No Function
010 - 019
Auto Program 1
Auto
020 - 029
Auto Program 2
030 - 039
Auto Program 3
040 - 049
Auto Program 4
050 - 059
No Function
060 - 069
Sound Program 1
Sound
070 - 079
Sound Program 2
080 - 089
Sound Program 3
Page 9

090 - 099
Sound Program 4
100 - 255
No Function
5
000 - 255
Speed: slow →
fast
Can be set when
Auto Program 1,
2, 3 or 4 is used
via CH4.
Microphone sensitivity:
min. → max.
Adjustable when sound
program 1, 2, 3 or 4 is
used via CH4.
Influences all
functions of CH4
6 Kanal Mode:
6 CH
1
000 - 255
Red,
Intensity 0% - 100%
2
000 - 255
Green,
Intensity 0% - 100%
3
000 - 255
Blue,
Intensity 0% - 100%
4
000 - 255
White,
Intensity 0% - 100%
5
000 - 255
Amber,
Intensity 0% - 100%
6
000 - 255
UV,
Intensity 0% - 100%
77 Kanal Mode:
77 CH
1
000 - 255
Master Dimmer 0 - 100%
Influences all
functions of CH3 –
CH76
2
000 - 009
No Function
010 - 255
Stroboscope: slow → fast
Influences all
functions of CH3 –
CH76
3
000 - 255
Red,
Intensity 0% - 100%
Pixel 1
4
000 - 255
Green,
Intensity 0% - 100%
5
000 - 255
Blue,
Intensity 0% - 100%
6
000 - 255
White,
Intensity 0% - 100%
7
000 - 255
Amber,
Intensity 0% - 100%
8
000 - 255
UV,
Intensity 0% - 100%
9
000 - 255
Red,
Intensity 0% - 100%
Pixel
2
Page 10

10
000 - 255
Green,
Intensity 0% - 100%
11
000 - 255
Blue,
Intensity 0% - 100%
12
000 - 255
White,
Intensity 0% - 100%
13
000 - 255
Amber,
Intensity 0% - 100%
14
000 - 255
UV,
Intensity 0% - 100%
15
000 - 255
Red,
Intensity 0% - 100%
Pixel 3
16
000 - 255
Green,
Intensity 0% - 100%
17
000 - 255
Blue,
Intensity 0% - 100%
18
000 - 255
White,
Intensity 0% - 100%
19
000 - 255
Amber,
Intensity 0% - 100%
20
000 - 255
UV,
Intensity 0% - 100%
21
000 - 255
Red,
Intensity 0% - 100%
Pixel 4
22
000 - 255
Green,
Intensity 0% - 100%
23
000 - 255
Blue,
Intensity 0% - 100%
24
000 - 255
White,
Intensity 0% - 100%
25
000 - 255
Amber,
Intensity 0% - 100%
26
000 - 255
UV,
Intensity 0% - 100%
27
000 - 255
Red,
Intensity 0% - 100%
Pixel 5
28
000 - 255
Green,
Intensity 0% - 100%
29
000 - 255
Blue,
Intensity 0% - 100%
30
000 - 255
White,
Intensity 0% - 100%
31
000 - 255
Amber,
Intensity 0% - 100%
32
000 - 255
UV,
Intensity 0% - 100%
33
000 - 255
Red,
Intensity 0% - 100%
Pixel 6
34
000 - 255
Green,
Page 11

Intensity 0% - 100%
35
000 - 255
Blue,
Intensity 0% - 100%
36
000 - 255
White,
Intensity 0% - 100%
37
000 - 255
Amber,
Intensity 0% - 100%
38
000 - 255
UV,
Intensity 0% - 100%
39
000 - 255
Red,
Intensity 0% - 100%
Pixel 7
40
000 - 255
Green,
Intensity 0% - 100%
41
000 - 255
Blue,
Intensity 0% - 100%
42
000 - 255
White,
Intensity 0% - 100%
43
000 - 255
Amber,
Intensity 0% - 100%
44
000 - 255
UV,
Intensity 0% - 100%
45
000 - 255
Red,
Intensity 0% - 100%
Pixel 8
46
000 - 255
Green,
Intensity 0% - 100%
47
000 - 255
Blue,
Intensity 0% - 100%
48
000 - 255
White,
Intensity 0% - 100%
49
000 - 255
Amber,
Intensity 0% - 100%
50
000 - 255
UV,
Intensity 0% - 100%
51
000 - 255
Red,
Intensity 0% - 100%
Pixel 9
52
000 - 255
Green,
Intensity 0% - 100%
53
000 - 255
Blue,
Intensity 0% - 100%
54
000 - 255
White,
Intensity 0% - 100%
55
000 - 255
Amber,
Intensity 0% - 100%
56
000 - 255
UV,
Intensity 0% - 100%
57
000 - 255
Red,
Intensity 0% - 100%
Pixel 10
58
000 - 255
Green,
Intensity 0% - 100%
Page 12

59
000 - 255
Blue,
Intensity 0% - 100%
60
000 - 255
White,
Intensity 0% - 100%
61
000 - 255
Amber,
Intensity 0% - 100%
62
000 - 255
UV,
Intensity 0% - 100%
63
000 - 255
Red,
Intensity 0% - 100%
Pixel 11
64
000 - 255
Green,
Intensity 0% - 100%
65
000 - 255
Blue,
Intensity 0% - 100%
66
000 - 255
White,
Intensity 0% - 100%
67
000 - 255
Amber,
Intensity 0% - 100%
68
000 - 255
UV,
Intensity 0% - 100%
69
000 - 255
Red,
Intensity 0% - 100%
Pixel 12
70
000 - 255
Green,
Intensity 0% - 100%
71
000 - 255
Blue,
Intensity 0% - 100%
72
000 - 255
White,
Intensity 0% - 100%
73
000 - 255
Amber,
Intensity 0% - 100%
74
000 - 255
UV,
Intensity 0% - 100%
75
000 - 009
No Function
COLOR PRESETS
010 - 019
RED 020 - 029
GREEN
030 - 039
BLUE
040 - 049
WHITE
050 - 059
AMBER
060 - 069
UV
070 - 079
YELLOW
080 - 089
MAGENTA
090 - 099
CYAN
100 - 109
DARK ORANGE
110 - 119
GREEN YELLOW
120 - 129
SALMON
130 - 139
TURQUISE
Page 13

140 - 149
LIGHT GREEN
150 - 159
ORANGE
160 - 169
LAVENDER
170 - 179
LIGHT BLUE
180 - 189
DARK BLUE
190 - 199
PINK
200 - 255
No Function
76
000 - 009
No Function
010 - 019
auto program 1
Auto
020 - 029
auto program 2
030 - 039
auto program 3
040 - 049
auto program 4
050 - 059
No Function
060 - 069
sound program 1
Sound
070 - 079
sound program 2
080 - 089
sound program 3
090 - 099
sound program 4
100 - 255
No Function
77
000 - 255
Speed: slow →
fast
Can be set when
Auto Program 1,
2, 3 or 4 is used
via CH76.
Microphone sensitivity:
min. → max.
Adjustable when sound
program 1, 2, 3 or 4 is
used via CH76.
Beeinflusst alle
Funktionen von
CH76
3.4 Connections in "DMX" mode:
DMX is the abbreviation for digital multiplex and allows the digital control of several DMX devices via a
common control cable.
Connect the DMX input of the unit to the DMX output of a DMX controller or other DMX device.
Connect the output of the first DMX device to the input of the second and so on to form a series circuit
DMX connectors: A three-pin XLR socket serves as a DMX output, a three-pin XLR connector serves
as a DMX input.
Page 14

For installations with very long DMX cable paths or high electrical interference, such as in a
discotheque, it is recommended to use a DMX terminator. The DMX terminator is connected in an XLR
connector as a 120 Ω resistor between pins 2 and 3 which is plugged into the last output socket of the
DMX line.
3.5 Connections in "Master / Slave" mode:
When you configure a group of devices in "Master / Slave" mode, the first device controls the others
and allows an automatic or music-controlled and synchronized show. This feature is especially useful
for starting a show without great Programing. Connect the DMX output of the master device to the
DMX input of the first slave device. Then connect the DMX output of the first slave device to the DMX
input of the second slave device and so on.
3.6 Stand-Alone-Operation:
The "PaintBAR HEX12P" can also be used in stand-alone mode without a DMX controller. Disconnect
the "PaintBAR HEX12P" from the controller and call the preProgramed program.
Page 15

3.7 Infrared remote control (included):
The included remote control allows you to control the "PaintBAR HEX12P" even without a DMX
controller and offers much more possibilities than the functions available via the on-board menu.
Make sure the remote control is pointing directly at the unit and there are no obstructions between the
unit and the remote control.
AUTO Mode:
The "AUTO" key puts the unit into the automatic mode.
1. Press <AUTO> on the remote control.
2. Press <+> or <-> to switch between the various Automatic programs.
SOUND Mode:
The <SOUND> key puts the unit in the music-controlled mode.
1. Press <SOUND> on the remote control.
2. Press <+> or <-> to switch between the various Sound programs.
STROBE Mode:
Press the <STROBE> key to activate the stroboscope in the automatic mode
Or music-controlled operation.
1. Press <STROBE> on the remote.
2. Press <+> or <-> to set the desired strobe speed.
3. Press <STROBE> again to turn off the strobe effect.
SPEED Mode:
Use the <SPEED> button to regulate the speed in automatic mode
Or music-controlled operation.
1. Press <SPEED> on the remote control.
2. Press <+> or <-> to set the desired running speed.
SENSITIVITY:
With the SENSIVITY you adjust the microphone sensitivity in the music - controlled
Operation.
1. Press <SENSIVITY> key to select the microphone sensitivity.
2. Press <+> or <-> to select the desired microphone sensitivity.
DMX Mode:
Press the <DMX /%> button to put the unit to DMX mode.
MANUAL Mode:
1. Press <MANUAL> on the remote control.
2. Use the R, G, B, A, UV or W buttons to select the desired colors set to.
(Depending on the device).
3. Press <+> or <-> to switch between the different color presets to choose.
FADE Mode (depending on the device):
The "FADE" button puts the unit into the color change mode.
1. Press <FADE> on the remote control.
2. Press <FADE> again to exit the color change mode.
Number 1~9:
With the numbers 1-9, you can set the desired brightness in the automatic mode or in music-controlled mode.
Press <1> to <9> to select between the brightness levels.
BLACK OUT:
The <BLACK OUT> button turns off the LEDs.
1. Press <BLACK OUT> to turn off the LEDs.
2. Press <BLACK OUT> again to turn on the LEDs.
Page 16

Part 4: Troubleshooting:
The device does not work, no light:
Check the mains connection and the main fuse.
If the instructions given here do not lead to success, please contact your specialist dealer.
Part 5: Maintenance:
IMPORTANT: Disconnect the device from the power supply before servicing!
Screws used must be tightened and may not show rust marks. The housing, the mounting bracket and
the mounting location (e.g., ceiling or traverse) may not be adapted; Do not drill additional holes in
mounting brackets, change the connections, etc. Clean the externally accessible optical lenses
regularly to optimize the light output. The frequency of cleaning depends on the operating
environment: damp, smoky or particularly dirty environments can cause a greater amount of dirt
accumulation on the device's appearance. Use a lint-free, moistened cloth for cleaning. Never use
alcohol or solvents for cleaning!
Change of fuse.
IMPORTANT: Replace the fuse only with a fuse of the same type and with the same values (imprint
on the device). If the fuse is triggered repeatedly, please contact an authorized service center.
1: Unplug the power cord from the wall outlet and disconnect the power cord from the wall outlet.
2: Open the fuse holder on the back of the unit with a suitable screwdriver.
3: Remove the defective fuse from the fuse holder.
4: Insert the new fuse into the fuse holder.
5: Replace the fuse holder in the housing.
Maintenance and service are reserved for the authorized personnel only!
Part 6: Technical specifications:
MODEL NAME:
PAINTBAR HEX12P
Product type:
LED BAR / Wallwasher
Color spectrum:
RGBWA+UV
Number of LEDs:
12
LED Type:
12W 6in1
Beam angle:
25 °
DMX Input:
XLR 3-Pol male
DMX Output:
XLR 3-Pol female
DMX Mode:
5, 6 or 77 channels
Controls:
Up, Down, Mode, Enter
Indicators:
LED-Display
Operating voltage:
100-240 VAC, 50/60 Hz
Power consumption:
50W
Fuse:
F1A 250V
Power supply:
Powercon-compatible socket input- and output
Measurements:
1087x87x104 mm
Weight:
3.3kg
Other features:
IR remote control
Page 17

Part 7: Environmental pRedection:
To all inhabitants of the European Union: This product is subject to European Directive 2002/96
/ EC. Dispose of your old device Not with normal household waste.
This symbol on the product or on the packaging indicates that disposal of this product
can damage the environment after its life cycle. Do not dispose of the unit (or used batteries) as
unsorted household waste. The unit or used batteries must be disposed of by a specialized company
for recycling. This unit must be returned to the dealer or a local recycling company. Respect the local
environmental regulations.
If in doubt, contact your local authority for disposal guidelines.
Part 8: Warranty conditions:
INVOLIGHT devices are subject to the valid, statutory warranty provisions. Check with your dealer for
the valid warranty conditions. The following conditions apply when purchasing an INVOLIGHT product:
Only authorized retailers designated by INVOLIGHT may carry out repairs to INVOLIGHT devices.
The warranty claim expires if an unauthorized service, technician or a private person undertakes a
repair attempt or opens the device. Equipment which has a defect within the warranty period can be
returned to the authorized seller for the purpose of repair or replacement. In the case of a necessary
repair or exchange, please clarify the exact sequence for the return shipment with the seller. If
applicable, consult the seller's general terms and conditions for information on warranty procedures.
Wearing parts are only taken into consideration by the warranty, if these have a defect already at the
delivery of the device. The guarantee claim does not exist if the device has been destroyed by itself
(eg camber or overvoltage). Mechanical defects such as broken switches or housing parts are also
excluded from the guarantee claim. For all service and repair services, please contact the dealer
where the device was purchased. He will help you as much as possible.
Stand: 04 / 2017- Technical and optical changes within the framework of the product improvement are
reserved - even without prior notice.
No liability shall be accepted for printing errors and resulting faulty operation. If in doubt, consult your
INVOLIGHT dealer!
EC Declaration of Conformity
The equipment marketed by Destilan Deutschland GmbH complies with the essential requirements
and other relevant specifications of the directives EMC Directive 2014/30 / EU and LVD Directive
2014/35 / EU
 Loading...