

Page 1
1
DMX512- 192
controller
User manual
VER:2.0
PLEASE READ USER MANUAL
Page 2

2
==============================Catalogue===============================
Technical specification---------------------------------------------------------------------------------------3
Cautions of safety---------------------------------------------------------------------------------------------3
Installation of controller-------------------------------------------------------------------------------------3
Connecting scanner------------------------------------------------------------------------------------------4
DMX512 address distribution---------------------------------------------------------------------------4
Digit display instruction-------------------------------------------------------------------------------------5
1)running scene and manual operation display ---------------------------------------------------5
2)edit scene operation display ------------------------------------------------------------------------5
3)edit and running cross chase operation display ------------------------------------------------5
Description rules----------------------------------------------------------------------------------------------5
Rear instruction-----------------------------------------------------------------------------------------------6
Panel instruction----------------------------------------------------------------------------------------------6
The number keys (1-12) in the scene / procedures / manual control mode of the corresponding
menu ----------------------------------------------------------------------------------------7
Description of A,B,C,D these four function keys in the Panel ------------------------------------7
A,B,C,D Four key scenes in the editing and editing, respectively, under the procedure menu
---------------------------------------------------------------------------------------------------------------------7
A,B,C,D Four key scenes in the editing process and editing of the functional state of operation--8
I)the schematic diagram of the edit scene panel --------------------------------------------8
A) copy scene function------------------------------------------------------------------------------8
B) save scene function------------------------------------------------------------------------------9
C) delete scene function----------------------------------------------------------------------------9
II)edit chase state function operation-------------------------------------------------------------------9
D) choose chase step and scene NO -------------------------------------------------------------9
E) delete chase step---------------------------------------------------------------------------------9
F) delete chase ---------------------------------------------------------------------------------------9
III)manual operation --------------------------------------------------------------------------------------9
A) delete manual operation ------------------------------------------------------------------------9
Edit scene -------------------------------------------------------------------------------------------------------9
1)
the schematic diagram of the edit scene panel ------------------------------------------9
2) introduction of editing scene-----------------------------------------------------------------------10
edit chase ------------------------------------------------------------------------------------------------------10
1)
the schematic diagram of the edit cross chase panel --------------------------------10
2) introduction of editing cross chase ---------------------------------------------------------------10
running scene -------------------------------------------------------------------------------------------------11
1)
the schematic diagram of the running scene panel ----------------------------------11
2) introduction of running scene ---------------------------------------------------------------------11
running chase-------------------------------------------------------------------------------------------------12
1)
the schematic diagram of the running cross chase-----------------------------------12
2) )introduction of running chase cross chase --------------------------------------------------12
manual operation--------------------------------------------------------------------------------------------13
1)
the schematic diagram of manual operation panel ----------------------------------13
2) )introduction of manual operation-------------------------------------------------------------13
Page 3
3
192,following the universal DMX 512 protocol,can control 12 16-channel scanners or other
equipment,chase program and manual control of scanners can be performed at the same time .the
functions are compact it’s convenient and flexible operation made it handled very easily.192 is
suitable for different ballroom ,taproom and small show.
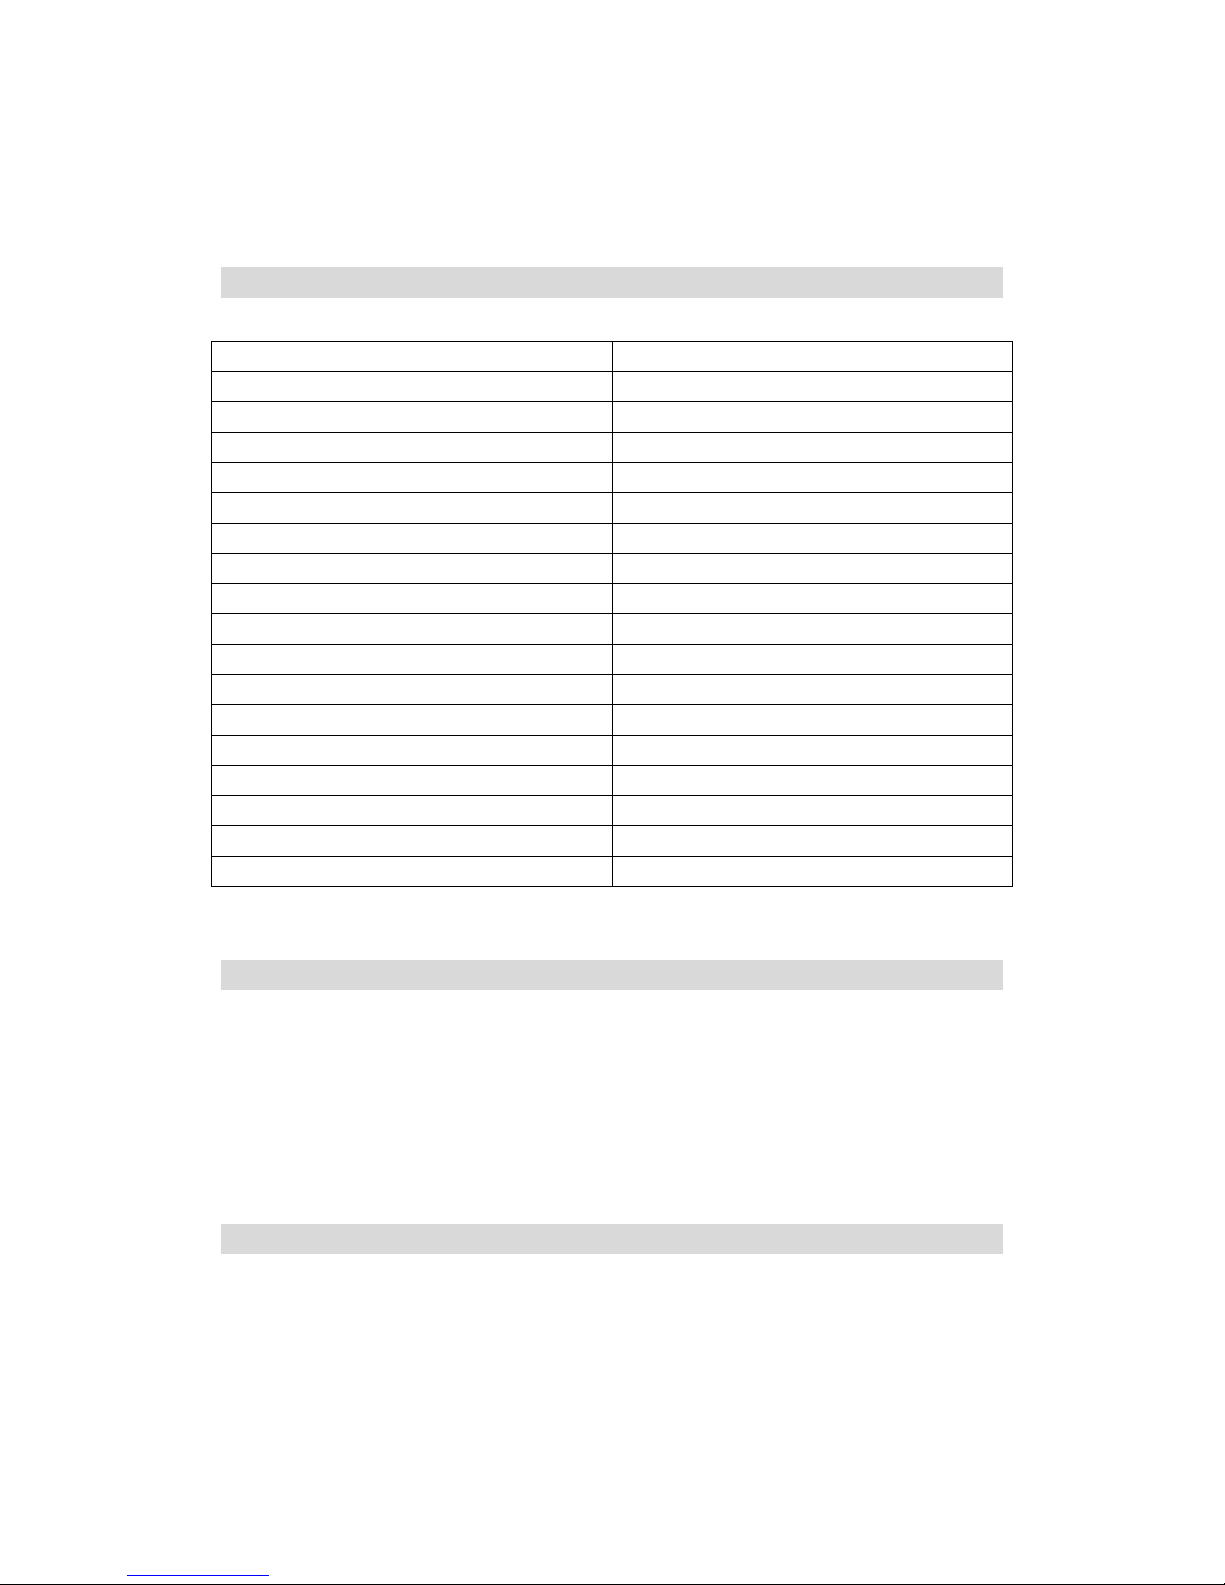
Technical specifications
Output signal DMX512
DMX channels 1-192
Maximum control channel amount a scanner 16
Control amount of scanners 12
Amount of chase 12
Maximum chase steos in a chase 100
Amount of scanner scene 100
Running scene directly 12
Manual operation of scanner Yes
Music run Yes
Blackout function Yes
Time of running chase can be adjust Yes
Cross of running chase can be adjust Yes
Display mond LED digit display
Port of DMX outpput XLR-D3F
Power supply AC90-240V,50-60Hz,4W
Size 53.5*18.5*10CM
Weight 2.5KG
Cautions of safety
◆ 192Ccontroller must be connected to the earthground to ensure the safety of user。
◆ When 192 controller are working,don’t plug in or plug out DMX 512 cable to avoid
destroying the electronic components of the port in the controller.
◆ Don’t splash any liquid to the controller to avoid destroying the electric components and the
functions of the controller
◆ The scanner controller is precision electric equipment .please pay attention to moistureproof
protection and dustproof .And please clean the controller panel termly.
Installation of controller
Contents in the package of 192Cscanner controller:
◆ 192Cscanner controller: 1;
◆ Power supply line :1;
◆ User manual : 1。
Installing structure of 192 scanner controller follows the international standard “19”3U.it can be
Page 4
4
embedded in operation board or directly installed in 19’’ shelf or cabinet.
The power of 192 scanner controller has steady voltage output in so wide range of power supply
voltage that it is adopt to the power supply of all the world .beafore the power supply is
connected ,.Please check whether the voltage is in normal range of 192
When the fuse needs to be replaced,please use the fuse with with the current capacity signed on
the rear of the 192.
Connecting to scanner
According to DMX512 protocol , DMX signal cable must be screened twist cable with
impedance of 120Ω. In practical engineering installation, if the whole length of the cable is short,
the cable may be replaced by high quality screened two-core microphone cable.
User joins each end of the cable to a XLR plug. Foot 1of the XLR plug is connected to the screen
net of the cable. Twist lines (distinguished by different colors) are connected to foot 2 and 3. Foot
3 is signal + and foot 2 is signal -. Foot 2 and foot 3 of the plug cannot be confused.
To ensure correct DMX signal transmission, an 120Ω terminal matching resistance must be
connected to the last equipment to absorb terminal signal reflection. The operation is as following:
connect a 120Ω resistance to foot 2 and foot 3 of a plug then plug it to the output of the last
scanner (or other equipment).
。
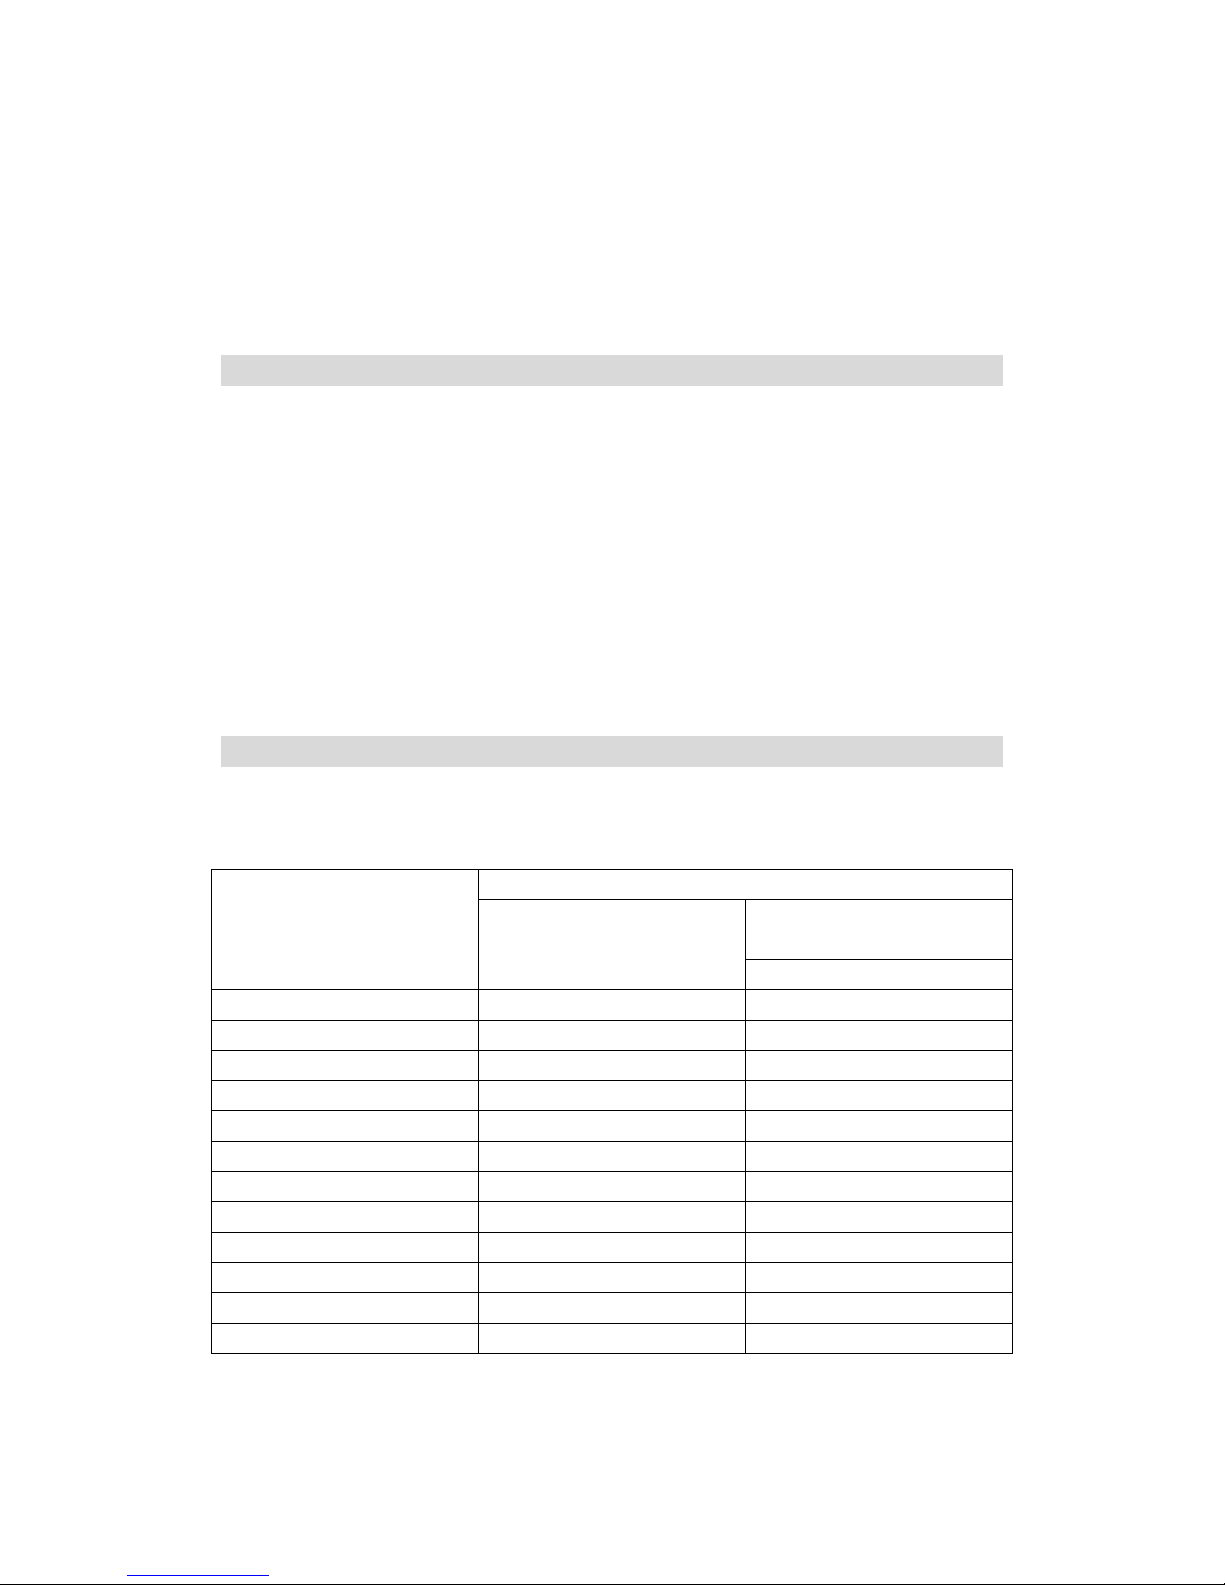
Address distribution of DMX512
192 scanner controller utilizes channel 1-192 of DMX512 to transmit the control signals to
various scanners. Each scanner is fixed with 16 control channels.
First DMX address of scanner
Switch bit of scanner
address
Scanner NO
Decimal code
123456789
1 1 100000000
2 17 100010000
3 33 100001000
4 49 100011000
5 65 100000100
6 81 100010100
7 97 100001100
8 113 100011100
9 129 100000010
10 145 100010010
11 161 100001010
12 177 100011010
Page 5

5
Digit display instruction
1) Running scene and manual operation display :
Channel NO separator channel
1) Channel NO——display the channel of current fader 0-f correspond1-16 channel 。
2) Channel ——display the current input channel value(range:000-255)。
3) Separator ——used in distincting different content。
2)editing scene operation display :
scene mark in effect separator scene NO
(display scene in effect) (no effect display)
1) Scene mark in effect——the content of choosing the scene(Y means“Ye s”,N means“NO”)。
2) scene NO——display the editing scene(range:00-99)
3) Separator ——used in distincting different content。
3)edit and running cross chase operation display:
chase step separator scene NO last chase step
(last step display) (not last step display)
1) Chase step——the editing chase step NO,range:00-99。
2) Scene NO——the scene will save in the chase step,range:00-99。
3) Last chase step——the step is the last chase step。
4) Separator ——used in distincting different content。。
5) no chase display——no content in the chase(as follows)。
(no chase display)
Description rules
1)xxx mean key,switch or channel fader,for example:“Chase”。
2) Step,Step , Scene 和 Scene keys in the following text , respectively,
also referred to as A,B,C and D key,
Because the four buttons are regarded Composite function keys,They can also correspond to a
state of expression of the corresponding functions。
Page 6

6
3) in the Schematic diagram of the operation,Circle with the number of steps means a one-to-one
relationship in explaining the steps and the schematic diagram of the serial number of the serial
number for
Example : “①”or “1)”;in “①”and“1)”are Consistent,both mean first step or No. 1
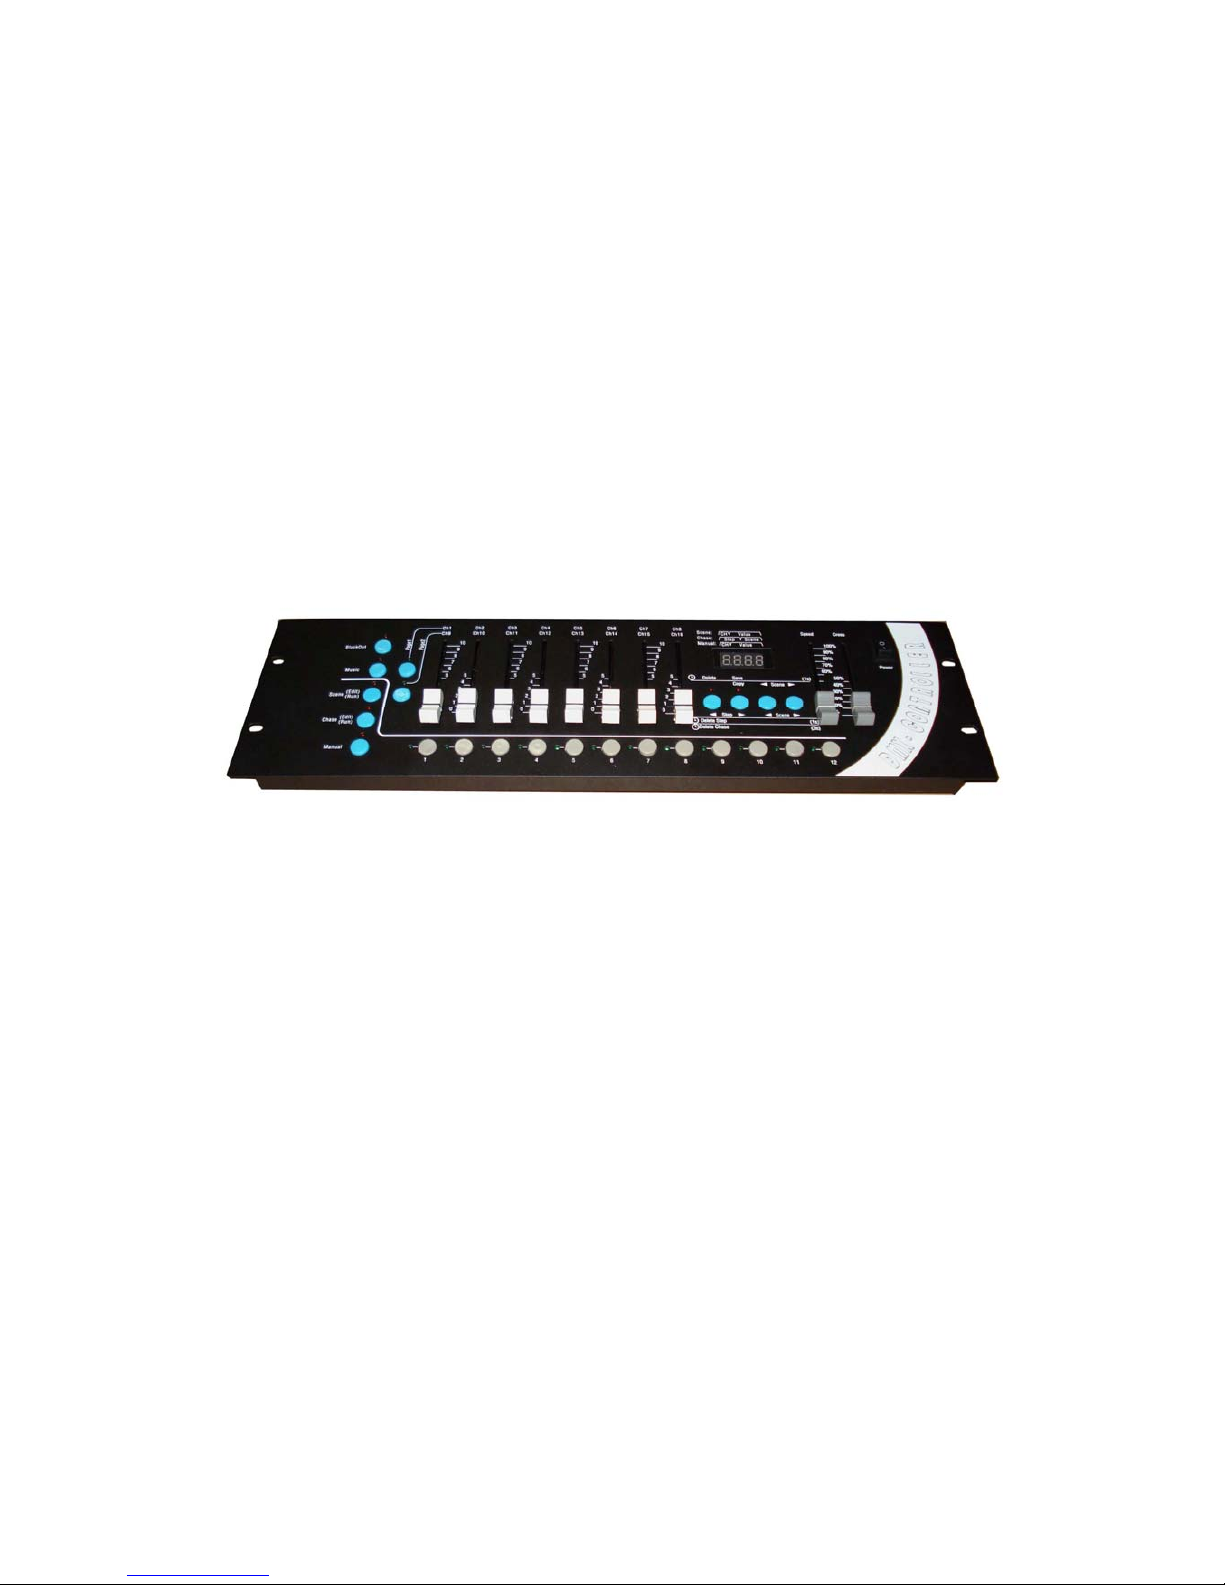
Rear instruction
Power input socket fuse DMX signal output port
Panel instruction
1) Blackout Output black keys, pressing the button make light
bright . when the control output
value of Platform, all channels to 0, resulting in black scenes。
2) Music Voice-activated key ,pressing the button make light
bright,Running the program is
triggered by the built-in microphone to run。
3) Scene Edit / Run Scene Editor / run key, if pressing time is more than 1 seconds, the indicator
light flashes into the scene editor state; then if pressing for 1 second again will withdrawn
from editing the state to the running state, Bright light is always on。
4) Chase Edit / Run walking light program editor / run key, if pressing time is more than 1
seconds, the indicator light flashes into the scene editor state; then if pressing for 1 second
again will withdrawn from editing the state to the running state, Bright light is always on。
5) Manual Manual control key。
6) Page1 Access keys page 1。
7) Page2 Access keys page 2。
8) Ch1/Ch9-Ch8/Ch16 Channel fader(page one 1-8 / page two 9-16)。
9) 1-12 The number keys 1-12(Used to select the No. field, and follow procedures and signal
lights to choose)。
10)
Step key is called as A key,(run)Operation to remove lantern; (edit scenes) deleted scenes;
Page 7

7
(Edit the walking light procedure) Step Remove Programs / Remove Programs / decreasing
step-by-step selection procedure。
11) Step
key is called as B key,(Edit scenes) scene copy / preserve the scene; (Editor lights go
procedure) incremental step-by-step selection procedure。
12)
Scenekey is called as C key,(Scene Editor / walking lights Procedure) its reduced choice
key of scenes
13) Scene
key is called as D key,(Scene Editor / walking lights Procedure) its increced
choice key of scenes。
14) Digital display。
15) Speed Speed adjustment fader。
16) Cross Gradual adjustment fader。
17) Power Power switch。
The number keys (1-12) in the scene / procedures / manual
control mode of the corresponding menu
function of number keys
functional state
the number keys 1-12
Editing Scene Used to select the lamp
Scene Edit / Runk
Running scene Used to select the runing scenes
Editing program Used to select the editing scenes
Chase Edit / Run
Runing program Used to select the runing scenes
Manual
Manual control Used to select the lamp
Description of A,B,C,D these four function keys in the panel
①Step
When running scene with a digital display that's just - the first for a digital control
channel number CH fader shows that the first 2-4 fader-bit digital control input values to show。
② When the lights go running process with a digital display that's just - the first-bit digital tube
A,B,C,D Four key
scenes in the
editing function of
state
the function of A,B,C,D
Four buttons in the
editeditediting
process
Page 8

8
1-2 run-time for the process step-by-step shows the current output, the first 2-4 bit digital
control for step-by-step procedures to preserve the scene in the show its。
③ Manual control with digital display that's just - the first for a digital control channel number
CH fader shows that the first 2-4 fader-bit digital control input values to show。
④ Delay icon button operation - said that the function of the corresponding button press and hold,
through a period of time after the delay generated by。
⑤ Button to operate the time delay value - there is 1 second and 3 seconds 。
A,B,C,D four key scenes in the editing and editing, respectively,
under the procedure menu
button
function
A ke y
B key C key Dkey
No delay --
Copy Scene
copy
Scene No.
scenes to move
the election
Edit
scene
Edit
scene
Delay 1S
Delete delete
scene
Save scene
preservation
--
No delay
Step Step
forward the
election process
Step
Backward
step-by-step
selection
procedure
Scene No.
scenes to move
the election
Edit
program
Delay 1S
Delete Step
Delete the current
step-by-step
procedures
-- --
Edit
program
Delay 3S
Delete
ChaseDelete the
current
procedures
-- --
Manual
lantern
No delay
to clear the state
of lantern
-- -- Manual lantern
A,B,C,D four key scenes in the editing process and editing of the
functional state of operation
I)Scenes in the editing function of the state of operation:
A) Scene copy function (Note: pressing time of less than 1 second):
1) Use C,D key to Select the scene to be copied (No. 3-4 bit digital tube will display
the number of the scenes);
2) Press B key make the light bright;
3) use C,D key to choose to paste No. scenes, the scenes will be changed (No. 3-4 bit digital
Page 9

9
tube will display the number of the scenes);
4) press B key To make light out on the scene to complete the replication process, the latter
scenario will be chosen before the contents of a scene instead of。
B) Save the scene features (Note: pressing time is greater than 1 second):
Press the B button for more than 1 second, the indicator light on the current editorial
content is saved to the scene of the Taiwan-controlled memory.
C) to remove scenes feature (Note: pressing time is greater than 1 second):
Press the B button for more than 1 second, the indicator light on the current content
has been edited to remove scenes.
II) in the editorial functions of the state of operation:
A) the selection process step-by-step with the scene number (Note: pressing time of
less than 1 second):
1) A, B button for forward and backward step selection process, when the final
step-by-step process occurs, then B button you can add a new procedure after the
step-by-step.
2) C, D keys used to select the step number to preserve the scene.
B) Remove Programs Step (Note: press time more than 1 seconds, less than 3
seconds):
Press the A button for more than 1 second, the indicator light shows the current
process step-by-step from the procedure was removed.
C) to remove the current procedure (Note: more than 3 seconds press time):
Press the A button for more than 3 seconds, indicator light will change the course of
two shows that the current process is removed, this time 1-2 bit digital tube displays
"00", the first-bit digital tube display 3-4 "--"。
III) the functions of the state of manual steps:
A) Clear lantern status:
Running mode, press the A button used to clear the current output lantern.
Edit scene
1)the schematic diagram of the edit scene panel:
Page 10

10
The definition of the process steps of the edit SCEN:
① Press SCENE button in excess of 1 second, the indicator light glittering, enter the edit scene
state.
② Use the
Scene& Scene button to choose the scene serial number;
If want to edit the current scene, then run the step 3;
If want to delete the current scene, then run the step 5;
If want to copy the current scene, then run the step 7.
③ Edit the current scene: use the number button 1-12 to choose the light number, then with the
cooperation of the Page1 & Page2 button, use the handspike Ch1/Ch9-Ch8/Ch16 to set the
value of each channel;
④ Save the editing scene: press the SAVE button in excess of 1 second, when the panel indicator
light and the screen glitter once, the current editing scene is saved;
If want to continue to edit other scene, run the step 2, choose another scene to edit; or run the
step 9 to exit the editing scene state.
⑤ Delete the current scene: press the DELETE button in excess of 1 second, the lighting of the
indicator light implies that the current scene is deleted.
If want to continue to edit other scene, run the step 2, choose another scene to edit; or run the
step 9 to exit the editing scene state.
⑥ Copy the current scene: press the COPY button, until the indicator light lighting, enter the
copy state, the contents of the current scene as the source of the scene content.
⑦ Use the
Scene& Scene button to choose the scene serial number which is used to store
the contents of the scene to copy, the serial number is the target serial number.
⑧ Press the COPY button again, the indicator go out, complete the copy process, then the
contents of the source scene to cover the contents of the target scene.
If want to continue to edit other scene, run the step 2, choose another scene to edit; or run the
step 9 to exit the editing scene state.
⑨ Exit the editing scene: press the SCENE button in excess of 1 second, the indicator light from
glittering to lighting, system switch from editing scene state.
Edit chase
1)
the schematic diagram of the edit chase panel:
2)introduction of editing chase:
①press Chase over 1 second,and the indicator light will flash ,meaning that the chase is
in editing state (digit will display “CHA”,prompting to select Chase number);
Page 11

11
②selecting the number that you want:use Num Lock 1-12toselect the chase number (if the
program is empty ,digit displays“00.--”. if step zero and the number of the saved scene in this
step will be displayed ,such as “00,08”)
If you want to delete the current chase, execute the ⑤step
③select program step :channels Step and Step keys used to select the step of the
Program that you want to edit
④selecting the scene number:using
Scene 和 Scene ,to select a scene number and the scene
will be saved in the chase step selected in the ③ step.
If you want to editing othe steps of the current chase,execute the③ repeatedly;
⑤deleting current program:press Delete key over 3 seconds,and the indicator light will flash 2
times, then the current chase will be deleted。(digit will display”00.--”)。
If you want to editing other steps of the current chase,execute the③ repeatedly;
⑥deleteing the current step of the chase:press Delete key over1second,and the pilot lamp will
flash 1 time, then the current step will be deleted。
If you want to editing other steps of the current chase,execute the③ repeatedly;
⑦exiting the editing state of the chase of linear light:press Chase key over 1 second ,and the pilot
will light constantly after flashing ,then the state will be switched to state of running chase of
the linear light
Running scene
1)
the schematic diagram of the running scene panel:
2) introduction of running scene’s step
①press Scene key , and the lights are always on, meaning having entering the state of running
scene
②selecting the scene number :use Num Lock 1-12 to choose the number you want
③if you want to output blackscene ,press blackout and if the indicator light is on ,the effect of
black scene is being out ,or the effect is exited
④cllose the scene’s output :use the NumLock to select the number of the scene that you want to
close
.
If you want to delete the current chase ,please execute the⑥ste
p
Page 12

12
Running chase
1)
the schematic diagram of the running chase panel:
2)introduction of running the chase
①pess Chase to light the indicator light
②select the chase number you want: use Num Lock 1-12 to select the number
③adjusting the settling-time :adjust the clipper Speedto adjust the setting-time of the chase
steps .The top means the shortest time and the bottom the longest
④adjusting the shading-time :adjust the clipperCross to adjust the shading-time of the chase
step,and .The top means non-shading and the more declined the longer shading-time
⑤ running by sound-activated: if you need to activate chase in the way of
sound-activated ,pressMusic to make the lamp on,meaning having enterred the state of
sound-activated,and if the lamp is off ,it means the sound-activated state is exited
⑥Outputting blackscene:if you need to output balckscene ,press Blackout key so that you can
choose to whether output blackscene or not
⑦exiting the running chase: use NumLock 1-12 to select the running chase number and the
the chase will be closed。
Page 13

13
manual operation
1)
the schematic diagram of the manual operation panel:
2)
The definition of the process steps of the manual operation :
① Entering the manual state: press the MANUAL button, make the indicator light constantly
shinning, enter manual operation state.
② Choosing the manual lights: use the number button 1-12 to choose the number of lights.
③ Modify the value of the channel of the lights: with the cooperation of the Page1 & Page2
button and the channel handspike can realize the purpose of manual control of the lights.
Press Page1 button, the indicator light on, handspike correspond to Ch1-Ch8; press Page2
button, the indicator light on, handspike correspond to Ch9-Ch16, realize the switch operation of
the 16 channels.
④ Cleanout the manual state: press DELETE button, cleanout the output state which was set on
the manual state.
⑤ If need the effects of blackout, press BLACKOUT button, switch the output
 Loading...