

Invisio G5 User Manual

1
Please read this User Manual carefully before
you start using your headset.
User Manual

2
USER MANUAL
In the following languages
ENGLISH P3
DANISH P19
FRENCH P37
GERMAN P57
ITALIEN P77
NORWEGIAN P97
NETHERLANDS P115
RUSSIAN P134
SPANISH P155
SWEDISH P174

3
Contents
Features . . . . . . . . . . . . . . . . . . . . . . . . . . . . 4
Passkey . . . . . . . . . . . . . . . . . . . . . . . . . . . . 4
Quick Start . . . . . . . . . . . . . . . . . . . . . . . . . . . 5
Charging Your INVISIO® G5 . . . . . . . . . . . . . . . . . . 5
Charging “On the Go” . . . . . . . . . . . . . . . . . . . . . 6
Preparing the Soft Springs . . . . . . . . . . . . . . . . . . . 6
Charging the Charger without G5 . . . . . . . . . . . . . . . 7
Wearing Your INVISIO® G5 . . . . . . . . . . . . . . . . . . 9
Turning On the INVISIO® G5 . . . . . . . . . . . . . . . . . 9
Pairing with a Bluetooth® Device . . . . . . . . . . . . . . .10
Make a Call. . . . . . . . . . . . . . . . . . . . . . . . . . .10
Answering Calls/Hangup/Reject a Call. . . . . . . . . . . . .10
Adjusting the Volume. . . . . . . . . . . . . . . . . . . . . .11
Mute . . . . . . . . . . . . . . . . . . . . . . . . . . . . . .11
Call Waiting (Headset Prole) . . . . . . . . . . . . . . . . .12
Conference Call . . . . . . . . . . . . . . . . . . . . . . . .12
Transfer and End Call . . . . . . . . . . . . . . . . . . . . .13
Redial (Hands-free Prole). . . . . . . . . . . . . . . . . . .13
Transferring a Call to a Mobile Phone . . . . . . . . . . . . .13
Voice Dialing . . . . . . . . . . . . . . . . . . . . . . . . . .14
Cautions . . . . . . . . . . . . . . . . . . . . . . . . . . . .14
Limited 2-Year Warranty . . . . . . . . . . . . . . . . . . . .16

4
Thank you for purchasing the INVISIO® G5. The INVISIO®
G5 can communicate with a wide range of devices, such
as mobile phones, PDAs and computers, using two audio
proles:
● Bluetooth® HEADSET
● Bluetooth® HANDS-FREE
NOTE: Check your device’s user manual for information
about supported Bluetooth® features and functions.
Features
● Patented Soft Spring system for use in either ear.
● 3-button interface, including a large TALK button.
● “All in one” carrying case and charger.
Passkey
Bluetooth® devices recognize each other by pairing.
Each Bluetooth® device uses a pairing code, called a
PASSKEY. The PASSKEY for the INVISIO® G5 is: 0000.
5
Quick Start
Charging Your INVISIO® G5
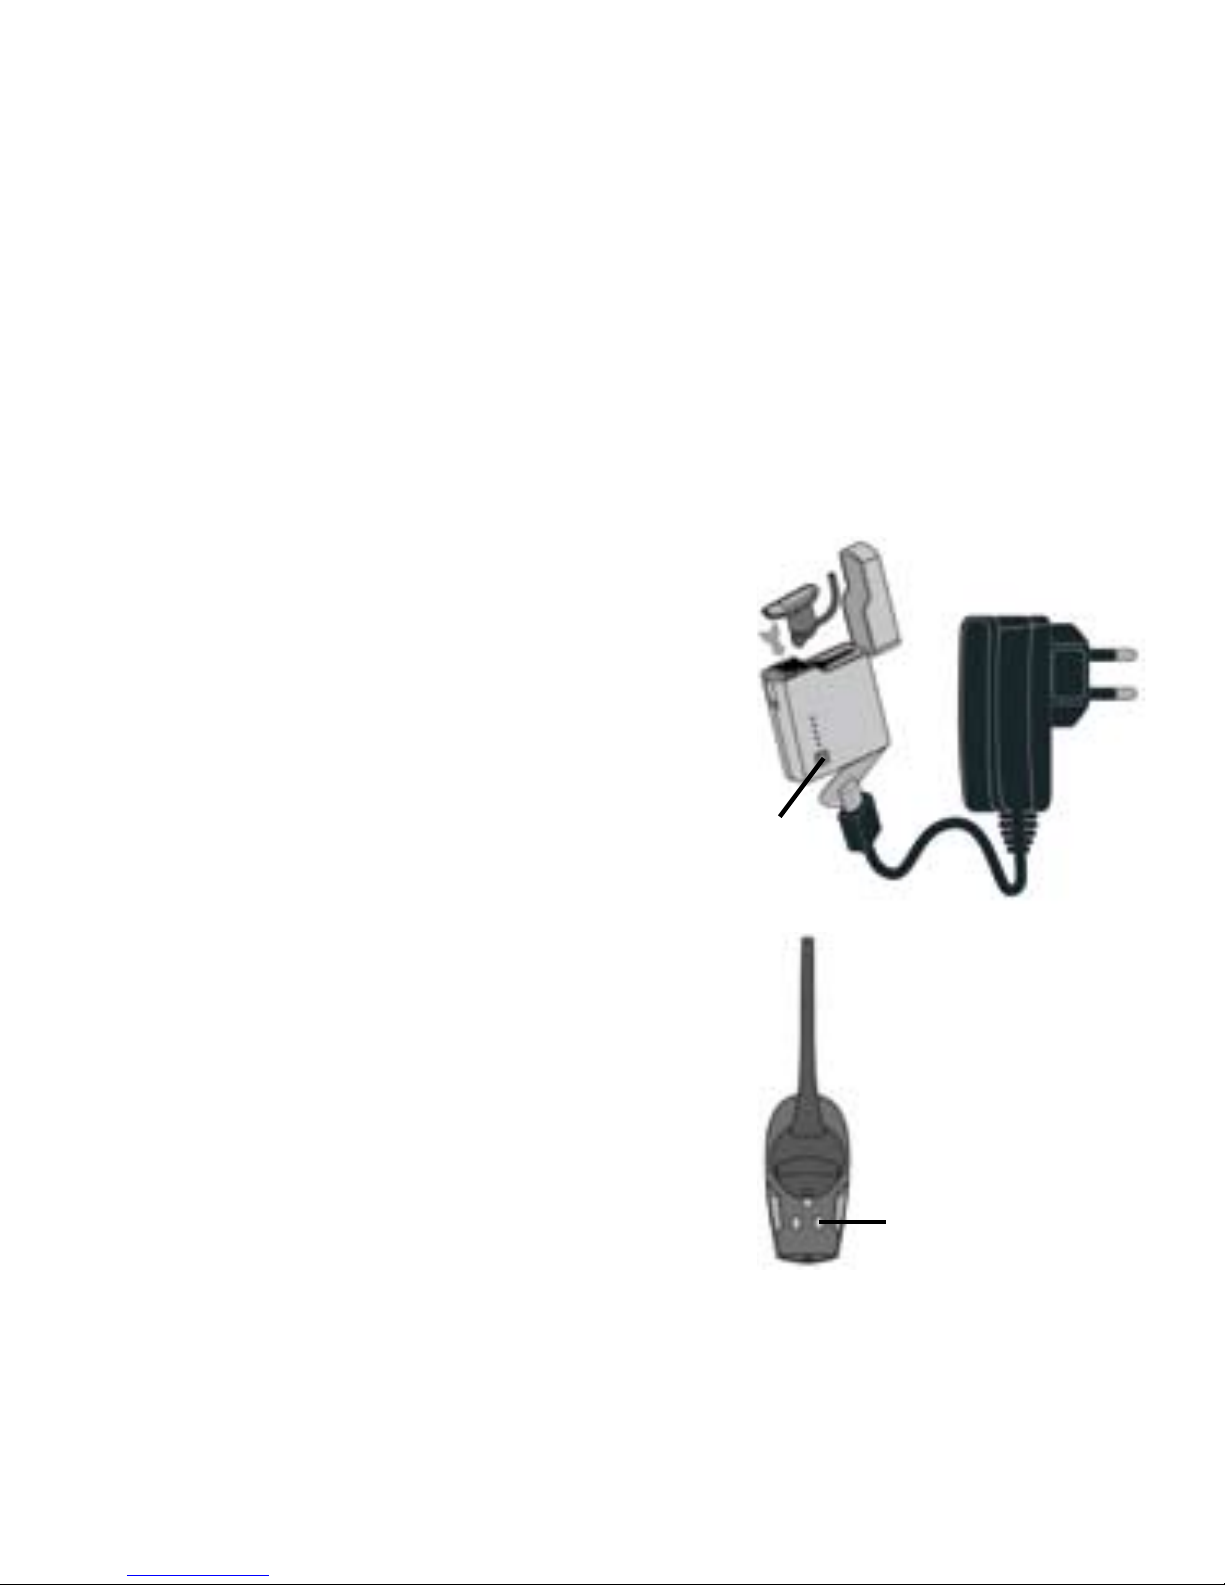
Charge the INVISIO® G5 for 8 hours before rst use.
When the headset needs charging, the red light ashes
every 10 seconds.
1. Connect the A/C adapter
to the carrying case charger
and plug the other end to a
wall outlet.
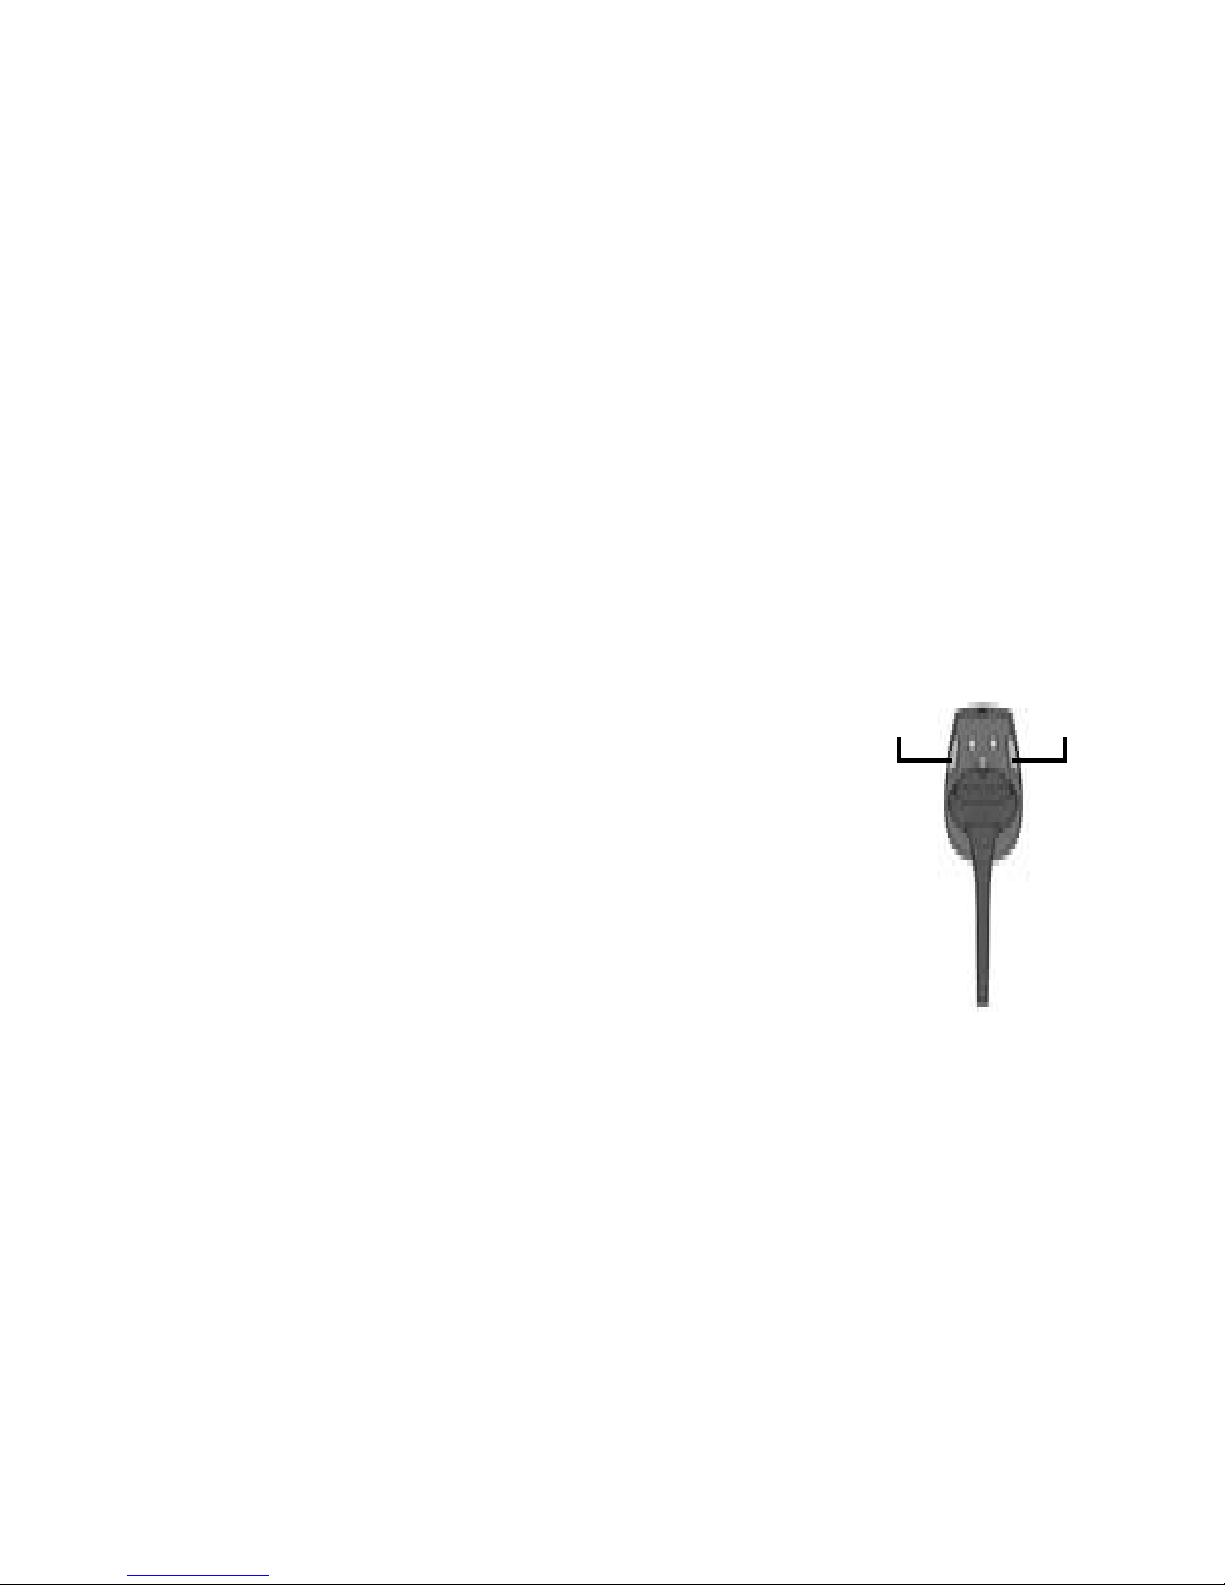
2. Insert the INVISIO
®
G5
into the carrying case char ger and close the lid. The
LEDs indication is for 10
sec. only. You can push the
button to check the status of
the charging for both the G5
and the charger.
Charge
Indicator
Charging
Contacts
6
Left Ear Right Ear
Charging “On the Go”
The carrying-case charger contains an internal battery
that lets you charge the headset up to 5 times without connecting to a wall outlet. Simply insert the INVISIO® G5 into
the charged carrying case charger and close the lid. To
charge the carrying case’s internal battery, connect it to a
wall outlet using the A/C adapter.
WARNING! Only use the supplied charging unit(s). If other power
supplies are used, the headset or battery can be damaged, and
NEXTLINK A/S cannot be held responsible.
Note: Red blinking light is an indication of low battery,
and it needs to be charged.
Preparing the Soft Springs
Soft Springs are made extra long,
and can be cut to t your ear, using
scissors or a hobby knife. Cut a
little piece of the Soft Spring at a
time (Approx. 0.3 cm / 0.125 in.).
Put the Soft Spring on the headset,
and adjust it for a comfortable t.

7
Charging the Charger without the G5
Before using the charger it needs to be charged. This can
be done by inserting the USB cable into the charger (USB
connector at the bottom of the charger). The LEDs will ash
for 10 sec.. You need to push the button to see whether the
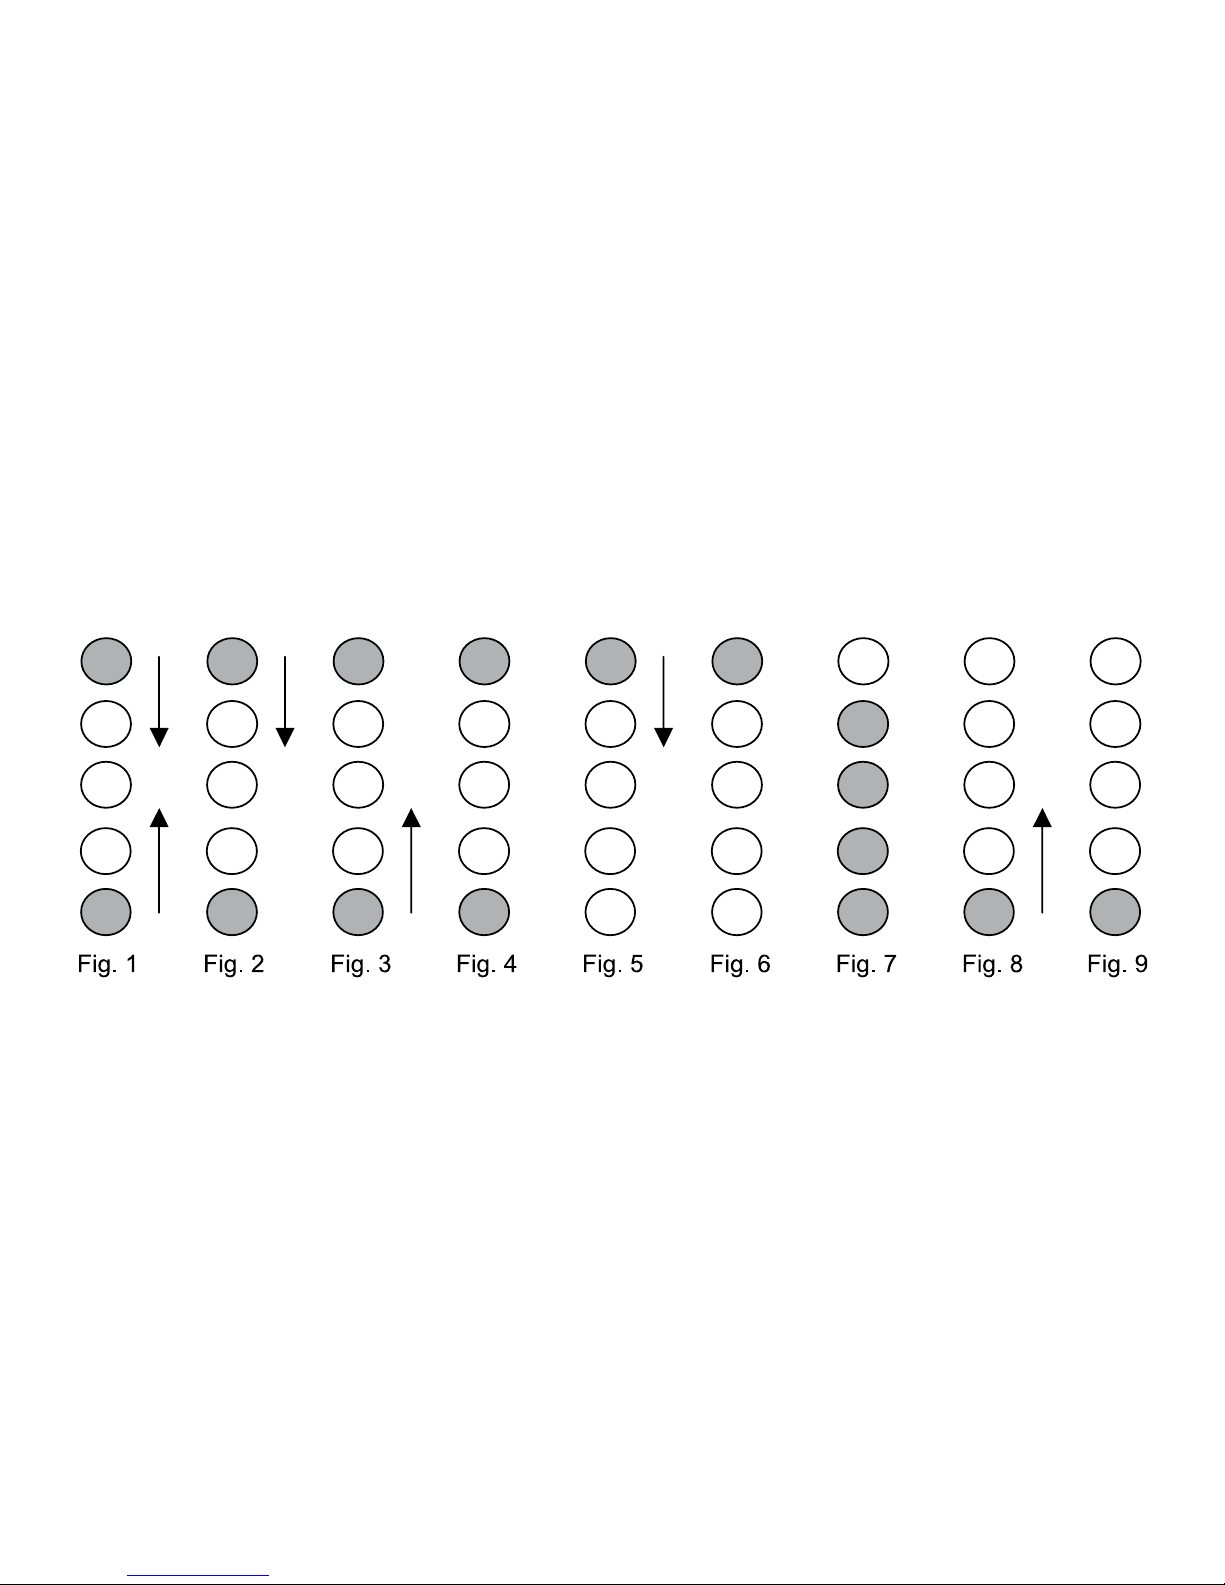
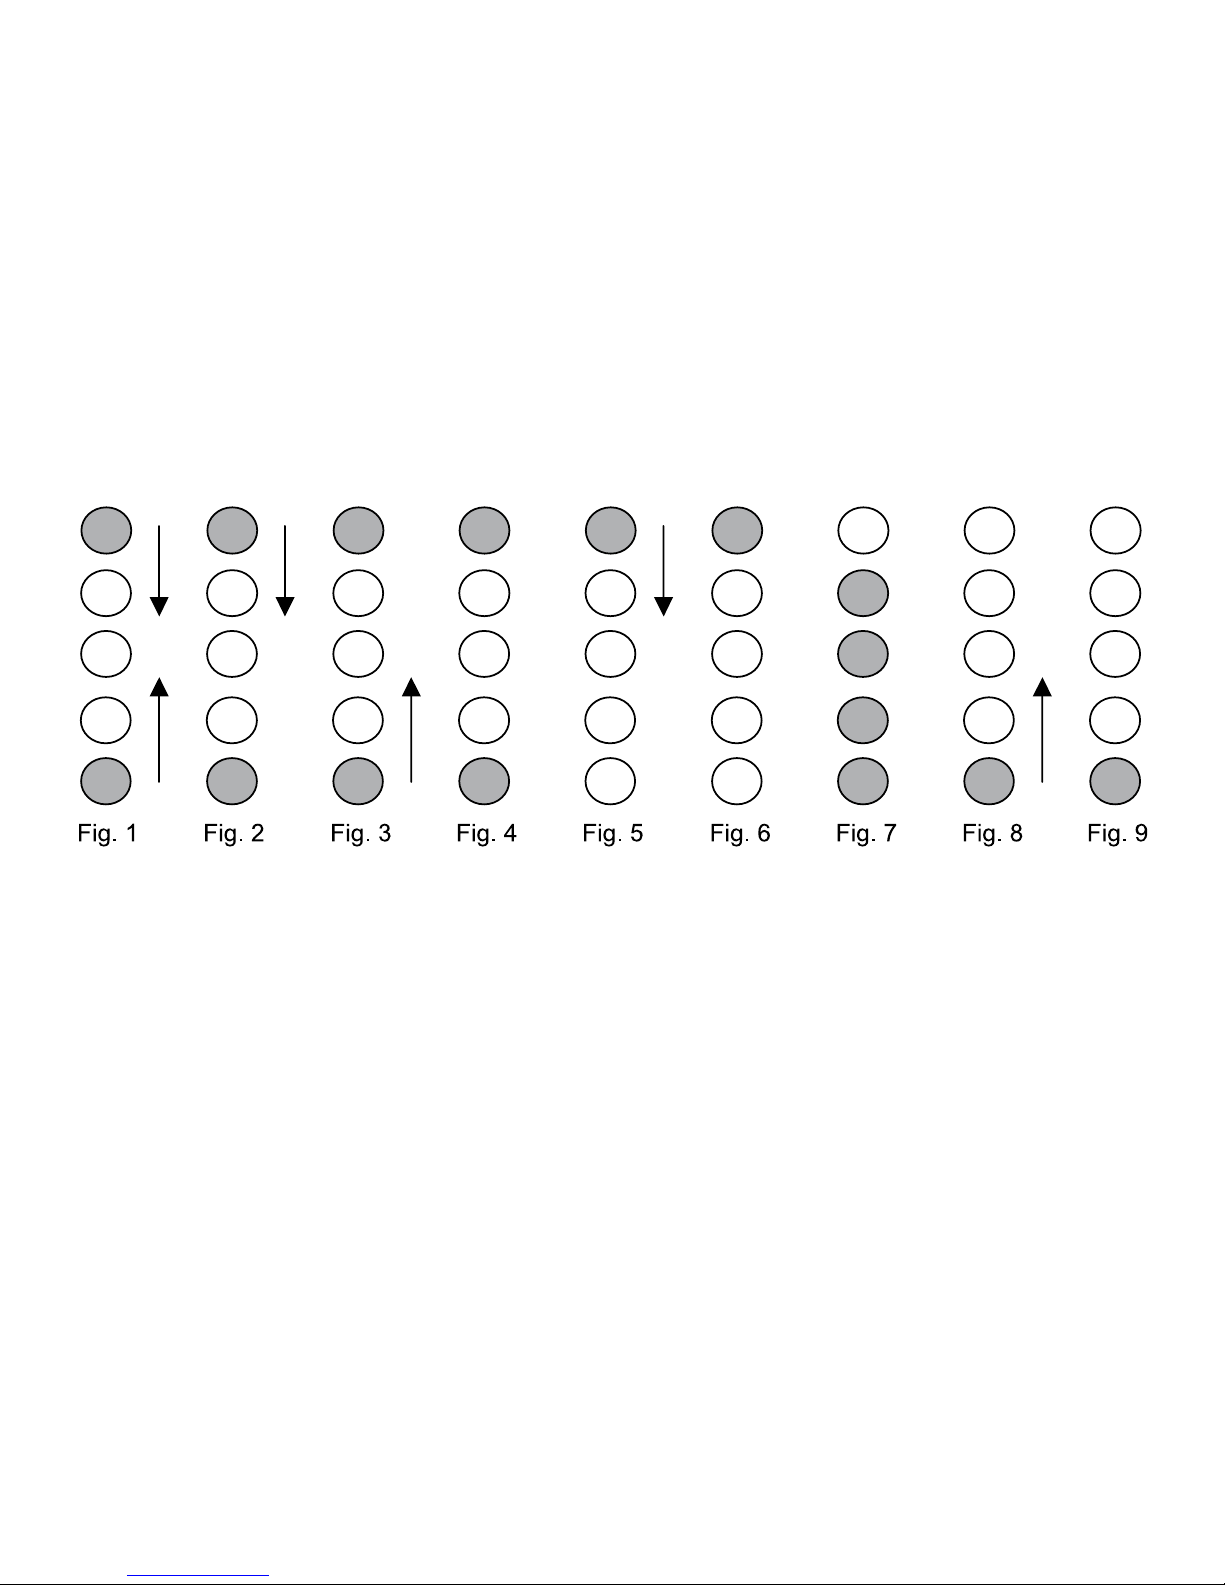
charger is still charging or if it is fully charged. Fig. 8 illustrates if it is still charging and Fig. 9 illustrates if it is fully
charged.
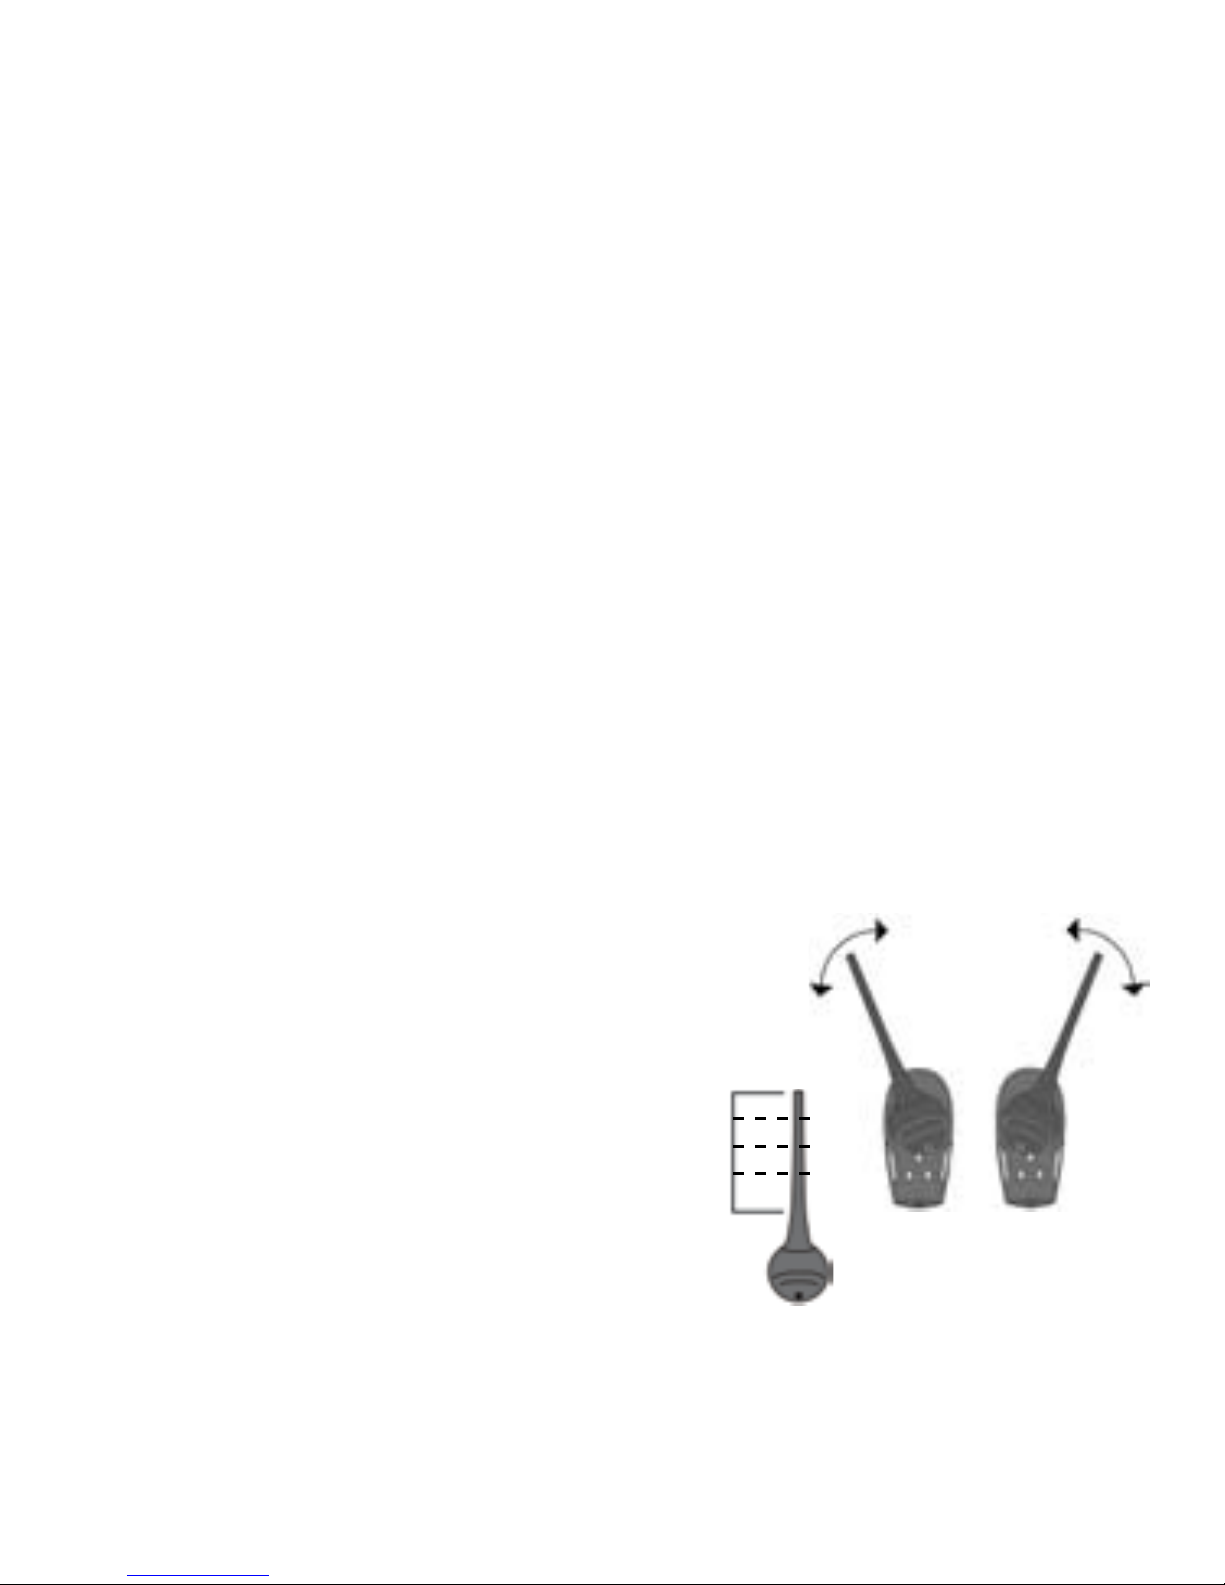
Battery Level of the Charger
Push and hold the button and the lights will be turned ON
until the button is released. The number of lights indicates
the level of the battery as shown in Fig. 7.
Charging the G5 and the charger at the same time
The G5 and the charger can be charged at the same time.
Insert the G5 into the charger and plug-in the USB cable to
the charger. The LEDs indication is for 10 sec only.
You can push the button to check the status of the charging
for both the G5 and the charger. When the button is pressed, the indicators will show for 10 seconds. Lights indica-
8
tion for several states: (Note: arrows indicate the direction
of the LEDs).
Fig. 1: Both G5 and the charger are charging
Fig. 2: G5 is fully charged and the charger is still charging
Fig. 3: G5 is charging and the charger is fully charged
Fig. 4: Both G5 and the charger are fully charged
Charging the G5
Insert the G5 into the charger and the LEDs indication will
ash for 10 sec. You need to push the button to see whether
the G5 is still charging or it is fully charged. Fig. 5 illustrates
if it is still charging and Fig. 6 illustrates if it is fully charged.
9
TALK
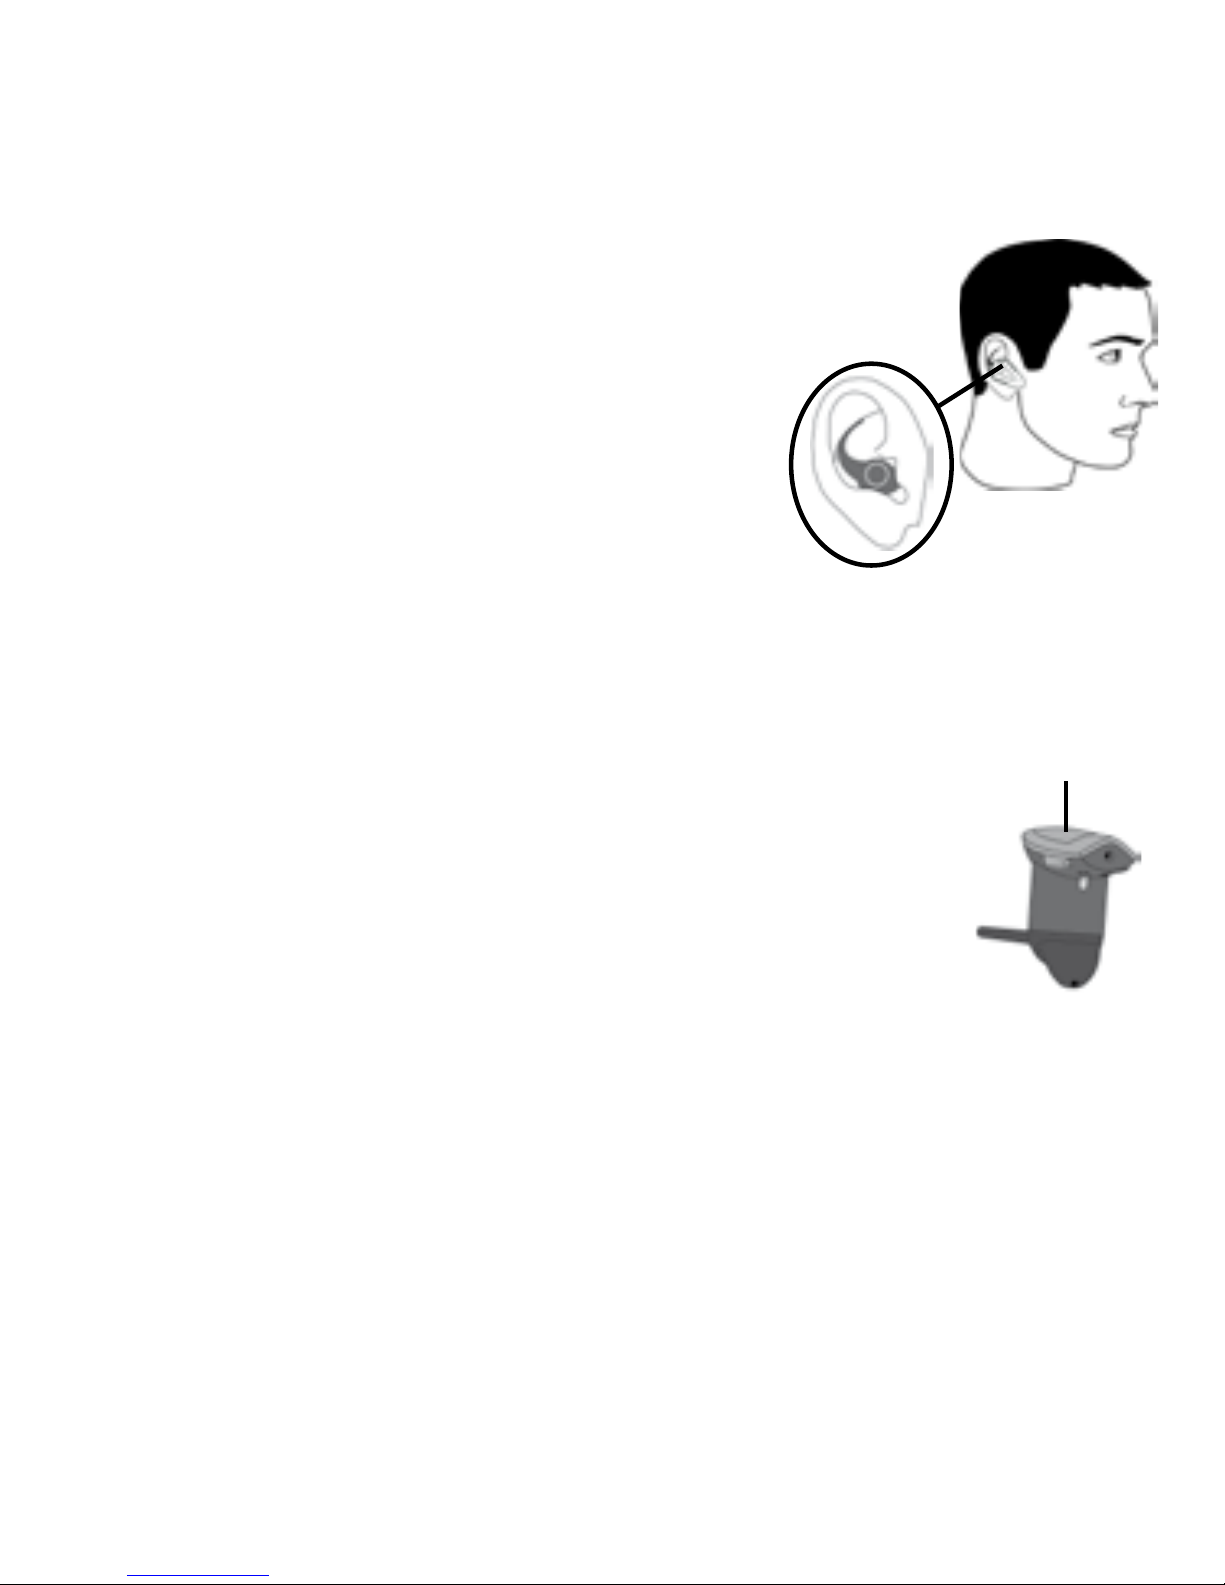
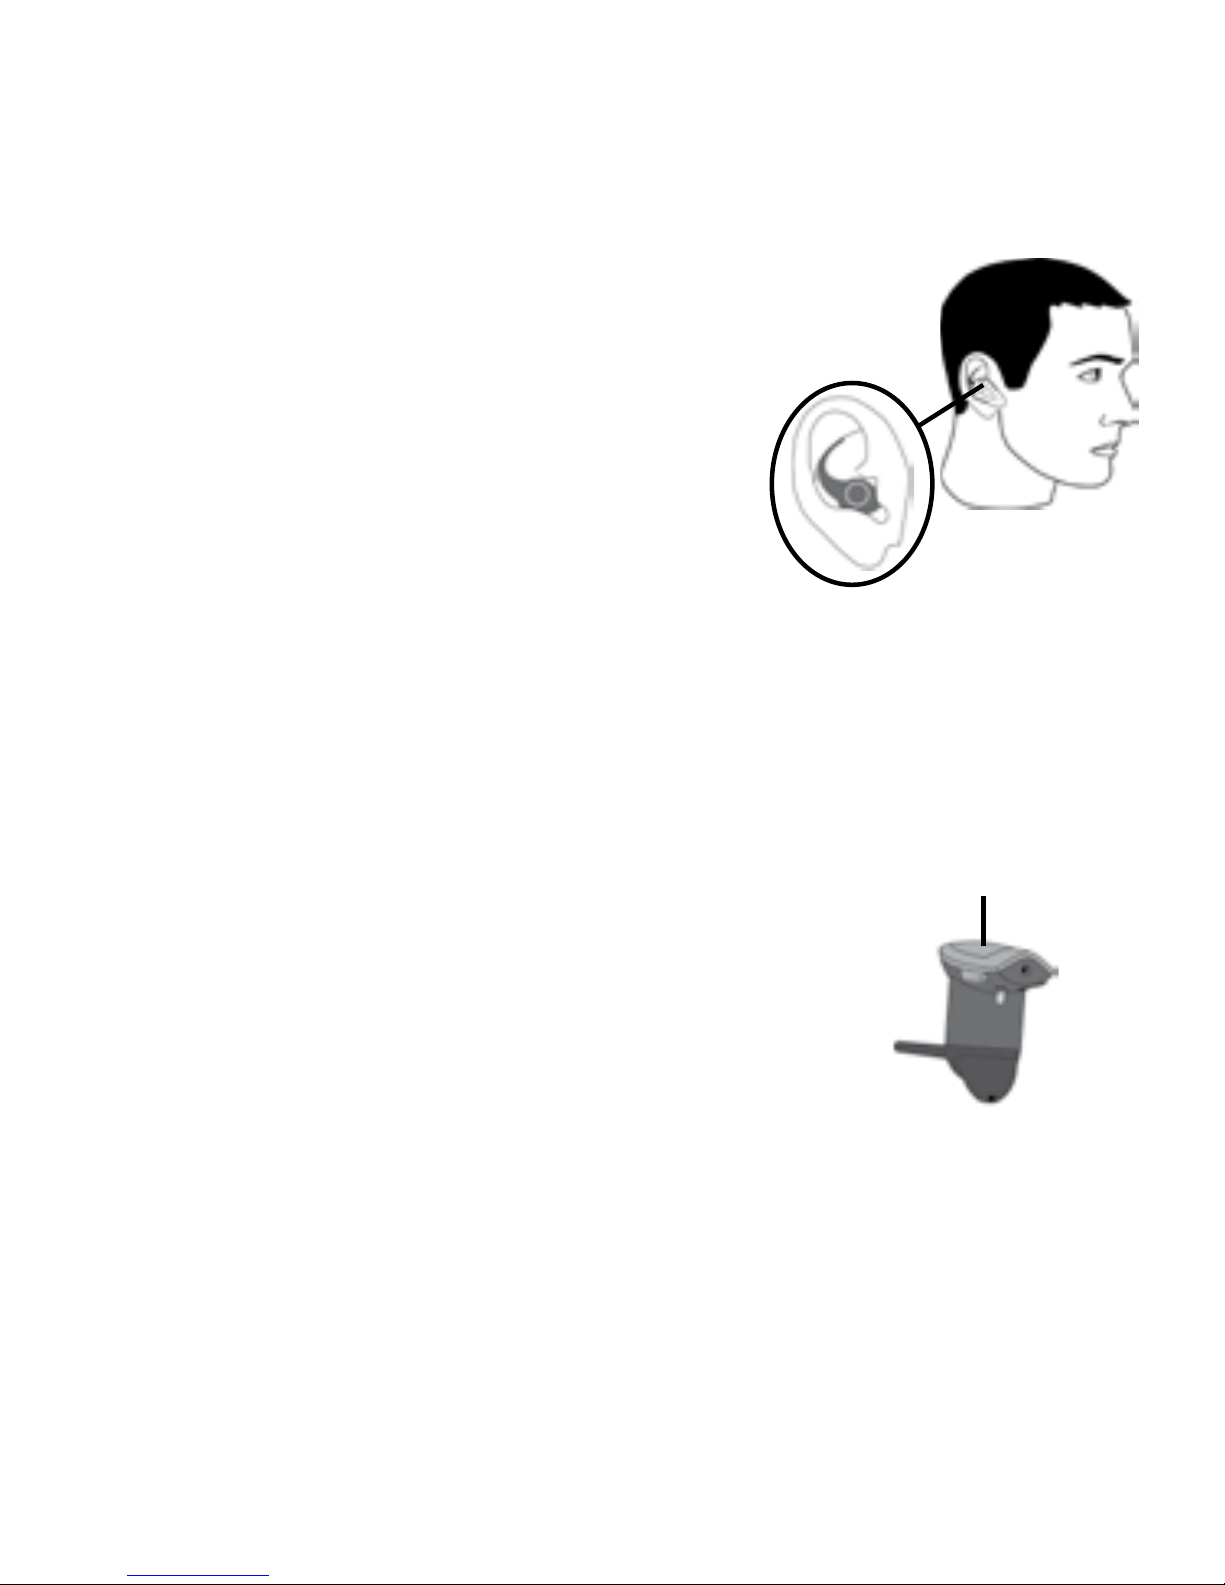
Wearing Your INVISIO® G5
Use your index nger to bend the Soft Spring,
and insert the headset in your ear.
Place the Soft Spring in the upper
bend of your ear. For best audio
quality, place the headset and
phone on the same side of your
body or with in line of sight.
Note: Do not place the Soft Spring in your ear without the
headset attached.
Turning ON/OFF
To turn on the headset, press the TALK button
until the green light ashes ve times followed
by two tones. When turned on, the headset
automatically connects to the most recent connected
device.
To turn off the headset, press the TALK button until the
red light ashes ve times followed by two tones.
Note: Audio tones can be heard only when wearing
the headset.

10
Pairing with a Bluetooth® Device
The INVISIO® G5 can pair with up to eight devices. If you
try to pair the headset with more than eight devices, the
device used least recently will be deleted.
To pair the headset with a device (in OFF state):
1. Hold down the TALK button until the red and green lights
ash repeatedly. Note: The headset is in pairing mode
for 5 minutes. The rst time the INVISIO® G5 is turned
on it will automatically enter into pairing mode.
2. Use your device’s Bluetooth
®
menu to search for the
headset. When found, “INVISIO® G5” appears in the
device’s list.
3. If the device requests a passkey, enter 0000.
Make a Call
When the headset is connected, dial or operate the phone
accordingly to place the call.
Answering Calls/Hangup/Reject a call
The headset sounds an alert for incoming calls. To answer
the call, press the TALK button. To hang up, press the

11
TALK button again. To reject a call, hold down the TALK
button for 3 seconds.
Note: Audio tones can be heard only when wearing the
headset.
Operation
Adjusting the Volume
Use the VOLUME UP and
VOLUME DOWN buttons
to adjust the volume. Each
adjustment is followed by a tone.
When the minimum or maximum level has
been reached, a different beep can be heard.
Note: The INVISIO® G5 saves the last used volume set-
tings when turned off.
Mute
To mute the headset microphone, press VOLUME UP +
VOLUME DOWN at the same time for 3 seconds. To un-
Volume
up
Volume
down

12
mute, press both buttons again for about 3 seconds. While
muted, the headset beeps twice every 2 seconds.
Note: Audio tones can be heard only when wearing
the headset.
Call Waiting (Headset Prole)
To answer a second call, press the TALK button for 1
second. The headset places the active call on hold and
answers the new call. To switch back, press TALK again
for 1 second.
Note: Call waiting must be supported by your phone and
service provider.
Conference Call
To connect the “on hold” call to the conference call, press
and hold the VOLUME UP button for 1 second, or until the
headset beeps.
Note: Conference call must be supported by your phone
and service provider.

13
Transfer and End a Call
To transfer the second call to the “on-hold” call as well as
disconnect yourself from the conversation, press and hold
the VOLUME DOWN button for 1 second, or until the
headset beeps.
Note: The service must be supported by your phone and
service provider.
Redial (Hands-free Prole)
To redial the last called number, hold the VOLUME DOWN
button for approximately 1 second. The headset connects
to the phone and requests a redial.
Transferring a Call to a Mobile Phone
To transfer a call from the headset to or from a mobile
phone, press twice on the TALK button in order to transfer
the audio to a mobile phone or from the mobile phone to
the headset.

14
Voice Dialing
The INVISIO® G5 supports voice dialing. Refer to your
phone’s owner’s manual to set up voice dialing. To use
voice dialing, press the TALK button and then complete
your phone’s voice-dial procedure. To cancel a voice dial,
press the TALK button again.
Cautions
Important safety information. Read this information
before using your INVISIO® G5.
• Do not expose the device to direct sunlight or extremely
high or low temperatures for prolonged periods of time.
• Do not expose the device to open ames, liquid or
moisture, etc.
• Do not drop, hit, throw or try to bend the INVISIO® G5.
Rough treatment could damage it.
• Swallowing the headset could be fatal, keep it away
from children.
Users are not permitted to change or modify this device in
any way. Changes or modications not expressly approved
by the party responsible for compliance could void the

15
user’s authority to operate the equipment. See 47 CFR
See, 15.21. This device complies with part 15 of the FCC
rules. Operation is subject to the following two conditions:
(1) This device may not cause harmful interference, and
(2) this device must accept any interference received, in-
cluding interference that may cause undesired operation.
See 47 CFR Sec.15.19(3).
Hospitals or health-care facilities may use equipment that
is sensitive to external RF energy. To avoid interference
and/or compatibility conicts, turn off your headset when
instructed to by posted notices.
Onboard aircraft, turn off your headset as instructed and
use the headset in accordance with applicable regulations
and airline crew instructions.
If you experience interference with a hearing aid or other
personal medical device, consult with that device’s manufacturer to discuss alternatives. Your physician may be
able to assist you in obtaining this information.

16
People with pacemakers should follow these precautions:
• The Health Industry Manufacturers Association
recommends a minimum separation of 15 centimeters
(Approx. 6 inches) between a handheld wireless device
and a pacemaker. These recommendations are consis tent with the independent research by, and recommen dations of, Wireless Technology Research.
• Do NOT carry the phone or Bluetooth® headset in
your breast pocket.
• Turn OFF the phone and headset immediately if you
suspect interference.
Limited 2-Year Warranty
NEXTLINK A/S warrants that this product is free from de-
fects in design, material and workmanship that can result
in malfunction of the product during normal use. The war-
ranty period is two (2) years from the purchase date of the
product by the end consumer.
1. The warranty is only valid under the following terms and
conditions: The warranty applies to the consumer on the
original receipt from the dealer and cannot be transfer red or re-assigned to another consumer.

17
2. When returning the product for repair or replacement,
attach a failure description and in the proper packaging.
3. During the warranty period, the product can either be re paired or replaced, and this will be based on the judge-
ment of personnel authorized by NEXTLINK A/S. After
replacement or repair, the product is warranted for the re maining time of the original warranty period.
This warranty does not cover defects due to:
1. Adjustments, modications, disassembly or any altera-
tion of the product done by personnel not authorized by
NEXTLINK A/S.
2. Accidents, exposure to liquids and food, moisture,extreme
high or low temperatures or environmental conditions,
forces of nature etc.
3. Variations in functionality when used with other devices,
radio interference and radio networks, radio range, soft ware update of the product needed due to changes or
functionality of other products like mobile phones,
computers etc.
4. Misuse of the product e.g. wrongful installation, breaking
covers and casing by using force, etc.

18
5. Conditions due to normal wear and tear when using the
product e.g. rechargeable batteries have a limited life span and performance is gradually reduced over time.
Soft Springs broken after extensive use.
There are no expressed warranties neither written nor oral
other than this warranty. In no event shall NEXTLINK A/S
or its vendors be liable for incidental or consequential
damages of any nature whatsoever, including but not
limited to commercial losses, Force Majeure or special
contracts/deals.
Please check the user’s guide for information and regulations about electronic operation of the product. This warranty does not affect the consumer’s legal rights due to
national legislation in force. If warranty service is needed,
please contact your dealer for further information.
All shipping costs for products covered by this warranty will
be divided equally between manufacturer and sender.

19
Indhold
Egenskaber . . . . . . . . . . . . . . . . . . . . . . . . . 20
Passkey . . . . . . . . . . . . . . . . . . . . . . . . . . . 20
Hurtigt i gang . . . . . . . . . . . . . . . . . . . . . . . . . 21
Opladning af din INVISIO® G5. . . . . . . . . . . . . . . . 21
Opladning “På farten” . . . . . . . . . . . . . . . . . . . . 22
Forberedelse af Soft Springs. . . . . . . . . . . . . . . . . 23
Opladning af opladeren uden G5 . . . . . . . . . . . . . . 23
Brug af INVISIO® G5. . . . . . . . . . . . . . . . . . . . . 26
Tænd for INVISIO® G5. . . . . . . . . . . . . . . . . . . . 26
Parring med en Bluetooth® enhed . . . . . . . . . . . . . . 27
Foretag et opkald. . . . . . . . . . . . . . . . . . . . . . . 27
Besvare opkald/Læg på/Afvise opkald . . . . . . . . . . . . 28
Justere lydstyrken . . . . . . . . . . . . . . . . . . . . . . 28
Afbryd lyd. . . . . . . . . . . . . . . . . . . . . . . . . . . 28
Opkald venter (Headset-prol) . . . . . . . . . . . . . . . . 29
Konferenceopkald . . . . . . . . . . . . . . . . . . . . . . 29
Viderestil og Afslut et opkald . . . . . . . . . . . . . . . . . 30
Genopkald (Håndfri-prol) . . . . . . . . . . . . . . . . . . 30
Overføre et opkald til en mobiltelefon . . . . . . . . . . . . .30
Stemmeopkald . . . . . . . . . . . . . . . . . . . . . . . . 31
Advarsel . . . . . . . . . . . . . . . . . . . . . . . . . . . 31
Begrænset 2-årig garanti. . . . . . . . . . . . . . . . . . . 33

20
Tak fordi du købte INVISIO® G5. INVISIO® G5 kan kommunikere med en lang række enheder, såsom mobiltele-
foner, PDA’er og computere ved hjælp af to audio-proler:
• Bluetooth® HEADSET
• Bluetooth® HÅNDFRI
Bemærk: kontrollér din enheds brugervejledning for oplysninger om understøttede Bluetooth®-funktioner.
Egenskaber
• Patenteret blød øresneglsystem til brug i højre eller
venstre øre.
• 3-knaps interface, herunder en stor TAL-knap.
• “Alt-i-én” bæretaske og oplader.
Passkey
Bluetooth® enheder genkender hinanden ved parring.
Hver Bluetooth® enhed bruger en parringskode, kaldet
PASSKEY. PASSKEY for INVISIO® G5 er: 0000.

21
Hurtigt i gang
Opladning af din INVISIO® G5
Oplad INVISIO® G5 i 8 timer før brug første gang. Når
headsettet har brug for at blive opladet, blinker det røde
lys for hver 10 sekunder.
Opladningskontakter
Opladningsindikator
1.Tilslut A/C-adapteren til
opladeren, og sæt den an den ende til en stikkontakt.
2.Sæt INVISIO® G5 ind i
opladeren og luk låget. Et
grønt lys på opladeren viser
opladning. Når det er op ladet, slukkes lampen.

22
Opladning “På farten”
Opladeren indeholder et internt batteri, som giver dig mulighed for at oplade headsettet op til 5 gange uden brug af
strøm fra en vægkontakt. Sæt blot INVISIO® G5 ind i den
opladeren og luk låget. For at oplade opladerens interne
batteri skal du sætte den til en stikkontakt ved brug af A/Cadapter.
ADVARSEL! Brug kun den vedlagte oplader-enhed. Hvis
andre strømforsyninger anvendes, kan headsettet eller
batteriet blive beskadiget, og NEXTLINK A/S kan ikke
gøres ansvarlig.
Bemærk: Et blinkende rødt lys angiver lav batteristand, og
batteriet skal derfor oplades.

23
Forberedelse af Soft Springs
Soft Springs er lavet ekstra lange, og de kan skæres af, så
dit passer til dit øre, ved hjælp af en saks eller en hobbykniv. Skær et lille stykke af ad gangen (cirka 0,3cm/0,125
tomme). Sæt Soft Spring på headsettet og justér for
behagelig pasform.
Opladning af opladeren uden G5
Før brug af opladeren, skal den oplades. Dette gøres ved
at indsætte USB-kablet i opladeren (USB-forbindelses-stik
på undersiden af opladeren). LED-lamperne vil blinke i 10
sekunder. Du skal trykke på knappen for at se, om opladeren stadig oplader, eller om den er fuldt opladet. Fig. 8 vi-
ser, om den stadig oplader, og g. 9 viser, om den er fuldt
opladet.
Venstre øre Højre øre

24
Batteriniveau på opladeren
Tryk og hold knappen nede og lamperne vil tænde på ON
indtil knappen slippes. Antallet af lamper, der lyser, viser
batteriniveauet, som det er vist i g. 7.
Charging the G5 and the charger at the same time
The G5 and the charger can be charged at the same time.
Insert the G5 into the charger and plug-in the USB cable to
the charger. The LEDs indication is for 10 sec only.
Du kan trykke på knappen for at tjekke opladningsstatus
for både G5 og opladeren. Når knappen trykkes ned, vil
indikatorerne ses i 10 sekunder. Lysindikationer for forskel-
lige niveauer: (Bemærk: pile viser retning af LED).
25
Fig. 1: Både G5 og opladeren oplader
Fig. 2: G5 er fuldt opladet og opladeren oplader stadig
Fig. 3: G5 oplader og opladeren er fuldt opladet
Fig. 4: Både G5 og opladeren er fuldt opladet
Opladning af G5
Indsæt G5 i opladeren og LED-indikatorerne blinker i 10
sekunder. Du skal trykke på knappen for at se, om G5
stadig oplader eller er fuldt opladet. Fig. 5 viser, om den
stadig oplader, og g. 6 viser, om den er fuldt opladet.
26
Brug af INVISIO® G5
Brug din pegenger til at bøje Soft Spring
og sæt headsettet i øret.
Sæt Soft Spring i den øverste
krumning i dit øre. For at opnå
den bedste lydkvalitet, skal
headset og telefon være på
samme side af kroppen eller på ugtlinje.
Bemærk: Sæt ikke Soft Spring i øret uden headsettet er
påsat.
Tænde/Slukke
For at tænde for headsettet skal du trykke
på TAL-knappen, indtil den grønne lampe
blinker fem gange efterfulgt af to toner.
Når det er tændt, forbinder headsettet
automatisk til den senest tilsluttede enhed.
For at slukke for headsettet, skal du trykke på TALknappen, indtil den røde lampe blinker fem gange
efterfulgt af to toner.
TALK

27
Bemærk: Der kan kun høres toner, når headsettet bæres.
Parring med en Bluetooth® enhed
INVISIO® G5 kan parres med op til otte enheder. Hvis du
forsøger at parre headsettet med ere end otte enheder,
slettes den enhed, der blev anvendt for længst tid siden.
For at parre headsettet med en enhed
(skal være i slukket tilstand):
1. Hold TAL-knappen inde, indtil den røde og den blå
lampe blinker hurtigt. Bemærk: Headsettet er i par ringstilstand i 5 minutter. Den første gang INVISIO® G5
tændes, går den automatisk over på parringstilstand.
2. Brug din enheds Bluetooth® menu til at søge efter head settet. Når det er fundet, vises ” INVISIO® G5” på en hedens liste.
3. Hvis enheden beder om en passkey, skal du taste 0000.
Foretag et opkald
Når headsettet er tilsluttet, kan du ringe op eller betjene
telefonen på anden vis for at foretage et opkald.
28
Besvare opkald/Læg på/Afvise opkald
Headsettet afgiver et signal for indgående opkald. For at
besvare opkaldet skal du trykke på TAL-knappen. For at
lægge på, skal du trykke på TAL-knappen igen. For at afvise et opkald, skal du holde TAL-knappen inde i 3 sek.
Bemærk: Der kan kun høres toner, når headsettet bæres.
Betjening
Justere Lydstyrken
Brug knapperne LYD OP og
LYD NED for at ændre lydstyrken.
Hver justering efterfølges af en tone.
Når maksimum- og minimumniveauet
er nået, høres en anden bip-tone.
Bemærk: INVISIO® G5 gemmer den sidst anvendte lyd-
styrke, når den slukkes.
Afbryd lyd
For at slå headsettets mikrofon fra, skal du trykke på Lyd
op og Lyd ned samtidig i tre sekunder. For at slå lydløs fra,
LYD OPLYD NED

29
skal du holde begge knapper inde igen i ca. 3 sekunder.
Mens den er slået fra, bipper headsettet to gange hvert 2.
sekund.
Bemærk: Der kan kun høres toner, når headsettet bæres.
Opkald venter (Headset-prol)
For at besvare et andet opkald, skal du trykke på TALknappen i 1 sek. Headsettet sætter den igangværende
samtale på hold og besvarer det nye opkald. For at skifte
tilbage skal du trykke på TAL-knappen i 1 sekund.
Bemærk: Opkald venter skal være understøttet af din
telefon og serviceudbyder.
Konferenceopkald
For at tilkoble et opkald ”på hold” til et konferenceopkald,
skal du trykke på og holde LYD OP-knappen inde i 1
sekund, eller indtil headsettet bipper.
Bemærk: Konferenceopkald skal være understøttet af din
telefon og serviceudbyder.

30
Viderestil og Afslut et opkald
For at viderestille det andet opkald til ”på hold” og frakoble
dig selv fra samtalen, skal du trykke på og holde LYD NEDknappen inde i 1 sekund, eller indtil headsettet bipper.
Bemærk: Servicen skal være understøttet af din telefon og
serviceudbyder.
Genopkald (Håndfri-prol)
For at ringe til det senest kaldte nummer, skal du holde LYD
NED inde i cirka 1 sekund. Headsettet forbinder til telefonen
og beder om et genopkald.
Overføre et opkald til en mobiltelefon
For at overføre et opkald fra headsettet til eller fra en mobiltelefon, skal du trykke to gange på TAL-knappen for at
overføre lyden til en mobiltelefon eller fra mobiltelefonen til
headsettet.
 Loading...