

Page 1

GPS naVIGatIon SySteM
en
Quick Start Guide
GPS-4V506-IUS
InStructIon Manual
Page 2

1
Welcome to Invion
We are delighted that you have chosenInvion ! This
naviga
tion software.
2
Operating Invion GPS
2.1 Main Menu and Navigation Screens
From the Main Menu screen, you can start a new trip by tapping
personal choices for the application's appearance and interface,by tapping
2.2 Navigation Screen Buttons
The toolbar button at the bottom of the screen makes it easy to navigate back to the main menu
with one touch.
Accepts your choice and moves you to the next step.
Lets you return to a previous screen.
Displays additional actions on the selected item.
After you have entered an address, you can choose to use the quickest or shortest route.You can
preview the
also
to generate the route:
destination course by playing a simulation, before instructing
Tap to calculate the route that takes the quickest time. This is the system default.
Quick Start Guide
tells you how to use the
You can set
button.
the GO
Settings.
up
the Invion GPS
US
your
Tap to calculate the route that is the shortest distance.
Tap the Go button to activate route calculation. When you click this button, the Invion GPS
displays the Main Map screen with the route highlighted in blue (for 2D maps) or green
(for 3D maps) and identies the destination with a checkered ag. As you drive, the
system provides visual prompts, directing you to your destination.
Tap this icon to play a simulated route to your destination address.
Page 3

2.3 How to Change the Map View
From the Main Map screen, you can switch the map from to 3D to
2D
Compass button. Each time you tap, the map view changes.
2D North Up
by tapping the
From the Options & Settings menu displayed by tapping the Settings button on the Main Menu,
you can also switch between the
Day/Night View by tapping the toggle buttons.
2D/3D View and
)
,
2.4 Using the Map Display Screen
The Main Map
When you
be turned on
screen lets you view the map, your route, and other information about your trip.
tap
the
icons they will show additional information.
Main Map
(to show on the map) or off (to not show) by tapping the
The
Main Map
Map Display button displayed
icons can
on the Options & Settings menu.
The controls and indicators on the Main Map are:
Zoom Out
Compass – Change from
2D to 3D to 2D North Up
Volume Control and Mute
The current Location and
generated route
Trip Information Bar – Tap to
toggle between the current
street name, remaining time and
distance, speed, etc
Zoom In
GPS Indicator
Power indicator
QuickNav – Sends you to a location you have set
as your QuickNav location
Directions Bar – Shows the next turn and
the street name. Tap to see directions or an
overview of your trip
Menu button –Returns you to the
Main Menu
2.5 QuickNav – One Touch Destination
The rst time you press the QuickNav button, the QuickNav screen is displayed. Select a destination address (e.g.
hotel address or ofce address) or a POI category (e.g. restaurants). After you have set the location, just touch the
QuickNav
button from the
screen .This immediately starts navigation to the stored address or to the
Main Map
closest POI from the selected category.
2.6 Directions Bar
Tap the Directions Bar to display
turn-by-turn list of directions
a complete
of your route.
2.7 GPS Status Bar
The GPS Status Bar displays the remaining travel distance, travel
time,
estimated time of arrival, current street name, speed and altitude.
2.8 Selecting a Point on the Map
By tapping the Main Map Screen you can obtain more information about
a point on the map or navigate to its location directly.
Page 4
2.9 Battery Status
On the Main Map screen, the
means the battery is half-
means the battery needs recharging.
3
To Arrive At Your Destination
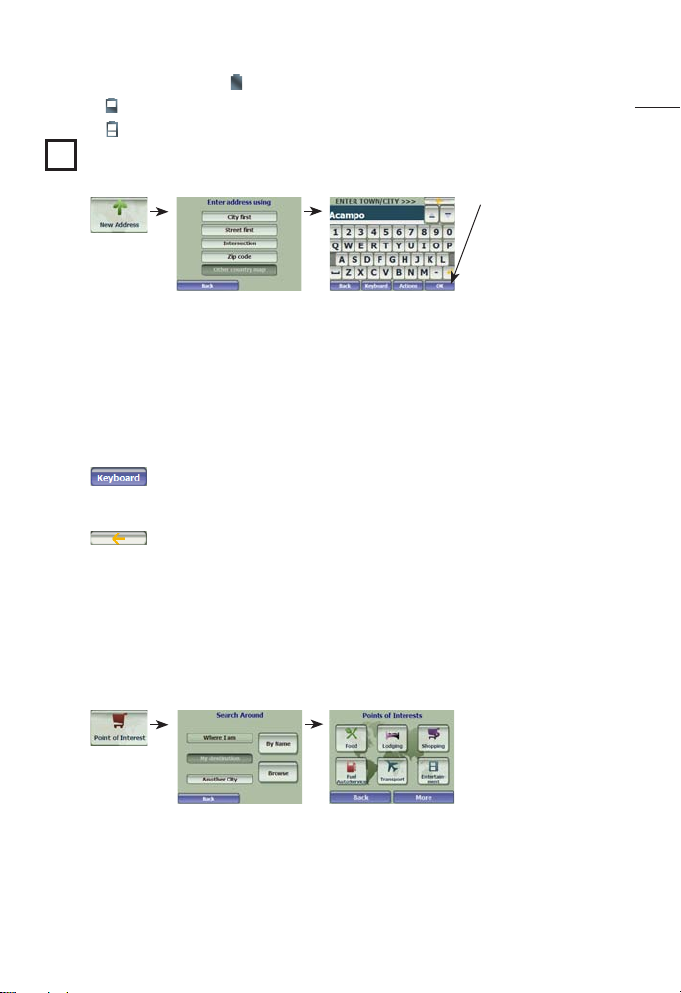
3.1 Entering an Address
icon means the battery is fully-charged.
charged.
US
Tap to move to the
next screen.
Select an address mode to instruct
example, if you select City First, the address sequence is City > Street > Number.
·
In the address field type the first few letters of the city of the destination. An address list
entries that match the characters you have entered. The system automatically searches for
characters throughout the entire list, including in the middle or at the end of the name.
· When you have selected the city, tap or click the OK button to display the street list. At the top of the
list is a special entry called City Center, which you can choose instead of entering a street.
· After selecting the street, displays the address number list. At the top of this list is a
special entry called Street Midpoint, which you can use instead of entering a specic number.
Tap the Keyboard button to hide or display the keyboard. When you tap this button, the
address list is extended, showing more address entries. Tap the Search button to display
the keyboard.
Tap the Erase button to remove the last character typed.
Please note:
If the address number that you want is not available for your selected street,
generate a
route to the street midpoint.
3.2 Navigating to a POI (Point of Interest)
POIs are popular or important locations. This option is especially useful if you are searching in a
particular category for a destination but do not know the address (e.g. for a restaurant near your
location).
Tap the By Name button and enter a POI name directly into the POI entry field. The system
automatically displays the POI entries that match the characters entered.
Tap the Browse button to display and look through common Points of Interest categories. Browse down
through a category, such a food, or tap More for additional categories.
· When you tap Food, you can choose a category (e.g. Restaurants) and then choose a subcategory for
type of cuisine.
· Use the Actions button to sort the results alphabetically instead of by distance.
your Invion GPS on how you want to enter the address information. For
shows the
those
the Invion GPS
the Invion GPS will
Page 5

· Tap the highlighted location or click OK to navigate to the destination.
· Press Go to start navigation.
Please note:
You can hide or show a POI category or subcategory by tapping the check box next to the POI entry.
4
Language Settings
From the Setup 2 menu, tap Language to specify the language you want to use for screen displays, voice,
and road prompts.
5
Installing the Device in the Car
When you mount the device in your vehicle, ensure it has a clear line of sight to the sky, that your
safety and line of sight are not impaired by the navigation system.
Warning! The device must not be mounted so that it impairs the driver’s view of the road. Please take
extra precaution to ensure that airbags are not obstructed by the device.
Please note:
The content of this QuickStartGuide was correct as of July 2007. Any subsequent changes to the system,
the features, the user interface, the maps or operation made due to technical updates may not be
included in this document.
Page 6

 Loading...