

Page 1

K K 5 5 1 / 6 0 1
KOELER
LARDER
GEBRUIKSAANWIJZING
INSTRUCTION MANUAL
Page 2

Page 3

N E D E R L A N D S
Huishoudelijke apparaten horen niet in de
vuilnisbak. Breng ze naar de betreende
afvalverwerkingsafdeling van uw gemeente.
E N G L I S H
Legislation requires that all electrical and
electronic equipment must be collected for
reuse and recycling. Electrical and electronic
equipment marked with the symbol indicating
separate collection of such equipment must be
returned to a municipal waste collection point.
Omschrijving van het apparaat pagina 4
1. Veiligheidsvoorschriften pagina 4
2. Ingebruikname pagina 5
3. De koeler gebruiken pagina 5
4. Tips pagina 5
5. Reiniging & onderhoud pagina 6
6. Storingen zelf oplossen pagina 6
7. Draairichting deur wijzigen pagina 6
8. Bovenblad verwijderen pagina 8
Technische specificaties pagina 9
Garantie & Service pagina 10
Description of the appliance page 11
1. Safety instructions page 11
2. Before first use page 12
3. Using the larder page 12
4. Tips page 12
5. Cleaning & maintenance page 13
6. Troubleshooting page 13
7. Reversing the door opening page 13
8. Removing the top panel page 15
Technical specifications page 16
Guarantee & after sales Service page 17
3
Page 4

1
2 + 3
NEDERLANDS
10
4
9
5
8
6
7
1 | VEILIGHEIDSVOORSCHRIFTEN
• Lees eerst de gebruiksaanwijzing aandachtig en
geheel door voordat u het apparaat gaat gebruiken en
bewaar deze zorgvuldig voor latere raadpleging.
• Gebruik dit apparaat uitsluitend voor de in de
gebruiksaanwijzing beschreven doeleinden. Het apparaat
is geschikt voor het bewaren van levensmiddelen.
• Sluit het apparaat alleen aan op wisselstroom, op een
randgeaarde wandcontactdoos, met een netspanning
overeenkomstig met de informatie aangegeven op het
typeplaatje van het apparaat.
• Maak geen gebruik van enkele/meerdere adapters of
verlengsnoeren.
• Gebruik het apparaat niet wanneer de stekker, het snoer
of het apparaat beschadigd is, of wanneer het apparaat
niet meer naar behoren functioneert of wanneer
het gevallen of op een andere manier beschadigd is.
Raadpleeg dan de winkelier of onze technische dienst. In
geen geval de stekker of het snoer zelf vervangen.
• Het apparaat moet worden verplaatst en geïnstalleerd
door twee of meer personen.
• Wees voorzichtig met het verplaatsen van het apparaat
om te voorkomen dat de vloer beschadigd raakt.
• Let op dat tijdens de installatie de voedingskabel niet
beschadigd raakt.
• Controleer of het apparaat niet te dicht bij een
warmtebron geplaatst wordt.
• Om een goede ventilatie te garanderen, moet er een
ruimte van 10 cm rondom het apparaat vrij gehouden
worden.
• De ventilatieopeningen nooit afdekken.
• Zorg dat de koelleidingen niet beschadigd raken.
• Installeer het apparaat op een stevige, vlakke en stabiele
ondergrond.
• Installeer het apparaat in een droge en goed
geventileerde ruimte. Het apparaat is bedoeld voor
1. Bovenblad
2. Binnenverlichting
3. Thermostaat knop
4. Glazen schappen
5. Ontdooiwaterafvoer
6. Groentelade
7. Stelvoeten
8. Flessenrek
9. Deurvakken
10. Handgreep
gebruik in een ruimte waar de omgevingstemperatuur
valt binnen de volgende klasse, afhankelijk de
klimaatklasse die u op het typeplaatje vindt aan de
achterzijde van het apparaat.
Klimaatklasse Omgevingstemperatuur
SN Van 10°C tot 32°C
N Van 16°C tot 32°C
ST Van 18°C tot 38°C
T Van 18°C tot 43°C
• Bewaar geen explosieve of licht ontvlambare stoen in
het apparaat. De dampen kunnen brandgevaar of een
explosie veroorzaken.
• Zorg ervoor dat kinde ren niet met het apparaat kunnen
spelen, zoals zich er in verstoppen. Dit is gevaarlijk.
• Het apparaat is niet bedoeld voor installatie door
hulpbehoevenden, kleine kinderen en/of personen
met gebrek aan ervaring en kennis, tenzij zij goede
begeleiding krijgen of geïnstrueerd zijn in het veilig
gebruiken van het apparaat door een persoon die
verantwoordelijk is voor hun veiligheid.
• Reparaties aan elektrische apparaten dienen uitsluitend
door vakmensen uitge voerd te worden. Het is gevaarlijk
om een reparatie uit te voeren waarbij de behuizing van
het apparaat geopend moet worden.
• Het apparaat uitsluitend binnenshuis gebruiken en
opbergen.
• Het netsnoer nooit scherp buigen of over hete delen
laten lopen.
• Verwijder de stekker altijd uit het stopcontact als het
apparaat gereinigd of gerepareerd wordt.
4
Page 5

• Het apparaat nooit gebruiken met onderdelen die niet
door de fabrikant zijn aanbevolen of geleverd.
• Niet aan het snoer c.q. het apparaat trekken om de
stekker uit de wandcontactdoos te halen. De stekker
nooit met natte of vochtige handen aanraken.
• Als u besluit het apparaat, vanwege een defect, niet
langer te gebruiken, adviseren wij u, nadat u de stekker
uit de wandcontactdoos heeft verwijderd, het snoer
af te knippen. Breng het apparaat naar de betreende
afvalverwerkingafdeling van uw gemeente.
• Dompel het apparaat, het snoer of de stekker nooit
onder in water.
• Dit apparaat is uitsluitend geschikt voor huishoudelijk
gebruik. Wanneer het apparaat oneigenlijk gebruikt
wordt, kan er bij eventuele defecten geen aanspraak op
schadevergoeding worden gemaakt en vervalt het recht
op garantie.
2 | INGEBRUIKNAME
Voordat u het apparaat voor de eerste maal in gebruik
neemt, dient u als volgt te werk te gaan: pak de koeler
voorzichtig uit en verwijder al het verpakkingsmateriaal.
De verpakking (plastic zakken, piepschuim en karton)
buiten het bereik van kinderen houden. Controleer na het
uitpakken het apparaat zorgvuldig op uiterlijke schade,
mogelijk ontstaan tijdens transport. Plaats het apparaat op
een stevige, vlakke ondergrond en let op dat er genoeg
ruimte omheen is voor voldoende ventilatie.
Er is minimaal 10 cm rondom nodig tussen de koeler en
de muren. Op deze wijze kan de koeler de warmte goed
kwijt, goed koelen en energiezuinig functioneren. Met de
stelvoetjes kunt u het apparaat waterpas zetten.
Plaats de koeler niet in de buurt van warmtebronnen zoals
verwarming of fornuis.
Monteer de bijgeleverde handgreep aan de gewenste kant
van de deur met de bijgeleverde schroeven en plaats de
bijgeleverde witte afdekdopjes aan de andere kant van de
deur waar u de handgreep niet wilt hebben. Let op: de
koeler nooit aan de handgreep optillen.
Laat het apparaat nadat het geplaatst is, minimaal 3 uur
staan voordat u de stekker in het stopcontact steekt.
Reinig eerst de binnenkant van
de koeler. Gebruik hiervoor een
warm sopje met bijvoorbeeld
afwasmiddel, allesreiniger of soda. Neem de binnenkant
van de koeler na het schoonmaken af met schoon water
en droog alles goed na. Laat het apparaat 1 à 2 uur drogen.
De bediening van de koeler bevindt zich aan de
binnenkant. Stel de thermostaat in op stand 3.
Controleer of de spanning overeenkomt met die
vermeld is op het typeplaatje en steek de stekker in het
stopcontact. Het apparaat zal nu continue koelen tot
de ingestelde temperatuur is bereikt. Laat het apparaat
op temperatuur komen zonder levensmiddelen in de
koeler. Dit duurt meestal 2 tot 3 uur. Daarna kunt u de
thermostaat op de gewenste stand zetten en de koeler
vullen met levensmiddelen.
3
3 | DE KOELER GEBRUIKEN
Stand 1 = warm, kleinste capaciteit
Stand 7 = koud, grootste capaciteit
Over het algemeen zal de koeler gebruikt worden op
stand 3 of 4.
De lamp binnen in de koeler zal, elke keer als u de deur
opent, aan gaan.
Attentie:
De omgevingstemperatuur, de frequentie van het openen
van de deur en de positie van het apparaat hebben invloed
op de temperatuur in de koeler. Houd hier rekening mee
met het instellen van de thermostaat.
• Plaats geen heet voedsel in de koeler.
• Plaats nooit gevaarlijke, licht ontvlambare of explosieve
stoen zoals alcohol, aceton of benzine in de koeler
omdat er een kans op explosiegevaar is.
• Pak vlees en vis goed in om nare geuren te voorkomen.
• Laat voldoende ruimte tussen de verschillende
levensmiddelen om de lucht goed te kunnen laten
circuleren.
• Plaats geen voedsel tegen de achterwand van de
koeler. De schappen hebben een stop om dit te
vermijden.
• Laat de deur niet langer open dan noodzakelijk.
4 | TIPS
• Een hoge omgevingstemperatuur beïnvloedt het
energieverbruik nadelig. Ook direct zonlicht en andere
warmtebronnen in de buurt van de koeler hebben een
ongunstige invloed.
• Houd de ventilatieopeningen vrij. Afgedekte
en vervuilde openingen veroorzaken een hoge
energieverbruik. Zorg voor voldoende ruimte rondom
de koeler zodat een goede ventilatie en luchtstroming
rondom de koeler mogelijk is.
• Open de deur van de koeler niet vaker dan nodig is en
laat de deur zo kort mogelijk open.
• De afstand tussen de schappen en de achterwand
zorgt voor een vrije luchtcirculatie. Plaats dus geen
levensmiddelen tegen de achterwand.
• Zet de thermostaat op een lagere stand als de
omstandigheden dat toelaten.
• Laat gekookt voedsel wat u in de koeler wilt bewaren
eerst afkoelen tot kamertemperatuur voordat u het in de
koeler legt.
• Een deurrubber die niet goed sluit kan het
stroomverbruik verhogen. Laat het daarom op tijd en
door een vakman vervangen.
• De condensor aan de achterkant van de koeler moet
altijd schoon en stofvrij gehouden worden.
• Als de instructies niet worden nageleefd dan kan dat
leiden tot een hoger stroomverbruik.
5
Page 6
5 | REINIGING & ONDERHOUD
Zet voordat u de koeler wilt reinigen het apparaat uit,
verwijder de stekker uit de wandcontactdoos.
Reinig de binnenkant van de koeler. Gebruik hiervoor een
warm sopje met bijvoorbeeld afwasmiddel, allesreiniger of
soda om vieze geuren te voorkomen. Neem de binnenkant
van de koeler na het schoonmaken af met schoon water
en droog alles goed na. Laat het apparaat 1 à 2 uur drogen.
De schappen, de lade en de deurrekjes kunt u eenvoudig
uit de koeler nemen en met de hand afwassen. Deze
onderdelen mogen niet in de vaatwasmachine gereinigd
worden.
Reinig de buitenkant van de koeler en de deurrubbers met
een zachte vochtige doek.
Reinig de achterzijde van de koeler minstens één keer
per jaar met een stofzuiger zodat de condensator en
de ventilatieopeningen schoon blijven en de koeler zo
optimaal kan functioneren.
Het ontdooien van de koelruimte gebeurt volledig
automatisch. De aanwezigheid van waterdruppels op de
achterwand aan de binnenkant van de koeler geeft aan
dat het koelgedeelte aan het ontdooien is. Het dooiwater
loopt via het afvoergootje naar een opvangbakje waarin
het verdampt.
HET VERVANGEN VAN DE LAMP
Wanneer de lamp in de koeler kapot is, kunt u deze zelf
vervangen. Volg deze stappen:
• Verwijder de stekker uit het stopcontact.
• Verwijder het afdekkapje van de verlichting door het
schroee los te draaien en trek het kapje dan naar u toe.
• Controleer eerst of het lampje goed is aangedraaid.
• Als het lampje defect is, vervang het dan door hetzelfde
type: kleine buislamp, maximaal 10 Watt, fitting E14. Een
dergelijk lampje is algemeen verkrijgbaar.
• Plaats het afdekkapje en het schroee weer terug.
• Steek de stekker in het stopcontact.
6 | STORINGEN ZELF OPLOSSEN
Storing Oorzaak Oplossing
Apparaat maakt
lawaai
Verlichting
brandt niet
Opmerking: het borrelen en het maken van
expansiegeluiden in het koelcircuit is normaal.
Is het apparaat
goed geïnstalleerd?
Raakt de
achterkant van
de koeler iets?
Lamp is defect Vervang de
Controleer de
installatie
Controleer dit en
plaats de koeler
verder naar voren
lamp volgens de
instructies
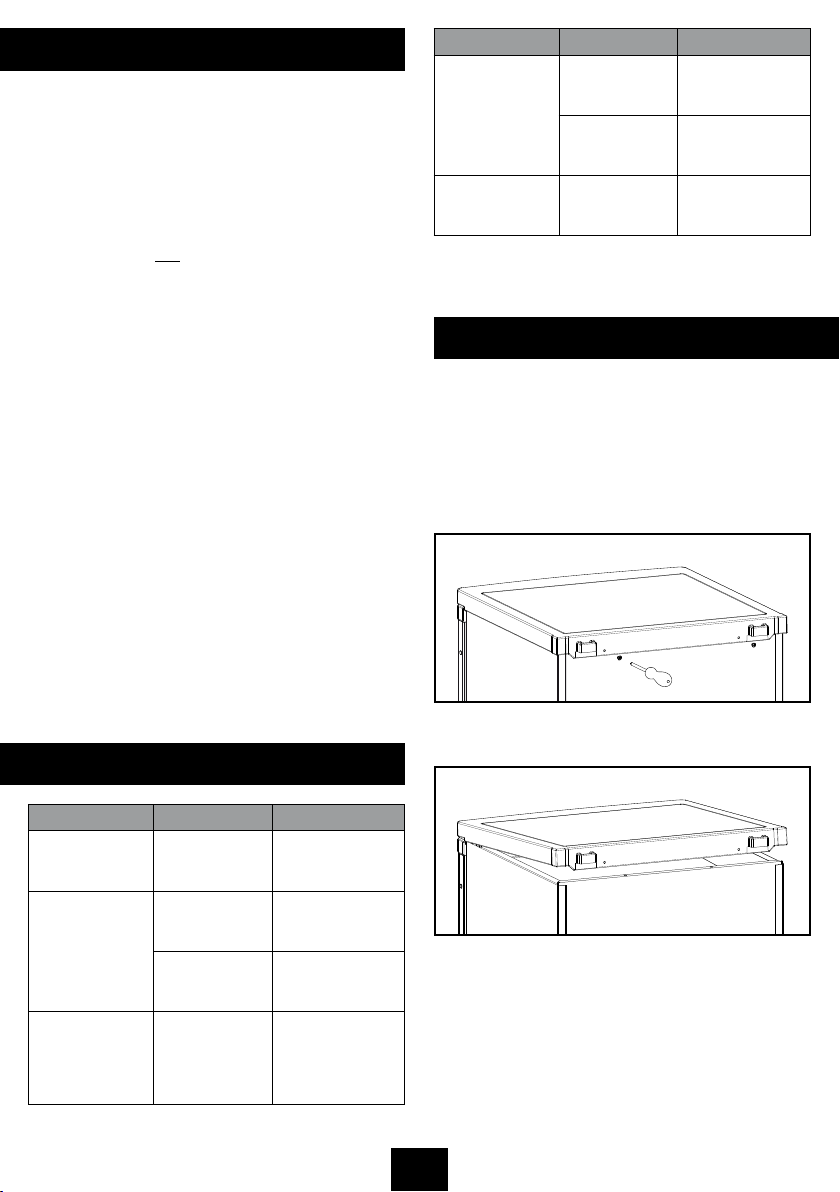
7 | DRAAIRICHTING DEUR WIJZIGEN
De deur van de koeler kan aan de rechter- of linkerkant
worden geopend. Het apparaat wordt standaard geleverd
met de opening aan de linkerkant. Om de draairichting van
de deur te wijzigen volgt u de onderstaande instructies.
Attentie: Verwijder eerst de stekker uit het stopcontact
voordat u de draairichting van de koelerdeur wijzigt.
• Verwijder de schroeven aan de achterzijde van de koeler
terwijl u het bovenblad tegen het apparaat blijft houden.
• Til het bovenblad aan de achterkant op en verwijder
hem uit de voorste bevestigingspunten en leg deze
apart.
Storing Oorzaak Oplossing
Apparaat doet
niets; lampje
brandt niet
Temperatuur
in de koeler te
hoog of te laag
Water loopt uit
de koeler
Stekker niet in
het stopcontact
Thermostaat
verkeerd
ingesteld
Ventilatieopeningen zijn
geblokkeerd
Dooiwaterafvoer is
verstopt
Steek de stekker
in het stopcontact
Zet de
thermostaat op
de juiste stand
Reinig de ventilatieopeningen
Maak de dooiwaterafvoer vrij
door deze met
een satéprikker
door te prikken.
6
Page 7

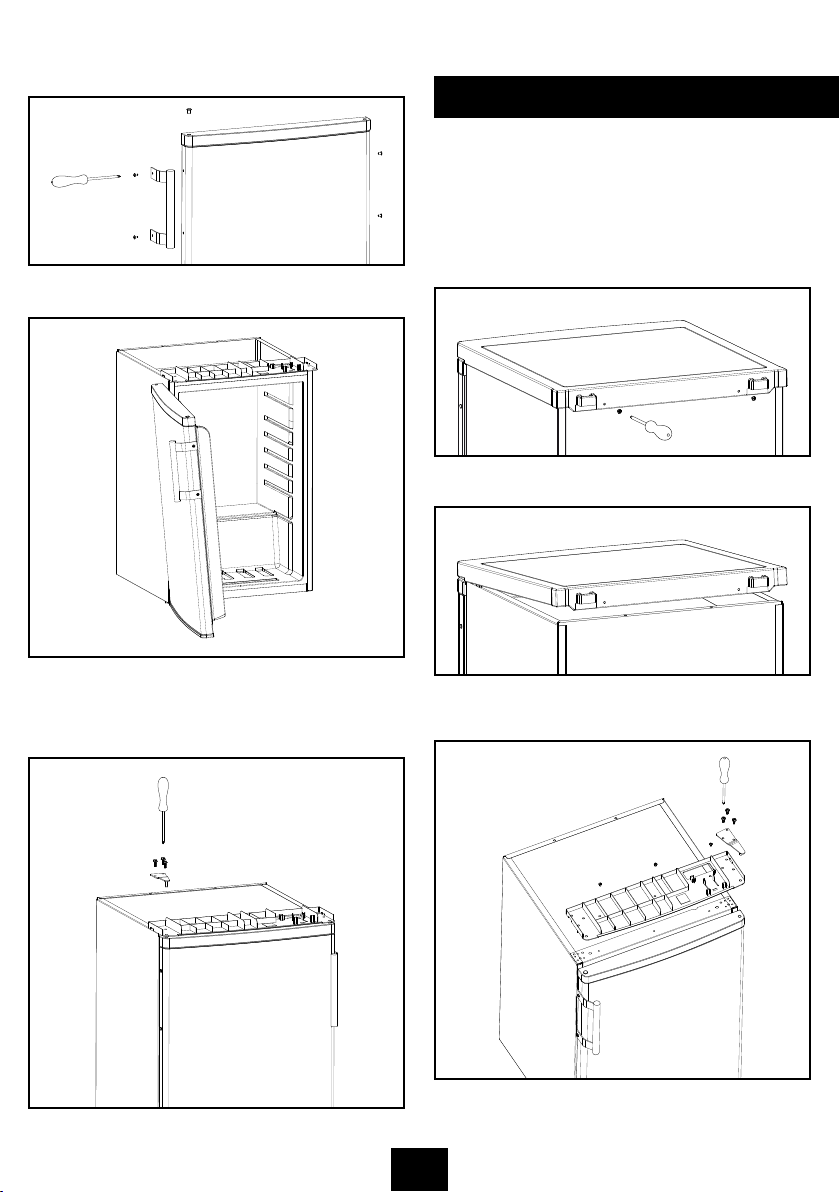
• Verwijder de drie schroeven waarmee het deurscharnier
bevestigt is, terwijl u het scharnier (rechterkant) tegen
het frame houdt. Verwijder het bovenste scharnier.
• Til de deur op van de pen van het onderste scharnier en
leg de deur op bijvoorbeeld een deken zodat er geen
krassen op de deur komen.
• Voordat u het onderste scharnier weer plaatst, moet
de pen van het scharnier worden verwijderd en moet de
richting van het scharnier worden omgekeerd.
Monteer het onderste scharnier op de linkerkant, met
behulp van de twee schroeven.
• Om het scharnier aan de onderkant te kunnen
verwijderen, laat u de koeler achter over hellen (max.
45°).
• Verwijder het stelpootje links door deze helemaal los te
draaien.
• Verwijder de twee schroeven terwijl u het onderste
scharnier ondersteunt. Verwijder het onderste scharnier.
• Monteer de scharnierpen in het onderste scharnier.
• Plaats het stelvoetje terug.
• Zet de koeler rustig recht neer.
7
Page 8
• Verwijder de handgreep, als deze al gemonteerd
is. Verwijder voorzichtig de afdekdopjes en schroef de
handgreep aan de gewenste zijde vast. Plaats de
afdekdopjes aan de andere kant van de deur.
• Plaats de deur op het onderste scharnier en houd
deze goed vast.
• Laat de koeler 2 à 3 uur rusten voordat u de stekker
in het stopcontact doet.
8 | BOVENBLAD VERWIJDEREN
Om de koeler makkelijk onder bijvoorbeeld een werkblad
te plaatsen, kan het bovenblad verwijderd worden. Volg de
onderstaande instructies.
Attentie: Verwijder eerst de stekker uit het stopcontact.
• Verwijder de schroeven aan de achterzijde van de
koelkast terwijl u het bovenblad tegen het apparaat blijft
houden.
• Til het bovenblad aan de achterkant op en verwijder hem
uit de voorste bevestigingspunten.
• Monteer, terwijl de deur gesloten is, het bovenste
scharnier aan de linkerkant met behulp van de drie
schroeven. Draai de schroeven pas vast als de deur
waterpas is ten opzichte van de ondergrond van het
apparaat.
• Monteer het bovenblad met de schroeven.
• Verwijder de schroeven op het kunststof frame en het
metalen scharnier van de deur.
• Verwijder het scharnier en het kunststof frame.
8
Page 9

• Plaats het metalen scharnier terug met de drie
schroeven.
• Zet de koelkast op de juiste plek en wacht 2 à 3 uur
voordat u de stekker in het stopcontact steekt.
Technische gegevens
Modelnummer KK551
Afmetingen buitenkant 55 x 58 x 85 cm
Energieklasse A
+
Klimaatklasse N
Netto inhoud 130 liter
Netto inhoud koelgedeelte 130 liter
Voltage 230Volt ~50Hz
Wattage 80 Watt
Netto gewicht ± 29 kg
Modelnummer KK601
Afmetingen buitenkant 60 x 60 x 85 cm
Energieklasse A
++
Klimaatklasse N
Netto inhoud 147 liter
Netto inhoud koelgedeelte 147 liter
Voltage 230Volt ~50Hz
Wattage 80 Watt
Netto gewicht ± 34 kg
Opmerking: Op het typeplaatje - welke op de achterkant
van de koeler geplaatst is - vindt u de de technische
gegevens van de koeler ook vermeldt.
9
Page 10

GARANTIE & SERVICEVOORWAARDEN NL
• Op alle apparaten van INVENTUM krijgt u standaard 2 jaar volledige fabrieksgarantie geldend vanaf de aankoopdatum.
De garantie dekt aantoonbare defecten in materiaal, fabricage en functioneren van onderdelen en is inclusief
materiaalkosten, voorrijkosten (indien van toepassing) en arbeidsloon.
• INVENTUM geeft naast de 2 jaar volledige garantie 3 jaar verlengde garantie op arbeidsloon en onderdelen. Het enige
dat we u berekenen zijn de voorrij- of verzendkosten. Op deze manier is de kwaliteit van uw INVENTUM apparatuur dus
5 jaar lang gegarandeerd.
• Om in aanmerking te komen voor de uitgebreide 5 jaar garantie, dient u uw apparaat binnen 45 dagen na aanschaf te
registreren op www.inventum.eu
• Waarom is registratie belangrijk voor u?
1. U krijgt 5 jaar garantie
2. Alle details van uw apparaat zijn bij Inventum bekend. U hoeft niet meer op zoek te gaan naar uw modelnummer.
3. Inventum kan u sneller en beter van dienst zijn wanneer u zich meldt bij ons servicecenter.
• De garantie is alleen van toepassing als de originele gedrukte aankoopnota (of een kopie hiervan) kan worden overlegd.
Bewaar daarom uw aankoopnota zorgvuldig. De garantietermijn vangt aan op de aankoopdatum.
• De garantie geldt niet in geval van:
- normale slijtage;
- onoordeelkundig, onjuist en/of oneigenlijk gebruik;
- onvoldoende onderhoud;
- het niet in acht nemen van bedienings- en onderhoudsvoorschriften;
- ondeskundige installatie, montage of reparatie door uzelf of derden;
- door de afnemer toegepaste niet originele onderdelen
zulks ter beoordeling van onze service organisatie.
• De garantie geldt niet voor:
- normale verbruiksartikelen - zoals schappen en kunststof accessoires;
- normale gebruiksslijtage - zoals glasbreuk, krassen op apparatuur, verkleuringen van kunststof of gelakte onderdelen;
Door onvoldoende of verkeerd onderhoud kunnen verkleuringen aan oppervlakten ontstaan en rubbers en kunststoen
snel verouderen. Ook dit valt niet onder de garantie.
- (uitwisselbare) signaal- en verlichtingslampjes;
- defecten en gevolgschaden veroorzaakt door sterke verontreiniging en verkeerd onderhoud zulks ter beoordeling van
onze service organisatie.
Buiten de garantie vallen transportschades. Controleer daarom uw nieuwe apparatuur voordat u deze in gebruik neemt.
Als u beschadigingen aantreft, neem dan binnen 5 werkdagen na aankoop contact op met uw leverancier.
Van garantie en/of vervanging zijn uitgesloten: defecten aan, verlies en beschadiging van het apparaat als gevolg van een
gebeurtenis die gewoonlijk verzekerd is onder de inboedelverzekering.
Tot wie kunt u zich wenden?
Op www.inventum.eu vindt u - naast gebruiksadviezen en schoonmaaktips - alle antwoorden op uw service vragen.
Raadpleeg eerst de website voordat u zich meldt bij ons service center.
Via de website www.inventum.eu kunt u uw service aanvraag snel en eenvoudig online aanmelden. Het is ook mogelijke
om dit telefonisch te doen via de INVENTUM service organisatie.
INVENTUM Service Organisatie: 0900-INVENTUM (0900-468 36 88)
Om u zo goed mogelijk van dienst te zijn en uw service aanvraag zo snel mogelijk te verwerken, raden wij u aan om altijd
eerst contact op te nemen met INVENTUM.
Deze garantievoorwaarden gelden voor Nederland. Voor de lokale garantievoorwaarden neemt u contact op met uw
leverancier.
In de landen waar INVENTUM een vertegenwoordiging heeft, kunt u zich tot deze wenden als u een beroep wilt doen op
de INVENTUM service organisatie. In de overige landen neemt u contact op met uw leverancier.
Indien de garantie is komen te vervallen of indien de garantietermijn is verstreken, dienen wij de kosten welke verbonden
zijn aan een beoordeling en/of reparatie in rekening te brengen.
Op verzoek zullen wij u eerst een prijsopgave verstrekken alvorens tot reparatie over te gaan. Zonder dit verzoek om
prijsopgave gaan wij ervan uit dat u, met het opsturen van uw apparaat, automatisch een opdracht tot reparatie heeft
verstrekt.
Wij verlenen twee maanden garantie op de door onze servicedienst uitgevoerde herstelwerkzaamheden en het daarbij
nieuw aangebrachte materiaal, gerekend vanaf de hersteldatum. Indien zich binnen deze periode een storing voordoet
welke het directe gevolg is van de uitgevoerde herstelwerkzaamheden of het daarbij nieuw aangebrachte materiaal, heeft
de koper het recht op kosteloos herstel.
Wijzigingen en drukfouten voorbehouden. De laatste versie van de gedeponeerde garantievoorwaarden is op te vragen bij via onze service
organisatie.
10
Page 11

1
2 + 3
ENGLISH
10
4
9
5
8
6
7
1 | SAFETY INSTRUCTIONS
• Please read these instructions before operating the
appliance and retain for future use.
• The appliance is intended solely for domestic use within
the home. The appliance is suitable for keeping food.
• Before plugging into a socket, check that the voltage in
your home corresponds with the voltage printed on the
bottom of the appliance.
• Do not use single/multiple adapters or extension cables.
• Always carry out regular checks of the appliance and
the power cord to ensure no damage is evident. Should
there be any signs that the appliance or the power cord
is damaged in the slightest degree, the entire appliance
should be returned to the Customer Service Department.
For your own safety, only use the accessories and spare
parts from the manufacturer which are suitable for the
appliance.
• The appliance must be handled and installed by two or
more persons.
• Be careful not to damage the floor when you move the
appliance.
• During installation, make sure the appliance does not
damage the power cable.
• Check the appliance is not positioned near a heat source.
• Make sure that there is sucient ventilation, leave a
space of 10 cm around the appliance.
• Keep the vent outlets of the appliance free.
• Do not damage the refrigerant circuit pipes of the
appliance.
• Install the appliance on a firm and stable surface.
• Install the appliance in a dry and well ventilated area.
The appliance is intended for operation in environments
where ambient temperatures fall within the following
ranges, depending on the climatic class indicated on the
rating label at the back of the appliance. The appliance
1. Top panel
2. Interior lighting
3. Thermostat
4. Glass shelves
5. Drain outlet
6. Vegetabe drawer
7. Adjustable feet
8. Bottle rack
9. Door compartments
10. Handle
may not work properly if it is left for a long time at a
temperature outside the specified range.
Climatic class Ambient temperature
SN From 10°C to 32°C
N From 16°C to 32°C
ST From 18°C to 38°C
T From 18°C to 43°C
• Do not store or use petrol, flammable liquids or gas in the
vicinity of this or other electrical appliances. The fumes
can create a fire hazard or explosion.
• Do not allow children to play or hide inside the appliance
- there is a risk of becoming trapped and suocating.
• This appliance is not intended for installation by persons
(including children) with reduced physical, sensory or
mental capabilities, or lack of experience and knowledge,
unless they have been given supervision or instruction
concerning use of the appliance by a person responsible
for their safety.
• It is hazardous for anyone other than a competent
person to carry out any service or repairs that involve the
removal of the housing.
• Only use and place the appliance indoors.
• Do not let the cord hang over the edge of the table or
counter and keep it away from the heated surface.
• Before moving or cleaning the appliance, make sure it is
switched of and unplugged.
• For your own safety, only use the accessories and spare
parts from the manufacturer which are suitable for the
appliance.
• Never unplug it from the socket by pulling on the cable.
11
Page 12

Always ensure that your hands are dry before handling
the plug or power cord.
• Should you decide not to use the appliance anymore,
make it inoperative by cutting the power cord after
removing the plug from the socket. We also recommend
making all potentially dangerous parts of the appliance
harmless, particularly for children who might be tempted
to play with it.
• Never immerse any part of the main body, lid, power
cord and plug in water or any other liquid to protect
against electrical hazards.
• If the appliance is used for other purposes than intended,
or is it not handled in accordance with the instruction
manual, the full responsibility for any consequences will
rest with the user. Any damages to the product or other
things are not covered by the warranty.
2 | BEFORE FIRST USE
Before you use the appliance for the first time, please do as
follows: Carefully unpack the appliance and remove all the
packaging material. Keep the material (plastic, polystyrene
and cardboard) out of reach of children. Check the
appliance after unpacking for any damage, possible from
transportation. Place the appliance on a flat and stable
surface. Make sure there is enough open space around the
appliance for the intake and/or outlet vents. A minimum
clearance of 10 cm is required between the appliance and
any adjacent walls. The larder needs good ventilation for
easy dissipation of heat, high eciency of refrigeration and
low power consumption.
You can level the appliance using the adjustable feet.
Do not place the appliance near a heat source such as a
heater or furnace.
Mount the enclosed handle on the desired side of the door
with the enclosed screws and place the enclosed caps on
the other side for a nice finish. Attention: never lift the
larder by the handle.
Leave the appliance to stand for at least 3 hours before
you insert the plug into the socket.
First clean the interior of the appliance. Use warm water
and a neutral detergent. After cleaning, rinse the interior
with clean water and rub dry. Leave the appliance to dry
for 1 to 2 hours.
The appliance features internal
controls. Set the thermostat on
setting 3. Check that the voltage in
your home corresponds with the voltage printed on the
back of the appliance and plug it in a socket. The appliance
now cools continuously until the set temperature has
been reached. Do not place anything in the larder until the
set temperature is reached. This usually takes 2 or 3 hours.
Then set the thermostat at the desired setting and place
food into the larder.
3
3 | USING THE LARDER
Setting 1 = lowest cooling setting (highest temperature)
Setting 7 = higest cooling setting (lowest temperature)
In general setting 3 or 4 is used for the refrigeration.
The light on the inside will now light up every time you
open the door.
Note:
The ambient air temperature, how often the door is
opened and the position of the appliance can aect the
internal temperature. These factors must be taken into
account when setting the thermostat.
• Do not put hot food into the larder.
• Never introduce volatile, inflammable or explosive fluids
such as alcohol, acetone or petrol because of the risk of
explosion.
• It is advisable to wrap meat and fish to avoid odours.
• Leave sucient space between the food to enable air to
circulate correctly between them. Similarly, when storing
them, avoid puttin food items in contact with eacht
other.
• Do not place food items in contact with the cold wall
at the back of the larder. The shelves have a stop to
avoid this.
• The door should not be left open any longer than
necessary.
4 | TIPS
• High ambient temperatures have a negative eect on
energy use. Keep the larder in a position away from
direct sunlight or other sources of heat.
• Keep ventilation openings free. Clogged openings lead to
higher use of energy.
• Try not to open the door too often, especially when the
weather is wet and hot. Once you open the door, mind
to close it as soon as possible.
• The space between the shelves and the rear wall of the
larder compartment must be unobstructed to allow
the cool air to circulate. Therefore don’t place any food
items against the back.
• Turn the thermostat to a lower setting when the
circumstances allow it.
• Before storing fresh cooked food, make sure the food has
cooled at least to room temperature.
• If the gasket is damaged or if it turns out that the sealing
is poor, the energy consumption is substantially higher.
To restore eciency, replace the gasket.
• Keep the condensor on the rear wall always clean, free of
dust or any impurities.
• Always consider the instructions, otherwise the
energyconsumption is substantially higher.
12
Page 13

5 | CLEANING & MAINTENANCE
Before cleaning the larder always unplug the appliance.
Clean the interior of the appliance. Use warm water and
a neutral detergent to prevent any bad smells occurring.
After cleaning, rinse the interior with clean water and rub
dry. Leave the appliance to dry for 1 to 2 hours. Simply
remove the shelves, drawer and door compartments to
clean them by hand. Do not clean the interior accessories
in the dishwasher.
Clean the outside of the larder and the gasket with a soft
moist cloth.
We recommend that you dus the back of the appliance
with a cloth or vacuum cleaner once a year in order to
maintain a good output and low energy consumption.
Defrosting of the larder compartment is completely
automatic. Droplets of water on the rear wall of the larder
compartment indicate that the periodic automatic defrost
cycle is in progress. The defrost water is automatically
routed to a drain outlet and into a container from which it
evaporates.
REPLACING THE BULB
When replacing the bulb, proceed as follows:
• Unplug the appliance from the mains.
• Remove the lamp cover by unscrewing the screw and
pull the lamp cover towards you.
• First check if the bulb is fully screwed in.
• If the bulb is defective, replace it with a bulb of the same
type: maximum 10 Watt, socket E14. This kind is widely
available.
• Replace the cover and the screw.
• Plug the appliance back into the mains.
Problem Cause Solution
Appliance is
excessively noisy
The inside light
is not working
Note: gurgling and hissing noises due to expansion in the
refrigerant circuit are normal.
Has the
appliance been
installed
correctly?
Are the pipes
at the back
touching or
vibrating?
Lamp is
defective
Check the
installation
Check it and
move the
appliance
forwards
Replace the bulb
following the
instructions
7 | REVERSING THE DOOR OPENING
It is possible to change the door opening from either the
left or the right side. The appliance is delivered with the
door opening from the left side. To change the opening
direction, please follow these instructions.
Note: Before reversing the door swing, unplug the
appliance from the mains.
• Remove the screws at the back, holding the top panel
to the appliance.
6 | TROUBLESHOOTING
Problem Cause Solution
Appliance is not
functioning;
light does not
work
Temperature
inside the
larder is too high
or too low
Water is running
out of the
larder
Aplliance is not
plugged in
Thermostat has
been set
incorrectly
Air
circulation
vents are
blocked
Drain outlet is
blocked
Plug the
appliance in the
socket
Set the
thermostat
correctly
Clean the
ventilation
openings
Clear the drain
outlet with a
skewer
• Lift the top panel at the backside and remove it.
13
Page 14

• Remove the three screws holding the top hinge (right
side) to the frame. Remove the top hinge.
• To easily remove the bottom hinge tilt the appliance at
max. 45°.
• Lift the door from the bottom hinge pin and place it on a
non-scratching surface.
• Remove the front leg on the left by unscrewing it.
• Remove the two screws holding the bottom hinge.
Remove the bottom hinge.
• Before replacing the bottom hinge, remove the hinge pin
and reverse the direction of the hinge. Reassemble the
bottom hinge on the left hand side using the two screws.
• Replace the hinge pin into the bottom hinge.
• Replace the front leg.
• Set the larder carefully upright.
14
Page 15

• Remove the handle, if it is already fitted, and place it on
the other side of the door. Don’t forget to also refit the
white screw caps.
• Lower the door onto the bottom hinge pin and hold it.
• While holding the door in the closed position, reassemble
the top hinge on the left hand side using the three
screws. Do not tighten the screws until the top of the
door is level with the counter top.
8 | REMOVING THE TOP PANEL
To install the refrigerator beneath a counter top for
example, you can easily remove the top panel.
Note: unplug the appliance.
• Remove the screws at the back, holding the top panel to
the appliance.
• Lift the top panel at the backside and remove it.
• Remove the screws on both the frame and the metal
hinge.
• Remove the hinge and the frame.
• Refit the top panel using the screws.
• Leave the appliance to stand for at least 3 hours before
you insert the plug into the socket.
15
Page 16

• Reassemble the metal hinge using the three screws.
• Leave the appliance to stand for at least 3 hours before
you insert the plug into the socket.
Technical specifications
Model KK551
External dimensions 55 x 58 x 85 cm
Energy rate A
+
Climat class N
Net capacity 130 liter
Net capacity cooling compartment 130 liter
Voltage 230Volt ~50Hz
Wattage 80 Watt
Net weight ± 29 kg
Model KK601
External dimensions 60 x 60 x 85 cm
Energy rate A
++
Climat class N
Net capacity 147 liter
Net capacity cooling compartment 147 liter
Voltage 230Volt ~50Hz
Wattage 80 Watt
Net weight ± 34 kg
Note: On the rating label - which you can find at the back on
the larder - you can also find the technical specificactions.
16
Page 17

GUARANTEE & AFTER SALES SERVICE EN
• INVENTUM guarantees this product for a period of 2 years starting from the date of purchase. The warranty covers
proven defects in material, manufacturing and functioning of components and includes material costs, travel- or
shipping costs and labor.
• INVENTUM provides not only the 2 years standard warranty, but also gives 3 years extended warranty on spare parts and
labor costs. We only bill the travel- or shipping costs. This way, the quality of your INVENTUM equipment is 5 years
guaranteed.
• To qualify for the extended 5 year warranty, please register your appliance within 45 days of purchase on
www.inventum.eu
• Why is registration important for you?
1. You get a 5-year warranty
2. All details of your appliance are known by Inventum. No need to search for your model number when you contact us.
3. Inventum can provide a faster and better service when you contact our service center.
• Guarantee can only be given if proof of purchase (e.g. till receipt or copy) can be shown. Therefore keep it in a safe
place. The guarantee period starts at the date of purchase.
• Guarantee is not valid in case of:
- normal wear;
- damage through misuse use or when the instructions were not followed correctly;
- lack of maintenance;
- not following the operation- and safety instructions;
- incompetent montage or repairs made by yourself or others;
- using accessories and spare parts which are not suitable for the appliance;
for assessment by our technical department.
• The guarantee is not valid for:
- normal wear - such as plastic accessories;
- normal wear and tear – such as glass breakage, scratches on the equipment, discoloration of plastic or painted parts;
Insucient or incorrect maintenance can cause discolouration of surfaces and rubbers and plastics can deteriorate fast.
This is also not covered under warranty.
- (interchangeable) signal- and controllamps;
- defects and consequential damage caused by strong contamination and incorrect maintenance;
for assessment by our technical department.
Defects which do not significantly influence the value or operation of the device asre excluded by free repair and / or
replacement.
Transport damage is not guaranteed. Therefore, check your new equipment before use. If any damage is found, please
contact your supplier within 5 working days after purchase.
From warranty and/or replacement are excluded: defects, loss and damage to the appliance due to an event that usually is
insured under the home contents insurance.
To whom can you turn to?
On www.inventum.eu you will find - besides advice on how to use the appliance and cleaning tips - all the answers to
your servce related questions. Please check the website before contacting our service center.
You can register your service request quickly and easily online at www.inventum.eu. It is also possible to do this by
telephone via the INVENTUM service organization.
INVENTUM Service Organization: 0900-INVENTUM (0900-468 36 88) (just for Holland).
To provide the best possible service and to process your service request as soon as possible, we recommend that you
always first contact INVENTUM.
These warranty conditions only apply to the Netherlands. For local warranty please contact your dealer.
In countries where INVENTUM has a distributor, you can turn to them if you need the INVENTUM service organization. In
other countries, contact your dealer.
When the guarantee is no longer valid or when the period of guarantee has passed, we will charge any costs that
flow out of an assessment and/or repairing.
On request we will supply a statement before repairing. Without requesting a statement, we assume that you, by
sending the appliance, automatically order to repair the appliance.
A guarantee period of two months is valid for repairs done by our technical department and the used spare parts,
counting from the repairdate. When a malfunction occurs within this period which directly flows out of the repairs and the
used spare parts, the consumer has the right of repairs without any costs.
Modification and printing errors reserved. The latest version of the deposited guarantee conditions can be obtained through our service
organization.
17
Page 18

18
Page 19

Page 20

Generatorstraat 17, 3903 LH , Veenendaal, Nederland
Inventum Group BV
Tel.: 0318 54 22 22, Fax.: 0318 54 20 22, Mail: helpdesk@inventum.eu
Website: ww w . i n v e n t u m .eu
16KK551-601/01.0313V
Wijzigingen en drukfouten voorbehouden/ Modifications and printing errors reserved!
 Loading...