

Invacare 6808A, 6801A, 6815A, 6816A, 6803A Installation And Operating Instructions Manual
...
ICCI Bed Rails and Accessories
Assembly, Installation and Operating Instructions
Part No. 6801A, 6803A, 6808A, 6815A, 6816A, IH5748A, IHRAILTS-DLX
SAVE THESE INSTRUCTIONS
NOTE: Check all parts for shipping damage before using. In case of damage, DO NOT use the equipment. Contact the
Dealer/Carrier for further instructions.
Safety Summary
WARNING
DO NOT use this product or any available optional equipment without first completely reading and
understanding these instructions and any additional instructional material such as owner’s manuals, service
manuals or instruction sheets supplied with this product or optional equipment. If you are unable to understand
the warnings, cautions or instructions, contact a healthcare professional, dealer or technical personnel before
attempting to use this equipment - otherwise, injury or damage may occur.
These bed rails are intended to prevent an individual from inadvertently rolling out of bed. DO NOT use for
restraint purposes.
DO NOT use the bed rails as push handles for moving the bed.
ALWAYS test to make sure that the bed rails are properly and securely in place before using.
Although bed rails are not rated to any specific weight limitation, the bed rails may become deformed or broken
if excessive side pressure is exerted on the bed rails. This bed rail is not an assist rail for getting into or out of
bed. DO NOT use the bed rails as push handles when moving the bed.
ACCESSORIES WARNING
Invacare products are specifically designed and manufactured for use in conjunction with Invacare accessories.
Accessories designed by other manufacturers have not been tested by Invacare and are not recommended for
use with Invacare products.
ENTRAPMENT WARNING
Proper patient assessment and monitoring, and proper maintenance and use of equipment is required to reduce
the risk of entrapment. Variations in bed rail dimensions, and mattress thickness, size or density could increase
the risk of entrapment. Visit the FDA website at http://www.fda.gov to learn about the risks of entrapment.
Review “A Guide to Bed Safety”, published by the Hospital Bed Safety Workgroup.
Refer to the bed owner’s manuals for additional product and safety information.
Mattress MUST fit bed frame and bed rails and/or positioning device snugly to reduce the risk of entrapment.
After any adjustments, repair or bed service and before use, make sure all attaching hardware is tightened
securely. Rails and/or positioning devices with dimensions different from the original equipment supplied or specified by the bed manufacturer may not be interchangeable and may result in entrapment or other injury.
Installing/Using the Epoxy Bed Rails
NOTE: For this procedure, refer to FIGURE 1.
Installing 6801A and 6808A Bed Rails
1. Position the pivot brackets on the bed frame as shown in Details “A” and “B” of FIGURE 1.
2. Loosely attach the pivot brackets to the bed frame with the hex bolts and locknuts.
NOTE: DO NOT tighten the hex bolts and locknuts at this time.
3. Slide the mounting pins of the bed rails through the pivot tubes.
NOTE: Make sure the release lever on the bed rail is pointing towards the foot end of the bed.
For more information regarding Invacare Continuing Care, Inc. (ICCI) products, parts, and services,
please visit www.invacare-ccg.com or call 800-668-2337
Part No 1143214 1 ICCI Bed Rails and Accessories
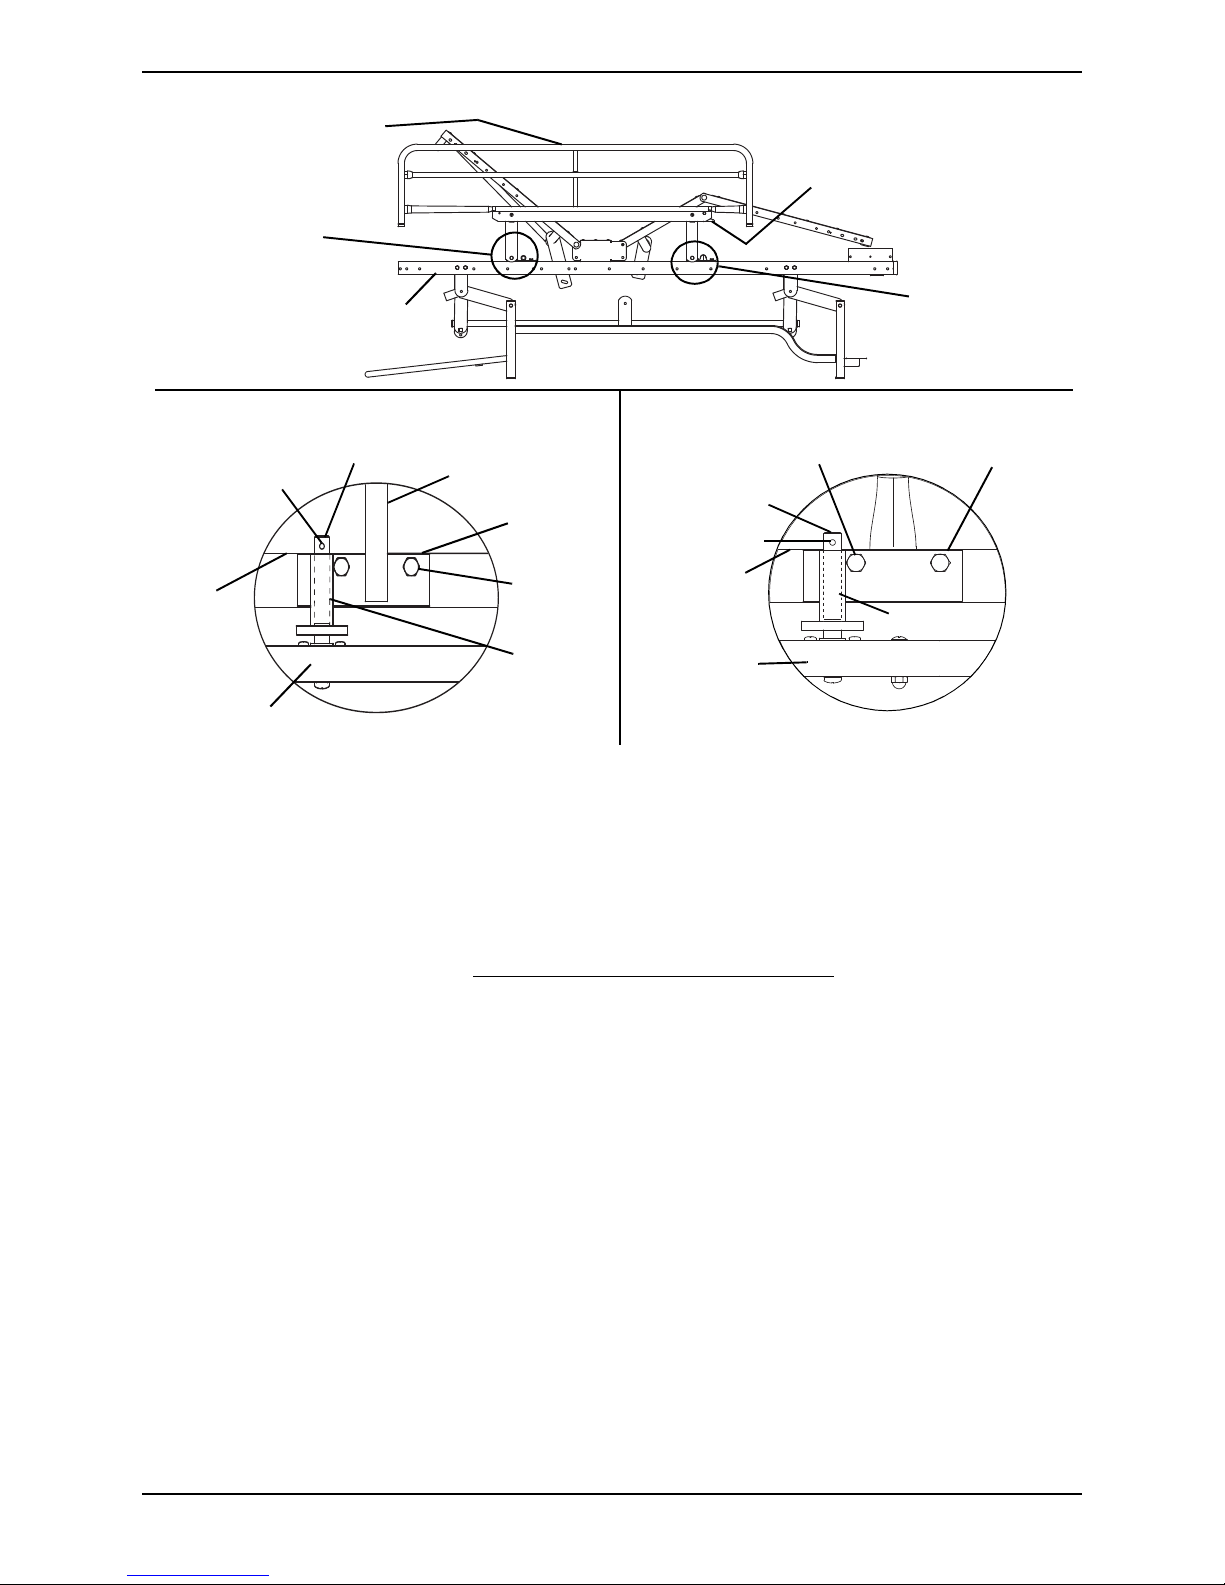
4. Install a socket screw into the head end and foot end mounting pins and tighten securely.
Release Lever
DETAIL “B” - FOOT END TOP VIEW
DETAIL “A” - HEAD END TOP VIEW
Bed Rail (on the outside of bed
frame)
Bed Frame
Bed Rail (on the outside of bed frame)
Crossmember
Inside of Bed
Frame
Socket Screw
Pivot Tube
Mounting Pin
Socket Screw
Mounting Pin
Bed Rail (on the
outside of bed
frame)
Pivot Bracket
Hex Bolt and Locknut
Pivot Tube
Pivot
Bracket
Hex Bolt and
Locknut
Inside of Bed
Frame
See Detail B
See Detail A
5. Securely tighten the hex bolts and locknuts that secure the pivot brackets to the bed frame.
6. Repeat STEPS 3-6 for the opposite bed rail.
Installing 6815A, 6816A and 6803A Bed Rails
NOTE: For this procedure, refer to FIGURE 2.
1. When installing bed rails 6815A, 6816A or 6803A on a bed used with an 80-inch mattress, the head board mounting
brackets MUST be adjusted. Refer to Changing the Head Board Mounting Position
2. Raise the mattress deck to which the bed rail will be attached.
3. Locate the proper mounting holes on the bed to install the bed rails. Refer to Detail “B” of FIGURE 2.
4. Position the mounting bracket on the mattress deck. Refer to Detail “B” of FIGURE 2.
5. Secure the mounting bracket to the mattress deck with the two hex bolts and locknuts.
6. Install the bed rail to the mounting bracket by sliding the mounting pin of the bed rail through the pivot tube.
NOTE: Ensure that the release lever is pointing towards the foot end of the bed.
FIGURE 1 Installing 6801A and 6808A Bed Rails
on page 6.
ICCI Bed Rails and Accessories 2 Part No 1143214
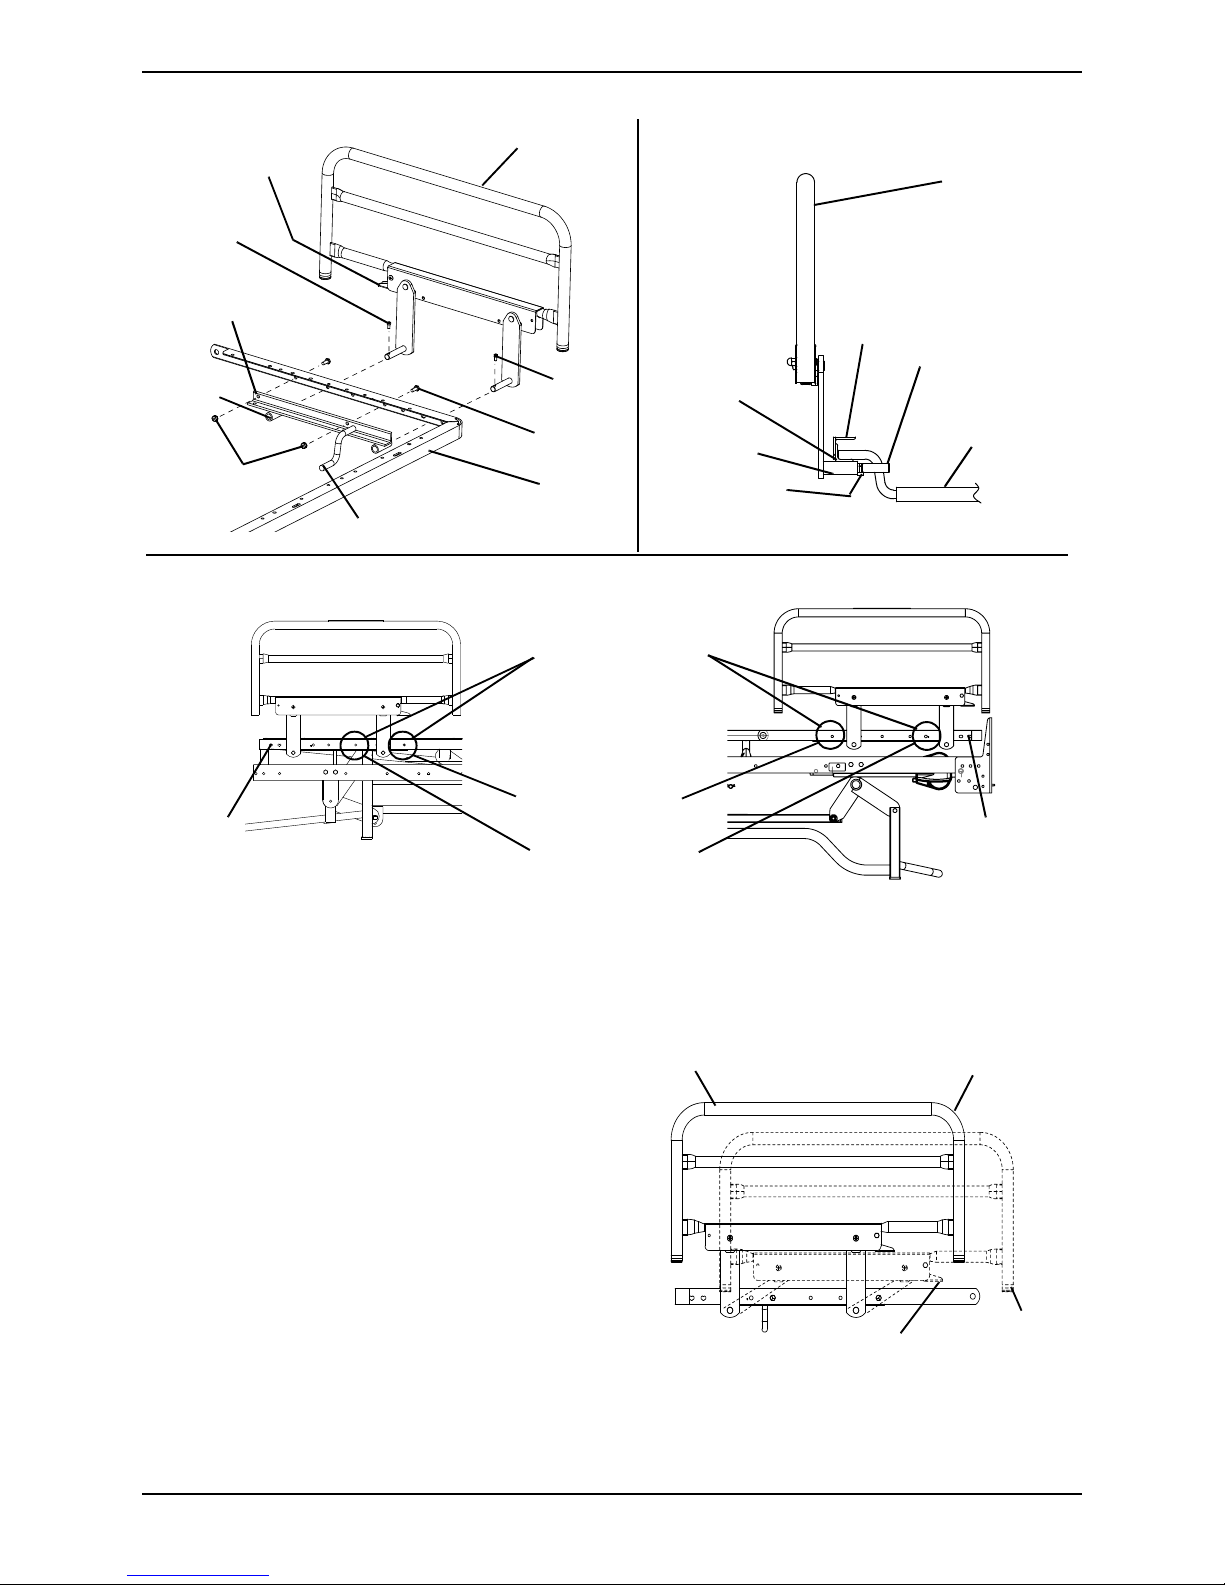
Release Lever
the bed)
Bed Rail
Socket
Screw
Mounting
Bracket
Hex Bolt
Locknut
Mattress
Deck
Attach Head End Crossmember Here
Bed Rail
Mattress
Deck
Mounting
Bracket
Socket Screw
DETAIL “B” - MOUNTING HOLE
LOCATION FOR MOUNTING
BRACKETS
DETAIL “A” - SIDE VIEW OF BED RAIL
Mounting Holes for
Mounting Bracket
Head End
Foot End
Mounting Pin
Crossmember (Head
End Only)
Mounting
Pin
Pivot Tube
Pivot
Tube
8th Mounting Hole
5th Mounting Holes
1st Mounting
Hole
1st
Mounting
Hole
Towards Foot End of
Bed
Bed Rail
Release Lever
Bed Rail in
Lowered Position
FIGURE 2 Installing 6815A, 6816A and 6803A Bed Rails
7. Secure the bed rail to the mounting bracket with the two socket screws.
8. Head End Mounting Bracket Only - Position the crossmember between the two bed rails as shown in Detail “A” of
FIGURE 2 on page 3.
9. Repeat STEPS 3-7 to install the other bed rail on the opposite side.
Using the Epoxy Bed Rails
NOTE: For this procedure, refer to FIGURE 3.
1. Perform one of the following:
• Raising - Pull up on the bed rails while rotating
towards the head end of the bed until the bed
rail locks into place.
• Lowering - Pull up on the release lever and push
down on the bed rail while rotating towards the
foot end of the bed until the bed rail lowers into
place.
FIGURE 3 Using the Epoxy Bed Rails (Head End)
Part No 1143214 3 ICCI Bed Rails and Accessories
Installing/Using Nylasar Bed Rails
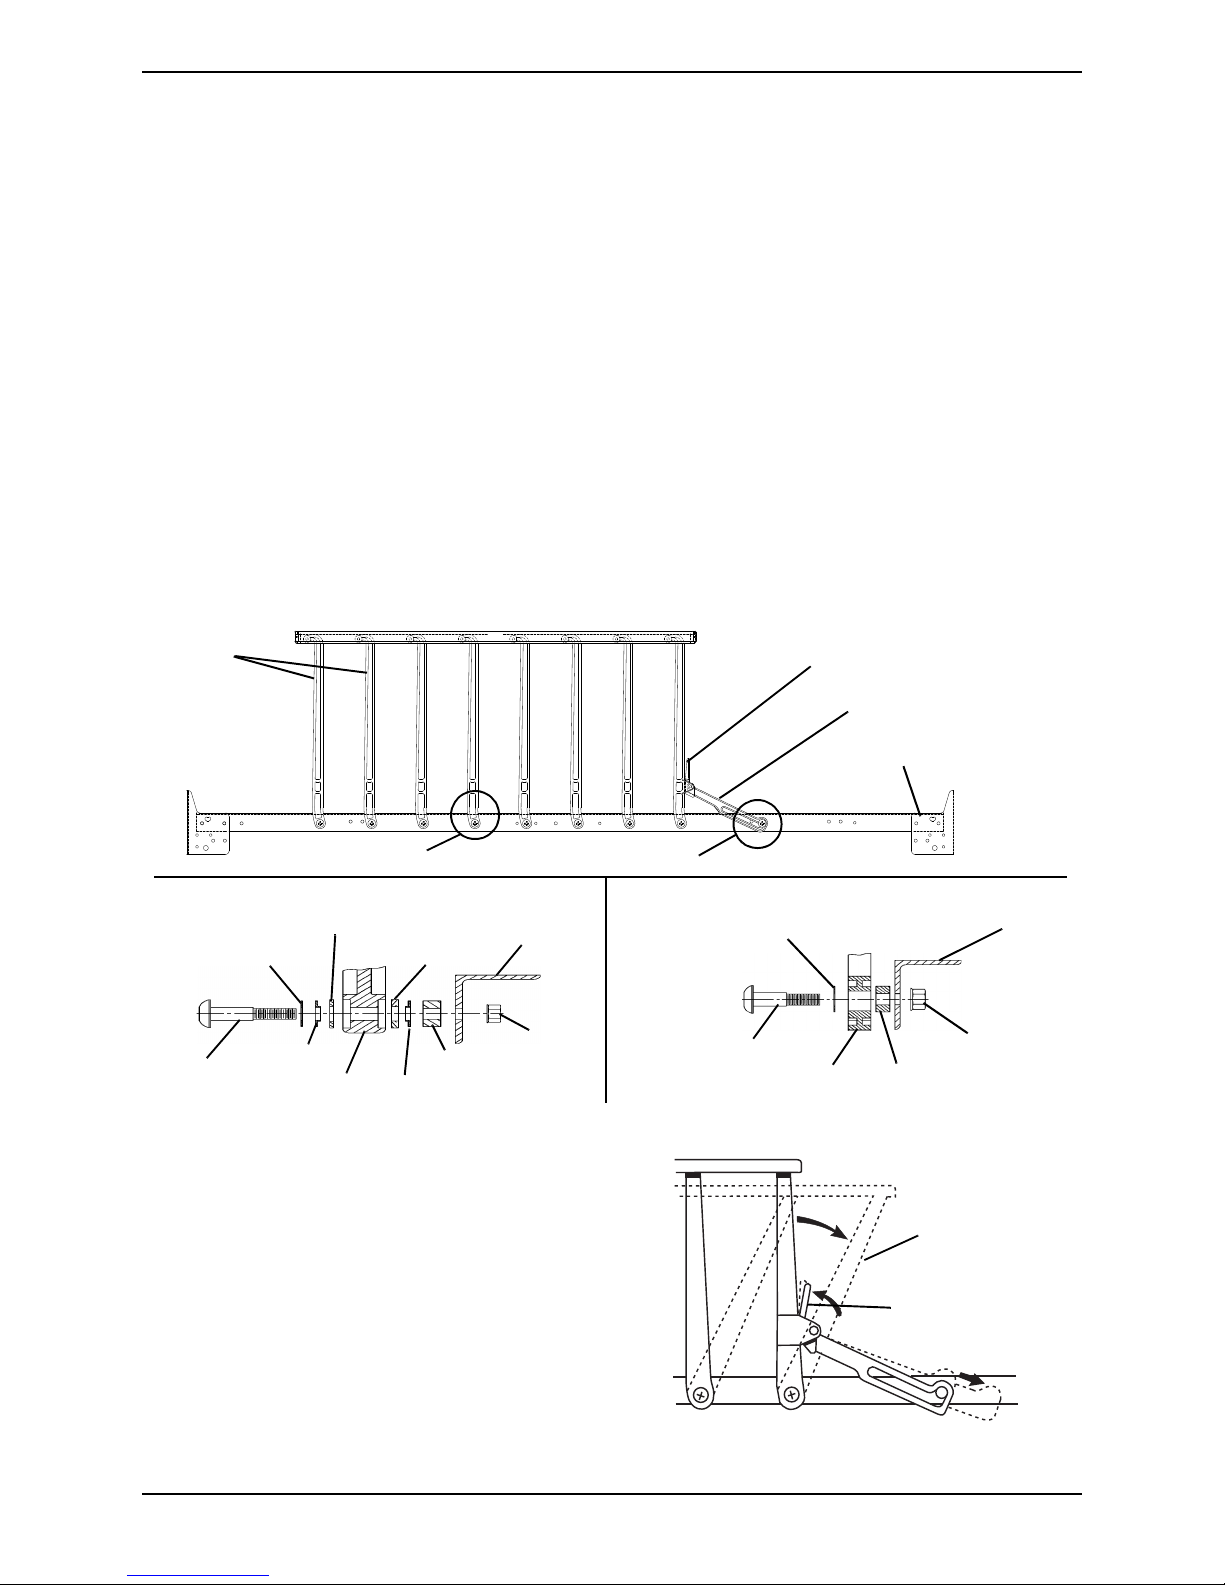
Release Lever
Spacer
DETAIL “B” - LATCH ARM HARDWARE
Bar
Bolt
Hex Nut
Latch Arm
Spacer
Bed
Frame
Bars
Bed Frame
Refer to Detail “A”
Refer to Detail “B”
Rubber
Bushing
Bar
Bearing
Bolt
Bed
Frame
Washer
DETAIL “A” - BAR HARDWARE
Hex
Nut
Spacer
Spacer
Bearing
Foot End
of Bed
Foot End of Bed
Release Lever
Bed Rail
NOTE: The hardware shown in FIGURE 4 on page 4 is already assembled to the bars and latch arms before shipment. It is not
necessary to remove the hardware from the bolt or to remove the bolt from the bars or latch arms. Holding the bolt in place while
removing the hex nuts will prevent the hardware from becoming disassembled. In case of disassembly, refer to FIGURE 4 on page 4
for the correct placement of the hardware.
Installing the IH5748A Bed Rails
NOTE: For this procedure, refer to FIGURE 4 on page 4.
NOTE: Invacare recommends two people perform the following installation procedure. One person should hold the bed rail up
against the bed and one person should attach the rail to the bed.
1. Position the bed rail on the bed frame with the release lever towards the foot end of the bed.
2. Loosen and remove the hex nut from the latch arm at the foot end of the bed (Detail “B”).
3. Carefully push the bolt through the mounting hole in the bed frame (Detail “B”).
4. Loosely install the hex nut on the bolt to secure the latch arm to the bed frame (Detail “B”).
5. Loosen and remove the hex nut from the bar closest to the latch arm (Detail “A”).
6. Carefully push the bolt through the corresponding mounting hole in the bed frame (Detail “A”).
7. Loosely install the hex nut on the bolt to secure the bar to the bed frame (Detail “A”).
8. Repeat STEPS 5-7 for the remaining bars.
9. Securely tighten all bolts and hex nuts securing the bars and the foot end latch arm to the bed frame. Torque to
100-150 inch-pounds.
FIGURE 4 Installing/Using Nylasar Bed Rails - Installing the IH5748A Bed Rails
Using the IH5748A Bed Rails
NOTE: For this procedure, refer to FIGURE 5.
1. Perform one of the following:
• Raising - Lift up on the bed rail until the rail
locks into place.
• Lowering - Press in on the release lever and
ICCI Bed Rails and Accessories 4 Part No 1143214
push down on the rail.
FIGURE 5 Using the IH5748A Bed Rails

Installing/Using the Carroll Assist Rail®and Carroll Assist Bar
Head End
Mounting Holes for
Mounting Bracket
8th Mounting Hole
5th Mounting
Hole
1st
Mounting
Hole
Installing/Using IHRAILAB-DL and IHRAILAE-DLX
For instruction involving installation and use of the Carroll Assist Rails and Carroll Assist Bar, refer to the instruction
sheet included with the rails.
Installing/Using the ThinkSoft®Positioning Device
WARNING
DO NOT use this product or any available optional equipment without first completely reading and
understanding these instructions and any additional instructional material such as owner’s manuals, service
manuals or instruction sheets supplied with this product or optional equipment. If you are unable to understand
the warnings, cautions or instructions, contact a healthcare professional, dealer or technical personnel before
attempting to use this equipment - otherwise, injury or damage may occur.
This device is intended to provide a grip surface to a bed occupant to position themselves.
DO NOT use for restraint purposes.
DO NOT use this device as a push handle for moving the bed.
ALWAYS test to make sure that this device is properly and securely in place before using.
Although this device is not rated to any specific weight limitation, this device may become deformed or broken
if excessive side pressure is exerted on this device.
Installing the IHRAILTS-DLX Positioning Device
NOTE: For this procedure, refer to FIGURE 6 and FIGURE 7.
1. When installing the positioning device IHRAILTS - DLX on a bed used with an 80-inch mattress, the head board
mounting brackets and mattress keepers MUST be adjusted. Refer to Changing the Head Board Mounting Position
and Changing the Mounting Position of the Mattress Keepers
2. Raise the mattress deck to which the positioning device will be attached.
3. Locate the proper mounting holes on the bed to install the positioning device (FIGURE 6).
on page 7.
FIGURE 6 Mounting Holes for Mounting Bracket
4. Position the mounting bracket on the mattress deck (FIGURE 7).
5. Secure the mounting bracket to the mattress deck with the two hex bolts and locknuts (FIGURE 7).
6. Install the positioning device into the mounting bracket by sliding the mounting pin of the bed rail through the
pivot tube (FIGURE 7).
7. Secure positioning device in place with two retaining clips (FIGURE 7).
NOTE: Ensure that the release lever is pointing towards the foot end of the bed.
8. Slide the nylon washer over the end of the mounting pins (FIGURE 7).
9. Snap retaining clips into grooves on the end of the mounting pins (FIGURE 7).
10. Head End Mounting Bracket Only - Position the crossmember between the two bed rails (FIGURE 7).
NOTE: Repeat STEPS 3-9 to install the other positioning device on the opposite side.
Part No 1143214 5 ICCI Bed Rails and Accessories

Using the IHRAILTS-DLX Positioning Device
Release Lever
(Towards the foot end
of the bed)
Mounting
Bracket
Hex Bolt
Locknut
Mattress Deck
Attach Head End Crossmember Here
Pivot
Tube
IHRAILTS-DLX
Positioning Device
Washer
Retaining
Clip
Mounting Pin
IHRAILTS-DLX
Positioning Device
Mattress Deck
Mounting
Bracket
Pivot
Tube
Washer
Retaining Clip
Crossmember
Positioning Device
Release Lever
NOTE: For this procedure, refer to FIGURE 8.
1. Perform one of the following:
Changing the Head Board Mounting Position
NOTE: For this procedure, refer to FIGURE 9.
NOTE: When using bed rails 6815A, 6816A, 6803A or IHRAILTS - DLX in conjunction with an 80-inch mattress, the head board
mounting brackets MUST be adjusted.
1. Remove the two mounting screws that secure head board mounting bracket to the bed frame. See Detail “A”.
2. Secure the head board mounting bracket to the bed frame as shown in Detail “B” using two mounting screws and
NOTE: Ensure mounting brackets are perpendicular to the floor.
3. Repeat STEPS 1-2 to install remaining head board mounting brackets.
FIGURE 7 Installing the IHRAILTS-DLX Positioning Device
• Raising - Pull up on the positioning device while
rotating towards the head end of the bed until
the positioning device locks into place.
• Lowering - Pull up on the release lever and push
down on the positioning device while rotating
towards the foot end of the bed until the
positioning device lowers into place.
FIGURE 8 Using the IHRAILTS-DLX Positioning
Device
locknuts. Securely tighten.
ICCI Bed Rails and Accessories 6 Part No 1143214

FIGURE 9 Changing the Head Board Mounting Position
Head Board Mounting Bracket
Bed Frame
Mounting Screws and Locknuts
DETAIL “A”
NOTE: Mounting position of head board mounting
bracket for use with 80-inch mattress - without side
rails
DETAIL “B”
NOTE: Mounting position of head board mounting bracket for
use with 80-inch mattress - using side rails 6815A, 6816A,
6803A, or IHRAILTS-DLX.
Mounting Screws and Locknuts
Bed Frame
Head Board Mounting Bracket
1-inch Gap
2-inch Gap
Mattress Keeper
Head End of
Mattress
Deck
Mounting Screws and Locknuts
2-inch Gap
DETAIL “B”
DETAIL “A”
Mattress Keeper
Head End of
Mattress
Deck
Mounting Screws and Locknuts
1-inch Gap
NOTE: Mounting position of the mattress keeper for
use with 80-inch mattress - without side rails
NOTE: Mounting position of the mattress keeper for use with
80-inch mattress - using side rails 6815A, 6816A, 6803A, or
IHRAILTS-DLX.
Changing the Mounting Position of the Mattress Keepers
NOTE: For this procedure, refer to FIGURE 10 on page 7.
NOTE: When using bed rails 6815A, 6816A, 6803A or IHRAILTS_DLX in conjunction with an 80-inch mattress, the mattress
keepers on the head end of the mattress deck MUST be adjusted.
1. Remove the two mounting screws that secure the mattress keeper to the head end of the mattress deck. See Detail
“A ” .
2. Secure the mattress keeper to the head end of the mattress deck as shown in Detail “B” using two mounting screws
and locknuts. Securely tighten.
3. Repeat STEPS 1-2 to adjust the remaining mattress keeper on the head end of the mattress deck.
Part No 1143214 7 ICCI Bed Rails and Accessories
FIGURE 10 Changing the Mounting Position of the Mattress Keepers

APPENDIX
SPECIAL NOTE
For your convenience, the January 2008 version of the FDA’s bed safety guidelines are provided in this section.
The information from the FDA’s brochure, published by Hospital Bed Safety Workgroup, is reproduced verbatim, the latest revision of which is available at http://www.fda.gov.
A Guide to Bed Safety Bed Rails in Hospitals, Nursing Homes and Home Health
Care: The Facts
Bed Rail Entrapment Statistics
Today there are about 2.5 million hospital and nursing home beds in use in the United States. Between 1985 and 2005,
691 incidents of patients* caught, trapped, entangled, or strangled in beds with rails were reported to the U.S. Food and
Drug Administration. Of these reports, 413 people died, 120 had a nonfatal injury, and 158 were not injured because
staff intervened. Most patients were frail, elderly or confused.
*NOTE: In this brochure, the term patient refers to a resident of a nursing home, any individual receiving services in a home care
setting, or patients in hospitals.
Patient Safety
Patients who have problems with memory, sleeping, incontinence, pain, uncontrolled body movement, or who get out
of bed and walk unsafely without assistance, must be carefully assessed for the best ways to keep them from harm, such
as falling. Assessment by the patient’s health care team will help to determine how best to keep the patient safe.
Historically, physical restraints (such as vests, ankle or wrist restraints) were used to try to keep patients safe in health
care facilities. In recent years, the health care community has recognized that physically restraining patients can be
dangerous. Although not indicated for this use, bed rails are sometimes used as restraints. Regulatory agencies, health
care organizations, product manufacturers and advocacy groups encourage hospitals, nursing homes and home care
providers to assess patients’ needs and to provide safe care without restraints.
The Benefits and Risks of Bed Rails
Potential benefits of bed rails include:
• Aiding in turning and repositioning within the bed.
• Providing a hand-hold for getting into or out of bed.
• Providing a feeling of comfort and security.
• Reducing the risk of patients falling out of bed when being transported.
• Providing easy access to bed controls and personal care items.
Potential risks of bed rails may include:
• Strangling, suffocating, bodily injury or death when patients or part of their body are caught between rails or
between the bed rails and mattress.
• More serious injuries from falls when patients climb over rails.
• Skin bruising, cuts, and scrapes.
• Inducing agitated behavior when bed rails are used as a restraint.
• Feeling isolated or unnecessarily restricted.
• Preventing patients, who are able to get out of bed, from performing routine activities such as going to the
bathroom or retrieving something from a closet.
Meeting Patients' Needs for Safety
Most patients can be in bed safely without bed rails. Consider the following:
• Use beds that can be raised and lowered close to the floor to accommodate both patient and health care worker
needs.
• Keep the bed in the lowest position with wheels locked.
• When the patient is at risk of falling out of bed, place mats next to the bed, as long as this does not create a greater
risk of accident.
• Use transfer or mobility aids.
• Monitor patients frequently.
• Anticipate the reasons patients get out of bed such as hunger, thirst, going to the bathroom, restlessness and pain;
meet these needs by offering food and fluids, scheduling ample toileting, and providing calming interventions and
pain relief.
ICCI Bed Rails and Accessories 8 Part No 1143214

When bed rails are used, perform an on-going assessment of the patient’s physical and mental status; closely monitor
high-risk patients. Consider the following:
• Lower one or more sections of the bed rail, such as the foot rail.
• Use a proper size mattress or mattress with raised foam edges to prevent patients from being trapped between the
mattress and rail.
• Reduce the gaps between the mattress and side rails.
Which Ways of Reducing Risks are Best?
A process that requires ongoing patient evaluation and monitoring will result in optimizing bed safety. Many patients
go through a period of adjustment to become comfortable with new options. Patients and their families should talk to
their health care planning team to find out which options are best for them.
Patient or Family Concerns About Bed Rail Use
If patients or family ask about using bed rails, health care providers should:
• Encourage patients or family to talk to their health care planning team to determine whether or not bed rails are
indicated.
• Reassure patients and their families that in many cases the patient can sleep safely without bed rails.
• Reassess the need for using bed rails on a frequent, regular basis.
To report an adverse event or medical device problem, please call FDA’s MedWatch Reporting Program at
1-800-FDA-1088.
For additional copies of the brochure, see the FDA’s website at http://www.fda.gov/cdrh/beds/
For more information about this brochure, contact Beryl Goldman at 610-335-1280 or by e-mail at
bgoldman@kendaloutreach.org. She has volunteered to answer questions.
For information regarding a specific hospital bed, contact the bed manufacturer directly.
Developed by the Hospital Bed Safety Workgroup
Participating Organizations:
•AARP
• ABA Tort and Insurance Practice Section
• American Association of Homes and
• Services for the Aging
• American Health Care Association
• American Medical Directors Association
• American Nurses Association
• American Society for Healthcare
• Engineering of the American
• Hospital Association
• American Society for Healthcare Risk
• Management
• Basic American Metal Products
• Beverly Enterprises, Inc.
• Care Providers of Minnesota
• Carroll Healthcare
• DePaul College of Law
Updated January 2008
•ECRI
• Evangelical Lutheran Good Samaritan Society
• Hill-Rom Co., Inc.
• Joint Commission on Accreditation of Healthcare
Organizations
• Medical Devices Bureau, Health Canada
• National Association for Home Care
• National Citizens’ Coalition for Nursing Home
Reform
• National Patient Safety Foundation
•RN+ Systems
• Stryker Medical
• Sunrise Medical, Inc.
• The Jewish Home and Hospital
• Untie the Elderly, The Kendal Corporation
• U.S. Food and Drug Administration
Part No 1143214 9 ICCI Bed Rails and Accessories

NOTES
ICCI Bed Rails and Accessories 10 Part No 1143214

LIMITED WARRANTY
PLEASE NOTE: THE WARRANTY BELOW HAS BEEN DRAFTED TO COMPLY WITH FEDERAL LAW
APPLICABLE TO PRODUCTS MANUFACTURED AFTER JULY 4, 1975.
This warranty is extended only to the original purchaser who purchases this product when new and unused
from Invacare Continuing Care, Inc. or a dealer. This warranty is not extended to any other person or
entity and is not transferable or assignable to any subsequent purchaser or owner. Coverage under this
warranty will end upon any such subsequent sale or other transfer of title to any other person.
This warranty gives you specific legal rights and you may also have other legal rights which vary from state
to state.
ICCI warrants this product when purchased new and unused to be free from defects in materials and
workmanship for a period of one year from date of purchase from ICCI or a dealer, with a copy of the seller’s
invoice required for coverage under this warranty. If within such warranty periods any such product shall be
proven to be defective, such product shall be repaired or replaced, at ICCI’s option. This warranty does not
include any labor or shipping charges incurred in replacement part installation or repair of any such product.
ICCI's sole obligation and your exclusive remedy under this warranty shall be limited to such repair and/or
replacement.
For warranty service, please contact the dealer from whom you purchased your ICCI product. In the event
you do not receive satisfactory warranty service, please write directly to ICCI at the address on the back
cover, provide dealer's name, address, and the date of purchase, indicate nature of the defect and, if the
product is serialized, indicate the serial number. Do not return products to our factory without our prior
consent.
LIMITATIONS AND EXCLUSIONS: THE FOREGOING WARRANTY SHALL NOT APPLY TO SERIAL
NUMBERED PRODUCTS IF THE SERIAL NUMBER HAS BEEN REMOVED OR DEFACED, PRODUCTS
SUBJECTED TO NEGLIGENCE, ACCIDENT, IMPROPER OPERATION, MAINTENANCE OR STORAGE,
PRODUCTS MODIFIED WITHOUT ICCI'S EXPRESS WRITTEN CONSENT (INCLUDING, BUT NOT
LIMITED TO, MODIFICATION THROUGH THE USE OF UNAUTHORIZED PARTS OR
ATTACHMENTS; PRODUCTS DAMAGED BY REASON OF REPAIRS MADE TO ANY COMPONENT
WITHOUT THE SPECIFIC CONSENT OF ICCI, OR TO A PRODUCT DAMAGED BY CIRCUMSTANCES
BEYOND ICCI'S CONTROL, AND SUCH EVALUATION WILL BE SOLELY DETERMINED BY ICCI. THE
WARRANTY SHALL NOT APPLY TO NORMAL WEAR AND TEAR OR FAILURE TO ADHERE TO THE
PRODUCT INSTRUCTIONS.
THE FOREGOING EXPRESS WARRANTY IS EXCLUSIVE AND IN LIEU OF ANY OTHER
WARRANTIES WHATSOEVER, WHETHER EXPRESS OR IMPLIED, INCLUDING THE IMPLIED
WARRANTIES OF MERCHANTABILITY AND FITNESS FOR A PARTICULAR PURPOSE, AND THE
SOLE REMEDY FOR VIOLATIONS OF ANY WARRANTY WHATSOEVER, SHALL BE LIMITED TO
REPAIR OR REPLACEMENT OF THE DEFECTIVE PRODUCT PURSUANT TO THE TERMS
CONTAINED HEREIN. THE APPLICATION OF ANY IMPLIED WARRANTY WHATSOEVER SHALL
NOT EXTEND BEYOND THE DURATION OF THE EXPRESS WARRANTY PROVIDED HEREIN. ICCI
SHALL NOT BE LIABLE FOR ANY CONSEQUENTIAL OR INCIDENTAL DAMAGES WHATSOEVER.
SOME STATES DO NOT ALLOW THE EXCLUSION OR LIMITATION OF INCIDENTAL OR
CONSEQUENTIAL DAMAGE, OR LIMITATION OF HOW LONG AN IMPLIED WARRANTY LASTS,
SO THE ABOVE EXCLUSION AND LIMITATION MAY NOT BE APPLICABLE.
THIS WARRANTY SHALL BE EXTENDED TO COMPLY WITH STATE/PROVINCIAL LAWS AND
REQUIREMENTS.
Part No 1143214 11 ICCI Bed Rails and Accessories

Invacare Continuing Care,
Inc.
USA and Canada:
One Invacare Way
Elyria, Ohio USA
44036-2125
For Customer Service, call
800-668-2337
Invacare Continuing Care, Inc.
A subsidiary of Invacare
Corporation.
www.invacare-ccg.com
Manufacturing
Location:
2101 E. Lake Mary Blvd
Sanford, Florida USA
32773
All rights reserved. Trademarks are identified
by the symbols ™ and ®. All trademarks are
owned by or licensed to Invacare Corporation
or its subsidiaries unless otherwise noted.
©2009 Invacare Corporation
Part No 1143214 Rev E - 3/09
 Loading...