

Page 1
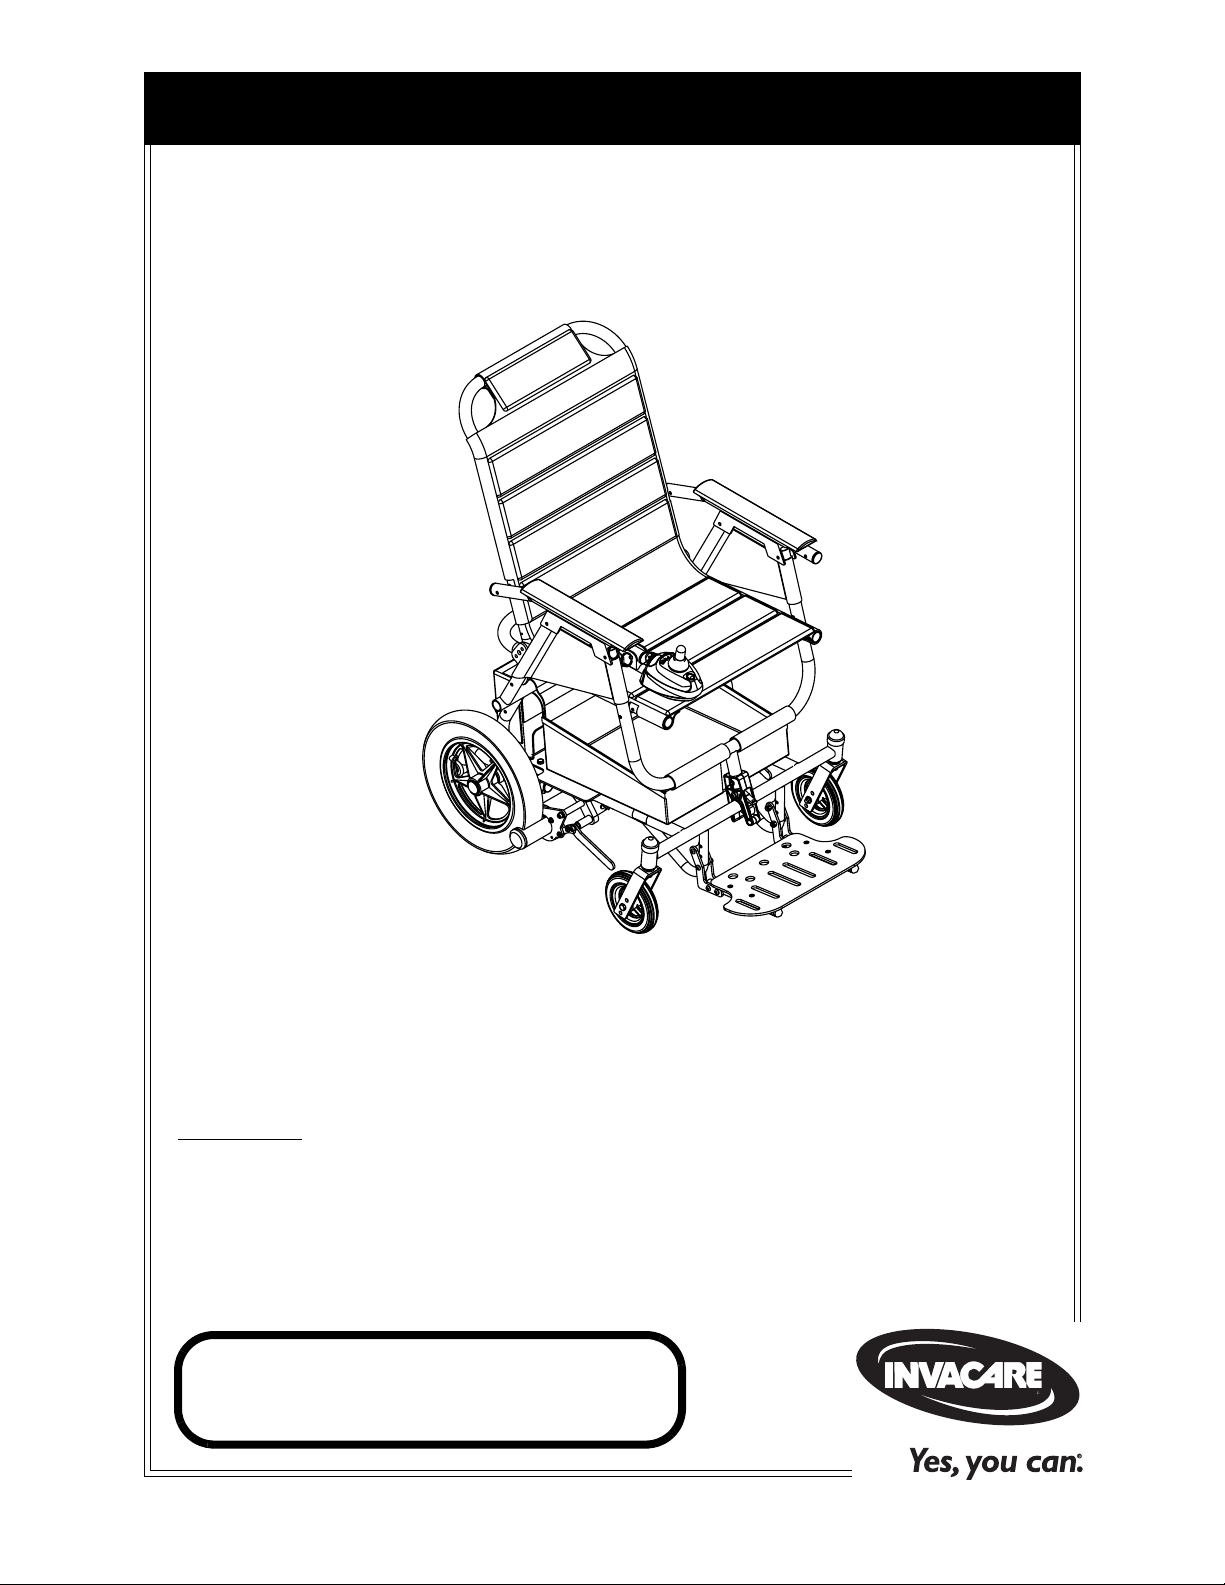
Service Manual
At’m and At’m QT
DEALER: Keep this manual. The
procedures in this manual MUST be
performed by a qualified technician.
For more information regarding
Invacare products, parts, and services,
please visit www.invacare.com
Page 2

REFERENCE DOCUMENTS
WARNING
A QUALIFIED TECHNICIAN MUST PERFORM THE INITIAL SET UP
OF THIS WHEELCHAIR. ALSO, A QUALIFIED TECHNICIAN MUST
PERFORM ALL PROCEDURES IN THE SERVICE MANUAL.
DEALERS AND QUALIFIED TECHNICIANS: DO NOT SERVICE OR
OPERATE THIS EQUIPMENT WITHOUT FIRST READING AND
UNDERSTANDING (1) THE OWNER’S OPERATOR AND
MAINTENANCE MANUAL, (2) THE SERVICE MANUAL (IF
APPLICABLE) AND (3) THE SEATING SYSTEM’S MANUAL (IF
APPLICABLE). IF YOU ARE UNABLE TO UNDERSTAND THE
WARNINGS, CAUTIONS AND INSTRUCTIONS, CONTACT
INVACARE TECHNICAL SUPPORT BEFORE ATTEMPTING TO
SERVICE OR OPERATE THIS EQUIPMENT - OTHERWISE, INJURY
OR DAMAGE MAY RESULT.
REFERENCE DOCUMENTS
Refer to the table below for part numbers of additional documents which are referenced
in this manual.
WHEELCHAIR TYPE OWNER’S MANUAL ELECTRONICS MANUAL
At’m and At’m QT 1125035 1110532
NOTE: Updated versions of this manual are available on www.invacare.com
At’m and At’m QT 2 Part No. 1125078
Page 3

TABLE OF CONTENTS
TABLE OF CONTENTS
REFERENCE DOCUMENTS ................................................................. 2
SPECIAL NOTES ................................................................................ 6
LABEL LOCATION ............................................................................ 7
At’m ...............................................................................................................................................................7
At’m QT .......................................................................................................................................................8
TYPICAL PRODUCT PARAMETERS .................................................... 9
SECTION 1—GENERAL GUIDELINES ................................................. 10
Repair or Service Information ...............................................................................................................10
Tire Pressure .............................................................................................................................................10
Operation Information............................................................................................................................11
Oxygen........................................................................................................................................................11
Batteries......................................................................................................................................................11
Grounding Instructions ...........................................................................................................................13
Rain Test.....................................................................................................................................................13
Weight Training ........................................................................................................................................13
Weight Limitation.....................................................................................................................................13
SECTION 2—EMI INFORMATION ..................................................... 14
SECTION 3—SAFETY INSPECTION/TROUBLESHOOTING .................... 16
Checklist .....................................................................................................................................................16
Troubleshooting........................................................................................................................................17
Checking Battery Charge Level.............................................................................................................27
Field Load Test..........................................................................................................................................27
Electro-Mechanical Parking Brake Test ...............................................................................................29
SECTION 4—FOOTBOARD ASSEMBLY .............................................. 30
Removing/Installing the Footboard Assembly....................................................................................30
Adjusting Footboard Assembly Height................................................................................................30
SECTION 5—SEAT ........................................................................... 31
Removing/Installing the Seat...................................................................................................................31
Replacing Seat Positioning Strap ...........................................................................................................33
Removing/Installing Under-Seat Basket ...............................................................................................34
Removing/Installing Seat Upholstery....................................................................................................34
Replacing the Seat Latches .....................................................................................................................36
Part No. 1125078 3 At’m and At’m QT
Page 4

TABLE OF CONTENTS
TABLE OF CONTENTS
SECTION 6—ARMS ......................................................................... 37
Removing/Installing Arm Pads................................................................................................................37
Replacing Clothing Guard.......................................................................................................................38
Removing/Installing Arm Tube ..............................................................................................................39
SECTION 7—JOYSTICK .................................................................... 40
Disconnecting/Connecting the Joystick...............................................................................................40
Removing/Installing the Joystick ............................................................................................................41
Repositioning the Joystick to Opposite Arm .....................................................................................43
SECTION 8—BATTERIES .................................................................. 44
Warnings For Handling and Replacing Batteries...............................................................................44
Recommended Battery Type .................................................................................................................44
Removing/Installing the Battery Pack on the At’m ...........................................................................45
Removing/Installing the Battery Box on the At’m QT.....................................................................46
Removing/Installing the Batteries From/Into the At’m Battery Pack............................................47
Removing/Installing the Batteries From/Into the At’m QT Battery Box.....................................49
Removing/Installing the At’tm QT Battery Box Assembly..............................................................50
Charging Batteries ....................................................................................................................................52
Resetting the Circuit Breaker................................................................................................................54
SECTION 9—MOTORS ..................................................................... 56
Engaging/Disengaging the Motors .........................................................................................................56
Removing/Installing Motor Shroud .......................................................................................................57
Removing/Installing the Base Plate........................................................................................................58
Removing/Installing MK5 Controller....................................................................................................59
Removing/Installing the Motors.............................................................................................................60
Replacing the Knurled Cylinder ............................................................................................................61
SECTION 10—FRONT RIGGINGS ...................................................... 64
Installing/Removing the Front Rigging Support Brackets.................................................................64
Installing/Removing the Front Rigging Assembly ...............................................................................65
Adjusting Footrest Height ......................................................................................................................66
SECTION 11—WHEELS AND CASTERS .............................................. 67
Replacing Front Casters..........................................................................................................................67
Replacing Forks .........................................................................................................................................68
Adjusting Forks .........................................................................................................................................68
Removing/Installing the Drive Wheels ................................................................................................69
Replacing Drive Wheels on the Drive Axle.......................................................................................70
At’m and At’m QT 4 Part No. 1125078
Page 5

TABLE OF CONTENTS
TABLE OF CONTENTS
SECTION 12—ANTI-TIPPERS ........................................................... 71
Removing/Installing the Anti-Tippers...................................................................................................71
SECTION 13—TRANSPORTING THE WHEELCHAIR ........................... 74
LIMITED WARRANTY ..................................................................... 76
Part No. 1125078 5 At’m and At’m QT
Page 6

SPECIAL NOTES
SPECIAL NOTES
Signal words are used in this manual and apply to hazards or unsafe practices which
could result in personal injury or property damage. Refer to the table below for
definitions of the signal words.
SIGNAL WORD MEANING
DANGER
WARNING
CAUTION
Danger indicates an imminently hazardous situation which,
if not avoided, will result in death or serious injury.
Warning indicates a potentially hazardous situation which, if
not avoided, could result in death or serious injury.
Caution indicates a potentially hazardous situation which, if
not avoided, may result in property damage.
NOTICE
THE INFORMATION CONTAINED IN THIS DOCUMENT IS SUBJECT TO
CHANGE WITHOUT NOTICE.
WHEELCHAIR USER
As a manufacturer of wheelchairs, Invacare endeavors to supply a wide variety of
wheelchairs to meet many needs of the end user. However, final selection of the
type of wheelchair to be used by an individual rests solely with the user and his/her
healthcare professional capable of making such a selection.
WHEELCHAIR TIE-DOWN RESTRAINTS AND SEAT RESTRAINTS
Wheelchair users should not be transported in vehicles of any kind while in
wheelchairs. As of this date, the Department of Transportation has not approved
any tie-down systems for transportation of a user while in a wheelchair, in a moving
vehicle of any type.
It is Invacare’s position that users of wheelchairs should be transferred into
appropriate seating in vehicles for transportation and use be made of the restraints
made available by the auto industry. Invacare cannot and does not recommend any
wheelchair transportation systems.
WARNINGS
Wheelchairs should be examined during maintenance for signs of corrosion (water
exposure, incontinence, etc). Electrical components damaged by corrosion should
be replaced IMMEDIATELY.
Wheelchairs that are used by incontinent users and/or are frequently exposed to
water may require replacement of electrical components more frequently.
Invacare products are specifically designed and manufactured for use in conjunction
with Invacare accessories. Accessories designed by other manufacturers have not
been tested by Invacare and are not recommended for use with Invacare products.
The seat positioning strap is a positioning belt only. It is not designed for use as a
safety device withstanding high stress loads such as auto or aircraft safety belts. If
signs of wear appear, belt MUST be replaced IMMEDIATELY.
At’m and At’m QT 6 Part No. 1125078
Page 7
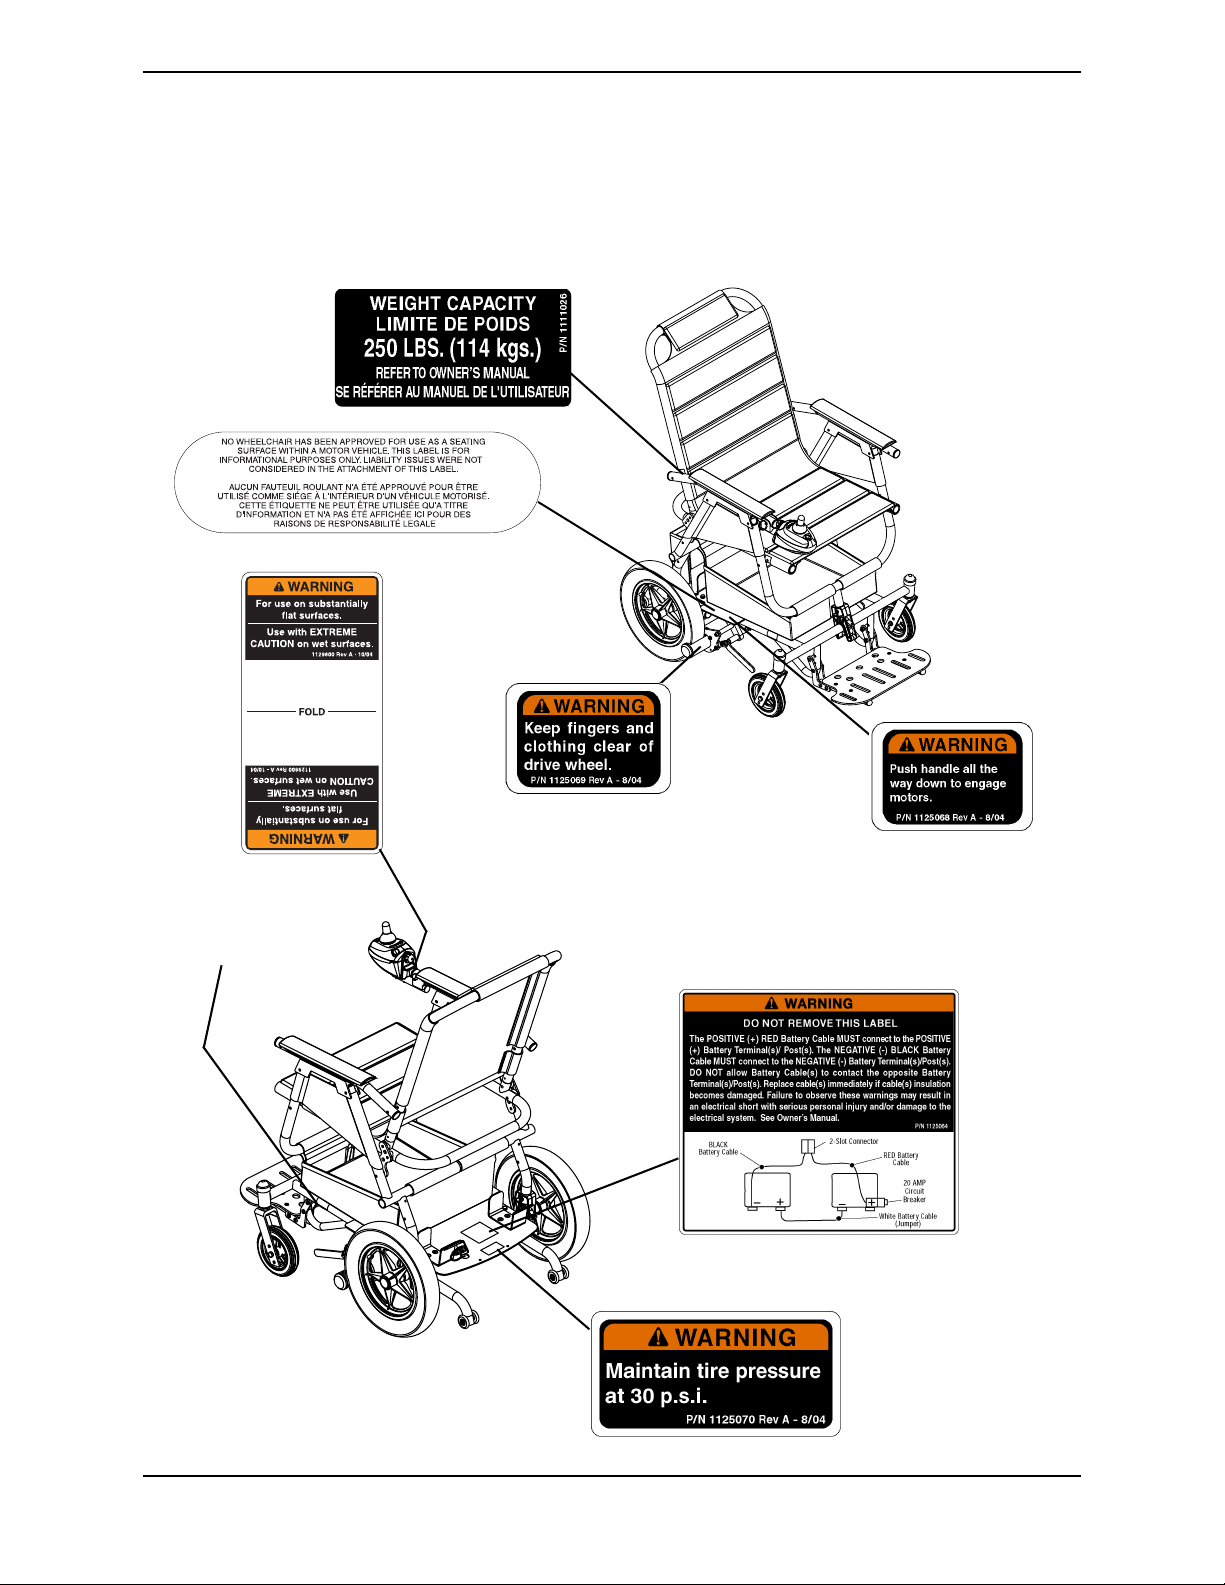
At’m
LABEL LOCATION
LABEL LOCATION
Serial Number Label is
located on inside of
the base frame tube.
NOTE: Warning label
1125069 is also located
on the opposite side.
NOTE: Warning
label 1125068 is also
located on the
opposite side.
Part No. 1125078 7 At’m and At’m QT
Page 8
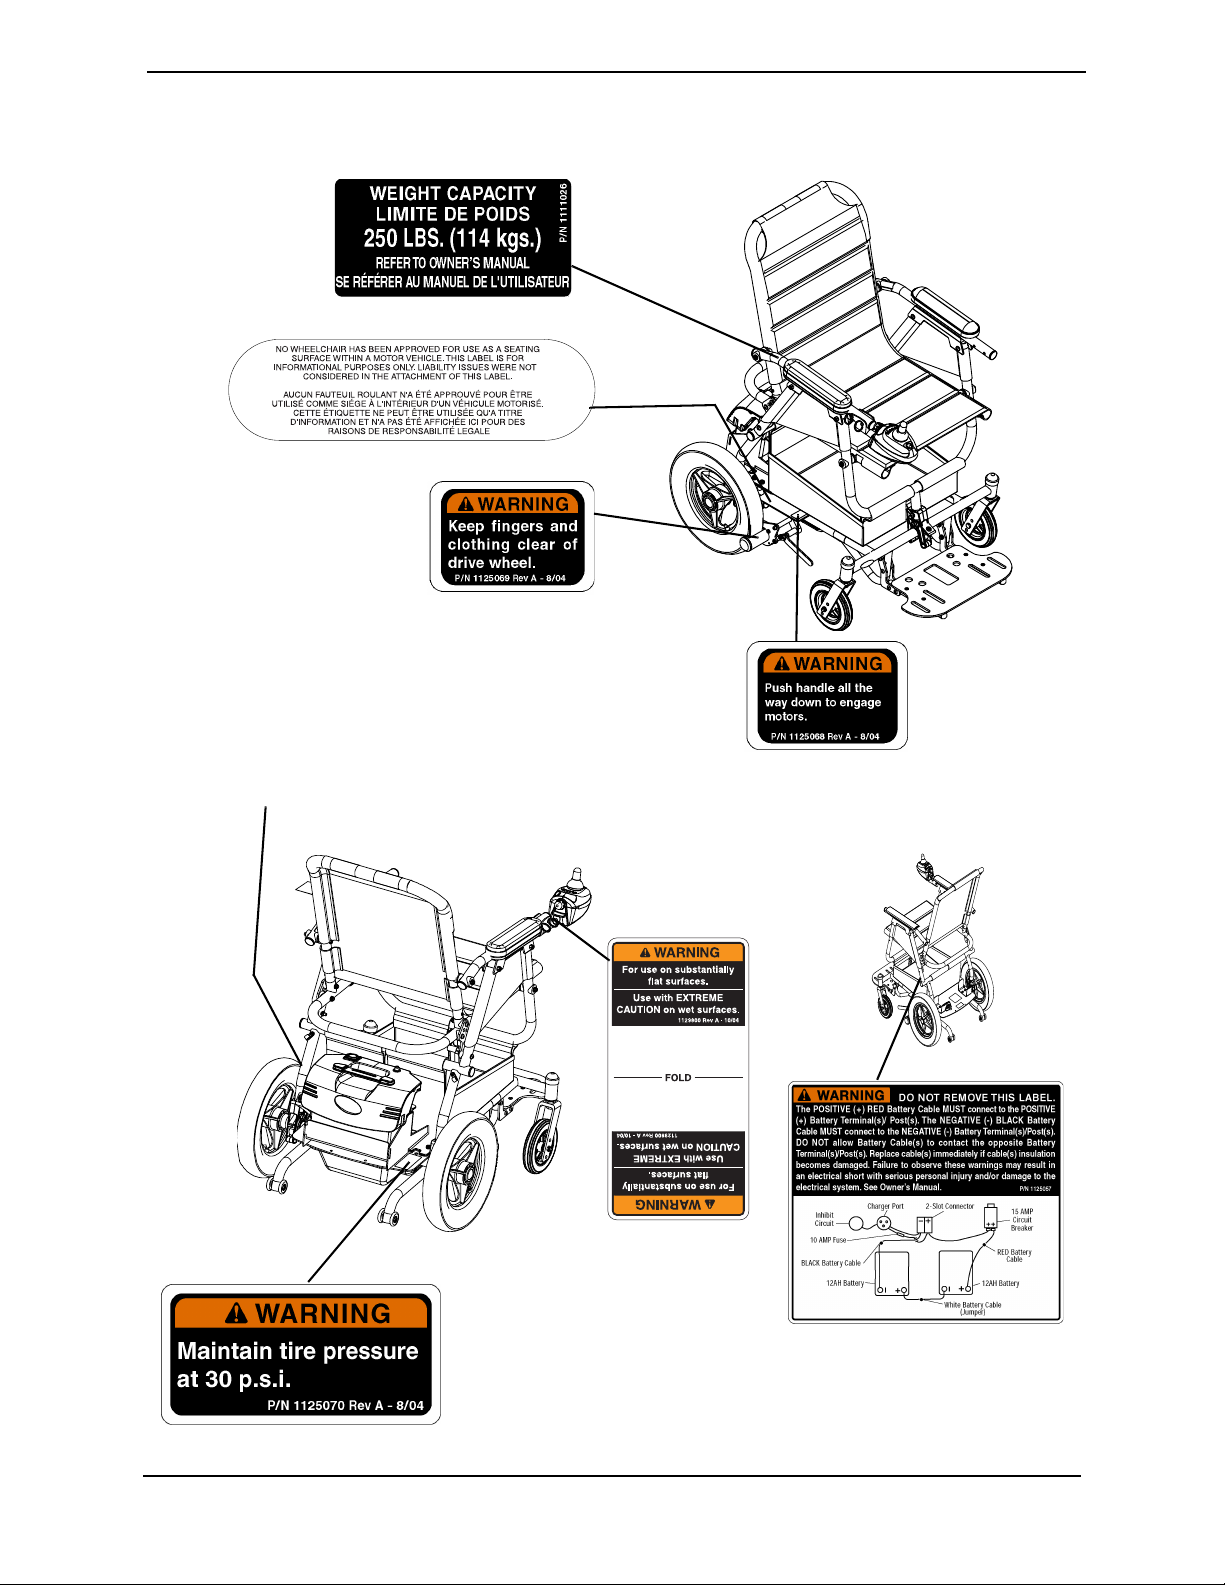
LABEL LOCATION
At’m QT
NOTE: Warning label 1125069 is
also located on the opposite side.
Serial Number Label is
located on inside of the
base frame tube.
NOTE: Warning label 1125068 is
also located on the opposite side.
At’m and At’m QT 8 Part No. 1125078
Page 9

TYPICAL PRODUCT PARAMETERS
TYPICAL PRODUCT PARAMETERS
PARAMETERS At’m At’m QT
SEAT WIDTH: 16, 18 inches 18 inches
SEAT DEPTH: 14, 16 inches 16 inches
BACK HEIGHT: 18, 21 inches 21 inches
SEAT-TO-FLOOR: 20 inches
OVERALL WIDTH (EXCLUDING JOYSTICK): 25.5 inches
OVERALL HEIGHT
FOR 16 INCHES WIDE:
FOR 18 INCHES WIDE:
OVERALL LENGTH (INCLUDING ANTI-TIPPERS): 35.5 inches
WEIGHT
BASE WITHOUT BATTERY PACK/BOX:
SEAT:
BATTERY PACK/BOX:
SHIPPING: 90 lbs
38 inches
41 inches
34 lbs
14 lbs
26 lbs
N/A
41 inches
38 lbs
14 lbs
21 lbs
DRIVE WHEELS/TIRES: 12½ x 2¼ inches
CASTER WITH PRECISION SEALED BEARINGS: 6-inch solid
UPHOLSTERY: Black Nylon
BATTERY SIZE (TWO REQUIRED): M17 - 12 SLSM gel cell PE 12V 12SLA
PERFORMANCE
SPEED (M.P.H.):
MAXIMUM RAMP/SLOPE CAPABILITY:
*RANGE (VARIABLE):
WEIGHT LIMITATION:
3¾
6°
Up to 12 miles
250 lbs
3¾
6°
Up to 6 miles
250 lbs
*NOTE: Values for range are calculated for maximum chair weight rating using largest batteries
applicable (M17 - 12 SLSM gel cell/PE 12V 12SLA), per test procedures described in
ANSI/RESNA WC/VOL2-1998 Section 4 and meet federal reimbursement requirements for this
product. While considered typical, they are derived based on certain ideal conditions. Variances in
battery condition, user weight, usage pattern or overall terrain conditions will result in actual
values for range that differ from these stated values. Users should become accustomed to how their
unique conditions impact their individual results. Users should become familiar with the battery
discharge indicator on the joystick to determine the range of their wheelchair. Refer to Charging
Batteries on page 52 for more information about the battery discharge indicator.
Part No. 1125078 9 At’m and At’m QT
Page 10

SECTION 1—GENERAL GUIDELINES
SECTION 1—GENERAL GUIDELINES
WARNING
SECTION 1 - GENERAL GUIDELINES contains important information for the safe
operation and use of this product. DO NOT use this product or any available
optional equipment without first completely reading and understanding these
instructions and any additional instructional material such as Owner’s Manuals,
Service Manuals or Instruction Sheets supplied with this product or optional
equipment. If you are unable to understand the Warnings, Cautions or Instructions,
contact a healthcare professional, dealer or technical personnel before attempting
to use this equipment - otherwise, injury or damage may occur.
Repair or Service Information
Set-up of the Electronics Control Unit is to be performed only by a qualified technician.
The final adjustments of the controller may affect other activities of the wheelchair.
Damage to the equipment could occur if improperly set-up or adjusted.
After any adjustments, repair or service and before use, make sure that all attaching
hardware is tightened securely - otherwise injury or damage may result.
Before performing any maintenance, adjustment or service verify that the On/Off switch
on the joystick is in the Off position.
Wheelchairs should be examined during maintenance for signs of corrosion (water
exposure, incontinence, etc). Electrical components damaged by corrosion should be
replaced IMMEDIATELY.
Wheelchairs that are used by incontinent users and/or are frequently exposed to water
may require replacement of electrical components more frequently.
Tire Pressure
DO NOT USE YOUR WHEELCHAIR UNLESS IT HAS THE PROPER TIRE
PRESSURE (P.S.I.) - OTHERWISE THE WHEELCHAIR MAY NOT DRIVE
CORRECTLY, STOP CORRECTLY OR MAY EXPERIENCE ERRATIC
PERFORMANCE.
Maintain tire pressure at 30 p.s.i. Otherwise, the wheelchair may not drive correctly, stop
correctly or may experience erratic performance.
DO NOT overinflate the tires. Failure to follow these suggestions may cause the tire to
explode and cause bodily harm. The recommended tire pressure is listed on the side wall
of the tire.
At’m and At’m QT 10 Part No. 1125078
Page 11

SECTION 1—GENERAL GUIDELINES
Operation Information
Invacare products are specifically designed and manufactured for use in conjunction with
Invacare accessories. Accessories designed by other manufacturers have not been tested
by Invacare and are not recommended for use with Invacare products.
Performance adjustments should only be made by professionals of the healthcare field or
persons fully conversant with this process and the driver's capabilities. Incorrect settings
could cause injury to the driver, bystanders, damage to the chair and to surrounding
property.
After the wheelchair has been set-up, check to make sure that the wheelchair performs to
the specifications entered during the set-up procedure. If the wheelchair does not
perform to specifications, turn the wheelchair off IMMEDIATELY and reenter set-up
specifications. Repeat this procedure until the wheelchair performs to specifications.
The basket under the seat is designed for light items such as jackets and umbrellas. DO
NOT overload the basket.
Ensure that the items stored in the basket are fully contained within the basket - otherwise
they could become entangled with the friction drive and may cause injury to the user or
damage the wheelchair.
Before performing any maintenance, adjustment or service verify that on/off switch on
the joystick is in the Off position.
Avoid storing or using the wheelchair near open flame or combustible products. Serious
injury or damage to property may result.
For use on substantially flat surfaces.
Use EXTREME CAUTION on wet surfaces.
Oxygen
Extreme care should be exercised when using oxygen in close proximity to electric circuits
and other combustible materials. Contact your oxygen supplier for instruction in the use
of oxygen.
Batteries
The warranty and performance specifications contained in this manual are based on the
use of deep cycle gel cell batteries. Invacare strongly recommends their use as the power
source for this unit.
Carefully read battery/battery charger information prior to installing, servicing or
operating your wheelchair.
ALWAYS transport the battery pack/box in an upright and secure manner. To prevent
damage, DO NOT transport the battery pack/box with other objects that could suddenly
shift during transportation, unless they are secured or in a different vehicle area. DO NOT
transport battery pack/box with gas cans or similar containers in the same vehicle area.
Part No. 1125078 11 At’m and At’m QT
Page 12

SECTION 1—GENERAL GUIDELINES
The use of rubber gloves is recommended when working with batteries.
Some battery manufacturers mold a carrying strap and/or hold down flanges directly into
the battery case. Batteries that interfere with the battery box cannot be used for these
applications. Attempting to “wedge” a battery into a battery box may damage the box,
the battery and/or be a fire hazard, resulting in serious injury or further damage to
property.
Charging Batteries
DANGER
When using an extension cord, use only a three wire extension cord having at least
16 AWG (American Wire Gauge) wire and the same or higher electrical rating as
the device being connected. Use of improper extension cord could result in a risk of
fire and electric shock.
Three prong to two prong adapters should not be used. Use of three prong adapters
can result in improper grounding and present a shock hazard to the user.
NEVER attempt to recharge the batteries by attaching cables directly to the battery
terminals.
DO NOT attempt to recharge the batteries and operate the wheelchair at the same time.
DO NOT operate wheelchair with extension cord attached to the AC cable.
DO NOT attempt to recharge the batteries when the wheelchair has been exposed to any
type of moisture.
DO NOT attempt to recharge the batteries when the wheelchair is outside.
DO NOT sit in the wheelchair while charging the batteries.
Read and carefully follow the manufacturer’s instructions for each charger (supplied or
purchased). If charging instructions are not supplied, consult a qualified technician for
proper procedures.
Ensure the pins of the extension cord plug are the same number, size, and shape as those
on the charger.
DO NOT under any circumstances cut or remove the round grounding plug from the
charger AC cable plug or the extension cord plug.
At’m and At’m QT 12 Part No. 1125078
Page 13

SECTION 1—GENERAL GUIDELINES
Grounding Instructions
DO NOT, under any circumstances, cut or remove the round grounding prong from any
plug used with or for Invacare products. Some devices are equipped with three-prong
(grounding) plugs for protection against possible shock hazards and fire. Where a
two-prong wall receptacle is encountered, it is the personal responsibility and obligation
of the customer to contact a qualified electrician and have the two-prong receptacle
replaced with a properly grounded three-prong wall receptacle in accordance with the
National Electrical Code. If you must use an extension cord, use only a three-wire
extension cord having the same or higher electrical rating as the device being connected.
In addition, Invacare has placed RED/ORANGE warning tags on some equipment. DO
NOT remove these tags.
Rain Test
Invacare has tested its power wheelchairs in accordance with ISO 7176 “Rain Test.” This
provides the end user or his/her assistant sufficient time to remove his/her power
wheelchair from a rain storm and retain wheelchair operation.
DO NOT leave power wheelchair in a rain storm of any kind.
DO NOT store power wheelchair in a damp area for an extended period of time.
Direct exposure to excessive rain or dampness may cause the chair to malfunction electrically
and mechanically, may cause the chair to prematurely rust or may damage the upholstery.
Check to ensure that the battery pack/box is securely fastened, that all electrical
connections are secure at all times and joystick boot is not torn or cracked where water
can enter.
If the joystick boot becomes torn or cracked, replace IMMEDIATELY.
Weight Training
Invacare does not recommend the use of its wheelchairs as a weight training apparatus.
Invacare wheelchairs have not been designed or tested as a seat for any kind of weight
training. If occupant uses said wheelchair as a weight training apparatus, Invacare shall
not be liable for bodily injury and the warranty is void.
Weight Limitation
The At’m wheelchairs have a weight limitation of 250 lbs.
Part No. 1125078 13 At’m and At’m QT
Page 14

SECTION 2—EMI INFORMATION
SECTION 2—EMI INFORMATION
WARNING
CAUTION: IT IS VERY IMPORTANT THAT YOU READ THIS INFORMATION
REGARDING THE POSSIBLE EFFECTS OF ELECTROMAGNETIC
INTERFERENCE ON YOUR POWERED WHEELCHAIR.
Electromagnetic Interference (EMI) From Radio Wave Sources
Powered wheelchairs and motorized scooters (in this text, both will be referred to
as powered wheelchairs) may be susceptible to electromagnetic interference (EMI),
which is interfering electromagnetic energy (EM) emitted from sources such as
radio stations, TV stations, amateur radio (HAM) transmitters, two way radios, and
cellular phones. The interference (from radio wave sources) can cause the powered
wheelchair to release its brakes, move by itself, or move in unintended directions. It
can also permanently damage the powered wheelchair's control system. The
intensity of the interfering EM energy can be measured in volts per meter (V/m).
Each powered wheelchair can resist EMI up to a certain intensity. This is called its
"immunity level." The higher the immunity level, the greater the protection. At this
time, current technology is capable of achieving at least a 20 V/m immunity level,
which would provide useful protection from the more common sources of radiated
EMI.
There are a number of sources of relatively intense electromagnetic fields in the
everyday environment. Some of these sources are obvious and easy to avoid.
Others are not apparent and exposure is unavoidable. However, we believe that by
following the warnings listed below, your risk to EMI will be minimized.
The sources of radiated EMI can be broadly classified into three types:
1) Hand-held Portable transceivers (transmitters-receivers with the antenna
mounted directly on the transmitting unit. Examples include: citizens band (CB)
radios, "walkie talkie", security, fire and police transceivers, cellular telephones,
and other personal communication devices).
NOTE: Some cellular telephones and similar devices transmit signals while they are ON,
even when not being used.
2) Medium-range mobile transceivers, such as those used in police cars, fire trucks,
ambulances and taxis. These usually have the antenna mounted on the outside of
the vehicle; and
3) Long-range transmitters and transceivers, such as commercial broadcast
transmitters (radio and TV broadcast antenna towers) and amateur (HAM)
radios.
NOTE: Other types of hand-held devices, such as cordless phones, laptop computers,
AM/FM radios, TV sets, CD players, cassette players, and small appliances, such as electric shavers and hair dryers, so far as we know, are not likely to cause EMI problems to
your powered wheelchair.
At’m and At’m QT 14 Part No. 1125078
Page 15

SECTION 2—EMI INFORMATION
WARNING
Powered Wheelchair Electromagnetic Interference (EMI)
Because EM energy rapidly becomes more intense as one moves closer to the
transmitting antenna (source), the EM fields from hand-held radio wave sources
(transceivers) are of special concern. It is possible to unintentionally bring high
levels of EM energy very close to the powered wheelchair's control system while
using these devices. This can affect powered wheelchair movement and braking.
Therefore, the warnings listed below are recommended to prevent possible
interference with the control system of the powered wheelchair.
Electromagnetic interference (EMI) from sources such as radio and TV stations,
amateur radio (HAM) transmitters, two-way radios, and cellular phones can affect
powered wheelchairs and motorized scooters.
FOLLOWING THE WARNINGS LISTED BELOW SHOULD REDUCE THE
CHANCE OF UNINTENDED BRAKE RELEASE OR POWERED WHEELCHAIR
MOVEMENT WHICH COULD RESULT IN SERIOUS INJURY.
1) DO NOT operate hand-held transceivers (transmitters receivers), such as
citizens band (CB) radios, or turn ON personal communication devices, such as
cellular phones, while the powered wheelchair is turned ON;
2) Be aware of nearby transmitters, such as radio or TV stations, and try to avoid
coming close to them;
3) If unintended movement or brake release occurs, turn the powered wheelchair
Off as soon as it is safe;
4) Be aware that adding accessories or components, or modifying the powered
wheelchair, may make it more susceptible to EMI (NOTE: There is no easy way
to evaluate their effect on the overall immunity of the powered wheelchair); and
5) Report all incidents of unintended movement or brake release to the powered
wheelchair manufacturer, and note whether there is a source of EMI nearby.
Important Information
1) 20 volts per meter (V/m) is a generally achievable and useful immunity level
against EMI (as of May 1994) (the higher the level, the greater the protection);
2) This device has been tested to a radiated immunity level of 20 volts per meter.
3) The immunity level of the product is unknown.
Modification of any kind to the electronics of this wheelchair as manufactured by
Invacare may adversely affect the EMI immunity levels.
Part No. 1125078 15 At’m and At’m QT
Page 16

SECTION 3—SAFETY INSPECTION/TROUBLESHOOTING
SECTION 3—SAFETY
INSPECTION/TROUBLESHOOTING
Checklist
These adjustments should be made whenever you service this product, especially as a
part of the initial set up. Follow these maintenance procedures:
WARNING
Before performing any maintenance, adjustment or service, turn power off.
CAUTION
As with any vehicle, the wheels and tires should be checked periodically for cracks
and wear, and should be replaced.
❑ Check pneumatic tires for proper inflation.
❑ Ensure that the wheelchair rolls straight (no excessive drag or pull to one side).
❑ Ensure all clothing guard fasteners are secure.
❑ Clean seat upholstery and armrests.
❑ Ensure armrest pads sit flush against arm tubes.
❑ Ensure seat is secured to wheelchair frame.
❑ Ensure seat release latches are functional. Replace if necessary.
❑ Inspect seat upholstery for rips or sagging.
❑ Ensure no excessive side movement or binding occurs when drive wheels are lifted
and spun when disengaged (freewheeling).
❑ Ensure caster assembly has proper tension when caster is spun. Caster should come
to a gradual stop.
❑ Loosen/tighten caster locknut if wheel wobbles noticeably or binds to a stop.
❑ Ensure all caster/wheel/fork/headtube fasteners are secure.
❑ Ensure that casters are free of debris.
❑ Inspect tires for flat spots and wear.
❑ Inspect for any loose hardware on the wheelchair.
❑ Inspect the seat positioning strap for signs of wear. Ensure buckle latches. Verify
hardware that attaches strap to frame is secure and undamaged. Replace if necessary.
❑ Inspect charger AC power cord for damage. Replace if necessary.
❑ Check that all labels are present and legible. Replace if necessary.
❑ Inspect electrical components for signs of corrosion. Replace if corroded or damaged.
At’m and At’m QT 16 Part No. 1125078
Page 17

SECTION 3—SAFETY INSPECTION/TROUBLESHOOTING
Troubleshooting
NOTE: For additional troubleshooting information and explanation of error codes, refer to the
individual electronics manual supplied with each wheelchair.
Wheels
SOLUTIONS
FLUTTER
LEFT/RIGHT
WHEELCHAIR VEERS
X X X X X If pneumatic, check tires for correct and equal pressure.
X X X X Check for loose stem nuts/bolts.
X X Check that casters contact ground at the same time.
SLUGGISH TURN/
CASTERS
PERFORMANCE
RATTLES
SQUEAKS AND
LOOSENESS
IN WHEELCHAIR
WHEELS
WHEELCHAIR 3
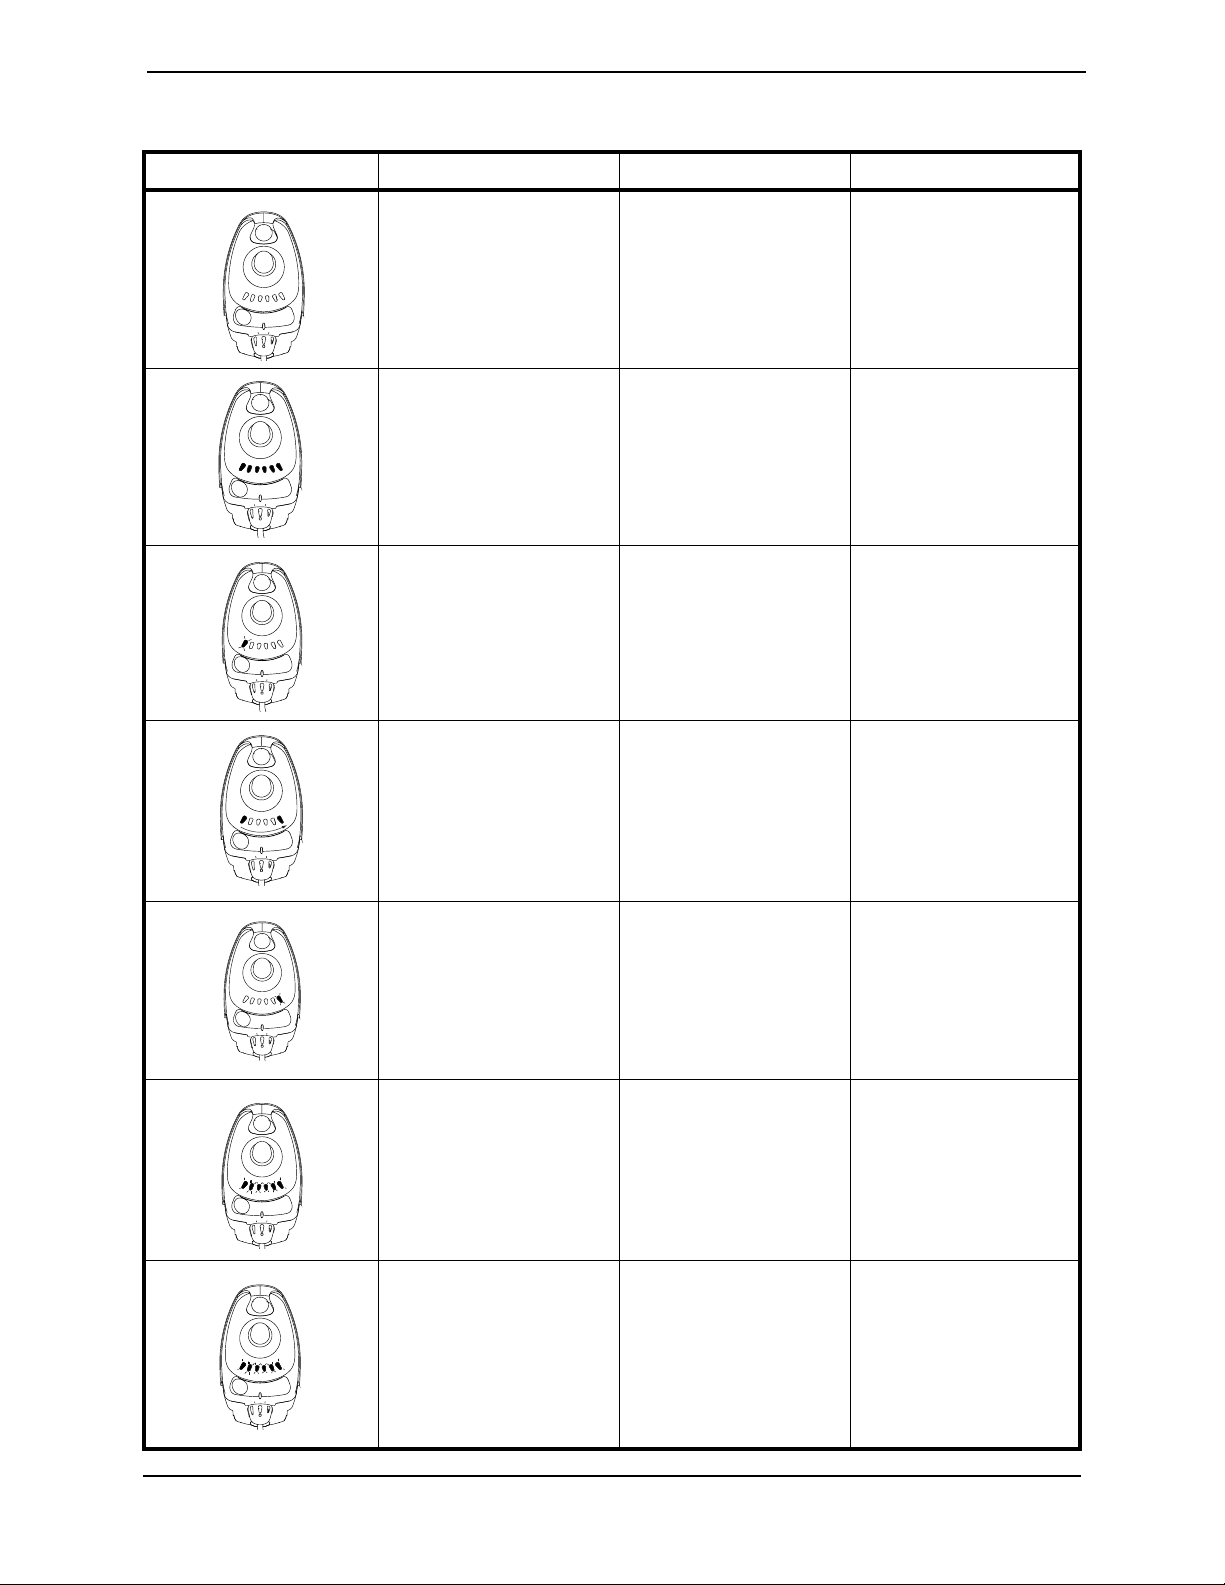
Information Gauge and Diagnostics Codes
The joystick information gauge and the Remote Programmer give indications of the type
of fault or error detected by the control module. When a fault is detected, the wheelchair
will stop and not drive. All of the lights on the information gauge will begin to flash. The
number of flashes indicates the nature of an abnormal condition. An error code and a
quick description of the fault will begin to scroll across the Remote Programmer display.
If multiple faults are found, only the first fault encountered by the control module
program will be displayed. A table of the diagnostics codes and their causes follows.
*NOTE: The fault log displays a four digit number. The first two digits are the diagnostic code and
the remaining two digits are the sub code.
Part No. 1125078 17 At’m and At’m QT
Page 18
SECTION 3—SAFETY INSPECTION/TROUBLESHOOTING
Information Gauge
DISPLAY DESCRIPTION DEFINITION COMMENTS
All LEDs are off. Power is Off.
All LEDs are on. Power is On. Fewer than three LEDs on
Left RED LED is flashing. Battery charge is low. The batteries should be
implies reduced battery
charge.
charged as soon as possible.
Left to Right “chase” alternating with steady display.
Right GREEN LED is flashing.
All LEDs are flashing slowly. Joystick has detected
All LEDs are flashing
quickly.
Joystick is in programming, inhibit and/or charging mode.
Joystick is in Speed Limit
mode.
Out-of-Neutral-at-Power-Up mode.
Joystick has detected a
fault.
The steady LEDs indicate
the current state of the
battery charge.
The current state of battery charge will be displayed at the same time.
Release the joystick back
to Neutral.
Joystick uses Flash codes
to indicate faults. Refer to
the electronics manual
(Part Number 1110532).
At’m and At’m QT 18 Part No. 1125078
Page 19

SECTION 3—SAFETY INSPECTION/TROUBLESHOOTING
Diagnostic Codes
POSSIBLE
ERROR CODE
DESCRIPTION
DIAGNOSTICS CODE
NUMBER OF FLASHES
1 E 01 User Fault 00 Stall Timeout or user error. Release joystick to neutral and try again.
2 E02 Battery Fault 00 Recharge batteries or replace. Check the batteries and cable. Try charg-
3 E03 Left Motor Fault 00 Left Motor Short Circuit Check the left motor, connections and
SUB CODE*
01 Left Motor Open Circuit
02 Left Motor Connection Fault
03 Motor Terminal Connected
04 Left Motor Voltage Fault
DETAILS OF
B-
to B+
ERROR CODE
ing the batteries. Batteries may require
motor cable.
SOLUTION
replacing.
05 Left Motor Bridge Fault
06 Too Many Hardware Current
Limit Events
07 Current Offset Out of Range
08 Hardware Current Limit Fault
4 E04 Right Motor Fault 00 Right Motor Short Circuit Check the right motor, connections and
01 Right Motor Open Circuit
02 Right Motor Connection Fault
B-
03 Motor Terminal Connected
to B+
04 Right Motor Voltage Fault
05 Right Motor Bridge Fault
06 Too Many Hardware Cur-
rent Limit Events
07 Current Offset Out of Range
08 Hardware Current Limit Fault
motor cable.
Part No. 1125078 19 At’m and At’m QT
Page 20

SECTION 3—SAFETY INSPECTION/TROUBLESHOOTING
ERROR CODE
DESCRIPTION
DIAGNOSTICS CODE
NUMBER OF FLASHES
5 E05 Left Park Brake
Fault
6 E06 Right Park Brake
Fault
SUB CODE*
00 Left Park Brake Drive-Time
01 Left Park Brake Output
Enabled When Wheelchair
02 Left Park Brake Output Did
not Enable When Entering
03 Left Park Brake fault during
power-up testing
04 Left park brake feedback low
during drive (park brake
00 Right Park Brake Drive-Time
DETAILS OF
ERROR CODE
Test Failed
Idle
Drive Mode
short)
Test Failed
POSSIBLE
SOLUTION
Check the left park brake connections and
cable.
Check the right park brake connections
and cable.
01 Right Park Brake Output
Enabled When Wheelchair
Idle
02 Right Park Brake Output Did
not Enable When Entering
Drive Mode
03 Right Park Brake fault during
power-up testing
04 Right park brake feedback
low during drive (park brake
short)
7 E07 Remote Fault 00 Local SR Fault (CPU,
EEPROM, etc.)
01 Joystick fault at the remote
02 Speed pot fault at the remote
Check the communications bus, connec-
tions and wiring. Replace the remote.
At’m and At’m QT 20 Part No. 1125078
Page 21

SECTION 3—SAFETY INSPECTION/TROUBLESHOOTING
POSSIBLE
ERROR CODE
DESCRIPTION
DIAGNOSTICS CODE
NUMBER OF FLASHES
8 E08 Controller Fault 00 Controller fault Check connections and wiring. Replace
SUB CODE*
01 RAM fault
02 ROM fault
03 CPU fault
04 EEPROM fault
05 Watchdog fault
06 Stack fault
07 Software fault
08 Power-up testing fault
DETAILS OF
ERROR CODE
power module.
SOLUTION
09 Relay fault or precharge fault
10 Bridge fault or disable all fault
11 Electronics fault: Thermistor
12 Calibration setting fault
9 E09 Communications
Fault
10 E10 General Fault 00 General fault Check all connections and wiring. Contact
11 E11 Incompati-
ble/incorrect
Remote
00 Remote connection lost Check connections and wiring. Replace
01 Low communication mode
00 Incompatible/incorrect
Remote
Invacare Technical Service.
Wrong type of remote connected. Ensure
the branding of the joystick matches that
Bus cable.
of controller unit.
Part No. 1125078 21 At’m and At’m QT
Page 22

SECTION 3—SAFETY INSPECTION/TROUBLESHOOTING
Motor/Gearbox/Brake
SYMPTOM PROBABLE CAUSE SOLUTIONS
Erratic performance of wheelchair (driving uphill,
increase in braking
distance).
Wheelchair will not
drive.
Motors stall and
start up again.
Motor “chatters”
or runs irregularly.
Low tire pressure. Inflate tires to the proper tire pressure.
Low tire pressure.
Motor engagement handles are disengaged.
Batteries require charging.
Charger plugged in.
Circuit breaker tripped.
Current rollback. Stop driving and let electronics cool.
Electrical malfunction. Contact Invacare.
Inflate tires to the proper tire pressure.
Engage motor engagement handles.
Charge batteries. Make sure the setting on the
charger is correct.
Unplug charger from wall outlet before operating
the wheelchair.
Press the reset button. Refer to Resetting the Circuit Breaker on page 54.
Only one drive
wheel turns.
Joystick erratic or
does not respond
as desired.
Wheelchair does
not respond to
commands.
Power indicator off
- even after
recharging.
Electrical malfunction.
One motor is disengaged.
Electrical malfunction.
Controller programmed improperly.
Poor battery terminal connection. Have terminals cleaned.
Electrical malfunction. Contact Invacare for service.
Contact Invacare for service.
Engage motor engagement handle.
Contact Invacare for service.
Reprogram controller (Refer to electronics manual supplied with wheelchair).
At’m and At’m QT 22 Part No. 1125078
Page 23

SECTION 3—SAFETY INSPECTION/TROUBLESHOOTING
SYMPTOM PROBABLE CAUSE SOLUTIONS
Wheelchair will not
drive.
Motor chatters or
runs erratically, or
only one motor
turns.
Wheelchair veers
to the left or right
when driving on
level surface.
Low tire pressure.
Motor engagement handles are disengaged.
Batteries require charging.
Charger plugged in.
Circuit breaker tripped.
Damaged connector or worn
brushes.
Bad motor.
Controller malfunction. Check for error codes with programmer. Refer to
Uneven tire pressure.
Motors out of balance.
Inflate tires to the proper tire pressure (30 psi).
Engage motor engagement handles.
Charge batteries. Make sure the setting on the
charger is correct.
Unplug charger from wall outlet before operating
the wheelchair.
Press the reset button. Refer to Resetting the Circuit Breaker on page 54.
Ohm out motors. Replace motor if high reading is
present. Normal reading is 0-5 Ohms.Refer to
Electro-Mechanical Parking Brake Test
page 29.
electronics manual provided.
Inflate tires.
Replace tires if worn.
Use programmer to balance motors.
on
E09/E10 error code
will not go away.
Excessive clicking
coming from
motor.
Motor stutters.
Motor fails to start
after initial installation.
Only one drive
wheel turns.
Joystick erratic or
does not respond
as desired.
Wheelchair does
not respond to
commands.
Bad motor connection.
Bad brake coil.
Bad bearing in motor. Replace motor.
Loose wheel hardware. Tighten hardware, (use removable Loctite™ on
Poor connection or worn drive
cylinder.
Battery voltage is too low.
Bad connection.
One motor is disengaged.
Electrical malfunction.
Electrical malfunction.
Controller programmed improperly.
Poor battery terminal connection. Clean the battery terminal connectors.
Check all connections. Ohm out each brake coil.
Normal reading is 45-50 Ohms. Refer to Electro-Mechanical Parking Brake Test on page 29.
hardware). Follow torque settings in this manual.
Check drive cylinders and replace if necessary.
Check batteries and recharge if necessary.
Check connector.
Engage motor engagement handle.
Replace motor.
Replace joystick.
Reprogram controller. Refer to electronics manual provided.
Part No. 1125078 23 At’m and At’m QT
Page 24

SECTION 3—SAFETY INSPECTION/TROUBLESHOOTING
SYMPTOM PROBABLE CAUSE SOLUTIONS
Motor is running
then fails to restart
when stopped.
Motor runs but
loses power.
Wheelchair loses all
power while
driving.
Heavy load on the motors forcing
controller into the current rollback
mode.
Blown fuse in battery wiring
harness.
Damaged Motor Replace brushes if necessary, or replace motor if
Controller power stage board or
relays may be damaged.
Controller senses heavy load and
has entered the current rollback
mode.
Bad connection on wheelchair. Turn power “OFF”, wait ten seconds and turn
Leave power ON and allow controller to count
down, and recharge the wheelchair overnight with
power ON.
Replace battery wiring harness.
internal damage is determined.
Ohm out motor to check for possible internal
damage (worn out brushes may be possible).
Refer to Electro-Mechanical Parking Brake Test
on page 29.
Replace controller or send to Invacare for repair.
Stop driving and let electronics cool.
Leave power ON and allow controller to count
down, and recharge the wheelchair overnight with
power ON.
power back “ON”.
Check joystick connection.
Check battery connections and circuit breaker.
Power indicator off
- even after
recharging.
Electrical malfunction. Contact Invacare for service.
At’m and At’m QT 24 Part No. 1125078
Page 25

SECTION 3—SAFETY INSPECTION/TROUBLESHOOTING
Troubleshooting - Battery
SYMPTOM PROBABLE CAUSE SOLUTIONS
Batteries draw
excessive current
when charging.
Battery indicator
shows low charge
level immediately
after charging.
Batteries won’t
charge.
Short Charge Time
No power to
wheelchair motors.
Corroded battery
wiring connections.
Batteries draw
excessive current
when charging.
Battery indicator
shows low charge
level immediately
after charging.
Battery failure.
Electrical malfunction.
Batteries weak, won’t hold charge.
Electrical malfunction.
Charger malfunction.
Tripped breaker or damaged cables.
Batteries sat discharged too long.
One or both batteries may be bad
(if batteries charge up too soon).
Bad connection or tripped breaker.
Check Joystick connection.
Batteries are dead.
Loose battery connections Check battery cable connections, may have
Possible water, salt, or urine damage. Replace battery wiring harness.
Battery failure.
Electrical malfunction.
Batteries weak, won’t hold charge.
Electrical malfunction.
Charger malfunction.
Have batteries checked for shorted cell. Replace if
necessary.
Contact Invacare.
Replace Batteries.
Contact Invacare.
Replace charger. Contact Invacare.
Check cables for damage or replace battery wiring
harness.
Replace batteries
Check each battery and replace if needed.
Check all connections and housings for damage.
Check battery voltage and replace if necessary.
vibrated loose when driving on rough terrain.
Have batteries checked for shorted cell. Replace if
necessary.
Contact Invacare.
Replace Batteries.
Contact Invacare.
Replace charger. Contact Invacare.
Part No. 1125078 25 At’m and At’m QT
Page 26

SECTION 3—SAFETY INSPECTION/TROUBLESHOOTING
Troubleshooting - Battery Charger
SYMPTOM PROBABLE CAUSE SOLUTIONS
No LED’s on
Charger
Batteries won’t
charge.
Batteries have
short driving range
during a single
charge. Battery
Gauge falls off
faster than normal.
Charger not plugged into outlet, or
disconnected from wiring harness on
wheelchair.
No AC power at outlet. Check for AC power with digital volt meter.
Damaged power cord. Check for damage on the power cord, replace if
Charger LED’s burnt out. Send charger to Invacare for repair.
Charger may have internal fuse that is
blown.
Tripped breaker in wiring harness, or
charger.
Charger not plugged into outlet. Make sure charger is plugged into the outlet.
No AC power at the outlet. Check for AC power with a digital volt meter.
Charger power cord may be
damaged, or the connector may be
damaged.
Charger may have internal damage. Charge batteries with known good charger.
Battery voltage too low for charger to
start charging cycle.
Consumer not charging batteries long
enough.
Batteries may be weak. Perform load test or check “Battery Quality Menu”
Check programming settings. Torque setting and power level setting may be too
Make sure the charger is plugged into the outlet
and check the wiring on the wheelchair.
damaged or send in for repair.
Remove charger cover and check for fuses. If fuses
are present, Ohm out fuses and replace if
necessary. Refer to Electro-Mechanical Parking
Brake Test on page 29.
Check battery wiring harness breaker on the
wheelchair. If the breaker is tripped, determine the
cause and correct it prior to resetting the breaker.
Check for damage and replace if necessary, or
send in for repair.
Replace batteries.
Instruct consumer to charge for 8-10 hours
minimum.
with the programmer. Refer to Field Load Test
page 27.
high.
on
At’m and At’m QT 26 Part No. 1125078
Page 27

SECTION 3—SAFETY INSPECTION/TROUBLESHOOTING
Checking Battery Charge Level
The following “Do’s” and “Don’ts” are provided for your convenience and safety.
DO DON’T
Read and understand this manual and any service
information that accompanies a battery and charger
before operating the wheelchair.
Move the wheelchair to a work area before opening
battery box or installing service batteries.
Recharge as frequently as possible to maintain a high
charge level and extend battery life.
Follow recommendations in this manual when selecting a battery or charger.
Fully charge new batteries before using. DO NOT put new batteries into service before charging.
DO NOT perform any installation or maintenance
without first reading this manual.
DO NOT perform installation or maintenance of
batteries in an area that could be damaged by
battery spills.
DO NOT make it a habit to discharge batteries to the
lowest level.
DO NOT use randomly chosen batteries or chargers.
Field Load Test
NOTE: For this procedure, refer to FIGURE 3.1.
NOTE: The following test can also be performed through the controller of the wheelchair along
with a remote programmer. Refer to the electronics manual supplied with each wheelchair.
Old batteries lose their ability to store and release power, due to increased internal
resistance. This means that as you try to take power from the battery, some of that power
is used up in the process of passing through the battery, resulting in less voltage at the
posts. The more power drawn, the lower the voltage available. When this lost voltage
drops the output 1.0 volts under load (2.0 for a pair), replace the batteries.
To spot this problem, test batteries under load.
Use a digital voltmeter to check battery charge level at the charger connector. It is located
on the joystick.
NOTE: READ these instructions and the manufacturer’s instructions CAREFULLY on the
digital voltmeter before using the digital voltmeter.
NOTE: Invacare recommends that ONLY a qualified technician perform this test.
1. Ensure that power is OFF.
2. Make sure battery is fully charged. An extremely discharged battery will exhibit the
same symptoms as a bad one.
3. Remove the footrests from the wheelchair
4. Connect the voltmeter leads to the charger port on the wheelchair as shown in
FIGURE 3.1. Most digital voltmeters are not affected by polarity, however, analog
meters (meters with swinging needles) can be and should be used carefully. A good
meter reading should be 25.5 to 26 VDC.
Part No. 1125078 27 At’m and At’m QT
Page 28

SECTION 3—SAFETY INSPECTION/TROUBLESHOOTING
WARNING
When performing STEPS 5 and 6, ensure feet are clear from casters and wall,
otherwise injury may result.
5. Sit in wheelchair and place feet against a wall, workbench or other stationary object.
6. Turn the power ON and carefully push the joystick forward, trying to drive the
wheelchair through the stationary object.
NOTE: This puts a heavy load on the batteries as they try to push through the stationary object. If
the wheels spin, have two individuals (one on each arm) apply as much downward pressure as
possible on the arms of the wheelchair.
7. Read the meter while the motors are straining, no longer than 3-4 seconds, to
determine the voltage under load.
NOTE: If the voltage drops more than two volts from a pair of fully charged batteries while under
load, they should be replaced regardless of the unloaded voltages.
Charger
Port
Digital
Voltmeter
BATTERY
QUALITY
0 to 2 volts Good
2 to 2.5 volts Poor
2.5 or more Bad
FIGURE 3.1 Field Load Test
At’m and At’m QT 28 Part No. 1125078
Page 29

SECTION 3—SAFETY INSPECTION/TROUBLESHOOTING
Electro-Mechanical Parking Brake Test
NOTE: For this procedure, refer to FIGURE 3.2.
NOTE: This procedure should only be performed on wheelchairs with conventional motor/gearbox
assembly.
1. On the four-pin motor connector, locate the side by side connectors in the black
housings.
2. Set the digital multimeter to read ohms.
3. Measure the resistance between the two brake contacts. A normal reading is between
45-100 ohms depending on the motor. A reading of 0 ohms or a very high reading; i.e.,
MEG ohms or O.L. (out of limit) indicates a shorted brake or an open connection
respectively. If either condition exists, send the motor to Invacare Technical Service for
inspection/repair.
WARNING
A shorted electro-mechanical brake will damage the brake output section in the
controller. DO NOT connect a shorted electro-mechanical brake to a good
controller module. A shorted brake MUST be replaced.
Proper controller operation regarding brake function should be performed whenever a shorted brake is found and replaced.
NOTE: A bad motor can damage the controller module but a bad controller will NOT damage a
motor.
.
4 Pin Motor
Connector
Digital
Multimeter
Motor
Cap
FIGURE 3.2 Electro-Mechanical Parking Brake Test
Part No. 1125078 29 At’m and At’m QT
Page 30

SECTION 4—FOOTBOARD ASSEMBLY
SECTION 4—FOOTBOARD
ASSEMBLY
WARNING
After any adjustments, repair or service and before use, make sure that all attaching
hardware is tightened securely - otherwise injury or damage may result.
Before performing any maintenance, adjustment or service verify that On/Off
switch on the joystick is in the off position.
DO NOT stand on the flip-up footboard. When getting in or out of the wheelchair,
make sure that the flip-up footboard is in the upward position.
Limited clearance between footboard and caster - The user’s feet MUST remain on
the footboard while operating the chair. If the user’s feet are allowed to rest off the
side of the footboard they may come in contact with the caster possibly resulting in
injury.
Removing/Installing the Footboard Assembly
NOTE: For this procedure, refer to FIGURE 4.1.
Removing
1. Remove the two mounting bolts that
mount the footboard assembly to the
base frame.
2. Remove the footboard assembly from
the base frame.
Installing
1. Align the footboard assembly with the
adjustment holes in the base frame.
2. Install the footboard assembly using
the two mounting bolts and locknuts.
Mounting
Bolt
Footboard
Assembly
FIGURE 4.1 Removing/Installing the
Base Frame
Locknuts
Footboard Assembly
Adjusting Footboard Assembly Height
Adjustment
Holes
Mounting
Bolt
NOTE: For this procedure, refer to FIGURE 4.1.
1. Remove the footboard assembly. Refer to Removing/Installing the Footboard
Assembly on page 30.
2. Align the footboard assembly to one of three desired adjustment holes on the base
frame.
3. Attach the footboard assembly to the base frame with two mounting bolts and
locknuts. Securely tighten.
At’m and At’m QT 30 Part No. 1125078
Page 31

SECTION 5—SEAT
SECTION 5—SEAT
WARNING
After any adjustments, repair or service and before use, make sure that all attaching
hardware is tightened securely - otherwise injury or damage may result.
Before performing any maintenance, adjustment or service verify that on/off switch
on the joystick is in the off position.
Removing/Installing the Seat
NOTE: For this procedure, refer to FIGURE 5.1 on page 32.
Removing
1. Disconnect the joystick. Refer to Disconnecting/Connecting the Joystick on page 40.
2. Remove the battery pack/box. Refer to Removing/Installing the Battery Pack on the
At’m on page 45 or Removing/Installing the Battery Box on the At’m QT on page 46.
3. Pull up the front latch release loop and tilt the seat assembly back. Refer to Detail “A”
of FIGURE 5.1.
4. Pull up the rear latch release cord with the other hand and lift the seat assembly off
and away from the wheelchair base. Refer to Detail “B” of FIGURE 5.1.
5. Fold the seat assembly. Refer to Detail “C” of FIGURE 5.1.
Installing
1. Lower the rear latches onto the rear crossbrace.
NOTE: An audible click is heard as the rear latches lock into place.
NOTE: Ensure both latches sit flush against the rear crossbrace. If not flush, lift the rear latch
release cord, remove the seat and repeat STEP 1.
2. Tilt back the seat assembly.
3. Unfold the seat assembly.
4. Lower the front latch onto the front crossbrace until it locks in place.
NOTE: An audible click is heard as the front latch locks into place.
5. Lift the seat assembly to ensure that the seat is secured to the wheelchair base.
6. Reinstall the battery pack/box. Refer to Removing/Installing the Battery Pack on the
At’m on page 45 or Removing/Installing the Battery Box on the At’m QT on page 46.
7. Reconnect the joystick. Refer to Disconnecting/Connecting the Joystick
Part No. 1125078 31 At’m and At’m QT
on page 40.
Page 32

SECTION 5—SEAT
DETAIL “A” - SEAT TILTED BACK
Seat Assembly
Wheelchair Base
DETAIL “C” - FOLDED SEAT
Front Seat
Release Loop
Front
Latch
Front
Crossbrace
DETAIL “B” - SEAT REMOVED
Seat
Assembly
Wheelchair
Base
Rear Crossbrace
Folded Seat Assembly
Rear Latch
Release Cord
Rear
Latch
NOTE: At’m seat shown. At’m
QT seat is removed/installed in
the same way.
FIGURE 5.1 Removing/Installing the Seat
At’m and At’m QT 32 Part No. 1125078
Page 33

SECTION 5—SEAT
Replacing Seat Positioning Strap
WARNING
ALWAYS wear your seat positioning strap.
The seat positioning strap is a positioning belt only. It is not designed for use as a
safety device withstanding high stress loads such as auto or aircraft safety belts. If
signs of wear appear, belt MUST be replaced IMMEDIATELY.
NOTE: For this procedure, refer to FIGURE 5.2.
1. Remove the locknut that secures one seat positioning half-strap to the wheelchair
frame.
NOTE: DO NOT remove the mounting screw.
2. Slide the seat positioning half-strap away from the wheelchair frame.
3. Position one new seat positioning half-strap on the mounting screw.
4. Reinstall the locknut that secures the seat positioning half-strap to the wheelchair
frame.
5. Repeat STEPS 1- 4 for the other half of the seat positioning strap.
One Seat Positioning
Half-Strap
Wheelchair
Frame
Mounting Screw
NOTE: DO NOT remove the mounting screw.
NOTE: Seat upholstery not shown for clarity.
One Seat Positioning
Half-Strap
Locknut
FIGURE 5.2 Replacing Seat Positioning Strap
Part No. 1125078 33 At’m and At’m QT
Page 34

SECTION 5—SEAT
Removing/Installing Under-Seat Basket
NOTE: For this procedure, refer to FIGURE 5.3.
Removing
1. Remove the seat. Refer to Removing/Installing the Seat on page 31.
2. Unfasten the hook-and-loop fastening straps from the front and rear seat tubes.
3. Remove the basket.
Installing
1. Place the basket under the seat.
2. Fasten the hook-and-loop fastening straps around the front and rear seat tubes
3. Ensure that the hook-and-loop fastening straps are secured around the tubes.
4. Install the seat. Refer to Removing/Installing the Seat on page 31.
Hook-and-loop
Fastening Straps
Rear Seat
Tube
Under-Seat Basket
Front Seat
Tube
Hook-and-loop
Fastening
Straps
Rear Seat
Tube
Hook-and-loop
Fastening
Straps
FIGURE 5.3 Removing/Installing Under-Seat Basket
Removing/Installing Seat Upholstery
NOTE: For this procedure, refer to FIGURE 5.4 on page 35.
NOTE: Ensure that the wheel locks are engaged and the chair is locked into place.
Removing
1. Remove the seat. Refer to Removing/Installing the Seat on page 31.
Front Seat
Tube
Hook-and-loop
Fastening
Straps
Under-Seat Basket
2. Remove the arm tubes. Refer to Removing/Installing Arm Tube
3. Remove the under-seat basket. Refer to Removing/Installing Under-Seat Basket
on page 39.
on
page 34.
4. Remove the two mounting bolts that secure the front seat tube to the seat. Refer to
Detail “A” of FIGURE 5.4.
5. Remove the two mounting bolts that secure the rear seat tube to the seat. Refer to
Detail “A” of FIGURE 5.4.
At’m and At’m QT 34 Part No. 1125078
Page 35

SECTION 5—SEAT
6. Remove the four mounting bolts, coved washers, locknuts, and two brackets that
secure the back frame to the seat frame. Refer to Detail “B” of FIGURE 5.4.
7. Lift up the hook-and-loop fastening strap and pull the back frame out of the
upholstery. Refer to Detail “C” of FIGURE 5.4.
8. Pull the seat frame out of the upholstery. Refer to Detail “C” of FIGURE 5.4.
DETAIL “A”
Seat Frame
Front Seat Tube
Hook-and-loop
Fastening Strap
Mounting
Bolts
Rear Seat
Tube
DETAIL “C”
DETAIL “B”
Washers
Bracket
Locknuts
Rear Seat
Tube
Back
Frame
Hook-and-loop
Fastening Strap
Back
Upholstery
Coved
Seat
Frame
Front Seat Tube
Back
Frame
Upholstery
Back
Frame
Seat
Frame
Seat
Frame
Upholstery
Seat
Frame
Upholstery
FIGURE 5.4 Removing/Installing Seat Upholstery
Installing
1. Insert the seat frame into the upholstery. Refer to Detail “C” of FIGURE 5.4.
2. Insert the back frame into the upholstery and secure the hook-and-loop fastening
strap. Refer to Detail “C” of FIGURE 5.4.
3. Secure the back frame to the seat frame using the two brackets, and four mounting
bolts, coved washers, and locknuts. Refer to Detail “B” of FIGURE 5.4.
4. Mount the rear seat tube to the seat frame with the two mounting bolts. Refer to Detail
“A” of FIGURE 5.4.
Part No. 1125078 35 At’m and At’m QT
Page 36

SECTION 5—SEAT
5. Mount the front seat tube to the seat frame with the two mounting bolts. Refer to
Detail “A” of FIGURE 5.4.
6. Install the under seat basket. Refer to Removing/Installing Under-Seat Basket on
page 34.
7. Install the arm tubes. Refer to Removing/Installing Arm Tube on page 39.
8. Install the seat. Refer to Removing/Installing the Seat on page 31.
Replacing the Seat Latches
NOTE: For this procedure, refer to FIGURE 5.5.
1. Remove the seat. Refer to Removing/Installing the Seat on page 31.
2. Turn the seat upside down.
3. Perform one of the following:
• For Rear Seat Latches - untie the release cord from the latch.
• For Front Seat Latches - remove the front seat release loop.
4. Remove mounting bolt and locknut that secures the latch to the seat frame.
NOTE: DO NOT remove the latch bolt.
5. Insert the new latch onto the frame.
6. Install the mounting bolt and locknut.
7. Perform one of the following:
• For Rear Seat Latches - insert the release cord through the hole in the latch and
secure the cord to the latch.
• For Front Seat Latches - secure the front seat release loop to the latch with the one
locknut.
8. Install the seat. Refer to Removing/Installing the Seat on page 31.
Latch
Locknut
Latch Bolt
DO NOT Remove
Mounting Bolt
Seat Frame
FIGURE 5.5 Replacing the Seat Latches
At’m and At’m QT 36 Part No. 1125078
Page 37

SECTION 6—ARMS
SECTION 6—ARMS
WARNING
After any adjustments, repair or service and before use, make sure that all attaching
hardware is tightened securely - otherwise injury or damage may result.
Before performing any maintenance, adjustment or service verify that on/off switch
on the joystick is in the off position.
Removing/Installing Arm Pads
NOTE: For this procedure, refer to FIGURE 6.1 on page 38.
Removing
1. Disconnect the joystick. Refer to Disconnecting/Connecting the Joystick on page 40.
2. Remove the two mounting bolts, four nylon washers, two locknuts and steel washers
that secure the arm bracket to the front and rear seat tubes (Detail “A”).
3. Lift up arm tube.
4. Under the arm tube, remove the two mounting screws and washers that secure the
arm pad to the arm tube and arm bracket (Detail “B”).
5. Repeat STEPS 2 to 4 for the other arm pad.
Installing
1. Secure the arm pad and arm bracket to the arm tube using two mounting screws and
washers (Detail “B”).
2. Align the arm bracket with the front and rear seat tubes.
3. Secure the arm bracket to the front and rear seat tubes with the two mounting bolts,
four nylon washers, two locknuts and steel washers (Detail “A”).
4. Repeat STEPS 1 to 3 for other arm pad.
5. Connect the joystick. Refer to Disconnecting/Connecting the Joystick on page 40.
Part No. 1125078 37 At’m and At’m QT
Page 38

SECTION 6—ARMS
t
DETAIL “A”
Washers
Mounting
Bolts
Front Seat
Tube
Locknuts
Nylon
Washers
Arm
Bracket
Rear
Seat
Tube
DETAIL “B”
Arm Tube
Arm
Bracket
Washers
Mounting
Screw
NOTE: Clothing guard not shown for clarity.
FIGURE 6.1 Removing/Installing Arm Pads
Replacing Clothing Guard
NOTE: For this procedure, refer to FIGURE 6.1 and FIGURE 6.2.
Arm
Pad
1. Disconnect the joystick. Refer to Disconnecting/Connecting the Joystick on page 40.
2. Remove the two mounting bolts, four nylon washers, two locknuts and steel washers
that secure the arm bracket to the front and rear seat tubes (Detail “A” of FIGURE 6.1).
3. Lift up arm tube.
4. Slide the clothing guard off the front and rear seat tubes (FIGURE 6.2).
5. Slide the new clothing guard onto the front and back seat tubes.
NOTE: The mesh side of the clothing guard
should face out.
6. Lower the arm tube.
Arm Tube
Arm
Bracket
7. Align the mounting holes in the arm
bracket with those in the front and rear
seat tubes.
8. Secure the arm bracket to front and
Clothing
Guard
back seat tubes with the two mounting
bolts, four nylon washers, two locknuts
and steel washers (FIGURE 6.1).
9. Repeat STEPS 2 to 8 for the other side.
Front Seat
Tube
Rear Sea
Tube
10. Connect the joystick. Refer to
Disconnecting/Connecting the Joystick
on page 40.
At’m and At’m QT 38 Part No. 1125078
FIGURE 6.2 Replacing Clothing Guard
Page 39

SECTION 6—ARMS
Removing/Installing Arm Tube
NOTE: For this procedure, refer to FIGURE 6.3.
Removing
1. If needed, remove the joystick. Refer to Removing/Installing the Joystick on page 41.
2. Remove arm pad. Refer to Removing/Installing Arm Pads on page 37.
3. Remove the mounting bolt, two nylon spacers, three coved washers, locknut, and
washer attaching arm tube to rear seat tube.
4. Repeat for other arm tube if necessary.
Installing
1. Secure the arm tube to the rear seat tube with the mounting bolt, two nylon spacers,
three coved washers, locknut, and washer. Securely tighten.
2. Install the arm pad. Refer to Removing/Installing Arm Pads on page 37.
3. If needed, install the joystick. Refer to Removing/Installing the Joystick on page 41.
DETAIL “A” -
BOTTOM VIEW
Coved Washer
Arm Tube
Coved Washers
Washer
Locknut
Outside
Frame
Inside
Frame
Arm Pad
Arm Tube
Bracket
Full Frame
Back Frame
Mounting
Bolt
Nylon
Spacers
Back Frame
Front Seat Tube
Rear Seat Tube
FIGURE 6.3 Removing/Installing Arm Tube
Part No. 1125078 39 At’m and At’m QT
Page 40

SECTION 7—JOYSTICK
SECTION 7—JOYSTICK
WARNING
After any adjustments, repair or service and before use, make sure that all attaching
hardware is tightened securely - otherwise injury or damage may result.
Before performing any maintenance, adjustment or service verify that On/Off
switch on the joystick is in the off position.
Disconnecting/Connecting the Joystick
NOTE: For this procedure, refer to FIGURE 7.1 on page 41.
Disconnecting
NOTE: Verify the joystick On/Off button is in the “Off” position before disconnecting the joystick
connector.
1. Pull the light GREY collar portion of the joystick connector and disengage the grey
collar from the controller connector.
Connecting
CAUTION
The joystick connector and controller connector fit together in one way only, DO
NOT force them together.
1. Hold the light GREY collar portion of the joystick connector with one hand and align
the joystick connector with the controller connector.
2. Lightly push to engage the joystick connector and the controller connector.
At’m and At’m QT 40 Part No. 1125078
Page 41

SECTION 7—JOYSTICK
DETAIL “A” - AT’M
Wheelchair Base
DETAIL “B” - AT’M QT
Connector
from Controller
Connector
from Controller
Joystick
Connector
Battery Box
Battery
Pack
Light GREY
Collar
Joystick
Connector
Light GREY
Collar
Wheelchair Base
FIGURE 7.1 Disconnecting/Connecting the Joystick
Removing/Installing the Joystick
NOTE: For this procedure, refer to FIGURE 7.2 on page 42.
Removing
1. Disconnect the joystick. Refer to Disconnecting/Connecting the Joystick on page 40.
2. Cut the tie-wraps that secure the joystick cable to the wheelchair arm and frame. Refer
to Detail “A” of FIGURE 7.2.
3. Pull the hook-and-loop fastening strap connecting the under seat basket to the chair.
4. Cut the three tie-wraps that secure the joystick cable to the wheelchair frame.
5. Remove the two quick-release pins that mount the joystick to the arm.
6. Remove the joystick and mounting bracket assembly.
Part No. 1125078 41 At’m and At’m QT
Page 42

SECTION 7—JOYSTICK
Installing
1. Align the mounting bracket assembly with the mounting holes on the arm.
2. Install the two quick-release pins that mount the joystick to the arm.
3. Secure the joystick cable to the wheelchair arm with three tie-wraps. Refer to Detail
“A” of FIGURE 7.2.
4. Secure the joystick cable to the wheelchair frame with three tie-wraps.
5. Secure the hook-and-loop fastening strap, over the cable and tie-wrap, to the base
frame.
NOTE: Route the joystick cable under the basket upholstery to prevent it from interfering with
wheelchair motion.
6. Connect the joystick. Refer to Disconnecting/Connecting the Joystick on page 40.
Joystick
Joystick
Cable
Mounting
Bracket
Mounting Holes
on Bracket
DETAIL “A” - AT’M
Tie-Wrap
Quick-Release
Pins
Joystick
Basket
Upholstery
Flap
Mounting
Hole on Arm
NOTE: At’m wheelchair shown. The joystick
on the At’m QT repositions the same way.
DETAIL “B” - AT’M QT
Tie-Wrap
Joystick
Cable
Joystick
Joystick
Cable
Tie-Wrap
Tie-Wrap under Flap
(Hidden from View)
Basket
Upholstery Flap
Tie-Wrap
FIGURE 7.2 Removing/Installing the Joystick
At’m and At’m QT 42 Part No. 1125078
Page 43

SECTION 7—JOYSTICK
Repositioning the Joystick to Opposite Arm
NOTE: For this procedure, refer to FIGURE 7.2.
1. Remove the joystick. Refer to Removing/Installing the Joystick on page 41.
2. Reposition the joystick and mounting bracket assembly on the opposite arm.
NOTE: Route the joystick cable under the basket upholstery to prevent it from interfering with
wheelchair motion.
3. Install the joystick. Refer to Removing/Installing the Joystick on page 41.
Part No. 1125078 43 At’m and At’m QT
Page 44

SECTION 8—BATTERIES
SECTION 8—BATTERIES
Warnings For Handling and Replacing Batteries
WARNING
After any adjustments, repair or service and before use, make sure that all attaching
hardware is tightened securely - otherwise injury or damage may result.
Before performing any maintenance, adjustment or service verify that On/Off
switch on the joystick is in the Off position.
Most batteries are not sold with instructions. However, warnings are frequently
noted on the cell caps. Read them carefully, otherwise serious injury or damage may
occur.
The use of rubber gloves is recommended when working with batteries.
Invacare strongly recommends that battery installation and battery replacement
ALWAYS be done by a qualified technician.
ALWAYS transport the battery pack/box in an upright and secure manner. To
prevent damage, do not transport the battery pack/box with other objects that
could suddenly shift during transportation, unless they are secured or in a different
vehicle area. DO NOT transport battery pack/box with gas cans or similar
containers in the same vehicle area.
DO NOT tip the batteries. Keep the batteries in an upright position.
NEVER allow any of your tools and/or battery cable(s) to contact both battery posts
at the same time. An electrical short may occur and serious personal injury or
damage may occur.
The POSITIVE (+) RED battery cable must connect to the POSITIVE (+) battery
terminal, otherwise serious damage will occur to the electrical system.
NOTE: If there is battery acid in the bottom of the battery tray or on the sides of the battery(ies),
apply baking soda to these areas to neutralize the battery acid. Before reinstalling the existing or
new battery(ies), clean the baking soda from the battery tray or battery(ies) being sure to avoid
contact with skin and eyes. Determine source of contamination. Never install/reinstall a battery
with a cracked or otherwise damaged case.
Recommended Battery Type
CAUTION
Failure to use the correct battery size and/or voltage may cause damage to the
wheelchair and give unsatisfactory perfomance.
At’m and At’m QT 44 Part No. 1125078
Page 45

SECTION 8—BATTERIES
NOTE: For this procedure, refer to FIGURE 8.1.
At’m uses two M17-12 SLSM type batteries (Detail “A” of FIGURE 8.1).
At’m QT uses two PE 12V 12SLA batteries (Detail “B” of FIGURE 8.1).
DETAIL “A”
DETAIL “B”
M17-12 SLSM
Battery
PE 12V 12SLA
Battery
FIGURE 8.1 Recommended Battery Type
NOTE: Recommended battery type is spill proof and requires no maintenance except routine
charging.
NOTE: Charge batteries daily. DO NOT allow batteries to completely discharge. To charge
batteries, refer to Charging Batteries on page 52.
NOTE: Invacare recommends that both batteries be replaced if one battery is defective.
Removing/Installing the Battery Pack on the At’m
WARNING
NEVER unplug the battery cables by pulling on the wires. Unplug the battery cables
by pulling on the connector ONLY. Otherwise injury or damage may result.
NOTE: For this procedure, refer to FIGURE 8.2 on page 46.
NOTE: If there is battery acid in the bottom of the battery pack, tray or on the sides of the
battery(ies), apply baking soda to these areas to neutralize the battery acid. Before reinstalling the
existing or new battery(ies), clean the baking soda from the battery tray or battery(ies) being sure
to avoid contact with skin and eyes. Determine source of contamination. Never install/reinstall a
battery with a cracked or otherwise damaged case.
Removing
1. Verify the joystick on/off button is in the off position and disconnect the joystick. Refer
to Disconnecting/Connecting the Joystick
2. Disconnect the battery connector from the wheelchair (RED and BLACK connector).
3. Using the battery handle, lift the battery pack up and away from the wheelchair base.
on page 40.
Part No. 1125078 45 At’m and At’m QT
Page 46

SECTION 8—BATTERIES
Installing
1. Verify the joystick on/off button is in the off position and disconnect the joystick. Refer
to Disconnecting/Connecting the Joystick on page 40.
2. Position the battery pack into brackets located on the rear of the wheelchair.
3. Connect the battery connector to the connector on the rear of the wheelchair (RED and
BLACK connector).
4. Connect the joystick. Refer to Disconnecting/Connecting the Joystick on page 40.
RED and BLACK
Battery Connector
Brackets
Battery Pack
Handle
Battery Pack
RED and BLACK
Wheelchair Base
Controller Connector
FIGURE 8.2 Removing/Installing the Battery Pack on the At’m
Removing/Installing the Battery Box on the At’m QT
NOTE: For this procedure, refer to FIGURE 8.3 on page 47.
Removing
1. Hold the battery box handle and lift the battery box up and away from the wheelchair.
Installing
1. Holding the battery box handle, carefully lower the battery box on to the battery tray
in the wheelchair.
2. Press down the battery box to engage the connector on the battery box with the
connector on the battery tray on the wheelchair base.
3. Turn on the wheelchair to verify that the battery box is connected properly. If power
does not turn on, repeat STEP 2.
At’m and At’m QT 46 Part No. 1125078
Page 47

SECTION 8—BATTERIES
Connector on
Connector on
Battery Tray
Battery Tray
Wheelchair Base
FIGURE 8.3 Removing/Installing the Battery Box on the At’m QT
Battery Box
(Hidden from View
Battery Box
Handle
Battery Box
Removing/Installing the Batteries From/Into the At’m
Battery Pack
NOTE: For this procedure, refer to FIGURE 8.4 on page 48.
Removing
1. Remove the battery pack from the wheelchair. Refer to Removing/Installing the
Battery Pack on the At’m on page 45.
2. Open the battery pack by performing the following -
A. Grasp the side flaps and pull up.
B. Grasp the front flap and pull up.
3. Disconnect the wiring harness from the batteries in the following order -
A. NEGATIVE (-) BLACK battery cable from the NEGATIVE (-) battery terminal on
the left battery.
B. POSITIVE (+) RED battery cable from POSITIVE (+) battery terminal/post on the
right battery.
C. WHITE battery cable (jumper) from the POSITIVE (+) battery terminal/post on the
left battery and the NEGATIVE (-) battery terminal/post on the right battery.
4. Remove the batteries from the battery pack.
Part No. 1125078 47 At’m and At’m QT
Page 48

SECTION 8—BATTERIES
Installing
1. Install the batteries into the battery pack in the orientation shown in FIGURE 8.4.
2. Connect the wiring harness to the batteries in the following order -
A. NEGATIVE (-) BLACK battery cable to the NEGATIVE (-) battery terminal on the
left battery.
B. POSITIVE (+) RED battery cable to POSITIVE (+) battery terminal/post on the right
battery.
C. WHITE battery cable (jumper) to the POSITIVE (+) battery terminal/post on the left
battery and the NEGATIVE (-) battery terminal/post on the right battery.
3. Slide the red and black battery connector out of the battery pack in the slit provided
on the front flap.
4. Close the battery pack by performing the following -
A. Fold down the front flap and press to engage the hook and loop straps.
B. Fold down the side flaps and press to engage the hook and loop straps.
NOTE: Ensure that the hook and loop straps are securely fastened before lifting the battery pack.
5. Install the battery pack on the wheelchair. Refer to Removing/Installing the Battery
Pack on the At’m on page 45.
DETAIL “A” - BATTERY WIRING
NEGATIVE BLACK
Battery Cable
POSITIVE
Terminal
NEGATIVE
Terminal
RED and BLACK
Battery Connector
POSITIVE RED
Battery Cable
Circuit
Breaker
POSITIVE
Terminal
Right
Battery
Side
Flap
Left
Battery
Front
Flap
Side Flap
Slot
NEGATIVE
Terminal
Battery Pack
Left
Battery
Right Battery
FIGURE 8.4 Removing/Installing the Batteries From/Into the At’m Battery Pack
At’m and At’m QT 48 Part No. 1125078
Page 49

SECTION 8—BATTERIES
Removing/Installing the Batteries From/Into the At’m
QT Battery Box
NOTE: For this procedure, refer to FIGURE 8.5 on page 50.
Removing
1. Remove the battery box from the wheelchair. Refer to Removing/Installing the Battery
Box on the At’m QT on page 46.
2. Remove the ten mounting screws that secure the battery box top to the battery box
(Detail “A” of FIGURE 8.5).
3. Disconnect the wiring harness from the batteries by holding the connectors and
pulling them in the following order (Detail “B” of FIGURE 8.5):
A. NEGATIVE (-) BLACK battery cable from the NEGATIVE (-) battery terminal on
the left battery.
B. POSITIVE (+) RED battery cable from the POSITIVE (+) battery terminal on the
right battery.
C. WHITE battery cable (Jumper) from the POSITIVE (+) battery terminal on the left
battery and the NEGATIVE (-) battery terminal on the right battery.
4. Remove the batteries from battery box by lifting the batteries out.
Installing
1. Install the two new batteries into the battery box.
2. Connect the wiring harness to the batteries in the following order (Detail “B” of
FIGURE 8.5):
A. NEGATIVE (-) BLACK battery cable to the NEGATIVE (-) battery terminal on the
left battery.
B. POSITIVE (+) RED battery cable to the POSITIVE (+) battery terminal on the right
battery.
C. WHITE battery cable (Jumper) to the POSITIVE (+) battery terminal on the left
battery and the NEGATIVE (-) battery terminal on the right battery.
3. Replace the top of the battery box and secure with the ten mounting screws (Detail “A”
of FIGURE 8.5). Securely tighten.
4. Reinstall the battery box on to the wheelchair. Refer to Removing/Installing the
Battery Box on the At’m QT on page 46.
Part No. 1125078 49 At’m and At’m QT
Page 50

SECTION 8—BATTERIES
Battery
Box Cover
Left
Battery
DETAIL “A”
Battery
Box
Right
Battery
Mounting
Screws
DETAIL “B”
Charger Port
10 Amp Fuse
NEGATIVE (-)
BLACK Battery
Terminal
NEGATIVE (-)
BLACK Battery
Cable
WHITE
Battery Cable
(Jumper)
Inhibit
Circuit
Left Battery
RED Battery
Connector
POSITIVE (+)
RED Battery
POSITIVE (+)
Right Battery
NOTE: Charger port, inhibit circuit, RED battery
connector and circuit breaker are mounted to the
battery box.
Circuit
Breaker
Terminal
RED Battery
Cable
FIGURE 8.5 Removing/Installing the Batteries From/Into the At’m QT Battery Box
Removing/Installing the At’tm QT Battery Box
Assembly
NOTE: For this procedure, refer to FIGURE 8.6 on page 51.
Removing
1. Disconnect the joystick. Refer to Disconnecting/Connecting the Joystick on page 40.
2. Remove the two rear wheels. Refer to Removing/Installing the Drive Wheels on
page 69.
3. Remove the four locknuts, eight washers, four hex head screws and twelve coved
washers that secure the battery box assembly to the base frame.
NOTE: Battery box assembly includes a top battery receiver and a bottom battery receiver.
4. Remove the two Phillips
battery box assembly.
NOTE: Removing the battery box assembly will also remove the anti-tipper and the joystick plug
bracket.
®
screws and locknuts that secure the battery connector to the
At’m and At’m QT 50 Part No. 1125078
Page 51

SECTION 8—BATTERIES
Installing
1. Install the battery box assembly, joystick plug bracket and anti-tippers onto the base
frame using the four locknuts, eight washers, four hex head screws and twelve coved
washers.
2. Install the battery connector to the battery box assembly using the two Phillips screws
and locknuts.
3. Install the two rear wheels. Refer to Removing/Installing the Drive Wheels on page 69.
4. Connect the joystick. Refer to Disconnecting/Connecting the Joystick on page 40.
Hex Head Screw
Washers
Hex Head Screws
Phillips Screws
Battery
Connector
Coved
Washers
Coved
Washers
Joystick Plug Bracket
Top Battery Receiver
Locknuts
Bottom Battery Receiver
Wheelchair Base
Washer
Locknuts
Anti-Tipper
NOTE: The battery box assembly comprises the top and bottom battery receivers.
FIGURE 8.6 Removing/Installing the At’tm QT Battery Box Assembly
Part No. 1125078 51 At’m and At’m QT
Page 52

SECTION 8—BATTERIES
Charging Batteries
WARNING
NEVER attempt to recharge the batteries by attaching cables directly to the
battery terminals.
DO NOT attempt to recharge the batteries and operate the wheelchair at the same
time.
DO NOT attempt to recharge the batteries when the wheelchair has been exposed
to any type of moisture.
DO NOT attempt to recharge the batteries when the wheelchair is outside.
DO NOT sit in the wheelchair while recharging the batteries.
CAUTION
New batteries MUST be fully charged prior to initial use of the wheelchair.
ALWAYS charge new batteries before initial use or battery life will be reduced.
As a general rule, you should recharge your batteries as frequently as possible to
assure the longest possible life and to minimize required charging time. Plan to
recharge them when you do not anticipate using the wheelchair.
Basic concepts which will help you understand this automatic process are:
The amount of electrical current drawn within a given time to charge a battery is called
“charge rate”. If, due to usage, the charge stored in the battery is low, the charge rate is
high. As a charge builds up, the charge rate is reduced, and the battery charger rate
decreases to a “trickle charge”.
NOTE: If the batteries need to be charged more often or take longer to charge than normal, they
may need to be replaced. Contact a qualified technician.
Charging Using an Independent Charger
WARNING
Read and carefully follow the individual instructions for each charger (supplied or
purchased). If charging instructions are not supplied, consult a qualified technician
for proper procedures.
CAUTION
Only use a charger approved by Invacare when charging through the joystick on this
wheelchair model.
DO NOT use an independent charger with an output rating of over 8A (Amps).
Otherwise, damage may occur.
At’m and At’m QT 52 Part No. 1125078
Page 53

SECTION 8—BATTERIES
Charger Plugged Into the Joystick
NOTE: For this procedure, refer to FIGURE 8.7.
NOTE: The charger port located on the front of the joystick requires the use of an independent
charger. The independent charger is supplied with the wheelchair.
1. Attach the battery charger connector to
the charger port on the front of the
joystick.
2. Plug the charger’s AC power cord or
Multi-Function
Charger Port
extension into the grounded 110-volt
wall outlet.
3. When charging is complete, turn
charger off.
4. Disconnect output cable from joystick
charger port.
FIGURE 8.7 Charging Using an
Independent Charger - Charger Plugged Into
the Joystick
Charger Plugged Directly to Batteries - At’m Only
NOTE: For this procedure, refer to FIGURE 8.8.
1. Disconnect the RED and BLACK connector from the wheelchair harness.
2. Connect 3-pin charger connector to the female 3-pin connector on the charger jumper
cable (supplied).
3. Connect RED and BLACK connector on the charger jumper cable to the RED and
BLACK connector on the battery pack.
4. Plug the charger’s AC power cord into the grounded 110-volt wall outlet.
5. When charging is complete, turn charger off.
6. Disconnect the charger jumper cable from the battery pack.
7. Reconnect the RED and BLACK connector from the battery pack to the wheelchair
harness.
AC Power Cord
Independent
Charger
3-Pin Charger
Connector
RED and
BLACK Battery
Connectors
Female 3-Pin
Connector
Plug into Wall Outlet
Charger Jumper Cable
Battery
Pack
FIGURE 8.8 Charging Using an Independent Charger - Charger Plugged Directly to Batteries
- At’m Only
Part No. 1125078 53 At’m and At’m QT
Page 54

SECTION 8—BATTERIES
Charger Plugged Directly to Batteries - At’m QT Only
NOTE: For this procedure, refer to FIGURE 8.9.
1. If necessary, remove the battery box from the wheelchair. Refer to
Removing/Installing the Battery Box on the At’m QT on page 46.
2. Slide the charger port cap (located on the battery box) to one side.
3. Plug the charger connector into the charger port located on the battery box
(FIGURE 8.9).
4. Plug the charger power cord into 110-volt wall outlet.
AC Power Cord
Independent Charger
3-Pin Charger Connector
Charger Port on Battery Box
Plug into Wall Outlet
Battery Box
FIGURE 8.9 Charging Using an Independent Charger - Charger Plugged Directly to Batteries
- At’m QT Only
Resetting the Circuit Breaker
WARNING
NEVER defeat or bypass the circuit breaker. Only replace with a circuit breaker of
the same rating.
At’m
NOTE: For this procedure, refer to FIGURE 8.10 on page 55.
1. Remove the battery pack from the wheelchair base. Refer to Removing/Installing the
Battery Pack on the At’m on page 40.
2. Open the battery pack by performing the following -
A. Grasp the side flaps and pull up.
B. Grasp the front flap and pull up.
At’m and At’m QT 54 Part No. 1125078
Page 55

SECTION 8—BATTERIES
3. To reset - press the circuit breaker reset button located inside the protector ring on top
of circuit breaker.
4. Close the battery pack by performing the following -
A. Fold down the front flap and press to engage the hook and loop straps.
B. Fold down the side flaps and press to engage the hook and loop straps.
NOTE: Ensure that the hook and loop straps are securely fastened before lifting the battery pack.
Front Flap
Side Flap
Circuit Breaker
Battery Pack
Side Flap
Protector
Ring
Reset Button
FIGURE 8.10 Resetting the Circuit Breaker - At’m
At’m QT
NOTE: For this procedure, refer to FIGURE 8.11.
1. To reset - press the circuit breaker button located on the battery box.
Circuit Breaker
Reset Button
Battery Box
FIGURE 8.11 Resetting the Circuit Breaker - At’m QT
Part No. 1125078 55 At’m and At’m QT
Page 56

SECTION 9—MOTORS
SECTION 9—MOTORS
WARNING
After any adjustments, repair or service and before use, make sure that all attaching
hardware is tightened securely - otherwise injury or damage may result.
Before performing any maintenance, adjustment or service verify that on/off switch
on the joystick is in the off position.
Engaging/Disengaging the Motors
WARNING
DO NOT attempt to transfer into or out of the wheelchair without the motor
engagement handles in the engaged (horizontal) position with the motor turned off.
DO NOT engage or disengage the motors until the power is off.
Push the motor engagement handles all the way down to engage the motors.
Engaging/Disengaging the motor allows free-wheeling the wheelchair or operating it by
a joystick. Free-wheeling allows an attendant to maneuver the wheelchair without power.
NOTE: For this procedure, refer to FIGURE 9.1.
1. Locate the motor engagement handle on one motor.
CAUTION
If the motor engagement handles are forced to engage in the wrong direction, the
motors will be damaged and will need to be replaced.
2. Perform one of the following:
• To Engage - Push the motor engagement handle all the way down (to the
horizontal position) towards the front of the wheelchair.
• To Disengage - Pull up the motor engagement handle (to the vertical position).
3. Repeat STEPS 1-2 to engage/disengage the other motor.
DETAIL “A” - MOTOR ENGAGED
Motor Engagement Handle
in Engaged Position
Wheel
DETAIL “B” - MOTOR DISENGAGED
Motor Engagement Handle
in Disengaged Position
Wheel
FIGURE 9.1 Engaging/Disengaging the Motors
At’m and At’m QT 56 Part No. 1125078
Page 57

SECTION 9—MOTORS
Removing/Installing Motor Shroud
NOTE: For this procedure, refer to FIGURE 9.2.
Removing
1. Disconnect the joystick. Refer to Disconnecting/Connecting the Joystick on page 40.
2. Remove the battery pack/box. Refer to Removing/Installing the Battery Pack on the
At’m on page 45 or Removing/Installing the Battery Box on the At’m QT on page 46.
3. Remove the seat. Refer to Removing/Installing the Seat
4. Remove the three mounting screws that secure the motor shroud to the base frame
and base plate.
5. Pull the motor shroud out from around the base frame and lift out.
on page 31.
Installing
1. Position the motor shroud over the motors.
2. Secure the shroud to the base frame and base plate with three mounting screws.
Securely tighten.
3. Install the seat. Refer to Removing/Installing the Seat on page 31.
4. Install the battery pack/box. Refer to Removing/Installing the Battery Pack on the At’m
on page 45 or Removing/Installing the Battery Box on the At’m QT on page 46.
5. Connect the joystick. Refer to Disconnecting/Connecting the Joystick on page 40.
Base Frame
Mounting Screws
Base Plate
Motor Shroud
Motors
NOTE: Drive Wheels not shown for clarity.
FIGURE 9.2 Removing/Installing Motor Shroud
Part No. 1125078 57 At’m and At’m QT
Page 58

SECTION 9—MOTORS
Removing/Installing the Base Plate
NOTE: For this procedure, refer to FIGURE 9.3 on page 58.
Removing
1. Disconnect the joystick. Refer to Disconnecting/Connecting the Joystick on page 40.
2. Remove the seat. Refer to Removing/Installing the Seat on page 31.
3. Remove the battery pack/box. Refer to Removing/Installing the Battery Pack on the
At’m on page 45 or Removing/Installing the Battery Box on the At’m QT on page 46.
4. Remove the motor shroud. Refer to Removing/Installing Motor Shroud on page 57.
5. Remove the two mounting screws, washers, and locknuts that secure the front of the
base plate to the base frame.
6. Remove the two mounting bolts, washers, and locknuts to remove the left battery pack
bracket.
7. Repeat STEP 6 for the right battery pack bracket.
8. Remove the base plate.
Mounting
Bolts
Left Battery Pack
Bracket
Washers
FIGURE 9.3 Removing/Installing the Base Plate
Right Battery Pack Bracket
Mounting Screws
Base Plate
Base Frame
Locknuts
Installing
1. Install the left battery pack bracket using two mounting bolts, washers, and locknuts.
2. Repeat STEP 1 for the right battery pack bracket.
3. Secure the base plate on the base frame using the two mounting screws, washers, and
locknuts. Securely tighten.
At’m and At’m QT 58 Part No. 1125078
Page 59

SECTION 9—MOTORS
4. Install the battery pack/box. Refer to Removing/Installing the Battery Pack on the At’m
on page 45 or Removing/Installing the Battery Box on the At’m QT on page 46.
5. Install the seat. Refer to Removing/Installing the Seat on page 31.
6. Connect the joystick. Refer to Disconnecting/Connecting the Joystick on page 40.
Removing/Installing MK5 Controller
NOTE: For this procedure, refer to FIGURE 9.4 on page 59 and FIGURE 9.5 on page 60.
Removing
1. Disconnect the joystick. Refer to Disconnecting/Connecting the Joystick on page 40.
2. Remove the battery pack/box. Refer to Removing/Installing the Battery Pack on the
At’m on page 45 or Removing/Installing the Battery Box on the At’m QT on page 46.
3. Remove the seat. Refer to Removing/Installing the Seat on page 31.
4. Remove the motor shroud. Refer to Removing/Installing Motor Shroud on page 57.
5. From the controller, unplug the following connectors (not shown):
A. The joystick connector
B. The battery connector
C. The right motor connector
D. The left motor connector
6. Remove the two mounting screws and coved washers that secure the controller to the
base frame.
DETAIL “A”
Coved
Washer
Mounting Screws
NOTE: Motors, drive wheels, and connectors not shown.
Base Plate
MK5 Controller
Coved
Washer
Base
Frame
Base Plate
Mounting Screws
DETAIL “B”
MK5 Controller
Base Frame
FIGURE 9.4 Removing/Installing MK5 Controller
Part No. 1125078 59 At’m and At’m QT
Page 60

SECTION 9—MOTORS
Installing
1. Mount the controller to the base frame with the two mounting screws and coved
washers.
2. Plug the following connectors into the controller:
A. The joystick connector
B. The battery connector
C. The right motor connector
D. The left motor connector
3. Install the motor shroud. Refer to Removing/Installing Motor Shroud on page 57.
4. Install the seat. Refer to Removing/Installing the Seat on page 31.
5. Install tthe battery pack/box. Refer to Removing/Installing the Battery Pack on the
At’m on page 45 or Removing/Installing the Battery Box on the At’m QT on page 46.
6. Connect the joystick. Refer to Disconnecting/Connecting the Joystick
Plug
Joystick
HERE
Plug LEFT
Motor HERE
Plug Battery HERE
Plug RIGHT
Motor HERE
on page 40.
FIGURE 9.5 Removing/Installing MK5 Controller - Installing
Removing/Installing the Motors
NOTE: For this procedure, refer to FIGURE 9.6.
NOTE: Ensure that the motor engagement handles are disengaged.
Removing
1. Disconnect the joystick. Refer to Disconnecting/Connecting the Joystick on page 40.
2. Remove the seat. Refer to Removing/Installing the Seat on page 31.
3. Remove the battery pack/box. Refer to Removing/Installing the Battery Pack on the
At’m on page 45 or Removing/Installing the Battery Box on the At’m QT on page 46.
4. Remove the drive wheel. Refer to Removing/Installing the Drive Wheels
5. Remove the motor shroud. Refer to Removing/Installing Motor Shroud
on page 69.
on page 57.
6. Unplug the motor from the controller.
7. Remove the two mounting bolts, coved bracket, two washers, and two locknuts that
secure the motor to the base frame (Detail “B” of FIGURE 9.6).
8. Repeat STEPS 1 - 7 for the other motor.
At’m and At’m QT 60 Part No. 1125078
Page 61

SECTION 9—MOTORS
Unplug/Plug
LEFT Motor
HERE
DETAIL “A”
Motor
Coved Bracket
Washers
Mounting
Bolts
Locknuts
Unplug/Plug
RIGHT Motor
HERE
DETAIL “B”
FIGURE 9.6 Removing/Installing the Motors
Installing
1. Secure the motor to base frame with the two mounting bolts, coved bracket, two
washers, and two locknuts (Detail “B” of FIGURE 9.6).
2. Plug the motor into the controller.
3. Install the motor shroud. Refer to Removing/Installing Motor Shroud on page 57.
4. Install the battery pack/box. Refer to Removing/Installing the Battery Pack on the At’m
on page 45 or Removing/Installing the Battery Box on the At’m QT on page 46.
5. Install the seat. Refer to Removing/Installing the Seat on page 31.
6. Connect the joystick. Refer to Disconnecting/Connecting the Joystick on page 40.
Replacing the Knurled Cylinder
NOTE: For this procedure, refer to FIGURE 9.7 on page 63.
NOTE: It is recommended that two people perform this procedure in order to properly secure the
motor during roll-pin removal.
NOTE: The roll-pin must be replaced when performing this procedure.
1. Disconnect the joystick. Refer to Disconnecting/Connecting the Joystick
2. Remove the seat. Refer to Removing/Installing the Seat
on page 31.
3. Remove the battery pack/box. Refer to Removing/Installing the Battery Pack on the
At’m on page 45 or Removing/Installing the Battery Box on the At’m QT on page 46.
on page 40.
4. Remove the motor shroud. Refer to Removing/Installing Motor Shroud on page 57.
Part No. 1125078 61 At’m and At’m QT
Page 62

SECTION 9—MOTORS
5. Remove the motor from the base frame. Refer to Removing/Installing the Motors on
page 60.
6. Remove the swing arm screw.
7. Remove the swing arm bracket screw.
8. Remove the two shroud screws securing the cylinder shroud.
9. Remove the cylinder shroud.
10. With a 1/8-inch punch and hammer, gently tap out the roll-pin that secures the
knurled drive cylinder to the drive shaft.
CAUTION
DO NOT use excessive force handling the roll-pin, otherwise damage will occur.
11. Slide the knurled drive cylinder off the drive shaft.
12. Install a new knurled drive cylinder onto the drive shaft.
13. Align the holes in the knurled drive cylinder with the holes in the drive shaft.
14. Insert a new roll pin into the mounted knurled drive cylinder.
15. With a 1/8-inch punch and hammer, gently tap the roll-pin into place.
CAUTION
DO NOT use excessive force handling the roll-pin, otherwise damage will occur.
16. Install the cylinder shroud and align it with swing arm and swing arm bracket.
17. Secure the cylinder shroud with the two shroud screws.
18. Secure the swing arm bracket with the one swing arm bracket screw.
19. Secure the swing arm with the one swing arm screw.
20. Install the motor to the base frame. Refer to Removing/Installing the Motors
page 60.
21. Install the motor shroud. Refer to Removing/Installing Motor Shroud on page 57.
22. Install the battery pack/box. Refer to Removing/Installing the Battery Pack on the At’m
on page 45 or Removing/Installing the Battery Box on the At’m QT on page 46.
23. Install the seat. Refer to Removing/Installing the Seat
24. Reconnect the joystick. Refer to Disconnecting/Connecting the Joystick
on page 31.
on
on page 40
At’m and At’m QT 62 Part No. 1125078
Page 63

SECTION 9—MOTORS
Knurled Drive
Cylinder
Shroud
Shroud
Screws
Swing Arm Screw
Roll-Pin
Cylinder
Drive
Shaft
Swing Arm
Bracket Screw
Motor
Swing Arm
Bracket
FIGURE 9.7 Replacing the Knurled Cylinder
Swing Arm
Assembly
Part No. 1125078 63 At’m and At’m QT
Page 64

SECTION 10—FRONT RIGGINGS
SECTION 10—FRONT RIGGINGS
WARNING
After any adjustments, repair or service and before use, make sure that all attaching
hardware is tightened securely - otherwise injury or damage may result.
Before performing any maintenance, adjustment or service verify that On/Off
switch on the joystick is in the Off position.
NOTE: This sections applies to the At’m wheelchair only.
Installing/Removing the Front Rigging Support Brackets
NOTE: For this procedure, refer to FIGURE 10.1 on page 65.
NOTE: Perform the following steps one side at a time.
1. Remove the plug button from the seat frame tube.
2. Note the orientation of the hardware that connects front seat support tube to the seat
frame tube.
3. Remove the mounting screw, coved washers, spacers, washers and locknut securing
front seat support tube to the seat frame tube. DO NOT discard.
4. Insert the proper (right or left) front rigging support bracket into the seat frame tube
until two of the four mounting holes on the front rigging support bracket are aligned
with the two mounting holes in the seat frame tube.
CAUTION
Two mounting screws are used to secure the front rigging support bracket to the
seat frame tube for any mounting position used.
5. Install the existing mounting screw, coved washers, spacers, washers and locknut that
secure front seat support tube to the seat frame tube in the orientation noted in STEP
2. DO NOT tighten locknut at this time.
6. Install the new mounting screw, spacer and locknut (hardware supplied) through the
large mounting hole on the seat frame tube. Securely tighten.
NOTE: Make sure that the spacer is aligned with the large mounting hole in the seat frame tube
and is properly seated against the front rigging support bracket during and after tightening. Refer
to Detail “A” of FIGURE 10.1.
7. Tighten the locknut securing the front seat tube to the seat frame until it is snug and
then turn an extra 1/8-turn. DO NOT over-tighten as this is a pivot joint when folding
the seat.
8. Repeat STEPS 1-7 to install the front rigging support bracket on the other side.
At’m and At’m QT 64 Part No. 1125078
Page 65

SECTION 10—FRONT RIGGINGS
DETAIL “A”
Seat Frame Tube
Locknut
Existing Mounting
*Large Mounting Hole
Spacer
*Small Mounting Hole
Spacer
Screw
Spacer
Seat Frame Tube
Front Seat
Support Tube
New Mounting
Screw
Locknut
Spacer
Coved Washers
Front Rigging
Support
Bracket
Front Seat
Support
Tube
Mounting Holes
on Front Riggings
Support Bracket
Front Rigging
Support Bracket
*NOTE: Mounting hole arrangement on 16-inch wide seat shown. On the 18-inch wide seat, the
mounting hole positions are reversed.
FIGURE 10.1 Installing/Removing the Front Rigging Support Brackets
Installing/Removing the Front Rigging Assembly
NOTE: For this procedure, refer to FIGURE 10.2 on page 66.
Installing
1. Turn the front rigging assembly to the side (open footrest is perpendicular to the
wheelchair).
2. Insert the mounting pin on the front rigging assembly into the front rigging support
bracket.
3. Rotate the front rigging assembly towards the inside of the wheelchair until it locks
into place.
NOTE: The footplate will be facing the inside of the wheelchair when locked in place.
4. Repeat STEPS 1-3 for the other front rigging assembly.
5. If necessary, adjust the footrest height. Refer to Adjusting Footrest Height on page 66.
Part No. 1125078 65 At’m and At’m QT
Page 66

SECTION 10—FRONT RIGGINGS
Removing
1. Push the front rigging release lever inward while rotating the front rigging assembly
outward.
2. Lift the front rigging assembly out of the front rigging support bracket.
3. Repeat STEPS 1-2 for the other front rigging assembly, if necessary.
Mounting Pin
Seat Frame Tube
Inside of
Wheelchair
Front Rigging
Release Lever
Front Rigging
Support Bracket
Front Rigging
Assembly
Outside of
Wheelchair
Footrest
FIGURE 10.2 Installing/Removing the Front Rigging Assembly
Adjusting Footrest Height
NOTE: For this procedure, refer to FIGURE 10.3.
1. Remove the front rigging assembly. Refer to Installing/Removing the Front Rigging
Assembly on page 65.
2. Remove the hex screw and coved spacer.
3. Move the footrest with slide tube up or
down on its mounting tube until the
desired footrest height is achieved.
Hex
Screw
Front Rigging
Upper Support
4. Install the hex screw and coved spacer
through the front rigging upper
support and the slide tube. Securely
tighten.
Coved
Spacer
Slide
Tube
5. Install the front rigging assembly. Refer
to Installing/Removing the Front
Rigging Assembly on page 65.
6. Repeat STEPS 1-5 for the other side, if
FIGURE 10.3 Adjusting Footrest Height
Footrest
necessary.
At’m and At’m QT 66 Part No. 1125078
Page 67

SECTION 11—WHEELS AND CASTERS
SECTION 11—WHEELS AND
CASTERS
WARNING
After any adjustments, repair or service and before use, make sure that all attaching
hardware is tightened securely - otherwise injury or damage may result.
Before performing any maintenance, adjustment or service verify that on/off switch
on the joystick is in the off position.
DO NOT USE YOUR WHEELCHAIR UNLESS IT HAS THE PROPER TIRE
PRESSURE (P.S.I.) - OTHERWISE THE WHEELCHAIR MAY NOT DRIVE
CORRECTLY, STOP CORRECTLY OR MAY EXPERIENCE ERRATIC
PERFORMANCE.
DO NOT overinflate the tires. Failure to follow these suggestions may cause the
tire to explode and cause bodily harm. The recommended tire pressure is listed on
the side wall of the tire.
Keep fingers and clothing clear of drive wheels.
CAUTION
As with any vehicle, the wheels, casters and tires should be checked periodically for
cracks and wear and should be replaced.
Replacing Front Casters
NOTE: For this procedure, refer to
FIGURE 11.1.
1. Remove the mounting bolt, two spacers
and locknut that secures the caster to
the fork.
2. Remove the front caster and discard.
3. Secure new front caster to fork with the
existing mounting bolt, two spacers
and locknut. Securely tighten.
4. Repeat STEPS 1-3 for the other caster.
Wheelchair
Frame
Locknut
Spacer
Front Caster
Fork
Mounting
Bolt
Spacer
FIGURE 11.1 Replacing Front Casters
Part No. 1125078 67 At’m and At’m QT
Page 68

SECTION 11—WHEELS AND CASTERS
Replacing Forks
NOTE: For this procedure, refer to FIGURE 11.2 on page 69.
1. Remove the headtube caps from the caster headtubes.
2. Remove the locknut and washer that secure the fork to the caster head tube.
3. Remove the caster from the old fork and install on the new fork. Refer to Replacing
Front Casters on page 67
4. Insert the new fork into the wheelchair frame and secure with one locknut and washer.
5. Adjust the forks. Refer to Adjusting Forks on page 68.
6. Replace the headtube caps on the caster headtube.
Adjusting Forks
NOTE: For this procedure, refer to FIGURE 11.2 on page 69.
1. Remove the headtube caps from the caster headtubes.
2. To properly tighten the caster journal system and guard against flutter, perform the
following check:
A. Remove battery pack from wheelchair. Refer to Removing/Installing the Battery
Pack on the At’m on page 45.
B. Tip back the wheelchair to floor.
C. Simultaneously, pivot both forks and casters to the top of their arc.
D. Let casters drop to bottom of arc (wheels should swing once to one-side, then
immediately rest in a straight downward position).
E. Adjust locknuts according to freedom of caster swing.
F. Bring wheelchair back to driving position.
G. Install the battery pack. Refer to Removing/Installing the Battery Pack on the At’m
on page 45.
3. Test wheelchair for maneuverability.
4. Readjust locknuts if necessary, and repeat STEPS 1-3 until correct.
5. Snap headtube caps into the caster headtubes.
At’m and At’m QT 68 Part No. 1125078
Page 69

SECTION 11—WHEELS AND CASTERS
Fork Stem
Fork
Front Caster
FIGURE 11.2 Replacing Forks - Adjusting Forks
Headtube Cap
Locknut
Washer
Caster Headtube
Removing/Installing the Drive Wheels
WARNING
Maintain tire pressure at 30 p.s.i. Otherwise, the wheelchair may not drive correctly, stop correctly or may experience erratic performance.
NOTE: For this procedure, refer to FIGURE 11.3 on page 70.
Removing
1. Disengage the motors. Refer to Engaging/Disengaging the Motors on page 56.
2. Push and hold the quick-release button on the drive axle and pull the drive wheel out
of the wheelchair frame.
3. Repeat STEPS 1-2 for the other drive wheel.
Installing
1. Align drive axle with the wheelchair frame.
2. Push and hold the quick-release button on the drive wheel and push the drive wheel
into the wheelchair frame.
3. Engage the motor. Refer to Engaging/Disengaging the Motors on page 56.
4. Repeat STEPS 1-3 for the other drive wheel.
Part No. 1125078 69 At’m and At’m QT
Page 70

SECTION 11—WHEELS AND CASTERS
WARNING
Pull the drive wheel to ensure that the drive wheel is locked in place before operating the wheelchair. Otherwise, serious injury or damage may occur.
Side view
Quick-Release
Top view
Button
Wheelchair
Frame
Drive Wheel
Drive Axle
Drive Wheel
Motor Engagement Handle in
the Disengaged Position
NOTE: Removing/installing the drive wheel on the At’m shown. The drive wheel on the At’m
QT installs/removes the same way.
FIGURE 11.3 Removing/Installing the Drive Wheels
Replacing Drive Wheels on the Drive Axle
WARNING
Maintain tire pressure at 30 p.s.i.
NOTE: For this procedure, refer to FIGURE 11.4.
1. Remove the drive wheel. Refer to
Removing/Installing the Drive Wheels
on page 69.
2. Depress the quick release button on the
drive axle, and remove the axle from
the tire.
3. Insert the drive axle into a new drive
wheel.
4. Replace the drive wheel onto the chair.
Refer to Removing/Installing the Drive
Wheels on page 69.
At’m and At’m QT 70 Part No. 1125078
Drive Wheel
Drive Axle
Quick Release
Button
FIGURE 11.4 Replacing Drive Wheels on
the Drive Axle
Page 71

SECTION 12—ANTI-TIPPERS
SECTION 12—ANTI-TIPPERS
WARNING
After any adjustments, repair or service and before use, make sure that all attaching
hardware is tightened securely - otherwise injury or damage may result.
Before performing any maintenance, adjustment or service verify that on/off switch
on the joystick is in the off position.
Removing/Installing the Anti-Tippers
WARNING
Anti-tippers MUST be fully engaged before using the wheelchair.
Ensure both anti-tippers have the same ground clearance.
A 1½ to 2-inch clearance between the bottom of the anti-tipper wheels and the
ground/floor MUST be maintained at all times.
Anti-tippers MUST be used at all times. When outdoors on wet, soft ground or
gravel surfaces, anti tippers may not provide the same level of protection against tip
over. Extra caution must be observed when traversing such surfaces.
At’m
NOTE: For this procedure, refer to FIGURE 12.1 on page 72.
Removing
1. Disconnect the joystick. Refer to Disconnecting/Connecting the Joystick on page 40.
2. Remove the battery pack. Refer to Removing/Installing the Battery Pack on the At’m
on page 45.
3. Remove the seat. Refer to Removing/Installing the Seat on page 31.
4. Remove the two mounting bolts, four washers, two locknuts, and four coved washers
that secure the anti-tipper to the base frame (FIGURE 12.1).
5. Repeat STEP 4 for the other anti-tipper.
Installing
1. Install the anti-tippers to the base frame using the two mounting bolts, four washers,
two locknuts, and four coved washers that secure the anti-tipper to the base frame
(FIGURE 12.1).
2. Repeat STEP 1 for the other anti-tipper.
3. Install the battery pack. Refer to Removing/Installing the Battery Pack on the At’m on
page 45.
4. Connect the joystick. Refer to Disconnecting/Connecting the Joystick
Part No. 1125078 71 At’m and At’m QT
on page 40.
Page 72

SECTION 12—ANTI-TIPPERS
Mounting Bolts
Base Frame
Coved Washers
Anti-Tippers
Washers
Washers
Washers
Coved Washers
Washers
Locknuts
FIGURE 12.1 Removing/Installing the Anti-Tippers - At’m
At’m QT
NOTE: For this procedure, refer to FIGURE 12.2 on page 73.
Removing
1. Disconnect the joystick. Refer to Disconnecting/Connecting the Joystick on page 40.
2. Remove the battery box. Refer to Removing/Installing the Battery Box on the At’m QT
on page 46.
3. Remove the seat. Refer to Removing/Installing the Seat on page 31.
4. Remove the four coved washers, two washers and two locknuts that secure the
anti-tipper to the base frame.
NOTE: It is not necessary to remove the hex head screws from the wheelchair base to remove the
anti-tipper.
5. Repeat STEP 4 for the other anti-tipper.
Installing
1. Install the anti-tippers to the base frame using the four coved washers, two washers
and two locknuts.
2. Repeat STEP 1 for the other anti-tipper.
3. Install the battery box. Refer to Removing/Installing the Battery Box on the At’m QT
on page 46.
4. Install the seat. Refer to Removing/Installing the Seat on page 31.
5. Connect the joystick. Refer to Disconnecting/Connecting the Joystick on page 40.
At’m and At’m QT 72 Part No. 1125078
Page 73

SECTION 12—ANTI-TIPPERS
Base Frame
Washer
Locknuts
FIGURE 12.2 Removing/Installing the Anti-Tippers - At’m QT
Hex Head Screws
Coved Washer
Anti-Tipper
Part No. 1125078 73 At’m and At’m QT
Page 74

SECTION 13—TRANSPORTING THE WHEELCHAIR
SECTION 13—TRANSPORTING THE
WHEELCHAIR
WARNING
After any adjustments, repair or service and before use, make sure all attaching
hardware is tightened securely - otherwise injury or damage may result.
ALWAYS transport the battery pack/box in an upright and secure manner. To
prevent damage, do not transport the battery pack/box with other objects that
could suddenly shift during transportation, unless they are secured or in a different
vehicle area. DO NOT transport battery pack/box with gas cans or similar
containers in the same vehicle area.
The weight of the wheelchair without the user and batteries is approximately 74 lbs.
Use proper lifting techniques (lift with your legs) to avoid injury. Extreme caution is
advised when it is necessary to move an unoccupied power wheelchair. Invacare
recommends using two assistants and making thorough preparations. Make sure to
use only secure, non-detachable parts for hand-hold supports.
NOTE: For this procedure, refer to FIGURE 13.1 on page 75.
1. Remove the occupant from the wheelchair.
2. Remove the battery pack or battery box. Refer to Removing/Installing the Battery Pack
on the At’m on page 45 or Removing/Installing the Battery Box on the At’m QT on
page 46.
3. Remove the seat. Refer to Removing/Installing the Seat on page 31.
4. Remove any accessories on the wheelchair.
5. Bend your knees and keep your back straight.
6. Using non-removable (nondetachable) parts, transfer the seat, battery pack or battery
box, wheelchair base and any accessories to the desired location.
7. Reinstall any accessories that were removed in STEP 3.
8. Reinstall the seat. Refer to Removing/Installing the Seat on page 31.
9. Reinstall the battery pack or battery box. Refer to Removing/Installing the Battery
Pack on the At’m on page 45 or Removing/Installing the Battery Box on the At’m QT
on page 46.
At’m and At’m QT 74 Part No. 1125078
Page 75

Fully Assembled Chair
NOTE: At’m wheelchair
shown. The At’m QT
assembles the same way.
DETAIL “A” - READY FOR TRANSPORTATION
SECTION 13—TRANSPORTING THE WHEELCHAIR
Seat
Battery
Pack
Base
NOTE: At’m wheelchair shown. At’m QT transports the same way and has a battery box
instead of a battery pack.
FIGURE 13.1 Transporting the Wheelchair
Part No. 1125078 75 At’m and At’m QT
Page 76

LIMITED WARRANTY
For warranty information, please refer to the original owner's manual which came with
this product, or contact Invacare for more information.
Invacare Corporation
USA
One Invacare Way
Elyria, Ohio USA
44036-2125
800-333-6900
www.invacare.com
Canada
570 Matheson Blvd E Unit 8
Mississauga Ontario
L4Z 4G4 Canada
800-668-5324
Invacare, Yes, you can. and the Medallion
Design are registered trademarks of
Invacare Corporation.
MK
is a trademark of Invacare
5
Corporation.
Phillips is a registered trademark of Phillips
Corporation.
© 2006 Invacare Corporation
Part No. 1125078
Rev C - 12/06/06
 Loading...