

Page 1
(120IO) SEQUOIA SPIRIT™ WOOD-GRAIN FRAME POOL ENGLISH 7.5” X 10.3” PANTONE 295U 05/26/2016
English
120A
IMPORTANT
SAFETY RULES
Please read, understand, and follow
all instructions carefully before
installing and using this product.
keep for future reference.
TM
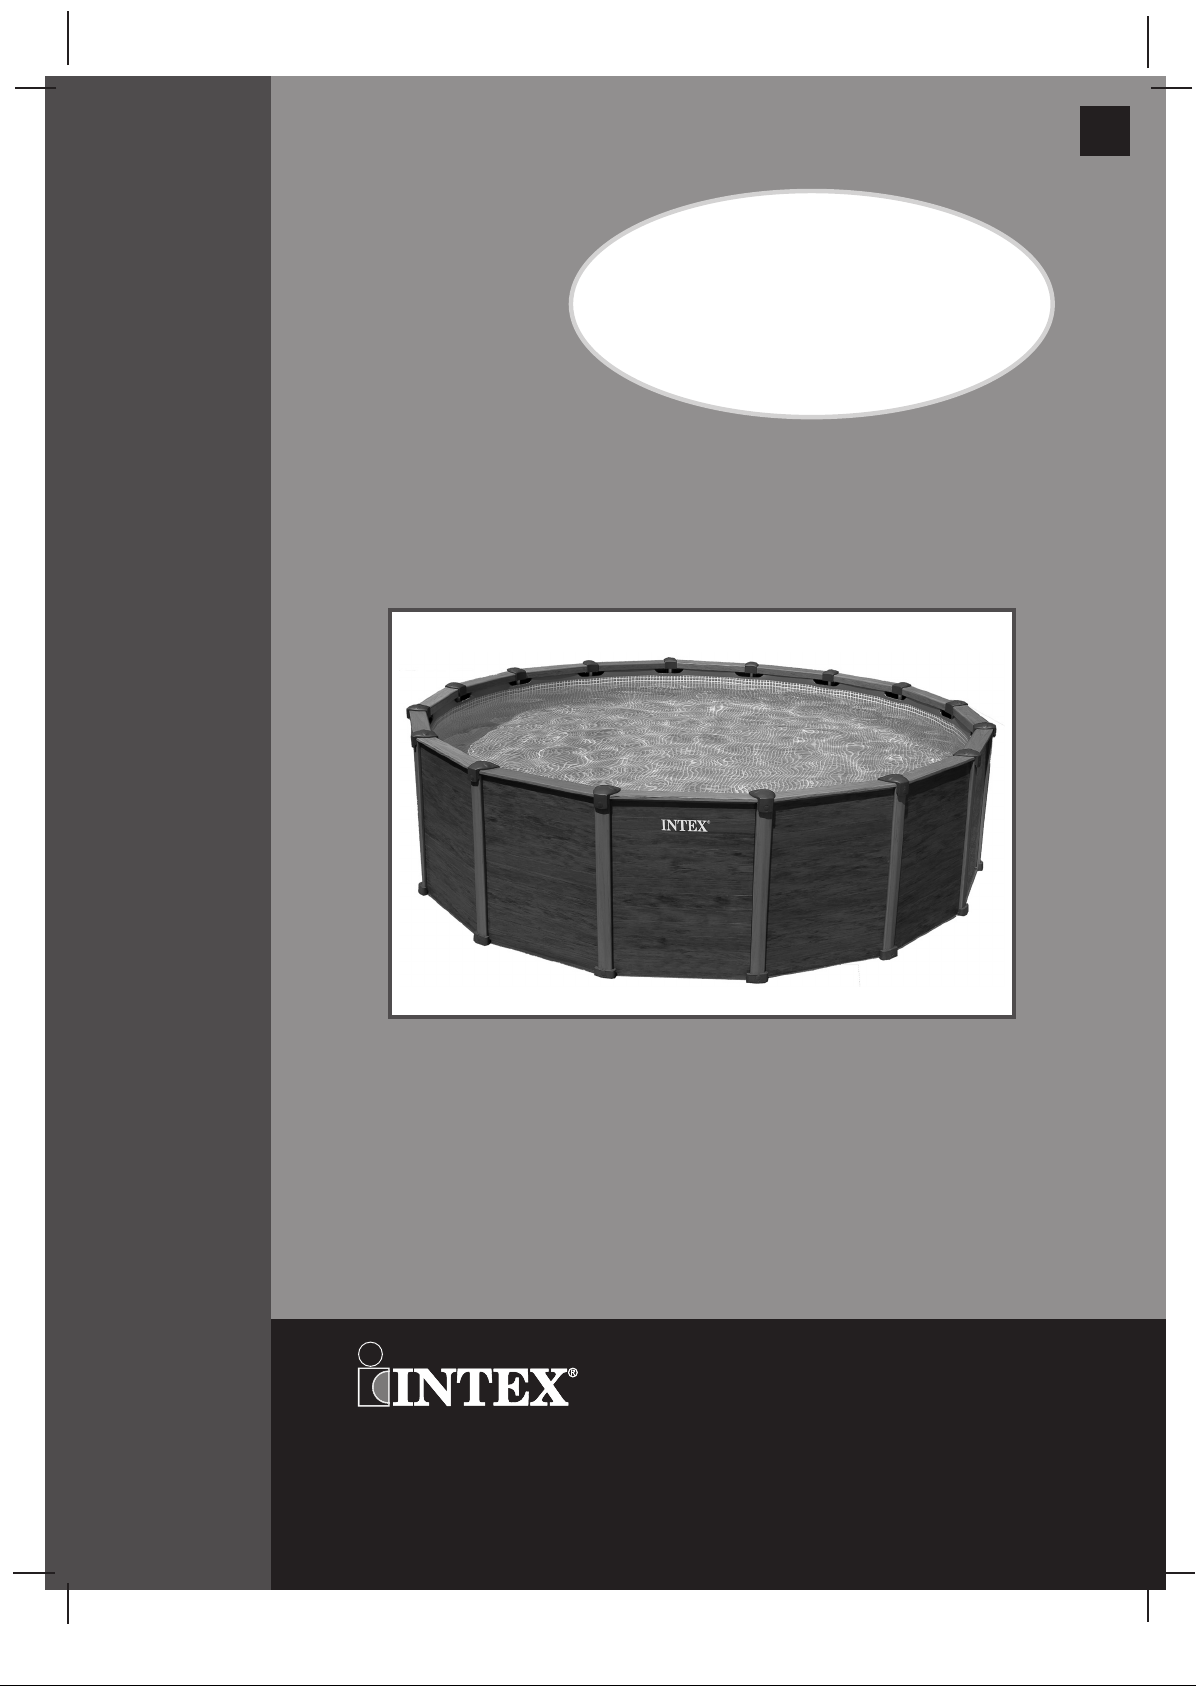
GRAPHITE GRAY PANEL POOL SET
15’8” (478 cm) & 18’8” (569 cm) models
For illustrative purposes only. Accessories may not be provided with pool.
Don’t forget to try these other fine Intex products: Pools, Pool
Accessories, Inflatable Pools and In-Home Toys, Airbeds and
Boats available at fine retailers or visit our website listed below.
Due to a policy of continuous product improvement, Intex
reserves the right to change specifications and appearance,
which may result in updates to the instruction manual without
notice.
©2016 Intex Marketing Ltd. - Intex Development Co. Ltd. - Intex Trading Ltd.
- Intex Recreation Corp.
Rechte vorbehalten. Printed in China/Imprimé en Chine/Impreso en China/Gedruckt in China.
®™ Trademarks used in some countries of the world under license from/®™ Marques utilisées dans certains pays sous
licence de/Marcas registradas utilizadas en algunos países del mundo bajo licencia de/Warenzeichen verwendet in einigen
Ländern der Welt in Lizenz von/
OWNER’S MANUAL
Box 28829, Hong Kong & Intex Recreation Corp., P.O. Box 1440, Long Beach, CA 90801
Union by/Distribué dans l’Union Européenne par/Distribuido en la unión Europea por/Vertrieb in der Europäischen Union
Intex Trading B.V., Venneveld 9, 4705 RR Roosendaal – The Netherlands
durch/
www.intexcorp.com
All rights reserved/Tous droits réservés/Todos los derechos reservados/Alle
Intex Marketing Ltd. to/à/a/an Intex Trading Ltd., Intex Development Co. Ltd., G.P.O
• Distributed in the European
120-*A*-R0-1705
Page 2

(120IO) SEQUOIA SPIRIT™ WOOD-GRAIN FRAME POOL ENGLISH 7.5” X 10.3” PANTONE 295U 05/26/2016
TABLE OF CONTENTS
Warnings / Important safety rules
Parts References
Setup Instructions
Pool Maintenance and Chemicals
Common Pool Problems
Pool Draining
Storage
.............................................................................................
.............................................................................
...........................................................................
................................................................
...................................................................................
.................................................
.................................................
English
3-4
5-6
7-15
16-17
16
17
17-18
120A
General Aquatic Safety
Limited Warranty
............................................................................
...................................................................
18
19
Special Introductory note:
Thanks for buying an Intex pool and enclosure. Please read this manual before setting up
your pool and enclosure. This information will help extend the pool life and make the pool safer
for your family's enjoyment. View the video included before installation. A team of 2-3 people is
recommended for pool and enclosure set up. Additional people will speed up the installation.
No tools are required for the assembly.
SAVE THESE INSTRUCTIONS
Page 2
Page 3

(120IO) SEQUOIA SPIRIT™ WOOD-GRAIN FRAME POOL ENGLISH 7.5” X 10.3” PANTONE 295U 05/26/2016
English
IMPORTANT SAFETY RULES
Read, Understand and Follow All Instructions Carefully Before Installing and Using this Product.
WARNING
Continuous and competent adult supervision of children and the disabled is required at all times.
•
• Secure all doors, windows and safety barriers to prevent unauthorized, unintentional or unsupervised pool
entry.
• Install a safety barrier that will eliminate access to the pool for young children and pets.
• Pool and pool accessories are to be assembled and disassembled by adults only.
• Never dive, jump or slide into an above-ground pool or any shallow body of water.
• Failure to set up pool on flat, level, compact ground or over filling could result in the pool’s collapse and the
possibility that a person lounging in the pool could be swept out/ejected.
• Do not lean, straddle, or exert pressure on the inflatable ring or top rim as injury or flooding could occur. Do
not allow anyone to sit on, climb, or straddle the sides of the pool.
• Remove all toys and flotation devices from, in, and around the pool when it is not in use. Objects in the pool
attract young children.
• Keep toys, chairs, tables, or any objects that a child could climb on at least four feet (1.22 meters) away
from the pool.
• Keep rescue equipment by the pool and clearly post emergency numbers at the phone closest to the pool.
Examples of rescue equipment: coast guard approved ring buoy with attached rope, strong rigid pole not
less than twelve feet (12') [3.66m] long.
• Never swim alone or allow others to swim alone.
• Keep your pool clean and clear. The pool floor must be visible at all times from the outside barrier of the
pool.
• If swimming at night use properly installed artificial lighting to illuminate all safety signs, ladders, pool floor
and walkways.
• Stay away from the pool when using alcohol or drugs/medication.
• Keep children away from pool covers to avoid entanglement, drowning, or other serious injury.
• Pool covers must be completely removed before pool use. Children and adults cannot be seen under a pool
cover.
• Do not cover the pool while you or anyone else is in the pool.
• Keep the pool and pool area clean and clear to avoid slips and falls and objects that may cause injury.
• Protect all pool occupants from recreational water illnesses by keeping the pool water sanitized. Don’t
swallow the pool water. Practice good hygiene.
• All pools are subject to wear and deterioration. Certain types of excessive or accelerated deterioration can
lead to an operation failure, and can ultimately cause the loss of large quantities of water from your pool.
Therefore, it is very important that you properly maintain your pool on a regular basis.
• This pool is for outdoor use only.
• Empty pool completely when not in use for a longer period and safely store the empty pool in such a way
that it does not collect water from rain or any other source, and to prevent from being blown away by strong
wind. See storage instructions.
• While the swimming pool is in use, you will need to operate the filter pump to ensure that there is at least
one complete change of water a day. Consult your pump’s manual to calculate the necessary
operating hours.
120A
POOL BARRIERS AND COVERS ARE NOT SUBSTITUTES FOR CONTINUOUS AND COMPETENT
ADULT SUPERVISION. POOL DOES NOT COME WITH A LIFEGUARD. ADULTS ARE THEREFORE
REQUIRED TO ACT AS LIFEGUARDS OR WATER WATCHERS AND PROTECT THE LIVES OF ALL
POOL USERS, ESPECIALLY CHILDREN, IN AND AROUND THE POOL.
FAILURE TO FOLLOW THESE WARNINGS MAY RESULT IN PROPERTY
DAMAGE, SERIOUS INJURY OR DEATH.
Advisory:
Pool owners may need to comply with local or state laws relating to childproof fencing, safety barriers, lighting,
and other safety requirements. Customers should contact their local building code enforcement office for
further details.
SAVE THESE INSTRUCTIONS
Page 3
Page 4

(120IO) SEQUOIA SPIRIT™ WOOD-GRAIN FRAME POOL ENGLISH 7.5” X 10.3” PANTONE 295U 05/26/2016
English
IMPORTANT SAFETY RULES
Please read, understand, and follow all instructions carefully before installing and using this product. These
warnings, instructions, and safety guidelines address some common risks of water recreation, but they cannot
cover all risks and dangers in all cases. Always use caution, common sense, and good judgment when
enjoying any water activity. Keep for future reference. Packaging must be read carefully and kept for future
reference. See product for additional warnings.
General
• Check pins, bolts and screws for rust; splinters or any sharp edges regularly, especially accessible surfaces,
to avoid injuries.
Non swimmers safety
• Continuous, active, and vigilant supervision of weak swimmers and non-swimmers by a competent adult is
required at all times (remembering that children under five are at the highest risk of drowning).
• Designate a competent adult to supervise the pool each time it is being used.
• Weak swimmers or non-swimmers should wear personal protection equipment when using the pool.
• When the pool is not in use, or unsupervised, remove all toys from the swimming pool and its surrounding to
avoid attracting children to the pool.
Safety devices
• It is recommended to install a barrier (and secure all doors and windows, where applicable) to prevent
unauthorized access to the swimming pool.
• Barriers, pool covers, pool alarms, or similar safety devices are helpful aids, but they are not substitutes for
continuous and competent adult supervision.
Safety equipment
• It is recommended to keep rescue equipment (e.g. a ring buoy) by the pool.
• Keep a working phone and a list of emergency phone numbers near the pool.
Safe use of the pool
• Encourage all users especially children to learn how to swim
• Learn Basic Life Support (Cardiopulmonary Resuscitation - CPR) and refresh this knowledge regularly. This
can make a life-saving difference in the event of an emergency.
• Instruct all pool users, including children, what to do in case of an emergency
• Never dive into any shallow body of water. This can lead to serious injury or death.
• Do not use the swimming pool when using alcohol or medication that may impair your ability to safely use
the pool.
• When pool covers are used, remove them completely from the water surface before entering the pool.
• Protect pool occupants from water related illnesses by keeping the pool water treated and practicing good
hygiene. Consult the water treatment guidelines in the user’s manual.
• Store chemicals (e.g. water treatment, cleaning or disinfection products) out of the reach of children.
• Removable ladders shall be placed on a horizontal surface.
• Observe and follow the warnings and safety signs on the pool wall.
120A
SAVE THESE INSTRUCTIONS
Page 4
Page 5

(120IO) SEQUOIA SPIRIT™ WOOD-GRAIN FRAME POOL ENGLISH 7.5” X 10.3” PANTONE 295U 05/26/2016
English
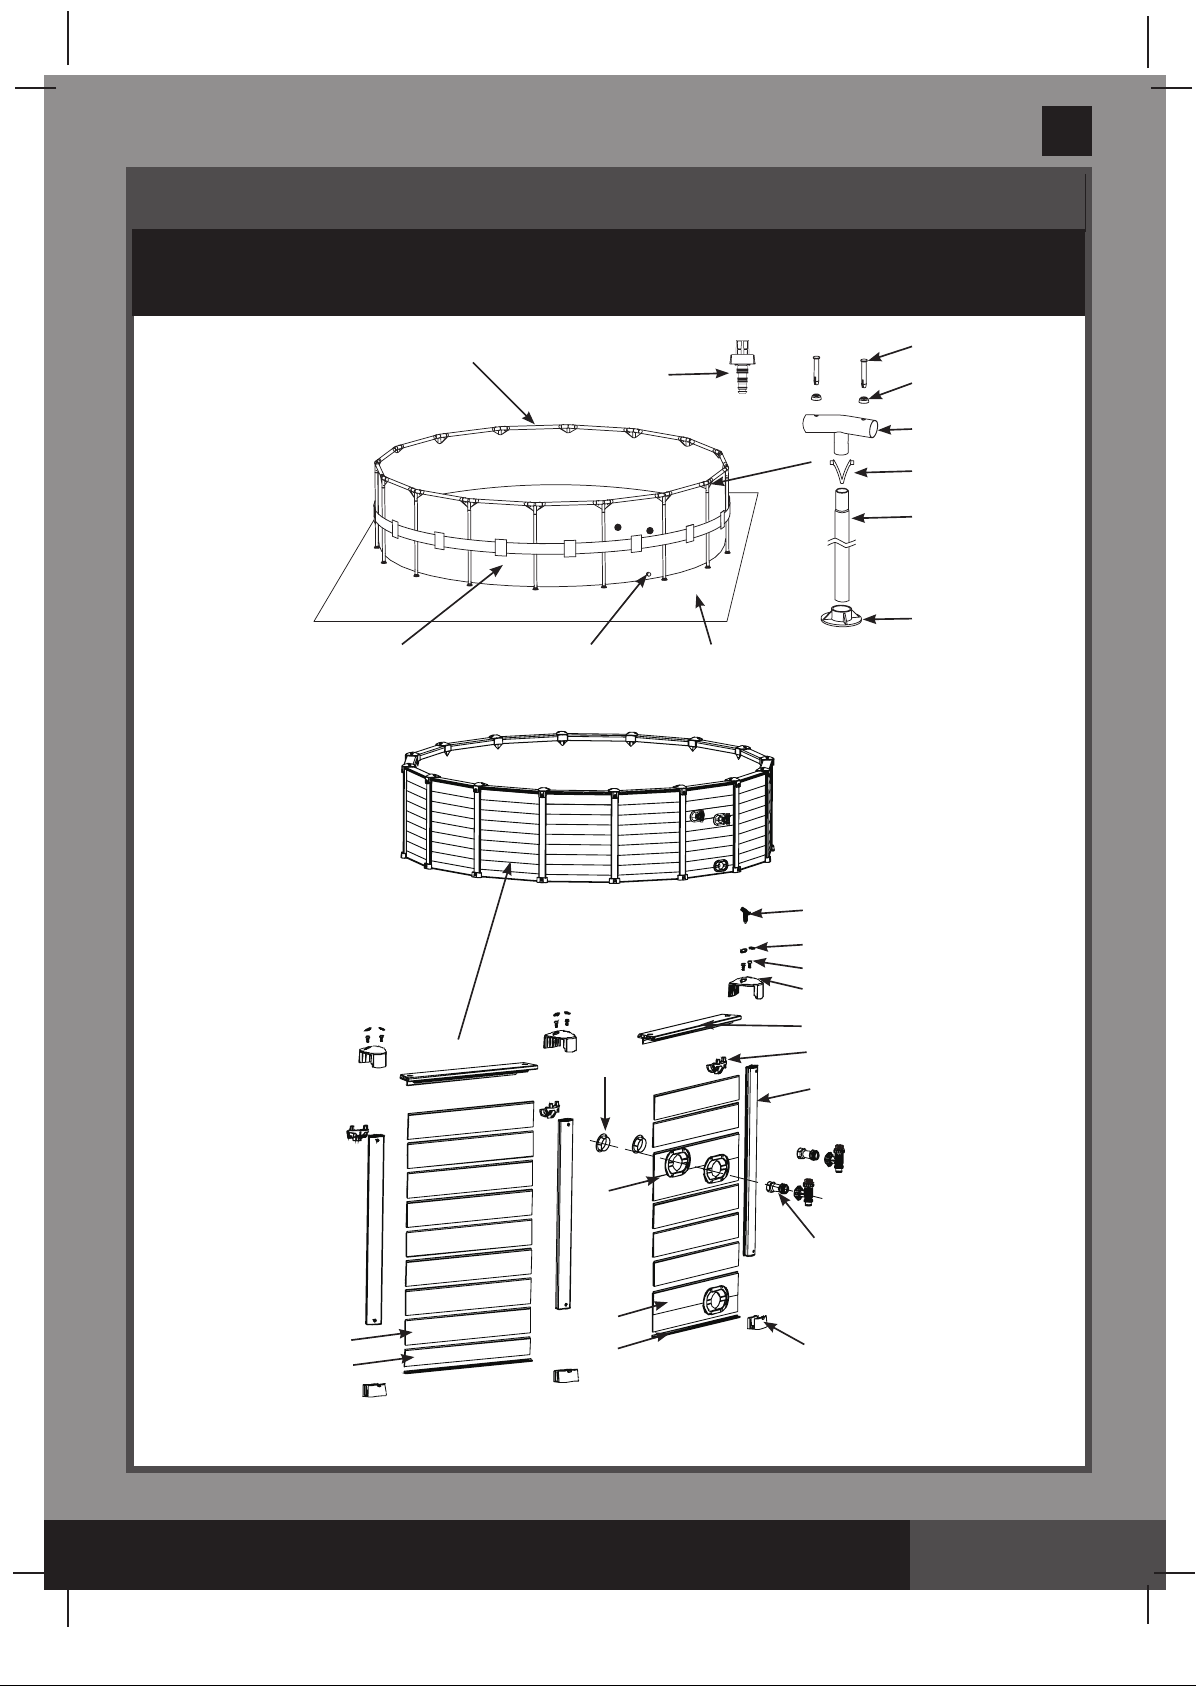
PARTS REFERENCE
Before assembling your product, please take a few minutes to check the contents
and become familiar with all the parts.
7
8
10 11
16'8'' (508 cm) model
9
1
2
3
4
5
6
120A
NOTE:
26
12
13
14
15
19
22
23
20
21
Drawings for illustration purpose only. Actual product may vary. Not to scale.
24
16
17
18
25
SAVE THESE INSTRUCTIONS
Page 5
Page 6

(120IO) SEQUOIA SPIRIT™ WOOD-GRAIN FRAME POOL ENGLISH 7.5” X 10.3” PANTONE 295U 05/26/2016
REF. NO. DESCRIPTION
PIN (WITH 2 EXTRA)
1
SEAL (WITH 2 EXTRA)
2
T - JOINT
3
SPRING PIN
4
VERTICAL LEG (SPRING PIN INCLUDED)
5
LEG CAP
6
HORIZONTAL BEAM
7
POOL LINER (DRAIN VALVE CAP INCLUDED)
8
DRAIN CONNECTOR
9
DRAIN VALVE CAP
10
GROUND CLOTH
11
WATERPROOF CAP (WITH 4 EXTRA)
12
BOLT (WITH 4 EXTRA)
13
TOP CLAMP COVER
14
TOP BOARD
15
TOP CLAMP
16
SUPPORT POST
17
PLUNGER VALVE CONNECTOR
18
STRAINER VALVE CAP
19
SIDE BOARD A
20
SIDE BOARD B
21
SIDE BOARD COMBINATION WITH TWO HOLES
22
SIDE BOARD COMBINATION WITH ONE HOLE
23
BOTTOM RAIL
24
BOTTOM CAP
25
BOLT WRENCH
26
POOL SIZE & QUANTITIES
15'8" x 49"
(478 cm x124 cm)
32
32
15
15
15
15
15
1
1
1
1
34
34
15
15
15
15
2
2
116
0
1
1
15
15
2
English
18'8" x 53"
(569 cm x 135 cm)
38
38
18
18
18
18
18
1
1
1
1
40
40
18
18
18
18
2
2
141
17
1
1
18
18
2
120A
REF. NO. DESCRIPTION
PIN (WITH 2 EXTRA)
1
SEAL (WITH 2 EXTRA)
2
T - JOINT
3
SPRING PIN
4
VERTICAL LEG (SPRING PIN INCLUDED)
5
LEG CAP
6
HORIZONTAL BEAM
7
POOL LINER (DRAIN VALVE CAP INCLUDED)
8
DRAIN CONNECTOR
9
DRAIN VALVE CAP
10
GROUND CLOTH
11
WATERPROOF CAP (WITH 4 EXTRA)
12
BOLT (WITH 4 EXTRA)
13
TOP CLAMP COVER
14
TOP BOARD
15
TOP CLAMP
16
SUPPORT POST
17
PLUNGER VALVE CONNECTOR
18
STRAINER VALVE CAP
19
SIDE BOARD A
20
SIDE BOARD B
21
SIDE BOARD COMBINATION WITH TWO HOLES
22
SIDE BOARD COMBINATION WITH ONE HOLE
23
BOTTOM RAIL
24
BOTTOM CAP
25
BOLT WRENCH
26
15'8" x 49"
(478 cm x124 cm)
SPARE PART NO.
10312
10648
10861
10313
10864
10309
10414
11490
10201
11044
18927
12172
12173
12174
12199
12200
12201
11040
11240
12203
12204
12205
12206
12208
12218
11053
18'8" x 53"
(569 cm x 135 cm)
10312
10648
10862
10313
10865
10309
10414
11110
10201
11044
11290
12172
12173
12174
12199
12200
12202
11040
11240
12203
12204
12205
12207
12208
12218
11053
SAVE THESE INSTRUCTIONS
Page 6
Page 7

(120IO) SEQUOIA SPIRIT™ WOOD-GRAIN FRAME POOL ENGLISH 7.5” X 10.3” PANTONE 295U 05/26/2016
English
POOL SETUP
IMPORTANT SITE SELECTION AND GROUND
PREPARATION INFORMATION
• Thepoollocationmustallowyoutosecurealldoors,windows,andsafetybarrierstoprevent
unauthorized, unintentional or unsupervised pool entry.
• Installasafetybarrierthatwilleliminateaccesstothepoolforyoungchildrenandpets.
• Failuretosetupthepoolonflat,level,compactgroundandtoassembleandfillwithwater
in accordance with the following instructions could result in the pool’s collapse or the
possibility that a person lounging in the pool could be swept out/ejected, resulting in serious
injury or property damage.
• Riskofelectricshock:connectthefilterpumponlytoagroundingtypereceptacleprotected
by a ground-fault circuit interrupter (GFCI) or residual current device (RCD). To reduce the risk
of an electrical shock, do not use extension cords, timers, plug adapters or converter plugs
to connect the pump to an electrical supply. Always provide a properly located outlet. Locate
the cord where it cannot be damaged by lawn mowers, hedge trimmers, and other equipment.
See the filter pump manual for additional warnings and instructions.
• Riskofseriousinjury:donotattempttoassemblepoolinhighwindconditions.
WARNING
120A
Select an outdoor location for the pool with the following requirements in mind:
1.
The area where the pool is to be set up must be
slope or inclined surface.
2.
The ground surface must be compacted and firm enough to withstand the pressure and weight of a fully
set up pool.
3. Do not
pool.
4.
The pool requires at least 4 feet of space all around pool from objects that a child could climb on to gain
access to the pool.
5.
Grass under the pool will be damaged. Splash out chlorinated pool water could damage the surrounding
vegetation.
6.
Eliminate all aggressive grasses first. Certain types of grass such as St. Augustine and Bermuda, may
grow through the liner. Grass growing through the liner it is not a manufacture defect and is not covered
under warranty.
7.
The area shall facilitate drainage of the pool water after each use and/or for long term pool storage.
Do not
set up the pool on mud, sand, soft or loose soil conditions.
set up the pool on a deck, balcony or platform, which may collapse under the weight of the filled
absolutely flat and level. Do not
set up the pool on a
SAVE THESE INSTRUCTIONS
Page 7
Page 8
(120IO) SEQUOIA SPIRIT™ WOOD-GRAIN FRAME POOL ENGLISH 7.5” X 10.3” PANTONE 295U 05/26/2016
A
English
POOL SETUP (continued)
GROUND PREPARATION
Select an outdoor location for the pool which should be on a level concrete pad. If there is no concrete pad
available, follow the instructions below to prepare the installation area. It is important you ask a professional
(builder or gardener) to perform the following ground preparation.
NOTE:
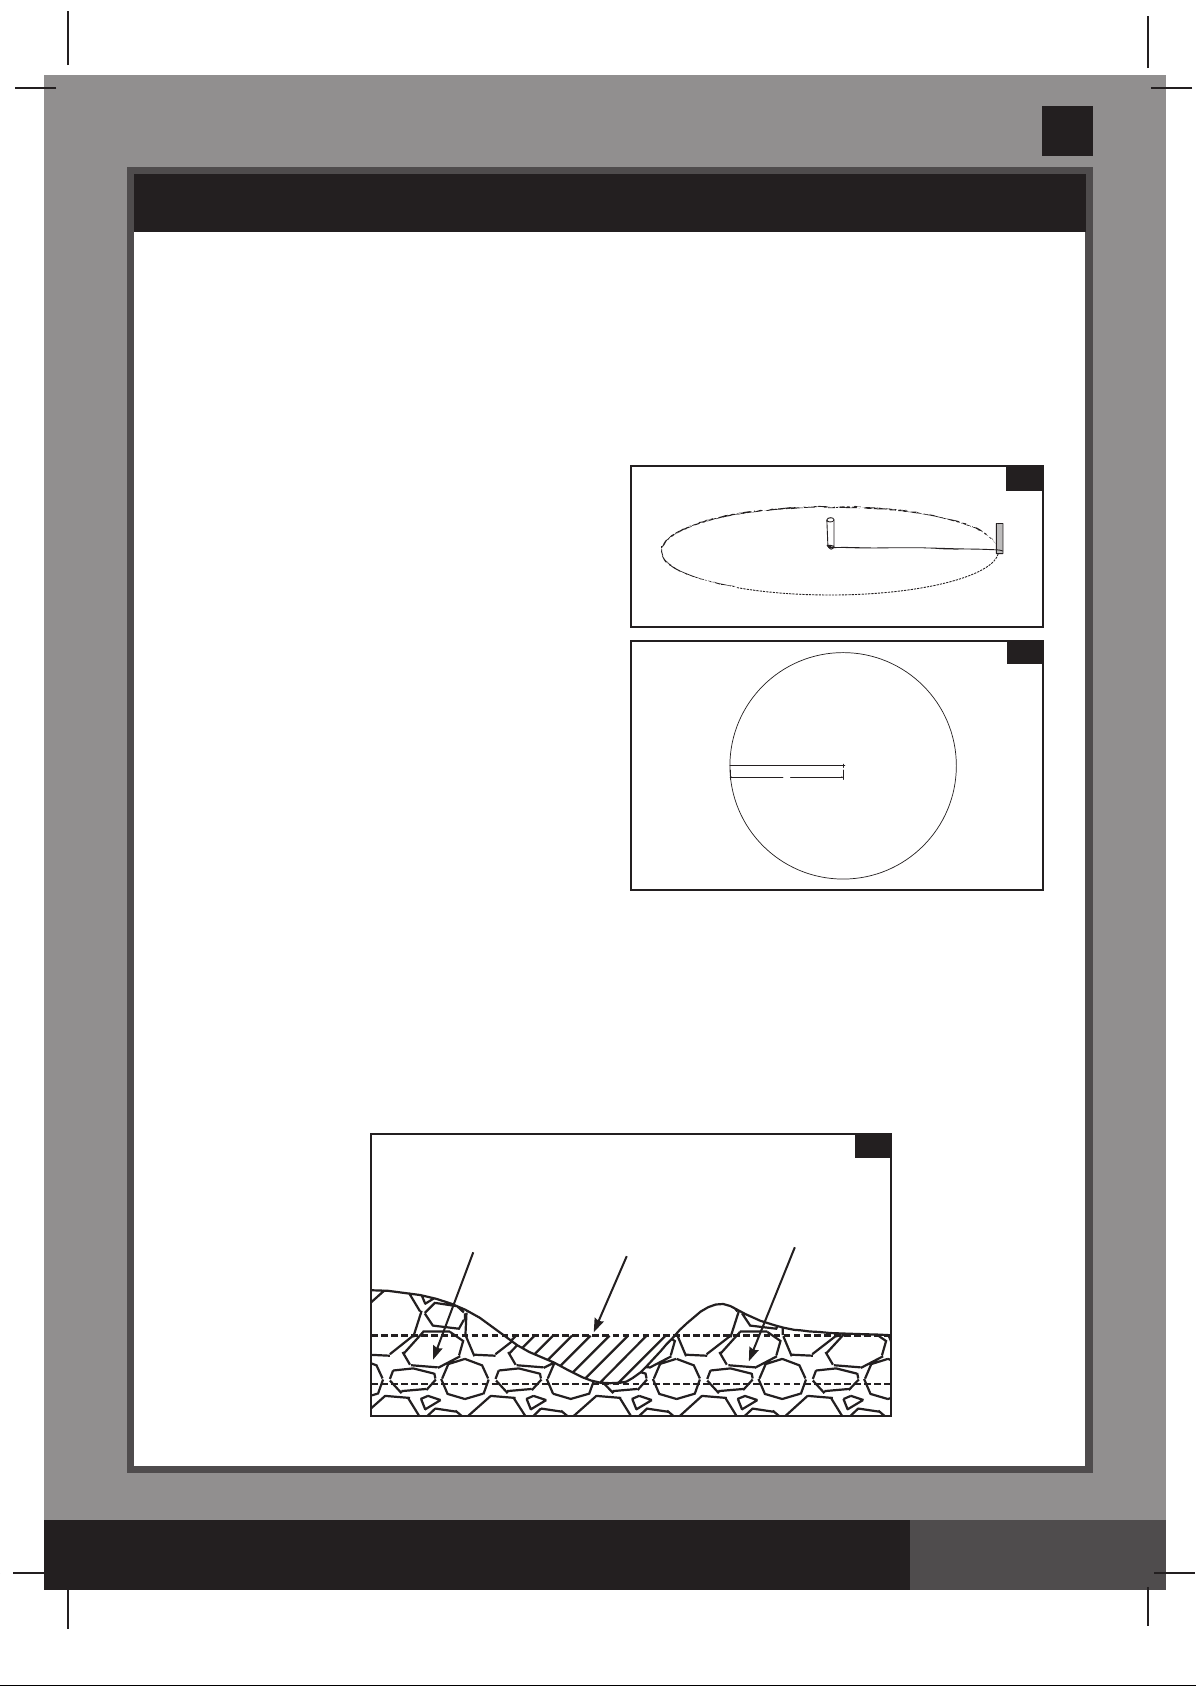
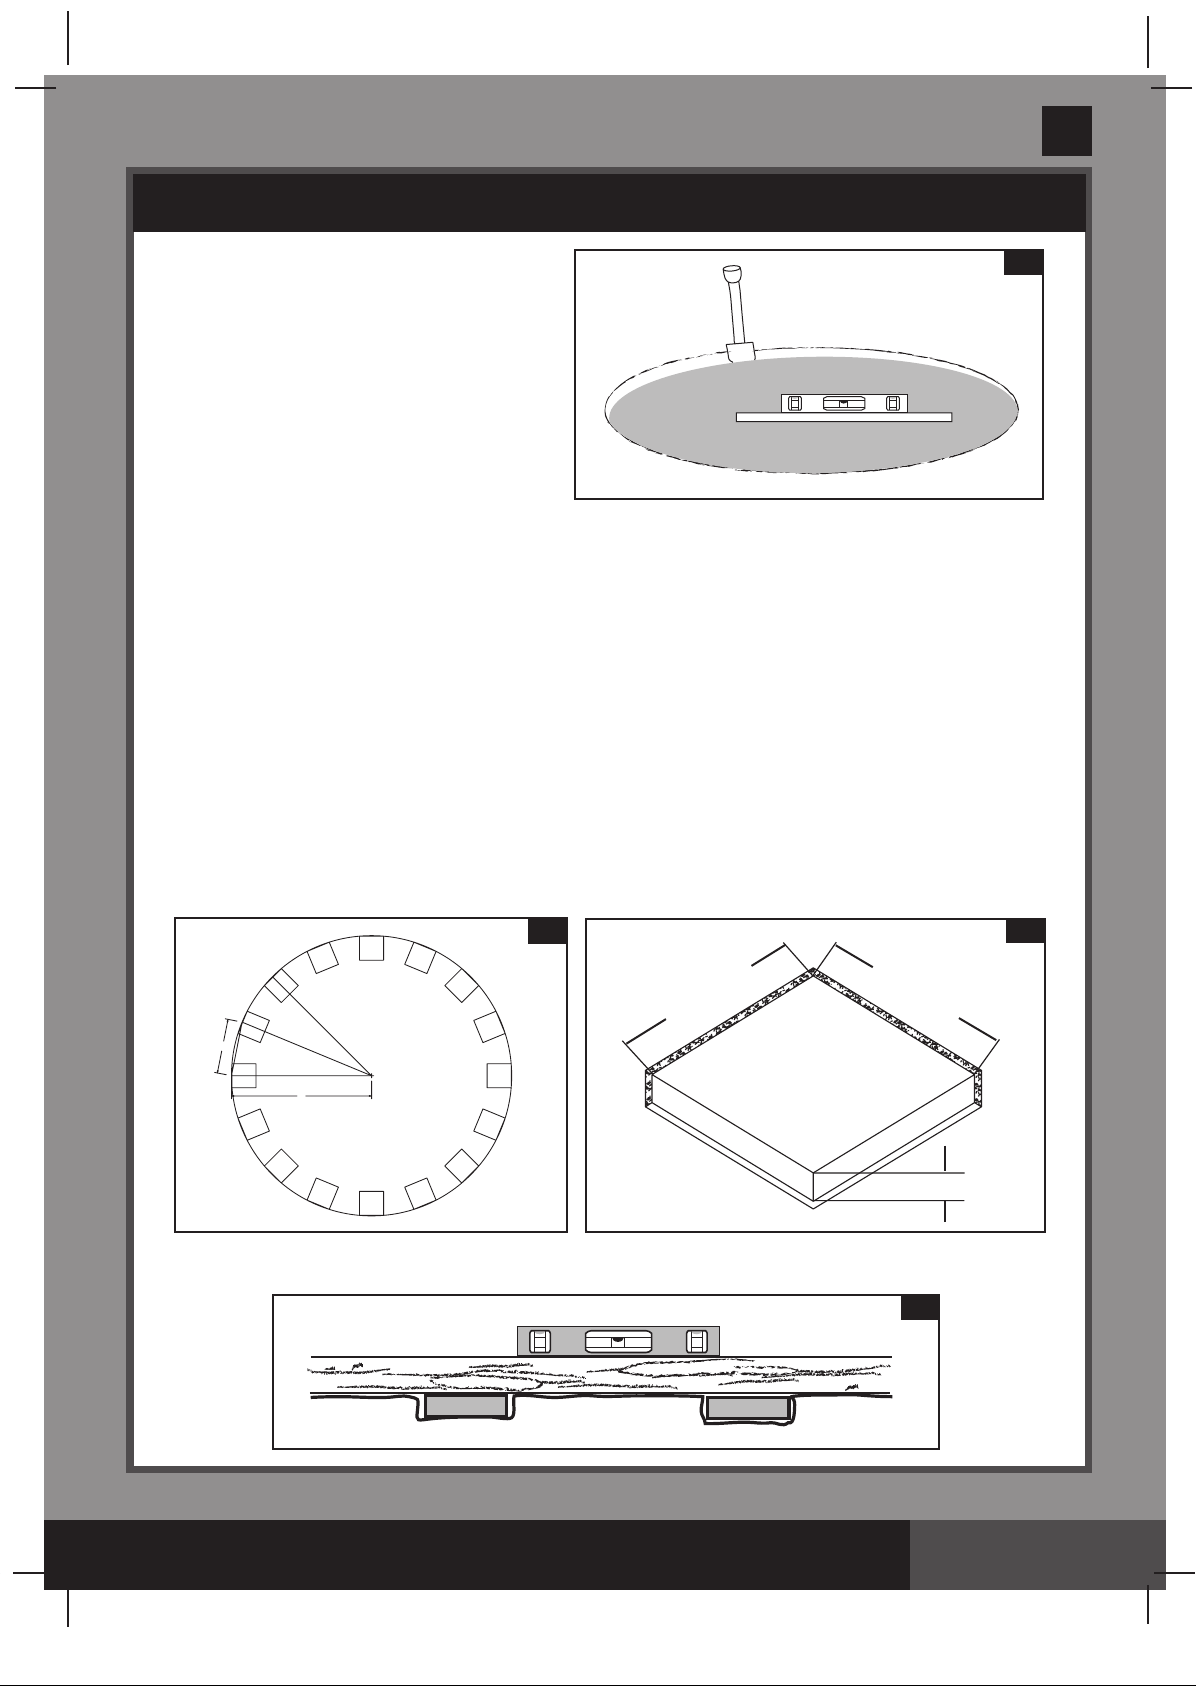
1. Mark the installation area
• Once the location area is chosen, drive stake at
center point of where you wish pool to be located.
Attach string to center stake. Measure the length
A on string, and attach marking stick, paint marker,
or funnel with flour to string. Mark circumference of
pool area using string and marker (see drawing 1.1).
• For 15'8" (478 cm) pool, where
A = 8’3” (251.5 cm) = Radius of grass area need to
be removed and leveled.
For 16'8" (508 cm) pool, where
A = 8'9” (266.7 cm) = Radius of grass area need to
be removed and leveled.
For 18’8" (569 cm) pool, A = 9'9" (297.1 cm)
see drawing 1.2.
Tools are not included.
1.1
1.2
A
120A
2. Clear the installation area
• Remove all grass, stones and sticks from marked area. Also remove center stake and string.
3. Leveling
• Establish lowest point in pool area. Level entire pool site by digging or scraping away uneven areas
to the level of the lowest point.
filling in the bottom
when excess ground is removed, you may fill any
dirt). Always compact and level ground afterwards (see drawing 2.1).
to ensure greater ground stability and firmness. When all the areas are level and
Unacceptable
Grade
Acceptable
Grade
Always remove material from the top of the slope rather than
small low areas
Always remove material from the top of the
slope rather than filling in the bottom.
Do not add
which are left to level (with fined
2.1
RemoveRemove
SAVE THESE INSTRUCTIONS
Page 8
Page 9

(120IO) SEQUOIA SPIRIT™ WOOD-GRAIN FRAME POOL ENGLISH 7.5” X 10.3” PANTONE 295U 05/26/2016
A
English
120A
POOL SETUP (continued)
• Use a large mason rule (aluminum or wood)
and a level. Level out the ground by cutting
rectangles (or squares), locating this rule in
the selected and cleaned area (see
drawing 2.2).
4. Finishing
• On the cleaned and leveled ground, spread a light coat of sieved dirt to a maximum depth of 1/2 inch
(1 cm). Spray water and compact it (with a garden roller). Double check and ensure it is well leveled.
The ground has to be perfectly level in order to proceed further.
5. Patio block installation
• Purchase 15 pieces of patio block for 15’8” pool or 16 pieces of patio block for 16’8” pool or 18 pieces
for 18’8” pool. The minimum dimensions of each block should be 18” x 18” x 2”. Mark the area where
the blocks will be buried (see drawing 3.1), then remove 2” (5.08 cm) of soil from the marked area (see
drawing 3.2).
• For 15’8” (478 cm) pool, where
A = 8’3” (251.5 cm) = Radius of grass area need to be removed and leveled.
B = 3’5” (104.1 cm) = Distance between each Patio Block.
For 16’8” (508 cm) pool, where
A = 8’9” (266.7 cm) = Radius of grass area need to be removed and leveled.
B = 3’5” (104.1 cm) = Distance between each Patio Block.
For 18’8” (569 cm) pool, where
A = 9’9” (297.1 cm)
B = 3’5” (104.1 cm)
3.1
18” (45.7 cm)
2.2
3.2
18” (45.7 cm)
B
A
2” (5.08 cm)
• The top of blocks should be flush with soil surface and level with the area surface and with all patio
blocks around entire pool (see drawing 3.3).
3.3
SAVE THESE INSTRUCTIONS
Page 9
Page 10
(120IO) SEQUOIA SPIRIT™ WOOD-GRAIN FRAME POOL ENGLISH 7.5” X 10.3” PANTONE 295U 05/26/2016
English
POOL SETUP (continued)
You may have purchased this pool with the Intex Krystal Clear™ filter pump. The pump has its
own separate set of installation instructions. First assemble your pool unit and then set up the
filter pump.
Estimated assembly time 120 minutes. (Note the assembly time is only approximate and
individual assembly experience may vary.)
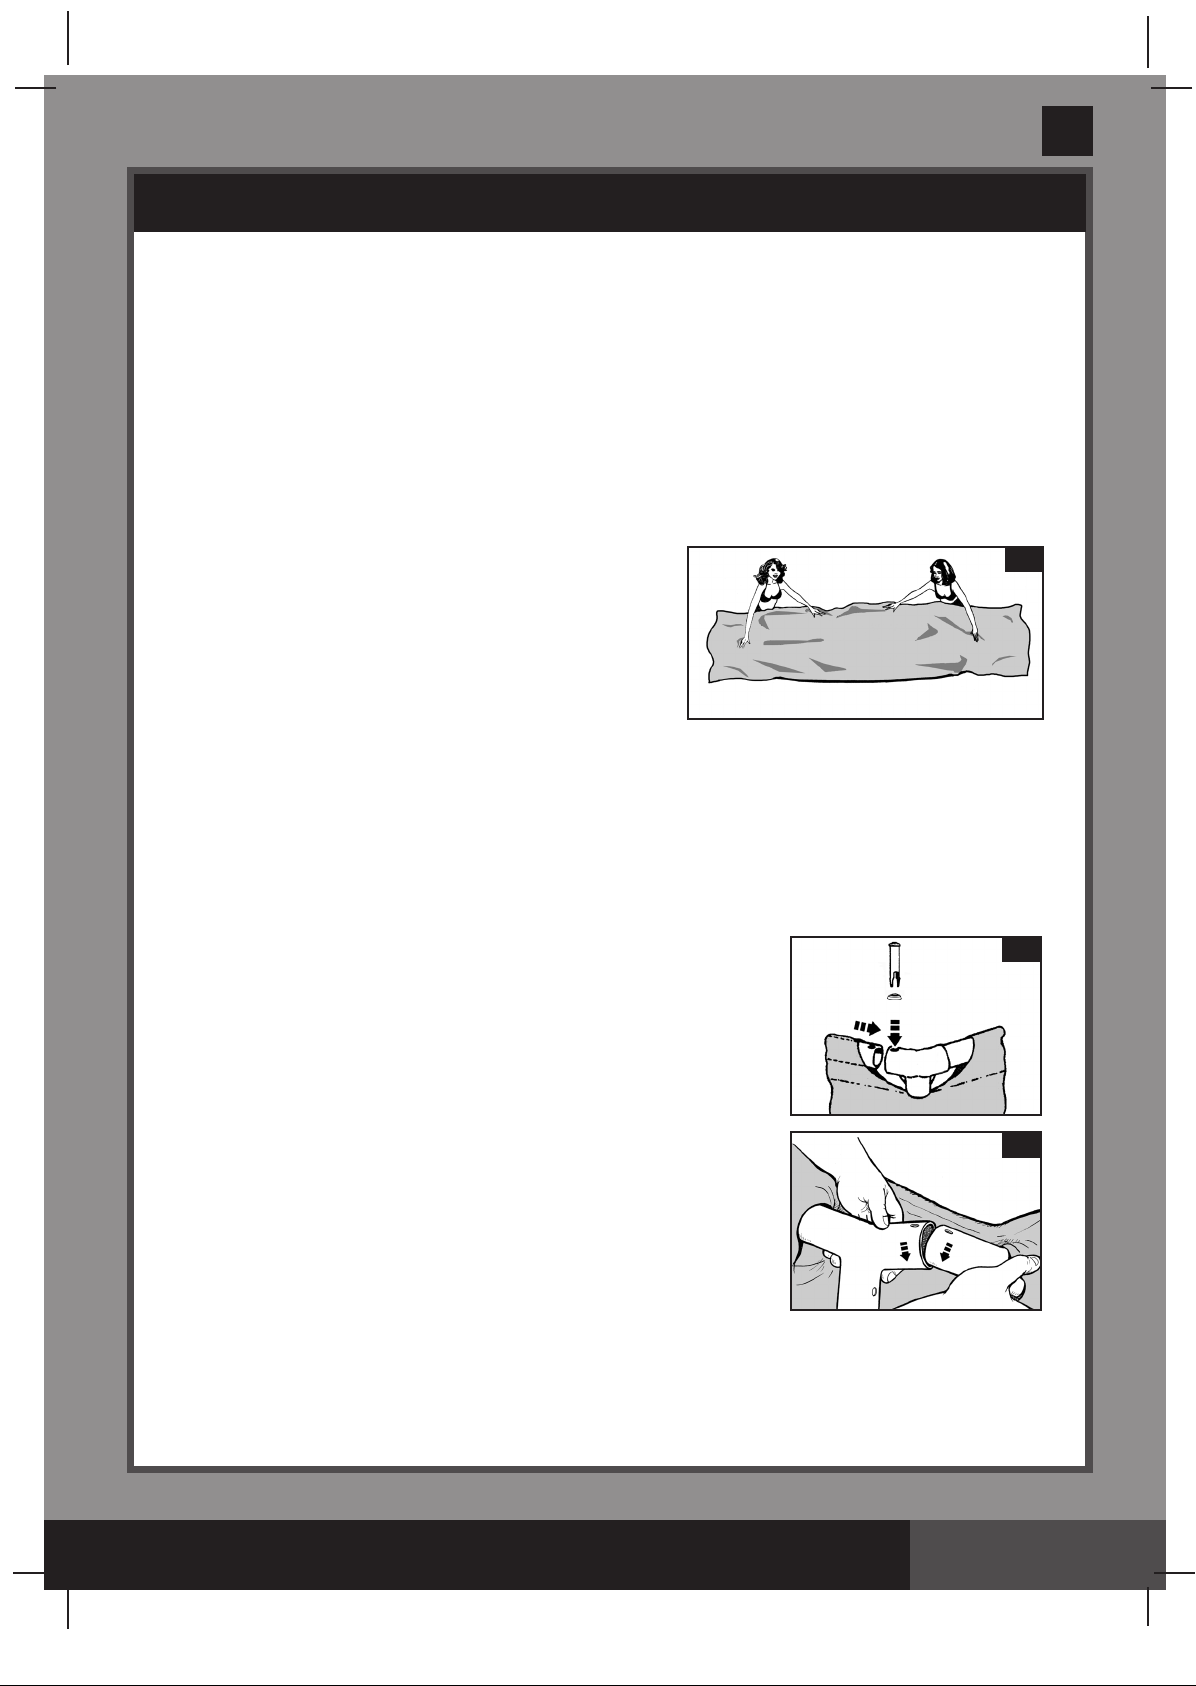
1. Liner preparation
• Open the carton containing the liner, joints, legs, etc., very carefully as this carton can be used to store
the pool during the winter months or when not in use.
• Take out the ground cloth
cleared area. Then take out the liner
over the ground cloth, with the drain valve directed towards
the draining area. Place the drain valve away from the
house. Allow the sun to warm up the liner before inserting
the beams
IMPORTANT: Always set up the pool unit with at least 2
persons. Do not drag the liner across the ground as this
can cause liner damage and pool leakage (see drawing 4).
• During the set-up of the pool liner, point the hose connections or openings in the direction of the electric
power source. The outer edge of the pool should be within reach of the pump’s electrical connection.
(7)
into the sleeve openings.
(11)
and spread it over the
(8)
and spread it out
8
120A
4
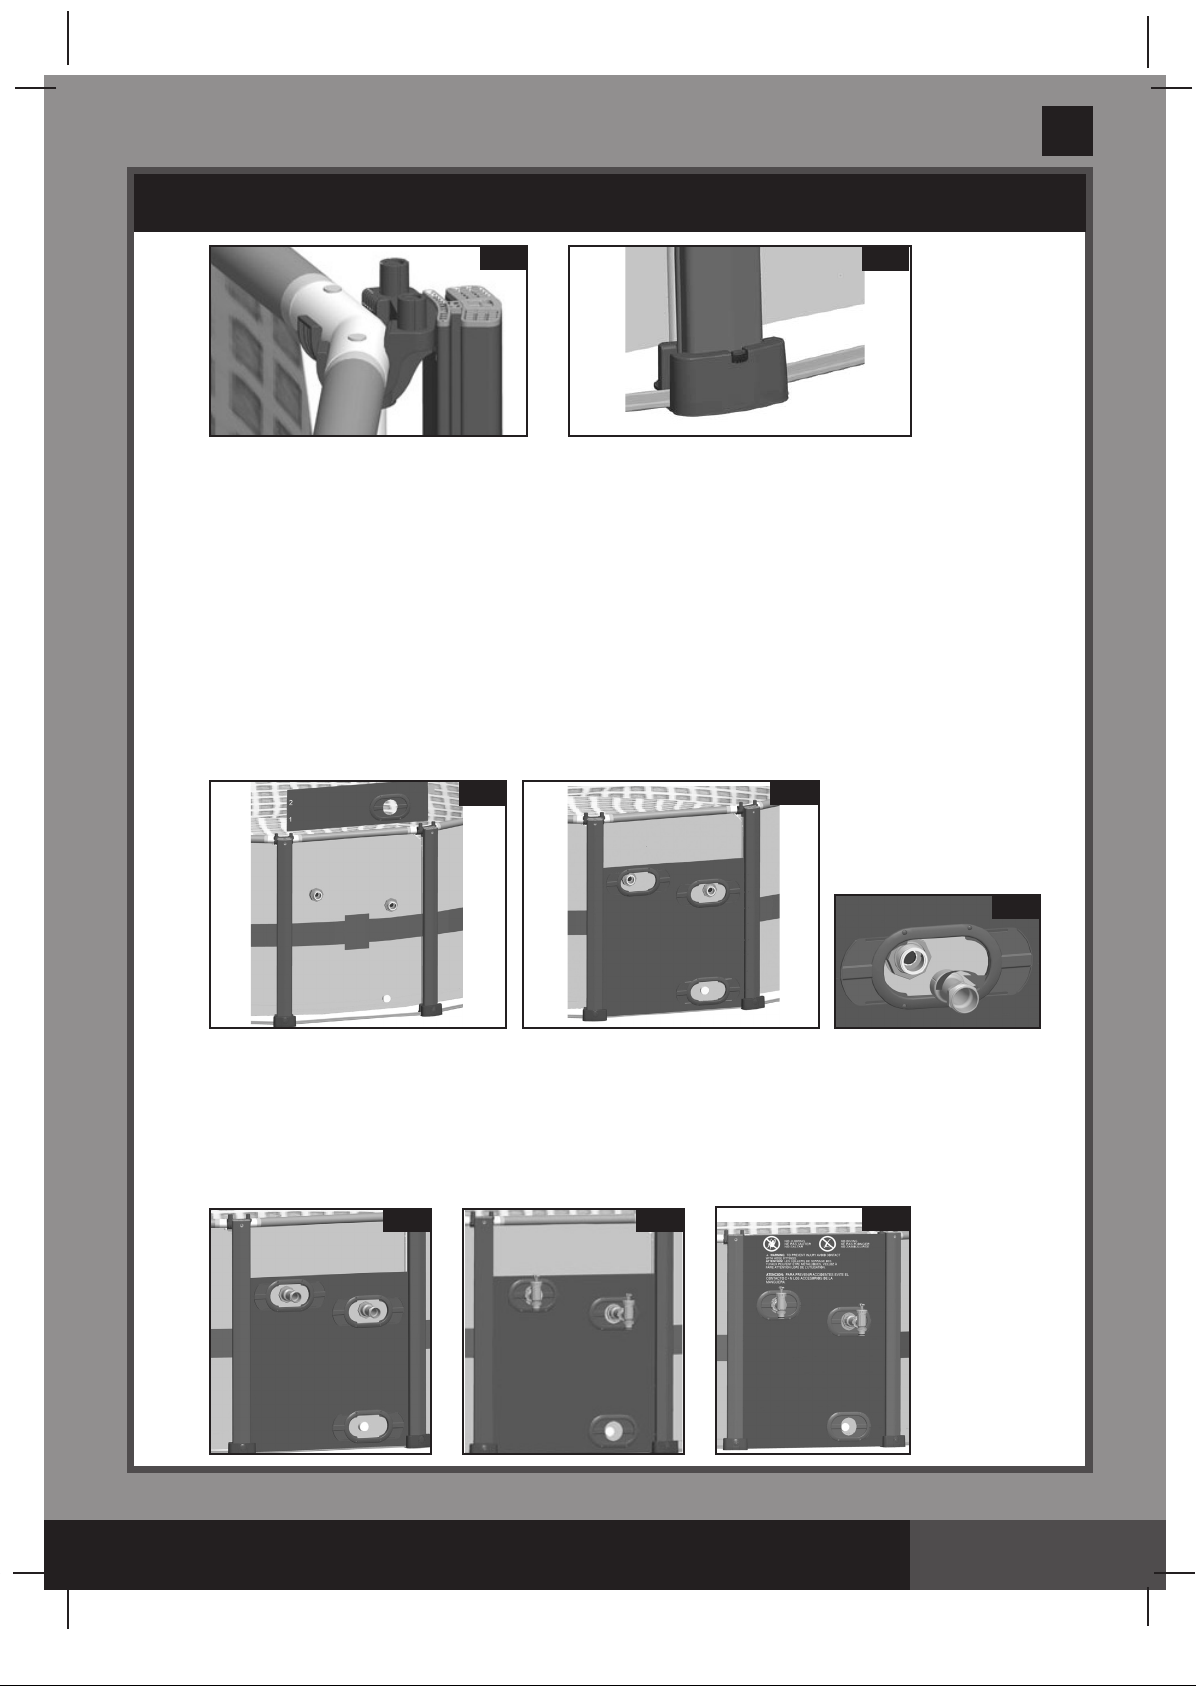
2. Frame assembly
• The frame pool’s legs
beams that are slid (pushed) into the sleeve openings at the top of the liner. The smaller diameters are
the vertical legs. Both these legs and beams fit into the T-joints
• Starting at any location, but always working in the same direction, push
the horizontal beam into the sleeve. Once the beam is centered take one
of the T- joints and using the connection pin
end of the beam by inserting the pin through the seal
pre-drilled holes. Repeat this procedure in a circular fashion until all the
beams and joints have been connected
The last joint connection may be difficult to complete. You can do
it though, if you first simultaneously raisethe last joint and beam
about 2 inches (5 cm). Now, insert the beam into the joint while
lowering the pieces into position. The beam will easily slide into
the joint (see drawing 5.2). Ensure that the last joint is fully
connected before proceeding to connecting the legs.
(5)
and beams
(7)
fall into two groups. The larger diameters are the horizontal
(3)
.
1
(1)
, attach the joint to one
(2)
(see drawing 5.1)
and in the
.
2
3
3
7
5.1
5.2
SAVE THESE INSTRUCTIONS
Page 10
Page 11

(120IO) SEQUOIA SPIRIT™ WOOD-GRAIN FRAME POOL ENGLISH 7.5” X 10.3” PANTONE 295U 05/26/2016
POOL SETUP (continued)
• Next slide the vertical legs into the belt loop located in the middle of
the pool liner. Carefully slide the leg into the belt loop and insert the
top of the leg into the bottom of the joint.
Snap the leg into the joint’s holes by aligning the holes and the
spring-loaded pin. Attach the leg’s end cap
(see drawings 6.1 & 6.2)
leg
• Upon connecting the last leg, grab hold of the frame pool’s top beams
in 2 – 3 locations. Shake the pool to be sure that all the joints, legs
and beams fit into each other. Ensure that all pins are in position by
pushing them downwards through the holes
• Pull gently, in an outward direction, the bottom of the leg making sure
the leg is vertical and perpendicular to the level ground.
3. Filling of the pool
• See Krystal Clear™ filter pump manual, install the strainer nuts, flat
strainer rubber washers and threaded strainer connectors on the liner
pre-cut holes. Use strainer valve caps
threaded strainer connectors from the inside of the pool so water will not run out while filling.
.
(6)
to the bottom of the
(see drawing 7.1)
(19)
and plug them into the
.
6.1
3
5
6
6.2
English
4
7.1
120A
• Before filling the pool with water, ensure that the drain plug inside the pool is closed and that the drain
cap on the outside is screwed on tightly. Fill the pool with no more than 1 inch (2.5 cm) of water. Check
to see whether the water is level.
IMPORTANT: If the water in the pool flows to one side, the pool is not completely level. Setting up
the pool on unlevel ground will cause the pool to tilt resulting in the sidewall material bulging and
a potential collapse of the pool. If the pool is not completely level, you must drain the pool, level
the area or move the pool to a different area that is level, and re-fill the pool, following the above
directions.
• Smooth out the bottom liner wrinkles (from inside the pool) by pushing out where the pool floor and pool
sides meet. Or, (from outside pool) reach under the side of the pool, grasp the pool floor and pull in
an outward direction. If the ground cloth is causing the wrinkles, have 2 people pull from opposite sides to
remove all wrinkles. Use the properly assembled pool ladder when entering or exiting the pool during this
process.
4
. Fill the pool with water up to just below the sleeve line.
(see drawing 7.2)
.
WATER LEVEL
7.2
SAVE THESE INSTRUCTIONS
Page 11
Page 12

(120IO) SEQUOIA SPIRIT™ WOOD-GRAIN FRAME POOL ENGLISH 7.5” X 10.3” PANTONE 295U 05/26/2016
English
POOL ENCLOSURE SETUP
Once the pool has been filled with water, and it has been confirmed that it is completely level and that all
vertical legs are positioned in the middle of each patio block, proceed with the assembly of the pool
enclosure.
1. Top clamp installation
• Fasten a top clamp
top clamp are facing upward. Repeat the procedure until all the top clamps are fastened to the T joints
of the pool frame (see drawings 8.1 & 8.2).
2. Bottom cap and bottom rail installation
• Place a bottom cap
in the bottom cap is facing outward. Place all bottom caps in position.
• Starting at any location, but always working in the same direction, connect a bottom rail
two bottom caps
bottom cap. Repeat this procedure in a circular fashion until all the bottom rails and bottom caps have
been connected. Adjust the distance of the bottom cap to the leg cap by estimating that the support
post
(17)
will stand vertical after it is installed (see drawings 9.1 & 9.2).
(16)
to the T-joint of the pool frame from the underneath. Ensure the two bolts on
8.1 8.2
(25)
on the ground and align it with the leg cap. Ensure that the threaded side hole
(24)
(25)
. Ensure the pre-drilled holes on the bottom rail hook through the knobs on the
9.1
in between
9.2
120A
3. Support post installation
• Remove the cardboard inserts from the both slides of each support post.
• Insert the support post
the upper end of the support post hook onto the ridge at the top clamp. Push downward to ensure the
support post is connected firmly with the top clamp and inserted in the bottom cap (see drawings 10.1,
10.2 & 10.3).
• Repeat these procedures until all the support posts are joined to the top clamps and bottom caps (see
drawing 10.4).
(17)
into the bottom cap
10.1
SAVE THESE INSTRUCTIONS
(25)
. Lift up the support post slightly to let the slot on
10.2
Page 12
Page 13
(120IO) SEQUOIA SPIRIT™ WOOD-GRAIN FRAME POOL ENGLISH 7.5” X 10.3” PANTONE 295U 05/26/2016
English
POOL ENCLOSURE SETUP (continued)
10.3
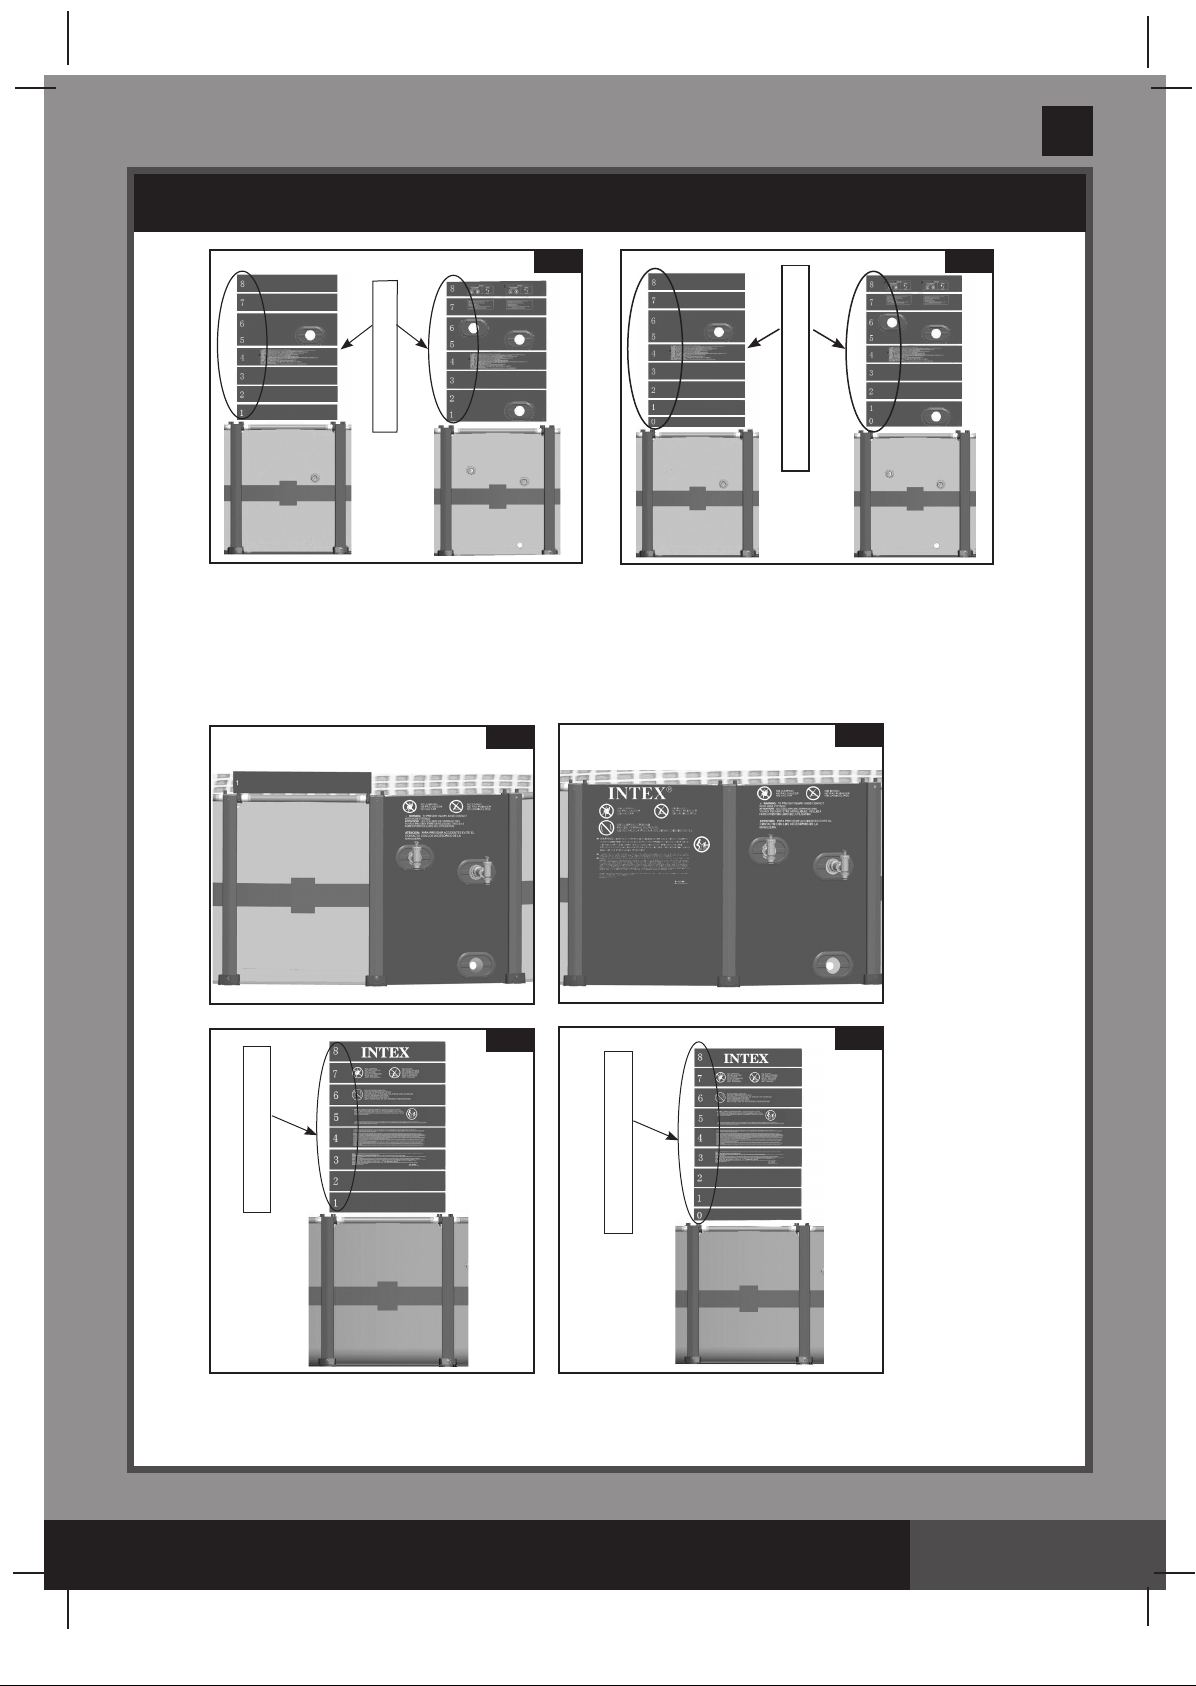
4. Side panel installation
The number of the side panels depends of the size of your pool. There are two side panels which need
special attention during installation: First, the side panel which needs to be installed outside the pool inlet
& outlet holes, and second, the side panel with the warning panel which needs to be installed in a location
that the warning display is easily seen by pool users before entering the pool. The side boards for these
two special panels are wrapped separately from others.
4a. Side panel with holes installation
• Locate the side panel with holes outside the pool liner where the inlet & outlet holes are located.
Unwrap the side boards from pack and slide the side board combination with one hole
the support posts and insert onto the vertical edge of the bottom rail. Follow with the number sequence
from bottom to top. The groove of the board needs to be inserted fully onto the tongue of previous
board. The printing on the side boards needs to be facing outward. Then slide the side board
combination with two holes
the tongue of side board marked with number “4” (see drawings 11.1 & 11.2).
(22)
marked with number “5 & 6” through the support posts and insert onto
11.1
11.2
10.4
(23)
first down
120A
11.3
• In clockwise motion screw the plunger valve connectors
were already installed on the pool liner during the pool set up (see drawing 11.3). In a clockwise motion
screw the plunger valves onto the plunger valve connectors
handle down and turn in a clockwise direction to lock as described in filter pump manual. Now, the
strainer valve caps
pool (see drawings 11.4 & 11.5).
• Continue to finish the side panel installation by installing the rest of the side boards marked with number “7”
and “8” (see drawing 11.6).
(19)
can be unplugged out of the threaded strainer connectors from the inside of the
11.4 11.5
(18)
onto the threaded strainer connectors which
(18)
. Close the plunger valves by pushing the
11.6
SAVE THESE INSTRUCTIONS
Page 13
Page 14
(120IO) SEQUOIA SPIRIT™ WOOD-GRAIN FRAME POOL ENGLISH 7.5” X 10.3” PANTONE 295U 05/26/2016
English
POOL ENCLOSURE SETUP (continued)
11.7
8
7
6
5
4
3
2
1
15'8" x 49"
4b. Side panel with “warnings” installation
• Locate the side panel with warnings such that the warnings will be easily seen by pool users before
entering the pool. Unwrap the side boards from pack and slide the side board first down the support
posts and insert onto the vertical edge of the bottom rail. Follow with the number sequence from bottom
to top. The groove of the board needs to be inserted fully onto the tongue of the previous board. The
printing on the side boards needs to be facing outward (see drawings 12.1 & 12.2).
8
7
6
5
4
3
2
1
0
18’8” x 53”
11.8
120A
12.1
12.3
8
7
6
5
4
3
2
1
8
7
6
5
4
3
2
1
0
12.2
12.4
15'8" x 49"
15'8" x 49"
18’8” x 53”
18’8” x 53”
SAVE THESE INSTRUCTIONS
Page 14
Page 15

(120IO) SEQUOIA SPIRIT™ WOOD-GRAIN FRAME POOL ENGLISH 7.5” X 10.3” PANTONE 295U 05/26/2016
English
POOL ENCLOSURE SETUP (continued)
4c. Other side panel installation
(21)
(20)
each.
at the
• For 49” height pool, install the rest of the side panels by using eight pieces of side boards A
For 53” height pool, install the rest of the side panels by using one piece of side board B
bottom plus eight pieces of side boards A
top. Insert the groove of the first side board onto the vertical edge of the bottom rail, and the groove
of the other side boards onto the tongue of each previous board. The side boards with wood veins
printed need to be faced outward (see drawings 13.1 & 13.2).
13.1
5. Top Board Installation
Attach the top board
on the top clamps
top board
NOTE:
three pieces apart from each other (see drawings 14.1, 14.2 & 14.3).
(15)
There are four pieces of top board which are printed with warnings. Install those four top boards
(15)
on the top of the side panel, with the holes at its two ends aligning with the nuts
(16)
. Make sure the groove underneath the top board fits firmly onto the tongue of the
. Repeat this procedure until all the top boards are fixed to the top clamps and side boards.
(20)
each. Install the side boards one by one from bottom to
13.2
120A
14.1
6. Top Clamp Cover Installation
Install the top clamp cover
the slot on the top end of the support post. Align the top holes on top clamp cover with the nuts of the top
clamp. Insert and screw bolt
then cover with the waterproof caps
the top clamps and support posts (see drawings 15.1, 15.2 & 15.3).
(14)
where the two top boards meet. Insert the ridge of top clamp cover into
(13)
to each of the threaded holes by using the wrench
(12)
. Repeat this procedure until all the top clamp covers are fixed to
15.1
14.2
15.2
NOTE:
Drawings for illustration
purpose only.
14.3
(26)
provided, and
15.3
SAVE THESE INSTRUCTIONS
Page 15
Page 16

(120IO) SEQUOIA SPIRIT™ WOOD-GRAIN FRAME POOL ENGLISH 7.5” X 10.3” PANTONE 295U 05/26/2016
English
POOL MAINTENANCE & CHEMICALS
WARNING
REMEMBER TO
• Protect all pool occupants from possible water-related illnesses by keeping the pool water
clean and sanitized. Do not swallow the pool water. Always practice good hygiene.
• Keepyourpoolcleanandclear.Thepoolfloormustbevisibleatalltimesfromtheoutside
barrier of the pool.
• Keepchildrenawayfrompoolcoverstoavoidentanglement,drowning,orotherserious
injury.
Water maintenance
The maintenance of a proper water balance through appropriate use of sanitizers is the single most
important factor in maximizing the life and appearance of the liner as well as ensuring clean, healthy
and safe water. Proper technique is important for water testing and treating the pool water. See your
pool professional for chemical, test kits and testing procedures. Be sure to read and follow the
written instructions from the chemical manufacturer.
1
. Never let chlorine come in contact with the liner if it is not completely dissolved. Dissolve granular or
tablet chlorine first in a bucket of water, then add it to the pool water. Likewise with liquid chlorine; mix it
immediately and thoroughly with the pool water.
2
. Never mix chemicals together. Add the chemicals to the pool water separately. Thoroughly dissolve each
chemical before adding another one to the water.
3
. An Intex pool skimmer and an Intex pool vacuum are available to assist in maintaining clean pool water.
See your pool dealer for these pool accessories.
4
. Do not use a pressure washer to clean the pool.
120A
PROBLEM
ALGAE
COLORED
WATER
FLOATING
MATTER IN
WATER
CHRONIC LOW
WATER LEVEL
SEDIMENT ON
POOL BOTTOM
SURFACE DEBRIS
TROUBLESHOOTING
DESCRIPTION
• Greenish water.
• Green or black spots
on pool liner.
• Pool liner is slippery
and/or has a bad odor.
• Water turns blue,
brown, or black when
first treated with
chlorine.
• Water is cloudy or
milky.
• Level is lower than
on previous day.
• Dirt or sand on pool
floor.
• Leaves, insects etc.
• Chlorine and pH level
need adjustment.
• Copper, iron or
manganese in water
being oxidized by the
added chlorine.
• "Hard water" caused by
a too high pH level.
• Chlorine content is low.
• Foreign matter in water.
• Rip or hole in pool liner
or hoses.
• Heavy use, getting in
and out of pool.
• Pool too close to trees.
CAUSE
SOLUTION
• Super chlorinate with shock
treatment. Correct pH to your
pool store's recommended level.
• Vacuum pool bottom.
• Maintain proper chlorine level.
• Adjust pH to recommended
level.
• Run filter until water is clear.
• Replace cartridge frequently.
• Correct the pH level. Check with
your pool dealer for advice.
• Check for proper chlorine level.
• Clean or replace your filter
cartridge.
• Repair with patch kit.
• Finger tighten all caps.
• Replace the hoses.
• Use Intex pool vacuum to
clean bottom of pool.
• Use Intex pool skimmer.
SAVE THESE INSTRUCTIONS
Page 16
Page 17

(120IO) SEQUOIA SPIRIT™ WOOD-GRAIN FRAME POOL ENGLISH 7.5” X 10.3” PANTONE 295U 05/26/2016
English
POOL MAINTENANCE & DRAINAGE
ALWAYS FOLLOW THE CHEMICAL MANUFACTURER'S
CAUTION
Do not add chemicals if the pool is occupied. This can cause skin or eye irritation.
chlorine solutions can damage the pool liner. In no event is Intex Recreation Corp., Intex Development Co.
Ltd., their related companies, authorized agents and service centers, retailers or employees liable to the
buyer or any other party for costs associated with the loss of pool water, chemicals or water damage.
spare filter cartridges on hand. Replace cartridges every two weeks.
Krystal Clear™ Intex Filter Pump with all of our above-ground-pools.
EXCESSIVE RAIN: To avoid damage to the pool and over filling, immediately drain rain water that
causes the water level to be higher than the maximum.
How to Drain Your Pool and Long Term Storage
1
. Check local regulations for specific directions regarding disposal of swimming pool water.
2
. Check to make sure that the drain plug inside the pool is plugged in place.
3
. Remove the cap from the drain valve on the outside pool wall.
4
. Attach the female end of the garden hose to the drain connector.
5
. Place the other end of the hose in an area where the water can be safely drained away from the house
and other nearby structures.
6
. Attach the drain connector to the drain valve.
open inside the pool and water will start to drain immediately.
7.
When the water stops draining, start lifting the pool from the side opposite the drain, leading any
remaining water to the drain and emptying the pool completely.
8
. Disconnect hose and adapter when finished.
9
. Re-insert drain plug in drain valve on inside of pool for storage.
10
. Replace drain cap on outside of pool.
11
. Reverse set-up instructions to disassemble the enclosure and pool, and remove all connecting parts.
12
. Be sure that the pool and all parts are completely dry before storage. Air dry the liner in the sun until
completely dry before folding
sticking together and to absorb any residual missed.
13
. Create a square shape. Starting at one side, fold one-sixth of liner in on itself twice. Do the same on the
opposite side
14
. Once you have created two opposing folded sides, simply fold one over the other like closing a book
(see drawings 22.1 & 22.2)
15
. Fold the two long ends to the middle
16
. Fold one over the other like closing a book and finally compact the liner
17
. Store the liner and accessories in a dry, temperature controlled, between 32 degrees Fahrenheit
(0 degrees Celsius) and 104 degrees Fahrenheit (40 degrees Celsius), storage location.
18
. The original packing can be used for storage.
(see drawings 21.1 & 21.2)
DIRECTIONS, AND THE HEALTH AND HAZARD WARNINGS.
We recommend the use of a
NOTE: The drain connector will push the drain plug
(see drawing 20)
.
(see drawing 23)
. Sprinkle some talcum powder to prevent the vinyl from
.
.
(see drawing 24)
Concentrated
Keep
.
120A
20
22.1
21.1
22.2
21.2
23 24
SAVE THESE INSTRUCTIONS
Page 17
Page 18
(120IO) SEQUOIA SPIRIT™ WOOD-GRAIN FRAME POOL ENGLISH 7.5” X 10.3” PANTONE 295U 05/26/2016
English
WINTER PREPARATIONS
Winterizing your Above Ground Pool
After usage, you can easily empty and store away your pool in a safe place. You must
drain, disassemble and properly store the pool when the temperature drops below 41
degrees Fahrenheit (5 degrees Celsius) to prevent ice damage to the pool and related
components. Ice damage can result in sudden liner failure or pool collapse. Also see the
section ‘’How To Drain Your Pool’’.
Should temperatures in your area not drop below 41 degrees Fahrenheit (5 degrees
Celsius), and you choose to leave your pool out, prepare it as follows:
1.
Clean the pool water thoroughly. If the type is an Easy Set Pool or an Oval Frame Pool,
make sure that the top ring is properly inflated.
2.
Remove the skimmer (if applicable) or any accessories attached to the threaded strainer
connector. Replace strainer grid if necessary. Be sure all accessories parts are clean and
completely dry before storage.
3.
Plug the Inlet and Outlet fitting from the inside of the pool with the plug provided (sizes 16'
and below). Close the Inlet and Outlet Plunger Valve (sizes 17' and above).
4.
Remove the ladder (if applicable) and store in a safe place. Be sure the ladder is completely
dry before storage.
5.
Remove the hoses that connect the pump and filter to the pool.
6.
Add the appropriate chemicals for the winter period. Consult your local pool dealer as to
which chemicals you should use and how to use them. This can vary greatly by region.
7.
Cover pool with Intex Pool Cover.
SAFETY COVER.
8.
Clean and drain the pump, filter housing and hoses. Remove and discard the old filter
cartridge. Keep a spare cartridge for the next season.
9.
Bring pump and filter parts indoors and store in a safe and dry area, preferably between 32
degrees Fahrenheit (0 degrees Celsius) and 104 degrees Fahrenheit (40 degrees Celsius).
IMPORTANT NOTE: INTEX POOL COVER IS NOT A
120A
GENERAL AQUATIC SAFETY
Water recreation is both fun and therapeutic. However, it involves inherent risks of
injury and death. To reduce your risk of injury, read and follow all product, package and
package insert warnings and instructions. Remember, however, that product warnings,
instructions and safety guidelines cover some common risks of water recreation, but do
not cover all risks and or dangers.
For additional safeguards, also familiarize yourself with the following general guidelines
as well as guidelines provided by nationally recognized Safety Organizations:
• Demand constant supervision. A competent adult should be appointed as a “lifeguard” or
water watcher, especially when children are in and around the pool.
• Learn to swim.
• Take the time to learn CPR and first aid.
• Instruct anyone who is supervising pool users about potential pool hazards and about the use
of protective devices such as locked doors, barriers, etc.
• Instruct all pool users, including children what to do in case of an emergency.
• Always use common sense and good judgement when enjoying any water activity.
• Supervise, supervise, supervise.
SAVE THESE INSTRUCTIONS
Page 18
Page 19

(120IO) SEQUOIA SPIRIT™ WOOD-GRAIN FRAME POOL ENGLISH 7.5” X 10.3” PANTONE 295U 05/26/2016
English
LIMITED WARRANTY
Your Intex Pool has been manufactured using the highest quality materials and
workmanship. All Intex products have been inspected and found free of defects prior to
leaving the factory. This Limited Warranty applies to the Intex Pool only.
This limited warranty is in addition to, and not a substitute for, your legal rights and
remedies. To the extent that this warranty is inconsistent with any of your legal rights, they
take priority. For example, consumer laws across the European Union provide statutory
warranty rights in addition to the coverage you receive from this limited warranty: for
information on EU-wide consumer laws, please visit the European Consumer Center
website at http://ec.europa.eu/consumers/ecc/contact_en/htm.
The provisions of this Limited Warranty apply only to the original purchaser and are not
transferable. This Limited Warranty is valid for a period of 90 days from the date of the
initial retail purchase. Keep your original sales receipt with this document, as proof of
purchase will be required and must accompany warranty claims or the Limited Warranty
will be invalid.
If you find a manufacturing defect in the Intex Pool during the warranty period, please
contact the appropriate Intex Service Center listed in the separate “Authorized Service
Centers” sheet. If the item is returned as directed by the Intex Service Center, the Service
Center will inspect the item and determine the validity of the claim. If the item is covered by
the provisions of the warranty, the item will be repaired or replaced, with the same or
comparable item (at Intex’s choice) at no charge to you.
120A
Other than this warranty, and other legal rights in your country, no further warranties are
implied. To the extent possibly in your country, in no event shall Intex be liable to you or
any third party for direct or consequential damages arising out of the use of your Intex Pool,
or Intex or its agents’ and employees’ actions (including the manufacture of the product).
If your country does not allow the exclusion or limitation of incidental or consequential
damages, this limitation or exclusion does not apply to you.
You should note that this limited warranty does not apply in the following circumstances:
• If the Intex Pool is subject to negligence, abnormal use or application, accident,
improper operation, improper maintenance or storage.
• If the Intex Pool is subject to damage by circumstances beyond Intex’s control, including
but not limited to, punctures, tears, abrasions, ordinary wear and tear and damage
caused by exposure to fire, flood, freezing, rain, or other external environmental forces;
• To parts and components not sold by Intex; and/or
• To unauthorized alterations, repairs or disassembly to the Intex Pool by anyone other
than Intex Service Center personnel.
The costs associated with the loss of pool water, chemicals or water damages are not
covered by this warranty. Injury or damage to any property or person is not covered by this
warranty.
Read the owner’s manual carefully and follow all instructions regarding proper operation
and maintenance of your Intex Pool. Always inspect your product prior to use. This limited
warranty will be void if use instructions are not followed.
SAVE THESE INSTRUCTIONS
Page 19
Page 20
(120IO) SEQUOIA SPIRIT™ WOOD-GRAIN FRAME POOL DANISH 7.5” X 10.3” PANTONE 295U 05/26/2016
Dansk
120B
VIGTIGT
SIKKERHEDSREGLER
Læs, forstå og følg alle instruktionerne
omhyggeligt før opstilling og brug af
poolen. Opbevares til
senere brug.
TM
GRAPHITE GRAY PANEL POOL SET
Modellerne 478 cm & 569 cm
Kun til illustration. Tilbehør følger muligvis ikke med poolen.
Prøv også disse andre fine Intex produkter: pools, pool
tilbehør, oppustelige pools og indendørs legetøj, luftmadrasser
og både kan findes hos store forhandlere eller besøg vores
hjemmeside.
Som led i vores politik om hele tiden at forbedre vores
produkter, forbeholder Intex sig retten til uden varsel at ændre
specifikationer og design, hvilket kan resultere i opdateringer af
denne vejledning.
©2016 Intex Marketing Ltd. - Intex Development Co. Ltd. - Intex Trading Ltd.
- Intex Recreation Corp.
Rechte vorbehalten. Printed in China/Imprimé en Chine/Impreso en China/Gedruckt in China.
®™ Trademarks used in some countries of the world under license from/®™ Marques utilisées dans certains pays sous
licence de/Marcas registradas utilizadas en algunos países del mundo bajo licencia de/Warenzeichen verwendet in einigen
Ländern der Welt in Lizenz von/
Box 28829, Hong Kong & Intex Recreation Corp., P.O. Box 1440, Long Beach, CA 90801
BETJENINGSVEJLEDNING
Union by/Distribué dans l’Union Européenne par/Distribuido en la unión Europea por/Vertrieb in der Europäischen Union
Intex Trading B.V., Venneveld 9, 4705 RR Roosendaal – The Netherlands
durch/
www.intexcorp.com
All rights reserved/Tous droits réservés/Todos los derechos reservados/Alle
Intex Marketing Ltd. to/à/a/an Intex Trading Ltd., Intex Development Co. Ltd., G.P.O
• Distributed in the European
Page 21

(120IO) SEQUOIA SPIRIT™ WOOD-GRAIN FRAME POOL DANISH 7.5” X 10.3” PANTONE 295U 05/26/2016
INDHOLDSFORTEGNELSE
Advarsel / Vigtigt sikkerhedsregler
Indholdsliste
Opstillingsvejledning
..................................................................................
.....................................................................
Vedligeholdelse og brug af kemikalier
Almindelige poolproblemer
Tømning af pool
Opbevaring
..............................................................................
......................................................................................
...........................................................
..............................................
.........................................
Dansk
3-4
5-6
7-15
16-17
16
17
17-18
120B
Generelle sikkerhedsregler
Begrænset garanti
...........................................................................
............................................................
18
19
Introduktion:
Tak, fordi du købte en Intex pool og indhegning. Før du installerer poolen og
indhegningen, skal du bruge et par minutter på at læse denne vejledning. Informationerne
kan øge poolens levetid samt sikre din families glæder. Gennemse den medfølgende video
før installering. Det anbefales, at 2-3 personer arbejder sammen om at klargøre og installere
poolen og indhegningen. Flere personer vil gøre opstillingen hurtigere.
Der skal ikke bruges værktøjer til montering.
GEM DENNE VEJLEDNING
Side 2
Page 22

(120IO) SEQUOIA SPIRIT™ WOOD-GRAIN FRAME POOL DANISH 7.5” X 10.3” PANTONE 295U 05/26/2016
Dansk
VIGTIGT SIKKERHEDSREGLER
Læs, forstå og følg alle instruktionerne omhyggeligt før opstilling og brug af poolen.
ADVARSEL
• Børnoghandikappedeskalværeunderuafbrudtopsynafenkompetentvoksen.
• Sikr døre, vinduer og øvrige barrierer, således at uautoriseret, utilsigtet eller uovervåget adgang til poolen
undgås.
• Opsæt en sikkerhedsbarriere, der hindrer børn og dyr adgang til poolen.
• Pool og tilbehør skal samles og tages ned af voksne.
• Spring eller glid aldrig ned i en fritstående pool eller anden lavvandet vandbeholder.
• Poolen skal installeres på et fladt, plant og kompakt underlag og må ikke overfyldes. Dermed mindskes
risikoen for, at poolen klapper sammen, og eventuelle badende kommer til skade.
• Læn dig ikke op ad poolen, sid ikke overskrævs eller tryk ned på den oppustelige ring eller toppen, da
skader eller oversvømmelse kan forekomme. Tillad ingen at sidde på, kravle eller sidde overskrævs på
poolens sider.
• Fjern alt legetøj og flydende dele fra poolen og området omkring, når poolen ikke er i brug. Ting i poolen
tiltrækker små børn.
• Hold legetøj, stole, borde og andre objekter, børn kan kravle op på, mindst 120 cm væk fra poolen.
• Hav altid førstehjælpsudstyr i nærheden af poolen, og sørg for, at telefonnummeret på alarmcentralen (112)
ligger tydeligt fremme ved den nærmeste telefon. Eksempler på redningsudstyr: Godkendt afmærkningsbøje
med påsat reb, stærk uelastisk stang minimum 366 cm lang.
• Svøm aldrig alene i poolen og lad ikke andre svømme alene.
• Hold poolen ren og vandet klart. Sørg for at kunne se poolens bund udefra.
• Hvis poolen benyttes om aftenen, skal der sørges for belysning af sikkerhedsskilte, stiger, poolens bund og
området omkring poolen.
• Poolen må ikke benyttes af personer under indflydelse af alkohol eller stoffer.
• Hold børn væk fra poolcoveret for at undgå indvikling, drukning eller andre alvorlige skader.
• Poolcoveret skal fjernes helt inden brug af poolen. Børn og voksne kan ikke ses under et poolcover.
• Dæk ikke poolen til, imens du eller andre er i poolen.
• Hold poolen og området omkring den rent og frit for legetøj etc. for at undgå fald og skader.
• Beskyt alle brugere af poolen mod vandsygdomme ved at holde vandet i poolen rent. Drik ikke poolens vand.
Hav god hygiejne.
• Pools er genstand for slid og forringelse. Vedligehold poolen korrekt. Visse former for usædvanlig og
voksende forringelse kan medføre fejl i poolen. Sådanne fejl kan resultere i huller i pooldugen, hvilket vil
medføre spild af store vandmængder.
• Denne pool må kun bruges udendørs.
• Tøm produktet helt for vand, når det ikke er i brug i en længere periode. Opbevar det et sted, hvor det ikke
udsættes for regn eller risikerer at blæse væk. Se opbevaringsvejledningen.
• Under brug af svømmepølen, vil der være nødvendigt at betjene filter pumpen for at sikre at der er mindst et
komplet skift af vand om dagen. Referere til pumpens brugsvejledning for at beregne de nødvendige
betjenings timer.
120B
BARRIERER OG POOL COVERS ER IKKE ERSTATNING FOR KONSTANT VOKSENT OPSYN. POOLEN
LEVERES IKKE MED LIVREDDER. VOKSNE SKAL DERFOR FUNGERE SOM LIVREDDERE OG HOLDE
OPSYN FOR AT BESKYTTE ALLE BRUGERE, ISÆR BØRN, I OG OMKRING POOLEN.
HVIS DISSE SIKKERHEDSREGLER IKKE FØLGES, KAN DER SKE SKADE PÅ
EJENDOMMEN, ELLER DET KAN RESULTERE I ALVORLIGE SKADER ELLER
DØD.
Vejledning:
Ejere af pools skal følge kommunale retningslinier med hensyn til indhegning, sikkerhedsbarrierer, belysning
og andre sikkerhedsforanstaltninger. Kontakt kommunen for yderligere oplysninger.
GEM DENNE VEJLEDNING
Side 3
Page 23
(120IO) SEQUOIA SPIRIT™ WOOD-GRAIN FRAME POOL DANISH 7.5” X 10.3” PANTONE 295U 05/26/2016
Dansk
VIGTIGT SIKKERHEDSREGLER
Læs, forstå og følg alle instruktionerne omhyggeligt før opstilling og brug af poolen. Disse produktadvarsler,
vejledninger og retningslinjer for sikker leg berører almindelige risici for vandleg, men de dækker ikke alle
risici og farer. Brug altid almindelig sund fornuft og god dømmekraft, når du har at gøre med vandaktiviteter.
Opbevares til senere brug. Læs omhyggeligt oplysningerne på emballagen, og behold den til senere
reference. Se produktet for yderligere advarsler.
Generel
• Tjek regelmæssigt søm, bolte og skruer for rust. Tjek også for splinter og skarpe kanter, så du undgår
skader.
Sikkerhed for ikke-svømmere
• Det er nødvendigt, at en voksen konstant holder øje med dårlige svømmere og ikke-svømmere (husk, at
børn under fem år har størst risiko for at drukne)
• Udpeg en voksen, der har ansvaret for at holde øje med poolen, hver gang den benyttes.
• Dårlige svømmere og ikke-svømmere bør bruge beskyttelsesudstyr, når de anvender poolen.
• For at undgå at tiltrække børn bør alt legetøj fjernes fra poolen, når den ikke er i brug, eller den ikke bliver
holdt øje med.
Sikkerhedshjælpemidler
• Det anbefales at opsætte en afspærring (og sikre alle døre og vinduer) for at undgå uautoriseret adgang
til poolen.
• Afspærring, poolbetræk og poolalarm eller lignende hjælpemidler kan hjælpe en del, men de kan ikke
erstatte, at en voksen holder øje med poolen.
Sikkerhedsudstyr
• Det anbefales at have redningsudstyr ved poolen (f.eks. en redningskrans).
• Sørg for, at der er en telefon med nummeret på alarmcentralen (112) og andre vigtige telefonnumre i
nærheden af poolen.
Sikker brug af poolen
• Opfordr alle brugere, og især børn, til at lære at svømme.
• Lær førstehjælp, og hold det ved lige. Det kan være forskellen på liv og død, hvis der sker en ulykke.
• Instruer alle, der bruger poolen, i, hvad de skal gøre i en nødsituation.
• Spring aldrig på hovedet i vand, der ikke er dybt. Dette kan føre til alvorlige skader.
• Brug ikke poolen, hvis du har drukket alkohol eller indtaget medicin, der kan påvirke din evne til at bruge
poolen sikkert.
• Hvis du bruger et poolbetræk, skal det fjernes helt fra poolens vandoverflade, inden nogen benytter poolen.
• Beskyt alle brugere af poolen mod mulige vandsygdomme ved at holde vandet i poolen rent og udøve god
hygiejne. Se, hvordan du skal behandle poolvandet i manualen.
• Opbevar kemikalier (f.eks. til behandling af poolvandet, rensning eller desinfektion) utilgængeligt for børn.
• Aftagelige stiger skal placeres på en vandret overflade.
• Læs, og følg advarslerne og sikkerhedssymbolerne på poolvæggen.
120B
GEM DENNE VEJLEDNING
Side 4
Page 24
(120IO) SEQUOIA SPIRIT™ WOOD-GRAIN FRAME POOL DANISH 7.5” X 10.3” PANTONE 295U 05/26/2016
Dansk
INDHOLDSLISTE
Før du installerer produktet, skal du bruge et par minutter på at kontrollere
indholdet og gør dig fortrolig med delene.
7
8 10 11
9
1
2
3
4
5
6
120B
BEMÆRK:
26
12
13
14
15
19
22
23
20
21
Tegningerne er kun til illustration. Viser ikke det korrekte produkt. Er ikke i skala.
24
16
17
18
25
GEM DENNE VEJLEDNING
Side 5
Page 25

(120IO) SEQUOIA SPIRIT™ WOOD-GRAIN FRAME POOL DANISH 7.5” X 10.3” PANTONE 295U 05/26/2016
N° DE
PIÈCE
1
2
3
4
5
6
7
8
9
10
11
12
13
14
15
16
17
18
19
20
21
22
23
24
25
26
N° DE
PIÈCE
1
2
3
4
5
6
7
8
9
10
11
12
13
14
15
16
17
18
19
20
21
22
23
24
25
26
BESKRIVELSE
SAMLEPIND (+ 2 EKSTRA)
GUMMIFORSEGLING (+ 2 EKSTRA)
T-SAMLING
FJEDRENDE PIND
LODRET BEN (FJEDRENDE PIND MEDFØLGER)
FOD
VANDRET STANG
POOLDUG (AFLØBSVENTILHÆTTE MEDFØLGER)
AFLØBSTILSLUTNING
AFLØBSVENTILHÆTTE
POOLUNDERLAG
VANDTÆT HÆTTE (+ 4 EKSTRA)
BOLT (+ 4 EKSTRA)
HÆTTE TIL SPÆNDEBØJLE
TOPLISTE
SPÆNDEBØJLE
STØTTELISTE
STEMPELVENTILTILSLUTNING
HÆTTE TIL SINETTET
SIDEPANEL A
SIDEPANEL B
SIDEPANEL MED 2 HULLER
SIDEPANEL MED 1 HUL
BUNDSKINNE
BUNDHÆTTE
BOLTSKRUENØGLE
POOL STØRRELSE & ANTAL
15'8" x 49"
(478 cm x124 cm)
32
32
15
15
15
15
15
1
1
1
1
34
34
15
15
15
15
2
2
116
0
1
1
15
15
2
15'8" x 49"
(478 cm x124 cm)
RESERVEDEL NUMMER
10312
10648
10861
10313
10864
10309
10414
11490
10201
11044
18927
12172
12173
12174
12199
12200
12201
11040
11240
12203
12204
12205
12206
12208
12218
11053
(569 cm x 135 cm)
(569 cm x 135 cm)
Dansk
18'8" x 53"
38
38
18
18
18
18
18
1
1
1
1
40
40
18
18
18
18
2
2
141
17
1
1
18
18
2
18'8" x 53"
10312
10648
10862
10313
10865
10309
10414
11110
10201
11044
11290
12172
12173
12174
12199
12200
12202
11040
11240
12203
12204
12205
12207
12208
12218
11053
120B
GEM DENNE VEJLEDNING
Side 6
Page 26
(120IO) SEQUOIA SPIRIT™ WOOD-GRAIN FRAME POOL DANISH 7.5” X 10.3” PANTONE 295U 05/26/2016
Dansk
OPSTILLING AF POOL
VIGTIG: INFORMATION OM UDVÆLGELSE AF OMRÅDE OG
FORBEREDELSE AF UNDERLAGET
• Poolensplaceringskaltilladedigatsikrealledøre,vinduerogsikkerhedsbarriererforatundgå
uautoriseret, utilsigtet og ubevogtet brug.
• Opsætensikkerhedsbarriere,derhindrerbørnogdyradgangtilpoolen.
• Poolenskalinstallerespåetfladt,planogkompaktunderlagogfyldesmedvandihenholdtil
anvisningerne for at undgå, at poolen klapper sammen, og eventuelle badende kommer
alvorligt til skade, eller der opstår skader på stedet.
• Risikoforelektriskstød:Detteproduktmåkunsluttestiletjordstik,dererbeskyttetmeden
jordfejlsafbryder(HFI)ellerfejlstrømsafbryder.Foratreducererisikoenforelektriskstødmå
du ikke bruge forlængerledninger, timere, stikadaptere eller omformere til at tilslutte pumpe til
strømforsyningen.Brugenkorrektplaceretstikkontakt.Ligledningenetsted,hvordenikke
bliver beskadiget af græsslåmaskinen, hækkesakse og lignende redskaber. Se filterpumpens
manualforyderligereadvarsleroginstruktioner.
• Risikoforalvorligeskader:Undgåatforsøgeatsættepoolenop,hvisdetblæserkraftigt.
ADVARSEL
120B
Vælg et område udendørs med følgende i mente:
1.
Stedet, hvor poolen stilles op skal være helt jævn og flad. Sæt ikke poolen op på en skråning eller
ujævn overflade.
2.
Underlaget skal være kompakt og fast nok til at modstå presset og vægten af en fuld opstillet pool.
Opstil ikke poolen på sand, løs jord eller andre bløde områder.
3.
Sæt ikke poolen op på en terrasse, balkon eller anden platform, der kan kollapse under vægten
af den fyldte pool.
4.
Der skal være minimum 1.2 meter fri omkring hele poolen for genstande børn kan bruge til at kravle på
for at få adgang til poolen.
5.
Evt. græs under poolen vil blive beskadiget. Sprøjt fra poolen kan ødelægge bevoksningen.
6.
Fjern først aggressive typer græs. Visse typer græs som eksempelvis kan gro gennem pooldugen.
Græs, som vokser gennem beklædningen, er ikke en produktionsdefekt og er ikke dækket af garantien.
7.
Området skal kunne være i stand til at opsuge poolvandet efter brug, og når poolen skal opbevares.
GEM DENNE VEJLEDNING
Side 7
Page 27

(120IO) SEQUOIA SPIRIT™ WOOD-GRAIN FRAME POOL DANISH 7.5” X 10.3” PANTONE 295U 05/26/2016
A
Dansk
OPSTILLING AF POOL (fortsat)
FORBEREDELSE AF UNDERLAGET
Vælg en udendørs placering til poolen, der skal være et jævnt betonunderlag. Følg nedenstående
instruktioner til klargøring af området, hvis der ikke er noget betonunderlag til rådighed. Det er vigtigt, at du
får en professionel (entreprenør eller gartner) til at udføre den følgende forberedelse af underlaget.
BEMÆRK:
1. Opmærk installationsområdet
• Når området er udvalgt, sættes en markeringsstok
i det centrum, hvor du ønsker poolen placeret.
Sæt en snor på markeringsstokken i centrum. Mål
længden af snoren A og sæt en markeringspind
fast i enden af snoren. Opmærk omkredsen af
poolens område ved hjælp af snor og
markeringspind (se tegning 1.1).
• Til 478 cm pool, hvor
A = 251,5 cm = radius af græsset, der skal fjernes
og udjævnes.
Til 508 cm pool, hvor
A = 266,7 cm = radius af græsset, der skal fjernes
og udjævnes.
Til 569 cm pool, A = 297.1 cm
se tegning 1.2.
Værktøj medfølger ikke.
1.1
1.2
A
120B
2. Rens installeringsområdet
• Fjern alt græs, sten og grene fra det markerede område. Markeringsstokken i centrum og
markeringspinden fjernes også.
3. Udjævning
• Find det laveste punkt i området. Udjævn hele området ved at grave eller skrabe de ujævne områder
væk, så det bliver på niveau med det laveste punkt.
stedetforatfyldepåibunden
områder er i niveau og overskydende jord er fjernet, kan du fylde de små huller, som endnu ikke er i
niveau, med jord. Sørg for at stampe og udjævne jorden efterfølgende (se tegning 2.1).
for at sikre at underlaget bliver så stabilt og fast som muligt. Når alle
Fjern altid materiale fra toppen af bakken i
stedet for at fylde på i bunden.
Uacceptabel
Grad
Acceptabel
Grad
Fjern altid materiale fra toppen af bakken i
2.1
Påfyld ikke
FjernFjern
GEM DENNE VEJLEDNING
Side 8
Page 28
(120IO) SEQUOIA SPIRIT™ WOOD-GRAIN FRAME POOL DANISH 7.5” X 10.3” PANTONE 295U 05/26/2016
A
Dansk
120B
OPSTILLING AF POOL (fortsat)
• Brug et stort bræt eller lignende (træ eller
aluminium) og et vaterpas. Udjævn området
ved at grave rektangler (eller firkanter), med
brættet i det valgte og rensede område (se
tegning 2.2).
4. Færdiggørelse
• På den rengjorte og i niveau jord spredes et let lag af siet jord (max 1 cm). Sprøjt vand på det og stamp
det til (med en havetromle). Doublecheck og afsikr at det er udjævnet. Underlaget skal være helt jævnt
for at kunne fortsætte.
5. Installation af terrassefliser
• Køb 15 fliser til 477,5 cm pool eller 16 fliser til 508 cm pool eller 18 fliser til 569 pool. Der hver skal
have minimum dimensionerne 46 x 46 x 5cm. Markér området, hvor fliserne skal lægges (se tegning 3.1),
og fjern så 5 cm af jorden i det markerede område (se tegning 3.2).
• Til 478 cm pools, hvor
A = 251,5 cm = radius af græsset, der skal fjernes og udjævnes.
B = 104,1 cm = afstanden mellem hver terrasseflise.
Til 508 cm pools, hvor
A = 266,7 cm = radius af græsset, der skal fjernes og udjævnes.
B = 104,1 cm = afstanden mellem hver terrasseflise.
Til 569 cm pools, hvor
A = 297.1 cm
B = 104,1 cm
3.1
18” (45.7 cm)
2.2
3.2
18” (45.7 cm)
B
A
2” (5.08 cm)
• Overfladen af terrassefliserne skal være jævn, på niveau med jordoverfladen, overfladen på det
afdækkede område og med alle fliserne hele vejen rundt om poolen (se tegning 3.3).
3.3
GEM DENNE VEJLEDNING
Side 9
Page 29

(120IO) SEQUOIA SPIRIT™ WOOD-GRAIN FRAME POOL DANISH 7.5” X 10.3” PANTONE 295U 05/26/2016
Dansk
OPSTILLING AF POOL (fortsat)
Denne pool kan være købt med Krystal Clear™ filterpumpe. Denne filterpumpe har et separat
sæt installeringsinstruktioner og skal stilles op efter samling af selve poolen.
Anslået samletid 120 min. (Bemærk, at samletiden kun er vejledende, og at det kan variere for den enkelte
bruger.)
1. Klargøring af beklædningen
• Åbn kartonen der indeholder liner, led, ben, mv., meget forsigtigt eftersom denne karton kan bruger til
opbevaring af svømme bassinet under vinter måneder eller når den ikke bruges.
• Tag underlaget
område. Tag herefter pooldugen
underlaget med afløbsventilen pegende mod området til
udtømning. Vend afløbsventilen væk fra huset. Lad solen
opvarme pooldugen, inden benene
Vigtigt! Opstille altid pøl enheden med mindst 2
personer. Træk ikke pooldugen over jorden, da dette kan
resultere i utætheder eller andre skader (se tegning 4).
• Under opstillingen af poolen skal slangetilslutningerne eller åbningerne pege i retning mod strømkilden.
Ydersiden af den samlede pool skal være indenfor rækkevidde af elektrisk tilslutning til den mulige
filterpumpe.
(11)
og spred det ud på det klargjorte
(8)
og spred det ud over
(7)
isættes åbningerne.
8
120B
4
2. Samling af metalrammen
• Metalramme-poolens ben
vandrette stænger, der skal skubbes ind i åbningerne øverst i pooldugen. De mindre diametre er de
lodrette ben. Begge typer ben og stænger passer ind i T-samlingerne
• Start et hvilket som helst sted, men sørg for hele tiden at arbejde i
samme retning, med at skubbe stængerne ind i åbningerne. Når stangen
er i midten, påsættes en af T-samlingerne, der fastgøres ved hjælp af
samlepinden
stikke en samlepind ind gennem gummiforseglingen
Gentag dette, indtil alle stænger og T-samlinger er samlet
tegning 5.1)
Den sidste samling kan være svær. Den kan let klares, hvis den
sidste samling og stængerne samtidig løftes ca. 5 cm, hvorefter
stængerne isættes T-samlingen, imens det hele sænkes til normal
højde. Stangen vil nu glide ind i T-samlingen (se tegning 5.2). Sørg
for, at den sidste samling er helt samlet, før du går videre til
monteringen af benene.
(1)
, T-samlingen sættes på den ene ende af stangen ved at
.
(5)
og stænger
(7)
hører til 2 forskellige grupper. De store diametre er de
(3)
.
1
2
(2)
og ned i hullerne.
(se
3
3
7
5.1
5.2
GEM DENNE VEJLEDNING
Side 10
Page 30

(120IO) SEQUOIA SPIRIT™ WOOD-GRAIN FRAME POOL DANISH 7.5” X 10.3” PANTONE 295U 05/26/2016
OPSTILLING AF POOL (fortsat)
• Skub derefter benene ned i stroppen, der er placeret i midten af
pooldugen. Skub forsigtigt benet ind i stroppen, og sæt det øverste
af benet ind i bunden af samlingen. Klik benene fast i samlingens
huller ved at rette de fjedrende pinde ind i benenes huller. Påsæt
foden
• Tag fat i metalramme-poolens topstænger 2-3 steder, og “ryst” poolen
for at sikre, at alle samlinger, ben og stænger passer ind i hinanden.
Efterse og sikr alle pindene ved at trykke dem ned gennem hullerne
• Træk forsigtigt udad i bunden af benet, og sørg for, at benet står
lodret og vinkelret i forhold til den vandrette overflade.
3.Påfyldningafpoolen
• Se i Krystal Clear™ filterpumpemanualen og installer møtrikkerne, de
flade spændeskiver og de
gevindskårne tilslutninger i de forskårne huller i pooldugen. Brug filter-
ventilhætter
gevindskårne tilslutninger fra indersiden af poolen, så der ikke løber vand ud under påfyldning.
(6)
i den anden ende af benet
(se tegning 7.1)
(19)
og isæt dem i de
.
(se tegning 6.1 & 6.2)
.
6.1
3
5
6
6.2
Dansk
4
7.1
120B
• Før opfyldning af poolen, sørg for at tømningsventilen på indersiden af pooldugen er lukket og
tømningshætten på ydersiden er skruet stramt på. Påfyld ikke mere end ca. 3 cm vand, og check at der
ikke er forskel på hældningen af bunden af poolen.
VIGTIGT: Hvis vandet i poolen hælder til den ene side, så er poolen ikke helt plan. Opstilling af
poolen på et ujævnt område vil få poolen til at hælde, hvilket vil få væggene til at bule ud. Hvis
poolenikkestårfuldstændigplant,skaldutømmedenogjævneområdetellerflyttepoolentilet
andetområde,dererplant,ogfyldepoolenigen.
• Begynd at udglatte de sidste folder (fra indersiden af poolen) ved at skubbe ud, der hvor bunden er
samlet med siderne, eller (fra ydersiden af poolen) ræk ind under siderne og træk ud i bunden. Hvis det
er poolunderlaget, der er skyld i folderne, så få 2 personer til at trække i hver sin side, for at fjerne alle
folderne. Brug den korrekt samlede poolstige, når du kravler ned i eller op ad poolen.
4
. Vand må fyldes til lige under indvendige svejsesøms linie
(se tegning 7.2)
.
VANDSTAND
7.2
GEM DENNE VEJLEDNING
Side 11
Page 31

(120IO) SEQUOIA SPIRIT™ WOOD-GRAIN FRAME POOL DANISH 7.5” X 10.3” PANTONE 295U 05/26/2016
Dansk
OPSTILLING AF POOL INDHEGNING
Når poolen er fyldt helt op med vand, og det er checket, at poolen er helt jævn og at alle ben står lodret i
midten af hver sin terrasseflise, kan man fortsætte med installeringen af pool indhegningen.
1. Installering af spændebøjle
• Påsæt en spændebøjle
vender opad. Gentag punktet indtil alle spændebøjlerne er fæstnet til rammens T-samlinger (se tegning
8.1 & 8.2).
2. Installation af bundhætte og bundskinne
• Placer bundhætten
gevindskårne hul bundhætten vender udad. Placer alle bundhætterne i position.
• Start fra et hvilket som helt punkt, men hele tiden i den samme retning og montér en bundskinne
mellem to bundhætter
på bundhætterne. Gentag dette punkt hele vejen rundt om poolen indtil alle bundskinner og bundhætter
er sat sammen. Justér afstanden mellem bundhætten og hætten på benet ved at antage at støttelisten
(17)
skal stå lodret, når den er installeret (se tegning 9.1 & 9.2).
(16)
fra undersiden af rammens T-samling. Sikr at de to bolte på spændebøjlen
8.1 8.2
(25)
på jorden og udlign den med hætterne på benene. Sørg for at det
(25)
. Sørg for, at de forborede huller i bundskinnerne klikker fast på knopperne
(24)
120B
9.1
3. Installation af støtteliste
• Fjern papstykkerne fra begge sider af hver støtteliste.
• Isæt støttelisten
at sidde fast på hakket spændebøjlen. Tryk ned for at sikre at støttelisten er sat godt fast på
spændebøjlen og i bundhætten (se tegning 10.1, 10.2 & 10.3).
• Gentag disse procedurer indtil alle støttelister er monteret i spændebøjlerne og bundhætterne (se
tegning 10.4).
(17)
i bundhætten
(25)
. Løft lidt op i støttelisten for at få hullet i toppen af støttelisten til
10.1
10.2
9.2
GEM DENNE VEJLEDNING
Side 12
Page 32

(120IO) SEQUOIA SPIRIT™ WOOD-GRAIN FRAME POOL DANISH 7.5” X 10.3” PANTONE 295U 05/26/2016
Dansk
OPSTILLING AF POOL INDHEGNING (fortsat)
10.3
4. Installation af sidepaneler
Antallet af sidepaneler afhænger af størrelsen på din pool. Der er to sidepaneler, der skal tages specielle
hensyn til under installation. For det første er der et sidepanel, der skal påsættes over poolens ind- og
udtag. For det andet skal sidepanelet med advarslen placeres så den er nem at se for poolens brugere
før de går op i poolen. Disse to specielle sidepaneler er pakket separat i forhold til de øvrige paneler.
4a. Installering af sidepaneler med huller
• Placér sidepanelet med hullerne udfor ind- og udtagshullerne i pooldugen. Pak panelerne ud af pakken
og skub det med et hul
Fortsæt i nummerrækkefølgen fra bund til top. Feren på panelerne skal skubbes helt ned i noten på det
foregående panel. Teksten på panelerne skal vende udad. Skub efterfølgende sidepanelet med to
huller
tegning 11.1 & 11.2).
(22)
markeret med nummer 5 og 6 ned af støttelisterne og isæt det i panelet med nummer 4 (se
(23)
først ned af støttelisterne og isæt det i den vandrette kant på bundskinnen.
10.4
120B
11.1
11.2
11.3
• Stempelventiltilslutningerne
installeret i pooldugen under opstilling af poolen (se tegning 11.3). Stempelventilerne skrues ind i
stempelventiltilslutningerne
ned og dreje det mod uret som beskrevet i filterpumpe manualen. Nu kan filterventilhætterne
ud af de gevindskårne filtertilslutninger fra indersiden af poolen (se tegning 11.4 & 11.5).
• Fortsæt med at installere sidepanelerne ved at isætte panelerne markeret med 7 og 8 (se tegning 11.6).
(18)
skrues på de gevindskårne filtertilslutninger, der allerede blev
(18)
ved dreje dem mod uret. Luk stempelventilerne ved at trykke håndtaget
11.4 11.5
11.6
(19)
tages
GEM DENNE VEJLEDNING
Side 13
Page 33

(120IO) SEQUOIA SPIRIT™ WOOD-GRAIN FRAME POOL DANISH 7.5” X 10.3” PANTONE 295U 05/26/2016
Dansk
OPSTILLING AF POOL INDHEGNING (fortsat)
11.7
8
7
6
5
4
3
2
1
15'8" x 49"
4b. Installering af sidepanel med ”advarsel”
• Isæt sidepanelet med advarslerne sådan at det let kan ses af poolens brugere inden de stiger op i
poolen. Pak panelerne ud af pakken og skub det første ned af støttelisterne og isæt det i den vandrette
kant på bundskinnen. Fortsæt i nummerrækkefølgen fra bund til top. Feren på panelerne skal skubbes
helt ned i noten på det foregående panel. Teksten på panelerne skal vende udad (se tegning 12.1
& 12.2).
8
7
6
5
4
3
2
1
0
18’8” x 53”
11.8
120B
12.1
12.3
8
7
6
5
4
3
2
1
8
7
6
5
4
3
2
1
0
12.2
12.4
15'8" x 49"
15'8" x 49"
18’8” x 53”
GEM DENNE VEJLEDNING
18’8” x 53”
Side 14
Page 34

(120IO) SEQUOIA SPIRIT™ WOOD-GRAIN FRAME POOL DANISH 7.5” X 10.3” PANTONE 295U 05/26/2016
Dansk
OPSTILLING AF POOL INDHEGNING (fortsat)
4c. Installation af øvrige sidepaneler
•
Til pools med højde på 125 cm installeres det resterende sidepanel ved at bruge 8 panel A til hver.
Til pools med højde på 135 cm installeres det resterende sidepanel ved at bruge et panel B i bunden
og 8 panel A til hver. Isæt panelerne en ad gangen fra bunden og opad. Isæt noten på det første panel
på den vandrette bundlistes kant og noten på følgende paneler sættes fast på det foregående panels
fer. Side panelerne med de printede træåre skal vende mod yderkanten (se tegning 13.1 & 13.2).
13.1
5. Installation af topliste
Påsæt toplisten
spændebøjlerne
punkt indtil alle toplisterne er sat på spændebøjlerne og sidepanelerne.
med advarsler. Påsæt disse toplister med tre neutrale toplister imellem (se tegning 14.1, 14.2 & 14.3).
(15)
øverst på sidepanelerne med hullerne i enderne over møtrikkerne på
(16)
. Sørg for at noten under toplisten passer med feren på toplisten
BEMÆRK:
13.2
(15)
. Gentag dette
Der er fire toplister
120B
14.1
6. Installation af hætte til spændebøjlerne
Påsæt hætterne
klemme i åbningen på den øverste ende af støttepælen. Udlign de øverste huller på spændebøjlernes
hætter med møtrikkerne på spændebøjlerne. Isæt en skrue og bolt
ved at bruge den medfølgende boltskruenøgle
Gentag dette indtil alle spændebøjlernes hætter og monteret på spændebøjlerne og på støttelisterne (se
tegning 15.1, 15.2 & 15.3).
(14)
til spændebøjlerne, hvor de to toplister mødes. Indsætte kanten af den øverste
(31)
og efterfølgende dække med de vandtætte hætter
15.1
14.2
15.2
(13)
i alle de gevindskårne huller
BEMÆRK: Tegningerne er kun
til illustration.
14.3
(12)
15.3
.
GEM DENNE VEJLEDNING
Side 15
Page 35

(120IO) SEQUOIA SPIRIT™ WOOD-GRAIN FRAME POOL DANISH 7.5” X 10.3” PANTONE 295U 05/26/2016
Dansk
POOL VEDLIGEHOLDELSE OG KEMIKALIER
ADVARSEL
HUSK AT
• Beskytallebrugereafpoolenmodvandsygdommevedatholdevandetipoolenrent.Drik
ikkepoolensvand.Havgodhygiejne.
• Holdpoolenrenogvandetklart.Sørgforatkunnesepoolensbundudefra.
• Holdbørnvækfrapoolcoveretforatundgåindvikling,drukningellerandrealvorligeskader.
Opretholdelse af vandkvaliteten
Vedligeholdelse af en korrekt vandbalance er den vigtigste faktor til forlængelse af pooldugens
levetid og udseende samt til at sikre rent, sundt og sikkert vand. Det er vigtigt at have den rette
tekniktilattestevandet.Kontaktdinlokaleforhandlerafpoolkemikalierforvejledningmedhensyn
til kemikalier, testkits og testprocedurer. Sørg for at læse og følge instruktionerne fra
kemikalieproducenten.
1. Klor må aldrig komme i kontakt med pooldugen, før det er helt opløst. Pulver og tabletter opløses først i
en spand vand.
2. Bland aldrig kemikalier. Tilsæt kemikalierne separat og rør i vandet, inden øvrige kemikalier tilsættes en
ad gangen.
3. Intex poolskimmer og Intex poolsuger kan hjælpe med at holde vandet rent. Kontakt din forhandler for
køb af tilbehør.
4. Brug ikke højtryksrenser til rengøring af poolen.
120B
PROBLEM
ALGER
FARVET VAND
OPSLÆMMET
SUBSTANS I
VANDET
KONSTANT LAV
VANDSTAND
BUNDFALD I
POOLEN
BESKIDT
OVERFLADE
TROUBLESHOOTING
BESKRIVELSE
• Grønligt vand.
• Grønne eller sorte
pletter på pooldugen.
• Pooldugen er slimet
og/eller lugter
ubehageligt.
• Vandet bliver blåt, brunt
eller sort, når det
klorbehandles.
• Vandet har et
uigennemsigtigt og
mælkeagtigt udseende.
• Vandstanden er lavere
end den foregående dag.
• Skidt eller sand på
bunden af poolen.
• Blade og lignende.
• Klormængden og
PH-værdien trænger
til at blive justeret.
ÅRSAG
• Kobber, jern eller
mangan i vandet
oxyderer på grund af
kloret. Dette er
almindeligt visse steder.
• "Hårdt vand" på grund af
for høj PH-værdi.
Klorindholdet er lavt.
Fremmede partikler i
vandet.
• Revne eller hul i
pooldugen.
• Revne eller hul i slange.
• Spændebåndene er ikke
stramme nok.
• Hyppig anvendelse med
stor trafik til og fra
poolen.
• Poolen står for tæt på
nogle træer.
LØSNING
• "Chokbehandling" med klor.
Kontroller PH-værdien og
korriger til anbefalet niveau.
Kontakt forhandler af
poolkemikalier angående dette.
Fjern forsigtigt pletterne med en
børste. Vedligehold korrekt
klorværdi.
• Justér PH-værdien til
anbefalet niveau. Lad pumpen
køre, indtil vandet er klart.
Udskift filtret hyppigt.
• Justér PH-værdien til
anbefalet niveau.
• Kontroller klorværdien.
• Rens eller udskift filtret.
• Find revnen/ hullet og sæt en
lap på. Reparer/udskift slange.
Stram alle spændebånd.
• Erstat slangerne.
• Brug Intex suger til at rense
bunden af poolen.
• Brug Intex pool skimmer.
GEM DENNE VEJLEDNING
Side 16
Page 36

(120IO) SEQUOIA SPIRIT™ WOOD-GRAIN FRAME POOL DANISH 7.5” X 10.3” PANTONE 295U 05/26/2016
Dansk
POOL VEDLIGEHOLDELSE OG AFLEDNING
FØLG ALTID KEMIKALIEPRODUCENTENS INSTRUKTIONER SAMT
ADVARSEL
Tilsæt aldrig kemikalier, mens der er personer i poolen. Dette kan medføre hud- og øjenirritation
Koncentreret klor kan medføre skade på pooldugen. "Intex Recreation Corp.", "Intex Development Co. Ltd.",
relaterede firmaer, autoriserede agenter, servicecentre, detailhandlere eller medarbejdere kan ikke i noget
tilfælde gøres ansvarlige overfor køber eller anden part for omkostninger i forbindelse med tab af vand,
kemikalier eller vandskader.
brugesKrystalClear™Intexfilterpumpertilallefritståendepools.
STORE REGNMÆNGDER: Regnvand bør udledes med det samme, så vandniveauet ikke kommer
over den maksimale vandstand med deraf følgende risiko for skader på poolen, og så poolen ikke
bliveroverfyldt.
Sådan tømmes poolen og gøres klar til vinteropbevaring
1
. Check de lokale bestemmelser for specifikke anvisninger vedrørende bortskaffelse af vand fra pools.
2
. Sørg for at afløbsproppen inden i poolen er trykket på plads.
3
. Fjern hætten fra afløbsventilen på ydersiden af poolen.
4
. Tilslut den ene ende af haveslangen til den specielle slangeadapter.
5
. Læg den anden ende af haveslangen et sted, hvor vandet kan løbe ud – væk fra huset.
6
. Tilslut slangeadapteren på afløbsventilen.
vilbegyndeatløbemeddetsamme.
7.
Når vandet holder op med at dræne, løfte da svømme bassinet fra den modsatte side til dræn, derved
ledes det efterblivende vand til dræn og bassinet kan tømmes helt.
8
. Frakobl slange og adapter, når du er færdig.
9
. Isæt afløbsproppen i afløbsventilen på indersiden af poolen til opbevaring.
10
. Sæt hætten på afløbsventilen udvendigt på poolen.
11
. Følg instruktionerne i modsat rækkefølge for at skille indhegning og pool ad og fjern alle VVS delene.
12
. Pool og alle tilbehørsdele skal være helt tørre før opbevaring. Lufttør pooldugen i solen, så den er helt
tør, inden den foldes sammen
sammen og for at suge det vand op, du kan have overset.
13
. Lav en rektangulær form. Start fra den ene side og fold 1/6 af pooldugen sammen ad 2 omgange. Gør
det samme fra den modsatte side
14
. Når begge sider er foldet ind mod hinanden, så foldes de sammen, ligesom når man lukker en bog
tegning 22.1 & 22.2)
15
. Fold to langsider ind mod midten
16
. Fold den ende side over den anden som når man lukker en bog og tryk pooldugen godt sammen
tegning 24)
17
. Opbevar pooldugen og tilbehøret på et tørt og tempereret (mellem 0° og 40° Celsius) sted.
18
. Den originale emballage kan bruges til opbevaring.
.
Havaltidnyefiltreklar.Skiftfiltrethverandenuge.Vianbefaler,atder
.
HELBREDS- OG RISIKOADVARSLER.
BEMÆRK: Adapteren vil åbne afløbsproppen, og vandet
(se tegning 20)
(se tegning 21.1 & 21.2)
(se tegning 23)
. Drys talkum på pooldugen for at undgå, at den klistre
.
.
.
(se
(se
120B
20
22.1
21.1
22.2
21.2
23 24
GEM DENNE VEJLEDNING
Side 17
Page 37

(120IO) SEQUOIA SPIRIT™ WOOD-GRAIN FRAME POOL DANISH 7.5” X 10.3” PANTONE 295U 05/26/2016
Dansk
VINTER FORBEREDELSER
Vinterklargøring af din fritstående pool
Din pool kan tømmes let og opbevares et sikkert sted om vinteren. Du skal tømme,
afmontere og opbevare poolen, når temperaturen falder til under 5 oC for at forhindre, at is
beskadiger poolen og de tilhørende komponenter. Hvis is beskadiger poolen, kan det
medføre pludselige skader på dugen, eller at poolen kollapser. Se ”sådan tømmer du
poolen” sektion.
Hvis temperaturerne i dit område ikke falder til under 5 oC, og du derfor opbevarer din pool
udenfor, skal du gøre følgende:
1.
Rens vandet i poolen grundigt (hvis det er en Easy set pool eller ovalramme pool skal du sørge
for, at topringen er korrekt oppustet).
2.
Fjern skimmeren (hvis monteret) eller andet tilbehør monteret på det gevindskårne
siforbindelsesstykke. Erstat sinettet hvis nødvendigt. Sørg for at alle delene er rene og tørre
inden opbevaring.
3.
Isæt de medfølgende propper i indtags og udtags installationerne fra indersiden af poolen
(488 cm pools eller derunder). Luk indtags og udtags ventilerne (størrelser på eller over
518 cm).
4.
Fjern stigen (hvis monteret) og opbevar den et sikkert sted. Sørg for at stigen er helt tør inden
opbevaring.
5.
Fjern slangerne, der tilslutter poolen til pumpe og filter.
6.
Tilføj passende vinterkemikalier. Kontakt din lokale poolforhandler, da regionerne varierer
meget.
7.
Overdæk poolen med Intex-pooloverdækning.
IKKE EN SIKKERHEDSOVERDÆKNING.
8.
Rens og tøm pumpe, filterhuset og slangerne. Fjern og smid det brugte filter ud (Hav et
reservefilter klar til næste sæson).
9.
Tag pumpen og filterdelene med indendørs og opbevar dem på et sikkert og tørt sted – helst
mellem 0° og 40° Celsius.
VIGTIGT: INTEX-POOLOVERDÆKNING ER
120B
TROUBLESHOOTING
Vandrekreation er både sjovt og terapeutisk. Det er dog forbundet med risiko for skader
eller død. For at reducere risikoen for skader, læs og følg alle advarsler og instruktioner på
produkt, pakke etc. Husk dog, at produktadvarsler, instruktioner og sikkerhedsregler kun
dækker almindelig risiko ved vandrekreation, men ikke alle former for risiko og fare.
Foryderligeresikkerhed,lærogsåfølgendegenerellereglersamtreglerfrainternationale
sikkerhedsorganisationer at kende:
• Forlang konstant opsyn. En kompetent voksen bør udpeges som “livredder” og holde opsyn,
især når der er børn i eller i nærheden af poolen.
• Lær at svømme.
• Tag dig tid til at lære førstehjælp.
• Fortæl alle, der har opsyn med poolens brugere, om de potentielle farer ved brug af en pool, og
gør opmærksom på brug af beskyttelsesforanstaltninger som f.eks. aflåste døre, afspærringer
osv.
• Fortæl alle poolbrugere, heriblandt børn, hvad de skal gøre i nødstilfælde.
• Brug sund fornuft og dømmekraft ved enhver form for vandaktivitet.
• Opsyn - opsyn - opsyn.
GEM DENNE VEJLEDNING
Side 18
Page 38

(120IO) SEQUOIA SPIRIT™ WOOD-GRAIN FRAME POOL DANISH 7.5” X 10.3” PANTONE 295U 05/26/2016
Dansk
BEGRÆNSET GARANTI
Din Intex-pool er fremstillet med håndværksmæssig dygtighed og af de bedste materialer.
Alle Intex-produkter er blevet kontrolleret og er fri for defekter ved deres afsendelse fra
fabrikken. Den begrænsede garanti er kun gældende for denne Intex-pool.
Denne begrænsede garanti er et tillæg til, og ikke en erstatning for, dine juridiske
rettigheder og retsmidler. I tilfælde, hvor denne garanti er i modstrid med dine juridiske
rettigheder, prioriteres dine rettigheder. For eksempel yder forbrugerlovgivning i hele EU
lovpligtig garantirettigheder ud over dækningen, du for af denne begrænsede garanti: Du
kan læse mere om den EU-dækkende forbrugerlovgivning på det europæiske
forbrugercenter på http://ec.Europa.EU/consumers/ECC/contact_en/htm.
Bestemmelserne i denne begrænsede garanti gælder kun for den oprindelige køber og
kan ikke overdrages. Denne begrænsede garanti er gældende i en periode på 90-dage fra
købsdatoen. Gem den originale kvittering sammen med denne brugsanvisning som
dokumentation for køb af produktet ved fremsættelse af krav under garantien; i modsat fald
bortfalder den begrænsede garanti.
Hvis en produktionsfejl findes indenfor den 90 dages periode, bedes du kontakte et af Intex’
servicecentre som findes på den separate oversigt over autoriserede servicecentre. Hvis
enheden returneres som instrueret af Intex Service Center, vil servicecenteret inspicere
enheden og evaluere validiteten af kravet. Hvis varen er dækket af bestemmelserne i
garantien, repareres eller udskiftes varen, med den samme eller tilsvarende vare (efter
Intexs eget valg), uden beregning.
120B
Udover denne garanti, og andre juridiske rettigheder i dit land, er ingen yderligere garantier
underforstået. I omfanget, hvor det er muligt i dit land, er Intex under ingen omstændigheder
ansvarlig for dig eller nogen tredjepart for direkte eller indirekte skader, som følge af brugen
af din Intex-pool, eller Intexs eller deres agenters og medarbejdernes handlinger (herunder
fremstilling af produktet). Nogle lande, eller juridiske områder tillader ikke udelukkelsen eller
begrænsningen af tilfældige eller følgeskader, derfor kan ovenstående begrænsning eller
udelukkelse ikke nødvendigvis være gældende for dig.
Bemærk venligst, at denne begrænsede garanti ikke gælder i følgende tilfælde:
• Hvis Intex-pool forsømmes, bruges på unormal vis, udsættes for en ulykke, ukorrekt
betjening, bugsering, forkert vedligeholdelse eller opbevaring.
• Hvis Intex-pool beskadiges pga. omstændigheder, der er uden for Intexs kontrol,
herunder, men ikke begrænset til, punktering, ridsning, skrabning eller almindelig slitage
og skader, som følge af brand, oversvømmelse, frysning, regn eller andre miljømæssige
kræfter.
• Dele og komponenter, der ikke sælges af Intex; og/eller.
• Uautoriserede ændringer, reparationer eller adskillelse af Intex-pool af nogen andre end
Intexs servicepersonale.
Omkostninger forbundet med tab af poolvand, kemikalier eller vandskade er ikke omfattet af
denne garanti. Personskade eller tingsskade er ikke omfattet af denne garanti.
Læs vejledningen grundigt, og følg alle instruktioner om betjening og vedligeholdelse af din
Intex-pool. Kontrollér altid luftmadrassen, før du bruger den. Din begrænsede garanti kan
annulleres hvis instruktionerne ikke følges.
GEM DENNE VEJLEDNING
Side 19
Page 39

(120IO) SEQUOIA SPIRIT™ WOOD-GRAIN FRAME POOL SWEDISH 7.5” X 10.3” PANTONE 295U 05/26/2016
Swedish
120A
VIKTIGA
SÄKERHETSREGLER
Innan du monterar och använder den
här produkten ska du läsa, förstå och
noga följa alla anvisningar.
Spara för framtida bruk.
TM
GRAPHITE GRAY PANEL POOL SET
15’8” (478 cm) & 18’8” (569 cm)
Endast i illustrationssyfte. Tillbehören kanske inte medföljer poolen.
Prova även dessa utmärkta produkter från Intex: pooler,
pooltillbehör, uppblåsbara pooler, leksaker, luftmadrasser och båtar.
Du hittar dem hos en återförsäljare eller på vår webbsida.
P.g.a. en policy gällande kontinuerlig produktförbättring reserverar
sig Intex rätten att ändra specifikationerna och utseendet, vilket kan
resultera i uppdateringar av bruksanvisningen utan förvarning.
©2016 Intex Marketing Ltd. - Intex Development Co. Ltd. - Intex Trading Ltd.
- Intex Recreation Corp.
Rechte vorbehalten. Printed in China/Imprimé en Chine/Impreso en China/Gedruckt in China.
®™ Trademarks used in some countries of the world under license from/®™ Marques utilisées dans certains pays sous
licence de/Marcas registradas utilizadas en algunos países del mundo bajo licencia de/Warenzeichen verwendet in einigen
Ländern der Welt in Lizenz von/
BRUKSANVISNING
Box 28829, Hong Kong & Intex Recreation Corp., P.O. Box 1440, Long Beach, CA 90801
Union by/Distribué dans l’Union Européenne par/Distribuido en la unión Europea por/Vertrieb in der Europäischen Union
Intex Trading B.V., Venneveld 9, 4705 RR Roosendaal – The Netherlands
durch/
www.intexcorp.com
All rights reserved/Tous droits réservés/Todos los derechos reservados/Alle
Intex Marketing Ltd. to/à/a/an Intex Trading Ltd., Intex Development Co. Ltd., G.P.O
• Distributed in the European
Page 40

(120IO) SEQUOIA SPIRIT™ WOOD-GRAIN FRAME POOL SWEDISH 7.5” X 10.3” PANTONE 295U 05/26/2016
Varningar / Viktiga säkerhetsregler
...............................
Lista över komponenter och komponentöversikt
Monteringsanvisningar
Poolunderhåll och kemikalier
Vanliga problem med poolen
Poolunderhåll och tömning
Allmän vattensäkerhet
...................................................
.......................................
.........................................
............................................
....................................................
........
3-4
5-6
7-15
16-17
16
17-18
18
Swedish
120A
Begränsad garanti
..........................................................
19
Inledning:
Tack för att du har valt en Intex-pool. Var snäll och läs igenom den här
bruksanvisningen innan du monterar poolen. Informationen ökar poolens
livslängd och gör den säkrare för din familj att använda. Titta på videon som
medföljer innan du installerar. 2–4 personer rekommenderas för montering av
poolen. Fler personer gör att monteringen går snabbare.
Inga verktyg krävs för monteringen.
SPARA ANVISNINGARNA
Sida 2
Page 41

(120IO) SEQUOIA SPIRIT™ WOOD-GRAIN FRAME POOL SWEDISH 7.5” X 10.3” PANTONE 295U 05/26/2016
Swedish
VIKTIGA SÄKERHETSREGLER
Innan du monterar och använder den här produkten ska du läsa, förstå och noga följa alla anvisningar
.
VARNING!
• Se till att en vuxen har kontinuerlig och kompetent uppsikt över barn och funktionshindrade.
• Säkra alla dörrar, fönster och säkerhetshinder för att förhindra icke auktoriserad, ofrivillig eller oövervakad
användning av poolen.
• Installera ett säkerhetshinder som gör att små barn och djur inte har tillgång till poolen.
• Poolen och pooltillbehören ska endast monteras och nedmonteras av vuxna.
• Dyk, hoppa eller åk aldrig ner i grunt vatten eller i en pool som står ovanpå marken.
• Om du inte sätter upp poolen på plan, jämn och kompakt mark kan den kollapsa, och människor som
befi nner sig i poolen kan ramla ut.
• Luta dig inte emot, gränsla eller tryck inte på den uppblåsbara ringen eller den övre kanten eftersom du
riskerar att skadas eller kan orsaka översvämning. Tillåt ingen att sitta på, klättra på eller gränsla poolens
kanter. Saker i poolen kan verka lockande för små barn.
• När poolen inte används ska du plocka bort alla leksaker och fl ythjälpmedel både i och utanför poolen.
• Förvara leksaker, stolar, bord eller andra objekt som ett barn kan klättra upp på åtminstone 2 meter ifrån
poolen.
• Förvara räddningsutrustning bredvid poolen och placera tydligt telefonnummer till räddnings-tjänsten
bredvid telefonen närmast poolen. Exempel på räddningsutrustning: godkänd livboj med rep, stark och
stadig stång som inte är kortare än 365 cm.
• Simma aldrig ensam eller låt andra simma ensamma.
• Se till att poolen är ren och fri. Det måste alltid gå att se poolbotten från poolens yttre spärr.
• Se till att ha belysning om poolen ska användas på kvällen så att säkerhetsskyltar, stegar, poolbotten och
gångvägar är ordentligt upplysta .
• Använd inte poolen i samband med droger och alkohol.
• Håll barn borta från poolskyddet för att undvika att de trasslar in sig, drunknar eller ådrar sig annan allvarlig
skada.
• Poolskyddet måste tas bort helt innan poolen används. Barn och vuxna syns inte under ett poolskydd.
• Se till att poolen och poolområdet hålls rena och fria för att undvika halkning och fall och objekt som kan
orsaka skada.
• Ta inte bort eller sätt på skyddet om någon befi nner sig i poolen.
• Skydda alla poolanvändare från badvattenrelaterade sjukdomar genom att hålla poolvattnet rent. Svälj inte
poolvattnet. Håll god hygien.
• Om inte poolen underhålls ordentligt kan vissa typer av överdriven eller ökande försämring orsaka att
poolstrukturen släpper ut stora mängder vatten, vilket kan orsaka kroppsskada och skada på egendom.
• Den här poolen är endast till för utomhusbruk.
• Töm poolen och förvara den säkert när den inte används.
• Under hela poolsäsongen ska fi ltersystemet köras varje dag, minst så lång tid att hela vatten-mängden
säkert körs igenom.
120A
POOLSPÄRRAR OCH HÖLJEN KAN ALDRIG ERSÄTTA KONTINUERLIG UPPSIKT AV VUXEN.
OM DESSA VARNINGAR INTE EFTERLEVS KAN FÖLJDEN BLI SKADOR PÅ EGENDOM,
ALLVARLIGA PERSONSKADOR ELLER DÖDSFALL.
Uppmaning!
Innan du börjar monteringen, notera att 3 kap. 5§ i Ordningslagen innehåller bestämmelser om pooler och
liknande anläggningar. Enligt Ordningslagen är det anläggningens ägare som ansvarar för att
bestämmelserna i lagen uppfylls. Boverkets byggregler ställer krav på att pooler skall vara försedda med
tillfredställande skydd mot barnolycksfall och Boverket ger förslag på lämpliga skyddsanordningar i sina
allmänna råd. Kontakta Boverket eller din kommun för ytterligare information. www.boverket.se
SPARA ANVISNINGARNA
Sida 3
Page 42

(120IO) SEQUOIA SPIRIT™ WOOD-GRAIN FRAME POOL SWEDISH 7.5” X 10.3” PANTONE 295U 05/26/2016
Swedish
VIKTIGA SÄKERHETSREGLER
Innan du monterar och använder den här produkten ska du läsa, förstå och noga följa alla anvisningar.
Dessa varningar, instruktioner och säkerhetsanvisningar tar itu med några av de vanligaste riskerna med
vattenrekreation, men de täcker inte alla faror och risker. Var alltid försiktig och använd vanligt förnuft och
bra omdöme när du njuter av någon vattenaktivitet. Spara för framtida bruk. Packeteringen måste läsas
igenom noga och sparas för framtida bruk. Se produkten för ytterligare varningar.
UPPBLÅSNING
• Kontrollera regelbundet stift, bultar och skruvar efter rost; flisor eller vassa kanter, särskilt vid åtkomliga
ytor för att undvika skador.
Säkerhet för icke-simmmare
• Kontinuerlig, aktiv och uppmärksam övervakning av svaga simmare och icke-simkunniga krävs av en
vuxen vid alla tidpunkter (kom ihåg att barn under fem år löper störst risk för drunkning).
• Utnämn en vuxen med bra meriter för att övervaka poolen.
• Svaga simmare eller icke-simkunniga bör använda personlig skyddsutrustning när de använder poolen.
• När poolen inte används, eller inte övervakas, ta bort alla leksaker från simbassängen och dess omgivning
för att undvika att locka barn till poolen.
Säkerhetsenheter
• Det rekommenderas att installera en barriär (och säkerställa alla dörrar och fönster där tillämpligt) för att
förhindra otillåten åtkomst till badbassängen.
• Barriärer, poolskydd, poollarm eller likande säkerhetsfunktioner är användbara verktyg, men de ersätts
inte för kontinuerlig och kompetent övervakning av vuxen.
Säkerhetsutrustning
• Det rekommenderas att hålla räddningsutrustning (t.ex. en ringboj) vid poolen.
• Håll en fungerande telefon och en lista över nummer för nödfall i närheten av poolen.
Använda poolen på ett säkert sätt
• Uppmuntra alla användare, i synnerhet barn att lära sig hur man simmar.
• Lär dig grundläggande livräddning (Cardiopulmonary Resuscitation - CPR) och uppdatera denna kunskap
regelbundet. Denna kunskap kan utgöra liv eller död vid nödfall.
• Instruera alla användare av poolen, inklusive barn, vad man ska göra vid nödfall.
• Dyk aldrig i grunt vatten. Det kan leda till allvarliga personskador eller dödsfall.
• Använd inte simbassängen under inflytande av alkohol eller medidcin som kan påverka din säkra
användning av poolen.
• När poolskyddet används, ta bort det helt och hållet från vattenytan innan det monteras på poolen.
• Skydda de i poolen från vattenrelaterade sjukdomare genom att hålla vattnet väl behandlat och med god
hygien. Rådfråga riktlinjerna för vattenbehandling i bruksanvisningen.
• Förvara kemikalier (t.ex. vattenrenings-, rengörings- eller desinfektionsprodukter) utom räckhåll för barn.
• Den avtagbara stegen måste placeras på en horisontell yta.
• Observera och följ varningarna och säkerhetsskyltarna på poolens vägg.
120A
SPARA ANVISNINGARNA
Sida 4
Page 43

(120IO) SEQUOIA SPIRIT™ WOOD-GRAIN FRAME POOL SWEDISH 7.5” X 10.3” PANTONE 295U 05/26/2016
Swedish
KOMPONENTÖVERSIKT
Innan du monterar produkten bör du kontrollera innehållet och bekanta dig med alla
komponenter
7
8
10 11
Modell 16'8'' (508 cm)
.
1
9
2
3
4
5
6
120A
26
12
13
14
15
16
17
18
25
20
21
19
22
23
24
ANMÄRKNING: Ritningarna är endast för illustrationssyfte. Det kan hända att det inte är
den aktuella produkten som visas. Ej skalenlig.
SPARA ANVISNINGARNA
Sida 5
Page 44

(120IO) SEQUOIA SPIRIT™ WOOD-GRAIN FRAME POOL SWEDISH 7.5” X 10.3” PANTONE 295U 05/26/2016
REF.-NR. BESKRIVNING
STIFT (MED 2 EXTRA)
1
TÄTNING (MED 2 EXTRA)
2
FÖRGRENINGSRÖR
3
FJÄDERSTIFT
4
VERTIKALT BEN (MED FJÄDERSTIFT)
5
FOT
6
HORISONTELL BALK
7
POOLDUK (MED LOCK TILL TÖMNINGSVENTIL)
8
TÖMNINGSANSLUTNING
9
LOCK TILL TÖMNINGSVENTIL
10
MARKDUK
11
VATTENTÄTT LOCK (MED 4 EXTRA)
12
BULT (MED 4 EXTRA)
13
LOCK FÖR ÖVRE KLÄMMA
14
ÖVRE BRÄDA
15
ÖVRE KLÄMMA
16
STÖD
17
KOLVVENTILSANSLUTNING
18
LOCK TILL SILVENTIL
19
SIDOBRÄDA A
20
SIDOBRÄDA B
21
SIDOBRÄDESKOMBINATION MED TVÅ HÅL
22
SIDOBRÄDESKOMBINATION MED ETT HÅL
23
NEDRE SKENA
24
NEDRE HATT
25
BULTNYCKEL
26
Swedish
BESKRIVNINGPOOLSTORLEK & KVANTITET
15'8" x 49"
(478 cm x124 cm)
32
32
15
15
15
15
15
1
1
1
1
34
34
15
15
15
15
2
2
116
0
1
1
15
15
2
15'8" x 49"
(478 cm x124 cm)
RESERVDELSNUMMER
10312
10648
10861
10313
10864
10309
10414
11490
10201
11044
18927
12172
12173
12174
12199
12200
12201
11040
11240
12203
12204
12205
12206
12208
12218
11053
18'8" x 53"
(569 cm x 135 cm)
38
38
18
18
18
18
18
1
1
1
1
40
40
18
18
18
18
2
2
141
17
1
1
18
18
2
18'8" x 53"
(569 cm x 135 cm)
10312
10648
10862
10313
10865
10309
10414
11110
10201
11044
11290
12172
12173
12174
12199
12200
12202
11040
11240
12203
12204
12205
12207
12208
12218
11053
120A
SPARA ANVISNINGARNA
Sida 6
Page 45

(120IO) SEQUOIA SPIRIT™ WOOD-GRAIN FRAME POOL SWEDISH 7.5” X 10.3” PANTONE 295U 05/26/2016
Swedish
MONTERINGSANVISNINGAR
VIKTIG INFORMATION OM VAL AV PLATS OCH
MARKFÖRBEREDELSE
• Poolen måste stå så att du kan låsa alla dörrar, fönster och säkerhetsskydd för att förhindra
otillåten, ofrivillig eller obevakad användning av poolen.
• Installera ett säkerhetshinder som gör att små barn och djur inte får tillgång till poolen.
• Om du inte sätter upp poolen på plan, jämn och kompakt mark och i enlighet med följande
anvisningar kan den kollapsa, och de som befi nner sig i poolen kan ramla ut med svåra
skador på person eller egendom som följd.
• Risk för elektrisk stöt: Anslut fi lterpumpen endast till ett jordat honkontaktdon som
skyddas av en jordfelsbrytare av typen GFCI eller RCD. Minska risken för elektriska stötar
genom att inte använda förlängningssladdar, timers, adapters, eller omvandlarkontakter för
att ansluta enheten till strömkällan; se till att kontakten är placerad på lämplig plats.
Placera sladden där den inte kan skadas av gräsklippare, häcktrimmers eller annan
utrustning.Ytterligare varningar och anvisningar fi nns i bruksanvisningen för fi lterpumpen.
• Risk för allvarliga personskador: Försök inte att montera poolen i starka vindar.
VARNING
120A
Välj en plats utomhus för poolen med följande i åtanke:
1.
Området där poolen ska stå måste var alldeles plant och jämnt. Ställ inte upp poolen i en backe eller en
sluttande yta.
2.
Marken måste vara kompakt och stark nog för att stå emot trycket och vikten av en färdiguppställd pool.
Montera den INTE på lera, sand eller mjuk lös jord.
3.
Montera inte poolen på ett deck, balkong ellerplattform som kan kollapsa under den uppfyllda poolens
vikt.
4.
Håll ett avstånd på minst 2 meter runt poolen fritt från föremål som ett barn skulle kunna klättra på för
att komma i poolen.
5.
Gräs som befinner sig under poolen kommer att skadas.Poolen dödar vegetationen. Vatten som läcker
ut kan skada växtligheten.
6.
Rensa bort allt ogräs först. Vissa typer av gräs, till exempel St. Augustine- och Bermuda-gräs kan växa
genom duken. Gräs som växer upp genom materialet är inte en tillverkningsdefekt och omfattas inte av
garantin.
7.
Området måste ha dränering för poolvattnet efter varje användning och/eller för långvarig förvarning av
poolen.
SPARA ANVISNINGARNA
Sida 7
Page 46

(120IO) SEQUOIA SPIRIT™ WOOD-GRAIN FRAME POOL SWEDISH 7.5” X 10.3” PANTONE 295U 05/26/2016
Swedish
MONTERING (fortsättning)
FÖRBEREDA UNDERLAG
Välj en plats utomhus för poolen som bör vara på en jämn betongplatta. Om det inte finns någon
betongplatta tillgänglig följer du anvisningarna nedan för att förbereda installationsplatsen. Det är viktigt att
du ber en yrkesman (byggare eller trädgårdsmästare) att utföra följande förberedelse av underlaget.
Obs!
Verktyg medföljer ej.
1. Märk ut installationsområdet
• När du har valt en plats slår du ner en påle i
mittpunkten där du vill att poolen ska vara.
Fäst ett snör e i mittpålen. Mät ut längden A
på snöret och fäst märkpinne, färgpenna eller
tratt med mjöl på snör et. Märk ut poolområdets
omkrets med hjälp av snöret och vald märkmetod
(se bild 1.1).
• För en pool på 478 cm är området
A = 251,5 cm = den gräsradie som måste tas bort
och jämnas ut.
För en pool på 508 cm är området
A = 266,7 cm = den gräsradie som måste tas bort
och jämnas ut.
För en pool på 569 cm är
A = 297,1 cm se bild 1.2.
A
1.1
1.2
120A
2. Rensa installationsområdet
• Ta bort allt gräs och alla stenar och pinnar från det markerade området.Ta även bort mittpålen och
snöret.
3. Utjämning
• Fastställ den lägsta punkten i poolområdet. Jämna ut hela poolens plats genom att gräva eller skrapa
bort ojämna områden så att de blir i nivå med den lägsta punkten. Ta alltid bort material från den
högre punkten i stället för att fylla ut den lägre punkten, så att grunden blir stabilare och fastare. När
alla områden är jämna och när överflödig jord har tagits bort kan du fylla ut eventuella mindre lägre
områden som är kvar att jämna ut (med fin jord). Tänk på att alltid packa och jämna ut marken efteråt
(se bild 2.1).
2.1
Ej godtagbargrad
Godtagbargrad
Ta alltid bort material från den högrepunkten
i stället för att fylla ut den lägre.
Lägg inte till
Ta bortTa bort
SPARA ANVISNINGARNA
Sida 8
Page 47

(120IO) SEQUOIA SPIRIT™ WOOD-GRAIN FRAME POOL SWEDISH 7.5” X 10.3” PANTONE 295U 05/26/2016
Swedish
MONTERING (fortsättning)
• Använd en stor murarregel (aluminium
eller trä) och ett vattenpass. Jämna ut
marken genom att skära ut rektanglar
(eller fyrkanter) med regeln i det utvalda
och rengjorda området (se bild 2.2).
4. Slutföra
• På den rengjorda och utjämnade marken sprider du ett tunt lager sållad sand med ett högsta djup på
1 cm. Spruta lätt med vatten och packa (med en rullvält). Dubbelkolla och se till att ytan är or dentligt
jämn. Marken måste vara helt jämn för att du ska kunna fortsätta.
5. Patio block installation
• Köp 15 stycken trädgårdsplattor för en pool på 478 cm eller 16 stycken för en pool på 508 cm eller 18
stycken för en pool på 569 cm. De minsta måtten på varje platta måste vara 45 x 45 x 5 cm. Märk ut
området där plattor na ska läggas ned (se bild 3.1) och ta sedan bort 5 cm jord från det markerade
området (se bild 3.2).
• För en pool på 478 cm är området A = 251 cm = den gräsradie som måste tas bort och jämnas ut.
B = 104 cm = avståndet mellan varje trädgår dsplatta.
För en pool på 508 cm är området A = 266 cm = den gräsradie som måste tas bort och jämnas ut.
B = 104 cm = avståndet mellan varje trädgår dsplatta.
För en pool på 569 cm där
A = 297 cm
B = 104 cm
3.1
18” (45.7 cm)
2.2
120A
3.2
18” (45.7 cm)
B
A
2” (5.08 cm)
• Plattornas överdel ska ligga i jämnhöjd med jordytan och på samma nivå som områdets yta och alla
trädgår dsplattor runt hela poolen (se bild 3.3).
3.3
SPARA ANVISNINGARNA
Sida 9
Page 48

(120IO) SEQUOIA SPIRIT™ WOOD-GRAIN FRAME POOL SWEDISH 7.5” X 10.3” PANTONE 295U 05/26/2016
Swedish
MONTERING (fortsättning)
Denna metallsargpool kan ha köpts med Intex Krystal Clear™ filterpump. Filterpumpen har
separata monteringsanvisningar och måste monteras när poolen är färdigmonterad.
1.
• Öppna lådan med duken, förgreningar, ben m.m. mycket försiktigt då den kan användas för att förvara
poolen i under vinterhalvåret.
• Ta ut underlaget (11) och bred ut det på det
rensade området och ta sedan ut duken (8)
och lägg den ovanpå underlaget med
tömningsventilen mot tömningsområdet.
Placera tömningsventilen bort från huset.
Låt solen värma upp duken innan du sätter
i balkar na (7) i öppningarna.
VIKTIGT! Poolenheten ska alltid monteras av minst
2 personer. låt inte poolduken släpa i marken efter
som den kan gå sönder eller skadas på annat sätt
(se bild 4).
• Rikta slanganslutningsnaggarna eller öppningarna mot strömkällan vid monteringen av poolduken.
Ytterkanten på den monterade poolen ska vara inom elsladdens längd från den valfria filterpumpen.
8
4
120A
2.
• Sargpoolens ben (5) och balkar (7) kan delas in i två grupper. De stora är de horisontella balkar na
som skjuts (trycks) in i öppningarna högst upp på duken. De mindre är de vertikala benen. Både
benen och balkar na passar in i förgreningarna (3).
• Börja var som helst med att trycka in den horisontella
balken i en öppning men arbeta hela tiden i samma
riktning. När balken är centrerad tar du en av förgren
ingarna och fäster förgreningen i balkens ände genom att
föra in anslutningsstiftet (1) i gummitätningen (2) och i de
förborrade hålen. Upprepa proceduren hela vägen runt tills
alla balkar och förgreningar är anslutna. (se bild 5.1).
Den sista förgreningen kan vara svår att få dit men
det kan hjälpa att samtidigt höja den sista
förgreningen och balken ca 5 cm och föra in balken
i förgreningen medan du sänker delarna till normalt
läge. Balken glider in i förgreningen (se bild 5.2).
Se till att den sista förgreningen är fullt monterad
innan du sätter ihop benen.
1
2
7
3
3
5.1
5.2
SPARA ANVISNINGARNA
Sida 10
Page 49

(120IO) SEQUOIA SPIRIT™ WOOD-GRAIN FRAME POOL SWEDISH 7.5” X 10.3” PANTONE 295U 05/26/2016
MONTERING (fortsättning)
• Sedan för du in de vertikala benen i öglan i mitten av poolduken.
Skjut försiktigt in benet i bandöglan och sätt in benets övre del i
botten på skarven. Klicka fast benet i förgreningens hål genom att
passa in hålen i fjäderstiften. Fäst foten (6) nederst på benet (se
bild 6.1 och 6.2).
• Fatta tag i sargpoolens övre balkar på 2-3 ställen och “skaka”
poolen för att vara säker på att alla för greningar, ben och balkar
“passar in i varandra”. Kontr ollera och se till att alla stift sitter som
de ska genom att trycka ner dem i hålen (se bild 7.1).
• Dra varsamt nederdelen på benet utåt och se till att benet är
vertikalt och vinkelrätt i förhållande till marknivån.
6.1
Swedish
3
5
6
6.2
120A
4
7.1
3.
• Se handboken till Krystal Clear™-filterpump, installera silmuttrarna, de platta gummi-brickor na och de
gängade silanslutningarna i de förfabricerade hålen i poolduken. Använd locken till silventiler na (19) och
koppla in dem i de gängade silanslutningarna från poolens insida så att inte vattnet rinner ut medan du
fyller poolen.
• Se till att tömningsventilen på insidan av poolen är stängd och att tömningslocket är hårt åtskruvat innan
du börjar fylla poolen med vatten. Fyll poolen med max 2,5 cm vatten och se om det blir någon skillnad i
poolgolvets lutning.
VIKTIGT: Om vattnet i poolen rinner över på ena sidan står inte poolen helt jämnt. Om poolen
placeras på ett ojämnt underlag kan den luta, vilket leder till att sid-väggar na buktar ut och att
risken för att poolen går sönder ökar. Om poolen inte står på ett helt jämnt underlag måste du
tömma den och jämna ut marken eller flytta poolen och placera den på ett jämnt underlag. Fyll
den där efter med vatten.
• Jämna ut skrynklor nertill (från poolens insida) genom att trycka utåt där poolens golv och sidor möts.
Alter nativt (från poolens utsida): Sträck in armen under poolen, ta tag i dess golv och dra utåt. Om det
är markduken som orsakar problemet kan två vuxna dra från varsin sida för att få bort alla skrynklor.
4.
Vatten får fyllas på till precis under den
invändiga svetssömmens linje (se bild 7.2).
VATTENLINJE
7.2
SPARA ANVISNINGARNA
Sida 11
Page 50

(120IO) SEQUOIA SPIRIT™ WOOD-GRAIN FRAME POOL SWEDISH 7.5” X 10.3” PANTONE 295U 05/26/2016
Swedish
MONTERING AV POOLSKYDD
När poolen har fyllts med vatten och du har kontrollerat att den är helt plan och att alla vertikala ben står i
mitten av respektive trädgårdsplatta fortsätter du med monteringen av poolskyddet.
1. Montera övre klämma
• Fäst en övre klämma (16) på poolramens förgrening från undersidan. Se till att de två bultar na på den
övre klämman är vända uppåt. Upprepa detta tills alla de övre kläm-mor na har fästs på poolramens
förgreningar (se bild 8.1 och 8.2).
8.1 8.2
2. Installation av nedre hatt och nedre skena
• Placera en nedre hatt (25) på marken och passa in den med foten. Se till att det gängade sidohålet på
den nedre hatten är vänt utåt. Placera ut alla de nedre hattarna.
• Börja på valfri plats men arbeta hela tiden i samma riktning och anslut en nedre skena (24) mellan
två nedre hattar (25). Se till att de förborrade hålen på den nedre skenan hakar i knopparna i den
nedre hatten. Upprepa proceduren hela vägen runt tills alla nedre skenor och nedre hattar är anslutna.
Justera avståndet mellan den nedre hatten och foten genom att kontrollera att stödet (17) står vertikalt
efter att det har installerats (se bild 9.1 och 9.2).
9.1
9.2
120A
3. Installation av stöd
• Ta bort kartonginläggen från stödets båda sidor.
• För in stödet (17) i den nedre hatten (25). Lyft upp stödet en aning så att skåran på den övre delen av
stödet hakar i upphöjningen på den övre klämman. Tryck nedåt så att stö- det hakar i den övre
klämman ordentligt och så att det förs in i den nedre hatten (se bild 10.1, 10.2 och 10.3).
• Upprepa detta tills alla stöd sitter ihop med de övre klämmorna och de nedre hattarna (se bild 10.4).
10.1
SPARA ANVISNINGARNA
10.2
Sida 12
Page 51

(120IO) SEQUOIA SPIRIT™ WOOD-GRAIN FRAME POOL SWEDISH 7.5” X 10.3” PANTONE 295U 05/26/2016
Swedish
MONTERING AV POOLSKYDD (fortsättning)
10.3
4. Installation av sidopanel
Antalet sidopaneler beror på poolens storlek. Det finns två sidopaneler som behöver särskild
uppmärksamhet under installationen: För det första är det sidopanelen som måste installeras utanför
poolens in- och utloppshål, och för det andra är det sidopanelen med varningsskylten som måste
installeras på en plats där den är lätt att se av de som använder poolen innan de går i poolen.
Sidopanelerna för dessa två särskilda platser är förpackade separat.
4a. Installation av sidopanel med hål
• Leta reda på sidopanelen med hål utanför poolduken där in- och utloppshålen sitter Packa upp
sidopaneler na från paketet och skjut sidopanelskombinationen med ett hål (23) först ned över stöden
och infoga i den vertikala kanten på den nedre skenan. Följ sedan nummersekvensen från nederkant
till överkant. Panelens spår måste föras in helt i sponten på för egående panel. Trycket på
sidopanelerna ska vara vänt utåt. Skjut sedan in sidopanelskombinationen med två hål (22) märkt med
nummer “5 och 6” genom stöden och för över sponten på sidopanelen märkt med nummer “4” (se bild
11.1 och 11.2).
11.1
11.2
10.4
120A
11.3
• Skruva kolvventilsanslutningarna (18) medurs på de gängade silanslutningarna som redan installerats
på poolduken under monteringen av poolen (se bild 11.3). Skruva kolvventilerna medurs på
kolvventilsanslutningarna (18). Stäng kolvventilerna genom att trycka handtaget nedåt och vrid medurs
för att låsa, enligt anvisningar na i filterpumpens handbok. Nu kan locken till silventilerna (19) kopplas
bort från de gängade silanslut-ningarna från poolens insida (se bild 11.4 och 11.5).
• Slutför installationen av sidopanelerna genom att installera resten av sidopanelerna märkta med
nummer “7” och “8” (se bild 11.6).
11.4 11.5
11.6
SPARA ANVISNINGARNA
Sida 13
Page 52

(120IO) SEQUOIA SPIRIT™ WOOD-GRAIN FRAME POOL SWEDISH 7.5” X 10.3” PANTONE 295U 05/26/2016
Swedish
MONTERING AV POOLSKYDD (fortsättning)
11.7
8
7
6
5
4
3
2
1
15'8" x 49"
4b. Installation av sidopanel med “varningar”
• Leta upp sidopanelen med varningar så att varningarna är lätta att se för poolanvändar na innan de
går i poolen. Packa upp sidopanelerna från paketet och skjut sidopanelen först ned över stöden och
infoga i den vertikala kanten på den nedr eskenan. Följ sedan nummersekvensen från nederkant till
överkant. Panelens spår måste föras in helt i sponten på för egående panel. Trycket på sidopanelerna
ska vara vänt utåt (se bild 12.1 och 12.2).
8
7
6
5
4
3
2
1
0
18’8” x 53”
11.8
120A
12.1
12.3
8
7
6
5
4
3
2
1
8
7
6
5
4
3
2
1
0
12.2
12.4
15'8" x 49"
15'8" x 49"
18’8” x 53”
SPARA ANVISNINGARNA
18’8” x 53”
Sida 14
Page 53

(120IO) SEQUOIA SPIRIT™ WOOD-GRAIN FRAME POOL SWEDISH 7.5” X 10.3” PANTONE 295U 05/26/2016
Swedish
MONTERING AV POOLSKYDD (fortsättning)
4c. Installation av andra sidopaneler
• För en pool med höjden 125,5 cm installerar du resten av sidopanelerna genom att använda åtta delar
sidopanel A (20) var dera. För en pool som är 134,5 cm hög installerar du resten av sidopanelerna
genom att använda en del sidopanel B (21) längst ned samt åtta delar sidopanel A (20) var dera.
Installera sidopanelerna en i taget från nederkant till överkant. För in spåret på den första sidopanelen
i den vertikala kanten på den nedre skenan och spåret på den de andra sidopanelerna i sponten på
föregående panel (se bild 13.1 och 13.2).
13.1
5. Installation av övre bräda
Fäst den övre brädan (15) på sidopanelens överkant, så att hålen i dess två ändar passar ihop med
muttrarna på de övre klämmorna (16). Se till att spåret under den övre brädan passar väl in i sponten på
den övre brädan (15). Upprepa detta tills alla de övre brädorna är fästa på de övre klämmorna och
sidopanelerna.
dessa fyra övre brädor med tre delars avstånd från varandra (se bild 14.1, 14.2 och 14.3).
OBS:
Det finns fyra delar för den övre brädan som är tryckta med varningar. Installera
13.2
120A
14.1
6. Installation av lock för övre klämma
Installera locket för den övre klämman (14) där de två övre brädorna möts. Sätt kanten på den övre
klämman i öppningen på den övre änden av stödbenet. Passa in de övre hålen på locket för den övre
klämman med muttrarna för den övre klämman, och sidohålet med hålet på stödet utanför poolen. För in
och skruva fast bulten (13) i vart och ett av de gängade hålen med hjälp av den medföljande nyckeln (26)
och täck sedan med de vattentäta locken (12). Upprepa detta tills alla locken för de övre klämmorna
sitter på de övre klämmorna och stöden (se bild 15.1, 15.2 och 15.3).
15.1
14.2
15.2
OBS:
Ritningarna är endast för
illustrationssyfte.
14.3
15.3
SPARA ANVISNINGARNA
Sida 15
Page 54

(120IO) SEQUOIA SPIRIT™ WOOD-GRAIN FRAME POOL SWEDISH 7.5” X 10.3” PANTONE 295U 05/26/2016
Swedish
POOLUNDERHÅLL OCH KEMIKALIER
VARNING!
KOM IHÅG ATT
• Skydda alla poolanvändare från badvattenrelaterade sjukdomar genom att hålla poolvattnet
rent. Svälj inte poolvattnet. Håll god hygien.
• Se till att poolen är ren och fri. Det måste alltid gå att se poolbotten från poolens yttre spärr.
• Håll barn borta från poolskydd för att undvika att de trasslar in sig, drunknar eller ådrar sig
annan allvarlig skada.
Det allra viktigaste för dukens livslängd är att ha rätt vattenbalans. Då blir också vattnet rent och
säkert. Rätt teknik är viktig vid vattentestning. Kontakta din poolåterförsäljare för kemikalier,
testkit och testprocedurer. Se till att du läser och följer de skriftliga anvisningarna från
kemikalietillverkaren.
1
. Det allra viktigaste för dukens livslängd är att ha rätt vattenbalans. Då blir också vattnet rent och säkert.
Rätt teknik är viktig vid vattentestning. Kontakta din poolåterförsäljare för kemikalier, testkit och
testprocedurer. Se till att du läser och följer de skriftliga anvisningarna från kemikalietillverkaren.
2
. Blanda aldrig kemikalier med varandra, lägg i varje kemikalie i vattnet separat och låt det cirkulera i
poolvattnet innan du lägger i ytterligare kemikalier.
3
. Det finns en Intex skimmer och en Intex pooldammsugare som hjälper till att hålla pool- vattnet rent.
Kontakta din poolåterförsäljare för information om de här pooltillbehören.
4
. Använd inte trycktvättaggregat för att rengöra poolen.
120A
PROBLEMLÖSNING
PROBLEM BESKRIVNING ORSAK ÅTGÄRD
ALGER • Grönaktigt vatten.
FÄRGAT
VATTEN
FLYTANDE
PARTIKLAR I
VATTNET
KRONISKT LÅG
VATTENNIVÅ
SEDIMENT PÅ
POOLENS
BOTTEN
SKRÄP PÅ
VATTENYTAN
• Gröna eller svarta
fl äckar på poolduken.
• Poolduken är hal och/
eller luktar illa.
• Vattnet blir blått, brunt
eller svart när det
behandlas med klor
första gången.
• Vattnet är grumligt eller
ogenomskinligt.
• Nivån är lägre än
föregående dag.
• Smuts eller sand på
poolbotten.
• Löv, insekter etc. • Poolen står för nära träd. • Använd Intex pool skimmer.
• Klornivån och pH-värdet
behöver justeras.
• Koppar, järn eller man gan i vattnet oxideras av
det tillsatta kloret. Detta
är vanligt.
• “Hårt vatten” på grund av
för högt pH-värde.
• Klorhalten är för låg.
• Främmande partiklar i
vattnet.
• Reva eller hål i poolduk
eller slangar.
• Omfattande användning,
många stiger i och ur
poolen.
• Chockbehandla med mycket
klor. Justera pH-värdet till det
värde som rekommenderas av
poolbutiken.
• Dammsug poolens botten.
• Upprätthåll korrekt klornivå.
• Justera pH-värdet till
rekommen-derat värde.
• Byt ut patronen ofta.
• Kör fi ltret tills vattnet är klart.
• Justera pH-värdet. Fråga pool
handlaren om vattenbehandling.
• Kontrollera att klornivån är
korrekt.
• Rengör eller byt ut fi ltret.
• Laga med reparationssats.
• Dra åt alla lock med fi ngrarna.
• Rengör poolbotten med Intex
pooldammsugare.
SPARA ANVISNINGARNA
Sida 16
Page 55

(120IO) SEQUOIA SPIRIT™ WOOD-GRAIN FRAME POOL SWEDISH 7.5” X 10.3” PANTONE 295U 05/26/2016
Swedish
POOLUNDERHÅLL OCH TÖMNING
FÖLJ ALLTID KEMIKALIETILLVERKARENS ANVISNINGAR OCH OBSERVERA
VARNING
Fyll inte på kemikalier i poolen när den används. Irritationer på huden och i ögonen kan uppstå.
Koncentrerade klorlösningar kan skada poolduken. Under INGA omständigheter ska Intex Recreation
Corp., Intex Development Co. Ltd, relaterade företag, auktoriserade återförsäljare och servicecenter,
återförsäljare eller anställda hållas ansvariga inför köparen eller annan part för kostnader i samband med
poolvattenförlust, kemikalier eller vattenskada. Se till att ha fi lterpatroner i reserv. Byt patron
varannan vecka. Vi rekommenderar att man använder en Krystal Clear™ Intex fi lterpump med alla
våra portabla pooler.
ÖVERDRIVET REGNANDE: För att undvika att poolen skadas tömmer du omedelbart ut regnvatten
som får poolens maxbegränsning att överskridas.
Tömning av poolen och långtidsförvaring
Obs! Den här poolen är försedd med tömningsventiler i två hörn. Anslut trädgårds-slangen till
hörnventilen som riktar vattnet åt rätt håll.
1. Kontrollera att tömningsproppen på poolens insida är på plats.
2. Kontrollera lokala föreskrifter för specifi ka anvisningar för tömning av poolvatten.
3. Ta bort locket på tömningsventilen på poolväggens utsida.
4. Fäst trädgårdsslangens honända vid den patenterade slangadaptern.
5. Placera den andra änden av slangen någonstans där det är säkert att tömma ut vatten så att inte huset
tar skada.
6. Fäst slangadaptern i tömningsventilen. OBS! Adaptern kommer att öppna tömnings-proppen på
poolens insida och vattnet börjar rinna ut direkt.
7. Koppla bort slangen och adaptern när det är klart.
8. Sätt tillbaka tömningsproppen i tömningsventilen på poolens insida.
9. Sätt tillbaka locket på tömningsventilen på utsidan.
10. Följ monteringsanvisningarna i omvänd ordning för att nedmontera poolen och ta bort alla rördelar.
11. Se till att poolen och alla dess delar är helt torra innan förvaring. Lufttorka poolduken i solen tills den är
helt torr innan du viker ihop den (se bild 20). Strö över talkpuder för att förhindra att gummit klibbar ihop
och för att absorbera vatten som du kan ha missat.
12. Gör en rektangulär form. Börja på en sida och vik in en sjättedel av duken två gånger. Gör likadant på
motsatt sida (se bilderna 21.1 & 21.2).
13. När du har två vikta sidor mittemot varandra viker du den ena sidan över den andra, precis som när du
slår ihop en bok (se bilderna 22.1 & 22.2).
14. Vik ihop de två långsidorna mot mitten (se bild 23).
15. Vik över den ena som när du stänger en bok och packa ihop duken (se bild 24).
16. Förvara enheten och tillbehören på en torr, sval och absolut frostfri förvaringsplats där temperaturen
hålls mellan 0 och 40 grader.
17. Den ursprungliga förpackningskartongen kan användas vid förvaringen.
VARNINGARNA RÖRANDE HÄLSA OCH SÄKERHET.
120A
20
22.1
21.1
22.2
21.2
23 24
SPARA ANVISNINGARNA
Sida 17
Page 56

(120IO) SEQUOIA SPIRIT™ WOOD-GRAIN FRAME POOL SWEDISH 7.5” X 10.3” PANTONE 295U 05/26/2016
Swedish
FÖRBEREDELSER FÖR VINTERN
Så gör du i ordning din pool för vintern
Efter användning av poolen, kan du enkelt tömma och förvara din pool på ett säkert ställe. Du
måste tömma, plocka isär och korrekt förvara poolen när temperaturen sjunker under 5 grader
Celsius. Detta för att förhindra att isskador uppstår på poolen och tillhörande komponenter.
Isskador kan resultera i plötsligt fel på poolduken eller att poolen kollapsar. Se även avsnittet “Hur
man tömmer sin pool’’.
Om temperaturen i ditt område Tappa inte faller under 5 grader Celsius, och du väljer att
lämna din pool ute i det fria, förbered den då enligt följande:
1.
Rengör poolvattnet noggrant. Om poolen är en Easy Set-pool eller en pool med oval ram ska
du se till att toppringen är ordentligt uppblåst.
2.
Ta bort skimmern (om möjligt) och alla andra tillbehör som har fästs på den gängade
filterhållaren. Ta bort s ilfiltergallret om det behövs. Se till att alla tillbehör och delar är rena
och helt torra innan förvaring.
3.
Stäng inlopps- och utloppspluggarna från insidan av poolen med de medföljande pluggarna
(storlek 475 cm och mindre). Stäng kolvventilerna till inloppet och utloppet (storlek 504 cm och
mindre).
4.
Ta bort stegen (om möjligt) och förvara den på en lämplig plats. Se till att stegen är helt torr
innan den läggs undan för förvaring.
5.
Ta bort alla slangar som kopplar ihop pumpen och filtret med poolen.
6.
Tillsätt tillbörliga kemikalier för vinterperioden. Rådfråga din lokala poolhandlare om vilka
kemikalier du ska använda och hur de ska användas. Detta kan variera kraftigt mellan olika
regioner.
7.
Täck poolen med ett Intex-poolöverdrag.
ETT SÄKERHETSÖVERDRAG.
8.
Rengör och töm pumpen, filterhuskåpan och slangarna. Ta bort och släng den gamla
filterkassetten. Se till att du har en reservkassett för nästa säsong.
9.
Ta in pump-och filterdelarna och förvara dem på en lämplig, torr plats där temperaturen ligger
mellan 0 och 40 °C.
VIKTIGT: INTEX-POOLÖVERDRAGET ÄR INTE
120A
ALLMÄN VATTENSÄKERHET
Lek i vatten är både roligt och avslappnande. Det kan dock innebära en risk att man
skadar sig eller dör. För att minska risken för skada ska du läsa och följa alla varningar
och instruktioner på produkt, förpackning och informationsblad. Kom dock ihåg att
varningar, instruktioner och säkerhetsinstruktioner nämner några allmänna risker med
vattenlek, men inte täcker alla tillfällen då risker eller farakan uppstå.
För ytterligare säkerhetsinformation kan du läsa följande generella riktlinjer samt riktlinjer
som ges av nationellt erkända säkerhetsorganisationer:
• Kräv att badare alltid hålls under uppsikt. En kompetent vuxen ska utses till “badvakt” eller
vattenövervakare, särskilt när barn befinner sig i eller inärheten av poolen.
• Lär dig simma.
• Ta dig tid att lära dig hjärt-lungräddning och första hjälpen.
• Instruera alla som har uppsikt över poolanvändare om potentiella faror med poolen och om hur
skyddsenheter som t.ex. låsta dörrar och avspärrningar används.
• Instruera alla poolanvändare, inklusive barn, om vad de ska göra om en nödsituation uppstår.
• Använd alltid sunt förnuft och gott omdöme vid alla vattenaktiviteter.
• Håll uppsikt! Håll uppsikt! Håll uppsikt!
SPARA ANVISNINGARNA
Sida 18
Page 57

(120IO) SEQUOIA SPIRIT™ WOOD-GRAIN FRAME POOL SWEDISH 7.5” X 10.3” PANTONE 295U 05/26/2016
Swedish
BEGRÄNSAD GARANTI
Din Intex-pool har tillverkats med material och arbete av högsta kvalitet. Alla
komponenter i pump och filter har inspekterats och befunnits felfria före leverans från
fabriken. Denna begränsade garanti avser enbart Intex-poolen.
Denna begränsade garanti är ett tillägg till, och inte en ersättning för dina juridiska
rättigheter och rättsmedel. Om denna garanti strider mot någon av dina juridiska
rättigheter så har de prioritet. Konsumentlagar inom EU ger till exempel lagstadgade
garantirättigheter utöver omfattningen du får från denna begränsade garanti: För
information om EU-konsumentlagar, besök European Consumer Centers hemsida:
http://ec.europa.eu/consumers/ecc/contact_en/htm.
Villkoren i denna begränsade garanti gäller enbart för den ursprunglige köparen och kan
inte överföras. Denna begränsade garanti gäller under en period av 90 dagar från första
inköp från detaljist. Förvara dina ursprungliga kassakvitton tillsammans med
bruksanvisningen eftersom bevis för inköpet kommer att krävas och måste åtfölja
garanti-krav, annars är garantin ogiltig.
Om en fabrikationsdefekt hittas under denna 90-dagarsperiod, kontakta närmaste Intex
servicecenter Som finns i listan i den separata “Auktoriserade servicecenter”. Om
produkten returneras enligt direktiven från Intex servicecenter kommer servicecentret att
inspektera produkten och besluta beträffande kravets giltighet. Om produkten omfattas
av bestämmelserna i garantin kommer objektet att repareras eller bytas ut, med samma
eller liknande produkt (Intex val) utan kostnad för dig.
120A
Förutom denna garanti, och andra juridiska rättigheter i ditt land, är inga ytterligare
garantier underförstådda. I den mån som omfattas av ditt land, skall under inga
omständigheter Intex hållas ansvariga gentemot dig eller någon tredje part för direkta
eller indirekta skador till följd av dina Intex-pool eller Intex eller dess företrädares eller
anställdas åtgärder (inklusive tillverkning av produkten). Om ditt land inte tillåter
uteslutning eller begränsning av oförutsedda skador eller följdskador gäller inte denna
begränsning eller undantag för dig.
Observera att denna begränsade garanti inte gäller under följande omständigheter:
• Om Intex-pool är föremål för vårdslöshet, onormal användning eller tillämpning,
olycka, felaktig användning, felaktigt underhåll eller förvaring.
• Om Intex-pool l är föremål för skador av omständigheter utanför Intex kontroll,
inklusive men inte begränsat till, punkteringar, revor, nötning, vanligt slitage och
skador som orsakas av brand, översvämning, frysning, regn eller andra yttre
miljökrafter;
• För delar och komponenter som inte säljs av Intex.
• För obehöriga ändringar, reparationer eller isärtagningar av Intex-pool som utförts av
någon annan än service personal för Intex.
Kostnader i samband med förlust av pool-vatten, kemikalier eller vattenskada täcks inte
av garantin. Skada på egendom eller person täcks inte av garantin.
Läs ägarhandboken noggrant och följ alla anvisningar avseende korrekt användning och
underhåll av din Intex-pool. Inspektera alltid produkten före användning. Din garanti kan
upphävas om instruktionerna inte följs.
SPARA ANVISNINGARNA
Sida 19
Page 58

(120IO) SEQUOIA SPIRIT™ WOOD-GRAIN FRAME POOL NORWEGIAN 7.5” X 10.3” PANTONE 295U 05/26/2016
120A
Norwegian
Norwegian
120A
VIKTIGE
SIKKERHETSREGLER
Les, forstå og følg alle anvisningene nøye
før du monterer og bruker produktet.
Oppbevar disse anvisningene
for fremtidig referanse.
TM
GRAPHITE GRAY PANEL POOL SET
15’8” (478 cm) & 18’8” (569 cm)
Bildet er bare til veiledning. Tilbehør leveres ikke nødvendigvis sammen med bassenget.
Glem ikke å prøve disse andre produktene fra Intex: Bassenger,
bassengtilbehør, oppblåsbare bassenger og inneleker,
luftmadrasser og båter kan fås hos utvalgte forhandlere eller på
vårt nettsted.
På grunn av kontinuerlige produktforbedringer forbeholder Intex
seg retten til å endre spesifikasjoner og utseende, som kan føre
til en oppdatering av instruksjonsboken uten forutgående varsel.
©2016 Intex Marketing Ltd. - Intex Development Co. Ltd. - Intex Trading Ltd.
- Intex Recreation Corp.
Rechte vorbehalten. Printed in China/Imprimé en Chine/Impreso en China/Gedruckt in China.
®™ Trademarks used in some countries of the world under license from/®™ Marques utilisées dans certains pays sous
licence de/Marcas registradas utilizadas en algunos países del mundo bajo licencia de/Warenzeichen verwendet in einigen
Ländern der Welt in Lizenz von/
BRUKSANVISNING
Box 28829, Hong Kong & Intex Recreation Corp., P.O. Box 1440, Long Beach, CA 90801
Union by/Distribué dans l’Union Européenne par/Distribuido en la unión Europea por/Vertrieb in der Europäischen Union
Intex Trading B.V., Venneveld 9, 4705 RR Roosendaal – The Netherlands
durch/
www.intexcorp.com
All rights reserved/Tous droits réservés/Todos los derechos reservados/Alle
Intex Marketing Ltd. to/à/a/an Intex Trading Ltd., Intex Development Co. Ltd., G.P.O
• Distributed in the European
Page 59

(120IO) SEQUOIA SPIRIT™ WOOD-GRAIN FRAME POOL NORWEGIAN 7.5” X 10.3” PANTONE 295U 05/26/2016
Advarsle
Oversikt over deler
Monteringsveiledning
Viktige sikkerhetsregler
/
........................................................
....................................................
Bassengvedlikehold og kjemikalier
Vanlige problemer
Bassengvedlikehold og tømming
Vinterlagring av bassenget
..........................................................
.................................
...........................................
..............................
.............................
Norwegian
3-4
5-6
7-15
16-17
16
17
17-18
120A
Generell informasjon om sikkerhet og vann
Garantibestemmelser
.....................................................
...............
18
19
Innledning:
Takk for at du har kjøpt et Intex-basseng. Bruk et par minutter på å lese
denne veiledningen før du monterer bassenget. Informasjonen kan forlenge
bassengets levetid og gjøre det sikrere under bruk. Se den vedlagte videoen
før du setter opp bassenget. Det anbefales at to–fi re personer monterer
bassenget. Med fl ere personer går monteringen raskere.
Ingen verktøy kreves for montering.
TA VARE PÅ BRUKSANVISNINGEN
Side 2
Page 60

(120IO) SEQUOIA SPIRIT™ WOOD-GRAIN FRAME POOL NORWEGIAN 7.5” X 10.3” PANTONE 295U 05/26/2016
Norwegian
VIKTIGE SIKKERHETSREGLER
Les, forstå og følg alle instruksjoner nøye før du installerer og bruker produktet.
ADVARSEL!
• Barn og funksjonshemmede skal alltid være under oppsyn av en kvalifi sert voksen person.
• Lås alle dører, vinduer og sikkerhetshindre for å hindre at bassenget brukes av uvedkom- mende,
utilsiktet eller uten oppsyn.
• Monter et sikkerhetshinder som hindrer adgang til bassenget for små barn og kjæledyr.
• Bassenget og tilbehøret skal bare monteres og demonteres av voksne.
• Ikke stup, hopp eller skli ned i et frittstående basseng eller grunt vann.
• Hvis bassenget ikke monteres på et fl att, hardt underlag, kan bassenget falle sammen, og personer som
oppholder seg i bassenget, kan risikere å bli kastet ut.
• Ikke len deg mot, sitt overskrevs eller trykk på den oppblåsbare ringen eller den øverste kanten på
bassenget. Det kan medføre personskade eller oversvømmelse. Ikke la personer sitte eller klatre på
bassengkantene.
• Fjern alle leker og fl yteenheter som er i og rundt bassenget når det ikke er i bruk. Gjenstander som
befi nner seg i bassenget, tiltrekker små barn.
• Hold leker, stoler, bord og andre gjenstander som barn kan klatre på, minst 1,2 meter unna bassenget.
• Ha redningsutstyr i nærheten av bassenget og skriv opp nødnumre ved den telefonen som befi nner seg
nærmest bassenget. Eksempler på redningsutstyr: offentlig godkjent livbøye med tau, kraftig, stiv stang,
minimum 365 cm (12 fot).
• Svøm aldri alene eller la andre svømme alene.
• Hold bassenget rent og vannet klart. Bassenggulvet skal alltid være synlig fra utsiden av bassenget.
• Ved bading om natten skal det brukes kunstig lys slik at bassenggulvet og alle sikkerhetsskilt, stiger, og
gangveier er synlige.
• Hold deg unna bassenget når du er påvirket av alkohol eller medisiner.
• Hold barn unna bassengovertrekk for å unngå sammenfi ltringer, drukning og andre alvorlige skader.
• Bassengovertrekk må fjernes helt før bassenget tas i bruk. Barn og voksne kan ikke ses under et
bassengovertrekk.
• Ikke ta bassengovertrekket av eller på når du eller andre er i bassenget.
• Hold bassenget og bassengområdet rent og fritt for gjenstander for å unngå at personer sklir og faller og
skader seg.
• Beskytt alle som bruker bassenget mot sykdom ved å holde bassengvannet rent. Svelg ikke
bassengvannet. Sørg for god hygiene.
• Basseng utsettes for slitasje og forringelse. Sørg for godt vedlikehold. Enkelte former for overdreven eller
tiltagende forringelse kan føre til feil på bassengkonstruksjonen. Dette kan føre til at store vannmengder
strømmer ut av bassenget.
• Bassenget er bare beregnet på utendørs bruk.
• Tøm bassenget og sett det bort når det ikke er i bruk.
• Hver dag gjennom hele sesongen skal bassenget fi ltreres minimum slik at man har fått gjennom alt
vannet.
120A
BASSENGGJERDER OG OVERTREKK ER INGEN ERSTATNING FOR KONTINUERLIG OPPSYN AV EN
ANSVARLIG VOKSEN.
DERSOM DISSE ADVARSLENE IKKE BLIR FULGT, KAN DET FØRE TIL MATERIELLE SKADER,
ALVORLIGE PERSONSKADER ELLER DØD.
Råd: Bassengeiere må følge lokale eller nasjonale regler med hensyn til barnesikre gjerder,
sikkerhetssperrer, belysning og andre sikkerhetskrav. Vi anbefaler våre kunder å kontakte den kommunale
etaten for byggesaker for nærmere informasjon.
TA VARE PÅ BRUKSANVISNINGEN
Side 3
Page 61

(120IO) SEQUOIA SPIRIT™ WOOD-GRAIN FRAME POOL NORWEGIAN 7.5” X 10.3” PANTONE 295U 05/26/2016
Norwegian
VIKTIGE SIKKERHETSREGLER
Les, forstå og følg alle instrukser nøye før dette produktet installeres og tas i bruk. Disse advarslene,
instruksjonene og sikkerhetsretningslinjene omfatter en del vanlige risikoer som er forbundet med rekreasjon
i vann, men de kan ikke dekke alle risikoer og farer i alle situasjoner. Utvis alltid forsiktighet, sunn fornuft og
god dømmekraft når du driver med aktiviteter i vann. Oppbevar disse anvisningene for fremtidig referanse.
Les merknadene på emballasjen nøye, og oppbevar den for fremtidig referanse. Se produktet for ytterligere
advarsler.
OPPBLÅSING
• For å unngå skader må stifter, bolter og skruer kontrolleres for rust og bassengets overflater sjekkes
regelmessig for oppsplintring eller skarpe kanter, særlig i tilgjengelige områder.
Sikkerhet for personer som ikke er svømmedyktige
• Personer som er svake svømmere eller som ikke kan svømme, må holdes under kontinuerlig, aktivt og
årvåkent oppsyn av en svømmedyktig voksen (husk at barn under fem år er utsatt for den høyeste
drukningsrisikoen).
• Utpek en svømmedyktig voksen til å holde oppsyn med bassenget hver gang det er i bruk.
• Personer som er svake svømmere eller som ikke kan svømme, bør ha på seg personlig verneutstyr når
de bruker svømmebassenget.
• Fjern alle leker fra svømmebassenget og det omkringliggende området når bassenget ikke er i bruk eller
ikke holdes under oppsyn, for å unngå at barn blir tiltrukket til bassenget.
Sikkerhetsinnretninger
• Det anbefales å installere en barriere (og sikre alle dører og vinduer, om relevant) for å forhindre
uautorisert tilgang til svømmebassenget.
• Barrierer, bassengtrekk, bassengalarmer og tilsvarende sikkerhetsinnretninger er nyttige hjelpemidler, men
de kan ikke erstatte kontinuerlig tilsyn fra en voksen svømmedyktig person.
Sikkerhetsutstyr
• Det anbefales å oppbevare redningsutstyr (f.eks. en livbøye) ved bassenget.
• En fungerende telefon og en liste over nødnumre må finnes i nærheten av bassenget.
Sikker bruk av bassenget
• Oppmuntre alle brukere, særlig barn, til å lære seg å svømme.
• Lær deg grunnleggende livredning (hjerte-lunge-redning), og oppfrisk livredningskunnskapene dine med
jevne mellomrom. Dette kan gjøre en livreddende forskjell i en nødsituasjon.
• Gi alle brukere av bassenget instrukser om hva de skal gjøre i en nødsituasjon.
• Stup aldri ut i en grunn vannmasse. Dette kan medføre alvorlig skade eller dødsfall.
• Bruk ikke svømmebassenget når du har drukket alkohol eller brukt legemidler som kan påvirke evnen din
til å bruke bassenget på en sikker måte.
• Dersom bassengtrekk brukes, må dette fjernes fullstendig fra vannoverflaten før du går ut i bassenget.
• Beskytt de badende mot vannrelaterte sykdommer ved å sørge for at bassengvannet til enhver tid er
behandlet og ved å praktisere god hygiene. Se retningslinjene for vannbehandling i brukermanualen.
• Oppbevar kjemikalier (f.eks. vannbehandlings-, rengjørings- eller desinfiseringsmidler) utilgjengelig for
barn.
• Avtakbare stiger må plasseres på en horisontal overflate.
• Les og følg advarslene og sikkerhetsskiltene på bassengveggen.
120A
TA VARE PÅ BRUKSANVISNINGEN
Side 4
Page 62

(120IO) SEQUOIA SPIRIT™ WOOD-GRAIN FRAME POOL NORWEGIAN 7.5” X 10.3” PANTONE 295U 05/26/2016
Norwegian
INNHOLDSLISTE
Bruk et par minutter på å kontrollere innholdet og bli kjent med alle delene før du
monterer produktet.
7
8
10 11
Model 16'8'' (508 cm)
9
1
2
3
4
5
6
120A
26
12
13
14
15
19
22
23
20
21
MERK: Tegningene er bare til veiledning. Det kan være de ikke gjenspeiler det virkelige produktet.
Produktet vises ikke i virkelig målestokk.
24
16
17
18
25
TA VARE PÅ BRUKSANVISNINGEN
Side 5
Page 63

(120IO) SEQUOIA SPIRIT™ WOOD-GRAIN FRAME POOL NORWEGIAN 7.5” X 10.3” PANTONE 295U 05/26/2016
REF.-NR. BESKRIVELSE
LÅSEPINNE (PLUSS 2 EKSTRA)
1
TETNING (PLUSS 2 EKSTRA)
2
T-KOBLING
3
FJÆRTAPP
4
VERTIKALT BEIN (FJÆRTAPP FØLGER MED)
5
FOT
6
HORISONTAL STANG
7
BASSENGKLEDNING (TØMMEVENTILHETTE FØLGER MED)
8
TØMMEKOBLING
9
TØMMEVENTILHETTE
10
BAKKEDUK
11
VANNTETT HETTE (MED 4 EKSTRA)
12
BOLT (PLUSS 4 EKSTRA)
13
DEKSEL TIL TOPPSTYREKLEMME
14
TOPPBORD
15
TOPPSTYREKLEMME
16
STØTTESTANG
17
STEMPELVENTILKONTAKT
18
SILVENTILHETTE
19
SIDEBORD A
20
SIDEBORD B
21
SIDEBORDKOMBINASJON MED TO HULL
22
SIDEBORDKOMBINASJON MED ETT HULL
23
BUNNSTANG
24
BUNNHETTE
25
SKIFTENØKKEL TIL BOLT
26
Norwegian
BASSENG STØRRELSE & ANTALL
15'8" x 49"
(478 cm x124 cm)
32
32
15
15
15
15
15
1
1
1
1
34
34
15
15
15
15
2
2
116
0
1
1
15
15
2
18'8" x 53"
(569 cm x 135 cm)
120A
38
38
18
18
18
18
18
1
1
1
1
40
40
18
18
18
18
2
2
141
17
1
1
18
18
2
REF.-NR. BESKRIVELSE
LÅSEPINNE (PLUSS 2 EKSTRA)
1
TETNING (PLUSS 2 EKSTRA)
2
T-KOBLING
3
FJÆRTAPP
4
VERTIKALT BEIN (FJÆRTAPP FØLGER MED)
5
FOT
6
HORISONTAL STANG
7
BASSENGKLEDNING (TØMMEVENTILHETTE FØLGER MED)
8
TØMMEKOBLING
9
TØMMEVENTILHETTE
10
BAKKEDUK
11
VANNTETT HETTE (MED 4 EKSTRA)
12
BOLT (PLUSS 4 EKSTRA)
13
DEKSEL TIL TOPPSTYREKLEMME
14
TOPPBORD
15
TOPPSTYREKLEMME
16
STØTTESTANG
17
STEMPELVENTILKONTAKT
18
SILVENTILHETTE
19
SIDEBORD A
20
SIDEBORD B
21
SIDEBORDKOMBINASJON MED TO HULL
22
SIDEBORDKOMBINASJON MED ETT HULL
23
BUNNSTANG
24
BUNNHETTE
25
SKIFTENØKKEL TIL BOLT
26
15'8" x 49"
(478 cm x124 cm)
RESERVEDELSNUMMER
10312
10648
10861
10313
10864
10309
10414
11490
10201
11044
18927
12172
12173
12174
12199
12200
12201
11040
11240
12203
12204
12205
12206
12208
12218
11053
18'8" x 53"
(569 cm x 135 cm)
10312
10648
10862
10313
10865
10309
10414
11110
10201
11044
11290
12172
12173
12174
12199
12200
12202
11040
11240
12203
12204
12205
12207
12208
12218
11053
TA VARE PÅ BRUKSANVISNINGEN
Side 6
Page 64

(120IO) SEQUOIA SPIRIT™ WOOD-GRAIN FRAME POOL NORWEGIAN 7.5” X 10.3” PANTONE 295U 05/26/2016
Norwegian
MONTERINGSVEILEDNING
VIKTIG INFORMASJON OM VALG OG KLARGJØRING
AV UNDERLAG
• Der du velger å sette bassenget, må det være mulig å låse alle dører, vinduer og
sikkerhetshindre for å hindre at bassenget brukes av uvedkommende, utilsiktet eller
uten oppsyn.
• Monter et sikkerhetshinder som hindrer adgang til bassenget for små barn og
kjæledyr.
• Hvis bassenget ikke monteres på et fl att, hardt underlag i samsvar med instruksene,
kan bassenget falle sammen, og personer som oppholder seg i bassenget, kan
risikere å bli kastet ut.
• Reduser faren for elektrisk støt: Filterpumpen må bare kobles til en jordet stikkontakt
beskyttet med jordfeilbryter eller en feilstrømbryter. Bruk ikke skjøteledning,
tidsbrytere, kontaktadaptere eller kontaktomformere for å koble pumpen til
strømnettet. Bruk et strømuttak plassert på egnet sted. Det reduserer faren for
elektrisk støt. Legg ledningen slik at den ikke skades av gressklippere,
hekksakser eller annet utstyr, jf. fi lterpumpens brukerveiledning for ytterligere
advarsler og instrukser.
• Risiko for alvorlig skade: Ikke forsøk å sette opp bassenget ved kraftig vind.
ADVARSEL
120A
Velg utendørs plassering av bassenget med følgende i tankene:
1. Området der du skal montere bassenget, må være helt fl att og jevnt. Monter ikke bassenget på
skrånende eller hellende underlag.
2. Underlaget må være kompakt og solid nok til å stå i mot trykket og vekten av et ferdigmontert basseng.
Monter ikke bassenget i mudder eller sand eller i jord som er myk eller løs.
3. Ikke sett opp bassenget på en terrasse, en balkong eller en plattform som kan kollapse under vekten av
det fylte bassenget.
4. Det må være minst ca. 1,5–2,0 m klaring rundt bassenget fra gjenstander barn kan klatre på for å komme
seg ut i bassenget.
5. Gress som befinner seg under bassenget, vil bli skadet. Klor i bassengvannet kan skade plantene rundt.
6. Fjern først alt vanskelig gress. Noen gresstyper som St. Augustine og Bermuda kan vokse gjennom
bassengduken.
7. Området må være egnet for drenering av bassengvannet etter hver bruk og/eller i forbindelse med
langtidsoppbevaring av bassenget.
TA VARE PÅ BRUKSANVISNINGEN
Side 7
Page 65

(120IO) SEQUOIA SPIRIT™ WOOD-GRAIN FRAME POOL NORWEGIAN 7.5” X 10.3” PANTONE 295U 05/26/2016
Norwegian
MONTERINGSVEILEDNING (fortsetter)
BAKKEKLARGJØRING
Velg en utendørs plassering for bassenget, som bør være på en jevn betongoverfl ate. Følg instruksjonene
under for å klargjøre monteringsområdet, hvis det ikke er en betongoverfl ate tilgjengelig, Det er viktig at du
spør en fagperson (bygger eller gartner) om å utføre følgende bakkeklargjøring.
MERKNAD:
1. Marker monteringsområdet
• Når du har valgt plassering, setter du en stolpe
midt i området der du vil plassere bassenget.
Fest en tråd i midtstolpen. Mål lengde A på
tråden, og fest en markering-spinne,
malingsmarkør, eller trakt med mel til tråden.
Marker omkretsen til basseng-området med tråd
og markør (se tegning 1.1).
• For et basseng på 478 cm,
hvor A = 251,5 cm = Gressområdet i radiusen
må fjernes og planeres.
For et basseng på 508 cm,
hvor A = 266,7 cm = Gressområdet i radiusen
må fjernes og planeres.
For et basseng på 569 cm, A = 297,1 cm
se tegning 1.2.
Verktøy følger ikke med.
1.1
1.2
A
120A
2. Tøm monteringsområdet
• Fjern gress, steiner og pinner fra markert område. Fjern også stolpen og tråden.
3. Planering
• Finn det laveste punktet i bassengområdet. Planer bassengområdet ved å grave eller skrape bort
ujevne områder ned til nivået til det laveste punktet. Fjern alltid materiale fra toppen av helningen
istedenfor å fylle i bunnen, for å skape større bakkestabilitet og-fasthet. Når området er planert og
overfl ødig jord har blitt fjernet, kan du fylle i lave om råder som står igjen å planere (med fi n jord).
Bakken må alltid fortettes og planeres etterpå (se tegning 2.1).
2.1
Fjern alltid materiale fra toppen av helningen
istedenfor å fylle i bunnen.
Ikke legg til
Uakseptabel
kvalitet
Akseptabel
kvalitet
FjernFjern
TA VARE PÅ BRUKSANVISNINGEN
Side 8
Page 66

(120IO) SEQUOIA SPIRIT™ WOOD-GRAIN FRAME POOL NORWEGIAN 7.5” X 10.3” PANTONE 295U 05/26/2016
Norwegian
MONTERINGSVEILEDNING (fortsetter)
• Bruk en stor murerlinjal (aluminium eller tre)
og et vater. Planer bakken ved å kutte
rektangler (eller kvadrater) og plassere
denne linjalen i valgt og renset område
(se tegning 2.2).
4. Ferdigbearbeiding
• Strø et lett lag med silt sand på maks. 1 cm dybde på den rensede og planerte bakken. Spray på vann
og fortett (med en hagevalse). Dobbeltsjekk og sørg for at det er godt planert. Bakken må være
fullstendig planert for å kunne fortsette.
5. Terrassemontering
• Kjøp 15 terrasseblokker til basseng på 478 cm eller 16 til basseng på 508 cm eller 18 til basseng på
569 cm. Minste dimensjon på hver blokk bør være 45,72 cm x 45,72 cm x 5,8 cm. Marker området hvor
blokkene skal graves ned (se tegning 3.1), fjern så 5,8 cm med jord fra det markerte området (se
tegning 3.2).
• For et basseng på 478 cm, hvor A = 251,5 cm = Gressområdet i radiusen må fjernes
og planeres. B = 104,1 cm = Avstand mellom hver terrasseblokk.
For et basseng på 508 cm, hvor A = 266,7 cm = Gressområdet i radiusen må fjernes
og planeres. B = 104,1 cm = Avstand mellom hver terrasseblokk.
Til basseng på 569 cm, der
A = 297,1 cm
B = 104,1 cm
3.1
18” (45.7 cm)
2.2
3.2
120A
18” (45.7 cm)
B
A
2” (5.08 cm)
• Toppen på blokkene bør ligge i samme høyde som jordoverfl aten og plant med område overfl aten og
med alle terrasseblokkene rundt hele bassenget (se tegning 3.3).
3.3
TA VARE PÅ BRUKSANVISNINGEN
Side 9
Page 67

(120IO) SEQUOIA SPIRIT™ WOOD-GRAIN FRAME POOL NORWEGIAN 7.5” X 10.3” PANTONE 295U 05/26/2016
Norwegian
MONTERINGSVEILEDNING (fortsetter)
Dette bassenget kan være kjøpt med Intex Krystal Clear™ fi lterpumpe. Filterpumpen har en egen
monteringsveiledning og skal monteres etter at bassenget er montert.
1.
• Åpne esken som inneholder kledningen, skjøtene, beina osv. Vær forsiktig, for du kan bruke denne esken
til å oppbevare bassenget om vinteren.
• Ta ut bakkeduken (11) og legg den på bakken. Ta deretter
ut kledningen (8) og legg den oppå bakkeduken med
tømme-ventilen mot tømmeområdet. Plasser tømmeventilen
vekk fra huset. La kled-ningen varmes opp i solen før du
setter stengene (7) inn i hylseåpningene.
VIKTIG: Sørg alltid for å være 2 personer ved
montering av bassenget. Dra ikke bassengkledningen
over bakken. Det kan føre til at den lekker eller blir
skadet, jf. tegning 4.
• Når du monterer bassengkledningen, skal slangekoblingene eller åpningene peke mot strømkilden.
Yttersiden av det monterte bassenget må befi nne seg innenfor strømled-ningens rekkevidde til
fi lterpumpen (ektstrautstyr).
8
4
120A
2.
• Bassengbeina (5) og stengene (7) er delt inn i to grupper. De store diameterne er de horisontale
stengene som skal skyves inn i åpningene øverst på kledningen. De mindre diameterne er de vertikale
beina. Begge typer bein og stenger passer i T-koblingene (3).
• Start et hvilket som helst sted, men sørg hele tiden for å arbeide i
samme retning, og skyv den horisontale stangen inn i åpningen.
Når stangen er i midten, bruker du en T-kobling og en låsepinne (1)
for å feste koblingen til én ende av stangen ved å stikke en pinne
gjennom tetningen (2) og inn gjennom hullene. Gjenta denne
fremgangsmåten til du har montert alle stengene og koblingene
(se tegning 5.1).
Den siste monteringen kan være vanskelig, men den kan enkelt
utføres ved at du løfter den siste koblingen og stangen omtrent
5 cm og setter stangen i koblingen mens du senker delene til
normal høyde. Stangen vil nå gli inn i koblingen (se tegning 5.2).
Pass på at den siste koblingen er ferdigmontert før du går over
til å montere beina.
1
2
7
3
3
5.1
5.2
TA VARE PÅ BRUKSANVISNINGEN
Side 10
Page 68

(120IO) SEQUOIA SPIRIT™ WOOD-GRAIN FRAME POOL NORWEGIAN 7.5” X 10.3” PANTONE 295U 05/26/2016
MONTERINGSVEILEDNING (fortsetter)
• Skyv deretter beina ned i stroppen som befi nner seg i midten av
bassengkledningen. Skyv beinet forsiktig inn i beltesløyfen, og
plasser toppen av beinet på bunnen av festet. Klikk beinet på
plass i koblingens hull ved å justere hul-lene i forhold til den
fjærbelastede bolten. Sett foten (6) på nederst på benet, (se
tegning 6.1 og 6.2).
• Ta tak i rammebassengets toppstenger på 2–3 steder og “rist”
i bassenget for å påse at alle koblinger, bein og stenger passer
i hverandre. Kontroller og sikre alle pinnene ved å trykke dem
ned gjennom hullene (se tegning 7.1).
• Dra forsiktig utover, bunnen av beinet sørger for at beinet er
vertikalt og loddrett på fl at mark.
6.1
3
5
6
Norwegian
4
6.2
7.1
120A
3.
• Les bruksanvisningen til fi lterpumpen Krystal Clear™, monter silmutterne, de fl ate underlagsskivene i
gummi til silen, og silkoblingen med gjenger i hullene i veggkledningen. Bruk silventilhettene (19) og
plugg dem i silkoblingen med gjenger fra innsiden av bassenget slik at det ikke renner ut vann når det
fylles.
• Før du begynner å fylle bassenget med vann, må du påse at tømmepluggen på innsiden av bassenget
er lukket, og at avløpsdekselet på utsiden er skrudd godt til. Fyll bassenget med maksimalt 2,5 cm vann,
og se om du ser noen forskjell på hellingen på bassenggulvet.
VIKTIG: Hvis vannet i bassenget renner til én av sidene, er ikke bassenget helt i vater. Hvis
bassenget settes opp på ujevnt underlag, vil det helle til den ene siden slik at materialet i
sideveggen buler ut. Hvis bassenget ikke står helt plant, må du tømme bassenget, planere
grunnen og fylle bassenget på nytt.
• Glatt ut foldene i bunnkledningen (fra innsiden av bassenget) ved å trykke ut der bunnen og sidene av
bassenget møtes. Eller (fra utsiden) ved å ta under siden av bassenget, ta tak i bunnen og trekke den
utover. Hvis bakkeduken forårsaker problemene, må to voksne trekke fra begge sider for å fjerne alle
foldene.
4
. Vann kan fylles til rett under festene (se tegning 7.2).
VANNSTAND
7.2
TA VARE PÅ BRUKSANVISNINGEN
Side 11
Page 69

(120IO) SEQUOIA SPIRIT™ WOOD-GRAIN FRAME POOL NORWEGIAN 7.5” X 10.3” PANTONE 295U 05/26/2016
Norwegian
MONTERING AV BASSENGINNGJERDING
Når bassenget er fylt med vann, og det er slått fast at det er fullstendig plant og at alle vertikale ben står
plassert midt i hver terrasseblokk, kan du montere bassenginngjerdingen.
1. Montering av toppstyreklemmen
• Fest toppstyreklemmen (16) til T-koblingene på bassengrammen nedenfra. Sørg for at de to boltene
på toppstyreklemmen vender oppover. Gjenta fremgangsmåten til alle toppstyreklemmene er festet til
T-koblingene på bassengrammen (se tegningene 8.1 og 8.2).
8.1 8.2
2. Montering av bunnhette og bunnstang
• Plasser en bunnhette (25) på bakken og sett den på linje med foten. Sørg for at jengehullet i siden på
bunnhetten vender utover. Plasser alle bunnhettene riktig.
• Start hvor som helst, men jobb i samme retning hele tiden. Fest en bunnstang (24) mellom to
bunnhetter (25). Sørg for at hullene i bunnstangen festes i knappene i bunnhetten. Gjenta denne
fremgangsmåten til du har montert alle bunnstengene og bunnhettene. Juster avstanden mellom
bunnhetten og foten ved å anslå at støttestangen (17) er vertikal når den er montert (se
tegningene 9.1 og 9.2).
120A
9.1
3. Montering av støttestenger
• Fjern pappinnleggene fra glidestykkene på støttestengene.
• Før støttestangen (17) inn i bunnhetten (25). Løft støttestangen slik at spalten øverst på støttestangen
kan feste seg i kanten på toppstyreklemmen. Trykk ned for å sørge for at støttestangen er festet godt i
toppstyreklemmen og bunnhetten (se tegningene 10.1, 10.2 og 10.3).
• Gjenta denne fremgangsmåten til alle støttestengene er festet i toppstyreklemmene og bunnhettene
(se tegning 10.4).
10.1
10.2
9.2
TA VARE PÅ BRUKSANVISNINGEN
Side 12
Page 70

(120IO) SEQUOIA SPIRIT™ WOOD-GRAIN FRAME POOL NORWEGIAN 7.5” X 10.3” PANTONE 295U 05/26/2016
Norwegian
MONTERING AV BASSENGINNHEGNING (for tsetter)
10.3
4. Montering av sidepanel
Antall sidepaneler avhenger av bassengstørrelsen. Det er spesielt to sidepaneler som du må være særlig
oppmerksom på under monteringen. Dette gjelder sidepanelet som må monteres over bassengets
inntaks- og utløpshull, og sidepanelet med advarselsskilt, som må monteres på et sted hvor
bassengbrukerne vil se det før de går i bassenget. Disse to sidepanelene er pakket inn for seg.
4a. Montering av sidepanel med hull
• Plasser sidepanelet med hull over bassengets innhegning der inntaks- og utløpshullene er. Ta
sidepanelene ut av pakningen og før panelet med ett hull (23) først nedover støttesten-gene og inn på
den vertikale kanten av bunnstangen. Følg nummerrekken fra bunn til topp. Noten på panelet må
festes helt i fjæren på forrige panel. Skriften på sidepanelene må vende utover. Før så sidepanelet
med to hull (22) markert med numrene “5 og 6” gjennom støttestengene og inn på fjærene på
sidepanelet markert nummer “4” (se tegning 11.1 og 11.2).
10.4
120A
11.1
11.2
11.3
• Skru stempelventilkontaktene (18) med klokken inn på silkoblingene med gjenger, som ble montert på
bassenginnhegningen under bassengmonteringen (se tegning 11.3). Skru stempelventilene fast i
stempelventilkontaktene (18) med klokken. Lukk stempelventilene ved å trykke håndtaket ned og dreie
mot klokken for å låse slik som beskrevet i manualen til fi lterpumpen. Nå kan silventilhettene (19)
plugges ut av silkoblingene med gjenger fra innsiden av bassenget (se tegningene 11.4 og 11.5).
• Fortsett å montere sidepanelet ved å montere resten av sidepanelene markert “7” og “8”
(se tegning 11.6).
11.4 11.5
11.6
TA VARE PÅ BRUKSANVISNINGEN
Side 13
Page 71

(120IO) SEQUOIA SPIRIT™ WOOD-GRAIN FRAME POOL NORWEGIAN 7.5” X 10.3” PANTONE 295U 05/26/2016
Norwegian
MONTERING AV BASSENGINNHEGNING (for tsetter)
11.7
8
7
6
5
4
3
2
1
15'8" x 49"
4b. Montering av sidepanel med “advarsler”
• Plasser sidepanelet med advarsler slik at de lett vil kunne sees av bassengbrukere før de går i
bassenget. Ta sidepanelene ut av pakningen og før panelet først nedover støt-testengene og så inn
på den vertikale kanten av bunnstangen. Følg nummerrekken fra bunn til topp. Noten på panelet må
festes helt i fjæren på forrige panel. Skriften på side-panelene må vende utover (se tegningene 12.1
og 12.2).
8
7
6
5
4
3
2
1
0
18’8” x 53”
11.8
120A
12.1
12.3
8
7
6
5
4
3
2
1
8
7
6
5
4
3
2
1
0
12.2
12.4
15'8" x 49"
15'8" x 49"
18’8” x 53”
18’8” x 53”
TA VARE PÅ BRUKSANVISNINGEN
Side 14
Page 72

(120IO) SEQUOIA SPIRIT™ WOOD-GRAIN FRAME POOL NORWEGIAN 7.5” X 10.3” PANTONE 295U 05/26/2016
Norwegian
MONTERING AV BASSENGINNHEGNING (for tsetter)
4c. Montering av andre sidepaneler
• For basseng på 124 cm, monteres resten av sidepanelene ved å bruke åtte stykker side-panel A (20)
på hver. For basseng på 135 cm monteres resten av sidepanelet ved å bruke et sidepanel B (21) i
bunnen pluss åtte stykker sidepanel A (20) på hver. Monter ett og ett sidepanel fra bunn til topp. Fest
noten på det første sidepanelet i den vertikale kanten påbunnstangen, og fjæren på de andre
sidepanelene i noten på forrige panel (se tegningene 13.1 og 13.2).
13.1
5. Montering av toppanel
Fest toppanelet (15) over toppen av sidepanelet, med hullene i linje med mutterne på
topp-styreklemmene (16). Sørg for at noten under toppanelet er festet godt i fjæren på toppan-elet (15).
Gjenta denne fremgangsmåten til alle toppanelene er festet til toppstyreklemmene og sidepanelene.
MERK:
tegningene 14.1, 14.2 og 14.3).
Fire av toppanelene er utstyrt med advarsler. Monter disse fi re top-panelene hver for seg (se
13.2
120A
14.1
6. Montering av deksel til toppstyresklemme
Installer dekselet til toppstyreklemmen (14) der hvor to toppaneler møtes. Sett kanten av den øverste
klemmen i åpningen på den øverste enden av støttestangen. Plasser topphullene i dekselet over
mutterne på klemmen, og hullet på siden over hullet på støttestangen utenfor bassenget. Sett i og skru
fast bolten (13) i hvert av de gjengede hullene ved hjelp av skiftenøkkelen (26) som følger med, og dekk
så til med vanntette hetter (12). Gjenta denne fremgangsmåten til alle dekslene er festet på
toppstyreklemmene og støttestengene (se tegningene 15.1, 15.2 og 15.3).
15.1
14.2
15.2
MERK:
Tegningene er bare til
veiledning.
14.3
15.3
TA VARE PÅ BRUKSANVISNINGEN
Side 15
Page 73

(120IO) SEQUOIA SPIRIT™ WOOD-GRAIN FRAME POOL NORWEGIAN 7.5” X 10.3” PANTONE 295U 05/26/2016
Norwegian
BASSENGVEDLIKEHOLD OG KJEMIKALIER
ADVARSEL
HUSK AT
• Beskytt alle brukere av bassenget mot vannsykdommer ved å holde vannet i bassenget rent.
Drikk ikke bassengvannet. Ha god hygiene.
• Hold bassenget rent og vannet klart. Sørg for å kunne se bassengets bunn utenfra.
• Hold barn vekk fra bassengtrekket for å unngå innvikling, drukning eller andre alvorlige skader.
Å opprettholde riktig vannbalanse er den aller viktigste faktoren når det gjelder å forlenge levetiden
på og bevare kledningen i tillegg til å sikre et rent, sunt og sikkert vann. Riktig teknikk er viktig når du
tester vannet. Kontakt bassengforhandleren for å kjøpe kjemiske testsett og hvis du vil vite mer om
testprosedyrer. Påse at du leser og følger anvisningene fra produsenten av kjemikaliene.
1.
La aldri klor komme i kontakt med kledningen før det er helt oppløst. Kornet klor eller klortabletter kan
løses opp i en bøtte før dette helles i vannet. Det samme gjelder for fl ytende klor. Hvis du heller klor i
bassenget på forskjellige steder, må du straks blande det godt med bassengvannet.
2.
Bland aldri kjemikalier sammen. Ha heller kjemikalier i vannet hver for seg og la det sirkulere helt
gjennom bassenget før du tilsetter fl ere kjemikalier.
3.
En Intex-bassengoppsamler og Intex-bassengstøvsuger er tilgjengelig for å opprettholde rent
bassengvann. Kontakt bassengforhandleren for å kjøpe dette bassengtilbehøret.
4.
Ikke bruk trykkspyler til rengjøring av bassenget.
120A
FEILSØKING
PROBLEM BESKRIVELSE ÅRSAK LØSNING
ALGER • Grønnaktig vann.
FARGET VANN • Vannet blir blått, brunt eller
SLAM I VANNET • Vannet er grumsete eller
KRONISK LAVT
VANN-NIVÅ
BUNNFALL PÅ
BASSENGBUNNEN
AVFALL PÅ
OVERFLATEN
• Grønne eller svarte fl ekker på
bassengkled-ningen.
• Bassengkledningen er
glatt og/eller lukter ille.
svart første gangen det
behandles med klor.
melkeaktig.
• Nivået er lavere enn dagen før. • Ripe eller hull i basseng
• Skitt eller sand på
bassenggulvet.
• Løv, insekter osv. • Bassenget står for nært trær. • Bruk Intex-bassengoppsamler.
• Klor- og pH-nivået må justeres. • Superkloring med sjokkbehand-
• Vannet inneholder kobber, jern
eller mangan som oksiderer
når det tilsettes klor.
• “Hardt vann” på grunn av for
høy pH-verdi.
• Klorandelen er lav.
• Fremmedlegemer i vannet.
kledningen eller slangene.
Stram lokkene.
• Hard bruk, inn- og utstigning
av bassenget.
ling. Korriger pH-en til
basseng-leverandørens
anbefalte verdi.
• Støvsug bassengbunnen.
• Oppretthold korrekt klornivå.
• Juster pH-verdien til anbefalt
verdi.
• La fi lteret gå til vannet er klart.
• Skift patronen regelmessig.
• Juster pH-verdien. Kontakt
bassengforhandleren for korrekt
vannbehandling.
• Kontroller at klornivået er korrekt.
• Rengjør eller skift fi lter.
• Reparer med lappesaker.
• Trekk til alle lokk for hånd.
• Bruk Intex-bassengstøvsuger
for å rengjøre bassengbunnen.
TA VARE PÅ BRUKSANVISNINGEN
Side 16
Page 74

(120IO) SEQUOIA SPIRIT™ WOOD-GRAIN FRAME POOL NORWEGIAN 7.5” X 10.3” PANTONE 295U 05/26/2016
Norwegian
BASSENGVEDLIKEHOLD OG TØMMING
FØLG ALLTID ANVISNINGENE FRA PRODUSENTEN AV
FORSIKTIG
Ikke hell kjemikalene i bassenget når det er personer i det. Det kan medføre hud- og øyeirritasjon.
Konsentrerte klorløsninger kan skade bassengkledningen. Ikke i NOE tilfelle skal Intex Recreation Corp.,
Intex Development Co. Ltd., deres tilknyttede selskaper, autoriserte representanter og servicesentre,
forhandlere eller ansatte være ansvarlige overfor kjøperen eller noen annen tredjepart for kostnader
forbundet med vanntap, kjemikalier eller vannskader. Ha reservepatroner tilgjengelig. Skift patron annenhver
uke. Vi anbefaler at du bruker en Krystal Clear™ Intex fi lterpumpe sammen med alle våre frittstående
basseng.
FOR MYE REGNVANN: Unngå skader på bassenget: Tøm straks ut regnvann som har oversteget
maksimumsvannstanden.
Tømming av bassenget og langtidslagring
Merk: Det er installert avløpsventiler i to hjørner av dette svømmebassenget. Koble hageslangen til
hjørneventilen som leder vannet til et passende sted.
1. Undersøk om det fi nnes lokale forskrifter for tømming av vann fra basseng.
2. Kontroller at tømmepluggen på innsiden av bassenget er festet helt.
3. Fjern hetten på tømmeventilen på utsiden av bassengveggen.
4. Fest mutterenden på hageslangen til den patenterte slangeadapteren.
5. Plasser den andre enden av slangen i et område hvor vannet kan tappes ut i trygg avstand fra huset.
6. Fest slangeadapteren til tømmeventilen. MERK: Adapteren vil skyve opp tømmeplug-gen på
innsiden av bassenget, og vannet vil begynne å tappes ut umiddelbart.
7. Koble fra slangen og adapteren når du er ferdig.
8. Sett tømmepluggen i tømmeventilen på innsiden av bassenget igjen for oppbevaring.
9. Sett på plass tømmehetten på utsiden av bassenget.
10. Følg installasjonsveiledningen i motsatt rekkefølge når du skal demontere bassenget og fjerne alle
rørdelene.
11. Påse at bassenget og alle deler er fullstendig tørre før oppbevaring. Tørk kledningen i solen til den er
fullstendig tørr før den brettes i sammen. tegning 20. Dryss over talkum for å forhindre at vinylet kleber
seg fast og for å suge opp vann du kan ha oversett.
12. Lag en rektangulær form. Start på den ene siden, og brett en sjettedel av kledningen in nover mot seg
selv to ganger. Gjør det samme på den motsatte siden, jf. tegning 21.1 og 21.2.
13. Når du har laget to motsatt brettede sider, bretter du ganske enkelt den ene siden over den andre,
akkurat som når du lukker en bok, jf. tegning 22.1 og 22.2.
14. Brett to langsider mot midten, jf. tegning 23.
15. Brett den ene over den andre som når du lukker en bok, og brett sammen kledningen, jf. tegning 24.
16. Sett bort kledningen og tilbehøret på et sted hvor det er tørt, og temperaturen er 0-40°C.
17. Bruk gjerne originalemballasjen til lagring.
KJEMIKALIENE OG TA HENSYN TIL HELSE- OG FAREADVARSLER.
120A
20
22.1
21.1
22.2
21.2
23 24
TA VARE PÅ BRUKSANVISNINGEN
Side 17
Page 75

(120IO) SEQUOIA SPIRIT™ WOOD-GRAIN FRAME POOL NORWEGIAN 7.5” X 10.3” PANTONE 295U 05/26/2016
Norwegian
VINTERLAGRING AV BASSENGET
Vinterlagring av bassenget
Etter bruk kan du lett tømme og oppbevare bassenget på et trygt sted. Du må tømme,
demontere og riktig oppbevare bassenget når temperaturen faller til under 5 grader Celsius
for å unngå isskade på bassenget og tilhørende komponenter. Isskade kan føre til plutselig
klendingsfeil eller at bassenget kollapser. Se også avsnittet «Hvordan tømme bassenget».
Hvis temperaturen i ditt område aldri går under 5 grader Celsius, og du bestemmer å la
bassenget stå ute, skal det forberedes som følger:
1. Rengjør bassengvannet grundig (pass på at luften er tatt ordentlig ut av toppringen hvis du har
Easy Set-basseng eller basseng med oval ramme).
2. Fjern skummeren (hvis du har det) eller annet tilbehør festet til den gjengede silkoblingen.
Skift ut silnettingen om nødvendig. Pass på at alle tilbehørsdelene er rene og helt tørre før du
setter dem bort.
3. Plugg igjen innløps- og avløpsfestet fra innsiden av bassenget med pluggen som følger med
(størrelse 16” eller mindre). Lukk innløpet og utløpets stempelventil (størrelse 17” eller større).
4. Fjern stigen (hvis du har det) og sett den bort på et trygt sted. Påse at stigen er helt tørr før du
setter den bort.
5. Fjern slangene som kobler pumpen og fi lteret til bassenget.
6. Tilsett egnede vinterkjemikalier. Hør med bassengforhandleren der du bor; det kan være store
regionale forskjeller.
7. Dekk til bassenget med bassengdekselet fra Intex. VIKTIG: BASSENGDEKSELET FRA
INTEX ER IKKE ET SIKKERHETSDEKSEL.
8. Rengjør og tøm pumpe, fi lterhus og slanger. Fjern og deponer gamle (sørg for å ha en ekstra
patron til neste sesong).
9. Oppbevar pumpen og fi lterdelene innendørs på er tørt, trygt sted, helst med en temperatur på
0-40 °C.
120A
GENERELT OM SIKKERHET OG VANN
Lek i vann er både morsomt og avslappende. Det innebærer likevel en risiko for at man
kan komme til skade eller dø. For å redusere risikoen for fare må du lese og følge alle
advarsler og instruksjoner på produktet, emballasjen og vedlagte papirer. Husk at
produktadvarsler, veiledninger og retningslinjer for sikker lek omfatter vanlige risikoer ved
lek i vann, men de omfatter ikke alle former for risiko og fare.
Se flere sikkerhetsforanstaltninger under og finn ev. selv flere retningslinjer utarbeidet av
nasjonalt anerkjente organisasjoner:
• Krev konstant tilsyn. En kompetent voksen skal utpekes somlivredder eller skal følge med på
vannet, spesielt hvis det er barn i eller rundt bassenget.
• Lær deg å svømme.
• Lær deg hjerte- og lungeredning samt førstehjelp.
• Opplys alle som passer på bassengbrukere, om potensielle farer ved bassenget, og om bruken
av sikkerhetsanordninger som sperredører, hindre osv.
• Lær alle bassengbrukere, inkludert barn, hva de skal gjøre i en nødsituasjon.
• Bruk sunn fornuft og god dømmekraft når du holder på med fritidsaktiviteter som inkluderer
vann.
• Følg med hele tiden.
TA VARE PÅ BRUKSANVISNINGEN
Side 18
Page 76

(120IO) SEQUOIA SPIRIT™ WOOD-GRAIN FRAME POOL NORWEGIAN 7.5” X 10.3” PANTONE 295U 05/26/2016
Norwegian
GARANTIBESTEMMELSER
Din Intex Pool er produsert av materialer og gjennom utførelse, i høy kvalitet. Alle
pumper og filterelementer er kontrollert og funnet fri for feil før de forlater fabrikken.
Denne begrensede garantien gjelder bare for Intex Pool.
Denne begrensede garantien kommer i tillegg til, og er ikke en erstatning for, dine
juridiske rettigheter og rettsmidler. I den utstrekning denne garantien er uforenlig med
noen av dine juridiske rettigheter, har de sistnevnte forrang. Forbrukervernlovgivningen i
EU gir for eksempel lovfestede garantirettigheter i tillegg til dekningen denne
begrensede garantien gir. For nærmere informasjon om forbrukervernlovgivningen i EU,
besøk nettstedet til European Consumer Center på http://ec.europa.eu/consumers/ecc/
contact_en/htm.
Bestemmelsene i denne begrensede garantien gjelder kun for den opprinnelige kjøpere
og kan ikke overføres. Denne begrensede garantien er gyldig i en periode på 90 dager
fra den opprinnelige kjøpsdatoen. Ta vare på original kjøpskvittering sammen med
denne manualen; bilaget er påkrevd som bevis på dette kjøpet og må være vedlagt
garantikrav ellers er denne begrensede garantien ugyldig.
Hvis en produksjonsfeil oppdages i denne 90-dagersperioden, kontakt det lokale Intex
Service Center ført opp på det separate “Authorized Service Centers”-arket. Hvis varen
returneres i henhold til avtalen som inngås med Intex Service Center vil servicesenteret
inspisere varen og avgjøre gyldighet av garantikravet. Dersom artikkelen er dekket av
bestemmelsene i garantien, vil den bli reparert eller erstattet med en identisk eller
sammenlignbar artikkel (etter Intex’ eget skjønn), uten kostnader for deg.
120A
Det gis ingen underforståtte garantier utover denne garantien og de juridiske
rettighetene som gjelder i ditt land. I den grad dette er tillatt i ditt land skal Intex ikke
under noen omstendigheter kunne holdes ansvarlig overfor deg eller tredjemann for
direkte skader eller følgeskader som inntreffer som følge av bruken av din Intex Pool,
eller for handlingene til Intex eller Intex’ representanter eller ansatte (herunder
produksjonen av produktet). Dersom eksklusjon eller begrensning av tilfeldige skader
eller følgeskader ikke er tillatt i ditt land, gjelder denne begrensningen eller eksklusjonen
ikke for deg.
Vi gjør oppmerksom på at denne begrensede garantien ikke gjelder:
• Dersom Intex Pool har vært gjenstand for uaktsomhet, unormal eller ikke tiltenkt
bruk, en ulykke, feil bruk eller dårlig vedlikehold eller oppbevaring.
• Dersom Intex Pool I er blitt påført skade som følge av omstendigheter som ligger
utenfor Intex’ kontroll, herunder men ikke begrenset til punktering, slite- eller
skrapeskader, vanlig slitasje og skader som skyldes eksponering for brann,
oversvømmelse, frost, regn eller andre krefter i det utvendige miljø;
• For deler og komponenter som ikke er solgt av Intex, og/eller
• Dersom uautoriserte modifikasjoner, reparasjoner eller demontering av Intex Pool er
blitt foretatt av noen annen person enn personalet ved Intex’ servicesenter.
Kostnadene knyttet til tap av bassengvann, kjemikalier eller vannskader dekkes ikke av
denne garantien. Personskader eller skader på eiendom eller personer dekkes ikke av
denne garantien.
Les brukermanualen nøye og følg alle instruksjoner om riktig bruk og vedlikehold av
Intex Pool. Inspiser alltid utstyret ditt før bruk. Din begrensede garanti kan være ugyldig
dersom instruksjonene ikke er fulgt.
TA VARE PÅ BRUKSANVISNINGEN
Side 19
Page 77

(120IO) SEQUOIA SPIRIT™ WOOD-GRAIN FRAME POOL FINNISH 7.5” X 10.3” PANTONE 295U 05/26/2016
120A
Finnish
Finnish
120A
TÄRKEITÄ
TURVAOHJEITA
Lue kaikki ohjeet huolellisesti ennen
tuotteen asennusta ja käyttöä, ja
noudata ohjeita. Säilytä tulevia
tarpeita varten.
TM
GRAPHITE GRAY PANEL POOL SET
15’8” (478 cm) & 18’8” (569 cm) models
Kuva on tarkoitettu vain havainnollistamiseen. Lisävarusteet eivät välttämättä kuulu toimitukseen.
Kokeile myös seuraavia Intex-tuotteita: altaita, allasvarusteita,
ilmatäytteisiä altaita ja leluja, ilmapatjoja ja kumiveneitä. Niitä on
saatavana jälleenmyyjiltämme. Vieraile myös verkkosivuillamme.
Jatkuvan tuotekehityksen takia Intex varaa oikeuden muuttaa
ilman ennakkoilmoitusta teknisiä tietoja ja ulkonäköä, mistä
saattaa seurata päivityksiä käyttöoppaaseen.
©2016 Intex Marketing Ltd. - Intex Development Co. Ltd. - Intex Trading Ltd.
- Intex Recreation Corp.
Rechte vorbehalten. Printed in China/Imprimé en Chine/Impreso en China/Gedruckt in China.
®™ Trademarks used in some countries of the world under license from/®™ Marques utilisées dans certains pays sous
KÄYTTÖOHJE
licence de/Marcas registradas utilizadas en algunos países del mundo bajo licencia de/Warenzeichen verwendet in einigen
Ländern der Welt in Lizenz von/
Box 28829, Hong Kong & Intex Recreation Corp., P.O. Box 1440, Long Beach, CA 90801
Union by/Distribué dans l’Union Européenne par/Distribuido en la unión Europea por/Vertrieb in der Europäischen Union
Intex Trading B.V., Venneveld 9, 4705 RR Roosendaal – The Netherlands
durch/
www.intexcorp.com
All rights reserved/Tous droits réservés/Todos los derechos reservados/Alle
Intex Marketing Ltd. to/à/a/an Intex Trading Ltd., Intex Development Co. Ltd., G.P.O
• Distributed in the European
Page 78

(120IO) SEQUOIA SPIRIT™ WOOD-GRAIN FRAME POOL FINNISH 7.5” X 10.3” PANTONE 295U 05/26/2016
Varoitukset / Tärkeitä turvaohjeita
Osaluettelo ja osien pikaopas
Asennusohjeet
................................................................
Altaan hoito ja kemikaalit
Yleisiä allasongelmia
.....................................................
Altaan hoito ja tyhjennys
.......................................
..............................................
..............................................
Maanpäällisen altaan talvisäilytys
................................
...............................
3-4
5-6
7-15
16-17
16
17
17-18
Finnish
120A
Yleinen turvallisuus vedessä
Rajoitettu takuu
.............................................................
.......................................
18
19
Johdanto:
Kiitos, että ostit Intex-altaan. Lue tämä käyttöohje ennen altaan asennusta.
Käyttöohjeen tiedot auttavat pidentämään altaan käyttöikää ja tekemään
siitä turvallisemman, jotta perheesi voi nauttia sen käytöstä. Katso oheinen
video ennen altaan asentamista. Altaan asennukseen tarvitaan 2–4 henkilöä.
Asennus sujuu nopeammin, jos mukana on useampia henkilöitä.
Asentaminen ei vaadi työkaluja.
SÄILYTÄ OHJEET
Sivu 2
Page 79

(120IO) SEQUOIA SPIRIT™ WOOD-GRAIN FRAME POOL FINNISH 7.5” X 10.3” PANTONE 295U 05/26/2016
Finnish
TÄRKEITÄ TURVAOHJEITA
Lue kaikki ohjeet huolellisesti ennen tuotteen asennusta ja käyttöä ja noudata ohjeita
.
VAROITUS
• Pätevän aikuisen henkilön on valvottava jatkuvasti lapsia ja toimintarajoitteisia henkilöitä, jotka käyttävät
allasta.
• Pidä kaikki ovet, ikkunat ja turvaesteet suljettuina, jotta kukaan ei pääse altaaseen luvatta, tahattomasti tai
ilman valvontaa.
• Asenna turvaeste, joka estää pienten lasten ja lemmikkieläinten pääsyn altaaseen.
• Vain aikuiset saavat koota ja purkaa altaan ja siihen liittyvät varusteet.
• Älä koskaan sukella, hyppää tai liu’u maanpäälliseen altaaseen tai muuhun matalaan veteen.
• Jos allasta ei sijoiteta tasaiselle, vaakasuoralle ja tiiviille alustalle, allas voi kaatua ja altaassa olija voi
kulkeutua pois altaasta veden mukana.
• Altaan ilmatäytteiseen vuoraukseen tai yläreunaan nojaaminen, reunan päällä istuminen tai reunan
painaminen saattaa olla vaarallista ja aiheuttaa vesivuodon. Älä anna kenenkään istua tai kiipeillä altaan
reunojen päällä.
• Kerää kaikki leikkikalut ja kellukkeet altaasta ja sen lähistöltä, kun allasta ei käytetä. Pienet lapset
saattavat kiinnostua altaassa olevista esineistä.
• Pidä leikkikalut, tuolit, pöydät ja muut esineet, joiden päälle lapset voivat kiivetä, vähintään 1,2 metrin
päässä altaasta.
• Säilytä pelastusvälineitä altaan lähistöllä ja merkitse hätänumero selkeästi allasta lähimpänä olevaan
puhelimeen. Esimerkkejä pelastusvälineistä: rannikkovartioston hyväksymä rengaspoiju, jossa
kiinnitysköysi, vahva ja kestävä tanko, jonka pituus on vähintään 365 cm.
• Älä ui altaassa yksin äläkä anna muidenkaan uida yksin.
• Pidä allas puhtaana ja esteettömänä. Altaan pohjan on näyttävä aina altaan esteen ulkopuolelta.
• Jos uit yöllä, valaise kaikki turvamerkinnät, tikkaat, altaan pohja ja kävelyreitit keinovalolla.
• Pysy poissa altaasta, jos olet käyttänyt alkoholia tai lääkkeitä.
• Pidä lapset poissa altaan peitteiden luota estääksesi takertumisen, hukkumisen ja vakavat
loukkaantumiset.
• Altaan peitteet on poistettava kokonaan ennen altaan käyttöä. Peitteen alla olevat lapset tai aikuiset ovat
näkymättömissä.
• Älä peitä allasta tai poista peitettä, jos itse olet altaassa tai jos siinä on muita ihmisiä.
• Pidä allas ja sen ympäristö puhtaana ja esteettömänä estääksesi liukastumiset, kaatumiset ja esineiden
aiheuttamat loukkaantumiset.
• Suojaa kaikki altaan käyttäjät veden välityksellä leviäviltä taudeilta pitämällä altaan vesi puhtaana. Älä
niele altaan vettä. Huolehdi hygieniasta.
• Altaat kuluvat ja heikentyvät käytössä. Käytä ja huolla allastasi oikein. Allas voi rikkoutua altaan rakenteen
heikentymisen takia. Jos allas rikkoutuu, altaasta voi päästä vuotamaan suuria vesimääriä.
• Allas on tarkoitettu ainoastaan ulkokäyttöön.
• Tyhjennä ja varastoi allas, kun sitä ei käytetä.
• Joka päivä altaan käyttökauden aikana suodatusjärjestelmän on oltava käynnissä vähintään niin kauan,
että altaan kaikki vesi varmasti ehtii vaihtua.
120A
ALTAAN ESTEET JA SUOJUKSET EIVÄT KORVAA AIKUISEN JATKUVAA JA PÄTEVÄÄ VALVONTAA.
JOS NÄITÄ VAROITUKSIA EI NOUDATETA, SEURAUKSENA VOI OLLA AINEELLINEN VAHINKO,
VAKAVA LOUKKAANTUMINEN TAI KUOLEMA.
Huom:
Altaan omistajan on noudatettava paikallista tai valtiollista lainsäädäntöä, joka koskee lapsille tarkoitettuja
turva-aitoja, turvaesteitä, valaistusta ja muita turvallisuusvaatimuksia. Lisätietoja saat paikallisilta
rakennusviranomaisilta.
SÄILYTÄ OHJEET
Sivu 3
Page 80

(120IO) SEQUOIA SPIRIT™ WOOD-GRAIN FRAME POOL FINNISH 7.5” X 10.3” PANTONE 295U 05/26/2016
Finnish
TÄRKEITÄ TURVAOHJEITA
Lue kaikki ohjeet huolellisesti ennen laitteen asennusta ja käyttöä, ja noudata ohjeita. Nämä varoitukset,
ohjeet ja turvaohjeet koskevat joitakin yleisimpiä veden virkistyskäyttöön liittyviä riskejä, mutta ne eivät voi
kattaa kaikkia riskejä ja vaaroja. Ole aina varovainen, käytä tervettä järkeä ja hyvää harkintaa nauttiessasi
vesiaktiviteeteista. Säilytä tulevia tarpeita varten. Pakkaustekstit tulee lukea huolellisesti ja säilyttää tulevia
tarpeita varten. Katso lisävaroitukset tuotteesta.
TÄYTTÖ
• Tarkista tapit, pultit ja ruuvit ruosteen varalta; tarkista mahdolliset terävät säröt ja reunat sekä
kosketuspinnat säännöllisesti tapaturmien välttämiseksi.
Uimataidottomien turvallisuus
• Pätevän aikuisen tulee valvoa huonosti uivia ja uimataidottomia koko ajan aktiivisesti ja valppaasti (on
muistettava, että alle 5-vuotiailla on suuri hukkumisriski).
• Määritä pätevä aikuinen valvomaan allasta aina, kun se on käytössä.
• Huonosti uivien ja uimataidottomien täytyy käyttää henkilökohtaisia turvavarusteita altaassa ollessaan.
• Poista kaikki lelut uima-altaasta ja sen ympäristöstä, kun allasta ei käytetä tai valvota, jotta ne eivät
houkuttele lapsia altaaseen.
Turvalaitteet
• On suositeltavaa asentaa aita (tai lukita ovet ja ikkunat, mikäli sovellettavissa) estämään luvaton pääsy
uima-altaalle.
• Aidat, altaan kannet, altaan hälyttimet tai vastaavat turvalaitteet ovat hyviä apuvälineitä, mutta ne eivät
korvaa pätevän aikuisen suorittamaa jatkuvaa valvontaa.
Pelastusvarusteet
• On suositeltavaa pitää pelastusvarusteet (esim. pelastusrengas) altaan lähellä.
• Säilytä toimiva puhelin ja luettelo hälytysnumeroista lähellä uima-allasta.
Altaan turvallinen käyttö
• Kannusta kaikkia käyttäjiä ja etenkin lapsia opettelemaan uimaan.
• Opettele hengenpelastuksen perusteet (puhallus- ja paineluelvytys, CPR) ja päivitä tämä osaaminen
säännöllisesti. Sillä voit pelastaa hengen hätätilanteessa.
• Anna kaikille altaan käyttäjille, mukaan lukien lapset, ohjeet hätätilanteiden varalle.
• Älä koskaan sukella mihinkään matalaan veteen. Se voi aiheuttaa vakavan vamman tai kuoleman.
• Älä mene uima-altaaseen, jos olet käyttänyt alkoholia tai lääkkeitä, jotka voivat heikentää kykyäsi käyttää
allasta turvallisesti.
• Mikäli altaassa käytetään kantta, poista se täydellisesti veden pinnalta ennen altaaseen menoa.
• Suojaa altaan käyttäjät veden välityksellä leviäviltä taudeilta pitämällä altaan vesi käsiteltynä ja
ylläpitämällä hyvä hygienia. Katso käyttöoppaan vedenkäsittelyohjeet.
• Säilytä kemikaalit (esim. vedenkäsittely-, puhdistus- tai desinfiointituotteet) poissa lasten ulottuvilta.
• Irrotettavat portaat tulee asettaa vaakasuoraan asentoon.
• Huomioi kaikki altaan reunoihin kiinnitetyt varoitukset ja turvamerkit sekä noudata niitä.
120A
SÄILYTÄ OHJEET
Sivu 4
Page 81

(120IO) SEQUOIA SPIRIT™ WOOD-GRAIN FRAME POOL FINNISH 7.5” X 10.3” PANTONE 295U 05/26/2016
OSIEN PIKAOPAS
Tarkista tuotteen sisältö ja tutustu kaikkiin osiin ennen laitteen asentamista.
7
8
10 11
Model 16'8'' (508 cm)
9
1
2
3
4
5
6
Finnish
120A
26
12
13
14
15
19
22
23
20
21
Huomautus: Kuvat on tarkoitettu vain havainnollistamiseen. Ne eivät välttämättä vastaa
varsinaista tuotetta. Mittasuhteet eivät täsmää.
24
16
17
18
25
SÄILYTÄ OHJEET
Sivu 5
Page 82

(120IO) SEQUOIA SPIRIT™ WOOD-GRAIN FRAME POOL FINNISH 7.5” X 10.3” PANTONE 295U 05/26/2016
VIITENRO KUVAUS
TAPPI (2 YLIMÄÄRÄISTÄ)
1
TIIVISTE (2 YLIMÄÄRÄISTÄ)
2
T-LIITOSKAPPALE
3
JOUSITAPPI
4
PYSTYSUORA JALKA (JOUSITAPPI MUKANA)
5
JALAN KORKKI
6
VAAKASUORA TANKO
7
ALTAAN VUORAUS (TYHJENNYSVENTTIILIN KORKKI MUKANA)
8
TYHJENNYSLIITIN
9
TYHJENNYSVENTTIILIN KORKKI
10
POHJAKANGAS
11
VEDENPITÄVÄ KORKKI (4 YLIMÄÄRÄISTÄ)
12
PULTTI (4 YLIMÄÄRÄISTÄ)
13
YLÄKIRISTIMEN SUOJUS
14
YLÄTASO
15
YLÄKIRISTIN
16
TUKIPAALU
17
MÄNTÄVENTTIILIN LIITIN
18
SUODATTIMEN VENTTIILIN KORKKI
19
SIVULEVY A
20
SIVULEVY B
21
SIVULEVY-YHDISTELMÄ, JOSSA KAKSI AUKKOA
22
SIVULEVY-YHDISTELMÄ, JOSSA YKSI AUKKO
23
POHJAKISKO
24
POHJAKAPPALE
25
PULTTIAVAIN
26
Altaan koko ja kappalemäärä
15'8" x 49"
(478 cm x124 cm)
32
32
15
15
15
15
15
1
1
1
1
34
34
15
15
15
15
2
2
116
0
1
1
15
15
2
Finnish
18'8" x 53"
(569 cm x 135 cm)
38
38
18
18
18
18
18
1
1
1
1
40
40
18
18
18
18
2
2
141
17
1
1
18
18
2
120A
VIITENRO KUVAUS
TAPPI (2 YLIMÄÄRÄISTÄ)
1
TIIVISTE (2 YLIMÄÄRÄISTÄ)
2
T-LIITOSKAPPALE
3
JOUSITAPPI
4
PYSTYSUORA JALKA (JOUSITAPPI MUKANA)
5
JALAN KORKKI
6
VAAKASUORA TANKO
7
ALTAAN VUORAUS (TYHJENNYSVENTTIILIN KORKKI MUKANA)
8
TYHJENNYSLIITIN
9
TYHJENNYSVENTTIILIN KORKKI
10
POHJAKANGAS
11
VEDENPITÄVÄ KORKKI (4 YLIMÄÄRÄISTÄ)
12
PULTTI (4 YLIMÄÄRÄISTÄ)
13
YLÄKIRISTIMEN SUOJUS
14
YLÄTASO
15
YLÄKIRISTIN
16
TUKIPAALU
17
MÄNTÄVENTTIILIN LIITIN
18
SUODATTIMEN VENTTIILIN KORKKI
19
SIVULEVY A
20
SIVULEVY B
21
SIVULEVY-YHDISTELMÄ, JOSSA KAKSI AUKKOA
22
SIVULEVY-YHDISTELMÄ, JOSSA YKSI AUKKO
23
POHJAKISKO
24
POHJAKAPPALE
25
PULTTIAVAIN
26
15'8" x 49"
(478 cm x124 cm)
VARAOSA NUMERO
10312
10648
10861
10313
10864
10309
10414
11490
10201
11044
18927
12172
12173
12174
12199
12200
12201
11040
11240
12203
12204
12205
12206
12208
12218
11053
18'8" x 53"
(569 cm x 135 cm)
10312
10648
10862
10313
10865
10309
10414
11110
10201
11044
11290
12172
12173
12174
12199
12200
12202
11040
11240
12203
12204
12205
12207
12208
12218
11053
SÄILYTÄ OHJEET
Sivu 6
Page 83

(120IO) SEQUOIA SPIRIT™ WOOD-GRAIN FRAME POOL FINNISH 7.5” X 10.3” PANTONE 295U 05/26/2016
Finnish
ALTAAN ASENNUS
TÄRKEÄÄ TIETOA ALTAAN SIJOITTAMISESTA JA ALTAAN ALUSTASTA
• Allas on sijoitettava niin, että kaikki ovet, ikkunat ja turvaesteet voi pitää suljet- tuina, jotta
kukaan ei pääse altaaseen luvatta, tahattomasti tai ilman v alvontaa.
• Asenna turvaeste, joka estää pienten lasten ja lemmikkieläinten pääsyn altaaseen.
• Jos allasta ei sijoiteta tasaiselle, vaakasuoralle ja kiinteälle alustalle seuraavien ohjeiden
mukaisesti, allas voi kaatua ja altaassa olija voi kulkeutua pois altaasta veden mukana.
Seurauksena voi olla vakava loukkaantuminen tai aineellinen vahinko.
• Sähköiskun vaara: Kytke suodatinpumppu vain maadoitettuun pistorasiaan, joka on suojattu
maavuotokytkimellä (GFCI) tai jäännösvirtalaitteella (RCD). Älä kytke pumppua
sähköiskuvaaran vuoksi sähköverkkoon jatkojohdolla, ajastimella, pistotulpan sovittimella tai
muunnetulla pistotulpalla. Katso, että pistorasia on sopivassa paikassa. Sijoita johto paikkaan,
jossa ruohonleikkuri, pensasleikkuri ja muut laitteet eivät vahingoita sitä. Katso muut
varoitukset ja ohjeet suodatinpumpun käyttöohjeesta.
• Vakavan henkilövahingon vaara: älä yritä asentaa allasta tuulisissa olosuhteissa.
VAROITUS
120A
Sijoita allas ulos ja muista seuraavat seikat:
1.
Altaan alustan on oltava täysin tasainen ja vaakasuora. Älä pystytä allasta rinteeseen tai kaltevalle
alustalle.
2.
Alustan on oltava riittävän kiinteä ja luja kestääkseen täysinäisen altaan painon ja paineen. Älä pystytä
allasta mutaiselle alustalle, hiekalle tai pehmeän, irtonaisen maa-aineksen päälle.
3.
Älä aseta allasta levyn päälle, parvekkeelle tai alustalle, joka saattaa romahtaa täytetyn altaan
painosta.
4.
Altaan ympärille on jätettävä vähintään 1,5–2,0 metriä tilaa, jotta lapset eivät pääse kiipeämään
altaaseen altaan ympärillä olevien esineiden kautta.
5.
Altaan alla oleva nurmikko vahingoittuu. Allas vahingoittaa nurmikkoa. Vesiroiskeet voivat vahingoittaa
kasveja.
6.
Poista kaikki haittaavat heinät ja muut kasvit. Jotkin ruohotyypit, kuten St. Augustine ja Bermuda,
voivat kasvaa altaan pohjan läpi. Altaan pohjan läpi voi joskus kasvaa ruohoa. Tämä ei ole vika, eikä
se kuulu takuun piiriin.
7.
Alueella pitää olla mahdollisuus altaan veden tyhjentämiseen jokaisen käyttökerran jälkeen ja/tai ennen
pitkäaikaiseen säilytykseen laittamista.
SÄILYTÄ OHJEET
Sivu 7
Page 84

(120IO) SEQUOIA SPIRIT™ WOOD-GRAIN FRAME POOL FINNISH 7.5” X 10.3” PANTONE 295U 05/26/2016
Finnish
ALTAAN ASENNUS (jatkoa)
MAA-ALUSTAN VALMISTELU
Sijoita allas ulos tasaiselle betonialustalle. Jos alusta ei ole betonia, noudata seuraavia ohjeita allasalueen
valmistelussa. Anna maa-alustan valmistelutyö ammattilaisen (rakennusammattilaisen tai puutarhurin)
hoidettavaksi.
HUOM.
1. Merkitse allasalue
• Kun olet valinnut altaan sijoituspaikan, aseta tappi
allasalueen keskikohtaan. Kiinnitä keskikohdan
tappiin naru. Mittaa narun avulla pituus A, ja
kiinnitä naruun merkintävälineeksi merkkitikku,
maalikynä tai jauholla täytetty suppilo. Merkitse
allasalueen ympärys narun ja merkintävälineen
avulla (katso piirros 1.1).
• Jos käytössäsi on 478 cm:n allas,
jossa A = 251,5 cm, ruoho on poistettava
säteen alueelta ja maa on tasoitettava.
Jos käytössäsi on 508 cm:n allas,
jossa A = 266,7 cm, ruoho on poistettava
säteen alueelta ja maa on tasoitettava.
Jos käytössäsi on 569 cm:n allas,
jossa A = 297,1 cm, katso piirros 1.2.
Työkalut eivät sisälly toimitukseen.
1.1
1.2
A
120A
2. Tyhjennä ja puhdista allasalue
• Poista ruoho, kivet ja kepit merkityltä alueelta.
Poista myös keskikohdan tappi ja naru.
3. Maan tasaaminen
• Määritä allasalueen matalin kohta. Tasaa koko allasalue matalimman kohdan tasolle poistamalla maata
muista kohdista. Jotta maa-alustasta tulisi mahdollisimman tasainen ja vakaa, maata poistetaan aina
kohoumista sen sijaan, että sitä lisättäisiin notkelmiin. Kun koko alue on tasainen ja ylimääräinen
maa-aines on poistettu, jäljelle jääneet pienet kolot voi täyttää alueen tasaamiseksi (täytä hienolla
maa-aineksella). Tasoita ja tiivistä maa-alusta aina jälkeenpäin (katso piirros 2.1).
2.1
Kelpaamatontaso
Hyväksyttävätaso
Maata poistetaan aina kohoumista sensijaan,
että sitä lisättäisiin notkelmiin.
Älä lisää.
Poista.Poista.
SÄILYTÄ OHJEET
Sivu 8
Page 85

(120IO) SEQUOIA SPIRIT™ WOOD-GRAIN FRAME POOL FINNISH 7.5” X 10.3” PANTONE 295U 05/26/2016
Finnish
ALTAAN ASENNUS (jatkoa)
• Käytä suurta viivainta (alumiinia tai puuta) ja
vesivaakaa. Mittaa maa-alueen tasaisuus
jakamalla alue kolmioihin (tai suorakulmioihin)
ja sijoittamalla mittausvälineet valitulle ja
puhdistetulle alueelle (katso piirros 2.2).
4. Viimeistely
• Levitä puhdistetulle ja tasatulle maalle ohut, enintään 1 cm:n paksuinen kerros siivilöityä hiekkaa.
Suihkuta hiekalle vettä ja tiivistä maa (puutarhajyrällä). Tarkista vielä, että maa-alusta on tasoitettu
hyvin. Maa-alustan on oltava täysin tasainen, ennen kuin voit jatkaa eteenpäin.
5. Pohjalaatan asennus
• Hanki 15 pohjalaattaa 478 cm:n altaaseen tai 16 laattaa 508 cm:n altaaseen tai 18 laattaa 569 cm:n
altaaseen. Jokaisen laatan vähimmäismitat ovat 45 x 45 x 5 cm. Merkitse alue, johon laatat upotetaan
(katso piirros 3.1), ja poista sitten 5 cm maata merkityltä alueelta (katso piirros 3.2).
• 478 cm:n allas, jossa
A = 251,5 cm = ruoho on poistettava säteen alueelta ja maa on tasoitettava.
B = 104,1 cm = etäisyys jokaisen pohjalaatan välillä.
508 cm:n allas, jossa
A = 266,7 cm = ruoho on poistettava säteen alueelta ja maa on tasoitettava.
B = 104,1 cm = etäisyys jokaisen pohjalaatan välillä.
569 cm:n allas, jossa
A = 297,1 cm
B = 104,1 cm
3.1
18” (45.7 cm)
2.2
3.2
120A
18” (45.7 cm)
B
A
2” (5.08 cm)
• Laattojen yläpinnan on oltava maanpinnan tasalla ja täysin vaakatasossa ympäröivään alueeseen ja koko
allasalueen muihin osiin nähden (katso piirros 3.3).
3.3
SÄILYTÄ OHJEET
Sivu 9
Page 86

(120IO) SEQUOIA SPIRIT™ WOOD-GRAIN FRAME POOL FINNISH 7.5” X 10.3” PANTONE 295U 05/26/2016
Finnish
ALTAAN ASENNUS (jatkoa)
Tämän altaan kanssa on mahdollisesti hankittu Intex Krystal Clear™-suodatinpumppu.
Suodatinpumpulle on erilliset asennusohjeet, ja se asennetaan altaan kokoamisen
jälkeen.
1.
• Avaa varovasti pakkaus, joka sisältää altaan vuorauksen, liitoskappaleet, jalat ym., sillä pakkausta
voidaan käyttää altaan säilytykseen talven aikana.
• Ota pakkauksesta pohjakangas (11) ja levitä se
puhdistetulle alustalle. Ota sitten altaan vuoraus (8) ja
levitä se pohjakankaan päälle tyhjennysventtiili
tyhjennyspaikkaa kohti. Sijoita tyhjennysventtiili talosta
poispäin.
Anna auringon lämmittää altaan vuorausta, ennen kuin
työnnät tangot (7) tankokujiin.
vähintään kaksi henkilöä. Älä vedä vuorausta maata pitkin, sillä vetäminen saattaa aiheuttaa
vuotoja tai muita vahinkoja (katso piirros 4).
• Kun asennat altaan vuorausta, sijoita letkuliitännät tai -aukot siihen suuntaan, jossa on virtalähde. Allas
on sijoitettava niin, että altaan ulkoreuna on virtalähteen ulottuvilla lisävarusteena saatavan
suodatinpumpun käyttöä varten.
8
TÄRKEÄÄ: Altaan pystyttämiseen tarvitaan aina
120A
4
2.
• Kehysaltaan jalat (5) ja tangot (7) erottaa toisistaan koon perusteella. Vaakasuorien tankojen halkaisija
on suurempi. Ne työnnetään vuorauksen yläosassa oleviin tankokujiin. Pystysuorien jalkojen halkaisija
on pienempi. Sekä jalat että tangot sopivat T-liitoskappaleisiin (3).
• Voit aloittaa mistä tahansa kohdasta, mutta etene aina
samaan suuntaan työntäessäsi tankoja tankokujiin. Kun
tanko on keskellä tankokujaa, ota yksi T-liitoskappale ja
kiinnitä se tangon toiseen päähän työntämällä
liitostappi (1) kumitiivisteen (2) läpi valmiisiin reikiin.
Jatka samaan tapaan altaan ympäri, kunnes kaikki
tangot ja liitoskappaleet on kiinnitetty (katso piirros 5.1).
Viimeisen liitoksen tekeminen saattaa olla vaikeaa,
mutta sitä voidaan helpottaa nostamalla viimeistä
liitoskappaletta ja tankoa samanaikaisesti noin 5 cm
ja asettamalla tanko liitoskappaleeseen samalla, kun
osat lasketaan normaaliin asentoonsa. Tanko liukuu
liitoskappaleeseen (katso piirros 5.2). Varmista, että
viimeinen liitoskappale on kunnolla paikallaan, ennen
kuin siirryt kokoamaan jalat.
1
2
3
3
5.1
7
5.2
SÄILYTÄ OHJEET
Sivu 10
Page 87

(120IO) SEQUOIA SPIRIT™ WOOD-GRAIN FRAME POOL FINNISH 7.5” X 10.3” PANTONE 295U 05/26/2016
ALTAAN ASENNUS (jatkoa)
• Liu’uta seuraavaksi pystysuorat jalat altaan vuorauksen keskellä
olevaan vyölenkkiin. Liu’ta jalka varovasti vyölenkkiin ja työnnä
jalan yläosa liitoskappaleen alaosaan. Napsauta jalka kiinni
liitoskappaleen reikiin asettamalla reiät ja jousikuormitettu tappi
kohdakkain. Kiinnitä jalan alakappale (6) jalan alaosaan (katso
kuvat 6.1 ja 6.2).
• Tartu kehysaltaan ylätankoihin 2–3 kohdasta ja ravistele allasta
varmistaaksesi, että kaikki liitos-kappaleet, jalat ja tangot ovat
kunnolla kiinni. Varmista, että kaikki tapit ovat paikoillaan,
työntämällä tappeja alaspäin reikien läpi (katso kuva 7,1).
• Vedä jalkojen alaosasta varovasti ulospäin varmistaaksesi, että
jalat ovat pystysuorassa ja kohtisuorassa tasaiseen maahan nähden.
6.1
Finnish
3
5
6
6.2
120A
4
7.1
3.
• Katso Krystal Clear™ -suodatinpumpun käyttöohjeet ja asenna suodattimen mutterit, suodattimen litteät
välilevyt ja suodattimen kierreliittimet altaan vuorauksen reikiin. Ota suodattimen venttiilin korkit (19) ja
työnnä ne altaan sisäpuolelta suodattimen kierreliittimiin, jotta vesi ei valu pois allasta täytettäessä.
• Ennen kuin alat täyttää allasta vedellä, varmista, että altaan sisällä oleva tyhjennystulppa on kiinni ja
ulkopuolella oleva tyhjennyskorkki tiukasti paikallaan. Päästä altaaseen vettä parin senttimetrin verran ja
tarkista, onko altaan pohjan kaltevuudessa havaittavia vaihteluja.
Ennen kuin alat täyttää allasta vedellä, varmista, että altaan sisällä oleva tyhjennystulppa on
kiinni ja ulkopuolella oleva tyhjennyskorkki tiukasti paikallaan. Päästä altaaseen vettä parin
senttimetrin verran ja tarkista, onko altaan pohjan kaltevuudessa havaittavia vaihteluja.
• Suorista pohjavuorauksen rypyt (altaan sisäpuolelta) työntämällä altaan reunoja ulospäin. Voit myös
ottaa kiinni altaan sivujen alta (altaan ulkopuolelta) ja vetää altaan pohjaa ulospäin. Jos rypyt johtuvat
pohjakankaasta, kaksi henkilöä voi tasoittaa rypyt vetämällä kangasta vastakkaisilta puolilta.
4
. Vettä saa lisätä sisäpuolisen hitsaussauman
alareunaan asti (katso piirrosta 7.2).
VEDENPINTA
7.2
SÄILYTÄ OHJEET
Sivu 11
Page 88

(120IO) SEQUOIA SPIRIT™ WOOD-GRAIN FRAME POOL FINNISH 7.5” X 10.3” PANTONE 295U 05/26/2016
Finnish
ALTAAN KEHIKON ASENNUS
Kun allas on täytetty vedellä ja kun on varmistettu, että allas on täysin vaakatasossa ja kaikki pystysuorat
jalat asettuvat pohjalaattojen keskelle, voidaan edetä altaan kehikon asennukseen.
1. Yläkiristimen asennus
• Kiinnitä yläkiristin (16) alapuolelta altaan kehyksen T-liitoskappaleeseen. Varmista, että yläkiristimen
molemmat pultit osoittavat ylöspäin. Toista vaiheet, kunnes kaikki yläkiristimet on kiinnitetty altaan
kehyksen T-liitoskappaleisiin (katso piirrokset 8.1 ja 8.2).
8.1 8.2
2. Pohjakappaleen ja pohjakiskon asennus
• Aseta pohjakappale (25) maahan ja kohdista se jalan korkkiin. Varmista, että pohjakappaleen
kierteitetty sivuaukko osoittaa ulospäin. Aseta kaikki pohjakappaleet paikoilleen.
• Aloita mistä tahansa, mutta työskentele aina samaan suuntaan, ja kiinnitä pohjakisko (24) kahden
pohjakappaleen (25) väliin. Varmista, että pohjakappaleen nupit asettuvat pohjakiskoon porattuihin
reikiin. Jatka samaan tapaan altaan ympäri, kunnes kaikki pohjakiskot ja pohjakappaleet on kiinnitetty.
Säädä pohjakappaleen ja jalan korkin etäisyys sopivaksi siten, että varmistat, että tukipaalu (17) on
pystysuorassa asennuksen jälkeen (katso piirrokset 9.1 ja 9.2).
120A
9.1
3. Tukipaalun asennus
• Poista kartongit tukipaalujen molemmilta puolilta.
• Aseta tukipaalu (17) pohjakappaleeseen (25). Nosta tukipaalua kevyesti, jotta tukipaalun yläpäässä
oleva lovi asettuu yläkiristimen kohoumaa vasten. Paina alaspäin, jotta tukipaalu kiinnittyy kunnolla
yläkiristimeen ja pohjakappaleeseen (katso piirrokset 10.1, 10.2 ja 10.3).
• Toista vaiheet, kunnes kaikki tukipaalut on liitetty yläkiristimiin ja pohjakappaleisiin (katso piirros 10.4).
10.1
10.2
9.2
SÄILYTÄ OHJEET
Sivu 12
Page 89

(120IO) SEQUOIA SPIRIT™ WOOD-GRAIN FRAME POOL FINNISH 7.5” X 10.3” PANTONE 295U 05/26/2016
Finnish
ALTAAN KEHIKON ASENNUS (jatkoa)
10.3
4. Sivupaneelin asennus
Sivupaneelien määrä vaihtelee altaan koon mukaan. Kaksi sivupaneelia vaatii erityistä huomiota
asennuksen aikana: sivupaneeli, joka on asennettava altaan tulo- ja poistoaukkojen ulkopuolelle, sekä
varoitukset sisältävä sivupaneeli, joka on asennettava kohtaan, josta varoitukset näkee helposti ennen
altaaseen menoa. Näiden erityistä huomiota vaativien sivupaneelien sivulevyt on pakattu erikseen.
4a. Aukollisen sivupaneelin asennus
• Sijoita aukollinen sivupaneeli altaan vuorauksen ulkopuolelle kohtaan, jossa altaan tulo- ja poistoaukot
sijaitsevat. Ota sivulevyt pakkauksesta ja liu’uta levy-yhdistelmä, jossa on yksi aukko (23) ensin alas
tukipaaluihin ja työnnä se sitten pohjakiskon pystysuoraan uraan. Jatka samoin numerojärjestyksen
mukaisesti alhaalta ylöspäin. Levyn uran on asetuttava kokonaan edellisen levyn kielekkeen päälle.
Sivupaneelien painatusten on näyttävä ulospäin. Liu’uta sitten sivulevy-yhdistelmä, jossa on kaksi
aukkoa (22) ja numeromerkintä 5 & 6 tuki- paalujen läpi numeromerkinnällä 4 merkityn sivulevyn
kielekkeen päälle (katso piirrokset 11.1 ja 11.2).
11.1
11.2
10.4
120A
11.3
• Kiinnitä mäntäventtiilin liittimet (18) myötäpäivään kiertämällä suodattimen kierreliittimiin, jotka
asennettiin altaan vuoraukseen altaan asennuksen aikana (katso piirros 11.3). Kiinnitä mäntäventtiilit
myötäpäivään kiertämällä mäntäventtiililiittimiin (18). Sulje ja lukitse mäntäventtiilit painamalla
kädensijaa alaspäin ja kääntämällä sitä myötäpäivään suodatinpumpun käyttöohjeissa mukaisesti.
Nyt suodattimen venttiilin korkit (19) voi irrottaa suodattimen kierreliittimistä altaan sisäpuolelta (katso
piirrokset 11.4 ja 11.5).
• Jatka sivupaneelien asennusta asentamalla loput sivulevyt, joissa on numeromerkintä 7 tai 8 (katso
piirros 11.6).
11.4 11.5
11.6
SÄILYTÄ OHJEET
Sivu 13
Page 90

(120IO) SEQUOIA SPIRIT™ WOOD-GRAIN FRAME POOL FINNISH 7.5” X 10.3” PANTONE 295U 05/26/2016
Finnish
ALTAAN KEHIKON ASENNUS (jatkoa)
11.7
8
7
6
5
4
3
2
1
15'8" x 49"
4b. Varoitukset sisältävän sivupaneelin asennus
• Sijoita sivupaneeli, jossa on varoitukset niin, että käyttäjät näkevät varoitukset helposti ennen altaaseen
astumista. Ota sivulevyt pakkauksesta ja liu’uta levy-yhdistelmä, ensin alas tuki-paaluihin ja työnnä se
sitten pohjakiskon pystysuoraan uraan. Jatka samoin numerojärjes- tyksen mukaisesti alhaalta
ylöspäin. Levyn uran on asetuttava kokonaan edellisen levyn kielekkeen päälle. Sivupaneelien
painatusten on näyttävä ulospäin (katso piirrokset 12.1 ja 12.2).
8
7
6
5
4
3
2
1
0
18’8” x 53”
11.8
120A
12.1
12.3
8
7
6
5
4
3
2
1
8
7
6
5
4
3
2
1
0
12.2
12.4
15'8" x 49"
15'8" x 49"
SÄILYTÄ OHJEET
18’8” x 53”
18’8” x 53”
Sivu 14
Page 91

(120IO) SEQUOIA SPIRIT™ WOOD-GRAIN FRAME POOL FINNISH 7.5” X 10.3” PANTONE 295U 05/26/2016
Finnish
ALTAAN KEHIKON ASENNUS (jatkoa)
4c. Muiden sivupaneelien asennus
• Asenna 124 cm korkean altaan loput sivupaneelit käyttämällä jokaiseen paneeliin kahdeksan sivulevyä
A (20). Asenna 134 cm korkean altaan loput sivupaneelit asentamalla jokaisen paneelin alaosaan yksi
sivulevy B (21) sekä kahdeksan sivulevyä A (20). Asenna sivulevyt yksi kerrallaan alhaalta ylöspäin.
Aseta ensimmäisen sivulevyn ura pohjakiskon pystysuoraan reunaan ja muiden sivulevyjen urat
edellisten levyjen kielekkeiden päälle (katso piirrokset 13.1 ja 13.2).
13.1
5. Ylätason asennus
Kiinnitä ylätaso (15) sivupaneelin yläpuolelle niin, että tason molempien päiden reiät kohdistuvat
yläkiristimien (16) muttereihin. Varmista, että ylätason alapuolella oleva ura asettuu tiukasti ylätason (15)
kielekkeen päälle. Toista vaiheet, kunnes kaikki ylätasot on kiinnitetty yläkiristimiin ja sivulevyihin.
HUOM. Neljään ylätasoon on painettu varoituksia. Asenna nuo neljä ylätasoa erilleen toisistaan (katso
piirrokset 14.1, 14.2 ja 14.3).
13.2
120A
14.1
6. Yläkiristimen suojuksen asennus
Asenna yläkiristimen suojus (14) kahden ylätason yhtymäkohtaan. Aseta ylimmän liittimen reuna
tukipylvään yläpäässä olevaan aukkoon. Aseta kiinnityssankojen hattujen ylimmät reiät kiinnityssankojen
muttereiden tasalle. Asenna ruuvi ja pultti (13) kaikkiin kierrereikiin käyttämäl lä tuotteen mukana
toimitettua avainta (26) ja peitä ne sen jälkeen vedenpitävillä hatuilla (12). Tee samoin, kunnes kaikki
yläkiristimen suojukset on kiinnitetty yläkiristimiin ja tukipaaluihin (katso piirrokset 15.1, 15.2 ja 15.3).
15.1
14.2
15.2
Huomautus:
tarkoitettu vain
havainnollistamiseen.
Kuvat on
14.3
15.3
SÄILYTÄ OHJEET
Sivu 15
Page 92

(120IO) SEQUOIA SPIRIT™ WOOD-GRAIN FRAME POOL FINNISH 7.5” X 10.3” PANTONE 295U 05/26/2016
Finnish
ALTAAN HOITO JA KEMIKAALIT
VAROITUS
MUISTA
• Suojaa kaikki altaan käyttäjät veden välityksellä leviäviltä taudeilta pitämällä altaan vesi
puhtaana. Älä niele altaan vettä. Huolehdi hygieniasta.
• Pidä allas puhtaana ja esteettömänä. Altaan pohjan on näyttävä aina altaan esteen
ulkopuolelta.
• Pidä lapset poissa altaan peitteiden luota estääksesi takertumisen, hukkumisen ja vakavat
loukkaantumiset.
Asianmukaisen vesitasapainon ylläpito on tärkein tekijä, kun pyritään maksimoimaan vuorauksen
elinikä, huolehtimaan altaan ulkonäöstä ja varmistamaan, että vesi on puhdasta, terveellistä ja
turvallista. Oikean tekniikan käyttäminen on tärkeää veden testauksessa. Altaiden hoitoon
erikoistuneelta asiantuntijalta saat tietoja kemikaaleista, testausvälineistä ja testausmenetelmistä.
Lue kemikaalin valmistajan kirjalliset käyttö-ohjeet ja noudata niitä.
1.
Älä koskaan päästä klooria kosketuksiin vuorauksen kanssa, ennen kuin kloori on liuennut kokonaan.
Liuota rakeinen tai tablettimuotoinen kloori ensin vesiämpärissä. Jos nestemäistä klooria kaadetaan
altaan eri puolille, myös se on sekoitettava viipymättä ja huolellisesti altaan veteen.
2.
Älä koskaan sekoita kemikaaleja keskenään vaan lisää altaan veteen yksi kemikaali kerrallaan. Levitä se
koko altaaseen ennen kuin lisäät muita kemikaaleja.
3.
Voit hankkia Intex-roskanerottimen ja Intex-allasimurin, jotka helpottavat altaan veden puhtaanapitoa.
Kysy näitä lisävarusteita jälleenmyyjältäsi.
4.
Älä käytä altaan puhdistukseen painepesuria.
120A
VIANMÄÄ RITYS
ONGELMA KUVAUS SYY KORJAUS
LEVÄ
VÄRJÄYTYNYT
VESI
VEDESSÄ ON
LIETETTÄ
VESIMÄÄRÄ ON
JATKUVASTI
LIIAN ALHAINEN
ALTAAN
POHJALLA
ON SAKKAA
PINNALLA ON
LIKAA
• Vesi on vihertävää.
• Altaan sisäverhouksessa
on vihreitä tai
mustia pilkkuja.
• Altaan sisäverhous on
liukas, ja/tai se haisee
pahalle.
• Vesi muuttuu kloorikä sittelyssä siniseksi,
ruskeaksi tai mustaksi.
• Vesi on sameaa.
• Taso on alhaisempi
kuin edellisenä päivänä.
• Altaan pohjalla on
likaa tai hiekkaa.
• Lehtiä, hyönteisiä
yms.
• Kloori- ja pH-tasoja on
säädettävä.
• Kloori hapettaa vedessä
olevaa kuparia,
rautaa tai mangaania.
Yleinen ongelma.
• Liian korkea pH-taso on
muodostanut kovaa vettä.
• Klooripitoisuus on liian
alhainen.
• Vedessä on vierasta
ainesta.
• Altaan vuorauksessa
tai jossain letkussa
on repeämä tai reikä.
Kiristä korkit.
• Allasta käytetään paljon,
ja siihen noustaan
ja siitä poistutaan usein.
• Allas on liian lähellä
puita.
• Tehoklooraus. Korjaa pH-taso
allasmyyjän suosittelemalle
tasolle.
• Imuroi altaan pohja.
• Ylläpidä oikeaa klooritasoa..
• Säädä pH suositellulle tasolle.
• Käytä suodatinta, kunnes vesi
on kirkasta.
• Vaihda suodattimen patruuna
usein.
• Korjaa pH-taso. Tarkista
veden käsittelytapa altaan
jälleen-myyjältä.
• Tarkista oikea klooritaso.
• Puhdista tai vaihda suodatin.
• Korjaa paikkaussarjalla.
• Kiristä kaikki korkit sormitiuk kuuteen.
• Puhdista altaan pohja Intex-
allasimurilla.
• Käytä Intex-roskanerotinta.
SÄILYTÄ OHJEET
Sivu 16
Page 93

(120IO) SEQUOIA SPIRIT™ WOOD-GRAIN FRAME POOL FINNISH 7.5” X 10.3” PANTONE 295U 05/26/2016
Finnish
ALTAAN HOITO JA ALTAAN TYHJENNYS
NOUDATA AINA KEMIKAALIN VALMISTAJAN OHJEITA SEKÄ TERVEYTTÄ
HUOM
Älä lisää kemikaaleja altaaseen, kun altaassa on ihmisiä. Muutoin seurauksena voi olla ihon tai
silmien ärsytystä.
Intex Trading Ltd. ja niihin liittyvät yhtiöt, valtuutetut edustajat, valtuu-tetut huoltoliikkeet, jälleenmyyjät ja
työntekijät eivät ole MISSÄÄN tapauksessa vastuussa tuotteen ostajalle tai muille osapuolille
kustannuksista, jotka liittyvät allasveden menetykseen, kemikaaleihin tai vesivahinkoihin. Pidä
suodattimen varapatruunoita saatavilla. Vaihda patruunat kahden viikon välein. Suosittelemme Intexin
Krystal Clear™-suodatinpumpun käyttöä kaikissa maanpäällisissä altaissa.
RANKKASADE: Jos sadevesi nostaa altaan vesitason enimmäistasoa korkeammalle, tyhjennä
sadevesi altaasta, jotta allas ei vaurioidu.
Väkevöidyt klooriliuokset voivat vahingoittaa altaan materiaalia. Intex Recreation Corp.,
JA VAARATILANTEITA KOSKEVIA
Altaan tyhjennys ja pitkäaikainen varastointi.
HUOMAUTUS: Tässä altaassa on tyhjennysventtiili kahdessa kulmassa. Liitä puutarhaletku
kulmaventtiiliin, joka johtaa veden sopivaan paikkaan.
1. Tarkista, mitä paikallisissa asetuksissa määrätään uima-altaan veden hävittämisestä.
2. Varmista, että altaan sisällä oleva tyhjennystulppa on kiinni.
3. Poista altaan ulkoseinässä olevan tyhjennysventtiilin korkki.
4. Yhdistä puutarhaletkun naaraspää patentoituun letkusovittimeen.
5. Sijoita letkun toinen pää paikkaan, johon vesi voidaan tyhjentää turvallisesti.
6. Yhdistä letkusovitin tyhjennysventtiiliin. HUOMAUTUS: Sovitin työntää auki altaan sisällä olevan
tyhjennystulpan, jolloin vesi alkaa valua ulos välittömästi.
7. Kun allas on tyhjä, irrota letku ja sovitin.
8. Työnnä tyhjennystulppa takaisin altaan sisällä olevaan tyhjennysventtiiliin varastointia varten.
9. Kiinnitä tyhjennyskorkki paikalleen altaan ulkopuolelle.
10. Pura allas noudattamalla asennusohjeita käänteisessä järjestyksessä. Päästä kaikki ilma pois
ylärenkaasta ja irrota kaikki ylimääräiset osat.
11. Varmista, että allas ja kaikki sen osat ovat täysin kuivat ennen varastointia. Anna vuorauksen kuivaa
ulkona auringossa täysin kuivaksi, ennen kuin viikkaat sen. Katso kuva 20. Ripottele altaaseen
hieman talkkia, jotta vinyylipinnat eivät tartu yhteen ja altaaseen mahdollisesti jäänyt kosteus
imeytyy talkkiin.
12. Taittele allas suorakulmion muotoon. Aloita toiselta puolelta ja taita kuudesosa vuorauksesta kahdesti
itsensä päälle. Toista sama toisella puolella. Katso kuva 21.1 & 21.2.
13. Kun olet saanut aikaan kaksi vastakkaista taiteltua reunaa, taita toinen reuna toisen päälle aivan kuin
sulkisit kirjan. Katso kuva 22.1 & 22.2.
14. Taita päädyt keskelle Katso kuva 23.
15. Taita toinen pää pituussuunnassa toisen päälle ja purista verhous kokoon. Katso kuva 24.
16. Säilytä vuorausta ja varusteita kuivassa ja viileässä paikassa.
17. Säilytyksessä voidaan käyttää alkuperäistä pakkauslaatikkoa.
.
120A
20
22.1
21.1
22.2
SÄILYTÄ OHJEET
21.2
23 24
Sivu 17
Page 94

(120IO) SEQUOIA SPIRIT™ WOOD-GRAIN FRAME POOL FINNISH 7.5” X 10.3” PANTONE 295U 05/26/2016
Finnish
PITKÄAIKAINEN SÄILYTYS
Maanpäällisen altaan valmistelu talveen
Käytön jälkeen allas voidaan helposti tyhjentää ja varastoida turvalliseen paikkaan.
Jäätymisen aiheuttamien vaurioiden estämiseksi allas tulee tyhjentää, purkaa ja
varastoida asianmukaisesti, kun lämpötila laskee alle 5 Celsius-asteen (41 Fahrenheitasteen). Jäätyminen saattaa vaurioittaa vuorausta tai aiheuttaa altaan sortumisen. Katso
myös osiota “Näin tyhjennät altaan”.
Jos lämpötila laskee alle 5 Celsius-asteen (41 Fahrenheit-asteen), ja haluat edelleen pitää
altaan ulkona, toimin seuraavalla tavalla:
1.
Puhdista altaan vesi huolellisesti (tarkista, että Easy Set -altaan ja soikeakehyksisen altaan
ylärengas on kunnolla täytetty).
2.
Irrota roskanerotin (jos käytössä) ja muut suodattimen kierreliittimeen kiin nitetyt lisävarusteet.
Vaihda tarvittaessa suodattimen sihti. Varmista ennen varastointia, että kaikki varusteet ovat
puhtaita ja kuivia.
3.
Tuki tulo- ja lähtöliitännät altaan sisäpuolelta toimitukseen kuuluvalla tul-palla (16’:n malli ja
sitä pienemmät allaskoot). Sulje tulo- ja lähtöliitännän mäntäventtiili (17’:n malli ja sitä
suuremmat allaskoot).
4.
Irrota tikkaat (jos käytössä) ja varastoi ne turvalliseen paikkaan. Varmista ennen varastointia,
että tikkaat ovat täysin kuivat.
5.
Irrota letkut, joilla pumppu ja suodatin on liitetty altaaseen.
6.
Lisää oikeat talvikemikaalit. Ota yhteyttä paikalliseen jälleenmyyjään, sillä ohjeet vaihtelevat
suuresti alueittain.
7.
Peitä allas Intexin allaspeitteellä.
8.
Puhdista ja tyhjennä pumppu, suodatinkotelo ja letkut. Irrota ja hävitä vanha suodatinpatruuna
(pidä varapatruunoita saatavilla seuraavaa käyttö-kautta varten).
9.
Säilytä pumppua ja suodattimen osia kuivissa sisätiloissa, jossa lämpötila on 0-40°C.
TÄRKEÄÄ: INTEXIN ALLASPEITE EI OLE SUOJAKUORI.
120A
YLEINEN TURVALLISUUS VEDESSÄ
Vedessä virkistäytyminen on sekä hauskaa että terapeuttista. Siihen liittyy kuitenkin
tiettyjä loukkaantumisriskejä ja jopa kuolemanvaara. Lue kaikki tuotteen mukana toimitetut
myös pakkauksen kyljessä olevat ohjeet ja varoitukset ja noudata niitä
loukkaantumisriskien vähentämiseksi. Muista, että tuotetta koskevat ohjeet, varoitukset ja
turvallisuussäännöt liittyvät vain yleisimpiin vedessä oleskelun aiheuttamiin riskeihin,
eivätkä ne voi sisältää varoituksia kaikkien välittömien vaaratilanteiden varalle.
Tutustu seuraaviin yleisiin toimintaohjeisiin ja oman maasi tunnettujen
turvallisuusjärjestöjen antamiin suosituksiin turvallisuuden tehostamiseksi:
• Valvo lapsia jatkuvasti. Kun lapsia on altaassa tai altaan lähellä, uimataitoisen aikuisen on
toimittava uimavalvojana.
• Opettele uimaan.
• Opettele puhallus-paineluelvytys ja ensiaputaidot.
• Varoita lapsia valvovia henkilöitä altaaseen liittyvistä vaaratilanteista ja neuvo lukittavien
porttien, aitojen ja muiden suojalaitteiden käyttö.
• Neuvo lapsille ja altaan käyttäjille oikea toiminta hätätilanteessa.
• Käytä arvostelukykyäsi ja harkintaa kaikissa vesileikeissä.
• Valvonnan merkitystä ei voi korostaa liikaa.
SÄILYTÄ OHJEET
Sivu 18
Page 95

(120IO) SEQUOIA SPIRIT™ WOOD-GRAIN FRAME POOL FINNISH 7.5” X 10.3” PANTONE 295U 05/26/2016
Finnish
RAJOITETTU TAKUU
Intex-altaasi on valmistettu korkealaatuisista materiaaleista ammattitaitoisesti. Kaikkien
pumpun ja suodattimen osien virheettömyys on tarkastettu ennen laitteen toimittamista
tehtaalta. Tämä rajoitettu takuu koskee vain Intex-allasta.
Tämä rajoitettu takuu täydentää lakisääteisiä oikeuksiasi, eikä korvaa niitä. Mikäli takuun
ehdot ovat ristiriidassa lakisääteisten oikeuksiesi kanssa, lakisääteiset oikeudet ovat
ensisijaiset. Esimerkiksi Euroopan Unionin kuluttajansuojalait antavat takuuseen liittyviä
oikeuksia, jotka ovat lisänä tähän rajoitettuun takuuseen. Eurooppalaisista
kuluttajansuojalaeista saat lisätietoa Euroopan kuluttajakeskuksen sivuilta:
http://ec.europa.eu/consumers/ecc/contact_en/htm.
Tämän rajoitetun takuun ehdot koskevat ainoastaan alkuperäistä hankkijaa, eikä niitä voi
siirtää. Tämä rajoitettu takuu on voimassa 90 päivää alkuperäisestä ostopäivästä alkaen.
Pidä alkuperäinen myyntikuitti tämän käsikirjan kanssa, sillä todiste hankinnasta
vaaditaan, ja se on liitettävä takuuvaatimuksiin, tai rajoitettu takuu on mitätön.
Jos tämän 90 päivän jakson aikana löytyy valmistusvika, ota yhteys sopivaan Intexin
huoltoon, joka on lueteltu erillisellä “Valtuutetut huoltopisteet” -lehdellä. Jos tuote
palautetaan Intexin huollon määräämällä tavalla, huolto tarkistaa tuotteen ja
määrittää, onko vaatimus pätevä. Jos tuote kuuluu takuun piiriin, se korjataan tai
vaihdetaan samanlaiseen tai vastaavaan tuotteeseen (Intexin valinnan mukaan)
veloituksetta.
120A
Mitään muut takuut eivät ole voimassa kuin tämä takuu ja lakisääteiset oikeutesi
kotimaassasi. Kotimaasi lainsäädännön sallimissa puitteissa Intex ei ole
korvausvastuussa sinulle tai millekään kolmannelle osapuolelle suorista tai välillisistä
vahingoista, jotka aiheutuvat Intex-altaan tuotteen käytöstä tai Intexin tai sen edustajien
tai työntekijöiden toimenpiteistä (mukaan lukien tuotteen valmistaja). Tämä rajoitus ei
koske sinua, jos kotimaasi lainsäädäntö ei salli satunnaisten tai välillisten vahinkojen
rajoittamista.
Ota huomioon, että tämä rajoitettu takuu ei korvaa seuraavissa tilanteissa:
• Jos Intex-altaan tuotteen vika on aiheutunut huolimattomuudesta, epänormaalista
käytöstä tai toiminnasta, onnettomuudesta, virheellisestä käytöstä tai virheellisestä
huoltamisesta tai varastoinnista.
• Jos Intex-altaan l on altistunut vahingoille olosuhteissa, joihin Intex ei voi vaikuttaa,
mukaan lukien, mutta niihin rajoittumatta, reiät, repeämät, hankautumat tai
tavanomainen kuluminen, joka on aiheutunut tuotteen altistumisesta tulelle, tulvalle,
jäätymiselle, sateelle tai muille ulkoisille ympäristötekijöille;
• Osia ja komponentteja, joita ei ole myynyt Intex ja/tai
• Ilman lupaa tehtyjä muutoksia, korjauksia tai Intex-altaan tuotteen purkamista, johon
on ryhtynyt joku muu kuin Intex-huoltoliikkeen henkilö.
Tämä takuu ei kata allasveden menetyksen, kemikaalien tai vesivaurioiden aiheuttamia
kustannuksia. Tämä takuu ei kata loukkaantumista tai vauriota omaisuudelle tai ihmisille.
Lue käyttöohje huolellisesti ja noudata kaikkia Intex-altaan oikeaa käyttöä ja huoltoa
koskevia ohjeita. Tarkasta tuote aina ennen käyttöä. Rajoitettu takuu saattaa mitätöityä,
jos ohjeita ei noudateta.
SÄILYTÄ OHJEET
Sivu 19
 Loading...