

Page 1
97PO) DELUXE MAINTENANCE KIT ENGLISH SIZE: 4.875” X 7.25” PANTONE 295U 11/11/2011
(
English
IMPORTANT
SAFETY RULES
Read, understand, and follow all
instructions carefully before installing
and using this product.
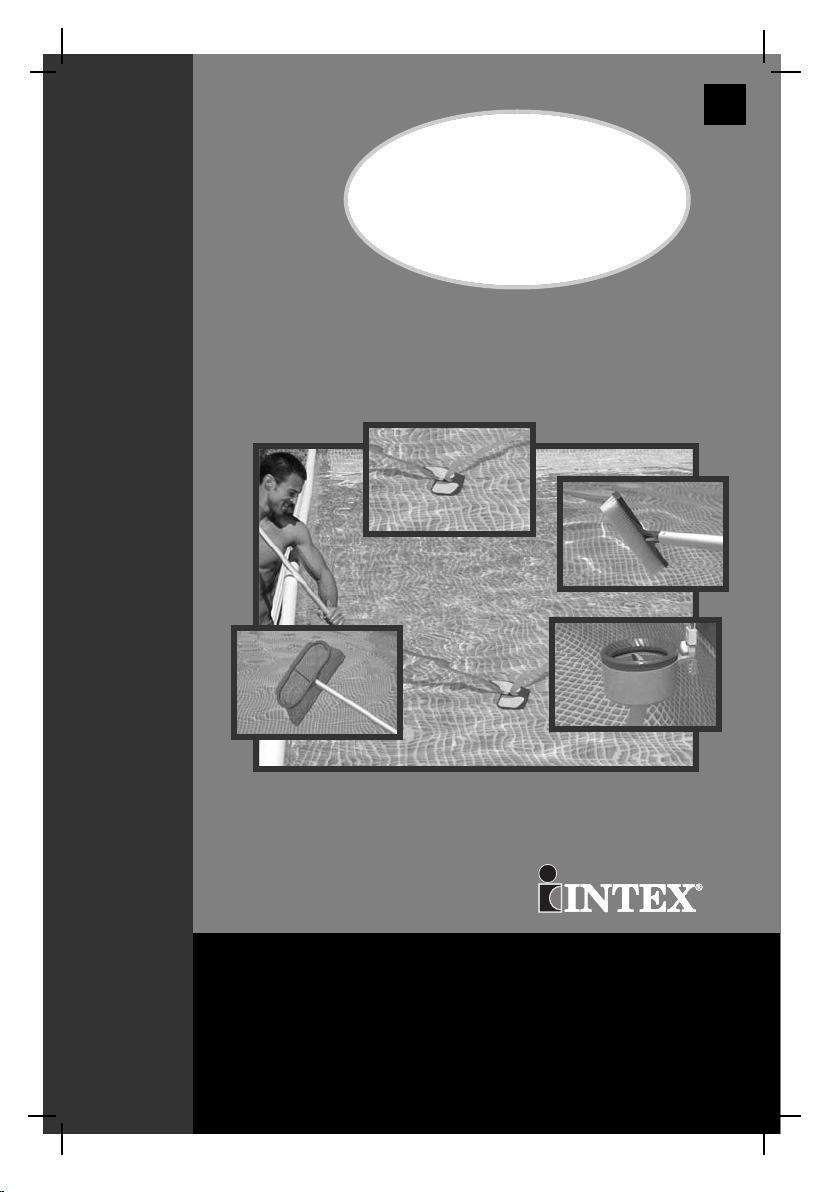
Deluxe
Maintenance Kit
97PO
For illustrative purposes only. Pool may not be provided.
Don’t forget to try these other fine Intex products: pools, pool
accessories, inflatable pools and in-home toys, airbeds and boats
available at fine retailers or visit our website.
IIMMPPOORRTTAANNTT!
!
DO NOT RETURN PRODUCT TO STORE
OOWWNNEERR’’SS MMAANNUUAALL
To purchase parts and accessories or to obtain non-technical assistance,
Visit www.intexcorp.com
For technical assistance and missing parts call us toll-free (for U.S. and Canadian Residents):
1-800-234-6 839
Monday through Friday, 8:30am to 5:00pm Pacific Time
097-*PO-R
1-1211
Page 2
(97PO) DELUXE MAINTENANCE KIT ENGLISH SIZE: 4.875” X 7.25” PANTONE 295U 11/11/2011
English
Warnings.......................................................................... 3
Parts List & Reference................................................... 4-6
Hook Assembly for Easy-Set
Inflatable Top Rings........................................................ 7
Hook Assembly for Metal Frame Pools........................ 8
Surface Skimmer Setup Instructions............................ 9-11
Pool Vacuum Setup Instructions................................... 12-15
Pool Vacuum Operating Instructions............................ 16
Hand-held Skimmer Assembly and
Operating Instructions................................................... 17
Hand-held Brush Assembly and
Operating Instructions................................................... 17
Long Term Storage......................................................... 18
®
Pools with
9
7PO
TTAABBLLEE OOFF CCOONNTTEENNTTSS
General Aquatic Safety.................................................. 18
Intex Service Center Locations..................................... 19
S AVE THESE INSTRUCTIONS
Page 2
Page 3
(97PO) DELUXE MAINTENANCE KIT ENGLISH SIZE: 4.875” X 7.25” PANTONE 295U 11/11/2011
English
IMPORTANT SAFETY RULES
Read, Understand and Follow All Instructions Carefully Before Installing and Using this Product.
WARNING
• Do not permit children to use this product. Adult use only.
• Do not operate the filter pump while the pool is occupied or in
use.
• Strong suction. Do not remove or obstruct the floating cover
opening while the filter pump is operating!
• Keep hands and hair away from the skimmer and floating cover
opening when the filter pump is operating!
• Turn off or unplug the filter pump before adjusting, cleaning,
servicing or removing the skimmer, basket or floating cover.
• Remove all maintenance items when the pool is in use.
• Keep telescoping aluminum handle away from any overhead
power lines.
FAILURE TO FOLLOW THESE WARNINGS MAY RESULT IN
PROPERTY DAMAGE, ELECTRIC SHOCK, ENTANGLEMENT OR
OTHER SERIOUS INJURY, DROWNING OR DEATH.
These product warnings, instructions and safety rules provided with
the product represent some common risks of water recreation
devices and do not cover all instances of risk and danger. Please
use common sense and good judgement when enjoying any water
activity.
9
7PO
SSAAFFEETTYY RRUULLEESS
Filter Pump Flow Rate Requirement:
800 - 4000 gallons/hour (3028 - 15140 liters/hour)
S AVE THESE INSTRUCTIONS
Page 3
Page 4
(97PO) DELUXE MAINTENANCE KIT ENGLISH SIZE: 4.875” X 7.25” PANTONE 295U 11/11/2011
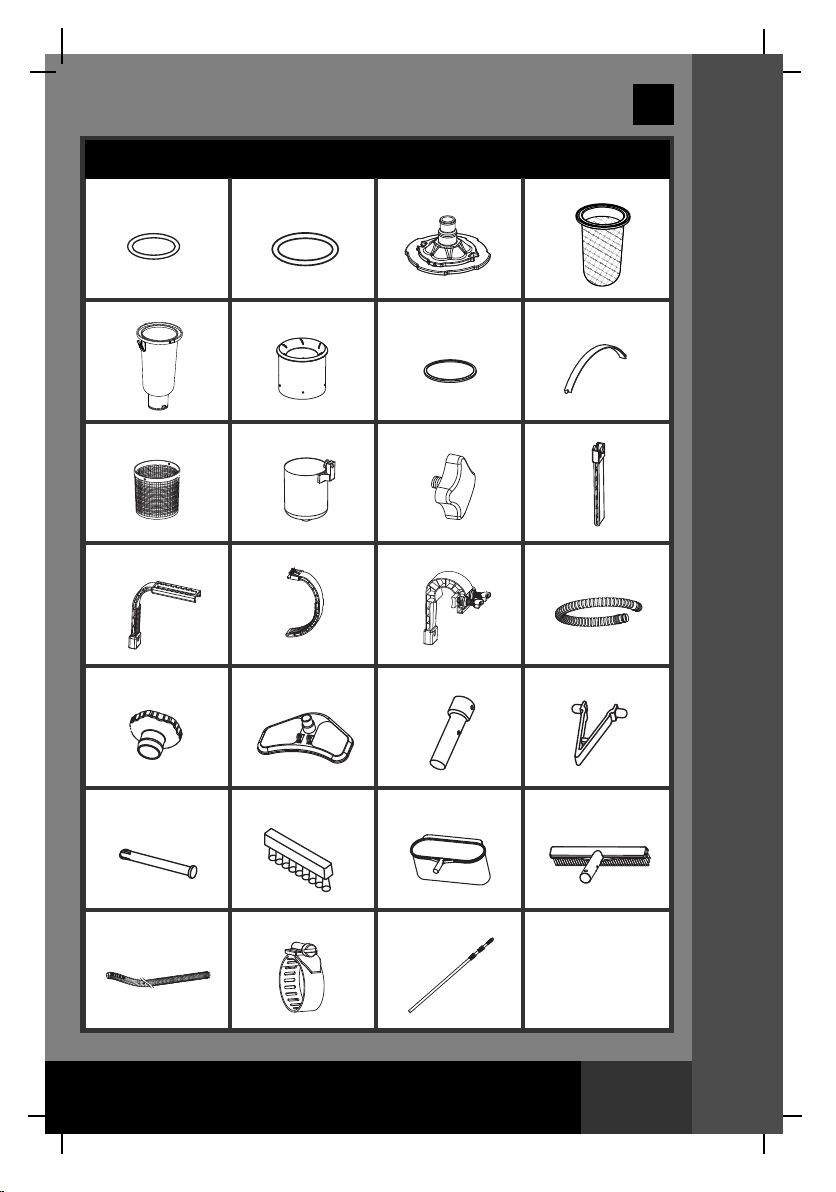
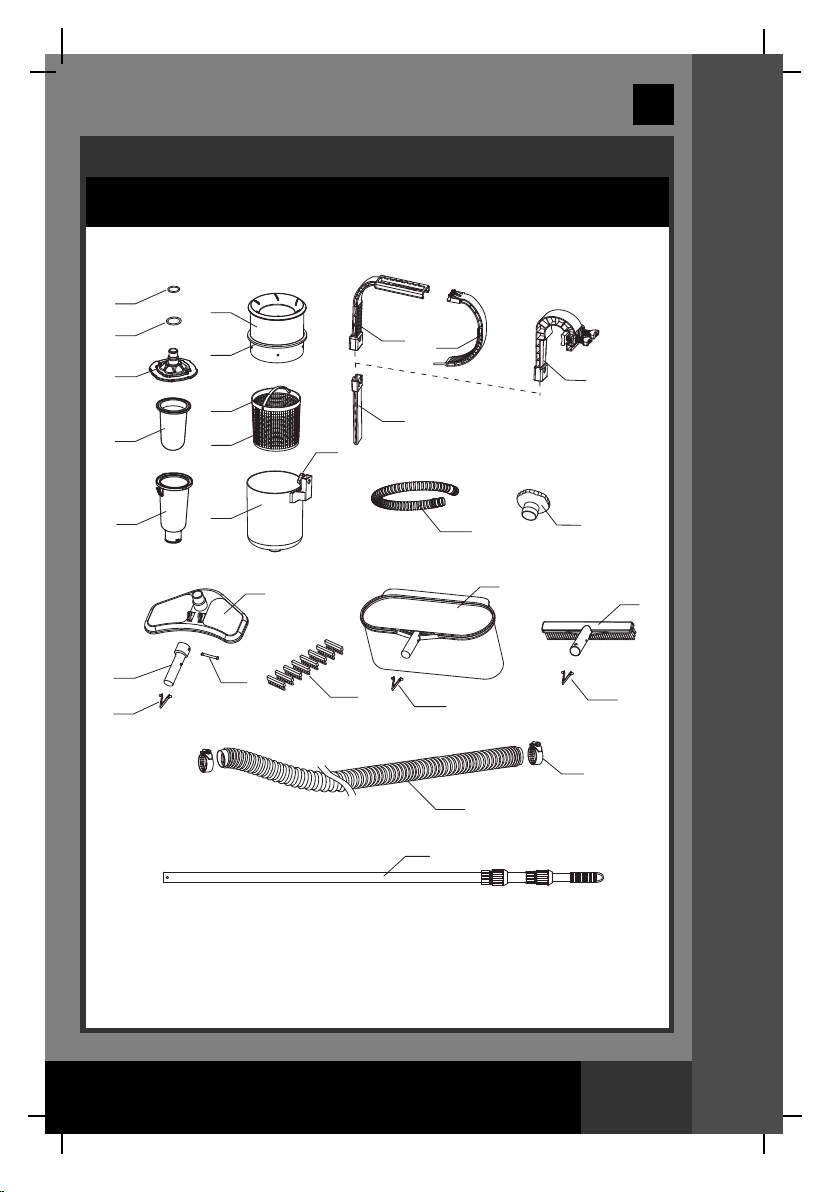
PARTS LIST
12
56
9 10
13 14
* Optional
* Optional
3
7
11
15
* Optional
4
8
12
16
English
9
7PO
PPAARRTTSS LLIISSTT
17 18
21 22
25 26
NOTE: Drawings for illustration purpose only. Actual product may vary. Not to scale.
19
23
27
S AVE THESE INSTRUCTIONS
20
24
Page 4
Page 5
(97PO) DELUXE MAINTENANCE KIT ENGLISH SIZE: 4.875” X 7.25” PANTONE 295U 11/11/2011
19
20
English
9
7PO
PARTS REFERENCE
efore assembling your product, please take a few minutes to check the
B
1
2
3
4
5
contents and become familiar with all the parts.
6
7
8
9
10
11
18
13
12
14
16
15
17
23
24
PPAARRTTSS RREEFFEERREENNCCEE
21
22
20
20
26
25
27
NOTE: Drawings for illustration purpose only. Actual product may vary. Not to scale.
S AVE THESE INSTRUCTIONS
Page 5
Page 6
(97PO) DELUXE MAINTENANCE KIT ENGLISH SIZE: 4.875” X 7.25” PANTONE 295U 11/11/2011
English
REF. NO.
ESCRIPTION
EASY-
FRAME
®
SET
POOL
13 HOOK (OPTIONAL) 1 10521
14 ARM (OPTIONAL) 1 10520
OMMON
C
POOL
1 HOSE SEAL 1 10134
OSE O-RING
2 H
3
VACUUM COVER (HOSE SEAL & HOSE O-RING INCLUDED)
4 DEBRIS BAG 1 10788
5 VACUUM BODY 1 10789
6 FLOATING COVER 1 11075
7 COVER RIM 1 11076
8 BASKET HANDLE 1 11077
9 BASKET (BASKET HANDLE INCLUDED) 1 11078
10 SKIMMER 1 11079
11 SCREW 1 10526
12 DEPTH ADJUSTER 1 10522
15 FRAME HOOK (OPTIONAL) 1 11502
16 SKIMMER HOSE 1 10531
17 HOSE ADAPTOR B 1 11238
18
VACUUM HEAD ( HANDLE ADAPTOR, SPRING, PIN & BRUSH INCLUDED)
19 HANDLE ADAPTOR 1 10792
20 SPRING 3 10794
21 PIN 1 10793
22 BRUSH 8 10795
23 SKIMMER NET (SPRING INCLUDED) 1 10796
24 BRUSH HEAD (SPRING INCLUDED) 1 11073
25 VACUUM HOSE 1 10797
26 HOSE CLAMP 2 10122
27 TELESCOPING ALUMINUM HANDLE 1 10798
D
SPARE
TY.
Q
ART NO.
P
1 1
1 11095
1 10791
0262
9
7PO
PPAARRTTSS RREEFFEERREENNCCEE
S AVE THESE INSTRUCTIONS
Page 6
Page 7
(97PO) DELUXE MAINTENANCE KIT ENGLISH SIZE: 4.875” X 7.25” PANTONE 295U 11/11/2011
English
9
7PO
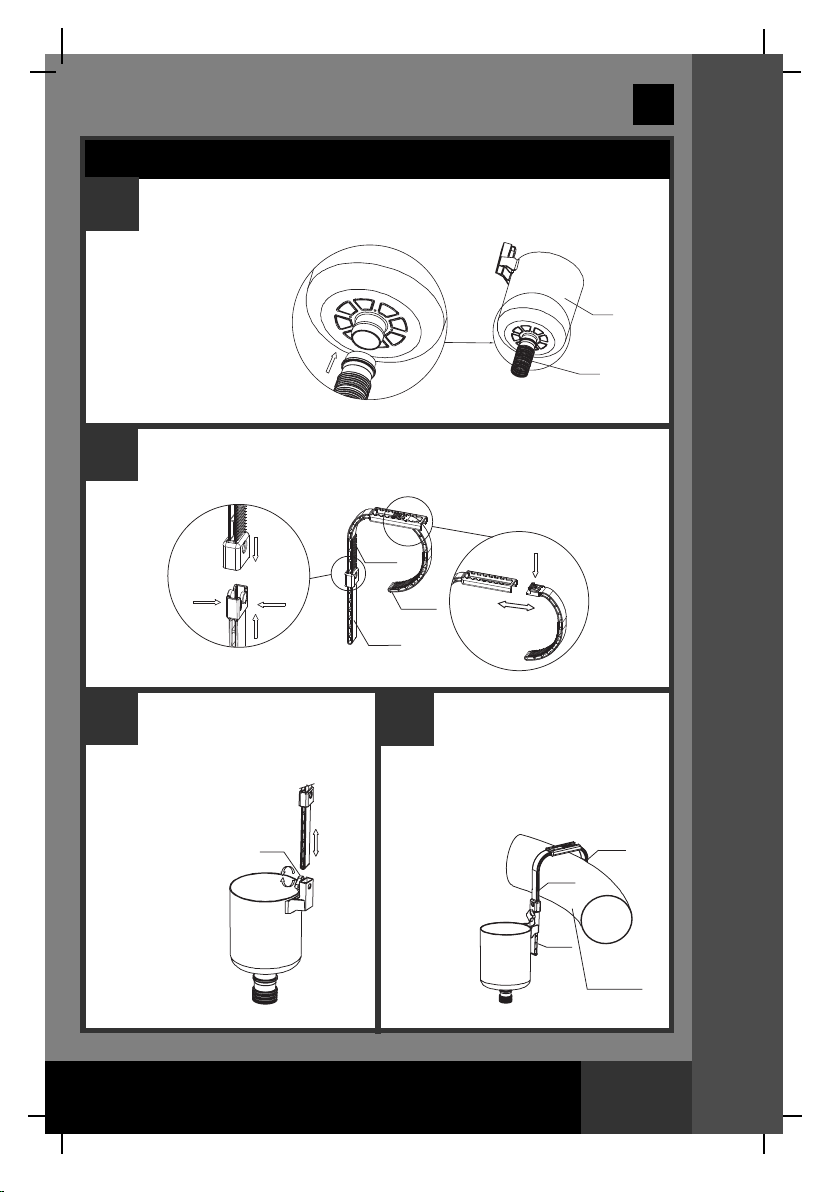
HOOK ASSEMBLY FOR EASY SET®POOLS WITH INFLATABLE TOP RINGS
NOTE: If you are using a METAL FRAME POOL, go to page 8.
1
Connect the skimmer
hose (16) to the
skimmer (10)
bottom connector.
Assemble the hook as shown. Adjust the opening of the hook (13) by
2
pressing and sliding the arm (14) at the same time.
Press
Insert
Press
Insert
13
14
12
Slide
10
16
Press
HHOOOOKK AASSSSEEMMBBLLYY
Loosen the skimmer
3
screw (11), attach the
assembled hook and hand
tighten the screw.
NOTE: Do not over
tighten or use tools
such as pliers.
11
Slide
4
EASY-SET® pool top ring near the
water inlet connector (lower hose
connection). Adjust the hook to be
snug around the
inflated ring
(see step #2).
Ensure
the hook is
securely
tightened
over the
pool.
Place the whole assembled
hook unit over the top of an
S AVE THESE INSTRUCTIONS
14
13
12
Inflatable
Top Ring
Page 7
Page 8

(97PO) DELUXE MAINTENANCE KIT ENGLISH SIZE: 4.875” X 7.25” PANTONE 295U 11/11/2011
HOOK ASSEMBLY FOR METAL FRAME POOLS
1
Connect the skimmer
hose (16) to the
skimmer (10)
bottom connector.
2
Assemble the hook as shown.
Press
Insert
Press
Insert
English
15
12
7PO
9
10
16
HHOOOOKK AASSSSEEMMBBLLYY
3
Loosen the skimmer
screw (11), attach the
assembled hook and hand
tighten the screw.
NOTE: Do not over
tighten or use tools
such as pliers.
11
Slide
Place the whole assembled
4
hook unit over the top of a
frame pool horizontal beam near the
water inlet connector (lower hose
connection). Adjust the hook by
adjusting the two dove-tail screws, to
be tight on
the top beam.
Ensure the
hook is
securely
tightened
over the
pool top
beam.
Top Beam
S AVE THESE INSTRUCTIONS
15
Page 8
Page 9
(97PO) DELUXE MAINTENANCE KIT ENGLISH SIZE: 4.875” X 7.25” PANTONE 295U 11/11/2011
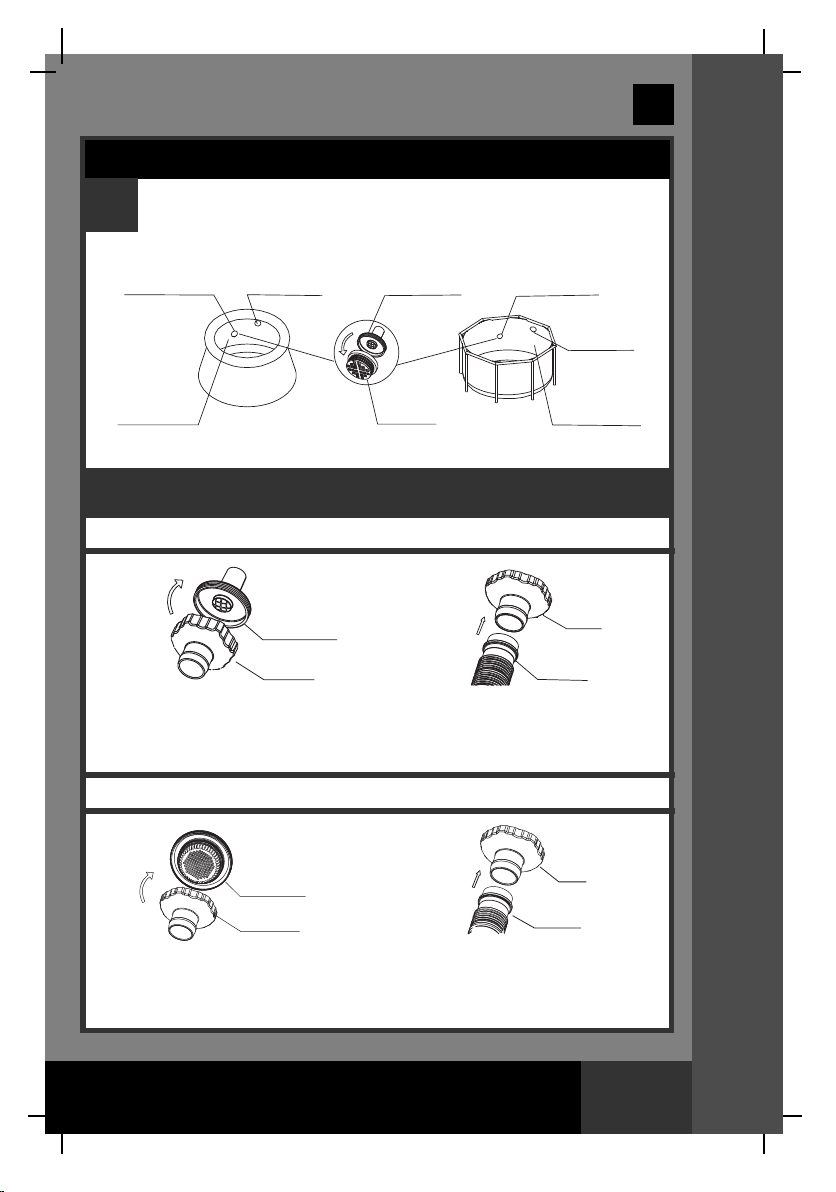
SETUP INSTRUCTIONS
For pool size 16' (488 cm) and below:
1
Unscrew the strainer grid from the threaded strainer connector
(lower) from inside of the pool.
pper Hose
Lower Hose
onnection
C
Inside of the
Pool Wall
Depending on the size of pool purchased.
2
For 16' (488 cm) and below pools with strainer
a
U
Connection
EASY-SET®POOL
Threaded
Strainer
Connector
17
hreaded Strainer
T
Connector
Strainer
Grid
METAL FRAME POOL
b
English
ower Hose
L
onnection
C
16
Upper Hose
Connection
Inside of the
Pool Wall
17
9
7PO
Screw the hose adaptor B (17) to the
threaded strainer connector, from
inside of the pool.
Connect the other end of the
skimmer hose (16) to the
hose adaptor B (17).
For 18' (549 cm) and above pools with large strainer
a
Screw the hose adaptor B (17) to the
threaded strainer connector, from
inside of the pool.
Threaded
Strainer
Connector
17
b
Connect the other end of the
skimmer hose (16) to the
hose adaptor B (17).
S AVE THESE INSTRUCTIONS
SSEETTUUPP IINNSSTTRRUUCCTTIIOONNSS
17
16
Page 9
Page 10

(97PO) DELUXE MAINTENANCE KIT ENGLISH SIZE: 4.875” X 7.25” PANTONE 295U 11/11/2011
3
4
English
SETUP INSTRUCTIONS (continued)
Place the basket (9), cover rim (7) and the floating cover (6) into
the skimmer (10). NOTE: the cover rim must be installed in place
in order to hold the Floating Cover in position.
6
7
9
10
Inside of the
Pool Wall
EASY-SET®POOL
The floating cover (6) should be floating off the skimmer (10) by 1"
to 5" (2.5cm to 12.7cm). Loosen the skimmer screw, slide the
skimmer up and down on the assembled hook to adjust the height.
Hand tight the screw when done.
Inside of
the Pool Wall
METAL FRAME POOL
9
7PO
1”- 5”
(2.5CM-12.7CM)
Inside of the
Pool Wall
EASY-SET®POOL
IMPORTANT: The skimmer must stay vertical at all times, so that the top of
the floating cover can parallel to the water surface for skimming.
S AVE THESE INSTRUCTIONS
1”- 5”
(2.5CM-12.7CM)
Inside of the
Pool Wall
METAL FRAME POOL
Page 10
SSEETTUUPP IINNSSTTRRUUCCTTIIOONNSS
Page 11
(97PO) DELUXE MAINTENANCE KIT ENGLISH SIZE: 4.875” X 7.25” PANTONE 295U 11/11/2011
English
SETUP INSTRUCTIONS (continued)
5
WARNING
• Do not operate the filter pump while the pool is occupied or in use.
• Strong suction. Do not remove or obstruct the floating cover opening
while the filter pump is operating!
• Keep hands and hair away from the skimmer and floating cover
opening when the filter pump is operating!
• Turn off or unplug the filter pump before adjusting, cleaning, servicing
or removing the skimmer, basket or floating cover.
• Set up the filter pump following the filter pump owner's manual. Turn on or
connect the filter pump to an electrical outlet.
IMPORTANT
If no water is flowing into the pump, make sure that the surface skimmer
is perpendicular to the water surface and below the water surface. Open
the air release valve located on the filter housing top cover. When water
starts to flow out, close the air release valve back.
Never run the pump dry as the motor may overheat and damage the
pump!
9
7PO
SSEETTUUPP IINNSSTTRRUUCCTTIIOONNSS
• Remove the skimmer and the hook assembly from the pool before placing
a pool cover over the pool.
• Store the product and accessories in a dry and safe place indoors.
S AVE THESE INSTRUCTIONS
Page 11
Page 12

(97PO) DELUXE MAINTENANCE KIT ENGLISH SIZE: 4.875” X 7.25” PANTONE 295U 11/11/2011
1
2
3
English
POOL VACUUM SETUP INSTRUCTIONS
Set up the surface skimmer by following the floating surface skimmer
manual. Turn off filter pump.
Remove the basket (9), cover rim (7) and the floating cover (6) from
the skimmer.
Place the debris bag (4) in the vacuum body (5). Press and hold the
clip on the vacuum body and close the vacuum cover (3) by turning
clockwise.
3
4
5
6
7
9
2
1
PRESS
4
3
5
9
7PO
PPOOOOLL VVAACCUUUUMM SSEETTUUPP
Place the vacuum assembly into the skimmer, turn clockwise to
4
connect.
3
5
10
2
3
16
1
10
16
S AVE THESE INSTRUCTIONS
Page 12
Page 13

(97PO) DELUXE MAINTENANCE KIT ENGLISH SIZE: 4.875” X 7.25” PANTONE 295U 11/11/2011
POOL VACUUM SETUP INSTRUCTIONS
The handle adaptor (19) on the
5
vacuum head has a plastic spring
that connects to the end of the
handle. Align the plastic spring
located inside the vacuum head
with the holes drilled in the
handle. Gently squeeze together
the plastic spring tips so that
the handle slips onto the vacuum
head and the spring "pops" into
the pre-drilled holes.
With hose clamp, secure one
6
end of the vacuum hose (25) to
the hose connection on the
vacuum head. Make sure hose
clamp is tight.
19
English
1
1
2
27
25
26
18
20
18
9
7PO
Turn telescope A and clamp B counterclockwise and slide each
7
section to extend or shorten the length of the telescoping handle. Turn
clockwise to lock each section in place.
S AVE THESE INSTRUCTIONS
PPOOOOLL VVAACCUUUUMM SSEETTUUPP
Page 13
Page 14

(97PO) DELUXE MAINTENANCE KIT ENGLISH SIZE: 4.875” X 7.25” PANTONE 295U 11/11/2011
POOL VACUUM SETUP INSTRUCTIONS
Place pool vacuum into the water. Fill up the vacuum hose with water
8
by submerging the hose into the water to remove all of the entrapped
air from the hose. TIPS: Starting from the end of vacuum head,
submerge the vacuum hose vertically into the water, section by
section.
With hose clamp, fasten one end of the vacuum hose (25) to the
9
connection of vacuum head. Make sure hose clamp is tight.
25
25
English
9
7PO
26
3
10
16
S AVE THESE INSTRUCTIONS
PPOOOOLL VVAACCUUUUMM SSEETTUUPP
Page 14
Page 15
(97PO) DELUXE MAINTENANCE KIT ENGLISH SIZE: 4.875” X 7.25” PANTONE 295U 11/11/2011
English
POOL VACUUM SETUP INSTRUCTIONS
10
WARNING
• Do not permit children to use this product. Adult use only.
• Remove all maintenance items when the pool is in use.
IMPORTANT
• Release all the air from the hoses and filter pump before use.
• Keep the brush head under the water at all times during use.
• Remove the brush head assembly from the skimmer when running the
filter pump only and when the pool is not in use.
• Check and empty the debris bag regularly during and after each use.
The pool vacuum is now ready to use.
9
7PO
S AVE THESE INSTRUCTIONS
PPOOOOLL VVAACCUUUUMM SSEETTUUPP
Page 15
Page 16
(97PO) DELUXE MAINTENANCE KIT ENGLISH SIZE: 4.875” X 7.25” PANTONE 295U 11/11/2011
English
POOL VACUUM OPERATING INSTRUCTIONS
1. The filter pump is an airtight system. To eliminate air trapped in the hose
or in the pump, turn the top air release valve 1-2 turns in a
counter-clockwise motion to open the valve.
2. When water starts flowing out of the air release valve hole, screw in the
air release valve back into the filter housing cover. Do not over tighten
the valve.
3. Connect the filter pump to the power outlet and turn ON the pump.
4. In soft gentle strokes "sweep" the entire bottom surface of the pool liner
until it’s clear of debris.
IMPORTANT
If you experience low suction on the vacuum, check that all of
the air has been removed from the hose. If you still have a low
suction problem, please review the Troubleshooting Guide for
your filter pump under "Filter pump does not pump water or flow
is very slow". Also, check that the debris bag is clean.
5. Make sure the filter pump is turned off, and disconnect the power cord
from the electrical outlet. Remove the pool vacuum from the pool.
6. Using the Set-Up instructions in reverse, disassemble the vacuum
cleaner. Clean the debris bag if necessary.
7. Store the pool vacuum in an area where it will not be a safety hazard.
9
7PO
S AVE THESE INSTRUCTIONS
PPOOOOLL VVAACCUUUUMM OOPPEERRAATTIINNGG IINNSSTTRRUUCCTTIIOONNSS
Page 16
Page 17
(97PO) DELUXE MAINTENANCE KIT ENGLISH SIZE: 4.875” X 7.25” PANTONE 295U 11/11/2011
English
9
7PO
HAND-HELD SKIMMER ASSEMBLY & OPERATING INSTRUCTIONS
23
20
1. The hand-held skimmer uses the same handle as the pool vacuum.
2. The skimmer net (23) has a plastic spring (20) that connects to the end of handle.
Align the plastic spring located inside the net with the holes drilled in the handle.
Gently squeeze together the plastic spring tips so that the handle slips onto the net
and the spring "POPS" into the pre-drilled holes.
27
WARNING
• Do not permit children to use this product. Adult use only.
• Remove all maintenance items when the pool is in use.
3. Gently sweep the surface of the pool with the skimmer net removing
floating leaves, etc.
HAND-HELD BRUSH ASSEMBLY & OPERATING INSTRUCTIONS
24
27
20
1. The hand-held brush uses the same handle as the pool vacuum.
2. The brush head (24) has a plastic spring (20) that connects to the end of handle.
Align the plastic spring located inside the brush head with the holes drilled in the
handle. Gently squeeze together the plastic spring tips so that the handle slips onto
the brush head and the spring "POPS" into the pre-drilled holes.
WARNING
• Do not permit children to use this product. Adult use only.
• Remove all maintenance items when the pool is in use.
3. Gently sweep the entire side and bottom surfaces of the pool liner until it’s clear of
debris.
S AVE THESE INSTRUCTIONS
Page 17
AASSSSEEMMBBLLYY AANNDD OOPPEERRAATTIINNGG IINNSSTTRRUUCCTTIIOONNSS
Page 18
(97PO) DELUXE MAINTENANCE KIT ENGLISH SIZE: 4.875” X 7.25” PANTONE 295U 11/11/2011
English
LONG TERM STORAGE
1. Make sure the filter pump is turned off and disconnect the power cord
from the electrical outlet.
2. Using the Set-Up instructions in reverse, disassemble the floating surface
skimmer, pool vacuum, hand-held skimmer or hand-held brush.
3. Clean and air dry all the accessories and parts thoroughly.
4. The original packaging can be used for storage. Store in a dry, cool
storage location.
GENERAL AQUATIC SAFETY
Water recreation is both fun and therapeutic. However, it involves
inherent risks of injury and death. To reduce your risk of injury, read and follow all
product, package and package insert warnings and instructions. Remember,
however, that product warnings, instructions and safety guidelines cover some
common risks of water recreation, but do not cover all risks and dangers.
For additional safeguards, also familiarize yourself with the following general
guidelines as well as guidelines provided by nationally recognized Safety
Organizations:
• Demand constant supervision. A competent adult should be appointed as a “lifeguard”
or water watcher, especially when children are in and around the pool.
• Learn to swim.
• Take the time to learn CPR and first aid.
• Instruct anyone who is supervising pool users about potential pool hazards and about
the use of protective devices such as locked doors, barriers, etc.
• Instruct all pool users, including children what to do in case of an
emergency.
• Always use common sense and good judgement when enjoying any water activity.
• Supervise, supervise, supervise.
For additional information on safety, please visit
• The Association of Pool and Spa Professionals: The Sensible Way to
Enjoy Your Aboveground/Onground Swimming Pool www.nspi.org
• American Academy of Pediatrics: Pool Safety for Children
www.aap.org
• Red Cross www.redcross.org
• Safe Kids www.safekids.org
• Home Safety Council: Safety Guide www.homesafetycouncil.org
• Toy Industry Association: Toy Safety www.toy-tia.org
SAFETY IN YOUR POOL
Safe swimming depends on constant attention to the rules. The "NO DIVING" sign
within this manual can be posted near your pool to help keep everyone alert to the
danger. You may also wish to copy and laminate the sign for protection from the
elements.
9
7PO
SSTTOORRAAGGEE && SSAAFFEETTYY GGUUIIDDEELLIINNEESS
S AVE THESE INSTRUCTIONS
Page 18
Page 19
(97PO) DELUXE MAINTENANCE KIT ENGLISH SIZE: 4.875” X 7.25” PANTONE 295U 11/11/2011
English
COUNTRIES/REGIONS SERVICE CENTER LOCATIONS
UNITED STATES INTEX RECREATION CORP.
•
• CANADA 1665 Hughes Way
• MEXICO KAY INTERNACIONAL, S.A. DE C.V.
• PANAMA SUPRO MUNDIAL S.A./
• PARAGUAY PRODUCTOS SUPERIORES S.A.
• ECUADOR Boulevard Andrews, Albrook,
• HONDURAS Panama, Rep. of Panama
• EL SALVADOR Tel: 507-300-3800
• NICARAGUA Fax: 507-300-3813
• COSTA RICA CENTURY USA, LLC
• DOMINICAN REPUBLIC 4731 W. Atlantic Ave., Suite B-3
• GUATEMALA Delray Beach, FL 33445, USA
• COLOMBIA Tel: 561-495-0648
• VENEZUELA Fax: 561-495-4782
• MIDDLE EAST REGION FIRST GROUP INTERNATIONAL
• ASIA INTEX DEVELOPMENT CO. LTD.
For answers to most frequently asked questions, please visit www.intexcorp.com.
Non U.S. Residents, please visit www.intexdevelopment.com.
Long Beach, CA 90801
el: 1-800-234-6839
T
ax: 310-549-2900
F
Website: www.intexcorp.com (U.S./Canada only)
Consumer Service Hours: 8:30 am to 5:00 pm
Pacific Time, Mon. thru F
SAN JERONIMO # 550- INT.501 Y 502. COL.
JARDINES DEL PEDREGAL. C.P. 01900
MÉXICO D.F.
Tel: 01-800-347-4020 (Collect Call)
Tel: 55-9172-8035
Fax: 55-9172-8047
E-mail: servicenter@kayinternacional.com
Website: www.intexmexico.com.mx
E-mail: suproadmin@supropanama.com
E-mail: sales@centuryusa.com
Al Moosa Group Building, 1st Floor,
Office 102 & 103, UMM Hurair Road,
Karama, Dubai, UAE
TEL: 00971-4-800INTEX(46839) / +971-4-3373322
FAX: 00971-4-3375115
E-mail: intex@firstgroupinternational.com.
Website: www.firstgroupinternational.com
9th Floor,
Dah Sing Financial Centre
108 Gloucester Road,
Wanchai, Hong Kong
Tel: 852-28270000
Fax: 852-23118200
E-mail: xmservicesupport@intexcorp.com.cn
Website: www.intexdevelopment.com
RI. only.
9
7PO
S AVE THESE INSTRUCTIONS
Page 19
Page 20

®
97PO) DELUXE MAINTENANCE KIT ENGLISH SIZE: 4.875” X 7.25” PANTONE 295U 11/11/2011
(
English
For Residents of the U.S. & Canada:
INTEX RECREATION CORP.
Attn: Consumer Service
1665 Hughes Way
Long Beach, CA 90801
Phone: 1-800-234-6839
Fax: (310) 549-2900
Consumer Service Hours:
8:30 am to 5:00 pm Pacific time
Monday thru Friday only
Website: www.intexcorp.com
For Residents outside of the U.S. and Canada:
Please refer to the Service Center Locations
©2011 Intex Marketing Ltd. - Intex Development Co.
Ltd. - Intex Trading Ltd. - Intex Recreation Corp.
All rights reserved/Tous droits réservés/Todos los
derechos reservados/Alle Rechte vorbehalten.
Printed in China/Imprimé en Chine/Impreso en
China/Gedruckt in China.
®™ Trademarks used in some countries of the world
under license from/®™ Marques utilisées dans certains
pays sous licence de/Marcas registradas utilizadas en
algunos países del mundo bajo licencia
de/Warenzeichen verwendet in einigen Ländern der
Welt in Lizenz von/Intex Marketing Ltd. to/à/a/an Intex
Trading Ltd., Intex Development Co. Ltd., G.P.O Box
28829, Hong Kong & Intex Recreation Corp., P.O.
Box 1440, Long Beach, CA 90801 • Distributed in the
European Union by/Distribué dans l’Union Européenne
par/Distribuido en la unión Europea por/Vertrieb in der
Europäischen Union durch/Intex Trading B.V., P.O. Box
I N T E X
nr. 1075 – 4700 BB Roosendaal – The Netherlands
 Loading...