

Page 1

1
AQUA MARVEL
GSM/GPRS Mobile Phone
User Guide
Page 2

2
Dear INTEX customer,
Congratulations on becoming a proud owner of INTEX product.
You have now joined the fraternity of millions of satisfied INTEX
customers spread across the globe.
Intex Technologies is one of the fastest growing IT Hardware,
Mobile Phones and Electronics Company. A well established brand,
INTEX has kept pace with the technology needs of millions of IT
hardware & electronics consumers and has been serving them with
more than 300 user friendly, high quality, state-of-the art yet
simple products/solutions. The products have been in the market
since 1996 and conform to global standards.
Page 3

3
Brand INTEX covers a wide range of computer peripherals and
accessories such as Computer Multimedia speakers, Cabinets,
Keyboards, Mouse, UPS, Add-on cards, Webcams, Headphones,
Laptop bags, etc. As a part of its diversification strategy, Intex
also offers an interesting range of PCs, TFT-LCD Monitors,
Consumer Electronics (DVD Players), Home UPS & Mobile
Phones.
Every INTEX product goes through a rigorous process of sample
evaluation and approval before commercial launch. Customers look
upon the brand as a value-for-money & feature-rich offering,
supported by efficient after sales service.
We look forward to your patronage.
It would be our pleasure to receive feedback and suggestions you
may have for improvements in the product(s) you are using.
Intex Technologies (I) Ltd
info@intextechnologies.com
Page 4

4
www.intextechnologies.com
Helpline No. 1800-103- 8822 (India)
Intex Way Gulf LLC
service@intexuae.com
www.intexuae.com
Toll Free No. 800-468- 39823 (Dubai)
Tel: 00971 04 3931991
SAFETY TIPS
Use of wireless hands-free system (headphone, headset)
with a low power Bluetooth emitter.
Make sure the cell phone has a low SAR.
Keep your calls short or send a text message (SMS)
(instead. This advice applies especially to children,
adolescents and pregnant women.
Page 5

5
Use cell phone when the signal quality is good.
People having active medical implants should preferably keep
the cell phone at least 15 cm away from the implant.
Contents
I. WARNING ................................................................ 8
Page 6

6
1 SAFETY INFORMATION ................................................... 9
2 CAUTIONS ON MOBILE PHONE USE .................................... 10
3 PRECAUTIONS FOR USE OF BATTERY...................................11
4 CAUTIONS FOR CHILDREN .............................................. 12
II. KEYS AND PARTS ...................................................... 13
ICONS ....................................................................... 14
III. START TO USE ........................................................ 16
1 BATTERY ................................................................. 16
2 CONNECTING TO NETWORK ........................................... 20
IV. BASIC FUNCTIONS .................................................... 27
1 MAKE CALLS............................................................ 27
2 EMERGENCY CALLS ..................................................... 31
3 ANSWER CALLS ......................................................... 31
4 CALL HISTORY ......................................................... 32
Page 7

7
5 CONNECTION OPTION .................................................. 32
V. FUNCTION MENU INSTRUCTION ...................................... 35
1. BROWSER .............................................................. 35
2. CALCULATOR .......................................................... 35
3. CALENDAR ............................................................ 36
4. CALL LOG ............................................................. 36
5. CAMERA ............................................................... 37
6. CLOCK ................................................................. 37
7. CONTACTS ............................................................. 38
8. DOWNLOADS .......................................................... 38
9. EMAIL ................................................................. 39
10. FILE MANAGER ...................................................... 39
11. FM RADIO ............................................................ 39
12. GALLERY ............................................................. 40
Page 8

8
13. MESSAGES ............................................................ 41
14. MUSIC ................................................................ 42
15. DIAL .................................................................. 43
16. SEARCH .............................................................. 43
17. SETTINGS ............................................................. 43
18. SIM TOOLKIT ........................................................ 49
19. SOUND RECORDER .................................................. 49
20. INTEX ZONE ........................................................ 50
VI. TECHNICAL INFORMATION ............................................ 51
I. Warning
Please read the concise rules. The breach of the rules may result
in danger or violation of law.
Page 9

9
1 Safety information
1.1 Traffic safety first
Please use the mobile phone carefully when you drive a car. Park
your car at roadside and then use the mobile phone if the driving
condition is bad.
1.2 Turn off in hospital
Please abide by relevant provisions or regulations. Please turn off
your mobile phone near medical equipment.
1.3 Turn off in airplane
Wireless equipment has disturbance to the airplane, so the use
of the mobile phone in airplane is dangerous and illegal.
Page 10

10
1.4 Turn off when refueling
Please don’t use the mobile phone in gas station or near fuels or
chemicals.
1.5 Turn off near blasting sites
Don’t use the mobile phone in blasting sites. Please observe
relevant restrictions and carry out rules or regulations.
2 Cautions on mobile phone use
2.1 Interference
All phones may be interfered, which affect phone calls.
2.2Reasonable use
Use only in the normal position. Do not touch the antenna area
unnecessarily.
Page 11

11
2.3 Qualified maintenance service
Only qualified personnel may install or repair this product.
2.4 Water-resistance
Your device is not water resistant. Keep it dry.
2.5 Emergency calls
Ensure the phone is switched on and in service. Enter the
emergency number and press the Dial icon.
3 Precautions for use of battery
3.1 Do not dispose of batteries near or in a fire to avoid dangers.
3.2 Do not dispose of batteries in the garbage. Dispose of
batteries to assigned battery recycling center.
Page 12

12
4 Cautions for children
Keep your device out the reach of children in case of accidental
injury caused by incorrect use of the device as toys.
Page 13
13
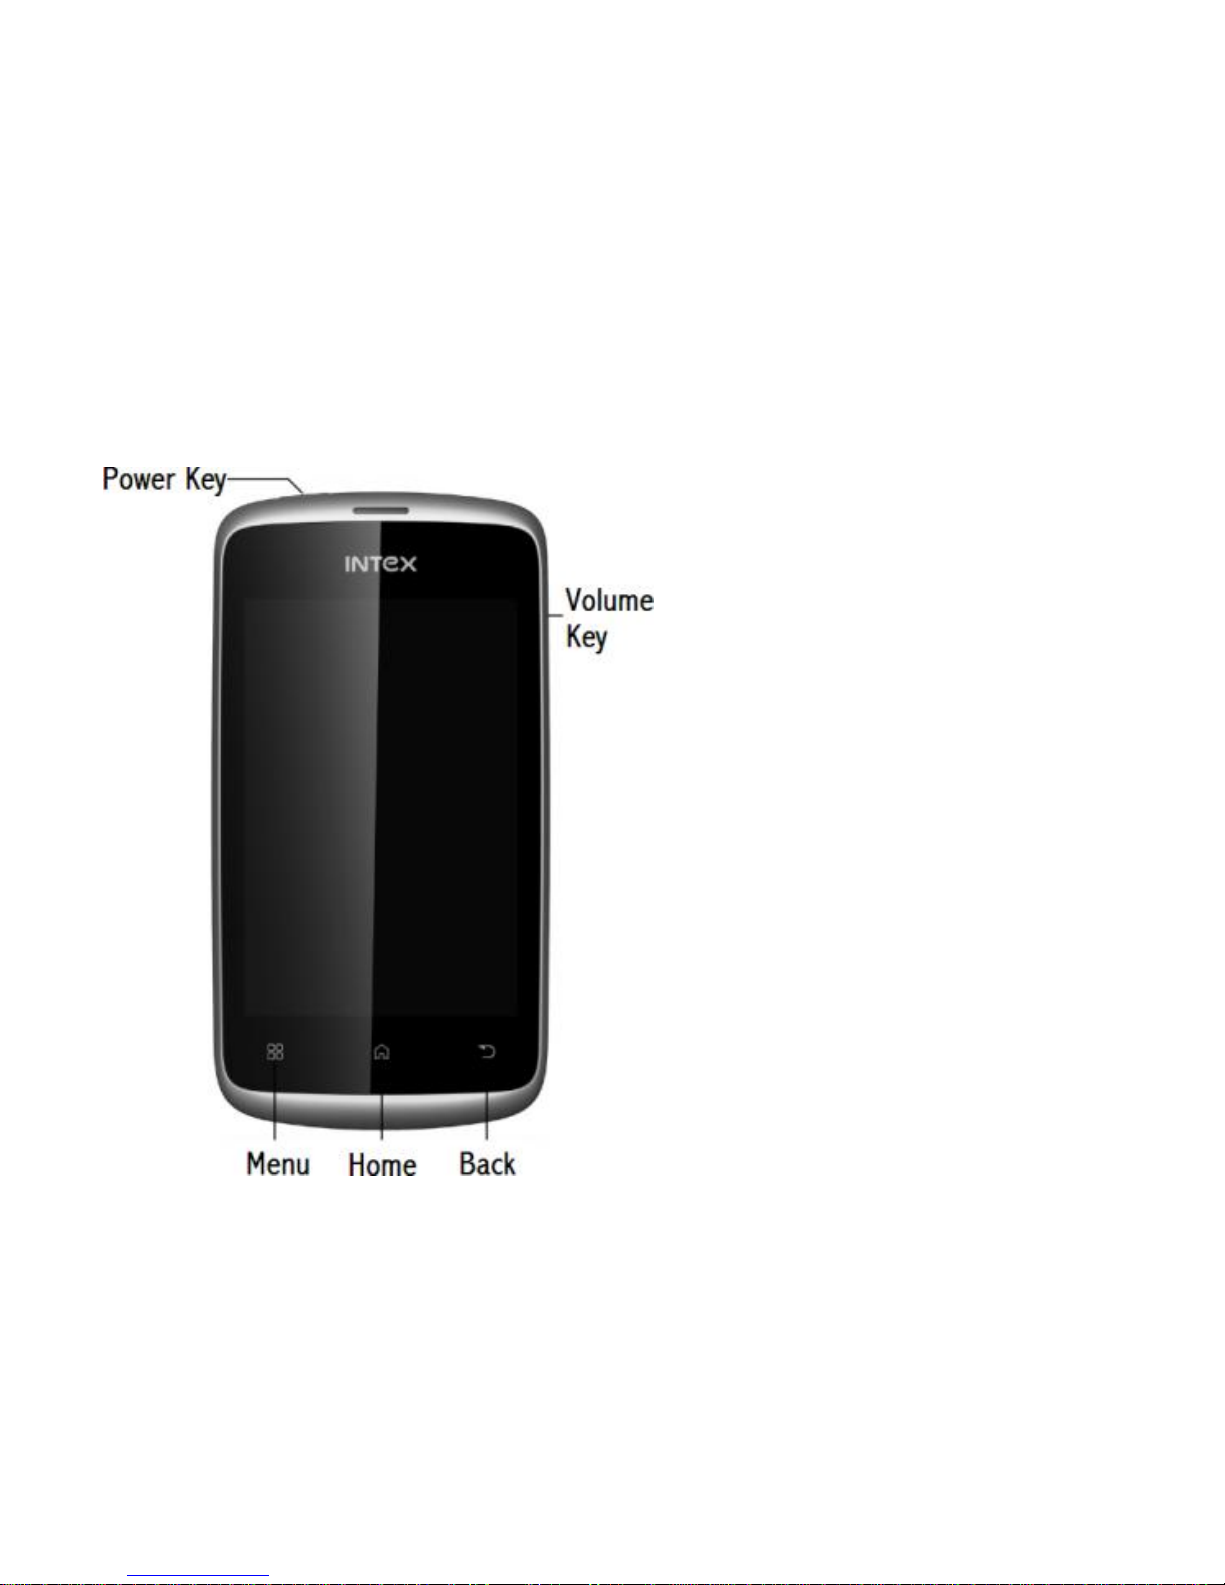
II. Keys and parts
Home key
Press Home key at a non-
standby screen to go back
to standby screen
Volume key
Press Volume key to change
the volume.
Menu Key
Press Menu key to
add/manage applications,
wall papers, searches,
notices and menu settings.
Back Key
Page 14
14
Press Back key to go back to previous menu.
Power Key
Short press on the Power key shall lock the screen and a long press
on the Power key shall switch on/off the device.
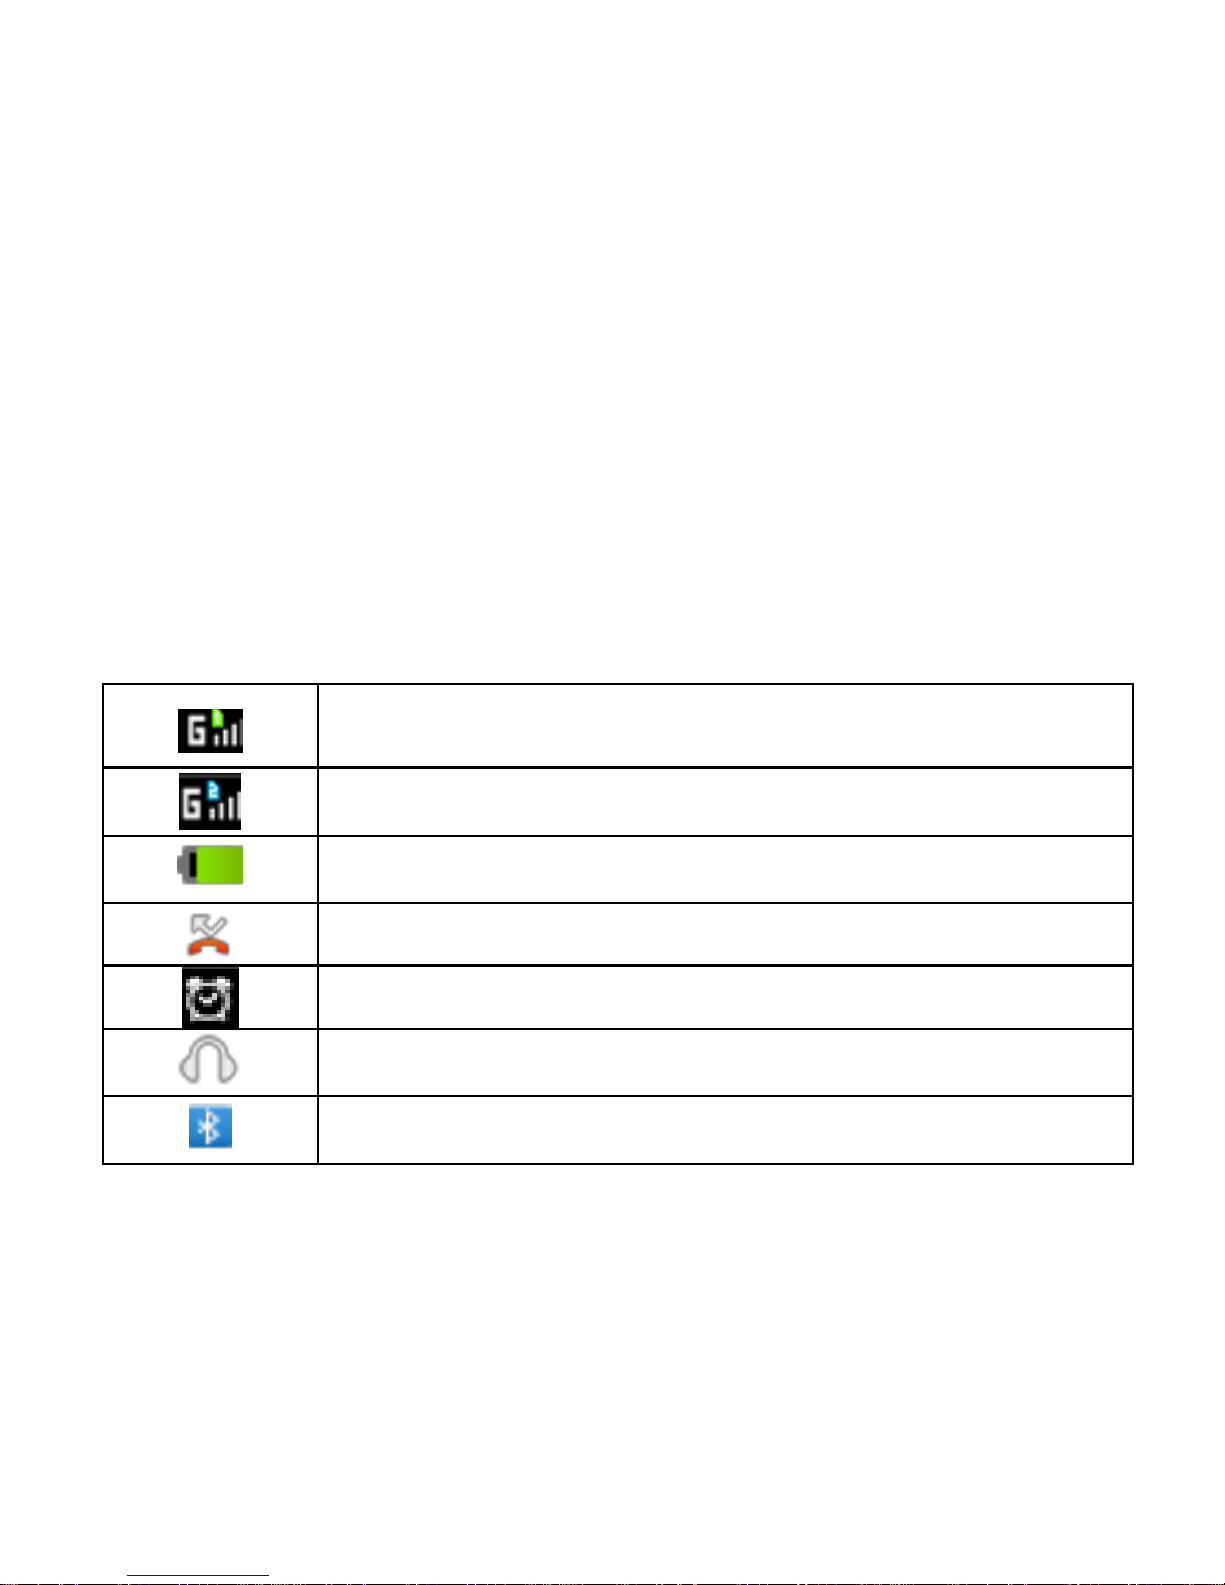
Icons
Show the SIM1’s current network signal level.
Show the SIM2’s current network signal level.
Show the power level of Battery.
You have missed calls in SIM.
Alarm is set on.
The headset is plugged in.
Bluetooth is powered on.
Page 15
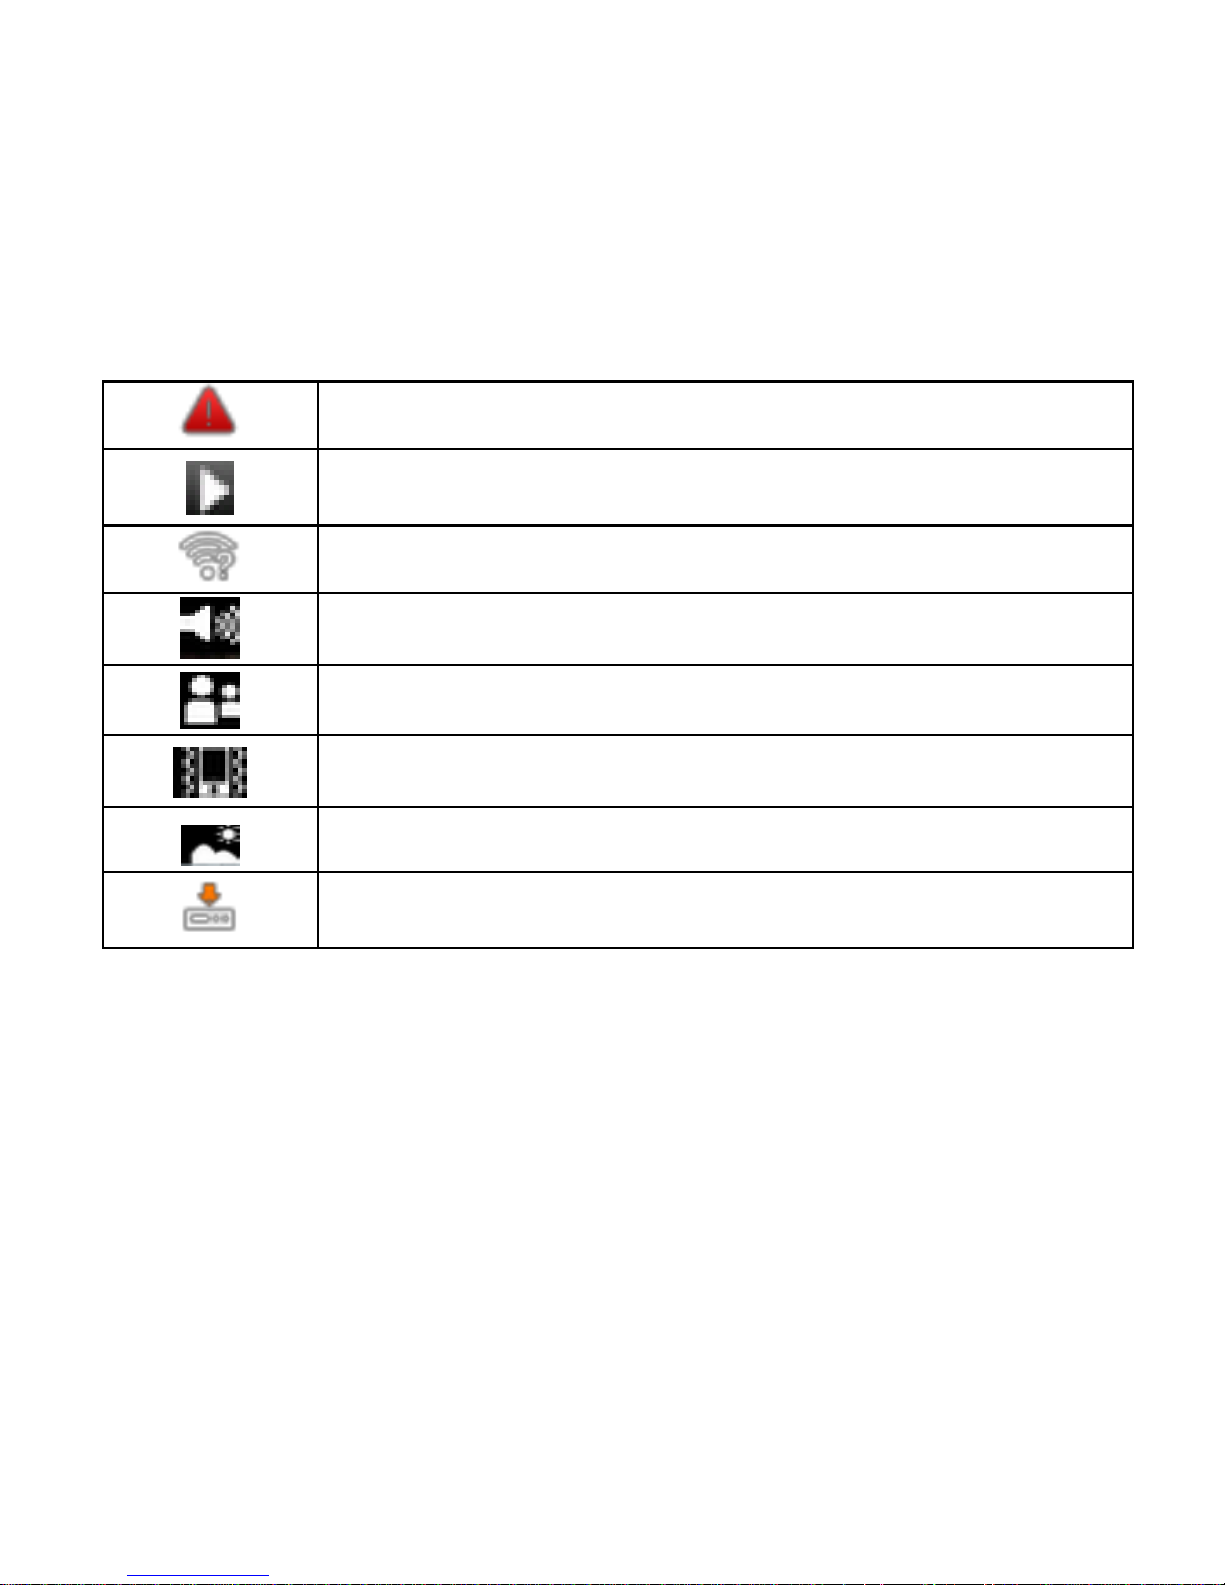
15
Warning: No SIM card.
The Audio player is in use.
An open network is available.
General Mode is actived.
Meeting Mode is actived
Silent Mode is actived.
Outdoor Mode is actived.
Applications are being downloaded or installed.
The "press" related to the screen in this manual means using your
finger to touch the screen.
Page 16

16
III. Start to use
1 Battery
The battery which is initially 50% charged can be used immediately.
Please fully charge/discharge the battery for the first three times
to get maximum capacity.
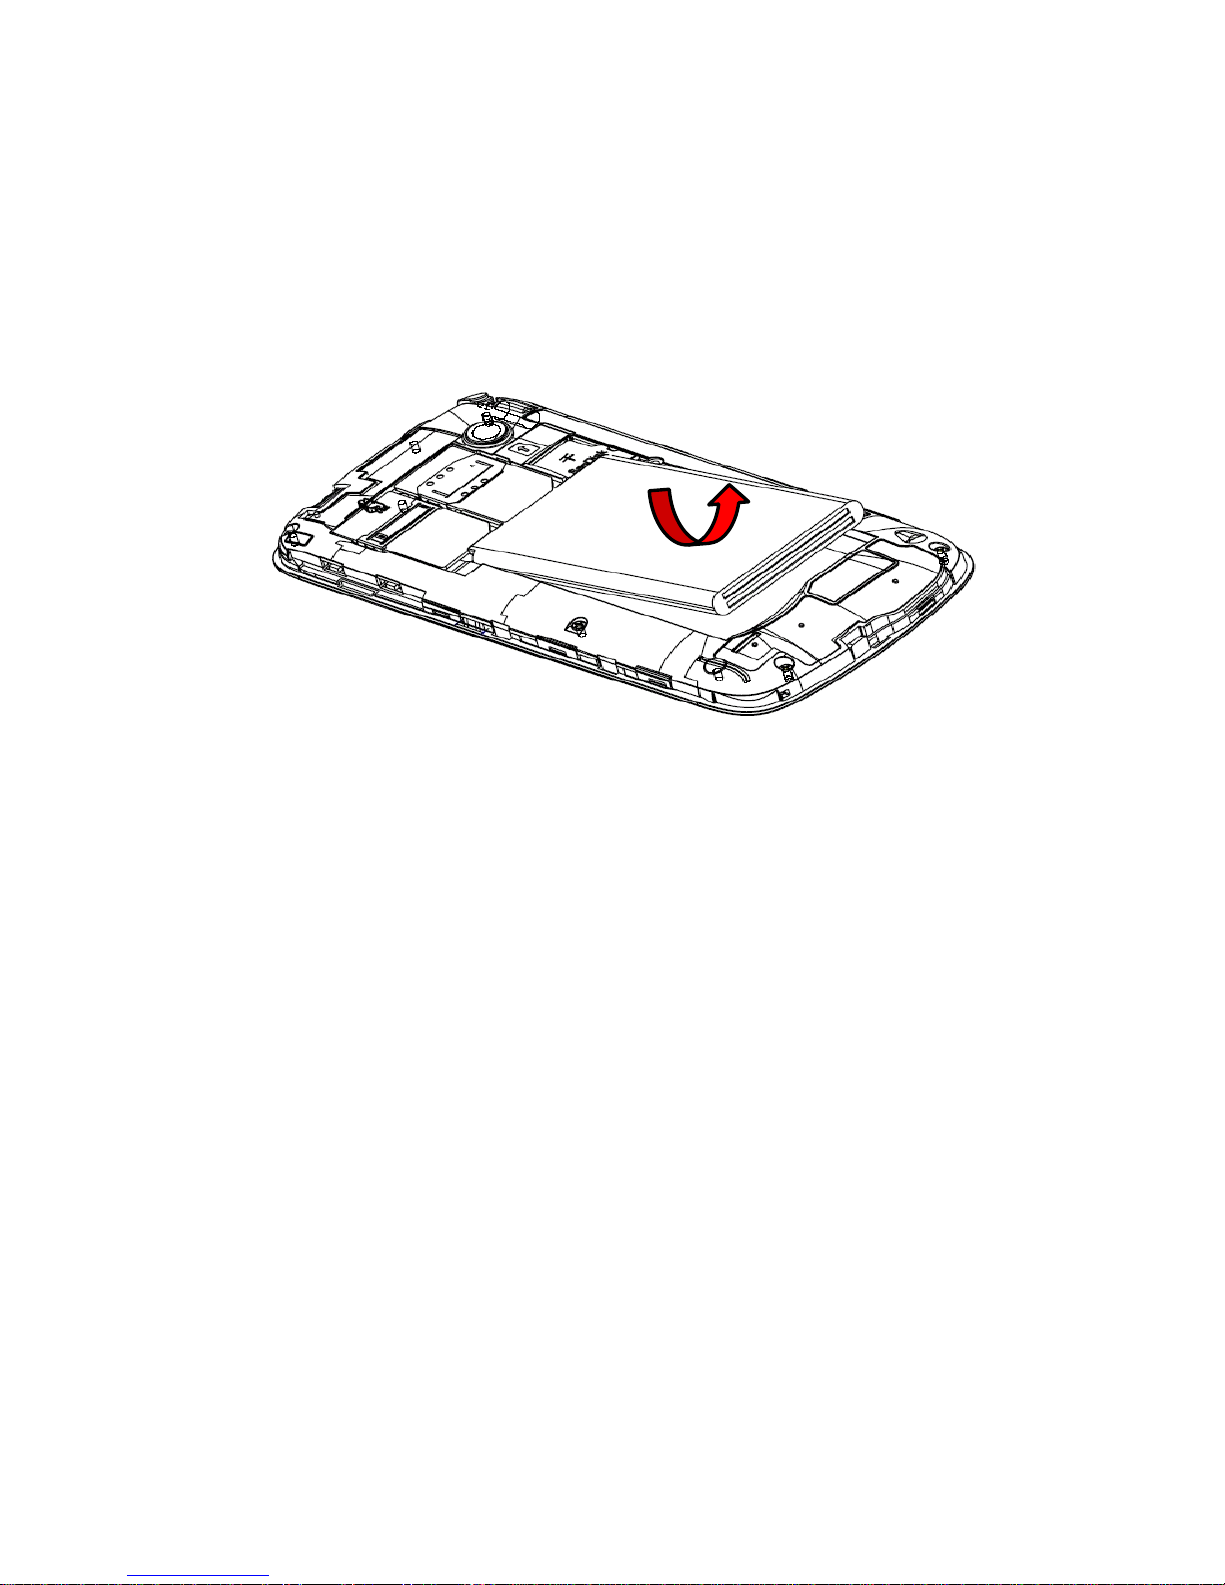
1.1 Remove/insert the battery
Follow the steps below to remove the battery:
A. Open the back cover by the gap at its upper right side.
Page 17

17
B. Lift up the battery bottom at its upper side in the direction
of the arrow.
C. Close the back cover.
Follow the steps below to install the battery:
A. Align the metal contacts of the battery with the metal
contacts in the battery compartment as per the direction of the
arrow, press the battery bottom into the compartment.
B. Put on the battery cover in a parallel way until it is completely
matched.
Page 18
18
1.2 Charge the battery
During charging, the battery indicator on the phone is a thunder
icon. If the device is switched off during charging, there will still
be a charging indication on the screen that shows the phone is
being charged. If the device is overused when the battery is low,
the charging icon might take some time to appear.
When the battery indicator on the screen says 'Battery is full',
thunder icon will disappear, which means the completion of
Page 19

19
charging. If the phone is switched off during charging, the screen
will display ' Battery is full ' . It generally takes 4 hours to charge
the battery. During charging, the battery, the device and the
charger will get hot. This is normal.
Unplug the charger from the AC electrical outlet and
disconnect the wiring between the phone and the charger
after charging. .
Cautions: Charge the phone in a well ventilated place in which the
temperature is between -10℃ to +55℃. Use the charger provided
by the manufacturer only. The use of unconfirmed charger may
lead to dangers and violate the manufacturer's warranty clause.
If the temperature is too high or too low during charging, the
device will automatically send a warning and stop charging to avoid
Page 20

20
damage to the battery or any danger.
2 Connecting to network
2.1 SIM card
Insert a valid SIM card (subscriber identity module) before using
the device.
All information related to the reach of the network are recorded
in the chip of SIM card, including the name, phone number and
messages stored in the SIM card contacts. In case of losing or
damaging SIM card information, users should avoid touching the
metal touching side and keep SIM card away from electrical and
magnetic field.
Page 21

21
2.2 Insert and remove the SIM card
Switch off the device, and remove the battery and other
external power supply.
Insert the SIM card into the card slot.
Please switch off the phone and remove the battery before
removing the SIM card.
Warning: Damages could happen to your SIM card if the device
is not switched off when taking out of the SIM card.
Page 22

22
Attention: SIM1 (left side in the picture) supports GSM network
while SIM2 (right side in the picture) supports GSM network.
This device is a dual SIM- card dual standby mode mobile phone
(handset).
2.3 Insert/remove the memory card.
Switch off the handset.
Insert the memory card into the slot and lock the slot.
Attention: This handset doesn't support the hot-swap of
Memory
Page 23

23
T card. When you need to take out the inserted card, please
switch off the device before taking it out.
2.4 Switch on/off
Long press the Switch on/off key to switch on/off the phone.
If the device is switched on but the SIM card isn't inserted, the
title bar will show no signal.
After inserting the SIM card, the screen will show the signal
strength in the title bar when the phone is switched on:
Type in PIN code - if you have already set the SIM code.
Search—the handset will be searching for proper network
connection.
Page 24

24
2.5 Unlock SIM card
To avoid illegal use, the SIM card is enciphered with PIN (personal
identification number) as a protection. When this function is ON
and you have already set a PIN code, you need to type in PIN
code every time the handset is switched on in order to unlock SIM
card and use the handset.
You can switch off the SIM PIN code. Yet in this situation, the
SIM card can't prevent illegal use.
Input PIN code, press cancel key to erase typing error and
press OK to end typing. For example, if the PIN code is set as
1234, then type "1234" then press OK.
The SIM card will be locked if you type in wrong code for three
times continuously. The handset will inform you to type in PUK
code.
Page 25

25
Attention: Your network provider will set a standard PIN code
(four to eight numbers) for your SIM card. It is recommended
that you change the code into a personal code as soon as possible.
2.6 Connection to network
When the SIM card is successfully unlocked, the handset will
automatically search for available network (the screen shows
searching). The handset will show the information of the network
provider, the status bar will show the signal strength and the
network condition once the handset is successfully connected to
a network.
Attention: If the screens shows "Emergency", it means that
you're out of network coverage (service coverage) or your card
is not valid, yet you can still make emergency calls based on enough
Page 26

26
signal strength.
Page 27

27
IV. Basic functions
1 Make calls
When the network provider icon appears on the standby screen,
you can call out or answer calls. The indicator on the upper right
part shall show the signal strength.
Quality of connection will be greatly influenced by obstructions.
So movement in a small range may effectively improve the quality
of connection.
1.1 Make domestic calls
Use virtual keyboard to enter phone numbers and then press Dial
icon to call. If you need to change the phone number, please press
the cancel key on the touch screen to delete (numbers entered).
When the call is answered, the screen shall show the connection
Page 28

28
status.
1.2 Call extension phone
Some of the extension phones can't be directly connected to. Use
the virtual keyboard, enter switchboard number, open the option
menu and choose "Add 2-sec pause", and then dial the extension
phone number.
Type in as follows to call extension phone:
Zone description › switchboard number › temporarily held for 2s ›
extension phone number › call
1.3 Make international calls
If you need to make an international call, long press the 0 key
on the virtual keyboard until there appears the sign "+" for
international call prefix, which helps you call numbers from any
Page 29

29
country (For example, 86 for China)even if you don't know the
international call prefix of that country.
You can make an international call according to the following
typing order: + › country code › complete phone number › dialing
icon (type in the prefix code(+), and then continue to enter the
country code and complete phone number). Country code usually
follows conventional practice: German is 49, Britain 44, Sweden
46 and so on.
When making international phone calls, the "0" in the city code
should be omitted.
For example, if you want to make a call to Shanghai from other
countries, you should dial: +86 21 114
1.4 Make listed calls
Every dialed and received phone number is recorded in the call
Page 30

30
history list. Recently dialed, answered and missed phone numbers
are in order (latest to earliest) listed in the "all" log. You can
also choose and check missed, answered and dialed list as needed.
Follow the instructions below to check the list:
Press Dial icon at standby screen to dial or check call history.
Listed phone numbers can be called out by pressing the
respective log.
Press the small icon on the right side to enter the log detail
interface. In the call history interface, users can long press to save
or delete the number. In the details interface, the phone number
saving function is preset.
Page 31

31
2 Emergency calls
You can make emergency call as long as you are in the network
coverage (check the signal strength indication bar on the upper
right side of the handset screen). If your network provider doesn't
provide roaming service in this area, there will be "Emergency Calls
Available" on the screen. If you are in the network coverage, you
can make emergency calls even without a SIM card.
3 Answer calls
Directly slide "answer key" to answer an incoming call. If your
headphone is connected to the handset, you can use the
headphone key on the headphone to answer calls.
Cautions: A short press on the headphone key will answer the call
while a long one will hang up the phone.
Page 32

32
4 Call history
This handset can not only list all calls in reverse order, but also
list a floating menu with all, answered, dialed, missed calls for
checking call history of different kinds.
5 Connection option
This option can only be seen during a call. The waiting call, hold
call, multi-party call functions require the support of the network.
Please contact your service provider for details.
In the connection option page, you can do the following
operations:
Hold
Temporarily hold the current one-line call.
End Call
End the current call.
Page 33

33
Contacts
Enter the Contacts menu.
Dialpad
Enter the dialing screen during a call.
Speaker
The voice passes through the speaker system
Mute
Turn on/off Mute. When the mute is ON, the other person can't
hear the sound from this handset.
Recording.
Record the current call.
* Conference*
In Conference call mode, you answer the incoming call and add it
to the conference in accordance with the instructions; Hold
Page 34

34
multiparty conference; Have a private conversation with one
party and hold other parties' call; Connect one party to the other
and end the conference call; Put one party on hold; End current
call and all holdon calls.
Cautions: menu items marked by * means happening only under
certain situations. Users need to apply for opening the conference
call service from their service provider.
Page 35

35
V. Function menu instruction
1. Browser
Press the browser icon to enter the browser interface and you
can search for websites.
2. Calculator
The handset is provided with a calculator with basic functions. You
can carry out the operation for plus, minus, multiply, and division
by pressing icons on the screen. You can use more functions in
the advanced panel.
Cautions: the accuracy is limited and round-off error may occur.
Page 36

36
3. Calendar
Enter the calendar menu and there shall appear a virtual calendar
on the screen with the current date marked on background frame
in a special color. Press the touch screen to browse date and the
calendar information on the screen shall be correspondingly
updated.
4. Call Log
Enter Call history interface, press and change the tagged pages
on the upper side of the screen, choose call history, contacts and
contact groups.
Use finger to scroll from down to up to select phone numbers.
Short press a log can call the contact directly while long press will
turn to the page with functions such as dialing, send text, edit
number before calling, add to contact, delete from call history
Page 37

37
and so on.
5. Camera
In viewing interface, press the bottom icons to do the following
operations. Press the center icon to shoot a picture or film a
video, press the camera icon to switch among the camera mode,
Camcorder mode or Panorama mode. Press the right icon to show
the latest captured picture or video.
6. Clock
Enter the clock menu and press alarm icon to add a new alarm.
Drag the scrollbar to set alarm time. Choose “settings” to edit
the activity, alarm time, repeat, alarm tone, vibration and tag,
press “done” to finish the setting. If you need to change the
settings (reset), choose "edit alarm". If you want to delete the
Page 38

38
alarm, press "delete alarm".
7. Contacts
Enter the Contacts interface, you can check all the contacts,
search for contacts or add new contact. New contact means a
newly added phone number that is recorded in the SIM card or
the handset.
When adding a new contact, you can type in the name, address,
phone number, workplace, more phone number, handling/work
place/ other email address and so on.
You can also check call history and contact group.
8. Downloads
You can check the downloaded or being-downloaded contents.
Page 39

39
9. Email
First you need to set the Email account. Step 1: Input email
address and password. Step 2: select account type, press OK to
connect.
10. File manager
You can manage file folders, including Download, Music, Received
files. Press menu key to create a new folder or select folders to
copy, move and delete.
11. FM Radio
Notice: this handset doesn't have a built-in antenna. If you want
to listen to the radio, please insert the headphone first. Pressing
the side keys can adjust the volume.
1. Channel list: check all the channels and select.
Page 40

40
2. FM recording: choose recording after turning on the FM radio.
3. Start/stop: start/stop FM.
4. Previous/Next: press this key to change FM channel.
12. Gallery
In the gallery interface, there are different folders. Select a folder
and press to enter. Press the picture to view it..
When viewing the picture, if you press on the screen or press the
menu key, "share, delete, more" will pop out. Choose "share" to
send the file via bluetooth or a message; choose "more" for further
functions such as detailed information, set as, edit, print, and
rotate left or right.
If you press the shooting icon at the upper right corner, you can
directly shoot a picture or record a video.
Page 41

41
13. Messages
13.1 Write a new message
Press “compose new message” to get a new text message:
1. Press the edit frame, type in the message after a virtual
keyboard pops out.
2. Press the number frame and enter number, or press add
contact icon and select stored contact number from Contacts, or
call history or contact group.
3. Input contents into the typing frame on the touch screen.
After editing, press send icon to send the text.
4. Press menu key to add subject, Attach, Discard, Insert quick
text, Insert smiley and more operations.
Page 42

42
13.2 Message setting
Include storage settings, SMS settings, MMS settings, notice
settings, service information settings and so on.
14. Music
In the music interface, there are four tags: Artists, Albums, Songs
and Playlists. Press different tags to enter different tag
interfaces.
In the play interface, you can press the menu key to change
settings of the player's by selecting part shuffle play, all shuffle
play or sound effects. In the sound effect menu, you can choose
Bass Boost, Virtualization, Preset Reverberation and Equalizer
Effect.
Page 43

43
15. Dial
Press Dial icon, enter the phone number, and press Call icon.
16. Search
Input key words to search in the network, messages, applications,
contacts, call history and music, etc.
17. Settings
17.1 SIM management
The contents in this menu may differ subject to different service
providers. For detailed information, please view in the phone.
17.2 Wireless & networks
Change settings for wireless connection and network such as
Airplane mode, Wi-Fi, Wi-Fi settings, Bluetooth, Bluetooth
Page 44

44
settings, Tethering & portable hotspot, VPN settings and mobile
networks.
17.2.1 Bluetooth
To activate Bluetooth, you need to make Bluetooth settings.
Bluetooth settings:
1. Bluetooth: Activate/Inactivate bluetooth.
2. Device name: check and change device name.
3. Discoverable: Enable others to find your device after you
activate this function.
4. Advanced settings: you can transfer files, select visit authority
and remote SIM mode.
5. Scan for device: Scan and search devices.
Page 45

45
17.3 Call settings
Change settings of voice call, video call and Internet call, and other
settings.
17.4 Audio profiles
Include General, Silent, Meeting and Outdoor.
17.5 Display
Change settings of brightness, auto-rotate screen, –active
desktop and screen timeout.
17.6 Location
Locate your position through tools like wireless network and GPS.
17.7 Security
Change the settings of screen lock/unlock, SIM card lock,
Page 46

46
passwords, device management and credential storage items.
1. Screen lock settings:
2. Pattern: unlock the screen through designed pattern. Draw a
private pattern to unlock the screen so as to avoid unauthorized
use of the handset.
3. PIN: type in PIN numbers to unlock the screen.
4. Password: type in password to unlock the screen.
17.8 Applications
Include the management of applications, the condition and
development of the currently used service and storage space.
17.9 Accounts & sync
You may add user accounts here and sync data and applications
as you like.
Page 47

47
17.10 Privacy
Restore default settings - in this menu, related settings will be
restored to default if you press "reset the phone". You can also
format the SD card. If you select this option, all of the data in
the SD card will be erased.
17.11 Storage
Include the SD card storage, available storage, insert SD card (If
a SD card has already been inserted, then this option will show
"remove SD card"), format SD card and all available storage.
17.12 Language & Keypad
Include language settings, keypad settings, input methods and so
on.
Page 48

48
17.13 Voice input & output
Include text to voice settings. You can use the default setting,and
install linguistic data.
17.14 Accessibility
Power button: press power button to end calls.
Quick boot: switch on/off the handset quickly.
17.15 Date & Time
Include automation, set date, select time zone, set time, use
24hour format and select date format.
17.16 Schedule power on/off
You can set the time for switching on/ off the handset, which
include setting time and repetition date.
Page 49

49
17.17 About phone
Include status information, battery information, law information,
type, android version, baseband version, core version and version
number.
18. SIM Toolkit
The contents in this menu will differ subject to different service
providers. For detailed information, please view in the phone.
19. Sound Recorder
1. Press Record to start recording. In the middle of the screen
is a timing bar. Press Stop to stop recording and select "Save"
in the pop up "Save/Cancel' to save the recording. You can press
Play key to listen to the recording before selecting "Save/Cancel".
2. Press menu key to select recording quality.
Page 50

50
20. Intex Zone
20.1 Mobile tracker
When the SIM card is replaced, the device will automatically send
a message to your preset number.
20.2 Data protector
You can set Peer control item and Peer control setting. When
you send the preset setting to the device, it will complete your
preset Peer control items.
20.3 Auto call record
When the function is on, it will auto call record during the call.
20.4 Change Password
The initial password is 1234. You can change password here.
Page 51

51
VI. Technical Information
Model: AQUA MARVEL
Size Length: 116mm ×Width: 61.7mm ×Depth: 11.9mm
Battery: 1400mAh
Networks: GSM 900/1800 MHz
SAR Value: GSM900 MHz: 0.542 W/kg;
GSM1800MHz:0.792W/kg
Weight: 118.0±5 gram(with battery)
Battery Type: Lithium Battery
Model: BR 1435N
Page 52

52
Nominal voltage: 3.7v
Max. Voltage: 4.2v
Capacity rating: 1400mAh
Operation Temperature: -10°C ~+55 °C
The operation time of the battery depends on conditions such as:
• Transmitting power level
• Signal (distance between the phone and the base station)
• Network parameters defined by the operator
• Phone use (WAP, games, SMS)
• Charging procedure used
Exclusions:
Subject to the exclusions contained below:
1. Damage due to the improper use.
2. User does not follow the manual.
Page 53

53
Explanation:
The company has the final right of the explanation for this
document.
Software upgrades will not be announced.
All pictures are for reference only in the instruction book; please
refer to the actual phone.
Disclaimer
© Intex. All rights reserved.
Features and specifications are subject to change without prior
notice. Certain mobile phone features may not be activated by
your service provider, and / or their network setting may limit
the feature's functionality. Services and some features such as
GPRS, email may be dependent on the network, SIM card, as well
as on the compatibility of the devices used and content formats
Page 54

54
supported and may require network/service subscription/solutions.
Data transfers speeds are network dependent. Always contact
your service provider for details or help. Talk and standby time
is quoted in digital mode and are approximate; battery
performance and the signal reception depend on network
configuration, signal strength, type of SIM card, operating
temperature, features selected as well as voice, data and other
application usage pattern. The phones supports Bluetooth, A2DP,
in order for Bluetooth devices to communicate with one another,
they must utilize the same Bluetooth Profile. To determine the
profiles supported by other Intex products, visit
www.intextechnologies.com, for other devices, contact their
respective manufacturers. Always demand for original Intex mobile
phones to protect against buying tinkered and/or used,
Page 55

55
refurbished or tampered phones. The warranty is applicable only
for Intex phones; the company is not responsible for any loss or
theft. Always use Intex original Enhancements (including batteries)
for safety. The use of any other type may invalidate and approval
or warranty applying to the mobile phone and may be dangerous.
The phone is designed to operate using Li-ion batteries approved
by the phone manufactures. Using non approved batteries with
the phone may result in poor performance and damage to the
phone or its enhancements. The display and products visualization
here are illustrative purposes only; Display / color of the phone
may differ from that shown on the manual. All features,
functionality and other product specifications are based on the
latest available information and are correct at the time of printing;
however such product specifications are subject to change without
Page 56

56
notice. Copyrights are reserved. Intex is the trademark of INTEX
TECHNOLOGIES (INDIA) LTD. which is registered. The
unauthorized copying of copyrighted material is not legalized is
inimical to the provisions of the copyright laws of India and other
countries.
INFORMATION UNDER E-WASTE (MANAGEMENT AND
HANDLING) RULES, 2011
For disposal of e-waste, please call our helpline no. or visit our
website.
E-waste Helpline no. 1800-103-8822
Weblink:
http://intextechnologies.com/window_self/Waste%20Disposal.h
tml
Page 57

57
1. Do’s for disposal of product
a) Always drop your used electronic products, batteries, and
packaging materials after the end of their life in nearest
collection point or collection center
b) Separate the packaging material according to responsible
waste disposal options and sorting for recycling.
c) The battery can easily be removed from the product for
recycling.
2. Don’t disposal of equipment
a) Never dump E-waste in garbage bins or municipal solid waste
stream.
b) Do not dispose of your product as unsorted municipal waste.
Page 58

58
c) Do not throw used batteries into household waste.
d) Do not dispose damaged or leaking Lithium Ion (Li-Ion)
battery with normal household waste.
3. Information on the consequences of improper handling,
accidental breakage damage and improper recycling of the end
of life product.
a) If batteries are not properly disposed of, it can cause harm
to human health or the environment.
b) Placing of batteries or devices on or in heating devices, such
as microwave ovens, stoves, or radiators and improper disposal
Page 59

59
of batteries may lead to explosion.
c) If the battery terminals are in contact with metal objects,
it may cause a fire.
APPENDIX
The customer can connect to High speed internet over Wi-fi
network at below hotspots. Upto 750 MB usage will be free for
one month.
Mc Donalds, Cafe Coffee Day, Ansal Plaza, Slice of Italy, RG
Computers, The chowk, Asian Saga Spa, Cocoberry, 3-D
Restaurant, 64 Bistro Café, Aditya Restaurant, Adonis Gym, AL
– BEK, Al Rimaal, Alibaba, All Heavens, Ambrosia Restaurant,
Amritsar to China, Anatomy Gym, Anjappar, Ansal Plaza,
Appointment, Aquajava, Aryan Restaurant, Ashish Resort ,
Page 60

60
Asian Saga Spa, ATE 9 ATE, Ateal Restaurant, Attapur
Hyderabad house, Au Bon Pain, Aura Lounge & Bar, Bangalore Club,
Barichi Restaurant, Barista, Baskin Robbins, Bean it Up, Beijing
Bites, Bikanewala, Bikers and Guzzlers, Blanco restaurant,
Blossoms square, Boca Grand, Boca Grand(Floor-1), Bollywood
blues, Books N Brew, Booster Juice, Bowl O China, Bowl-O-China,
Bread works, Brewberry, Brews Café, Brix Pizza, Bromfy, BRU
WORLD CAFE, Burger Girl, Cad B, Café 27, Café buddy, Café
Buzz, Cafe Coffee Day- Netaji Subhash Place, Cafe Coffee
Day-Kingsway Camp, Café Cruise, Cafe Festa, CAFE KOOBA, Cafe
Melange, Café Oz, Café Retro, Café WTF, Cakes & Bakes, Capri
Italy, Casa Lolo, Casa Rivera, C-Factor, Chaipatti, Chakh le, Chef
Bakers, Chillm, Chin Chin Restaurant, Chings, Chocolate room,
Chocolatier, Chokola, Chung Wah, Cirrus, Cocoberry, Coffee Bean
Page 61

61
& Tea Leaf, Coffee NU, Coffee World, Comesum, cosmopolitan
westend mall ludhiana, Costa, Cream and Fudge Factory,
Creambell, Creppeteria, CRN Cambay Hotel, Curzon Court,
Daddy's Deli, Daily Bread, Dana Choga, Darbar Restaurant, Delhi
Darbar, Desmonds, Dominos, Eden Park (Sofraah), Eden
Park(Tangra), Eden Park(The Lounge ), Enigma, Fast Trax, Fay
Yan Restaurant, Figurine Fitness,Fireflies, Fit N Fine, Fitness
Gear, Flambe Restaurant, Food junction, Fortis, Forum Value
Mall, Frumix, FYI Maggi, Gloria Jean's Coffees, Golden Dragon,
Good Bakery, Goverdhan, Grand Westend, gravey, Guru Datta,
H30 Pub, Hall Of Fame, Harry Karaoke Lounge Bar, Head Turners,
Hear Cup Coffee, Herbs & Spices, Hercules, Hotel Arpit, Hotel
Chanakya, Hotel garden, Hotel Shalimar, Hungry Hogs,
HYDERABAD DELICACY, Hyderabad Delicasy, Hyderabad house,
Page 62

62
Indulge spa, Indus Grill, Infinitea, Innova Car Comesum Delhi,
Italia, Javacity, Javed Habib-Pitampura, JMD Kohinoor Mall,
Juke box, Jullundur Hotel & Restaurant, Just Bake, Kamini Bar,
Kamini Dining Hall, Kamini Garden Restaurant, KFC, khana
khazana, KSRTC Bus, Kunzum travels, Kylin, La Casa, Legends of
Rock, Lemon Grass, Leslie Molly Malone, Linger on, Little Italy,
Love Latte, Love Shack, Maduri Grand, Mahaveer Mall,
Manchester United, Mandarin Express, Mandarin Trail, Margarets
Beauty Parlour (Ladies), Margarets Beauty Parlour(Gents),
Medicity, Mirage- rohini, Mirchi Restaurant & Bar, Mojo's,
Monster Slice, Moti mahal, Moti mahal –Pitampura, Mr. Beans,
Nestle Café, New Delhi Railway Station, News Café, NewsCafe,
Nirulas, Nirula's, NJAC(Not Just another Coffee), Nokia
Priority Store, Om Book Store, ON-TOES-ICESPICE, OOMPH,
Page 63

63
Orchid, Oven fresh, Pack and Chew, Pecos R & B, Pegassus fit life-
Paschim Vihar,Phileas Hogg,Pizzahut,Pizzarro,Planet- M,
Portfolio, Studio, Punjabi by taste- Janakpuri, Punjabi Haveli,
Rauch Haus, RD-MALL, Red ball Internet-rohini, Reforma, RG
Computers, River View Bar, River View Dining Hall, River, View
Garden Restaurant, RM Supermarket, Ruby Tuesday, Ruby's Bar
& Grill, Sahibaan Restaurant Sangria, Shivaaz, Shruti electronics,
Slice of Italy, Slice of Italy- Rajori Garden, Smokin Joe's, snake
pit, So Food and More, Spardise,Speciality Group-Flame & Grill,
Speciality Group-Kibbeh, Speciality Group-Machan, Speciality
Group-Mainland China, Speciality Group-Oh! Calcutta, Speciality
Group-Sigree, Speciality Group-Sweet Bengal, Spice Tree, Stones,
Styx, Subway, Subway City Center, Subway Clock Tower, Subway
DLF
Page 64

64
Subway Hitech City Cyber Gateway, Subway I Max, Subway
Rajbhavan, Subway Sredavi mall warangal, Subway vizag 1, Subway
Vizag Inox 2, Suvarna Samphala Inn, Sweet, Obsession, Swensen's,
TAJ SATS CAKE & BAKE, Talwalkars, Tandoori Hippies, The Biere
Club ,The Bowl House, The Brown Cup, The Chocolate Beetle, The
Chocolate Room, The chowk , The Mairaj Restaurant, The wall
Street, The Yum Yum Tee, Toast Lazzez, TURQUOISE COTTAGE ,
U.S PIZA, Urban solace, US Pizza, Vaango, Via Milano, Village
Rooftop, Viva Goa International, Wagh Bakri Tea Lounge, Wang
Dynasty, Washing Bay, Whipped, WINGS N FRIES , Woods Inn
AP2, Xtreme sports bar outlet , Yoko Sizzlers, Your Fitness Club,
Zafran Kasbah, Zen Cafe
 Loading...