


OCTOPUS 1-2-3
Instruction Manual
©INTERZEAG (01/2003) IZ Nr.: 4-0200-0310
revision
2
INTERZEAG AG
Rietbachstrasse 5, Postfach, CH-8952 Schlieren, Switzerland
Telefon: ++41 1 733 68 11, Fax: ++41 1 730 03 30, E-Mail: info@interzeag.com, www.interzeag.com


OCTOPUS Perimeter 1-2-3 Instruction Manual
C
ONTENTS
1 Introduction 4
1.1 Safety Tips 4
1.2 Working with the OCTOPUS 1-2-3 4
1.3 Configuration of Parameters 5
1.3.1 Periphery 5
1.3.2 Input Selection 5
1.3.3 Time / Date 5
1.3.4 Language 5
1.3.5 Default 5
1.3.6 Print Parameters and Setup 5
1.4 Examination Programs 5
1.5 Examination Strategies 5
1.6 Stages and Phases 5
1.7 Procedure Codes 5
2 The Examination 6
2.1 Examinations Using a Procedure Code 6
2.2 Manual Operation 6
2.3 Enter Patient Data 6
2.4 Position the Patient 6
2.4.1 Instruct the Patient 6
2.4.2 Setting the Trial Lens(es) 6
2.5 Monitoring the Examination 6
2.5.1 Pupil Diameter 7
2.5.2 Stimulus Interval 7
2.5.3 Eye Fixation 7
2.5.4 Fixation Brightness 7
2.5.5 End 7
2.6 On-screen Information 7
5 Technical Data 10
5.1 Manufacturer 10
5.2 Instrument 10
5.3 EMC 10
5.4 Designations 10
6 Certifications and CE Marking 11
3 Data Management and Evaluation 8
3.1 Data Management 8
3.1.1 Display 8
3.1.2 Edit 8
3.1.3 Delete 8
3.1.4 Printout 8
3.2 Printer Connections 8
3.3 Data Transmission 8
3.3.1 Cable Connections 8
3.3.2 Data Transmission 8
4 Care and Maintenance 9
4.1 Protecting the Unit from Dust 9
4.2 Cleaning 9
4.2.1 Cleaning the Ocular Lens and the Monitor Screen 9
4.3 Moving the Perimeter 9
4.4 Chin Rest Paper 9
© INTERZEAG Page 3/11

OCTOPUS Perimeter 1-2-3 -Instruction Manual
1 I
NTRODUCTION
The OCTOPUS 1-2-3 is a direct projection perimeter to
examine the central 30° visual field. For data storage,
display and analysis we recommend to use the (optional)
P
ERITREND
software.
Your local OCTOPUS distributor who is also responsible
for instructing the operating staff will install the
OCTOPUS 1-2-3.
Technical specifications subject to change without notice.
1.1 Safety Tips
Pay attention to the special messages in this manual to
avoid any risks to the patient.
CAUTION: These instructions must be followed to avoid risk to the
patient and/or the operator.
ATTENTION: These instructions must be followed to prevent damage
to the perimeter.
NOTE: Hints for guaranteeing error-free functioning of the
perimeter.
• Auto: Automatic screening test (
STX
)
• Code: Section 2.1
• Manual: Section 2.2
• Prepare: Enter patient data
• Options: Section 1.3
• Process: Chapter 3
When one of these commands is highlighted and the OK
key is pressed, the unit carries either this function out, or
it activates a submenu.
With the ESC key the menu returns to the next higher
level.
The lower half of the screen (C) contains either an
information or an entry window. If you see -OK- on the
dividing line (B), the text in the lower half of the screen
(C) is purely informative like on the main screen.
A
B
C
ATTENTION: The fuse must correspond to the setting of the voltage
selector. See further data in chapter 5.2.
ATTENTION The ON/OFF switch does not fully disconnect the
perimeter from the power lines.
CAUTION: Arrange the power cords and connecting cable in such
a way that they do not present any danger.
ATTENTION: Components of OCTOPUS 1-2-3 have to be replaced
by original INTERZEAG components.
NOTE: INTERZEAG is not responsible for damages occurred
from the interpretation of examination data. Especially
the interpretation of the ‘Descriptive Report’ is in the
responsibility of the eyecare physician.
1.2 Working with the OCTOPUS 1-2-3
The perimeter is controlled by using the keys on a keypad
(Figure 1-1) following the indications on the screen.
Figure 1-2
Two vertical arrows - - on the dividing line (B), such as
in Figure 1-3, indicate that an entry or a selection can be
made as follows:
Use the keys to highlight your choice in the
!
menu bar (A) and press OK.
Use the vertical arrows to move to the (C) area of
!
the screen.
Figure 1-3
Figure 1-1
The screen is usually divided into two sections by a
horizontal line (B) in Figure 1-2. The upper part (A)
contains the menu bar. Main sections are defined below:
Page 4/11 © INTERZEAG

OCTOPUS Perimeter 1-2-3 Instruction Manual
1.3 Configuration of Parameters 1.4 Examination Programs
Use the keys to highlight ‘Options’ and press OK. The perimetry software includes three standard programs
!
With the keys highlight ‘Install’ and press OK.
!
1.3.1 Periphery
Delete with confirmation: Leave ‘YES’ to have a
!
confirmation question before old examinations are
deleted.
!
Buzzer: Select ON or OFF.
!
Printer: Select printer type.
!
COM1/COM2: For connection with P
ERITREND
PC select ‘Transmission’ on COM1, none on COM2.
1.3.2 Input Selection
!
Set the perimeter to the preferred examination
strategy such as ‘Normal’, ‘Dynamic’ or ‘TOP’.
!
If the transmission function is not activated, the
patient data input can either be done by typing the
patient’s age (quick and easy) or the complete date
of birth.
To obtain a ‘Descriptive Report’ chose ‘Yes’. This
!
feature is only active after a complete G1X
examination (one phase) is made.
on
and ten custom test programs.
G1X Glaucoma examination (59 locations)
M2X Macula examination (45 / 81 locations)
STX Screening test (59 locations)
32X Normal examination (76 locations)
1.5 Examination Strategies
Five different examination strategies are available to be
used in certain combinations with the examination
programs.
• Normal strategy (quantitative)
• Dynamic strategy (quantitative)
• Low Vision strategy (quantitative)
• 2-Level strategy (qualitative)
• TOP / Tendency Oriented Perimetry (quantitative)
(option for G1X, M2X, 32X)
The results of a qualitative examination can be quantified
in a succeeding phase using the normal or dynamic
strategies.
1.3.3 Time / Date
Adjust to the present time and date in either US or
!
International mode.
IMPORTANT: The actual date is important to calculate the patient’s
age from the date of birth.
1.3.4 Language
Continue with the keys to highlight ‘Language’. !
Press key to move down to ‘Preferred language’. !
Use the keys to select the language. !
! Press OK to confirm.
Press ESC (twice) to return to the main screen.
!
NOTE: There is a choice of six languages depending on the
software version as displayed in (Figure 1-2).
1.3.5 Default
To reset all parameters to standard settings.
!
1.3.6 Print Parameters and Setup
NOTE: We recommend to make a printout of the actual
instrument settings.
1.6 Stages and Phases
Stages and phases are defined in order to quickly gain
information about the visual field in priority steps. The
examination can be interrupted at the end of a stage or
phase and then continued at a later time.
Consult the OCTOPUS Visual Field Digest for further
details.
1.7 Procedure Codes
A single code number can be set for a complete
examination procedure (saving and printing included)
(Figure 1-4). This code is then used routinely to get
quickly into the examination.
Figure 1-4
© INTERZEAG Page 5/11

OCTOPUS Perimeter 1-2-3 -Instruction Manual
2 T
HE EXAMINATION
After switching ON, the perimeter asks for calibration (first
screen). Normally the ocular cap is sufficient to darken
the room .
The second screen should be answered depending on
the state of the buffer.
From the main screen (Figure 1-2) there are two ways to
start an examination.
2.1 Examinations Using a Procedure Code
It is good practice to use a Procedure Code (see 1.7):
! In the menu, highlight ‘Code’ and press OK.
Enter the code number and press OK (twice).
!
2.2 Manual Operation
In ‘Manual’ all selections can be made as follows:
! In the menu, highlight ‘Manual’ and press OK.
The selection of the L/R eye is established automatically
with the position of the perimeter.
Using the
and keys select the examination
program, test strategy and fixation target. Press OK.
2.3 Enter Patient Data
There is the choice (Figure 2-1) of entering new patient
data, test the same patient (other eye) or to take the
patient data from the buffer memory (see section 3).
2.4 Position the Patient
Position the patient straight up but comfortably on the
chair. Apply the eye occluder and hand the patient the
patient button.
CAUTION: Only the answer buttons produced by INTERZEAG
should be connected to the perimeter.
2.4.1 Instruct the Patient
To obtain reliable examination results, instruct the patient
in all detail about the examination procedure.
In particular inform the patient
• to maintain fixation and to blink regularly to avoid dry
eyes;
• to press the button only when a stimulus is thought to
be seen;
• not to worry because the bracketing procedure is
characterized by the fact that approximately half of the
stimuli can not be seen;
Tell the patient how long test is going to take.
NOTE: The patient can always stop the procedure by closing
the eye or by keeping the response button pressed.
2.4.2 Setting the Trial Lens(es)
The lens holder has 10° marks as shown (Figure 2-2) for
aligning the cylindrical lens axis correctly.
NOTE: The patient is corrected with her/his far correction. No
correction is needed for presbyopic eyes.
Use only small rim
correction lenses!
Figure 2-2
2.5 Monitoring the Examination
Figure 2-1
It is mandatory to type in the date of birth (or age,
!
see 1.3).
!
It is recommended to also enter the ID number, and
Sex by using the and keys.
!
The other information is optional.
!
NOTE: It is important to measure and enter the pupil size
during the examination (2.5.1).
Page 6/11 © INTERZEAG
After the patient has been positioned, the examination
menu (Figure 2-3) shows the eye and other test data.
Figure 2-3
Make sure the patient is centered correctly.
!
! Press OK for Start.

OCTOPUS Perimeter 1-2-3 Instruction Manual
During the test, the menu has changed in (Figure 2-4):
Figure 2-4
IMPORTANT: The operator should not leave the patient unattended,
especially when the patient is new to this type of
examination.
NOTE: Restart the examination when the patient obviously has
not yet understood the procedure.
The following is part of the routine during the
examination:
2.5.1 Pupil Diameter
The ruler on the monitor allows a quick measurement of
the pupil size (scale in mm).
!
Highlight ‘Input’. Press OK.
!
Enter the pupil size in the patient data. The eye
fixation control remains active even if the eye is not
shown.
2.5.2 Stimulus Interval
The stimulus interval is adapted to the reaction time of
the patient. If the patient finds the speed too fast,
Highlight ‘Interval’. Press OK.
!
The speed will now be constant and slow. ‘Interval*’ is
marked to signal the operator that the speed is fixed.
2.5.3 Eye Fixation
Behind the screen the pupil position is controlled by an
‘invisible’ measuring cursor. If the pupil size is smaller
than 2 mm or larger than 6 mm:
Press OK to ‘Stop’.
!
Highlight ‘Cursor’ and press OK.
!
Adjust eye fixation control from ‘normal’ to the
!
respective value ‘small’ or ‘large’. Press OK.
In case the pupil size is very narrow or when the
!
patient can not fixate at all, switch the eye fixation
control to ‘no control’. Press OK.
Press ESC to return.
!
2.5.4 Fixation Brightness
Sometimes the patient can not fixate well because the
fixation mark is too dim or to bright.
Press OK to ‘Stop’.
!
Highlight ‘Fixation’ and press OK.
!
!
Using the keys switch to brighter (dimmer for
reverse action) and increase the intensity by
pressing OK several times.
! Press ESC to return.
NOTE: It is not recommended to change the brightness too
much to avoid blinding and contrast effects.
2.5.5 End
OCTOPUS examinations are run in stages. If the
operator wishes to stop the test at the end of a stage:
! Highlight ‘End’ and press OK.
‘End*’ is now marked and the procedure will stop
automatically after the end of the stage.
At this point, the Examination can be continued or saved.
2.6 On-screen Information
# Questions: The number of stimuli (including
repetitions) that have been presented.
# Repetitions: The number of stimuli that have been
repeated. Stimuli are repeated when the patient closes
the eye or reacts within 100 ms after the stimulus is
displayed.
# False pos.: The total number and the number of falsely
answered positive catch trials.
# False neg.: The total number and the number of falsely
answered negative catch trials.
# Elapsed time: Elapsed examination time. Time that
elapses during an interruption is omitted.
NOTE: With the key, the intermediate values in dB and the
indices MD, LV will be displayed.
# Progress indicator: This bar graph shows the
progress of the examination.
# Defect level indicator: The depth of the visual field
defect and the variance of the results obtained thus far
are shown by a vertical and a horizontal bar.
© INTERZEAG Page 7/11
OCTOPUS Perimeter 1-2-3 -Instruction Manual
3 D
ATA MANAGEMENT AND EVALUATION
3.1 Data Management
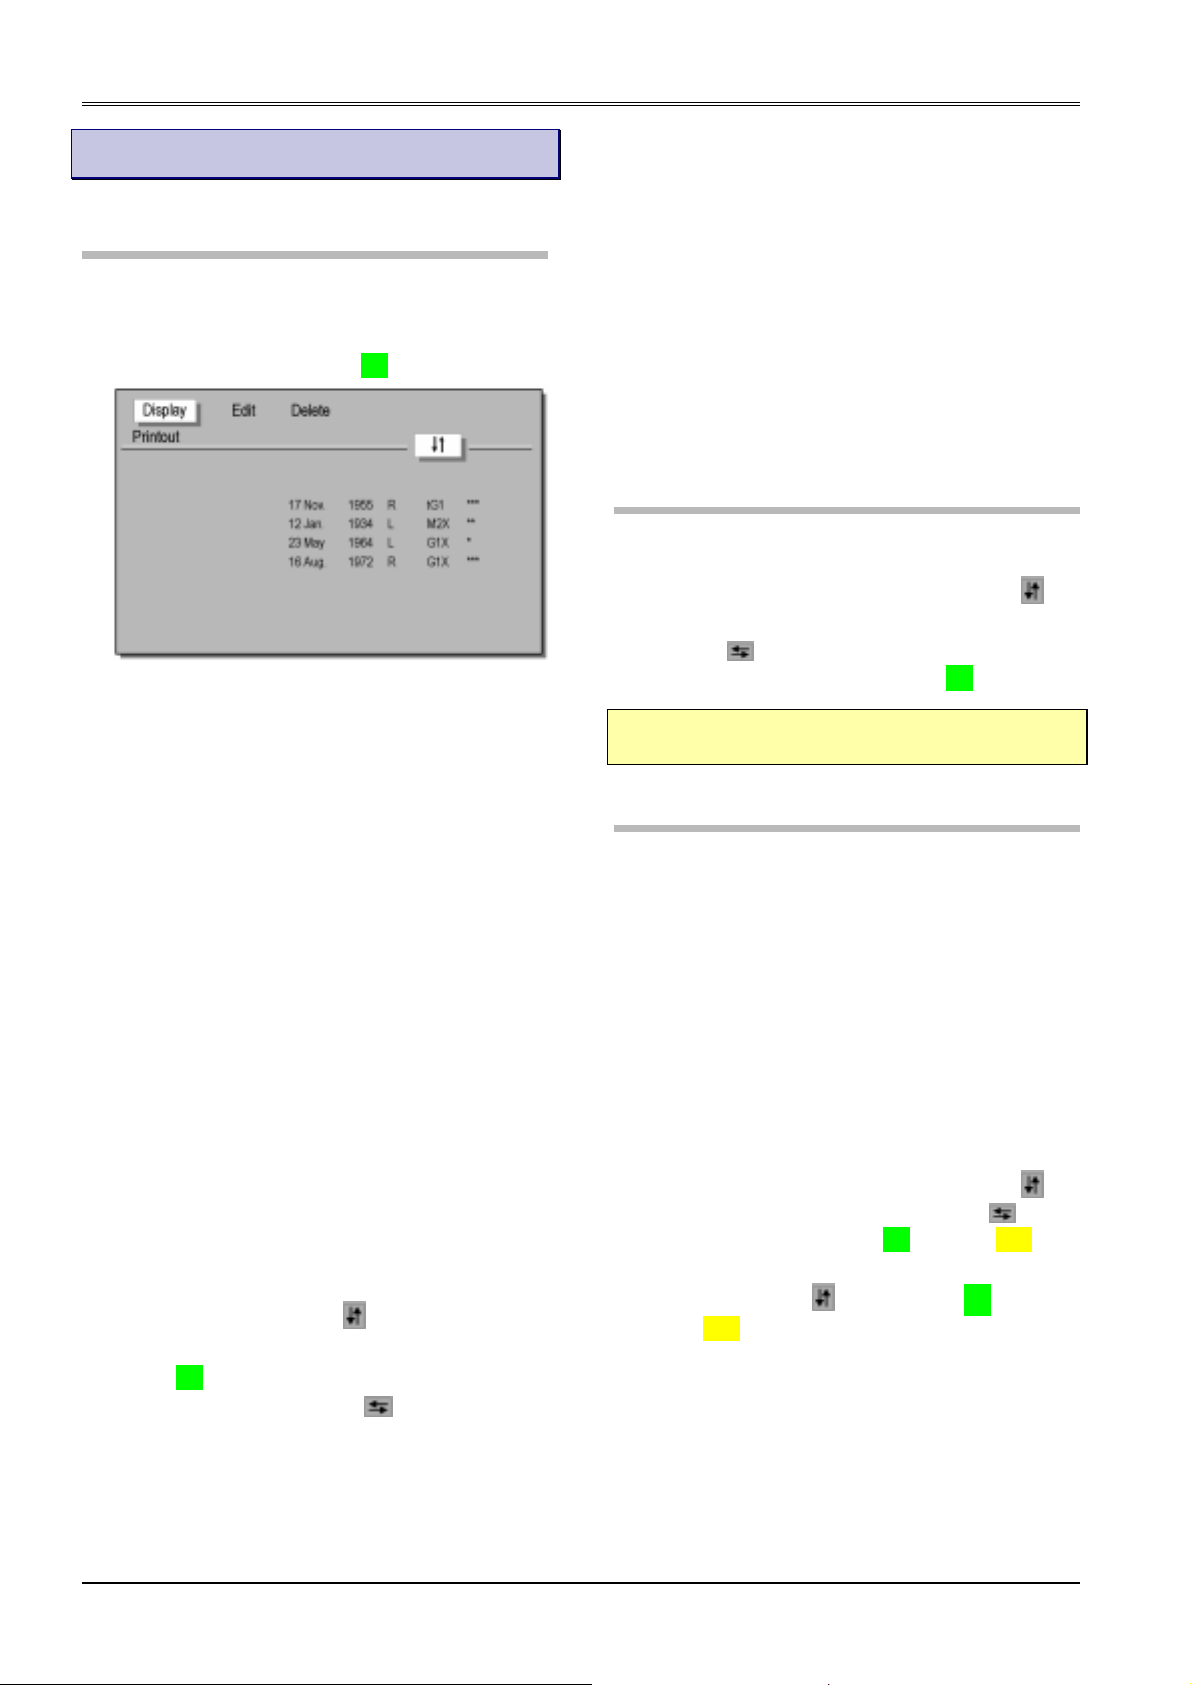
Examination results are saved and stored in the
examination buffer (Figure 3-1) in chronological order.
In the main menu:
Highlight ‘Process’ and press OK. !
Figure 3-1
This menu also appears if you choose ‘Select from Buffer’
in Manual or Code mode (see 2.2).
The different examination tags indicate:
* Prepared patient data /examination
** Interrupted test, can be continued
*** Finished examination
**** Finished and printed examination
3.1.1 Display
The visual fields can be displayed on the monitor in
several formats.
3.1.2 Edit
In case patient data needs to be amended or changed
this menu opens the file to allow making the corrections.
3.1.3 Delete
This menu allows deletion of selected examinations. In
particular this is important when the buffer is full
(maximum 15 examinations). Examinations, which have
been printed out, are normally deleted first.
3.1.4 Printout
Highlight ‘Printout’ and use keys to select a
!
particular examination.
Press OK.
!
Choose a printout format with keys.
!
The printout menu has following options:
• Seven-in-One
• Combination
• Comparison
• Value table
• Defect curve
• Descriptive report
• Grayscale
• Profiles
• CO-Grayscale
3.2 Printer Connections
The OCTOPUS connects through the parallel printer port
to almost any modern laser or inkjet type printer.
Under ‘Options’ - ‘Install’ - ‘Periphery’ use the
!
keys to highlight the Printer selections.
With the keys select the proper or most
!
appropriate printer model and press OK.
NOTE: Call your printer supplier for assistance if the dip
switches on the printer itself need adjustments.
3.3 Data Transmission
Please call your OCTOPUS distributor for assistance to
connect the OCTOPUS 1-2-3 to a PC with PeriTrend
under Windows.
Refer to the special PeriTrend manual for instructions on
the data import functions.
3.3.1 Cable Connections
A standard (female-female type) serial interconnecting
cable connects the OCTOPUS 1-2-3 serial output port
COM1 (nearest to the printer port) with the serial import
port (mostly also COM1) on the PC.
3.3.2 Data Transmission
Under ‘Options’ - ‘Install’ - ‘Periphery’ use the
!
keys to highlight the COM1 port. With the
select ‘Transmission’, press OK and twice ESC.
Under ‘Process’ highlight ‘Transmission’. Select an
!
examination by the keys and press OK. Press
twice ESC to return.
keys
Page 8/11 © INTERZEAG

OCTOPUS Perimeter 1-2-3 Instruction Manual
4 C
ARE AND MAINTENANCE
There are a few simple steps, which will maintain your
OCTOPUS 1-2-3 in good condition for many years.
4.1 Protecting the Unit from Dust
Dust is the most common cause for malfunctioning. The
OCTOPUS 1-2-3 is supplied with a dust cover which
should be used whenever the unit is not being used.
4.2 Cleaning
Normally, it is sufficient to dry clean the unit occasionally
with a soft cloth.
NOTE: Under no circumstances should the unit be cleaned
with a wet cloth.
4.2.1 Cleaning the Ocular Lens and the Monitor
Screen
When the ocular lens and the headrest need cleaning, it
is recommended to use a damp chamois leather wetted
with alcohol if necessary.
4.3 Moving the Perimeter
If the OCTOPUS 1-2-3 needs to be transported to
another location, pay attention to the following:
Ensure that all cables have been removed from the
!
plug panel.
!
Adjust the height of the cross support to the lowest
position. This will be necessary if the unit is
transported in its original packaging.
Always ensure that the cross support is firmly
!
secured by fixing the two screws.
4.4 Chin Rest Paper
These products are recommended for the chin rest:
Chin rest paper 9.0370.9040 I
Chin rest paper 950-1379 H
NTERZEAG
AAG-STREIT
© INTERZEAG Page 9/11

OCTOPUS Perimeter 1-2-3 -Instruction Manual
5 T
ECHNICAL DATA
5.1 Manufacturer
INTERZEAG AG
Rietbachstrasse 5; CH-8952 Schlieren / Switzerland.
5.2 Instrument
Designation: OCTOPUS 1-2-3
Power requirements: 115V~/ 50/60Hz, 230V~/ 50/60Hz
Power consumption: 80VA
Fuses: 115V~/ 50/60Hz:
230V~/ 50/60Hz:
Measurements (W x L x H): 400 x 420 x 550/580mm
Footprint: 0.156m
Weight: 25.5kg
Shipping size: 660 x 570 x 620 mm
Shipping weight: 33.5kg
Temperature: Operation: +15°C ... +40°C
Storage: -20°C ... +50°C
Humidity: Operation: 20% ... 75%
Storage: 10% ... 90%
Operation principle: Direct projection system
Positioning accuracy ±0.25°
Measurement principle: Bracketing procedure
Measurement range: 0 ... 40dB
Measurement accuracy: 1dB
Max. stimulus intensity: 1273cd/m
Stimulus colour: yellow, 592±2nm
Stimulus size: Goldmann III, Goldmann V
Stimulus duration: 100ms, 200ms, 500ms
Stimulus interval: Fixed 3 sec, adaptive
Background intensity (I): 31.4asb, (10cd/m
Background colour (I): White (colour temp. 2854K)
T1A/250V (high braking)
T2A/250V (high braking)
2
(390 x 400mm)
2
(4000asb)
2
)
5.4 Designations
Safety Class B instrument, international safety code
of protection against electrical shock hazard.
Swiss safety mark
OFF Power supply to the OCTOPUS 101 is
interrupted.
ON Power supply to the OCTOPUS 101 is
connected.
Electrical fuse
Protective ground lead connection
Ground
Technical specifications subject to change without notice.
Safety regulations
The perimeter complies with the EN 60601-1, safety class B
instrument.
5.3 EMC
The OCTOPUS Perimeter 101 complies with the requirements
of the 89/336/EEC directive for ‘Electromagnetic Compatibility’.
The instrument is designed and manufactured in a way that
generation and emission of electromagnetic parasitic signals is
limited to levels that other appliances are not influenced in their
specified functions. Adequate inherent consistency
against externally interfering
provided.
Page 10/11 © INTERZEAG
electromagnetic signals is

OCTOPUS Perimeter 1-2-3 Instruction Manual
6 C
QM System in accordance with: SN EN ISO 9001 and
Certified by: Bureau Veritas Quality International
This product is in conformity with the following directives and
standards:
ERTIFICATIONS AND CE MARKING
EN 46001
Directives
• 93/42/EWG Medical Devices
• 89/336/EWG Electromagnetic Compatibility (EMC)
Standards
• EN 60601-1: 1990
• EN 60601-1/A1: 1993
• EN 60601-1/A2: 1995
• EN 60601-1/A13: 1996
• EN 60601-1-2: 1993
• CISPR 11: 1990
CE Marking
Safety regulations
The perimeter complies with the EN 60601-1, safety class B
instrument.
© INTERZEAG Page 11/11
 Loading...