

Page 1

Interton Ready
User guide
Receiver-In-Ear hearing aids
Page 2

2 3
Left Hearing Aid Right Hearing Aid
Serial number Serial number
Model number Model number
Receiver type
Low Power
Medium Power
High Power
Ultra Power
Receiver type
Low Power
Medium Power
High Power
Ultra Power
Receiver length
0 1 2 3 4
Receiver length
0 1 2 3 4
Battery size
312 13
Open/ standard
fitting:
Small
Medium
Large
Small
Medium
Large
Tulip Earmould
Open dome Power dome Tulip dome RIE mould
Programme Beep Description
1
2
3
4
Specific features supported by your hearing system:
Power-on Delay on page 13
AutoPhone on page 22
Telecoil on page 24
Direct Audio Inputon page 26
Tinnitus Sound Generator on page 29
Hearing aid type designations for models included in this user guide are:
BRIE, FCC ID: X26BRIE, IC: 6941C-BRIE; VE312, FCC ID: X26VE312, IC: 6941C-VE312. Please see page 7
for list of models referring to all types.
This device includes an RF transmitter which operates in the frequency band of 2.4 GHz – 2.48 GHz.
Nominal RF output power transmitted is 0 dBm.
Page 3

4 5
1 Introduction
Congratulations on the purchase of your new hearing aids. Interton’s innovative sound technology and
design, combined with the customized programming selected by your hearing care professional, will
make hearing a more enjoyable experience.
Please read this manual carefully in order to wholly benefit from the use of your hearing aids. With
proper care, maintenance, and usage, your hearing aids will serve you in better communication for
many years.
Ask your hearing care professional if you have any questions.
2 Intended use
Generic air-conduction hearing aids are wearable sound-amplifying devices intended to compensate
for impaired hearing. The fundamental operating principle of hearing aids is to receive, amplify, and
transfer sound to the eardrum of a hearing impaired person.
3 Becoming accustomed to amplification
While purchasing a hearing aid is a major step, it is only one step in a process toward more comfortable
hearing. Successfully adapting to the amplification your hearing aid provides takes time and consistent
use.
You will enjoy more benefits from your Interton hearing aid by taking the following actions:
• Wear the hearing aid regularly in order to get comfortable with using it.
• It takes time to get used to a hearing aid. It may help to begin by wearing your hearing aid for
short periods – even as little as 15 minutes – and then gradually increasing your wearing time. In
a way, it is no different from adjusting to contact lenses. Speak to your hearing care professional,
who can design a schedule tailored just for you.
• As you get more comfortable with the hearing aid, increase the wearing time and wear your
hearing aid in multiple types of listening environments.
It may take as long as several months for your brain to get used to all the “new” sounds around you.
Following these suggestions will give your brain time to learn how to interpret amplification and increase the benefits you get from using a Interton hearing aid.
Page 4

6 7
4 Statement
This device complies with part 15 of the FCC rules and ISED rules.
Operation is subject to the following two conditions:
1. This device may not cause harmful interference.
2. This device must accept any interference received, including interference that may cause undesired operation.
i
NOTE: This equipment has been tested and found to comply with the limits for a Class B digital
device, pursuant to part 15 of the FCC rules and ISED rules. These limits are designed to provide
reasonable protection against harmful interference in a residential installation. This equipment
generates, uses and can radiate radio frequency energy and, if not installed and used in accordance with the instructions, may cause harmful interference to radio communications. However,
there is no guarantee that interference will not occur in a particular installation. If this equipment
does cause harmful interference to radio or television reception, which can be determined by
turning the equipment off and on, the user is encouraged to try to correct the interference by
one or more of the following measures:
• Reorient or relocate the receiving antenna.
• Increase the separation between the equipment and receiver.
• Connect the equipment into an outlet on a circuit different from the one in which the receiver is connected.
• Consult the dealer or an experienced radio/TV technician for help.
Changes or modifications can void the user´s authority to operate the equipment.
The products are in compliance with the following regulatory requirements:
• In EU: the device conforms to the Essential Requirements according to Annex I of Council Directive 93/42/EEC for medical devices (MDD) .
• Hereby, Interton A/S declares that the radio equipment types BRIE and VE312 are in compliance
with Directive 2014/53/EU. The full text of the EU declaration of conformity is available at the
following internet address: www.interton.com/legal
• In US: FCC CFR 47 Part 15, subpart C.
• Other identified applicable international regulatory requirements in countries outside the EU
and US. Please refer to local country requirements for these areas.
• In Canada: these hearing aids are certified under the rules of ISED.
• Japanese Radio Law and Japanese Telecommunications Business Law Compliance. This device
is granted pursuant to the Japanese Radio Law (電波法) and the Japanese telecommunications
Business Law (電気通信事業法) This device should not be modified (otherwise the granted designation number will become invalid
Mini Receiver In-the-Ear (RIE) hearing aids of type VE312 with FCC ID: X26VE312, IC number 6941C-
VE312 and size 312 battery are available in the following variants:
RD661-DRW, RD461-DRW, RD361-DRW, RD261-DRW
Receiver-in-the-ear (RIE) hearing aids of type BRIE with FCC ID X26BRIE, IC number 6941-BRIE and
size 13 battery are available in the following variants:
RD662-DRW, RD462-DRW, RD362-DRW, RD262-DRW
Page 5

8 9
5 Contents
1 Introduction .........................................................4
2 Intended use ........................................................4
3 Becoming accustomed to amplification .........5
4 Statement ............................................................6
5 Contents ..............................................................8
6 Descriptions ......................................................10
6.1 Your hearing aid RD61/RD62 .............................10
6.2 Recognising left and right hearing aid ..........12
7 Getting started .................................................13
7.1 On/Off function .....................................................13
7.1.1 Power-on Delay ..................................................... 13
7.2 Inserting/Replacing the battery ........................ 13
7.3 Low battery indicator ..........................................14
7.3.1 Low battery indicator when paired with
wireless accessories only ....................................15
7.4 Insert/Remove hearing aid .................................16
7.4.1 Insert earmould .....................................................16
7.4.2 Remove earmould ................................................. 17
7.4.3 Insert receiver wire with dome .......................... 17
7.4.4 Remove receiver wire with dome ......................18
7.4.5 Sports lock..............................................................18
7.5 Operation of the hearing aid .............................. 18
7.5.1 Push button and Multi-function button ...........18
8 Telephone use ....................................................21
8.1 Using Interton Hearing Aids with
iPhone, iPad, and iPod touch (optional) ...........21
8.2 Using Interton hearing aids with
Smartphone apps ................................................ 22
8.2.1 Intended use of smartphone apps ...................22
8.3 Cellular phones ..................................................... 22
8.4 AutoPhone .............................................................22
8.4.1 Place the AutoPhone magnets ......................... 23
8.4.2 How to use AutoPhone ....................................... 24
8.5 Telecoil (62-DRW only) ........................................ 24
8.5.1 Teleloop systems .................................................25
8.5.2 HAC Telephone .....................................................25
8.6 Direct Audio Input (optional) ............................26
8.6.1 Connecting DAI .................................................... 27
8.6.2 Disconnecting DAI ............................................... 27
8.7 Flight mode (optional) ........................................ 28
9 Tinnitus Sound Generator (TSG) module .....29
9.1 Intended use for the TSG module ....................29
9.2 User instructions for the TSG module ............ 29
9.2.1 Description of the device ...................................29
9.2.2 Explanation of how the device functions .......29
9.2.3 TSG volume control .............................................30
9.3 Using TSG with smartphone apps .....................31
9.4 The scientific concepts that form the basis
for the device .........................................................31
9.5 Technical Specifications ...................................... 31
9.5.1 Audio signal technology ...................................... 31
9.5.2 Available sounds .................................................. 32
9.6 Prescription use of a Tinnitus Sound
Generator (TSG) hearing aid .............................32
9.7 Important notice for prospective sound
generator users ....................................................33
10 The receiver wire ............................................. 34
11 How to apply domes ....................................... 34
11.1 Standard domes ..................................................34
11.2 Tulip domes .......................................................... 35
12 Wireless accessories ........................................36
13 Care and maintenance .....................................37
13.1 Daily maintenance ...............................................38
13.2 Cleaning the receiver wires and domes .........38
13.3 Cleaning RIE or moulds
(does not apply for UP moulds) ........................38
13.4 Change wax guards .............................................39
14 General warnings .............................................40
15 Using Interton hearing aids with
Interton apps for smartphones .................... 42
15.1 Intended use of Interton apps for
smartphones: ........................................................42
15.2 General precautions ............................................42
16 AutoPhone warnings....................................... 43
16.1 AutoPhone precautions......................................43
17 Important points for FM ................................. 44
18 Tinnitus Sound Generator (TSG) warnings . 45
18.1 TSG precautions ...................................................45
18.2 TSG warning to hearing care professionals ...45
19 Battery warnings ..............................................47
20 Hearing aid expectations ............................... 49
21 Warning to hearing aid professionals
(US Only) ........................................................... 50
22 Important notice for prospective hearing
aid users (US Only) ......................................... 50
23 Children with hearing loss (US Only) .............51
24 Technical specifications .................................50
25 Troubleshooting guide ................................... 56
26 Warranties and repairs ................................... 60
27 Temperature test, transport and storage
information .........................................................61
28 Advisories ...........................................................61
Page 6

6
543
13 1411 12
10
16
1
8
2
7
15
9
1
8
2
7
10 11
RD 62-DRW
RD 61-DRW
6 Descriptions
6.1 Your hearing aid – RD 61 / RD 62
1. Receiver wire
2. Open dome
3. Tulip dome
4. Power dome
5. RIE mould
6. Sports lock
7. Battery door
8. Receiver
9. Push button (only for RD 61 models)
10. Multi-function button (only for RD 62
models)
11. LP receiver wire
12. MP receiver wire
13. HP receiver wire
14. UP receiver/mould
15. Model, and serial number (in battery
chamber)
16. Direct audio input (only for RD 62
models)
Page 7

2
1
3
12 13
6.2 Recognising left and right hearing aid
If you have two hearing aids, they may be tuned differently. One for your left ear, the other for your
right. Do not swap them. Please pay attention to this when cleaning, storing and inserting the hearing
aids.
You might want to ask your hearing care practitioner to mark your hearing aids with a coloured Left
and Right indication: Left is blue and Right is red.
Left Right
7 Getting started
Once you have placed the hearing aids on your ears, you can turn them on.
The hearing aid always starts in programme 1 and with the pre-set volume.
7.1 On/Off function
1. Close the battery door to turn on the hearing aid in programme 1 (one).
2. Open the battery door to turn off the hearing aid. Use your fingernail
to pull it open.
i
NOTE: To save battery power, turn off your hearing aids when they are
not in use.
7.1.1 Power-on Delay
Power-on Delay delays the time before the hearing aid turns on after you close
the battery door. With Power-on Delay, you will hear a beep ( etc.) for each
second of the delay period (5 or 10 seconds delay).
If you do not want to turn on the hearing aids prior to placing them on your
ear, ask your hearing care professional to deactivate Power-on Delay.
7.2 Inserting/Replacing the battery
1. Open the battery door completely by using your fingernail. Remove
the used battery if present.
On
Off
Page 8

14 15
2. Prepare the new battery (please refer to page 2 for information on appropriate battery type/size
for your hearing aid). Remove the protective foil to activate the battery.
3. Wait for 2 minutes before inserting the battery into the hearing aid.
4. Insert the new battery with the positive side in the correct position. Always insert the battery in
the door: never directly into the hearing aid.
5. Gently close the battery door.
i
1. Always use new Zinc-Air batteries that have a minimum remaining shelf life of 1 year.
2. Whenever the hearing aids are not in use, remember to turn them off to avoid unnecessary
battery consumption.
3. At night, switch off the hearing aid and open the battery door completely to allow moisture
to evaporate and prolong the hearing aid’s lifespan.
4. If the hearing aid is experiencing frequent loss of connection to Interton wireless accessories,
contact your hearing care professional for a list of low impedance batteries.
i
WARNING: Batteries contain dangerous substances and should be disposed of carefully in the
interest of your safety and for the environment. Also, keep batteries away from pets, children and
mentally disabled persons.
7.3 Low battery indicator
When the batteries are low on power, your hearing aids reduce the volume, and play a melody every 15
minutes until they are empty and turn off.
i
NOTE: Keep spare batteries on hand.
7.3.1 Low battery indicator when paired with wireless accessories only
The batteries drain faster when you use wireless functionalities like streaming from your smartphone
or from your TV via TV Streamer 2.
As the battery power goes down, the wireless functions stop working. A short melody every five minutes indicates that battery power is too low.
The table below shows how the functionality shifts with the power level of the battery.
Battery level Signal Hearing aid Remote Control Streaming
Fully charged
P P P
Low
P P O
Depleted
(change battery)
P O O
Page 9

16 17
7.4 Insert/Remove hearing aid
For comfort, always turn off your hearing aids before you insert or remove them.
7.4.1 Insert earmould
1. Hold the earmould between your thumb and index finger and position its
sound outlet in your ear canal.
2. Slide the earmould all the way into your ear with a gentle, twisting movement.
3. Move the earmould up and down and gently press to place it correctly in
the ear. Opening and closing your mouth can ease insertion.
4. Make sure the hearing aid sits firmly behind the ear.
By experimenting, you may discover an easier method. With proper insertion,
hearing aids should fit snugly but comfortably.
i
NOTE: It may be helpful to pull your ear up and outward with your opposite hand during insertion.
i
CAUTION: Never attempt to modify the shape of the hearing aid, earmoulds, or tubing yourself.
7.4.2 Remove earmould
1. Lift the hearing aid from behind the ear. For a moment, let it hang beside your ear.
2. Gently pull the removal cord (not the hearing aid or the tubing) to pull the hearing aid from the
ear.
i
NOTE: For receiver wire custom earmoulds, grasp the removal cord and pull the earmould outward.
3. Remove the earmould completely by gently twisting it.
7.4.3 Insert receiver wire with dome
1. Hang the hearing aid over the top of
the ear.
2. Hold the receiver wire where it bends
and gently place/push the dome into
the ear canal. Push the dome far
enough into the ear canal so that the
receiver wire lies flush with the head
(check with a mirror).
i
NOTE: To avoid whistling, it is important that the tube and the dome fit correctly into your ear.
For other possible reasons, check with the Troubleshooting guide.
i
CAUTION: Never attempt to bend or modify the shape of the receiver wire.
Page 10

18 19
7.4.4 Remove receiver wire with dome
1. Hold the receiver wire with your thumb and forefinger and remove the receiver wire.
7.4.5 Sports lock
Your hearing care professional will apply and adjust the Sports lock.
7.5 Operation of the hearing aid
7.5.1 Push button or Multi-function button
Your hearing aid is equipped with a push button (61 models) or a multi-function button (62 models)
allowing you to use up to four different listening programmes, each of them suitable for certain situations.
1. Tap the push button or multi-function button to switch between programmes.
2. You will then hear one or more beeps. The number of beeps indicates which programme you
have selected (one beep = programme one, two beeps = programme two, etc.).
3. When you turn the hearing aids off and then back on, they always return to the default setting
(programme one and preset volume).
It should not be necessary to control the volume manually. However, in addition to controlling listening programmes, the multi-function button (62 models only) provides you with the ability to adjust the
amplification to your liking.
Your hearing care professional can configure your multi-function button so that you can control the
volume and switch between listening programmes.
Push button (61 models only) Multi-function button (62 models only)
If necessary, your hearing care practitioner can change the default settings for the multi-function button and fill in the following table to indicate the new settings:
Multi-function button action Default setting New Setting
Short press up Increases volume
Short press down Decreases volume
Long press up (3 seconds) Changes programmes
Long press down (3 seconds) Activates streaming
Page 11
20 21
8 Telephone use
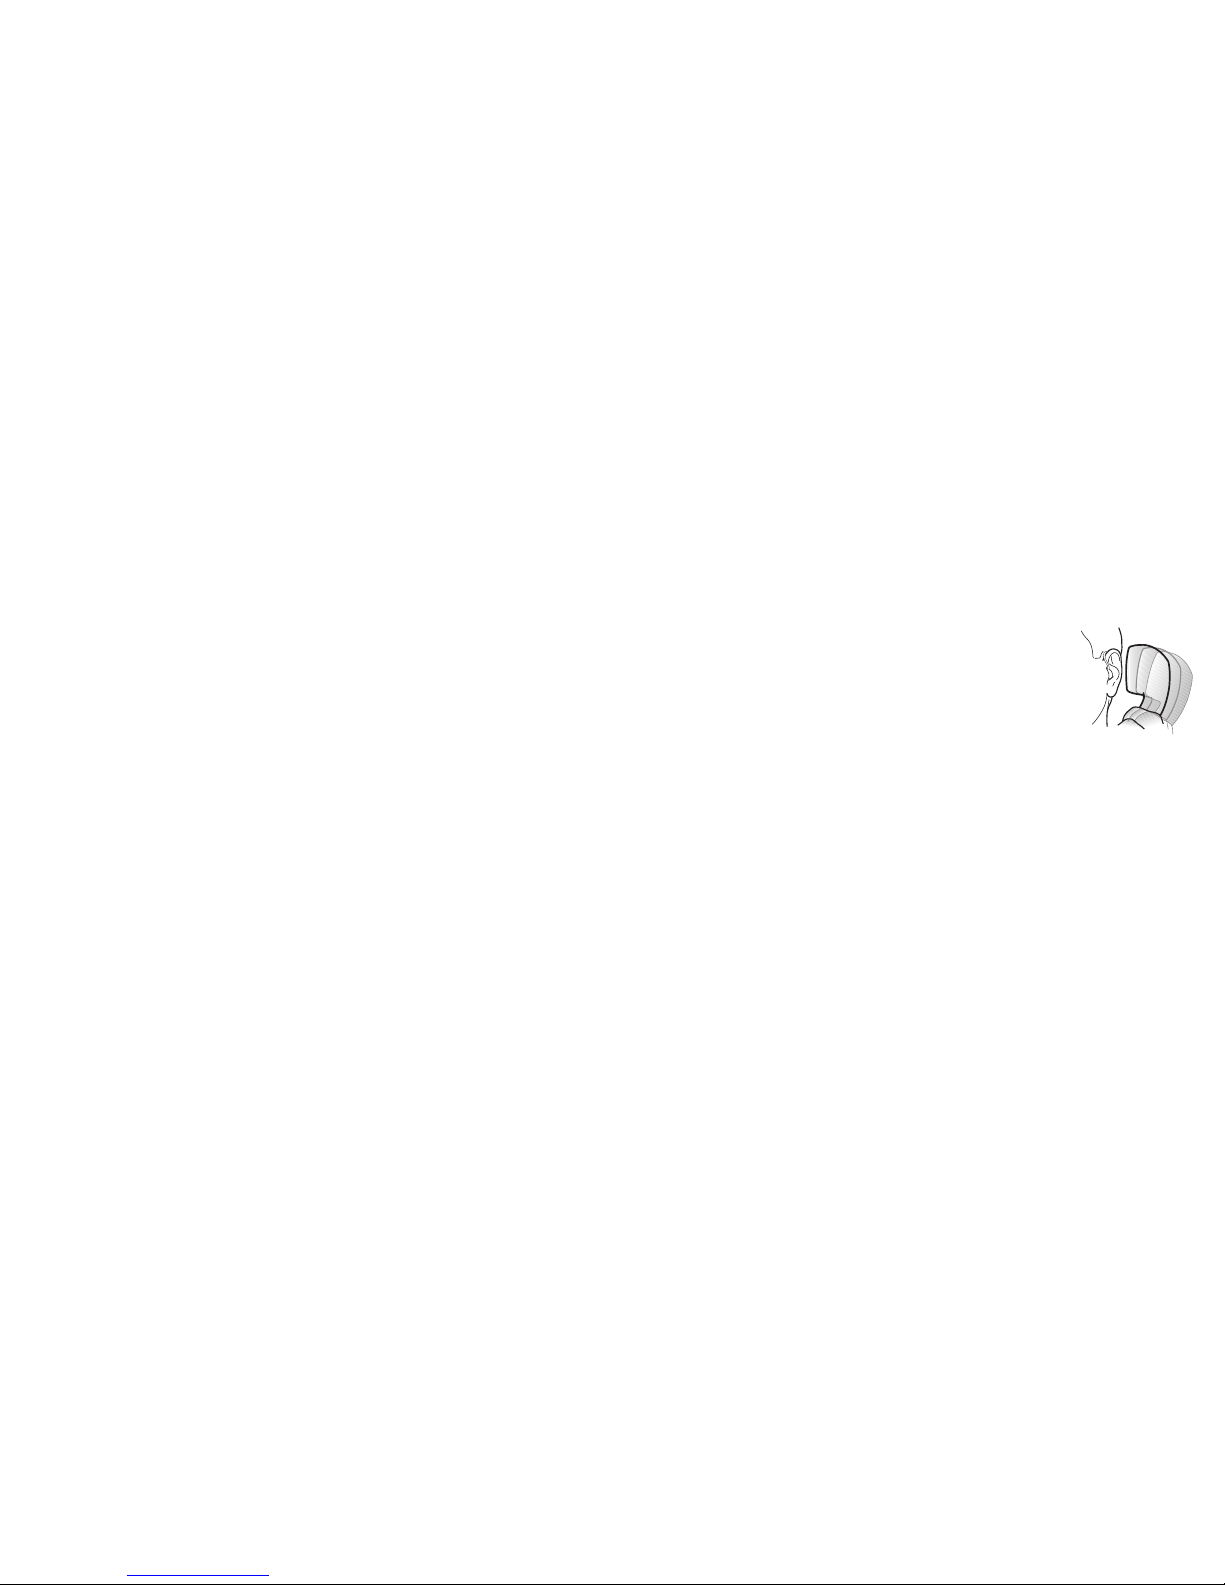
Your hearing aid allows you to use the telephone as you normally do. However,
finding the optimal position for your telephone may require practice.
The following suggestions may be helpful:
1. Hold the telephone up to your ear.
2. Hold the telephone towards the top of the ear (closer to where the
microphones are).
3. If whistling occurs, it may take a few seconds of holding the telephone
in the same position before the hearing aid eliminates the feedback.
4. Whistling may stop by holding the telephone slightly away from the ear.
i
NOTE: Depending on your individual needs, your hearing care professional may activate a programme specifically for telephone use.
8.1 Using Interton Hearing Aids with iPhone, iPad, and iPod touch (optional)
Interton Ready hearing aids are Made for Apple*, and allow for direct communication and control with
an iPhone, iPad, or iPod touch.
i
NOTE: For assistance with pairing and using these products with your Interton Ready device,
please contact your hearing care professional.
i
NOTE: If you have two hearing aids with the Push button synchronization enabled, programme
changes to one hearing aid automatically repeats in the second hearing aid. When you change a
programme in one hearing aid, it responds with one or more beeps. The same number of confirmation beeps in the second aid follow. This Push button synchronization can also be configured
to allow one side to control volume increase and the other side to control volume decrease. The
volume changes to one hearing aid are repeated on the other side to keep the levels the same.
*
Feature is only available in Interton Ready 6 and 4.
Page 12
22 23
8.2 Using Interton hearing aids with smartphone apps
Use with smartphone apps:
• Do not disable app notifications.
• Install updates to keep the app working correctly.
• Only use the app with hearing aids from Interton. Interton takes no responsibility if the app is
used with other hearing aids.
• If you want a printed version of the smartphone app user guide, please go to our website at
www.interton.com/get-going-rie or consult customer support.
8.2.1 Intended use of smartphone apps:
The app must only be used with Interton hearing aids for which they are intended, and Interton takes
no responsibility if the app is used with other hearing aids.
8.3 Cellular phones
Your hearing aid complies with the most stringent Standards of International Electromagnetic Compatibility. However, not all cell phones are hearing aid compatible (HAC).
Any degree of disturbance can be due to the nature of your particular cellular phone or of your wireless
telephone service provider.
i
NOTE: If you find it difficult to obtain a good result while using your cellular phone, your hearing
care professional will be able to give you advice on available wireless accessories to enhance
listening capabilities.
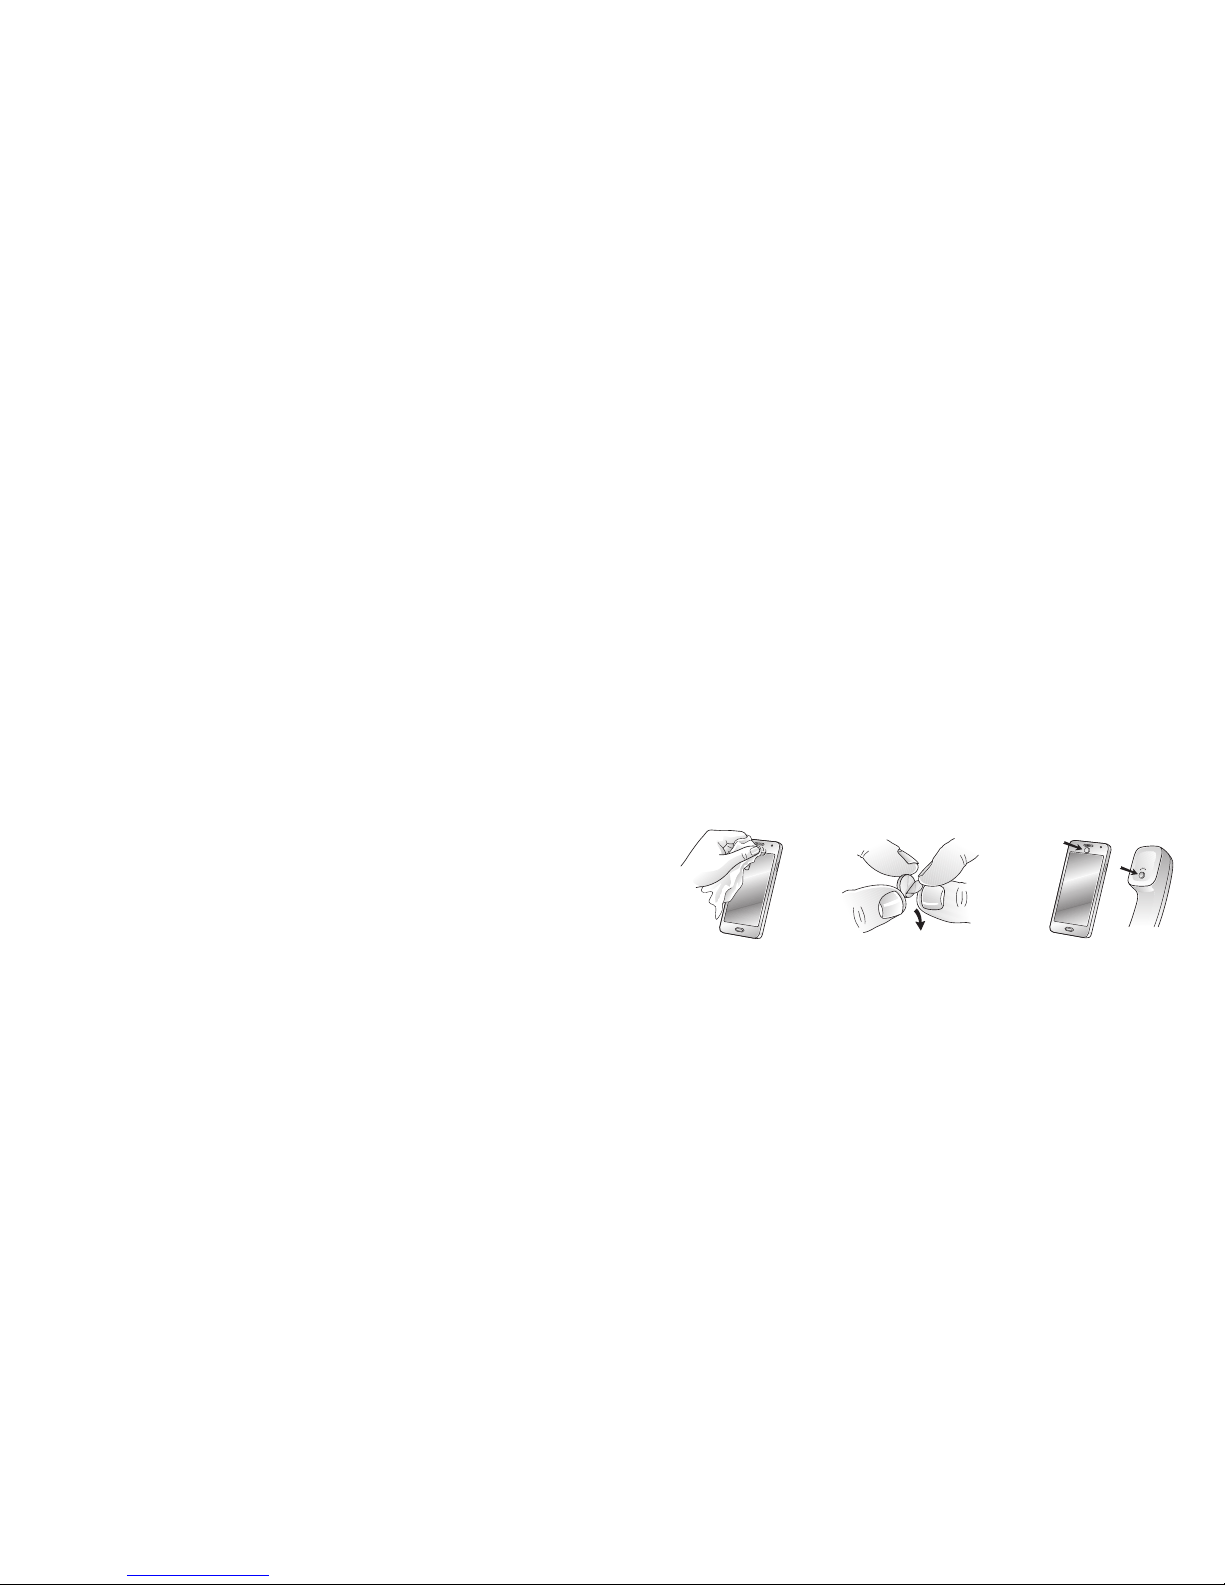
8.4 AutoPhone
By placing a magnet on the telephone receiver, your hearing aids automatically switch the telephone
programme on when the receiver is close to your ear.
When you remove the receiver from your ear, the hearing aids automatically return to the previous
listening programme.
i
NOTE: Ask your hearing care professional to enable AutoPhone as
one of your programmes.
8.4.1 Place the AutoPhone magnets
Follow these steps in order to place the AutoPhone magnet properly:
Clean the telephone thoroughly. Remove foil from magnet. Place the magnet.
Page 13
24 25
8.5.1 Teleloop systems
To use teleloop systems, follow these steps:
1. Switch your hearing aid to the Telecoil programme.
2. Find a good spot. Reception is not clear in all locations; it depends on the induction loop. Look
for signs or find another spot to sit.
3. If needed, adjust the volume.
4. When you leave, switch to programme 1.
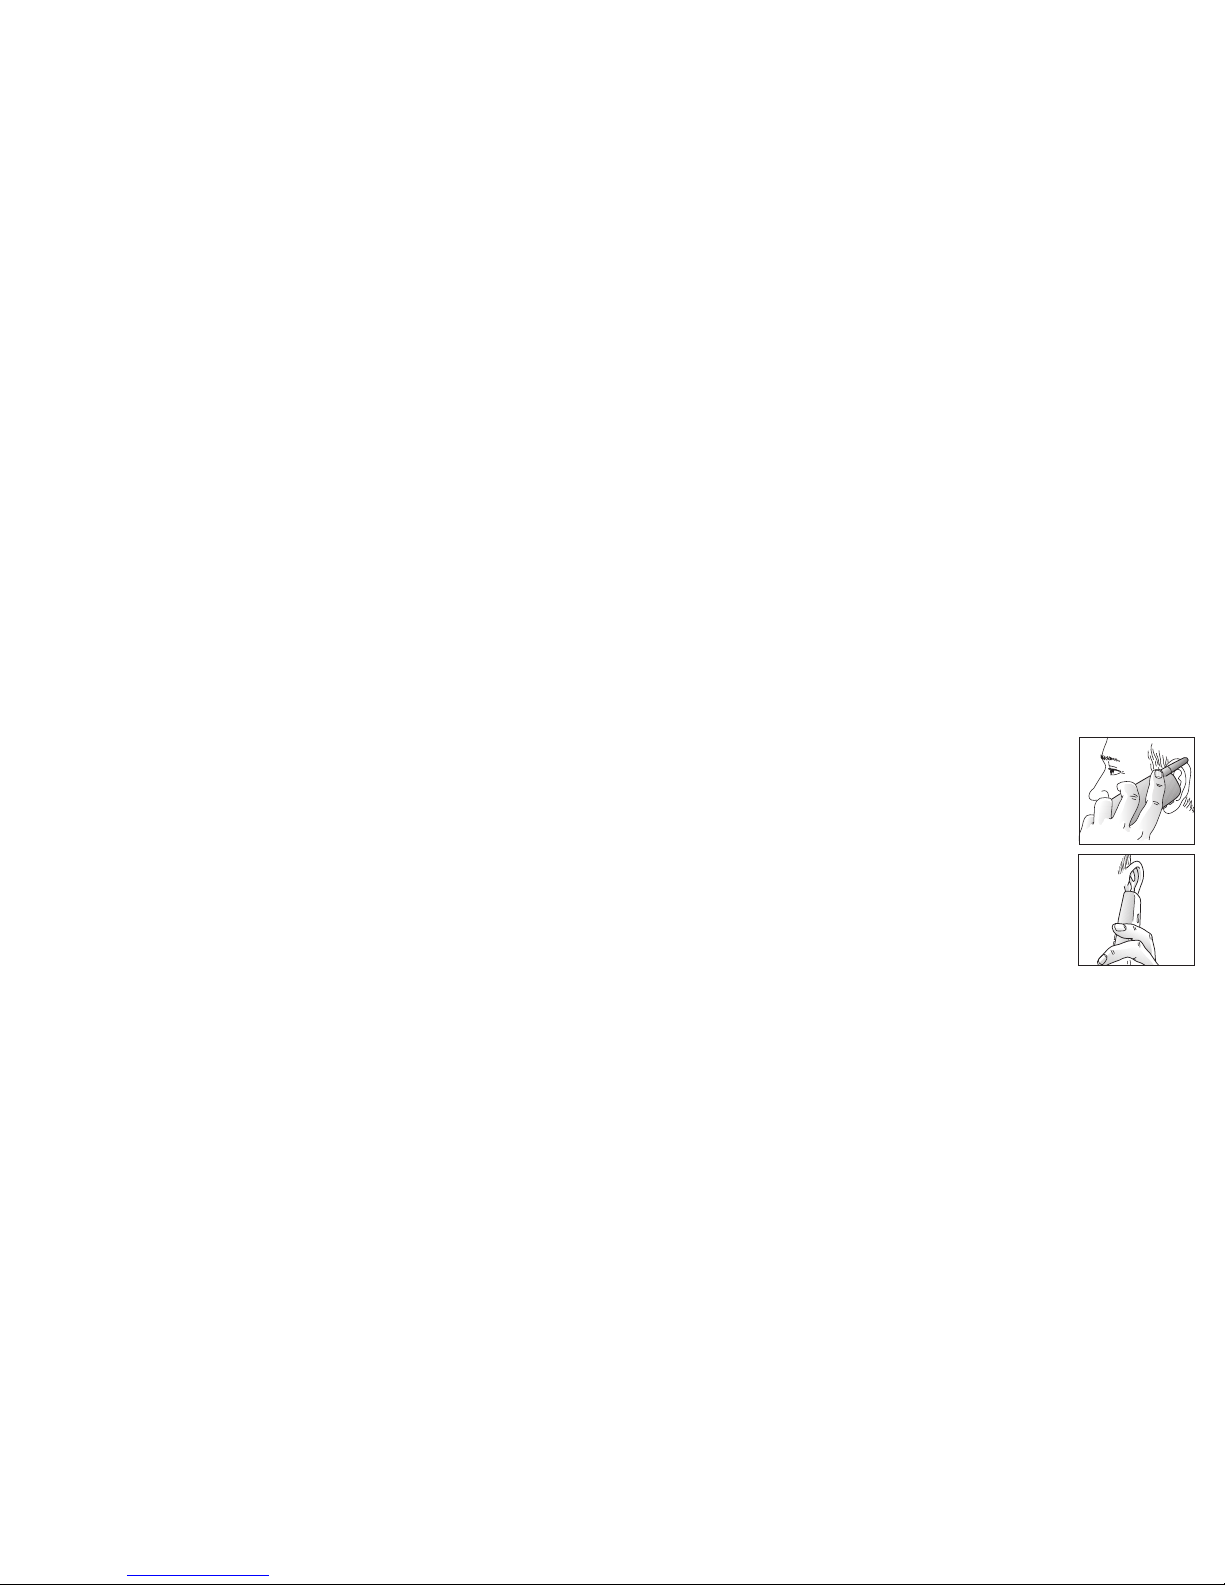
8.5.2 HAC Telephone
The telecoil picks up the HAC telephone’s telecoil signal and converts it to
sound.
To use the HAC telephone, follow these steps:
1. Switch your hearing aid to the Telecoil programme.
2. Pick up the telephone and place a call or answer a call.
3. Hold the telephone behind your ear – close to the hearing aid, and tilt it
slightly outwards.
4. Listen to the dialling tone and move the telephone to get the best reception.
5. If needed, adjust the volume.
6. When you hang up, switch to programme 1.
i
NOTE: If the phone has a poor telecoil signal, try to use a microphone
programme. To avoid whistling, move the handset slightly away from your
ear.
i
NOTE: If you experience frequent signal loss or noise during calls, move the AutoPhone magnet
to another place on the telephone receiver.
8.4.2 How to use AutoPhone
1. Lift the telephone to your ear.
2. When you hear a short melody, the phone programme is active.
i
NOTE: If your hearing aids have enabled the Comfort Phone functionality, the hearing aid on the
non-phone ear automatically turns down the volume.
8.5 Telecoil (62-DRW only)
Your hearing aid may be equipped with a telecoil. The Telecoil programme may help to improve speech
understanding with Hearing Aid Compatible telephones and in theatres, cinemas, houses of worship etc.
that has teleloop installed.
The telecoil cannot work without a teleloop (a.k.a. induction-loop) or a Hearing Aid Compatible (HAC)
telephone. When you switch on the Telecoil programme, your hearing aids pick up signals from the teleloop or HAC telephone.
i
NOTE: If you are having trouble hearing with the teleloop, ask you hearing care professional to
adjust the programme.
NOTE: If there is no sound from the hearing aids in a teleloop system and an active Telecoil programme, the teleloop system may not be turned on or is not operating correctly.
Page 14
26 27
8.6 Direct Audio Input (optional) (62-DRW only)
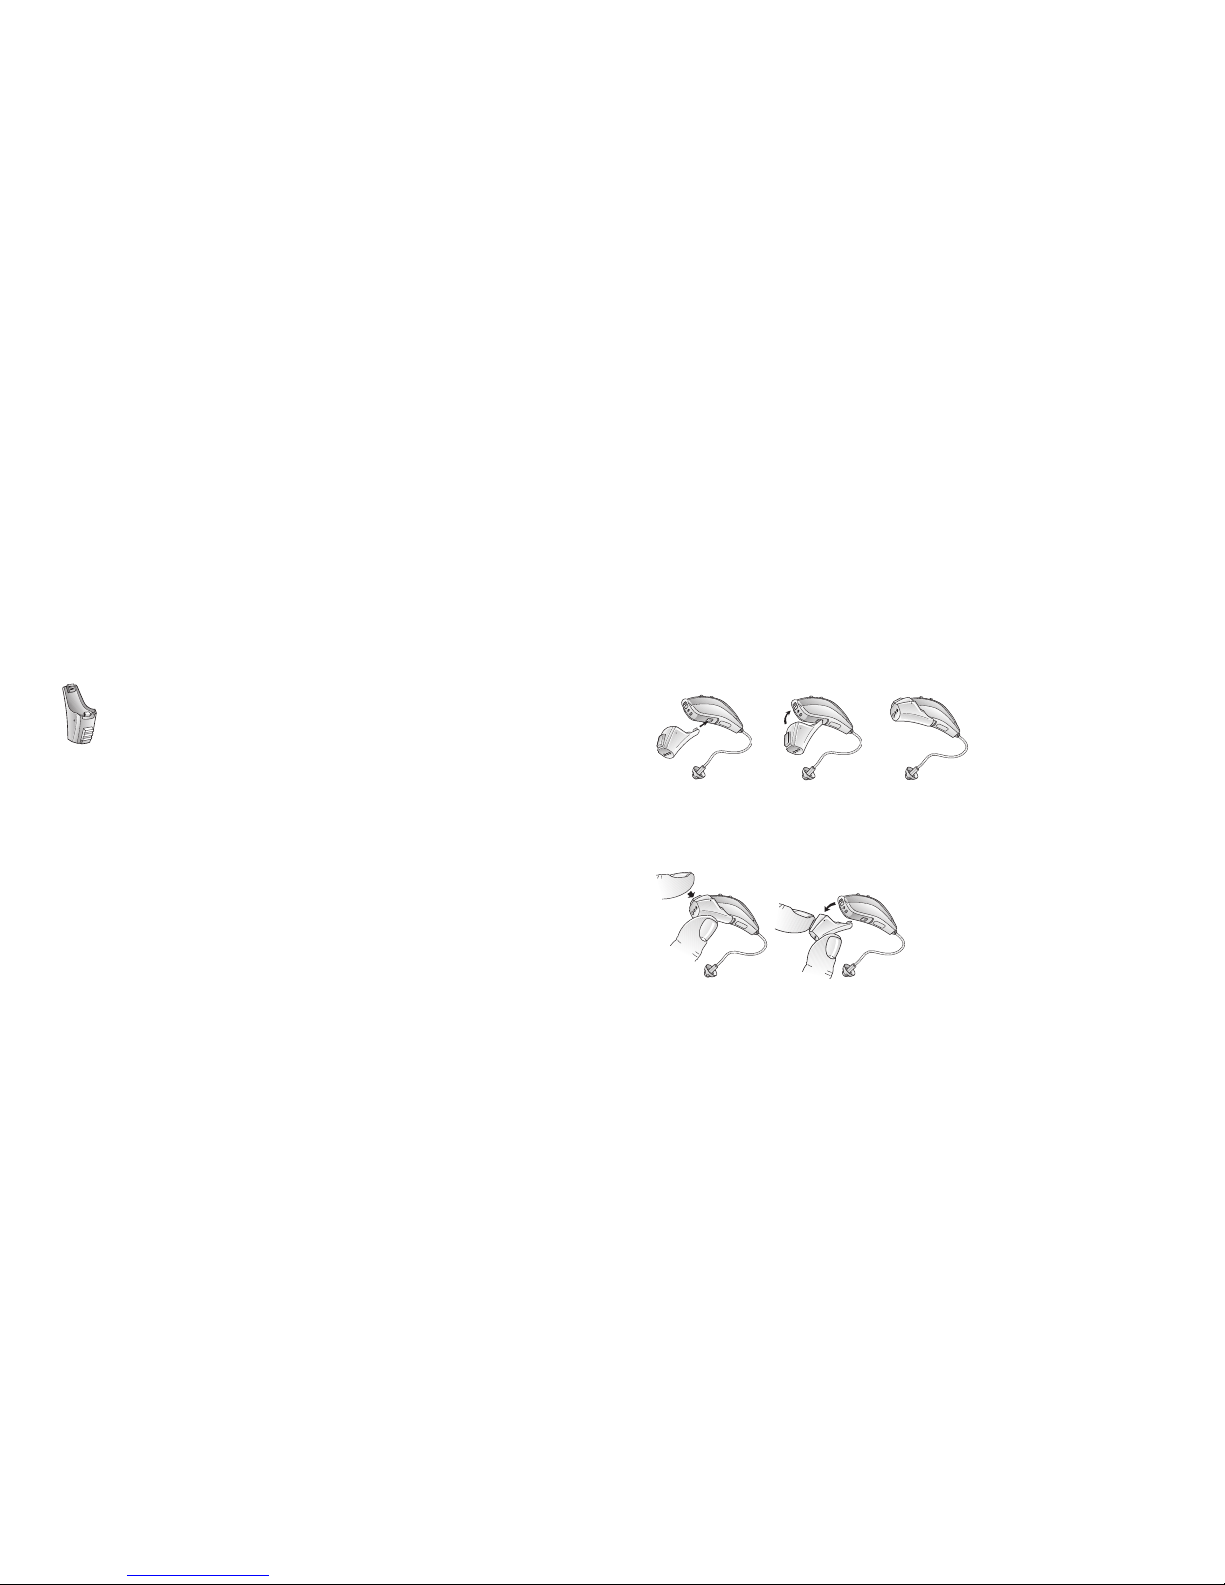
Your hearing aid is equipped with a Direct Audio Input facility. Direct Audio Input allows direct connection of sound sources, a radio, television or even school equipment, to your hearing aid. Often, this will
improve sound quality.
8.6.1 Connecting DAI
1. Align the tip of the DAI click-on adaptor with the groove just above the battery door and below
the model number.
2. Once in place, move the DAI click-on adaptor in the direction of the battery door.
3. Gently click the DAI click-on adaptor onto the hearing aid.
Audio shoe
The sound source transmits to your hearing aid via a cable and a click-on device.
The hearing aid automatically detects the Direct Audio Input (DAI) source. The DAI also supports wireless systems.
Your hearing aid professional can adjust your hearing aids to fit the mix between the digital audio input
and the microphones on your hearing aids. You may, for example, select to lower the ambient sounds
and amplify the sounds from the transmitter.
This accessory connects to the bottom of the hearing aids. Once clicked into place, the hearing aids
automatically close the microphones and switch to DAI.
8.6.2 Disconnecting DAI
1. Press and hold the button on the front side of the DAI click-on adaptor.
2. Gently remove the DAI click-on adaptor from the hearing aid.
Page 15

28 29
8.7 Flight mode (optional)
i
WARNING: When boarding a flight or entering an area where RF transmitters are prohibited,
deactivate wireless functionality.
Your Interton Ready hearing aids allows you to control it from your smartphone or Interton Remote
Control. However, in some areas you are requested to turn off wireless communication.
Follow these steps to turn off wireless mode:
1. For each hearing aid, open and close (open-close, open-close, open-close) the battery door three
times within a 10-second period.
2. Double-dings for ten seconds ( etc.) indicate that your hearing aid is in Flight mode.
Follow these steps to activate wireless mode:
1. For each hearing aid, open and close the battery door once.
2. Your hearing aids are in wireless mode after 10 seconds.
i
NOTE: Both hearing aids must be set in Flight mode - even with synchronisation enabled.
NOTE: It is important to wait an additional 15 seconds after wireless function resumes before
opening and closing the battery door again for any reason. Flight mode will resume if you open
and close the battery door during this 15-second window.
9 Tinnitus Sound Generator (TSG) module
9.1 Intended use for the TSG module
Your Interton hearing aid includes the Tinnitus Sound Generator function, a tool for generating sounds
to be used in tinnitus management programmes to relieve suffering from tinnitus.
The Tinnitus Sound Generator can generate sounds adjusted to the specific therapeutic needs and your
personal preference as determined by your doctor, audiologist, or hearing care professional. Depending
on the selected hearing aid programme and the environment you are in, you will sometimes hear the
therapeutic sound resembling a continuous or fluctuating humming.
9.2 User instructions for the TSG module
9.2.1 Description of the device
The Tinnitus Sound Generator (TSG) Module is a software tool that generates sounds to be used in tinnitus management programmes to relieve suffering from tinnitus.
9.2.2 Explanation of how the device functions
The TSG module is a frequency and amplitude shaped white-noise generator. Noise signal level and frequency characteristics can be adjusted to the specific therapeutic needs as determined by your doctor,
audiologist or hearing care professional.
Your doctor, audiologist or hearing care professional can modulate the generated noise with the purpose of making it more pleasant. The noise can then resemble, for example, crashing waves on a shore.
Page 16

30 31
Modulation level and speed can also be configured to your likes and needs.
If you have two wireless hearing aids that support ear-to-ear synchronisation this functionality can be
enabled by your hearing care professional. This will cause the Tinnitus Sound Generator to synchronise
the sound in both hearing aids.
If your tinnitus troubles you only in quiet environments, your doctor, audiologist or hearing care professional can set the TSG Module so that it becomes audible exclusively in such surroundings. The overall
sound level can be adjusted via an optional volume control. Your doctor, audiologist or hearing care
professional will review with you the need for having such a control.
For hearing aids where ear to ear synchronisation is enabled your hearing care professional can also
enable environmental monitoring synchronisation so that the TSG noise level is automatically adjusted
simultaneously in both hearing aids dependent on the background sound level. Additionally if the
hearing aid has a volume control then the background noise level monitored by the hearing aid and the
volume control can be used simultaneously to adjust the generated noise level in both hearing aids.
9.2.3 TSG volume control
The sound generator is set to a specific loudness level by the hearing care professional. When switching
the sound generator on, the volume will have this optimal setting. Therefore, it might not be necessary
to control the volume (loudness) manually. However, the volume control provides the ability to adjust
the volume, or amount of stimulus, to the liking of the user.
9.3 Using TSG with smartphone apps
The Tinnitus Sound Generator control via hearing aid push buttons can be enhanced with wireless
control from a TSG control app on a smartphone or mobile device. This functionality is available in supported hearing aids when a hearing care professional has enabled the TSG functionality during fitting
of the hearing aid.
To use smartphone apps the hearing aid must be connected with the smartphone or mobile device.
9.4 The scientific concepts that form the basis for the device
The TSG module provides sound enrichment with the aim of surrounding the tinnitus sound with a neutral sound, which is easily ignored. Sound enrichment is an important component of most approaches
to tinnitus management, such as Tinnitus Retraining Therapy (TRT). To assist habituation to tinnitus,
this needs to be audible. The ideal level of the TSG module, therefore, should be set so that it starts to
blend with the tinnitus, and so that you can hear both your tinnitus as well as the sound used.
In a majority of instances, the TSG module can also be set to mask the tinnitus sound, so to provide
temporary relief by introducing a more pleasant and controllable sound source.
9.5 Technical Specifications
9.5.1 Audio signal technology
Digital
Page 17
32 33
9.5.2 Available sounds
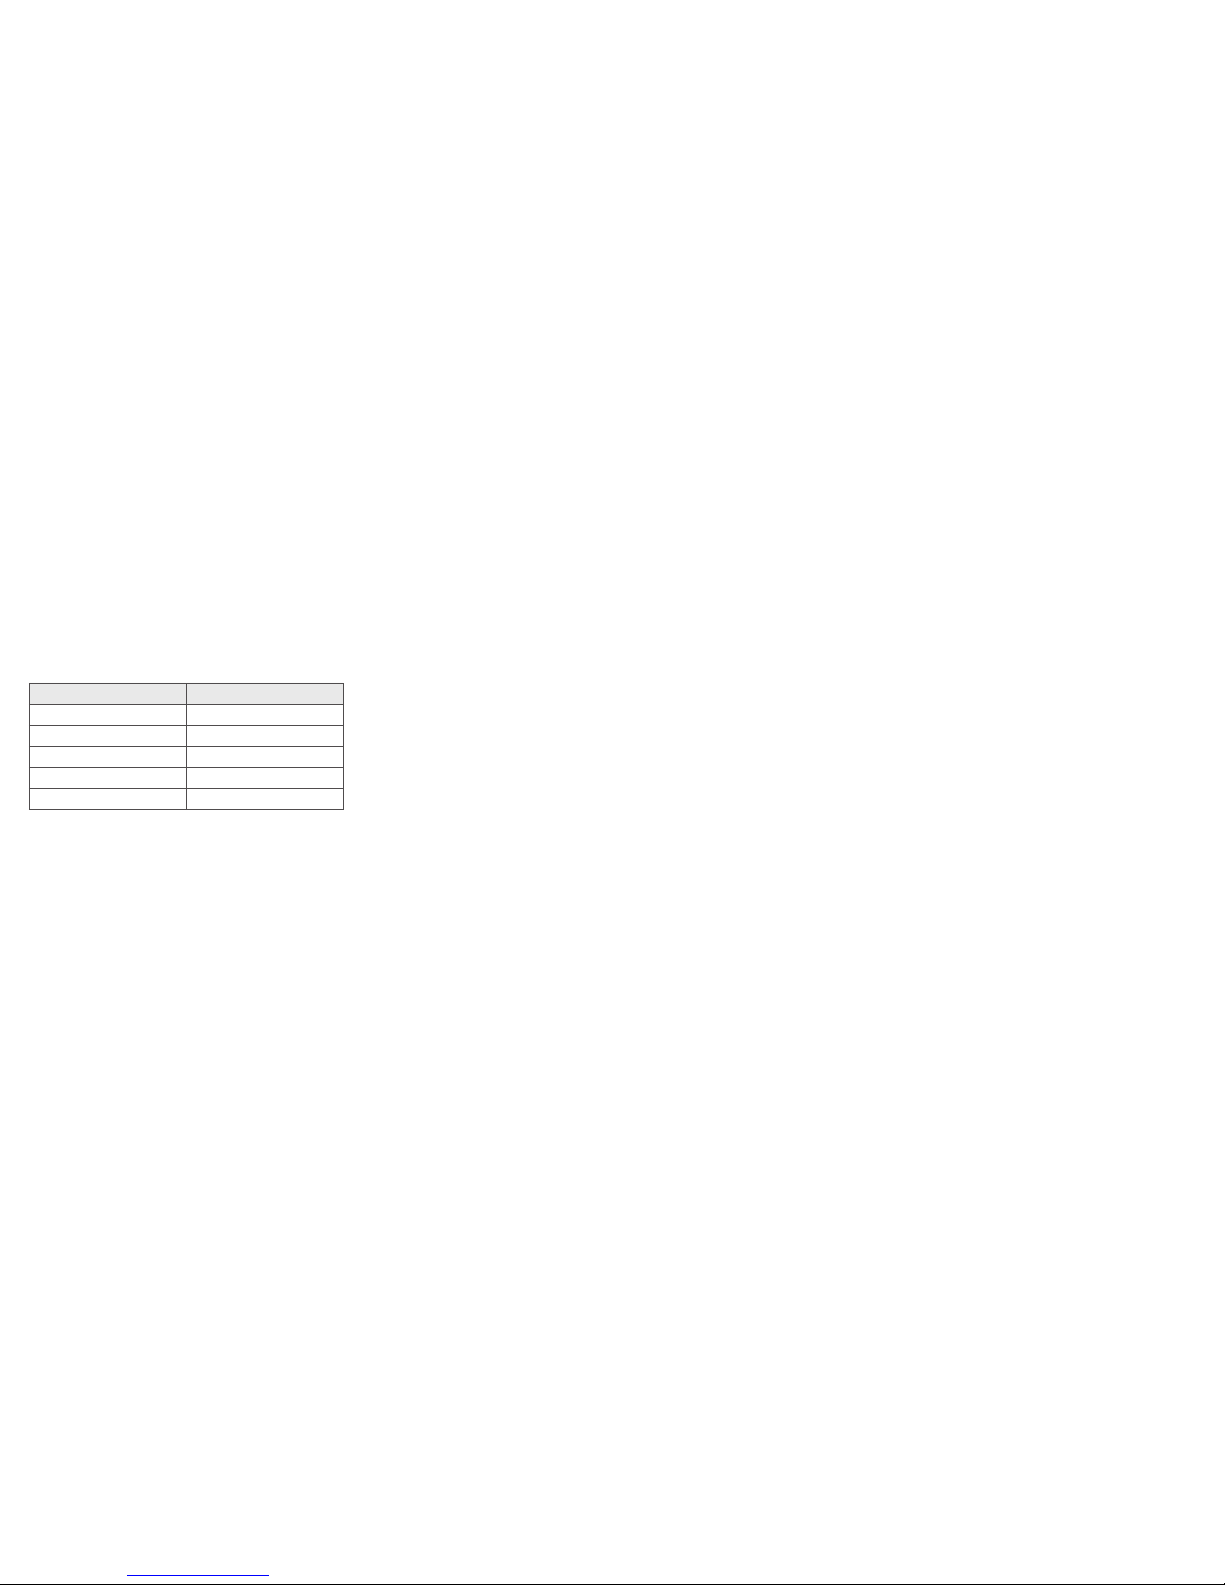
White noise signal which can be shaped with the following configurations:
The white noise signal can be modulated in amplitude with an attenuation depth of up to 14dB.
High-pass filter Low-pass filter
500 Hz 2000 Hz
750 Hz 3000 Hz
1000 Hz 4000 Hz
1500 Hz 5000 Hz
2000 Hz 6000 Hz
9.6 Prescription use of a Tinnitus Sound Generator (TSG) hearing aid
The TSG module should be used as prescribed by your doctor, audiologist or hearing care professional.
In order to avoid permanent hearing damages, the maximum daily usage depends on the level of the
generated sound.
Should you develop any side effects from using the sound generator, such as dizziness, nausea, headaches, perceived decrease in auditory function or increase in tinnitus perception, you should discontinue use of the sound generator and seek medical evaluation.
The target population is primarily the adult population over 18 years of age. This product may also be
used with children 5 years of age or older. However, children and physically or mentally disabled users
will require training by a doctor, audiologist, hearing care professional or the guardian for the insertion
and removal of the hearing aid containing the TSG module.
9.7 Important notice for prospective sound generator users
A tinnitus masker is an electronic device intended to generate noise of sufficient intensity and bandwidth to mask internal noises. It is also used as an aid in hearing external noises and speech.
Good health practice requires that a person with a tinnitus condition have a medical evaluation by a
licensed physician (preferably a physician who specializes in diseases of the ear) before using a sound
generator. Licensed physicians who specialize in diseases of the ear are often referred to as otolaryngologists, otologists or otorhinolaryngologists.
The purpose of medical evaluation is to assure that all medically treatable conditions that may affect
tinnitus are identified and treated before the sound generator instrument is used.
The sound generator instrument is a tool to generate sounds to be used with appropriate counselling
and/or in a tinnitus management programme to relieve patients suffering from tinnitus.
Page 18
21
34 35
10 The receiver wire
The receiver wire contains the wiring to the receiver, which delivers the sound to the ear canal. It is important that the receiver wire and the receiver dome/earmould fits correctly in your ear. If the receiver
wire or the receiver dome/earmould irritates your ear in any way and prevents you from wearing your
hearing aid, please contact your hearing care professional.
You should never attempt to modify the shape of the receiver wire yourself. The receiver wire and the
receiver dome/earmould should be cleaned regularly.
Please see cleaning instructions in chapter 13.2 – 13.4.
11 How to apply domes
It is recommended that your hearing care professional shows you how to change the domes, because
incorrect dome replacement could result in the dome being left in the ear when you remove the hearing aid.
11.1 Standard domes
Follow these steps to mount domes:
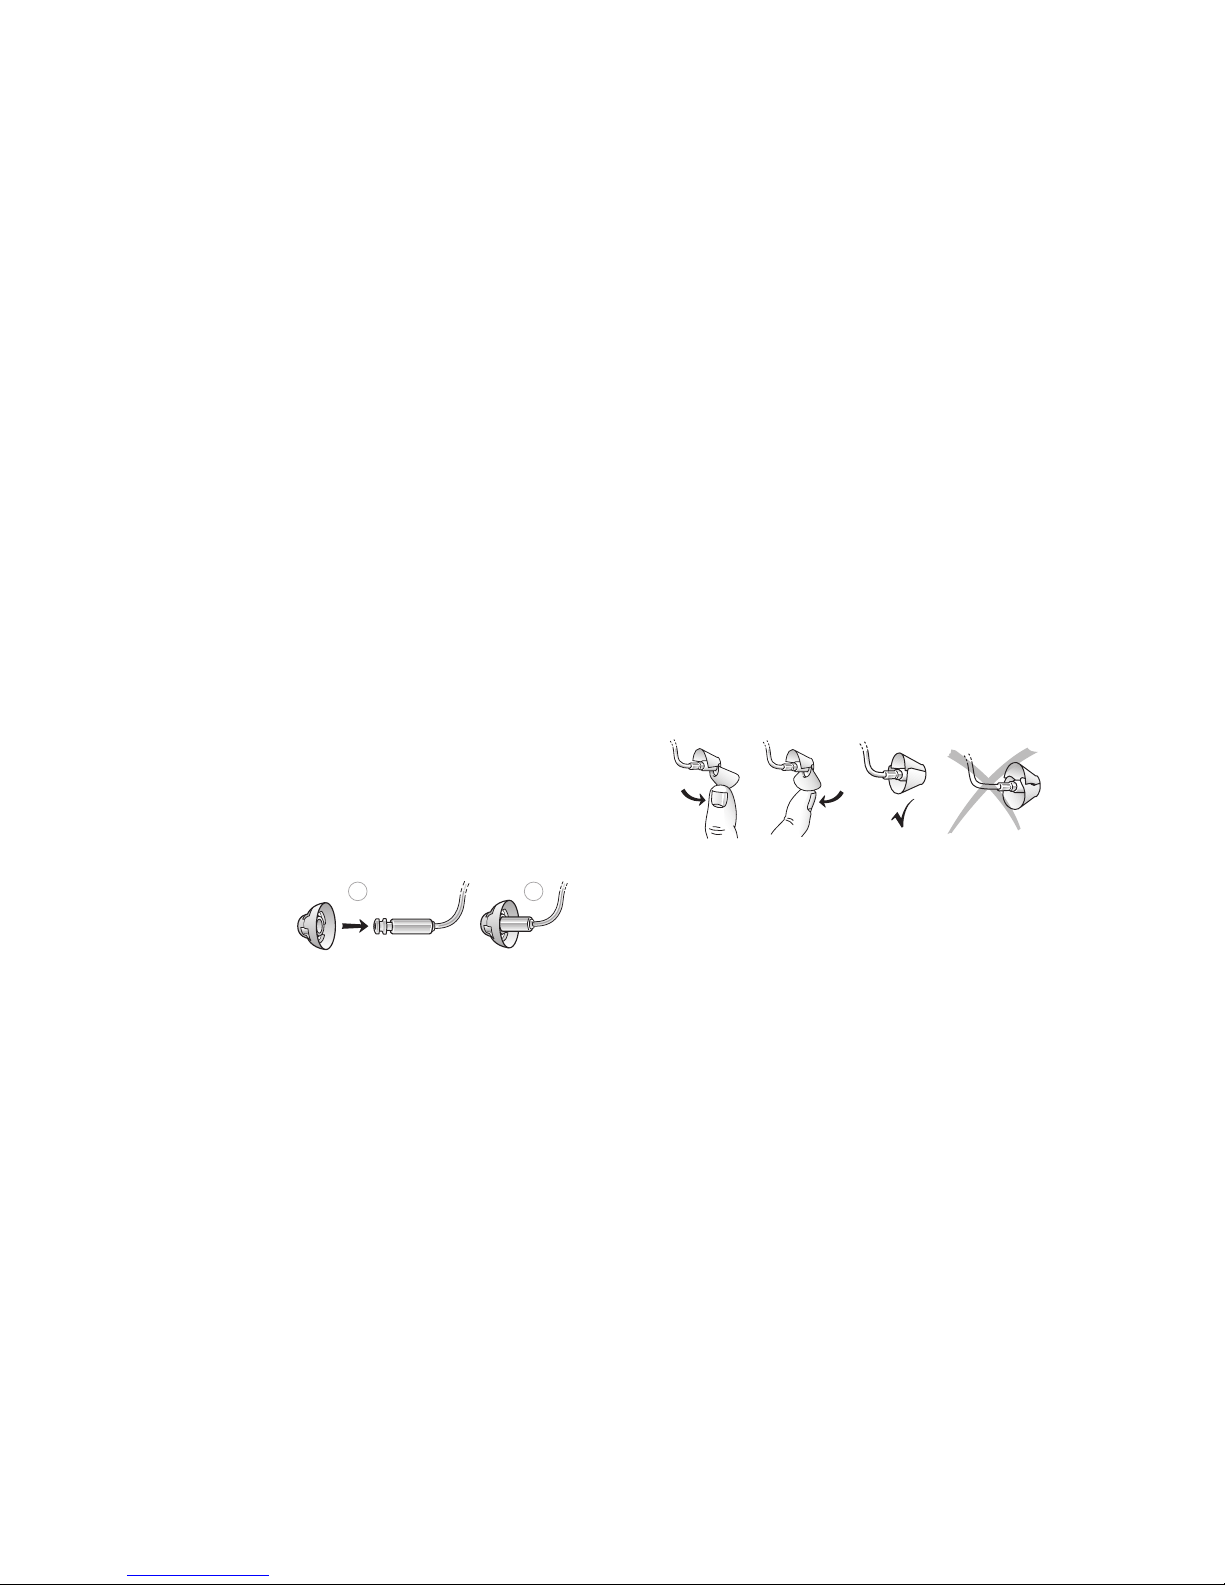
1. Push the new dome over the ribs flange
on the receiver wire.
2. Make sure that the new dome is properly
and securely mounted.
11.2 Tulip domes
The Tulip domes are mounted in a similar manner to the ordinary domes, but a few extra steps are
required. The Tulip domes consist of two “petals”.
Follow these steps to mount domes:
1. Push the largest petal away from the receiver wire using a finger. This bends the petal forward.
2. Push the new tulip dome over the flange.
3. Then push the largest petal backwards, and it will be placed on top of the smaller petal.
i
NOTE: It is important to note that the largest petal is the outermost petal.
4. Make sure that the new dome is properly and securely mounted.
Page 19

36 37
12 Wireless accessories
With Interton wireless accessories, you can stream sound from your TV or music player directly to your
Interton hearing aids and you can also control them without wearing an intermediary device around
your neck.
Ask your hearing care professional for more information on the range of Interton wireless accessories.
TV Streamer 2 allows you to stream the audio from TV sets and virtually any other audio source to
your hearing aids at a volume level that suits you.
Remote Control 2 allows you to adjust the volume or mute your hearing aids, change programmes,
and see all your settings at a glance on its display.
Phone Clip 2 streams phone conversations and stereo sound directly to both hearing aids, and it dou-
bles as a simple remote control.
Micro Mic is a body worn microphone for your friend or colleague. It significantly improves speech
understanding in noisy situations.
Multi Mic works like the Micro Mic but doubles as a table microphone. Connects with loop and FM systems , and has a mini-jack input for streaming audio from a computer or music player.
i
NOTE: Ask your hearing care professional for more information on the range of ReSound wireless accessories.
NOTE: For use of wireless functionality only use Interton wireless accessories. For further guidance regarding e.g. pairing, please refer to the user guide of the relevant Interton wireless accessory.
13 i Care and maintenance
Please follow the instructions below to have the best user experience and to prolong the durability of
your hearing aids:
1. Keep your hearing aids dry and clean.
2. Open the battery door to dry out your hearing aids when you are not wearing them.
3. Wipe the hearing aids with a soft cloth after use to remove grease or moisture.
4. Do not wear your hearing aids when putting on cosmetics, perfume, after-shave, hair spray, suntan lotion etc. These might discolour the hearing aid or get into the hearing aid causing damage.
5. Do not immerse your hearing aid in any liquid.
6. Keep your hearing aids away from excessive heat and direct sunlight. The heat may deform the
shell, damage the electronics and deteriorate the surfaces.
7. Do not swim, shower or steam bathe while wearing your hearing aids.
Page 20
38 39
13.1 i Daily maintenance
It is important to keep your hearing aid clean and dry. On a daily basis, clean the hearing aids using a
soft cloth or tissue. In order to avoid damage due to humidity or excessive perspiration, the use of a
drying kit is recommended.
13.2 Cleaning the receiver wires and domes
1. The receiver wire and the receiver dome should be cleaned regularly.
Use a damp cloth to clean the receiver wire and receiver dome on the outside.
i
NOTE: Receiver wires may become stiff, brittle, or discoloured over time. Contact your hearing
care professional regarding receiver changes.
13.3 i Cleaning RIE or moulds (does not apply for UP moulds)
1. Use a soft, dry cloth to wipe the earmould clean.
i
NOTE: Do not use water when you are cleaning the receiver wires or the receiver domes.
i
NOTE: Earmould tubing may become stiff, brittle, or discoloured over time. Contact your hearing
care professional regarding receiver wire changes.
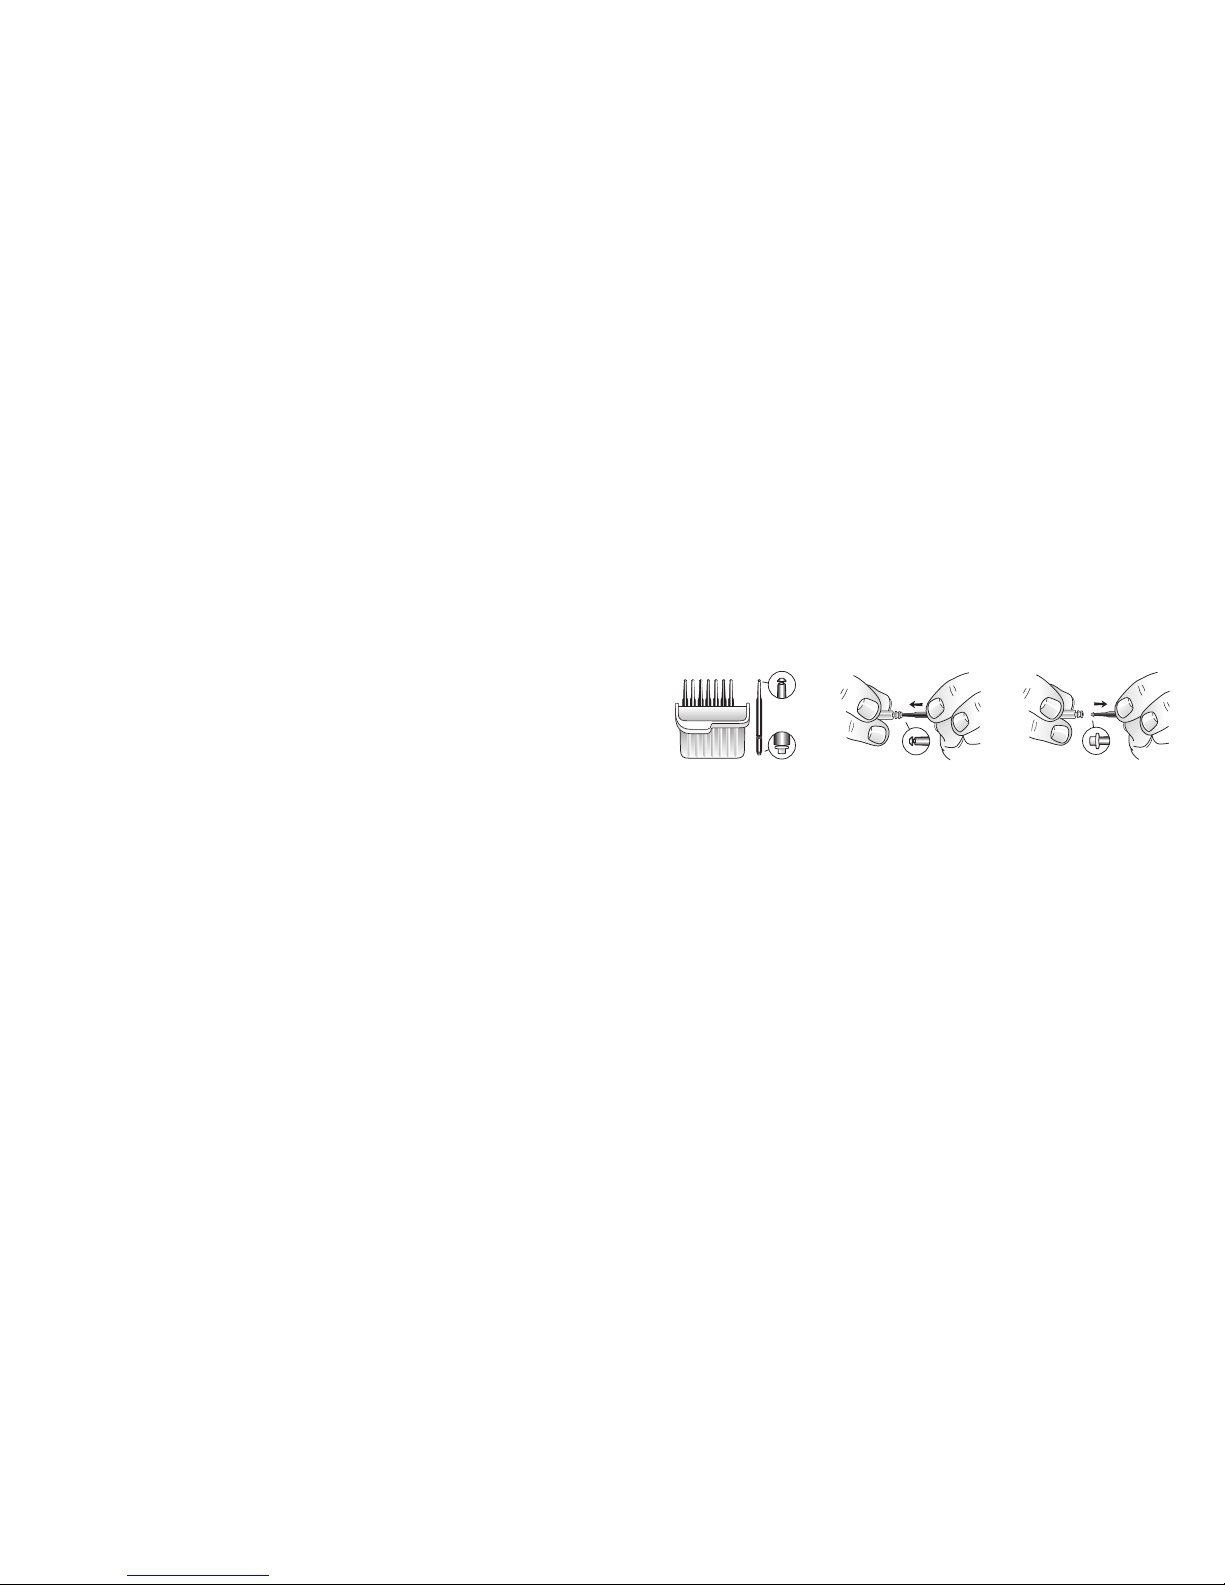
Carrying box with eight wax guard
tools.
Insert the removal tip of the tool into
the used wax guard so that the shaft
touches the rim of the wax guard.
Slowly pull the wax guard straight
out.
13.4 Change wax guards
If you wear a dome, remove it before following this procedure. To replace wax guards:
Page 21
40 41
14 i General warnings
1. Consult a hearing care professional if you think there may be a foreign object in your ear canal,
if you experience skin irritation, or if excessive earwax accumulates with the use of the hearing
aid.
2. Different types of radiation, from e.g. NMR, MRI, or CT scanners, may damage hearing aids. It is
recommended not to wear hearing aids during these or other similar procedures. Other types
of radiation, such as burglar alarms, room surveillance systems, radio equipment, mobile telephones, contain less energy and will not damage hearing aids. However, they have the potential
to momentarily affect the sound quality or temporarily create undesired sounds from hearing
aids.
3. Do not wear hearing aids in mines, oil fields, or other explosive areas unless those areas are
certified for hearing aid use.
4. Do not allow others to use your hearing aids.
5. Hearing aid usage by children or mentally disabled persons should be supervised at all times to
ensure their safety. The hearing aid contains small parts that could be swallowed by children.
Please be mindful not to leave children unsupervised with this hearing aid.
6. Hearing aids should be used only as prescribed by your hearing care professional. Incorrect use
may result in hearing loss.
7. Warning to hearing care professionals: Special care should be exercised in selecting and fitting
hearing aids with maximum sound pressure level that exceeds 132 dB SPL with an IEC 60711:1981
occluded ear simulator. The remaining hearing may risk further impairment.
8. Turn off your wireless functionality by using the flight mode in areas where radio frequency
emission is prohibited.
9. If a hearing aid is broken, do not use.
10. External devices connected to the electrical input must be safe according to the requirements of
IEC 60601-1, IEC 60065, or IEC 60950-1 , as appropriate (wired connection, for example HI-PRO,
SpeedLink).
i
For use of wireless functionality only use Interton wireless accessories. For further guidance
regarding e.g. pairing, please refer to the user guide of the relevant Interton wireless accessory.
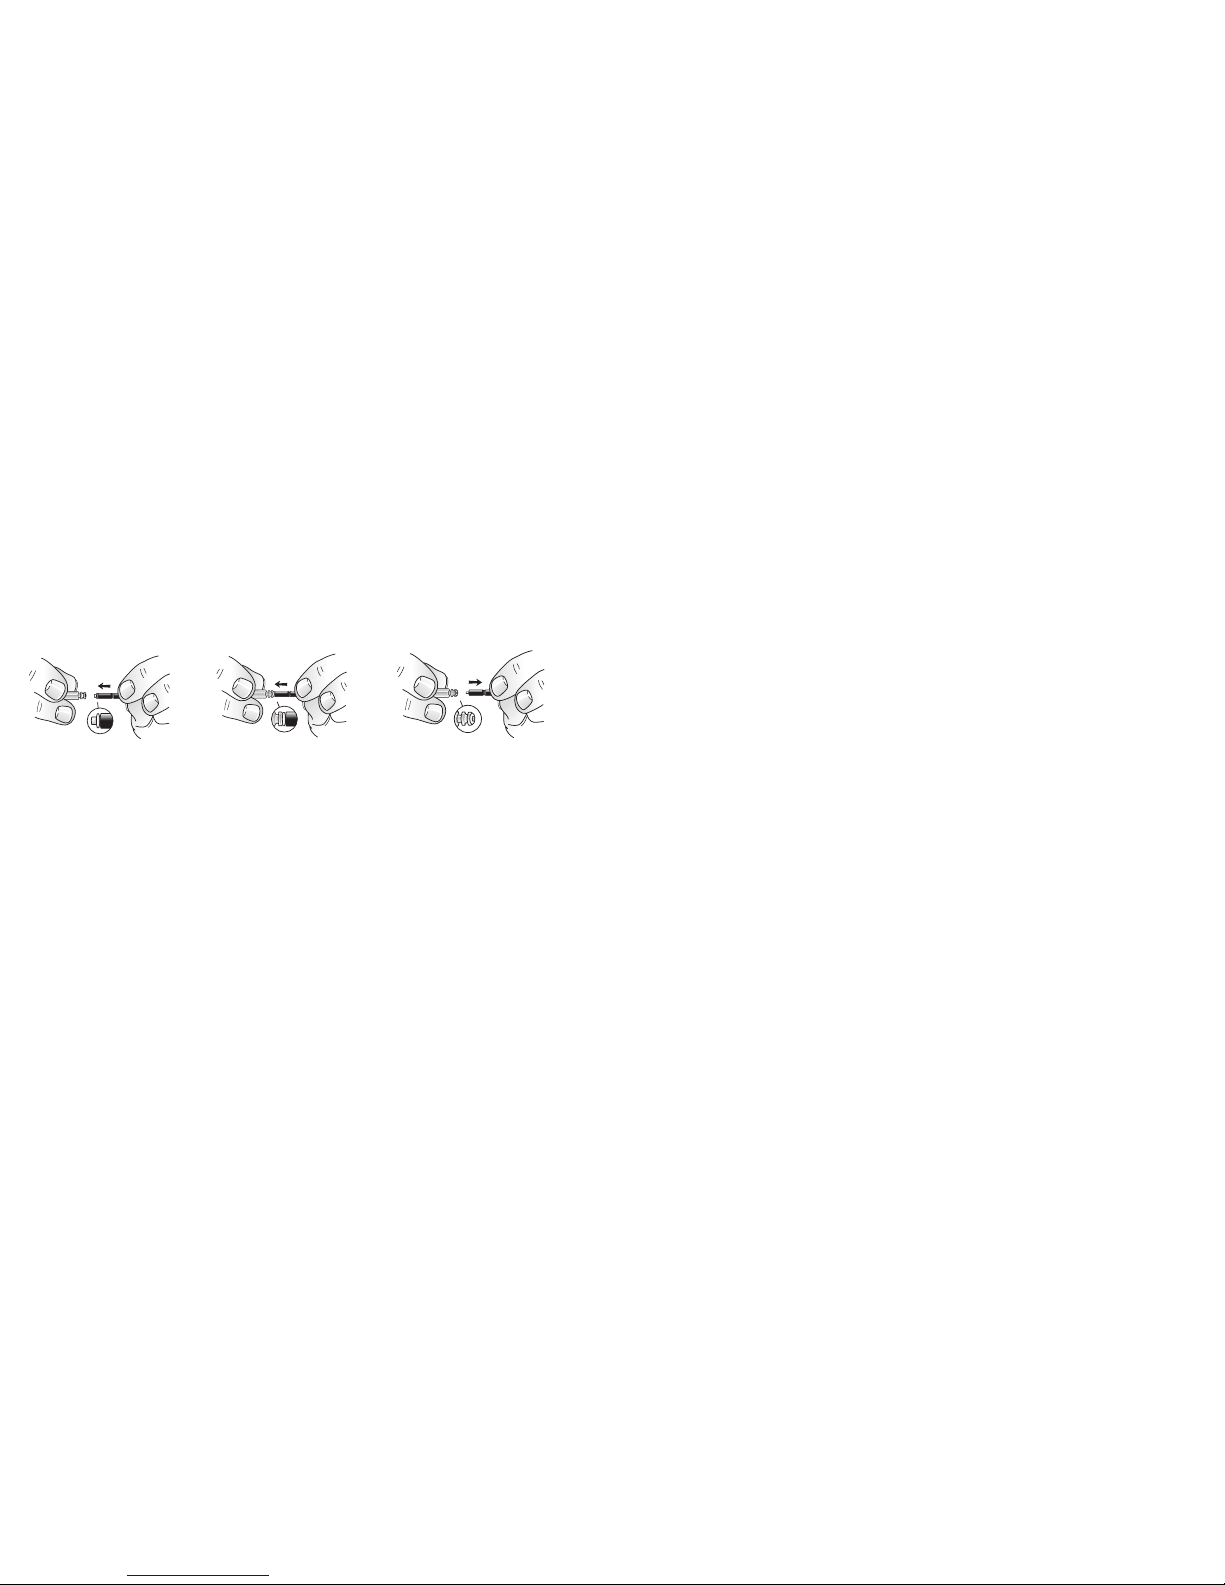
Insert the replacement tip of
the tool into the sound outlet.
Gently press the replacement tip
straight into the sound outlet until the
outer ring lies flush with the sound
outlet.
Pull the tool straight out - the
new wax guard will remain in
place. Please remember to reattach dome again, or a fresh
dome.
The wax guard tool has two functions: a removal tip to collect the used filter, and a replacement tip with
a white filter. To insert the new wax filters, follow these steps:
Page 22

42 43
16 i AutoPhone warnings
1. Keep magnets out of reach of pets, children and people with mental disabilities.
2. If a magnet is swallowed, please seek immediate advice from a medical practitioner.
3. The AutoPhone magnet may affect sensitive medical devices / electronic systems. Seek advice
from the manufacturers regarding appropriate safety measures when using the AutoPhone
solution near the sensitive device / equipment (pacemakers and defibrillators) in question.
If the manufacturer cannot issue a statement, we recommend keeping the magnet or a telephone equipped with the magnet 30 cm (12”) away from magnetically sensitive devices (e.g.
pacemakers).
16.1 i AutoPhone precautions
1. High distortion during dialling or phoning may mean that the magnet is not in the optimal position relative to the telephone receiver. To avoid the issue, please move the magnet to another
place on the telephone receiver.
2. Only use magnets supplied by Interton.
15 i Using Interton hearing aids with Interton apps for smart-
phones
15.1 Intended use of Interton apps for smartphones
Interton smartphone apps are intended to be used with Interton wireless hearing aids. Interton smartphone apps send and receive signals from the Interton wireless hearing aids via smartphones for which
the apps have been developed.
15.2 i General precautions
1. When wireless function is activated, the device uses low-powered digitally coded transmissions
in order to communicate with other wireless devices. Although unlikely, nearby electronic devices may be affected. In that case, move the hearing aid away from the affected electronic device.
2. When using wireless functionality and the devices are affected by electromagnetic interference,
move away from the source.
3. Use only original Interton consumables e.g. receiver wires and domes.
4. Only connect Interton hearing aids to Interton wireless accessories intended and qualified to be
used with Interton hearing aids.
Page 23

44 45
17 i Important points for FM
1. Do not use two transmitters on the same FM channel.
2. Do not use water or fluids for cleaning FM click-on receiver.
3. Do not use an FM transmitter in locations where it is forbidden to use electronic devices, for
instance in airplanes/oil rigs.
4. Be aware that FM signals might also be picked up and overheard by other receivers.
5. Before using the system in another country, contact your hearing care professional to make sure
your radio channel is permitted in that country.
6. Your FM boot and transmitter may only be repaired by an authorized service centre.
18 i Tinnitus Sound Generator (TSG) warnings
1. Sound generators can be dangerous if improperly used.
2. Sound generators should be used only as advised by your doctor, audiologist, or hearing care
professional.
3. Sound generators are not toys and should be kept out of reach of anyone who might cause
themselves injury (especially children and pets).
18.1 i TSG precautions
1. Should the user develop any side effects from using the sound generator, such as dizziness,
nausea, headaches, perceived decrease in auditory function or increase in tinnitus perception,
the user should discontinue use of the sound generator and seek medical evaluation.
2. Children and physically or mentally challenged users will require guardian supervision while
wearing the TSG hearing aid.
3. The volume control is an optional feature in the TSG module used for adjusting the sound
generator output level. To prevent unintended usage by paediatric or physically or mentally
challenged users, the volume control must, if enabled, be configured to only provide a decrease
of the sound generator output level.
Page 24

46 47
18.2 i TSG warning to hearing care professionals
A hearing care professional should advise a prospective sound generator user to consult promptly with
a licensed physician (preferably an ear specialist) before getting a sound generator if the hearing care
professional determines through inquiry, actual observation, or review of any other available information concerning the prospective user that the prospective user has any of the following conditions:
1. Visible congenital or traumatic deformity of the ear.
2. History of active drainage from the ear within the previous 90 days.
3. History of sudden or rapidly progressive hearing loss within the previous 90 days.
4. Acute or chronic dizziness.
5. Unilateral hearing loss of sudden or recent onset within the previous 90 days.
6. Audiometric air-bone gap equal to or greater than 15dB at 500 hertz (Hz), 1000 Hz, and 2000
Hz.
7. Visible evidence of significant cerumen accumulation or a foreign body in the ear canal.
8. Pain or discomfort in the ear.
i
CAUTION: The maximum output of the sound generator falls into the range that can cause hearing loss according to OSHA regulations. In accordance with NIOSH recommendations, the user
should not use the sound generator for more than eight (8) hours a day when set to a level of
85 dB SPL or above. When the sound generator is set to levels of 90 dB SPL or above, the user
should not use the sound generator for more than two (2) hours per day. In no case should the
sound generator be worn at uncomfortable levels.
19 i Battery warnings
Batteries contain dangerous substances and should be disposed of carefully in the interest of your
safety and for the environment. Please note:
1. Keep batteries away from pets, children and mentally challenged persons.
2. DO NOT place batteries in your mouth. Consult a physician immediately if a battery has been
swallowed, as they can be harmful to your health.
3. DO NOT attempt to dispose of batteries by burning them.
4. Used batteries are harmful to the environment. Please dispose of them according to local regulations or return them to your hearing care professional.
i
BATTERIES MAY LEAK. REMOVE THE BATTERY IF YOU LEAVE THE HEARING AIDS UNUSED FOR
LONGER PERIODS.
i
DO NOT RECHARGE ZINC AIR BATTERIES – THEY MAY LEAK OR EXPLODE.
i
ZINC AIR BATTERIES CAN BE HARMFUL TO YOUR HEALTH:
•CONSULT A PHYSICIAN IMMEDIATELY IF A BATTERY HAS BEEN SWALLOWED
•DO NOT PLACE ZINK AIR BATTERIES IN YOUR MOUTH
•KEEP BATTERIES AWAY FROM CHILDREN, MENTALLY DISABLED PERSONS, AND PETS
i
DO NOT ATTEMPT TO DISPOSE OF BATTERIES BY BURNING THEM.
Page 25

48 49
i
USED BATTERIES ARE HARMFUL TO THE ENVIRONMENT. PLEASE DISPOSE OF THEM ACCORDING TO LOCAL REGULATIONS OR RETURN THEM TO YOUR HEARING CARE PROFESSIONAL.
i
IF THE BATTERIES ARE NOT INSERTED CORRECTLY, THE DEVICE WILL NOT WORK AND THE
BATTERIES MAY BUILD UP HEAT. IF THIS HAPPENS, PLEA SE REMOVE THE BATTERIES.
20 i Hearing aid expectations
A hearing aid will not restore normal hearing and will not prevent or improve a hearing impairment
resulting from organic conditions. Consistent use of the hearing aid is recommended. In most cases,
infrequent use does not permit you to attain full benefit from it.
The use of a hearing aid is only part of hearing rehabilitation and may need to be supplemented by
auditory training and instructions in lip-reading.
21 i Warning to hearing aid professionals (US Only)
A hearing care professional should advise a prospective hearing aid user to consult promptly with a
licensed physician (preferably an ear specialist) before dispensing a hearing aid if the hearing aid professional determines through inquiry, actual observation, or review of any other available information
concerning the prospective user, that the prospective user has any of the following conditions:
1. Visible congenital or traumatic deformity of the ear.
2. History of active drainage from the ear within the previous 90 days.
3. History of sudden or rapidly progressive hearing loss within the previous 90 days.
4. Acute or chronic dizziness.
5. Unilateral hearing loss of sudden or recent onset within the previous 90 days.
6. Audiometric air-bone gap equal to or greater than 15 decibels at 500 hertz (Hz), 1,000 Hz, and
2,000 Hz.
7. Visible evidence of significant cerumen accumulation or a foreign body in the ear canal.
8. Pain or discomfort in the ear.
22 i Important notice for prospective hearing aid users (US Only)
Good health practice requires that a person with a hearing loss have a medical evaluation by a licensed
physician (preferably a physician who specializes in diseases of the ear) before purchasing a hearing
aid. Licensed physicians who specialize in diseases of the ear are often referred to as otolaryngologists,
otologists or otorhinolaryngologists. The purpose of medical evaluation is to assure that all medically treatable conditions that may affect hearing are identified and treated before the hearing aid is
purchased.
Page 26

50 51
Following the medical evaluation, the physician will give you a written statement that states that your
hearing loss has been medically evaluated and that you may be considered a candidate for a hearing
aid. The physician will refer you to an audiologist or a hearing care professional, as appropriate, for a
hearing aid evaluation. The audiologist or hearing care professional will conduct a hearing aid evaluation to assess your ability to hear with and without a hearing aid. The hearing aid evaluation will enable
the audiologist or hearing care professional to select and fit a hearing aid to your individual needs.
If you have reservations about your ability to adapt to amplification, you should inquire about the
availability of a trial-rental or purchase-option programme. Many hearing care professionals now offer
programmes that permit you to wear a hearing aid for a period of time for a nominal fee after which
you may decide if you want to purchase the hearing aid.
Federal law restricts the sale of hearing aids to those individuals who have obtained a medical evaluation from a licensed physician. Federal law permits a fully informed adult to sign a waiver statement
declining the medical evaluation for religious or personal beliefs that preclude consultation with a physician. The exercise of such a waiver is not in your best health interest and its use is strongly discouraged.
23 i Children with hearing loss (US Only)
In addition to seeing a physician for a medical evaluation, a child with a hearing loss should be directed
to an audiologist for evaluation and rehabilitation since hearing loss may cause problems in language
development and the educational and social growth of a child. An audiologist is qualified by training
and experience to assist in the evaluation and rehabilitation of a child with a hearing loss.
Page 27
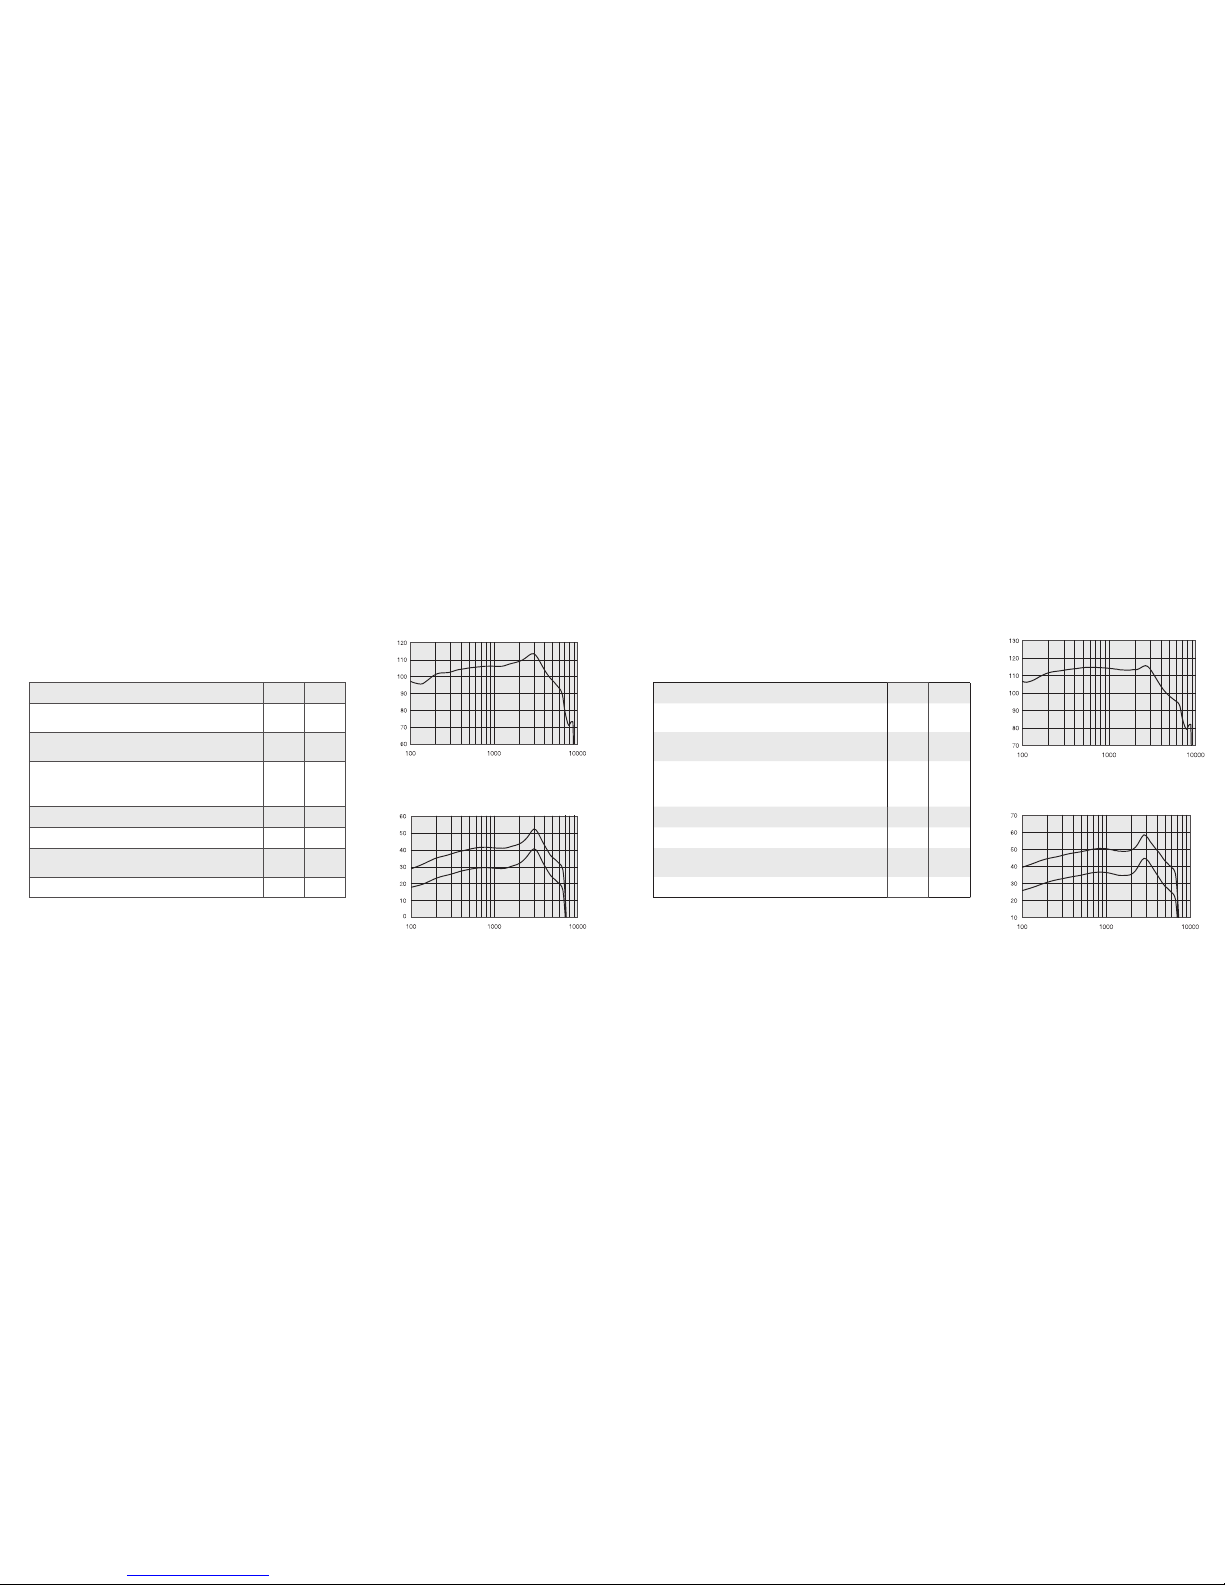
52 53
Reference test gain (60 dB SPL input) HFA 31 dB
Full-on gain (50 dB SPL Input)
Max
HFA5243
dB
dB
Maximum output (90 dB SPL input)
Max
HFA
113
108
dB SPL
dB SPL
Total harmonic distortion
500 Hz
800 Hz
1600 Hz
0.3
0.5
0.7
%
%
%
Telecoil sensitivity (SPLIV @ 31,6 mA/m) 90 dB SPL
Equivalent input noise (w/o noise reduction) 23 dB SPL
Frequency range (DIN 45605)
100–
7060
Hz
Current drain (in test mode) 1.3 mA
Frequency (Hz)
FULL-ON AND REFERENCE TEST GAIN FULL-ON AND REFERENCE TEST GAIN
Gain
(dB)
Reference test gain
60 dB SPL input
Full-on gain
50 dB SPL input
2cc Coupler
MAXIMUM OUTPUT (OSPL 90) MAXIMUM OUTPUT (OSPL 90)
Frequency (Hz)
Output
(dB SPL)
2cc Coupler
Data in accordance with IEC60118-0 Edition3.0 2015-06, IEC60118-7 and ANSI
S3.22-2009, supply Voltage 1.3V
Note: Telecoil sensitivity only applicable for 62 RIE models Note: Telecoil sensitivity only applicable for 62 RIE models
Reference test gain (60 dB SPL input) HFA 37 dB
Full-on gain (50 dB SPL Input)
Max
HFA5851
dB
dB
Maximum output (90 dB SPL input)
Max
HFA
116
114
dB SPL
dB SPL
Total harmonic distortion
500 Hz
800 Hz
1600 Hz
0.5
0.6
1.2
%
%
%
Telecoil sensitivity (SPLIV @ 31.6 mA/m) 96 dB SPL
Equivalent input noise (w/o noise reduction) 23 dB SPL
Frequency range (DIN 45605)
100–
7000
Hz
Current drain (in test mode) 1.3 mA
RIE - MP receiver
Models: RD662-DRW, RD462-DRW, RD362-DRW, RD262-DRW
RD661-DRW, RD461-DRW, RD361-DRW, RD261-DRW
Frequency (Hz)
Gain
(dB)
Reference test gain
60 dB SPL input
Full-on gain
50 dB SPL input
2cc Coupler
Frequency (Hz)
Output
(dB SPL)
2cc Coupler
Data in accordance with IEC60118-0 Edition3.0 2015-06, IEC60118-7 and ANSI
S3.22-2009, supply Voltage 1.3V
24 Technical specifications
RIE - LP receiver
Models: RD662-DRW, RD462-DRW, RD362-DRW, RD262-DRW
RD661-DRW, RD461-DRW, RD361-DRW, RD261-DRW
Page 28
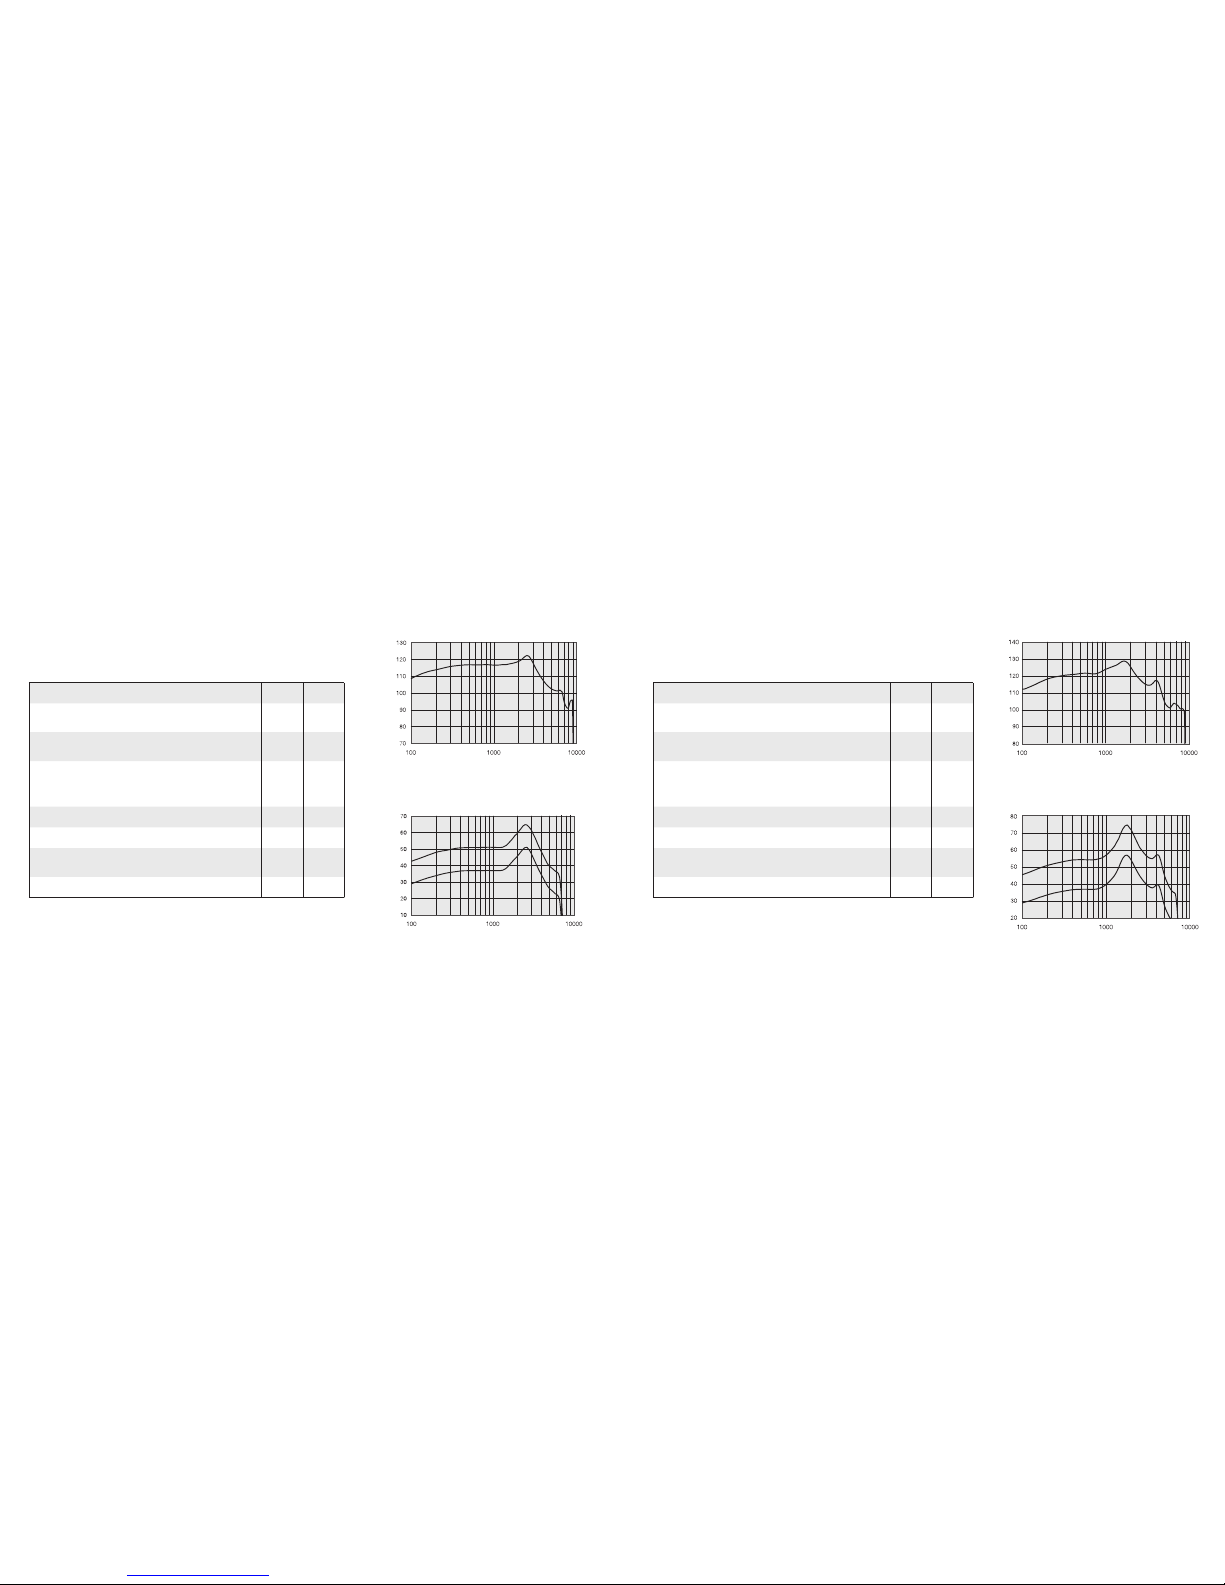
54 55
Reference test gain (60 dB SPL input) H FA 42 dB
Full-on gain (50 dB SPL Input)
Max
HFA6556
dB
dB
Maximum output (90 dB SPL input)
Max
HFA
122
118
dB SPL
dB SPL
Total harmonic distortion
500 Hz
800 Hz
1600 Hz
0.6
1.2
0.7
%
%
%
Telecoil sensitivity (SPLIV @ 31.6 mA/m) 101 dB SPL
Equivalent input noise (w/o noise reduction) 23 dB SPL
Frequency range (DIN 45605)
100–
6030
Hz
Current dr ain (in test mode) 1.3 mA
RIE - HP receiver
Models: RD662-DRW, RD462-DRW, RD362-DRW, RD262-DRW
RD661-DRW, RD461-DRW, RD361-DRW, RD261-DRW
Frequency (Hz)
Gain
(dB)
Reference test gain
60 dB SPL input
Full-on gain
50 dB SPL input
2cc Coupler
Frequency (Hz)
Output
(dB SPL)
2cc Coupler
Data in accordance with IEC60118-0 Edition3.0 2015-06, IEC60118-7 and
ANSI S3.22-2009, supply Voltage 1.3V
Reference test gain (60 dB SPL input) HFA 47 dB
Full-on gain (50 dB SPL Input)
Max
HFA7564
dB
dB
Maximum output (90 dB SPL input)
Max
HFA
129
124
dB SPL
dB SPL
Total harmonic distortion
500 Hz
800 Hz
1600 Hz
1.3
2.1
0.1
%
%
%
Telecoil sensitivity (SPLIV @ 31.6 mA/m) 107 dB SPL
Equivalent input noise (w/o noise reduction) 23 dB SPL
Frequency range (DIN 45605) 100–4910 Hz
Current dr ain (in test mode) 1.2 mA
RIE - UP receiver
Models: RD662-DRW, RD462-DRW, RD362-DRW, RD262-DRW
RD661-DRW, RD461-DRW, RD361-DRW, RD261-DRW
Frequency (Hz)
Gain
(dB)
-
Reference test gain
60 dB SPL input
Full-on gain
50 dB SPL input
2cc Coupler
Frequency (Hz)
Output
(dB SPL)
2cc Coupler
Data in accordance with IEC60118-0 Edition3.0 2015-06, IEC60118-7 and
ANSI S3.22-2009, supply Voltage 1.3V
FULL-ON AND REFERENCE TEST GAIN FULL-ON AND REFERENCE TEST GAIN
MAXIMUM OUTPUT (OSPL 90) MAXIMUM OUTPUT (OSPL 90)
Note: Telecoil sensitivity only applicable for 62 RIE models Note: Telecoil sensitivity only applicable for 62 RIE models
Page 29
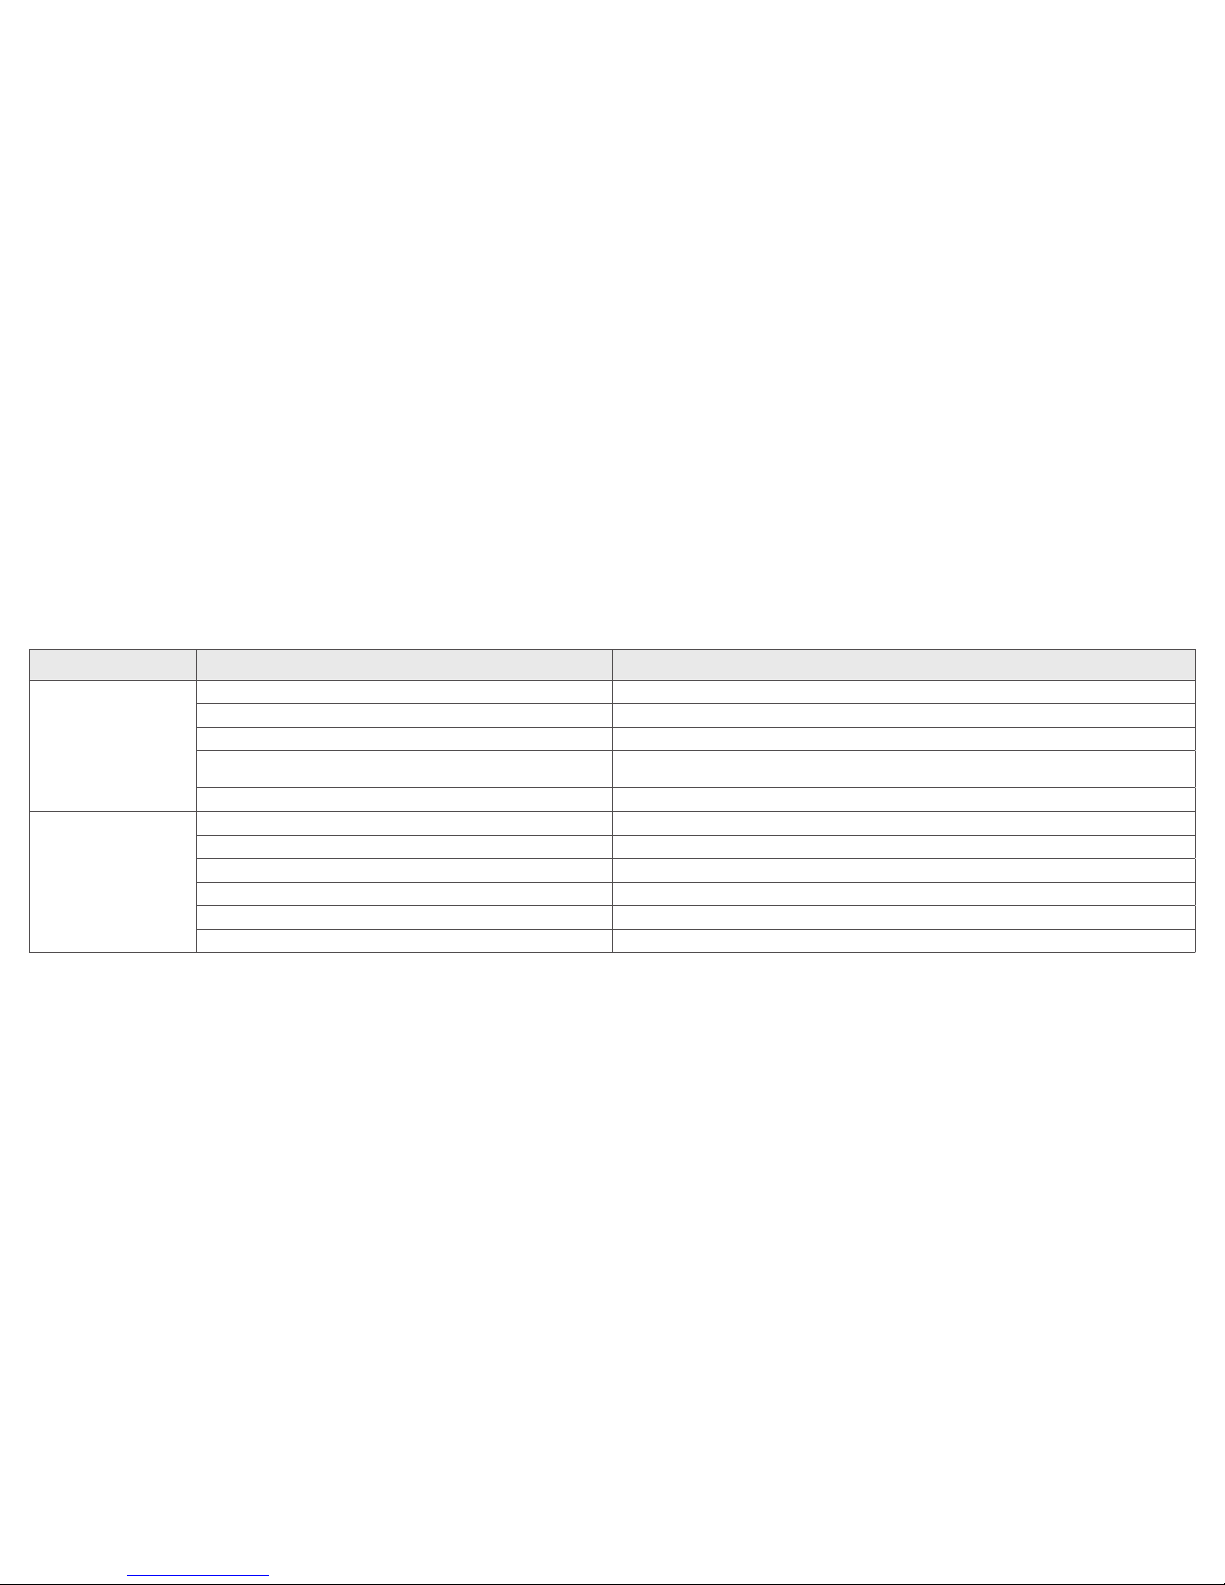
56 57
25 Troubleshooting guide
SYMPTOM CAUSE POSSIBLE REMEDY
Feedback, “whistling”
Is your earmould or dome inserted correctly? Put it in again.
Is the volume very loud? Reduce it.
Is the receiver wire or the earmould clogged or broken? Replace or visit your hearing care professional.
Are you holding an object (e.g. a hat, a telephone receiver) close to a
hearing aid?
Move your hand away to create more space between the hearing aid and the object.
Is your ear full of wax? Visit your physician.
No sound
Is the hearing aid turned on? Switch it on.
Is the hearing aid in telecoil mode (62-DRW only)? Switch to the microphone program.
Is there a battery in the hearing aid? Insert a new battery.
Is the battery still good? Replace with a new one.
Is the receiver wire or the earmould clogged or broken? Visit your hearing care practitioner.
Is your ear full of wax? Visit your physician.
Page 30
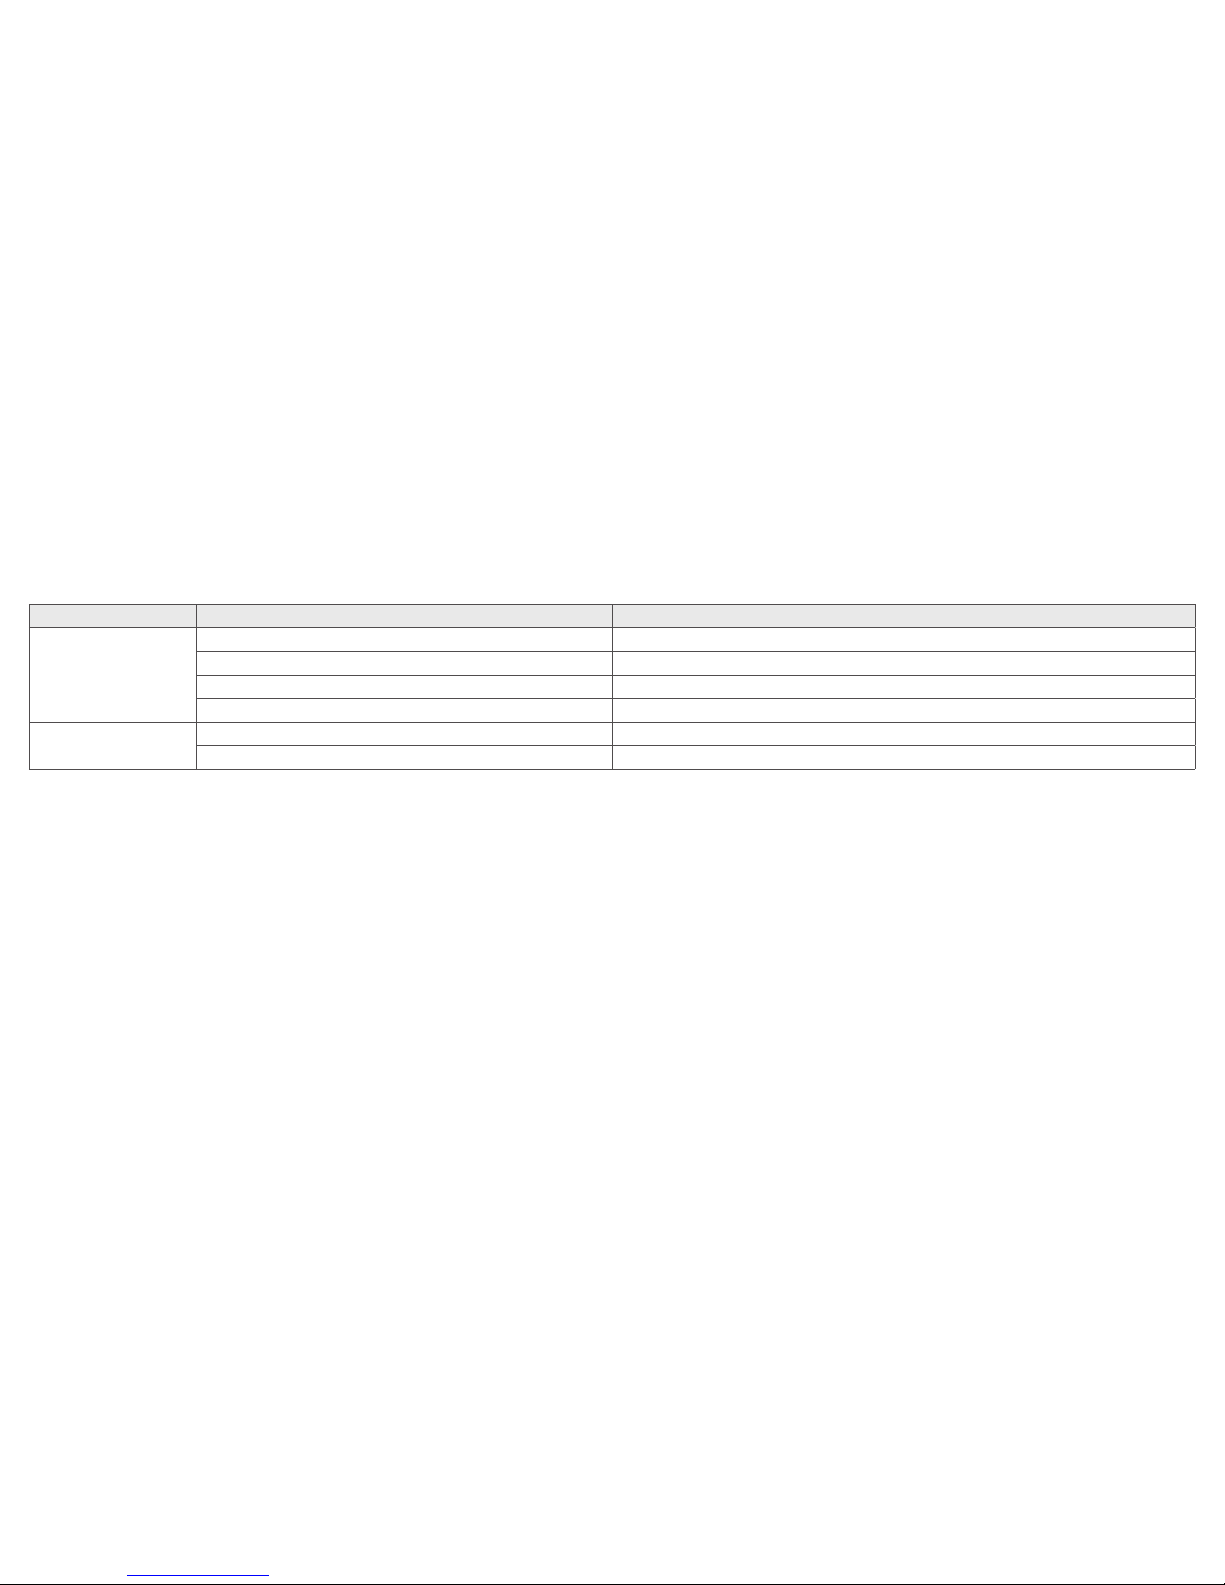
58 59
SYMPTOM CAUSE POSSIBLE REMEDY
Sound is distorted, spluttering or weak?
Is the battery dead? Replace it with a new one.
Is the battery dirty? Clean it or replace it with a new one.
Is the receiver wire or the earmould clogged or broken? Visit your hearing care professional.
Did your hearing aid get moist? Use a desiccant.
Battery drains very quickly
Did you leave your hearing aid switched on for long periods of time? Always switch off your hearing aid when you are not using them, e.g. during the night.
Is the battery old? Check the date on the battery packaging.
Page 31

60 61
26 Warranties and repairs
Interton provides a warranty on hearing aids in the event of defects in workmanship or materials,
as described in applicable warranty documentation. In its service policy, Interton pledges to secure
functionality at least equivalent to the original hearing aid. As a signatory to the United Nations Global
Compact initiative, Interton is committed to doing this in line with environment-friendly best practices.
Hearing aids therefore, at Interton’s discretion, may be replaced by new products or products manufactured from new or serviceable used parts, or repaired using new or refurbished replacement parts. The
warranty period of hearing aids is designated on your warranty card, which is provided by your hearing
care professional.
For hearing aids that require service, please contact your hearing care professional for assistance.
Interton hearing aids that malfunction must be repaired by a qualified technician. Do not attempt to
open the case of hearing aids, as this will invalidate the warranty.
27 Temperature test, transport and storage information
Interton hearing aids are subjected to various tests in temperature and damp heating cycling between
-25 °C and +70 °C according to internal and industry standards.
During transport or storage, the temperature should not exceed the limit values of -20 °C to +60 °C
and relative humidity of 90% RH, non-condensing (for limited time). The air pressure between 500 and
1100 hPa is appropriate.
28 Advisories
Be aware of information marked with the warning symbol:
i WARNING points out a situation that could lead to serious injuries.
i CAUTION indicates a situation that could lead to minor and moderate injuries.
i Advice and tips on how to handle your hearing aid better.
Equipment includes RF transmitter
Please ask your local hearing care professional concerning disposal of your hearing aid.
i NOTE: Country specific regulations apply.
Page 32

62 63
© 2018 GN Hearing GmbH. All rights reserved. Interton is a
trademark of GN Hearing GmbH. Apple, the Apple logo, iPhone,
iPad, iPod touch are trademarks of Apple Inc., registered in the
U.S. and other countries.
i
Use of the Made for Apple badge means that an accessory has been designed to connect specifically to iPhone,
iPad and iPod touch models, and has been certified by
the developer to meet Apple performance standards. Apple is not responsible for the operation of this device or
its compliance with safety and regulatory standards.
Portions of this software are written by Kenneth MacKay (micro-ecc) and licensed under the following
terms and conditions:
Copyright ® 2014, Kenneth MacKay. All rights reserved.
Redistribution and use in source and binary forms, with or without modification, are permitted provided
that the following conditions are met:
* Redistributions of source code must retain the above copyright notice, this list of conditions and the
following disclaimer.
* Redistributions in binary form must reproduce the above copyright notice, this list of conditions and
the following disclaimer in the documentation and/or other materials provided with the distribution.
THIS SOFTWARE IS PROVIDED BY THE COPYRIGHT HOLDERS AND CONTRIBUTORS “AS IS” AND ANY
EXPRESS OR IMPLIED WARRANTIES, INCLUDING, BUT NOT LIMITED TO, THE IMPLIED WARRANTIES
OF MERCHANTABILITY AND FITNESS FOR A PARTICULAR PURPOSE ARE DISCLAIMED. IN NO EVENT
SHALL THE COPYRIGHT HOLDER OR CONTRIBUTORS BE LIABLE FOR ANY DIRECT, INDIRECT, INCIDENTAL, SPECIAL, EXEMPLARY, OR CONSEQUENTIAL DAMAGES (INCLUDING, BUT NOT LIMITED TO,
PROCUREMENT OF SUBSTITUTE GOODS OR SERVICES; LOSS OF USE, DATA, OR PROFITS; OR BUSINESS INTERRUPTION) HOWEVER CAUSED AND ON ANY THEORY OF LIABILITY, WHETHER IN CONTRACT, STRICT LIABILITY, OR TORT (INCLUDING NEGLIGENCE OR OTHERWISE) ARISING IN ANY WAY
OUT OF THE USE OF THIS SOFTWARE, EVEN IF ADVISED OF THE POSSIBILITY OF SUCH DAMAGE.
Page 33
400940000GB-18.05-Rev.B
Any issues relating to the EU Medical Device Directive 93/42/EEC or EU Radio
Equipment Directive 2014/53/EU should be directed to Interton A/S.
Worldwide Headquarters
Interton A/S
Lautrupbjerg 7
DK-2750 Ballerup
Denmark
Tel.: +45 4575 1111
interton.com
CVR no. 55082715
United Kingdom
GN Hearing Ltd.
Kirtlington Business Centre
Portway
Kirtlington
Oxon OX5 3JA
Tel.: +44 1869 352 800
interton.com
Australia
GN Hearing Australia Pty. Ltd.
Gate C, 19-25 Khartoum Road
Macquarie Technology Park
Macquarie Park NSW 2113
Tel.: (free) 1800 658 955
interton.com
Singapore
GN Hearing Pte. Ltd.
2 Kallang Avenue
#07-19 CT HUB
Singapore - 339407
Tel: +65 6320 9388
interton.com
New Zealand
GN Hearing NZ Ltd.
Ground Floor, North Entrance
4 Fred Thomas Drive
Takapuna, Auckland, 0622
Tel.: (free) 0800 900 126
interton.com
Manufacturer according to
EU Medical Device Directive
93/42/EEC:
 Loading...