

Page 1

User Guide
Super power BTE
EL90-VI
Page 2

TABLE OF CONTENTS
Diagram of the Elipse Super Power Behind-the-Ear (BTE). . . . . . . . . . . . . . . . . . . . . . 6
YOUR HEARING SYSTEM . . . . . . . . . . . . . . . . . . . . . . . . . . . . . . . . . . . . . . . . . . . . . 8
Proper Placement in the Ear . . . . . . . . . . . . . . . . . . . . . . . . . . . . . . . . . . . . . . . . . . . . 8
OPERATING CONTROLS/USER ADJUSTMENT. . . . . . . . . . . . . . . . . . . . . . . . . . . . 10
Removal . . . . . . . . . . . . . . . . . . . . . . . . . . . . . . . . . . . . . . . . . . . . . . . . . . . . . . . . . . 10
On/Off Function . . . . . . . . . . . . . . . . . . . . . . . . . . . . . . . . . . . . . . . . . . . . . . . . . . . . 10
Volume Control . . . . . . . . . . . . . . . . . . . . . . . . . . . . . . . . . . . . . . . . . . . . . . . . . . . . . 11
Identifying Left and Right Instruments. . . . . . . . . . . . . . . . . . . . . . . . . . . . . . . . . . . . 11
Changing Memory Programs . . . . . . . . . . . . . . . . . . . . . . . . . . . . . . . . . . . . . . . . . . 12
Using the Telephone While Wearing Your Hearing System . . . . . . . . . . . . . . . . . . . . 14
The Telecoil Feature . . . . . . . . . . . . . . . . . . . . . . . . . . . . . . . . . . . . . . . . . . . . . . . . . 14
Cellular Phone and Hearing Instrument Compatibility . . . . . . . . . . . . . . . . . . . . . . . . 15
Using Assistive Listening (Tele-Loop) Systems . . . . . . . . . . . . . . . . . . . . . . . . . . . . . 16
Direct Audio Input (DAI) . . . . . . . . . . . . . . . . . . . . . . . . . . . . . . . . . . . . . . . . . . . . . . . 17
2 3
MAINTENANCE . . . . . . . . . . . . . . . . . . . . . . . . . . . . . . . . . . . . . . . . . . . . . . . . . . . . 18
Removing/Inserting the Battery. . . . . . . . . . . . . . . . . . . . . . . . . . . . . . . . . . . . . . . . . 18
Low Battery Warning. . . . . . . . . . . . . . . . . . . . . . . . . . . . . . . . . . . . . . . . . . . . . . . . . 19
Battery Safety . . . . . . . . . . . . . . . . . . . . . . . . . . . . . . . . . . . . . . . . . . . . . . . . . . . . . . 20
Cleaning the Instrument . . . . . . . . . . . . . . . . . . . . . . . . . . . . . . . . . . . . . . . . . . . . . . 21
Cleaning the Microphone Sound Inlet . . . . . . . . . . . . . . . . . . . . . . . . . . . . . . . . . . . . 21
Cleaning the Earmold . . . . . . . . . . . . . . . . . . . . . . . . . . . . . . . . . . . . . . . . . . . . . . . . 22
When the Hearing System Is Not in Use . . . . . . . . . . . . . . . . . . . . . . . . . . . . . . . . . . 23
Things that Can Damage Your Hearing System . . . . . . . . . . . . . . . . . . . . . . . . . . . . 23
GENERAL INSTRUCTIONS. . . . . . . . . . . . . . . . . . . . . . . . . . . . . . . . . . . . . . . . . . . . 26
General Warnings . . . . . . . . . . . . . . . . . . . . . . . . . . . . . . . . . . . . . . . . . . . . . . . . . . . 26
Children with Hearing Loss . . . . . . . . . . . . . . . . . . . . . . . . . . . . . . . . . . . . . . . . . . . . 27
Warning to Hearing Aid Dispensers. . . . . . . . . . . . . . . . . . . . . . . . . . . . . . . . . . . . . . 28
Technical Specifications . . . . . . . . . . . . . . . . . . . . . . . . . . . . . . . . . . . . . . . . . . . . . . 29
Hearing Instrument Identification. . . . . . . . . . . . . . . . . . . . . . . . . . . . . . . . . . . . . . . . 30
Notes . . . . . . . . . . . . . . . . . . . . . . . . . . . . . . . . . . . . . . . . . . . . . . . . . . . . . . . . . . . . 31
Page 3

Thank you for selecting an Interton hearing system. We are proud of our hearing products and are confident you have chosen one of the best products available.
Please familiarize yourself with the information in this guide. It contains important instructions for proper use and care, technical performance information, and other general information about your hearing system. Your hearing system has been adjusted
to your particular hearing loss. Your hearing healthcare professional will explain these
adjustments and the special features of your particular model. Becoming Accustomed
to Amplification While purchasing a hearing system is a major step, it is only one step in
a process toward more comfortable hearing. Successfully adapting to the amplification
your hearing system provides takes time and consistent use.
4 5
You will enjoy more benefits from your Interton hearing system by taking the following
actions:
• Wear the system regularly in order to get comfortable with using it.
• Begin by wearing your system for short periods of time in quiet environments.
• As you get more comfortable with the system, increase the wearing time and wear your
hearing system in multiple types of listening environments.
It may take as long as several months for your brain to get used to all the “new” sounds
around you. Following these suggestions will give your brain time to learn how to interpret
amplification and increase the benefits you get from using an Interton hearing system.
Page 4
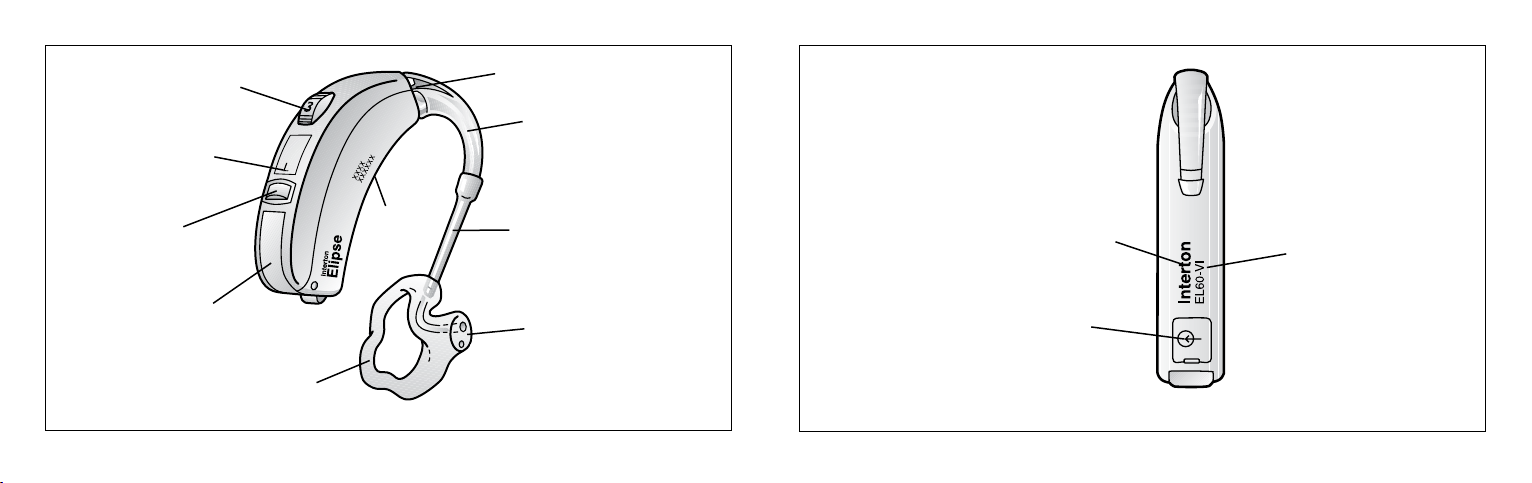
Volume control
Microphone (sound inlet)
Left(L)/Right(R)
indicator
Memory Selector
Battery compartment
and On/Off switch
Earmold
6 7
Serial
number
Earhook
Silicone tubing
Canal tip of earmold
Manufacturer
Direct Audio Input (DAI)
access panel
Model
Page 5
YOUR HEARING SYSTEM
Proper Placement in the Ear
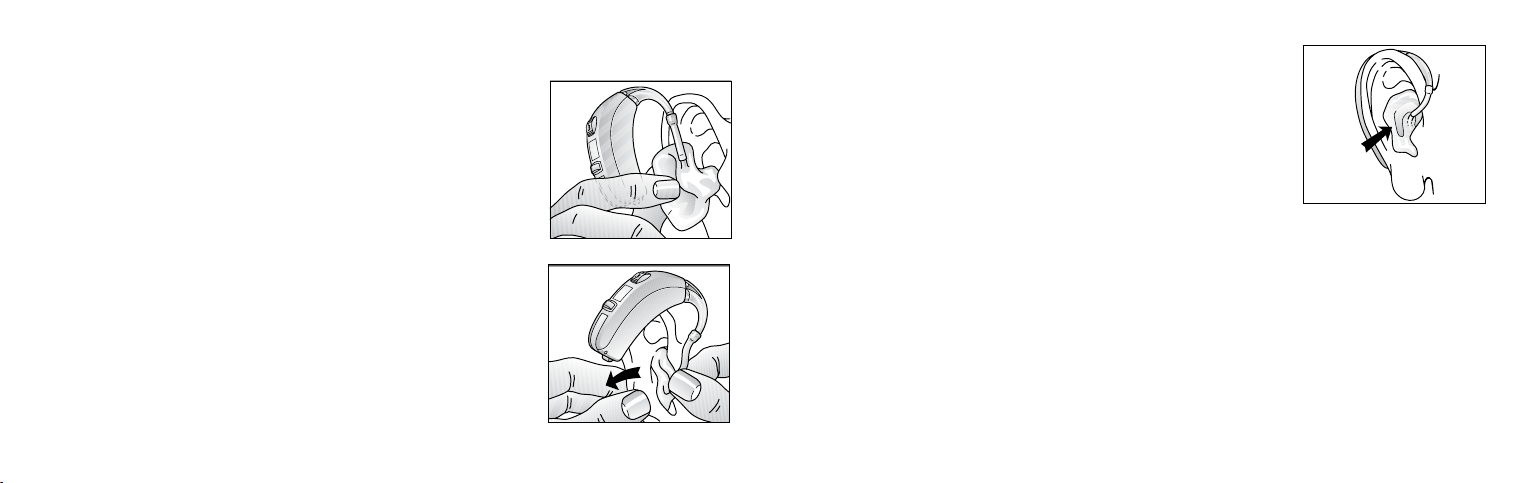
• With the battery door open (the Off position), take the earmold between thumb and index finger and position its “point”
in your ear canal. Now, slide the earmold all the way into your
ear with a gentle, twisting movement.
• Turn the top part of the earmold gently backward and forward
so that it fits behind the fold of skin above your ear canal.
• Place the hearing instrument behind your ear. Move the earmold up and down and press gently to ensure it is positioned
correctly in the ear. You will feel when the earmold is positioned correctly.
• Switch your hearing instrument on by closing the battery
door if you have not already turned it on.
8 9
Tip: Insertion of the earmold can be easier if you gently pull
your ear backward with your other hand. Opening and closing
your mouth while inserting may also be helpful.
If you need further help, your hearing healthcare professional
will be glad to show you how to insert your hearing instrument
correctly.
Note: If the hearing instrument irritates your ear in any way,
please contact your hearing healthcare professional. You
should never attempt to modify the shape of the earmold yourself.
Page 6
OPERATING CONTROLS/USER ADJUSTMENT
Removal
To remove the hearing instrument from your ear, simply pull the
earmold or tube outward with your thumb and forefinger. Consult your hearing healthcare professional if you have difficulty
removing the hearing instrument.
Battery
On/Off Function
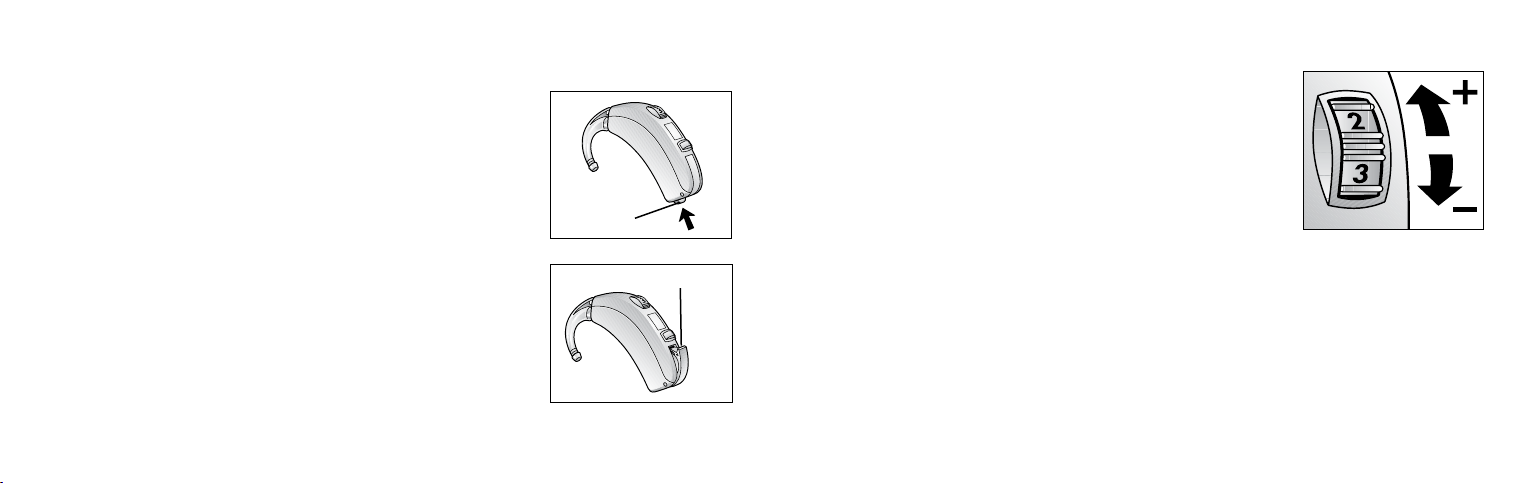
The door to the battery compartment serves as the On/Off
switch for your hearing instrument. When the door is fully closed, the instrument is on. To turn the instrument off, press the
tab on the base of the instrument with your fingertip until the
battery door snaps partly open, then put your fingernail under
the nail grip and pull gently to open it completely.
Tip: To reduce battery consumption, turn the instrument off
when it is not in use.
10 11
door tab
Open = Off
Volume Control
A volume control located on the back of your hearing instrument allows you to manually increase or decrease the volume.
Rolling the wheel in an upward direction will turn the volume up
while rolling the wheel in a downward direction will turn the volume down. Numerical markings from »1« (minimum level) to »4«
(maximum level) correspond to the volume level. Your hearing
healthcare professional will recommend an optimal volume setting for you.
Identifying Left and Right Instruments
If you have two hearing instruments, the instruments may be programmed differently
from each other. If you detach the earmolds from the hearing instruments when cleaning
and/or storing them, verify that you have connected the earmolds to the appropriate
hearing instruments before resuming use.
Page 7
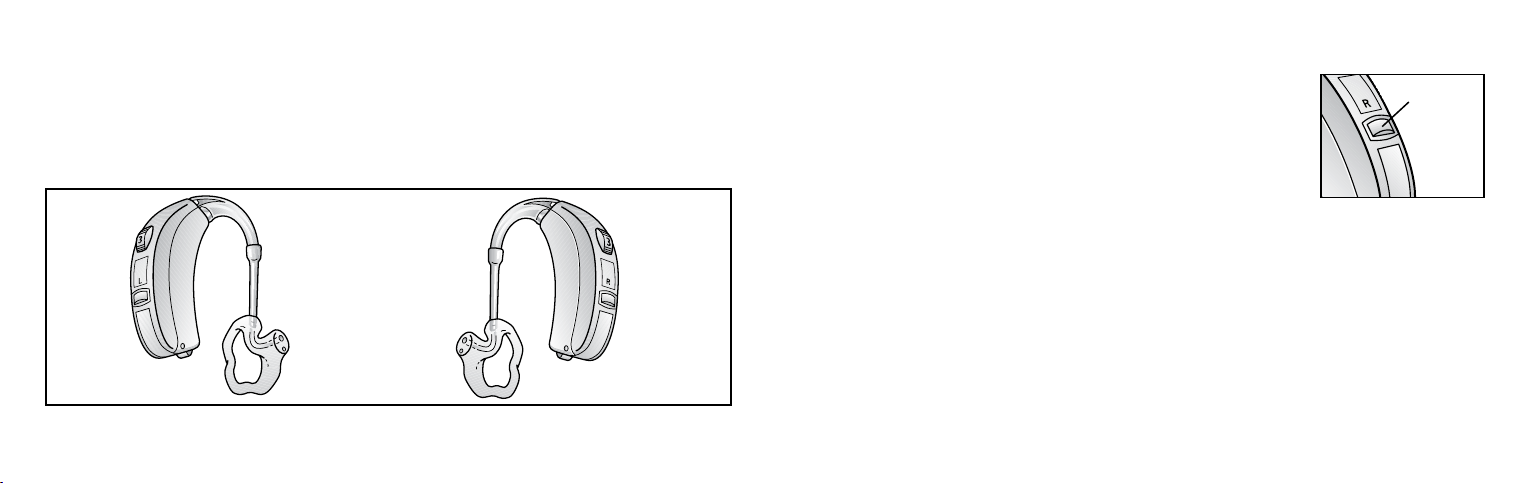
To identify your right and left hearing instruments, a designation is placed above the
Memory Selector. If your instrument does not have such a designation, please consult
your hearing healthcare professional for assistance.
“R” indicates that the hearing instrument has been programmed for the right ear while
“L” indicates that the instrument is for the left ear. Do not switch the hearing instruments
without consulting your hearing healthcare professional.
Left Right
12 13
Changing Memory Programs
Hearing instrument memories are used to store settings optimal
in different listening situations. Your hearing healthcare professional may have programmed multiple memories into your hearing
instruments to accommodate your lifestyle needs.
For future reference, ask your hearing health professional to fill
in your memory program information on the service page at the
back of this guide.
Whenever the hearing instrument is turned on, Memory 1 is automatically activated. Memories can then be selected by pushing the Memory Selector button on the instrument.
Special tones will indicate which memory has been activated. One tone will sound when
Memory 1 is activated, two tones will sound when Memory 2 is activated, etc. Memories
are always activated in sequence, for example: 1 to 2, 2 to 3, 3 to 1. You can also return
to Memory 1 by opening and closing the battery door.
Consult your hearing healthcare professional if the memory programs in your hearing
instruments need to be reconfigured.
Memory
Selector
Page 8

Using the Telephone While Wearing Your Hearing System
Close proximity to a telephone can sometimes cause hearing instruments to make a squealing sound, also known as feedback. To reduce
the potential for this problem, your system is equipped with feedback
suppression, which greatly reduces the chance of feedback.
Further measures to avoid feedback include positioning the phone
close to the hearing instrument, but not directly on the instrument. If
there is feedback, it may take a few seconds for the instrument’s signal processing to adapt. This technique may require practice.
The Telecoil Feature
Your hearing system has a built-in telecoil, and your hearing healthcare professional may
have programmed one of your listening programs to take advantage of it. When a telecoil
is activated, the hearing instrument will only detect and process sounds from coming
from the telephone.
14 15
To activate the telecoil you will need to use the Memory Selector to activate the appropriate memory.
To use the telephone while the telecoil is activated, position the telephone near, but not
directly on the instrument. You may need to re-position to fi nd the best reception.
Cellular Phone and Hearing Instrument Compatibility
Hearing instrument performance with cellular phones may vary based on the individual
hearing system or the cell phone being used. If your hearing system and cell phone are
not compatible you may experience a buzzing or clicking noise while using the two in
conjunction. If this is the case with your current hearing system and cell phone, consult
with your hearing healthcare professional to see if there are options to improve the sound
quality.
Measures you can take to prevent this situation:
• When purchasing a hearing system, be sure to test it with your existing phone to determine compatibility.
Page 9
• When shopping for a new cell phone, be sure to test it with your hearing system before
purchasing.
For additional guidance, please ask your cell phone provider for the booklet entitled
“Hearing Aid Compatibility with Digital Wireless Cell Phones” or visit their website for
more information.
Using Assistive Listening (Tele-Loop) Systems
Many gathering places are equipped with assistive listening (teleloop) systems, for
example, in schools, theaters and houses of worship. To take advantage of a tele-loop
system, select the telecoil program. When the telecoil program has been selected, you
will be able to hear a clean sound signal via the tele-loop system. If the instrument goes
dead in the telecoil program, this may be because the loop system is not operating.
If a school, theater or house of worship does not have a tele-loop system, try and sit as
close as possible to the front and use one of the microphone programs.
16 17
Direct Audio Input (DAI)
Your hearing professional can determine and discuss with you
whether the use of a Direct Audio Input (DAI) device would be
useful to you. If so, they will modify your hearing instrument to
be compatible with this device.
DAI offers you the option of direct, undisturbed connection to
external sound sources such as computers, stereo systems
and MP3 players as well as FM and Bluetooth communication
systems. DAI can produce a significant improvement in sound
quality in situations where noise levels are high or the sound
source is at a distance.
With DAI the sound source is connected to a hearing instrument via a cable or a wireless
adapter along and a DAI audio shoe. After an audio shoe is successfully connected, the
Memory Selector is used to switch to the Direct Audio Input listening program. Contact
your hearing healthcare professional for additional information on the DAI feature.
Page 10

MAINTENANCE
Removing/Inserting the Battery
Open the battery compartment completely by pressing the
tab on the base of the instrument with your fingertip until the
battery door snaps partly open, then put your fingernail under the nail grip and pull gently to open it completely. Remove
the used battery from the battery compartment.
Tip: Hold the instrument over a table or a soft surface in case
the battery falls out.
Remove the film from a new battery and place the new battery into the battery compartment, matching the plus (+) sign
on flat side of the battery to the plus sign in the battery compartment. A magnifying glass and good lighting may be helpful in seeing these small markings.
The correct battery size for your Elipse hearing instruments
is a 675.
18 19
For future reference, enter this information on the service page at the back of this guide.
Close the battery compartment tightly but do not use force – it should close very easily.
Your hearing system should now be on.
Tip: Removing the battery when the instrument is not being worn will help prevent cor-
rosion of the battery contacts. Corrosion can decrease efficiency, causing excessive
battery consumption.
Note: A weak battery will cause reduced system performance.
Low Battery Warning
Your hearing system features a Low Battery Warning function to give you notice when
your battery is getting low.
The instrument will signal when the battery power decreases to a certain level, and will
continue beeping until the instrument automatically switches off.
Tip: It is helpful to keep spare batteries with you in case you need them.
Page 11
Battery Safety
• Dispose of used batteries properly.
• Keep batteries out of reach of children or persons with diminished mental capacity.
• Keep batteries away from pets.
• Do not place batteries in your mouth. If a battery has been swallowed, consult a physician immediately.
To prevent batteries from leaking or exploding:
• Do not expose batteries to temperature extremes.
• Do not dispose of batteries in fire.
• Do not attempt to recharge batteries which are not specifically designated rechargeable, or reverse a battery’s polarity.
20 21
Cleaning the Instrument
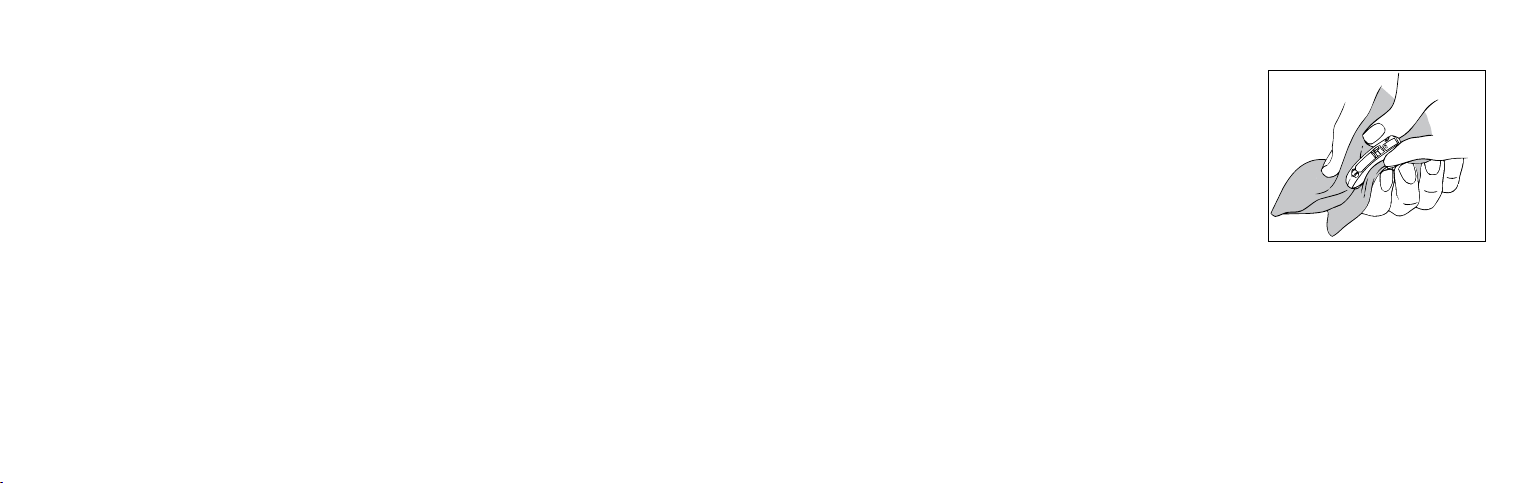
The surfaces of your instruments should be cleaned after
every use. Use a soft cloth to remove dirt, dust, earwax
and residue from cosmetics or colognes. Keeping the instruments as clean as possible will help avoid costly repairs.
Only use cleaning products recommended by your hearing healthcare professional. Please refer to “Things that
Can Damage Your Hearing System” for more information.
Cleaning the Microphone Sound Inlet
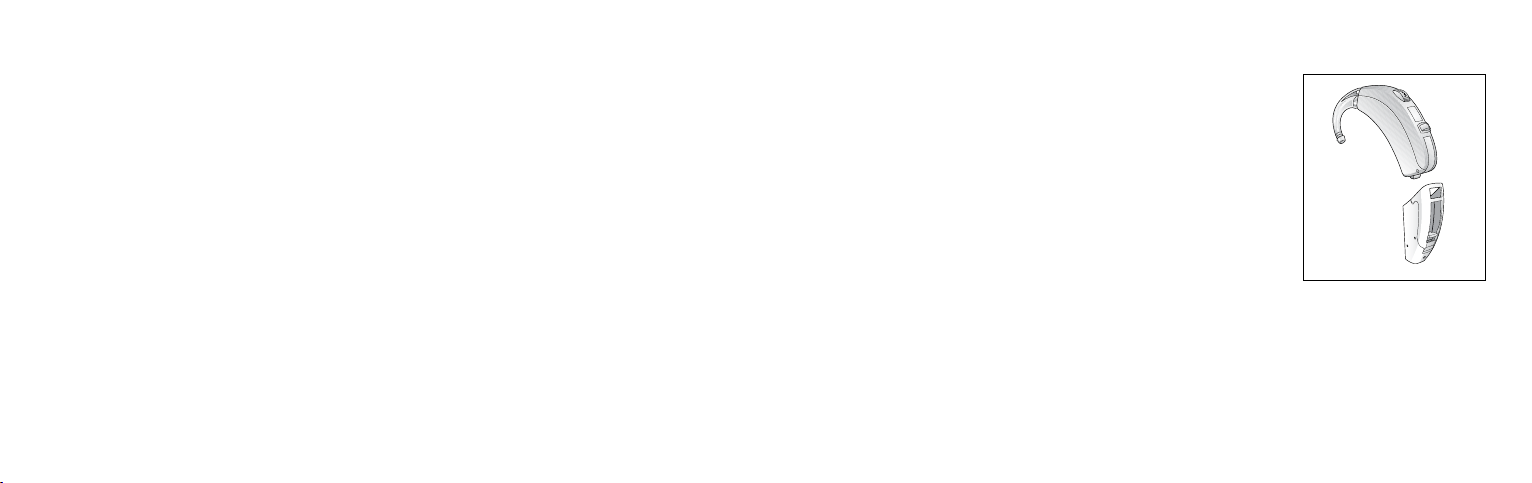
Refer to the diagrams on page 6 to locate the sound inlet on the hearing instrument.
Keeping the sound inlet clean will allow the microphone to function properly. Use the soft
brush provided with your hearing instruments to remove dust or other debris from the
sound inlet.
Page 12

Cleaning the Earmold
Keeping the earmold clean will allow it to properly feed the
amplified sound from the hearing instrument into the ear.
First, remove the earmold and the silicone tubing from
the hearing instrument. Use luke warm water to clean the
earwax off the earmold. If earwax is stuck in the sound
canal of the earmold, the cleaning loop or a syringe with
lukewarm water can easily be used to “push” the earwax
out. If you notice excessive earwax build-up, please contact your hearing healthcare professional. Improper cleaning may result in damage to your hearing instrument.
Be sure to thoroughly dry the earmold and its tubing before reconnecting it to the hearing instrument. Blow gently
through the tubing to remove moisture trapped inside. The
silicone tubing should be changed by your hearing healthcare professional if it becomes stiff or brittle.
22 23
Earmold
Tube
Your hearing healthcare professional can instruct you on how to properly use the cleaning loop and soft brush.
When the Hearing System Is Not in Use
To protect your hearing system when it is not in use, always store it inside its carrying
case. When storing the hearing system for a prolonged period of time, remove the battery to prevent damage from corrosion.
Things that Can Damage Your Hearing System
Keep in mind that some of your day-to-day routines require that you remove your hearing
system.
Moisture
Avoid getting moisture in the hearing system. It should not be worn in the shower, bath,
or sauna. Do not submerge the instrument in water or other liquids.
Page 13

If perspiration or humidity is an issue, you may find it beneficial to use a drying kit
specially designed for hearing systems. To prevent damage, only use drying kits that
are approved by your hearing healthcare professional.
Rough Treatment
Protect your hearing system from rough treatment by storing it in the
provided carrying case when it is not in use.
Temperature Extremes
Do not expose your hearing system to extremes of heat.
Some typical situations to avoid:
• Do not wear your hearing system when using a hair dryer.
• Do not leave your hearing system in your car or in direct sunlight.
• Do not attempt to dry your hearing system in any device other
than an approved drying kit.
24 25
Corrosive Substances
• Non-Approved Cleaning Solutions – If you use cleaning products,
only use those recommended by your hearing healthcare professional, as housing can be damaged by certain cleaning agents such as mineral acids,
hydrocarbons (benzol), esters, alcohols and ketones.
• Debris from Daily Hygiene Routines – It is suggested you not wear your hearing system
while applying the following: hairspray, cosmetics, colognes, perfumes, sunscreens,
insect repellent, etc.
Page 14

GENERAL INSTRUCTIONS
General Warnings
• Your hearing instruments should never be worn by others. They have been programmed for your comfort and hearing abilities. Unprescribed use by another person could
damage his or her hearing.
• Consult a physician if you find a foreign object in your ear canal, if you experience skin
irritation or if excessive earwax accumulates with the use of the hearing instrument.
• Different types of radiation, for example, from NMR, MRI or CT scanners, may damage
the hearing instrument. Therefore, do not wear the hearing instrument during these or
other corresponding scanning procedures. Other types of radiation (burglar alarms,
room surveillance systems, radio equipment, mobile telephones, etc.) contain less
energy and will not damage the hearing instrument. They could however momentarily
affect the sound quality or create strange sounds from the hearing instruments.
• Do not wear the hearing instrument in mines or other explosive areas, unless those
areas are certified for hearing instrument use.
26 27
• Keep the instruments away from children under the age of three. Hearing instruments
contain small parts that may present a choking hazard.
• Instrument usage by children or mentally challenged persons should be supervised
at any time.
Children with Hearing Loss
In addition to seeing a physician for a medical evaluation, a child with a hearing loss
should be directed to an audiologist for evaluation and rehabilitation since hearing loss
may cause problems in language development and the educational and social growth of
a child. An audiologist is qualified by training and experience to assist in the evaluation
and rehabilitation of a child with a hearing loss.
Page 15

Warning to Hearing Aid Dispensers
A hearing aid dispenser should advise a prospective hearing aid user to consult promptly
with a licensed physician (preferably an ear specialist) before dispensing a hearing aid
if the hearing aid dispenser determines through inquiry, actual observation, or review of
any other available information concerning the prospective user, that the prospective
user has any of the following conditions:
(i) Visible congenital or traumatic deformity of the ear.
(ii) History of active drainage from the ear within the previous 90 days.
(iii) History of sudden or rapidly progressive hearing loss within the previous 90 days.
(iv) Acute or chronic dizziness.
(v) Unilateral hearing loss of sudden or recent onset within the previous 90 days.
(vi) Audiometric air-bone gap equal to or greater than 15 decibels at 500 Hertz (Hz),
1,000 Hz, and 2,000 Hz.
(vii) Visible evidence of significant cerumen accumulation or a foreign body in the ear
canal.
(viii) Pain or discomfort in the ear.
28 29
Special care should be exercised in selecting and fitting a hearing instrument(s)
whose maximum sound pressure level exceeds 132 dB SPL with an IEC 60711: 1981
occluded ear simulator, because there may be a risk of impairing the remain ing hearing
of the hearing instrument user.
TECHNICAL SPECIFICATIONS
Max. Output dB SPL according to IEC-118-0
EL90-VI 145 dB SPL
Page 16

HEARING INSTRUMENT IDENTIFICATION
MODEL RECEIVED HEARING CARE PROFESSIONAL
EL90-VI
Serial number Right:
Serial number Left:
30 31
Notes
Page 17

Notes
32 33
Notes
Page 18
Notes
34 35
Page 19

Any issues relating to the EU Medical Device Directive
93/42/EEC should be directe d to Inter ton A/S.
Worldwide headquarters
Interton A/S | Lautrupbjerg 7 | DK-2750 Ballerup Denmark
Tel.: +45 45 75 1111 | Fax: +45 45 75 1119 | www.interton.com
17141800-GB 11.01 Rev.B
 Loading...