

Page 1

User Guide
Custom made Models:
CIC, ITC, ITE
Microphone-In-Helix (MIH)
Interton Cosmo
Interton Crisp
Interton Share
Interton Step
Page 2

2
3
Hearing instrument model:
Left serial number:
Right serial number:
Instrument version:
Completely In the Canal (CIC)
In The Canal (ITC)
In The Ear (ITE)
Microphone in Helix (MIH)
Power version:
Standard Power Ultra Power
Battery s ize:
13 o ra ng e 312 b row n 10A yellow
Programme Beep Descripti on of when to use
1
2
3
4
Delayed on-activatio n...............12
Volume control....................20
Push button......................21
Wireless................15, 22, 23, 36
AutoPhone.......................26
Telecoil/Tele-loop system ............31
Power device-exce eds 132 dB SPL ......
SPECIFIC F EATURES SUPPORTED BY YOUR H EARING SYSTEM:
Note: Your hearin g system might not sup port all 4 enviro nmental program mes. Ask your hear ing care professi onal for details.
Ask your he aring care profes sional to marked opt ions supported b y your hearing syste m.
Page 3

4
5
Th a n k You
Thank you for selecting an Interton hearing system. We are p roud of our hea ring products and are confi dent you have chosen one of the be st products ava ilable.
Please familiarize yourself with the information in this guide. It contains important instructions for proper
use and care, tec hnical pe rforma nce information, and other g eneral information ab out your hea ring system. Your hearing system h as been adj usted to your par ticular he aring los s. Your hearing hea lth care
profession al will explain these adj ustments an d the specia l features of your particu lar model.
All the key feature s and functions of your hea ring system are explained in
video tutorials. To watch them simply s can QR code s and watch the vid eos
on your smar tphone. If you do not have scann ing application insta lled yet you
can go to getsca nlife.com on your m obile browse r to download fre e application. (ScanL ife® is one of the free applic ations you can use to play QR cod es,
you can also us e any other QR sc anner to play the v ideos).
Becoming Accustomed to Amplification
While purch asing a hearing system is a m ajor step, it is only one step in a pro cess toward more comforta ble
hearing. Su ccessfully adapting to th e amplification your hea ring system prov ides takes time and consi stent
use.
You will enjoy more ben efits from your In terton hea ring system by taking the following actions:
• Wear the system reg ularly in o rder to get comfo rtable w ith using it.
• It takes time to get us ed to a hearin g aid. It may help to be gin by wearin g your heari ng aid for short
periods – eve n as little a s 15 minutes – and then gradually building up your wearing time. In a way, it’s
no different than adju sting to contact lenses. Speak to you hearing care professional, wh o can desig n
a schedule t ailored just for you.
• As you get more co mfortab le with the system, increase the wearing tim e and wear your h earing sys tem
in multiple t ypes of listening enviro nments.
It may take as long a s several months for your brain to get used to all the “new” sounds around you. Following these suggestio ns will give you r brain time to le arn how to interpret amplification and increase the
benefits you ge t from using an Interton hearing system.
Page 4

6
7
Hearing instrument t ype desi gnations for m odels incl uded in this u ser guide are: Hearing instrument
type des ignations fo r models inc luded in this user guide a re: Model BO312, FCC ID: X26BO312, IC:
6941C-BO312; Model BO13, FCC ID: X26BO13, IC: 6941C-BO13; Model PH312, FCC ID: X26PH312, IC:
6941C-PH312; and Model PH13, FCC ID: X26PH13, IC: 6941C-PH13. Please see page 12 and 13 for list of
models referring to all types.
Statement:
This devic e complies with Part 15 of the FCC Rul es and IC rul es.
Operation i s subject to the fo llowing two c onditions: (1) this device may not cause harmful inter ference,
and (2) this device m ust accept a ny interference received, including interfe rence that may c ause unde sired
operation.
Note: This equipme nt has been te sted and found to co mply with the limits for a Cla ss B digital d evice,
pursuant to pa rt 15 of the FCC Rules and ICES-00 3 of the IC rules. T hese limi ts are designed to provide
reasonable protection ag ainst harmful inter ference in a re sidentia l installati on. This equipment gen erates,
uses and ca n radiate radio f requency e nergy and, if n ot installe d and used in ac cordance with the instructions, m ay cause har mful inter ference to rad io communi cations. Howeve r, there is no guarantee that
interfere nce will not occur in a par ticular in stallation. If this equipm ent does ca use harmful interference to
radio or televi sion reception, which can be determined by turning the equipme nt off and on, the user is
encourag ed to try to corre ct the inter ference by on e or more of the foll owing measures:
• Reorient or relocate the receiving antenna.
• Increase the separation between the equipment and receiver.
• Connect th e equipment into an outlet on a c ircuit dif ferent fro m the one in which the receiver is connected.
• Consult the dealer or an experienced radio/TV technician for help.
Changes or modifications can void the user´s authority to operate the equipment.
Page 5

8
9
Intended use
Generic air-conduction hearing instruments are wearable sound-amplifying devices intended to compensate for impaire d hearing. The fundam ental oper ating principle of hearing instrum ents is to receive, amplify,
and transfer sound to the ear drum of a heari ng impaired person.
List of countries:
Products without wireless functionality are intended for worldwide sales.
In the EU, products with wireless functionality are intended for sale in countries within European Economic
Area as well as Switzerl and.
The products are in compliance with the following regulatory requirements:
• In EU: the device co nforms to the Ess ential Requirements ac cording to Annex I of Council D irective
93/42/EEC for medical d evices (MD D) and essential requirements and oth er relevant provisions of Directive 1999/5/EC (R&TTE).
• The declaration of conformity may be consulted at www.resound.com
• In US: FCC CFR 47 Part 15, subpart C.
• Other identified applicable international regulatory requirements in countries outside EU and US. Please
refer to local co untry req uirements fo r these area s.
• In Canada: the se hearing instruments are certified unde r the rules of IC.
• Cet apparei l numérique de la classe B est confor me à la norme N MB-003 d u Canada.
• Japanese Radio Law and Japanese Telecommunications Business Law Compliance. This device is
granted purs uant to the Japanese Radio L aw (電波法) and the Japanese telecommunications Business
Law (電気通信事業法) This device should not b e modified (othe rwise the granted designation number
will become invalid)
• This produc t is a custom-mad e device.
Page 6

10
11
Hearing Instrument(s) model and
basic information ........................2
Thank you .............................4
Becoming Ac customed to Amplification .......5
Intended use ...........................8
List of countr ies . . . . . . . . . . . . . . . . . . . . . . . . . 8
Instruments component identification ........12
On/Off function ........................16
Delayed activation (optional) ...............16
Inserting/ Replacing the battery ............ 17
Low batter y indicator ....................19
Inserting/removing hearing instruments.......20
Volume control (optional) .................24
Push button (optional) ...................25
Flight mode (wireless devices only)..........27
Telephone use ........................29
Listen to radio or T V ....................30
Cellular ph ones ........................30
AutoPhone (optional) ....................31
Telecoil (optional) .......................36
Tele-loop systems (optional) ...............37
Care and maintenance...................38
Contents
Cleaning Custom made device ............40
Replacing wa x filters.....................40
Wireless warnings and precautions
(wireless devices only) ...................42
General warnings.......................43
Troubleshooting guide ...................46
Technical Data .........................54
Warranty and repairs ....................60
Temperature test, transport and
storage information......................61
Hearing instrument expectations ...........62
Warning to Hear ing Aid Disp ensers (US on ly) ..62
Important Notice for Prospective
Hearing A id Users (US onl y) ...............63
Children wit h hearing lo ss (US only) .........64
High sound pressure levels ...............65
Page 7

12
13
Hearing instruments of type
BO13 are avail able in t he following variants:
C650-MW
C650-MPW
C650-MUW
C450-MW
C450-MPW
C450-MUW
Hearing instruments of type
PH312 are avai lable i n the fol lowing variants:
CI23 0-W
CI230-PW
CI230 -DW
CI230-DPW
CI33 0-W
CI330-PW
CI330 -DW
CI330-DPW
ST430-DPW
ST4 3 0 -D W
ST4 3 0 -P W
ST4 3 0 -W
ST230-DPW
ST230 -DW
ST230 -PW
ST23 0-W
Hearing instruments of type
BO312 are avai lable in the fol lowing variants:
C630-MW
C630-MPW
C630-MUW
C430-MW
C430-MPW
C430-MUW
Hearing instruments of type
PH13 are availa ble in t he following variants:
CI25 0-W
CI250-PW
CI250 -DW
CI250-DPW
CI35 0-W
CI350-PW
CI350 -DW
CI350-DPW
ST450-DPW
ST4 5 0 -D W
ST4 5 0 -P W
ST4 5 0 -W
ST250-DPW
ST250 -DW
ST250 -PW
ST25 0-W
Page 8

14
15
1. Push button (optional)
2. Battery compar tment an d On/Off
switch
3. Removal cord (optional)
4. Sound outlet
5. Wax fil ter
6. Venting (optional)
7. Microphone sound inlet(s)
8. Remote microphone and tubing
(for Microphone In Helix devices)
9. Volume control (optional)
10. Model
11. Manufacturer
12. Serial number
2
7
4
5
9
1
3
12
4
7
1
2
11
10
6
3
8
6
7
4
5
2
7
2
4
9
1
7
6
12
10
11
6
4
5
5
6
6
3
Non wireless hearing instruments a re avail able in t he following variants:
ST430-DP
ST4 3 0 -D
ST4 3 0 -P
ST4 3 0
ST230-DP
ST230 -D
ST230-P
ST230
ST450-DP
ST4 5 0 -D
ST4 5 0 -P
ST4 5 0
ST250-DP
ST250 -D
ST250-P
ST250
SR1310
SR1210
SR 1110
SR1310 -P
SR1210 -P
SR 1110 -P
SR133 0
SR133 0- D
SR1230
SR1230 -D
SR 113 0
SR133 0- P
SR133 0- DP
SR1230 -P
SR1230 -DP
SR 113 0 - P
SR135 0
SR135 0- D
SR125 0
SR125 0-D
SR 115 0
SR135 0- P
SR135 0- DP
SR125 0-P
SR125 0-DP
SR 115 0 - P
Page 9

16
17
Getting started
On&Off function
1. When the bat tery door i s closed, the
hearing instrument tu rns on, and the
default prog ram will be ac tiv ated.
2. To turn off the he aring instr ument, open
the batter y door. Many individuals can
use their fing ernail to pul l it open.
i
Whenever the hearing instruments a re not in use, re-
member to turn them off to avoid u nnecess ary bat tery consumption.
Delayed activation
Hearing instruments c an be turne d on once you have placed them on your ears. If you p refer to turn the m
on just prior to placing them on your ear, your hearing care professional can activate a function calle d
Scan a QR co de with your
smart pho ne and watch a
instruction video.
On
Off
Delayed on-activation. Thi s function w ill delay the ti me in which the hearing in struments turn on by several
seconds af ter the battery comp artment is closed. Wi th Delayed on-activation, a be ep will be heard for each
second of the delay perio d.
Inserting/Replacing the battery
1. Open the battery door completely by using your fingernail.
2. Remove the used bat tery if pre sent. Inser t the new bat tery
with the positive side in the correct position.
3. Gently close the batte ry door.
i
Always use new Zinc-Air batteries that have a m inimum
remaining s helf-life of 1 yea r.
Scan a QR co de with your
smart pho ne and watch a
instruction video.
Page 10

18
19
Low batter y indicato r
Your hearing care p rofessiona l can set your hearing ins trument to give a n acoustic al indicati on when the
battery i s reaching its end of life. The h earing instrument wi ll reduce am plificatio n and emit a me lody if battery power gets too low. This signal w ill recur eve ry five minu tes until the he aring instr ument autom atically
switches of f. It is recommended that you kee p spare batteries on han d.
Low batter y indicato r (instrume nts paired with access ories only)
Active usage of th e Interton wi reless acc essories (Remote Control, Phone Clip a nd TV Stre amer) requires
more batter y power from th e hearing i nstruments than when the se are working on their own. When the
battery i n the hearin g instrume nt has deple ted to a level at which u se of the Inter ton TV Strea mer TV a nd
Phone Clip ca nnot be supported, the he aring instr ument will play two sets of de scending tones. After
this, your hearing instru ment and Inter ton Remote Control will continue to work as usual, but you will n ot
be able to use your I nterton T V Streamer and Phone Cli p. At some point the battery leve l will not support
the remote control either and yo u will once again hear the d escendi ng tones. The he aring instruments wi ll
continue to work a s usual. Onc e a new batter y is inser ted, full ope ration of the acc essorie s will resume.
i WARNING
1. Remove the batteries to prevent l eakage wh en the hear ing instruments are not in us e for an extend ed
period of time.
2. Do not attempt to recharge batteries (Zinc Air) w hich are not sp ecifical ly design ated as rechargeable
because they may leak or exp lode.
3. Do not place bat teries in your mouth. Cons ult a physici an immediately if a batter y has bee n swallowed, as they can b e harmful to you r health.
4. Keep batte ries away from p ets, children and indivi duals who are mentally c hallenged.
5. Do not attempt to di spose of batte ries by burn ing them. Used batteries are harmfu l to the environment. Please d ispose of them according to lo cal regulations or retur n them to your hearing care
practitioner.
Page 11

20
21
Inserting/Removing hearing instruments
Insertion (MIH devices)
1. Hold the hearing instru ment betwe en your thumb a nd index finger, either
above and below or on the sides.
2. Pla ce the sound outlet portion into your ear canal. Turn the top par t of the
earmould gently back wards and forwards so that it tucks behind the fold of sk in
above your ear c anal.
3. Inser t the hear ing instrum ent into your ear canal. Ope ning and clo sing your
mouth may ease insertion.
4. Gently push the microphone into the creased a rea of the ear that is located
above the microphone entrance, and make sure the tubing is in place.
Scan a QR co de with your
smart pho ne and watch a
instruction video.
By experim enting, an easier method m ay be discovere d. With proper inserti on, hearing
instrumen ts should fit snugly but co mfortab ly. If the hearing in struments c ause irri tation
of the ears, contact your hea ring care professiona l.
i CAUTION
Never attempt to mo dify the s hape of the hearing instr ument yourself.
i CAUTION
Use only original Interton/GN Hearing consumables e.g. wax filters.
i
It may be helpfu l to pull your ear up and outward with your oppo site hand dur ing
insertion.
Page 12

22
23
Insertion (CIC, ITC, and ITE)
1. Hold the hearing instru ment betwe en your thumb a nd index finger, either above and be low
or on the sides.
2. Plac e the sound ou tlet porti on into your ear c anal. Turn the top part of the hearing
instrumen t gently back wards and fo rwards so th at it tucks beh ind the fold of sk in above
your ear can al.
3. Inser t the heari ng instrument into your ear c anal. Open ing and clos ing your mouth may ease inse rtion.
i CAUTION
Never attempt to mo dify the s hape of the hearing instr ument yourself.
i CAUTION
Use only original Interton/GN Hearing consumables e.g. wax filters.
i
It may be helpfu l to pull your ear up and outward with your opposite hand dur ing inser tion.
Removal options (CIC and MIH)
1. Hold the remova l cord with your thumb and index finger and pu ll outward.
2. Hol d the edges of th e hearing instrument w ith your thumb a nd forefinger and pull out ward
while slightly rotating your h and forwa rd.
3. If Microphone in Heli x hearing i nstruments do not have a removal c ord, gently pull
outward with the microphone tubing.
4. Consult your hear ing care profe ssional i f you have difficulties re moving the he aring
instrument.
Removal (ITC and ITE)
1. Hold the edges of the hearing instrum ent with your thumb and forefin ger.
2. Pull outward while slightly rotating your han d forward.
3. Consul t your heari ng care profes sional if you have difficulties remov ing the
hearing instrument.
Page 13
24
25
Operation of the hearing instrument
Volume control (optional)
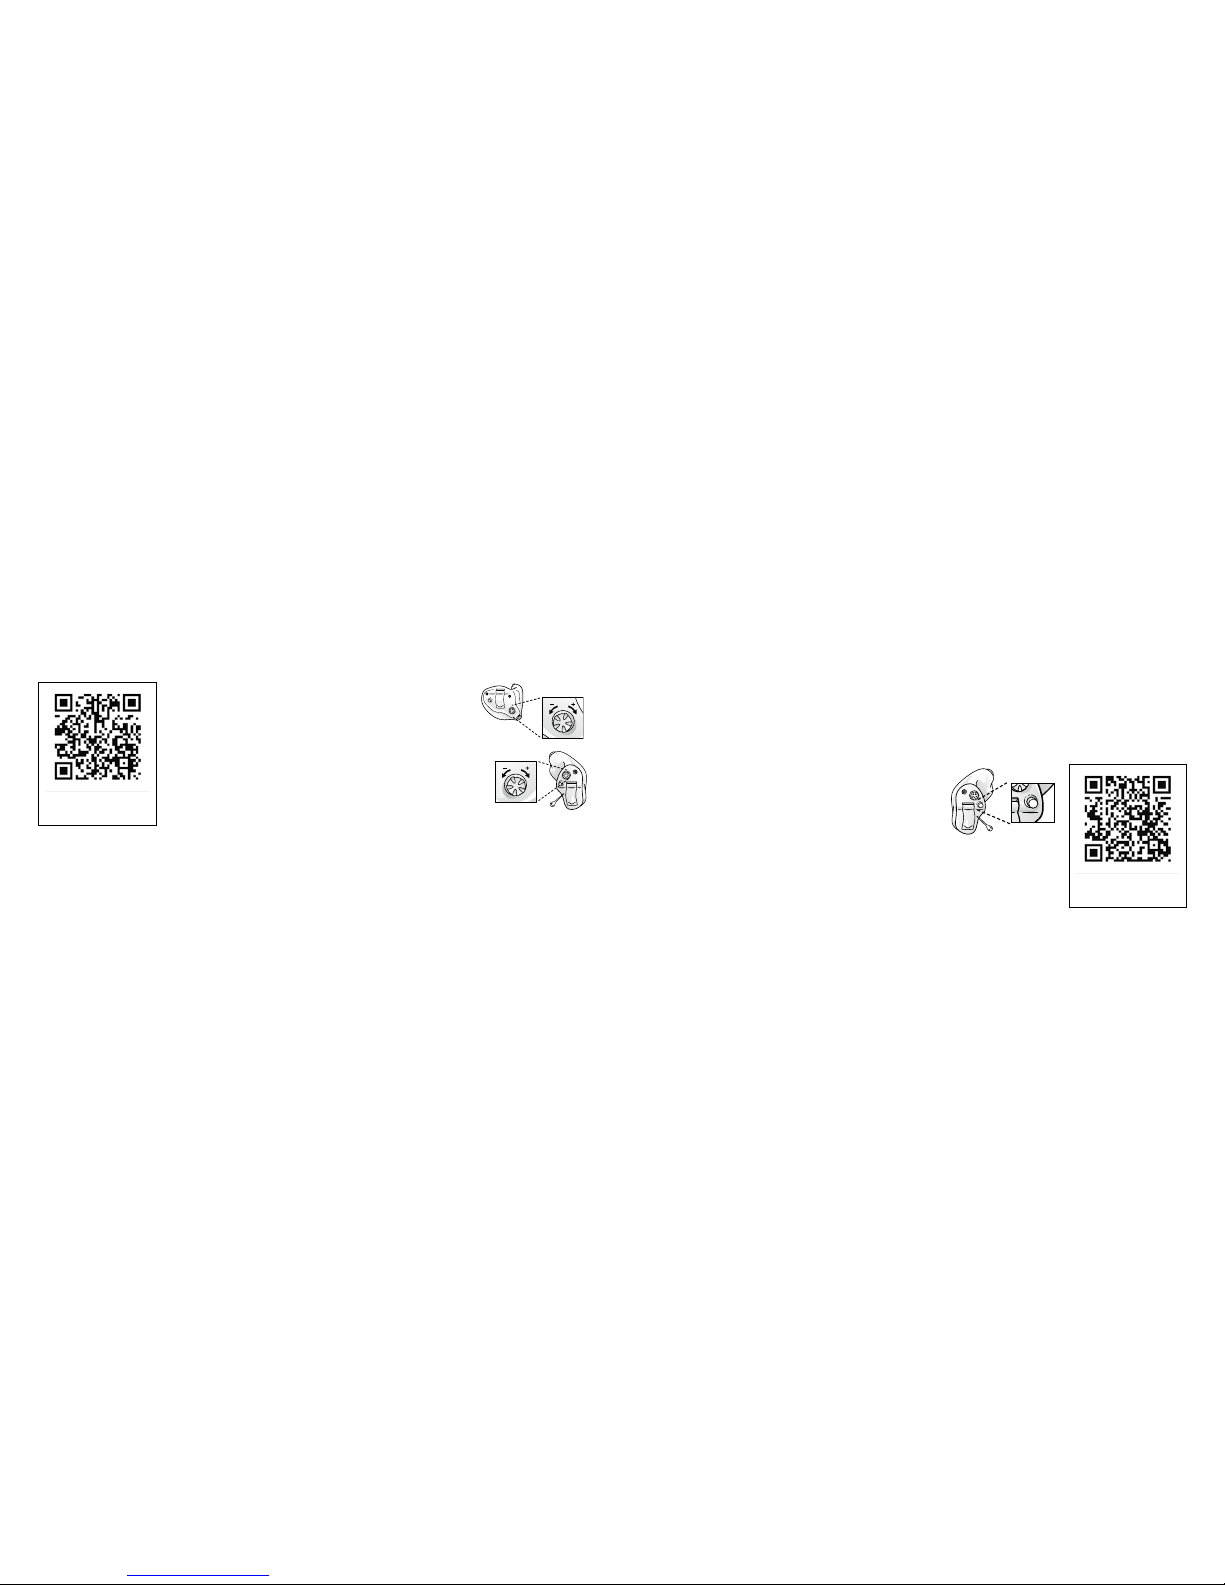
The volume control will allow the volume of he aring instruments to be increased or decreased.
1. To increase the volume, rotate the volume c ontrol
forward (towards your face whe n you are weari ng the
hearing instruments).
2. To decrease the volume, rotate th e volume contro l
backward (away from your face).
Applies only to Interton Share device s: Please note that w hen you turn th e volume all the way down (until
the volume con trol wheel stops rotating), the devic e will be turned off. To reboot the devic e, turn the volum e
back up by rotating th e volume control forward.
Scan a QR co de with your
smart pho ne and watch a
instruction video.
Push button (o ptional)
Depending on your experience leve l with hear ing instruments, indiv idual hea ring need s, and the type of listening
environme nts you experi ence, your he aring care p rofessional may activate additional programmes. If additional
programme s have been activated, the follow ing list explains how they work.
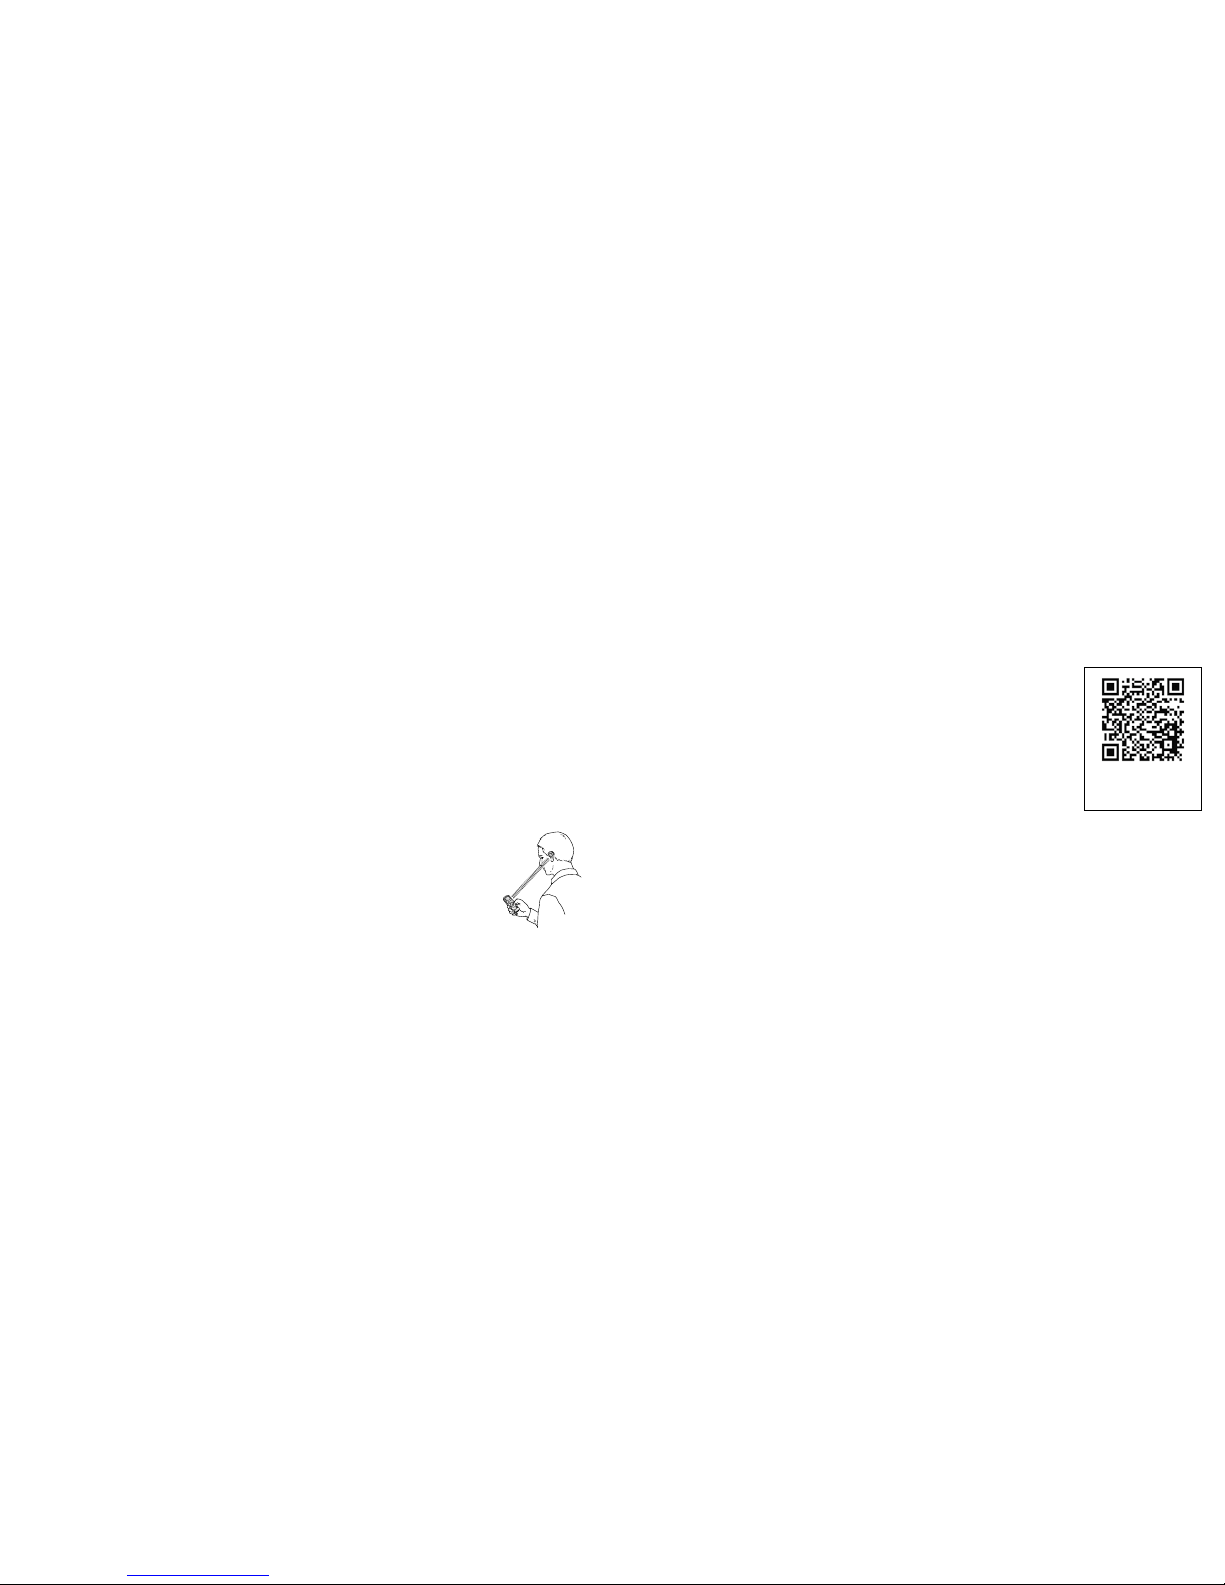
1. You can switch betwee n programmes by pushing the push but ton once.
Scan a QR co de with your
smart pho ne and watch a
instruction video.
When volume is increase d or decrea sed, a beep si gnal will be heard for eac h incremen tal change. W hen
the upper or lower limits of the volume range a re reached, a be ep signal w ith a longer d uration will be
heard. Duri ng the fitting of the instrument, your hearing care professional wi ll have chosen an optimal volume setting for you. When swi tching the instr ument on, the vo lume will have th is optimal set ting.
Page 14
26
27
Only appli cable to wir eless devices.
If your heari ng system supports wire less func tionalit y and it is paired with wireless acce ssory like TV
Streamer you can activate stre aming mode.
1. Push and hold the push but ton for 2 second s.
2. You will then h ear shor t melody th at indicates s treaming mo de.
To switch back to environme ntal progra m push the push button shor tly. Hearing I nstru-
ment will return to the default s etting (pro gramme one).
For easier eve ryday use of yo ur wireles s hearing instrumen t controls you ca n use wirele ss
remote control. Ask your hearing care professional for more information.
2. You will then h ear one or mo re beeps. The number of beeps indicates which prog ramme you have
selected (one b eep = programme one, two b eeps = programme two, etc.).
3. When the h earing instruments are turned of f and then bac k on, the heari ng instrument always retur ns
to the default setting (programme one).
Flight mode. Only applicable to wireless devices*
i WARNING
When board ing a flight or en tering an are a where RF transmitter s are prohibited,
wireless f unctionality must b e deactivated, as it is not allowed to radiate radio signals
during flights or in other wise restricted areas.
For Crisp wirel ess hearing ins trum ents fo llow the f ollowing steps t o enter
and leave fl ight mo de:
It is possibl e to disable wi reless operation by ope ning and clo sing the battery comp artment of the hearin g
instrumen t while at the sa me time pres sing the push button.
When disabled manually, wireless operation may be re-enabled by opening and closing the battery compartment normally, (i.e. without at the same time pressing the push but ton).
For devices w ithout a pus h button: It is possible to disab le wireless operatio n by opening and closing the
battery d oor twice within 10 seconds. Repeat this p rocedure to en able wirel ess again.
*Instruments paired with accessories only
Scan a QR co de with your
smart pho ne and watch a
instruction video.
Page 15
28
29
i
It is impor tant to wait an add itional 15 seconds after wire less fun ction resum es before ope n ing and
closing the battery compartm ent again for a ny reason. If the b attery compartm ent is opened and close d
during this 15 seco nd window, flight mod e will resum e.
For Step wirele ss heari ng instruments follow the following steps to enter and leave flight mode: It is possible to disab le wireless operatio n by opening and closing th e battery compar tment three times within a te n
second period (open-close, open-close, open-close). Your instruments will now be in flight mode.
If the hearing instrume nt is in flight mo de, the heari ng instrument must have be en operatin g in flight mode
for at least 10 seconds before attempting to enable wireless again. it is possible to re-enable wireless
opera tion by opening and closing the battery door once. 10 seconds after this operation is completed,
wireless o peration wi ll begin aga in.
Telephone use
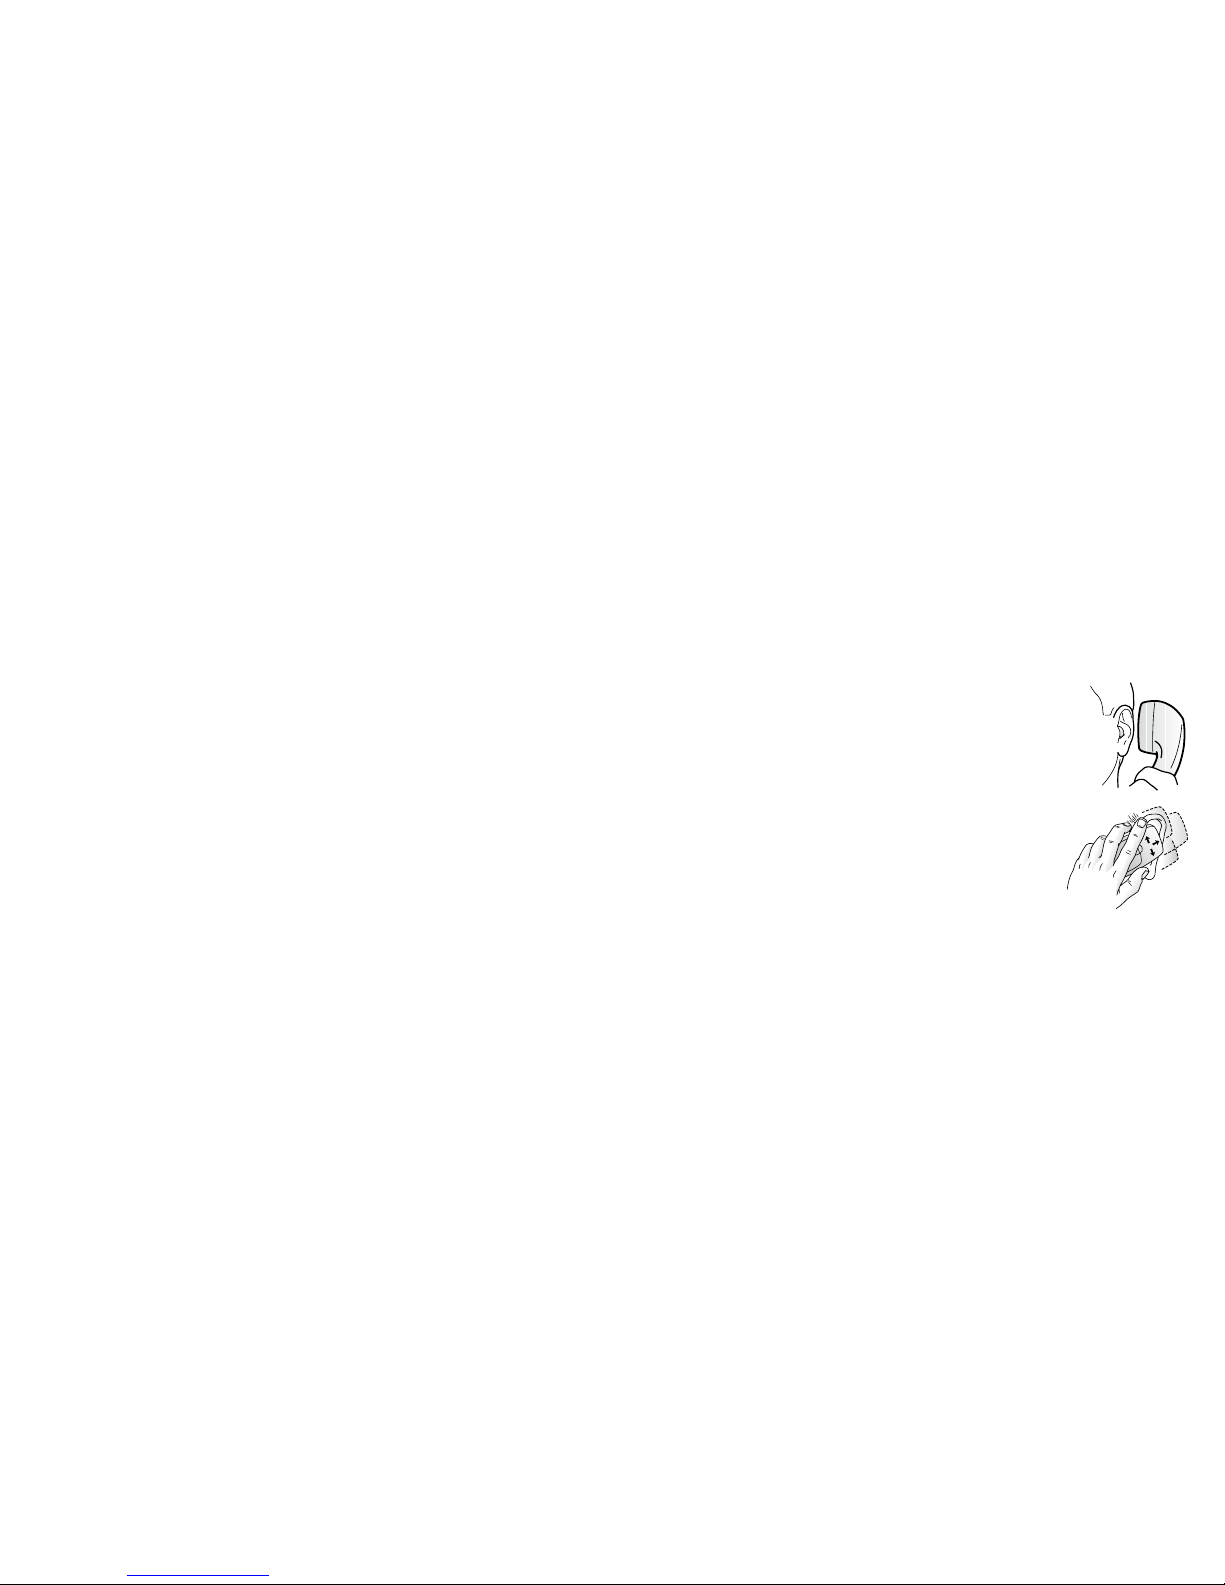
Finding the optimal position for holding a telephone may require practice for some
individu als, and one or m ore of the following sugges tions may be helpful.
1. Hold the telephone as you would normally.
2. If wh istling occurs, it may take a few seconds of hol ding the telephone in the
same position before the hearing instrument eliminates the feedback.
3. Any whistling may also be decrease d by holding the telephone s lightly away
from the ear.
4. Depe nding on your individu al needs, you r hearing c are professi onal may
activate a programme specifically for telephone use.
Page 16

30
31
Listen to radio or TV
When listen ing to the TV or th e radio, star t out by listeni ng to news comme ntators since they usually speak
clearly, then tr y other programmes. If you find it difficult to listen to T V or radio, your he aring care p rofessional will be able to give you ad vice on avail able acce ssories to enhance your l istening ca pabilitie s for TV
and radio.
Cellular phones
Your hearing instrument is designed to comply with the most stringent Standards of International Electromagnetic Compatibility. However, not all cell phones are hearing instrument compatible. The varying degree of distur bance can b e due to the nature of you r particu lar cellu lar phone or of yo ur wireless telephon e
service provider.
If you find it dif ficult to obtai n a good resul t while usin g your cellular phone, your hearing c are professi onal
will be able to gi ve you advice o n available ac cessories to enhanc e listening c apabiliti es.
AutoPhone (optional)
The AutoPhone function, allows your hearing instrument to automatically switch to your tele phone programme when a telephone receiver with an AutoPhone magnet is raised to the ear. When the telephone
receiver is removed from the ear, the hearing instrument au tomatically returns to the prev ious listeni ng
programme.
Page 17
32
33
Placement of AutoPhone magnets
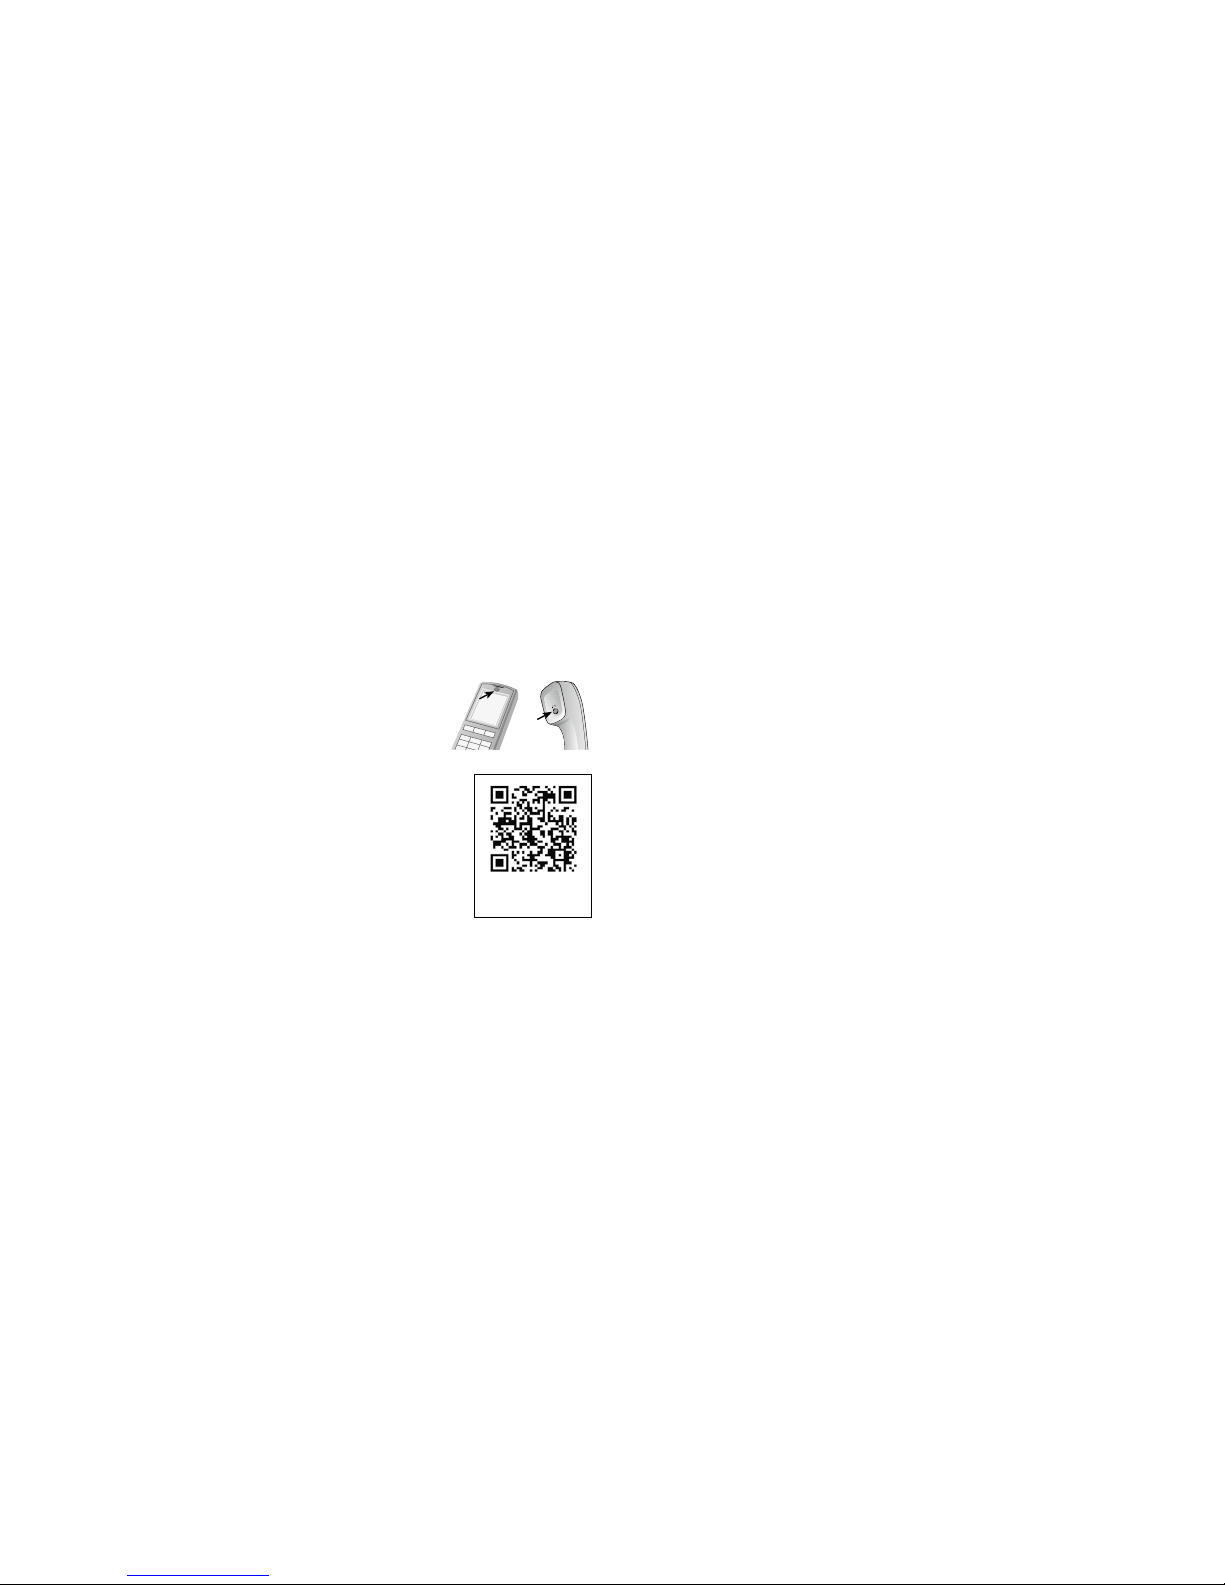
Place AutoPhone magnet on your telephone receiver to allow operation of the
AutoPhone function. In order to place AutoPhone magnet properly:
1. Clean the telephone receiver thoroughly.
2. Hold the telephone vertically, in a position similar to when making a telephone
call.
3. Place the magnets just be low the teleph one recei ver. Make sure not to cover
the microphone openings. If necessary, move the magnet to another position
4. If you are not satisfied wi th the strength of AutoPhone, you ca n repositio n the
AutoPhone magnet or add additional AutoPhone magnets.
i
Only use a recommended cleaning agent to clean the telephone prior to
placing the magnet on the phone.
Scan a QR co de with your
smart pho ne and watch a
instruction video.
AutoPhone usage
Telephones can b e used in a normal manner. A short melody w ill indicate th at the AutoPhone feature has
automatically switched the hearing instrument to your telephone programme. Initially, you may need to
move the telephone receiver slightly to find the best position for reliable AutoPhone activation and good
hearing on the telephon e. When you remove the telephon e receiver AutoPhone will stay activated for a
few seconds to avoi d accident al switching of f. After that hearing ins trument wi ll switch to previo usly used
environmental programme.
Page 18

34
35
i WARNING
AutoPhone warnings
1. Keep magnets o ut of reach of pets, children an d mentally challeng ed persons. If a magnet is swa llowed,
please seek advice from a medical practitioner.
2. The AutoPhone may af fect some medical devices or el ectronic systems. The man ufacturer of a ny
magnetically sensitive devices (e.g. pacemakers) should advise you regarding appropriate safety
precautio ns when using your hearing instrum ent and magn et in close proximity to the medical devi ce
or electronic system in question.
if the manufacturer cannot issue a statement, we recommend keeping the magnet or a telephone equipped
with the magnet 30 cm (12”) away from magnetica lly sensitive devices (e.g. pacemakers).
i CAUTION
AutoPhone precautions
1. High distortion during dialing or phoning may mean that the magnet is not in the optimal position relative
to the telephon e receiver. To avoid the issue, pl ease move the magnet to another p lace on the telephone
receiver.
2. Only use magnets supplied by Interton/GN Hearing.
Page 19

36
37
Tele-loop systems (optional)
Many places, such as theatres, houses of wo rship, and schools are equ ipped with tele-loop systems.
When using a telecoil pro gramme with tele-loop sy stems, sound is p icked up dire ctly and may improve
speech un derstanding. If there is no sound from the h earing in struments in a tele-loop system and with a
telecoil pro gramme activated, the tele-l oop system may not b e turned on or i s not operatin g correctl y. If
a facility i s not equippe d with a tele-l oop system, sit ting as clos e as possibl e to the front may be he lpful.
Telecoil (optional)
If equipped, a telecoil ca n be activated by you r hearing c are professional and ac cessed through one of
the additional programmes. A telecoil picks up a telephone’s magnetic signal and converts it to sound. An
optional telephone programme may help to improve speech understanding on the telephone. When using
a telecoil pro gramme, the re ceiver of the telephone may n eed to be held c loser to the hea ring instr ument.
The handset of the telephone may need to be move d to slightly different positions in o rder to find the be st
receptio n.
Page 20

38
39
Care and maintenance
i
Proper handling
Please follow the following instructions to prolong the durability of your hearing instruments:
1. Keep your hea ring instrument cle an and dry. Wipe the case wi th a soft cloth or tissue af ter use to remove
grease or moisture. Do not use water or solvents, a s these can damage the he aring instr ument(s).
2. Neve r immerse h earing ins truments in water or other liqu ids, as liqui ds may cause permanent damage
to the hearing i nstruments.
3. Avoid rough handling of hearing instruments or dropping them on hard surfaces or floors.
4. Do not le ave hearing i nstruments in or near direct heat or su nlight, such a s in a hot, parked ca r, as
excessive he at can cause d amage or deform the casing.
5. Do not wear your instrum ent while sh owering, swim ming, in heav y rain or in a mo ist atmosph ere such
as a steam bath or sauna.
6. If your instr ument doe s get wet, or if it has b een expose d to high humidity or perspiration, it s hould be
left to dry out overnig ht with the battery out an d the batter y compartment open. It is also a good id ea to
put the instru ment and bat tery in a se aled conta iner togethe r with a drying agent (de siccator) over night.
Do not use the instrument until it is completely dry. Consult your hear ing care profe ssional as to which
drying a gent to use.
7. Remove your hea ring instrument when applying s uch things as cosmetics, p erfum e, aftershave, hair
spray, and suntan lotion. These mig ht get into the instrument and c ause damage.
Page 21
40
41
Cleaning custom made device
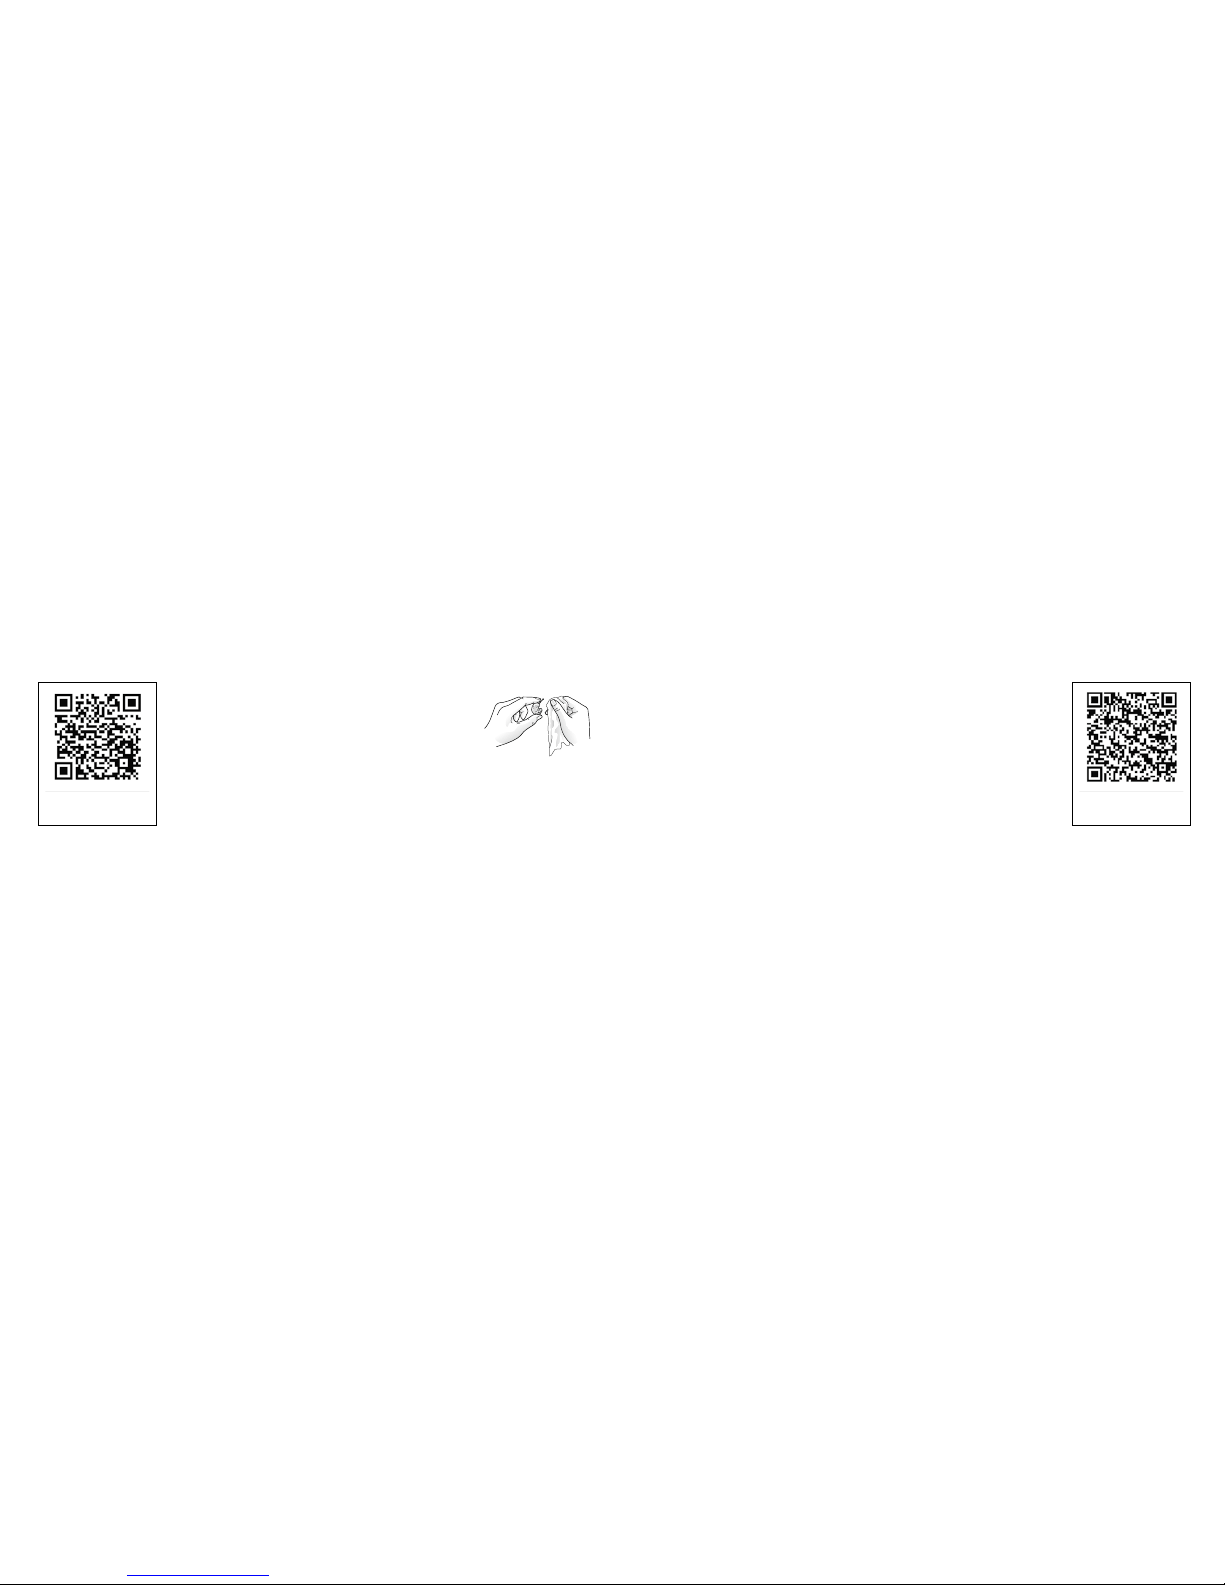
It is impor tant to keep your he aring instrument clean and
dry. On a daily ba sis, clean th e hearing i nstruments using a
soft cloth or ti ssue. Remove a ny wax or deb ris from hea ring
instrumen ts using a brush and/or a wire loop.
Replacing wa x filters
Custom hearing instrum ents may have wax filters that protec t against wa x and
moisture. It is re commend ed that these a re changed a s needed.
To change these filter s, the following steps are needed:
1. Brush th e sound outlet area with the s ound outlet p ointed down.
2. Inser t the thread ed end of the wa x filter tool into the u sed wax filte r, and gently rotate clock wise.
3. Gently pull u ntil the used filter is removed.
Scan a QR co de with your
smart pho ne and watch a
instruction video.
4. Discard the used filter i n the slot locate d in the wax filte r kit by press ing it into
the center, sliding it to on e end of the slot, and pull until the fil ter is discarded.
5. Flip the wax filter tool aroun d, locate a new filter i n the dial, and press the tip
of the tool into the center of the dial.
6. Gently pull th e new filter out of th e dial.
7. Align the new fil ter to the sound ou tlet.
8. Press the new filter into the openi ng, and simul taneously pull and roc k back
and forth until the new wax fi lter is in plac e.
i
Pressing on the new filter with the flat side of the wa x filter tool can ensure
that the filter is correctly in place.
i
If a differe nt type of wa x filter is use d for your hear ing instruments, or if your h earing in struments d o
not utilise wa x filters, con sult your hea ring care professiona l for guidan ce
Scan a QR co de with your
smart pho ne and watch a
instruction video.
Page 22

42
43
Applicable to all devices
i WARNING
General warnings
1. Consult a he aring care profession al if you discove r a foreign object in your ear canal, if you exp erienc e
skin irri tation, or if excessive ear wa x accumul ates with the use of the hearing instrument.
i
For use of wireless functionality only use Interton/ GN Hearing accessories. For further guidance
regarding e.g. pai ring, please refer to the user g uide of the relevant Interton / GN Heari ng access ory.
This devic e operates in th e frequency range of 2.4 GHz - 2.48 GHz.
This devic e includes a R F transmit ter that oper ates in the range of 2.4 GHz - 2.48 GHz.
Only applicable to wireless devices
i CAUTION
General precaution (w ireless h earing instrument): Whe n the wireless function is activated, the device uses
a low-powered dig itally coded transmi ssions in order to communicate with other w ireless d evices. Although unlikely, nearby electronic devic es may be affected. In that ca se, move the hear ing instrum ent
away from the affected elec tronic devic e. When usin g wireless functiona lity and th e devices a re affected
by electromagnetic inter ference, move away from the sourc e of interference.
i WARNING
General wa rnings (hearing ins trument): Be careful when boarding flights, to remember to deactivate the
wireless f unctiona lity. Turn off your wirel ess functi onality by using the flight mode in area s where radio
frequency emission is prohibited.
Page 23

44
45
2. Dif ferent ty pes of radiati on, e.g. from NMR, MRI or CT s canners, m ay damage the i nstrument. Therefore, do not wear the i nstrument d uring these or other cor responding scannin g procedure s. Other
types of radiation (burglar alarms, room surveillance systems, radio equipment, mobile telephones
etc.) will not damage the i nstrument. They could, howeve r, momentarily af fect the so und qualit y or
create strange sounds from the instrume nts.
3. Do not wear hea ring instr uments in min es, oil fields, or other explo sive areas unless those areas are
certified for hearing instrument use.
4. Do not allow oth ers to use your he aring instruments. Th is may cause damage to the hea ring instruments or to the hea ring of the othe r individu al.
5. Instrume nt usage by children or ment ally challenged pe rsons shou ld be super vised at a ll times to
ensure thei r safety.The hearing instrument contains small parts that c ould be swallowed by childre n.
Please be mindful not to leave c hildren unsuperv ised with this hearing instrumen t.
6. Hearing in struments s hould be use d only as prescribed by you r hearing c are professional. Incorrect
use may result in sudden an d permanent hearin g loss.
7. Special ca re should be exe rcised in selecting and fitting a hearing instr ument(s) whose maximum
sound pressure level excee ds 132 dB SPL (with an IEC 60711:1981 occluded ea r simulator), bec ause
there may be a ris k of impairin g the remaining hearing of the heari ng instrume nt user.
8. External devices c onnected to the electric al input must be safe acco rding to the requi rements of IEC
60601-1-1, IEC 60065, or IEC 60 950-1, as appropriate.
9. If device is broken, do not use.
i CAUTION
Only connect Interton hearing in struments to Interton/GN He aring accessorie s intended and qualifie d to be
used with Interton hearing instruments.
If device is bro ken, do not use.
Page 24

46
47
TROUBLESHOOTING GUIDE
SYMPTOM CAUSE
No sound • Not turned on
• Dead battery
• Battery d oor will not cl ose
• Blocked wa x filter
POSSIBLE REMEDY PAGE IN THIS USER GUIDE
• Turn on by closing the battery door 12
• Replace battery 13
• Insert battery properly 13
• Replace wax filter or consult your hearing care professional 34
Page 25

48
49
TROUBLESHOOTING GUIDE
SYMPTOM CAUSE
Not loud enough • Incorrect hearing instrument placement
• Blocked sou nd outlet filter
• Change in hearing sensitivity
• Excessi ve ear wax
• Volume set too low
POSSIBLE REMEDY PAGE IN THIS USER GUIDE
• Reinsert hearing instrument 16
• Change filter or consult your hearing care professional 34
• Consult your hearing care professional -
• Consult your physician -
• Increase the volume control if available or consult your hearing
care professional
20
Page 26

50
51
TROUBLESHOOTING GUIDE
SYMPTOM CAUSE
Excessi ve whistling / fe edback • Incorrect hearing instrument placement
• Excessi ve ear wax
• Feedback control may need adjustment
• Hearing instrument s ettings not optimal
POSSIBLE REMEDY PAGE IN THIS USER GUIDE
• Re-insert hearing instrument carefully 16
• Consult your hearing care professional -
• Consult your hearing care professional -
• Consult your hearing care professional 21
Page 27

52
53
TROUBLESHOOTING GUIDE
SYMPTOM CAUSE
Sound
distorted /
not clear
• Weak battery
• Improper hearing instrument fit
• Hearing instrument damaged
• Hearing instrument s ettings not optimal
Wireless d oes not work • Possible Root Cause - Devic e is in flight mod e
If there ar e any other problems n ot mentioned in thi s guide, please con tact your hearing ca re professional .
POSSIBLE REMEDY PAGE IN THIS USER GUIDE
• Replace battery 13
• Consult your hearing care professional 16
• Consult your hearing care professional -
• Consult your hearing care professional -
• For Crisp dev ices with pu sh button: Ope n and close th e battery compar tment. For Cris p devices with out push button: Open and c lose the battery door t wice with in 10 sec.
• For all Step devices: Open and close the bat tery com partme nt once. Wireless will re activate 10
seconds later. (If Root Cause is devic e in flight mode)
Page 28
54
55
Technical Data
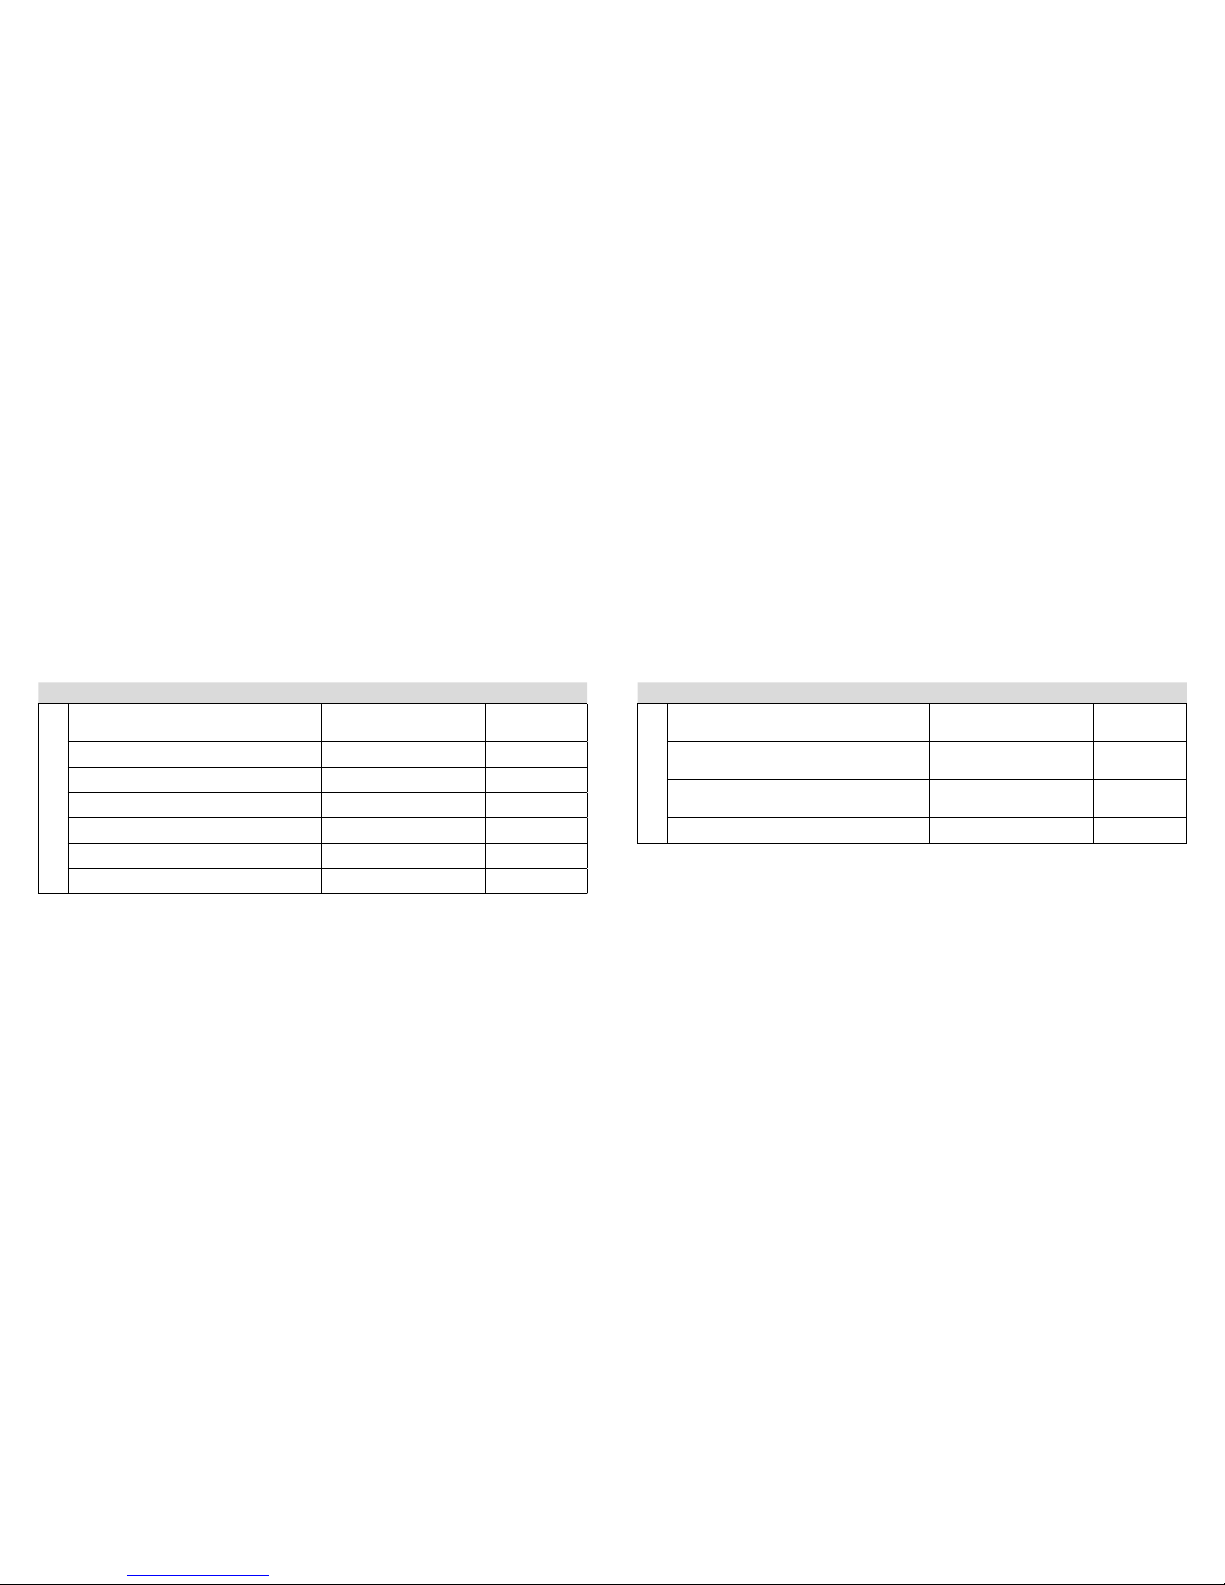
Microphone-In-Helix (MIH)
Hearing Instrument Model
Maximum output
(2ccCoupler / IEC 60118-7)
Battery s ize
C650-MW, C450-MW 112 dB SPL (typical ) 13
C630-MW, C430-MW 112 dB SPL (typical ) 312
C650-MPW, C450-MPW 117 dB SPL (typical) 13
C630-MPW, C430-MPW 117 dB SPL (typical) 3 12
C650-MUW, C450-MUW 128 dB SPL (typical) 13
C630-MUW,C430-MUW 128 dB SPL (typi cal) 312
Technical Data
CIC
Hearing Instrument Model
Maximum output
(2ccCoupler / IEC 60118-7)
Battery s ize
CI3 10, C I210 , SR 1310, S R1210, SR1110,
ST410, ST 210
112 dB SPL (typical ) 10A
C I 310 -P, CI 2 10 -P, SR 13 10 - P, S R 12 10- P,
SR 1110- P
116 dB SPL (typica l) 10A
ST410-P, S T210 -P 117 dB SPL (typical) 10A
Page 29
56
57
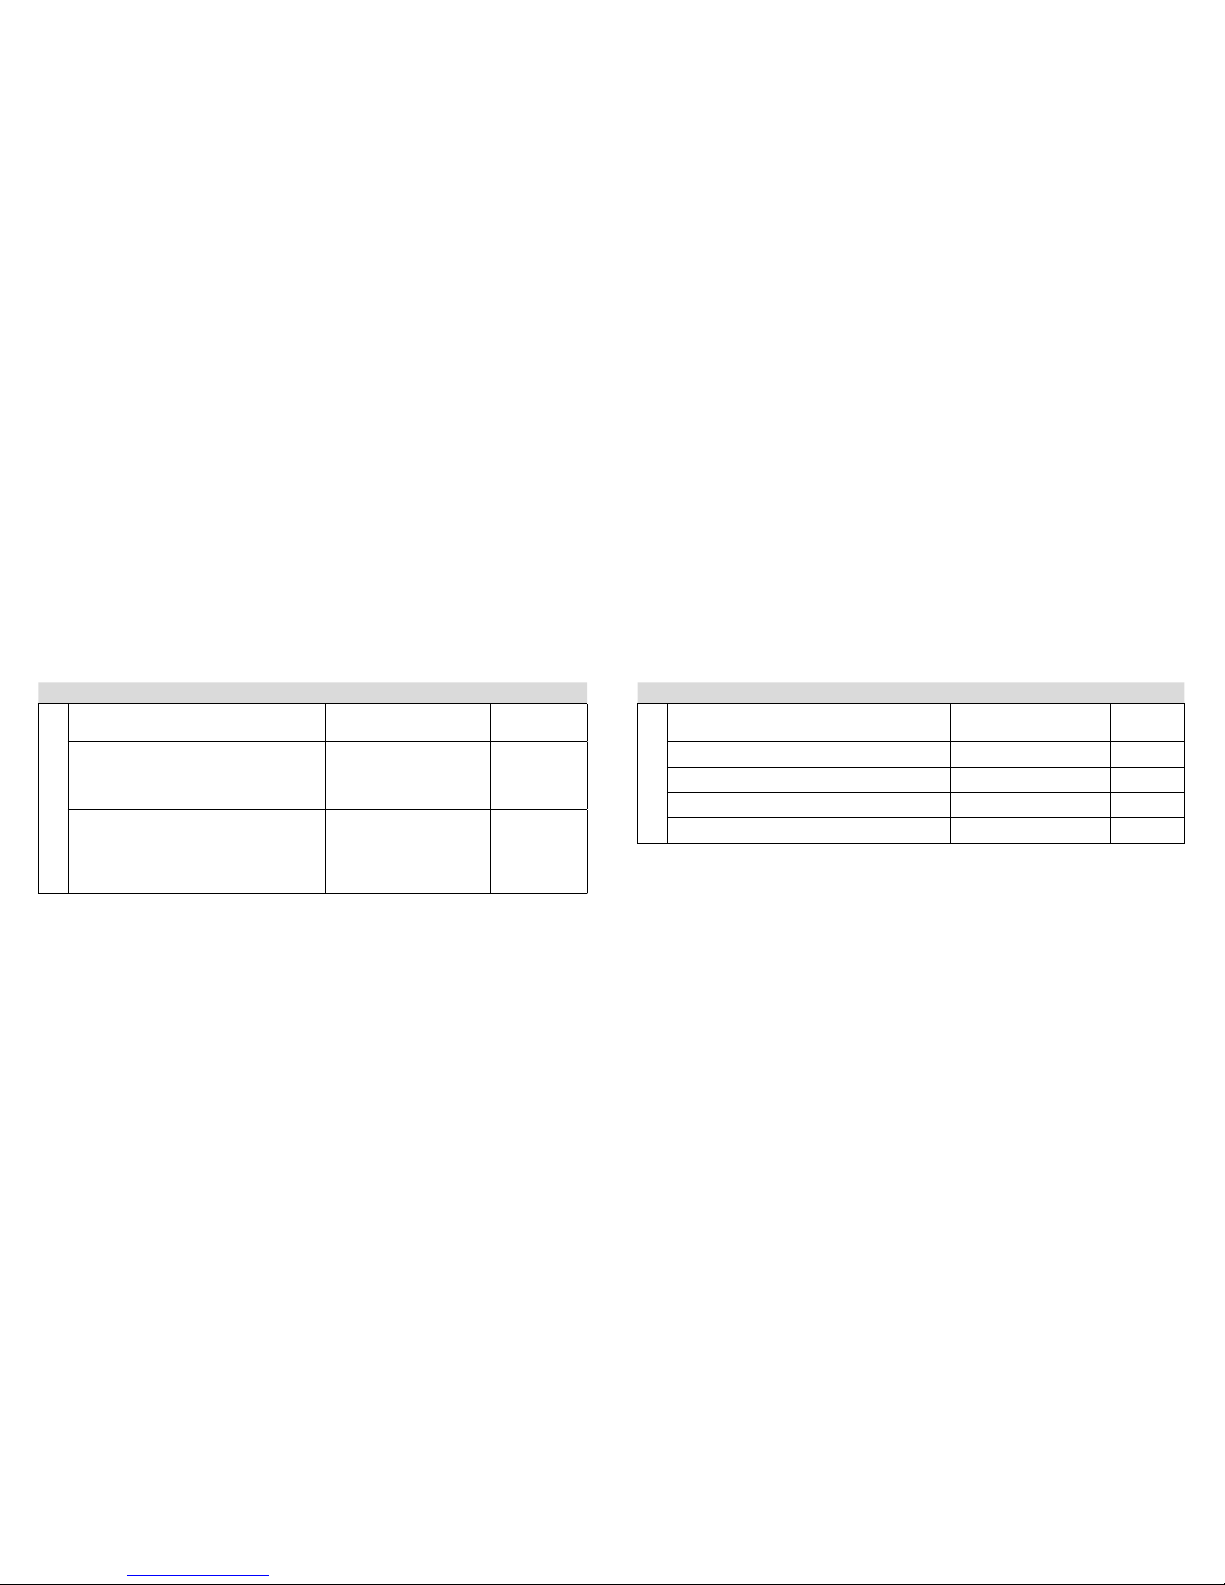
Technical Data
ITC
Hearing Instrument Model
Maximum output
(2ccCoupler / IEC 60118-7)
Battery s ize
CI330, CI330-D, CI230, CI230-D, CI330 -W,
CI330-DW, CI230-W, CI230-DW, SR1330,
SR1330 -D, SR123 0, SR1230 -D, S R1130
114 dB SPL (typical ) 312
CI330-P, CI330-DP, CI330-PW, CI330-D PW,
CI230-P, CI230-DP, CI230-PW, CI230-DPW,
SR1330-P, SR1330-DP, SR1230-P,
SR1230- DP, SR1130-P
117 dB SPL (typical) 3 12
Technical Data
ITC
Hearing Instrument Model
Maximum output
(2ccCoupler / IEC 60118-7)
Battery s ize
ST430, ST430-D, ST230, ST230-D 114 dB SPL (typical ) 312
ST430-P, ST430-DP, ST230-P, ST230-DP 118 dB SPL (typica l) 312
ST430-W, ST430-DW, ST230-W, ST230-DW 114 dB SPL (typical) 312
ST430-PW, ST430-DPW, ST230-PW, ST230-DPW 118 dB SPL (typical) 312
Page 30
58
59
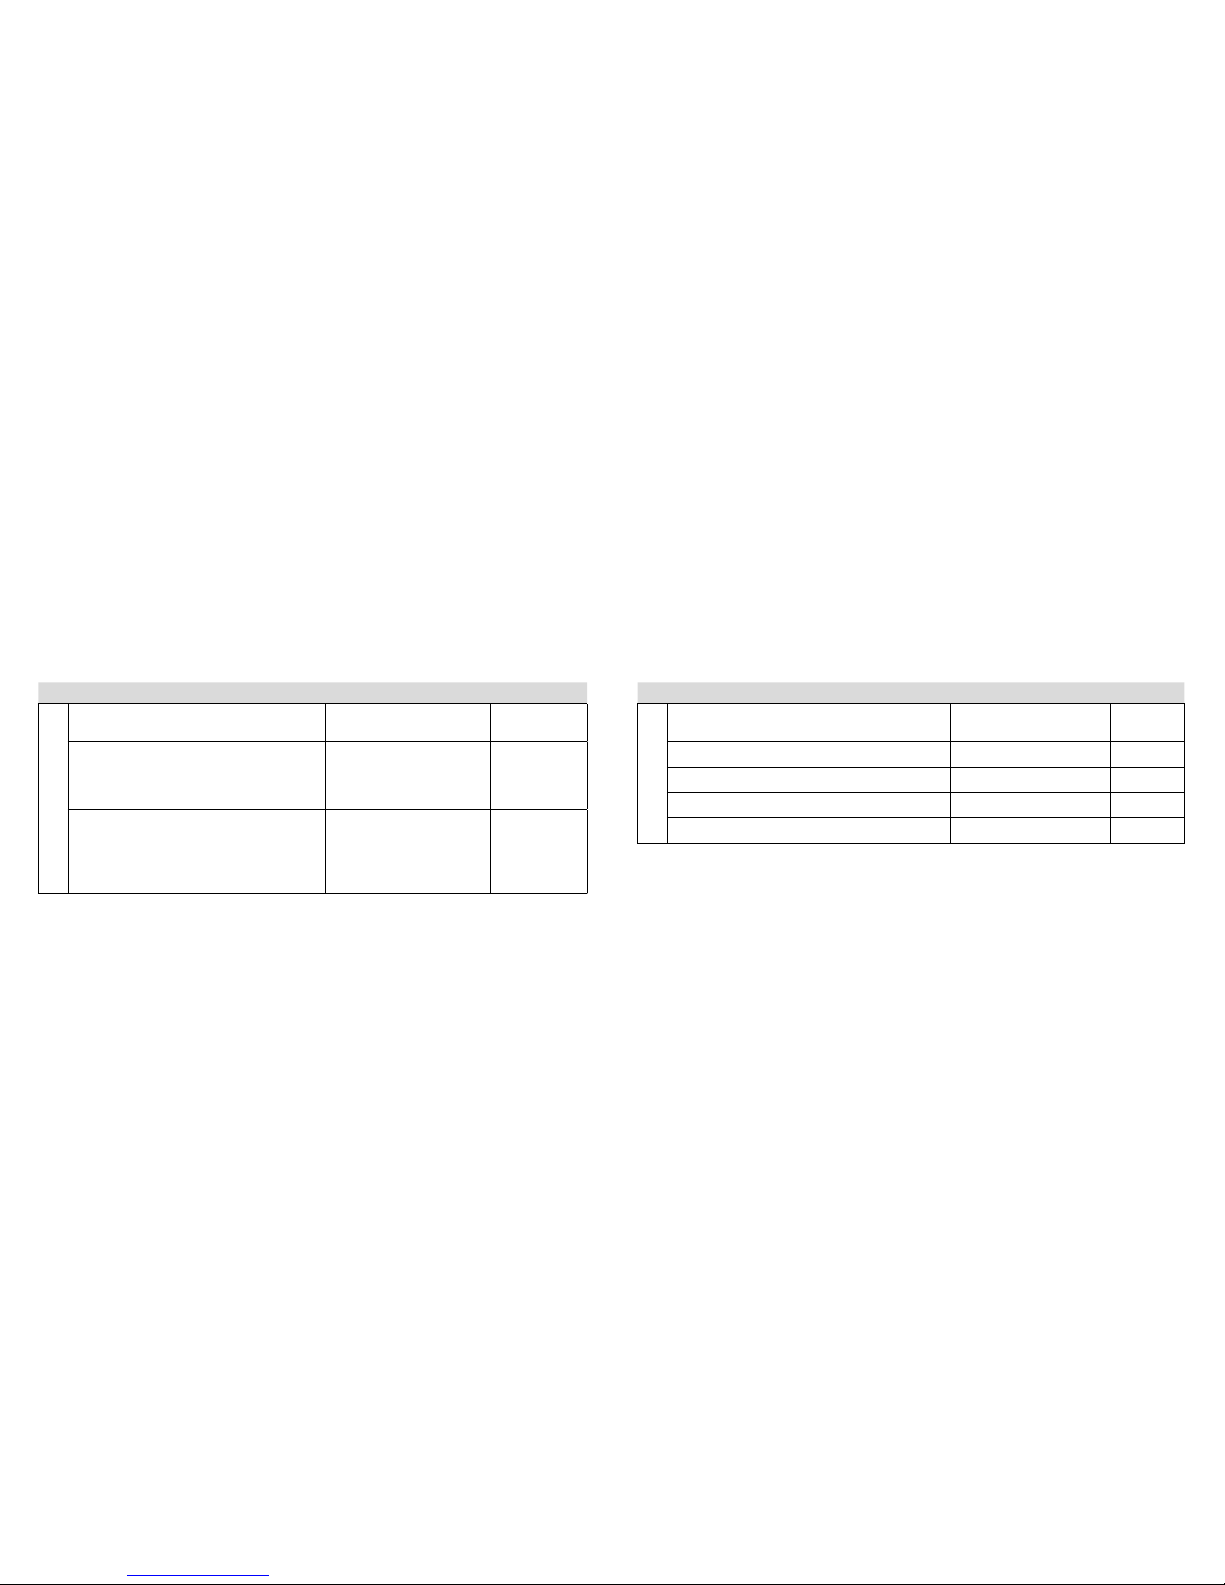
Technical Data
ITE
Hearing Instrument Model
Maximum output
(2ccCoupler / IEC 60118-7)
Battery s ize
CI350, CI350-D, CI350-W, CI350-DW, CI250,
CI250-D, CI250-W, CI250-DW, SR1350,
SR1350-D, SR1250, SR1250- D, SR1150
117 dB SPL (typical) 13
CI350-P, CI350-DP, CI350-PW, CI350-DPW,
CI250 -P, CI250-D P, CI250-P W, CI250 -DPW,
S R1 35 0 -P, S R 13 50 -D P, S R 12 50 -P,
SR1250-DP, SR1150-P
129 dB SPL (typical) 13
Technical Data
ITE
Hearing Instrument Model
Maximum output
(2ccCoupler / IEC 60118-7)
Battery s ize
ST450, ST450-D, ST250, ST250-D 118 dB SPL (typica l) 13
ST450-P, ST450-DP, ST250-P, ST250-DP 130 dB SPL (typical) 13
ST450-W, ST450-DW, ST250-W, ST250-DW 118 dB SPL (typical) 13
ST450-PW, ST450-DPW, ST250-PW, ST250-DPW 130 dB SPL (typical) 13
Page 31

60
61
Warranty and repairs
Interton provides a warra nty on hear ing instruments in the event of defects in wor kmanship or materials,
as described in applicable warranty documentation.
In its service policy, Interton pledges to secure functionality at least equivalent to the original hearing instrument.
As a signatory to the United Nations Global Compact initiative, Interton is committed to doing this in line
with environ ment-friendly best practices. Hearing instru ments therefo re, at Interton’s discretion, may be
replaced by new products or products manufactured from new or serviceable used parts, or repaired using new or refurbished replacement parts.
The warranty period of hearing instruments i s designate d on your warra nty card, which is provide d by your
hearing care professional.
For hearing instruments that require service, please contact your hearing care professional for assistance.
Interton hearing instr uments that malfunction must be repa ired by Inter ton qualified technicia n. Do not attempt to open the ca se of hearin g instrume nts, as this will i nvalidate the war ranty.
Temperature test, transport and storage information
Interton Hearing Instr uments are su bjected to vari ous tests in temp erature and damp heating c ycling between -25° C (-13F) and +70° C (+158F) according to inter nal and industry sta ndards.
During transport or storage, the tempe rature shou ld not exceed the limit values of -20° C (-4F ) to +60° C
(+140F) and relative hu midity of 9 0% RH, non conde nsing (for lim ited time). The air pressure bet ween 500
and 1100 hPa is appropriate.
Page 32

62
63
i
Hearing instrument expectations
A hearing aid will not restore normal he aring and will not prevent or i mprove a heari ng impairm ent resulting
from organic conditions
Consistent u se of the aid is rec ommende d. In most case s, infreque nt use does not permit you to at tain
full benefit from it.
The use of a hea ring aid is on ly part of hearing reh abilitation and may need to be suppleme nted by auditory
training and instructions in lip-reading.
i Warning to Hearing Aid Dispensers (US only)
A hearing aid dispens er should ad vise a prosp ective hearing aid use r to consult pro mptly with a lic ensed
physician ( preferabl y an ear specialist) befo re dispensing a hearing aid, if the hea ring aid dispenser determines through inquiry, actual observation, or review of any other available information concerning the
prospective user, that the prospective user has any of the following conditions:
(i) Visible congenital or traumatic deformity of the ear.
(ii) Histor y of active drai nage from the e ar within the p revious 90 d ays.
(iii) Histor y of sudden o r rapidly pro gressive h earing lo ss within the p revious 90 d ays.
(iv) Acute or chronic dizzi ness.(v) Unilate ral heari ng loss of sudd en or recen t onset within the previous
90 days.(vi) Audiometric air-bone g ap equal to or greater than 15 decibe ls at 500 her tz (Hz), 1,000
Hz, and 2,000 Hz.
(vii) Visible evidence of significant cerumen accumulation or a foreign body in the ear canal.
(viii) Pain or discomfor t in the ear.
Important Notice for Prospective Hearing Aid Users (US only)
Good health practice re quires that a pe rson with a hearing los s have a medica l evaluation by a licensed
physician (preferably a physician who specializes in diseases of the ear) before purchasing a hearing
aid. Licens ed physicians who specialize in dis eases of the e ar are often referred to as otolar yngol ogists,
otologists or otorhinolar yngologists. The pur pose of the medical evaluation is to assure that all medically
treatable conditions th at may affec t hearing a re identifie d and treated before the hearing aid is purchased.
Following the m edical evaluation, the physician will give you a writ ten statement that states that you r hearing loss has b een medic ally evaluated and that you may b e considered a candidate for a hearing aid. The
Page 33

64
65
physician w ill refer you to an audiologist o r a hearing a id dispenser, as appropriate, for a h earing ai d evaluation. The audiologist or h earing aid dispenser will cond uct a heari ng aid evaluation to assess yo ur abilit y
to hear with and w ithout a hearing aid. Th e hearing a id evaluatio n will enable the audiol ogist or dispenser
to select and fi t a hearing a id to your individual needs. If you have reservations a bout your abi lity to adapt
to amplificati on, you should inquire abou t the availabi lity of a tria l-rental or pu rchase-option progra m. Many
hearing aid dispens ers now offe r programs th at permit you to wear a hearing aid for a period of time for a
nominal fee after whic h you may decid e if you want to purchase the hear ing aid. Fede ral law restri cts the
sale of hear ing aids to those individu als who have obta ined a medi cal evaluati on from a lice nsed physic ian.
Federal law p ermits a ful ly informe d adult to sign a wai ver statemen t declinin g the medica l evaluation fo r
religious or personal beliefs that preclude consultation with a physician. The exercise of such a waiver is
not in your best h ealth intere st and its use is s trongly discouraged.
Children with hearing loss (US only)
In addition to se eing a physic ian for a medi cal evaluati on, a child with a h earing lo ss should be directed
to an audiolog ist for evaluati on and rehabilitation b ecause he aring los s may cause problems in lan guage
developme nt and the educational an d social grow th of a child. An a udiologi st is qualifi ed by training a nd
experien ce to assist in th e evaluation a nd rehabilitation of a chil d with hear ing loss.
i High sound pressure levels
Special care should be exercised in se lecting an d fitting a he aring instr ument(s) whose m aximum s ound
pressure level exceeds 132 dB SPL (with an I EC 60711:1981 occluded ear simulator), because there may
be a risk of impa iring the rem aining hearing of the he aring instrument use r.
Page 34
0297
66
67
Be aware of inform ation marked w ith the warni ng symbol i
i WARNING points out a situation that could lead to serious injuries,
CAUTION indicates a situation that could lead to minor and moderate injur ies.
i
Advice and tips on how to ha ndle your hearing instr ument bet ter.
Equipment includes RF transmitter.
Please ask yo ur local hearing c are profession al
concerning disposal of your hearing instrument
Faceplate/Electronics by: Interton A/S.
Any issues r elating to the EU Medi cal Device Direc tive 93/42/EEC, or Council D irective 1999/5/EC on
Radio Equ ipment and Telecommu nications termi nal equipment sh ould be directed to In terton A/S.
Page 35

Worldwide headquarters
Interton A/S | Lautrupbjerg 7 | DK-2750 Ballerup | Denmark
Tel.: +45 45 75 1111 | Fax: +45 45 75 1119 | www.interton.com | CVR no. 55082715
400081000-GB-14.03-Rev.D
 Loading...