

Page 1
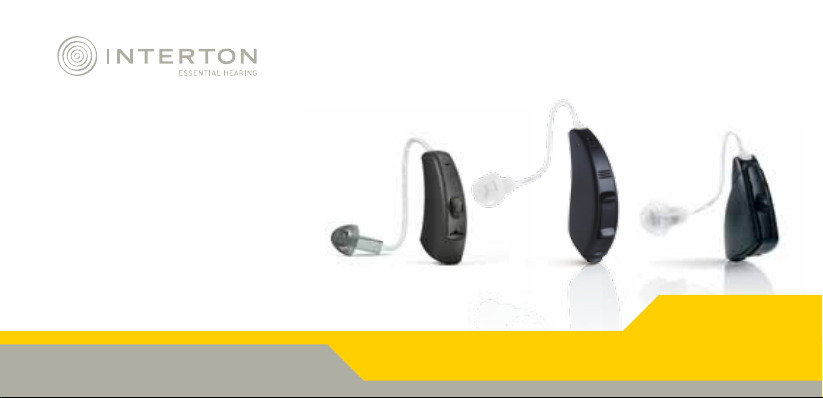
User Guide
Receiver-In-Ear (RIE) Models:
Interton Centro
Interton Cosmo
Interton Step
Interton Crisp
Interton Share
Page 2
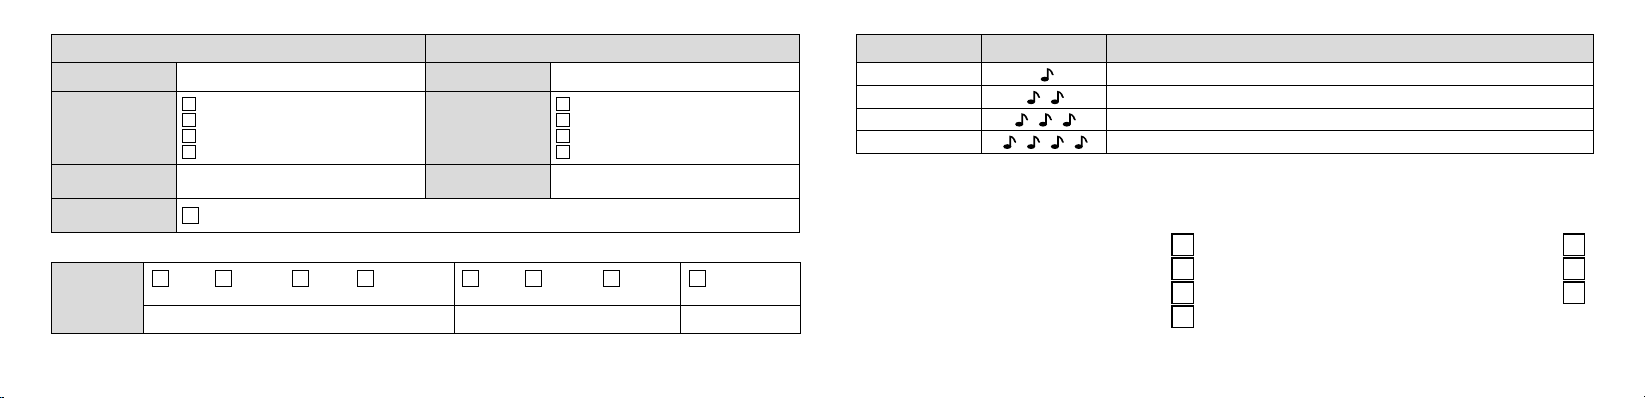
Left Hearing Instrument Right Hearing Instrument
Serial number Serial number
Low Power
Receiver type
Normal Power/Medium Power
High Power
Ultra Power
Receiver type
Reciever size Reciever size
Low Power
Normal Power/Medium Power
High Power
Ultra Power
Programme Beep Description of when to use
1
2
3
4
Note: Your hear ing syste m might n ot support al l 4 enviro nment al prog ramme s. Ask you r hear ing care profes siona l for deta ils.
Battery size
Open/
standard
fitting:
2
312 brown
Small Medium Large St dome Small Medium Large Custom
Open fitting air dome Power dome RIE mould
SPECIFIC FEATURES SUPPORTED BY YOUR HEARING SYSTEM:
Delayed on-activation...............16
Multi-Function button ...............24
Push button......................26
AutoPhone.......................32
Telecoil/Tele-loop system............ 37
Direct Audio Input (DAI)..............38
Wireless.................19, 27, 28, 49
Ask your h eari ng care profess ional to m arked options su ppor ted by your heari ng syste m.
3
Page 3

Thank You
Thank you for selecting an Interton hearing system. We are proud of our hearing products and are confident you have chosen one of the best products available.
Please familiarize yourself with the information in this guide. It contains important instructions for proper
use and care, technical performance information, and other general information about your hearing system.
Your hearing system has been adjusted to your particular hearing loss. Your hearing health care professional
will explain these adjustments and the special features of your particular model.
4
Becoming Accustomed to Amplification
While purchasing a hearing system is a major step, it is only one step in a process toward more comfortable
hearing. Successfully adapting to the amplification your hearing system provides takes time and consistent
use.
You will enjoy more benefits from your Interton hearing system by taking the following actions:
• Wear the system regularly in order to get comfortable with using it.
• It takes time to get used to a hearing aid. It may help to begin by wearing your hearing aid for shor t
periods – even as little as 15 minutes – and then gradually building up your wearing time. In a way, it’s
no different than adjusting to contact lenses. Speak to you hearing care professional, who can design
a schedule tailored just for you.
• As you get more comfortable with the system, increase the wearing time and wear your hearing system
in multiple types of listening environments.
It may take as long as several months for your brain to get used to all the “new” sounds around you. Following these suggestions will give your brain time to learn how to interpret amplification and increase the
benefits you get from using an Interton hearing system.
5
Page 4

Hearing instrument type designations for models included in this user guide are Model: SY312, FCC ID:
X26SY312, IC: 6941C-SY312, Model: MRIE, FCC ID X26MRIE, IC: 6941C-MRIE, Model SY312e, FCC ID:
X26SY312e, IC: 6941C-SY312e and Model VE312, FCC ID: X26VE312, IC: 6941C-VE312. Please see pages
12 and 14 for list of models referring to all types.
Statement:
This device complies with Part 15 of the FCC Rules and IC rules.
Operation is subject to the following two conditions: (1) this device may not cause harmful inter ference,
and (2) this device must accept any interference received, including interference that may cause undesired
operation.
Note: This equipment has been tested and found to comply with the limits for a Class B digital device,
pursuant to part 15 of the FCC Rules and ICES-003 of the IC rules. These limits are designed to provide
reasonable protection against harmful interference in a residential installation. This equipment generates,
uses and can radiate radio frequency energy and, if not installed and used in accordance with the in-
6
structions, may cause harmful interference to radio communications. However, there is no guarantee that
interference will not occur in a particular installation. If this equipment does cause harmful interference to
radio or television reception, which can be determined by turning the equipment off and on, the user is
encouraged to try to correct the interference by one or more of the following measures:
• Reorient or relocate the receiving antenna.
• Increase the separation between the equipment and receiver.
• Connect the equipment into an outlet on a circuit different from the one in which the receiver is connected.
• Consult the dealer or an experienced radio/TV technician for help.
Changes or modifications can void the user´s authority to operate the equipment.
7
Page 5

Intended use
Generic air-conduction hearing instruments are wearable sound-amplifying devices intended to compensate for impaired hearing. The fundamental operating principle of hearing instruments is to receive, amplify,
and transfer sound to the ear drum of a hearing impaired person.
The products are in compliance with the following regulatory requirements:
• In EU: the device conforms to the Essential Requirements according to Annex I of Council Directive
93/42/EEC for medical devices (MDD) and essential requirements and other relevant provisions of Directive 1999/5/EC (R&TTE).
• The declaration of conformity may be consulted at www.interton.com
• In US: FCC CFR 47 Part 15, subpart C.
• Other identified applicable international regulatory requirements in countries outside EU and US. Please
refer to local country requirements for these areas.
• In Canada: these hearing instruments are certified under the rules of IC.
• Japanese Radio Law and Japanese Telecommunications Business Law Compliance. This device is
granted pursuant to the Japanese Radio Law (電波法) and the Japanese telecommunications Business
Law (電気通信事業法) This device should not be modified (otherwise the granted designation number
will become invalid)
• Patents: US 7,593,537 US 8,000,849
8
9
Page 6

Contents
Hearing instrument(s) model and basic
information......................... 2,3
Thank you ...........................4
Becoming Accustomed to Amplification .....5
Intended use .........................8
Instruments component identification ......12
On/Off function ......................16
Delayed activation (optional) .............16
Inserting/ Replacing the battery ..........17
Low batter y indicator ..................19
Inserting/removing hearing instruments.....20
Multi function button (optional) ...........24
10
Push button (optional) .................26
Flight mode (wireless devices only)........28
Telephone use ......................30
Listen to radio or TV ..................31
Using Hearing Instruments with iPhone®,
iPad®, and iPod touch® (Interton Centro 6) ..31
Cellular phones ......................32
AutoPhone (optional) ..................32
Telecoil (optional) .....................37
Tele-loop systems (optional) .............37
Direct Audio input (optional) .............38
Connecting/Disconnecting audio boots ....38
Care and maintenance.................39
Cleaning the reciever tubes and domes ....42
Cleaning RIE moulds ..................42
Cleaning wax guard ...................43
How to apply domes ..................46
Mini domes .........................46
Standard domes .....................47
Using Interton hearing instrumetns with
smart phone apps ....................48
Wireless warnings and precautions
(wireless devices only) .................48
General warnings.....................49
Troubleshooting guide .................52
Technical Data .......................60
Warranty and repairs ..................64
Temperature test, transport and
storage information....................65
Hearing instrument expectations .........66
Warning to Hearing Aid Dispensers
(US only) ...........................66
Important Notice for Prospective
Hearing Aid Users (US only) .............67
Children with hearing loss (US only) .......68
11
Page 7
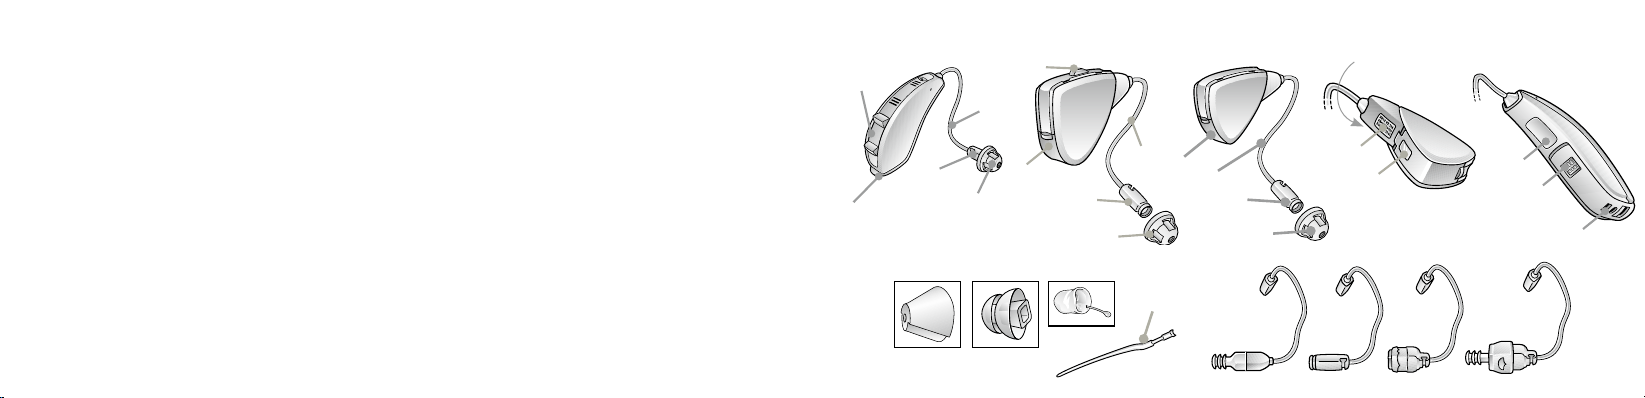
Mico RIE hearing instruments are available in
the following variants:
C662-DR, CI362-DR
Mini RIE hearing instruments of t ype SY312 are
available in the following variants:
C661-DRW, C461-DRW
Mini RIE hearing instruments of t ype MRIE are
available in the following variants:
CI36 0-DVIRW, CI260-DVIRW, ST460-DRW
ST260-DRW
12
1. Receiver tube
2. Receiver Open Dome
3. Receiver Tulip Dome
4. Receiver Power Dome
5. RIE mould
6. Sports lock
7. Battery compartment
8. Receiver
9. Push button
10. Multi-Function button
11. S receiver tube
12. NP receiver tube
13. HP receiver tube
14. HP2 receiver tube
15. Left/right indicator
16. Model, and serial number
17. Direct Audio Input
10
7
60 models
(type MRIE)
3
61 models
(typ e SY312)
9
1
8
7
2
4
8
2
5
62 models
1
7
1
8
2
6
(Indentification number for the SY312 devices)
16
15
1211 13 14
16
17
15
13
Page 8
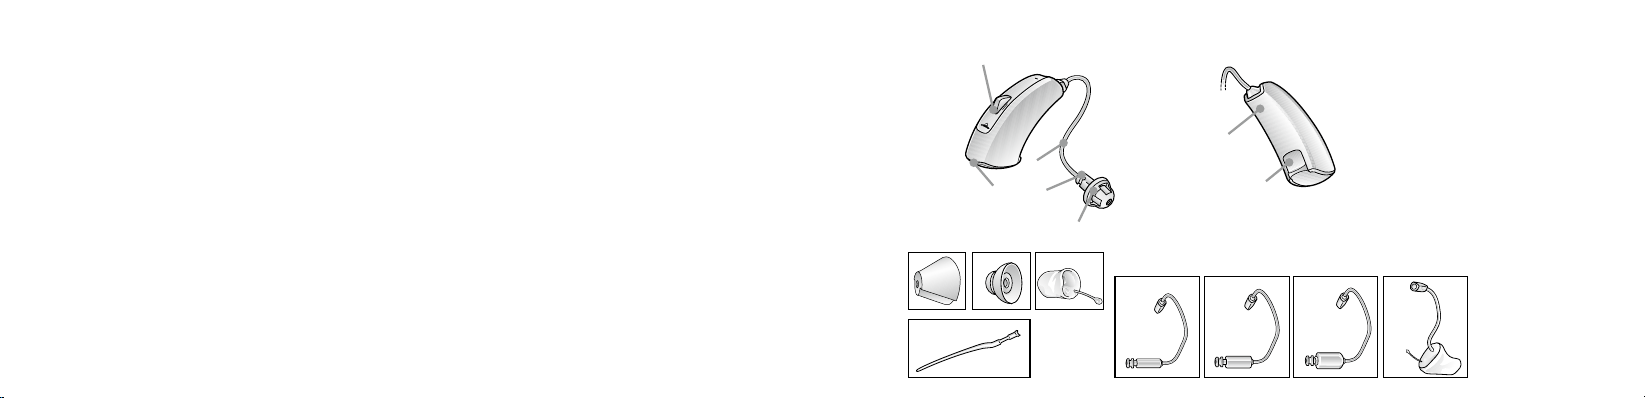
Mini Receiver In-the-Ear (RIE) hearing instruments of type VE312 with FCC ID: X26VE312, IC
number 6941C-VE312 and size 312 battery are
available in the following variant:
CT6 61-DRW, CT461-DRW
The identification number for the VE312, instrument
models can be found at location "15" as indicated in
the illustrations on page 15.
1. Receiver tube
2. Receiver Open Dome
3. Receiver Tulip Dome
4. Receiver Power Dome
5. RIE mould
6. Sports lock
7. Batter y compartment (serial number inside)
8. Receiver
9. Push button
10. S receiver tube
11. NP receiver tube
12. HP receiver tube
13. UP receiver tube
14. Left/right indicator
15. Model name and serial number
61 models
8
5
(type VE312)
2
10 11
15
14
12 13
9
1
7
3
6
4
14
15
Page 9
Getting started
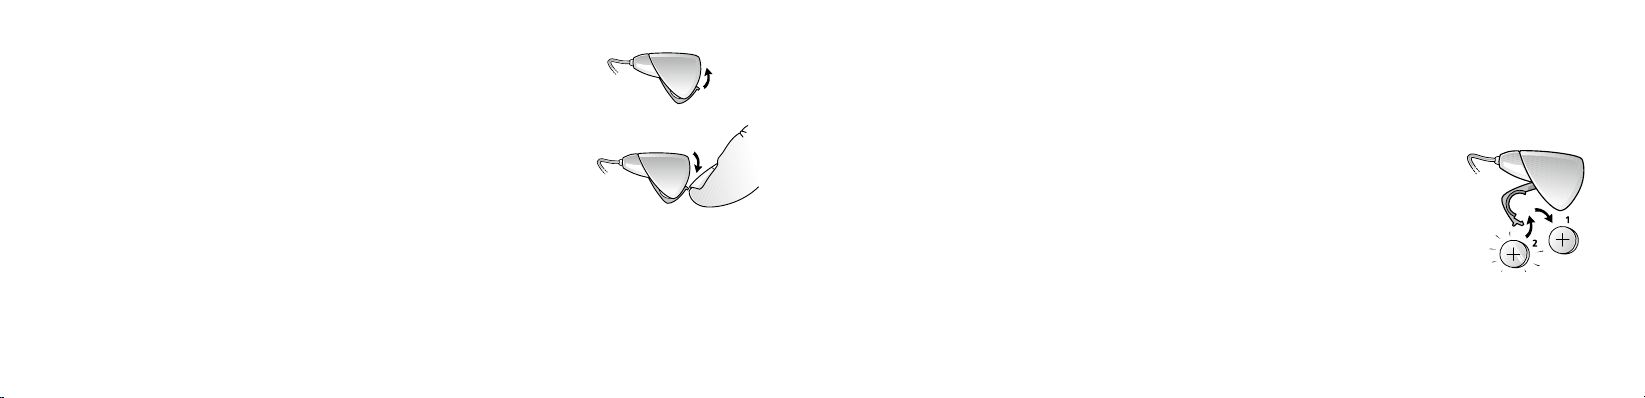
On&Off function
1. When the battery door is closed, the hearing instrument turns on, and
the default program will be activ ated.
2. To turn off the hearing instrument, open the battery door. Many
individuals can use their fingernail to pull it open.
Whenever the hearing instruments are not in use, remember to turn
i
them off to avoid unnecessary battery consumption.
Delayed activation
Hearing instruments can be turned on once you have placed them on your ears. If you prefer to turn them
on just prior to placing them on your ear, your hearing care professional can activate a function called
Delayed on-activation. This function will delay the time in which the hearing instruments turn on by several
On
Off
seconds after the battery compartment is closed. With Delayed on-activation, a beep will be heard for each
second of the delay period.
Inserting/Replacing the battery
1. Open the battery door completely by using your fingernail.
2. Remove the used batter y if present. Insert the new battery with the positive side
in the correct position.
3. Gently close the battery door.
Always use new Zinc-Air batteries that have a minimum remaining shelf-life of 1 year.
i
16
17
Page 10

i WARNING
1. Remove the batteries to prevent leakage when the hearing instruments are not in use for an extended
period of time.
2. Do not attempt to recharge batteries (Zinc Air) which are not specifically designated as rechargeable
because they may leak or explode.
3. Do not place batteries in your mouth. Consult a physician immediately if a batter y has been swallowed, as they can be harmful to your health.
4. Keep batteries away from pets, children and individuals who are mentally challenged.
5. Do not attempt to dispose of batteries by burning them. Used batteries are harmful to the environment. Please dispose of them according to local regulations or return them to your hearing care
practitioner.
18
Low battery indicator
Your hearing care professional can set your hearing instrument to give an acoustical indication when the
battery is reaching its end of life. The hearing instrument will reduce amplification and emit a melody if battery power gets too low. This signal will recur every five minutes until the hearing instrument automatically
switches of f. It is recommended that you keep spare batteries on hand.
Low battery indicator (instruments paired with accessories only)
Active usage of the Interton wireless accessories (Remote Control, Phone Clip and TV Streamer) requires
more battery power from the hearing instruments than when these are working on their own. When the
battery in the hearing instrument has depleted to a level at which use of the Interton TV Streamer T V and
Phone Clip cannot be supported, the hearing instrument will play two sets of descending tones. After
this, your hearing instrument and Inter ton Remote Control will continue to work as usual, but you will not
be able to use your Interton TV Streamer and Phone Clip. At some point the battery level will not support
the remote control either and you will once again hear the descending tones. The hearing instruments will
continue to work as usual. Once a new battery is inserted, full operation of the accessories will resume.
19
Page 11
Sports lock
Sports lock will be applied or adjusted by your hearing care professional.
Inserting/Removing hearing instruments
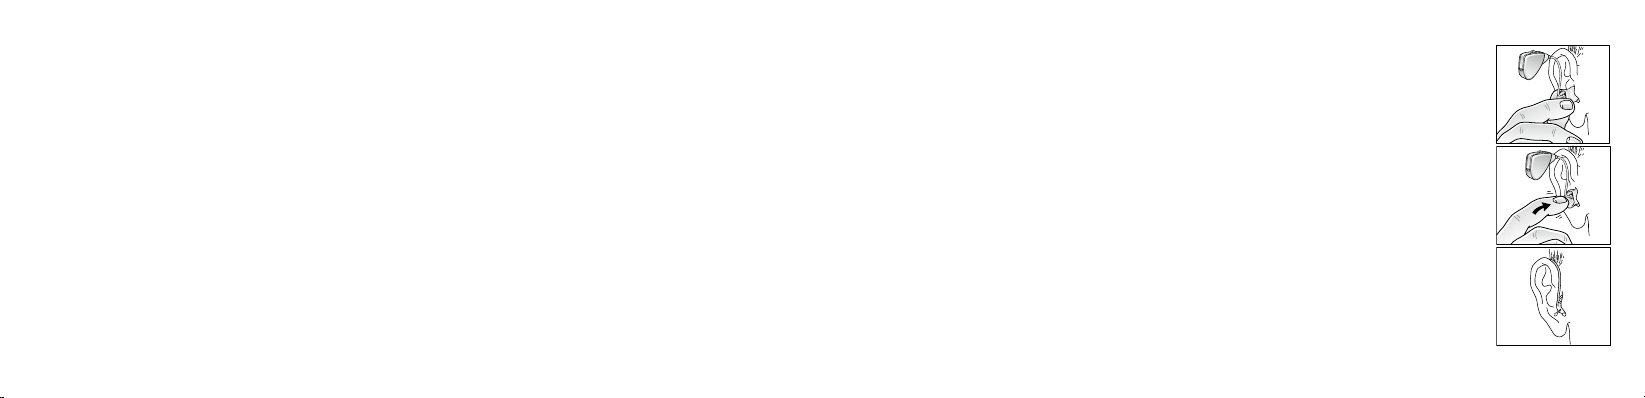
Insertion (custom RIE moulds)
1. Hold the RIE mould between your thumb and index finger and position its sound outlet in your ear
canal.
2. Slide the RIE mould all the way into your ear with a gentle, twisting movement.
3. Move the RIE mould up and down and gently press to ensure it is positioned correctly in the ear.
Opening and closing your mouth can ease insertion.
4. Make sure the hearing instrument is seated behind the ear..
By experimenting, an easier method may be discovered. With proper insertion, hearing
instruments should fit snugly but comfortably. If the hearing instruments cause irritation of
the ears, contact your hearing care professional.
I CAUTION
Never attempt to modify the shape of the hearing instrument, earmoulds, or tubing yoursel f.
It may be helpful to pull your ear up and outward with your opposite hand during
i
insertion.
20
21
Page 12
Insertion (domes)
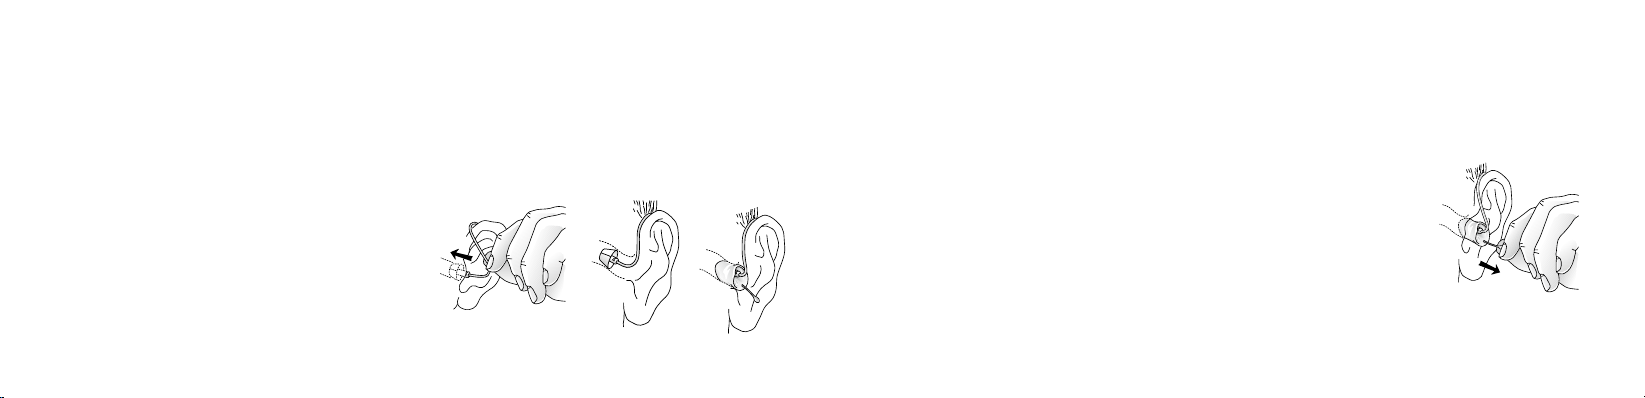
1. Hold the receiver tube where it bends, and gently push the dome into the ear canal. Push the dome
far enough into the ear canal so that the receiver tube lies flush with the side of the head.
2. It is important that the tube and the dome fit correctly into your ear.
3. When the dome is placed correctly, you should not be able to see the receiver tube sticking out when
facing a mirror.
I CAUTION
You should never attempt to bend or modify the shape
of the thin tube.
I CAUTION
Use only original Interton/GN Hearing consumables
e.g. tubes and domes.
Removal (RIE molds)
1. Grasp the removal string and pull the RIE mould outward.
2. Consult your hearing care professional if you have difficulties removing the hearing instrument.
Removal (domes)
1. Hold the receiver tube with your thumb and forefinger and pull the tube
outward.
2. Consult your hearing care professional if you have difficulties removing the
hearing instrument.
22
23
Page 13

Operation of the hearing instrument
Multi-Function button (optional)
The multi-function button is designed to change the volume or listening programs of the hearing instrument, based on different ways
it is pressed.
When using the program or multi-function buttons to switch programs, each press will move the instrument
to the next program. For example, if it was in program 1 it will switch to program 2, if it was in program 2 it
will switch to program 3 etc. When you close the batter y door and switch the instrument on, it will start in
program 1. Press the program or multi-function buttons if you want to move to a different listening program.
If necessary, your hearing care practitioner can change these settings and fill in the following table to indicate the new settings:
Multifunction button action
Default setting
New setting
Short press up Increases volume
Short press down Decreases volume
Long press up (2 seconds) Changes programs
Long press down (2 seconds) Activates streaming
24
25
Page 14
Push button (optional)
Depending on your experience level with hearing instruments, individual hearing needs, and the type of listening environments you
experience, your hearing care professional may activate additional
programmes. If additional programmes have been activated, the following list explains how they work.
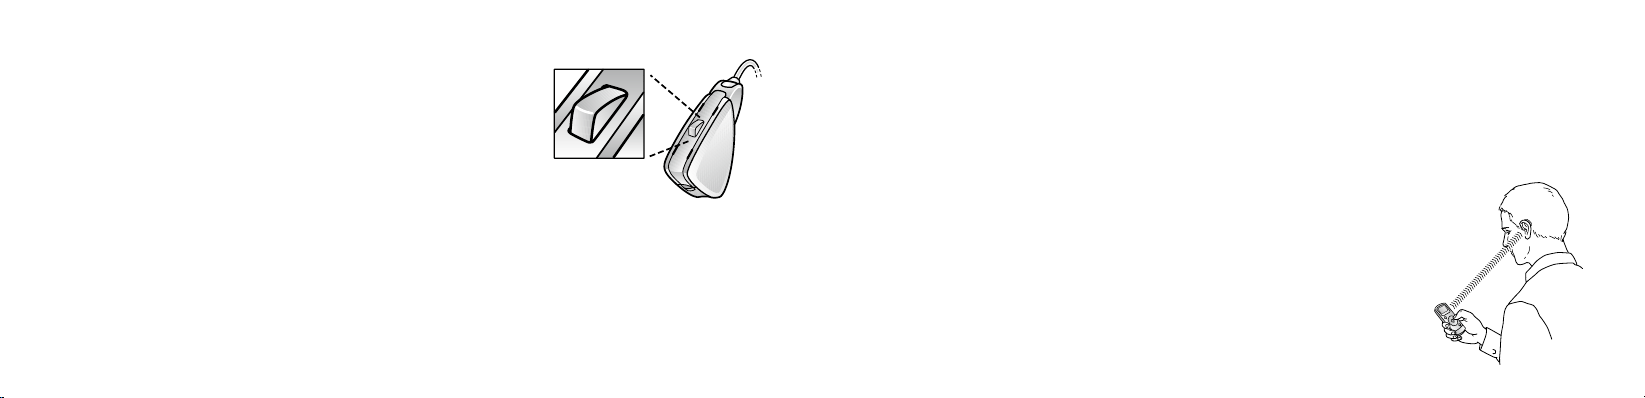
1. You can switch between programmes by pushing the push
button once.
2. You will then hear one or more beeps. The number of beeps indicates which programme you have
selected (one beep = programme one, two beeps = programme two, etc.).
3. When the hearing instruments are turned of f and then back on, the hearing instrument always returns
to the default setting (programme one).
Only applicable to wireless devices.
If your hearing system supports wireless functionality and it is paired with wireless accessory like TV
Streamer you can activate streaming mode.
1. Push and hold the push button or multi-function button down for 2 seconds.
2. You will then hear short melody that indicates streaming mode.
To switch back to environmental program push the push button shortly. Hearing Instrument will return to
the default setting (programme one).
For easier everyday use of your wireless hearing instrument controls you can use
wireless remote control. Ask your hearing care professional for more information.
26
27
Page 15

Flight mode. Only applicable to wireless devices*
I WARNING
When boarding a flight or entering an area where RF transmitters are prohibited, wireless functionality must
be deactivated, as it is not allowed to radiate radio signals during flights or in otherwise restricted areas.
For Crisp devices:
It is possible to disable wireless operation by opening and closing the
battery compartment of the hearing instrument while at the same time pressing
the push button. When disabled manually, wireless operation may be re-enabled
by opening and closing the battery compartment normally, (i.e. without at the
same time pressing the push button).
*Instruments paired with accessories only
For Centro and Step devices:
It is possible to disable wireless operation by opening and closing the battery compartment three times
within a ten second period (open-close, open-close, open-close). Your instruments will now be in flight
mode.
If the hearing instrument is in flight mode, the hearing instrument must have been operating in flight mode
for at least 10 seconds before attempting to enable wireless again. it is possible to re-enable wireless
opera tion by opening and closing the battery door once. 10 seconds after this operation is completed,
wireless operation will begin again.
It is impor tant to wait an additional 15 seconds after wireless function resumes before open ing and
i
closing the batter y compartment again for any reason. If the battery compartment is opened and closed
during this 15 second window, flight mode will resume.
28
29
Page 16

Telephone use
If your hearing instruments are fit with a receiver open dome or receiver tulip dome, you
can probably use the telephone as you normally would by holding it up to your ear canal
opening. If your hearing instruments are fit with a receiver power dome or RIE mould,
finding the optimal position for holding a telephone while using a hearing instrument
may require practice for some individuals, and one or more of the following suggestions
may be helpful.
1. Hold the telephone as you would normally.
2. Hold the telephone towards the top of the ear (closer to where the microphones
are).
3. If whistling occurs, it may take a few seconds of holding the telephone in the same
position before the hearing instrument eliminates the feedback.
4. Any whistling may also be decreased by holding the telephone slightly away from
th e e a r.
30
5. Depending on your individual needs, your hearing care professional may activate a programme
specifically for telephone use.
Listen to radio or TV
When listening to the T V or the radio, start out by listening to news commentators since they usually speak
clearly, then try other programmes. If you find it difficult to listen to TV or radio, your hearing care professional will be able to give you advice on available accessories to enhance your listening capabilities for T V
and radio.
Using Hearing Instruments with iPhone®, iPad®, and iPod touch® (Interton
Centro 6)
Interton Centro 6 is a Made for iPhone instrument and allows for direct communication and control with an
iPhone, iPad, or iPod touch. For assistance in pairing and using these products with your Interton Centro
6 device, please contact your hearing care professional.
31
Page 17

Cellular phones
Your hearing instrument is designed to comply with the most stringent Standards of International Electromagnetic Compatibility. However, not all cell phones are hearing instrument compatible. The varying degree of disturbance can be due to the nature of your particular cellular phone or of your wireless telephone
service provider.
If you find it difficult to obtain a good result while using your cellular phone, your hearing care professional
will be able to give you advice on available accessories to enhance listening capabilities.
AutoPhone (optional)
The AutoPhone function, allows your hearing instrument to automatically
switch to your tele phone programme when a telephone receiver with an AutoPhone magnet is raised to the ear. When the telephone receiver is removed
from the ear, the hearing instrument automatically returns to the previous listening programme.
32
Placement of AutoPhone magnets
Place AutoPhone magnet on your telephone receiver to allow operation of the AutoPhone function. In order
to place AutoPhone magnet properly:
1. Clean the telephone receiver thoroughly.
2. Hold the telephone vertically, in a position similar to when making a telephone call.
3. Place the magnets just below the telephone receiver. Make sure not to cover the microphone
openings. If necessar y, move the magnet to another position to improve ease of use and comfort
while speaking.
4. If you are not satisfied with the strength of AutoPhone, you can reposition the AutoPhone magnet or
add additional AutoPhone magnets.
Only use a recommended cleaning agent to clean the telephone prior to placing the magnet on the
i
phone.
33
Page 18

AutoPhone usage
Telephones can be used in a normal manner. A short melody will indicate that the AutoPhone feature has
automatically switched the hearing instrument to your telephone programme. Initially, you may need to
move the telephone receiver slightly to find the best position for reliable AutoPhone activation and good
hearing on the telephone. When remove you the telephone receiver AutoPhone will stay activated for a
few seconds to avoid accidental switching of f. After that hearing instrument will switch to previously used
environmental programme.
I WARNING
AutoPhone warnings
1. Keep magnets out of reach of pets, children and mentally challenged persons. If a magnet is
swallowed, please seek advice from a medical practitioner.
2. The AutoPhone magnet may affect some medical devices or electronic systems. The manufacturer of
any magnetically sensitive devices (e.g. pacemakers) should advise you regarding appropriate safety
precautions when using your hearing instrument and magnet in close proximity to the medical device
or electronic system in question.
3. if the manufacturer cannot issue a statement, we recommend keeping the magnet or a telephone
equipped with the magnet 30 cm (12”) away from magnetically sensitive devices (e.g. pacemakers).
34
35
Page 19

I CAUTION
AutoPhone precautions
1. High distortion during dialing or phoning may mean that the magnet is not in the optimal position
relative to the telephone receiver. To avoid the issue, please move the magnet to another place on the
telephone receiver.
2. Only use magnets supplied by Interton/GN Hearing.
Telecoil (optional)
If equipped, a telecoil can be activated by your hearing care professional and accessed through one of
the additional programmes. A telecoil picks up a telephone’s magnetic signal and converts it to sound. An
optional telephone programme may help to improve speech understanding on the telephone. When using
a telecoil programme, the receiver of the telephone may need to be held closer to the hearing instrument.
The handset of the telephone may need to be moved to slightly different positions in order to find the best
reception.
Tele-loop systems (optional)
Many places, such as theatres, houses of worship, and schools are equipped with tele-loop systems.
When using a telecoil programme with tele-loop systems, sound is picked up directly and may improve
speech understanding. If there is no sound from the hearing instruments in a tele-loop system and with a
telecoil programme activated, the tele-loop system may not be turned on or is not operating correctly. If
a facility is not equipped with a tele-loop system, sitting as close as possible to the front may be helpful.
36
37
Page 20
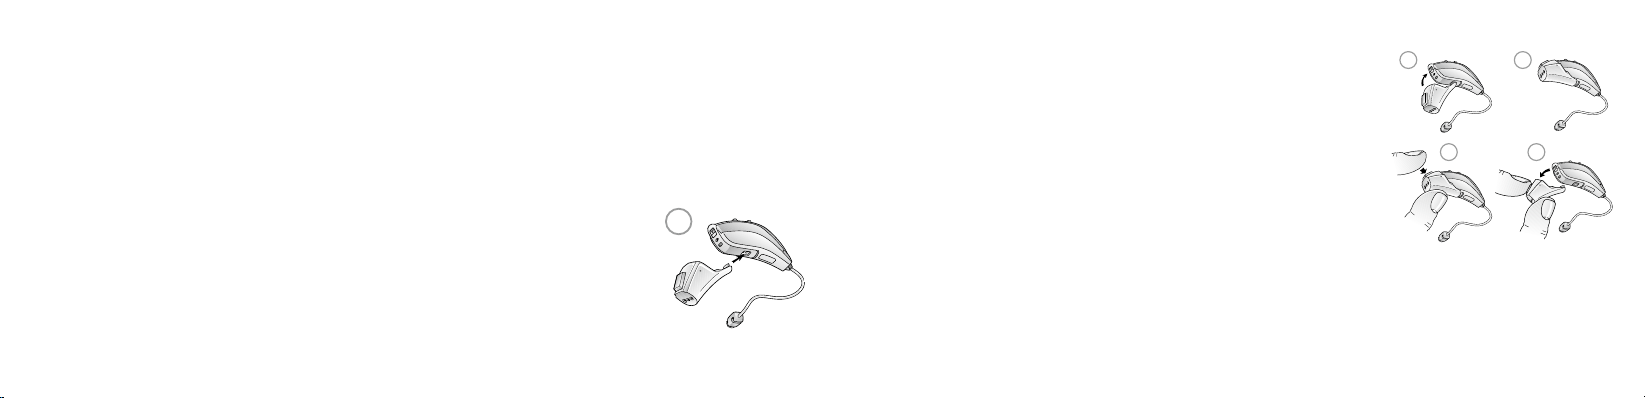
Direct Audio Input (optional)
Use of Direct Audio Input (DAI), which enables a direct connection of the hearing instruments to items such
as television, radio, and remote microphones, may increase speech understanding for some individuals.
The sound source is connected to the hearing instruments by a cable or a wireless FM system to the audio
boot. This accessory connects to the bottom of the hearing instruments, and once properly clicked into
place, the hearing instruments switch to DAI automatically.
Connecting/Disconnecting audio boots
Connecting audio boots
1. Align the tip of the audio boot with the groove just above the battery compartment
and below the model number.
1
2. Once in place, move the boot in the direction of the battery compar tment.
3. Gently click the audio boot onto the hearing instrument.
Disconnecting audio boots
4. Press and hold the button on the front side of the audio boot.
5. Gently remove the audio boot from the hearing instrument.
4 5
32
Care and maintenance
Proper handling
i
Please follow the following instructions to prolong the durability of your hearing instruments:
1. Keep your hearing instrument clean and dry. Wipe the case with a soft cloth or tissue after use
to remove grease or moisture. Do not use water or solvents, as these can damage the hearing
instrument(s).
38
39
Page 21

2. Never immerse hearing instruments in water or other liquids, as liquids may cause permanent damage
to the hearing instruments.
3. Avoid rough handling of hearing instruments or dropping them on hard surfaces or floors.
4. Do not leave hearing instruments in or near direct heat or sunlight, such as in a hot, parked car, as
excessive heat can cause damage or deform the casing.
5. Do not wear your instrument while showering, swimming, in heavy rain or in a moist atmosphere such
as a steam bath or sauna.
6. If your instrument does get wet, or if it has been exposed to high humidity or perspiration, it should
be left to dry out overnight with the battery out and the battery compartment open. It is also a good
idea to put the instrument and battery in a sealed container together with a drying agent (desiccator)
overnight. Do not use the instrument until it is completely dry. Consult your hearing care professional
as to which dr ying agent to use.
7. Remove your hearing instrument when applying such things as cosmetics, perfume, aftershave, hair
spray, and suntan lotion. These might get into the instrument and cause damage.
The receiver tube
The receiver tube for most Interton products comes in three different power levels:
Small (S), Normal Power (NP) and High Power (HP/HP2). Depending on your hearing loss you have either
been fitted with the S, NP or the HP/HP2 receiver type.
For Interton Centro, the receiver tube comes in four dif ferent power levels:
Low Power (LP), Medium Power (MP), High Power (HP) and Ultra Power (UP).
The receiver tube contains the wiring to the receiver which delivers the sound to the ear canal. It is important that the receiver tube and the receiver dome/RIE mold fits correctly in your ear. If the receiver tube or
the receiver dome/RIE mould irritates your ear in any way and prevents you from wearing your hear ing instrument, please contact your hearing care pro fessional. You should never attempt to modify the shape of
the receiver tube yourself. The receiver tube and the receiver dome/RIE mould should be cleaned regularly.
Please see instructions in the next section.
40
41
Page 22

Cleaning the receiver tubes and domes
The receiver tube and the receiver dome should be cleaned regularly. Use a damp cloth to clean the receiver tube and receiver dome on the outside. Do not use water when you are cleaning the receiver tubes
or the receiver domes. Please see instruction on page 41 or 43 for how to change the wax guard filter.
Note: Thin tube and dome systems should be changed every three months or sooner, should the components become stiff or brittle.
Cleaning RIE moulds
1. Separate the mould from the receiver tube.
2. Clean the RIE mould using a mild soap, and rinse with lukewarm
wa ter.
3. After cleaning, dry RIE moulds thoroughly and remove any residual
water and debris from the tubing utilising an air bulb and wire loop.
Changing wax guard for NP receiver tube
1. Clean any debris from the old waxguard.
2. Insert the wand into the old waxguard.
3. Twist the wand with the waxguard in a clockwise direction to ensure it is attached to the wand.
4. Pull the wand and waxguard away from the tube/mould.
5. Insert the old waxguard into the center of the HF3 wheel.
6. Dispose of the old wa xguard by drawing the wand to the narrow end of the center disposal area.
1
42
2 3 4 5
43
Page 23
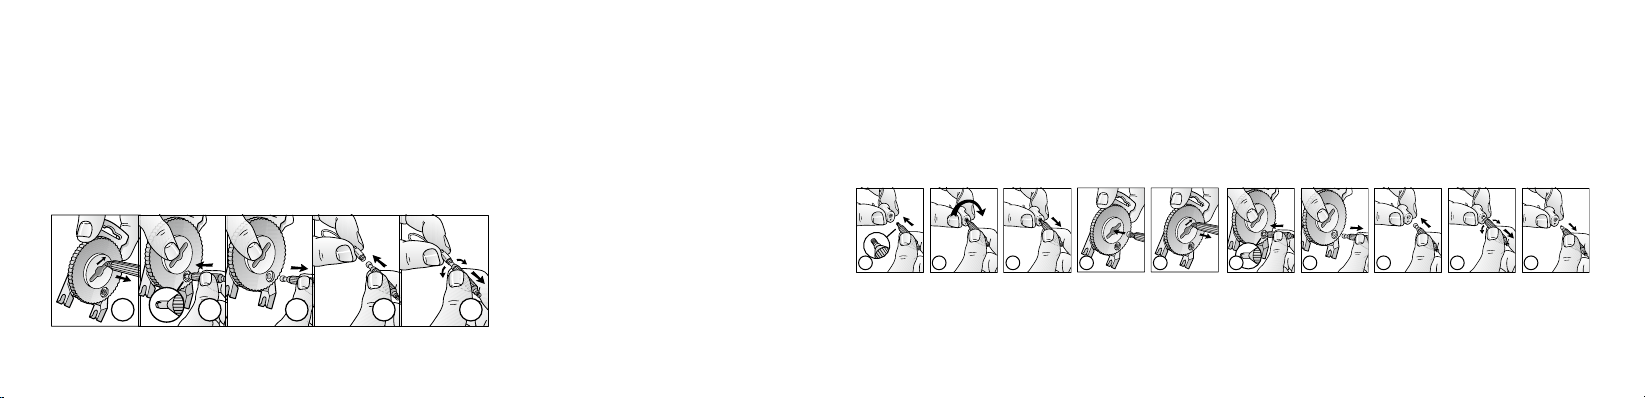
7. Insert the empty wand into a new waxguard on the HF3 wheel.
8. Pull the new waxguard attached to the wand away from the HF3 wheel.
9. Insert the wand into the receiver tube/mould.
10. Twist the wand to release the new waxguard onto the receiver tube/mould.
Changing wax guard for HP receiver tube
Power Dome:
Please contact your hearing care professional to have the wax guard in the power dome exchanged for
you.
RIE Mould:
1 2 3 4 5 6 7 8 9 10
44
6
7 8 9 10
45
Page 24
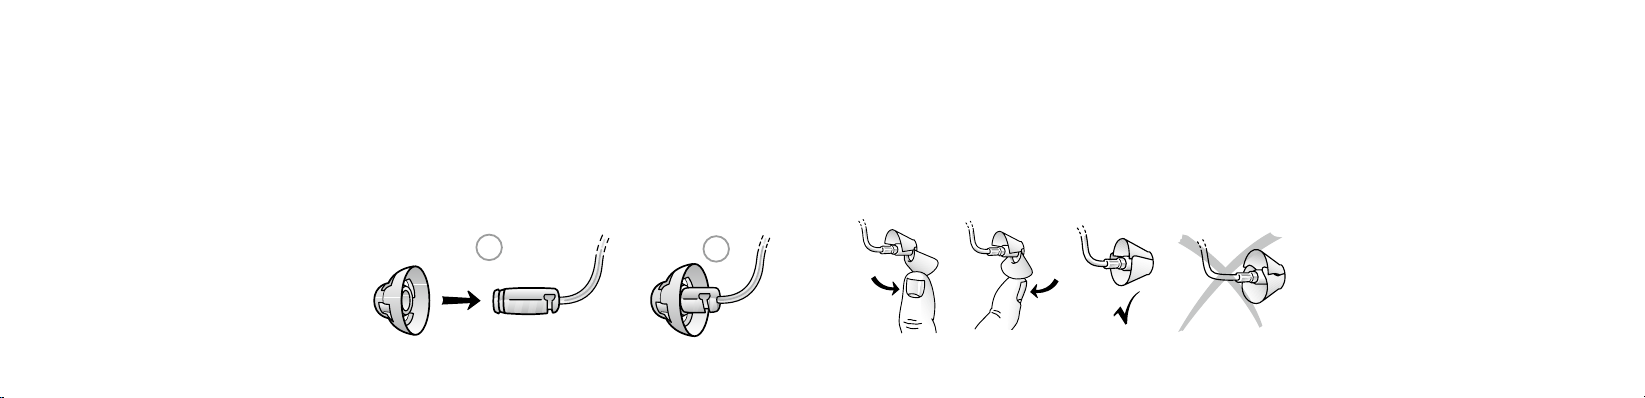
How to apply domes
It is recommended that your hearing care professional change domes, as incorrect dome re place ment
could result in the dome falling out in the ear.
Mini domes
1. Push the new dome over the flanges on the receiver.
2. Make sure that the new dome is properly and securely mounted.
Standard domes
Standard domes are mounted in a similar manner to mini domes, but a few extra steps are required. Tulip
domes consist of two “petals”. It is important to note that the largest petal is the outermost petal.
To ensure this:
1. Push the largest petal away from the receiver using a finger. This bends the petal forward.
2. Then push the largest petal back, and it will be placed on top of the smaller petal.
1
46
2
47
Page 25

Using Interton hearing instruments with smart phone apps
Intended use of smart phone apps:
i
Interton smart phone apps are intended to be used with Interton wireless hearing aids. Interton smart
phone apps send and receive signals from the Interton wireless hearing aids via smart phones for which
the apps have been developed.
Use with smart phone apps:
• Notifications of app updates should not be disabled, and it is recommended that the user installs all
updates to ensure that the app will function correctly and will be kept up to date.
• The app must only be used with Interton devices for which it is intended, and Interton takes no responsibility if the app is used with other devices.
• If you would like a printed version of the user guide for a smar t phone app please consult customer
sup port or our website to obtain a printed user guide.
48
Only applicable to wireless devices
I CAUTION
General precaution (wireless hearing instrument): When the wireless function is activated, the device uses
a low-powered digitally coded transmissions in order to communicate with other wireless devices. Although unlikely, nearby electronic devices may be affected. In that case, move the hearing instrument
away from the affected electronic device. When using wireless functionality and the devices are affected
by electromagnetic interference, move away from the source of interference.
I WARNING
General warnings (hearing instrument): Be careful when boarding flights, to remember to deactivate the
wireless functionality.Turn off your wireless functionality by using the flight mode in areas where radio frequency emission is prohibited.
For use of wireless functionality only use Interton/ GN Hearing accessories. For further guidance
i
regarding e.g. pairing, please refer to the user guide of the relevant Interton/ GN Hearing accessory.
49
Page 26

This device operates in the frequency range of 2.4 GHz - 2.48 GHz.
This device includes a RF transmitter that operates in the range of 2.4 GHz - 2.48 GHz.
Applicable to all devices
I WARNING
General warnings
1. Consult a hearing care professional if you discover a foreign object in your ear canal, if you experience
skin irritation, or if excessive ear wax accumulates with the use of the hearing instrument.
2. Different types of radiation, e.g. from NMR, MRI or CT scanners, may damage the instrument.
Therefore, do not wear the instrument during these or other corresponding scanning procedures.
Other types of radiation (burglar alarms, room surveillance systems, radio equipment, mobile
telephones etc.) will not damage the instrument. They could, however, momentarily affect the sound
quality or create strange sounds from the instruments.
3. Do not wear hearing instruments in mines, oil fields, or other explosive areas unless those areas are
certified for hearing instrument use.
50
4. Do not allow others to use your hearing instruments. This may cause damage to the hearing
instruments or to the hearing of the other individual.
5. Instrument usage by children or mentally challenged persons should be supervised at all times to
ensure their safety. The hearing instrument contains small parts that could be swallowed by children.
Please be mindful not to leave children unsupervised with this hearing instrument.
6. Hearing instruments should be used only as prescribed by your hearing care professional. Incorrect
use may result in sudden and permanent hearing loss.
7. External devices connected to the electrical input must be safe according to the requirements of IEC
60601-1-1, IEC 60065, or IEC 60950-1, as appropriate.
I CAUTION
Only connect Interton hearing instruments to Interton/GN Hearing accessories intended and qualified to be
used with Interton hearing instruments.
If device is broken, do not use.
51
Page 27
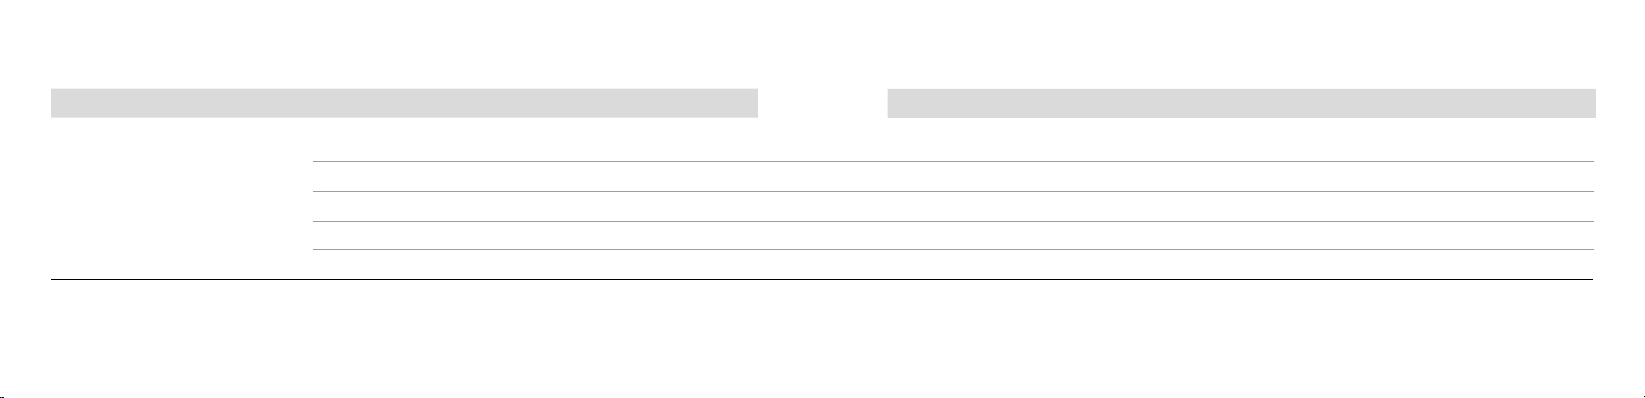
TROUBLESHOOTING GUIDE
SYMPTOM CAUSE
No sound • Not turned on
• Dead battery
• Battery door will not close
• Blocked RIE mould or dome
• Blocked wa x filter
52
POSSIBLE REMEDY PAGE IN THIS USER GUIDE
• Turn on by closing the battery door 12
• Replace battery 13
• Insert battery properly 13
• Clean RIE mould or dome 36
• Replace wa x filter or consult your hearing care professional 37, 3 9
53
Page 28
TROUBLESHOOTING GUIDE
SYMPTOM CAUSE
Not loud
enough
• Incorrect RIE mould placement
• Blocked RIE mould or dome
• Change in hearing sensitivity
• Excessive ear wa x
• Volume set too low
54
POSSIBLE REMEDY PAGE IN THIS USER GUIDE
• Reinsert RIE mould 16
• Clean RIE mould, replace dome, replace filter 36, 40, 37, 39
• Consult your hearing care professional -
• Consult your hearing care professional -
• Increase the volume control if available or consult your hearing
care professional
20
55
Page 29
TROUBLESHOOTING GUIDE
SYMPTOM CAUSE
Excessive
whistling / feedback
• Incorrect RIE mould placement
• Incorrect dome placement
• Excessive ear wa x
• Feedback control may need adjustment
• RIE mould worn or damaged
• Hearing instrument settings not optimal
56
POSSIBLE REMEDY PAGE IN THIS USER GUIDE
• Re-insert RIE mould carefully 16
• Re-insert dome 16
• Consult your hearing care professional -
• Consult your hearing care professional -
• Consult your hearing care professional -
• Consult your hearing care professional -
57
Page 30
TROUBLESHOOTING GUIDE
SYMPTOM CAUSE
Sound
distorted /
not clear
• Weak battery
• Improper earmould or dome fit
• Hearing instrument damaged
• Hearing instrument settings not optimal
Wireless does not work • Possible Root Cause - Device is in flight mode
If there a re any othe r problems not m entioned in this guide , pleas e contact your hea ring ca re profe ssion al.
58
POSSIBLE REMEDY PAGE IN THIS USER GUIDE
• Replace battery 13
• Consult your hearing care professional -
• Consult your hearing care professional -
• Consult your hearing care professional -
• For Crisp devices with push button: Open and close the battery compartment. For Crisp devices without push button: Open and close the battery door twice within 10 seconds
• For all Centro and Step devices: Open and close the battery compartment once. Wireless will
reactivate 10 seconds later. (If Root Cause is device in flight mode)
59
Page 31
Technical Data
Hearing Instrument Model
Maximum output
(2ccCoupler / IEC 60118-7)
Battery size
Technical Data
Hearing Instrument Model
Maximum output
(2ccCoupler / IEC 60118-7)
Battery size
60
ST4 6 0 S 114 dB SPL (typical) 312
receiver
Small/Low
CT661-D RW, C T461-D RW 113 dB SPL (typical) 312
C461-DRW NP Open, C661-DRW NP Open,
CI360-DVIRW NP Open, CI260-DVIRW NP Open,
receiver
SR1360-DVIR NP Open
CT661-D RW, C T461-D RW 116 dB SPL (typical) 312
Normal/Medium Power
114 dB SPL (typical) 312
61
Page 32
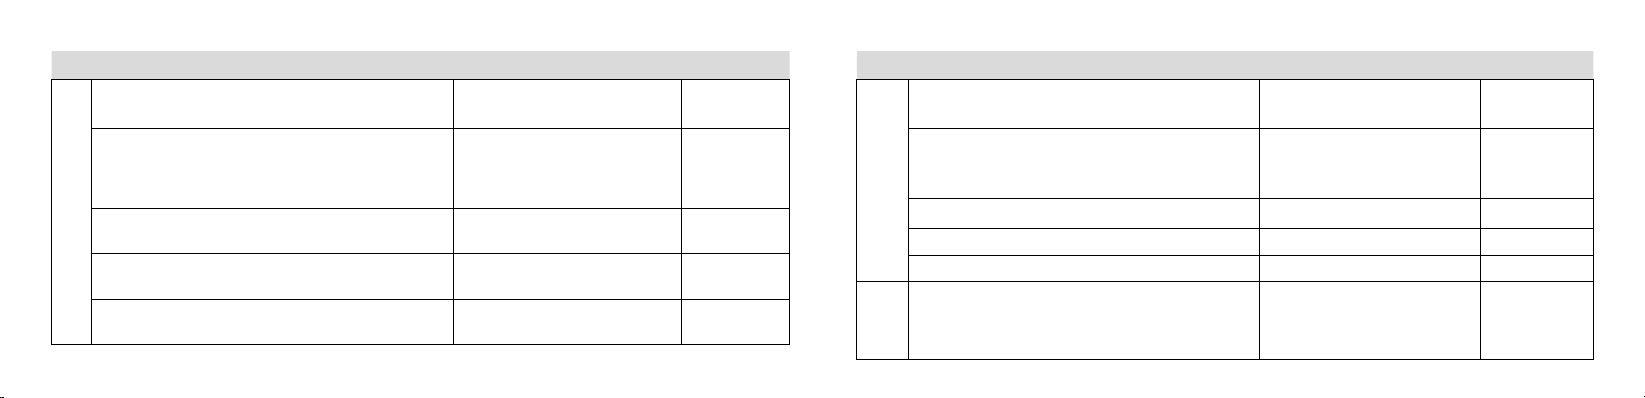
Technical Data
Hearing Instrument Model
Maximum output
(2ccCoupler / IEC 60118-7)
C461-DRW NP, C661-DRW NP,
CI360-DVIRW NP, CI260-DVIRW NP,
114 dB SPL (typical) 312
SR136 0 - DV I R NP
ST4 6 0 NP 117 dB SPL (typical) 312
C662-DR NP Open, CI362-DR NP Open 114 dB SPL (typical) 10A
Normal Power receiver
Battery size
Technical Data
Hearing Instrument Model
Maximum output
(2ccCoupler / IEC 60118-7)
C461-DRW HP, C661-DRW HP,
CI260-DVIRW HP, CI360-DVIRW HP,
117 dB SPL (typical) 312
SR1360-DVIR HP
Receiver
CI362-DR HP, C662-DR HP 117 dB SPL (typical) 10A
High Power
ST4 6 0 HP 118 dB SPL (typical) 312
CT661-D RW, C T461-D RW 122 dB SPL (typical) 312
Battery size
C662-DR NP, CI362-DR NP 114 dB SPL (typical) 10A
62
CT661-D RW, C T461-D RW 129 dB SPL (typical) 312
Receiver
Ultra Power
63
Page 33

Warranty and repairs
Interton provides a warranty on hearing instruments in the event of defects in workmanship or materials,
as described in applicable warranty documentation.
In its service policy, Interton pledges to secure functionality at least equivalent to the original hearing instrument.
As a signatory to the United Nations Global Compact initiative, Interton is committed to doing this in line
with environment-friendly best practices. Hearing instruments therefore, at Interton’s discretion, may be
replaced by new products or products manufactured from new or serviceable used parts, or repaired using new or refurbished replacement parts.
The warranty period of hearing instruments is designated on your warranty card, which is provided by your
hearing care professional.
For hearing instruments that require service, please contact your hearing care professional for assistance.
Interton hearing instruments that malfunction must be repaired by Interton qualified technician. Do not attempt to open the case of hearing instruments, as this will invalidate the warranty.
Temperature test, transport and storage information
Interton Hearing Instruments are subjected to various tests in temperature and damp heating cycling between -25° C (-13F) and +70° C (+158F) according to internal and industry standards.
During transpor t or storage, the temperature should not exceed the limit values of -20° C (-4F) to +60° C
(+140F) and relative humidity of 90% RH, non condensing (for limited time). The air pressure between 500
and 1100 hPa is appropriate.
64
65
Page 34

Hearing instrument expectations
i
A hearing aid will not restore normal hearing and will not prevent or improve a hearing impairment resulting
from organic conditions
Consistent use of the aid is recommended. In most cases, infrequent use does not permit you to attain
full benefit from it.
The use of a hearing aid is only part of hearing rehabilitation and may need to be supplemented by auditory
training and instructions in lip-reading.
i Warning to Hearing Aid Dispensers (US only)
A hearing aid dispenser should advise a prospective hearing aid user to consult promptly with a licensed
physician (preferably an ear specialist) before dispensing a hearing aid, if the hearing aid dispenser determines through inquiry, actual observation, or review of any other available information concerning the
prospective user, that the prospective user has any of the following conditions:
(i) Visible congenital or traumatic deformity of the ear.
(ii) Histor y of active drainage from the ear within the previous 90 days.
66
(iii) History of sudden or rapidly progressive hearing loss within the previous 90 days.
(iv) Acute or chronic dizziness.(v) Unilateral hearing loss of sudden or recent onset within the previous
90 days.(vi) Audiometric air-bone gap equal to or greater than 15 decibels at 500 hertz (Hz), 1,000
Hz, and 2,000 Hz.
(vii) Visible evidence of significant cerumen accumulation or a foreign body in the ear canal.
(viii) Pain or discomfort in the ear.
Important Notice for Prospective Hearing Aid Users (US only)
Good health practice requires that a person with a hearing loss have a medical evaluation by a licensed
physician (preferably a physician who specializes in diseases of the ear) before purchasing a hearing
aid. Licensed physicians who specialize in diseases of the ear are often referred to as otolaryngologists,
otologists or otorhinolaryngologists. The purpose of the medical evaluation is to assure that all medically
treatable conditions that may affect hearing are identified and treated before the hearing aid is purchased.
Following the medical evaluation, the physician will give you a written statement that states that your hearing loss has been medically evaluated and that you may be considered a candidate for a hearing aid. The
67
Page 35

physician will refer you to an audiologist or a hearing aid dispenser, as appropriate, for a hearing aid evaluation. The audiologist or hearing aid dispenser will conduct a hearing aid evaluation to assess your ability
to hear with and without a hearing aid. The hearing aid evaluation will enable the audiologist or dispenser
to select and fit a hearing aid to your individual needs. If you have reservations about your ability to adapt
to amplification, you should inquire about the availability of a trial-rental or purchase-option program. Many
hearing aid dispensers now offer programs that permit you to wear a hearing aid for a period of time for a
nominal fee after which you may decide if you want to purchase the hearing aid. Federal law restricts the
sale of hearing aids to those individuals who have obtained a medical evaluation from a licensed physician.
Federal law permits a fully informed adult to sign a waiver statement declining the medical evaluation for
religious or personal beliefs that preclude consultation with a physician. The exercise of such a waiver is
not in your best health interest and its use is strongly discouraged.
Children with hearing loss (US only)
In addition to seeing a physician for a medical evaluation, a child with a hearing loss should be directed
to an audiologist for evaluation and rehabilitation because hearing loss may cause problems in language
68
development and the educational and social growth of a child. An audiologist is qualified by training and
experience to assist in the evaluation and rehabilitation of a child with hearing loss.
69
Page 36
Be aware of information marked with the warning symbol
WARNING points out a situation that could lead to serious injuries,
i CAUTION indicates a situation that could lead to minor and moderate injuries.
Advice and tips on how to handle your hearing instrument better.
i
Equipment includes RF transmitter.
Interton Centro is compatible with iPhone 6, iPhone 6 Plus, iPhone 5s,
iPhone 5c, iPhone 5, iPad Air 2, iPad Air, iPad (4th generation), iPad mini 3,
iPad mini 2, iPad mini with Retina display, iPad mini and iPod touch (5th
generation) using iOS 7.X or later. Apple, the Apple logo, iPhone, iPad
and iPod touch are trademarks of Apple Inc., registered in the U.S. and
other countries.
“Made for iPhone” means that an electronic accessory has been
i
designed to connect specifically to iPhone and has been certified by the
developer to meet Apple performance standards. Apple is not responsible
for the operation of this device or its compliance with safety and regulatory
standards. Please note that the use of this accessory with iPhone may
affect wireless performance.
Please as k your local heari ng care professi onal
concerning disposal of your hearing instrument
Page 37
Any issue s relat ing to the EU M edical Devic e Dire ctive 93/42/EEC, or
Counci l Dire ctive 1999/5/EC on Radio Eq uipme nt and Telec ommunicatio ns
0297
termin al equipment s hould b e direc ted to Inte rton A /S.
Worldwide headquarters
Interton A/S | Lautrupbjerg 7 | DK-2750 Ballerup | Denmark
Tel.: +45 45 75 1111 | Fax: +45 45 75 1119 | www.interton.com | CVR no. 55082715
400082000-GB-15.04-Rev.E
 Loading...