

Page 1

INTERTON | APPRAISE 2
USER GUIDE
Page 2
How to start
Good To Know
Precautions and Warnings
In this guide you will find:
Airlink .....................................................................3
Other programming interfaces .............................................. 4
Start screen. . . . . . . . . . . . . . . . . . . . . . . . . . . . . . . . . . . . . . . . . . . . . . . . . . . . . . . . . . . . . . . 4
Product selection .......................................................... 5
Pre-Fit screen ............................................................. 5
Fit screen ................................................................. 5
Gain ................................................................. 6
Feature .............................................................. 6
Beeps and Volume Control ............................................. 6
Summary screen ...........................................................7
Animations & Videos ....................................................... 8
General Precautions ....................................................... 9
General Warnings .......................................................... 9
Easy fitting without cables
With Airlink 2 and Appraise fitting
software, the fitting process is designed to be as convenient, flexible
and comfortable as possible for
both you and your client.
Page 3
Airlink
3
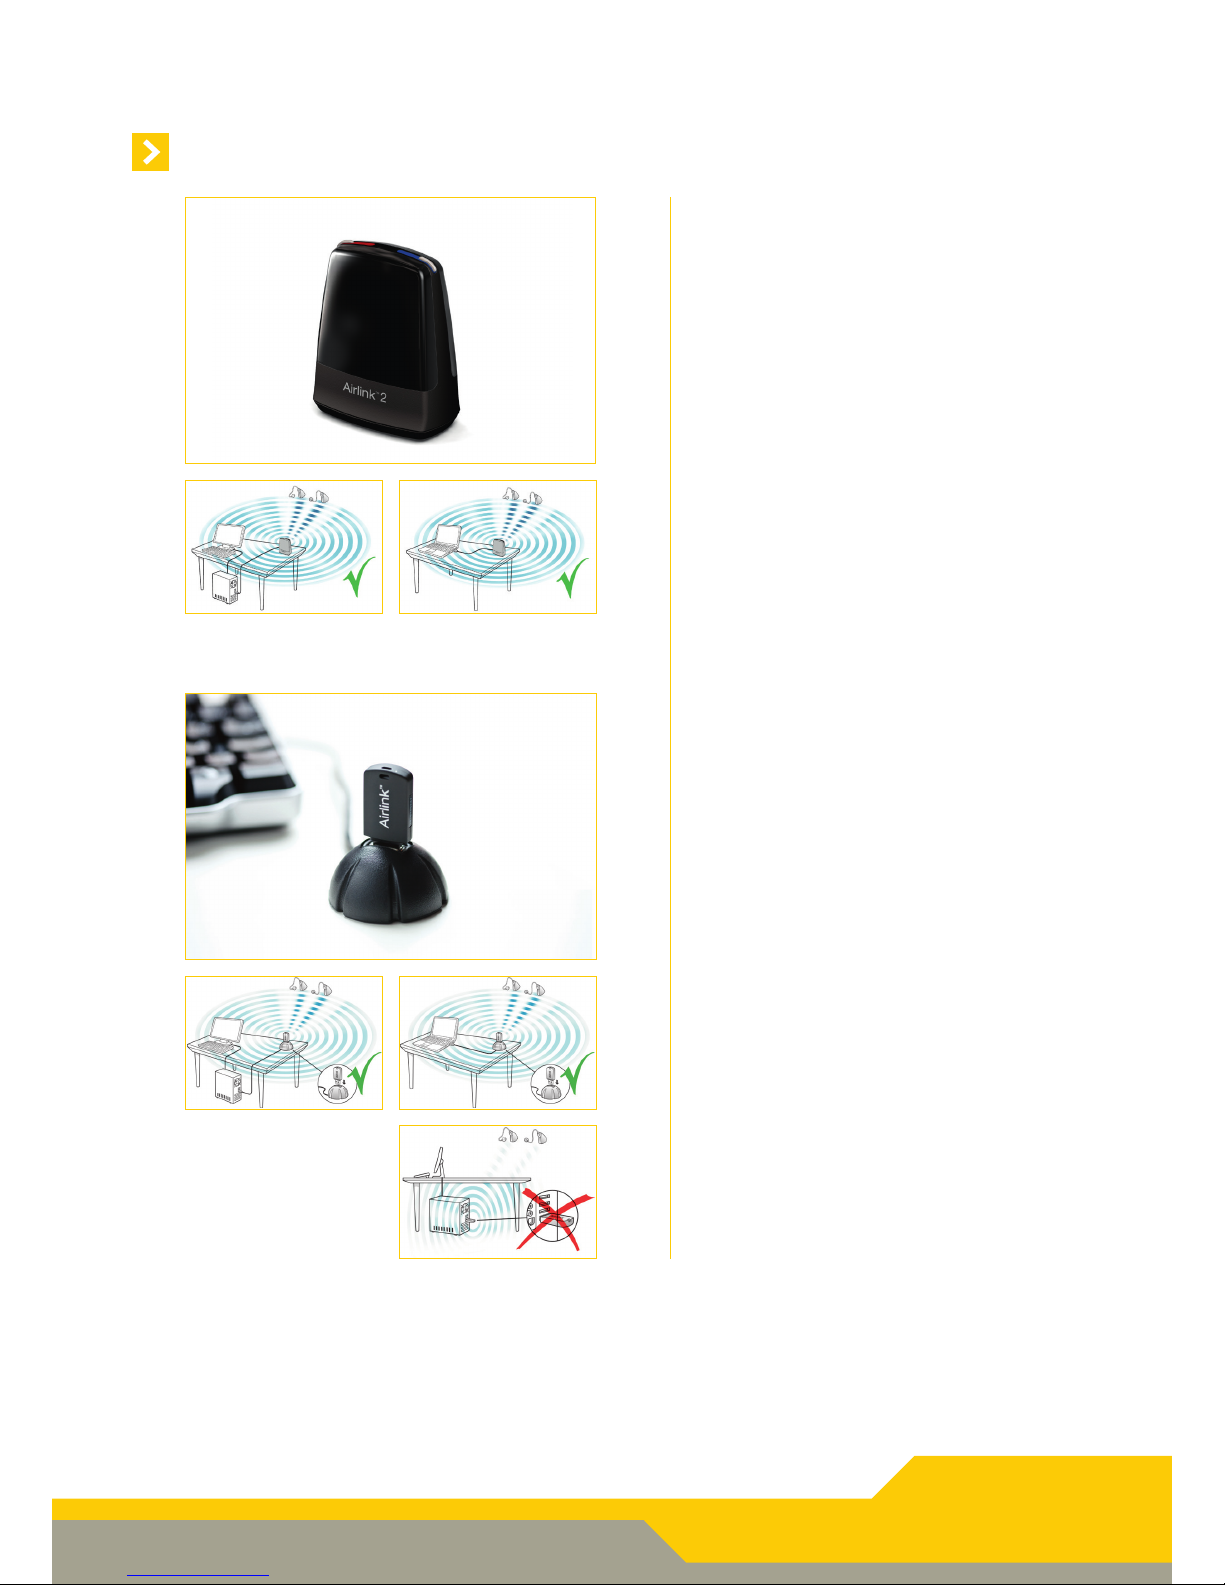
Interton Appraise supports two generations of Airlink; the Airlink dongle and
the latest Airlink 2.
Both generations offer the great client
experience of wireless fitting and the
comfort it brings.
Being the latest generation, Airlink 2 is
the recommended option of the two. It’s
designed to ensure optimal usage and
better usability.
• Place Airlink 2 on the table with a
clear line-of-sight to the hearing
instruments, which should be within a
range of 10 feet (3 metres).
• Avoid placing the Airlink 2 in a
USB hub with other USB devices
(e.g. Bluetooth dongle), as this can
decrease the efficiency of the Airlink
2.
• When fitting hearing instruments
inside a sound booth place the Airlink
2 inside or nearby the booth.
• It is recommended not to use USB
cables between the Air link 2 and the
PC exceeding a length of 10 feet (3
metres).
Note: If using the Airlink dongle it’s rec-
ommended to use a USB hub that places
the Airlink in an upright/vertical position as this provides for at better signal
broadcast.
Refer to the pictures to the left for more
guidance.
Page 4
Other programming interfaces
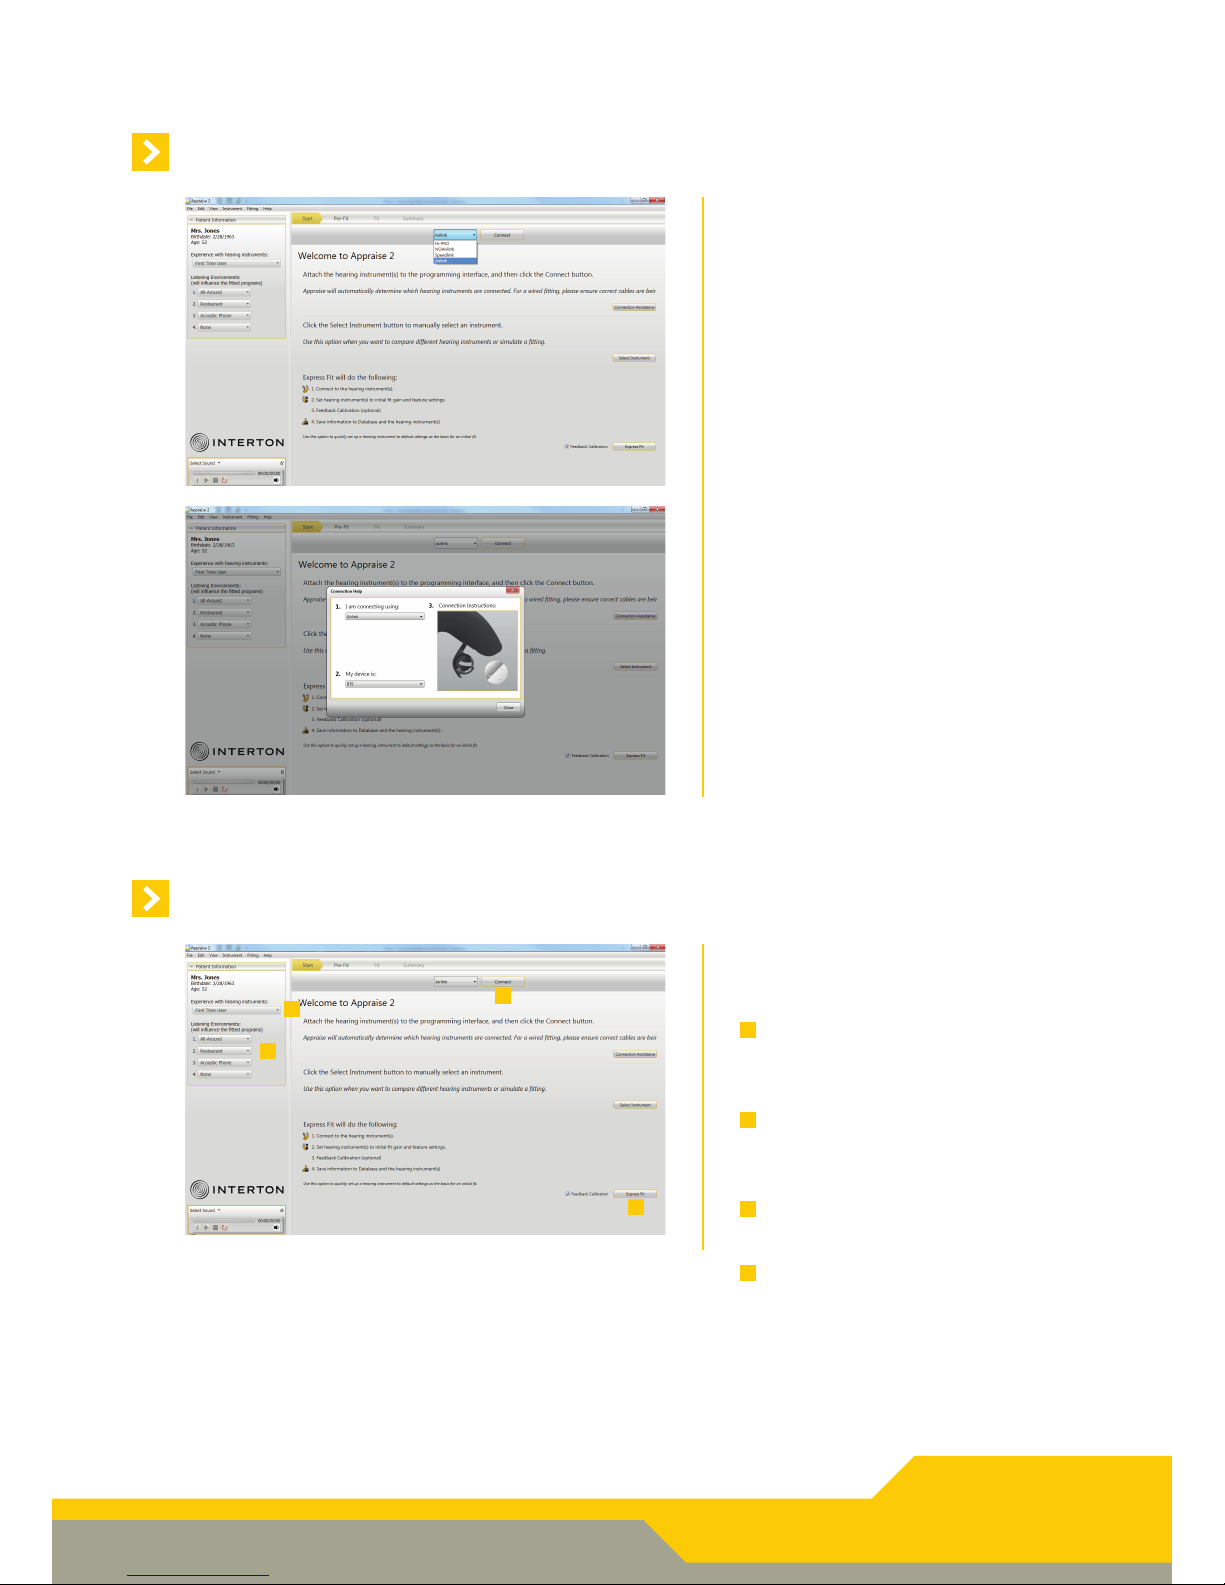
Appraise 2 works with:
- Airlink 2
- Airlink dongle
- Speedlink
- Hi-PRO
- NOAHlink
You can select programming interface
on top of the Start Screen.
Note: Animations in Connection Assistance will show you how to connect specific models of hearing instruments with
the selected programming interface.
4
Start screen
After launching Appraise you will see
the Start screen.
1
Select the patient’s experience with
hearing instruments for an optimized gain prescription.
2
Let Appraise recommend the pro-
gram de faults or select them based
on your patient interview.
3
Connect to the hearing instruments
chosen for this fitting.
4
Use Express Fit as the easiest most
direct path to a fitting.
1
2
3
4
Page 5
Product selection
1
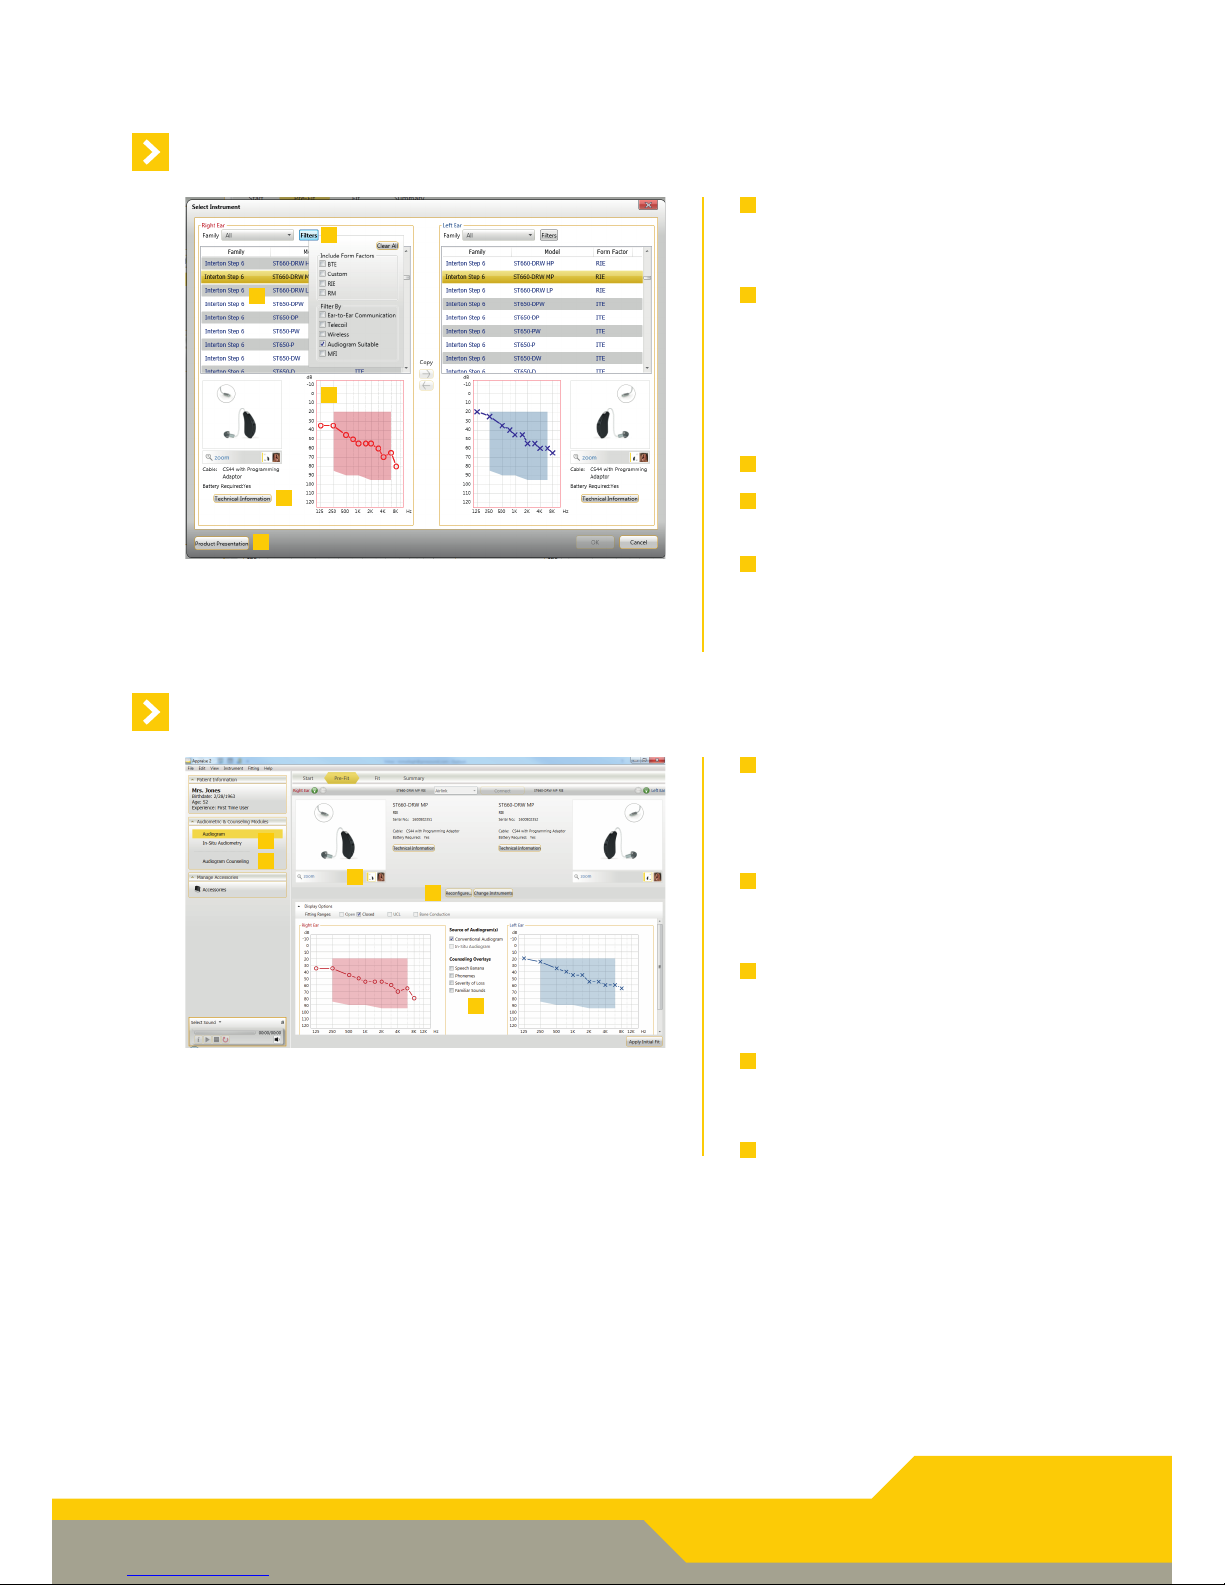
Product family selection - here you
can view all available products per
family.
2
Use filters to help you easily find the
most relevant products. For example, “Audiogram Suitable” is a filter
that shows only products with fitting
ranges that cover your patient’s individual audiogram.
3
Fitting range and patient audiogram.
4
Technical Information on the select-
ed hearing instrument(s).
5
Product Presentation, here you
can connect to product website to
present benefits of desired hearing
instrument to your patient.
1
2
3
4
5
5
Pre-Fit screen
1
Counsel on the audiogram using the
hearing loss simulator for a 3rd party
who is present during the fitting session.
2
Perform an in-situ audiogram by
presenting the pure tones from the
hearing instruments.
3
Reconfigure the hearing instrument
software to match the actual hardware.
4
Display audiogram overlays such
as the speech banana and familiar
sounds.
5
Have a closer look at how the hear-
ing instruments looks and how it sits
on the ear.
1
2
3
4
5
Page 6
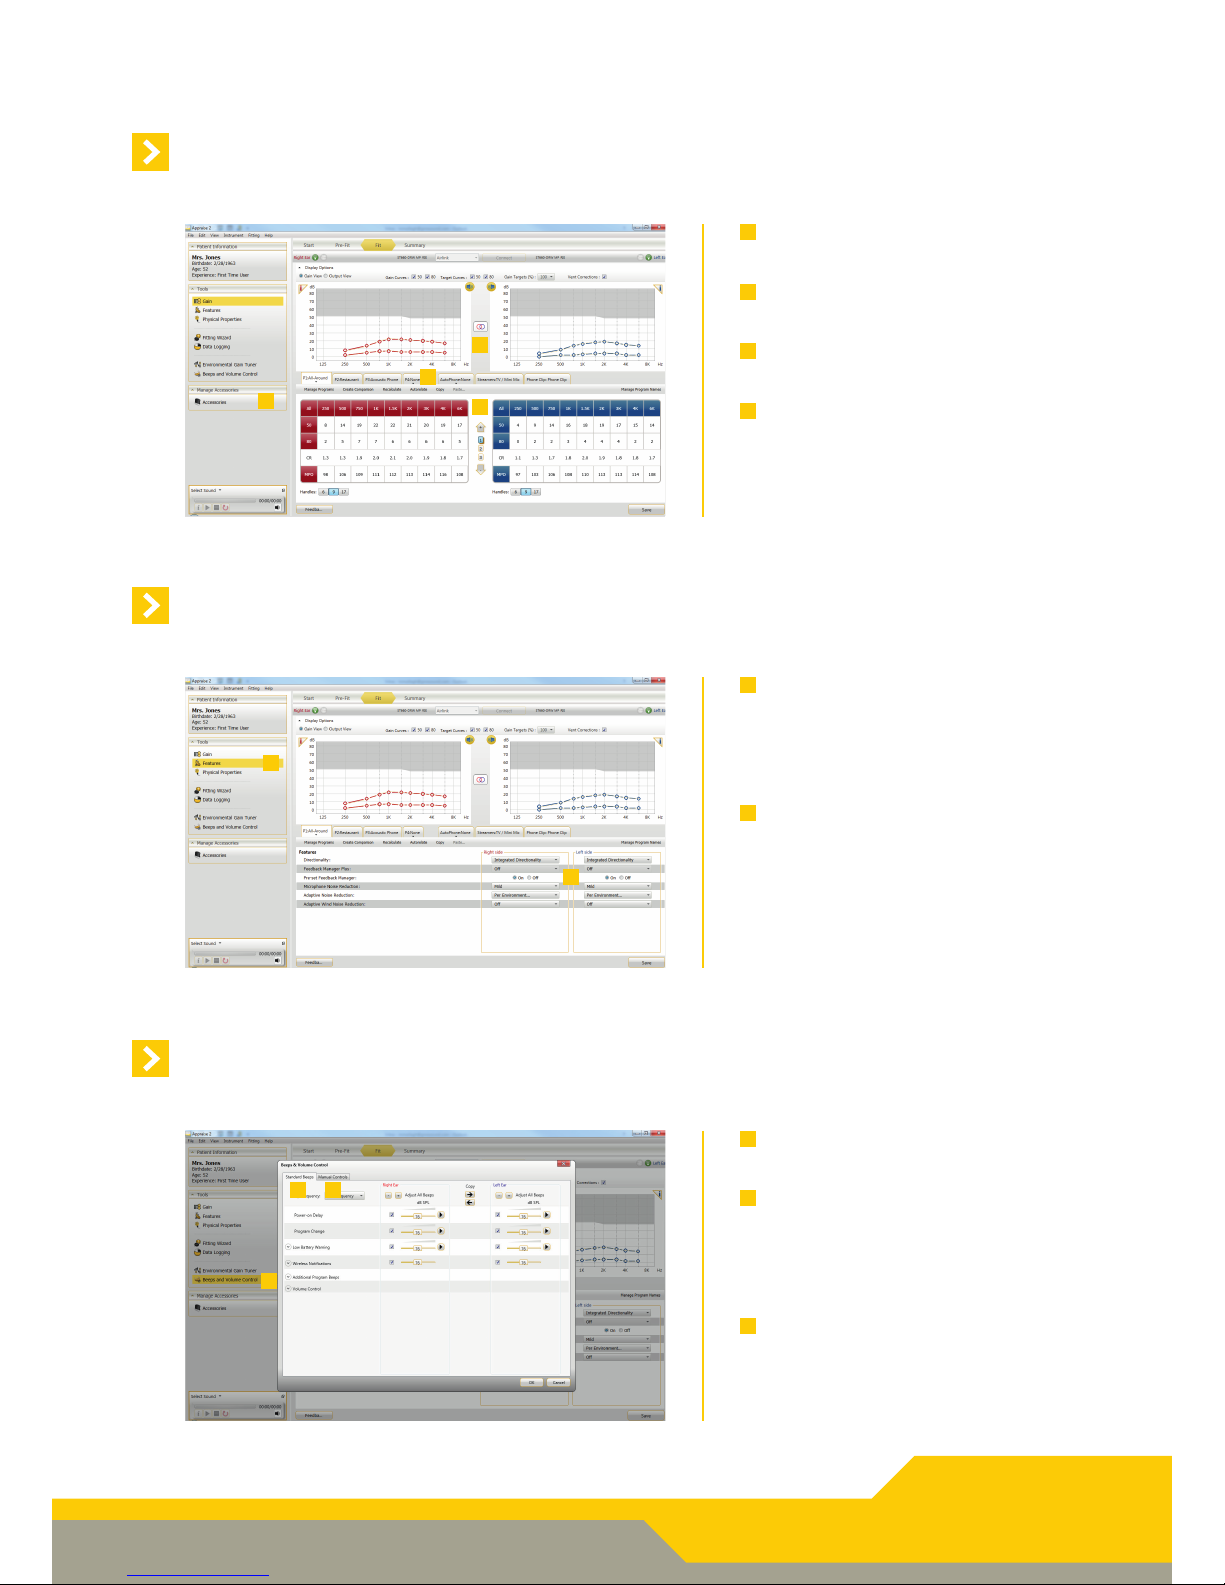
Fit screen
Gain
1
Adjust gain changes in increments
of 1 dB, 2 dB or 3 dB.
2
Choose and fine-tune environmental
programs and Wireless program.
3
Muting and linking the hearing in-
struments.
4
Pair the hearing instruments with
wireless accessories.
1
2
3
4
6
Fit screen
Features
Fit screen
Beeps and Volume Control
1
Feature settings are accessed by
clicking on “Features” in the “Tools”
section. These feature settings apply to the current ly selected program.
2
Adjust the features of the hearing
instruments as needed.
1
Click here to adjust beeps and vol-
ume set tings.
2
In the “Standard Beeps” tab, all the
acoustic indicators can be demonstrated, changed, added and removed as needed. Low or high frequency beeps can also be selected.
3
“Manual Controls” tab contains op-
tions such as customizing push button function, enabling and disabling
the program button and adjusting
the volume control range.
1
1
2
2 3
Page 7
7
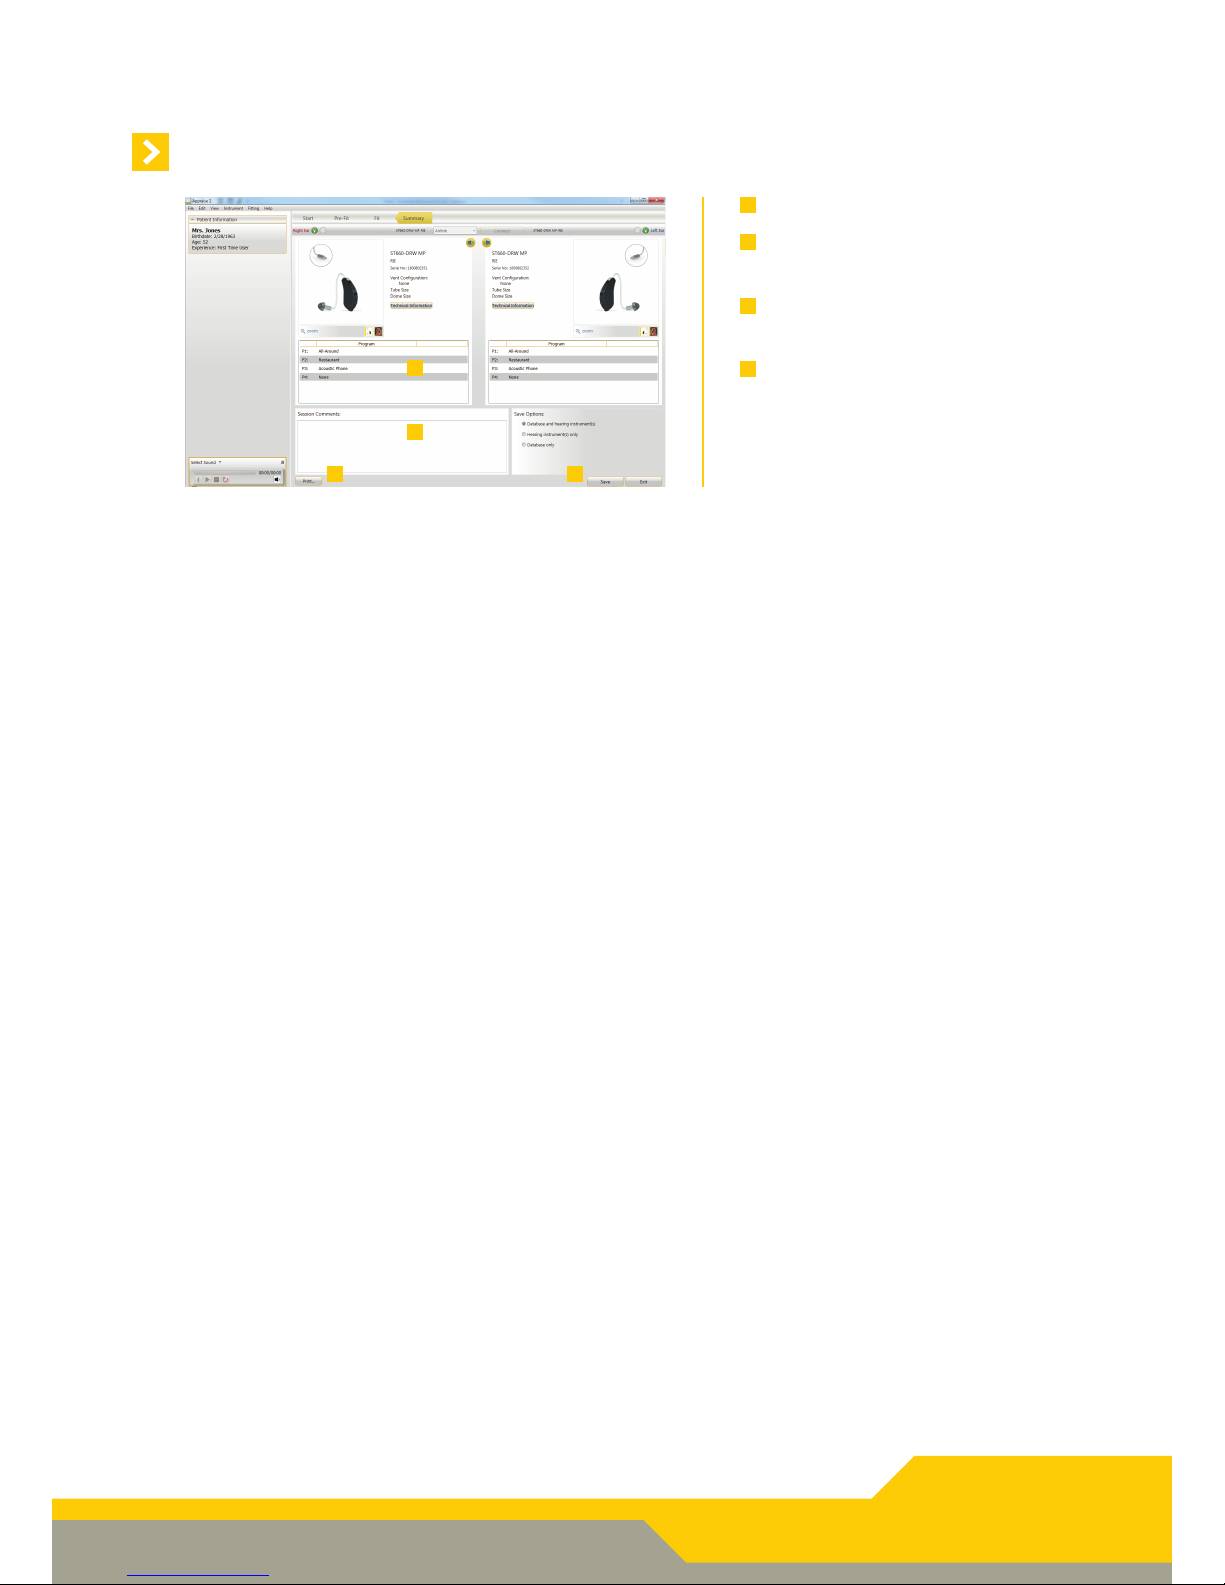
Summary screen
1
Confirm number of programs.
2
Customize the Clinician report and
the Patient handout.
3
Type in notes and they will be print-
ed on patient’s handout.
4
Save options let you select whether
to save data in both the hearing instruments and database, only in one
place, or not at all.
1
2
3
4
Page 8
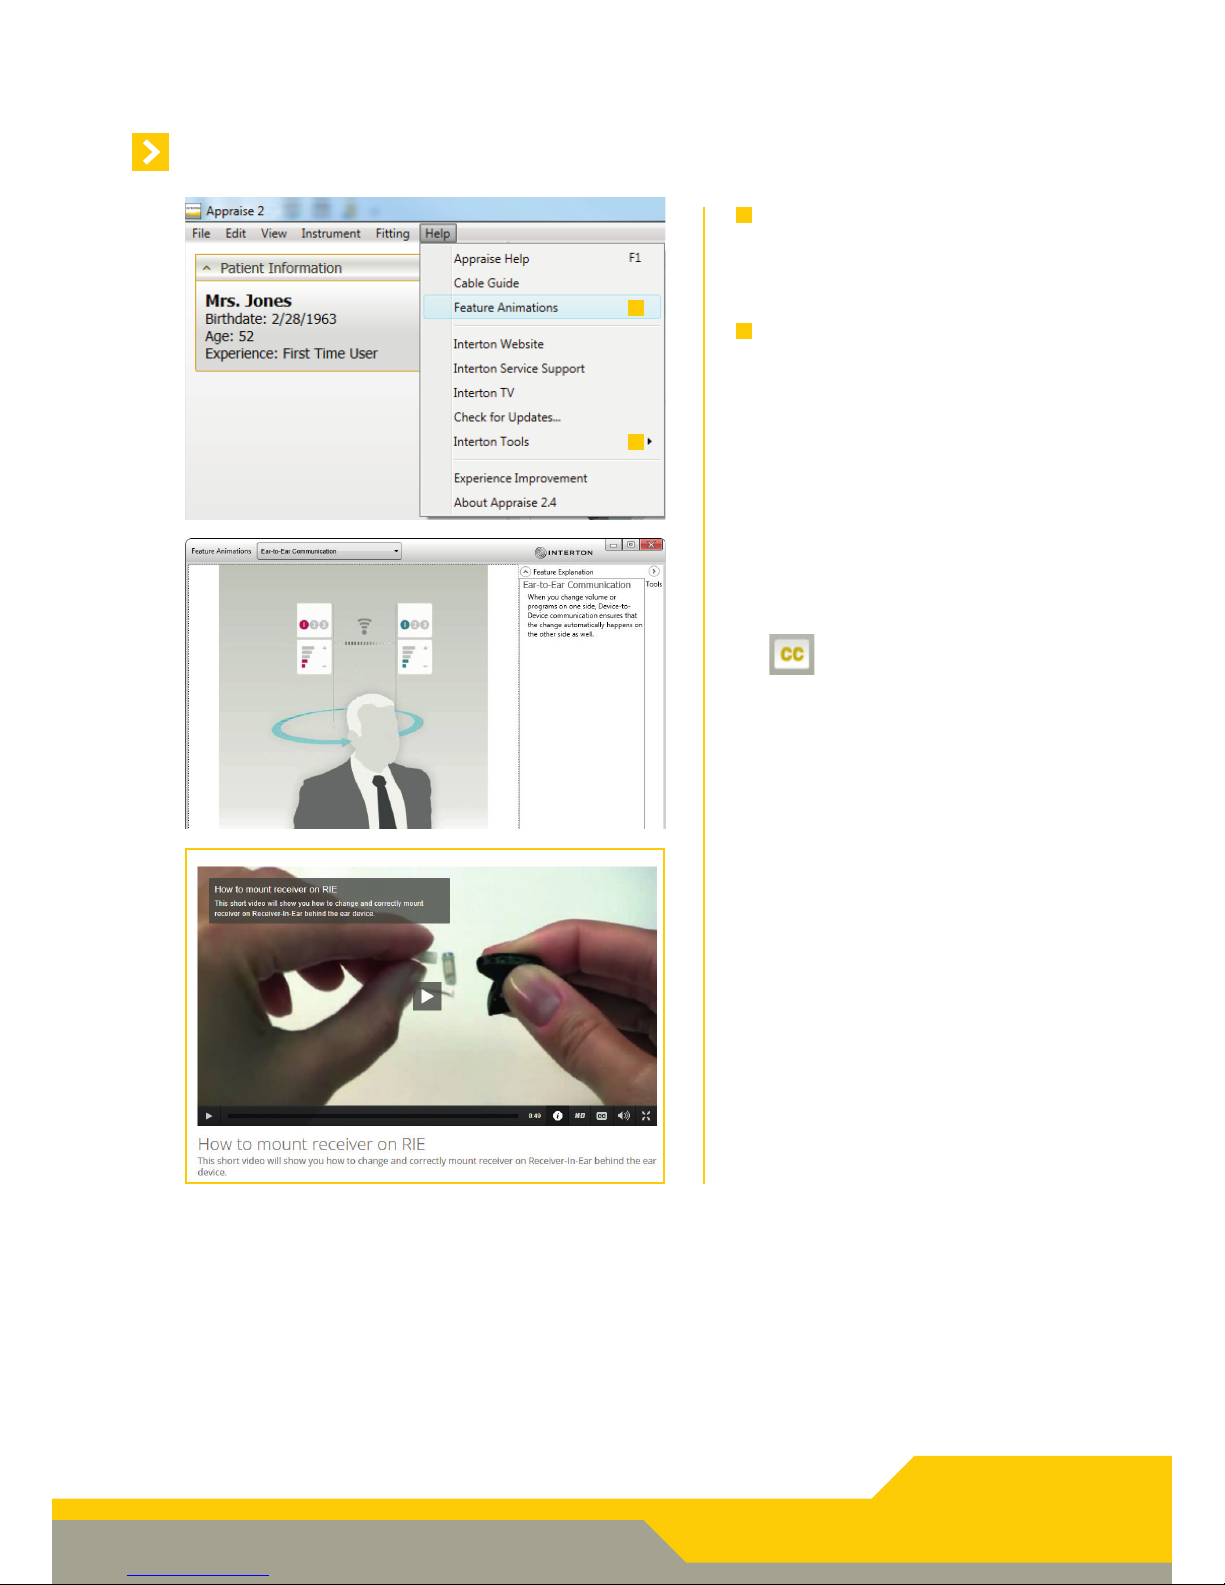
Animations & Videos
1
Feature Animations illustrate the
features available in the hearing instruments. You can find the animations in the Help menu.
2
If your computer is connected to
the internet you have access to
many useful videos prepared by
Interton. These short videos are
showing step-by-step how to work
with Appraise and Interton hearing instruments. The videos can
be accessed from every screen via
the menu - Help/Interton Tools.
Note: To see subtitles in your own
language click on “CC” button (subtitles) on the video player.
8
1
2
Page 9

General Precautions i
• This Appraise fitting software will apply recommended amplification settings based on available audiometrical information. Settings will be specific to each fitting.
• Manual modification of the fitting parameters will impact and change the amplification level prescribed.
This change will be audible to the patient when the instruments are connected.
• Caution should be exercised with patients sensitive to sounds, for example suffering from tinnitus or
hyperacusis.
• Hearing device performance may drift and decline over time, please en-sure devices are performing
within specifications prior to performing in situ threshold testing.
• Feature accuracy is reliant on ear canal being completely occluded.
General Warnings i
• When connected, the Appraise Fitting Software controls the acoustic amplification levels in a hearing
instrument. In some acoustic environments, over amplification can cause discomfort and damage to the
patients hearing.
• The Fitting System provides initial default amplification settings based on hearing threshold levels. These
default settings could be higher than stable levels and cause feedback when amplification is first applied.
• The Fitting System initiates the feedback calibration procedure. Feedback calibration uses broadband
noise to measure the amount of sound leaking from the hearing instrument. The output level is designed
to be on the boarder of “uncomfortable” level based on hearing threshold level at a specific frequency.
The sound will be ramped up in volume and cease when the calibration data is received. It is possible for
the level to exceed a patients comfort level, but it needs to be determined if it can obtain hazardous risk
levels.
• The Fitting System initiates feedback calibration to measure the receiver to microphone transfer function. This is used primarily by the hearing instrument to manage feedback suppression but it is also used
to display the limits of stable gain.
• The maximum stable gain estimates are based on feedback calibration data, the presence of active feedback suppression, and a headroom estimate. The headroom value is meant to be conservative however
the presence of directionality has shown to give inaccurate estimates of max. stable gain. The risk is that,
under some situations, the Fitting System could show that the hearing instrument is stable when it is
actually close to unstable and in risk of feedback.
• If feedback calibration has not been performed during fitting the Max Stable Gain is not known and the
device could cause feedback without warning.
• The Fitting System uses the DynaFit+ algorithm to interpret audio gram data for determining optimal
gain settings. The parameter used is “first time user”. This may give a less than optimal initial fitting but
should not pose a safety risk. The algorithm has been independently validated with the specification and
verified to be consistent with Fitting Software.
9
Page 10

• The Fitting System uses feedback calibration measurements to compute Max Stable Gain values. These
values are an estimate of the amount of gain that can be safely applied to a hearing instrument be fore
it begins to cause feedback. There is a warning when this gain is reached, and the over gain values are
highlighted with bold, red text. The safety margins give a “close” approximation of the actual feed back
border. However, it’s an estimation and feedback can occur before the warning is given. Sustained feedback on high power devices can damage residual hearing.
• Warning to hearing care practitioners Special care should be exercised in selecting and fitting hearing
instrument(s) whose maximum sound pressure level exceeds 132 dB SPL with an IEC 60711: 1981 occluded
ear simulator, because there may be a risk of impairing the remaining hearing of the hearing instrument
user.
• Children and physically or mentally challenged users will require guardian supervision while wearing the
device.
400103000-GB-16.02-Rev.C
Worldwide headquarter | Interton A/S | Lautrupbjerg 7 | DK-2750 Ballerup Denmark
Tel.: +45 45 75 1111 | Fax: +45 45 75 1119 | www.interton.com
i WARNING points out a situation that could lead to serious injuries, CAUTION indicates a situation
that could lead to minor and moderate injuries.
Any issues relating to the EU Medical Device Directive 93/42/EEC should be directed
to Interton A/S.
 Loading...