

Page 1
j ““t?
!
.?
Part Number
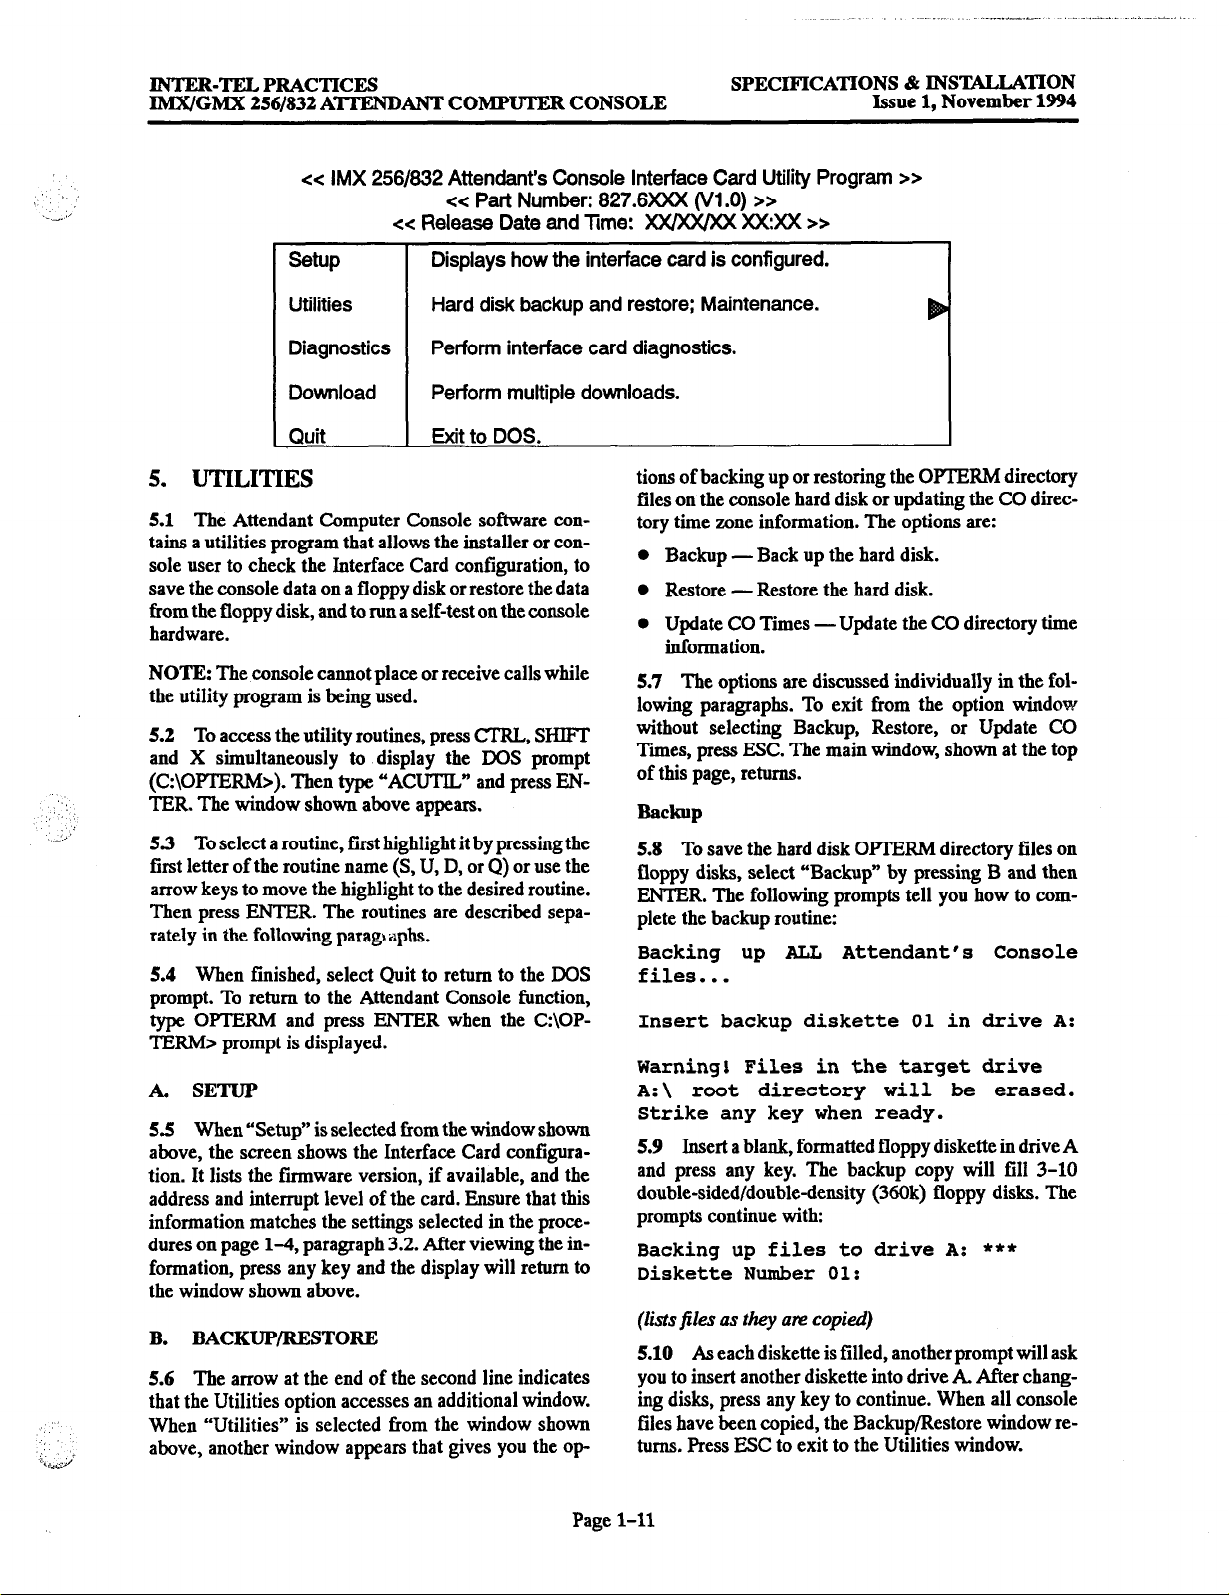
440.8078
INTEGRATED
TM
::/
....:
I:.
.=
lM!!GMX256/832
AITENDANT COMPUTER CONSOLE MANUAL
Issue 1, November 1994
.
. .
_’
@ Inter-Tel Integrated Systems, Inc. 1994
Printed in USA
Page 2
‘, .’
I:
.._,_ Y
.‘(
IMX/GMX 256/832 AlTENDANT COMPUTER CONSOLE ISSUE 1
- INDEX OF NEW FEATURES
For those individuals who are already familiar with the Issue 1 manuals for the IMX 2561832 and GMX-2561832 Systems, the following new items are documented in this Issue 1 combination manual. For complete information on each
item, refer to the page numbers following the brief explanation. Also, throughout the manual, “change bars” like the
one at the right have been placed in the margins to indicate any new or revised information since the original manuals.
IMX And GMX Combined Into One Manual
With the new 1995 North American Numbering Plan software releases, the IMX 2561832 and GMX-2561832
products are identical except for the station instruments that can be installed on them. To provide better service,
condense reference materials, streamline training, and facilitate technical support, the console manuals for the
two systems have been combined into one generic manual. When using this combined manual to help sell, install,
or service a particular system, be aware that not all of the station instruments described in this manual are available
on both products. Refer to the system installation and maintenance manual for a list of the station instruments that
can be installed on each product.
North American Numbering Plan (NANP)
The growth of telecommunications services has created an increasing demand for more telephone numbers. To
meet the demand, Bellcore has prepared a long-range North American Numbering Plan (NANP) to provide additional telephone numbers. The plan expands the capacity of the current numbering system by making area and
office codes interchangeable. That is, numbering patterns formerly reserved for office codes can be used as new
area codes, and office codes within existing area codes can have the same pattern as other area codes. This version
of software supports the new numbering plan. Refer to the system installation and maintenance manual for more
information.
I
.:’
:
One Installation Disk
The new console interface software is contained on one 1.2MB floppy disk. See pages l-2 and l-5.
Remote Hunt Group Remove/Replace
An attendant can control the hunt group remove/replace feature for any stations that have dial-zero access to that
attendant’s station. See F ::ge 2-46.
“Silent” Ring Tone Selection
When setting the ring tone on a keyset, the keyset user can enter 0 (zero) to disable ring tones. See page 2-62.
Toll Security Weekly Toll Limits
When enabled, the weekly toll limit feature keeps track of the accumulated call cost for specified types of toll
calls. The feature can monitor 7- and lo-digit toll calls and/or operator-assisted/international calls. Alarm mes-
sages have been added for toll limit management. See pages 2-26 and 2-46.
Expanded DID Names
This option allows the operator to program identifying names to the system’s DID numbers. The expanded name is
used in place of the seven-character system-programmed DID name to give the operator more information when
the DID name is displayed during a call. See pages 2-53 and 2-57.
LCR Toll Forced Account Code
Forced account codes for toll calls only can be programmed for stations with LCR-Only toll restriction in day and
night modes. When this account code type is enabled, the user only has to enter an account code if the system
detects that a toll call has been dialed when LCR is used. See page 2-27.
“,,,
..,
<. ;,:
‘L,.d
Station Off-Hook Alarm
The STmON OFF HOOK alarm now indicates the station that is off hook. Also, the alarm clears automatically
when the station user hangs up. See page 2-46.
Page v
Page 3
INDEX OF NEW FEATURES
(continued)
Station Exchange
This programmable station feature allows a station user to exchange the extension numbers of two station circuits.
This swaps the database and user programmed features of the extension numbers between two station circuits
without the need for database programming. The circuit number of the station locations are unchanged, but the
extension numbers are changed. gee pages 2-38.
Modem Compatibility Testing
There is a new option in the utilities program (ACUTlL) that allows you to test your modem card for compatibility
with the Interface Card by performing a series of downloads. gee page 1-14.
’ Y‘ :,.
: ’
Page vi
Page 4
INTER-TELPRACTICES
IMX/GMX 256/832AmANT COMPUTEX CONSOLE
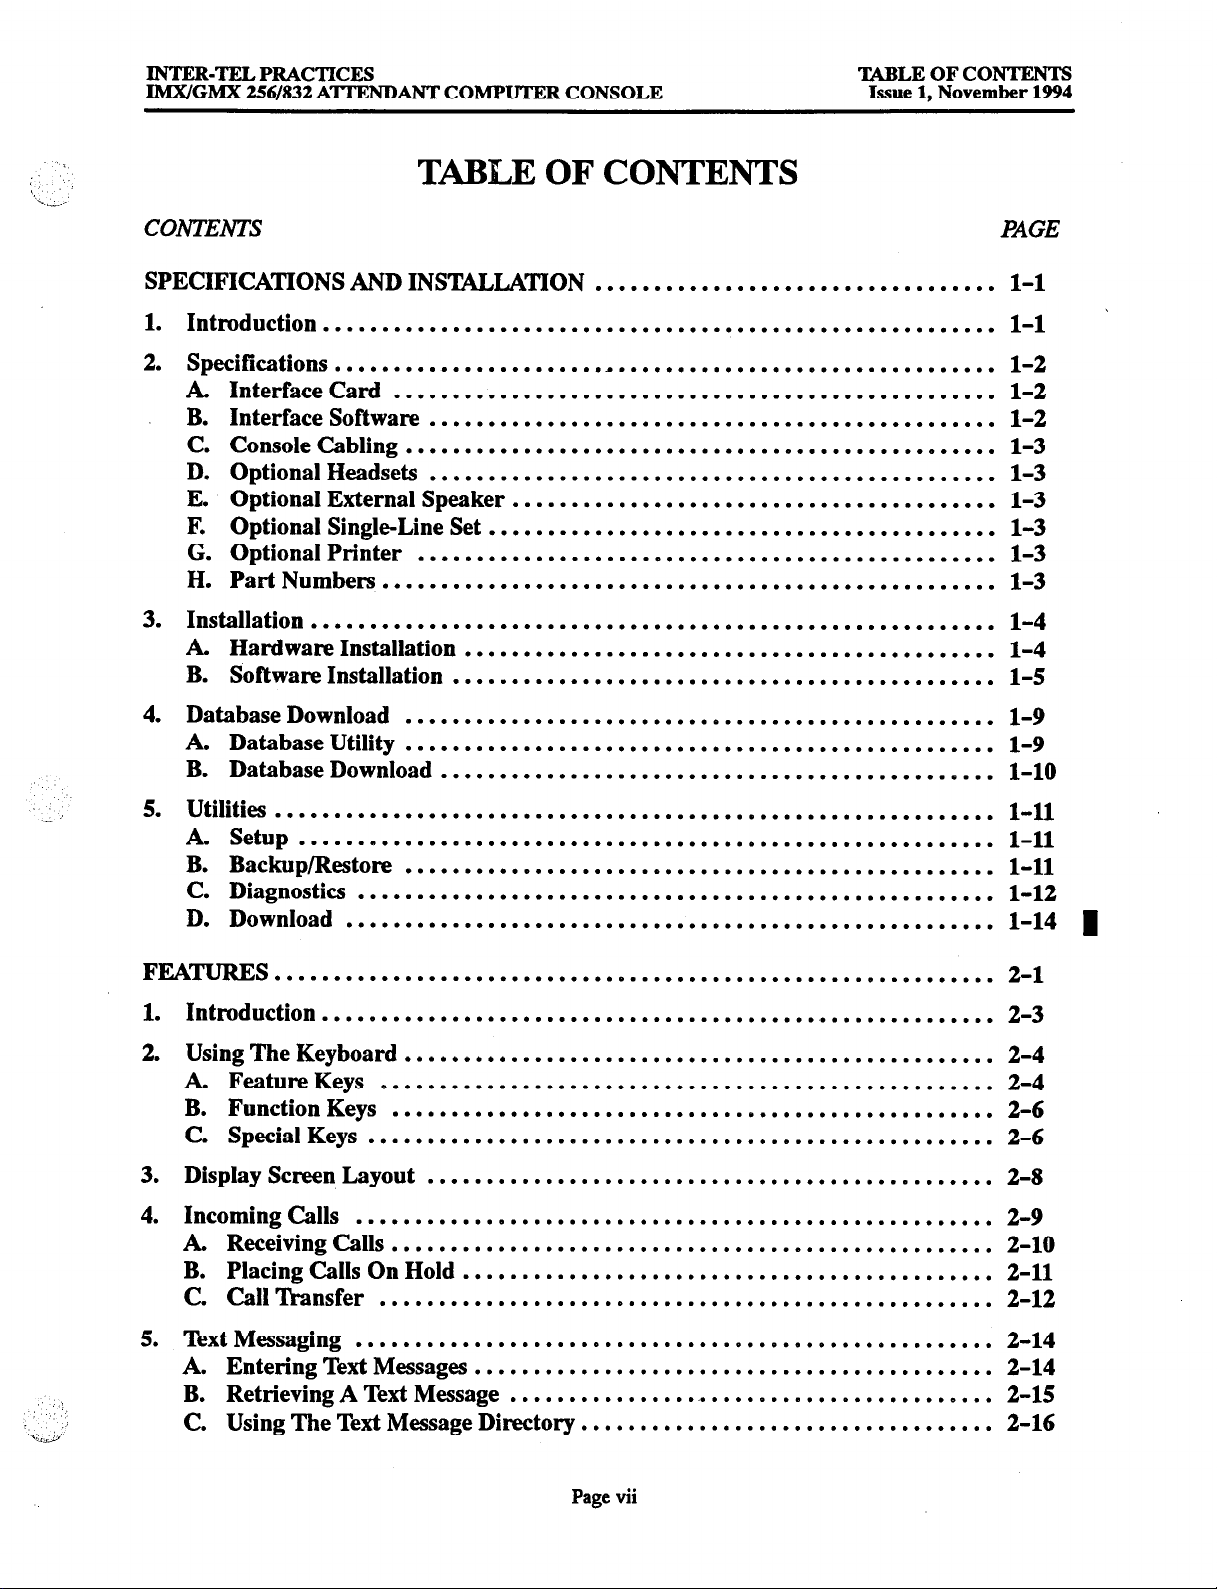
TABLE OF CONTENTS
TABLE OF CONTENTS
Issue 1, November 1994
CONTENTS
SPECIFICATIONS AND INSTALLATION ..................................
1. Introduction .........................................................
2.
Specifications ........................................................
. Interface Card ...................................................
B. Interface Sofiware ................................................
C. Console Cabling ..................................................
D. Optional Headsets ................................................
E. Optional External Speaker .........................................
F. Optional Single-Line Set ...........................................
G. Optional Printer .................................................
H. Part Numbers ....................................................
PAGE
l-l
l-l
l-2
l-2
l-2
l-3
l-3
l-3
l-3
l-3
l-3
3. Installation .......................................................... l-4
. Hardware Installation ............................................. l-4
B. Software Installation .............................................. l-5
4. Database Download
.................................................. l-9
A. Database Utility .................................................. l-9
B. Database Download ............................................... l-10
- ,’
5. Utilities ............................................................. l-11
A. Setup ........................................................... l-11
B. Backup/Restore
.................................................. l-11
C. Diagnostics ...................................................... 1-12
D. Download ....................................................... 1-14
FEATURES ............................................................. 2-l
1. Introduction ......................................................... 2-3
2. Using The Keyboard .................................................. 2-4
. Feature Keys ....................................................
2-4
B. Function Keys ................................................... 2-6
C. Special Keys .....................................................
2-6
3. Display Screen Layout ................................................ 2-8
4. Incoming Calls ...................................................... 2-9
. Receiving Calls ................................................... 2-10
B. Placing Calls On Hold .............................................
2-11
C. Call lkansfer .................................................... 2-12
5. Text Messaging ......................................................
A. Entering Text Messages
............................................ 2-14
B. Retrieving A Text Message .........................................
C. Using The Text Message Directory
................................... 2-16
2-14
2-15
Page vii
Page 5
TABLE OF CONTENTS
Issue 1, November 1994
CONTENTS
INTER-TFLPRAcTIcES
IMX/GMX 256/832 A’ITENDANT COMPUTER CONSOLE
6. Intercom Calls .......................................................
. Intercom Directory
...............................................
B. Placing Intercom Calls ............................................
C Ring Intercom Always
.............................................
D. Intercom Camp On And Busy Station Callback (Queue)
E. Off-Hook Voice Announce (OHVA)
7. Inter-Station Messages
. Leaving Messages
B. Receiving Messages
................................................
................................................
...............................................
.................................. 2-22
8. Outside Calls ........................................................
A. The CO Directory
................................................
B. Placing Outside Calls .............................................
C. ‘Dunk Camp On And Busy Trunk Group Callback (Queue)
D. Account Codes ...................................................
E. Hookilash .......................................................
................
.............
2-19
2-19
2-19
2-21
2-21
2-23
2-23
2-24
2-25
2-25
2-26
2-27
2-27
2-28
9. Reverse Transfer (Call Pick-Up) ........................................ 2-29
10. Conference Calls ..................................................... 2-29
. Placing A Conference Call .........................................
B. Add Parties To A Conference .......................................
C. Exiting A Conference .............................................
2-29
2-30
2-30
11. Barge ..............................................................
12. Call Privacy And Privacy Release .......................................
13. Call Forwarding .....................................................
14. Paging ..............................................................
15. Remove From Paging ................................................. 2-35
16. Do-Not-Disturb
......................................................
17. Reminder Messages ..................................................
1 18. Optional Station Exchange Feature .....................................
19. Operator Statistics ...................................................
20. ‘Dunk Statistics ...................................................... 2-40
21. Attendant Features ...................................................
. Attendant Recall .................................................
B. Placing The System In Night Mode .................................. 2-43
C. Programming System Reminder Messages
............................ 2-43
D. Programming System Do-Not-Disturb Messages .......................
.....................................
........................
........................... 2-45
I
E. Setting Time Of Day And Date
. Enabling Toll Security Database Programming
G. Programming System Speed-Dial Numbers
2-31
2-32
2-33
2-35
2-36
2-37
2-38
2-39
2-42
2-42
2-44
2-44
2-44
Page viii
Page 6
,....1/
INTER-TELPRACTICES
IMX/GMX 256/832 A’ITENDANT COMPUTER CONSOLE
CONTENTS
H. Remote Station Feature Cancel
I. Remote Hunt Group Remove/Replace
J. System Alarm Reporting
. ‘Dunk Maintenance
...............................................
L. Generating An SMDA Report
M. Saving The History Queue
N. Re-Lighting Message Lamps
0. Displaying The Software Version
.....................................
...............................
..........................................
......................................
.........................................
.......................................
....................................
TABLE OF CONTENTS
Issue 1, November 1994
2-45
2-46
2-46
2-47
2-47
2-47
2-47
2-47
22. Custom Configuration
. Interrupting The Configuration Programming Session
................................................
................. 2-48
B. Name ...........................................................
C. Display
.........................................................
D. Calls ...........................................................
E. Features ........................................................
. Message .........................................................
23. Other Console Adjustments
A Volume Controls
B. Selectable Ring Tone
C. Music-On-Hold ‘And Background Music
D. Music And Paging To Speaker
............................................
.................................................
..............................................
.............................
......................................
E. Clear Printer Queue ..............................................
._-,’
2-48
2-48
2-50
2-53
2-58
2-59
2-62
2-62
2-62
2-62
2-63
2-63
Page ix
Page 7
INTER-TJ3.L PRACTICES
IlWVGMX 256/832 ATTENDANT COMPUTER CONSOLE
SPECIFICAmONS AND INSTALLATION
SPECIFICATIONS % INSTALLATION
Issue 1, November 1994
CONTENTS
1. Introduction . . . . . . . . . . . . . . . . . . . . . . . . . . . . . . . . . . . . . . . . . . . . . . . . . . . . . . . . .
2.
Specifications ........................................................
A Interface Card ...................................................
B. Interface Software ................................................ l-2
C. Console Cabling .................................................. l-3
D. Optional Headsets ................................................ l-3
E. Optional External Speaker .........................................
F. Optional Single-Line Set ........................................... l-3
G. Optional Printer
.................................................
H. Part Numbers .................................................... l-3
3. Installation .......................................................... l-4
.
A. Hardware Installation ............................................. l-4
B. Software Installation
4. Database Download
. Database Utility
.............................................. 1-S
.................................................. l-9
.................................................. l-9
Phone Number ................................................. l-9
Baud Bate ..................................................... l-9
Communication Port ............................................ l-9
Time For Automatic Download ................................... l-9
B. Database Download ............................................... l-10
PAGE
l-l
l-2
l-2
l-3
l-3
5. Utilities
A. Setup
............................................................. l-11
........................................................... l-11
B. Backup/I&tore ..................................................
C. Diagnostics
...................................................... 1-12
D. Download .......................................................
1. INTBODUCTION .
NOTE: This Attendant Computer Console Manual is
intended for use in conjunction with the Installation and
Field Maintenance Manual for the IMX and GMX 256
and 4161832 Systems Refer to this manual for information specific to the Attendant Computer Console unit.
Refer to the appropriate system manual for all other system information, including FCC/safety regulations,
warranty information, product overview, specifications,
installation, feature descriptions, system programming,
troubleshooting, and repair/replacement.
1.1 The console unit itself is an IBM-XT, -AI’, or -386
(or compatible) personal computer (PC) that is connected to an available Keyset Card (KSC) circuit on a
256 or 4161832 System. The PC is equipped with a proprietary interface circuit card and special interface software.
1.2 The Attendant Computer Console is primarily designed for use by attendants of larger telephone systems,
especially those where the use of DSS/BLF Units would
be difficult due to the large number of users. However,
due to its enhanced call processing features, such as
electronic text messaging and directory dialing, the console unit is also an attractive option for smaller systems
as well.
l-11
1-14
Page l-l
Page 8
SPECIFICATIONS % INS’MLLATION
Issue 1, November 1994
IMX/GMX 256/832 A’lTENDANT COMPUTEB CONSOLE
INTEB-TELPBACTICES
2. SPECIFICATIONS
2.1 The Attendant Computer Console is an IBM (or
compatible) PC equipped with the following:
0 MS-DOS version 3.3 or above (if using 6.2, do not
use the DoubleSpace or Men&laker utilities)
I
. Minimumof64OkRAM
0 At least 20MB available space on the hard disk drive
l
Double- or high-density, SJ&inch floppy disk drive
0 Hard and Floppy Disk Controller Cards
0 CGA, EGA, or VGA monitor and Monitor Card
0 300/1200/2400-baud, Hayes-compatible, auto-dial
modem and Modem Card
0 Parallel port
0 Capacity to house a full-size (ldbit) circuit card
0 Case-mounted speaker (the speaker cannot be
mounted on the motherboard)
2.2 . The Attendant Computer Console package also
includes the following:
0 Specially designed Interface Card and software
0 122-key custom keyboard with cable
l
Handset with coiled cord
l
Adapter cable
23 Optional equipment that can be used with the console unit includes the following:
0 Headset
l
Floor stand to mount the PC vertically (cable extensions for the monitor and keyboard must be used
when the PC is mounted vertically)
0 External speaker for use when the PC is mounted
vertically in the floor stand (using a standard 6-pin,
6-position modular connector)
Attendant Computer Consoles. Console units camtot be
installed on Digital Keyset Card (DKSC) circuits or
KSC-D circuits that have been designated for “dualcircuit” 8-line AIM keyset use.And, although the Attendant Computer Console is installed on a keyset circuit, it
should not be associated with a DSS/BLF Unit.
B. INTERFACE SOFTWARE
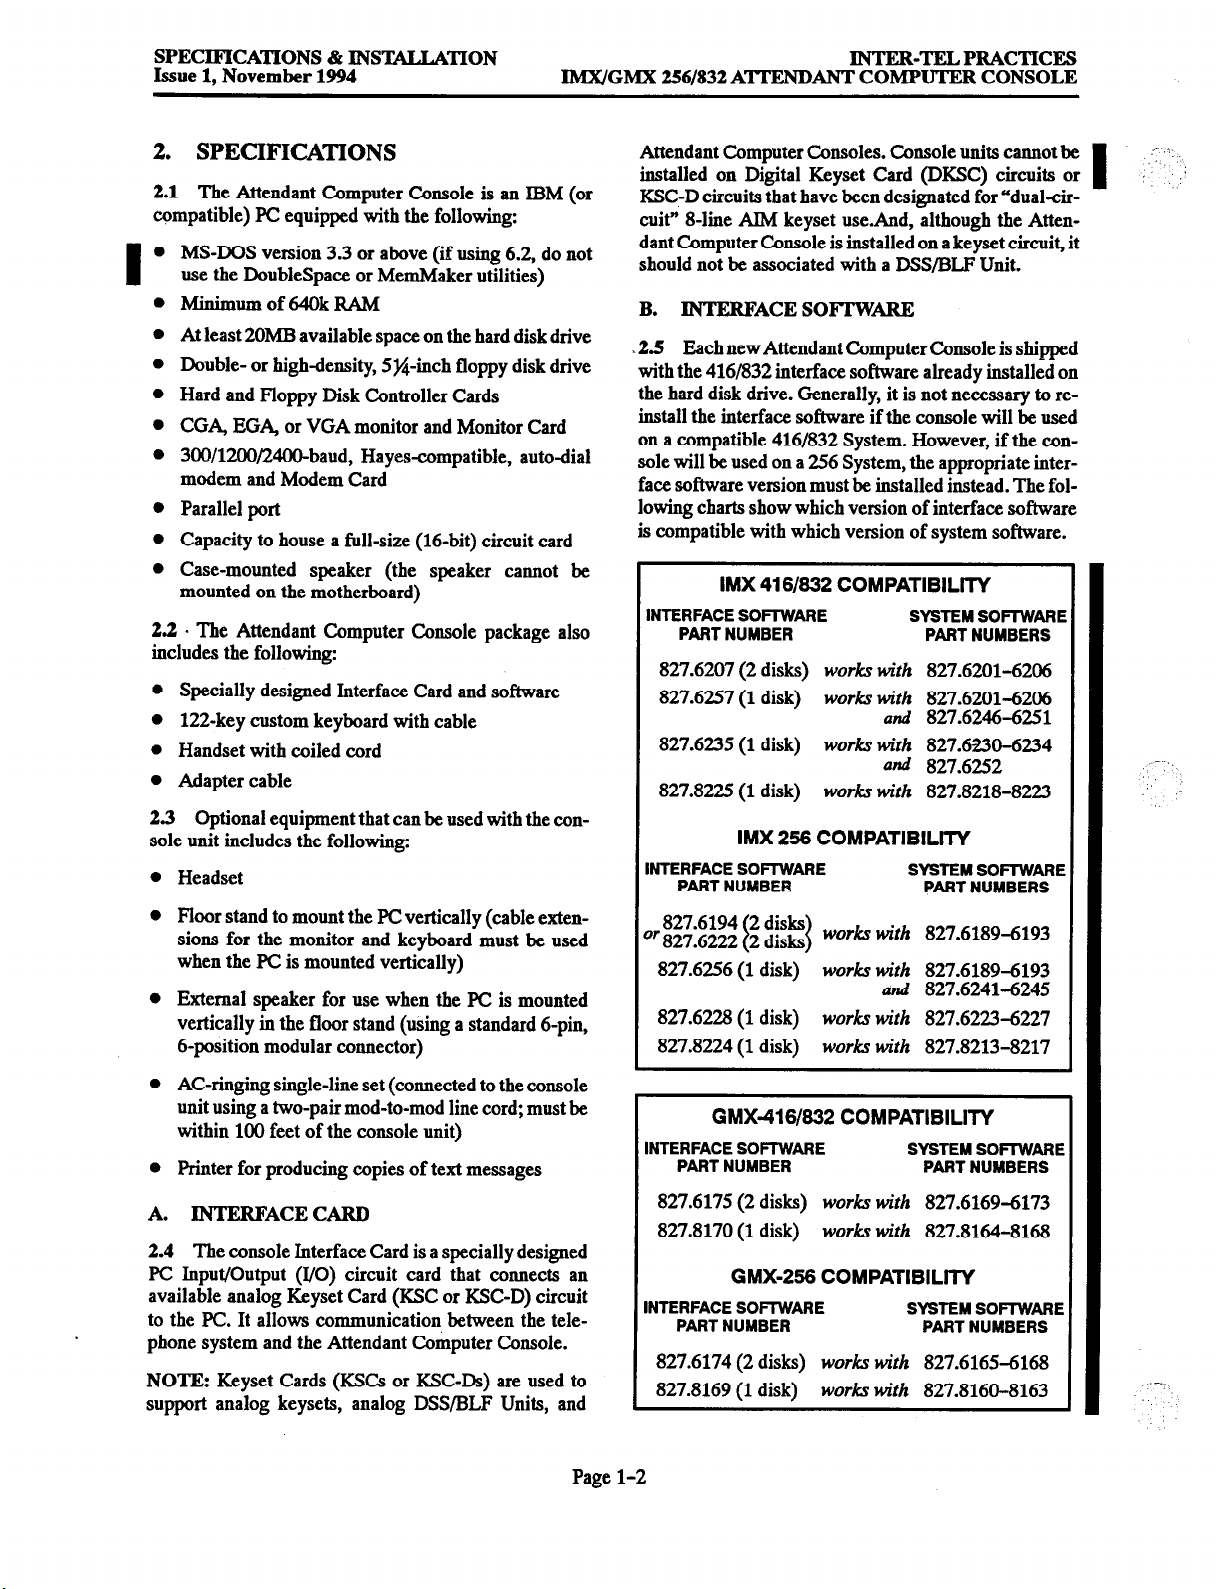
-2.5 Each new Attendant Computer Console is shipped
with the 416/832 interface software already installed on
the hard disk drive. Generally, it is not necessary to reinstall the interface software if the console will be used
on a compatible 4161832 System. However, if the console will be used on a 256 System, the appropriate interface software version must be installed instead. The following charts show which version of interface software
is compatible with which version of system software.
IMX 416/632 COMPATlBlLlTY
INTERFACE SOFIWARE SYSTEM SOFTWARE
PART NUMBER PART NUMBERS
827.6207 (2
827.6257 (1 disk)
827.6235 (1 disk)
827.8225
NTERFACE SOFTWARE SYSTEM SOFIWARE
PART NUMBER PART NUMBERS
or ;;;;;;; ; 2;: works with
.
827.6256 (1 disk)
disks) works with 827.6201-6206
works with 827.6201-6206
and
827.6246-6251
works with 827.6230-6234
ad 827.6252
works
with
(1 disk)
IMX 266 COMPATIBILlTY
I 1
works
827.8218-8223
827.6189-6193
with
827.6189-6193
and 827.6241-6245
827.6228 (1 disk) works
827.8224 (1 disk)
with 827.6223-6227
works
with
827.8213-8217
.-., :
.‘.
.,
:
:
I
l
AC-ringing single-line set (connected to the console
unit using a two-pair mod-to-mod line cord; must be
within 100 feet of the console unit)
l
Printer for producing copies of text messages
A. IN-IWWACECARJI
2.4 The console Interface Card is a specially designed
PC Input/output (I/O) circuit card that connects an
available analog Keyset Card (KSC or KSC-D) circuit
to the PC. It allows communication between the tele-
phone system and the Attendant Computer Console.
NOTE: Keyset Cards (KSCs or KSC-Ds) are used to
support analog keysets, analog DSS/BLF Units, and
Page l-2
GMX-4116/632 COMPATIBILITY
INTERFACE SOFTWARE SYSTEM SOFIWARE
PART NUMBER PART NUMBERS
827.6175 (2 disks)
827.8170 (1 disk)
GMX-266 COMPATlBlLlTY
INTERFACE SOFIWARE SYSTEM SOFIWARE
PART NUMBER PART NUMBERS
827.6174 (2 disks)
827.8169 (1 disk)
works
works
works
works
with
827.6169-6173
with
827.8164-8168
with
827.6165-6168
with
827.8160-8163
Page 9
INTER-TELPRACTICES
JMXIGMX 256/832 A’ITENDANT COMPUTER CONSOLE
SPECIFICATIONS & INSTALLATION
Issue 1, November 1994
C. CONSOLE CABLING
2.6 For each console unit, industry-standaxd, threepair (24 AWG) twisted cable is run from the station location to the MDF. All station cables are terminated on
blocks at the MDF and on six-conductor modular jack
assemblies at the station locations.
2.7 The loop limit for the Attendant Computer Console cabling is 103 ohms/2000 feet (609 m.). Refer to the
256 or 4161832 System manual for procedures on performing the station loop resistance test.
D. OPTIONAL HEADSETS
2.8 A headset may be attached to any Attendant Computer Console in place of the handset. The console units
are compatible with industry-standard, four-conductor,
modular headsets that have dynamic microphones, or
carbon-microphone headsets that are connected to the
console unit through an externally powered jackset
(which makes the headset dynamic-compatible).
E. OPTIONAL
EXTERNALSPEAKER
2.9 If desired, an external (8-ohm, l-watt) speaker
may be attached to the Attendant Computer Console.
This speaker is used in place of the internal PC speaker
for alerting tones and signals. If an external speaker is
used, the internal speaker
must be
disconnected.
some older units, the printer port was located on the
Monitor Card. Ifthe console unit does not have a printer
port, a Parallel Printer Adapter Card is required (part
number 440.5075). Installation instructions are shipped
with the card. The proper jumper setting for use on the
Attendant Computer Console is “LPTB” (JPl is set in
position 2).
H. PARTNUMBERS
2.14 The part numbers for some of the major console
components (at the time of this publication) are shown
in the table below.
2.10 To connect an external speaker, attach the speak-
er cables to the Y and BK terminals (pins 2 and 5) on a
six-conductor modular jack assembly. Then use a modto-mod line cord to connect the modular jack assembly
to the PC (jack J7).
F. OPTIONAL SINGLE-LINE SET
2.11 A single-line set can be connected to a jack on the
PC modem card to be used as a courtesy lobby phone or
auxiliary phone. It must have an AC ringer and the line
cord must be no longer than 100 feet.
G. OPTIONAL PRINTER
2.12
An optional IBM-compatible parallel printer can
bc installed to allow the attendant to print text messages.
2.13 With newer console units (using the DFI PC), the
printer port is located on the Disk Controller Card. With
Page l-3
Page 10
SPECIFICATIONS & INS’MLLATION
Issue 1, November 1994
lMX/GMX 256/832
A’ITEND ANT COMPUTER CONSOLE
JNTER-TELPRAcTIcES
3.
INSTALLATION
A. HARDWARE IMXALLATlON
3;l The AC power outlet for the console unit must
have a third-wire ground, and the 256 or 416/832 Sys-
tem must be properly grounded. If both ground connec-
tions are nof complete, the Attendant Computer Con-
sole may not work correctly.
3.2 TO AissEhmLEm ATTENDANT
COMPiJlER CONSOLE:
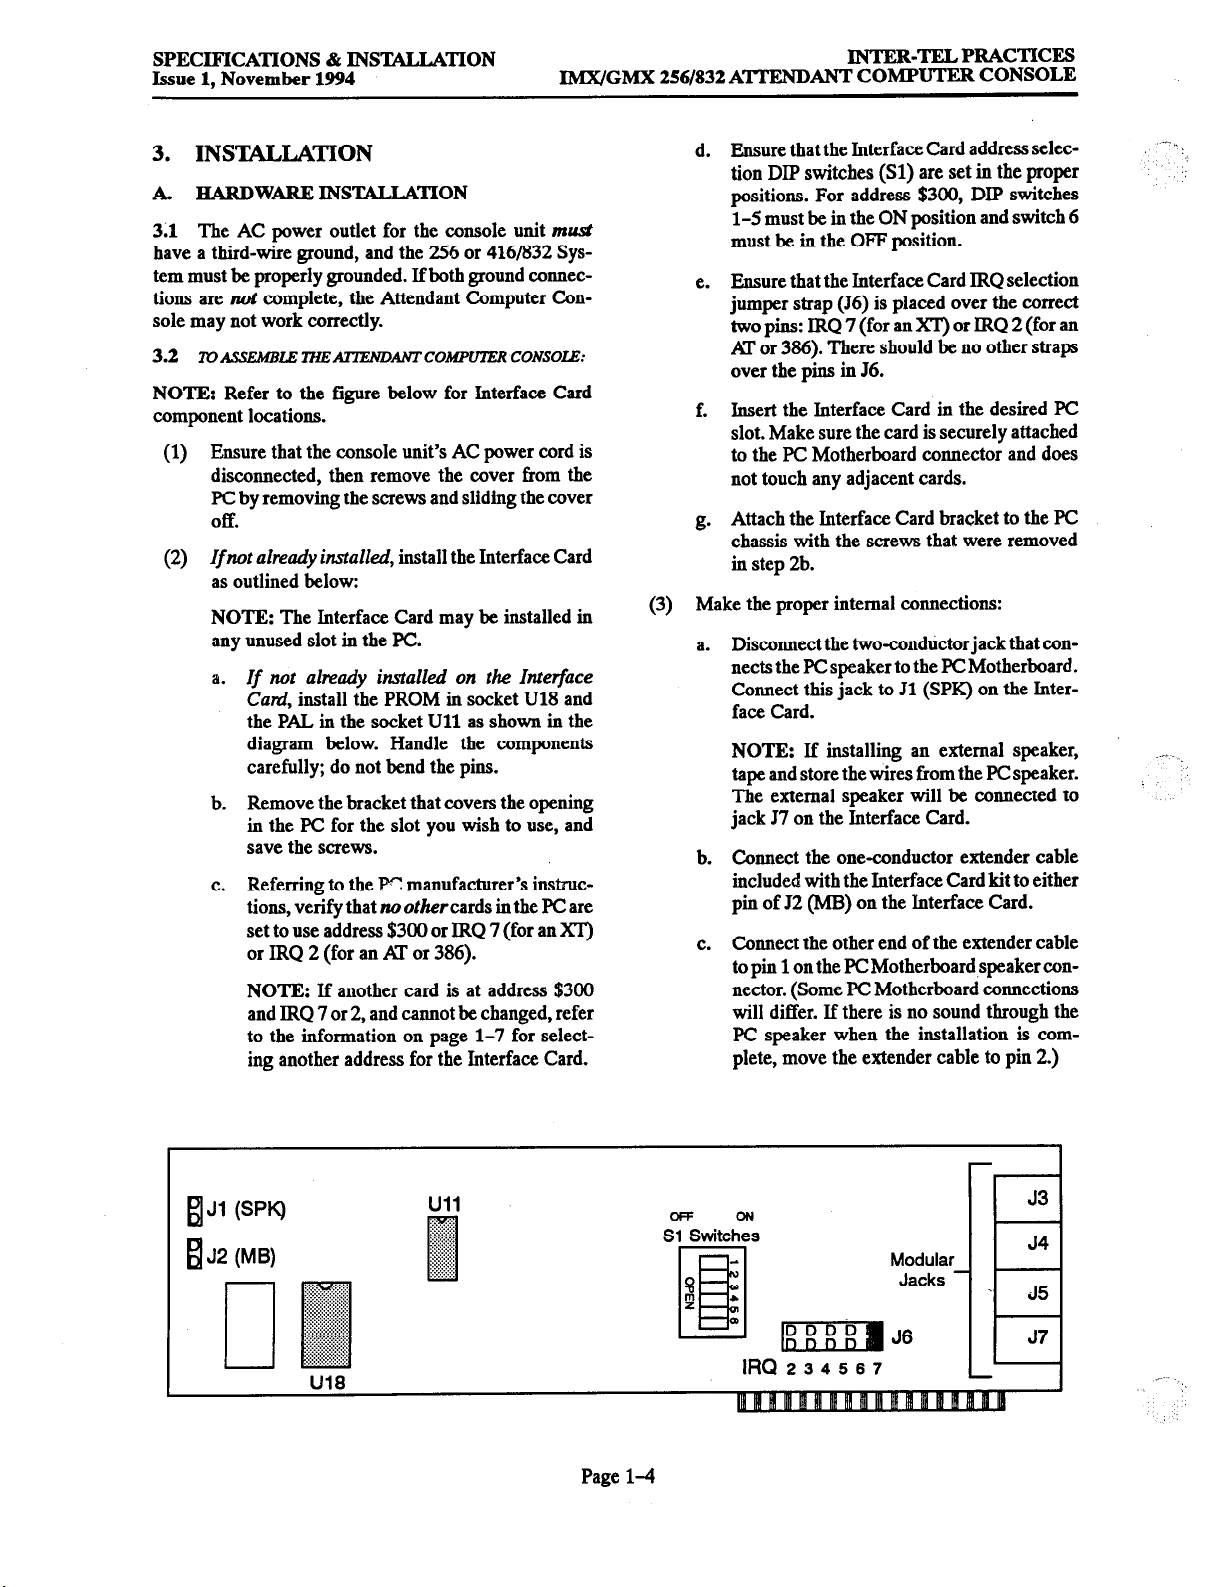
NOTE: Refer to the figure below for Interface Card
component locations.
(1) Ensure that the console unit’s AC power cord is
disconnected, then remove the cover from the
PC by removing the screws and sliding the cover
Off.
(2)
If
nor aZready instded, install the Interface Card
as outlined below:
NOTE: The Interface. Card may be installed in
any unused slot in the PC.
a.
If mt
already installed on the Interface
CUR& install the PROM in socket U18 and
the PAL in the socket Ull as shown in the
diagram below. Handle the components
carefully; do not bend the pins.
b.
Remove the bracket that covers the opening
in the PC for the slot you wish to use, and
save the screws.
c.
Referring to the P? manufacturer’s instructions, verify that no other cards in the PC are
set to use address $300 or JRQ 7 (for an XT)
or IRQ 2 (for an AP or 386).
NOTE: If another card is at address $300
and IRQ 7 or 2, and cannot be changed, refer
to the information on page l-7 for select-
ing another address for the Interface Card.
d. Ensure that the Interface Card address selec-
tion DIP switches (Sl) are set in the proper
positions. For address $300, DIP switches
l-5 must be in the ON position and switch 6
must be in the OFF position.
e. Ensure that the Interface Card IRQ selection
jumper strap (J6) is placed over the correct
two pins: IRQ 7 (for an XT) or IRQ 2 (for an
Al” or 386). There should be no other straps
over the pins in J6.
f. Insert the Interface Card in the desired PC
slot. Make sure the card is securely attached
to the PC Motherboard connector and does
not touch any adjacent cards.
g. Attach the Interface Card bracket to the PC
chassis with the screws that were removed
in step 2b.
(3) Make the proper internal connections:
a.
Disconnect the two-conductor jack that con-
nects the PC speaker to the PC Motherboard.
Connect this jack to Jl (SPK) on the Jnterface Card.
NOTE: If installing an external speaker, ..~. __
tape and store the wires from the PC speaker.
The external speaker will be comtected to
jack J7 on the Interface Card.
b. Connect the one-conductor extender cable
included with the Interface Card kit to either
pin of J2 (MB) on the interface Card.
c.
Connect the other end of the extender cable
to pin 1 on the PC Motherboardspeaker connector. (Some PC Motherboard connections
will differ. If there is no sound through the
PC speaker when the installation is complete, move the extender cable to pin 2.)
.-.. :..
Page l-4
ci=F ON
Sl Switches
Modular
Jacks -
Page 11
INTER-TELPRACTICES
IMX/GMX 256/832 A’ITENDANT COMPUTER CONSOLE
SPECIFICATIONS & INSTALLA~ON
Issue 1, November 1994
._,.c-’
:,,
Set the PC Modem Card with the following
(4)
parameters: COM Port 2, DIR and DCD
followed by the modem, and auto answer.
Replace the cover on the PC and re-install the
(5)
screws.
Plug one end of a two-pair mod-to-mod line cord
(‘5)
into jack 54 on the Interface Card. Plug the other
end of the line cord into the jack labeled
“WALL” on the PC Modem Card.
Check the setting of DIP switch 1 on the bottom
of the keyboard.
should bc in the OFF position.
If
connected to anXT,
Zf connected to an
AT or 386, the switch should be in the ON posi-
tion.
Comect the keyboard cable, monitor cable, and
@I
power cable according to the PC manufacturer’s
instructions.
Before mounting the modular jack assembly and
(9)
connecting the console, measure the voltage on
the RED terminal of the modular jack assembly
with respect to the GREEN terminal. (Ihe “common” probe of the voltmeter is placed on the
GREEN terminal.) It must measure +3OVDC
(&:ZOVDC). If -30VDC is measured, check the
cabling for a reversed pair. Ifthe power pair is reversed, the console will not operate.
Mount the modular jr ::k assembly on the wall.
(10)
Plug one end of the six-conductor line cord into
(11)
jack 53 on the Interface Card. Plug the other end
of the line cord into the modular jack assembly
mounted in step 10.
Plug the handset cord (or headset cord, if used
(12)
instead) into jack J5 on the Interface Card.
Zf
using
(13)
an extenuzl speaker,
plug its line cord
into jack 57 on the Interface Card.
the switch
B. SOFTWXRE INSTALLATION
3.3
‘ho floppy disks, one with 256 interface software
and one with 416/832 interface software, are provided
so that the console can be installed on either system.
NOTE: Although the console’s hardware is the same for
both systems, the interface software is different. The
console will not jhction unle.ss the appropriate inter-
face software is installed
For information on software
compatibility, refer to section B on page l-2.
Initial Software Installation
3.4
lC’LW.‘CYLL lHEINlEREACE SOFl’MRE, IF?ZEC-:
If
(1)
not already installed,
load DOS onto the hard
drive.
NOTE: When installing MS-DOS 6.2, do
not
use the DoubleSpace or MemMaker utilities.
Insert the Installation Disk (1 of 1) into the con-
(2)
sole unit’s floppy disk drive.
NOTE: Rather than two 360k floppy disks, the
new console software is contained on
one
1.2MB
floppy disk.
At the C: prompt, type “a:install” and press EN-
(3)
TER. (The monitor displays “Installing Atten-
dant’s Console software, please wait...“, followed by a series of installation messages and
PromPW
Follow the on-screen instructions. (When the in-
(4
stallation is complete, the monitor displays
“Attendant’s Console software has been in-
stalled. The Attendant’s Console will need to be
restarted. Remove the installation disk from the
disk drive. Strike a key when ready.“)
Remove the Installation Disk and press any key
(5)
on the keyboard to begin the power-up sequence.
Allow the PC to complete its power-up sequence
(6)
(wait for the Attendant Computer Console dis-
play screen and “Station is Idle” message).
console unit hesnot complete theproperpowerup sequence,
contact Customer Support.
If the
I
I
.’
‘. .,:..“G
If installing an auxiliary single-line
(14)
end of a mod-to-mod line cord into the jack
labeled “PHONE” on the PC Modem Card. Plug
the other end of the line cord into the single-line
set.
Turn on the console unit’s AC power switch.
(15)
set, plug one
Perform the database configuration procedures
0
as described on page l-9.
Perform the database download procedures as
(8)
described on page l-10.
When the database download is complete, the
(9
unit should be a functional Attendant Computer
Console. However, before using the unit, the
If necessary,
(16)
:’
software as described in the next section.
install the appropriate interface
attendant should perform the configuration procedures beginning on page 2-48.
Page l-5
Page 12
SPECIFICATIONS % INSTALLATION
Issue 1, November 1994
INTER-TELPRACTICES
IMX/GMX 256/832 ATTENDANT COMPUTER CONSOLE
Removing Existing Interface Software (If
Necessary)
3.5 When upgrading from one 416B32 interface soft-
ware version to another 416/832 interface software version, no special installation procedure is required. Simply install the new software as outlined on the previous
page. This same easy installation method also applies
when upgrading from one 256 interface software version to another 256 interface software version.
3.6 However, when switching from 416/832 interface
software to 256 interface software (or vice versa), or
when reverting back to a previous version of interface
software (no matter what the system), certain existing
interface software files and directories must first be removed as outlined below.
3.7
To REMOVE EyIslzNG ,WlEREACE SOFTMRE, IF NEC-
-
Turn on the console unit’s AC power switch and
(1)
allow the console to complete the power-up sequence (wait for the Attendant Computer Console display screen and *Station is Idle” message).
press the GIRL, SHlFT, and X keys all at the
(2)
same time. (The monitor displays the “C:\OP-
TERM>” prompt.)
At the C:\OPTERM> prompt, type “de1 opera-
(3)
tor” and press ENTER to delete all of the files
within the operator directory. (The monitor dis-
plays “Are you sure (y/n)?“)
Type “y” and press ENTER. (The monitor dis-
(4)
plays the “C:\OPTERM>” prompt.)
Repeat steps 3 and 4 for any of the following
(5)
directories that exist within the opterm directory:
-l3
history
help
busytmk
event
tmp\operator
outgomg
NOTE: Depending on the version of interface
software already installed, one or more of these
directories may not exist within the opterm
directory. If so, proceed to the next directory on
the list.
At the C:\OPTERM> prompt, type “rd operator”
(6)
and press ENTER to remove the operator directory. (The monitor displays the “C:\OFIERM>”
prompt.)
Repeat step 6 for any of the following directories
(7)
that exist within the opterm directory:
txtmsg
hiStOry
help
NOTE: Depending on the version of interface
software already installed, one or more of the
above directories may not exist within the op
term directory. If so, proceed to the next directo-
ry on the list.
At the C:\OP’IERM> prompt, type “de1 l .*” and
(8)
press ENTER to delete all the remaining files
within the opterm directory. (The monitor displays “Are you sure (y/n)?“)
Type “y” and press ENTER. (The monitor dis-
(9)
plays the “C:\OPTERM>” prompt.)
At the C:\OPTERM> prompt, type “cd..” and
w-9
press ENTER. (The monitor displays the C drive
programming prompt %k”.)
NOTE: It is not necessary to delete the opterm
directory itself. Also, be careful not to delete or
remove any other files or directories that may reside on the hard disk drive.
Install the appropriate interface software as out-
(11)
lined on the previous page.
busytmk
event
outgoing
tmp\operator
tmP
---,,
: !
‘.
_ ._
,,
Page l-6
Page 13
INTER-TEL PRACTICES
IMX/GMX 256/832 ATI’ENDANT COMPUTER CONSOLE
SPECIFICATIONS & INSTUTION
Issue 1, November 1994
\ I
. ...,,:,
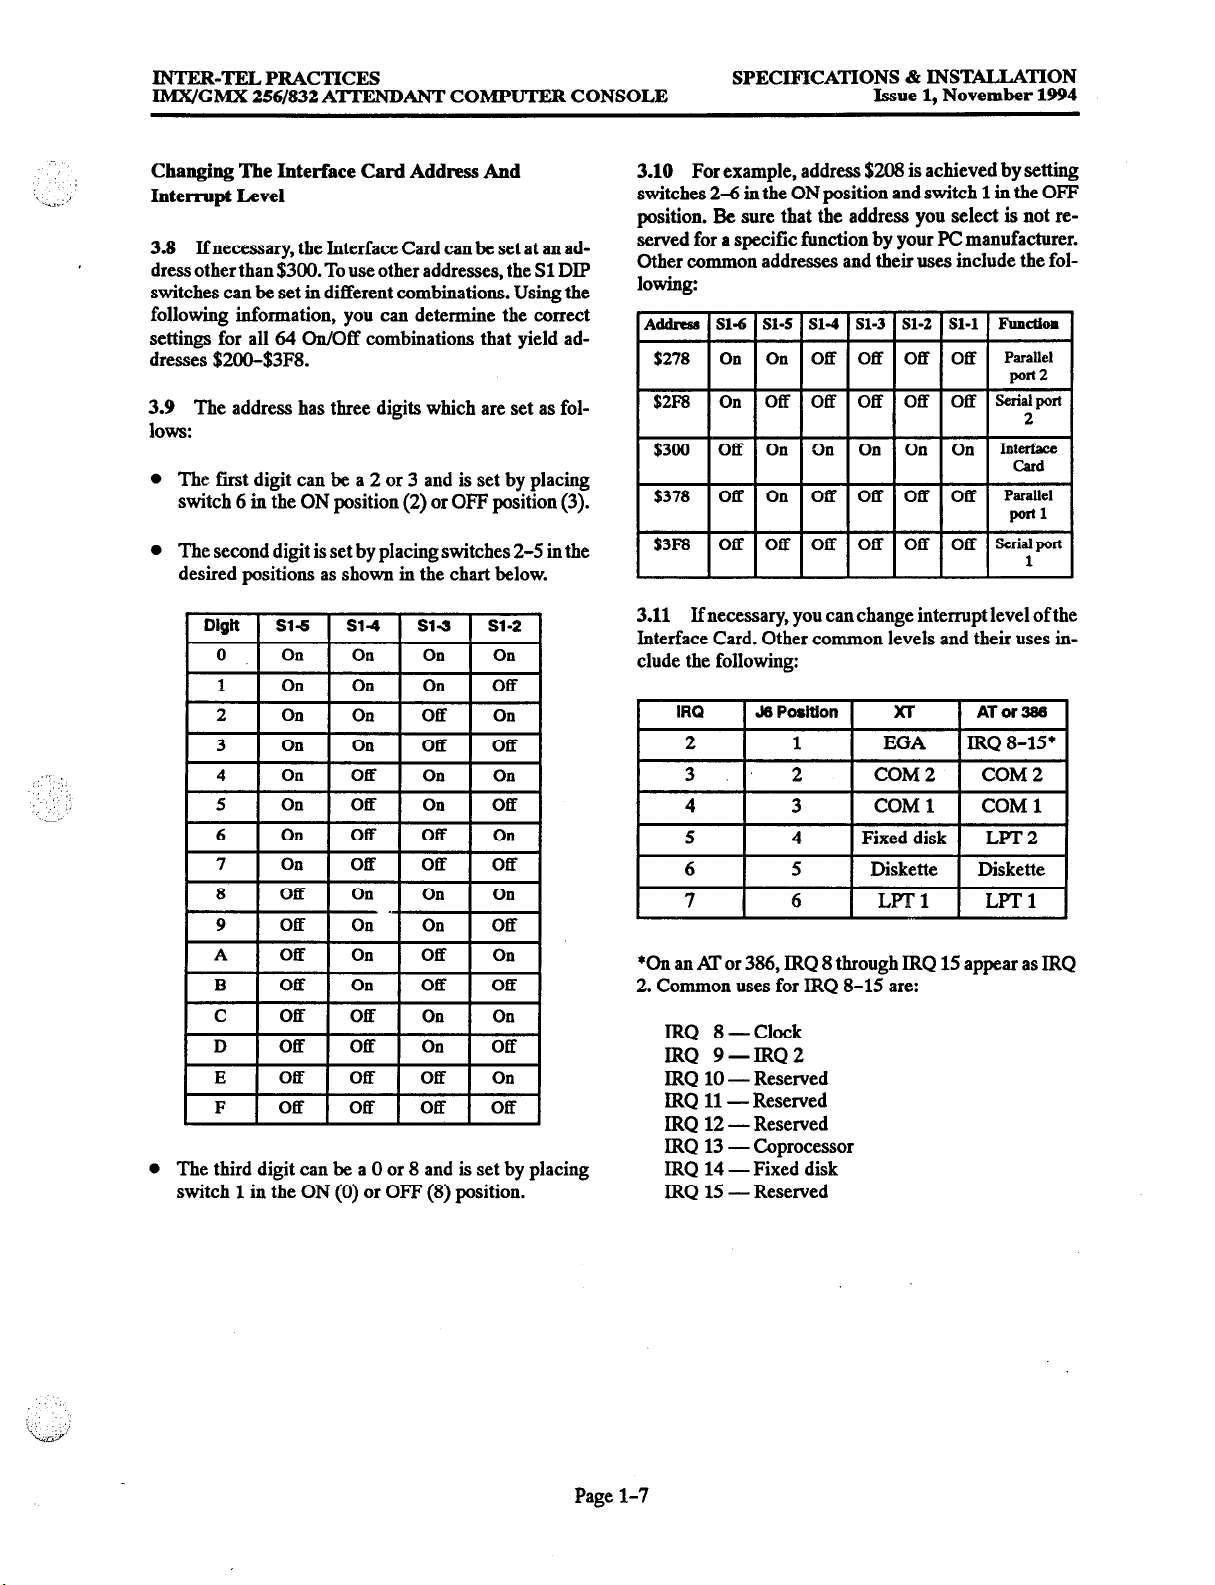
Changing The Interface Card Address And
Interrupt Level
3.8 Ifnecessary, the Interface Card canbe set at an address other than $300. To use other addresses, the Sl DIP
switches can be set in different combinations. Using the
following information, you can determine the correct
settings for all 64 On/Off combinations that yield addresses $200-$3F8.
3.9 The address has three digits which are set as follows:
l
The first digit can be a 2 or 3 and is set by placing
switch 6 in the ON position (2) or OFF position (3).
l
The second digit is set by placing switches 2-5 in the
desired positions as shown in the chart below.
Diglt 1 Sib 1 S14 1 Sl-2 1 S1-2 1
3.10 For example, address $208 is achieved by setting
switches 2-6 in the ON position and switch 1 in the OFF
position. Be sure that the address you select is not reserved for a specific function by your PC manufacturer.
Other common addresses and their uses include the following:
3.11 If necessary, you can change interrupt level of the
Interface Card. Other common levels and their uses include the following:
_:-I’ ::,
‘,
.L
‘, ::
5 On off On off
6 On off off On
7
8 Off On On On
I g
A off On off On
B Off On Off Off
F 1 Off 1 Off 1 Off 1 Off
On Off Off Off
1
Off 1 On 1 On 1 Off
I I
I
I
0 The third digit can be a 0 or 8 and is set by placing
switch 1 in the ON (0) or OFF (8) Position.
*On an Al’or 386, IRQ 8 through IRQ 15 appear as IRQ
2. Common uses for IRQ 8-15 are:
IRQ 8 -Clock
IRQ 9-IRQ2
IRQ 10 - Reserved
IRQ 11 - Reserved
IRQ 12 - Reserved
IRQ 13 - Coprocessor
IRQ 14 - Fixed disk
IRQ 15 - Reserved
Page l-7
Page 14

SPECIFICATIONS & INSTALLA’I’ION
Issue 1, November 1994
IMX/GMX 256/832 ATTENDANT COMPUTER CONSOLE
INTER-TELPRACTICES
Special Key Sequences
3.12
Occasionally, special circumstances arise in
which you may need
to clear the
keyboard buffer (user
error, after an object has rested against the keyboard,
etc.). To clear the buffer, press the CTRL and C keys at
the same time.
3.13 If desired, you can access the DOS prompt by
pressing CTRL, SHlFT, and X simultaneously (if a MAJOR ALARh4 display is showing, press CTRL and C).
The console will not be able to place or receive calls until the Attendant Console function is re-enabled. To return to the Attendant Console function, type “opterm”
and press ENTER when the C:\OPTERM prompt is dis-
played.
3.14 Another key sequence can be used to reboot the
PC. Before the keyboard driver has been loaded, you
must press CTRL, ALT, and SPLIT at the same time.
Once the keyboard driver has been loaded, CPRL, ALT,
DEL will reboot the system. USE THIS KEY SEQUENCE WlTH CAUTION. IT WILL REBOOT
THE AlTENDANT COMPVT.ER CONSOLE.
3.15 If a printer is attached to the PC, pressing CTRL,
ALT, and PAGE at the same time will print the screen
being viewed.
3.16 When troubleshooting the console, error messages can be enabled by pressing GIRL, SHlFI’, and E
at the same time. This will cause any error messages to
be displayed on the monitor as they occur. To disable the
error messages, press CTRL, SHIFT, and E again.
3.17 Service personnel may request that the error history information be stored immediately on the console
hard disk. If so, press the CI’RL, SHlFI’, and D keys at
the same time. This will disable the buffer and the transient display will show “History Input Buffering Is Disabled.” To reenable the buffer when requested, repeat
the CTRL-SHIFT-D command. The transient display
will then show “History Input Buffering Is Enabled.”
3.18 If the console “locks up” and the alarm message
shows “ALARM: OTIC board reset,” turn the power
switch of the console PC off for several seconds and then
on again.
Page l-8
Page 15
INTER-TEL PRACTICES
IMXIGMX 256/832 ATTENDANT COMPUTER CONSOLE
SPECIFICATIONS & INSTALLATION
Issue 1, November 1994
:
.Lj.’
: ,
,, 1.
‘,...:.:’
4. DATABASE DOWNLOAD
4.1 The Attendant Computer Console database is
derived from the system database. Information is transferred to the console by performing a database down-
load.
Phone Number
4.8
To PROGRAM THE SKYTEM MODEMNUMBER FOR THE
DAIXBASEDO-AD:
(1) Press CONPG and then the F6 key to select
“Database.“Alist of options appears in the lower
half of the screen.
4.2 A download must be performed when the console
is first installed and when any changes are made in the
system database through the system programming monitor. (Information programmed at the console is automatically communicated to the system.)
4.3 When the Attendant Computer Console is
installed on a 4161832 System, a download cannot be
performed while any other programming session is in
progress. If the system has an active remote or on-site
session, wait for the programmer to exit before attempt-
ing the download.
(2) Press Fl to select “Phone Number.” The screen
Prompts you to enter the “Modem Download
Number.”
(3) Enter the extension number of the system
modem (default is 2600 for 4161832 and 271 for
256) and press ENTER. The “Modem Options
for Database Download” window returns.
Baud Rate
4.9
To SET THE BAUD RATE FOR lHE DAZUMSE DOWN-
LOAD:
(1) Press CONPG and then the F6 key to select
4.4 When the Attendant Computer Console is
installed on a 256 System, the download can be per-
“Database.“Alist of options appears in the lower
half of the screen.
formed any time that the modem is available.
(2) Press P2 to select “Baud Rate.” The screen
4.!5 If desired, an automatic daily download can be
programmed to take place by setting the desired download time as described below. Communications parame-
:.
ters are also explained below. Instructions for performing a backup are shown on page l-11.
4.6 If the Attendant Computer Console is not
equipped with a modem, a manual database download
can be performed. Refer to the PROGRAMMING section of the IMX/GMX 256 c‘ 4161832 System manual
for instructions.
prompts you to “Select Baud Rate for Database
Download.”
(3) Press a key (Fl-F6) to select the desired baud
rate (default is 1200). The available baud rates
are 300, 1200, 2400, 4800, 9600, and 19200
baud. The “Modem Options for Database Download” window returns.
Communication Port
4.10
To DEllZRUWE UWICH PORT LYE CONSOLE USES To
PERF0RMlHEDOiwLOAv:
I
NOTE: If the system database is changed and no longer
matches the console database, if devices are programmed without extension numbers, or cabling problems prevent proper communication, the console will
generate an alarm message. The message “Database Inconsistency - Download To Clear” will be displayed
until a download is performed or the console is reset. To
reset the console, press CTRL, SHIFT, and X simulta-
neously; to return to the Attendant Console function,
type “opterm” and press ENTER when the C:\OPTERM
prompt is displayed. See page l-10 for download procedures.
A. DATABASE-
4.7 The Database Utility is used for setting the communications parameters for the database download and
for setting the time for the automatic daily database
download. Press CONPG and then F6 to program the
following parameters.
Page l-9
(1) Press CONFG and then the F6 key to select
“Database.” A list of options appears in the lower
half of the screen.
(2) Press P3 to select “Port.” The screen prompts
you to “Select Communication Port for Download.”
(3) Press Fl for communication port 1 or P2 for port
2 (default is COM2). The “Modem Options for
Database Download” window returns. (rf you
change the COM port, make sure the DIP
switches on the console’s modem are configured
correctly.)
Time For Automatic Download
4.11
TO SET THE lZUE FOR lHE AIYKMX’TC DALW DAIX-
EASEDOlT?NLOAD:
(1) Press CONPG and then the F6 key to select
“Database.“Alist of options appears in the lower
half of the screen.
Page 16
SPECIFICATIONS & INSTALLATION
Issue 1, November 1994
IMX/GMX 256/832 ATTENDANT COMPUTER CONSOLE
INTER-TELPRACTICES
(2) Press F4 to select “Time.” The screen prompts
you to “Enter the Time to Begin Database Download.”
(3) Enter the time in the indicated format with the
hours and minutes separated with a colon (for ex-
ample, “13:OO” or“l:OOpm”) and pressENTER.
The “Modem Options for Database Download”
window returns. (If you wish to disable the auto-
matic
afownlo~
erase the current entry and do
not enter a time before pressing ENTER.)
NOTE: Do not set the time for “290 am”. Other
system functions are preprogrammed to take
place at that time, which cause conflicts.
B. DA’MBASE DOWNLOAD
4.12 A database download can be performed at any
time using the following procedure. However, during a
download, the Attendant Computer Console cannot be
used for placing or receiving calls. Therefore, it is recommended that you perform the download before or after regular business hours, or forward the console station
to another station before performing the download. A
download will take between 2.5 and 5 minutes depend-
ing on the size of the 256 or 416/832 system database.
4.13
To PERFORMA D ATABASEDOUMOAD:
(1) Press the FEAT key and then press F3 to select
“Database Download.” The transient display
shows “Database Download” and gives the following messages while the download is in progress:
a. Initializing modem
b. Waiting for carrier (you may hear the console
dial and access the system modem)
c. Waiting for login
d. Downloading database... (this may take sev-
eral minutes)
e. Download complete
NOTE: You can cancel the download at any
stage by pressing the ESC key. The transient display will show “Aborting Download.”
(2) After the “Download Complete” message, the
screen resets. When the “Station is Idle” message appears with a flashing period at the end of
the message, the console is fully functional and
ready for use.
Page l-10
Page 17
INTER-TEL PRACTICES
IMX/GMX 256/832 ATIYENJIANT COMPUTER CONSOLE
SPECIFICATIONS % INSTALLATION
Issue
1, November 1994
._-, ,,
‘_’
<< IMX 256/632 Attendant’s Console Interface Card Utility Program >>
<< Part Number: 627.6xXx o/l .O) >>
+z Release Date and Tme: XXWWX XXXX >>
-uP
Displays how the interface card is configured.
Utilities Hard disk backup and restore: Maintenance.
Diagnostics Perform interface card diagnostics.
Download Perform multiple downloads.
Quit Exit to DOS.
5. UTILITIES
5.1 The Attendant Computer Console software contains a utilities program that allows the installer or con-
sole user to check the Interface Card configuration, to
save the console data on a floppy disk or restore the data
from the floppy disk, and to run a self-test on the console
hardware.
NOTE: The console cannot place or receive calls while
the utility program is being used.
5.2 To access the utility routines, press CTRL, SHIFT
and X simultaneously to display the DOS prompt
(C:\OFIERM>). Then type “ACUTL” and press ENTER. The window shown above appears.
5.3 To select a routine, first highlight it by pressing the
first letter of the routine name (S, U, D, or Q) or use the
arrow keys to move the highlight to the desired routine.
Then press ENTER. The routines are described separately in the following paragraphs.
5.4 When finished, select Quit to return to the DOS
prompt. To return to the Attendant Console function,
type OPTERM and press ENTER when the C:\OPTERM> prompt is displayed.
A. SETUP
5.5 When “Setup” is selected from the window shown
above, the screen shows the Interface Card configura-
tion. It lists the firmware version, if available, and the
address and interrupt level of the card. Ensure that this
information matches the settings selected in the proce-
dures on page l-4, paragraph 3.2. After viewing the in-
formation, press any key and the display will return to
the window shown above.
B. BACKUP/RESTORE
5.6 The arrow at the end of the second line indicates
that the Utilities option accesses an additional window.
When “Utilities” is selected from the window shown
above, another window appears that gives you the op-
tions of backing up or restoring the OPTERM directory
files on the console hard disk or updating the CO directory time zone information. The options are:
l
Backup- Back up the hard disk.
0 Restore - Restore the hard disk.
l
Update CO Times -Update the CO directory time
information.
5.1 The options are discussed individually in the following paragraphs. To exit from the option window
without selecting Backup, Restore, or Update CO
Times, press ESC. The main window, shown at the top
of this page, returns.
Backup
5.8 To save the hard disk OPTERM directory files on
floppy disks, select “Backup” by pressing B and then
ENTER. The following prompts tell you how to complete the backup routine:
Backing up ALL Attendant’s Console
files.. .
Insert backup diskette 01 in drive A:
Warning1 Files in the target drive
A:\ root directory will be erased.
Strike any key when ready.
5.9 Insert a blank, formatted floppy diskette in drive A
and press any key. The backup copy will fill 3-10
double-sided/double-density (36Ok) floppy disks. The
prompts continue with:
Backing up files to drive A: ***
Diskette Number 01:
(lists files as they am copied)
5.10 Aa each diskette is filled, another prompt will ask
you to insert another diskette into drive A. After changing disks, press any key to continue. When all console
files have been copied, the Backup/Restore window returns. Press ESC to exit to the Utilities window.
Page 1-11
Page 18
SPECIFICATIONS & INSTALLATION
Issui+ 1,
Restolp
5.11
November 1994
lMX/GMX 256/832 ATTENDANT COMPUTER CONSOLE
To restore the console OPTERM directory files
to the hard disk, from the backup floppy disks, select
“Restore” by pressing R and then ENTER. The follow-
ing prompts tell you how to complete the restore rou-
tine:
Restoring ALL Attendant * s
Console
files.. .
All Attendant's Console files are
going to be overwritten. Press ctrl-c
to abort, any other key to continue.
Strike a key when ready...
5.12 If you decide not to restore the files at this time,
press Cl’RL and C simultaneously. If you wish to begin
restoring files, press any other key. The next prompt is:
Insert backup diskette 01 in drive A:
Strike any
key
when ready.
5.13 Lmert the first backup diskette in drive A, and
press any key. The prompts continue as follows:
***Files were backed up XX-XX-19xX***
***Restoring files from drive A: ***
Diskette 01
(lists files as they are copied)
5.14 As each diskette is copied, another prompt will
ask you to insert another dir?ette into drive A. After
changing disks, press any key to continue. When all console files have been copied, the window shown on the
preceding page returns. Press ESC to exit to the Utilities
window.
Update CO Times
5.15
In the event that area codes or their time zones
change, the console can be updated with the new information. The area code/time zone table is located in a file
named CO-TIME.TBL in the OPTERM directory.
5.16 To update the time zone information, select “Update” by pressing U and then ENTER. The following
prompt appears:
The time information in the CO
directory will be updated based on
the contents of the co-time.tbl file.
Press ESC to abort or press any other
character to continue.
INTER-TELPRACTICES
5.17 To exit to the Utilities window without changing
the time zone table, press ESC. To update the time zone
table, press any key. The following prompt appears:
Proceeding with update... WARNING: DO
NOT interrupt.
5.18 Allow the update to proceed uninterrupted.
When the process is finished, the Utilities window returns.
C. DIAGNOSTICS
5.19
When “Diagnostics” is selected from the main
utilities window shown on page l-11, the following
window appears, showing the functions that will be
tested.
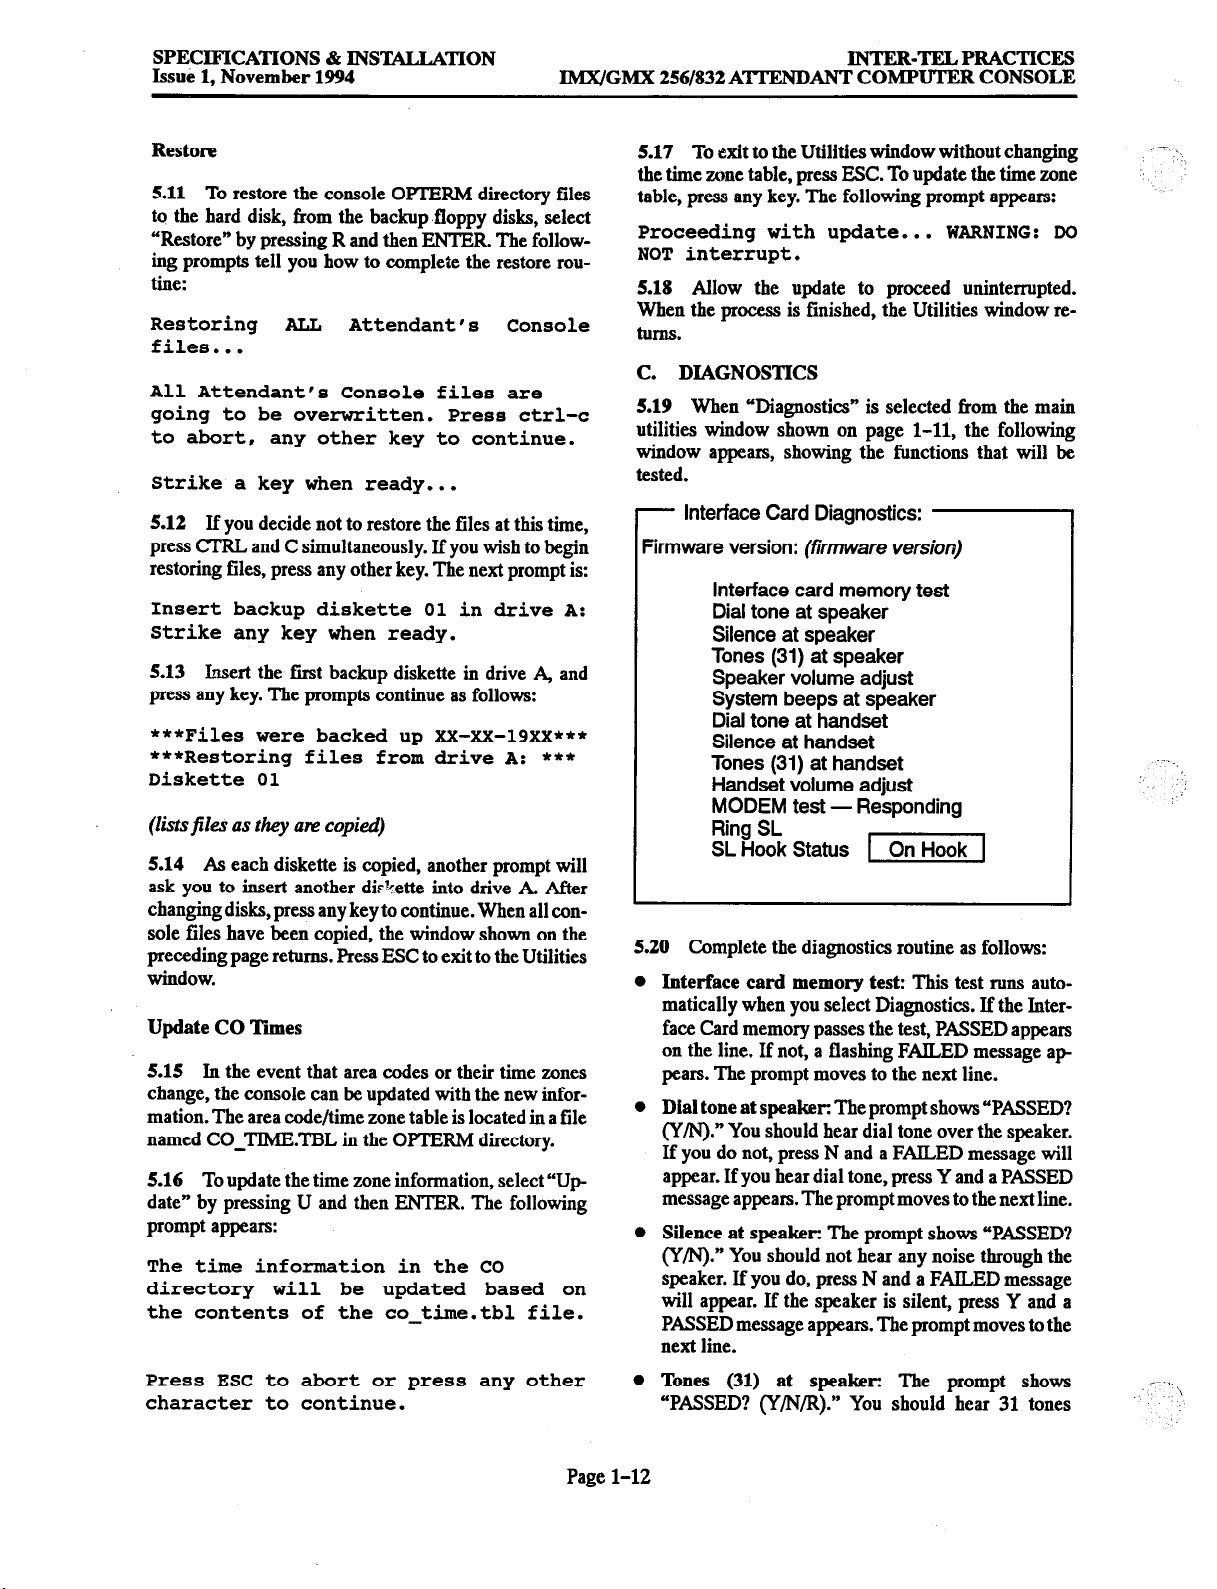
- Interface Card Diagnostics:
Firmware version:
(tifmwafe version)
Interface card memory test
Dial tone at speaker
Silence at speaker
Tones (31) at speaker
Speaker volume adjust
System beeps at speaker
Dial tone at handset
Silence at handset
Tones (31) at handset
Handset volume adjust
MODEM test - Responding
Ring SL
SL Hook Status -1
5.20 Complete the diagnostics routine as follows:
0 Interface card
memory test:
This test runs automatically when you select Diagnostics. If the Interface Card memory passes the test, PASSED appears
on the line. If not, a flashing FAILED message ap
pears. The prompt moves to the next line.
0 Dial tone at
speaker: The prompt shows “PASSED?
(y/N).” You should hear dial tone over the speaker.
If you do not, press N and a FAILED message will
appear. If you hear dial tone, press Y and a PASSED
message appears. The prompt moves to the next line.
0 Silence
at speaker:
The prompt shows “PASSED?
(Y/N)."You shouldnothearanynoisethroughthe
speaker. If you do, press N and a FAILED message
will appear. If the speaker is silent, press Y and a
PASSED message appears. The prompt moves to the
next line.
0
Tones (31) at speaker:
The prompt shows
“PASSED? (Y/N/R).” You should hear 31 tones
..-.-
_ . .
. .
\
(.
Page 1-12
Page 19
INTER-TRLPRACTICES
IMWGMX 256/832 ATTENDANT COMPUTER CONSOLE
SPECIFICATIONS & INSTALLATION
Issue 1, November 1994
. ._
played over the speaker. If you wish to have the tones
. .._)
play again, press R. If you do not hear the tones,
press N and a FAILED message will appear. If you
hear the tones, press Y and a PASSED message
appears. The prompt moves to the next line.
0
Speaker volume adjust: The Prompt shows
“PASSED? (Y/N/R).” You should hear a single tone,
pears on the line. If not, a flashing FAlLED message
appears. The prompt moves to the next line. A window appears that asks if you want to “Check the
single-line port.” Press N and EATER if there is not
a single-line set connected to the console, or Y and
ENTER if there is a single-line set. If you select N
the test ends. If you select Y, the prompt moves to the
next line.
.
that increases in volume, over the speaker. If you
wish to have the tone play again, press R. If you do
not hear the tone or if the volume does not change,
press N and a FAlLED message will appear. If you
hear the tone increase in volume, press Y and a
PASSED message appears. The prompt moves to the
next line.
0
System beeps at speaker: The prompt shows
“PASSED? (Y/N/R).” You should hear a single
beep. If you wish to hear the beep again, press R. If
you do not hear the beep, press N and a FAILED
message will appear. If you hear the beep, press Y
and a PASSED message appears. The prompt moves
to the next line.
0
Dial tone at handset: The prompt shows“PASSED?
(Y/N/R).” You should hear dial tone over the handset or headset. If you do not, press N and a FAlLED
message will appear. If you hear dial tone, press Y
and a PASSED message appears. The prompt moves
to the next line.
0
Silence at handset: The prompt shows “PASSED?
(Y/N/R).” You should not hear any noise through the
handset or headset. If you do, press N and a FAILED
message will appear. If ine handset or headset is
silent, press Y and a PASSED message appears. The
prompt moves to the next line.
Tones (31) at handset: The prompt shows
“PASSED? (Y/N/R).” You should hear 31 tones
played over the handset or headset. If you wish to
have the tones play again, press R. If you do not hear
the tones, press N and a FAILED message will ap
pear. If you hear the tones, press Y and a PASSED
message appears. The prompt moves to the next line.
0
Handset volume adjust: The prompt shows
“PASSED? (Y/N/R).“You should hear a single tone,
that increases in volume, through the handset or
headset. If you wish to have the tone play again,
press R. If you do not hear the tone or if the volume
does not change, press N and a FAILED message
will appear. If you hear the tone increase in volume,
Ring SL: The prompt shows “PASSED? (Y/N/IQn
The single-line set connected to the console should
ring. If it does not, press N and a FAILED message
will appear. If it rings, press Y and a PASSED message appears. The prompt moves to the next line.
SL Hook Status: A box at the end of this line shows
“On Hook” or “Off Hook” to indicate the present status of the single-line set. The prompt shows
“PASSED? (Y/N).” Ifthe box does not show the correct status when the single-line set hookswitch is
pressed and released or
hear a beep,
press N and a FATLED message
if the test times out and you
appears. If the status changes correctly, press Y and a
PASSED message appears.
5.21 When the test is complete, “Press any key to continue” appears at the bottom of the screen. Note which
tests, if any, failed. When you press a key, “Clearing/Resetting modem” appears momentarily, and then the Utilities window (shown on page l-11) returns.
5.22 If the Interface Card test failed: Turn off the
console, open the PC, and verify that the Interface Card
components are seated properly. Then, reassemble the
console and run the diagnostics test again. Ifthe test fails
again, contact Customer Support for assistance.
5.23 If any of the speaker tests failed: Turn off the
console, open the PC, and check the speaker connec-
tions. Then, reassemble the console and mn the diagnostics test again. If the speaker fails again, contact Cus-
tomer Support for assistance.
5.24 If any of the handset tests failed: Remove the
handset or headset and install a new one. Then run the
diagnostics test again. If the handset or headset fails
again, contact Customer Support for assistance.
5.25 If the modem test fails: Turn off the console,
open the PC, and verify that the modem parameters are
set correctly, as listed in step 4 on page l-5. Then,
reassemble the console and run the diagnostics test
again. If the test fails again, contact Customer Support
for assistance.
I
press Y and a PASSED message appears. The
prompt moves to the next line.
5.26 If either of the single-line set tests failed:
Remove the single-line set and install a new one. Then
MODEM test
-Responding: This test runs auto-
matically. If the modem passes the test, PASSED ap
run the diagnostics test again. If the single-line set fails
again, contact Customer Support for assistance.
Page 1-13
Page 20
SPECIFICATIONS % INSTALLATION
Issue 1, November 1994
IMX/GMX 256/832
A l’TENDANT COMPUTER CONSOLE
INTER-TELPRACTICES
1. DOWNLOAD
.27 The download option is used to test the modem
ard installed in the Attendant Computer Console by
erforming several downloads. It tests the modem card
x compatibility with the Attendant Computer Console
nterface Card and tests the performance of the modem.
.28 When “Download” is selected from the main uti-
ties window shown on page l-11, the following
rindow appears, showing the modem parameters.
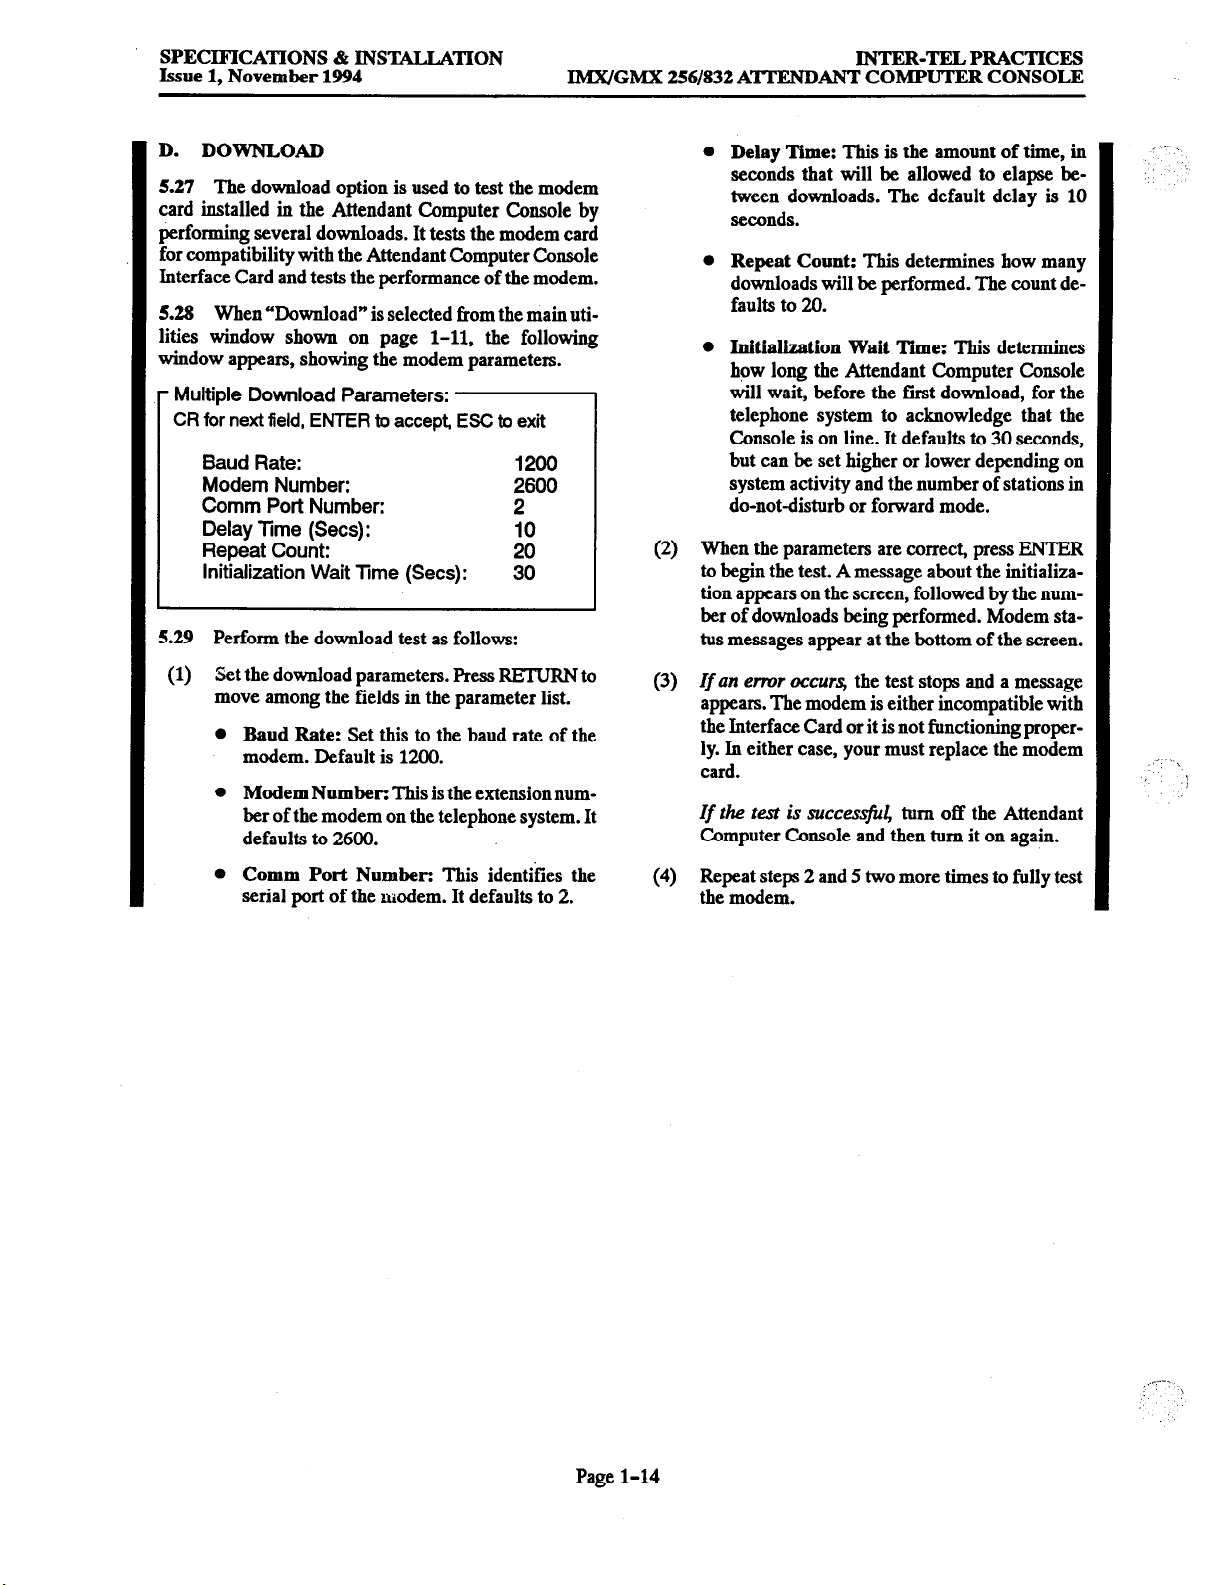
Multiple Download Parameters:
CR for next field,
ENTER to
accept, ESC to exit
Baud Rate: 1200
Modem Number:
2600
Comm Port Number: 2
Delay Time (Sets): 10
Repeat Count: 20
Initialization Wait Time (Se@: 30
.29 Perform the download test as follows:
Set the download parameters. press RETURN to
(1)
move among the fields in the parameter list.
0 Baud Rate: get this to the baud rate of the
modem. Default is 1200.
l
Modem Number: This is the extensionnumher of the modem on the telephone system. It
defaults to 2600.
Delay Time: This is the amount of time, in
seconds that will be allowed to elapse between downloads. The default delay is 10
seconds.
Repeat Count: This determines how many
downloads will be performed. The count defaults to 20.
Initialization Wait Time: This determines
how long the Attendant Computer Console
&ll wait, before the first download, for the
telephone system to acknowledge that the
Console is on line. It defaults to 30 seconds,
but can be set higher or lower depending on
system activity and the number of stations in
do-notdisturb or forward mode.
When the parameters are correct, press ENTER
(2)
to begin the test. A message about the initialization appears on the screen, followed by the number of downloads being performed. Modem sta-
tus messages appear at the bottom of the screen.
If an error occurs,
(3)
the test stops and a message
appears. The modem is either incompatible with
the Interface Card or it is not functioning proper-
ly. In either case, your must replace the modem
card.
Zf
the
test is
succe.r~JX, turn off the Attendant
Computer Console and then turn it on again.
,l...\
;, ‘:
,,’ “.,
‘, .!
0 Comm Port Number: This identifies the
serial port of the modem. It defaults to 2.
Repeat steps 2 and 5 two more times to fully test
(4
the modem.
Page 1-14
Page 21
INTER-TEL PRACTICES
IM.X/GMX 256/832 A’lTENDANT COMPUTER CONSOLE
Issue 1, November 1994
FEATURES
’
-VT
FEATURES
CONTENTS
1. Introduction .........................................................
2. Using The Keyboard
. Feature Keys ....................................................
B. Function Keys ...................................................
C. Special Keys
.3. Display Screen Layout ................................................
4. Incoming Calls ......................................................
A. Receiving Calls ...................................................
B. Placing Calls On Hold
C. Call Transfer
5. Text Messaging ......................................................
A. Entering Text Messages
B. Retrieving A Text Message .........................................
C. Using The Text Message Directory
6. Intercom Calls .......................................................
A. Intercom Directory
B. Placing Intercom Calls ............................................
C. Ring Intercom Aiways .............................................
D.
Intercom Camp On And Busy Station Callback (Queue)
E. Off-Hook Voice Announce (OHVA)
7. Inter-Station Messages ................................................
. Leaving Messages ................................................
B. Receiving Mesages ...............................................
8. Outside Calls ........................................................
. The CO Directory ................................................
B. Placing Outside Calls .............................................
C. Trunk Camp On And Busy Trunk Group Callback (Queue)
D. Account Codes
E. Hookilash .......................................................
9. Reverse Transfer (Call Pick-Up)
10. Conference Calls
A. Placing A Conference Call
B. Add Parties To A Conference
C. Exiting A Conference
11. Barge
..............................................................
12. Call Privacy And Privacy Release
13. Call Forwarding
14. Paging
.............................................................
15. Remove From Paging
16. Do-Not-Disturb
..................................................
.....................................................
.............................................
....................................................
............................................
................................... 2-16
...............................................
..................................
...................................................
........................................ 2-29
.....................................................
.........................................
.......................................
.............................................
.......................................
.....................................................
.................................................
......................................................
................
............. 2-27
PAGE
2-3
2-4
2-4
2-6
2-6
2-7
2-9
2-10
2-11
2-12
2-14
2-14
2-15
2-19
2-19
2-19
2-21
2-21
2-22
2-23
2-23
2-24
2-25
2-25
2-26
2-27
2-28
2-29
2-29
2-30
2-30
2-31
2-32
2-33
2-35
2-35
2-36
Page 2-l
Page 22
FEfwumm
Issue 1, November 1994
IMX/GMX 256/832 A’ITEXD
INTER-TELPRACTICES
ANT COMPUTER CONSOLE
CONTENTS
17. Reminder Messages ..................................................
4 18. Optional Station Exchange Feature
19. Operator Statistics
20. ‘Dunk Statistics ......................................................
21. Attendant Features
. Attendant Recall .................................................
B. Placing The System In Night Mode ..................................
C. Programming System Reminder Messages ............................
D. Programming System Do-Not-Disturb Messages ....................... 2-44
E. Setting Time Of Day And Date .....................................
I
I
F. Enabling Toil Security Database Programming ........................ 2-44
G. Programming System Speed-Dial Numbers ...........................
H. Remote Station Feature Cancel .....................................
I. Remote Hunt Group Remove/Replace ...............................
J. System Alarm Reporting ..........................................
. tink Maintenance ...............................................
L. Generating An SMDA Report
M. Saving The History Queue
N. Re-Lighting Message Lamps
0. Displaying The Software Version ....................................
22.
Custom Configuration
k Interrupting The Coniiguration Programming Session
B. Name ...........................................................
. Display
D. Calls ...........................................................
E. Features .. ..*;..........................................~
. Message .........................................................
23. Other Console Adjustments ............................................
. Volume Controls .................................................
B. Selectable Ring Tone ..............................................
. Music-On-Hold And Background Music .............................
D. Music And Paging To Speaker
E. Clear Printer Queue ..............................................
.........................................................
................................................... 2-39
...................................................
................................................
.....................................
......................................
.........................................
.......................................
......................................
.................
.......
PAGE
2-37
2-38
2-40
2-42
2-42
2-43
2-43
2-44
2-45
2-45
2-46
2-46
2-47
2-47
2-47
2-47
2-47
2-48
2-48
2-48 .'
2-50
2-53
2-58
2-59
2-62
2-62
2-62
2-62
2-63
2-63
'..r-..
.)!
,".
Page 2-2
Page 23
INTER-TELPRACTICES
IMX/GMX 256/832 ATTENDANT COMPUTER CONSOLE
Issue 1, November 1994
FEAm
1. INTRODUCTION
1.1
To describe the 256/832 Attendant Computer
Console features, this FEATURES chapter has been or-
ganized to cover four
l
Keyboard and Display Layout: The first sections
explain the layout of the customized keyboard and
the display screen. One section shows the locations
of the various feature keys and briefly explains their
functions. Another section shows the display screen
and explains where to look for specific on-screen information.
0 Call Processing Features:
the use of the station features that are available to all
main topics:
Several sections explain
station users, including intercom call features, out-
side call features, and other call processing features
such as conferencing, forwarding, etc.
Attendant Features:
This section explains the special attendant-only features and how to use them on
the Attendant Computer Console.
Configuring The Console:
Several console
features can be customized for each operator includ-
ing name display, screen colors, speed-dial directo-
ry, etc. These sections explain the configuration
tasks as well as how to adjust the speaker volume and
select ring tones and background music.
Page 2-3
Page 24
INTER-TELPRACTICES
lMX/GMX 256/832 A’ITENDANT COMPUTER CONSOLE
2. USING THE KEYBOARD
2.1 A custom keyboard is used to enhance the speed and accuracy of handling calls. To minimize keystrokes, the
most frequently used features are assigned to dedicated (non-programmable) keys.
A FEAlTJREKEYs
2.2 The following feature keys of the Attendant Computer Console are used most frequently and are located in the
right-hand key pads on the keyboard. The keys and their functions are described below.
II----III
1 BARGEll WAIL 11 MSG 1
PRS
TUV WXY
7 8 9
, -7.7. \
. .
. .J,
KEY
ESC
OUTGN
HOLD
BARGE
hiSG
CNEcr
VP, Dow9 m aad
RIGHT ARROWS
ANSW
PAGE
RBTRV
RELBASE
SPL.lT
FUNCTION
Used for cancelling various functions as described in the procedures. Also exits a menu or
moves up one menu level when programming.
Used for placing an outgoing call (default route and displayed directory are determined in
confi,uration programming).
Places a call on individual hold so that it can be directly accessed at that station or accessed
through a reverse transfer from any other station.
Allows the user to join into a call when calling a station, if the console station is enabled for
this feature in the 256 or 4161832 database.
Dials the voice mail unit for placing and retrieving voice messages, and for transferring calls
to the voice mail unit.
Sends and responds to message waiting indications. When pressed with the SHIFT key, it dis-
plays a directory of waiting messages.
Can be used in place of the ANSW or RETURN keys in some procedures.
These keys move the cursor in the indicated direction.
Answers the highest priority incoming call and changes the display to the call handling window no matter which call handling or utility program is being executed.
Accesses the paging network. The user can choose the desired page zone.
Accesses a call on transfer hold.
Returns the console to idle state.
Allows the user to move between two calls while executing a transfer.
Transfers a call to an extension or outside number.
.-
~
.’
Page 2-4
Page 25
INTER-TELPRACTICES
IMX/GMX 256/832 A’ITENDANT COMPUTER CONSOLE
Issue 1, November 1994
FEATURES
2.3 The following keys are located across the top edge of the keyboard and are used for accessing additional features.
The keys and their functions are listed below.
KEY
HELP
INS
DEL
HOME
END
PAGE UP
PAGE DOWN
TAG
BADLINE
VOL UP
VOL DOWN
FEAT
IC DIR
DND
FWD
CONFG
FLASH
CNF
NIGHT
3wIJE
PICK Up
EXTMSG
1 FUNCTION
Accesses the on-line help utility.
Allows the user to toggle between insert and replacement mode while programming or editing
text.
Allows the user to delete a character while programming or editing text.
When the user is viewing a list window, pressing this key moves the cursor to the beginning
of the list.
When the user is viewing a list window, pressing this key moves the cursor to the end of the
list.
Pressing the PAGE UP or PAGE DOWN key moves the cursor a preset number of lines up
or down. The number of lines may be customized by each user.
I
Permits the user to add an identifying tag to an incoming call before transferring it to a station
or outside number. With the ALT key, it is used for un-tagging calls. With the SHIFT key, it
tags the call and places it in the CO directory and with the ClRL key it reverses the first and
last names in a CO directory entry.
Allows an attendant to place a trunk out of service while connected to a call on the defective
trunk.
~ Adjusts the speaker and handset volume for calls and alerting tones. When pressed simulta-
neously with the ALT key, it saves the new setting.
A list of features appears when this key is pressed. The user can then select and execute the
desired feature. Features accessed by this key are listed on the next page.
The full intercom directory appears when this key is pressed. The user can then view station
status or can call any station on the list.
Places the console in, or cancels, do-notdisturb mode.
Places the console in, or cancels, call forwarding mode.
Allows the user to set up customized configuration options.
Sends a hookflash while on an outside call.
Allows the user to establish a conference.
At attendant stations, places the system in night mode and returns the system to day mode.
At stations with user statistics enabled, displays the statistics for that user.
Requests or cancels a busy trunk/station callback (queue).
Allows the user to pick up a call that is ringing or holding at a station or hunt group.
Accesses the text messaging utility to allow the user to enter and save detailed messages.
Page 2-5
Page 26
FEauREs
Issue 1, November 1994
INTEB-TELPBACTICES
IMX/GMX 256/832 ATI’ENDANT COMPUTER CONSOLE
2.4
The FEN key is used to access the following features. Procedures are given throughout this section of
the manual. Some features can only be used at attendant
stations.
Clear system alarm
Save/release history queue (Release history queue
- in 256
System only)
Database download
SMDA
Set time of day
Operator statistics
Trunk statistics
Program system speeddial
Program system do-notdisturb messages
Program system reminder messages
Database programming enable (for toll security pro-
gra=b3)
Cancel all station forward requests
Cancel individual station forward request
Cancel all station do-not-disturb requests
Cancel individual station do-not-disturb request
Cancel all station do-not-disturb/forward
requests
Cancel individual station do-notdisturb/forward
request
Remote hunt group remove/replace
Remove all trunks from maintenance
Reminder message
Reminder message cancel
Re-light message lamps
Background music channel selection
Ring tone selection
Music/page to speaker on/off
Background music on/off
Paging speaker music on/off
Hunt group remove/replace
Page remove/replace
Ring intercom always/cancel
Station exchange
Clear printer queue
Display software version
25 During an intercom call, pressing the FEAI key
allows the user to use the following features:
l
Do-not-disturb override
l
Microphone mute on/off
2.6 During an outside call, pressing the FEAf key allows the user to use the following features:
0
Optional account code
0
Private CO call
0
Microphone mute on/off
FUNCTION KEYS
B.
2.7 The function keys, labeled Fl-FlO, are located on
the left-hand side of the keyboard. They are used for
speed dialing and for selecting items that appear in directory and programming lists.
2.8 When a list is displayed, each line is preceded with
a number (Fl-FlO). To select a line, press the associated
function key.
2.9 When the list contains more than ten entries, addi-
tional entries are preceded with “Fl-“F6. To select one
of these entries, press the ClRL key and the indicated
function key at the same time.
C. SPECIALKEYS
2.10 RETUBN or CNECT: These
keys will select
the line that is highlighted in each programming window and move you to the next window or prompt. They
are also used to accept an entry and return you to the previous window. The use of these keys is described
throughout the Custom Configuration section. The “carriage return” (RETURN) key on the typewriter keyboard can be used in place of the ANSW and CNECT
keys in many features.
2.11 ENTER: Some features require you to press the
ENTER key to complete the task. It is located in the low-
er right comer of the typewriter keyboard.
2.12 ESC: The JZSC
key has the following uses when
the operator is programming console options:
The ESC key is used to cancel the present program-
ming utility and move you to the previous window.
When several subroutines are involved, you will
need to press ESC several times.
You can exit to the Console display screen by pressing SHIFT and RSC simultaneously.
If you wish to exit to the Console display screen tern-
porarily,
you can press ADT and ESC simultaneously; when you press CONPG again you will have the
option of continuing the previous activity or starting
over.
Page 2-6
Page 27
INTER-TELPRACTICES
IMx/GMX 256/832A’ITENDANT COMPUTER CONSOLE
2.13 ARROWS, PAGE UP/DOWN, HOME and
END: The UP ARROW, DOWN ARROW, PAGE UP,
PAGE DOWN, HOME, and END keys are used for
moving through lists, as described on page 2-5.
2.14
ARROWS, DEL, and
INS: When a prompt requires you to enter text (either letters or numbers) you
can edit the entry by using the LEFI and RIGHT ARROW keys to move the cursor, DEL to delete the character located above the cursor, or INS to toggle between
insert and replacement modes. The cursor is box-shaped
in insert mode and is an underline when in replacement
mode. In replacement mode, if you begin typing while a
previous entry is displayed (without first moving the
cursor), the former entry is overwritten. If desired, you
can press ESC to cancel the new entry before you press
RETURN.
2.15 C’l’RLz This is the “controln key that is used in
conjunction with the function keys to access items in
lengthy lists, as described in paragraph 2.9 on the pre-
vious page. It is located in the lower left corner of the
typewriter keyboard.
2.16 AL% There are two ALT keys and they are
located on either side of the SPACE BAR. They are used
for several purposes. For example, when both ALT keys
are pressed simultaneously, the keyboard “click” (that is
heard whenever a key is pressed) is turned on or off. A
single ALT key is used to access the “alternate” function
of a feature key (this use is described in detail for each
feature throughout the manual). While on a call, pressing an ALT and any keypad key simultaneously turns on
or off M’MF signaling (depending on the default DTMF
mode set up in CONFG programming described on page
2-56).
2.17
HELP: The HELP key can be used as follows:
If you press the HE&P key once, the Help text files
appear in the bottom half of the screen.
While viewing the Help text files you can press
CI’RL and HELP to display a menu of Help topics.
While scrolling through the Help text files you can
return to your starting point by pressing SHIFT and
I-ELI?
If you press HELP twice, the screen will display information about using the Help feature.
If you press the ADT and HELP keys at the same
time, the screen prompts you to press the key about
which you would like information.
Page 2-7
Page 28

FEATURES
Issue 1, November 1994
lMX/GMX
256/832
ATTEND
INTER-TELPRACTICES
ANT COMPUTER CONSOLE
3. DISPLAY SCREEN LAYOUT
3.1 The Attendant Computer Console screen display
appears as shown below. The different sections of the
screen, which are referred to throughout this manual, include the following:
l
The Current Operator is identified in the upper left
comer, if the operator has enabled it in Configuration. This indicates which operator’s customized op
tions are in effect.
l
The Alarms/Notices area displays an abbreviated
message to indicate system alarms and console status such as do-not-disturb, forward, or reminder
messages. When the console is idle, a box appears
below the abbreviated message to show the full
alarm or status message.
0 The Call Handling Widow changes when a call is
placed or received, and when do-not-disturb, forward, or reminder messages are displayed. These
displays are explained throughout the procedures in
this section.
0 The Variable Data changes to indicate the status of
the console and acts as an identifying header for the
information that appears in the large box at the bot-
tom of the screen (such as speed-dial numbers or di-
rectory listings). When the console is not in use, the
display shows “Station Is Idle.”
NOTE: The period at the end of the idle status message flashes to indicate that the console is operation-
al, but not in use. If the period fails to flash, contact
service personnel.
l
The Date and Time are shown in the upper right corner of the display. The operator can determine
whether the time appears in 12- or 24-hour format.
l
The lhnsient Display changes to show the operator what the console is doing. For example, after you
have programmed a reminder message, it shows
“Reminder Message Accepted.* The length of time
the display remains on the screen is determined by
the operator. Ifthe console is part of a hunt group, the
transient display is also used for showing the number
of calls camped on to the hunt group. These messages are cleared automatically, not by the operator.
l
The Extension Number of the Attendant Computer
Console appears below the transient display if enabled by the operator.
l
The Call Count Display shows the number of calls
ringing and holding. When the console is idle, it
shows “No Ringing Calls” and “No Holding Calls.”
_,-,.
‘,
:
CURRENT OPERATOR
CALL HANDLING WINDOW
VARIABLE DATA
‘ALARMS/NOTICES :
_.-..
Page 2-g
Page 29

Page 30

Page 31

INTER-TELPRACTICES
IMX/GMX 256/832
d.
Place the call on hold by pressing the HOLD
A’ITENDANT COMPUTER CONSOLE
key. Refer to the instructions below for more
information.
e.
Establish a conference call. Refer to page
2-29.
B. PLACING CALLS ON HOLD
4.11
An operator can place intercom and outside calls
on hold. While on hold, the caller hears music (if
equipped). The Attendant Computer Console can be
used to place calls on hold using the following methods:
0 Individual hold
places the call on hold at one
station. It can then be picked up directly at that station or it can be picked up at another station using the
reverse transfer feature.
l
Microphone mute
allows the operatorto disable the
microphone in the handset so that the caller cannot
hear the operator, but the operator can still hear the
caller. This does not activate a recall timer and the
caller will not hear music-on-hold.
4.12 Skate-to-hold, if enabled in the database, allows
operators to place calls on individual hold when the
ANSW key is pressed during a call (instead of pressing
the HOLD key and the desired key). When the system is
in the default state, pressing the ANSW key during a call
disconnects the call (skate-todisconnect).
4.13 Ifthe 256 or4161832 System is programmed with
transfer-to-park locations, calls could be transferred to
hold at a “park” location, then retrieved when the attendant becomes available. FLj information regarding
transfer-to-park, refer to page 2-12.
Issue 1, November 1994
PEATURES
4.14 If an outside call remains on hold until the hold
timer expires, it recalls the station. If the call is still unanswered when
the
recall timer expires, it recalls the station’s attendant. If the attendant does not answer the recall before the abandoned call timer expires, the call is
disconnected by the system. (If the system is in night
mode, the call recalls the station that placed it on hold
until the abandoned call timer expires and then the call is
disconnected.) Intercom calls will recall the station, but
will not recall the station’s attendant.
Individual Hold
4.15
To PL4CEANINlERCOMOR OVlXDE CALL ONINDI-
WDUAL HOLD:
While on the call press the HOLD key (or, if the
system is programmed with the skate-to-hold option, press ANSW to place the call on hold and
answer the next ringing call).
Microphone
4.16
CALL:
Mute
To MUTE THE BANLUET MICROPHONE JFWLE ON A
(1) Press the FEAT key, then press the function key
associated with “Microphone Mute On” (F3
while on an outside call, F2 while on an intercom
call). You can hear the caller, but the caller
can-
not hear you.
(2) To re-enable the microphone, press the FEAT
key, then press the function key associated with
“Microphone Mute On” (F3 while on an outside
call, F2 while on an intercom call).
:. :,’
‘- .<,..,i
‘I I
Page 2-11
Page 32

IMX/GMX
256/832
INTER-TJZLPRACTICES
ATTENDANT COMPUTER CONSOLE
c. CALLTRANSFER
4.17 Intercom and outside calls can be transferred to
other stations, to hunt groups, or to outside telephone
numbers.
4.18 In addition, transfer-to-park locations can be set
up by the installer. A transfer-to-park location is a station circuit with an extension number that is not
equipped with a station instrument. Calls can be transferred to these locations and then reverse transferred by
any station user. If all station circuits are equipped, the
installer cannot assign a transfer-to-park location.
4.19 If an outside call is transferred to another station
and is not answered before the transfer-available or
transfer-busy timer expires (and if it was not transferred
to hold), the call recalls the transferring station and rings
until the recall timer expires. If still unanswered after
the recall timer expires, it recalls the transferring party’s
attendant. If the attendant does not answer a recall before the abandoned call timer expires, the call is disconnected by the system. If the transferring station has no
attendant, the call remains at the transferring station until the recall and abandoned call timers expire, and then
the call is disconnected by the system. Transferred intercom calls will not recall the transferring station or the
attendant.
4.20 A call that is transferred to hold at a station does
not ring or send a display message while holding. After
the hold timer expires, the station rings or sends call
waiting signals. Also, calls transferred to hold do not re-
call the transferring party; thc.7 recall the receiving party’s attendant if unanswered after the hold and transfer
recall timers expire.
4.21 If the PAGE key is pressed instead of the
EXTEND key, the call is placed on hold at the receiving
station and the console operator can use the paging feature.
b.
If
tran.$erring to the transfer-to-park
location,
transfer the call to hold. Then page the desired party and announce the call. The party
must reverse transfer the call. Note that if the
call is not answered, it will recall your station
if transferred directly or will recall the called
transfer-to-park location’s attendant if transferred to hold.
hang up to complete the transfer, or
c. If transferring the call to a hunt group,
transfer is automatically completed when
you dial the pilot number.
(2)
If
de.rid wait for an answer and amtounce ,the
call. One of the following occurs:
a.
If the call is accept4 press E2LTEND
press HOLD to transfer the call to hold at the
receiving station). The transient display
shows “Transfer Completed.”
b.
If the call is reficserl, the station is busy, or
there is no answer,
To try another station: Disconnect from the
intercom call by pressing the RELEASE key.
You can enter another intercom number.
To return to the party on transfer hold and
disconnect the intercom call: press the
RETRV key.
To complete the transfer: press EXTEND
to complete the transfer (or press HOLD to
transfer the call to hold at the receiving sta-
tion, or press PAGE to place the call on hold
at the receiving station and connect you with
the paging network). Then page the party to
annOunce the transfer.
C.
Ifyou need to speak to thecallingparty again
do one of the following:
before completing the tram$er:
,.-
the
(or
,_
‘Ikansfer To An Extension Number
4.22
mlRANSFERACALL lOANEXlENSIONNlJMBER:
(1) While connected to a call, enter an intercom
number or press a speed-dial key. The
“CONNECTED!” message on the incoming call
changes to “TRANSFER HOLD” and the intercom call information is displayed on the next
line.
a.
If transferring to a station that is forwarded
to voice mail,
ring to a station forwarded to voice mail.” Go
to step 2.
the display shows “Transfer-
Page 2-12
1.
Press the SPLlT key. The station waiting
to receive the transfer is placed on hold
and you are connected to the party waiting to, be transferred.
Press SPLIT again to speak to the station
2.
user waiting to receive the transfer and
place the party to be transferred on hold.
3.
Press EXTEND to complete the transfer
(or press HOLD to transfer the call to hold
at the receiving station, or press PAGE to
place the call on hold at the receivingstation and connect your station with the
paging network).
Page 33
INTER-TELPRACTICES
IMX/GMX 256/832 A’ITENDANT COMPUTER CONSOLE
Issue 1, November 1994
FEATURES
‘Ihmsfer To Voice Mail
4.23
While connected to a call, press VMAIL. The
(1)
“CONNECTED!” message on the incoming call
changes to “TRANSPER HOLD.”
To send the call to a specific mailbox:
(2)
desired mailbox number. Or, select an entry from
the speed-dial directory at the bottom of the
screen and press RETURN or CNEcr.
If the system is checking for a valid mailbox
number and you entered a valid mailbox
number, the transfer is completed to voice
mail.
If the system is checking for a valid mailbox
number and the number you entered is inval-
Enter the
call changes to “TRANSFER HOLD” and the
outside call information is displayed on the next
line.
(2)
If using an outgoing trunk.- Dial the desired telephone number or press a speed-dial key.
If using an E&U trunk: Do one of the following:
If you hear ringing, wait for the other tele-
a.
phone system’s attendant to answer. Then ask
to be transferred to the desired station or outside telephone number.
b.
If you are connected to the other telephone
system (you may hear dial tone) and wish to
transfer the call to an extension number on
that system, dial the desired extension number.
ici, you hear reorder tones and you must enter
C.
a valid number.
If you are connected to the other telephone
system (you may hear da1 tone) and wish to
To send the call to the voice mail main menu:
Press RELEASE. The caller will be connected to
the voice mail unit and must enter the mailbox
number after listening to the introductory voice
transfe the call to an outside telephone numT
her, dial the other telephone system’s trunk
access code and the desired telephone number.
prompts.
One of the following occurs:
‘D-ansfer To An Outside Number Or E&M
::
. . .._A
Destination
(3)
a.
If
anwe& press EXTEND. The transient
display shows “Transfer Completed.”
NOTE: There may be some reduction in voice volume
b.
If the
when an outside call is transferred to an outside telephone number depending on the quality of the trunks being used.
call is refuseci, the number is b&y or
inval% or then? is no answel; disconnect
from the outside call by pressing the
RELEASE key; you can dial another num-
4.24 When a loop start trunk is being used by either
outside party, the duration of an outside call that is trans-
ber. Or, you can return to the party on transfer
hold by pressing the RETRV key.
ferred to outside telephone numbers is limited by the un-
c.
If
supervised CO timer. When this timer expires, the outside parties hear a burst of dial tone. They may then
press any DTMF key (before the dial initiation - SL set
timer expires) to reset the timer. If the timer is not reset,
the unsupervised call recalls the primary attendant. If
the attendant does not answer the recall before the abandoned call timer expires, the call is disconnected by the
system.
4.25
TO TRANSFER A CALL TO AN OUTSIDE NUMBER:
you needed to speak to the calling party
again before completing the tran$er:
1.
Press the SPLIT key. The station waiting
to receive the transfer is placed on hold
and you are connected to the party wait-
ing to be transferred.
Press SPLIT again to speak to the station
2.
user waiting to receive the transfer and
place the party to be transferred on hold.
(1) While connected to a call, press the OUTGN key.
The “CONNEXXED!“message on the incoming
3.
Press EXTEND to complete the transfer.
Page 2-13
Page 34

FEATURES
Issue 1, November 1994
Text Message Editor
IMTVGMX 256/832
A’ITENDANT COMPUTER CONSOLE
INTER-TELPRACTICES
FOR:
DEPT:
FROM:
.
PHO::;
Additional Information:
5. TEXT MESSAGING
5.1
The Text Messaging facility provides a means for
entering a memo-type text message, retrieving a specific text message, and maintaining a directory of text messages.
5.2
Ifthe party for whom the message was left is in the
company directory, that party’s extension is called and a
message indication is left at their station when the message is completed.
5.3 Each text message is automatically stamped with
the date, time, and name of the operator taking the message (if the operator’s name has been programmed in
configuration).
5.4 If an outside caller is placed on hold while a text
message is being entered, and the message is partially
completed, the text message is automatically retrieved
when the party is taken off hold. If an intercom caller is
placed on hold or if a caller (intercom or outside) hangs
up while on hold, the partially completed text message
is stored in a buffer. The next time you press TEXT
MSG, you can chose to save the incomplete message,
delete it, edit it, or leave it in the buffer. If you save it, it
is inserted in the text message directory and flagged as
“incomplete.” If you edit it and then press RETURN, it
is inserted in the directory as a completed message.
5.5 Ifthe number of text messages saved on disk nears
the specified limit, an alarm will be posted alerting you
that the messages will soon be lost (if enabled in the
computer console database to do so). Refer to page 2450
for more information.
Telephoned
Please call
Returned Your Call
URGENT
Will Call Again
A. ENTERING TEXT MESSAGES
NOTE: To cancel the message at any time before saving
it, press ESC. “MESSAGE ABANDONED” appears in
the transient information display.
Press the TEXT MSG key, the text messaging
(1)
window appears in the lower half of the screen as
shown above. The cursor is on the “FOR” line.
NOTE: If the message is being taken while
speaking to a party that has recalled from an extension number, the “FOR” field will be automatically filled in with the name of the called intercom party. Skip the next step.
Enter the extension number or name of the per-
(2)
son to receive the message (last name, first
name, or any portion that matches an intercom
directory name) and press RETURN.
If the name exnctly matches one in the system
(3)
directory,
the “DEPT” line is automatically
filled in. Go to the next step.
If the name does not match
directory,
a list of closely matching names from
a name in the system
the directory is displayed. You may select one of
the names by pressing the associated function
key (or highlighting it and pressing RETURN).
Or use the name as you typed it by pressing ESC.
The cursor moves to the “DEPT” line to allow
you to type a department name, if desired. Press
RETURN to continue to the next step.
NOTE: If the message is being taken while
speaking to an intercom party, the “FROM” field
Page 2-14
Page 35
INTER-TEL PRACTICES
IMX/GM.X 256/832 A’ITENDANT COMPUTER CONSOLE
Issue 1, November 1994
FEATURES
will be automatically filled in with the name of
the calling intercom party. Skip the next step.
The cursor moves to the “FROM” line. Type the
(4)
name of the party who is leaving the message and
press RETURN. If the call was taggeci, this
will already be filled in. You can type a new
name or just press ItElVRN to leave it unchanged.
The cursor moves to the “OF” line. ‘Qpe the
0
company or department of the party who is leaving the message, if desired, and press RETURN.
The cursor moves to the “PHONE” line. ‘l&e the
(6)
telephone number of the party who is leaving the
message, if desired, and press RETURN.
The cursor moves to the message notes vele-
(7)
phoned, Please Call, Returned Your Call,
URGENT, and Will Call Again) at the right side
of the screen. To mark a message note, use the
UP and DOWN ARROW keys to move the high-
light bar. When the desired note is highlighted,
press the SPACE BAR. Mark as many notes as
desired. (I’o unmark a message, highlight it
again and press the SPACE BAR.)
line
5.7
To !lEMlVRARlLY EXlT FROM lHl% MESSAGE AND AN-
SWERACALL:
(1)
If a call rings in while you are entering a text
message and you are not currently on a calJ
press the ANSW key. You are connected with the
incoming call. The partially completed textmessage will be held in memory.
Zf a call rings in while you are entering a text
message andyou
key and then the ANSW key. The previous call is
on hold and you are connected with the incoming
call. The partially completed text message will
be held in memory and will return when you reconnect the associated call
(2) To return to the message after the call is
completed: Press the TEXT MSG key (or
answer the holding call). A prompt allows you to
choose to edit the message, delete it, or save it on
disk as is. Highlight your choice and press RETURN.
Zfyou chose to edit the mmage, fill in
as described in the preceding procedures.
If you chose to save the message as i.r;
blank message screen is displayed for you to enter another message.
are
on a
call, press the HOLD
the spaces
a new,
I
To edit the message: Use the UP and DOWN
ARROW keys to move back through the entered
information and make changes or corrections.
To accept the message without changing it:
Press the PAGE DOWN key to move to the “Additional Information” line and type the message
as desired (up to 13,75character lines).
NOTE: To send the text message to the printer
before saving it, press the FlO key.
When the message appears as desired, press the
(9)’
ENTER key. “MESSAGE SAVED” appears in
the transient display and the console returns to
the idle state. If the party for whom the message
was left is in the company directory, a message
indication is left at that party’s extension when
the message is completed.
B. RETRIEVING A TEXT MESSAGE
5.8 There are two ways to retrieve a text message: automatically and manually.
l
Automatically: When you answer a call from a
station that has pending text messages, the oldest
pending message for that party is automatically retrieved and displayed in the lower half of the screen,
and the incoming date and time at which the message was received is added to the message. You can
then view, delete, or print any waiting messages.
0 Manually: When you receive a call from a station
user, either from an outside number or a station other
than his or her own, the caller’s pending messages
are not automatically displayed. To retrieve the messages, press SHIFT and TEXTMSG, scroll to the desired message, and press RETURN. You can then
view, delete, or print the message or additional mes-
sages. (Refer to USINGTHETEXT MESSAGE DIRECTORY on the next page for more details.)
Page 2-15
Page 36
FEATURES
Issue 1, November 1994
INTER-TELPRACTICES
IMX/GMX 256/832 AITENDANT COMPUTER CONSOLE
5.9 To VZEWMUZJ7PLEMESAGES:
If more than one message is pending for the call-
(1)
ing party, you can scroll through all the messages
without deleting them using the PAGE UP’,
PAGE DOWN, HOME, and END keys.
You may perform any of the procedures de-
(2)
scribed below. When finished, press ESC to
leave the message flagged as “Unretrieved” or
Press RELEASE to end the call and flag the message as “Received.”
If the texz message was rem’eved manually you
can transfer the caller to another intercom num-
ber and flag the message as “Received” by press-
ing IC DIR, selecting an intercom number, and
Pressing EXTEND. (For example, the station
user calls from an outside number to check text
messages and then wishes to be transferred to a
station or voice mail.)
5.10
To PRIh’TAbfESMGE R!HL?E VIEWTh’GlT:
Press the F3 key. The message will be printed via
the parallel printer port on the console. The message remains in the directory until it is deleted.
5.11
5.15
The messages appear in the directory in alpha-
betical order according to the
sage was taken. If there is more than one message for the
person for whom the mes-
same person, they are listed oldest first.
5.16 An asterisk (*) in the left margin indicates that
the message has not been retrieved. After you have read
the message once and pressed RELEASE (or the IC DIR
key as described on the preceding page), the asterisk is
removed, but the message remains in the directory until
you delete it. (If you press ESC while viewing a message, the asterisk remains.)
5.17 When erasing or printing messages, you can
choose a single message or “tag” (select) several messages. When the procedures state “tag the desired mes-
sages,” you can perform of the following steps.
5.18
TO ZilG MESSAGES:
To select a single message:
(1)
Use the UP or
DOWN ARROW keys to move the highlight bar.
When a message you wish to erase or print is
highlighted, press the CTRL and T keys at the
same time to tag it.
To select a range of messages: Press
the GIRL
and R keys at the same time. The screen prompts
you to “Select range.” Do one of the following:
Press the F2 key. The message is deleted from
memory.
5.12
TOEDlTAhfESSGE lS!HLLE WEWB’GIX:
Press the Fl key. Edit the message as described in
(1)
the instructions for entering a message.
When finished, press RETURN. The date and
(2)
time that the message was updated is added and
the message is stored in the directory.
C. USING THE TEXT MESSAGE
DIRECTORY
5.13 When you press
the SHIFT and TEXT MSG keys
at the same time, the text message directory window ap
pears in the lower half of the screen. You can view, erase,
print, or set a delayed printing of messages as desired.
5.14 Each directory entry consists of one line containing the following information:
l
Person for whom message was entered
l
Person from whom message was received
l
Date and time message was received or updated
l
Whether the message has been retrieved
l
Whether the message is complete
a.
To tag all messages: Press RE!TURN
to
select “All.”
b. To tag only the messages in a specific time
range:
1.
Press the DOWN ARROW key to highlight “Time” and press RETURN. The
screen prompts you to enter the starting
date.
2.
Enter the month, day, and year (for example, 01/01/90) and press RETURN. The
screen prompts you to enter the starting
time.
3.
Enter the hour and minutes in the indicated format (for example, “13:OO” or
“1:OO pm”) and press RETURN.
4.
The screen prompts you for the ending
date, then the ending time. Enter them as
described for the starting date and time
and press RETURN. The messages that
were received between the starting and
ending times are tagged.
c. To tag only the messages for a specific
tenant: Press the DOWN
ARROW key to
highlight “Group” and press RETURN. The
screen shows a list of tenants. Move the high-
Page 2-16
Page 37
INTER-TELPRACTICES
IMx/GM.X
256/832
ATTENDANT COMPUTER CONSOLE
Issue 1. November 1994
FEATURES
light bar to the desired tenant group and press
R.imJRN.
d.
To tag only the messages that have been
retrieved: press
the DOWN ARROW key to
highlight “Retrieved” and press RETURN.
e. To tag only the messages that have NOT
been retrieved: press
the DOWN ARROW
key to highlight “Unretrieved” and press RETURN.
a.
To erase the tagged messages:
RETURN to select “Tagged.” The text message directory returns. All previously tagged
messages have been removed.
b.
To erase only the message that is currently
highlighted:
Press the DOWN ARROW key
to highlight “Individual” and press
RETURN. The text message directory
returns. The previously highlighted message
Ress
has been removed.
f.
To clear ail tags: press
key to highlight “Clear” and press RETURN.
Repeat step 1 as necessary to tag additional mes-
(2)
sages. Zf you wish to name a tag from a me.+
sage, move the highlight bar to the desired mes-
sage and press the ClXL and U keys at the same
time.
5.19
To VlEWAbBXSAGE:
the DOWNARROW
C.
To cancel this function:
Press the DOWN
ARROW key to highlight “None” and press
R.iTNRN. The text message directory returns, unchanged.
5.22 m
PRONE OR MORE-GE:
NOTE: You can send the text message to the printer
while entering it by pressing the FlO key as described on
To select a specific message: press the
0)
ciated function key (or use the Up or DOWN
ARROW keys to move the highlight bar to the
message to be viewed and press RETURN). The
asso-
page 2-15.
To select several messages:
(1)
messages. (Refer to paragraph 5.18.)
I
Tag the desired
message appears at the bottom of the screen.
To select a message for a specific station:
Enter
a name or extension number and press RE-
>.’
TURN. The oldest waiting message for that per-
son is displayed at the bottom of the screen.
You may edit, delete, or print the message as de-
(2)
scribed in paragraphs 5.8 through 5.12.
To return to the text message directory:
(3)
Press
ESC.
5.20
TOERASEASINGLEM?SAGE:
Use the Up or DOWNARROW keys to move the
(1)
highlight bar to the message to be erased.
Press the GIRL and E keys at the same time to
(2)
erase the highlighted message.
5.21
To ERASE ONE OR MOREMESSAG~:
Tag the desired messages. (Refer to paragraph
(1)
5.18.)
Press the CTRL and E keys at the same time. A
(2)
window appears that asks “Delete which messages?” Do one of the following:
To select a specific message:
light bar to the desired message.
Press the CI’RL and L keys at the same time. If
(2)
only one message is in the directory it is sent to
the printer. If more than one message is in the directory, a window appears that asks “Print which
messages?” Do one of the following:
a.
To print the tagged messages:
FU3TURN to select “Tagged.” The text message directory returns. All tagged messages
are sent to the printer.
b.
To print only the message that ls currently
highlighted:
Press the DOWN ARROW key
to highlight “Individual” and press
RETURN. The text message directory
returns. The highlighted message is sent to
the printer.
c. To cancel this function:
ARROW key to highlight “None” and press
REXURN. The text message directory re-
turns.
Move the high-
Ress
Press the DOWN
Page 2-17
Page 38
FEATURES
Issue 1, November 1994
LMx/GMX 256/832 ATTENDANT COMPUTER CONSOLE
INTER-TELPRACTICES
5.23 To SETMEXSAGES FOR DELAYED PRNTUJG:
(1)
To select several messages:
Tag the desired
messages. (Refer to paragraph 5.18.)
To select a specific message:
Move the high-
light bar to the desired message.
(2) Press
the CTRL and D keys at the same time. A
window appears that asks “Print message
(delayed)?” Do one of the following:
a.
To print the tagged messages: press
REXURN to select “Tagged.”
b.
To print only the message that is currently
highlighted: press
the DOWN ARROW key
to highlight “Individual” and press RETURN.
c. To cancel this function: press the DOWN
ARROW key to highlight “None” and press
RETURN.
The screen prompts you to “Enter print date.”
(3)
Press RETURN to use the current date or enter
the date on which you
want the
message(s) to
print in the following format: month/date/year
(for example, 01/01/90). Press RETURN. The
screen prompts you to “Enter print time.”
Press RFTURN to use the current time or enter
(4)
the time in the indicated format with the hour and
minutes separated by a colon (for example,
“13:OO” or
message directory
“l:OOpm”). Ress RETURN. The text
returns. The
selected mes-
sages will be printed at the designated time.
_. I.
Page 2-18
. .
Page 39
INTER-TELPRACTICES
IMx/GMX 256/832 ATI-ENDANT COMPUTER CONSOLE
Issue 1, No”%=
6. INTERCOM CALLS
A. INTERCOM DIRECTORY
6.1 The system intercom directory is stored in the 256
or 416/832 System database and transferred to the
Attendant Computer Console during database download.
6.2 When the system is first installed, all stations and
hunt groups that have assigned extension numbers ap
pear in the intercom directory. To simplify the directory
for Attendant Computer Console Operators, the installer should delete all unused numbers. Refer to the 256 or
416/832 manual for the following applicable programming information:
0
Extension numbers, pilot numbers, user names, and
hunt group names are programmed through the Extensions, Usemames and Feature Codes Programming window described in the 256 and 416/832
installation manuals.
Aliases can be assigned to extension numbers that
have more than one user or purpose so that they ap
pear in the console intercom directory more than
once. For example, if two users share a station, one
name can be programmed as the user description for
that station and the other name can be programmed
as an alias. Or, if these two users also have a special
function, such as “customer service” that name can
be programmed as the main name for the station and
the individual names as aliases for that station.
There can be a total of up to 200 aliases programmed
in the 416/832 System and up to 100 in the 256 System. They are programmed using the Attendants Aliases window described in the 256 and 4161032
installation manuals.
NOTE: Aliases will not appear in the IC directory
that is accessed by keysets. These aliases can only be
viewed on Attendant Computer Console stations.
Tenant groups and departments and their names are
programmed through the Tenant and Departments
window described in the 256 and 416/832 installation manuals.
6.3 The intercom directory allows the Attendant
Computer Console operator to place a call to any extension number by pressing the IC DIR key and scrolling to
the desired name, by dialing the number, or by typing
the first name, last name, or department of the station
user. It also permits the console operator to see which
stations are in do-not-disturb and are forwarded.
6.4 When a station has both do-not-disturb and call
forward enabled, the do-notdisturb message is
displayed, and a “+” is added to the extension number to
indicate that a call forward message is also in effect. The
operator can press the question mark (?) key to toggle
between the do-not-disturb and call forward messages.
6.5 As part of the configuration function, each operator can select whether the intercom directory shows just
his/her tenant group or the entire system while an intercom call is being placed. (pressing the IC DIR key will
always display the entire system directory.) Refer to
page 2-52.
6.6 When the console operator dials an extension
number, the number is checked against the system direc-
tory for validity. Depending on configuration programming (see page 2-57), the call will be handled in one of
the following three ways when the number exactly
matches an entry in the system directory.
0
The call is dialed regardless of the station’s avail-
ability. If the station is busy, the call camps on. If in
do-not-disturb, the operator can use the queue, message, or do-not-disturb override feature (if enabled).
0
The call is dialed only if the station is available. If
the station is busy or in do-not-disturb, the operator
has the option of calling in order to camp on, queue,
leave a message, barge (if enabled), or override donot-disturb (if enabled).
0
The call is dialed if the station is busy, but not if the
station is in do-not-disturb. Ifthe called station is in
do-notdisturb, the operator can still choose to place
the call in order to use the queue, message, or do-notdisturb override feature (if enabled).
B.
PLACING INTERCOM CALLS
6.7
TO PL4CEANIATERCOM CALL:
(1) To use speed dialing: Speed dial an intercom
number by pressing any function key to display
the intercom speed-dial directory and then pressing the function key associated with the desired
number. Skip to step 3.
To call a station or hunt group: Dial an exten-
sion or pilot number. Whether the call to a station
is automatically connected depends on your configuration programming. If the call is not automatically connected, the intercom directory will
include the prompt “Call?” and you must press
RETURN or CNECT to complete the call. You
have the options described in step 3.
To use the directory search: Enter one of the
following:
0 The first number of an extension number.
0 The first letter of a last name.
0 A comma (,) followed by the first letter of a
first name.
Page 2-19
Page 40
FEATURES
Issue 1. November 1994
IM.X/GMX
256/832
ATTENJIANT COMPUTER CONSOLE
INTER-TELPRACTICES
0 Abackslash 0) and the department name fol-
lowed by another backslash (and a name if
desired).
The prompt “Last name, First or EXT” appears
in the call handling window and the intercom directory appears in the bottom half of the screen.
The entries on the directory list have numbers or
letters that match the character that was entered.
(For example, if you entered “P” the list includes
station users whose last name begins with P.)
To use the full intercom directory: Press the
DIR key. The prompt “Last name, First or EXT”
appears in the call handling window and the intercom directory appears in the bottom half of
the screen. Use the ARROW keys or PAGE UP/
DOWN keys to locate the desired extension
number, or enter characters as described above.
(2) You have the following options:
a. Continue entering the name and/or number.
As each character is typed, the directory list
in the lower half of the screen is shortened to
match the input. (For example, if “PO” has
been
entered the list includes only those station users whose name begins with PO.) If no
matching entries are available, the display
shows “[No entries].” If de&d you may include a comma in the entry to begin searching for a first name (for example, uPQ,l” for a
user whose last name begins with PO and
whose first name begins with I), or enter a
combination of letters and numbers (for example, “PO12” to find a user whose name begins with PO and whose extension number
begins with 12). Press the associated function
key (or press
RETURN or CNECf when the
desired name is highlighted).
NOTE: If you make a mistake, use the back-
space key to erase your entry before it is completed. This will expand the directory list as
fewer characters remain in the input. To cancel the call before it is complete, erase all
characters or press RELEASE or ESC.
b. Scroll through the list by pressing the UP or
DOWN ARROW key until the desired name
is highlighted. Then press the associated
function key or press RETURN or CNECT.
c. Move through the list alphabetically by
pressing the RIGHT ARROW key to move
forward. (Press the arrow once to show only
entries that begin with A, twice to show entries that begin with B, and so on.) To move
IC
backward, press the LEFI’ ARROW key. If
no entries are available for a
display shows “[No entries].” When the desired name is showing, press the associated
function key (or move the highlight bar to it
and press RETURN or CNECX).
d.
Press the function key (Fl-FlO) or the CTRL
key/function key combination (“Fl-“F6)
that appears next to the desired name. (Ifthe
desired name is not on the screen, use the ARROW, END, HOME, or PAGE UP/DOWN
keys to move through the list, or enter more
characters to shorten the list.)
(3) One of the following will occur:
a.
If calling a hanhftee kyset station,
after you hear a double tone. The call display
shows “CONNECTED! n
b.
If
calling another console, a single-line
station, a hunt group, or a keyset with
hana$fke a!isableci, you hear repeating double tones until the call is answered. The call
display shows “RINGING” until the call is
answered, then it shows “CONNECXED!”
C.
If
you dial an invalid numbel; the intercom
directory shows “No Entries” to indicate that
there is no match. Erase the number and try
again, using a valid number.
d.
If the called station is busy, the call display
shows “BUSY.” You have the following op
tions:
Press RELEASE to disconnect and try
1.
later. The console returns to the idle state.
2.
Wait for the called station to become
available. When your call camps on the
display changes to “CAMPED ON.”
When the called station is available, a private call is placed and the display shows
“RINGING” until the call is answered.
Refer to paragraph 6.11 for details.
3.
Request a busy station callback (queue)
by pressing the QUEUE key. This is similar to camping on except that you discon-
nect from the call and wait for the busy
station to be available. For more informa-
tion, refer to paragraph 6.14.
Leave a message waiting indication with
4.
the station itself or with the station’s message center by pressing the MSG key. For
details, refer to page 2-23.
5.
Press the BARGE key to join in the call.
Refer to page 2-31 for details.
given
letter, the
speak
--.
Page 2-20
Page 41

INTER-TEL PRACTICES
IMX/GMX 256/832
ATTENDANT COMPUTER CONSOLE Issue 1, November 1994
FEATuREs
.A
‘:
e. If you hear a repeating signal of four fast
tones and a pause, and the call a&-play shows
“ZN DND* and the selected do-not-dsturb
message the station is in do-not-disturb. You
can use the busy station callback feature,
leave a message waiting indication, or, ifen-
abled on your station, use the do-not-disturb
override feature by pressing the FEAT key,
then Fl to select the override feature. To cancel the intercom call, press RELEASE.
f.
Zf the
called station is a busy keyset and ifall
the necessary conditions for OWA are enabled, you can announce the call using the
off-hook voice announce feature. For a complete explanation of this feature, refer to page
2-22.
C. KING INTERCOM ALWAYS
6.8 Always place private calls by programming the
station with the ring intercom always feature code.
While this feature is enabled, the called party hears repeating double tones and must lilt the handset (or press
the SPKR key or IC key) to answer.
6.9
To PROGRAM THE Sz;pTION To ALWm PLACE PRlk!!
IN!lERCOM CALLS (RING INTERCOMALWWS):
(1) Press the FEKI key. A list of features appears in
the lower half of the screen.
(2) Move the highlight bar to “Ring Intercom
Always” and press the associated function key or
RETURN.
6.10 To CANCEL
RLNG LNTERCOMALWM:
Repeat the procedure shown above. The feature
name will have changed to “Ring Intercom Always Cancel” in the feature list.
D. INTERCOM CAMP ON AND BUSY
S’IXTION CALLBACK (QUEUE)
called station is available. The system periodically
sends call waiting signals to the busy station, if camp-on
tones are enabled.
6.12 If a called station enables do-not-disturb while an
intercom call is camped on, the caller is removed from
the camped on state and receives do-not-disturb indications. Intercom callers cannot camp on to a station that is
in do-notdisturb.
6.13 To CAMP
ON
To
ANIZXTENSIONNUMBER:
When calling an extension number and you wish
to camp on, do not hang up. You hear music (if
enabled) while camped on. When the station is
available, a private call is automatically placed
and you hear repeating double tones until the call
is answered.
Busy Station Callback (Queue)
6.14 When a called station is busy or in do-notdisturb, the caller can request a callback (queue) and
hang up until the station is available. This can be done
before or after the call camps on. Each station can have
only one active queue request at a time.
6.15 Queue callbacks must be answered before the
queue callback timer expires. If a callback is not
answered, the queue is canceled. If the station is busy
when called back, the queue request is placed behind
any other waiting queue requests.
6.16
To QUEUE A STAlTON:
(1) When calling an extension number that is busy or
in do-not-disturb, press the QUEUE key.
(2) When the queued station is available, you hear a
repeating signal of three tones and a long pause
and see a callback message in the incoming call
list. Highlight the callback and press RETURN,
CNECI’, or ANSW. A private call is automatically placed to the queued station.
Camp On
6.11 When a station user calls a busy station or hunt
group, the system sends a busy signal. The caller can
wait off hook to camp on (after the camp-on timer ex-
pires) and hear music (if enabled) while waiting until the
Page 2-21
6.17
lDCANCEZAQlJEUEREQUEST{BEFORE~QUEUED
SZiTION BECOMES AV’LE):
While the console is idle, press the ALT and
QUEUE keys at the same time. The transient display shows “Canceling Queue.=
Page 42

FEATURJZS
Issue
1,
November 1994
IMX/GMX 256/832 A’I-lTNDANT
INTER-TEL PRACTICES
COMPUTER CONSOLE
E. OFF-HOOK VOICE ANNOUNCE (OEIVA)
6.18 When a digital keyset, a 12&e or M-line analog
keyset, or an Inter-Tel/DVK keyset is busy, you can use
the off-hook voice anuounce (OHVA) feature (if en-
abled). This feature allows you to establish voice contact with the called keyset user, even though the user already has a call in progress on the handset. The called
keyset user can then talk freely on both uumections, using the handset for the original call and the speakerphone for your OHVA intercom call. Note that the caller
on the handset call will be able to hear your OHVA call
(unless the keyset user presses the MUTE key).
6.19 The OHVA feature must be enabled in the database. Each digital keyset, 12/244ine analog keyset, and
Inter-Tel/DVK keyset can be programmed for placing
and/or receiving OHVA calls, and each console, keyset,
and single-line set can be programmed for placing
OHVA calls, as desired. (Consoles, Wine analog key-
sets, and single-line sets cannot receive OWA calls
since they do not have secondary voice path circuitry.)
6.20
OHVAcalls cannot be processed if the secondary
voice path or the speakerphone of the called keyset is not
available. Also, OHVA calls are not possible if you are
placing a forced private intercom call.
6.21
To PUCE AN OFF-HOOK VOICE ANNOUNCE CALL:
When an intercom call is placed to a busy keyset,
(1)
do not hang up. You hear busy signals until the
camp-on timer and the OHVA screening timer
expire. (If you hear music after the camp-on
timer expires, conditions for an OHVA call were
not met and you are camped-on. gee paragraph
6.11.)
When the OHVA screening timer expires (and if
(2)
the keyset’s secondary voice path is available),
you are automatically connected to the called
party’s speakerphone.
Page 2-22
--.
Page 43

INTER-TELPRACTICES
IMWGMX 256/832 ATTENDANT COMPUTER CONSOLE
Issue 1, November 1994
FEATURES
_‘m. .A,
,,
._-A
I
7. INTER-STATION MESSAGES
7.1 If a station is busy or in do-notdisturb, or if there is
no answer, you may leave a message waiting indication.
The called station’s MSG key flashes (consoles and display keysets also show the message source). There are
two message options:
0 Have the called party return your call.
(Display
display shows MESSAGE RECEIVED
Mail].
73 Each station user can leave message waiting indications at more than one station, but only one per station.
A. LEAVING MESSAGES
7.6
lDLTAVEAMESSAGE W~GINLKAlTON:
FROM
poice
keysets and consoles show the source of the
message.) When the called party responds to the
message indication, a call is automatically placed to
your station.
l
Leave
a message with the called party’s message
center.
(Display keysets and consoles show that a
message was left with the user’s assigned message
center.) When the called party responds to the message indication, a call is automatically placed to his
or her message center.
(1) Place a call to the desired extension number.
(2) press the MSG key. The call handling window
shows “Release to leave at station or wait for
MSG center” if the called station has a message
center.
NOTE: If the station you are calling does not
have a designated message center or if you are
calling your message center, you will see “Message Left At Station” immediately after pressing
the MSG key. The station will receive a message
7.2 To signal that a message is waiting, a called
waiting indication.
keyset’s MSG key flashes and the display shows the
message source. Enhanced Single-Line Sets (ESLSs)
are equipped with message waiting lamps that, if enabled in the database, light when the station receives a
message. For all single-line sets, a system programming
option can be enabled that sends six short message waiting tones when the user lifts the handset or presses the
hookswitch.
7.3 When a message waiting indication is left at anAttendant Computer Console, “MSG” appears in the
alarms/notices area at the toy of the screen. When you
press the SHIFT and MSG keys at the same time, a list-
ing of waiting messages appears in the lower half of the
screen. Messages are listed in the order they were received. Each message is identified with the caller’s
name, department, and current status (busy, forwarded,
etc.). The waiting messages can be answered or can-
celed as desired.
7.4 Any station can be designated as the message center for any other station. However, a station cannot be
programmed as its own message center. If the designated message center is a voice mail system, the voice
mail system is called. When the voice mail system answers the call, the called party’s “mail box” is automatically dialed. The caller can then leave a message in the
mailbox. The called party’s MSG key flashes and the
(3) To have the called party call you: Press
RELEASE.
To leave the message with the called party’s
message center:
Do not hang up. When the message timer expires, a private call is automatically
placed to the called party’s message center. (If
the message center is a voice mail system, the
called party’s mailbox is automatically dialed after the voice mail system answers the call.)
Leave your message with the message center and
hang up. The called station receives message
waiting indications.
NOTE: If the message center does not answer,
the station will still call the message center when
responding to the message waiting indication.
You may wish to call the station again and leave a
message at the station instead of the message
center.
7.7
TO LEAVE A MESSAGE WmG INDICATlON U?ll?IOUT
CALLING THE SZ4TION (SILENTMESSAGE):
Highlight the desired extension number in the intercom directory and press the MSG key. The
transient display shows “Message Left At Station.”
Page 2-23
Page 44

FEATURES
Issue 1, November 1994
IMX/GMX
256/832
INTER-TELPRACTICES
A’ITENDANT COMPUTER CONSOLE
Canceling A Message Waiting Indication That You
Left
71 Occasionally, you may wish to cancel a message
waiting indication that you left before the station user
responds to the message. Ifthe message was left with the
station’s message center, you cannot cancel the message
waiting indication; only the message center can cancel
the message, using the procedure outlined below.
7.9 To WCELAMESSAGE YOULEET:
(1) Dial or highlight the desired extension number.
(2) Press the ALT and MSG keys at the same time.
The transient display shows “Message Canceled
At Station.”
B. RECEIVING MESSAGES
Answering Messages
7.10
To Ah’SUER MESSAGES:
If“MSG” appears in the alarm/notice area at the
(1)
top of the screen, press the SHlFT and MSG keys
at the same time to view the message directory. A
list of waiting messages appears in the lower half
of the screen.
To reply by calling the station: press
(2)
the fimc-
tion key associated with the desired message (or
move the highlight bar to the desired message
and press RETURN or CNEEI’). A private call is
placed to the party identified in the message.
To reply by calling voice mail: press the
VMAlL key and then press the function key associated with the desired message (or move the
highlight bar to the desired message and press
REiTURN or CNECT). The mailbox number for
the station that is identified in the message is automatically dialed.
NOTE: Ifthe station does not answer the private
call, is busy, or is in do-not-disturb, the directory
continues to indicate a waiting message unless
you leave a message before hanging up or cancel
the message after hanging up. The message waiting indications are canceled automatically only
when you are actually connected with the station
that left the message.
(3) Repeat this procedure for each message you wish
to answer.
Canceling A Waiting Message
7.11
To CANCEL.AMESSAGE WllHOUTANSWERlNG:
If “MSG” appears in the alarm/notice area at the
(1)
top of the screen, press the SHIFT and MSG keys
at the same time. A directory of waiting messages appears in the lower half of the screen.
Move the highlight bar to the message to be can-
(2)
celed and press the AL.T and MSG keys at the
same time.
Repeat this procedure for each message you wish
(3)
to cancel.
, ._,
,
Page 2-24
Page 45

INTER-TELPRACTICES
IMx/GMX 256/832
A’ITENDANT COMPUTER CONSOLE
Issue 1, November 1994
FEATURES
8. OUTSIDE CALLS
8.1 When
placing an outside call, the voice channel is seized and
cannot be used by any other station (unless Privacy release is enabled, see page 2-32, or the conferencing fea-
ture
is
group are busy, you can camp on or request a callback
(queue). Refer to the 256 or 4161832 manual for an explanation of trunk groups, auto trunks, and outgoing-access, allowed-answer, and ring-in assignments.
8.2 After answering an outside call, the operator can
tag it with a name and/or note by pressing the TAG key
and typing the name of the caller and, if a note is desired,
a backslash followed by the note. The caller’s name and
the note will replace the trunk identification. Ifthe call is
placed on hold and recalls, the operator will be able to
see the name of the waiting party. Also, when text messaging is used, the name is automatically inserted in the
PROM
directory as described in paragraph 8.8 below.
A. TEIE CO DIRECTORY
8.3 The console CO directory is displayed when an
outgoing call is placed. It includes the
numbers and any additional numbers that were entered
by the operator(s) using the procedure given on page
2-55 or the tagging procedure described below. To view
the complete directory, an operator can use the programming sequence (shown on page 2-SS), or Press OUTGN
followed by any letter and a BACKSPACE.
8.4 The numbers added by .he operator(s) can be given names and/or notes as desired. Each operator can add
numbers to the CO directory, but because all operators
of a single console share the CO directory, all will have
access to the numbers (the added numbers are not “pri-
vate” for each operator on a shared console). The names
can be 20 letters long and the notes can be 10 letters
long. Do not use digits or backslashes in the names or
notes.
8.5 System speed-dial entries are shown in the directory with the speed-dial location number in the “notes”
field. Unless the console user is an attendant or the system speed-dial Programming station, non-display
speed-dial numbers will show only the name (not the
telephone number) and they cannot be added as personal
entries in the CO directory or redialed.
a trunk group
is
selected for receiving or
used, see page 2-29). If all trunks in the desired
line. Tagged calls can also be added to the CO
system
speed-dial
8.6 While viewing’a CO directory entry, the console
user can press the “at” key (@) to display the area code,
location, and local time of the telephone number. If the
time is shown as XXXX, the area code spans two time
zones and the local time is estimated. If you know the
actual time for that telephone number, the local time can
be modified as described on page 2-55.
8.7 In the directory, toll-free “800” numbers are preceded by “$0” to indicate that they are free calls. Toll
numbers that begin with 9xX are preceded with “$$“.
8.8 l07XZ;4CACALLORREDL4LhTJMBERAND~OR~lTIN
THE CO DIREClWX:
While on an outgoing call or while viewing a
(1)
highlighted redial number in your personal CO
directory, Press the TAG key.
When prompted, enter the name and, if desired, a
(2)
backslash (j) followed by a note.
To tug the call and place the number in the CO
(3)
directory: press
SHlFI’ and TAG at the same
time. The name and note replaces the trunk identification.
To tag the call without adding it to the dinxtory: press
RETURN. The name and note
replaces the trunk identification. (You can later
add the call to the CO directory by repeating
steps l-3.)
To remove the tag from a tagged call: press
AUT and TAG at the same time. (This does not
remove the CO directory entry, if one was added.)
8.9 The numbers added by the operator(s) to the CO
directory can be listed by first name or last name, as desired. If the entry was made with the names reversed (for
example, “Joe Smith” was entered and “Smith, Joe” is
desired), the names can be reversed by highlighting the
entry and pressing GIRL and TAG at the same time.
8.10
When CO directory entries contain numbers that
exceed the space allotted, a plus (+) appears next to the
number. To view the expanded information, place the
highlight bar on the entry (using the ARROW keys) and
then press the question mark (?) key. To return to the
shorter display, press the question mark key again.
Page 2-25
Page 46

FEATURES
Issue 1, November 1994
IhWGMX 256/832
A’ITEN-DANT COMPUTER CONSOLE
INTER-TELPRACTICES
B. PLACING OUTSIDE CALLS
8.11 lVPLACEANOUlXDECALL:
(1)
To select the default outgoing trunk: Press the
OUTGN key. A trunk is selected according to the
customized option you have programmed (see
page 2-56).
To select a trunk other than the default selection: Press the
ALT and OUTGN keys at the
same time. A list of all trunk group access codes
is displayed in the lower half of the screen. Press
the associated function key (or highlight the desired option and press REZURN or cmcr).
(2) If you wish to use your class-of-service account
co&, press the FEAT key and then press Fl to select Gptional Account Code. A prompt appears
to allow you to enter the account code. Enter the
account code and press RETURN or CNECT.
You hear a single progress tone when the code is
accepted. Your usual toll restriction is now in ef-
fect.
(3) if you hear intercom dial tone: You have
accessed a dial-repeating E&M trunk. You can
dial an extension number to reach a station on the
other telephone system. Or, you can enter a valid
trunk access code (determined by the other telephone system) and dial and outside telephone
number.
If you hear outside dial tone: Dial a telephone
number using one of the following methods:
To dial directly:
Dial the desired number
and press RETURN or CNECT.
To use the console CO directory: Begin
entering a last name, first name (preceded
with a comma), a note (preceded with a backslash), or number. (If you make a mistake,
use the DEL key to back up and make correc-
tions.) The bottom portion of the screen will
display the closest matches. (To display listings with the next letter in the alphabet, press
the right arrow. To move back one letter,
press the left arrow.) When the desired num-
ber is displayed, press the function key associated with it (or press the arrow keys until
the highlight bar rests on the desired number
and then press
RETURNorCNECQ.Or
continue entering characters until a complete
number is shown then press RETURN or
CNECT.
To use a system speed-dial number:
Enter
the system speed-dial location number
followed by a right bracket ( ] ).
To redial a number or use your personal
speed-dial directory:
If the redial/speeddial directory is displayed, select a number
from the directory shown in the bottom half
of the screen by pressing the associated fnnction key (or moving the highlight bar to the
desired number and pressing RETURN or
CNECX).
(4) Zf an account code is requi~$ the screen
Prompts you to enter an account code. Enter a
forced account code (refer to page 2-27) and
press RETURN or CNECX
(5) The call handling window shows “PLACING
OUTGOING CALL” and then shows the call information including the trunk group selected, the
number dialed, elapsed time of the call, and
“CONNECTED!”
Zf
you hear @eating n?omkr tones: You are
restricted from the trunk group chosen; start over
and choose another trunk group. If your call has
been blocked because the weekly toll limit has
been exceeded, the display shows CALL
FAILED - TOLL LIMIT EXCEEDED.
If you hear busy sign&: The chosen trunk group
is busy. Camp on, use the busy trunk callback
(queue) feature, or start over and select another
trunk group.
NOTE: To turn DTMF mode on or off (depending on
the default mode), press the ALT key and any keypad
digit key. That digit and all digits dialed after it use the
new mode. To return to the default mode, disconnect
from the call or press ALT and any keypad key again.
I
Page 2-26
,,-.’ :/
:::’
,’
‘I
Page 47

INTER-TELPRACTICES
IMx/GMX 256/832 ATTENDANT COMPUTER CONSOLE Issue 1, No”%=
..-..’
_.,,
C. TRUNK CAMP ON AND BUSY TRUNK
GROUP CALLBACK (QUEUE)
Camp On
8.12 When you attempt to access a busy outgoing
trunk group, the system sends a busy signal. You can
wait off hook to camp on until a trunk is available.
8.13
ToCAKPONlDANOUlGOlNGlRUNKGROUP:
When you hear a busy signal after pressing the
OUTGN key, do nothing. You camp on and hear
music until a trunk in the trunk group is avail-
able. When the trunk is available, your call is
placed automatically.
Busy ‘lhnk Callback (Queue)
8.14 If you attempt to access a busy outgoing trunk
group and hear a busy signal or if you camp on, you can
request a callback (queue) and hang up until the system
signals your station that a trunk in the trunk group is
available. Each station can place only one queue request
at a time. If a second request is made, the first request is
canceled and replaced by the second request.
8.15 Queue callbacks must be answered before the
queue callback timer expires. If a callback is not an-
swered, the queue is canceled. Ifthe station is busy when
a trunk in the queued trunk group becomes available, the
queue request is placed at the end of the queue list.
8.16
TO QUEUE ABUSYOUTC;U‘NG TRUNKGROUP:
(1) When you hear a busy signal while selecting a
trunk or if you are camped on, press the QUEUE
key.
(2) Your station rings (a repeating signal of three
tones and a long pause) when the queued trunk is
available. Answer the callback by highlighting it
in the incoming call list and pressing ANSW or
CNECX Your call is placed automatically.
8.17
To CANCEL A QUEUE BEFORE THE QUEUED IllSUNK
GROUPBECOMES AVWLE:
While the console is idle, press the ALT and
QUEUE keys at the same time. The transient dis-
play shows “Canceling Queue.”
D. ACCOUNT CODES
8.18 There are four types of account codes in the system. All account codes are assigned the same character
length (4-g characters) in database programming. The
four types are as follows:
0
Standard account codes automatically appear in
the SMDR report (if programmed) to identify the
station that answered or initiated the call.
0
Forced account codes are programmed on a stationby-station basis. If required, a forced account code
must be entered before the user is given access to a
selected outgoing trunk group (refer to step 5, on
page 2-26, for procedures). The account code entered by the user must match any one of the programmed forced account codes before outgoing access is granted.
0
Forced account codes for toll calls only can be programmed for stations with LCR-On1 y toll restriction
in day and night modes. When this account code
type is enabled, the user only has to enter an account
code if the system detects that a toll call has been
dialed when LCR is used.
0
Optional account codes are used to identify calls to
and from customers for billing purposes. They can
be entered at any time during a call. These userdefined codes are not pre-programmed, but must be the
same length as the standard and forced account
codes. If entered, optional account codes are printed
in the SMDRlSMDA report for that call in place of
standard or forced codes that may have been used.
0
Class-of-service account codes: If the system-wide
class-of-service account code option is enabled, individual stations can be assigned account codes that
the users can enter at other stations to enable their
usual SCOS. When a user is at a station other than his
own, he can enter his class of service account code
before placing an outgoing call. The system will
then check the station circuit that is associated with
that account code and apply the appropriate SCOS
(it will not apply the trunk access permission or LCR
advance class of service). The class-of-service
account code can be entered when the system requests a forced account code or by using the optional
account code feature code (described below). The
SCOS is enabled for one call only. When the call is
completed, the station’s normal SCOS goes back
into effect.
Page 2-27
Page 48

FEATURES
Issue 1,
November 1994
IMX/GMX 256/832 ATTEND
lNTEFGTELPRAcTIcES
ANT COMPUTER CONSOLE
8.19 Forced account codes can be validated or
non-validated.
0
Validated:
If tht entered code matches one of the
preprogrammed forced account codes in the database, the call is allowed. Ifthe code does not match,
the call is blocked.
0
Non-Validated:
The code is not checked against any
lists and the call is allowed as soon as the code is entered.
8.20
TOEh’lERANOi=WONALACCOUNTCODE WhYLE ONAN
OVlXDE CALL:
(1) press the FEKF key and press Fl to select
Optional Account Code. A prompt appears that
allows you to enter the account code.
(2) Enter the account code and press FUZTURN or
CNECT. You hear a single progress tone when
the code is accepted. (If an account code is entered that has fewer than the programmed number of digits, the display shows “Invalid Account
Code -Enter any character to continue.” press
any character, then enter the code again, or press
ESC to cancel the account code display.)
E. HOOKFLASH
8.21 A hookflash may be required to access certain
external PBX or telephone company features. The duration of the hookflash can be changed by reprogramming
the CO hookflash timer (default value is 600ms).
8.22
TOSENDAlZMEDIiOOKFZASH~ONANOUTSLDE
l7WN.K:
Press the FTASH key.
Page 2-28
Page 49
INTER-TELPRACTICES
IMWGMX 256/832 AlTENDANT COMPUTER CONSOLE
Issue 1, November 1994
FlcATuREs
.-
‘_>’
9. REVERSE TRANSFER (CALL
PICK-UP)
9.1 Calls ringing or recalling at a station, a hunt group,
or a transfer-to-park location can be picked up at any
other station, using this feature. Calls on hold can also be
picked up from stations and from transfer-to-park locations.
9.2 If more than one call is ringing or holding at the
station, a priority list determines which call is reverse
transferred. Calls are selected in the following order,
and if more than one call of the same type is at the station, the calls are picked up in the order they were received:
1. Outside calls
a. direct ring-in calls
b. transferred and camped-on calls
c. recalls
d. calls on individual hold
2. Intercom calls
a. ringing calls (incoming, transferred, or
recalling)
b. holding calls
9.3 When a call is picked up from a hunt group, the
system uses a different priority list. The system follows
the hunt group list (always beginning with the first station on the list) to check each station in the hunt group
and then the overflow station for one type of call at a
time. If there is more than one call of the same type at the
selected station, the call that was received by the station
first is picked up. Camped-o;. calls, holding calls, and
queue callbacks cannot be picked up. The hunt group
call pick-up priority is as follows:
1. Ringing outside calls
a. direct ring-in calls
b. transferred calls
c. recalls
2. Ringing intercom calls (incoming, transferred,
or recalling)
9.4 To REYERSE TRANSFER (PICK UP) A CALL:
EITHER, Dial the extension or pilot number
where the call is ringing or holding and press the
PICK UP key. The reverse transferred call’s information and “Retrieved from XXXX” is displayed in the transient display.
10. CONFERENCE CALLS
10.1 Users can establish a three- to eight-party conference without operator assistance. Auser can initiate one
conference at a time. In addition to the initiating station,
the conference can include any combination of up to
seven intercom and/or outside calls. The initiating station is considered one of the conferencing parties.
10.2 If a conference is terminated using the hold feature, the remaining callers hear music while they are
waiting. The user must return to the callers one at a time.
If the hold timer expires, the calls on hold recall the station that placed them on hold in the order they were
placed. If still unanswered after the recall timer expires,
they recall the station’s attendant.
10.3 While
parties cannot dial numbers, enter hookflashes, or use
the call transfer features. Also, if any inside party exits
the conference by pressing the CNP key, the remaining
inside parties may not use the conference wait or hold
features to exit or terminate the conference.
NOTE: During a conference, some reduction in voice
volume may be noticed, depending on CO trunk quality.
A. PLACING A CO NFJZRJWCE CALL
lo.4 To PUCE A CONFERENCE CALL:
(1) While on a call, press the CNP key. The party is
(2) Place intercom or outside calls to other parties
a conference call is in progress, the inside
on conference wait hold (hears music) and the
call information appears in the lower half of the
screen. The transient display shows “CONFERENCE SETUP - 1 CALL PENDING.”
NOTE: If you hear a busy signal followed by
music, all conference resources are busy.
Attempt the conference again by pressing the
CNF key.
(or access existing calls) to be included in the
conference and place them on conference wait
hold as described in the first step. The transient
display shows the number of calls pending and
the call information is listed in the lower half of
the screen.
NOTE: After placing the first call on conference
hold, if you cannot reach the other parties and
need to speak to the caller on conference hold,
press CNF.
” :
:
. *‘.f
OR, Press the PICKUP key and then dial the extension or pilot number (or select it from the directory). The reverse transferred call’s information and “Retrieved from XXXX” is displayed in
the transient display.
Page 2-29
(3) When all parties are on conference wait hold,
press the CNP key again. All parties are
connected. Display shows “IN CONFERENCE”
and the call information shows “CONNECIED!” at the end of each line.
Page 50
FEATURES
Issue 1, November 1994
INTER-TELPRACTICES
IMX/GMX 256/832 ATTENDANT COMPUTER CONSOLE
NOTE: If you attempt to add more than the max-
imum number of parties, “MAXlMUM CON-
PERENCE SIZE REACHED” appears in the
transient display, and the last party you called
will be placed on individual hold. The confer-
ence is unaffected.
B. ADD PARTIES TO A CONFERENCE
103 To ADD IHRTLZS TOANEAXZWG CONFERENCE:
NOTE: Only one party in the conference can perform
this procedure at a time. This procedure cannot be performed if the maximum number of conference participants has been reached.
(1) During the conference, press the CNP key. The
other parties remain connected.
(2) Place an intercom or outside call to (or access an
existing call with) the other party to be included
in the conference. Then press the CNP key.
(3) To connect the conference: Press
the CNP key
again to connect all parties in a conference.
To add another party:
C. EXlTING
10.6
l0 EXIT l?LE CONFERENCE AND LEAVE THE OlHER
i?tRnEsCONNE~:
A CONFERENCE
Repeat steps 1 and 2.
To return to the conference: Press
(2)
the function
key associated with the conference (or highlight
the conference and press RETURN, CNECT, or
ANSW).
NOTE: If all remaining parties are outside
parties and the conference hold timer expires
while you are out of the conference, the parties
will hear a warning tone. One of the parties may
reset the timer by pressing any M’h4P key. If the
timer is not reset, the parties recall your station.
You hear recall tones and the call information
shows that the conference is a recall. Return to
the conference as described above. If the recall is
not answered before the recall and abandoned
call timers expire, the conference will be disconnected; it will not recall your attendant.
10.7
To PLACE THE OTHER PAR= ONHOLD:
During a conference call press HOLD. The con-
(1)
ference is terminated and the parties are placed
on individual hold. The lower half of the screen
changes to the incoming call list and the transient
display shows the number of calls ringing and
holding.
Return to the parties one at a time by pressing the
(2)
associated function key (or highlighting the desired call and pressing RETURN, CNECT, or ,“-.
ANSW).
10.8
To EA?D THE CONFERENCE:
(1) During the conference, press the CNP key. The
parties remain in conf...rence. The lower half of
the screen changes to the incoming call list and
the conference is placed on the list as a holding
call. The transient display shows the number of
calls ringing and holding. You may place or
answer other calls or use other console features.
During a conference call press RELEASE. If
there are no other inside parties, the conference
is terminated and all the calls are disconnected.
The console returns to the idle state. (If there is
another inside party, only you are removed from
the conference and control is transferred to the
other inside party.)
-/
Page 2-30
Page 51
INTER-TEL PRACTICES
IMX/GMX 256/832 ATTENDANT COMPUTER CONSOLE
Issue 1, November 1994
FEATURE!3
11. BARGE
11.1
If the barge feature is enabled system-wide, console stations can be programmed (on a station-by-station basis) to use the “barge” feature. This permits the
user to join an ongoing call by pressing the BARGE key.
Another option is available on a station-by-station basis
that prevents other stations from barging into calls
the station.
11.2 Only keyset and Attendant Computer Console
users can use the barge feature. They can join the conversation of any station to which they may make a call.
The user may never barge into a station that he or she
could not otherwise call, such as a cross-tenant station
when the system does not allow cross-tenant traffic.
11.3
A hunt group supervisor may barge on any call
that he or she can monitor; this could conceivably be a
station that he or she could not otherwise call.
11.4 Barge is not affected by do-not-disturb mode, the
call privacy and private call features, ring intercom always, or call forwarding. If any of these are programmed on the receiving station, barge will override
them.
11.5
A barge call will be received through the secondary voice path as an off-hook voice announce call if the
station being called is a digital keyset, a 12/24-line analog keyset, or an Inter-Tel/DVK keyset and the keyset
user is using the handset (using the speakerphone or a
headset would block the seondary voice path). Although it uses the secondary voice path, barge
used if OHVA is not enabled system-wide; the receiving
on
can be
keyset does not have to be programmed to receive
OHVA
11.6
A barge call will be received as a conference with
the ongoing call if the secondary voice path is not available or the keyset user is on one of the following types of
calls:
An intercom call
A
conference that does not exceed the maximum ca-
pacity of parties
An outside call using the speakerphone or headset
11.7
A barge cannot be completed on data calls or
calls on conference wait hold. Nor can a barge be completed if the conference resources or voice channels are
not available.
11.8 When a barging party joins a conference call, the
parties in the ongoing call hear a single tone (if barge
confirmation tone is enabled). The call then continues as
a conference.
11.9
To JO,TV(EARGE)ANONWING CALL:
If the receiving station does not huve an
available secondary voice path:
When placing
an intercom call to a busy station, press BARGE.
The parties in the ongoing call hear a single tone
and you are in the conference with all parties.
If the
secondary voice path:
nzceiving station has an available
When placing an intercom call to a busy station, press BARGE. You are
connected to the keyset user through the
secondary voice path (speakerphone) as if you
were placing an off-hook voice announce call.
Page 2-31
Page 52
PEA=
Issue 1, November 1994
IMXIGMX 2561832
A Tl’ENDANT COMPUTER CONSOLE
INTER-TELPRACTICES
12. CALL PRIVACY AND PRIVACY
RELEASE
12.1
Call privacy restricts voice channel access to one
station at a time. When a voice channel
other station user can gain access to the channel. However, access to and control of a channel can be passed to
another station using the conference or transfer features.
12.2 In addition, the database contains an installer-
programmable option that can be set to enable call privacy on all trunks or to allow keyset users to join an ongoing call by pressing the lit individual trunk key.
Single-line set and console users cannot join calls, but
keyset users can join a call that involves a single-line or
console station. When the system is in the default state,
calls on all trunks are private and any user attempting to
access a busy trunk will hear busy tones.
12.3 A keyset or console user cannot join established
conference calls, data calls, calls on individual hold,
DISA calls, and calls forced private by the user.
is
selected, no
12.4 Even when privacy release is enabled systemwide, an individual station user can restore call privacy
during an outside call by entering the private call feature
code or by placing the station in do-not-disturb. The call
then cannot be joined by other people unless the conferencing feature is used. If the call is transferred or
placed on system hold, the privacy restore feature is canceled. Privacy is retained if the call is put on individual
hold.
12.5 There is a programmable option that enables or
disables a signal tone (barge confirmation tone) that is
heard by the parties on the call whenever another user
joins the call.
12.6
To RESTORE PRIKACYONA NON-PRl’WlE TRUNK:
EITHER, While on an outside call, press the
PEAT key and then press IT? to select “Private
CO Call.”
OR, While on an outside call, press the DND key
to place your station in do-notdisturb.
‘.
Page 2-32
,
Page 53

INTER-TELPRACTICES
IMTVGMX 256/832
ATl’ENDANT COMPUTER CONSOLE
Issue 1. November 1994
FEATURES
.1_ ’
13. CALL FORWARDING
13.1 With call forwarding, a station user can route incoming intercom and outside calls (including direct
ring-in calls and DID calls) to another station, to a hunt
group, or to an outside telephone number, if allowed by
toll and trunk restrictions. The four forwarding options
are:
Forward all calls:
ately forwarded.
Forward if no answer: Incoming
forwarded if they are not answered before the for-
ward no answer timer expires.
Forward
if
forwarded if the station is busy.
Forward if no answer or busy: Incoming
forwarded immediately if the station is busy, or forwarded if calls are not answered before the forward
no answer timer expires.
13.2 When call forward is enabled, the call handling
window shows the call forwarding status and destination while the console is idle. The alarm/notice area
shows “FWD” until the request is canceled.
13.3 Users can chain forwards from station to station
providing that the forwards do not form a loop. The conditional forward features (if busy, if no answer, if busy/
no answer) may form a loop that the system cannot detect until a call is placed to the forwarding station. For
example, if two station users iorward their calls to each
other using the forward if busy feature, the system accepts the requests. However, if a call is received at either
station while both stations are busy, the forwards create
an illegal loop. In this case, the call camps on to the
called station.
13.4 If more than one statipn has ring-in permission
for a trunk group, direct ring-in calls on that trunk group
will forward to extension numbers, but not to outside
numbers or voice mail.
13.5 Calls cannot be forwarded to restricted outside
telephone numbers or stations in do-not-disturb. If the
station that is programmed to receive your forwarded
calls is later placed in do-not-disturb, intercom callers
will see the receiving station’s do-not-disturb display,
but the call will be forwarded.
13.6 If your station is in do-notdisturb and you have
call forwarding programmed, the call is still forwarded.
If you enabled call forward no answer, intercom callers
will see the do-notdisturb display that you programmed
before the call is forwarded.
All incoming calls are immedi-
busy:
Incoming calls are immediately
calls are
calls are
13.7 Call forwarding overrides system call forward-
ing at the principal station.
13.8 Queue callbacks and recalls do not forward, except that a recall at the attendant’s station will forward to
another station.
Forwarding To An Outside Number Or E8zM
Destination
13.9
When programming a station for call forward to
an outside telephone number or E&M destination, a
trunk group is selected before the telephone number. If
the station is called while the selected trunk group is
busy, the call will not be forwarded. An intercom caller
will hear busy signals. An outside call will ring at the
forwarded station until the call is answered or the caller
hangs up.
13.10
The forwarding station’s (not the intercom call-
er’s) trunk and toll restrictions are checked when the call
is forwarded to an outside number.
NOTE: While this system is designed to be reasonably
secure against CO trunk misuse by outside callers, there
is no implied warranty that it is invulnerable to unauthorized intrusions. If the central office does not provide supervision and disconnect the call when one party hangs
up, it is possible for a caller to remain connected to a CO
trunk circuit. Ifthis happens, and the caller begins dialing, the call could be placed through the 256/832 System
and would then be billed to the system’s owner. The system cannot check this type of call for toll restriction and
may not register the call in SMDR. This problem could
arise when a call is connected to a station, or when it is
forwarded or transferred to the public network.
13.11
If using an E&M trunk that is connected to
another telephone system, and forwarding to an outside
number through the other system, the E&M trunk access
code is entered, followed by the other system’s trunk access code, and the telephone number. Then, when a call
is forwarded, the system automatically pauses after the
ELM trunk access code, for the duration of the pause
digit timer, before dialing the rest of the number.
13.12
When an outside call is forwarded to an outside
number using a loop start trunk, the unsupervised CO
timer is activated (unless disabled in database programming). When the timer expires, both parties hear a burst
of dial tone. Either party can reset the timer by pressing
any DTMF key. If the timer is not reset, the call recalls
the attendant. If the attendant does not answer the recall
before the abandoned call timer expires, the call is disconnected.
Page 2-33
Page 54

FEATURES
Issue 1,
November 1994
IMX/GMX 256/832 AT-I-END
INTER-TELPRACTICES
ANT COMPUTER CONSOLE
NOTE: There may be some reduction in voice volume
when an outside call is forwarded to an outside telephone number, depending on central office trunk quali-
9.
Using Call Forwarding
13.13
l0 FORWARD CALLS:
Press the FWD key. A window appears in the
(1)
lower half of the screen with the available
forwarding options.
Select the desired option by pressing the asso-
(2)
ciated function key (or moving the highlight bar
and pressing RETURN).
To forward to an intercom number or pilot
(3)
number: Dial the extension number of the station to receive the calls, 0 for the attendant, a
hunt group pilot number, or the voice mail extension numbers (or highlight the number in the intercom directory and press RETURN). “FWD”
appears in the alarm/notice area and, when the
console is idle, the forward condition and destination are shown in the call handling window.
To forward to an outside number: Press
OUTGN. A list of trunk groups appears. Press
the associated function key (or highlight the desired line and press RETURN). Then dial the desired outside telephone number and press RETURN. (If you entered a restricted number, the
transient display shows “Invalid Operation.”
You must press ESC to exit or enter another number.) “FWD” appears in the alarm/notice area
and, when the console is idle, the forward condition and destination are shown in the call handling window.
To forward to an outside telephone number
via an E&M trunk Press OUTGN. Select the
E&M trunk group from the trunk group list. Dial
the other system’s trunk access code and the desired outside telephone number, then press RE-
TURN. The system automatically enters a pause
and the display keysets show an “S” to indicate a
short pause. If you entered an invalid E&M trunk
group feature code or dialed a restricted number,
you hear repeating reorder tones. (Display keysets show FORWARD To RESTRICI’ED
mUN-9
To forward to an extension on the other tele-
phone system via an E&M trunk press
OUTGN. Select the E&M trunk group from the
trunk group list. Then dial the desired intercom
number and press IUTDRN. If you entered an
invalid E&M trunk group feature code or dialed
a restricted number, you hear repeating reorder
tones. (Display keyseta show FORWARD TG
RESTRICTEDTRUNK.)
13.14
REQUEST:
To CANCEL OR CHANGE ANY CALL FORWm
(1) Press the FWD key. A window appears in the
lower half of the screen with the available forwarding options. ‘Cancel Forward” appears at
the top of the list.
(2) To cancel call forward: Press Fl or RETUFLN to
select“Cance1 Forward.“The “FWD” notice and
forward status display disappear.
To change your forward@ option: Select the
desired option by pressing the associated function key (or by moving the highlight bar and
pressing RETURN). Then enter the new extension or outside number as described in paragraph
13.13, step 3.
,.‘i )
Page 2-34
/
Page 55
INTER-TELPRACTICES
IMX/GMX 256/832
AlTYDJDANT COMPUTER CONSOLE
Issue 1, November 1994
FJL4TuREs
.__ ,: ‘,
.:,
14. PAGING
14.1 The paging feature allows announcements to be
made through console and keyset internal speakers. Gptional paging equipment (amplifiers and paging speak-
stations or external zones in the selected page
zone, the necessary system resources are busy, or
the paging zone is being used by another station.
Users cannot camp on to or queue the paging system.
ers) may also be installed on external paging ports or re-
lays to provide paging for an external area, such as a
warehouse or loading dock.
(4) Zf you complete your page in less than the
allotted time, press RELEASE to end the page.
14.2 When the system is in the default state, all consoles and keysets are assigned to paging zone 1 to provide an all-page zone. Consoles, keysets and external
paging ports/relays can be assigned to any, all, or none
of the paging zones, as desired.
143
TOMAKEAl?iGE:
Press the PAGE key. A window appears in the
(1)
lower half of the screen that lists the paging
zones.
Scroll to the desired page zone and press
(2)
RETURN or press the function key associated
with the desired zone.
A display in the call handling window appears to
(3)
show you the selected page zone. Make your
page before the paging timer expires and the display disappears.
If you hear reorder tones and the transient
display shows “Invalid Operation, W there are no
15. REMOVE FROM PAGING
15.1
A console operator can prevent the console from
receiving pages or allow it to receive pages again using
this feature. If the console is assigned to more than one
page zone, all zones are removed or replaced; the operator cannot toggle individual zones.
15.2
l0B4lXORENABLE ZONE PAGES:
Press the PEAX key.
(1)
Locate the page remove/replace feature code in
(2)
the feature list. (If paging is enabled, “Page Remove” will be in the list. If paging has been removed, “Page Replace” will be in the list.)
Press the associated function key (or move the
(3)
highlight bar to the “Page Remove/Replace” fea-
ture code and press RETURN or CNECI).
Page 2-35
Page 56
INTER-TELPRACTXCES
IMX/GMX 256/832 ATTENDANT COMPUTER CONSOLE
16. DO-NOT-DISTURB
16.1 Placing a station in do-notdisturb halts all pages,
incoming intercom calls, camped-on calls, and transferred calls to that station. Queue callbacks, recalls, and
direct ring-in calls are not blocked. Another user calling
the station while it is in do-not-disturb hears a repeating
signal of four fast tones and a pause (consoles and display keysets show the do-not-disturb message); the user
cannot camp on, but can queue or leave a message at the
station.
16.2 If desired, individual stations can be prevented
from using do;notdisturb by disabling the do-notdisturb option in the database. Another option concerns
do-not-disturb breakthrough. Normally, calls to a sta-
tion through DISA or the automated attendant are not
blocked by placing the station in do-notdisturb. If desired, individual stations can be set to prevent these calls
from breaking through do-not-disturb.
16.3 Console stations may be given do-notdisturb
override permission. These stations, when reaching a
station in do-not-disturb, can bypass do-notdisturb and
place an intercom call. This procedure is shown on page
2-20, step 3e.
16.4 Default do-not-disturb messages are programmed as follows. Additional, customized two-line
messages can bc programmed by each console operator.
Refer to page 2-58 for do-not-disturb message custom-
izing information.
01 DO-NOT-DISTURB ” OUTOFOFFICE
02 lNMBEllNGUNTlL 12 OuTuNTlL
03 lNh4BETlNG 13 WlTHACLIENT
04 ON VACATION ‘TIL 14 WTl-HAGUlST
05 ONVACAI-ION 15 WlTHAPAlIENT
06 CALLhEAr 16 UNAVAILABLE
07 cALLMBAFrBR
08 AWAYAl- 18 AWAY FROM DESK
09 ONBREAK 19 GONEHOME
10 OUT OF TOWN ‘TJL 20 OUTMLUNCH
165 When a customized message ispot used, the second line of the message can be filled in with a numeric/
alphanumeric message of up to 16 characters.
16.6
To ENABLE DO-NOT-DISTURB MODE AT YOUR
.WllTON:
(1) Press the DND key. The list of customized and
default do-not-disturb messages appears in the
lower half of the screen.
(2) Press the function key associated with the de-
sired message (or move the highlight bar to the
desired message and press RETURN or
0JECl-j.
17 INCONFERENCE
If you selected a customized two-line message
“DND” appears in the alarm/notice area at the
top of the screen. When the console is idle, the
full message appears in the call handling window.
If you did not select a customizd message, the
screen prompts you to “Enter custom DND message.”
(3) If desire4 enter a second line of up to 16 charac-
ters and press
REYIVRN or CNECT. (If you make
a mistake, you can use the backspace or delete
keys to back up and correct the entry before
pressing REEURN or CNECT, or press ESC to
completely erase the entry.) “DND” appears in
the alarm/notice area at the top of the screen.
When the console is idle, the DND message ap
pears in the call handling window.
NOTE: If you do not enter a character within 10
seconds when programming the second line, the
program times out and the characters already entered (if any) are used as the second line of the
DND message.
If you do not wish to enter a second line, press
RETURN or CNECI’ without entering a message. “DND” appears in the alarm/notice area at
the top of the screen. When the console is idle,
the DND message appears in the call handling
window.
16.7
To CHANGE THE DO-NOT-DISTURB MESSAGE:
(1) Press the DND key. A window appears with the
options “Cancel” and “Program.”
(2) Press the F2 key to select “Program.” Enter the
new message as described in paragraph 16.6.
16.8
To CANCEL DO-NOT-DISTURB:
ElTHER, Press the ALT and DND keys at the
same time.
OR, Press the DND key. When the list appears,
press Fl or
16.9
To PIACE YOUR BUSY STATION IN DO-NOT-DISTURB
WIILE A CALL IS CAMPED ON:
RETURN to select “Cancel.”
If, while on a call, you hear call waiting signals
and you wish to let the caller know you do not
want to be disturbed, press the DND key. Then
press RETURN twice or let the program time
out. The console is in do-not-disturb. The intercom caller is no longer camped on and’receives
do-not-disturb indications.
- Y’,:.
c
Page 2-36
Page 57

INTER-TEL PRACTICES
IMX/GMX 256/832 ATTENDANT COMPUTER CONSOLE
Issue 1, November 1994
FEATURES
17. REMINDER MESSAGES
17.1 Reminder messages are set, like an alarm clock,
to signal your station at a specified time. You can select
the message and time up to 24 hours in advance. l?venty
different reminder messages are available.
17.2 At the programmed time, the reminder message
signals the station with two short tones and the message
appears in the transient display. When the console is
idle, the full reminder message appears in the lower half
of the screen.
17.3 Messages can be changed by the installer or any
attendant, if desired (see page 2-43). They are limited to
16 characters. The default messages are:
01 MEEIWG
02 Sl’AFFhEETING
03 SALES-G
04 CANCELhfEETING
05 APPoINTh4mT
06 PLACECALL
07 CALLCLIENT
08 cALLcumh4F.R
09 CALLHOME
10 CAILCORPORKm
17.4
To REQUESTREiULVDER MESSAGES:
(1) While the console is idle, press the FEAT key. A
list of features appears in the lower half of the
screen.
(2) Locate “Reminder Message” in the list, then
press the function key associated with it (or highlight it and press RETURN or CNECT). A list of
reminder messages af:xars.
11 CAILENGINEERING
12 CALL-G
13
CALLACCQUNTING
14
CANCELDND
15 CANCELCALLFWD
16 TAKJ3 MEDICATION
17 MAKE RFSERVAl’ION
18 RF5’IEWSCHEDULE
19 LUNCH
20 REMmDF,R
Locate the desired reminder message in the list,
(3)
then press the function key associated with it (or
highlight it and press
RETURN or CNECT). The
screen prompts you to “Enter Reminder Time.”
Enter the time at which you wish to receive the
(4
message, in the indicated format, with the hour
and minutes separated by a colon (for example:
“13:OO” or “1:OO pm”) and press RE5‘VRN. The
transient display shows “Reminder Message Accepted.”
173
lOCL?XRARECEIVED
-ER
MESEAGE:
At the selected time, you hear two short tones
and the message displays in the transient display
and, if the console is idle, it appears in the lower
half of the screen.
To clear the message: When the console is idle,
press the asterisk (*) key on the typewriter or
numeric keypad.
17.6
To CANCEL ALL OF YOUR
QUESTS:
RlS#NDER bfESSAGE RE-
(1) press the PEAf key. A list of features appears in
the lower half of the screen.
(2) Locate the “Reminder Message Cancel” feature
in the list, then press the function key associated
with it (or highlight it and press RETURN or
CNECT). The transient display shows “Reminder Message Canceled.”
Page 2-37
Page 58

PEAIssue 1, November 1994
18. OPTIONAL SPIXIION EXCHANGE
FEATURE
18.1
This programmable station feature allows a station user to exchange the extension numbers of two station circuits. This swaps the database and user programmed features of the extension numbers between
two station circuits without the need for database programming. The circuit number of the station locations
are unchanged, but the extension numbers are changed,
as illustrated below.
BEFC
I STATION EXC INGE
CIRCUIT
01.02
EXENSION
NUMBER 1010
CIRCUIT
03.01
EXTENSION
NUMBER 2ooO
r
Circuit Number 01.02 has all of the database and user
. _- . -.
la pr~rammed as Extemii Numbew 2000.
IMX/GMX 256/832 ATTENDANT COMPUTER CONSOLE
the keyset to lose station speeddial locations l-3. This
is because those locations are automatically modified
by the console. Speed-dial locations l-3 will remain
functional at the console station.
18.5 Neither station involved in the exchange can
have a call in progress, ringing, or recalling when an exchange is attempted. There can be calls on hold or hunt
group calls can be camped on, recalling, or ringing. If
the exchange is denied, the user hears reorder tones.
18.6
l0 EXChQh’GE SZ4lTONS:
(1) To bring a new extension number to your present
location, press the FEAf key. A list of features
appears in the lower half of the screen.
(2) Locate the “Station Exchange” feature in the list,
then press the function key associated with it (or
highlight it and press RETURN or CNECT). An
extension number prompt and directory appear.
If the station you are using isnotpmgrammedfor
Station Exchange, you hear reorder tones and the
station returns to idle state.
INTER-TELPRACTICES
_-,
\
,::
Circuit Number 01.02 becomes Extension Number 2WO.
Circuit Number 03.01 becomes Extensbn Number 1010.
18.2 All database-programmed station features (such
as, trunk access, station flags, loll restriction, usemame,
etc.) as well as all user programming (speed-dial numbers, call forwarding, do-not-disturb, reminder messages, etc.) will stay with the extension number during
an exchange.
18.3 Any station that will be involved in a station exchange must have the Station Exchange station flag enabled and a programmed Station Exchange Password. If
a station user attempts an exchange in which one or both
extension numbers do not have the flag enabled, the exchange will not be allowed. If the user does not enter a
valid password after entering the Station Exchange feature code, the exchange will not be allowed.
18.4 Attendant Computer Console stations can be exchanged with other Console stations or with Analog
Keyset stations. They cannot exchange with Digital
Keyset stations or Single-Line stations. NOTE: Ex-
changes between a console and keyset station will cause
(3) Enter the extension number you wish to bring to
the station you are using. You hear a confirmation tone. The display shows the number you
dialed.
You will hear reonier tones and must start over
any of the following occur:
- You entered an invalid extension number
- The extension number that you entered is not
programmed for Station Exchange
- You entered an extension number of mismatched station device type (digital vs. analog, or keyset vs. single-line)
- You entered an extension number of a station
that is not idle
(4) When the password window appears, enter the
Station Exchange Password for the extension
number entered in step 2. When the password is
accepted, you hear a continuation tone. The station you are using is reset to reflect the database
and user programming of the extension number
selected in step 2.
If you entered an invalidpasswo~ you see “In-
valid Operation” in the transient display and
must start over.
if
,.
Page 2-38
Page 59

INTER-TELPRACTICES
IMX/GMX 256/832 Al-l’JWDANT COMPUTER CONSOLE
Issue 1, November 1994
FEATURES
19. OPERATOR STATISTICS
19.1
While the Attendant Computer Console is in use,
statistics are being tallied. These statistics include the
number and average time of calls that rang, recalled, and
were placed on hold, as well as total number of calls handled, time spent talking, and percent of calls that recalled. If no calls were placed on hold or recalled, this
information is also indicated. Statistics are not kept for
separate operators, but are continually compiled until
they are cleared by an operator or during a database
download.
19.2
To VIEW lL?E OPERATOR .s-zd.nsncs:
(1) Press the FE/D key and then press F6 to select
“Operator Statistics.” The statistics display as
shown below.
Operator name - Current Operator
Statistics collected from Mon Jan 01 >o(:XX to Mon Jan 01 xX:xX
X calls rang in
X calls recalled
X calls on hold
X calls handled
Average time for calls ringing in
Average time calls in recall
Average time calls on hold EE
Time spent talking on calls x:xX:xX
(2) When you are finished reading the statistics,
press ESC or RELEASE. If you Pressed ESC, the
screen allows you to “Clear Operator Statistics.”
(3) To allow the data to continue to accumulate:
Press Fl to select “Do Not Clear.” The console
returns to the idle state.
To clear the accumulated data: Press F2 to
select “Clear.” The console returns to the idle
state.
19.3 An operator option can also be selected in the
configuration utility that will display operator statistics
when the NIGHT key is pressed to place the system in
night mode. Refer to page 2-52.
Percent of ringing calls that were recalls X%
‘Y.,,,j;
:
,,
:
Page 2-39
Page 60

FEATURES
Issue 1, November 1994
lMX/GMX
256/832
AlTENDANT COMPUTER CONSOLE
INTER-TELPRACTICES
20. TRUNK STATISTICS
20.1 The console operator can display trunk statistics
that show instances, if any, when all trunks in a trunk
group are busy. When this feature is selected, the display
shows a list of trunk groups that includes the trunk group
description, access code, number of times all the trunks
in the trunk group were busy, the total amount of time
they were busy, and any errors that have been logged
(trnnk flags).
20.2 When the operator selects one of the truukgroups
to review, the display shows a list of instances when all
trunks were busy (the most recent instance is listed
first). Bach line shows the date and time that the trunk
group became busy, date and time the busy condition ended, and amount of time it was busy.
203 Up to 1000 “all busy” instances can be recorded
for each trunk group. And up to 40 can be recorded per
trunk group in an hour. Once either maximum is
reached, the oldest instance is removed from the list.
20.4 The trunk flags indicate errors that have been
logged against the trunk group. The errors (FE, MI, and
MB) should be reported to service personnel. The possible trunk flags and their meanings are as follows:
l
FE (File Error): An error occurred with one of the
trunk busy files while trying to log a busy/idle condition.
0 PB (Pending for Busy): A busy condition was
logged for this trunk, but the Attendant’s Console
was restarted (powered off and then on or reset) before the trunk became idle. Therefore it cannot be
determined how long the trunk was busy.
MI (Multiple Idle Conditions): +Bvo idle conditions were noted without an intervening busy condi-
tion.
MB (Multiple Busy Conditions): ‘Iwo busy conditions were noted without an intervening idle condition.
IO (Instance Overflow): More than 1000 busy
instances were logged for the trunk group and some
records may have been deleted, but the total time is
correct.
HO (Hour Overflow): More than 40 busy instances
were logged in an hour. Some records may have been
deleted.
20.5 While reviewing a trunk group, the operator can
choose to Prim or delete the information or to select
another trunk group.
20.6
To VlEWAh!DIOR PRMTlXR lltUNKSTAl7Sl7CS:
Press the PEAT key. A list of features is dis-
(1)
played. Locate “Trunk Statistics.” Then press
the associated function key (or highlight it and
press RETURN or CNBCT). A list of trunk
groups is displayed. (If there were no instances
of all trunks being busy in any of the trunk
groups, the console returns to the idle state.)
Locate the desired trunk group and then press the
(2)
associated function key (or highlight the trunk
group and press RETURN or CNECT). The “All
Trunk Busy” display appears as shown below. (If
the trunk group did not have any instances when
all trunks were busy, the display shows “No busy
conditions for this selected trunk.“) If you wish
to scroll through the records, press the UP or
DOWN ARROW, PAGE UP, PAGE DOWN,
HOME, or END keys to move through the list.
Press y/b/PgUp/PgDn/Home/End, Fl 0: Options, ESC: New Group, ALT-ESC: Exit
lnst Time Went Busy Time Went Idle Time Busy
2 : Mon Jan 01 XX:XX%X 1990 : Mon Jan 01 XI(:XX:X.X 1990 : X:XX:XX
1 : Mon Jan 01 XXZXXX 1990 : Mon Jan 01 xX:xX:xX 1990 : X:xX:xX
Page 2-40
Page 61

INTER-TELPRACTICES
IMx/GMX 256/832 AlTENDANT COMPUTER CONSOLE
Issue 1, November 1994
FEATURJS
.__ _,
(3) You then have the following options:
a.
Return the console to the idle state: Press
the ALT and ESC keys at the same time.
b.
Select a different trunk group: press
ESC key and repeat step 2.
C.
Print or delete records: press
“Busy Trunk Options” display appears. Continue to the next step.
(4)
While viewing the “Busy Trunk Options” win-
dow, you may perform any of the following:
a.
To return to the Data For ‘Drunk Group
screen: Press Fl. Return to step 3.
b.
To print the totals for all of the trunks:
Press F2. The screen asks you if you want to
“Output the total data only.” Press RJZTURN
to exit, or enter Y and then press RlZTURN to
print the totals for the trunks being displayed.
(This prints the summary information shown
in the highlighted area of the Data For Trunk
Croup screen.) The screen shows “Outputting this trunk group’s data, press any key to
abort.”
the
FlO. The
ter Y and then press RJSTURN to print the re-
cords for the trunk being displayed. The
screen shows “Outputting this trunk group’s
data, press any key to abort.”
NOTE: If the selected output has previously
been sent to the printer and is still pending,
the screen displays: “The data output file exists, overwrite?” Do not overwrite the file;
enter N and press RETURN.
d.
To print the records for ALL trunk
groups:
Ress F4. The screen asks you to
verify that you want to “Output data for ALL
trunk groups.” Press REZURNtoexitorY
and then RETURN to print the records for
ALL trunks. (This printa itemized information for all of the trunks.) The screen shows
“Outputting ALL trunk group data, press any
key to abort.”
NOTE: If the selected output has previously
been sent to the printer and is still pending,
the screen displays: “The data output file ex-
ists, overwrite?” Do not overwrite the file;
enter N and press RETURN.
NOTE: If the selected output has previously
been sent to the printer and is still pending,
the screen displays:
“The total data output
file exists, overwrite?” You can choose to
overwrite the existing file by entering Y and
pressing RETURN. If you do not wish to
overwrite the file enter N and press RETURN.
c. To print the records for the selected trunk:
Press F3. The screen asks you to verify that
you want to “Output the selected trunk
group’s data.” Press RETURN to exit, or en-
e.
To delete the records for the selected trunk
group:
Press F5. The screen asks you to
verify that you want to “Delete the selected
trunk group’s data.” Press RETURN to exit,
or enter Y and then press RElXJRN to delete
the records for the trunk being displayed.
f.
To delete the records for ALL trunk
groups:
Press F6. The screen asks you to
verify that you want to “Delete data for ALL
trunk groups.” Press RETlVRN to exit, or enter Y and then press RETURN to delete the
records for ALL trunks.
Page 2-41
Page 62

FEATURES
Issue 1, November 1994
IMX/GMx 256/832 ATTENDANT COMPUTER CONSOLE
INTER-TELPRACTICES
21. ATTENDANT FEATURES
21.1 This section describes the attendant-only features. Attendants with Attendant Computer Console stations can provide the following services for the stations
they serve:
Accessed by dialing “On
Central operators for incoming calls (if
programmed for ring in)
Message centers (if programmed)
Recall stations for unanswered calls
Clear displayed system alarms
Able to cancel do-not-disturb and/or call forwarding
for the stations they serve
Able to control the hunt group remove/replace feature for stations they serve
Program system do-not-disturb messages
Program system reminder messages
Program tenant-specific and system-wide speed-
dial numbers
Place the tenant group in night mode or day mode
ter that time, the call recalls the station that transferred it
or placed it on hold. If the call remains unanswered at
the station until the recall timer expires, it recalls the station’s attendant. If the attendant station is busy, the call
camps on and the display shows the source of the recall.
If the call is not answered before the abandoned call
timer expires, the call is disconnected.
21.4 If a station user transfers or forwards an outside
call to an outside telephone number and a loop start
trunk is involved, the call is limited by the unsupervised
CO timer (this does not apply to ground start trunks).
When the timer expires, the parties hear a warning tone.
One of the outside parties can reset the timer by pressing
any DIMP key. If the timer is not reset, the call recalls
the primary attendant station. This
SCNCS
two purposes:
It allows the attendant to monitor the length of CO-
to-CO calls. When a CO-to-CO call recalls, the attendant can disconnect the call or allow it to continue.
If the callers hang up before the attendant receives
the recall, the system may not have disconnected the
trunks because a disconnect was not received from
the central office. The attendant must disconnect the
call.
‘3
:
Set the system time of day, date, and day of week
Enable database programming for toll security pro-
gramming
Generate an SMDA report
Take trunks out of service ior maintenance purposes
and then place them back in service when mainte-
nance is complete
21.2 In addition to the capabilities listed above, if the
console operator is the primary attendant, he or she can:
0 Place the entire system in night mode or day mode
0 Program all system speed-dial numbers (including
tenant-specific numbers), unless this ability has
been assigned to another station
0 Receive unsupervised outside call and hunt group
recalls
NOTE: Station circuits do not have to be assigned as
attendant stations in order to use an Attendant Computer
Console.
A. AlTENDANT RECALL
21.3 When a call is placed on hold or is transferred
from one station to another, certain system timers limit
the amount of time the call may remain unattended. Af-
21.5 Arecall appears in the incoming call list after any
calls that are ringing. Unsupervised calls and conferences are identified as such in the call information. Ifthe
system is in night mode, the call recalls the station that
transferred the call or placed it on hold until the abandoned call timer expires; then the call is disconnected.
21.6 If the attendant has calls forwarded, recalls from
stations follow internal call forward requests. Recalls do
not forward to outside telephone numbers, but recall the
attendant’s station until they are answered or the abandoned call timer expires. Placing the attendant’s station
in do-not-disturb does not block recalls or direct ring-in
calls.
21.7
lOANWERAHOLD OR TRANSF~RECALL:
Highlight the call in the incoming call list and
(1)
press ANSW, RETURN,
If the caller wishes to speak to another party,
(2)
or CNECT.
transfer the call by dialing another extension
number and pressing EXTEND.
If the caller wishes to continue to ho& press the
HOLD key.
If you wish to disconnect the call, press the
RELEASE key.
Page 242
Page 63

..__.
:,
‘,.
INTER-TELPRACTICES
IMWGMX 256/832 A’JTEN-DANT COMPUTER CONSOLE
21.8
TO ANSWER AN ~NSUPER~ED OUXSIDE CALL
RECALL:
(1) Highlight the call in the incoming call list and
21.15
press ANSW, RETURN, or cNEm.
(2) Check to see if the trunk is still being used.
If theparties are still talking, press the CNF key
to return the parties to their conversation. You
can enter the conference at any time by pressing
C. PROGRAMMIN G SYSTEM REMINDER
the CNP key. When the conference-hold timer
expires, the conference recalls your station
again.
If the
parties have hung up or are finisheri, press
RELEASE to disconnect the call.
B. PLACING THE SYSTEM IN NIGHT MODE
21.9 Each attendant can place the associated tenant
group in night mode to change the allowed-answer and
ring-in assignments to the night lists.
21.10 The primary attendant can place the entire system (all tenant groups) in day or night mode. When the
primary attendant places the system in night mode, the
night mode display appears at all attendant and console
stations. If the primary attendant places the system in
21.16 The stored system reminder messages can be
changed from any attendant’s station. (See page 2-37
for information concerning their use.) When the system
is in the default state, the 20 reminder messages listed
below are programmed. Attendants can delete them or
change them to any other value (up to 16 characters).
01 IMEETING
02 SMFFhiElZING
03 SALJSMEETING
04 CANCELMFETING
05 APPOINTMENT
M FZCECALL
07cALLaIENT
08 CALLcum~
09 CAILHOME
10 CALLCGRFOm
day mode, the night mode display is cleared at all other
attendant stations.
21.11 There is no attendant recall during night mode.
Hold and transfer recalls ring at the station that trans-
21.17
(1)
ferred them or placed them on hold. If a recall is not an-
swered before the abandoned call timer expires, the call
(2)
is disconnected. Unsupervised call recalls and unassigned DID trunks will continue to ring at the primary
attendant’s station in night mode.
Issue 1, November 1994
FEATURES
date and, if programmed, the operator statistics
are displayed in the lower half of the screen.
To PLACE lHE SYSTEMMDAYiUODE:
Press the NIGHT key again. The night mode indication and operator statistics disappear when
the system is placed in day mode.
MESSAGES
11
CALLENGINEERING
12
CALL-G
13
CALLACCOUNTING
14
CANCEL DND
15
CANCELCALLFWD
16
TAKE hiEDICATION
17
MAKEREZRVATION
18
Rl?A’IEWscHEDuLE
19
LUNCH
20
REMINDER
TOPROGRAMA SYSlEM-ER MESSGE:
Press the PEAX key. A list of features appears in
the lower half of the screen.
Move the highlight bar to “Program System Reminder Messages” and press the associated function key, or press IXETURN or CNECT.
A list of reminder messages appears.
21.12 The configuration utility contains an option
that, if enabled, will display operator statistics whenever the NIGHT key is pressed.
21.13 If the console station is not programmed as an
attendant in the database, pressing the NIGHT key will
cause “Invalid Operation” to appear in the transient display and will have no effect on the system. However, if
operator statistics are programmed to appear, the statistics will be shown in the bottom half of the screen.
21.14
To PLACE THE SYSTEMINNIGHTMODE:
Press the NIGHT key. When the system is in
night mode, “NIGHT MODE” appears above the
Page 2-43
Move the highlight bar to the message you wish
(3)
to change and press RETURN or CNECT. The
screen prompts you to “Enter New Reminder 1
Message.”
Enter the desired message, up to 16 characters
(4)
and press RETURN. The console returns to the
idle state.
Perform a database download (as described on
(5)
page l-lo), as soon as it is convenient, to update
the messages in your console’s database. Any
other consoles will also need to perform downloads to update their databases.
Page 64
FEATURES
Issue 1, November 1994
IMX/GMX 256/832 AlTEND
INTER-TELPRACTKES
ANT COMPUTER CONSOLE
D. PROG
RAMMING SYSTEM
DO-NOT-DISTURB MESSAGES
21.18 The stored system do-not-disturb messages can
be changed from any attendant station. (See page 2-36
for information concerning their use.) When the system
is in the default state, the 20 do-not-disturb messages
listed below are programmed. Attendants can delete or
change messages 02-20 to any other desired value (up to
16 characters). Message number 01 (DG-NOT-DIS-
TURD) cannot be changed.
01 DO-NOT-DISIURB 11 OUT OF OFFICE
02 JNMEEllNGUNTIL 12 OUTUNTIL
03 INh4EETING 13 WITHACLENT
04 ONVACM-ION “I-IL 14 WITHAGJJEST
05 ONVACM-ION 15 WITHAPtU’ENT
06 CALLMEAT 16 UNAVAILABLE
07 cALLMBAFER 17 INmNFERENa
08 AWAY AT 18 AWAY FROM DESK
09 ONBFEAK 19 GONEHOME
10 OUT OFTOWN ‘TIL 20 0uTTOLuNcH
21.19
biES!ZAGE:
To PROGRAMA SYSTEMDO-NOT-DISlURB
Press the FEAI key. A list of features appears in
(1)
the lower half of the screen.
Move the highlight bar to ‘Program System
(2)
DND Messages” and press the associated function key, or press RETURN or CNECT.
A list of do-not-disturb messages appears.
Move the highlight bar to the message you wish
(3)
to change (except the first message, which cannot be changed) and press RETURN or CNECT.
I
The screen prompts you to “Enter Replacement
DND Message.”
Enter the desired message, up to 16 characters
(4)
and press RETURN. The console returns to the
idle state.
Perform a database download (as described on
(5)
page l-lo), as soon as convenient, to update the
messages in your console’s database. Any other
consoles will also need to perform downloads to
update their databases.
E. SE’ITING TIME OF DAY AND DATE
21.20 Occasionally, the system time or date needs to
be reset (for example, for daylight-saving time). Any
attendant can change the date and time message that
appears on all consoles and display keysets and in the
SMDA and SMDR reports.
21.21
ToSETlXElWEOFDAYANDDAl3Z:
(1) Press the FEAT key and press FS to select “Set
Tie Of Day.” The screen prompts you to “Enter
new date.”
(2) To enter the date:
Enter a new month, day, and
year (for example, 01/01/90) and press
RETURN.
To edit the date:
Change the current date by using the LEFT or RIGHT ARROW keys to move
the cursor to the digit to be changed, entering the
new digit, and pressing RETURN.
To leave the date unchanged: Press RETURN.
(3) The prompt changes to “Enter New Time” and
the cursor is flashing on the first digit of the time.
Do one of the following:
To enter the time:
Enter the new time in the
indicated format with the hour and minutes
separated by a colon (for example “13:OO” or
“l:OO pm”), and press RETURN. The console returns to the idle state and the date and
time display is updated.
To edit the time:
Change the current time by
using the LEFT or RIGHT ARROW keys to
move the cursor to the digit to be changed,
entering the new digit, and pressing RE-
TURN.
To leave the time unchanged:
Press
RETURN. The console returns to the idle
state and the system date and time display is
updated.
F. ENABLING TOLL SECURITY DA’IXRASE
PROGRAMMING
21.22
Weekly toll limit information can be changed
only after the Database Programming feature code has
been entered at an attendant station. The programming
privilege will remain in effect until the end of the
programming session. When the data has been changed,
a system alarm shows TOLL SECURITY DAfA
CHANGED at alarm stations and in SMDR
21.23
bh!NG:
RI ENABLE TOLL SECLJRllY DAZ4EASE PROGRAM-
Press the FEKI’ key. A list of features appears.
(1)
Scroll to the end of the list and 1ocate”Database
Programming Enable.”
Press the associated function key (or highlight it
(2)
and press RETURN or CNECI’). The display
automatically returns to the idle state.
Page 2-44
Page 65
INTER-TEL PRACTICES
IMX/GMX 256/832 ATTENDANT COMPUTER CONSOLE
Issue 1, November 1994
FEATURES
G. PROGRAMMIN G SYSTEM SPEED-DIAL
NUMBERS
21.24 Through database programming, each system
speed-dial number can be designated in the database as
available to all stations or available only to stations
within a certain tenant group. If desired, an identifying
name can also be stored with each speeddial number.
21.25 All Attendant Computer Console operators can
dial and view the system speed-dial numbers. However,
if the station is programmed as an attendant or system
speed-dial progr
amming station, the operator can also
program system speed-dial numbers.
21.26 The system speeddial numbers and names are
stored on the system hard disk and will not be erased in
the event of a power failure.
21.27 The system speed-dial numbers and names are
programmed by the installer, an attendant, or at the system speed-dial programming station. When the system
is in the default state, the primary attendant station is the
designated system speeddial programming station.
21.28 System speed-dial numbers can contain up to 32
digits each and can include hookflashes and/or short or
long pauses for dialing a series of numbers. For example, the speed-dial number can contain an SCC local
number, a pause, an access code, and the telephone
number. For using E&M trunks, the other systems’ trunk
access codes, followed by a pause, may be included in
speeddial numbers. The len@hs of the hookflash and
the pause are determined by the programmable “CO
hookflash” and “pause digit” timers.
21.29 System speeddial numbers are subject to toll
restriction unless a system-wide option has been enabled that allows any station to dial any system speeddial number regardless of that station’s SCOS.
21.30
NLJMERSAND NAMES:
To PROGRAM OR CHMiGE SYSTEM SPEED-DIAL
(1) Press the FEN’ key, then press Fi3 to select “Pro-
gram System Speed Dial.” The screen prompts
you to “Enter bin number.”
(2) Enter the speed-dial location code (000-399)
that you wish to program and press RETURN.
The screen prompts you to “Enter name.”
Enter the name that
(3)
ber and press
is
associated with the num-
RETURN. The screen prompts you
to “Enter outside number.”
Enter the desired number, up to 32 digits and
(4)
press RE’TURN. To include pauses or kook-
frnshes in the number, enter F for a hookflash, S
for a short pause, or L for a long pause.
The screen momentarily shows “Programming”
Q
and then returns to “Enter bin number.” Repeat
the process to program or change other numbers,
or press ESC to exit.
The screen prompts you to perform a database
(6)
download. Perform a database download (as de-
scribed on page l-lo), as soon as it is convenient, to update the system speed-dial numbers
in your cousole’s database. Any other consoles
will also need to perform downloads to update
their databases.
H.
REMOTE S’JXIION FEATURE CANCEL
21.31
An attendant can cancel call forward and/or
do-not-disturb for any or all stations that have dial-zero
access to that attendant’s station.
2132
To CANCEL Fl3lWW.S FOR SXUONS YOU SERVE:
Press the FEN’ key. A list of features appears in
(1)
the lower half of the screen.
Move the highlight bar to one of the following
(2)
feature codes and press the associated function
key, or press
RlTWRN or CNECT.
a. Cancel all station forward requests
b. Cancel station forward request
c. Cancel all station do-not-disturb requests
d. Cancel station do-not-disturb request
e. Cancel all station DND/FWD requests
f. Cancel station DND/FWD request
Ifyou cleared ail stations, the console returns to
(3)
the idle state.
If
clearing an inaWdua1 station, the intercom
directory appears in the lower half of the screen.
Dial the extension number or locate the desired
number in the directory and press RETURN or
CNECX
Page 2-45
Page 66
FEATURES
Issue 1, November 1994
IMX/GMX 256/832
INTER-TELPRACTICES
A’ITJZNDANT COMPUTER CONSOLE
I. REMOTE FIUNT GROUP
REMOVWREPLACE
21.33
An attendant can control the hunt group re-
move/replace feature for any stations that have dial-zero
access to that attendant’s station.
21.34
TO USEREMOlEHUNTGROlJPREMOvEIREpLQCE:
(1) press the FEXI’ key. A list of features appears in
the lower half of the screen.
(2) Move the highlight bar to the Remote Hunt
Group Remove or Remote Hunt Group Replace
feature. The press the associated function key,
RETURN, or CNECT.
(3) The intercom directory appears in the lower half
of the screen. Dial the extension number or
locate the desired number in the directory and
press RETURN or CNECI.
J. SYSTEM-
21.35
The system’s alarm reporting feature detects
REPORTING
equipment failures, determines the impact, and classifies the problem as a major or minor alarm. Minor
alarms are indicated on the primary attendant’s station
display and can be programmed to appear on all attendants’ stations. Both major and minor alarms areprinted
in the error report printout. Major alarm messages ap
pear on all consoles and display keysets. On Attendant
Computer Consoles, “ALARM” appears in the alarm/
notice area at the top of the SC.- :en and a full alarm message appears in the lower half of the screen when the
console is idle.
21.36 The first four minor alarms indicate problems
that can be corrected without calling service personnel.
All other minor alarms require attention from service
personnel. Refer to the 256 or 416/832 manual for a listing of the possible alarms and their meanings.
21.37 A major alarm message, WARNING! MAJOR
ALARM, appears on all consoles and display keysets in
the event of a major system reset. If the major alarm
appears on a group of keysets, the associated KSC board
has failed (or, if they are dual-circuit &line AIM key-
sets, the circuits may be incorrectly programmed as
“single” circuits, instead of “dual”). The warning might
also appear on a single station if the console is defective.
Major alarms require immediate attention from service
personnel.
21.38 If necessary, you can press the ClRL and C
keys at the same time to return the console PC to the
C:\OPIERM prompt while a major alarm is displayed.
21.39
~RESIKND lVAMiWOR SYSTEMALARM:
(1) When a minor alarm indication appears, write
down the alarm number, alarm message, date,
and time.
(2) Clear the message by pressing the FE/XI key and
then pressing the Fl key or RETURN to select
“Clear System Alarm.”
(3) If the alarm message is #OS or
#IO or higher;
con-
tact service personnel.
Ifthe
alarm message is
#01-04,
correct the prob-
lem:
a.
#OI SZWION X%X OFF-HOOR The
indicated station remained off hook and inactive
until the inactivity alarm timer expired.
SMDR also indicates which station is off
hook. The station’s key on DSS/BLF Units
and on other stations’ SD keypads flutters
continuously. Have the station user replace
the handset in the cradle. The alarm automaticall y clears when the station user hangs up.
NOTE: Calls being transmitted over the secondary voice path are not affected or interrupted by an off-hook alarm condition.
b.
#02, #03, or #04 PRINTER TIMEOUT: The
indicated printer is not functioning properly.
Check that the cable and the power cord are
connected and that it has paper and ribbon.
c. #30
TOLL SECURITY FEATURE EX-
PIRED:
Indicates that the weekly toll limit
feature is no longer in effect. It can be reenabled only by Inter-Tel Services personnel.
d.
#31 TOLL SECURITY LIMIT EXCEEDED
and #34 TOLL SECURITYLIMITAT 80%:
The weekly limit for one or both types of
monitored calls is 80% or 100% depleted.
The programmer can set the limit to a higher
value or reset it to zero. (When either of these
alarms is displayed, any further alarms will
not overwrite the display.)
e. #32
TOLL SECURITY DAiY CHANGED:
This indicates that the weekly toll limit information has been changed in the database.
f.
#33 DISA SECURITY LIMIT EXCEEDED:
This indicates that a DISA caller has entered
an invalid password three consecutive times.
DISA will not answer that trunk for five minutes after the third invalid password has been
entered.
Page 2-46
Page 67

INTER-TJ3LPRAcTxcES
IMXIGMX 256/832
ATI’JDJBANT COMPUTER CONSOLE
Issue 1, November 1994
FEATURES
- ._a,’
K. TRUNK MAINTENANCE
21.40 Au attendant can take an individual trunk out of
service while using that trunk, or return ull trunks to ser-
vice at once by selecting the remove all trunks from
maintenance feature code.
21.41
lVZ4KEATRUA!UOUTOFSERVICE:
While on a call using the trunk to be removed
(1)
from service, press the BAD LINE key. The dis-
play asks you if you wish to remove the trunk
from service.
To remove the trunk from service: Enter Y and
(2)
then press RETURN. Once you complete your
call and press RELEASE, the trunk cannot be accessed for placing or answering calls until it is returned to service.
To cancel the BAD LINE feature: Press the RE-
TURN key.
21.42
~PLxEALLI~~UNKSWSERVICE:
(1) Press the FEKI key. A list of features appears in
the lower half of the screen.
(2) Move the highlight bar to “Remove All Trunks
From Maintenance” and press the associated
function key, or press
RETURN or CNECT. All
trunks are placed back into service.
L. GENERATING AN SMDAREPORT
On the256
System, the history queue must be released before messages can accumulate, to be
saved again. To release the history queue, repeat
this procedure, but select Release History Queue
from the feature list instead of Save History
Queue.
NOTE: Service personnel may request that the
error history information be stored immediately
on the console hard disk. If so, press the CI’RL,
SHIFT, and D keys at the same time. This will
disable the buffer and the transient display will
show “History Input Buffering Is Disabled.” To
re-enable the buffer when requested, repeat the
CTRL-SHIFT-D command. The transient display will then show “History Input Buffering Is
Enabled.”
N. RELIGHTING MESSAGE LAMPS
21.47 It is possible that the message lamps on keysets
and ESLSs could be turned off as the result of a power
failure, database reset, or user error. For this reason, the
Attendant Computer Console can be used to re-send any
message waiting indications for any text messages that
were originally sent using the console and re-light the
lamps.
21.48 This can also be done automatically, by setting
the recall interval option in configuration programming
(see page 2-60) tore-send message indications when the
system is placed in night mode, at a preset time of day, or
b-oth.
k . . . ..A
21.42 A programming option can be enabled that
allows the attendant to gerucate an SMDA report on
demand.
21.44
To GEAWAlEANSMDAREPORh
Press the FEM key and then press F4 to select
“SMDA.” The SMDA report begins printing on
the designated system port.
M. SAVING THE HISTORY QUEUE
21.45 When requested to do so by service personnel,
an attendant can command the system to save a copy of
the current call processing history so that trained personnel can analyze the data.
21.46
To SAVE THE HISTOWQUEUE:
Press the FEAT key and then press F2 to select
“Save History Queue.” The system error history
report will be saved on the system hard disk and
logged in the Save/Restore window for retrieval.
The Attendant’s Console error history is saved in
the C:/OPfERM/HISTQRY directory and can
be copied to a floppy diskusing DOS commands.
21.49
TORE-LIGHTbiESSAGEL4MPS:
Press the FEAI key. A list of features appears in
(1)
the lower half of the screen.
Move the highlight bar to “Re-light Message
(2)
Lamps” and press the associated function key, or
press RETURN or CNECT.
0. DISPLAYING THE SOFTWARE VERSION
21.50 When requested to do so by service personnel,
an attendant can display the current software version of
the Attendant Computer Console.
21.51
To DISPLAYTHE SOFTWARE WZSION:
Press the FEAT key. A list of features appears.
(1)
Scroll to the end of the list and locate “Display
Software Version Number.”
Press the associated function key (or highlight it
(2)
and press RETURN or CNECT). A message
showing software version that is installed on the
console is displayed.
Press ESC when you wish to clear the display and
(3)
return the console to the idle state.
Page 2-47
Page 68
FEATURES
Issue 1, November 1994 IMX/GMX 256/832 ATIXNDANT COMPUTER CONSOLE
INTER-TELPRACTICES
22. CUSTOM CONFIGURATION
22.1
Upto 16 operators can store customized information on a single Attendant Computer Console. A set of
customized options (name, colors, speed-dial numbers,
etc.) can be saved for each operator when multiple users
share a console. Then, each operator can restore his or
her custom configuration on command. Ifthe console is
turned off and back on, the customized options for the
last active operator are used.
22.2
When the CONFG key is pressed, a window ap
pears in the lower half of the console screen to show the
available configuration options. The options include the
following. Some options apply to aU operators of the
console and some can be customized for
0
Name:
Each operator can have a user name of up to
20 characters and up to 16 operators can be pro-
grammed with customized configurations. This util-
ity allows you to select, create, delete, or change op
erator designations or use the default configuration.
This option is explained on the next page.
0
Display:
This utility allows each operator to
customize the display screen and save custom configurations. Refer to page 2-50 for a list of options.
0
Calls:
Each operator can select several options relating to call handling including, speed-dial displays,
trunk access, call connect, voice mail, and DID
names. (Trunk access, call connect, and voice mail
I
information is programm ..d for all operators of the
console, not on an individual-operator basis.) Instructions for programming these options begin on
page 2-53.
each
operator.
A INTFXRUPTINGTEKECONFIGUIWI’ION
PROGRAMMING SESSION
223 The Attendant Computer Console can continue
to receive calls while the configuration utility is being
used. To halt programming and view the Console display screen, press ALT and ESC. To halt programming
and answer a call, press ANSW. Any programming
completed to that point will be in effect. When the call is
completed, press CONFG again, a prompt will ask you
if you wish to continue or initiate a new configuration
session. Press the function key associated with the desired option. You will return to the “Options” window if
you choose to initiate a new session, or to the last window you viewed if returning to a previous session.
B. NAME
22.4 To select the active operator, or modify, add, or
delete operator names, perform the following steps.
Select Operator
22.5
lD CHANGE lTiE CURRENTOPERAlOR:
(1) Press CONFG and then the Fl key to select
“Name.” A list of options appears in the lower
half of the screen.
(2) Press Fl to select “Select.” A list of currently
available operators appears.
(3) Press the function key that corresponds to the
new operator (or use the UP and DOWN
ARROW keys to move the highlight bar to the
desired name and then press RETURN or
CITECT). The console resets to the new operator’s configuration and the transient display
shows “XXXX IS THE NEW OPERAI0R.”
,_,:-.
:’
:-. ,,
,;
0
Features:
Each operator can program customized
do-not-disturb messages and determine which call
forwarding feature the FWD key will use as its default. This option is explained on page 2-58.
0
Message:
Operators can store tenant-related greetings to remind them what to say when receiving calls
for specific tenant groups. Using this utility, they can
also set the duration of the transient display and set
several text messaging options. Tenant messages
and text messaging options are set for all operators
of the console and cannot be programmed on an individual-operator basis. Programming is explained on
page 2-59.
0
Database:
Database download parameters for the
console are set using this utility. Instructions are giv-
en on page l-9.
Modify Operator Name
22.6
Page 2-48
To MODIFYAh?kLWSlTNG OPERATOR NAME:
(1) Press CONFG and then the Fl key to select
“Name.” A list of options appears in the lower
half of the screen.
(2) Press F2 to select “Modify.” A list of currently
available operators appears.
(3) Press the function key that corresponds to the
new operator (or use the UP and DOWN
ARROW keys to move the highlight bar to the
desired name and then press RETURN or
CNECI’). A prompt allows you to enter a new
name or edit the existing name. Do one of the following:
To change the name:
Edit the name and press
RETURN. Use the LEFT or RIGHT ARROW
--.
Page 69
INTER-TELPRACTICES
IMX/GMX 256/832 AmANT COMPUTER CONSOLE
Issue 1, November 1994
FEHUTtES
key to move the cursor. Use the backspace or
DEL key to remove letters. Use the INS key to
toggle between insert and replacement modes.
When you press
RETURN, a window shows you
the previous name and the new name. Press RETURN to accept the name and return to the “Operator’s Name to be MODIFIED” window, or
press ESC to retain the old name and return to the
“Operator Names” window.
To add a name:
Enter a new name. As you type,
the old name is removed. When you press RETURN, a window shows you the previous name
and the new name. Press REPURN to accept the
name and return to the “Operator’s Name to be
MODIFIED” window, or press ESC to return to
the old name and return to the “OperatorNames”
window.
To continue without changing the name:
Leave the name unchanged and return to the
“Operator Names” window by pressing the ESC
key.
Add Operator Name
22.7
TOADDANEWOPERAl0RNAME:
Press CONFG and then the Fl key to select
(1)
“Name.” A list of options appears in the lower
half of the screen.
Press F3 to select “Add.” The screen prompts
(2)
you to “Enter Operate Name.”
Enter the name as you wish it to appear on the
(3)
screen. Use the backspace key to back up and
make corrections, if necessary. Press RETURN
when the name appears as desired.
If there are two or more operators from which to
(4
choose, the screen then prompts you to “Select
Initial Configuration Values” and gives a list of
existing names. Press the function key of the op
erator name that has the customized configurations most similar to those you wish to use (or
move the highlight bar to the desired name and
press RETIJRN).
(5) The screen displays the new name and the
selected default configuration. Do one of the following:
To accept the name:
Press RETURN. The
screen returns to the “Enter Operator Name”
window. You can enter another name or press
ESC to return to the “Operator Names” window.
To erase the name:
Press ESC. The display re-
turns to the “Operator Names” window.
Delete Operator Name
22s
l0 DELElEANEXSlTh’G OPERATOR NAME:
Press CONFG and then the Fl key to select
(1)
“Name.” A list of options appears in the lower
half of the screen.
Press F4 to select “Delete.” The screen prompts
(2)
you to select the “Operator’s Name to be DELETED.” (If there are no names to be deleted,
the “Operator Names” window remains on the
screen. You cannot delete the Default operator.)
Press the function key that corresponds to the
(3)
name to be deleted (or use the UP and DOWN
ARROW keys to move the highlight bar to the
desired name and then press RETURN or
cNEcT)*
The screen shows the name you have chosen. Do
(4
one of the following:
To delete the operator:
Press RETURN to delete that name. You return to the “Operator
Names” window. (If there are other names pro-
grammed, the screen then shows the next avail-
able name on the list. If you wish to also delete
that name, press RETURN, otherwise press ESC
to return to the “Operator Names” window.)
To leave the operator unchanged:
Press ESC to
cancel the deletion and return to the “Operator’s
Names” window.
Page 2-49
Page 70
C. DISPLAY
IMX/GMX 256/832 ATTENDANT COMPUTER CONSOLE
INTER-TELPR4cTIcES
22.9 To customize the console displays, press
CONFG and then F2 to select “Display.” A list of display options appears in the lower half of the screen
which allows each operator to customize the following
configuration options:
Color: The colors of the different areas of the display screen and the messages and directories that ap
pear on it can be changed to suit each operator’s
preference.
Name:
The operator’s name can be programmed to
appear in the upper left corner of the screen.
Time:
The time display can be Programmed to show
the time in 24- or 1Zhour format. This determines
the format of the time display as well as the format
used when programming.
Scroll
Overlap:
When an operator presses the
PAGE UP or PAGE DOWN key, a number of entries
will uoverlapn from the previous page. This can be 0,
1,2, or 3 entries.
lVMODIFYlXEDISPL4YCOWRS:
Press CONFG and then the F2 key to select “Display.” A list of options appears in the lower half
of the screen.
Press Fl to select “Color.” The list of color
options appears in the lower half of the screen.
To return all colors to default configuration:
Move the highlight bar to “Default” at the end of
the list and press the associated function key, RETURN, or CNECI’. When the prompt asks “Restore all colors to their default values?” enter Y
and press RETURN. The “Color” menu returns.
To change colors:
Change selected areas of the
display by moving the highlight bar to the area
for which you wish to change the color and pressing the associated function key, RETURN, or
CNECT. The options include the following.
Each of these options, when selected, presents
another menu that lists the components of the
selected area that can be changed individually.
a.
Border: Changes the color of the border of
the entire screen.
Tenant:
intercom directory that
Each operator can determine whether the
is
displayed when a number
or letter is entered shows the entire system directory
or just those names that are included in his or her tenant group. (The entire sy:+em directory is displayed
whenever the IC DIR key is pressed.)
Statistics: Each operator can determine whether call
handling statistics are displayed each time the
NIGHT key is pressed.
Screen
Saver:
The screen can be programmed to go
blank when the console has been inactive for a period of time. It is then restored when any key is pressed
or when a call is received (press the SPACE BAR or
RELEASE key to restore the screen without activating any features). The length of inactivity that triggers screen saver can be set to each operator’s preference.
Directory:
Each operator can determine which, if
any, directory is displayed when calls are answered.
Extension:
The extension number that appears
above the call count display can be enabled or
disabled.
b.
Answer Handling:
Changes the “CONNECTED!” and “TRANSFER HOLD” message color.
C.
IC Directory:
OIS.
d.
Incoming:
Changes the IC Directory col-
Changes the incoming call list
colors.
e.
Status:
f.
Configuration:
Changes the status window colors.
Changes the configuration
programming window colors.
Text Message:
Changes the text message
display colors.
h.
Text Message Directory:
Changes the text
message directory colors.
.
1.
General:
Changes the color of the windows
that show the DND and FWD messages.
j.
Paging:
Changes the color of the box that
indicates when paging is active.
k.
Help:
Changes the color of the screen dis-
played when the HELP key is pressed.
1.
Busy tink Window:
Changes the color of
the trunk statist& window.
__ ;, ,,
., /
Page 2-50
Page 71
INTER-TELPRACTICES
IMX/GMX 256/832 ATI’ENJIANT COMPUTEB CONSOLE
m.
Busy ‘lhmk Options:
the options shown in the trunk statistics window.
n. CO Outgoing:
the CO directory that is displayed during an
Changes the color of
Changes the color used for
Operator Name
22.11
SCREEN WHEN YOUR CONFTGURAlTON IS IN USE:
(1) Press CONPG and then the F2 key to select “Dis-
outgoing call.
o. Other: Changes screen background, status
indicator, and alarm status window colors.
(4) The “Modify Color” prompts appear. Perform
any or all of the following steps. The sample box
(2) Press F2 to select “Name.” The “Display Current
(3) If
in the lower right comer indicates what you have
selected. (Note that not all areas will have all of
these options. For example, “Borders” has only a
“Background” option.)
a.
To change the color of the background:
Move the highlight bar to “Background” by
using the LEFT or RIGHT ARROW key.
Clock Format
22.12
24-HOUR FORMXT:
Then use the UP or DOWN ARROW key to
select the desired color as shown in the sam-
(1) Press CONFG and then the F2 key to select “Dis-
ple.
b.
To change the color of the foreground:
Move the highlight bar to “Foreground” us-
(2) Press F3 to select “Time.” The “Time Formats”
ing the LEXT or RIGHT ARROW key. Then
use the UP or DOWN ARROW key to select
the desired color as shown in the sample.
c. To change the intensity of the selected
(3)
color: Move the highlight bar to “Intensity”
by using the LEFI’ or RIGHT ARROW key.
Then use the UP or DOWN ARROW key to
select the desired mtensity as shown in the
sample.
d.
To turn blinking
on
or
ofi Move the highlight bar to “Blink” by using the LEFT or
RIGHT ARROW key. Then use the UP or
Page Overlap
22.13
PREVIOUSAiGE OKERL4PwHENlTIEI3GE UPOR AQGEDOMJ
KEYIS PRESSW:
(1) Press CONPG and then the F2 key to select “Dis-
DOWN ARROW key to turn blinking on or
off.
Issue 1, November 1994
FEATURES
lV DhlERMME IF YOUR NAbiE APPEARS ON lHE
play.” A list of options appears in the lower half
of the screen.
Operator’s Name” prompts appear.
you wish to have the name appear in the upper
lefr comer of the screen, press Fl to select “On.”
Ifyoudonotwanttheoperator’snamedisplay&
press F2 to select “Off.”
To DETERMINE l4CS?Em THE CLOCK USES 12- OR
play.” A list of options appears in the lower half
of the screen.
prompts appear.
If you wish to have the time appear in 244wur
format, Press Fl to select “Continental.”
If you wish to have the time appear in AIUIPIU
(124wur) format, press F2 to select “AM/PM.”
To DElERMNE HOW MANY LLVES FROM THE
play.” A list of options appears in the lower half
of the screen.
(5)
Press RFiTURN or CNECT to save the new color
selection (or ESC to cancel the changes) and
back up one menu level.
(6) Select other colors to change or press ESC to exit
and update the console to the new colors.
Page 2-51
(2) Press F4 to select “Scroll Overlap.” The screen
prompts you to “Enter overlap for page scrolling.”
(3) Enter the desired number (0, 1,2, or 3) and Press
RETURN.
Page 72
PEA-
Issue 1, November 1994
IMX/GMX 256/832
AT’I’ENDANT COMPUTER CONSOLE
INTER-TELPRACTICES
Tenant Intercom Directory Contents
22.14
~SLVllZRCObiDlREClmYLKT:
lt?Dm
lHECONlYENlXOFTHEACllVETEh’-
NOTE: This changes the directory that appears when a
number or letter is entered when placing an intercom
call. It does not change the IC DIR key function. The IC
DIR key will always access the complete system intercom directory.
(1) Press CONFG and then the F2 key to select “Dis-
play.” A list of options appears in the lower half
of the screen.
(2) press F5 to select “Tenanf.n The “IC Directory
Contents” prompts appear.
(3) If you wish to have the directory include all
ertenn’on numbers in
the
system, press Fl to
select “All.”
If you wish to have the akctory include only the
fzctension numbers in your tenant pup and the
tenant group of the trunk being useci, press F2 to
select ‘TenanLn
Operator Statistics
22.15
ARE DISPUIZD WHEN lHE NIGHTKEYIS PRESSED:
To DETERMINE
U!HETUER OPERATOR STATKUCS
(1) Press CONFG and then the F2 key to select “Dis-
play.” A list of options appears in the lower half
of the screen.
(2) Ress F6 to select “Statistics.“The prompts“Dis-
play Operator Statistics at End of Session.”
(2) Rcss F7 to select “Screen Saver.” The “Screen ,.-- -:.
Saver Options” prompts appear.
(3) To enable or disable screen saver: Press Fl to
., r
(
select “Switch.” The enable/disable prompts
appear. Press Fl to enable screen saver or F2 to
disable it.
To set the screen saver interval: Press F2 to
select “Interval.” The screen prompts you to enter the time (in minutes and seconds) for the “Inactive Period Before Blanking Screen.” Enter
the desired time in minutes, followed by a colon
(:) and the seconds.
Display After Answering
22.17
SWERANINCOMINGC4LL:
To Dm R?fIATIS DISPIAYED KME.N YOUAN-
(1) Press CONFG and then the F2 key to select “Dis-
play.” A list of options appears in the lower half
of the screen.
(2) Press F8 to select “Directory.” The “Display
After Answering Call” prompts appear.
(3) If you wish to have your intexom speeddial
directory appeal; press Fl to select “Speed
Dial.”
Ifyou wish to have the system intexom directov ’
appear, press F2 to select “IC &rectory.”
If you wish to leave the lower half of the screen
blank when you answer a call, press F3 to select
“Blank.”
Station Extension Number
(3) If you want operator statistics enabl4 press Fl
to select “On.”
If you want operator statistics disableci, press F’2
to select “Off.”
Screen Saver
22.16
TmINlERvAL:
To ENABLE OR DIS4BLE SCREEN SAVER ANDIOR SET
(1) Press CONFG and then the F2 key to select “Dis-
play.” A list of options appears in the lower half
of the screen.
22.18
BER APPEARS ON THE SCREEN:
Page 2-52
ToDEmRhm’E IF THE Sz;4noN’S EXlENSIONNU,U-
(1) Press CONFG and then the F2 key to select “Dis-
play.” A list of options appears in the lower half
of the screen.
(2) Press F9 to select “Extension.” The “Display
Own Extension Number” prompts appear.
(3) If you wish to have the extension number appeal;
press Fl to select “On.”
If you do not want the extekon number
displayeci, press F2 to select “Off.”
Page 73
INTER-TELPRACTICES
IMX/GMX 256/832 ATFENDANT COMPUTER CONSOLE
Issue 1, November 1994
FEATURES
. .._ii
D. CALLS
22.19 The following configuration options can be programmed by pressing CONFG and then F3 to select
“Calls.”
l
IC Speed Dial:
Each operator can program up to 10
numbers in his or her intercom speed-dial directory.
CO Speed Dial:
Each operator can program up to 10
numbers in his or herpersonul outside call directory.
(Some Bocations may be programmed for redialing
the last number dialed, as described below.)
CO Options:
many of the locations in the
Each operator can determine how
personal
outside call di-
rectory are reserved for redialing. Any number O-10
can be designated.
0
CO
Directory:
The
system
speed-dial directory can
contain additional numbers that are frequently used
by the operator. This option is used for enteringnumbcrs in the CO directory (see page 2-2.5 for another
method of entering numbers in the CO directory using the TAG key). These additional numbers can be
given names and/or notes as desired. Each operator
can add numbers to the CO directory, but because all
operators of the console share the CO directory, all
will have access to the numbers (the added numbers
are not “private” for individual operators on a shared
console). System speed-dial entries are shown in the
directory with the speed-dial location number in the
“notes” field.
DTMFz
Each operator can determine whether the
console will be in M’MFmode automatically during
an outgoing call or remains in non-IYTMF mode.
‘lhnk Access: The OUTGN
key can be pro-
grammed to access LCR or any available trunk
group for placing an outgoing call. This option
applies to all operators of the console and cannot be
programmed on an individual-operator basis.
0
Call Connect:
Determine when intercom calls will
be placed. They can be placed as soon as the entered
number matches an entry in the intercom directory,
or only when the called station is not busy or not in
do-notdisturb. This option applies to ull operators
of the console and cannot be programmed on an individual-operator basis.
Voice
Qpe: This option identifies the mode used to
access
the voice mail unit: customized directory
Mode or generic M’MF mode.
Expanded DID Names:
This option allows the op
erator to program identifying names to the system’s
DID numbers. The expanded name is used in place
of the seven-character system-programmed DID
name to give the operator more information when
the DID name is displayed during a call. Each DID
name must be unique for this feature to work proper-
ly-
Personal Intenzom Speed Dial
22.20 This utility is used for programming or deleting
entries in each operator’s
personal
intercom speed-dial
list. Three options are available. They are:
l
IC
is used for programming intercom numbers that
match extensions in the system intercom directory.
l
Generic is used for programming digit strings that
may be used during a call. For example, when calling voice mail, you could press the speed-dial key
that contains your mailbox number and password to
listen to waiting messages.
NOTE: Generic numbers cannot begin with num-
bers that match a feature code, nor can the digits that
follow a pause or hookflash begin with a number that
matches a feature code. For example, a voice mail
password that begins with 9 (e.g., 9999) cannot be
entered, as the entire number or after a pause, because 9 is the default feature code for least-cost rout-
ing*
0
Remove
is used for deleting numbers from the
speed-dial list.
22.21
NUMBERS:
To PROGRAM OR DELETE IIVZERCOM SPEED-DIAL.
press CONFG and then the F3 key to select
0)
“Calls.” A list of options appears in the lower
half of the screen.
Press the Fl key to select “IC Speed Dial.” The
(2)
“IC Speed Dial Types” window appears. press
the associated function key (or move the highlight bar and press REIVRN or CNECT) to
select one of the three choices: IC, Generic, or
Remove.
Voice Mail:
Any operator can program the intercom
number that is accessed by the VMAIL key. This option applies to a.U operators of the console and cannot be programmed on an individual-operator basis.
Page 2-53
The intercom speed-dial list appears. Use a func-
(3)
tion key (or move the highlight bar and press RFTURN or CNECX) to select the speed-dial number that you wish to program or delete.
Page 74

FEATURES
Issue 1, November 1994
IMX/GMX 256/832
A’ITENDANT COMPUTER CONSOLE
INTER-TELPRACTICES
(4) Determine which of the following procedures
applies to your selection:
If you chose IC in the first step, the system inter-
com directory and an input prompt appear. Enter
the desired intercom number (or move the highlight bar to the desired number in the directory
and press RETURN or CNECI). The intercom
speed-dial list reappears, showing the number in
the selected location. You may choose another
number to program or press ESC to return to the
“IC Speed Dial Types” window.
NOTE: If an alias has been assigned to the station that you wish to enter as an IC number, you
can use the main listing for that number or the
alias.
If you chose Generic in the first step, the screen
prompts you to “Enter Generic IC Number.” Enter the desired number and press RETURN. The
screen then prompts you to enter the “Name
Associated with Number.” If desired, enter a
name for this number and/or press RETURN.
The intercom speeddial list reappears, showing
the number in the selected location. You may
choose another number to program or press ESC
to return to the “IC Speed Dial Types” window.
NOTE: If you enter an extension number as a
“generic number,: the station’s status will not
appear in the intercom speed-dial directory.
If you chose Remove i#i the first step, the screen
prompts you to “Verify Operation” and asks “De-
lete Speed Dial at F,? N” Enter Y and press RETURN to delete the number (or press RETURN
to cancel the operation). The intercom speeddial list reappears, showing the selected location
as “<No Entry>.” You may choose another number to program or press ESC to return to the “IC
Speed Dial Types” window.
Personal CO Speed-Dial
22.22 Each operator has a personal CO speed-dial
list. This speeddial list will be displayed whenever the
OUTGN key is pressed. The operator can then choose to
press a function key or enter a number that is not on the
list.
22.23 Some CO speed-dial locations can be reprogrammed for redialing numbers (as described on the
next page). If all locations are set for redialing, this op
tion will not be available to the operator.
22.24 The CO speed-dial numbers can contain up to
32 digits each and can include dashes, hookflashes, and/
or short or long pauses for dialing a series of numbers.
For example, the speeddial number can contain an SCC
local number, a pause, and an access code. For using
E&M trunks, speed-dial numbers may contain the other
system’s trunk access code if it is followed by a pause.
The lengths of the hookflash and the pause are determined by the programmable “CO hookflash” and
“pause digit” timers. (Refer to the 256 or 416/832manu-
al for additional information regarding the timers.)
22.25
DL4LU.W
To PROGRAM OR DELElE NUbfBRRS Ih’ THE SPEED-
Press CONFG and then the F3 key to select
(1)
“Calls.” A list of options appears in the lower
half of the screen.
Press the F2 key to select “CO Speed Dial.” The
(2)
CO speeddial list appears. Use a function key
(or move the highlight bar and press RETURN
or
CNECT) to select the number that you wish to
program or delete.
A window appears with prompts for entering the
(3)
name, note, number, and local time.
a.
Enter the desired name. If the last name is
listed first, separate the names with a comma.
b.
Enter or modify the desired note and press
RETURN or CNECI’. Do not use a backslash
(\) in the note.
‘C.
Enter the desired telephone number and press
RJ5TURN or CNECI’. (To include pauses or
hoo~ashes in the numbex enter F for a
hooknash, S for a short pause, or L for a long
pause.)
d.
Zf the time wne is correct, skip to the next
step. If the time wne is not correct, type Y
and press RETURN. A window appears that
contains United States time zones and “Other.” Select the desired time zone. If you se-
lected “Other,” another window appears so
that you can enter the time of&et from Greenwich Mean Time and “East” or “West” for
the number’s location.
Press ENTER to place the number in the speed-
(4)
dial directory. The CO speed-dial list reappears,
showing the number in the selected location.
You may choose another number to program or
(5)
press ESC to return to the “CO Speed Dial
Types” window.
,,- , _
-.,
Page 2-54
Page 75

INTER-TELPRACTICES
IMX/GMX 256/832 A’lTENDANT COMPUTER CONSOLE
Issue 1, November 1994
lwAmREs
co options
’ .
22.26 Each operator can determine how many (if any)
(To include pauses or hookjlashes in the nwnbec
enter F for a hookflash, S for a short pause, or L
for a long pause.)
personal CO speed-dial locations will be used for stor-
ing numbers for redialing.
If the time wne is correct, skip to the next step. If
(7)
the time wne is not conwt, type Y and press RE-
22.27
ING:
Press CONFG and then the F3 key to select
(1)
“Calls.” A list of options appears in the lower
half of the screen.
Press the F3 key to select “CO Options.” A win-
(2)
dow appears with the prompt “Number of CO
Speed Dial Entries to be Used for Redial
(o-lo).n
Enter the desired number (O-10) and press RE-
(3)
TURN.
CO Directory
22.28 Using this option, each operator can add,
modify, and/or delete CO directory numbers. These
numbers displayed in the directory that contains the system speed-dial numbers. Because all operators of the
console share the CO directory, all will have access to
the numbers (the added numbers are not “private” for individual operators on a shared console).
22.29 To ENTER OR iUODII;yNUMBEIU W l?IE SYSTEM CO
DIREmRY:
Press CONFG and then the F3 key to select
(1)
“Calls.” A list of options appears in the lower
half of the screen.
Press the F4 key to select “CO Directory.” A list
(2)
of options appears.
To add a number, press Fl. A window appears
(3)
with prompts for entering the name, note, number, and local time.
To moo?& a number; press F2 (or enter the desired
name or number and press RETURN). Awindow
appears that shows the current name, note, number, and local time.
Enter or modify the desired name (up to 20 char-
(4)
acters). If the last name is listed first, separate the
names with a comma.
TURN. A window appears that contains United
States time zones and “Other.” Select the desired
time zone. If you selected “Other,” another window appears so that you can enter the time of&et
from Greenwich Mean Time and “East” or
“West” for the telephone number’s location.
Press ENTER when the number appears as de-
(8)
sired. If modijjhg a number the CO directory
appears. You may choose another number to
modify or press ESC to exit.
2230
KJRE
TODELElEANUMBER FROMTHESYSTEMCODIREC-
Press CONFG and then the F3 key to select
(1)
“Calls.” A list of options appears in the lower
half of the screen.
Press the F4 key to select “CO Directory.” A list
(2)
of options appears.
Press F3 (or enter the desired name or number
(3)
and press FEZURN). A window appears that
shows the current
name,
note, number, and local
time, followed by a prompt that asks if you want
to delete the number.
Press Y and ENTER to delete the number or
(4)
press N and ENTER to leave the number unchanged.
2231
The CO Directory option is also used for setting
the console’s default value for the local time zone and
for the international dialing code(s).
2232 TosETmmAL TLUEZONE:
Press CONFG and then the F3 key to select
(1)
“Calls.” A list of options appears in the lower
half of the screen.
Press the F4 key to select “CO Directory.” A list
(2)
of options appears.
RessF4 again to select “Location.” Alist of time
(3)
zones appears.
Enter or modify the desired note (up to 10 char-
(5)
acters) and press
RETURN or CNECT. Do not
use a backslash ( \ ) in the note.
Enter or modify the desired telephone number
(up to 42 digits) and press RETURN or CNECT.
You can include dashes in the number, if desired.
Page 2-55
Select the desired United States time zone or
(4)
“Other” and press RETURN.
a. If you selected a U.S. time wnc, another
window appears that contains two prompts.
Enter the following information and then
press ENTER.
Page 76

IMX/GMX 256/832 ATIXNDANT COMPUTER CONSOLE
INTER-TELPRACTICES
Daylight-saving time occurs? (y/n): press
YandRETURNiftheconsoleisinanarea
that follows daylight-saving time. Press N
and RETURN if daylight-saving time is not
used.
Local description code: You can
enter up to
three characters that will be used in the CO
directory to identify local calls. Enter the desired characters (if arty) and press RETURN.
b. Zf you selected
“Othel; n
a window appears
that prompts you for the time offset from
Greenwich Mean Time. Enter the following
information and then press ENTER.
Time omet from Universal Time Zone
(hours:min):
Enter the number of hours and
minutes difference between the local time
and Greenwich Mean Time. Enter the hours,
a colon, and the minutes, then press RE-
TURN.
East (-) or
West
(+)
of the
Universal Time
Zone (E/w): Indicate whether the local zone
is located east or west of the international
date line by entering E or W and pressing RETURN.
(5) Press ENTER when the location information is
correct. (Or press ESC to exit without saving the
changes.)
22.33
To SET THE LNlERNATIONAL DLUNG CODE(S):
Press CONFG and then the F3 key to select
(1)
“Calls.” A list of options appears in the lower
half of the screen.
Press the F4 key to select “CO Directory.” A list
(2)
of options appears.
Press F5 to select ‘Code.” A window with two
(3)
prompts appears.
ized service or voice mail system), this option can be
used to automatically enable MMF mode during outgoing calls. (To enable MMF on incoming calls, press
AUT and any keypad key, regardless of the DTMFmode
option selected. To disable MMF during the incoming
call, press ALT and any keypad again.)
22.35
While on an outgoing call, pressing the ALT
and any keypad key simultaneously turns on or off
DI’MF signaling (depending on the default MMF
mode). To return the DTMF mode to default, you can
disconnect from the call or press ALT and any keypad
key again.
2236
To SRT THE DlMF MODE OPTION:
Ress CONFG and then the F3 key to select
(1)
“Calls.” A list of options appears in the lower
half of the screen.
Press F5 to select “IYTMF.” A window with two
(2)
options appears.
Press Fl to enable DTMF mode on all outgoing
(3)
calls, or press F2 to disable IYTMF.
Ress ESC when finished.
(4)
‘lhnk Access
22.37 This option determines whether LCR or a trunk
group is accessed when a console operator presses the
OUTGN key.
22.38 The OUTGN key selection can be overridden
whenever desired by pressing the ALT and OUTGN key
simultaneously, then selecting the desired route for the
call being placed.
22.39
OVlGNKEY..
To DElERbUNE THE DEFAULT FUNCTION OF THE
(1) Press CONFG and then the F3 key to select
“Calls.” A list of options appears in the lower
half of the screen.
,.r.r,
Enter or edit the first dialing code and press RE-
(4)
TURN. (Or just press RETURN to leave it unchanged.)
Enter or edit the second dialing code and press
(5)
RJZTURN. (Or just press RETURN to leave it unchanged.)
Press ENTER when the dialing codes are cor-
03)
rect. (Or press ESC to exit without saving the
changes.)
DTMF
2234 If M’MF tones are frequently needed during
outgoing calls (for example, when calling a computer-
Page 2-56
(2) Press F6 to select “Trunk Access.” A list of trunk
group access codes and descriptions appears.
Press the associated function key (or move the
highlight bar to the desired code and press RETURN or CNECT).
NOTE: If a trunk group access code has been deleted from the 256 or 416/832 database, it will
not appear in this list.
Voice
Mail
22.40 This determines the number that is dialed when
a console operator presses the VMAIL key.
22.41
To PROGRAM THE tmxu NUUBER:
_, -.
\a
Page 77

INTER-TELPRACTICES
IMX/GMX 256/832 ATTENDANT COMPUTER CONSOLE
Issue 1, November 1994
FEATURES
(1) Press CONFG and then the F3 key to select
“Calls.” A list of options appears in the lower
half of the screen.
(2) Press F7 to select “Voice Mail.” When prompted,
enter the extension number of the voice mail unit
and press RETURN.
Voice m
22.42 This option determines the mode used to access
the voice mail unit connected to the 256 or 416/832 System. It is needed to allow the console to send commands
that are suited to the voice mail unit.
22.43
l0 PROGRAM THE VOICE MAIL UNITACCESS MODE:
(1) Press CONFG and then the F3 key to select
“Calls.” A list of options appears in the lower
half of the screen.
(2)
Press F8 to select “Voice Type.” TWO choices ap
pear. Press Fl for customized Directory Mode or
press F2 for the generic DI’MF Mode.
NOTE: Most voice mail systems require the
generic MMF Mode. The customized Directory
Mode
is used only for voice mail systems that
have been specially modified to interface direct-
_-
‘.
ly with the 256 or 416/832 System.
Call Connect
22.44 When an intercom number is dialed, it is
checked against the intercom directory for validity. This
option determines what will occur when a console operator dials a number that exactly matches an entry in the
system intercom directory. The options are as follows.
0 The call is automatically dialed regardless of the sta-
tion’s availability. If the station is busy, the call
place the call in order to use the queue, message, or
do-not-disturb override feature.
22.45
OPTION:
To PROGRAM lHR INTERCOM CALL COMCT
(1) Press CONFG and then the F3 key to select
“Calls.” A list of options appears in the lower
half of the screen.
(2)
Ress F9 to select “Call Connect.” Three choices
appear. Press one of the following keys:
(3) Select one of the following options:
To
connect
the called station:
To automatically connect calls only if the
called station is available:
To automatically connect calls only if the
called station is not in do-notdisturb:
calls regardless of
Press Fl.
Press F2.
availability of
Press
F3.
Expanded DID Names
22.46 This option allows the operator to program
identifying names to the system’s DIDnumbers. The ex-
panded name is used in place of the seven-character sys-
tem-programmed DID name to give the operator more
information when the DID name is displayed during a
call.
22.47
To PROGRAMANEXFMDED DID NAME:
Press CONFG and then the F3 key to select
(1)
“Calls.” A list of options appears in the lower
half of the screen.
Ress FlO to select “Expanded DID Name.”
(2)
A
list of DID numbers appears.
camps on. Ifthe station is in do-not-disturb, you can
use the queue, message, or do-not-disturb override
feature.
Press the associated function key (or move the
(3)
highlight bar to the desired number and press
RETURN or CNECT).
l
The call is automatically dialed only if the station is
available. If the station is busy or in do-not-disturb,
you have the option of calling in order to camp on,
queue, leave a message, barge, or override do-notdisturb.
A window appears that contains a space for you
(4)
to enter the new information. (No other informa-
tion in that window can be changed.) Qpe the
desired name or number, up to 48 characters, and
press ENTER. The list returns.
l
The call is automatically dialed if the station is busy,
but not if the station is in do-not-disturb. If the called
station is in do-not-disturb, you can still choose to
To program a name for another DID number, re-
0
peat steps 3 and 4. Or, to exit, press ESC.
Page 2-57
Page 78

FEATURES
Issue 1. November 1994
IMX/GMX 256/832
A’ITENDAN’T COMPUTER CONSOLE
INTER-TELPRACTICES
E. FEATURES
22.49 Each operator can program customized do-notdisturb messages and/or determine the function of the
FWD key by pressing CONPG and then F4 to select
“Features.”
Do-Not-Disturb Messages
22.49 Customized do-not-disturb messages combine
the programmed system messages with a personalized
second line. The custom messages appear at the top of
the list of do-notdisturb message selections.
22.50
SAGES:
TO PROGRAM CUSXMUED DO-NOT-dllsTuRB MES-
Press CONPG and then the F4 key to select “Fea-
(1)
tures.” A list of options appears in the lower half
of the screen.
Press Fl to select “DND.” mo choices appear.
(2)
Press Fl to select “Replace.” Alist of do-notdis-
(3)
tub
message locations appears.
Ress the function key associated with the mes-
(4)
sage location you wish to program (or move the
highlight bar to the desired location and press
RETURN). The list of system do-not-disturb
messages appears.
Press the function key associated with the mes-
(5)
sage you wish to appear on the first line of your
custom message (or move the highlight bar to the
desired message and press RJTWRN). The
screen prompts you to “Enter Replacement DND
Message.”
Enter the message you wish to appear on the sec-
(6)
ond line of your customized message and press
RETURN. The list of locations reappears, show-
ing the new message in the selected location.
You may select another location or press ESC to
return to the “DND Operation” window.
22.51
SAGE:
To DELETE A CUSl0MUED DO-NOT-DISlURB MES-
Press CONPG and then the F4 key to select “Fea-
(0
tures.” A list of options appears in the lower half
of the screen.
Press Fl to select “DND.” ‘limo choices appear.
(2)
Ress F2 to select “Remove.” A list of do-
(3)
not-disturb message locations appears.
Ress the function key associated with the mes-
(4)
sage location you wish to delete (or move the
highlight bar to the desired location and press
RETURN). The screen prompts you to “Verify
Operation.”
Enter Y and press
(5)
RETURN to delete the indi-
cated message. Or just press RETURN to exit to
the list of do-not-disturb message locations. You
may select another location or press ESC to return to the “DND Operation” window.
Forward
22.52 The FWD key can be programmed to default to
one of the four forwarding options (all calls, if no answer, if busy, or if no answer/busy). When the FWD key
is pressed, the operator has two options: press RETURN
to use the default option, or select an alternate option by
pressing a function key (or move the highlight bar to the
desired option and press IZEWRN).
22.53
To D,QERMNE THE DEFAULTFWD OPTION:
Ress CONFG and then the P4 key to select “Fea-
(1)
tures.” A list of options appears in the lower half
of the screen.
Press F2 to select “Forward.” The four forward-
(2)
ing choices appear.
Press
(3)
the function key associated with the for-
warding option you wish to select (or move the
highlight bar to the desired option and press RE-
TURN).
se:7’,.
Page 2-58
Page 79

INTER-TELPRACTICES
IMWGMX 256/832
ATTENDANT COMPUTER CONSOLE
Issue 1, November 1994
FEATURES
.:_
--
F. MESSAGE
22.54 Three parameters are programmed by pressing
CONFG and then F5 to select “Message.” They are as
follows:
0
Greeting:
When console operators answer calls for
several tenant groups, the operators may wish to
have special greeting prompts to remind them which
tenant is being called and what the Preferred greeting is. Different messages can be entered for each
tenant group and for morning, evening, and night
hours. The operators can also Program the time at
which the message will change. This information is
shared by all operators of the console and cannot be
programmed on an individual-operator basis. Messages can only be programmed for tenant groups that
have descriptions programmed in the database (refer
to the 256 or 416/832 manual for tenant group programming information.)
a
‘lhnsient Display Timer:
The transient display
alerts the operator when an operation has been completed or when the operation is invalid. The length of
time a transient message will remain on the display
is programmed by each operator. (One exception to
this timer is the Hunt Group Camp-On display which
appears for four seconds regardless of the transient
display timer value.)
a
Text Message Options:
The text messaging option
allows operators to enter detailed messages and retrieve them as desired. Using this utility, the operators can determine the various parameters of the text
messaging option. This ir formation is shared by ull
operators of the console and cannot be programmed
on an individual-operator basis.
Morning, Afternoon, and Evening Greetings
22.55
To PROGRAMCUSlOMIZED GREETLVGS:
temoon, or F5 for Evening), or move the highlight bar to the desired message and press
IIETURN or CNECT. The screen Prompts you to
“Select Tenant Option” and shows a list of tenants and the Previously Programmed greetings.
Select the desired tenant by pressing the asso-
(4)
ciated function key (or move the highlight bar to
the desired message and press BETUBN or
CNECI’). The screen prompts you to “Enter New
Message.”
Type the desired message (up to 30 characters)
(5)
and press RETURN. The “SelectTenant Option”
window returns, showing the new message. You
can select another message to program by retuming to step 4, or exit to the “Greeting
options” window by pressing ESC.
22.56
To SET IHE lZUE PERIODS FOR THE bE9.SAGE.T:
Press CONFG and then the F5 key to select
(1)
“Message.” Alist of options appears in the lower
half of the screen.
Press Fl to select “Greeting.” The display shows
(2)
the “Greeting Message options” window.
Select the desired time period by pressing the as-
(3)
sociated function key (F2 for Morning, F4 for
Afternoon, or F6 for Evening), or move the high-
light bar to the desired time period and press RE-
TURN or CNECT. The screen Prompts you to
“Select Tenant Option” and shows a list of tenants and the Previously programmed time.
Select the desired tenant by pressing the asso-
(4
ciated function key (or move the highlight bar to
the desired tenant and Press RETURN or
CNECI’). The screen prompts you to “Enter the
Time to Begin Greeting Message.”
Message
(1) Press CONFG and then the F5 key to select
“Message.” Alist of options appears in the lower
half of the screen.
(2) Press Fl to select “Greeting.“The display shows
the “Greeting Message Gptions” window.
(3) Select the desired message by pressing the asso-
ciated function key (Fl for Morning, F3 for Af-
Page 2-59
Type the desired time, in the indicated format,
0
with hours and minutes separated by a colon (for
example “13:OO” or “1:OO pm”) and Press RETURN. The “Select Tenant Option” window returns, showing the new time. You can select
another tenant to program by returning to step 4,
or exit to the “Greeting Message Options” window by pressing ESC.
Page 80
FEATURES
Issue 1, November 1994
xNTJzR-TELPRAcTIcES
IMX/GMX 256/832 ATTENDANT COMPUTER CONSOLE
‘Ikansient Display Tier
22.57
ToSETTHEDURAnoNOFTRANsIENTDISPwS:
Press CONFG and then the F5 key to select
(1)
“Message.” Alist of options appears in the lower
half of the screen.
Press F2 to select “Transient.” The screen
(2)
prompts you to enter the “Transient Message
Display Time (1 to 5 Seconds).”
Enter the desired value (l-5) and press
(3)
RETURN. Or, just Press RETURN to keep the
current value. The “Message Options” window
returns.
Text Messaging Parameters
22.58 The following parameters can be set for the text
messaging option:
Auto Purge:
The operator can set the maximum
number of messages that will be held in the textmessage directory for each tenant. When this maximum
is reached, the oldest waiting message will automatically be purged as each new message is entered. The
maximum number of messages that can be stored in
the system is dependent on disk space, but the high-
est possible number is 10,000 messages.
Full Alarm:
If enabled, this alarm will alert the op
erator when a tenant’s me-*ages are within 90% of
the maximum number allowed. The word
“ALARM” appears in the alarm/notice area at the
top of the screen and a detailed message appears in a
box in the lower half of the screen when the console
station is idle. The detailed message will state that
the message quantity is near limit when more than
90% of the maximum has been reached. If the directory is 100% full, it will state that the quantity is at
the limit. The operator should then delete anyunnecessary messages.
Recall Interval:
It is possible that occasionally the
message lamps on keysets and ESL.Ss will be turned
off as the result of a power failure, database reset, or
user error. For this reason, the Attendant Computer
Console can be used to re-send the message waiting
indications and light the lamps. This can be done au-
tomatically, by setting the recall interval to re-send
message indications when the system is placed in
night mode, at a preset intervals during the day, or
both. Or the operator can choose to only reset the
lamps manually using the “Re-Light Message
Lamps” option under the m ke y (see page 2-47).
l Print
Size: This determines the minimum number
of lines that will be printed per text message.
22.59 TO SET THE
bilLSAGES:
Press CONFG and then the F5 key to select
(1)
biXXLUUM NUMBER OF SAVED
“Message.” Alist of options appears in the lower
half of the screen.
Press F3 to select “Text.” The screen shows the
(2)
“Text Message Options.”
Press Fl to select “Auto Purge.” The screen
(3)
prompts you to “Select Tenant Option.”
If there is more than one tenant group, select the
(4)
desired tenant by pressing the associated function key, (or move the highlight bar to the desired
tenant and press
RETURN or CNECT). The
screen prompts you to “Enter Number of Text
Messages for
(tenant).”
Enter the desired number and Press RETURN.
Or, just press REXURN to leave the number unchanged. The “Select Tenant Option” window
returns, showing the new number. You can select
another tenant to program by returning to step 4,
or exit to the “Text Message Options” window by
pressing Est.
22.60
Press CONFG and then the F5 key to select
(1)
“Message.” A list of options appears in the lower
half of the screen.
Press F3 to select ‘Text.” The screen shows the
(2)
“Text Message Options.”
Ress F2 to select “Full Alarm.” The screen
(3)
prompts you to “Select Tenant Option.”
Select the desired tenant by pressing the asso-
(4)
ciated function key, (or move the highlight bar to
the desired tenant and Press RETURN or
CNECIJ. The screen prompts you to “Enable/
Disable Text Message Alarms for (tenant).”
Press Fl to enable the alarm or F2 to disable it.
(5)
The “Select Tenant Option” window returns,
showing the enable/disable status. You can select
another tenant to Program by returning to step 4,
or exit to the “Text Message Options” window by
pressing ESC.
22.61
Press CONFG and then the F5 key to select
(1)
“Message.” A list of options appears in the lower
half of the screen.
C-Y”‘.,
I
,, -.
,, \
_. .,
Page 2-60
Page 81
INTER-TELPRACTICES
IMX/GMX 256/832 AITENDANT COMPUTER CONSOLE
(2)
Press F3 to select “Text.” The screen shows the
“Text Message Options.”
(3) Press F3 to
select “Recall Interval.” The screen
shows a list of options.
(4)
Select one of the following:
a.
To have the messages m-sent every time
the system is placed in night mode: Press
Fl
to select “Night Ring.” The “Text Message
Options” window returns.
b.
To have the messages re-sent at preset intervals:
screen prompts you to enter “Starting Time
to Re-notify Recipients.” Enter the time in
the indicated format with the hours and min-
Press F2 to select “Interval.” The
22.62
The “print size” is the minimum number of lines that
will be printed per page of text messages:
utes separated with a colon (for example,
“13:OO” or “l:OO pm”) and press RETURN.
(1)
The screen prompts you to enter the “Time
Interval to Re-notify Recipients.” Enter the
amount of time you wish to have elapse IXtween notifications with the hours and min-
(2)
utes separated by a colon and press RETURN. The “Text Message Options”
window returns.
(3)
Issue 1, Nov%%
“13:OO” for 1:OOPM) and press RETURN.
The screen prompts you to enter the Time
Interval to Re-notify Recipients.” Enter the
amount of time you wish to have elapse between notifications with the hours and min-
utes separated by a colon (for example, 3:00
to re-notify every three hours) and press RETURN. The “Text Message Options” window returns.
d.
To disable the automatic re-sending of the
messages: press F4
to select “None.” The
“Text Message Options” window returns.
mDEImhf~?%
lnEPRkNTsIzE:
Press CONPG and then the F5 key to select
“Message.” Alist of options appears in the lower
half of the screen.
Press F3 to select “Text.” The screen shows the
“Text Message Options.”
Press F4 to select “Print Size.” The screen
prompts you to enter a number.
I
c. To have the messages re-sent when the sys-
tem is placed in night mode andat the preset intervals: press F3
to select “Both.” The
screen prompts you to enter “Starting Time
to Re-notify Recipients.” Enter the time in
the indicated format with the hours and minutes separated wl’th a colon (for example,
Enter minimum number of lines per printed
(4)
page. (If a message is shorter than this length, or
if the last page of a message is shorter than this
length, blank lines will be added automatically
to make the message meet the minimum length.)
If this is set to 0, the default message spacing is
used.
Page 2-61
Page 82
IMX/GMX 256/832
A’I-PBNDAN?” COMI’UTEB CONSOLE
INTER-TELPRACTICES
23. OTHER CONSOLE ADJUSTMENTS
A. VOLUME CONTROLS
23.1 The volume of calls, music, pages, progress
tones, and ring signals that are heard through the handset
or headset are controlled by pressing volume control
feature keys (labeled VOL, with up and down arrows).
23.2 Separate volumes can be saved for intercom
calls, outside calls, background music, alerting tones,
and progress/reorder tones. The volume of pages is the
same as for intercom calls.
23.3 To CHANGE CXL, MUSIC, APGING, OR PROGRESS
mNE voi.iJbfE:
While listening to an intercom or outside call, a
(1)
page, background music, or progress/reorder
tones, press the VOL UP key to raise the handset
volume or press the VOL DOWN key to lower
the volume. The transient display shows which
volume is being changed (call, music, page, or
tone) followed by a number 1-13, and a bar
graph, to show the level as it is raised or lowered.
To
(2)
23.4
(1)
(2)
B. SELECTABLE RING TONE
23.5 The tone of the ring signals can bc changed by the
operator to create distinctive ringing. If stations are
placed close together, changing the tone makes each station’s ring easier to recognize.
save the setting: Press the ALT key and a
VOL key at the same time. The transient display
shows “VOLUME SAVED.” If this step is not
performed, the console will return to the previous volume level when the call ends.
To ChXNGEALERlTNG TONE (RkNG .lVNE) VOWblE:
While the console is :inging or idle, press the
VOL UP key to raise the volume or press the
VOL DOWN key to lower the volume. The transient display shows “Alerting Tone” followed by
a number l-13, and a bar graph, to show the level
as it is raised or lowered.
To save the setting: Press
the ALT key and a
VOL key at the same time. The transient display
shows “VOLUME SAVED.” If this step is not
performed, the console will return to the previous volume level when the call ends.
Using the UP or DOWN ARROWS and/or the
(2)
PAGE UP and PAGE DOWN keys, move the
highlight bar to select “Ring Tone Selection.” ’
Press the associated function key or press
(3)
RETURN. The screen prompts you to “Select
Tone using # and *, or use 0 for no ring tone.” m
Press the asterisk (*) key to scroll backward
(4)
through the eight available tones or the Pound (#)
key to scroll forward. Or press 0 to turn off ring
tones.
Press BSC or allow the timer to expire. The last
0
tone selected will now bc heard when the console
rings.
C. MUSIC-ON-HOLD AND BACKGROUND
MUSIC
23.7 The 256 and 4161832 Systems can be equipped
with one or two optional external music sources for the
music-on-hold and background music features. Station
users can select a music
channel
that determines which
of the two music sources they wish to listen to when
camped onto a system resource, when placed on hold by
another station, and for background music. The music
channel defaults are assigned on a station-by-station basis in the database.
23.8 Background music is interrupted for pages. The
music channel heard by outside callers is determined on
a trunk group-by-trunk group basis in the database.
To TURNBACKGROUND MUSIC ON OR OFF:
23.9
Press the PEAT key. A list of feature codes
(1)
appears.
Using the UP or DOWN ARROWS and/or the
(2)
PAGE UP and PAGE DOWN keys, move the
highlight bar to select “Background Music On
(or Ofi.” The option that is shown (on or off) is
the function that will be performed.
Press the associated function. key or press
(3)
RETURN. The console returns to the idle state
and music can be heard through the handset or
headset. If background music/paging to the
speaker is enabled, it is heard through the speak-
er.
23.10
Press the PEAT key. A list of feature codes ap
(1)
pears.
,‘--. .!,
I
23.6
To CHANGE CONSOLE RLNG TONE:
(1) Press the PEAT key. A list of feature codes is dis-
played in the lower half of the screen.
Page 2-62
Using the UP or DOWN ARROWS and/or the
(2)
PAGE UP and PAGE DOWN keys, move the
highlight bar to select “Background Music
Channel Selection.“The number at the end ofthe
Page 83
INTER-TELPRACTICES
IMX/GMX 256/832 ATTENDANT COMPUTER CONSOLE
line (1 or 2) shows which channel will be
selected.
(3) press the associated function key or press
RETURN. The console returns to the idle state
and the new channel can be heard through the
handset, or headset (or the speaker, if back-
ground music/paging is enabled).
D. MUSIC AND PAGING TO SPEAKER
23.11
If desired, the operator can disable both music
and pages that would be heard over the console speaker.
23.12
ON OR OFF:
ToluRNSPEAKERBbcKGROUM)MusICAND~GEs
(1) press the FEN’ key. A list of feature codes
appears.
(2) Using the Up or DOWN ARROWS and/or the
PAGE Up and PAGE DOWN keys, move the
highlight bar to select “Music/page to Speaker
On (or Ofi.” The option that is shown (on or otl)
is the function that will be performed.
(3) press the associated function key or press
RETURN or CNECT. The console returns to the
idle state and music can be heard through the
speaker if background music was enabled.
E. CLEARPRINTERQUEUE
23.13
If necessary, the operator can clear all informa-
tion that is waiting to be printed by clearing the printer
queue.
23.14 To CLEAR lHE PRWlER QUEUE:
(1) press the FEAI’ key. A list of feature codes
appears.
(2) Using the Up or DOWN ARROWS and/or the
PAGE Up and PAGE DOWN keys, move the
highlight bar to select “Clear printer Queue.”
The printer queue is cleared automatically and
the console returns to the idle state.
Page 2-63
Page 84

INTER-TELPRACTICES
IMX/GMX 256/832 ATTENDANT COMPUTER CONSOLE
Issue 1, November 1994
INDEX
.,
A
Account codes, 2-27
LCR-Only, 2-27
validated, 2-28
Adapter card for printer, l-3
Alarm/notice display, 2-8
Aliases, 2-19
ALT key, 2-6
Attendant features, 2-42
Attendant recall, 2-42
B
Background music
channel selection, 2-62
speaker enabled, 2-63
Backup, l-11
Barge, 2-31
BaQd rate for downloading, l-9
C
Cabling, l-3
Call connect options, 2-53,2-57
Call count display, 2-8
Call forwarding
all calls, 2-33
if busy, 2-33
if no answer, 2-33
if no answer/busy, 2-33
selecting FWD option, 2-58
to E&M destination, 2-33, 2-34
to outside number, 2-33
unsupervised CO timer, 2-33
Call handling window, 2-8
Call pick-up, 2-29
Call privacy, 2-32
Call processing history, 2-47
Call transfer, 2-12
recall, 2-12
to a hunt group, 2-12
to E&M destination, 2-13
to extension number, 2-12
to outside number, 2-13
to park, 2-12
to voice mail, 2-13
unsupervised CO timer, 2-13
Callback (queue)
station, 2-21
trunk, 2-27
Camp on
station, 2-21
trunk, 2-27
Class-of-service account codes, 2-27
Clear printer queue, 2-63
Clock format, 2-51
CO directory, 2-25,2-53
displaying local times, 2-25
making entries, 2-25
programming, 2-55
sorting names, 2-25
time update, l-11,1-12
CO options, 2-53,2-55
CO speed dial, 2-53
Colors, 2-50
Communications port for downloading, l-9
Components, l-3
Computer
installation, l-4
specifications, l-l, l-2
Canferencing, 2-29
CONFG key, 2-48
Control (ClXL) key, 2-6
Custom configuration, 2-48
D
Database
backup/restore, l-11
configuration, l-5
download, l-5
automatic, l-9
baud rate, l-9
COM port, l-9
manual, l-10
phone number, l-9
installation, 1-5
Database programming enable, 2-44
Date/time display, 2-8
programming, 2-44
Diagnostics, 1-12
DID names, 2-53,2-57
Display configuration, 2-50
Display screen layout, 2-8
Do-not-disturb, 2-36
messages, 2-58
system-widi: messages, 2-44
DOS, l-2
exiting to, l-8
Download testing, l-14,1-14
DTMF mode, 2-26
lYfMF signaling, 2-7,2-53
programming default, 2-56
Page I-l
Page 85
INDEX
Issue 1, November 1994
IMX/GMX
256/832
ATTENDANT COMPUTER CONSOLE
INTER-TELPRACTICES
E
EgtMtrunks
forward to, 2-33
.speed dialing, 245
transfer to, 2-13
Enter key, 2-6
Error history, l-8
Error messages, l-8
Expanded DID names, 2-53,2-57
Extension number display, 2-8,2-52
External music source, 2-62
External speaker, l-3
installation, 14,1-5
F
Feature keys, 24
Forced accountcodes, 2-27
LCKOnly, 2-27
validated, 2-28
Forwarding. See Call forwarding
Function keys, 2-6
G
Greetings for tenants, 2-59
Grounding, 14
Croup call pick-up, 2-29
H
Handset
installation, l-5
self test, 1-13
Headset, l-3
installation, l-5
self test, 1-13
HELP key, 2-7
History queue save/release, 247
Hold (individual), 2-11
Hold recall, 2-11
Hookfiash, 2-28
I
IC speed dial, 2-53
Inuming calls, 2-9
Installation, 14
Inter-station messages, 2-23
Intercom calls, 2-19
callback (queue), 2-21
camp on, 2-21
messages, 2-23
off-hook voice announce, 2-22
placing, 2-19
speed dialing, 2-19
using the directory, 2-19
Intercom directory, 2-19
display, 222
programmng, 2-52
Intercom speed-dial, 2-53
Interface card, l-2
address/interrupt level, 14, l-7, l-11
components, 14
installation, 14
memory test, 1-12
It
Keyboard click enable/disable, 2-7
Keyboard layout, 24
Keyset Card (KSC), l-2
’
L
Lock up, l-8
Loop limits, l-3
M
Message center, 2-23
Message lamp re-light, 247
Messages
inter-station, 2-23
reminder, 2-37 .
Microphone mute, 2-11
Modem, l-2
Modem card, l-5
self test, 1-13
testing utility, 1-14
Modular jack assembly, l-5
Monitor, l-2
Music channel selection, 2-62
Music-on-hold, 2-62
channel selection, 2-62
music 2-62 source,
N
Night mode, 243
0
Off-hook voice announce (OHYA), 2-22
Operator name
display, 2-51
programming, 248
selecting, 2-48
Operator statistics, 2-39,2-52
-.
.,
I’
Page I-2
Page 86
~-..-._-
INTER-TELPRACTICES
IM7VGM.X 256/832 ATTENDANT COMPUTER CONSOLE Issue 1, Novemb!??~
Optional account codes, 2-27
Optional equipment, l-2
Outside call speed dial, 2-54
Outside calls
account codes, 2-27
callback (queue), 2-27
camp on, 2-27
placing, 2-25-2-28
P
Page overlap, 2-51
Paging, 2-35
remove/replace, 2-35
speaker enabled, 2-63
Part numbers, l-3
Personal directory. See CO directory
Phone number for downloading, l-9
Print screen command, l-8
printer, l-3
adapter card, l-3
printer queue, 2-63
privacy release, 2-32
Q
Queue
station, 2-21
trunk, 2-27
R
Reboot, l-8
Recall
hold, 2-11
transfer, 2-12
unsupervised call, 2-13
Receiving calls, 2-10
Redial numbers, 2-25
programming space for, 2-53,2-55
Reminder messages, 2-37
programming, 243
Remote hunt group remove/replace, 246
Remote station feature cancel, 245
Remove from paging, 2-35
Restore, 1-12
RETURN key, 2-6
Reverse transfer, 2-29
Ring intercom always, 2-21
Ring tone selection, 2-62
S
Screen saver, 2-52
Selectable ring tone, 2-62
Setting time and date, 244
Setup utility, l-11
Single-line set, l-3
installation, l-5
self test, 1-13
Skate-to-hold, 2-11
SMDA report generation, 247
SMDR account codes, 2-27
Software installation, l-5
Software version display, 247
Speaker self test, 1-12
Speed dial
directory, 2-25
E&M trunks, 245
intercom, 2-53
personal CO directory, 2-54
system, 245
Standard account codes, 2-27
Station exchange, 2-38
Statistics
operator, 2-39,2-52
trunk, 240
System alarms, 246
System capacity, l-2
System directory display, 2-52
System speed dial, 245
E&M trunks, 245
T
Text messages
auto purge, 2-60
deleting, 2-16
directory, 2-16
editing, 2-16
entering, 2-14
erasing, 2-17
full alarm, 2-60
incomplete, 2-14
parameters, 2-60
printing, 2-16,2-17
recall interval, 2-60
retrieving, 2-15
tagging, 2-16
unretrieved, 2-16
viewing, 2-16,2-17
Text messaging
print size, 2-60,2-61
printing, 2-15,2-17
Time for automatic download, l-9
Toll security, 244
alarms, 246
Transfer. See Call transfer
_-
Page I-3
Page 87
Eef November 1994
lMX/GMX 256/832 A’lTENDANT COMPUTER CONSOLE
INTER-TELPRACTICES
Transient display, 2-8
timer, 2-60
Trunk access, 2-56
programming, 2-53
Trunk statistics, 2-40
TN&S
call privacy, 2-32
maintenance, 2-47
privacy release, 2-32
U
Unsupervised CO timer
attendant recall, 2-42
call forwarding, 2-33
transfer to outside number, 2-13
Utilities, l-11
,.i-7
: ” ))I
,.‘: :,
.:y_ /
1,
Page I-4
I .‘, ,
 Loading...