

Page 1

Contact Center Suite
User Guide
Page 2

Page 3

Notice
Enter provider information above
This Inter-Tel® Contact Center Suite User Guide is released by Inter-Tel, Inc. as a guide for
end-users. It provides information necessary to use Contact Center Suite. The contents of
this user guide, which reflect current Inter-Tel standards, are subject to revision or change
without notice. Some features or applications mentioned may require a future release and
are not available in the initial release. Future product features and applications are subject
to availability and cost. Some features or applications may require additional hardware
and/or specific software.
For sales, service, or technical support,
contact your local authorized Inter-Tel provider.
If you have any questions or comments regarding this manual or other technical
documentation, contact Inter-Tel’s Technical Publications Department at:
tech_pubs@inter-tel.com
All products and services mentioned in this publication are the trademarks, service marks, registered
marks, or registered service marks of their respective owners.
®
Inter-Tel
Microsoft
GoldMine
Verint Audiolog™ is a trademark of Verint.
© 2007 Inter-Tel (Delaware), Incorporated: Personal use of this material is permitted. However,
permission to reprint/republish this material for advertising or promotional purposes or for creating
new collective works for resale or redistribution to servers or lists, or to reuse any copyrighted
component of this work in other works must be obtained from Inter-Tel, Incorporated.
is a registered trademarks of Inter-Tel (Delaware), Incorporated.
®
Office Outlook® is a registered trademark of Microsoft Corporation.
®
is a registered trademark of FrontRange Solutions.
Page 4

Page 5

Contents
Overview . . . . . . . . . . . . . . . . . . . . . . . . . . . . . . . . . . . . . . . . . . . . . . . . . . . . . . . . . . . . 1
About This Guide . . . . . . . . . . . . . . . . . . . . . . . . . . . . . . . . . . . . . . . . . . . . . . . . . . . . . . . . . 1
Online Help . . . . . . . . . . . . . . . . . . . . . . . . . . . . . . . . . . . . . . . . . . . . . . . . . . . . . . . . . . . . . . 2
Navigating Help Topics. . . . . . . . . . . . . . . . . . . . . . . . . . . . . . . . . . . . . . . . . . . . . . . . . . 2
Searching Help . . . . . . . . . . . . . . . . . . . . . . . . . . . . . . . . . . . . . . . . . . . . . . . . . . . . . . . . 3
Printing a Help Topic . . . . . . . . . . . . . . . . . . . . . . . . . . . . . . . . . . . . . . . . . . . . . . . . . . . 3
Where to Find Additional Information. . . . . . . . . . . . . . . . . . . . . . . . . . . . . . . . . . . . . . . . . 3
About Contact Center Suite . . . . . . . . . . . . . . . . . . . . . . . . . . . . . . . . . . . . . . . . . . . . . . . . . 4
Software Applications. . . . . . . . . . . . . . . . . . . . . . . . . . . . . . . . . . . . . . . . . . . . . . . . . . . . . . 5
Licenses. . . . . . . . . . . . . . . . . . . . . . . . . . . . . . . . . . . . . . . . . . . . . . . . . . . . . . . . . . . . . . . . . 5
Support Services. . . . . . . . . . . . . . . . . . . . . . . . . . . . . . . . . . . . . . . . . . . . . . . . . . . . . . . . . . 6
Features of Contact Center Suite v4.0 and Later . . . . . . . . . . . . . . . . . . . . . . . . . . . . . . . . 6
CallViewer . . . . . . . . . . . . . . . . . . . . . . . . . . . . . . . . . . . . . . . . . . . . . . . . . . . . . . . . . . . 7
Introduction . . . . . . . . . . . . . . . . . . . . . . . . . . . . . . . . . . . . . . . . . . . . . . . . . . . . . . . . . . . . . . 7
Starting CallViewer . . . . . . . . . . . . . . . . . . . . . . . . . . . . . . . . . . . . . . . . . . . . . . . . . . . . . . . . 7
Using Startup Wizard . . . . . . . . . . . . . . . . . . . . . . . . . . . . . . . . . . . . . . . . . . . . . . . . . . . . . . 8
Using the CallViewer Tray Bar Icon . . . . . . . . . . . . . . . . . . . . . . . . . . . . . . . . . . . . . . . . . . 13
Using the Look and Feel Options . . . . . . . . . . . . . . . . . . . . . . . . . . . . . . . . . . . . . . . . . . . 14
Selecting a Look and Feel Option . . . . . . . . . . . . . . . . . . . . . . . . . . . . . . . . . . . . . . . . 14
Exploring Look and Feel Components . . . . . . . . . . . . . . . . . . . . . . . . . . . . . . . . . . . . . 16
Changing the Look . . . . . . . . . . . . . . . . . . . . . . . . . . . . . . . . . . . . . . . . . . . . . . . . . . . . 22
Using the Active Call List . . . . . . . . . . . . . . . . . . . . . . . . . . . . . . . . . . . . . . . . . . . . . . . . . . 22
Controlling Calls with CallViewer . . . . . . . . . . . . . . . . . . . . . . . . . . . . . . . . . . . . . . . . . . . 23
Making a Call . . . . . . . . . . . . . . . . . . . . . . . . . . . . . . . . . . . . . . . . . . . . . . . . . . . . . . . . 23
Transferring / Redirecting a Call. . . . . . . . . . . . . . . . . . . . . . . . . . . . . . . . . . . . . . . . . . 23
Using Go Dial and Quick Connect . . . . . . . . . . . . . . . . . . . . . . . . . . . . . . . . . . . . . . . . 24
Understanding Agent States . . . . . . . . . . . . . . . . . . . . . . . . . . . . . . . . . . . . . . . . . . . . . . . 24
©Inter-Tel, Inc., Revised June, 2007 printed in U.S.A.
iii
Page 6

Using Button Manager . . . . . . . . . . . . . . . . . . . . . . . . . . . . . . . . . . . . . . . . . . . . . . . . . . . . 25
Adding a Button . . . . . . . . . . . . . . . . . . . . . . . . . . . . . . . . . . . . . . . . . . . . . . . . . . . . . . 26
Editing or Removing Buttons . . . . . . . . . . . . . . . . . . . . . . . . . . . . . . . . . . . . . . . . . . . . 28
Controlling DND States. . . . . . . . . . . . . . . . . . . . . . . . . . . . . . . . . . . . . . . . . . . . . . . . . . . . 28
Using Call History . . . . . . . . . . . . . . . . . . . . . . . . . . . . . . . . . . . . . . . . . . . . . . . . . . . . . . . . 28
Advanced CallViewer Topics . . . . . . . . . . . . . . . . . . . . . . . . . . . . . . . . . . . . . . . . . . . . . . . 29
Creating Hot Keys . . . . . . . . . . . . . . . . . . . . . . . . . . . . . . . . . . . . . . . . . . . . . . . . . . . . 29
Screen Popping Calls and E-mails . . . . . . . . . . . . . . . . . . . . . . . . . . . . . . . . . . . . . . . . 30
Defining and Using Rules . . . . . . . . . . . . . . . . . . . . . . . . . . . . . . . . . . . . . . . . . . . . . . . 30
Media Blending. . . . . . . . . . . . . . . . . . . . . . . . . . . . . . . . . . . . . . . . . . . . . . . . . . . . . . . 32
Tiles, Filters, and Statistics . . . . . . . . . . . . . . . . . . . . . . . . . . . . . . . . . . . . . . . . . . . . 35
Introduction . . . . . . . . . . . . . . . . . . . . . . . . . . . . . . . . . . . . . . . . . . . . . . . . . . . . . . . . . . . . . 35
Tiles . . . . . . . . . . . . . . . . . . . . . . . . . . . . . . . . . . . . . . . . . . . . . . . . . . . . . . . . . . . . . . . . . . . 35
Adding a Tile. . . . . . . . . . . . . . . . . . . . . . . . . . . . . . . . . . . . . . . . . . . . . . . . . . . . . . . . . 36
Editing a Tile. . . . . . . . . . . . . . . . . . . . . . . . . . . . . . . . . . . . . . . . . . . . . . . . . . . . . . . . . 36
Removing a Tile . . . . . . . . . . . . . . . . . . . . . . . . . . . . . . . . . . . . . . . . . . . . . . . . . . . . . . 36
Filters . . . . . . . . . . . . . . . . . . . . . . . . . . . . . . . . . . . . . . . . . . . . . . . . . . . . . . . . . . . . . . . . . . 37
Using Filter Manager . . . . . . . . . . . . . . . . . . . . . . . . . . . . . . . . . . . . . . . . . . . . . . . . . . 37
Adding a Filter . . . . . . . . . . . . . . . . . . . . . . . . . . . . . . . . . . . . . . . . . . . . . . . . . . . . . . . 38
Editing a Filter. . . . . . . . . . . . . . . . . . . . . . . . . . . . . . . . . . . . . . . . . . . . . . . . . . . . . . . . 41
Removing a Filter . . . . . . . . . . . . . . . . . . . . . . . . . . . . . . . . . . . . . . . . . . . . . . . . . . . . . 41
Statistics . . . . . . . . . . . . . . . . . . . . . . . . . . . . . . . . . . . . . . . . . . . . . . . . . . . . . . . . . . . . . . . 42
Types of Statistics . . . . . . . . . . . . . . . . . . . . . . . . . . . . . . . . . . . . . . . . . . . . . . . . . . . . 42
Using Statistics . . . . . . . . . . . . . . . . . . . . . . . . . . . . . . . . . . . . . . . . . . . . . . . . . . . . . . . 43
iv
Page 7

RealViewer . . . . . . . . . . . . . . . . . . . . . . . . . . . . . . . . . . . . . . . . . . . . . . . . . . . . . . . . . . 45
Introduction . . . . . . . . . . . . . . . . . . . . . . . . . . . . . . . . . . . . . . . . . . . . . . . . . . . . . . . . . . . . . 45
Starting RealViewer. . . . . . . . . . . . . . . . . . . . . . . . . . . . . . . . . . . . . . . . . . . . . . . . . . . . . . . 45
Using Startup Wizard . . . . . . . . . . . . . . . . . . . . . . . . . . . . . . . . . . . . . . . . . . . . . . . . . . . . . 45
Adding a Deskboard Tile . . . . . . . . . . . . . . . . . . . . . . . . . . . . . . . . . . . . . . . . . . . . . . . . . . 49
Applying Filters to Tiles . . . . . . . . . . . . . . . . . . . . . . . . . . . . . . . . . . . . . . . . . . . . . . . . . . . 52
Advanced RealViewer Topics. . . . . . . . . . . . . . . . . . . . . . . . . . . . . . . . . . . . . . . . . . . . . . . 53
Using Tile Alarms . . . . . . . . . . . . . . . . . . . . . . . . . . . . . . . . . . . . . . . . . . . . . . . . . . . . . 53
Rearranging Tiles in the RealViewer Window . . . . . . . . . . . . . . . . . . . . . . . . . . . . . . . 53
Reporter . . . . . . . . . . . . . . . . . . . . . . . . . . . . . . . . . . . . . . . . . . . . . . . . . . . . . . . . . . . . 55
Introduction . . . . . . . . . . . . . . . . . . . . . . . . . . . . . . . . . . . . . . . . . . . . . . . . . . . . . . . . . . . . . 55
Starting Reporter. . . . . . . . . . . . . . . . . . . . . . . . . . . . . . . . . . . . . . . . . . . . . . . . . . . . . . . . . 55
Using Startup Wizard . . . . . . . . . . . . . . . . . . . . . . . . . . . . . . . . . . . . . . . . . . . . . . . . . . . . . 55
Running Reports . . . . . . . . . . . . . . . . . . . . . . . . . . . . . . . . . . . . . . . . . . . . . . . . . . . . . . . . . 57
Saving and Reusing Reports . . . . . . . . . . . . . . . . . . . . . . . . . . . . . . . . . . . . . . . . . . . . . . . 57
Report Options . . . . . . . . . . . . . . . . . . . . . . . . . . . . . . . . . . . . . . . . . . . . . . . . . . . . . . . . . . 58
Applying a Date Range. . . . . . . . . . . . . . . . . . . . . . . . . . . . . . . . . . . . . . . . . . . . . . . . . 58
Applying a Filter . . . . . . . . . . . . . . . . . . . . . . . . . . . . . . . . . . . . . . . . . . . . . . . . . . . . . . 58
Creating a Report . . . . . . . . . . . . . . . . . . . . . . . . . . . . . . . . . . . . . . . . . . . . . . . . . . . . . . . . 59
Exporting Data. . . . . . . . . . . . . . . . . . . . . . . . . . . . . . . . . . . . . . . . . . . . . . . . . . . . . . . . . . . 60
Advanced Reporter Topics. . . . . . . . . . . . . . . . . . . . . . . . . . . . . . . . . . . . . . . . . . . . . . . . . 60
Previewing and Printing Reports . . . . . . . . . . . . . . . . . . . . . . . . . . . . . . . . . . . . . . . . . 60
Playing Back Recorded Calls . . . . . . . . . . . . . . . . . . . . . . . . . . . . . . . . . . . . . . . . . . . . 61
Using Auto Reporter . . . . . . . . . . . . . . . . . . . . . . . . . . . . . . . . . . . . . . . . . . . . . . . . . . . 61
v
Page 8

Reporter Real-Time . . . . . . . . . . . . . . . . . . . . . . . . . . . . . . . . . . . . . . . . . . . . . . . . . . . 65
Introduction . . . . . . . . . . . . . . . . . . . . . . . . . . . . . . . . . . . . . . . . . . . . . . . . . . . . . . . . . . . . . 65
Starting Reporter Real-Time. . . . . . . . . . . . . . . . . . . . . . . . . . . . . . . . . . . . . . . . . . . . . . . . 65
Using Startup Wizard . . . . . . . . . . . . . . . . . . . . . . . . . . . . . . . . . . . . . . . . . . . . . . . . . . . . . 66
Using Reporter Real-Time Tiles . . . . . . . . . . . . . . . . . . . . . . . . . . . . . . . . . . . . . . . . . . . . . 67
Adding a Tile. . . . . . . . . . . . . . . . . . . . . . . . . . . . . . . . . . . . . . . . . . . . . . . . . . . . . . . . . 73
Changing Statistics on a List Tile . . . . . . . . . . . . . . . . . . . . . . . . . . . . . . . . . . . . . . . . . 75
Using Tile Alarms . . . . . . . . . . . . . . . . . . . . . . . . . . . . . . . . . . . . . . . . . . . . . . . . . . . . . 76
Applying Filters to Tiles . . . . . . . . . . . . . . . . . . . . . . . . . . . . . . . . . . . . . . . . . . . . . . . . 76
Advanced Reporter Real-Time Topics. . . . . . . . . . . . . . . . . . . . . . . . . . . . . . . . . . . . . . . . 77
Creating StationViewer Tiles . . . . . . . . . . . . . . . . . . . . . . . . . . . . . . . . . . . . . . . . . . . . 77
Using Call Control. . . . . . . . . . . . . . . . . . . . . . . . . . . . . . . . . . . . . . . . . . . . . . . . . . . . . 79
Using Auto Reporter . . . . . . . . . . . . . . . . . . . . . . . . . . . . . . . . . . . . . . . . . . . . . . . . . . . 81
Index . . . . . . . . . . . . . . . . . . . . . . . . . . . . . . . . . . . . . . . . . . . . . . . . . . . . . . . . . . . . . . . 83
vi
Page 9

OVERVIEW
Overview
This section provides a broad overview on the Contact Center Suite application.
About This Guide
This guide contains instructions for agents and supervisors using Contact Center Suite
client applications, including Connection Assistant.
The features described in this guide may not be available in the license
NOTE
To help you find information more quickly, this guide is divided into six sections:
• Overview: This section gives a brief description of the Contact Center Suite client
applications and the features in version 4.0 and later. It also contains information on
other sources of help for using Contact Center Suite.
• CallViewer: This module contains information on starting CallViewer, using the
Startup Wizard and the new “look and feel” options. It also covers basic CallViewer
tasks, such as call control functionality and using Button Manager. Advanced tasks
include using hot keys, screen popping, Rule Manager, and handling e-mails routed
with Media Blending. If you are using Connection Assistant, this information applies,
however, refer to the Options License topic in the online help for details on CallViewer
and Connection Assistant feature differences.
• Tiles, Filters, and Statistics: This section covers general concepts for tiles, filters,
and statistics, which are common to several client applications.
• RealViewer: This module contains information on starting RealViewer and using
Startup Wizard. It also covers basic RealViewer tasks, such as creating a Deskboard
tile and applying filters to tiles. Advanced topics include setting tile alarms and
rearranging the RealViewer window.
• Reporter: This module contains information on starting Reporter and using Startup
Wizard. It also covers basic Reporter tasks, such as running reports, saving and
reusing reports, changing report options, and exporting data. Advanced topics include
printing and previewing reports, using Auto Reporter and integrating with the Mercom
Audiolog™ Server.
• Reporter Real-Time: This module contains information on starting Reporter Real-
Time and using Startup Wizard. It also covers basic tasks such as adding tiles,
customizing the tile’s appearance, changing the statistics on a tile, and applying
filters. Advanced topics include creating DSS tiles for extensions and agents, using
call control, and using Auto Reporter.
level you have purchased. Refer to the online help for feature capabilities
for your license.
Contact Center Suite User Guide 1
Page 10

OVERVIEW
Online Help
book selector list
There are several ways to access the online help from within the client applications,
although not all options may be available in every window:
• Press F1 on your keyboard.
• Click the Help button.
• Select Help from the application menu or tray bar menu.
Navigating Help Topics
In most cases, the right pane of the help window displays information about the current
screen. You can navigate to other topics using the table of contents in the left pane of the
help window.
The contents are organized into “books” of related
information. Double-click a book to open it and reveal
the topics and/or books it contains, as shown in the
example on the right.
You can also use the drop-down menu to select help topics. Click the Previous and Next
icons to navigate through the related topics in the chosen book.
2
Contact Center Suite User Guide
Page 11

OVERVIEW
Searching Help
Sometimes the fastest way to find the information you need is to use the help search
feature.
To search help:
1. Click the Search tab.
2. Type the keyword you want to find in
the text box, and then click List
Topics .
3. Select the topic from the list in the
lower portion of the panel, and then
click Display.
Printing a Help Topic
To print a help topic, navigate to the information you want to print, and then click the Print
icon at the top of the window.
Where to Find Additional Information
You can find additional information in the Contact Center Suite Installation Manual (part no.
835.2208) or in the online Help for each of the individual clients. This User Guide does not
include information on the Server, Data Manager, and Intelligent Router.
Contact Center Suite User Guide 3
Page 12

OVERVIEW
About Contact Center Suite
Contact Center Suite is a Computer Telephony Integration (CTI) application. It links the
telephone system and the computer, providing a seamless and automated technological
partnership. Contact Center Suite can be used with the following communications systems:
• Inter-Tel
• Inter-Tel 5000 Network Communications Solutions (Single and Multiple Nodes)
• Inter-Tel 7000 Network Communications Solutions
Contact Center Suite is ideal for businesses, such as an order entry center, help desk
(customer support), telemarketing firm, etc., that experience high call volumes and use a
computerized database and/or an automatic call distribution system, although it is also
suited to low-volume environments.
As more customers turn to the Internet for sales, support, and service, call centers receive
e-mails and faxes, in addition to traditional phone calls. Contact Center Server v4.0 or later
supports full Media Blending, effectively modeling all three forms of contact.
NOTE
®
Axxess® Converged Communications Platform (Single and Multiple Nodes)
A third-party fax to e-mail gateway is required to support modeling of faxes.
Refer to the Advanced Applications Design Guide for Contact Center Suite
(part no. 835.3053) for details.
4
Contact Center Suite User Guide
Page 13

OVERVIEW
Software Applications
The Contact Center Suite software package contains the following modules:
• Server: Stores all call data and provides real-time information for the other
components of the system. The Server is the heart of the Contact Center system.
Refer to the Contact Center Suite Installation Manual for information on Server.
• Data Manager: Used to configure the Server. It connects over the network to the
Server, and allows the administrator to configure various settings, such as lists of
devices, or how to connect to the telephone system. The Data Manager can also be
executed on the same computer as the Server. Refer to the Contact Center Suite
Installation Manual for information on Data Manager.
• CallViewer: Allows individual users to screen pop information from the company
database and manage calls and e-mail messages. CallViewer includes several “look
and feel” choices to help you customize the application to suit your need.
• RealViewer: Allows users to see statistics, at their own computer, based on the
activity of the user or their group.
• Reporter (Reporter Basic, Reporter, and Reporter Pro): Allows you to analyze the
call log historically in a variety of ways to make better business decisions. Note that
licensing varies for Reporter Basic, Reporter, and Reporter Pro.
• Reporter Real-Time (Reporter and Reporter Pro): Allows you to analyze the call log
in real-time in a variety of ways to make better business decisions. Note that licensing
varies for Reporter and Reporter Pro.
• Intelligent Router: Allows you to program routing schemes (and numerous other
actions) for calls and other media types based on call information and other statistics.
Intelligent Router is required if the optional media blending feature is desired. Refer to
the Contact Center Suite Installation Manual for information on Intelligent Router.
• Verint (formerly Mercom) Audiolog
Verint Audiolog voice recorder, which enables the recording of your calls and
subsequent playback from Reporter.
• Auto Reporter: Provides Web publishing capabilities for Reporter and Reporter Real-
Time. With Auto Reporter, you can schedule reports to automatically publish them to
a Web site (Internet or intranet), send them to a printer, or e-mail them with
attachments in .doc or .xls format. Wireless Application Protocol (WAP) reports
can be published to a Web site for viewing on a WAP-compliant device. Finally, Auto
Reporter allows you to schedule exports for reports. Refer to pages 61 and 81 for
more information.
®
Server: Contact Center Suite supports the
Licenses
The features available in each Contact Center Suite module are controlled by the license
level you have purchased. Refer to the Server chapter of the Contact Center Suite
Installation Manual or the online help for details on checking your licensing information.
Contact Center Suite User Guide 5
Page 14

OVERVIEW
Support Services
NOTE
If you have questions about any of the Contact Center Suite products, refer to this manual
or the online help. If you need additional support, please contact the designated on-site
System Manager. If this does not resolve the problem, contact your authorized Inter-Tel
provider for technical assistance.
Technical support personnel may need to view the installation, setup, etc. of
the Server using Inter-Tel Remote Support.
Features of Contact Center Suite v4.0 and Later
Contact Center Suite v4.0 or later contains many features including the following:
• Internal Call Modeling: Allows new activity reporting and intelligent routing
capabilities for internal calls, enabling managers to monitor the performance of
internal departments, both historically and in real-time, and automatically manage
their call traffic. See the Intelligent Router chapter of the Contact Center Suite
Installation Manual for more details.
• Enhanced CallViewer: Provides enhanced user functionality and customization
including changeable Looks, DSS buttons, integrated call logger and personal call
router. See the “CallViewer” section, beginning on page 7, for more details.
• Media Blending: Allows e-mails sent to contact centers to be routed and handled like
calls. See the “CallViewer” section for more details.
• Multi-Media Reporting: With the addition of real-time and historical reporting,
enables managers to monitor and report on routed e-mails and normal telephone
traffic. See the “Reporter” and “Reporter Real-Time” sections for more details.
• Agent Help Support: New agent-help functionality allows managers to monitor and
react to the support needs of their staff in real time when faced with a difficult call that
requires the assistance of a manager. See page 29 for more details.
6
Contact Center Suite User Guide
Page 15

CALLVIEWER
CallViewer
This section provides details for the Callviewer module in Contact Center Suite.
Introduction
CallViewer (or Connection Assistant) is a software product that provides telephony call
control, screen popping, and desktop automation on a Windows-based computer. This
application makes extensive use of Caller ID and Dialed Number Identification Service
(DNIS).
A CallViewer user will have a networked PC connected to the Server, and a telephone
connected to the company telephone system. When the user makes outbound calls or
receives inbound calls, the dialed number or the Caller ID of the caller, along with other
pertinent customer information, appears in the CallViewer user interface. This enables the
user to see information about the caller before answering. CallViewer can also be used to
screen pop the customer information in the company database, saving you time locating
the relevant information.
Version 4.1 of CallViewer provides Media Blending functionality. When an agent is routed
an e-mail by Intelligent Router, the e-mail message appears in Contact Center Suite just
like a received call.
If you are using Connection Assistant, the information in this section applies, however, refer
to the Options License topic in the online help for details on CallViewer and Connection
Assistant feature differences.
Starting CallViewer
From the Start menu, choose Programs – Inter-Tel Contact Center Suite, and then
select CallViewer (or Connection Assistant).
NOTE
When CallViewer starts, the Startup Wizard begins, as described on the next page.
The features of CallViewer can be limited by specifying passwords on the Server. If the
Server has all password levels set, you will need to enter a password to access CallViewer.
Contact Center Suite User Guide 7
In the remainder of this section, “CallViewer” is referenced, although the
information may also apply to Connection Assistant.
Page 16

CALLVIEWER
Using Startup Wizard
When you launch CallViewer for the first time, the Startup Wizard helps you configure
various common options step-by-step. Each set of options is shown on its own page and
includes Next/Previous buttons for navigating through the wizard.
NOTE
The following screens display during setup:
If you want to run the startup wizard at a later time, right-click the CallViewer
tray bar icon ( ) and select Startup Wizard.
• Welcome Page: This page begins a sequence of Startup Wizard pages that is used
to collect some configuration defaults for the software.
• Devices Page: Enter the extension number and the voice mail number used for this
installation of CallViewer. The devices can be changed later using the Options dialog,
on the Devices tab.
• Search for Contact Center Server: Choose one server option from the following
choices:
o Run in simulation mode: When enabled, no connection is made to a CTI Server
and the software runs in simulation mode. Enable this option when you need to
simulate calls to test macros that you have written.
Simulation mode is only used with the Contact Center Suite
NOTE
o Search network for a CTI Server: When enabled, the Startup Wizard searches the
network for available CTI servers when you proceed to the next page of the
Startup Wizard. This is the default option when no information is available for the
server connection.
o Connect to this CTI Server: When enabled, CallViewer uses the server that you
specify in the text box below this option. This is the default option when
information is available for the server connection.
The server option can be changed later using the Network Settings dialog (see the
online help for details).
Developer SDK when creating user-defined actions. If you are not
using the dongle provided with the Developer SDK and running
in Simulation mode, CallViewer will not function.
8
Contact Center Suite User Guide
Page 17

CALLVIEWER
• Auto Configure Page: This page is displayed only if you selected the option to
search the network for a CTI Server in the previous page. The Auto Configure page
searches the local area network for CTI servers and after the search is complete, a
list of available server names is displayed. Select a server name to proceed.
o If you are using NETBIOS, auto-configure searches for servers named
CTISERVER1 through CTISERVER9, on any valid LANA numbers between 0 and
20.
o If you are using TCP/IP, auto-configure searches the port number specified in
network settings (default 3986) for computers in the same class C subnet as this
computer. For example, if your IP address is 10.1.2.10, auto-configure will look for
servers on addresses 10.1.2.1 to 10.1.2.254.
• Look and Feel Page: Choose which look you prefer for CallViewer from the drop-
down list. For each selection, you see a sample picture and a description of the
features included. The example below shows the Executive Display.
NOTE
Contact Center Suite User Guide 9
You can change to another “Look and Feel” selection at a later time if you
choose. See page 14 for details.
Page 18

CALLVIEWER
• Ready To Go Page: Select and configure a Ready To Go solution so that you can
quickly access another application from within CallViewer. The Ready To Go
Solutions choices are shown in the following example.
If you choose to install a solution, you can determine when CallViewer screen pops
the database, using the following options:
o Automatically screen pop when call is answered: When enabled, the chosen
database screen pops when a call is answered at the CallViewer extension. When
disabled, the chosen database screen pops when a call starts to alert.
10
The application you intend to use for screen popping must be open
NOTE
while you are using screen popping from CallViewer. For example, to
screen pop Outlook, it must be running on the PC where CallViewer
is being used.
o Screen pop application for: Choose inbound calls, outbound calls, or both inbound
and outbound calls. Inbound calls will also screen pop routed e-mails.
You do not need to set up the RTG options using the Startup Wizard. You can also
create a Ready To Go action when defining a new rule or button. You can also edit
the settings of a Ready To Go solution created using the Startup Wizard using the
Action Manager. See the online help for details on configuring Ready To Go
solutions.
Contact Center Suite User Guide
Page 19

CALLVIEWER
• Dial Rules Page: The dial rules affect how a number is altered before being passed
to the CTI Server to be dialed. Choose one of the following options:
o Calculate dial rules via CallViewer Contact Center Server: When enabled, all dial
rules are calculated at the CTI Server using previously configured options. This is
the default setting.
o Specify dial rules for this installation: When enabled, all dial rules are calculated
by CallViewer using rules configured here or from the Options feature. To support
canonical format dialing (i.e., the format that Outlook uses to store numbers), you
need to use local rules that are correctly configured. Then you can dial numbers in
the form “+country (area) number,” for example, “+44 1293 608200.”
The dial rules configuration includes tabs for General, Local, Long Distance, and
International settings. Each tab contains a “test” section (described on page 12) so
you can try out the settings before finishing the configuration. To set the dial rules,
complete the following steps.
1) On the General tab, program the Outbound Dial Prefix, which is the number
you need to dial to reach an outside line, for example, 8 or 9. This information
is critical for external outbound dialing.
2) On the Local tab, program the following:
o Local area code: Enter your area code (for example, 480).
o Local toll calls: Enter any prefixes, within your area code, that may require
the long distance code. You can enter partial prefixes to indicate a range
(e.g., 8 would indicate 800-899).
o Always dial the local area code on local calls: When enabled, the local
area code is always prefixed to the number being dialed, when dialing a
local number.
o The local area code is prefixed with ‘0’ for non-international calls: When
enabled, this setting will prefix the local area code being dialed with a “0”
for non-international calls entered using canonical format. For example, a
UK number such as 01293 608200 would be entered in canonical form as
+44 1293 608200, and would be dialed as such from a non-UK country, but
in the UK the “0” needs to be prefixed to the local area code, and so this
setting would need to be enabled. This setting only takes effect when
dialing numbers in canonical form.
3) On the Long Distance tab, program the following:
o Long distance code: Enter the code required to dial outside your area code
(e.g., 1 for the US).
o Don’t dial long distance code: Enter a comma-separated list of area codes
that do not require the long distance code.
Contact Center Suite User Guide 11
Page 20

CALLVIEWER
4) On the International tab, program the following:
o International dial code: Enter your international dial code (e.g., 011 for the
US).
o Country code: Enter the country code where you are calling from, e.g., “44”
for UK, “1” for US.
o Replace ‘+’ with international dialing code: When enabled, a “+” in the
number to be dialed is changed to the international dialing code the caller
enters.
The Test section appears on each tab, and contains a Sample telephone
number text box where you can type digits to test. As you type the number to
test, the Actual number dialed field updates as you type, to reflect the number
that would be dialed by CallViewer.
Click Test to apply the dial rules to the sample telephone number and produce a
result in the Actual number dialed display. The type of call (internal, local, long
distance, or international) is also displayed to help you determine which rule you
may need to adjust for correct dialing.
NOTE
The Actual Number Dialed area is for display only; you cannot edit
the contents.
• Import Your Previous Configurations Page: This page appears only if you are
upgrading from an earlier release of CallViewer (version 3.x or before), if legacy
macro files or hot key settings are detected, and there are no current actions or hot
keys defined for the current installation.
If you have existing Ready To Go (RTG) macros in use in CallViewer, you should
NOT upgrade your old macros and buttons, but instead recreate them with the new
Ready To Go integrations. In v4.0 and later, the Ready To Go options are more
advanced and provide tighter integration with v4.0 and later (i.e., they can be more
fully customized, have multiple instances, etc.). This also applies to automatic
macros, which are now defined by rules. If you have existing RTGs in use, but also
have other macros, you may want to perform the upgrade, but then delete the RTGs
and recreate then using the new versions.
Many simple macros from v3.x are replaced by built-in actions in v4.0 and later, such
as those that opened a file or placed a call. For example, the “Set Call Note” macro
from v3.x has been entirely replaced by a built-in feature, so you can delete that
button or associated macros.
12
Contact Center Suite User Guide
Page 21

CALLVIEWER
The import page contains the following options:
CallViewer Icon
o Import existing button macros: This option is enabled if existing macro files from
an earlier release are installed on this computer. When enabled, upon successful
completion of the Wizard, the Wizard imports the existing button macros as new
actions bound to new buttons.
o Import existing automatic macros: This option is enabled if the previous option is
enabled. When enabled, upon successful completion of the Wizard, the Wizard
imports the existing automatic macros as new actions bound to new rules.
o Import existing hot keys: This option is enabled if existing hot keys from an earlier
release are configured and enabled on this computer. When enabled, upon
successful completion of the Wizard, the Wizard imports the existing hot keys as
new hot keys in this installation.
• Finished Page: To complete the CallViewer configuration, click Finish in the Startup
Wizard.
Using the CallViewer Tray Bar Icon
When CallViewer is launched, an icon appears on the Windows tray bar, as shown below.
The tray bar icon provides access to the CallViewer options and indicates the current
connectivity status, as described below.
While CallViewer is loading, move the mouse pointer over the tray bar icon to see a tooltip
message on the progress. The tooltip shows the following states.
• Offline/Disconnected: CallViewer is not connected to a CTI Server, and not
running in simulation mode. During this state, you can only use CallViewer to
configure network settings.
• Connecting: CallViewer is trying to connect to a CTI Server. During this state
you cannot use CallViewer's telephony functionality because the connection to the
CTI Server is not fully established.
• CallViewer: CallViewer is connected and functioning normally.
• Telephone system offline: CallViewer is connected to the CTI Server, but the
CTI Server has lost the connection to the telephone system.
The CallViewer tray bar icon has menus that you can access using left and right mouse
buttons.
To access the call control menu, click the CallViewer tray bar icon ( ). Some of the
options may be unavailable when there are no active calls at the extension. See
“Controlling Calls with CallViewer” on page 23 for details on using the menu options.
Right-click the tray bar icon to display the Main Menu; refer to the online help for
descriptions of the menu options.
Contact Center Suite User Guide 13
Page 22

CALLVIEWER
Using the Look and Feel Options
CallViewer uses several “look and feel” options to define the appearance and functionality
of the main windows. Some options are typically used by a call center agent for screen
popping, while others may be used by other non-call center users as a computer-based
interface to their desktop phone. The options are described in greater detail in later areas of
this section.
Items such as network settings dialogs and button creation dialogs are not defined by the
look and feel, and are common across all choices.
Selecting a Look and Feel Option
Use the following descriptions to help you choose the look and feel option that suits your
need best. Refer to page 16 for descriptions of the components.
• CallViewer Legacy: Provides a familiar interface for existing users with its similarity in
appearance to previous versions of CallViewer. The buttons that were included on the
caption bar on previous versions to launch Personal Navigator and user-defined
feature buttons are no longer available.
The Legacy option has a compact design that requires little desktop space, which
makes it ideal for call center agents use, however, it contains the fewest features. It
also offers a smaller “mini mode” version with only control buttons.
• CallViewer Executive Display: Provides a small main window with options to open
additional windows for the dial pad, active calls, call history, and user-defined buttons.
This option may be preferred by call center agents and managers or non-call center
users because of its flexibility.
14
Contact Center Suite User Guide
Page 23

CALLVIEWER
• CallViewer Quick Connect: Provides call controls in the smallest interface option.
Feature buttons
Window controls
Display area
Titlebar area
System Menu icon
This option may be preferred by a call center agent who need basic call control
functionality without sacrificing space on the desktop.
The CallViewer Quick Connect look and feel option is not the same as
the Show Quick Connect feature available in all the choices. When you
NOTE
enable Show Quick Connect in the CallViewer Legacy, Executive
Display, or Handset, you see a small icon, either or , that you can
position anywhere on your screen.
• CallViewer Handset: Provides basic call control through an interface that resembles
a telephone display, with additional windows for call history and user-defined buttons.
Contact Center Suite User Guide 15
Each look and feel choice contains its own set of options and features, such as an active
call list, call history, and dial pad, which are described in the following sections.
Page 24

CALLVIEWER
Exploring Look and Feel Components
Each “look and feel” consists of one or more windows. Each look has a main window, and
any number of other windows, the availability of which depends on the look being used.
The main window is often the most different among each “look,” as this window is often
central to the functionality of the “look.” The other windows have a more common interface.
The basic elements of the main window are described below. Refer to the online help for
specific look information.
The following types of windows are available:
• Main window (see below)
• Active Call List (see page 17)
• Dial List (see page 19)
• Call History (see page 19)
• User Button area (see page 21)
• Feature sets (see page 21)
• Quick Connect (see page 21)
Main Window
The main window is the central window for each “look and feel” and provides access to
other components of the look. The functionality of each individual look will vary in the main
window. This section describes some common elements of the windows.
The main window cannot be resized, but can be moved using the window titlebar like any
normal Windows application. The titlebar is at the top of each window.
16
NOTE
For specific information about the main window of a particular look, refer to the
online help.
Docking Windows
Many “looks” allow you to dock (join together) windows to the main window, or to other
windows in the “look.”
To dock windows together: Drag the window using its titlebar to the side of the window
that it is to dock with. When the window gets close to the other window, the two will snap
together. You can dock windows to any corner of a window, as long as both windows
support docking.
To undock a window: Use the titlebar of the window to drag it away from the window it is
docked with. The window will not undock immediately, but after it has been moved a short
distance, it will undock, and then be positioned on the screen as normal.
You can move all the docked windows as one by dragging the titlebar of the main window
(or if two other windows are docked together, dragging the titlebar of the window that has
been docked to).
Contact Center Suite User Guide
Page 25

CALLVIEWER
Status Bar
Many “looks” indicate textual status information on the main window. This information
includes the current connection state with the Server. See the online help for details on the
status messages. 1001
Active Call List
The active call list displays a list of calls and routed e-mails that are active at your
extension right now. In some “looks” the active call list is in a separate window, while in
others it is part of another window. Each call in the call list consists of the call status, call
detail, and call control buttons, as shown in the example below:
• Call Status: The call status consists of two icons. The left-most icon indicates the
current call status, such as whether it is inbound or outbound, answered or alerting.
The available icons are described below.
Button Description
An unanswered outbound call is ringing.
An unanswered inbound call is ringing.
The call has been answered.
The call is on hold.
The call was answered and is now on hold.
The item is a routed e-mail.
The right-most icon ( ) indicates whether a call annotation is present for this call or
e-mail. If the icon is present, then the call or e-mail has an annotation. Hover the
mouse cursor over the icon to display the current call note.
Contact Center Suite User Guide 17
Page 26

CALLVIEWER
• Call Detail: The call detail area displays one or more fields of information about each
active call. You can also double-click an item in the call list to display all information
known about the call. (See “Examining Call Details” on page 18.)
You can choose which fields are displayed in the call list using the Call List Fields
page of the Options dialog (see the online help, where you will also find a list of
available fields and their descriptions). The color of the text in the call detail section
denotes the type of call:
o Red text – unanswered call
o Green text – answered call or e-mail
o Yellow background – inbound external call
o Green background – outbound external call
o White background – internal call
• Call Control Buttons: The right side of the call list contains one or more call control
buttons for each call in the list. You can configure which buttons appear in the list from
the Call List Buttons page of the Options dialog. Some buttons may be disabled; this
will depend on the status of the calls at your extension, whether you are licensed to
use such a call control feature, and whether the telephone system supports the call
control feature. See the online help for descriptions of the available call control
buttons.
Examining Call Details
To obtain a summary of information on the current call you are handling, double-click a call
in the active call list. The Call Details screen is displayed, as shown below.
18
Contact Center Suite User Guide
Page 27

CALLVIEWER
Dial List
Enter new numbers
here or click a number
from the drop-down list
to redial.
CallViewer stores a list of the last 20 dialed or received telephone numbers, allowing you to
quickly re-use numbers that you have recently called or received calls from. When more
than 20 entries exist in the list, the bottom-most entry is removed. Click a dial list button on
a window to display a menu containing all the numbers in your recent dial list. Click a
number in the list to immediately place a call to that caller from your extension.
• To dial a new number, click in the dial entry area shown at the
right and enter the number to dial. Press Enter to dial the number.
• To redial a recent incoming or outgoing number, click the
drop-down arrow and then select a number from the list. CallViewer automatically
dials the number as it is selected from the list.
Call History
The call history window displays a list of all calls and e-mails that have been active at your
extension. While CallViewer is running, it stores information about each call or e-mail at
your extension. Up to 5000 items can be stored when you are using the full CallViewer
license or up to 1000 items for Connection Assistant. When the maximum number of items
have been reached, the oldest item in the list is removed to make space for the next new
item. Items are updated in the list only when CallViewer is connected to the CTI Server.
See page 28 for information on using call history.
Contact Center Suite User Guide 19
Page 28

CALLVIEWER
Viewing Call History
The Call History window can display several pieces of information about each call. The
information being displayed can be configured using the Call Log Fields tab of the Options
dialog. See the online help for further details, including a list of available fields that can be
displayed in the list.
The Call History window uses icons to depict information about the status of each call, as
described below.
Status
Icon
Description
Unanswered outbound call
Unanswered inbound call or e-mail.
Answered inbound or outbound call or e-mail.
Answered e-mail.
In addition to the status icons described above, the call history window uses the color of the
text to denote information about each call: red text denotes an alerting call, while black text
denotes an answered call. A green background denotes an outbound external call, a yellow
background an inbound external call. Internal calls and e-mails are highlighted in purple.
The top of the call history contains the header, which displays the names of the fields in the
call history. You can click a field header to sort on that field. Click the same field header
again, and the sort order toggles between ascending and descending.
You can resize the individual fields by dragging the right edge of a field in the header.
Filtering Call History
You can also filter a contact list to make it easier to locate calls. Click the Options button
on the Call History window to display the Call History Options dialog box. Refer to the
online help for details on using this feature.
20
Contact Center Suite User Guide
Page 29

CALLVIEWER
Buttons
There are three types of buttons available in CallViewer windows:
• Fixed Buttons: These buttons are part of the look. They perform a specific action,
such as opening another window, and cannot be changed or removed from the
window.
• User Buttons: These buttons can be created by the user. When they are created
they appear in the “User Button area.” You can choose the action that the button
performs when it is clicked. You can also choose whether to display a picture on the
button, and/or a label.
• Feature Buttons: These buttons are similar to both Fixed Buttons and User Buttons.
A feature button already exists in a specific location in a look, and often has some
default functionality, such as changing the ACD Agent state of the associated
CallViewer extension. However, the user can edit a feature button to change its
assigned action, as well as change the picture or text displayed on the button. If a
feature button is edited, it can also be reset to its default functionality.
User Button Area
The user button area contains buttons you create. Some user button areas are resizable,
allowing you to expand the area to fit the buttons. The location and size of the User Button
area depends on the look being used.
You can use the User Button area to create, edit, and remove buttons. See “Using Button
Manager” on page 25 for more information.
Feature Sets
Some looks have Feature Set windows available (called Feature Set 1 and Feature Set 2).
Feature Sets consist of several blank Feature Buttons to which you can assign actions, as
an alternative to simply creating User Buttons in the User Button area. For example, you
could use the User Button area for screen popping and application integration buttons,
Feature Set 1 for some common speed dial buttons (a button which makes a call to a
specific number), and Feature Set 2 for DSS buttons.
Quick Connect Button
Several of the looks include a separate Quick Connect button that can be positioned
anywhere on the desktop, regardless of whether the main window is minimized or not.
Accessing the Quick Connect is look-specific; see the look sections of the online help for
details. Refer to page 24 for instructions on using Go Dial and Quick Connect.
Action Menu
When you are active on a call you can access the Action Menu (see the look sections of
the online help for locations and contents). The Action Menu allows you to perform various
call control actions on the active call, much like clicking call control icons described in
“Using the Active Call List” on page 22.
Contact Center Suite User Guide 21
Page 30

CALLVIEWER
Changing the Look
When the Startup Wizard runs, you select the look and feel, however, you can change the
look at any time using the steps below.
To change the CallViewer appearance:
1. From the Windows tray bar menu, right-click the CallViewer icon ( ), and select
Look And Feel.
2. Select a look from the list available. When you have clicked on your selection, the
current look closes, and the new look is opened. This may take a few seconds to
complete.
NOTE
Future releases of CallViewer may contain additional “look and feel” options
that are not described in this User Guide.
Using the Active Call List
The Active Call List displays calls that are currently active at your extension, including
those alerting, answered (i.e., in progress), and holding. You can easily answer, end, hold,
and transfer the calls that appear in the list using the call control buttons described in the
online help.
To use a control button, select the item in the call list and then click the desired control
button. In addition to the call controls, there may be options for user-defined actions, which
are represented with a icon. See the online help for descriptions of the call control
buttons and user-defined actions.
22
Contact Center Suite User Guide
Page 31

CALLVIEWER
Controlling Calls with CallViewer
There are many ways to make, receive, and control calls from your computer screen. For
example, you can use buttons, hot keys, shortcut menus, or create user buttons. The
following sections describe some of the possible methods.
Making a Call
You can make a call using CallViewer in a number of ways, which are described below.
Using Go Dial
1. Highlight a telephone number in another application.
2. Click the Go Dial ( ) button.
Using the Dial List
Click the Dial List button in the Dial Area (see page 19) to select one of the last 20 recently
placed calls. The number is dialed as soon as you make a selection.
OR, type a new number in the Dial Area's text box, and press Enter to dial the number.
Using the Dial Command
1. From the Action menu (see page 21), select Dial. The Make Call dialog box is
displayed.
2. Type the telephone number in the text box and then click OK to dial the number, or
click Cancel to close the dialog box without dialing.
Transferring / Redirecting a Call
A Direct (or Blind) transfer does not place the transferring call on hold while ringing the
destination number, but immediately completes the transfer (i.e., the person at the distant
end will hear the call ringing at the destination number).
To transfer or redirect a call:
1. Choose one
• Click the button on the Active Call List for the call that you want to
• Select Blind Transfer or Redirect from the Action menu.
• If you are using the default hot keys, press CTRL + F10 to transfer or redirect
The Transfer Call dialog box is displayed.
2. In the text box, type the extension or number of the destination where you want to
transfer or redirect the call.
3. Click OK to transfer or redirect the call, or click Cancel to return to the active call
without transferring it.
Contact Center Suite User Guide 23
of the methods described below.
transfer or redirect.
a call.
Page 32

CALLVIEWER
Using Go Dial and Quick Connect
Using Go Dial and Quick Connect are similar operations. Both are used to quickly dial a
number from CallViewer. Use Go Dial when you want to dial a number that is highlighted in
the last active Windows application. For example, you can highlight a telephone number in
an e-mail message and dial it using the steps below.
To use Go Dial or Quick Connect:
1. Highlight a telephone number in a Windows application.
2. Choose one of the methods described below.
• Click the Go Dial option from the Action menu or the icon ( ) in the
Executive look or in the Legacy and Quick Connect looks).
• Click the Quick Connect window.
You can also use Quick Connect to dial a number from the list of recent inbound and
outbound calls. Right-click the Quick Connect icon ( or ) and select a number to dial.
Understanding Agent States
As a member of a hunt group, your agent state changes to allow Intelligent Router to route
calls and e-mail messages. The following states are used to determine your availability for
calls and/or e-mails.
Agent State Description
24
Logged Out You are not logged into the hunt group, and
therefore, are not available for calls or e-mails.
Free You are available for calls or e-mails.
Busy (Call) You are busy on a call.
Busy (E-mail) You are busy on an e-mail.
Wrapup (Call) You are in wrapup following a call.
Busy N/A (DND)
Busy N/A on the
7000 phone system
Free (E-mail) You are available for e-mails.
Wrapup (E-mail) You are in wrapup following an e-mail.
Unlicensed (Inter-Tel
7000 system only)
You are logged into the hunt group, however, you
are not available for calls or e-mails.
You have exceeded the number of concurrent agent
licenses available for this application.
Contact Center Suite User Guide
Page 33

CALLVIEWER
Using Button Manager
You can create, edit, and delete user-defined buttons (see “User Button Area” on page 21)
that will be displayed in the “button area” of a CallViewer window using the Button
Manager. Buttons can be customized with labels and/or pictures, for example, the picture of
the person you call using a speed dial button.
To open Button Manager, do one of the following.
• Right-click the CallViewer tray bar icon ( ) and select Buttons.
• Open the Buttons window on any of the CallViewer looks,
right-click to access the Button Manger shortcut menu, as
shown at right, and then click Buttons.
The Button Manager dialog box opens, as shown below.
NOTE
Contact Center Suite User Guide 25
See the “Sizing Buttons” topic in the online help for details on using Button
Manager’s Options tab.
Page 34

CALLVIEWER
Adding a Button
Using CallViewer's built-in actions, you can create buttons to perform a variety of tasks,
such as making, answering, and transferring calls, and setting states. Buttons can display
images or text, so you can easily identify a button’s function.
Example: Adding a Speed Dial Button
In this example, you will add a button to dial a number with a single click of the mouse.
1. From the Button Manager, click Add.
NOTE
2. On the General tab, select the Button Text check box and then type a label in the
text box.
3. If you do not want to add a picture to the button, skip this step.
If you do want to add a picture to the button:
a. Select the Display this picture on the button check box. A dialog box opens
for you to select the picture, which can be in .ico, .bmp, .gif, or .jpg format.
b. Navigate to where the picture file is stored and then select the file name. A small
preview of the image appears on the dialog box. See the online help for details
on image sizes and transparency settings.
c. Click Open.
4. On the Action tab, click the drop-down list and select Make Call.
5. Type the number that your button will dial in the Make a call to this telephone
number text box.
6. Click OK. For this example, you will not assign the speed dial to a hot key, however,
see the online help if you want to do so.
You can also begin from the Buttons window, by right-clicking and then
selecting Add Button.
26
Contact Center Suite User Guide
Page 35

CALLVIEWER
Example: Adding a DSS Button
You can create Direct Station Selection (DSS) buttons to quickly see the call status of
colleagues to determine whether they are on a call, unavailable or idle. Call control
operations for the extension being monitored, such as transferring or picking up calls, can
be done using DSS buttons.
In the following example, you will create a DSS button for a selected extension.
To create a DSS button:
1. From the Button Manager, click Add.
You can also begin from the Buttons window, by right-clicking and then selecting
Add Button.
2. On the General tab, select the Button Text check box and then type a name in the
text box.
3. On the Action tab, click the drop-down list and select DSS Button.
4. Type the extension number you want to monitor or use the drop-down list to select
one.
5. Click OK.
Refer to the online help for details on using DSS buttons to monitor and control extensions.
Example: Setting an Account Code
You can set an account code for a call using a button that you create in the User Button or
a Feature Sets, if they are available in the look you are using. First, follow these steps to
create an account code button.
To create a button to set an account code for a call:
1. Open the user button or feature set window.
The user button area on the Legacy look is integrated into the main
NOTE
window. The Legacy look does not support user-defined feature
buttons.
2. Right-click on the button area and select Add Button.
3. On the General tab, select the option Display this text on the button and then
type a label for your button in the text box. You will need to create a button for each
code you may want to use, so include the code in the label, for example, Code
9999.
4. On the Action tab, click Add and then select Set Account Code from the dropdown list.
5. Click OK.
To set an account code for a call, click the account code button while the call is active.
You can add the Account Code field to the Call List Fields (for the Active Call
NOTE
List) and/or the Call Log Fields (for the Call History). See the Options topics in
the online help for details.
Contact Center Suite User Guide 27
Page 36

CALLVIEWER
Editing or Removing Buttons
When you want to change the label, picture, action, or hot key associated with an existing
button, right-click the button, select Edit, and then make the changes to the options on the
General, Action, and/or the Hot Key tabs as needed. To remove a button, right-click the
button, and then select Remove Button.
Controlling DND States
The Handset look includes a built-in button to quickly enable or disable a DND state. In all
the looks, you can create a button to automate setting a state using the steps below. You
may want to create separate buttons for each state that you frequently use, in addition to a
button to disable any state.
This action is not supported when using the Inter-Tel 7000 system. To change
NOTE
Example: Creating a DND Busy N/A (DND) State Button
In the following example, you will create a button to change to the UNAVAILABLE state.
1. From the Button Manager, click Add.
2. On the General tab, select the Button Text check box and then type UNAVAILABLE
3. On the Action tab, click the action list and select Set DND State.
4. Select the option Enable DND at your extension.
5. Select UNAVAILABLE from the parameters list.
6. Click OK.
your DND/Status, you must use Personal Communicator and change the
“when I receive a call” setting.
in the text box.
Using Call History
The call history window contains details of the calls, and possibly routed e-mails (if Media
Blending is enabled on your system) that you have received. Icons and colors associated
with each item indicate whether the call was inbound or outbound, answered, unanswered,
etc. Refer to the online help for a complete description of colors and icons used in the call
history.
To place a call immediately to a number in the call list, double-click the entry. If you doubleclick a routed e-mail in the list, your default e-mail application creates a blank e-mail
addressed to that recipient.
You can filter the contact list to make it easier to locate calls, using the Options button in
the call history window. You can also customize the fields that are displayed using the Call
Log Fields tab of the CallViewer Options dialog box.
28
Contact Center Suite User Guide
Page 37

CALLVIEWER
Advanced CallViewer Topics
The following sections are intended for experienced users who want to further customize
CallViewer.
Creating Hot Keys
Hot keys are sequences (e.g., CTRL + ALT + F1) that perform a specified action or run a
CallViewer button action. This key sequence that you define also works globally across the
Windows environment, even when the CallViewer window is not the active application,
however, CallViewer must be running at the time. When a key sequence is assigned as a
hot key, the specified key combination is invisible to other Windows programs.
There are some key combinations, however, that cannot be assigned as a hot key because
Windows uses the combination for a special purpose or operation. Examples include CTRL
+ ALT + DELETE, PRINT SCREEN, ENTER, ALT + F4, etc.
Example: Defining a Hot Key for an Agent Help Request
Use the following procedure to first create a button to request agent help, and then assign
a hot key sequence to the button.
1. From the Windows tray bar menu, right-click the CallViewer icon ( ), and select
Button Manager. The Button Manager opens.
2. Click Add.
3. On the General tab, select the Button Text check box and then type Agent Help
in the text box.
4. On the Action tab, select the option Display Status LED and then select Agent
Help? from the settings drop-down list.
5. On the Hot Key tab, check the box for Enable the hot key associated with this
button and then click inside the key assignment text box.
6. Press the keyboard keys that you want to assign to the hot key, for example,
CTRL + H.
7. Click OK.
The Agent Help button appears in your user button area. To
request agent help, you can either click the button or press
CTRL + H. The LED on the button illuminates to indicate
that you have requested help. Supervisors can enable the
agent list tile in Reporter Real-Time to show which agents
have requested help.
Contact Center Suite User Guide 29
Page 38

CALLVIEWER
Screen Popping Calls and E-mails
CallViewer can be used to “screen pop” customer information in the company database,
however, a Ready To Go (RTG) solution must be configured or a custom macro have been
written for the feature. For example, if you have configured the Screen Pop from GoldMine
RTG, when you answer a call that is identified (i.e., has Caller ID), information about the
caller can be displayed for you if it is found in your GoldMine database.
Screen popping is most effective if it is triggered when the call is answered, rather than
when a call is alerting. Screen popping can be implemented using an RTG button, which
you click after answering a call, or using CallViewer rules, which automatically displays
information for identified contacts. The next section includes an example to create a screen
popping rule.
Defining and Using Rules
Rules enable you to automatically perform a specific action when a specific event occurs,
based on various criteria being met. For example, you could create a rule to send a call to
voice mail if it was received without Caller ID. The rules dictate the initial event, or trigger
event, that must occur before conditions are evaluated and an action is executed.
Rules are evaluated in the order that they appear in the Rules Manager screen.
NOTE
To open the Rules Manager, right-click the CallViewer tray bar icon ( ) and select Rules.
The rule list displays a list of all rules that have been created and the following information
for each rule:
• Rule: Displays the user-defined name and indicates whether the rule is currently
• Fire Count: Displays the number of times that the rule has fired since it was created.
• Last Fired At: Displays the last date/time that the rule fired or “N/A” if the rule has
• Fire Rate / Day: Displays the average number of times that this rule has fired since it
• Action: Displays the action that this rule executes when the rule fires.
When you create a rule, it is automatically added to the bottom of the list.
Therefore, if you want actions to fire in a specific order, you must add the rules
in the order in which you want them evaluated.
enabled ( – green icon) or disabled ( – gray icon). It does not reflect the global
rule enable state.
never fired.
was created, or “N/A” if the rule has never fired. If the average is less than one, “< 1"
is displayed to indicate that the rule has fired, but not enough times to be able to
accurately represent its average fire count.
®
30
Contact Center Suite User Guide
Page 39

CALLVIEWER
Example: Adding a Rule for Screen Popping
In the following example you will create a rule that screen pops a GoldMine database when
you answer inbound calls with Caller ID, whether or not the contact is contained in the
database.
1. From the Rule Manager, click Add. The Add Rule screen is displayed.
2. On the General tab, type Pop GoldMine in the rule name text box.
3. From the drop-down list, select Fire when call / e-mail answered for the rule type.
4. Select the following parameters:
• Direction: Inbound
• Call Type: All calls
• Caller ID: Caller ID received
• Caller Identified: Identity ignored
5. On the Action tab, click Add and then select Screen pop GoldMine from the dropdown list.
6. On the configuration dialog box, leave the default name that CallViewer
automatically inserts.
7. Click the [...] button next to the Database Path field, navigate to the database file
location, select it and then click Open.
8. If you need a username and password to open the GoldMine database, type them in
the text boxes provided. You can leave these fields blank if you do not need them
for GoldMine.
9. From the search extent drop-down, select Search everything to search all phone
fields using all number formats.
10. Click OK to finish the Ready To Go configuration.
11. Click OK to finish the rule.
Contact Center Suite User Guide 31
Page 40

CALLVIEWER
Enabling and Disabling Rules
You can disable rules so that they are not evaluated the next time the trigger event occurs.
This means that you can have multiple rules but have CallViewer evaluate only certain
rules.
To enable/disable individual rules:
1. Open Rules Manager (see “Defining and Using Rules” on page 30).
2. Highlight the rule and click Enable or Disable.
To temporarily disable all rules from firing:
From the Rule Manager, clear Enable rule firing and click OK. No rules will be evaluated
until you enable the setting again.
This setting controls whether rules are evaluated at all. It does not affect each
rule's enabled / disabled state – rules in the list are still displayed as either
NOTE
enabled or disabled regardless of this setting. This means that if a rule is
disabled when you select Enable rules firing, it will not become enabled
unless you specifically enable that rule.
Media Blending
Media Blending is a feature in Contact Center Suite v4.0 and later that allows Intelligent
Router to route other forms of media, such as e-mail messages, among available agents
just like it routes calls. If Media Blending has been enabled on your Contact Center Suite
system, you may receive e-mail messages that Intelligent Router has routed to you via the
hunt group you are logged into.
32
The e-mail messages appear along with calls in your Active Call List. When you receive the
e-mail, you are placed in the Busy (E-mail) agent state so that you will not receive any
telephone calls while you are working on the message.
Responding to a Routed E-mail Message
The process for answering a routed e-mail is the same as non-routed messages, as
follows.
1. Open the message in your e-mail client.
2. Read the message.
3. Click Reply.
4. Type your response.
5. Click Send.
After you have responded to the message you are taken out of the Busy (E-mail) state so
that you can take further calls.
Contact Center Suite User Guide
Page 41

CALLVIEWER
Using Outlook with Routed E-mails
If you are using Outlook as your e-mail client and you have installed the Contact Center
Suite Outlook Extensions support, the integrated toolbar allows you to easily send agent
requests and perform common functions on routed e-mails. Refer to the online help for
Outlook integration information, a list of the toolbar's buttons, and a description of the
corresponding action.
Using the Alternate Response Method (#ARM#) Command
In some instances it may be more appropriate to use some other method of
communication, such as a telephone call or a written letter, rather than responding by email. In this case, you do not want to send an e-mail response too, however, you need to
inform Intelligent Router of the status so the process can be closed. This is done with the
Alternate Response Method response.
To send an ARM response:
1. Respond to the message using an alternative to e-mail, such as with a telephone
call, fax, or letter.
2. From your e-mail application, initiate a reply to the original e-mail message. For
example, in Outlook, select the message and then click Reply.
3. Add the text #[ARM]# somewhere in the subject field of the message. You do not
need to add anything to the body of the message.
4. Click Send.
After you have responded to the message you are taken out of the Busy (E-mail) state so
that you can take further calls.
Using the No Reply Necessary (#[NRN]#) Command
There may be some instances when you receive a message which requires no reply, for
example, a follow-up response from a customer containing a “Thank you.” In this situation,
you can send Intelligent Router a No Reply Necessary response so that the message can
be removed from the hunt group queue.
To send a NRN response:
1. From your e-mail application, initiate a reply to the original e-mail message. For
example, in Outlook, select the message and then click Reply.
2. Add the text #[NRN]# somewhere in the subject field of the message. You do not
need to add anything to the body of the message.
3. Click Send.
Contact Center Suite User Guide 33
Page 42

CALLVIEWER
Using the Refuse (#[REFUSE]#) Command
If you do not want to respond to a routed e-mail message, you can refuse the message so
that Intelligent Router will distribute it to another agent.
To send a REFUSE response:
1. From your e-mail application, initiate a reply to the original e-mail message. For
example, in Outlook, select the message and then click Reply.
2. Add the text #[REFUSE]# somewhere in the subject field of the message. You do
not need to add anything to the body of the message.
3. Click Send.
Changing Agent Status with E-mail Commands
You can also change your agent status at any time by sending commands to Intelligent
Router in an e-mail message. See also “Understanding Agent States” on page 24.
To send an Agent Status change command:
1. From your e-mail application, begin a new e-mail message.
2. In the To field, type the address of the ACD hunt group that routes e-mail messages
to you.
3. In the subject field of the message, type #[<command>]#, where <command> is
replaced with the keyword (see table below) for the agent state to which you are
changing. For example, to change to the Wrapup state, you would type
#[WRAPUP]# in the e-mail subject field.
NOTE You do not need to type anything in the body of the message.
34
4. Click Send.
Keyword Abbreviation Agent State
#[FREE]#
#[FREEEMAIL]#
#[BUSYEMAIL]#
#[WRAPUP]#
#[WRAPUPEMAIL]#
#[BUSYNA]#
#[FR]# Sets the agent into the Free ACD
status.
#[FRE]# Sets the agent into the Free (E-mail)
ACD status.
#[BE]# Sets the agent into the Busy (E-mail)
ACD status.
#[WU]# Sets the agent into the Wrapup ACD
status.
#[WUE]# Sets the agent into the Wrapup
(E-mail) ACD status.
#[BNA]# Sets the agent into the Busy N/A ACD
status.
Contact Center Suite User Guide
Page 43

TILES, FILTERS
& STATISTICS
Tiles, Filters, and Statistics
Caption
Statistic
Zoom/Unzoom
Button
Properties
Button
Filter
Button
Filter
Name
This chapter provides details on the tiles, filters and statistics available in Contact Center
Suite.
Introduction
There are three elements of Contact Center Suite that are common to multiple client
applications: tiles, filters, and statistics. This section provides general concepts for each of
these. See the remaining sections of this User Guide for specific details of each
application’s usage.
Tiles
Tiles are the building blocks of RealViewer and Reporter Real-Time.
Contact Center Suite User Guide 35
Each tile consists of a caption, which describes the display, and the associated statistic.
Tiles display a single call summary statistic, which can be filtered to include only a
particular group of agents, or other information, such as the date and time. (Call Summary
does not support custom filters.) The statistic can also have an associated alarm that will
notify you when the statistic falls within a certain range (see “Using Tile Alarms” on
page 53).
Page 44

TILES, FILTERS
& STATISTICS
Each tile also includes the following buttons:
• Zoom/Unzoom: When displayed as , click this button to enlarge the tile to fill the
whole RealViewer display area. When displayed as , click to reduce the tile to the
original, unzoomed size.
• Properties: Click the button to change the content, description, color, or alarm
settings for the tile.
• Filter: Click the button to choose an existing filter to apply to the particular tile or
create a new one.
Tiles can display many types of statistics, as described in “Types of Statistics” on page 42.
Adding a Tile
Even though the types of tiles vary from one client application to another, the method used
to create them is the same. Reporter also provides a new tile wizard to help you create
tiles. See the online help for details on using the new tile wizard.
To create a tile:
Click the Add Tile button ( ) on the toolbar, or click Add Tile from the shortcut (rightclick) menu. The new tile is created, and the property sheet for that tile opens. See the
“RealViewer” and “Reporter Real-Time” sections of this User Guide for examples of various
types of tiles.
Editing a Tile
After you have created a tile, you can change the properties, such as the statistics
associated with that tile or add an alarm.
To edit a tile:
1. Double-click on that tile’s statistics, or right-click on the tile and select Properties.
The property sheet is displayed with the tile’s current settings.
2. Change the settings as desired.
3. Click OK when finished, or click Cancel to exit without saving changes.
Removing a Tile
36
NOTE
To remove a single tile, right-click on the tile to remove and click Remove. At the prompt,
click Yes to remove the tile or No to cancel the action.
NOTE Removing a tile cannot be undone.
You can also remove all tiles by using the Tiles property page of the Options property sheet
(see the online help).
See the online help for details on the property sheets associated with tile
properties.
Contact Center Suite User Guide
Page 45

TILES, FILTERS
& STATISTICS
Filters
Filtering is a feature provided in Reporter, Reporter Pro, RealViewer, and Intelligent Router.
This allows you to select information that you want to see, based on different parameters,
such as how long a call was active, what ACD hunt group the call rang, what DID number
the call used to access the switch, etc. You can choose to filter calls by trunk or by device.
Filtering calls by device considers each individual device with which a call is handled,
whereas filtering by trunk only considers each call once, regardless of how many devices
handled it. Filtering by device is often used to measure individual agents or extensions,
while filtering by trunk is used to measure statistics against DID numbers or trunk lines,
e.g., to measure the effectiveness of a marketing campaign. Further information on filtering
by device and by trunk can be found in the online help.
Every report or tile is filtered by the All Calls filter by default. The All Calls filter does not
exclude any calls when filtering, and cannot be edited or deleted.
In Reporter Real-Time and RealViewer, a filter can be applied to each tile, and the same
filter can be applied to multiple tiles. In Reporter, a filter is applied to a report, and the same
filter can be applied to multiple reports.
In Reporter Real-Time and RealViewer, the greater the number of different
NOTE
Using Filter Manager
filters that you apply to tiles increases the time it takes for the application to
start.
Contact Center Suite User Guide 37
The Filter Manager lists the currently available filters and provides access to programming
options. To display the Filter Manager, click the Filter Manager button ( ) on the toolbar
or press CTRL + F. Or, select Filter Manager from the main menu.
Page 46

TILES, FILTERS
& STATISTICS
You can also add, remove, edit, and copy filters, using the buttons described below.
NOTE You must have Administrator permission to add, edit, or remove a filter.
• Add: Displays the Add Filter dialog box so you can create a new filter. You can also
add a filter by clicking the Filter button on a tile or report, and choosing Add Filter.
• Remove: Removes the currently selected filter. You are prompted for a confirmation
before the filter is removed. If you remove a filter, any tiles or reports using that filter
will default to the All Calls filter.
• Remove All: Deletes all filters listed except the All Calls filter. You are prompted for a
confirmation before the filters are removed. If you remove all of the filters, any tiles or
reports using those filters will default to the All Calls filter.
• Edit: Displays the Edit Filter dialog box so you can edit the selected filter. (You can
also access the Edit Filter dialog box by double-clicking on the filter you want to edit).
• Copy: Copies the current filter and immediately includes it in the filter list. The name
of the copied filter is the same as the original filter except it includes “(1)” after the
name. For example, a copy of the Sales filter would result in Sales (1).
Each of these options is described in detail in the online help.
Adding a Filter
You can create as many filters as you need, limited only by the available memory of your
computer. You can also edit a filter after creating it, to immediately see the effects of the
changes you make.
38
NOTE
To add a new filter:
1. Open the Filter Manager, and click Add. Or, you can click the Filter button ( ) in a
2. Select the tab corresponding to the information you want to use as the filtering
When running in Call Summary mode, where you do not use a RealViewer
license, you cannot create or apply filters to tiles.
tile or report caption and click Add Filter. The Add New Filter screen is displayed.
parameters. Your options are as follows:
• General
• Call Route
• ACD Hunt Groups
• Direction & DID
• Duration
• Call Status
• Information
• Transferred Calls
• Miscellaneous
Contact Center Suite User Guide
Page 47

TILES, FILTERS
& STATISTICS
3. Program the information for the selected tabs, as described in the online help.
Any of the text-based fields can accept wild cards (e.g.,
“*@acme.com”) or comma separated lists (e.g., “200-204,207,209”)
to define the extensions, groups, or agents you want to include in the
filter. The list you enter can include ranges or individual extension
NOTE
4. Click OK when finished, or click Cancel to exit without saving changes. If you added
a filter through the Filter Manager, you are returned to the Filter Manager screen. If
you added a filter using the tile or report buttons, you are returned to the main
application window.
items wherever you can specify a device. For example, if you entered
“200-204,207,209,” the filter would include extensions 200, 201, 202,
203, 204, 207, and 209. You may not enter “abc-def” for a device
field range because letters are not valid in that context. You can also
select extensions or agents from the appropriate list, which are intelligently added to or removed from the list.
Example: Creating an Extension Filter
In the following example, you will create a filter to monitor a single extension.
1. Open Filter Manager as described on page 38, and then click Add.
2. On the General tab, type a unique description of the filter name. This will be
displayed in the Filter Manager and on any tile’s caption that uses the filter. The
description should provide enough information so you can easily identify what the
filter displays, for example, Ext. 1234.
3. In the Devices section, select the extension number from the drop-down list to
include in the filter, for example, 1234.
4. Click OK. The Ext. 1234 filter is ready to be applied to a tile.
Contact Center Suite User Guide 39
Example: Creating a Filter for an Agent ID for a Single Agent
In the following example, you will create a filter to monitor a single agent ID.
1. Open Filter Manager as described on page 38, and then click Add.
2. On the General tab, type a unique description of the filter name, for example, Agt.
6234.
3. In the Devices section, select the agent ID number from the drop-down list to
include in the filter, for example, 6234.
4. Click OK. The Agt. 1234 filter is ready to be applied to a tile.
Page 48

TILES, FILTERS
& STATISTICS
Example: Creating a Filter for an Extension or Agent ID in a Hunt Group
In the following example, you will create a filter to monitor an agent or extension in a hunt
group.
1. Open Filter Manager as described on page 38, and then click Add.
2. On the General tab, type a unique description of the filter name, for example, Ext.
1234 in HG 2000.
3. In the Devices section, select the extension number from the drop-down list to
include in the filter, for example, 1234.
4. On the Call Route tab, in the Call First Rang At Extension / Group field, select the
hunt group number to include in the filter, for example, 2000.
NOTE Do not select the hunt group on the ACD Hunt Group tab.
5. Click OK. The Ext. 1234 in HG 2000 filter is ready to be applied to a tile.
Example: Creating a Call Statistics Filter for a Hunt Group
In the following example, you will create a filter to monitor call statistics for a single hunt
group.
1. Open Filter Manager as described on page 38, and then click Add.
2. On the General tab, type a unique description of the filter name, for example, Call
Stats-HG2000.
3. On the Call Route tab, in the Call First Rang At Extension / Group field, select the
hunt group number to include in the filter, for example, 2000.
4. Click OK. The Call Stats-HG2000 filter is ready to be applied to a tile.
40
Other Filter Suggestions
The following filter suggestions are a few of the many types you can create to analyze
activities in Contact Center Suite:
• Filters on Direction
• Routing Filters
• Transferred Calls
• First Rung Information
• Call Durations
Contact Center Suite User Guide
Page 49

TILES, FILTERS
& STATISTICS
Editing a Filter
You can edit a filter to change any of the options that affect what is included in a tile or
report.
To edit a filter:
1. Open the Filter Manager by clicking the Filter Manager button ( ) or selecting
Filter Manager from the main menu.
2. Select the filter that you want to edit, and click Edit. Or, double-click on the filter that
you want to edit.
3. Make any necessary changes to the information on the tabs as described in “Adding
a Filter” on page 38 and then click OK.
After you have completed editing a filter, any tiles that are using the filter are automatically
updated.
NOTE You cannot edit the All Calls filter.
Removing a Filter
You can remove any filter except the All Calls filter using the Filter Manager.
To remove a filter:
1. Open the Filter Manager by clicking the Filter Manager button ( ) or selecting
Filter Manager from the main menu.
2. Select the filter that you want to remove, and click Remove.
NOTE After a filter is removed, it cannot be retrieved.
Contact Center Suite User Guide 41
3. At the prompt, click Yes to delete the filter or No to cancel the action.
If you click Yes , the filter will be removed, and any tiles using the filter will revert to
the default All Calls filter, which cannot be removed.
Page 50

TILES, FILTERS
& STATISTICS
Statistics
Every piece of data that can be displayed in Contact Center Suite is a statistic. Some of
these relate to information about a particular call, but the majority of statistics are calculated
values. How you choose to create your tiles and filters affects how the statistics are
calculated. Call segmentation settings also affect how the statistics are calculated. Refer to
the Contact Center Suite Installation Manual or the online help for information on call
segmentation.
Some statistics are available in all client applications (RealViewer, Reporter, Reporter RealTime, and Intelligent Router), however, some appear in only specific applications. All
statistics are described in the online help, along with information about which application
uses the statistic and which license levels are needed.
Types of Statistics
Call Summary Statistics are usually a single number or piece of information that
summarizes the calls for a particular group or filter. Such statistics can be displayed on
Deskboard or multi stat tiles or graphed on the graph tiles. Examples include Total Inbound
Calls, Calls Refused, and Agents Logged In.
Call Summary statistics include the following categories:
• Call Totals – Call statistics that increment after call termination, for example, Calls In
Completed.
• Active Call Statistics – Real-time call statistics, for example, Calls Queuing.
• % Call Totals – Percentages of call statistics that increment after call termination, for
example, % Answered <= 5, 15, 30, 60, 90, or 120s. Service level statistics are
included in this category.
• Call Times – Various times of call and e-mail statistics, for example, Avg Ans Time
(E-mail).
• Agent Statistics – All agent statuses, for example, Logged In, Idle, and Busy (Call).
• Network Statistics – Tools for testing traffic over the network between the client
application and the Contact Center Server, for example, Packets Sent / Minute.
• Miscellaneous – Time and date options.
42
Contact Center Suite User Guide
Page 51

TILES, FILTERS
& STATISTICS
Using Statistics
You will select which statistics you want to see on tiles in RealViewer and in reports in
Reporter. Anywhere you select an option or choose a field, you are using Contact Center
Suite’s statistics.
Example: Agent Status in a Hunt Group
In this example, you will create a filter to monitor agent status in a hunt group.
1. Open Filter Manager as described on page 38 and then click Add.
2. On the General tab, type a unique description of the filter name, for example, Agt.
Status for HG 2000.
3. On the ACD Hunt Group tab, select the hunt group number to include in the filter, for
example, 2000.
4. Click OK. The Agent Status for HG 2000 filter is ready to be applied to a tile.
Contact Center Suite User Guide 43
Page 52

Page 53

REALVIEWER
RealViewer
This chapter provides detailed information on how to use Realviewer.
Introduction
RealViewer is an application that shows real-time call statistics, enabling you to see current
details against all or selected call criteria on the telephone system.
Using RealViewer, you can view statistics, such as the Longest Waiting Inbound Call
Today, either across the telephone system, for a group of extensions, or for a particular
event. You can also view the number of agents currently in the busy state, for example, or
the number of inbound calls currently waiting to be answered. In addition, you can filter
information based on group, DID number, telephone number, etc.
RealViewer v4.0 and later supports internal call modeling and media blending. With media
blending, e-mail messages can be routed, handled, and filtered just like calls.
RealViewer requires an available license on the Server dongle. If a RealViewer license is
not available, Call Summary, which does not support custom filters and certain statistics, is
invoked. Refer to the Contact Center Suite Installation Manual or the online help for details
on features available with different license levels.
Starting RealViewer
From the Start Menu, choose Programs, Inter-Tel Contact Center Suite –
RealViewer – RealViewer. If a RealViewer license is available, RealViewer is
started. If there is no license available, Call Summary is started.
When RealViewer starts, if the Network Settings have not been configured yet or have not
been configured correctly, Startup Wizard attempts to automatically find a CTI Server
(Server) on your LAN using a self-configuration mode.
Using Startup Wizard
If this is the first time RealViewer has been run after installation, the RealViewer Startup
Wizard will run.
NOTE The Startup Wizard is not run for Call Summary installations.
The wizard will help you locate a CTI Server (Server) if one cannot be found, and it will ask
you some simple questions to help create a default RealViewer screen.
Contact Center Suite User Guide 45
Page 54

REALVIEWER
When using the RealViewer Wizard, you can navigate by using the following buttons:
• Next: Advances you to the next screen.
• Back: Returns you to the previous screen.
• Cancel: Stops the Wizard and returns you to the main screen.
NOTE
If the Wizard was started due to missing settings, clicking Cancel will
close RealViewer completely.
• Help: Displays the online Help information for that screen.
The following screens are displayed during setup:
• Welcome Page: This page begins a sequence of Startup Wizard pages that is used
to collect some configuration defaults for the software. Click Next to continue.
• Search for Contact Center Server: Choose one server option from the following
choices and then click Next:
o Keep existing settings: This option is visible and is the default choice if RealViewer
finds existing settings in the registry for a server to which to connect. Select this
option if you want the existing settings to be left unchanged.
o Search network for a CTI Server: Select this option to search the network for
available CTI servers.
o Connect to this CTI Server: Select this option to use the server that you specify in
the text box below this option.
• RealViewer Style: This page, shown below, allows you to choose the style of
RealViewer screen that you would like to create.
46
Contact Center Suite User Guide
Page 55

REALVIEWER
Select one of the following options and then click Next:
o Show statistics for an individual: Select this option to create a screen that will
show statistics for one extension or agent.
o Show statistics for a group: Select this option to create a screen that will show
statistics for a group of extensions or agents.
o Show statistics for everyone: Select this option to create a screen that will show
statistics for the entire telephone system.
• Type o f Calls: This page, shown below, allows you to select the type of calls that your
call center normally handles. This will affect the different statistics that your default
RealViewer screen displays.
Select one of the following options and then click Next:
o We mainly receive inbound calls: Select this option to create a screen that will
predominantly show statistics for inbound calls.
o We mainly make calls: Select this option to create a screen that will predominantly
show statistics for outbound calls.
o We make and receive calls: Select this option to create a screen that will show
statistics for both inbound and outbound calls.
• Filtering the Data: If you selected “Shows statistics for an individual” or “Show
statistics for a group” in the RealViewer Style screen (see page 46), the Filtering the
Data page allows you to specify the extension(s) that you want to include.
To do this, complete the following fields:
o Your extension: Enter the extension that you use to make and receive calls.
o Your group: Enter the list of extensions in your group, including your own
extension. Each entry should be separated by a comma (,).
Contact Center Suite User Guide 47
Page 56

REALVIEWER
• Finished: If you want to review your choices, use the Next and Back buttons. When
you are satisfied with your selections, click Finish to create the default RealViewer
screen or Cancel to close RealViewer.
48
Contact Center Suite User Guide
Page 57

REALVIEWER
Adding a Deskboard Tile
Tiles are the building blocks of RealViewer. See “Tiles, Filters, and Statistics” beginning on
page 35 for basic tile concepts.
To add a Deskboard tile:
1. Click the Add Tile button ( ) on the toolbar, or click Add Tile from the shortcut
(right-click) menu. The new tile is created, and the property sheet for that tile opens,
as shown below.
2. Complete the following fields in the Statistics tab:
• Item to display: Shows the currently selected statistic that the tile will display
(see the online help for details on statistics). To change the statistic, click the
ellipsis (...) button, and then choose the new statistic from the available menu.
If you change the statistic without changing the caption, you will be asked if the
caption should be changed when you click OK. If you click Yes, the caption
will change to match the new statistic. If you click No, the name will not
change.
The number of statistics that Call Summary supports is limited.
If Call Summary is running, any statistics that are not supported
are disabled.
NOTE
If you change a statistic for a tile, also change the caption to
match the statistic. If you do not change the caption, it may
become confusing.
Contact Center Suite User Guide 49
Page 58

REALVIEWER
• Caption: Allows you to edit the caption displayed above the tile. If you do not
change the caption but change the statistic, you will be asked if the caption
should be changed when you click OK.
• Filter: Use the drop-down list to select a filter to apply to the tile. This filter is
automatically applied when you click OK. If needed, you can click Add to
display the Add Filter dialog box, which will allow you to create a new filter. If
you create a new filter, it is automatically selected as your preferred filter for
this tile. See pages 37 and 52 for details on filters.
NOTE The Filter options are disabled if running Call Summary.
3. Select the Appearance tab.
50
Contact Center Suite User Guide
Page 59

REALVIEWER
Complete the following fields:
• Text Color: Use the drop-down list to choose the text color for the tile or click
the ellipsis button (...) to select a custom color.
• Background Color: Use the drop-down list to choose the background color
for the tile or click the ellipsis button (...) to select a custom color.
When selecting a custom color, move the sliders for the R, G, and B options to
change the colors in the sample areas.
o To lighten the shade of the Sample, click the color sample(s) to the left of
the center box.
o To darken the shade of the Sample, click the color sample(s) to the right of
the center box.
• Activate the alarm on this tile: Select this option to apply an alarm to the tile.
If an alarm is currently firing when you clear this box, the alarm will stop
signaling when you click OK.
• Alarm Settings: Click this button to configure the alarm using the Alarms
dialog box. Configure the alarm as described on page 53.
4. Click OK when finished, or Cancel to exit without saving changes. If you click OK,
the new tile will appear in the Tile Area.
Example: Creating a Tile for Calls Waiting
In this example, you will create a tile to monitor the number of internal and external inbound
calls that are currently ringing.
To create a tile for calls waiting:
1. Click the Add Tile button ( ) on the toolbar, or click Add Tile from the shortcut
(right-click) menu.
2. On the Statistics tab in the Item to display area, click the ellipsis button (...), select
Active Call Statistics, and then Calls Waiting.
The Calls Waiting caption is automatically added. For this example, leave the
label as it appears, however, you may customize others you create that you want to
distinguish from tiles with similar content.
Contact Center Suite User Guide 51
Page 60

REALVIEWER
3. On the Appearance tab, from the Background drop-down list, select .
4. Click OK. The new tile appears in the RealViewer window. The All Calls filter is
applied to the new tile automatically until a different filter is selected.
Applying Filters to Tiles
Applying a filter to a tile allows you to select information that you want to see, based on
different parameters. Beginning on page 37, the Filters section covers filters and some
examples of commonly used filters. In this section, you will see how to apply a filter to an
existing tile.
Example: Changing Tile Properties to a Different Filter
In a previous example (on page 40) you created a filter for call statistics for a hunt group. In
this example, you will apply the call statistics filter to the Calls Waiting tile that was created
in the previous example.
To change tile properties to a different filter:
1. Click the filter button ( ) on the top, right corner of a tile to display a shortcut menu
of available filters with the currently selected filter checked.
2. Select the Call Stats-HG2000 filter to apply to the Calls Waiting tile. There may be a
slight delay while the filter change is processed. When a filter is selected, the
statistics on all tiles are recalculated.
Notice that the name of the current filter appears under the caption on the tile.
52
Contact Center Suite User Guide
Page 61

REALVIEWER
Advanced RealViewer Topics
The following sections are intended for experienced users who want to further customize
RealViewer.
Using Tile Alarms
Tile alarms immediately notify you when a statistic is within a certain parameter. For
example, you may want to know when the number of overflowed calls reaches 15. With
RealViewer alarm options, you can set the tile to flash, play a wave file, or activate when
this occurs.
Example: Adding an Alarm to a Tile
In this example, you will add an alarm to the Calls Waiting tile to notify you when the
number of calls waiting equals or exceeds 25.
To add an alarm to a tile:
1. Double-click on the Calls Waiting tile’s statistics, or right-click on the tile and select
Properties.
2. On the Appearance tab, click Alarm Settings.
3. In the Alarm fires when area, use the first drop-down list to select >= (greater than
or equal to), and then in the second drop-down list select 25. This setting causes
the alarm to fire when the number of calls waiting reaches 25 or more.
4. Select only the Flash the tile option and 30s from the drop-down list to select how
long the tile will flash. Refer to the online help for information on the other alarm
action options.
You can select more than one notification option when setting the
NOTE
5. Click OK.
To deactivate an alarm, clear the Activate the alarm on this tile option in the Appearance
property sheet for the tile.
alarm (e.g., you can have the tile flash and play a sound file at the
same time).
Rearranging Tiles in the RealViewer Window
There are two ways you can rearrange the RealViewer window:
• Using the drag-and-drop feature, click and drag the tile you want to move. Then
position it over the tile that you want it to precede. The border of the stationary tile
thickens or becomes highlighted. Release the tile you are moving. It is automatically
placed in the area BEFORE the highlighted tile.
• Using the toolbar icon ( ), you can arrange the tiles in a grid, columns, rows, or by
best fit. Refer to the online help for details.
Contact Center Suite User Guide 53
Page 62

Page 63

REPORTER
Reporter
This chapter provides detailed information on the Reporter module in Contact Center Suite.
Introduction
Reporter Basic, Reporter, and Reporter Pro are used to run historical reports on call, email, and agent activity information, which is stored within a database on the CTI Server.
These reports can be run by specifying various criteria (e.g., reports can be filtered by
Caller ID, DID number, trunk line, extension or agent groups, time, date, call cost, etc.).
Reporter can include 70+ report templates, depending on the license level you have
purchased. Each license level (Reporter Basic, Reporter, or Reporter Pro) contains specific
report templates. Reporter and Reporter Real-Time have several different variants which
are either enabled or disabled based upon the software license, as described in the
Contact Center Suite Installation Manual and the online help.
Starting Reporter
From the Start Menu, choose Programs, then Inter-Tel Contact Center Suite, and
then Reporter. Then click on the Reporter menu item.
When Reporter starts, if the network settings have not been configured yet or have not
been configured correctly, a self-configuration mode will be invoked to attempt to
automatically find a CTI Server on your LAN.
Using Startup Wizard
Contact Center Suite User Guide 55
If this is the first time Reporter is run after installation, Reporter prompts for the following
options to be configured:
• Welcome: Click Next to begin the installation.
• Search for Contact Center Server: Choose one server option from the following
choices and then click Next:
o Keep existing settings: This option visible and is the default choice if Reporter
finds existing settings in the registry for a server to which to connect. Select this
option if you want the existing settings to be left unchanged.
o Search network for a CTI Server: Select this option to search the network for
available CTI servers.
o Connect to this CTI Server: Select this option to use the server that you specify in
the text box below this option. This is the default option when information is
available for the server connection.
Page 64

REPORTER
• Auto Configure Page: This page is displayed only if you selected the option to
search the network for a CTI Server in the previous page. The Auto Configure page
searches the local area network for CTI servers and after the search is complete, a
list of available server names is displayed. Select a sever name to proceed.
• Call Costing Page: Enter all the local dial codes for your area, separating each with a
comma. Click Next.
The call costing functionality provided by Reporter is based on limited
NOTE
information provided by telcos. Additionally, carriers can update their
tariffs at any time. For this reason, changes in tariffs or network carrier
discounts cannot always be reflected.
• Report Upgrade Page: Select one of the following options:
o Upgrade reports to process external and internal calls: Select this option to use
the report filter option “Only process calls (external and internal)” for all existing
reports from an earlier Reporter installation. Choosing this option excludes e-mails
from the upgraded reports, however, you can create additional reports that include
e-mails.
o Upgrade reports to process external calls only: Select this option to use the report
filter option “Only process external (trunk) calls” for all existing reports from an
earlier Reporter installation. Choosing this option effectively maintains the
functionality of the previous version reports, because version 3.x reports only
considered external calls.
o Do not upgrade reports: Select this option to leave the reports as they were in the
previous version (i.e., do not apply any of the filtering capability that is new to
v4.0). Choosing this option causes the upgraded reports to take into account emails and internal calls.
56
This option causes reports to include all media types, however, it
NOTE
will not change report names, so a report such as “Calls by Extension” will also process e-mails.
• Auto Reporter Site: This page appears only if a default site has not already been
created, you have Internet Information Server (IIS) or Personal Web Server installed
on your computer and the application detects it. This allows you to create an Auto
Reporter site using the default settings.
• Finished Page: To complete the Reporter configuration, click Finish in the Startup
Wizard.
You can modify these configurations at any time while running Reporter. See “Network
Settings” and “Options” topics in the online help for details.
Contact Center Suite User Guide
Page 65

REPORTER
Running Reports
When you start Reporter, the main window is displayed.
The report list on the left side of the main window displays all reports grouped on
categories, such as Reporter Basic Reports, Other Reports, My Reports, etc. The report
categories are based on the license in which a report works fully. For example, a Reporter
Pro license is grouped into the Reporter Pro group in the report list.
The current status of each report is also displayed along with the report name. Refer to the
online help for details on the icons used to depict the different report states.
To run a report, double-click the report name. If the report has already run and not yet
changed, the saved version of the report will be displayed.
Saving and Reusing Reports
When you run a report, it is automatically saved to the report cache stored on your local
computer. The next time you run that report, Reporter decides if the report data needs to be
processed again or whether it can be read from the report cache.
For example, if you have a call list report configured to display today’s data, the report will
always run using the latest data because today is always changing. If the report was
configured to display yesterday’s data and you ran the report at 9 AM, the report would be
processed again to reflect all of yesterday’s information. If, however, you ran the report
again (before midnight when the date changed), Reporter would use the information stored
in the report cache.
To run an existing report, do one of the following:
• Double-click the report in the report list.
• Select the report name in the report list and press ENTER.
• Right-click the report name and select Run.
Contact Center Suite User Guide 57
To view a previously run report:
Right-click on the report name and select View Saved Report.
NOTE
It takes longer to generate reports that were not previously run because
Reporter must gather and analyze data from Contact Center Server.
Page 66

REPORTER
Report Options
After you have run a report, you can quickly change the content or view of the current
report using the following buttons on the report window:
• Use this button to hide the header information (name of the filter used, the time
frame for the report content, the date and time the report was last run, the number of
items and the time it took to run the report). To display the header again, click the
button.
• Use the Date Range button to change the time frame for the report content (see
“Applying a Date Range” on page 58).
• Use the Filter button to select an existing filter for the report or create a new filter
(see “Applying a Filter” on page 58).
You can also use the Close ( ) button to close the current report.
Applying a Date Range
To change the date range for a report, click the Date Range
( ) button in the toolbar of the report and select the time
frame (e.g., today, yesterday, this week, etc.) from the dropdown list. If you have complex date criteria to apply or if you
want to define a custom time frame, use the Report
Properties dialog box (see the online help).
Applying a Filter
58
Filters control what is included in the resulting report (e.g., date/time, DID, extension(s),
group(s), etc.). To apply a filter to a report, click the Filter ( ) button in the report’s toolbar
and select an existing filter or click Add Filter to create a new one (see “Adding a Filter” on
page 38).
Contact Center Suite User Guide
Page 67

REPORTER
Creating a Report
Reporter contains report templates, which are predefined layouts that determine which call
statistics are contained within the report and how it is displayed. A report template can be
customized using the report properties.
A description for all Reporter report templates is provided in the online help.
There are two ways you can create a custom report:
• You can modify the report Properties for a default report. Use this option when you
want to run a temporary report and do not want to preserve the original values in the
default report list.
• You can create a new report and modify the options that are predefined for the report
type that you select as the starting point. Use this option when you want to define a
report that you plan to use at a later time and still preserve the original values in the
default report list.
Example: Modifying an Existing Report
In this example, you will modify the Call List report to remove two fields (Call Time and Call
Segment) that you do not need and add a field that you do want to see (Talk Time).
To modify an existing report:
1. On the Report List panel on the left, right-click the Call List report and select
Properties.
2. On the Fields tab, click the Call Time field to select it.
3. While pressing and holding the CTRL key, click the Call Segment field. Both fields
are now selected so that you can remove them both at once.
4. Click Remove.
5. Click Add and then select Talk Time.
6. Click OK. The report is updated automatically.
Contact Center Suite User Guide 59
Example: Creating a New Report
In the following example, you will create a new report based on the Call Cost by Cost
Group showing only Calls Out for last month.
To create a new report:
1. From the toolbar, click New Report ().
2. On the General tab:
a. At the end of the report name, type Last Month OUT to distinguish it from the
default report.
b. Select My Reports from the category drop-down list.
c. Click Call Cost by Cost Group report in the Report Type list.
3. On the Date/Time tab, select Last Month.
4. On the Fields tab, remove the Calls In and % Of All Calls In fields.
5. Click OK. The report is run automatically.
Page 68

REPORTER
Exporting Data
If you are licensed for Auto Reporter, you can export reports to a variety of applications
including Microsoft® Excel, Microsoft® Word, applications that accept Comma-Separated
Values (CSV), applications that accept Hyper-Text Markup Language (HTML), and
applications that use Wireless Markup Language (WML). You can also e-mail reports to
colleagues or publish reports to the Internet.
To make things easier, Reporter includes three separate wizards, each designed to step
you through the process of exporting, e-mailing, or publishing reports. It also includes an
Import Wizard designed to assist you in importing data from previous versions of Reporter
or from Reporter Real-Time. See the online help for details on using the wizards.
Advanced Reporter Topics
The following sections are intended for experienced users who want to further customize
Reporter.
Previewing and Printing Reports
Reporter has a preview feature you can use to see what the report looks like when printed
before sending it to the printer.
Do one of the following to preview the report:
• Click the Preview button ( ) on the toolbar or press ALT + V.
• Right-click and select Print Preview from the shortcut menu in the report window or
report list.
The preview is displayed in the report window, which contains its own toolbar with
various buttons as described in the online help.
Do one of the following to return to list mode:
• Click the Preview button.
• Press ALT + V again.
Do one of the following to print the report:
• Click the Print button ( ) on the toolbar. This option sends the report directly to the
default printer.
• Press CTRL + P.
• Select Print from the shortcut (right-click) or main menu.
60
Contact Center Suite User Guide
Page 69

REPORTER
Playing Back Recorded Calls
You must be licensed to use the Mercom Audiolog to play back recordings using Reporter.
If the call recording integration option was installed during the installation of Reporter, you
will be able to play back recordings from within Call List or Call Detail reports. See the
Contact Center Suite Installation Manual or the online help for recording server
configuration details.
When a call is recorded and available for playback, a Play Recording option is displayed in
the shortcut menu, and a speaker icon ( ) is displayed in the Call Detail list for that call
(or segment).
To play a recording:
• From a Call List report, right-click the call segment and select Play Recording. If the
Play Recording option is disabled, there is no recording for that call segment.
• From a Call Detail report, click Play, which is displayed at the top of the report. If this
option is disabled, there is no recording for that call segment.
There is a slight delay between the voice recording server and the Contact
NOTE
Center Server. If you attempt to play a call that was just recorded, you may
receive an error message. If this occurs, wait a few seconds and then
attempt to play the call again.
Using Auto Reporter
Auto Reporter provides the following types of reporting and publishing features:
• Scheduled Reporting: Allows you to schedule reports to be run at intervals ranging
from every 15 minutes to once a month. Reports can be automatically displayed,
printed, exported, published to the Internet, or e-mailed.
• Batch Reporting: Allows you to batch several reports together and perform the same
action on all reports at once. For example, you can print your monthly reports all at
the same time or publish key reports to the Internet every day.
• Report Publishing: Allows you to manually or automatically publish your reports to
the Internet for viewing in a Web browser or on a WAP-enabled device. Your reports
can be accessible no matter where you are.
• E-Mailing Reports: Allows you to e-mail exported reports to your colleagues either
automatically or at the touch of a button.
To successfully publish reports and statistics, you need access to a Web server. For this
server, you can use a company Web server, your own PC, or even an Internet Service
Provider (ISP). Refer to the online help for details on Web server configuration.
Contact Center Suite User Guide 61
Page 70

REPORTER
Example: Scheduling a Report
In this example, you will create a schedule to export two reports in spreadsheet format
every Monday at 8 AM.
To schedule a report:
1. From the Reporter toolbar, click the Auto Reporter icon and then select Report
Schedules.
2. From the toolbar, click New.
3. On the General tab:
a. Type Weekly Reports for the schedule name.
b. For the schedule option, select Every and then Monday.
c. Change the Starting at time to 8:00:00 AM.
4. On the Reports tab, click Add and then select Call Cost by Account Code.
5. Click Add again and then select Configuration: ACD Agent List.
6. In the Action area, select Export Reports from the drop-down list.
7. On the Export Wizard screen, select Microsoft Excel Spreadsheet (XLS) and then
click Next.
8. Check the default file names and location that Reporter shows for the two reports
and then click Finish. If you want to change either the file name or location, click
Browse to change the defaults before clicking Finish.
9. Click OK.
The schedule list shows the Weekly Report and the scheduled time.
62
Contact Center Suite User Guide
Page 71

REPORTER
Example: Manually Publishing a Report
In this example, you will e-mail a report manually (i.e., without a schedule).
To manually publish a report:
1. Open your e-mail application.
2. In Reporter, run the report you want to export, or open a previously saved version of
the report.
3. From the Reporter toolbar, click the Publish icon ( ) and then select E-mail
Report. The E-mail Wizard opens.
4. Click Next.
5. Select Microsoft Excel Spreadsheet (XLS) for the report format. If you want to
change the default report name, type a new name in the text box. If you want to
specify the location for the file, click the ellipsis button (...) and then select a
location.
6. Click Finish. Reporter prepares and exports the report, which may take several
minutes to complete.
When the report is finished, Reporter creates a new e-mail message in your e-mail
application with the report file attached, for example, Call List.xls.
7. Type the e-mail address to which you want to send the exported report.
Contact Center Suite User Guide 63
Page 72

Page 73

REPORTER
REAL-TIME
Reporter Real-Time
This chapter provides information on using the Reporter Real-Time module.
Introduction
Reporter Real-Time is an application that shows real-time call and routed e-mail statistics,
allowing you to see real-time details against all or selected call and e-mail criteria on the
telephone system. Not only will it show the current extension, agent, and trunk activity, it
will include detailed information such as the caller’s identity, DID number used, etc. With
Reporter Real-Time, you can tell who is involved in a call or e-mail (including the distant
end), how long the call/e-mail took to answer, and how long the call has been in progress.
You can also add a Direct Station Selection (StationViewer) tile that allows you to monitor
the current call activity of extensions and/or agents.
With Reporter Real-Time, you can summarize information across the telephone system or
by extensions, agents, or trunks. In addition, you can filter information, enabling you to
summarize information based on group, DID number, telephone number, etc.
Reporter has several different variations that are either enabled or disabled, based upon
the software license that you have purchased, as described in the Contact Center Suite
Installation Manual and the online help.
Starting Reporter Real-Time
From the Start Menu, choose Programs – Inter-Tel Contact Center Suite, and then
Reporter. Then click on the Reporter Real-Time menu item.
Contact Center Suite User Guide 65
Page 74

REPORTER
REAL-TIME
Using Startup Wizard
If this is the first time Reporter Real-Time has been run after installation, Reporter RealTime will invoke a configuration wizard containing the following pages:
• Welcome To Reporter Real-Time: This displays basic information about Reporter
Real-Time and the configuration wizard. Click Next to continue.
• Search for Contact Center Server: Choose one server option from the following
choices and then click Next:
o Keep existing settings: This option visible and is the default choice if Reporter
Real-Time finds existing settings in the registry for a server to which to connect.
Select this option if you want the existing settings to be left unchanged.
o Search network for a CTI Server: Select this option to search the network for
available CTI servers. This is the default option when no information is available
for the server connection.
o Connect to this CTI Server: Select this option to use the server that you specify in
the text box below this option. This is the default option when information is
available for the server connection.
• Auto Configure Page: This page is displayed only if you selected the option to
search the network for a CTI Server in the previous page. The Auto Configure page
searches the local area network for CTI servers and after the search is complete, a
list of available server names is displayed. Select a sever name to proceed.
• Extension for Call Control: This page allows you to program the supervisor
information. Enter the supervisor’s extension device number (not agent ID) and the
supervisor’s Talk Voice Mailbox (if your site has a Talk Voice Mail system).
• Finished: This is the last page of the wizard. You can review your choices by using
the Next and Back buttons. After you are satisfied with your selections, click Finish.
You can modify these configurations at any time while running Reporter Real-Time. See
“Network Settings” and “Options” topics in the online help for details.
66
Contact Center Suite User Guide
Page 75

REPORTER
REAL-TIME
Using Reporter Real-Time Tiles
The basic building block of Reporter Real-Time is the tile. Tiles can contain three basic
types of information: statistics, lists, or graphs. Reporter Real-Time provides the following
types of tiles, each of which can display information in different ways:
• Deskboard tile: Used to display a single call summary statistic.
• Multi Stat tile: Similar to Deskboard tile, but displays several call summary statistics
in a list format.
Contact Center Suite User Guide 67
Page 76

REPORTER
REAL-TIME
• Graph (Multi Stat) tile: Displays several similar statistics on one graph, graphed as a
bar, column, or pie chart with various other options.
• Graph Over Time tile: Displays a single statistic over a period of time. The statistic
can also be summarized by a particular time period (for example, every 15 minutes)
to give an indication of telephone activity over time.
68
Contact Center Suite User Guide
Page 77

REPORTER
REAL-TIME
• Graph By Device tile: Displays a single statistic for every device of a particular type
(e.g., agents, extensions, etc.), allowing you to visually compare a particular statistic,
such as total talk time, against a group of agents.
• StationViewer tile: Displays buttons that indicate the current status of an extension or
agent, allowing you to easily identify who is busy, idle, etc.
Contact Center Suite User Guide 69
Page 78

REPORTER
REAL-TIME
• Extension List tile: Displays various statistics per extension, such as the Caller ID of
the call on the extension, with colors to indicate the status of calls. The tile can also
display summary information for each extension, such as total talk time, calls handled,
etc.
70
Contact Center Suite User Guide
Page 79

REPORTER
REAL-TIME
• Agent List tile: Displays various statistics per agent, such as the Caller ID of the call
at the agent extension, with colors to indicate the status of calls. The tile can also
display summary information for each extension, such as total time logged in, % busy
time, etc.
• Trunk List tile: Displays various statistics per trunk, such as the Caller ID of the call
on the trunk, with colors to indicate the status of calls. The tile can also display
summary information for each trunk, such as calls handled, average ring time, etc.
Contact Center Suite User Guide 71
Page 80

REPORTER
REAL-TIME
• Contact List tile: Displays a list of active contact traffic, i.e., external and internal
calls as well as e-mails. The Contact List differs from the Trunk List in the following
ways:
o The contact list displays the Caller ID field and this field is sorted by default.
o The contact list can only display call detail statistics and is dynamic, showing only
calls that are currently active.
• Extension Detail tile: Displays every available statistic for a given extension and
graphs some of this information.
72
Contact Center Suite User Guide
Page 81

REPORTER
REAL-TIME
• Agent Detail tile: Displays every available statistic for a given agent and graphs
some of this information.
See the Tiles, Filters, and Statistics section of this User Guide and the online help for more
information.
Adding a Tile
The procedure for adding a tile is very similar to adding a tile in RealViewer, however,
Reporter Real-Time includes a New Tile Wizard to help you set the options. The examples
in this section do not use the New Tile Wizard.
You can also create the type of tile you want directly from the toolbar, not using the wizard
using the steps below.
To create a tile:
Click the Add button ( ) on the toolbar or click Add tile from the shortcut (rightclick) menu and then select the tile type. The new tile is created, and the property
sheet for that tile opens. See the online help for details on completing the tile options.
Contact Center Suite User Guide 73
Page 82

REPORTER
REAL-TIME
Example: Adding a List Tile
In this example, you will create a new tile containing an agent list using the report view.
To add a list tile:
1. From the Reporter Real-Time toolbar, click the Add button ( ) and then select
Agent List.
2. On the General tab:
a. Select the Use Report View option.
b. Leave the other options set to the default values.
3. On the Fields tab, click the No / Id (1) field and then click Move Up so that it is the
first field in the list.
4. On the Agent Help tab, select the Enable agent help on this tile.
5. Click OK. The Agent List tile is created and has the All Calls filter applied
automatically.
Example: Sorting Data on an Agent List Tile
In this example, you will change the view of the agent information by sorting on different
fields. Sorting a tile by different fields allows you to quickly see which agents are busy or
free without having to scroll through the entire tile.
To sort data on an Agent list tile:
Using the Agent List tile you created in the previous example, click the Current
Status column header. The data is now arranged with the agents who are logged in
and busy at the top of the tile, followed by the agents who are free, logged out, not
available, etc.
74
Contact Center Suite User Guide
Page 83

REPORTER
REAL-TIME
Example: Customizing a Tile’s Appearance
In this example, you will change the color of a tile showing a single statistic, Calls Waiting.
To customize a tile’s appearance:
1. If you do not already have a Deskboard tile to display the Calls Waiting statistic,
create one using the default color for the tile. Refer to the online help if necessary to
complete the fields.
2. Right-click on the Calls Waiting tile and select Properties.
3. On the Appearance tab, click the drop-down list for the Background and select
Yellow from the drop-down list.
4. Click the ellipsis button next to the Background color. The custom color selector
dialog box opens.
5. Drag the slider for the second color selector (G) from the right edge toward the left
until the sample boxes show a range of orange.
6. Click OK to close the custom color selector and then click OK to close the
Deskboard properties dialog box.
Changing Statistics on a List Tile
In this example, you will change the statistics that are shown on a contact list tile to remove
one field and add another.
To change the statistics on a list tile:
1. If you do not already have a Contact List tile, create one using the default fields and
colors for the tile. Refer to the online help if necessary to complete the fields.
There is a field on the tile to indicate the direction of the call, however, you can see
from the color coding on the tile which calls are inbound and which are outbound.
The direction field does not need to be included on the tile. You also decide that you
want to see where the call was first answered.
2. Right-click on the Contact List tile and then select Properties.
3. On the Fields tab, click the Direction field and then click Remove.
4. Click Add and then select User Ans On.
5. Click OK.
The tile is automatically updated with the new field you added.
Contact Center Suite User Guide 75
Page 84

REPORTER
REAL-TIME
Using Tile Alarms
You can set tile alarms to fire when inbound calls have been ringing for longer than a time
limit that you define. See “Using Tile Alarms” on page 53 for details on setting alarms.
Applying Filters to Tiles
Applying a filter to a tile affects all statistics on the tile, allowing you to view similar statistics
for a given filter, such as a group of agents. Refer to the “Tiles, Filters, and Statistics” and
“RealViewer” sections for information on creating and applying filters.
76
Contact Center Suite User Guide
Page 85
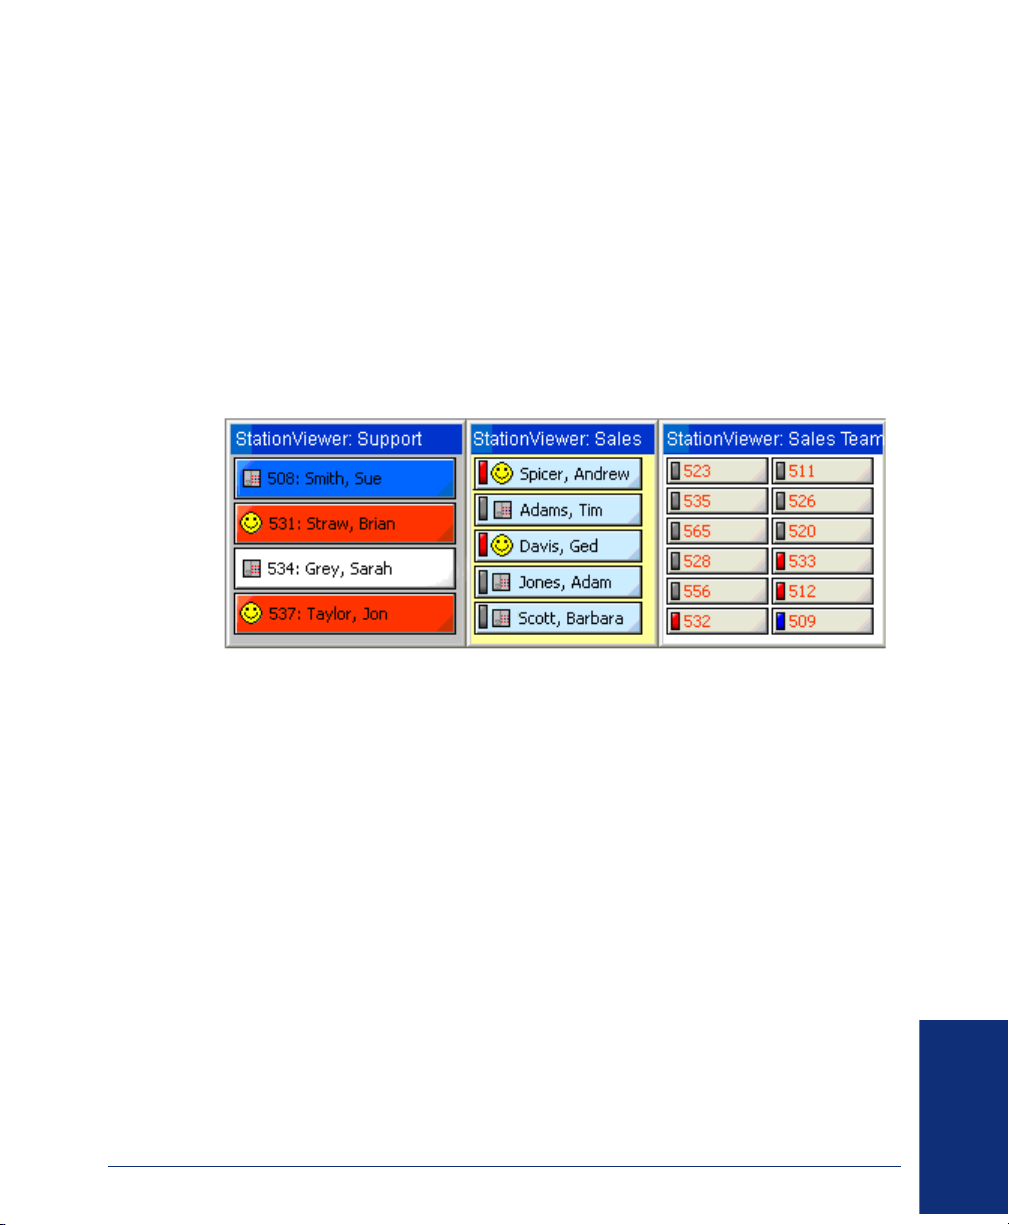
REPORTER
REAL-TIME
Advanced Reporter Real-Time Topics
The following sections are intended for experienced users who want to further customize
Reporter Real-Time.
Creating StationViewer Tiles
StationViewer tiles allow you to monitor the current call activity of extensions and/or agents.
On StationViewer tiles you can configure:
• The size of the button
• What information appears on the button
• The colors used to display the button
Each button contains a lamp (bulb) and an icon that indicates the state of the device. The
device extension and description (usually the username) is also displayed, allowing you to
easily identify who is busy, idle, etc. StationViewer list tiles are not filtered like other tile
types.
When you add a StationViewer tile, it is empty. You must fill the tile with extensions or
agents as described in the following example.
Contact Center Suite User Guide 77
Page 86

REPORTER
REAL-TIME
Example: Creating a StationViewer Tile for Agents
In this example, you will create a StationViewer tile showing the agents for a selected hunt
group.
To create a StationViewer List Tile for agents:
1. Make sure you have Administrator access before continuing with this procedure.
2. From the Reporter Real-Time toolbar, click the Add button ( ) and then select
StationViewer.
3. On the General tab:
a. For the Caption, type a descriptive title to display above the tile.
b. For the mode, select Agent List to add agents to the StationViewer tile.
NOTE
The Agent List option is available only with a Reporter Pro license
(see the online help for more information).
The title of the second tab changes depending on which StationViewer list mode
you select. For example, if you select Agent List, the second tab changes from
Extensions to Agents.
4. On the Agents tab, click Add to select the agents for the tile.
5. On the Appearance tab:
a. Use the drop-down list to select a button size. Your choices are Small, Standard,
and Large.
b. Select the option Use LED color for button face. Setting this option causes the
button face color to match the color that represents the associated agent's
device state. For example, when the device is in the busy state and with a busy
state color of red, the button face would be colored red. When the option is
disabled, the button face color is static and only the LED changes color to reflect
the device state.
6. Click OK.
78
Contact Center Suite User Guide
Page 87

REPORTER
REAL-TIME
Using Call Control
You can control calls using Reporter Real-Time from
the supervisor’s terminal using the call control menu,
which is accessed by clicking on a device in an Agent,
Extension, or Trunk List tile or a StationViewer tile.
The options available in the menu vary depending on
the state of the device selected and the type of tile
you are using. You can also handle calls at your own
extension using various toolbar buttons. See the
online help for details.
Before using the Call Control functionality, you must
specify your extension in the Call Control page in the
Configure View screen (see the Options Call Control
topic in the online help). You should also identify the
mailbox that will be used for recording calls.
Using Call Control with a StationViewer Tile
The call control menu for the StationViewer tiles
contains many of the options available for list tiles, for
example, Call now and Log in, which are described
in the online help.
The following options are available only for StationViewer tiles.
• Pickup Call: To pickup (reverse transfer) a call that is currently ringing an extension
or agent, select Pickup Call from the StationViewer call control menu.
• Blind Transfer: To transfer a call that is currently at your extension to the
StationViewer extension/agent, select Blind Transfer from the call control menu.
When selected, the call is automatically connected to the StationViewer extension/
agent, regardless of its current state.
• Enquiry Transfer: To perform an announced transfer, select Enquiry Transfer from
the call control menu. When selected, the call at your extension is placed on hold, and
another call to the StationViewer extension/agent is initiated.
After you have connected to the StationViewer extension/agent, you can either click
the Complete Transfer ( ) button to complete the transfer or click the Hold/Retrieve
( ) button to cancel the transfer and retrieve the call.
Example: Stealing Calls
In this example, you will transfer a call to your extension from an extension, agent, or trunk
list tile.
To steal calls:
1. From an extension, agent, or trunk list tile, click on the device you want to transfer to
your extension. The call control menu is displayed.
2. Select Steal Call. The call is transferred to your extension, but not automatically
answered.
Contact Center Suite User Guide 79
Page 88

REPORTER
REAL-TIME
Example: Changing an Agent State
In this example, you will change an agent state from Free to Busy N/A (DND) on an Agent
List tile. This operation might be useful for a supervisor who wanted to set the busy state
for someone who had forgotten to do so.
To change an agent state:
1. If you do not already have an Agent List tile, create one using the defaults for the
tile. Refer to the online help if necessary.
2. On the Agent List tile, click the Current Status column header to sort the agents by
status.
3. Scroll down to find an agent whose status is Free.
4. Click on the agent record and then select Enter busy N/A (DND) from the call
control menu.
Monitoring Calls
You can listen to and record conversations at other extensions if the features are enabled
on the telephone system. The following monitoring options are available when correctly
configured:
• Silent Monitor: To monitor an extension or agent from Reporter Real-Time, select the
agent or extension that you want to monitor, and then select the Silent Monitor
option. The agent will then be monitored from your extension until the monitoring call
ends. If the telephone system has been configured accordingly, the agent or
extension is not aware that they are being monitored.
NOTE
This option is unavailable if the agent or extension is not currently on a
call.
• Polite Intrude: To politely intrude on an extension or agent from Reporter Real-Time,
select the agent or extension that you want to monitor, and then select Polite intrude.
The agent is informed of the intrusion by a beeping noise, and can refuse to accept
the intrusion. If the agent accepts, then the Supervisor extension will intrude on the
conversation, as if they had been conferenced in.
NOTE This option is available only on the Inter-Tel 7000 system.
80
Contact Center Suite User Guide
Page 89

REPORTER
REAL-TIME
• Forced Intrude: To forcefully intrude on an extension or agent from Reporter Real-
Time, select the agent or extension that you want to monitor, and then select Forced
intrude. The agent will be briefly informed of the intrusion by a beep before the
Supervisor extension intrudes on the conversation, as if they had been manually
conferenced in.
NOTE This option is available only on the Inter-Tel 7000 system.
• Record This Call: You can also record calls at an agent or extension to your mailbox.
To record a call, select Record This Call. When the call ends, the recording will
appear in your mailbox. See the Contact Center Suite Installation Manual or the online
help for details on configuring flags and mailboxes.
NOTE
Certain or all types of call monitoring capability may be disabled on the
telephone system due to local by-laws/regulations, etc.
Using Auto Reporter
Auto Reporter provides several features to Reporter Real-Time in addition to the ones
available in Reporter. The added features include the following:
• Statistic Publishing: Allows you to publish up to 25 statistics per schedule to an
HTML or WML file for publishing to the Internet or your Intranet. The files can then be
viewed in a Web browser, on a WAP-enabled device, or used to drive a readerboard.
• Alarm Publishing: Automatically writes any alarms that you have configured within
Reporter Real-Time to an alarm list. You can then publish this list to the Internet in
HTML or WML format for viewing in a Web browser or on a WAP-enabled device. You
can also choose to display only certain alarms or alarms over a given period of time.
To successfully publish reports and statistics, you need access to a Web server. Refer to
the Contact Center Suite Installation Manual or the online help for configuration details.
For details on other Auto Reporter features, refer to “Using Auto Reporter” on page 61.
Contact Center Suite User Guide 81
Page 90

Page 91

Index
A
Action Menu 21
Active Call List 16, 17, 22
Adding a Filter 38
Agent Detail Tile 73
Agent Help 6
Agent ID Filter 39
Agent List Tile 71
Agent States 24, 80
Agent Status
changing 34
commands 33, 34
Agent Status Commands 33, 34
Alarm Publishing 81
Alarm Settings 51
Alarms 51, 53, 76
Alternate Response Method 33
Appearance 75
Appearance Tab 50
Applications 5
Applying a Filter 58
Applying Filters 52
Area Code 11
ARM 33
Auto Configure 9, 56, 66
Auto Reporter 5, 61, 81
Auto Reporter Site 56
Axxess 4
B
Background Color 51
Background Colour 51
Batch Reporting 61
Blind Transfer 79
Busy (E-mail) 34
Busy N/A 34
BUSYEMAIL 34
Buttons 21
C
Call Control 66, 79
buttons 18
extension 66
StationViewer 79
Call Costing 56
Call Detail 18
Call Details 18
Call History 15, 16, 19
Call Logger 6
Call Statistics Filter 40
Call Status 17
Call Summary 45
Caller ID 7
Calls
making 23
monitoring 80
playing recordings 61
recording 81
redirecting 23
transferring 23
CallViewer 5
Caption 50
Changing an Agent State 80
Color
Background 51
Text 51
Connection Assistant 1, 7
Contact List Tile 72
Controlling Calls 23
Country Code 12
CTI Server 8, 46, 55
, 66
D
Data Manager 3, 5
Date Range Button 58
Deskboard Tile 49, 67
Developer SDK 8
Devices 8
Dial List 16, 19
Dial Rules 11
Dialed Number Identification Service (DNIS) 7
DID Number 37, 45, 65
DNIS 7
Docking Windows 16
Dongle 45
DSS Buttons 6, 27
E
Editing
filter 41
tile 36
E-mail Messages 32
E-Mailing Reports 61
Enquiry Transfer 79
Executive Display Look 14
Export Reports 5
Exporting Data 60
Extension Detail Tile 72
Contact Center Suite User Guide 83
Page 92

Extension Filter 39, 40
Extension For Call Control 66
Extension List Tile 70
F
Feature Sets 16, 21
Filter
adding 38
agent ID 39
applying 52
applying to reports 58
applying to tiles 76
call statistics 40
editing 41
extension 39
extension in hunt group 40
RealViewer 50
removing 41
Filter Manager 37
Filtering Data 47
Filters 37
Flash The Tile 53
Free 34
Free (E-mail) 34
Freeemail 34
G
Go Dial 24
GoldMine 30
Graph (Multi Stat) Tile 68
Graph By Device Tile 69
Graph Over Time Tile 68
H
Handset Look 15
Help
navigating 2
printing 3
searching 3
Hunt Group 32, 37
I
Import
automatic macros 13
button macros 13
configurations 12
hot keys 13
Intelligent Router 3, 5, 6, 32, 37
Internal Call Modeling 6, 45
International Calls 11
International Dial Code 12
Inter-Tel 5000 4
Inter-Tel Axxess 4
Item To Display 49
L
Legacy Look 14
Licenses 5
Licensing 5, 45, 60
Local Area Code 11
Local Toll Calls 11
Long Distance Code 11
Look and Feel 6, 9, 14
active call list 16, 17
call history 16
changing 22
components 16
dial list 16, 19
Executive Display 14
feature sets 16
Handset 15
Legacy 14
main window 16
Quick Connect 15, 16
selecting 14
status bar 17
user buttons 16
M
Macros 12
Main Window 16
Media Blending 4, 6, 7
Menu 21
Mercom Audiolog Server 5
Monitor, Silent 80
Monitoring Calls 80
Multi Stat Tile 67
Multi-Media Reporting 6
N
NETBIOS 9
No Reply Necessary (NRN) 33
Non-international Calls 11
NRN 33
O
Online Help 2
Outlook 33
84 Contact Center Suite User Guide
Page 93

P
Personal Call Router. 6
Pickup Call 79
Playing Back Recorded Calls 61
Previewing Reports 60
Printing 60
Publishing Reports 5, 63
Q
Quick Connect 15, 16, 24
Quick Connect Button 21
R
Ready To Go 10
Real-Time Call Statistics 45
RealViewer 5, 37
Rearranging Tiles 53
Record a Call 81
Recorded Calls 61
Recording Server 5
Refuse Command 34
Removing
filter 41
tile 36
Reporter 5, 37
Reporter Pro 37
Reporter Real-Time 5
Reports
changing the date 58
creating 59
manually publishing 63
modifying 59
previewing 60
printing 60
running 57
saving 57
scheduling 62
upgrading 56
viewing 74
S
Scheduling a Report 62
Screen Popping 7, 10, 14, 21, 30, 31
SDK 8
Server 3, 5
recording 5
Show Statistics for a Group 47
Show Statistics for an Individual 47
Show Statistics for Everyone 47
Silent Monitor 80
Simulation Mode 8
Software Applications 5
Starting
CallViewer 7
RealViewer 45
Reporter 55
Reporter Real-Time 65
Startup Wizard
Callview Wizard RT 66
CallViewer 8
RealViewer 45
Report 55
Reporter Real-Time 66
StationViewer Call Control 79
StationViewer Tile 65, 69, 77
Statistic Publishing 81
Statistics
changing 75
Status Bar 17
Stealing Calls 79
Support
technical 6
T
TCP/IP 9
Technical Support 6
Telephone Code 11
Telephone System Offline 13
Text Color 51
Tile
adding 36, 73
adding list 74
Agent Detail 73
Agent List 71
alarms 51, 76
appearance 75
Contact List 72
Deskboard 49, 67
editing 36
Extension Detail 72
Extension List 70
Graph (Multi Stat) 68
Graph By Device 69
Graph Over Time 68
Multi Stat 67
rearranging 53
removing 36
sorting data 74
StationViewer 69, 77
Trunk List 71
Tile Alarms 53, 76
Tiles 35, 67
Contact Center Suite User Guide 85
Page 94

Toll Calls 11
Tray Bar Icon 13
Trunk List Tile 71
Type of Calls 47
U
Unzoom Tile 36
Upgrade 56
Use Report View 74
User Button 16
Windows
docking 16
undocking 16
Wrapup 34
Wrapup (E-mail) 34
Y
Your extension 47
Your group 47
W
Wild Cards 39
Z
Zoom Tile 36
86 Contact Center Suite User Guide
Page 95

Page 96

Part No. 835.2209
Issue 4.1, Revised June 2007
A946/331:A
 Loading...