

Page 1
INTER-TEL
ANCESSORY TALK
VOICE MAIL USER GUIDE
Part No. 550.8101
Issue 4, April 1996
IIuuIIIIII11111111111111111111111111
Page 2
Inter-Tel AXXESSORY Talk Voice Mail User Guide
TABLE OF CONTENTS
INTRODUCING THE INTER-TEL AXXESSORY TALK
VOICEMAILFEATURES ...................................... .
About This Guide .................................................. 1
General System Information
Mailboxes ......................................................... 2
Record-A-Call ..................................................... 2
Multilingual Capability
.........................................
..............................................
1
2
ENTERINGYOURMAILBOX
..................................
INITIALIZING YOUR MAILBOX . . . . . . . . . . . . . . . . . . . . . . . . . . . . . . . . . . .4
LISTENING TO MESSAGES . . . . . . . . . . . . . . . . . . . . . . . . . . . . . . . . . . . . .5
SENDINGMESSAGES .......................................... .
PERSONALOPTIONS..
......................................... .
REMOTE MESSAGING ........................................ 10
USING THE DIRECTORY ...................................... 11
NON-SUBSCRIBER ACCESS TO VOICE MAIL ................... 12
0 Inter-Tel Integrated Systems, Inc. 4/96
Page 3
Inter-Tel AXXESSORY Talk Voice Mail User Guide
INTRODUCING THE INTER-TEL AXXESSORY
TALK VOICE MAIL FEATURES
About This Guide
This user guide contains instructions for using the Voice Mail features available
through the Inter-Tel AXXESSORY Talk voice processing system. For more detailed
information and expanded procedures, refer to the Inter-Tel AXXESS Owner’s Guide.
For quick access to basic subscriber instructions, refer to the Inter-Tel AXXESSORY
Talk Subscriber Quick Reference Guide. For quick access to basic System Administrator procedures, refer to the Inter-Tel AXXESSORY Talk System Administrator
Quick Reference Guide.
General System Information
Inter-Tel AXXESSORY TalkTM Voice Mail allows callers to send and receive recorded messages from any station or DTMF telephone. (Callers using dial-pulse
phones can be routed to the operator for assistance.)
Station users and outside callers reach Voice Mail in the following ways:
l
By dialing the telephone number or extension number assigned to the Voice Mail
application
l
By being transferred to Voice Mail by the automated attendant
l
By being forwarded (using manual or system forward) to Voice Mail when a
called station is unavailable
l
By responding to message waiting indications left by voice mail at a station
When you reach Voice Mail, you will hear recorded instructions that tell you what to
do next. Simply listen to the prompts and press the keypad key that corresponds to the
desired choice. If you do not respond immediately, a second set of prompts is played.
Most prompts are interruptible, and you can press the desired key at any time during
the prompt. The prompt will then stop and the system will act on the requested choice.
Page 4

Voice Mail User Guide Inter-Tel AXXESSORY Talk
Mailboxes
Each Voice Mail user can be assigned a unique mailbox number. There are three
types of mailboxes on the voice mail system: Standard, Receive-Only, and System
Administrator.
l
Standard mailbox features include: listening to new messages, sending mes-
sages, forwarding messages, deleting messages, saving messages, programming
personal options, and, if authorized through database programming, setting up
remote messaging.
l
A Receive-Only mailbox user can only listen to new messages, save or delete
them, and program personal options.
l
The System Administrator has all of the Standard mailbox options, plus the abil-
ity to record and send broadcast messages, provide mailbox and group list main-
tenance, and record and select custom recordings.
When your mailbox receives a message, your station is signaled. If it is a keyset, the
MSG key is lit and the display shows that a message has been received. A single-line
set will receive message waiting signals of six tones when the handset is lifted, if
enabled system-wide.
Remote messaging can be enabled for your mailbox through database programming
and set up through your mailbox. It allows you to enter the primary and/or alternate
telephone number, pager number, or extension number that the voice mail system
will call when new messages are received by your mailbox. (See page 10 for details
on using remote messaging.)
Record-A-Call
Your phone may be programmed to use the Record-A-Gall feature. If so, you can
enter a feature code whenever you want to record an ongoing call. You can retrieve
the message later, just as you would any other mailbox message. For more information on using this feature, refer to the appropriate user guide for your type of phone.
Multilingual Capability
Your telephone system provides a choice between English and Japanese prompts and
displays. If your phone is programmed for English, all displays appear in English and
all Voice Mail prompts are delivered in English (unless overridden). If programmed
for Japanese, all displays appear in Katakana characters and all voice prompts are
played in Japanese (unless overridden). By default, all phones are set for English. For
more information on this feature, refer to the appropriate user guide for your”type of
phone.
2
Page 5
Inter-Tel AXXESSORY Talk
Voice Mail User Guide
ENTERING YOUR MAILBOX
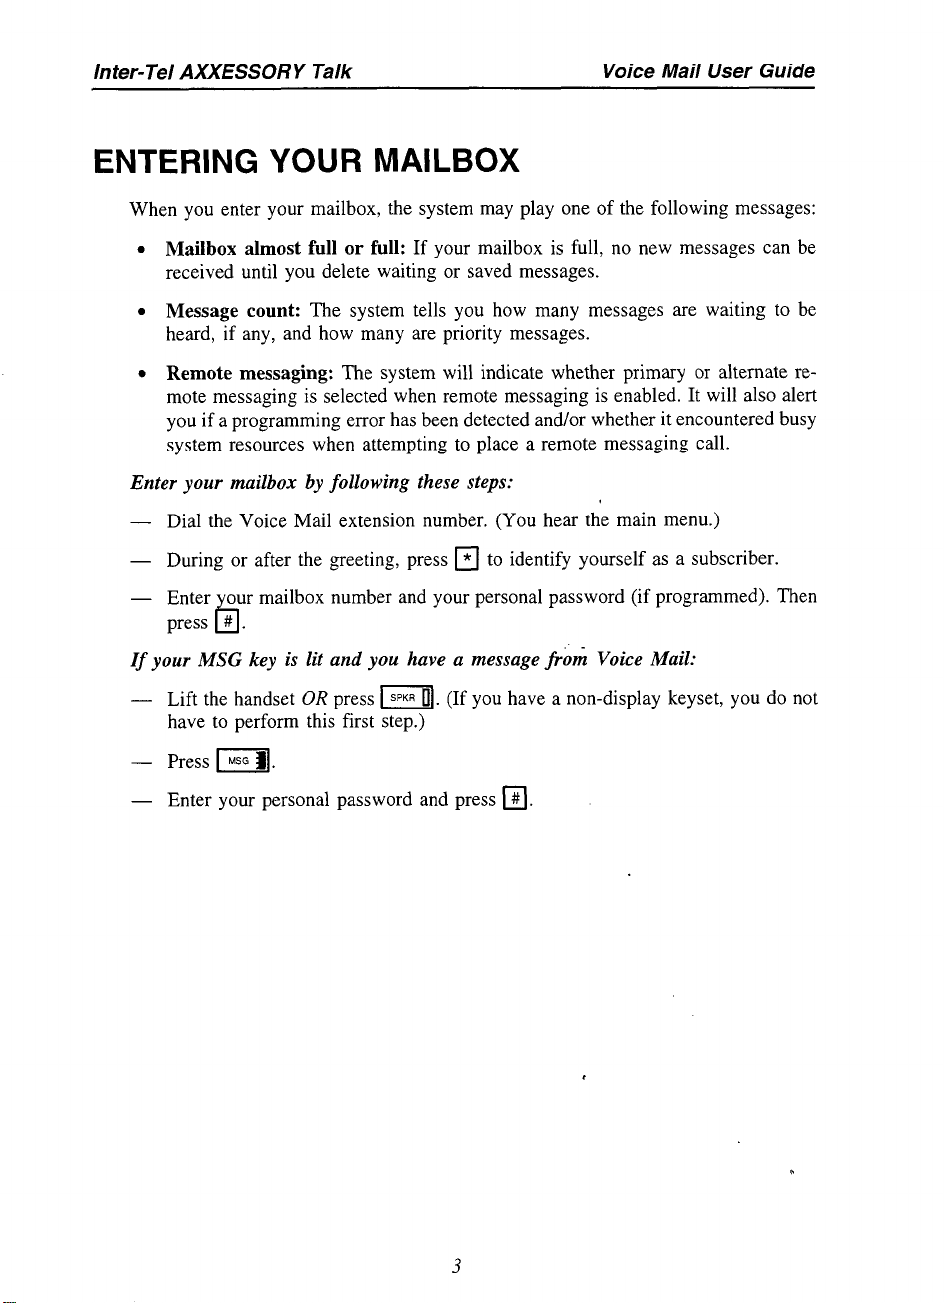
When you enter your mailbox, the system may play one of the following messages:
l
Mailbox almost full or full: If your mailbox is full, no new messages can be
received until you delete waiting or saved messages.
l
Message count: The system tells you how many messages are waiting to be
heard, if any, and how many are priority messages.
l
Remote messaging: The system will indicate whether primary or alternate remote messaging is selected when remote messaging is enabled. It will also alert
you if a programming error has been detected and/or whether it encountered busy
system resources when attempting to place a remote messaging call.
Enter your mailbox by following these steps:
-
Dial the Voice Mail extension number. (You hear the main menu.)
-
During or after the greeting, press q to identify yourself as a subscriber.
-
Enter our mailbox number and your personal password (if programmed). Then
press # .
b
If
your MSG key is lit and you have a message fr& Voice Mail:
-
Lift the handset
OR
press 11. (If you have a non-display keyset, you do not
have to perform this first step.)
-
Press ml.
-
Enter your personal password and press q .
Page 6
Voice Mail User Guide
Inter-Tel AXXESSORY Talk
INITIALIZING YOUR MAILBOX
The first time you use your mailbox, you must initialize it (set it up). System prompts
will instruct you to:
l
Change the default password number to a personal password.
l
Record a name to identify yourself in the company directory.
l
Listen to the Voice Mail application introduction. (You can skip this introduction
by pressing q , if desired.)
To initialize your mailbox:
Dial the Voice Mail extension number. (You hear the main menu.)
Press q to identify yourself as a subscriber. ,
Enter your mailbox number and default password. (Your default password is
your mailbox number.)
If you want a
Then press # . Voice Mail plays back your password.
assword, enter a new password using digits O-9 (up to 12 digits).
cs
If you do not want to use a password, press q .
Press q to accept the entry. (Or, press q if you wish to re-enter your pass-
word.) The system prompts you to record your directory name.
After the tone, record your first and last name. When finished, press q .
Press q again to accept the name. (Or, press 1 to replay the name you just
recorded, press q to add to your name, or press 3 to erase and re-record it.)
93
The system then plays a prompt that introduces you to basic Voice Mail features.
Page 7

Inter-Tel AXXESSORY Talk
Voice Mail User Guide
LISTENING TO MESSAGES
Whenever you enter your mailbox, you are told how many new and saved messages
you have.
To listen to messages:
-
Enter your mailbox as described on page 3.
-
EITHER, Press fl to listen to your new messages.
OR, Press q to listen to your saved messages.
-
The system plays each message in the queue selected. While you are listening to
a message, you can use the following options:
.
Press q to skip to the end of the recording. ,
.
Press q to back up.
.
Press q to pause. (Then press any key to continue.)
.
Press q to skip ahead.
.
Press q to lower the volume.
.
Press q to play the message envelope again.
.
Press q to raise the volume.
.
Press q to save the new message in your mailbox.
.
Press q to delete the message from your mailbox.
-
When the message has finished playing, you have the following options:
.
Press q to replay the message from the beginning.
.
Press q to reply to the message.
.
Press q to forward a copy of the message to another subscriber. If you want
to include introductory comments, press q and record an introduction. If
not, press q to forward the message without an introduction.
.
Press q to listen to the previous message.
.
Press q to play the introductory message “envelope” again.
.
Press q to listen to the next message.
.
Press q to save the new message in your mailbox.
.
Press q to delete the message from your mailbox.
5
n
Page 8
Voice Mail User Guide Inter- Tel AXXESSOR Y Talk
SENDING MESSAGES
To send messages:
- Enter your mailbox as described on page 3.
-
Press
q
- Dial the desired mailbox number or group list number.
-
After hearing the subscriber’s name, press q to accept it.
- When you hear the tone, record your message.
.
To pause while recording,
.
To erase and re-record your message,
- When you have completed your message, you have the following options:
press q . To continue, press any key.
press q .
To exit:
To replay your message:
To
To erase and re-record your message:
To use the special delivery options:
the following steps:
.
.
.
.
.
-
After the message has been sent, you may choose either of the following options:
.
.
Hang up.
add
to your message:
Press q to mark the message “private.” (This prevents the recipient from
forwarding it to other subscribers.)
Press q to mark the message
heard by the recipient, you will receive a receipt ‘notice.)
Press q to mark the message “priority.” (This will place your message
ahead of all other waiting messages in the receiving mailbox.)
Press q to cancel delivery options.
Press q to deliver the message. (If you wish to mark the message certified,
private, and/or priority, do so before completing this step.)
Press q and enter another mailbox number to send the message to another
destination.
Press q to exit.
OR,
press q and go to the next step.
Press q .
Press q and continue your message.
Press q .
Press q . You can perform one or more of
“certified.” (When a certified message is
n
6
Page 9

Inter-Tel AXXESSOR Y Talk Voice Mail User Guide
PERSONAL OPTIONS
Personal Options allow you to customize your mailbox. Voice Mail has the following
personal options:
l Greetings:
Your primary or alternate greeting is played to callers when they
reach your mailbox.
l Directory Name:
Your recorded name is used to identify you in the directory
and to verify your mailbox number when messages are addressed to you by nonsubscribers and other subscribers.
l
Password:
l Message Envelope Contents:
Your password prevents unauthorized access to your mailbox.
Each message is preceded by an “envelope” message that can be programmed to include time/date the message was left, the
source of the message, and/or the length of the message.
l Transfer Method (if enabled):
When a call is received by an automated attendant or call routing announcement application and the caller enters your extension number, the programmed Transfer Method determines how the call will be
transferred. Depending on the Transfer Method programmed for your phone,
transferred calls from AXXESSORY Talk may be unannounced (as usual), or
one of the following may occur:
-
“Announce Only” Calls:
Before the Voice Mail system transfers a call to
you, a prompt asks the caller to record his or her name before the system
completes the transfer.
- “Screened” Calls:
Before the Voice Mail system transfers a call to you, a
prompt asks the caller to record his or her name. When you answer the call
from Voice Mail, you hear, “You
have a call from (caller’s name),” You
then have the option of replaying the name, sending the call to voice mail (if
you have a mailbox), transferring the call to another extension, accepting the
call, or rejecting it,.
7
Page 10
Voice Mail User Guide
To program personal options:
- Enter your mailbox as described on page 3.
- Press q to select the Personal Options Menu. You may then perform any or all
of the following functions:
To change your personal greeting:
.
Press q .
.
EITHER, Press q to record and/or enable your primary greeting.
OR, Press q to record and/or enable your alternate greeting.
OR, Press q to enable the system default mailbox greeting.
l
If
you pressed 1 or 2, the current greeting is played (if one exists). Then do
one of the following:
EITHER, Press q to accept the greeting. (Or, press q if you wish to replay
the greeting, press q to add to the greeting, or press q to erase and re-
record the greeting.)
OR, Press q to exit without changing your greeting.
Inter-Tel AXXESSORY Talk
To change your directory name:
.
.
.
.
To change your password:
.
l
.
.
Continued...
Press a. Your current name is played. (Press q to replay your recorded
name, if desired.)
Press q to erase and re-record your name.
When you hear a tone, record your first and last name, then press
Press q again to acce t your recorded name. (Or, press 1
recorded name, press 2 to add to your name, or press 3 to erase and
re-record your name.)
Press a.
Ifyou want to have a password, enter a new password using digits O-9 (up to
12 digits).
If
you do not want to use a password, skip this step.
Press a. Voice Mail plays back your pass’word if you entered one.
Press q to accept the password as entered. Or, press q if you want to erase
and re-enter your password.
b
0
q
to replay your
0
Page 11

Inter-Tel AXXESSORY Talk
To change your message envelope:
.
Press q . You can then do any of the following:
To enable or disable the time/date option, press a.
To enable or disable the message source option, press n.
To enable or disable the message length option, press a.
To enable all options, press q .
To disable the envelope, press q .
To accept the envelope, press q .
To return to the Personal Options menu without changing the envelope,
press q .
To change your Transfer Method (if allowed):
.
Press q . The system tells you what your current Transfer Method is. You
can then select the desired Transfer Method, as follows:
To select unannounced transfers, press q .
Voice Mail User Guide
To select screened transfers, press a.
To select announce only transfer, press q .
To return to the Personal Options menu without changing the Transfer
Method, press q .
Page 12
Voice Mail User Guide
REMOTE MESSAGING
To set up remote messaging:
- Enter your mailbox as described on page 3.
-
Press q .
-
EITHER, press q to set up a Primary cascade.
OR, press q to set up an Alternate cascade.
-
A prompt tells you what the cascade’s current status is. (If desired, press q to
return to the Personal Options Menu.) Perform one of the following steps.
To program a cascade level: Press q then program the following:
l
Enter the number of the level you wish to program (l-9). You then have the
following options:
To enable or disable the cascade level: Press q . (You cannot enable the
level until a notification number is programmed.)
To set up or change the personal telephone number: Press q . Then press
q
if it is an extension number OR press q if it is an outside number. Then
enter the number. (Executive keyset users can enter the special characters
for pause, mailbox, and new message count by pressing their menu keys.)
Inter-Tel AXXESSORY Talk
To set up or change the pager telephone number:Press q . Then enter the
number. (Executive keyset users can enter the special characters for pause,
mailbox, and new message count by pressing their menu keys.)
To set up time of day for notification: Press q . Then, when prompted, enter
the time at which you wish to have the message notification start and stop. Enter
the times with two digits for the hour and two digits for the minutes. If enterin
the time in 12-hour format, you will be prompted to press q for AM or press
for PM. Note: If you wish to have 24-hour notification, program the starting and
ending times to be the same.
To set up the days of the week for notification: Press
following: Press q for messaging Monday-Friday, 2 for all days, or q to
select individual days. If you selected individual days, you will be prompted to
press digits l-7 which correspond to the days Sunday through Saturday.
To select all or priority-only message notif&ion: Press q . Then press
for all messages or q for priority messages only.
- The list of options returns. Either select another option, as described above, or
press q to save the settings and exit.
10
3 . Then select one of the
B
2
d
q
n
Page 13
Inter-Tel AXXESSORY Talk
Voice Mail User Guide
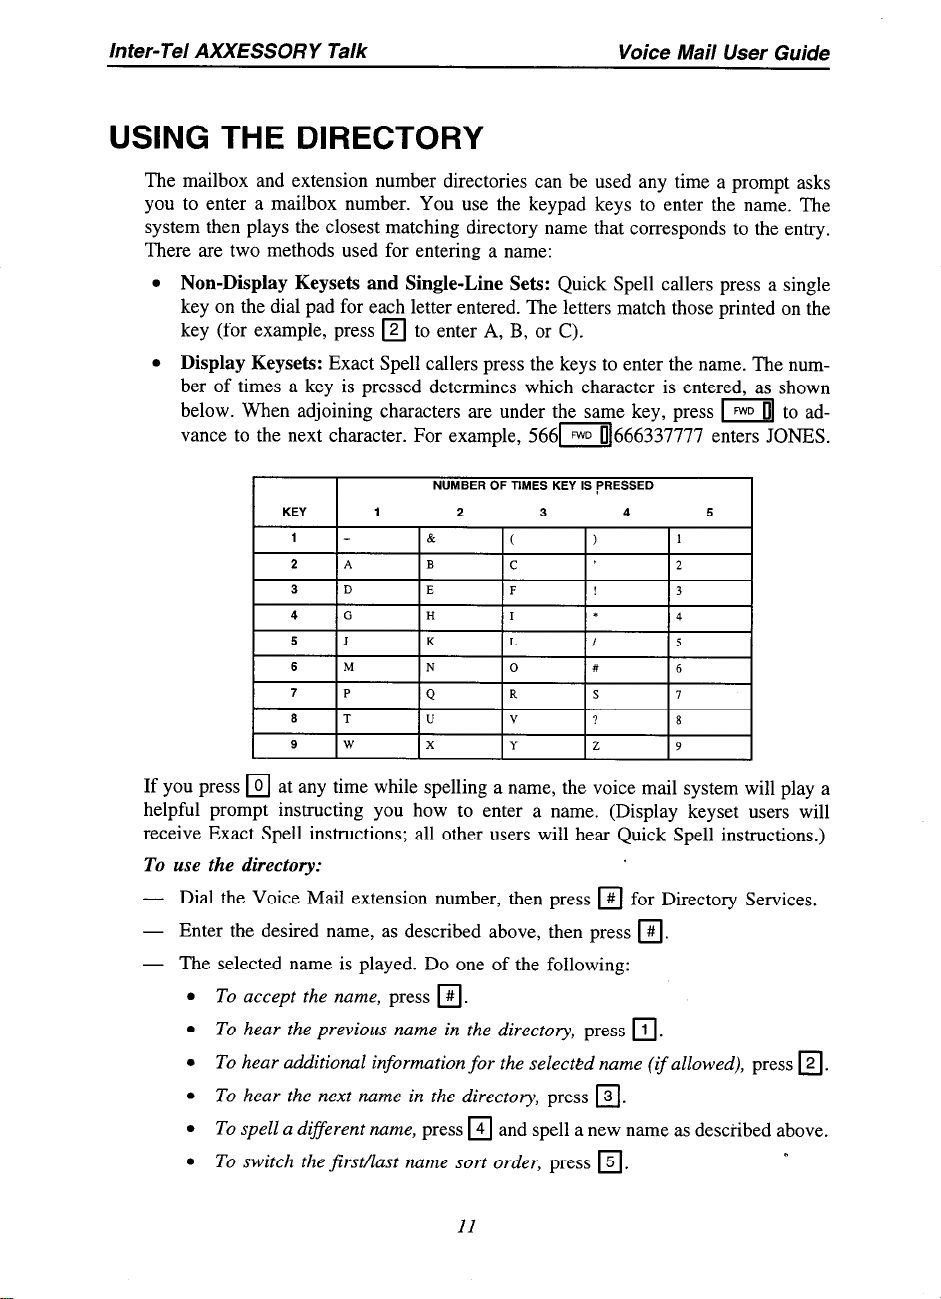
USING THE DIRECTORY
The mailbox and extension number directories can be used any time a prompt asks
you to enter a mailbox number. You use the keypad keys to enter the name. The
system then plays the closest matching directory name that corresponds to the entry.
There are two methods used for entering a name:
l
Non-Display Keysets and Single-Line Sets: Quick Spell callers press a single
key on the dial pad for each letter entered. The letters match those printed on the
key (for example, press q to enter A, B, or C).
l
Display Keysets: Exact Spell callers press the keys to enter the name. The number of times a key is pressed determines which character is entered, as shown
below. When adjoining characters are under the same key, press I] to advance to the next character. For example, 56611666337777 enters JONES.
6
9
tT
If you press q at any time while spelling a name, the voice mail system will play a
helpful prompt instructing you how to enter a name. (Display keyset users will
receive Exact Spell instructions; all other users will hear Quick Spell instructions.)
To use the directory:
-
Dial the Voice Mail extension number, then press q for Directory Services.
-
Enter the desired name, as described above, then press q .
- The selected name is played. Do one of the following:
l
To accept the name, press q .
l
To hear the previous name in the directory, press q .
l
To hear additional information for the selected name (ifallowed), press q .
l
To hear the next name in the directory, press q .
l
To spell a different name, press q and spell a new name as described above.
l
To switch the first/last name sort order, press q .
II
0
Page 14

Voice Mail User Guide Inter-Tel AXXESSORY Talk
NON-SUBSCRIBER ACCESS TO VOICE MAIL
You do not have to enter your mailbox to leave a message for another “subscriber.”
You can leave a “non-subscriber” message from any phone on your system or from
any outside telephone, but the recipient will not have the option of replying to your
message. However, if you leave a non-subscriber message using the phone associated
with your mailbox, the receiver can reply to your message; the reply will be sent to
the mailbox associated with your phone.
To leave a message as a non-subscriber:
- Ifyou hear the Voice Mail greeting or menu, dial the desired mailbox number. (If
you do not know the number, press q to access the mailbox directory.)
If you hear a subscriber’s personal mailbox greeting, skip this step.
- After hearing the subscriber’s greeting and a tone, record your message. You
have the following options:
.
Press q to call the attendant.
.
Press q to pause while recording. To continue, press any key except zero.
.
Press q to erase and re-record your message.
.
Press q to cancel the recording and return to the menu.
- When you have completed your message, you have the following options:
To exit:
To replay your message:
Hang up. OR, press q and go to the next step.
Press q ,
4
To add to your message:
To erase and re-record your message:
To use the special delivery options:
the following steps:
.
Press q to mark the message “private.” (This prevents the recipient from
forwarding it to other subscribers.)
.
Press q to mark the message “priority.” (This will place your message
ahead of all other waiting messages in the receiving mailbox.)
.
Press q to cancel delivery options.
.
Press q to deliver the message. (If you wish to mark the message certified,
private, and/or priority, do so before completing this step.)
- After the message has been sent, you may choosi either of the following options:
.
Press q and enter another mailbox number to send the message to another
destination.
.
Press q to exit.
Press q and continue your message.
Press q .
Press q . You can perform one or more of
12
Page 15

AXXESS KEYSET QUICK REFERENCE GUIDE
Select Outgoing Line: Depending on how
your system is programmed, you may have
several methods for selecting an outgoing
line. Generally, you can press the OUTGOING key, an unlit CALL or LINE key, or a
LINE GROUP key, or you can enter the
ARSfeaturecode(defaultis9200).Referto
the
Inter-Tel AXXESS Keyset User Guide
for more information.
INTERCOM CALL
Answer:
l
EITHER,
Respond handsfree
OR, Lift handset.
Place:
l
While on or off hook, dial extension number.
,OUTSIDE CALL
Answer:
l
Lift handset. If not connected.
press w, ml, or ml.
Place:
While on or off hook, select outgoing line.
Dial telephone number.
EMERGENCY CALL
Lift handset and dial ~~~~~ to
automatically call the preset emer-
gency number.
TRANSFER
While on a call or conference,
press MI.
EITHER, Dial extension number.
OR, Select outgoing line and dial
telephone number.
EITHER, Announce call and hang
up.
OR, Press I[ to transfer call to
hold.
HOLD
While on a call, press I[ and
hang up.
Return to caller by pressing
14, I], or-l.
REDIAL
Lift handset and press I[.
STATION SPEED DIAL
Store number:
While on hook, press m18l.
EITHER, Press Station Speed-
Dial key to be programmed.
?R, Dial desired location code
P-9).
EITHER, Dial extension number.
OR. Dial outside televhone num-
I
ber (press Fl once for asterisk,
twice for pound, three times for
hookflash, or four times to enter
pause).
Press q to store number and exit.
Dial number:
l
Lift handset, if desired.
0 If placing outgoing call, select
outgoing line.
l
EITHER, Press desired Station
Speed-Dial key (if you have one).
OR, Press Fl or II
[ql811?]. Then dial desired location code (O-9).
SYSTEM SPEED DIAL
l
Lift handset, if desired.
0, Select outgoing line.
0 Press -1 or mm8.
l
Dial location code (000-999).
Part Number 550.8004
0 Inter-Tel Integrated Systems, Inc. 8195
Page 16

REVERSETRANSFER
l
To pick up a call that is ringing or
holding at another station, lift
handset and press q .
l
Dial extension number where call
is ringing or holding.
QUEUING
Busy line or station callback:
l
When you hear busy signals, press
FC)UE or mm. Then hang
UP.
CALL WAITING
l
If you hear a single camp-on tone
while on a call, hang up to end the
current call. OR, Press I[.
l
Answer the waiting call by press-
ing ICALL I[, or I.
MESSAGES
Leave a message:
l
Place an intercom call and press
ml. Then hang up or wait for
message center to answer.
Reply to waiting message:
l
EITHER, Press -1 to view the
message and then press q to re-
spond.
OR, Lift handset and press -1.
Cancel waiting message:
l
While on hook, press- -1
view message, then press q .
DO-NOT-DISTURB
Enable:
0 Press 1x1.
l
Dial message number (01-20). OR
Press I=1 or [VI to scroll.
0 Press IS,,,
0 Press -1.
to
PAGING
l
Lift handset and press IFI or
Ia
l
Dial zone code (G9). After tone,
make announcement and hang up.
CONFERENCE
Start:
l
While on a call, press 1x1.
l
Place next call and press I-1.
(Repeat for additional parties.)
0 Press I-1 again.
Exit and re-enter conference:
0 Press ICNFjll to exit conference.
Press ml again to re-enter.
Exit and place conference on
hold (parties stay connected):
l
Press II to place conference
on hold.
0 Press ml-again to re-enter.
End conference and place par-
ties on hold:
l
Press -1, then press Il.
l
To return to one caller at a time,
press II or I.
CALL FORWARD
l
Standard or Basic Keyset:
EZTHER, Press m]. OR, Dial
call forward feature code:
355,All calls
356-If no answer
357-If busy
358-If no answer or busy
Executive Keyset: Press I-1
and then select menu option.
l
EITHER, Dial extension number.
OR, Select outside line and dial
,
telephone number.
Cancel: Cancel:
l
Press -1, then ‘press -1.
Page 17

There are three types of
System Administrator.
.
Standard mailbox features include: hstemng to new messages, sending messages, forwarding messages, deletmg messages, savmg messages, programmmg personal options, and, If authorized through database programming, setting up remote messaging.
.
A Receive-Only mallbox user can
and program personal options.
Remote Messaging must be enabled for your mailbox through database programming.
Then you set it up through your mallbox. It allows you to enter the primary and/or alternate
telephone number or extension number that the voice mail system will call when new messages are received by your mailbox.
When you enter your mailbox, you may hear one of the following announcements:
.
Mailbox almost full or full: If your mailbox
until you delete waiting or saved messages.
. Message count: This tells you how many
how many are priority messages.
.
Remote messaging: This announcement will indicate whether primary or alternate
remote messaging is selected when remote messaging is enabled. It will also alert you
if a programming error has been detected and/or whether Voice Mail encountered
busy system resources when attempting to place a remote messaging call.
For more detailed information and expanded procedures, refer to the Inter-Tel AXXESSORY Talk Voice Mail User Guide.
Your System Administrator is
Extension Number
0 Inter-Tel Integrated Systems, Inc. 4/96
mallboxes voice Standard, Receive-Only, and
only lIsten
MAILBOX ANNOUNCEMENTS
ADDITIONAL INFORMATION
messages, save or delete them,
is full, no new messages can be received
messages are waiting to be heard, if any, and
INTEGRATED i?sTE~s ~
INTER-TEL
AXXESSORY TALK
SUBSCRIBER
POCKET GUIDE
Inter-Tel AXXESSORY TalkTM Voice Mail allows you to send and receive recorded messages from any station. Station users and outside callers may enter Voice Mail in the following ways:
.
By dialing the telephone number or extension number assigned to the Voice Mall
application
. By being transferred to Voice Mail by the automated attendant
. By being forwarded (using manual or system forward) to Voice Mail when a called
station is unavailable
.
By responding to message waiting mdrcatlons left by voice mail at a station
When you reach Voice Mail, you will hear recorded mstructions that tell you what to do
next. Simply listen to the prompts and press the keypad key that corresponds to the desired
choice. If you do not respond immediately, a second set of prompts is played.
Most prompts are interruptible, and you can press the desired key at any time durmg the
prompt. The prompt will then stop and the system will act on the requested choice.
INTRODUCING VOICE MAIL
Page 18

WHILE THE MESSAGE IS PLAYING: 1
Back Up
Pause
Move Forward
Lower The Volume
Play The Envelope
Increase The Volume
Skrp To The End
AFTER THE MESSAGE:
Replay The Message
Reply To The Message
Forward A Copy
Lrsten To Prevtous Message
Play The Envelope Again
Listen To Next Message
Save The Message
Delete The Message
ENVELOPE OPTIONS
Trme And Date On/Off
Message Source On/Off
Message Length On/Off
All Opttons Enabled
No Options Enabled
Accept Settrngs
Cancel/Previous Menu
Replay Your Greetrng/Name
Add To Your Greetrng/Name q +
Erase And Re-record
Accept The GreetrnglName
CanceVPrevtous Menu
q
q
i REMOTE MESSAGING 1
+
Enter cascade level number then:
Enable/Disable Notrfrcatton
Enter Personal Number
Enter Pager Number
1 DAYSOFTHE WEEK 1
1 ?lP~-~:~ Week 8 1
Select lndivtdual Days l-7
J
MESSAGE TYPES
All Messages
Pnonty Messages Only H
+
2 Record Your Message
Pause
q
Erase
q
3. Press # for Options cl
Or hang up to send message & exit
+
OPTIONS
Replay Your Message
Add To Your Message
Erase And Re-record
Cancel
Delwery Opttons
Send Message and Exit
L
DELIVERY OPTIONS
q
El
El
Return To Previous Menu
El
El
El
El
El
El
4
q
-
III
 Loading...