

Page 1

ADDENDUM TO ISSUE 4 OF THE AXXESS MANUAL OCTOBER 1997
ADDENDUM TO ISSUE 4 OF THE
INTER-TEL AXXESS SYSTEM MANUAL
For Software Part Numbers: 827.8658, 827.8659, 827.8660, 827.8661, and 827.8662
This addendum describes feature, programming, and hardware changes that apply when the AXXESS System is
installed with the version 4.3 software part numbers listed above. It also includes changes and corrections to Issue 4
of the AXXESS Installation andField Maintenance Manual. For software installation instructions,referto the manual or to the document included with the software components. The new system software is identical to the previous
versionofsoftware, except for the changesandcorrectionsdescribed on these pages. Refertothe manual for detailed
system information.
•
FEATURE, PROGRAMMING, AND HARDWARE CHANGES
New Software Part Numbers
The part numbers for the new version 4.3 software are:
SOFTWARE PART NO.
Premium Software for CPU/MEM Card
(15 ROMs)
Premium Software for CPU020/PCM
Card (two floppy disks)
Database Programming Software (three
floppy disks)
AXXESSORY Talk Applications Software
for OS/2 (five floppy disks)
AXXESSORY Talk Applications Software
for Windows NT (five floppy disks)
AXXESSORY Talk OS/2 Japanese Voice
Prompts (four floppy disks)
AXXESSORY Talk NT Japanese
Voice Prompts (three floppy disks)
827.8659
827.8658
827.8662
827.8660
827.8661
827.8592
827.8742
Changes and New Features in the 4.3 Software Release
New 4.3 features and changes described in this addendum include:
•
Agent Set (see page 2)
•
“Send Alert Burst To Headset” Station Flag (see
page 2)
•
16-Circuit Single-Line Card (SLC-16) and Lamp
Options Card (see page 3)
• LGC and LGC-D Modification (see page 6)
• Call Routing to Public Network (see page 7)
Station Password (see page 10)
•
Remote Feature Programming (see page 12)
•
Group Listen Feature (see page 13)
•
CO Hookflash on Conference Calls (see page 13)
•
OPX Disconnect Enhancement (see page 14)
•
Advanced CO Interface Premium Feature Required for PRI (see page 14)
•
Trunk Group PRI Call By Call (see page 14)
•
OS/2 and NT Versions of AXXESSORY Talk (see
page 16)
•
Fax Delivery Report Indicates Failed Deliveries
(see page 23)
•
AXXESSORY Talk VisualMail (see page 24)
•
Automatic Fax Detection (see page 31)
•
Programming Fax-On-Demand Port availability
(see page 33)
•
VoiceMailSave/RestoreTo ANetworkDrive(see
page 34)
•
Explanation of ExtendedRing Cadences (see page
35)
•
RS-232-C Changes and Corrections (see page 36)
Changes and Features from Previous Software Releases
Earlier 4.1 and 4.2 features and changes described in
this addendum include:
•
Preventing Memory Shortages (see page 37)
•
New CPU020/PCM Card Configurations (see
page 37)
• New CPU/MEM Card Configuration(see page 37)
• New Options Card (OPC) Configuration (see page
37)
Document Part No. 550.8015
Page 1 of 73
##
Page 2

•
New T1 Card (T1C) Revision Level Changes (see
page 37)
•
T1 Gain Control (TGC) Daughter Card (see page
37)
•
DKSC-16 Extended Loop Length Modification
(see page 38)
•
New Voice Processing Card (VPC) Models (see
page 38)
•
CPU020/PCM Card Software Installation Information (see page 38)
•
New FCC Part 68 PBX Rating (see page 38)
•
New Fax Card Models (see page 38)
•
New PC Motherboard (see page 41)
•
Config.sys File Change (see page 41)
•
ACD Agent IDs (see page 43)
•
Primary Rate T1 Service (see page 50)
•
Customized AXXESSORY Talk Prompts (see
page 53)
•
Digital Keyset Enhancements (see page 60)
•
“Enable Database Server Compression” Preferences Flag (see page 63)
ADDENDUM TO ISSUE 4 OF THE AXXESS MANUALOCTOBER 1997
The Agent Set does not require a transformer or external power source.
To operate properly, the Agent Set must be programmed for headset mode. This can be done in one of
the following ways:
•
Enable Headset Mode via Station Programming in
the AXXESS or Axxent System database
•
At the keyset, unplug the headset or handset (to
take the Agent Set off hook) and enter the Headset
On/Off feature code (317) to enable headset mode.
Then plug in the headset or handset.
NOTE: There is nothing to prevent the user from disabling headset mode using the Headset On/Off feature
code at the station.
Because the Agent Set does not have feature keys, a
dialing pad, or a speaker, it must be connected to a PC
that is equipped with AXXESSORY Connect (or a similar OAI product t hat emulates a keyset). The AXXESSORY Connect is used for dialing and feature access.
The Agent Set also requires an Inter-Tel headset or
handset. Only Inter-Tel equipment should be used.
Other manufacturer’s equipment may not be compatible with the Agent Set.
•
“Forced Delayed Major Reset” System Flag (see
page 64)
•
“CO Provides Progress Tones” T1 Programming
Flag (see page 65)
•
Canadian Information (see page 66)
•
Changes and Corrections to the Issue 4 Manual
(see page 67)
Agent Set
The Agent Set is used in place of a keyset with an attached PCDPM. It is connected to a Digital Keyset
Card (DKSC or DKSC-16) port just as a keyset would
be.
It has a jack for plugging in an Inter-Tel handset or
headset. It also has a serial connector (DB9) for attachingittoaPC.
If the user wishesto receive audible signalsat theheadset, there is a new station flag (described below) that
willsendasingletonetothe headsetwhena call is ringing.
“Send Alert Burst To Headset” Station
Flag
Thereisa new stationflagthat will senda single tone to
a headset, instead of normal keyset ring tones, when a
call is ringing at the station (non-handsfree intercom
call, outside call, queue callback, or reminder message). The flag, called “Send Alert Burst To Headset,”
is programmed on a station-by-station basis.
The “Send Alert Burst To Headset” flag appears in the
Station Miscellaneous Flags screen and the Individual
Station/Miscellaneous Flags screen below the “Ring
Intercom Always” flag. By default the flag is disabled.
Page 2 of 73
Page 3

ADDENDUM TO ISSUE 4 OF THE AXXESS MANUAL OCTOBER 1997
16-Circuit Single-Line Card (SLC-16) and Lamp Options Card (LOC-16)
16-Port Single-Line Card (SLC-16)
The SLC-16 can support up to16on-premisesAC-ringing single-line devices. Like the 8-circuit SLC, it does
not support off-premises stations and does not have
DID capability.
An SLC-16 cannot be installed in a card slotthat is programmed for an SLC. The ports must be specifically
programmed for anSLC-16. However, if port programming is changed from SLC to SLC-16, the existing
eight circuits will retain their individual programming
and the new circuits will be in the default state. If the
port is changed from an SLC-16 to an SLC, all circuits
will retain their programming, but only the first eight
will be available.
The SLC-16 uses 72VDC to generate trapezoidal ringing waveforms, which have the same effect as sine
ringing waveforms. The card is capable of delivering a
total ringer equivalence number (REN)of 16.0 at a frequency of 20Hz (e.g., 1.0 REN per circuit). No single
circuit shouldexceed a REN of 5.0. If the card requires
more than 16.0 REN total, use a larger DC power supply (available from Inter-Tel). If a fax machine, modem, or single-line set does not respond to the ringing
provided by the SLC-16, consult the manual for that
device and/or contact Inter-Tel Technical Support.
If installing the optional LOC-16:
a. Carefully remove the two, solid, 16-position
jumper straps from jumper locations J3 and
J4 on the SLC-16.
b. Placejumper strap (J6) on the SLC-16 in the
LOW position (over the top two pins).
c. Carefully attach the LOC-16 to jumperloca-
tions J3, J4, and J5 on the SLC-16. Make
sure that the connectors are properly aligned
and seated.
d. When programming the database, be sure to
enable the message waiting lamps in station
programming.
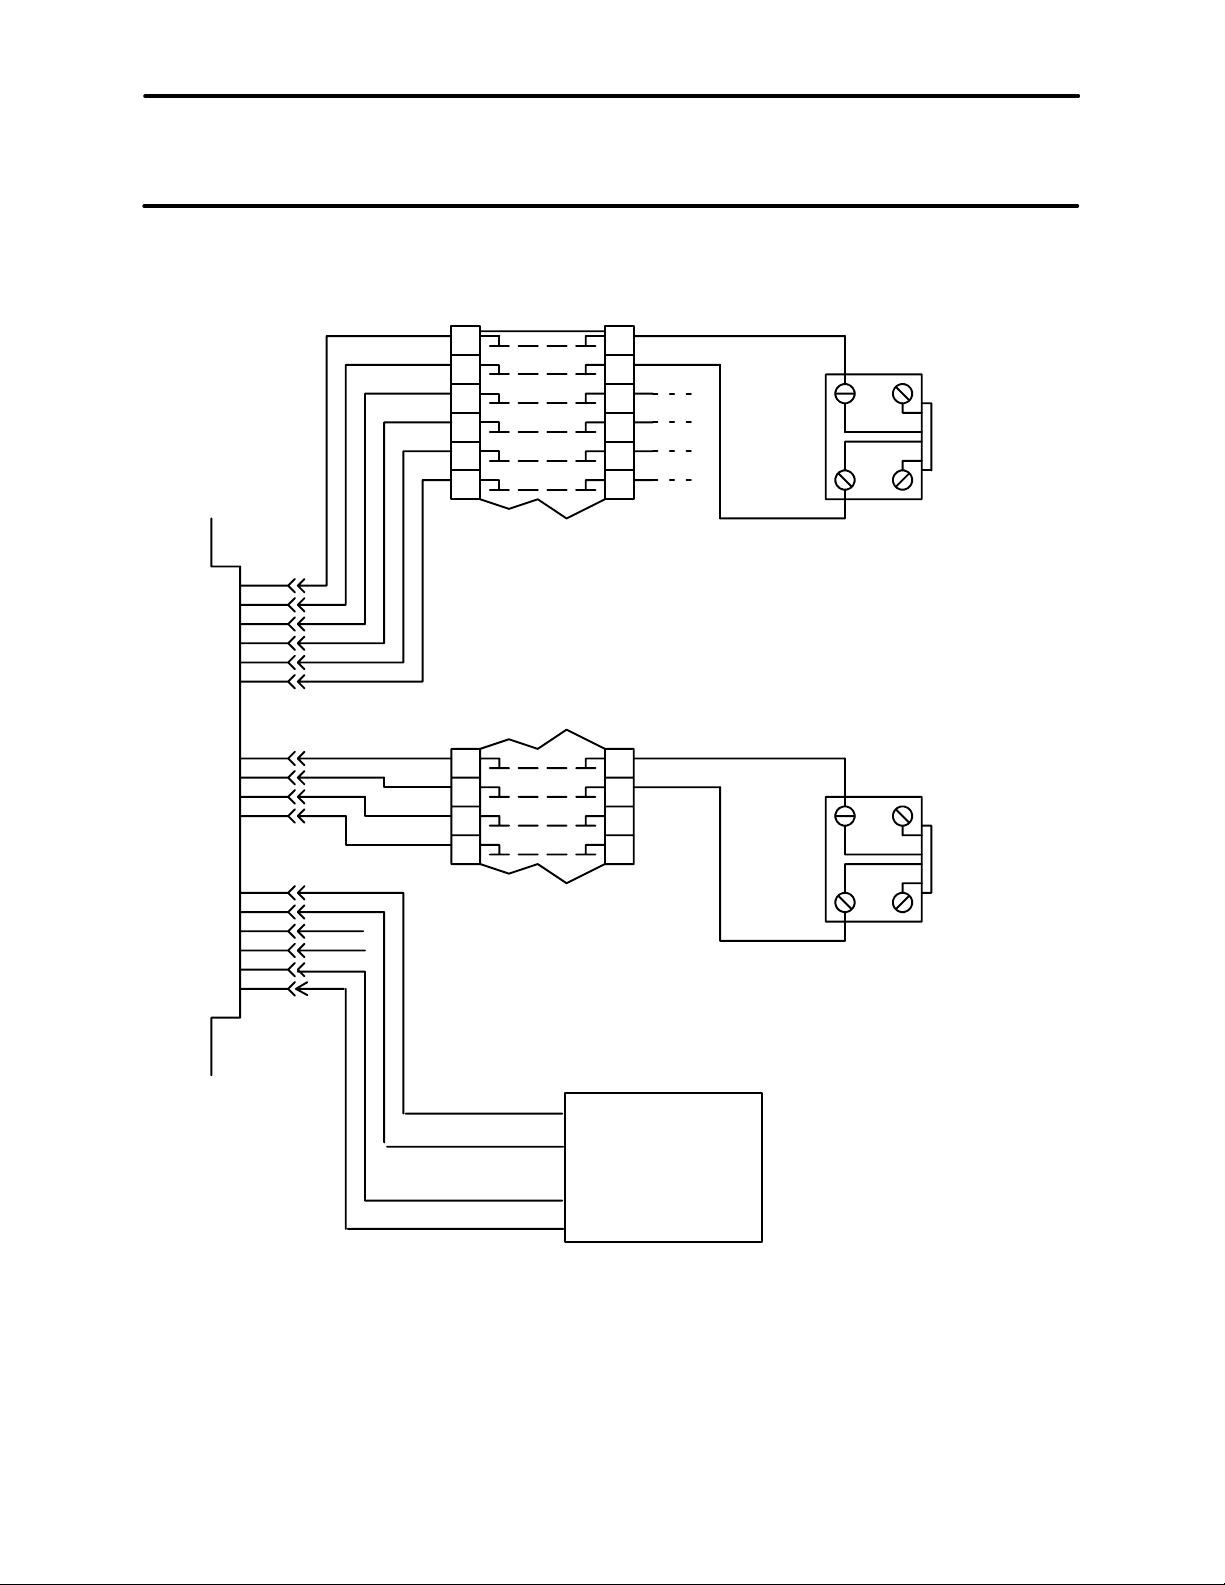
Power Supplies
A power supply is required for each SLC-16 because
the cards are not designed to pull talk battery, ring, or
message lamp power from the system power supply.
Powersuppliesareavailable that support onecard or up
to four cards. Refer to the illustration and chart on the
next two pages for cable termination information.
NOTE: If you receive a power supply witha connector
on the wires, the connector will have to be cut off before the power supply can be installed. Also, if a fourcard power supply is wall mounted, be surethat the fully-enclosed side is on the bottom (i.e., facing down).
The loop limit for the SLC-16 is 103 ohms/2000 feet
(609 m.).
16-Port Lamp Options Card (LOC-16)
A 16-port Lamp Options Card (LOC-16) is also available to provide visual message waiting capabilities for
single-line sets equipped with message lamps. The
single-line sets are then configured in database programming to receive visual and/or audible message
waiting indication tones. Except for these differences,
the installation and operation of the LOC-16 is similar
to that of the 8-port LOC described in the manual:
Part Numbers
The new SLC-16, LOC-16, and power supply part
numbers are:
SLC-16
LOC-16 550.2104
Power Supply for 1 Card 550.0114
Power Supply for up to 4 Cards 550.0116
NOTE: The SLC-16 and LOC-16 can be used only
with version 4.3 (or higher) system software.
550.2116
Page 3 of 73
Page 4
ADDENDUM TO ISSUE 4 OF THE AXXESS MANUALOCTOBER 1997
FIGURE 1. SLC-16 BLOCK CABLE TERMINATIONS
SINGLE-
LINE
CARD
W/BL
BL/W
W/O
O/W
W/G
G/W
Y/BL
BL/Y
Y/O
O/Y
Y/G
G/Y
Y/BR
BR/Y
Y/S
S/Y
NOTUSED
NOTUSED
TIP
RING
TIP
RING
TIP
RING
TIP
RING
NOTUSED
NOTUSED
SLC-16
1.1 1.1
1.2
1.3
1.16
1.2
1.3
1.16
66M1-50-TYPE
BLOCK
(PART OF MDF)
W/BL TIP
BL/W RING
W/BL TIP
BL/W RING
MODULAR
ASSEMBLY
GY
RBK
MODULAR
ASSEMBLY
GY
RBK
JACK
TO SINGLELINE SET OR
PLAYBACK
DEVICE
JACK
TO SINGLELINE SET OR
PLAYBACK
DEVICE
AMPHENOL-
TYPE
CONNECTOR
GND (BLACK)
–48V EXT ((RED)
POWER SUPPLY
GND (BLACK)
–72V EXT (YELLOW)
NOTE: For simplicity, this figure shows single-line sets and playback devices being installed using onepair cable and four-conductor m odular jacks. Of course,if three-pair cable and six-conductor modularjacks
are used instead (as is recommended), extra terminal blocksand t he use ofcross-connect wiring techniques
are required.
Page 4 of 73
Page 5

ADDENDUM TO ISSUE 4 OF THE AXXESS MANUAL OCTOBER 1997
FIGURE 2. SLC-16 CABLE TERMINATIONS ON THE SLC-16 STATION BLOCK
AMPHENOL
NO.
26 W–BL TIP
1 BL–W RING
27 W–O TIP
2 O–W RING
28 W–G TIP
3 G–W RING
29 W–BR TIP
4 BR–W RING
30 W–S TIP
5 S–W RING
31 R–BL TIP
6 BL–R RING
32 R–O TIP
7 O– R RING
33 R–G TIP
8 G– R RING
34 R–BR TIP
9 BR–R RING
35 R–S TIP
10 S–R RING
36 BK–BL TIP
11 BL–BK RING
37 BK–O TIP
12 O–BK RING
38 BK–G TIP
13 G–BK RING
39 BK–BR TIP
14 BR–BK RING
40 BK–S TIP
15 S–BK RING
41 Y–BL TIP
16 BL–Y RING
42 Y–O NOT USED
17 O–Y NOT USED
43 Y–G GND B2 (BLACK)
18 G–Y –48V EXT (RED)
44 Y–BR NOT USED
19 BR–Y NOT USED
45 Y–S GND B1 (BLACK)
20 S–Y –72V EXT (YELLOW)
46 V–BL NOT USED
21 BL–V NOT USED
47 V–O NOT USED
22 O–V NOT USED
48 V–G NOT USED
23 G–V NOT USED
49 V–BR NOT USED
24 BR–V NOT USED
50 V–S NOT USED
25 S–V NOT USED
CABLE
PAIR
SLC-16
Page 5 of 73
Page 6

ADDENDUM TO ISSUE 4 OF THE AXXESS MANUALOCTOBER 1997
Loop/Ground Start Card (LGC) and LGC Daughter Card (LGC-D) Modification
Under certain conditions,previous versions of theLGC
(part no. 550.2309) and the LGC-D (part no. 550.2310)
were not able to always properly detect the “ground
start” signal provided by the central office (CO). A
modification to the LGC and LGC-D has been implemented to correct this problem.
More specifically, the previous versions of the LGC
and LGC-D did not function properly in ground-start
mode when terminated on a CO trunk that had a
constantcurrent battery feed of lessthan approximately
25mA. The new cards have a built-in 50VDC power
supply and therefore no longer rely on the current from
the CO to detect the “ground start” signal.
Identifying the Problem
A customer site may have this problem if a keyset
user’s display shows “LINE IS UNPLUGGED” when
attempting t o access a ground start trunk on an LGC or
LGC-D. To determine if the card really does have a
problem detecting the ground start signal from the CO,
follow these steps:
(1) Ensure that the appropriate trunk circuit on the
card is programmed for ground start mode.
(Loop start mode is not subject to this problem.)
(2) Verify that the card is properly installed and
connected as outlined in the AXXESS Installa-
tion & Field Maintenance Manual.
to make sure the card can still receive dial
tone.
If you do not hear dial tone, apply ground to
the tip terminal. If you now hear dial tone,
tip and ring are reversed.
NOTE: Be sure the test set is in monitor
mode. If it is in off-hook mode, sometimes
the line can be seized regardlessof the polarity, and the test is invalid.
Identifying the Modified Cards
Remove the LGC and/or LGC-D and look at the part
number stenciled on the card. Immediately after the
part number, there should be a dash (–) and a single
letter contained within a box. This denotes the revision
level of the card. The following chart shows the revision level of the current, modified cards:
CARD PART NO. ECN NO. REVISION
LGC 550.2309 4813 826.5223–4D
(or higher)
826.5223–5D
(or higher)
826.5223–6
(any letter)
LGC-D 550.2310 4814 826.5224–3B
(or higher)
826.5224–4B
(or higher)
826.5224–5
(any letter)
(3) Verify that tip and ring for the trunk circuit are
properly connected. Here is a simple method
that works for most cases:
a. At the associated CO block, remove the
bridging clips for the trunk.
b. On the telco side of the block, attach a test
set (butt set) in monitor mode (on-hook) to
tip and ring.
c. Apply ground to the ring terminal.
d. If you hear dial tone (only while ground is
applied), tip and ring are properly con-
nected. Replace the bridging clips and check
Page 6 of 73
Compatibility
Improperly paired cards will not work together and the
trunks attached to these cards will not function.
LGC –6 cards will only work with LGC-D –5 cards
(and visa versa). They are not backwards compatible.
LGC–4and–5cardswillonlyworkwitheither LGC-D
–3 and –4 cards.
Resolution
If a system is experiencing this problem and if it is
equipped with older, unmodified LGC and/or LGC-D
cards, the card(s) may be replaced by contacting InterTel Technical Support.
Page 7
ADDENDUM TO ISSUE 4 OF THE AXXESS MANUAL OCTOBER 1997
Call Routing to Public Network
This feature changes the AXXESS system in the following ways:
•
Call Routing Tables can be programmed to route
outside calls to outgoing trunks, using Automatic
Route Selection (ARS)or a trunk group. However,
Primary Rate trunks can be used only through
ARS; individual B-channel trunks or trunk groups
containing B-channel trunks will not function
properly with this feature.
•
The system provides a means for thetrunk-to-trunk
call to be supervised including normal trunk disconnect supervision and timer disconnect supervision.
•
Toll restriction will be enforced on call attempts
made from one trunk to another trunk or trunk
group (but not on trunk-to-ARS calls).
Access To Outgoing Trunks
Call RoutingTables now allow patterns that route calls
to destinations of individual trunks, trunk groups, and
ARS anywhere single ring-in destinations are programmed.
If the caller is routed to a trunk or trunk group that is
busy, the system will camp on to the trunk. The caller
will hear busy tones, followed by music. When a trunk
becomes available, the caller hears dial tone and can
complete the call.
Toll Restriction
To provide security on outgoing calls made through direct trunk-to-trunk interfaces, t he toll restriction of the
selected outgoing trunk will be checked. However, if
ARS is used, toll restriction is not checked.
The toll restriction of the incoming trunk’s group and
that trunk’s “Subject To Toll Restriction” flag are not
checked.
If a caller dials a numberthat is not allowed t hrough toll
restriction, the call will be routed to the primary attendant.
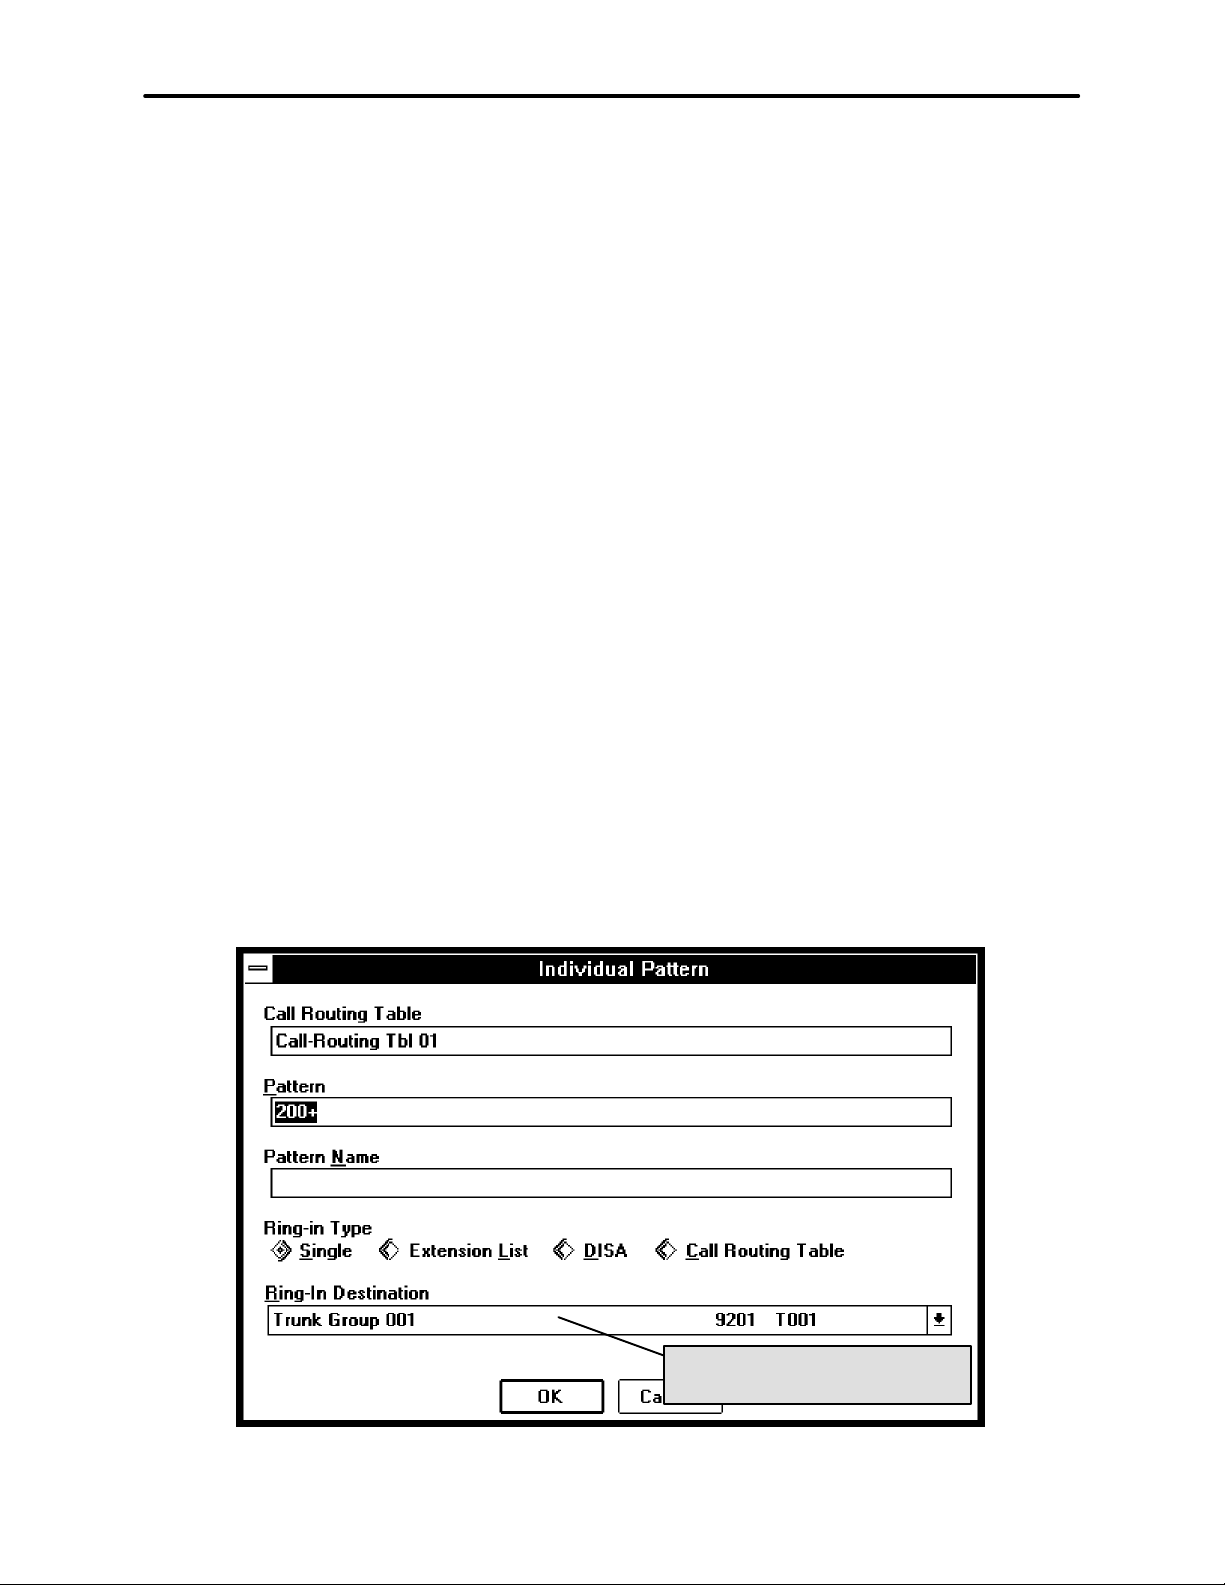
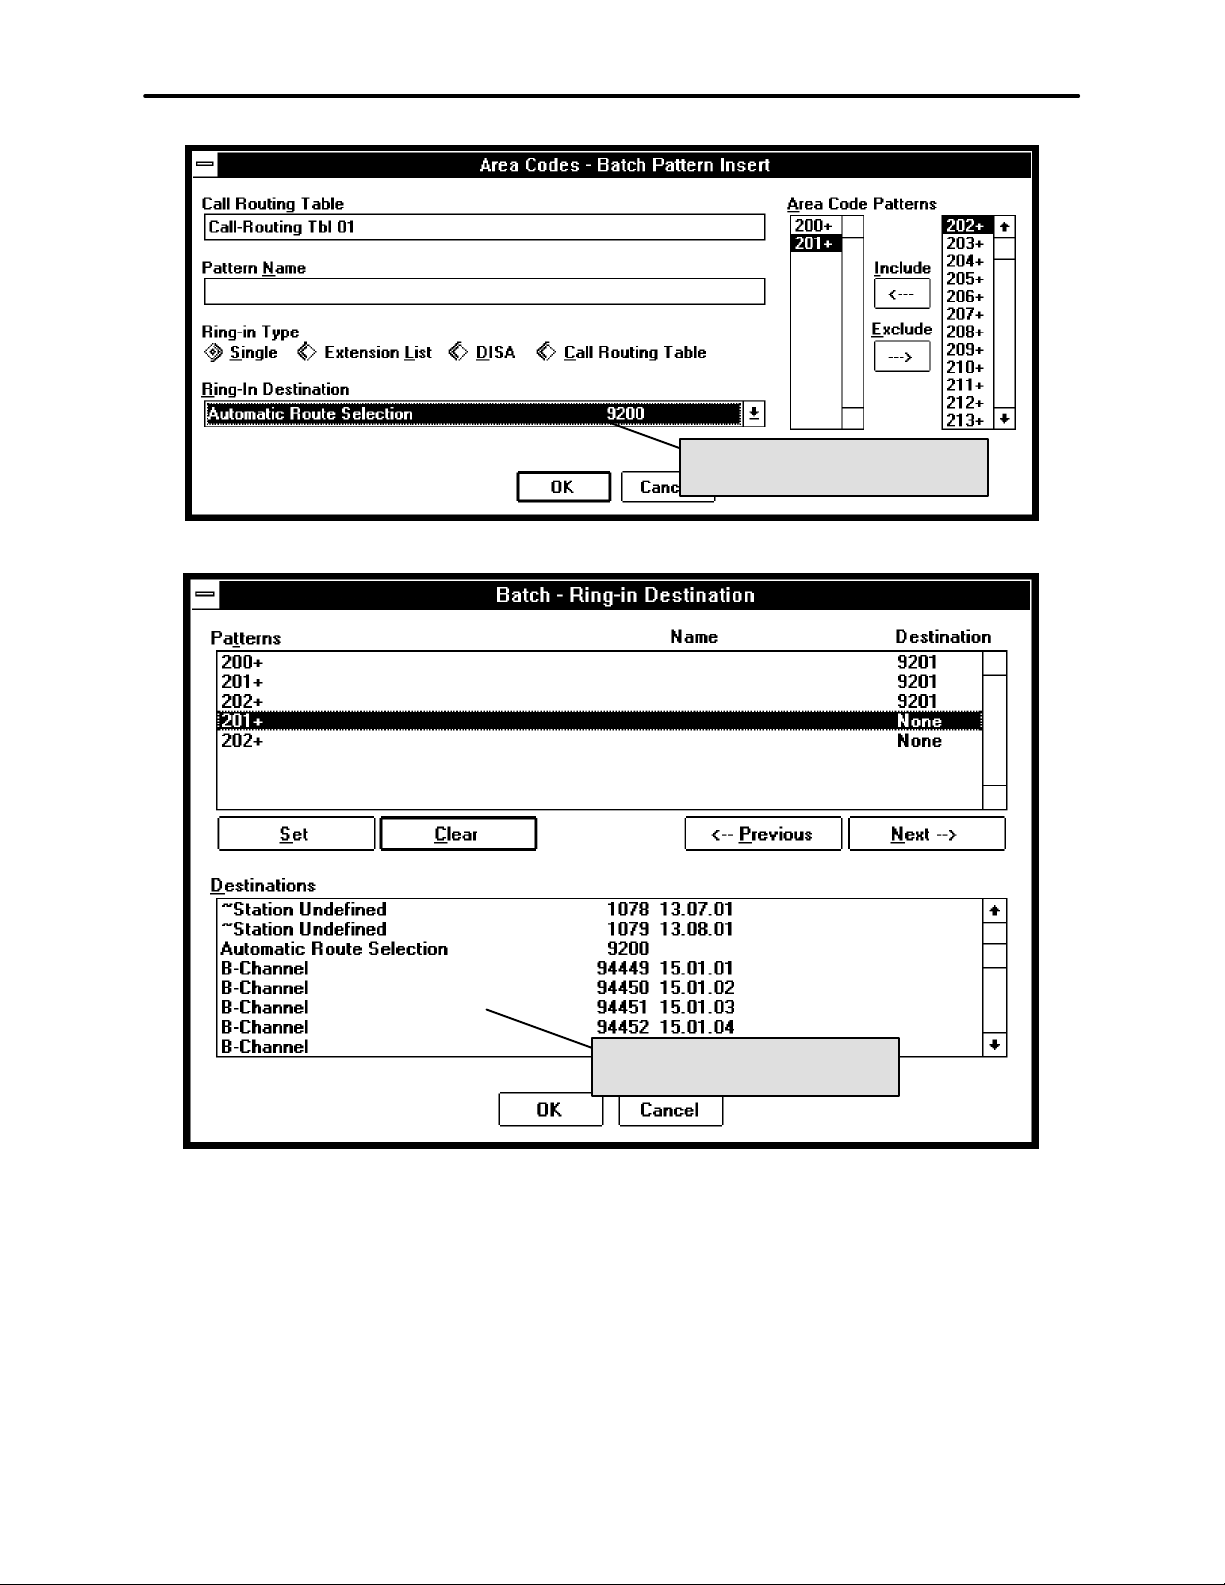
Programming Call Routing Tables
Call Routing to the Public Network is programmed
through the Call Routing Table screens for programming Individual Patterns, Area Code Batch Inserts, or
Batch Ring-In Destinations,as shown on the next page.
Even though Primary Rate trunks appear in the selection lists, they canonly be used by selectingARS;individual B-channel trunks or trunk groups containing Bchannel trunks will not function properly with this
feature.
NOTE: This cannot be programmed if you enter database programming using the “User” password and it
cannot be programmed through an Administrator’s
keyset.
Page 7 of 73
NOW YOU CAN CHOOSE ARS,
TRUNKS, OR TRUNK GROUPS
Page 8
ADDENDUM TO ISSUE 4 OF THE AXXESS MANUALOCTOBER 1997
NOW YOU CAN CHOOSE ARS,
TRUNKS, OR TRUNK GROUPS
NOW YOU CAN CHOOSE ARS,
TRUNKS, OR TRUNK GROUPS
Page 8 of 73
Page 9
ADDENDUM TO ISSUE 4 OF THE AXXESS MANUAL OCTOBER 1997
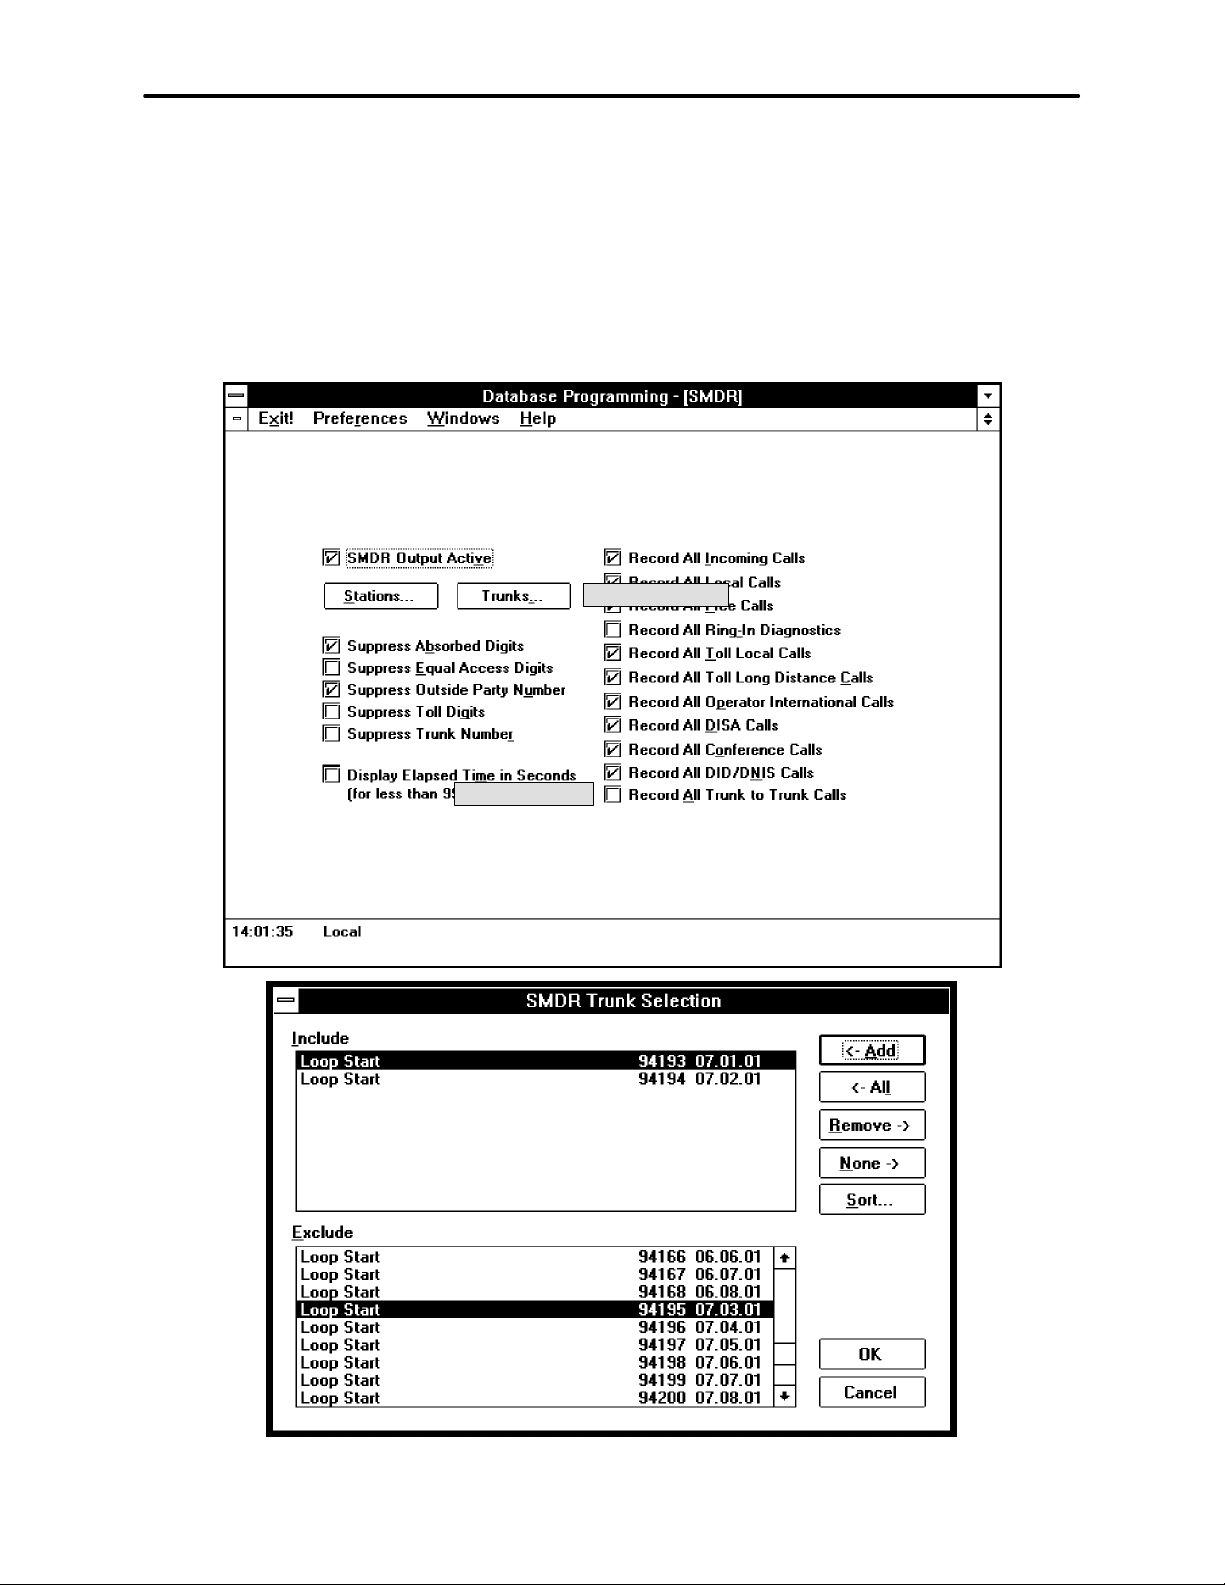
SMDR and Message Print Changes To Support Call Routing To The Public Network
Several changes have been made to the Station Message Detail Recording (SMDR) feature to support Call
Routing to the Public Network.
You can choose which trunks to include in the SMDR
report. This is done through the SMDR Programming
screen (shown below), just as it was for including sta-
tions. A new Trunks command button has been added
that displays a selection screen(shown at the bottom of
the page). The SMDR window also includes a new
check box for “Record All Trunk to Trunk Calls.” This
will include calls, made from one outside caller to
another, in the SMDR report.
An outgoing call that has been initiated by another
trunk will show the initiating trunk’s number in the
“EXT” field of the SMDR report.
←
NEW BUTTON
NEW OPTION
→
Page 9 of 73
Page 10

ADDENDUM TO ISSUE 4 OF THE AXXESS MANUALOCTOBER 1997
Station Password
A station password has been added to the system. This
password is used for the new Remote Programming
feature.
The station password can be up to 8 digits in length.
The default password is the extension number of the
station. The password can be changed by entering the
Program Station Password feature code at the station or
when using the new Remote Programming feature (described in detail on page 12). It can also be programmed through Individual Station programming, as
described on page 12.
If the new password is programmed from a station, the
user will be prompted for the old password, then the
new password, and will be asked toverify the new password. If it is programmed through Remote Programming, the user will alreadyhave entered a correct password, so the user is only prompted for the new
password and will be asked to verify the password.
Should the verified password and new password not
match, the old password will be retained and the programming session canceled.
TO CHANGE THE STATION PASSWORD FROM YOUR STATION:
(4) Enter the Program Station Password feature
code (392). You hear aconfirmation tone. Ifyou
have a display, it shows ENTER PASSWORD.
(5) Enter your current password, followed by #. (At
default it is your extension number.) If you have
a display, it shows NEW PASSWORD.
NOTE: If you enter an incorrect password, the
display will show INVALID PASSWORD and
your station will return to the idle state.
(6) Enter the newpasswordfollowedby #. Youhear
a c onfirmation tone.
(7) Enter the new password again for verification
followed by #. You hear a confirmation tone. If
you have a display, it shows PASSWORD
SAVED. Your station returns to the idle state.
TO CHANGE THE STATION PASSWORD USING REMOTE PROGRAMMING:
(1) If calling from an outside telephone, access the
system through a DISA line. Enter the DISAsecurity code (if applicable). Youhearaconfirmation tone.
If programming from another station, lift the
handset or press the SPKR key.
(2) Enter the Remote Programming feature code
(359). You hear a confirmationtone. If you have
a display, it shows ENTER EXTENSION.
(Executive Keyset users can press the IC DIR
key to use the intercom directory to look up a
number.)
(3) Enter the extension to be programmed. You
hear a confirmation tone. If you have a display,
it shows ENTER PASSWORD. If you entered
an invalid extension number, you will hear reorder tones and can try again.
(4) Enter the extension’s password followed by #.
You hear a confirmation tone.
NOTE: If you enter an incorrect password, the
display will show INVALID PASSWORD. Outside callers will be returned to dial tone and stations will return to the idle state.
(5) Enter the Program Station Password feature
code (392). You hear aconfirmation tone. Ifyou
have a display, it shows NEW PASSWORD.
(6) Enter the new password, followed by #. You
hear a confirmation tone.
(7) Enter the new password again for verification,
followed by #. You hear a confirmation tone. If
you have a display, it shows PASSWORD
SAVED. Outside callers will hear dial tone and
stations return to the idle state.
The Program Station Password feature code (392) is
now included in the Extensions, Usernames, and Feature Codes programming screen.
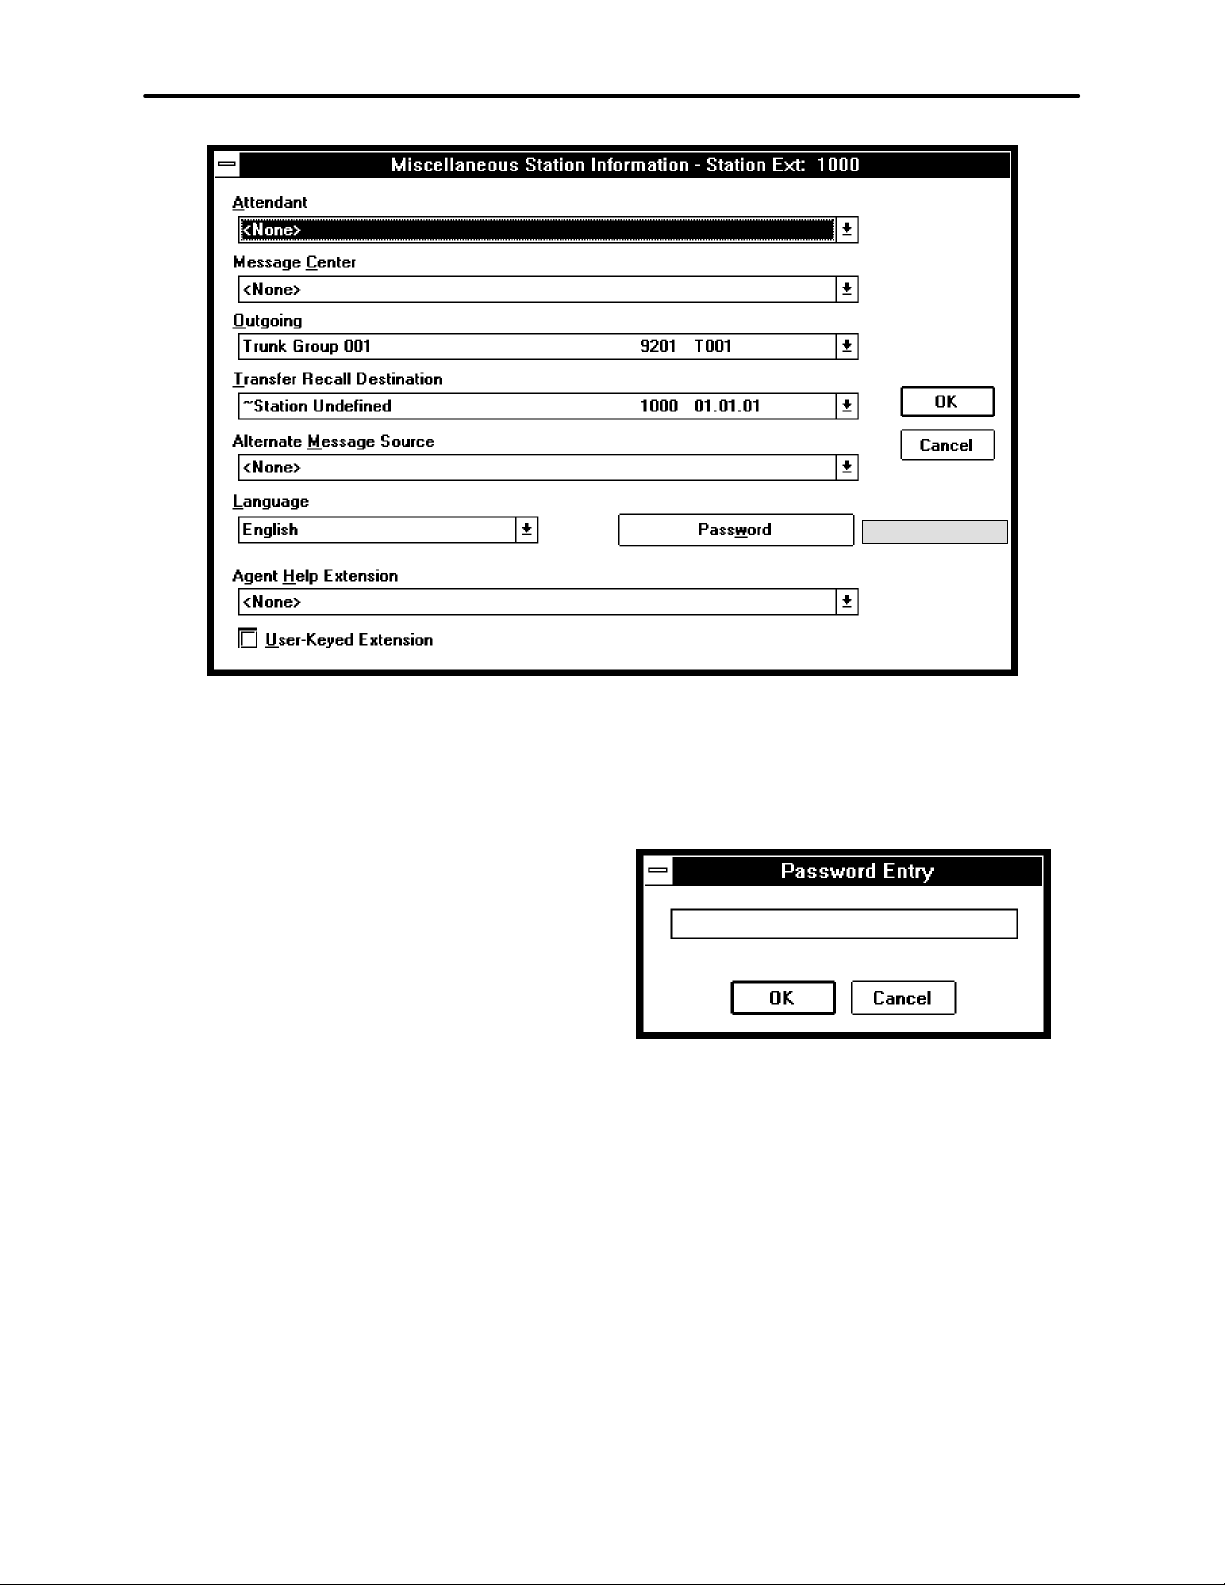
There is also a Station Password command button in
Individual Station Information, Miscellaneous Station
Information screen that allows the programmer to
change the password, as shown on the next page.
Page 10 of 73
Page 11
ADDENDUM TO ISSUE 4 OF THE AXXESS MANUAL OCTOBER 1997
←
NEW BUTTON
To change the station password through database programming, use the screen shown above. It can be
reached by selecting Miscellaneous Station Information from the Individual Station Information programming screen.
NOTE: This cannot be programmed if you enter database programming using the “User” password and it
cannot be programmed through an Administrator’s
keyset.
PASSWORD: When you select the Password command button, the following window appears. Enter the
desiredpassword,upto eight digits, and selectOK.(Or,
select Cancel to exit without changing the password.)
Anotherscreenwillappear that allows you to verifythe
password. Enter the password again, exactly as you entered it the first time. If you make a mistake, you will
see an error message and must start over.
Page 11 of 73
Page 12

ADDENDUM TO ISSUE 4 OF THE AXXESS MANUALOCTOBER 1997
Remote Feature Programming
The Remote Programming feature allows a user to
place a phone in do-not-disturb mode (DND) or forward the station’s calls, either from another station or
through DISA.
The Remote Programming feature code (359) is now
included in the Extensions, Usernames, and Feature
Codes programming screen.
Do-Not-Disturb Programming
TO PLACE A STATION IN DO-NOT-DISTURB MODE USING THE
REMOTE PROGRAMMING FEATURE:
NOTE: Aftereach entry, non-display keyset users will
hear a confirmation tone. Outside callers using a DISA
line will hear confirmation tone followed by DISAdial
tone. Display keyset users will not hear confirmation
tones but will see a prompt asking for the next entry.
(1) If calling from an outside telephone, access the
system through a DISA line. Enter the DISAsecurity code (if applicable). Youhearaconfirmation tone followed by DISA dial tone.
If programming from another station, lift the
handset or press the SPKR key.
(2) Enter the Remote Programming feature code
(359). If you have a display, it shows ENTER
EXTENSION. (Executive Keyset users can
press the IC DIR key to use the intercom directory to look up a number.)
(3) Enter the extension to be placed in DND. If you
have a display, it shows ENTER PASSWORD.
If you entered an invalid extension number, you
will hear reorder tones and can try again.
(4) Enter the extension’s password, followed by #.
If you have a display, it shows ENTER FEATURE CODE.
NOTE: If you enter an incorrect password, the
display will show INVALID PASSWORD and
the call is disconnected. Station users will hear
reorder tones.
(5) To turn on Do-Not-Disturb:
a. Enter the Do-Not-Disturb On feature code
(370). (The On/Off feature code cannot be
usedin remote programming.) If youentered
an invalid feature code, you will hear reor-
der tones and can try again.
NOTE: If the station you are programming
is not allowed to use DND, you will hear re-
order tones and the display will show CAN-
NOT ACCESS RESERVED FEATURE.
Outside callers will be returned to dial tone
and stations will return to the idle state.
b. Enter the desired do-not-disturb message
number (01–20). If you entered an invalid
message number, you will hear reorder tones
and can try again.
c. Enter the optional second-line message text,
if desired, using any combination of the following methods:
Remain in numeric mode: Press the keypad
keys to enter the desired number. Use the
pound key (#) for a hyphen (–) and the asterisk key (*) for a colon (:). Keyset users can
press the FWDkey once to leave a space, or
press the MUTE key to backspace.
Change to alphanumeric mode (keysets
only): Press the MSG key (the key lights) or
the USE ALPHA MODE menu key, then enter the desiredcharacters. (Referto the chart
and instructions in your user guide.) Keyset
users can press the FWD key once to
advance or twice to leave a space, or press
the MUTE key to backspace.
Use speed-dial and/or redial numbers (keysets only): In either numeric or alphanumer-
ic mode, you can speed dial a number (using
the speed-dial key or feature code). In numeric mode you can press the REDIAL key
to enter the stored characters. You may
chain speed-dial and/or redial numbers together.
d. Hang up to complete the programming.
(6) To turn off Do-Not-Disturb: Enter the Do-
Not-Disturb Off feature code (371). (The On/
Off feature code cannot be used in remote programming.) The call is automatically
disconnectedwhenthe feature code is accepted.
If you entered an invalid feature code, you will
hear reorder tones and can try again.
Remote Forward Programming
TO FORWARD A STATION USING THE REMOTE PROGRAMMING
FEATURE:
NOTE: Aftereach entry, non-display keyset users will
hear a confirmation tone. Outside callers using a DISA
line will hear confirmation tone followed by DISAdial
tone. Display keyset users will not hear confirmation
tones but will see a prompt asking for the next entry.
(1) If calling from an outside telephone, access the
system through a DISA line. Enter the DISAse-
Page 12 of 73
Page 13

ADDENDUM TO ISSUE 4 OF THE AXXESS MANUAL OCTOBER 1997
curity code (if applicable). Youhearaconfirmation tone followed by DISA dial tone.
If programming from another station, lift the
handset or press the SPKR key.
(2) Enter the Remote Programming feature code
(359). If you have a display, it shows ENTER
EXTENSION. (Executive Keyset users can
press the IC DIR key to use the intercom directory to look up a number.)
(3) Enter the extension to be forwarded. If you have
a display, it shows ENTER PASSWORD. If you
entered an invalid extension number, you will
hear reorder tones and can try again.
(4) Enter the extension’s password, followed by #.
If you have a display, it shows ENTER FEATURE CODE.
NOTE: If you enter an incorrect password, the
display will show INVALID PASSWORD and
the call is disconnected. Station users will hear
reorder tones.
(5) To turn on Call Forward:
a. Enter one of the followingCall Forwardfea-
ture codes. If you entered an invalid feature
code, you will hear reorder tones and can try
again.
Call Forward All Calls 355............
Call Forward If Busy 357.............
Call Forward If No Answer 356........
Call Forward If No Answer/Busy 358...
b. Enter the forwarding destination. This can
be an extension number or a trunk access
code followedby an outside telephone num-
ber.
If the forward destination is an extension
number, programming is complete and the
call is disconnected automatically.
If the forward destination is an outside num-
ber, hang up to complete the programming.
Group Listen F eature (Keysets Only)
The Group Listen feature allows a keyset user to transmit a conversation over the keyset speaker while in
handset or headset mode. This allows other people in
the room to listen to the conversation. However, the
keyset microphone remains disabled so that only the
headset or handset user can speak.
This feature cannot be used on a handsfree call. The
user must be on a call using the handset or a headset
before entering the feature code. Group Listen cannot
be used on single-line sets.
TO TURN THE GROUP LISTEN FEATURE ON OR OFF DURING A
CALL:
While on a call using the handset or a headset,
press the Special key and enterthe Group Listen
feature code (312). You hear a confirmation
tone and the display shows GROUP LISTEN
ON or GROUP LISTEN OFF. (The other party
will not hear the confirmation tone.)
The Group Listenfeature code (312) is now included in
the Extensions, Usernames, and Feature Codes programming screen. It is also available through the
Executive Keyset display menu.
When the feature is active in handset mode, the SPKR
lamp will remain unlit. Thisallowstheuserto place the
call into handsfree mode at any time during the call by
pressing the SPKR key. When the feature is active in
headset mode, the SPKR lamp is lit. Pressing the key
will disconnect the call.
The Group Listen feature code can be programmed under a feature key or DSS/BLF key just like any other
feature. The key functions as a toggle. If the key has a
lamp, it is lit when the feature is activated and unlit
when the feature is turned off.
If the Group Listen feature is active when an OHVA
call is receivedbythe keyset, the OHVA call will camp
on (because the speaker is busy).
If the station is not permitted to forward to
the destination entered, you will hear reor-
der tones and can try again.
If you hang up before entering a forward
destination, the programmed forwardis can-
celed.
(6) To turn off Call Forward: Enter 355 and then
hang up instead of entering a destination. You
hear a confirmation tone.
Page 13 of 73
CO Hookflash on Conference Calls
The system now supports the CO Hookflash feature
code (330) during a conference call.
TO GENERATE A HOOKFLASH WHILE ON A CONFERENCE
CALL:
Press
code (330).
∞
and dial the Hookflash feature
Page 14

ADDENDUM TO ISSUE 4 OF THE AXXESS MANUALOCTOBER 1997
OPX Disconnect Enhancement
In previous software versions, some sites had difficulties when using a loop start T1 line configured for OPX
to connect two Inter-Tel systems and performing
“semi-networking” applications such as intercom access, lighting message lamps, and shared voice mail.
The reason for the difficulty is that the T1 OPX does
not send a disconnect signal to the loop start trunk,
which caused trunks to be “locked up.”
The solution was to add a new flag in the 4.3 software
version.Thestationflag,forsingle-line stationsonly,is
called “Send T1 OPX Disconnect Flash.” It sends a proprietary disconnect signal from the T1 OPX to the loop
start trunk. (The “A” bit is toggled high for the duration
of the SL Disconnect Flash Duration timer.) Atdefault,
this flag is disabled.
The “Send T1 OPX Disconnect Flash” flag appears in
the Station MiscellaneousFlagsscreenand the Individual Station/Miscellaneous Flags screen below the
“Outside Party Call Information Has Priority” flag. By
default the flag is disabled.
To use this new station flag, you must have a T1 Card
equipped with the proper firmware. The part numbers
for the chips are 827.8664 (U4) and 827.8665 (U5). To
remind you, a warning will be displayed in Database
Programming whenever the flag is changed. The warning states that the flag will have no effect unless the
correct T1 firmware is installed on the card. If your T1
Card does not have the proper firmware, there is an upgrade kit available (part number 828.1423).
Trunk Group PRI Call By Call Feature
AXXESS trunk groups now provide limited access to
PRI Call By Call services. Each trunk group that contains B channels can be assigned a PRI Call By Call
feature to use for outgoing calls. The supported CallBy
Call features include switched digital circuit services,
foreign exchange, TIE services, local exchange, OUTWATS, inter-exchange carrier services, and custom
AT&T and Nortel private networks, features, and services. If the customer wishes to use more than one PRI
Call By Call feature, there can be multiple trunk
groups, each programmed to use a different feature.
The customer then can select the Call By Call feature
by selecting the trunk group associatedwith the feature.
When the trunk group has a programmed Call By Call
feature, all channels within the specified trunk group
will indicate the PRI Call By Call feature code in the
outgoing ISDN message. Each outgoing ISDN call
sendsaSETUPmessage on the Primary Rate D channel
that contains the B channel(voice channel) assignment,
called digits information, and t he network-specific facility. The PRI Call By Call feature is specifiedwithin
the network-specific facility, ISDN information element which contains the Call By Call feature code.
To properly program the PRI Call By Call feature, the
installer must analyze the customer’s ISDN outgoing
call traffic and configure the amount of B channels
needed to support a particular Call By Call feature or
service. In the service order, the installer must request
the Call By Call service for the PRI span or a subset of
channels.
NOTE: This flag does not affect T1 channels configured for Loop Start. Therefore, an Inter-Tel system can
be on the receiving end with T1 Loop Start channels
and will recognize the disconnect. However, it cannot
send the disconnect — only an AXXESS with 4.3 software and T1 OPX can send the disconnect.
Advanced CO Interfaces Premium Feature
Database Programming will not allow the system to
equip a T1/PRI Card unless the Premium Feature for
“Advanced CO Interfaces” is enabled.
When a database is updated andthe update programdetects that a T1/PRI card is equipped without the “AdvancedCOInterfaces”premium feature enabled, itwill
display an error message that says, “You have B-channels disabled. To activate the B-channels, turn on the
Advanced CO Interfaces Premium Feature.”
Page 14 of 73
Programming
The installer selects the Call By Call feature during
trunk group programming, as shown on the next page,
by selecting the desired feature from the PRI Call By
Call drop down box.
Afterthe trunk group has been createdandassignedto a
Call By Call feature, the appropriate ISDN B channels
are programmed into the trunk group.
Operation
The station user dials ARS or a PRI trunk group extension. The AXXESS system selects the trunk group’s
programmed Call By Call feature. The AXXESS system automatically inserts the Call By Call feature into
the ISDN call control message and transmits the message to the public network.The Public Network accepts
or rejects the requested Call By Call feature in the
ISDN message.
Page 15

ADDENDUM TO ISSUE 4 OF THE AXXESS MANUAL OCTOBER 1997
NEW DROP-DOWN BOX
The PRI Call By Call drop down box includes the following selections:
•
Call By Call Inactive
•
AT&T WATS Band
•
AT&T Banded OUTWATS
•
AT&T Foreign Exchange
•
AT&T TIE Trunk
•
AT&T Local Operator
•
AT&T Carrier Operator
•
AT&T Virtual Private Network
•
AT&T MEGACOM 800
•
AT&T MEGACOM
•
AT&T INWATS
•
AT&T WATS Maximal Band
•
AT&T ACCUNET Switched Digital
→
•
AT&T International LDS
•
AT&T International 800
•
AT&T Electronic Tandem Network
•
AT&T Private Virtual Network
•
AT&T DIAL-IT 900 / MultiQ
•
AT&T National ISDN INWATS
•
AT&T Unbanded OUTWATS
•
Nortel Private Network
•
Nortel INWATS
•
Nortel OUTWATS
•
Nortel Foreign Exchange
•
Nortel TIE trunk
NOTE: This cannot be programmed if you enter database programming using the “User” password and it
cannot be programmed through an Administrator’s
keyset.
Page 15 of 73
Page 16

ADDENDUM TO ISSUE 4 OF THE AXXESS MANUALOCTOBER 1997
OS/2 And NT Versions of AXXESSORY Talk
There are now two versions of AXXESSORY Talk that
are compatible with the 4.3 software release. One version runs under OS/2 andthe other runs underWindows
NT Workstation 4.0.
The OS/2 version has two major changes from the previous release:
•
Fax Delivery Report now indicates failed deliveries (see page 23)
•
Programming Fax-On-Demand Port availability
(see page 33)
The Windows NT version includes several new features:
•
Fax Delivery Report indicates failed deliveries
(see page 23)
•
AXXESSORY Talk VisualMail (see page 24)
•
Automatic Fax Detection to transfer to an extension number or to forward the fax to an E-mail address (see page 31)
•
Programming Fax-On-Demand Port availability
(see page 33)
NT 16-Port PC 550.5224
NT 24-Port PC 550.5225
NT 32-Port PC 550.5226
NOTE: Installers must provide Inter-Tel with proof of
Windows NT certification t o purchase the new voice
mail PC or to receive Technical Support assistance.
Specifications
The Windows NT-based AXXESSORY Talk PC is
equipped with the following items:
•
Microsoft Windows NT Workstation version 4.0
operating system software (equipped with Service
Pack 3)
•
Pentium 133MHz (or higher) microprocessor
•
32MB (or more) RAM
•
1.2GB (or larger) hard disk drive
•
3.5-inch (1.44MB) double-sided/high-density
floppy disk drive
•
CD-ROM
•
Network Interface Card
•
Standard VGA monitor, keyboard, and mouse
•
Voice Mail Save/Restore to a Network drive (see
page 34)
NOTE: The AXXESSORY Talk database is compatible in both versions. This means that a customer that
has the OS/2 version can switch over to the Windows
NT version (or vice versa) and simply copy the database files from one version to the other. All mailbox
configurations (messages, timers, etc. ), will have the
same programming as in the other version.
Windows NT PC
Because the new Windows NT-based PC is somewhat
similar in design and function to the original
OS/2-based PC, only the differences are noted in this
addendum. For all other specification and installation
information, refer to the Issue 4 AXXESS Installation
and Field Maintenance Manual.
The part numbers for the new system are as follows:
NT PC Upgrade Unit
NT 4-Port PC 550.5221
NT 8-Port PC 550.5222
NT 12-Port PC 550.5223
550.5220
The Network Interface Card (NIC) is a specially designed network communications processor card that
can transfer data packets between the AXXESSORY
Talk PC and a Local Area Network (LAN).
The RJ45 connector on the Network Interface Card
connects to the LAN via a customer-provided standard
network interface cable.
Hardware Installation
The chassis and motherboard used in the NT-based PC
are slightly different than the chassis and motherboard
used in the OS/2-based PC. See Figures 3 and 4 on
pages 21 and 22 for sample diagrams. For all other
hardware installation information, refer to the Issue 4
manual.
Windows NT Installation
The NT-based AXXESSORY Talk PC is shipped with
Windows NT W orkstation (version 4.0 with Service
Pack 3) already installed and properly set up. If necessary, Windows NT can be re-installedusingthe instructionsoutlined in Microsoft’sinstallation manual, while
observing the items listed below:
• Use FAT file allocation rather than NTFS
Page 16 of 73
Page 17

ADDENDUM TO ISSUE 4 OF THE AXXESS MANUAL OCTOBER 1997
•
Install TCP/IP protocol
•
Install Service Pack 3 (which can be downloaded
directly from Microsoft’s web site)
software has been installed before, you will be
asked to stop the Avdap service.
(9) A Select Destination Directory window asking
you for the desired destination directory name
AXXESSORY Talk Software Installation
If necessary, use the following procedure to re-install
the Windows NT version of AXXESSORY Talk applications software.
NOTE:The hard disk drive mustbeproperly formatted
and must have Windows NT Workstation version 4.0
with Service Pack3installed. Also, if upgradingfrom a
previous version of Windows NT AXXESSORY Talk,
first stop the Avdap service in Control Panel (see page
19 for details).
(1) If not already installed, attach the VGAmonitor
to the 15-pin Monitor Card connector on the
back of the AXXESSORY Talk PC. Then, plug
in the monitor’s AC power cord and turn on the
monitor’s AC power switch.
(2) If not already installed, attach the keyboard and
mouse to their appropriate connectors on the
back of the PC.
(3) Turn on the PC’s AC power switch and allow
the system to boot up.
appears. If the software has been installed before, the previous directory will be the default
value, if not it is C:\AVDAP.
(10) To use the default drive and directory name, se-
lect the Next commandbutton. To select another drive and/or directory, select the Browse
command button and follow the displayed instructions.Ifyou are re-installingsoftware,skip
to step 15.
NOTE: If the directory already exists, a message displays asking if you are sure you want to
use that directory. Select the Yes commandbutton to continue.
(11) The next window asks, “ Create Installer Ac-
count?” If you want a user account for the installer to log into Windows NT, select Yes. If
not, select No and skip to step 15.
(12) The User Account Information window appears.
Enter the desired logon name.
(13) Enter and then verify the password. This is a
case-sensitive password that can contain up to
(4) Press Ctrl–Alt-Del, log on as the systemadmin-
25 characters (any character).
istrator, and the press the OK command button
to continue.
NOTE: In the default state, the NT system administrator does not have a password. Inter-Tel
recommends setting up a password.
(5) Insert Applications Software Disk 1 of 5 in the
PC’s floppy disk drive.
NOTE: “Applications Software” disks 1–5
must be installed. For optional Japanese voice
prompts, “Japanese Prompts” disks 1–3 may
also be installed as described in step 30.
(6) Select “Start” and then “ Run. ”
(7) In the Command Line text box, enter “A:setup”
(or “B:setup” if the B drive is used). Thenselect
the OK command button.
NOTE: If necessary, you can select Cancel
from any setup window to exit without performing the installation. Also, during the file installation process, pressing ESC will exit the setup
program without completing the installation.
(14) Select the Next command button t o continue.
(15) When the “Ready To Install” window appears,
select the Next command button.
(16) Follow the installationinstructions displayed on
the monitor to install disks 2–5.
(17) After most of the files from the fifth disk are
installed, a Rhetorex Configuration Wizard
window appears. Select the Next command button to continue.
(18) A Board Information window appears. Select
the Add command button.
(19) Select VP (RDSP/Vantage) as the Board Type.
(20) Select the appropriate model from the list. The
model depends on number of ports. For exam-
ple, use RDSP/4000 for four ports, RDSP/8000
for eight ports, RDSP/24000 for 24 ports, etc.
(21) Set the Address to 300 (default) for the first
board in the PC. Use 308 for the second board
and 310 for the third board.
(8) A Welcome window appears. Select the Next
command button to begin the installation. If the
Page 17 of 73
NOTE: If anyVPCsare later added or removed
from the system, the Rhetorex Configuration
Page 18

ADDENDUM TO ISSUE 4 OF THE AXXESS MANUALOCTOBER 1997
Wizard window can be accessed by running the
Rhetorex Configuration Utilitythat is locatedin
the AXXESSORY Talk folder inside the Programs group.
(22) Select the OK command button, followed by the
Next command button.
(23) An Interrupt Request (IRQ) window appears.
Make sure the IRQ Valueis set to “5” (default).
Thenselect the Next command button to continue.
(24) A Shared Memory Address window appears.
Make sure the shared memory address is set to
“0xD0000” (default). Then select the Next command button to continue.
(25) An Advanced Options window appears. Select
the Advanced Optionscommand button to open
a dialog. In the dialog, change the Driver Startup to “Automatic.” Then select Ok to close the
dialog and select the Next command button to
continue.
(26) Another window displays, asking if you wish to
automatically start the drivers after updating
your configuration. Select No (default) and then
select the Finish command button to continue.
Windows NT Software Configuration
The following optional Windows NT software configuration changes can be made if necessary.
AXXESSORY Talk (Avdap) Service: The version 4.3
Windows NT-based AXXESSORY Talk software is
designed to start as a service using the default system
service account. Once started, it attempts to logon as a
network user in order to gain network access and, if
necessary, will continue to try to log on about once a
minuteuntilit either succeeds or is terminated.However, theseattemptswillnotdelay the start of AXXESSORY Talk features, other than VisualMail. While the
networkconnectionis down (either while the serviceis
awaiting logon or because of a later failure), VisualMail and activities, such as print report or save/restore,
mapped to a network location will fail. Once the logon
succeeds and while the network is up, activities involving the network connection will succeed.
AXXESSORY Talk will start up automatically and
does not require a user to log on to Windows NT in order to start it. However, the service must wait for “log
on” to get access to network resources in the following
situations:
•
If the customer’s E-mail System is configured to
MAPI, the service needs to log on so that it can
access the E-mail server.
(27) After some additional files are installed, the
HASP Device Driver Installation Utility for
Windows NT window appears. Select the OK
command button to continue.
(28) Afterthe remaining files are installed, a window
appears stating that AXXESSORY Talk has
been successfully installed. Select the Finish
command button to continue.
(29) A window appears informing you that you must
restart the system to complete the installation.
Select the OK command button.
(30) To install the Japanese voice prompts (if de-
sired), remove Applications Software Disk 5 of
5 and insert NT Japanese Prompts Disk 1 of 3.
Select “Start” and then “Run.” Enter “a:pmtsetup” and press ENTER. Then follow the installation instructions displayed on the monitor.
NOTE: If Japanese language prompts are not
installed,yeta user attempts to access them,English prompts will be delivered instead.
(31) If desired, disconnect the monitor, keyboard,
and mouse.
•
The B: drive ismapped to a network drive; the service needs to log on so that it can access the directory on the network drive.
To log on to the domain server, the service requires a
valid user ID and passwordon the domain server. They
are programmed throughAXXESSORY TalkDatabase
Programming in the AXXESSORY Talk System-Wide
Programming window (see page 27). The user ID and
password can be obtained from the Windows NT system administrator. It is important that the system administrator set up the password so that it will not expire. If the password expires, the log on will fail.
The account that the Avdap service usesmust be part of
the local “Administrator” group on the AXXESSORY
Talk PC and it must have an Advanced User Right set
to “Log on as a batch job.” To do this, follow these
steps:
(1) Select the Start button and open Programs, then
Administrative Tools (Common), and then se-
lect User Manager.
(2) Select the Administrators group from the list in
User Manager.
(3) Select the Add button.
Page 18 of 73
Page 19

ADDENDUM TO ISSUE 4 OF THE AXXESS MANUAL OCTOBER 1997
(4) Choose the Avdap service account from the
Names list. Select the Add button to add this
name.
(5) Select OK to exit to the Local Group Properties
window.
(6) Select “User Rights” from the Policies drop-
down menu.
(7) Check the box in the lower left corner to “Show
Advanced User Rights.”
(8) Select “Log on as a batch job” from the Right
drop-down list, then select the Add command
button.
(9) Choose the Avdap account from the “Names”
list and select the Add command button. Then
select OK.
(10) Select OK to exit the User Rights window.
(11) Exit the User Manager program.
There are two ways you can start the Avdap service
manually:
•
Open Services inside the Control Panel. Select the
“Avdap” service and select the Start button.
•
Open a command shell, then type: net start avdap
There are three ways you can shut downthe Avdap service manually:
•
From the avdapmon window (see next section),
type ~ (tilde).
•
Open Services inside the Control Panel. Select the
“Avdap” service and select the Stop button.
•
Open a command shell, then type: net stop avdap
AvdapMon Utility: Because the AXXESSORY Talk
software is running as a service, it does not have a console for displaying output. Inter-Tel provides a stand
alone program called “AvdapMon” that can be used for
viewing the AXXESSORY Talk software messages.
The setup program automatically creates a shortcut to
Avdapmon in the AXXESSORY Talk programming
group in the Programs folder.
Avdapmon uses a TCP/IP socket to connect to the
AXXESSORY Talk software. It can be run from the
AXXESSORY Talk PC itself or any other PC running
Windows NT or Windows 95, as long as there is aTCP/
IP network connection from the PCrunning the AvdapMonutilitytotheAXXESSORY Talk PC. Note that the
software supports only one active AvdapMon connection.
This program has the following parameters:
avdapmon <IP number> <socket number>
The <IP number> is the IP number of the AXXESSORYTalk PC in “dotted notation” (e.g. 190.253.11. 210).
The <socket number> is the socket number of the Avdap service. If not configured differently, the default
socket number is 4444.
If the AvdapMon utility is run on the AXXESSORY
Talk PC itself, there is a shortcutnotation to specify the
IP and port numbers. In this case, simply type avdap-
mon . . (that is: avdapmon followed by a space, a peri-
od, a space, and a period again).
To protect the AXXESSORY Talk against unauthorized access through AvdapMon, a password can be required to use the AvdapMon utility. This password is
set through Database Programming (see page 27).
Registry Information: AXXESSORY Talk 4.3 now
uses Windows NT Registry to store the command line
options.To modify values in the Registry,use the Windows NT registry editor program called REGEDT32.EXE.
CAUTION: Thisregistry configuration is not a part of
the software configuration. It is included here for diagnostic and troubleshooting purposes only. Under normal circumstances,you should never needto access the
registry settings. This procedure should only be performed by a trained installer; modifying the registry
values improperly can damage Windows NTconfiguration and render it unusable.
To modify the Avdap parameter in the registry, follow
these steps:
(1) Run the registry editor program by typing
regedt32 from a command prompt or select the
Start button, select Run, and type regedt32 in
the Open line.
(2) Select the HKEY_LOCAL_MACHINE win-
dow and locate the subkey called “Software.”
Open the Software subkey.
(3) Locate and open the subkey called “Inter-Tel.”
(4) Locate and select the Avdap subkey.
(5) Inside this subkey is a value called “Parame-
ters.” The type of this value is REG_MUL-
TI_SZ. Edit the value.
(6) You will see a window called Multi-String Edi-
tor that permits you to add or remove theAvdap
command option. Note that each option has to
appear a separate line. To add a new option,
simply type it in on a new line. To remove an
option, delete its line.
(7) When finished, select the OK button.
(8) Exit the registry editor program. The registry
will be saved automatically.
Page 19 of 73
Page 20

ADDENDUM TO ISSUE 4 OF THE AXXESS MANUALOCTOBER 1997
Microsoft Exchange (MAPI) Setup
Use the following procedures to set up VisualMail using Microsoft Exchange (a MAPI E-mail system).
NOTE: Be sure the AXXESSORY Talk PC has Windows NT 4.0 Service Pack 3 installed.
INSTALL MICROSOFT EXCHANGE:
Perform these procedures from the Administrator account on the AXXESSORY Talk PC.
(1) Add the Network Account to the Administrator
group on the AXXESSORY Talk PC. This is
necessary for the account to have access to the
Exchange profile stored in the Windows NT
Registry.
(2) Run Exchange’s Setup.exe.
(3) When asked to type in your full name, use the
name of the mailbox that AXXESSORY Talk’s
VisualMail will use as its connectionto the server. This needs to be the same as the network
logon account name.
(4) Select the OKbutton forthisscreenandforeach
of the next two screens.
(5) Choose Typical installation.
(6) After the installation ends, place the cursor on
the Inbox desktop icon and click the right but-
ton. Then select “Properties” from the pop-up
menu.
(7) Select the Add button to start Exchange’s Setup
Wizard to create a profile.
(8) Verify that the Microsoft Exchange Server in-
formation service is selected, then select the
Next button.
(9) Type in the name of the Microsoft Exchange
server.
(10) Verify the name of the VisualMail’s mailbox.
(11) Select the Next button for this screen and for
each of the next three screens.
(12) At the conclusion screen, select the Finish but-
ton.
(13) After the Setup Wizard concludes, verify that
the profile you just created has the name of the
VisualMailaccountandthat it is indicated asthe
default profile.
(14) Select the Close button to exit.
(15) Run the program copy_profile.exe to copy the
newly created profile into an area of the Win-
dows NT Registry used by Exchange when
started from the VisualMail. This program must
be run whenever there is a change to the profile
or to the selection of the default profile in this
Properties dialog. (Like Setup.exe, this program
can be run from the Windows NT Explorer,
from the Start menu’s Run selection, or from a
command shell.)
Lotus Notes (VIM) Special Setup
When using Lotus Notes (a VIM E-mail system), includethe directorywhereLotusNotesisinstalledinthe
Path System Variables. To do this, in Control Panel,
open System and select the Environment tab. then select the Path variable from the System Variables list
and enter the Lotus Notes directory in the Value text
box. Select OK to close System. The Path will take effect the next time the PC is rebooted.
SMTP/POP3 Special Setup
When VisualMail is configured for SMTP/POP3, you
must program the E-mail Real Name field as described
on page 28. However, the VisualMail must not be
logged on to the SMTP/POP3 E-mail service.
This is because when the VisualMail logs on to the
SMTP/POP3 server, the E-mail Real Name appears as
the sender. Once it is logged in, programming changes
to the E-mailReal Name will not takeeffectuntilVisualMail logs out and back in again. The best way to log
out is to change the E-mail System to “None,” update
the database. Wait at least 3 minutes to allow the databaseupdate to take effect. Thenchangethe E-mail System back to “SMTP/POP3” and update again. VisualMail will log back into the E-mail server.
Page 20 of 73
Page 21
ADDENDUM TO ISSUE 4 OF THE AXXESS MANUAL OCTOBER 1997
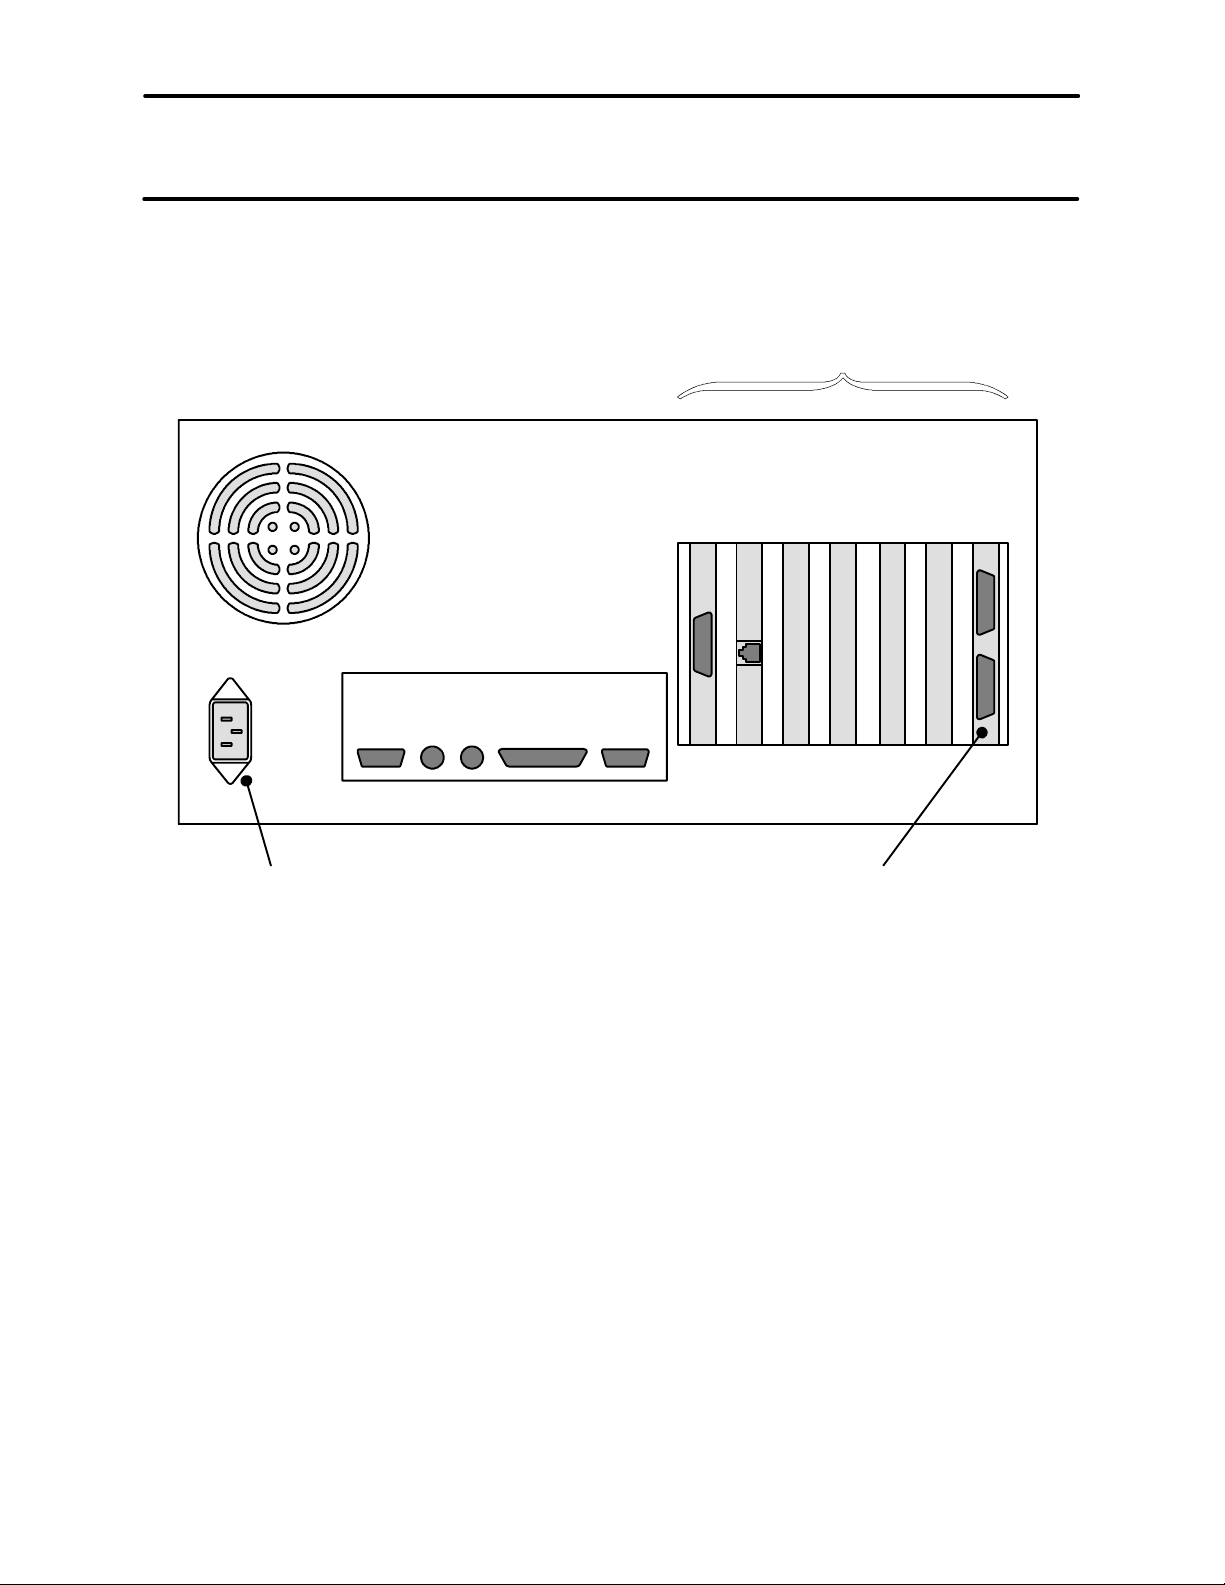
FIGURE 3. SAMPLE BACK OF ASSEMBLED AXXESSORY TALK PC
SAMPLE CARD SLOT
ARRANGEMENT
INTERFACECARD
CARD
NETWORK
MONITOR
1ST VPC
2ND VPC
(PCM PORT)
OPTIONAL
FAX CARD
TO CPU
(PCM PORT)
TO OPC
TO PC
(COM2)
AUDIO INTERFACE
CARD
POWER CABLE
CONNECTOR
TO RS-232-C
(COM1)
PARALLELKBDMSE
NOTE: Depending on the m odel of PC being used, the sample card slot arrangement and connector
locations shown above could vary somewhat.
Page 21 of 73
Page 22
ADDENDUM TO ISSUE 4 OF THE AXXESS MANUALOCTOBER 1997
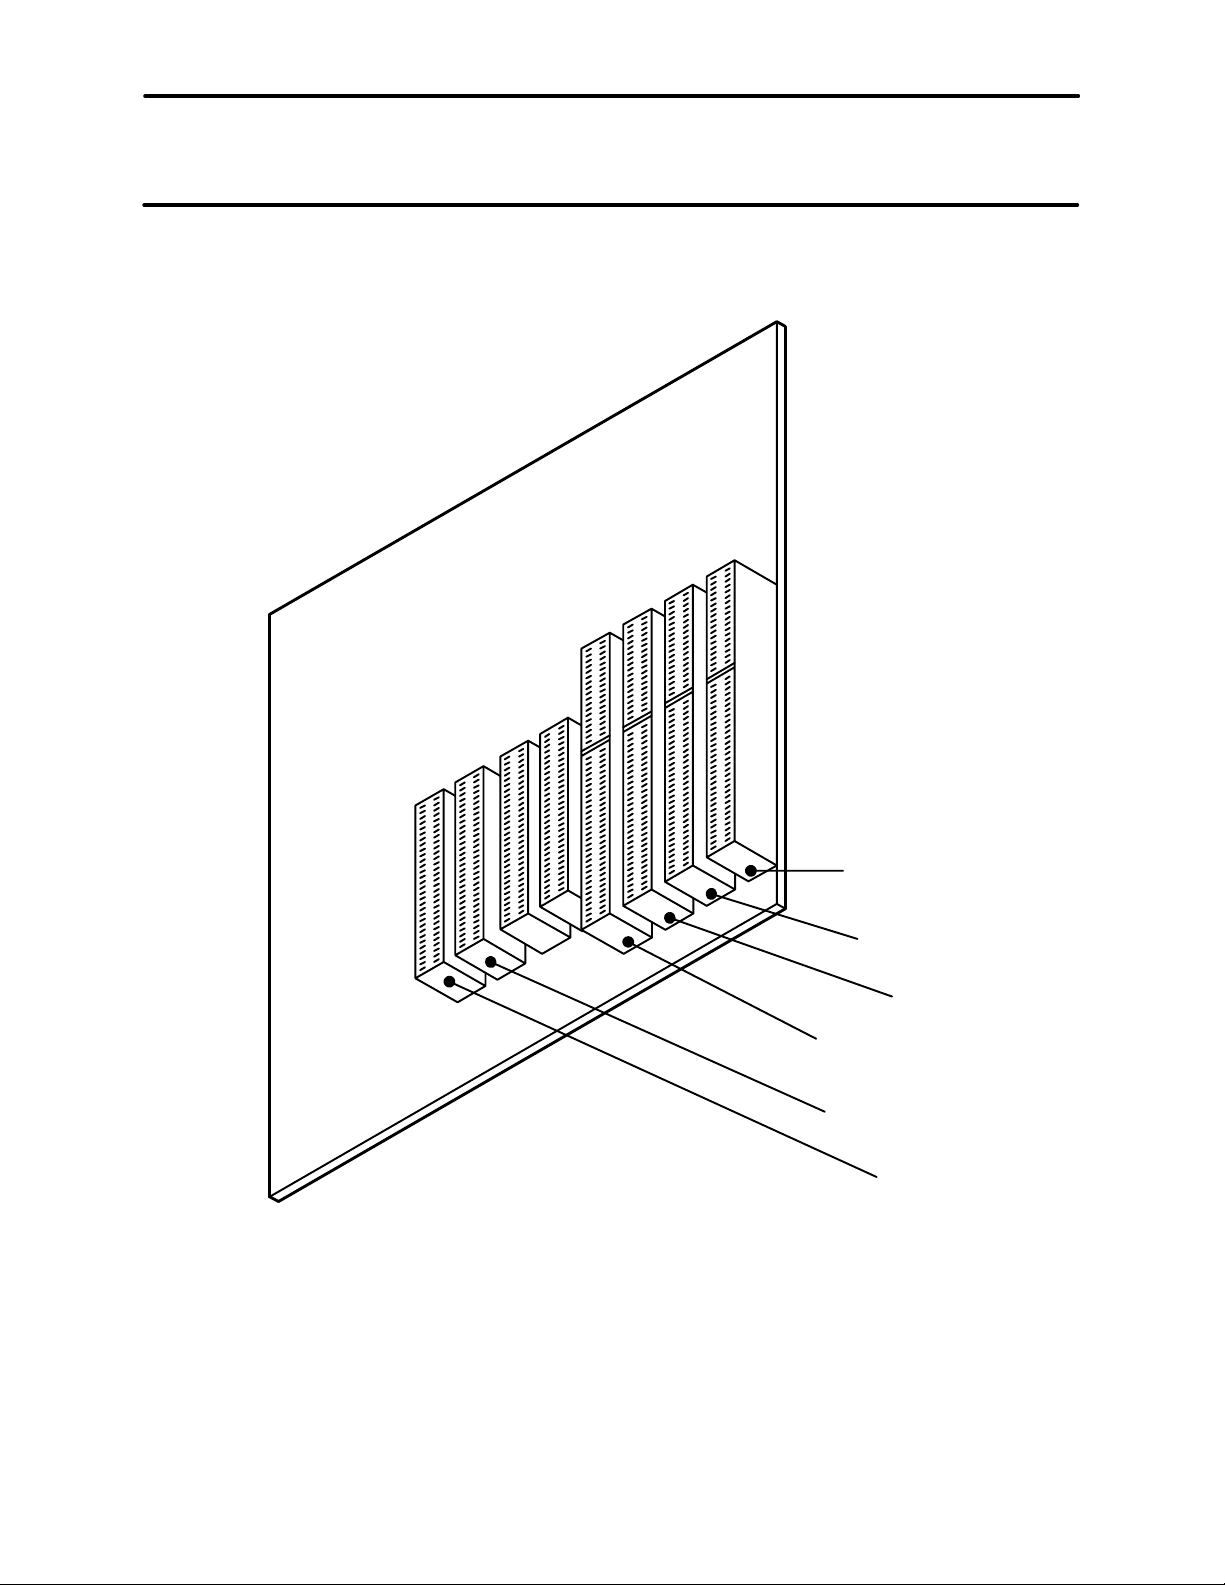
FIGURE 4. SAMPLE PC MOTHERBOARD CARD SLOT ARRANGEMENT
AUDIO INTERFACE
CARD (AIC)
OPTIONAL FAX
CARD OR 3RD VPC
2ND VPC
1ST VOICE PROCESSING
CARD (VPC)
NETWORK INTERFACE
CARD (NIC)
VIDEO CARD
NOTE: Depending onthe specific model of PCMotherboard being used, the sample card slot arrangement shown above could vary somewhat.
Page 22 of 73
Page 23

ADDENDUM TO ISSUE 4 OF THE AXXESS MANUAL OCTOBER 1997
Fax Delivery Report Indicates Failed Deliveries
The Fax Delivery Report now displays an asterisk (*)
immediately to the left of the delivery statusin the Fax
DeliveryReport for an entry representing a fax delivery
that failed and was removed from the delivery queue.
The sample Fax Delivery Report below illustrates the
change. The last entry indicates a fax delivery failure.
FAX DELIVERY REPORT Date: 4/02/1997
Delivery Date/Time
4–02–1997 13:44:46 4–02–1997 13:43:40 Successful 16176251201
– 8615
4–02–1997 13:52:14 4–02–1997 13:51:17 No Answer 14153452159
– 218
4–02–1997 13:56:21 4–02–1997 13:55:14 Busy 15056327936
– 111
4–02–1997 14:01:35 4–02–1997 13:54:52 Successful 15056327936
–52
–53
– 101
– 102
– 110
4–02–1997 14:03:28 4–02–1997 13:51:17 No Answer 14153452159
– 218
4–02–1997 14:08:07 4–02–1997 13:55:14 Successful 15056327936
– 111
4–02–1997 14:13:15 4–02–1997 13:58:51 Busy 19089963039
–61
–60
4–02–1997 14:14:36 4–02–1997 13:51:17 No Answer 14153452159
– 218
4–02–1997 14:25:05 4–02–1997 13:51:17 No Answer 14153452159
– 218
4–02–1997 14:28:00 4–02–1997 13:58:51 Successful 19089963039
–61
–60
4–02–1997 14:35:28 4–02–1997 13:51:17 *No Answer 14153452159
– 218
Request Date/Time Delivery Status Fax Number
Fax deliveries can fail for many reasons, but the most
common problem is that the fax number entered was
not a fax machine, but was a company’s main number
or answering service. In the sample below, the failures
to 1–415–345–2159 all were No Answer, probably indicating that the number was not a fax machine.
The System Administrator should review the Fax Delivery Report on a regular basis to check for delivery
failures.
Page 23 of 73
Page 24

ADDENDUM TO ISSUE 4 OF THE AXXESS MANUALOCTOBER 1997
AXXESSORY Talk VisualMail
This is available in the AXXESSORY Talk NT version
only. AXXESSORY Talk VisualMail is a feature that
provides the first step to linking Inter-Tel’s NT version
of AXXESSORY Talk voice mail with E-mail. AXXESSORY Talk VisualMail provides users the ability
to receive a voice mail message as an E-mail message
with a voice attachment. The voice attachment will be
in the form of a “wave” (.wav) file that can be played
on any computer equipped with a sound card, speakers,
and multimedia software (such as Sound Recorder).
When a mailbox receives a voice mail message or uses
the voice mail Record-A-Call feature, one of three
things can occur, depending on how the mailbox’s
VisualMail field is programmed.
•
If the field is programmed to DISABLED, the
voice mail or Record-A-Call message is delivered
to the mailbox justas normal and noE-mail is sent.
•
If the field is programmed to FORWARD ONLY,
the AXXESSORY Talk will convert the voice mail
or Record-A-Call message to an 8-bit WAV file,
build an E-mail message,attach the WAV file, and
sendthe E-mail message to the addressspecifiedin
the mailbox’s E-mail Address field. Once the Email message is sent, the original message will be
deleted from the mailbox. (If the E-mail message
cannot be delivered to the specified address, it will
be stored as a voice mail message in the mailbox
and will not be deleted.) NOTE: If VisualMail is
programmed for FORWARD ONLY, the mailbox
cannot use the Remote Notification feature. Because all messages are automatically sent to theEmail address, there is no voice mail message to
trigger the Remote notification.
•
If the mailbox’s VisualMail field is programmed to
COPY & FORWARD, the voice mail or RecordA-Call message will be stored in the mailbox and
the AXXESSORY Talk will convert the file to
WAV, attach it to an E-mail message, and deliver
the E-mail message to the address specified in the
mailbox’s E-mail Address field.
NOTE: Due to the nature of network connections, the
AXXESSORY Talk software is designed to handle a
network failure gracefully. If the network link from the
AXXESSORY Talk to the E-mail server is down, AXXESSORY Talk will store the messages in a queue. If
the network does not come back up in 15 minutes, the
AXXESSORY Talk will deliver all pending messages
in the queue back to the voice mailboxes and temporarily disable the E-mail queue until the network is
available.Thismeans that new messages will remain in
the mailboxes and will not be converted to E-mail messages until the network link is restored.
AXXESSORY Talk VisualMail is a “one-way”feature.
That is, the user cannot reply to the sender of a voice
mail message using E-mail. If a user attempts to reply,
the message will be sent to the Administrator’s E-mail
Address instead of to the sender of the voice mail message. The user should forward the message or send a
new message instead of replying.
E-mail messages containing WAV files can be forwarded to other E-mail addressesor stored on the computer’s local drive, just like any other E-mail message.
Or, the WAV file can be detached from the message
and stored on the computer.
E-mail System Requirements
To use this new feature, the customer must have an
existing E-mail system based on Message Application
Programming Interface (MAPI), Vendor Independent
Messaging (VIM), or Simple Mail Transport Protocol/
Post Office Protocol (SMTP/POP3). The following list
shows the E-mail systems that are supported, and the
protocols on which they are based.
•
Microsoft Mail or Microsoft Exchange (MAPI)
•
cc:Mail or Lotus Notes (VIM)
•
Internet mail (SMTP/POP3)
NOTE: Be sure the AXXESSORY Talk PC has Windows NT 4.0 Service Pack 3 installed.
The AXXESSORY Talk VisualMail feature requires
that the AXXESSORY Talk PC isable to communicate
with the customer’sE-mail system through thecustomer’s TCP/IP network (such as a LAN). This requires a
network interface card in the AXXESSORY Talk PC.
Since each customer’s network can be different, the
customer’s network administrator should be responsible for configuring the network interface card in the
AXXESSORY Talk PC as well as the network settings
in Windows NT. (Note that the AXXESSORY Talk
software will use TCP/IP protocol, therefore the customer’s network must support this protocol.)
The Windows NT networking should be properly configured for the customer’s network and the underlying
E-mail system that will be used by the AXXESSORY
Talk VisualMail PC must also be configured properly.
Due to the various configuration areas, the process requires participation and coordination between the customer’s network or MIS personnel, the voice mail administrator, and the voice mail installer/programmer.
Page 24 of 73
Page 25

ADDENDUM TO ISSUE 4 OF THE AXXESS MANUAL OCTOBER 1997
System Software Keys
To use the AXXESSORY Talk VisualMail feature, you
must have a software key attached to the parallel port
on the AXXESSORY Talk PC. The software key also
determines the number of users that can be programmed to use AXXESSORY Talk VisualMail. If the
key is removed, the VisualMail feature will default to
five-user status. Keys are available for the following
quantities of users:
NO.OFUSERS PART NUMBER
5 NO KEY NEEDED
25 827.8703
50 827.8704
100 827.8705
250 827.8706
500 827.8707
1000 827.8708
A user is defined as a mailbox that has VisualMail enabled or has a Fax E-mail Address programmed.
The software compares the number of mailboxes programmed for VisualMail against the user limit of the
software key periodically. It then sends a message
showing the number of users to Avdapmon, which can
be viewed using the Avdapmon utility. Exceeding the
user limit of the software key will disable VisualMail
for all mailboxes. If this happens, there will be a warning message in Avdapmon and an alarm at the System
Administrator’s station. You must install a higher-limit
software key or disable VisualMail or Fax E-mail Addresses at some mailboxes to be back within the user
limit. When you are within the limit, VisualMail will
restart automatically.
responsible for allotting sufficient space for the messages.
E-mail Message Format
The E-mail message sent by the voice mail will have
the following components:
•
To:The TO line will contain the recipient’sE-mail
address.
•
From: The FROMline will containthe E-mail address of the AXXESSORY Talk. If an E-mail Real
Name has been programmed for the AXXESSORY Talk, it will also be shown on this line.
•
Subject: The SUBJECT line will contain the line
“<length of message>Message for MB <number>
from <source>.” If the message is marked priority, the subject line will be preceded by the word
“PRIORITY.” The source of the voice mail mes-
sage will appear as one of the following:
—MB<number>
—x<extension number>
— the voice mail system
— an unknown caller
— an outside caller at <phone number>
NOTE: If the message is from an extension ID or a
mailbox, the programmed username will be shown
inside parentheses after the number. For example:
mailbox 1000 (ADMIN).
•
Received on: The RECEIVED ON line contains
the date and time that the voice mail was received
by the mailbox.
WAV File Storage Requirements
WAV files require more storage space than Rhetorex
voice files. For example, a 1MB voice mail message
will require 2.67MB as a WAV file. Here are some
sample file sizes for comparison:
DURATION OF
MSG IN
SECONDS
VOICE MAIL FILE
SIZE IN BYTES
WAV FILE SIZE
IN BYTES
30 89,640 239,148
60 180,480 481,324
90 269,568 718,892
120 361,536 964,140
600 1,801,056 4,802,860
Because the WAV files are stored on the customer’s
E-mail server, the customer’s network administrator is
Page 25 of 73
•
Priority, Private, or Certified: If the voice mail
message was sent with a delivery option, the body
will contain the line “Message marked <PRIOR-
ITY, PRIVATE or CERTIFIED>.” Note that this is
for informational purposes only and doesnot affect
on the E-mail message itself. For example, if a
voice mail message is marked for certified delivery, the sender will receive a confirmation when
the recipient listens to the voice mail message using the mailbox. However, the sender will not receive confirmation when the recipient reads the Email.
•
WAV file attachment: The WAV file attachment
will appear as a file with the name VM.WAV. To
listen to the message, the user must play the WAV
file using multimedia software (such as Sound Recorder).
Page 26

ADDENDUM TO ISSUE 4 OF THE AXXESS MANUALOCTOBER 1997
Programming
AXXESSORY Talk VisualMail must be programmed
on the system-widelevel and the mailboxlevel. It cannot be programmed through the AXXESSORY Talk
mailboxes.
System-wide programming is performed through the
AXXESSORY Talk System-Wide Information screen,
as shown on the next page. After the system-wide
E-mail fields have been programmed and saved to the
database,theAXXESSORY Talk will log on to thecustomer’s E-mail system. At that point, it is ready to start
sending E-mail messages.
NOTE:The installer shouldwatchthe voice mail mon-
itor closely and examine the AXXESSORY Talk messages to make sure that VisualMail is started. If it does
not start, the AXXESSORY Talk will keep trying every
30 seconds until login i s successful or VisualMail is
manually disabled.
Next, each mailbox thatis going to usethe AXXESSORY Talk VisualMail feature must be configured. This
requires programming ofthe mailbox’s VisualMail and
E-mail Address fields. Once these fields are pro-
grammed, AXXESSORY Talk VisualMail is fully operational. Mailbox programming is performed using
the Mailbox screen shown on page 30.
Note that there are some other external configurations
involved in getting the AXXESSORY Talk VisualMail
to work:
•
The network interface card installed in the AXXESSORY Talk PC must be configured properly.
•
Windows NT networking must be properly configured for the customer’s network configuration.
•
The customer’s E-mail System that is used byAXXESSORY Talk VisualMail should be tested to
send and receive E-mail properly.
The i nstaller/programmer should test the AXXESSORY Talk to make sure that:
•
All E-mail addresses are programmed correctly.
•
E-mail messages are sent to the E-mail server successfully.
•
The E-mail server delivers the messages to users
successfully.
Page 26 of 73
Page 27

ADDENDUM TO ISSUE 4 OF THE AXXESS MANUAL OCTOBER 1997
↓
NEW VISUALMAIL PROGRAMMING FIELDS
NEW BUTTON
→
System-wide AXXESSORY Talk VisualMail fields
cannot be programmed if you enter the database using
the “User” password. The programming fields are as
follows:
E-MAIL SYSTEM: This system-wide field specifies
the type of E-mail system that will be used to transfer
messages. The value programmed in this field must
correspond to the customer’s underlying E-mail system. For example, if the customer’s E-mail system is
Lotus Notes, this field should be programmed to VIM.
This field can be programmed to NONE, MAPI, VIM,
or SMTP/POP3. If it is programmed to NONE, the AXXESSORY Talk VisualMail feature is disabled for the
entire voice mail system. The default value for this
field is NONE.
E-MAIL SETTINGS: After you have selected the
E-mail System, the E-mail Settingscommand button is
available. When you select it, the window shown on the
next page appears. The fields that need to be programmed depend on the E-mail System selected:
↓
←
NEW BUTTON
to the username and password fields. The E-mail
Real Name field is optional when using SMTP/
POP3.
NETWORK SETTINGS: For VisualMail to function,
the “Avdap” service must be able to log on to the network as a user. To program the logon information (networkdomain, username,and password), select the Network Settings command button. A window appears as
shown on page 29.
MONITOR PASSWORD: To protect theAXXESSORY Talk against unauthorized access, a password can
be required to use the AvdapMon utility described on
page19.When youselectthiscommandbutton,thefollowing screen appears. Enter the password and select
OK. Then you will be prompted to enter the password
again. Enter it exactly as you did the first time and select OK. (Or select Cancel to leave the password unchanged.)
•
If the E-mail System field is programmed to MAPI
or VIM, only the E-mail Username and E-mail
Password fields need to be programmed.
• If the E-mail System is programmed to SMTP/
POP3, the E-mail SMTP Server and E-mail Address fields must also be programmed, in addition
Page 27 of 73
Page 28

ADDENDUM TO ISSUE 4 OF THE AXXESS MANUALOCTOBER 1997
E-MAIL ADDRESS: This field specifiesthe AXXES-
SORY Talk’s E-mail address. It is only required if the
E-mail System field is programmed to SMTP/POP3.
When the voice mail PC sends an Internet mail message, this address will be used as the E-mail address in
the “Reply-To” field of the E-mail header. This is the
addressat whichthe voice mail PCwillreceive Internet
mail messages. This field can contain up to 127charactersandit is empty by default. Forexample, whenusing
Internet mail, this field might look like johndoe@intertel.com.
E-MAIL REAL NAME: This field specifies the AXXESSORY Talk’s user name (such as VOICE MAIL).
It is only programmable if the E-mail System field is
programmed to SMTP/POP3 and it is optional. When
the voice mail PC sends an Internet mail message, this
name will be includedin the FROMfield of the E-mail
header. This field cancontain up to 127 characters, and
it is empty by default.
E-MAIL USERNAME: This field specifies the username for the voice mail PC’s E-mail account. Before
the voice mail PC can send or receive E-mailmessages,
it must log on to the underlying E-mail system. Therefore, the voice mail PC must have an account on the
customer’s E-mail system, and this field specifies the
username for that account. This field can contain up to
127 characters and it is empty by default.
E-MAIL SMTP SERVER: This field specifies the
AXXESSORY Talk’sSMTP mail server. Itis only programmable if the E-mail System field is programmed
to SMTP/POP3. The SMTP mail server is the server
that the voice mail PC connects to in order to send
E-mail messages over the Internet. This field can contain up to 127 characters and it is empty by default.
E-MAIL POP SERVER: This field specifies the POP
mail server that will be used to receive E-mail messages. It is only programmable if the E-mail System
field is programmed to SMTP/POP3. The POP mail
server is the server the voice mail PC connects to in
order to send E-mail messages through the Internet.
This field can contain up to 127 characters and it is
empty by default.
ADMINISTRATOR E-MAIL ADDRESS: This field
specifies the E-mail address of the System Administrator. Whenever anE-mail message is undeliverable(due
to invalid or wrong E-mail address, etc.) it will be forwarded to thisaddress. Or, if a user attempts to reply to
a VisualMail E-mail message, the message will go to
this address instead of going to the AXXESSORY Talk
PC. This field can contain up to 127 charactersand it is
empty by default. NOTE: Even though this field is not
required, Inter-Tel strongly recommends that you provide an E-mail address to forward any E-mail received
by the AXXESSORY Talk PC. It will alert the Administrator to any problem with the E-mail addresses.
PASSWORD: This system-wide field specifies the
password for the voice mail PC’s E-mail account. Before the voice mail PC can send or receive E-mail messages, it must log on to the underlying E-mail system.
Therefore, the voice mail PC must have an account on
the customer’s E-mail system, and this field specifies
the password for that account. Thisfield can containup
to 40 characters and it is empty by default.
Page 28 of 73
Page 29

ADDENDUM TO ISSUE 4 OF THE AXXESS MANUAL OCTOBER 1997
The following information is used bytheAvdap service
when it logs on to the network. Refer to page 18 for
information about setting up the Avdap user account.
NETWORK DOMAIN: This field specifies the name
of the network domain in which the AXXESSORY
Talk PC is a member.
USERNAME ON NETWORK DOMAIN: This field
specifies the username that the Avdap service user account will use to log on to the network.
PASSWORD: This field specifies the network password for the Avdap service user account.
Page 29 of 73
Page 30

ADDENDUM TO ISSUE 4 OF THE AXXESS MANUALOCTOBER 1997
↑
NEW VISUALMAIL PROGRAMMING FIELDS
Mailbox programming for AXXESSORY Talk VisualMail can be programmed using the “User” password.
However, it cannot be changed through the mailboxes.
It uses these two newfields in the Miscellaneous Mailbox Information screen:
VISUALMAIL: This field specifies the operation of
AXXESSORY Talk VisualMail for each individual
mailbox. This field can be programmedtoDISABLED,
FORWARD ONLY, or COPY & FORWARD.
•
When programmed to DISABLED, the mailbox
functions as a normal mailbox. This is the default
value for this field.
•
When programmed to FORWARD ONLY, all
voice mail messages delivered to the mailbox are
forwarded to the E-mail address specified in the
mailbox’s E-mail Address field. Note that in this
configuration, the voice mail messages are not
savedin the mailbox. Inother words, when the user
↑
deletes the E-mail message containing the voice
mail message, all recordof the voice mailmessage
is gone.
•
When this field is programmed to COPY & FORWARD, all voice mail messages for the mailbox
are delivered to the mailbox as normal and a copy
is forwarded to the mailbox’s E-mail Address. If
one is deleted, the other is unaffected.
E-MAIL ADDRESS: This field specifies the E-mail
address to which the voice mail messages will be forwarded.Thisfieldisunavailable if the VisualMail field
is programmed toDISABLED. The content and format
of the field depends on the E-mail system being used.
For example, when using Lotus Notes, this field could
be something like John Doe/Chandler/Inter-Tel, and
when using Internet mail, it would be johndoe@intertel.com. This field can contain up to 127charactersand
is empty by default.
Page 30 of 73
Page 31

ADDENDUM TO ISSUE 4 OF THE AXXESS MANUAL OCTOBER 1997
Automatic Fax Detection
This is available in the AXXESSORY Talk NT version
only. With Automatic Fax Detection,Call Routing An-
nouncement applications and mailboxes can be programmed to automaticallyroute incoming faxcallsto a
specified extension or to an E-mail address.
If the feature is enabled, the mailbox or Call Routing
Announcement Application will automatically listen
for fax tone.
•
A mailbox willlisten for fax tonesduring the mailbox greeting and while a message is being recorded. If the mailbox detects fax tones, the call
will be transferred to the specified extension or
E-mail address. If the tones are detected after a recording has started, the call will be disconnected.
•
Call Routing Applications will be able to detect
fax tones during the greeting and up to time-out.
The fax tone detection will also be disabled if the
caller performs an action that removes them from
the Call Routing Announcement (transferringtoan
extension, transferring to a mailbox, etc.).
Thisfeature is enabled indatabase programming. Itcan
be programmed using the “User” password. However,
it cannot be changed through the mailboxes.
AXXESSORY Talk VisualMail Required
To send faxes to an E-mail address, the AXXESSORY
Talk VisualMail feature, described on page 24, must
also be enabled. Refer to the description of that feature
for E-mail system requirements and programming instructions. Note that programming a mailbox Fax
E-mail Address counts as one user, as described in the
Software Key section on page 25.
Fax Card Required
To send and receive faxes, the AXXESSORY Talk PC
must have a fax card installed. This can be thesame fax
card that supports the Fax On Demand feature. The
software will support up to eight fax ports. See page 33
for more information on allocatingfax ports for the Automatic Fax Detection and Fax On Demand features.
Programming Call Routing Announcements And Mailboxes
Both Call Routing Announcements and voice mailboxes now have twonew fields. The a ffected programming screens are shown on the next page.
•
Fax Destination: This field, if programmed, specifies the extension of the fax machine that will receive incoming faxes.
• Fax E-mail Address: This field, if programmed,
specifies the E-mail Address of the account that
will receive incoming faxes. The fax is converted
to a TIFF file and sent to the E-mail address as an
attached file. The address can be up to 127 characters. To view a message, use any TIFF file viewer
(such as Imaging for Windows).
If only the Fax Destination field is programmed, the
AXXESSORY Talk performs a blind transfer to send
the fax to the programmed extension, allowing the fax
machine t o process the incoming fax.
If the Fax E-mail Address field isprogrammed, the disk
is not full, and the AXXESSORY Talk has an available
fax port to receive the incomingfax, the AXXESSORY
Talk receives the fax and stores the image in TIFF
Class F format. If the AXXESSORY Talk cannot receive the fax because the disk is full or the fax ports are
busy, the fax is transferred to the Fax Destination extension. If the Fax Destination is not programmed, the
AXXESSORY Talk disconnects the call (because it
cannot process the incoming fax).
If the disk becomes full while the AXXESSORY Talk
is receiving the fax, the AXXESSORY Talk disconnects the call and deletes the portion of the faxreceived
to that point. If the AXXESSORY Talk receives the fax
successfully, it disconnects the call and places the re-
ceived fax in a queue to be delivered to E-mail. The
AXXESSORY Talk processes the fax queue and delivers the fax images to theappropriate destination E-mail
accounts in the order they were received.
E-mail Message Format
The E-mail message sent by the voice mail will have
the following components:
•
To:The TO line will contain the recipient’sE-mail
address.
•
From: The FROMline will containthe E-mail address of the AXXESSORY Talk. If an E-mail Real
Name has been programmed for the AXXESSORY Talk, it will also be shown on this line.
•
Subject: The SUBJECT line will contain the line
“Fax received from <source>.” The source will be
the Call Routing Application number or the mailbox number from where t he fax is received, for example: CRA 2505 or MB 1000.
•
Received On: The RECEIVED ON line contains
the date and time that fax was received.
•
FAX.TIF file attachment: The file attachment
will appear as a file with the name FAX.TIF. To
view the fax, the user must display the TIF file using graphics software.
Page 31 of 73
Page 32

ADDENDUM TO ISSUE 4 OF THE AXXESS MANUALOCTOBER 1997
↓
NEW FAX PROGRAMMING FIELDS
↓
↓
NEW FAX PROGRAMMING FIELDS
Page 32 of 73
↓
Page 33

ADDENDUM TO ISSUE 4 OF THE AXXESS MANUAL OCTOBER 1997
Programming Fax-On-Demand Port Availability
NOTE: This option is available in both NT and OS/2
versions of AXXESSORY Talk.
In order to help make sure the AXXESSORY Talk has
one or more fax ports available for processing incoming faxes, there is a new database field in the Fax On
Demand programming screen shown below. The field
is called “Maximum Fax On Demand Ports” and it sets
the maximum number of fax ports the system can use
for performing Fax On Demand (either delivering outgoing faxes or importing fax documents from the system administrator mailbox). By placing a limit on the
number of Fax On Demand ports, the programmer can
reserve fax ports for receiving incoming faxes through
mailboxes and Call Routing Announcement applica-
NEW FIELD
tions. For example, ifthe system has eight fax ports and
the Maximum Fax On Demand Ports field is set to six,
there will be two ports available for faxes received
through mailboxes and Call Routing.
NOTE:If the Maximum Fax-On-DemandPorts field is
programmed to a number that exceeds the actual fax
ports available, the software will automatically adjust
the limit.
Also, to help support this new feature and Fax On Demand, the AXXESSORY Talk will now support up to
eight fax ports.
The maximum number of fax ports is set in database
programming. It can be programmed using the “User”
password. However, it cannot be changed through the
mailboxes.
→
Page 33 of 73
Page 34

ADDENDUM TO ISSUE 4 OF THE AXXESS MANUALOCTOBER 1997
Voice Mail Save/Restore To A Network Drive
The NT version of the AXXESSORY Talk allows the
user to save or restore the database, voice data, and selected information using a network directory in addition to the AXXESSORY Talk hard drive or floppy
drive. The AXXESSORY Talk provides thissupport by
mapping the B drive to the desired target directory as
follows:
•
The Avdap service must have access to directory
(read access for a restore and read/write access for
a save). If using a network path, it will need to run
AXXESSORY Talk so that it logs in as a network
user that has access to the network path.
•
Tell the Avdap service to map the B drive as the
specified directory.
•
Specify the B drive as the save/restore drive from
Database Programming.
NOTE: In order for this feature to work, the AXXESSORY Talk PC must not have a B drive (either real or
mapped). Otherwise, the AXXESSORY Talk will not
be able to perform its own B-drive mapping.
UNC_path is the name of the target directory in the
Universal Naming Convention as follows:
•
If the target directory is a Netware path, the
UNC_path can specify a directory path (for example, \\nwserver\sy2\ud\avdap\save).
•
If the target directory is on another NT machine,
the UNC_path must specify a share name (for example, \\ntserver\save_avdap_share).
For example, suppose a site wishes to perform saves to
the C:\AVDAPSV directory on the AXXESSORY Talk
PC itself (machine name VM_PC).The system administrator needs to create a share for the C:\AVDAPSV
directory. For example, the new shared directory is
calledVM_SAVE. The voice mail administratorwould
then need to edit the file avdap.opt and add the following line:
–map_b=\\VM_PC\VM_SAVE
To save to a directory on a different PC, the system administrator needs to create the shared directory on the
target PC, give the AXXESSORY Talk’s account read/
write access to the directory, and specify t he –map_b
line that refers to the target PC’s share.
To map the B drive to a directory on the network, the
voice mail administrator needs to add a new command
option to the avdap.opt file in the root directory where
the AXXESSORY Talk software is installed. For example, if the AXXESSORY Talk software is installed
in C:\AVDAP, the avdap.opt will have an absolutefilename C:\AVDAP\avdap.opt. Note that capitalization is
unimportant. The format of the command option to
map the B drive to a network directory is:
–map_b=UNC_path
CAUTION
When the AXXESSORY Talk performs a save operation, it erases files and/or directories from the
UNC_path. Therefore, be careful when specifying
the save/restore path. For example, do not specify
C:\ as the save/restore path because the AXXESSORY Talk would delete the entire C drive.
Page 34 of 73
Page 35

ADDENDUM TO ISSUE 4 OF THE AXXESS MANUAL OCTOBER 1997
Explanation of Extended Ring Cadences
The following table explains the difference between standard and extended ring cadences for the various types of
single-line devices used on the AXXESS System in the United States. (The flag for enabling Extended Ring Cadences is described on page 6–32 of the AXXESS manual.)
SINGLE-LINE DEVICE CADENCE TYPE DESCRIPTION
SLA, SLC, SLC-16, or T1 OPX Standard IC Ring This is a repeating 2-second cadence that rings
twice. Each ring lasts 200 ms and is separated
from the next ring by 400 ms of silence. The
remaining 1.2 seconds is silent.
Extended IC Ring This is a repeating 6-second cadence that rings
twice. Each ring lasts 800 ms and is separated
from the next ring by 400 ms of silence. The
remaining 4 seconds is silent
Standard CO Ring This is a repeating 6-second cadence that rings
once for 2 seconds followed by 4 seconds of
silence.
Extended CO Ring This is a repeating 6-second cadence that rings
once for 2 seconds followed by 4 seconds of
silence.
Digital Keyset MDPM Standard IC Ring This cadence has two 250 ms rings every 2
seconds.
Extended IC Ring This is a repeating 3-second cadence that rings
once for 1 second followed by 2 seconds of
silence.
Standard CO Ring This is a repeating 6-second cadence that rings
once for 2 seconds followed by 4 seconds of
silence.
Extended CO Ring This is a repeating 6-second cadence that rings
once for 4 seconds followed by 2 seconds of
silence.
Analog Keyset Data Port Module Standard IC Ring This cadence rings for 1024 milliseconds fol-
lowed by 2048 milliseconds of silence.
Extended IC Ring This is a repeating 2-second cadence that rings
twice. Each ring lasts 200 ms and is separated
from the next ring by 400 ms of silence. The
remaining 1.2 seconds is silent.
Standard CO Ring This is a repeating 6-second cadence that rings
once for 2 seconds followed by 4 seconds of
silence.
Extended CO Ring Same as Standard CO Ring cadence.
Page 35 of 73
Page 36

ADDENDUM TO ISSUE 4 OF THE AXXESS MANUALOCTOBER 1997
RS-232-C Changes and Corrections
The CPU/MEM, CPU020/PCM, and Options Card
RS-232-C connection information described on pages
2–35 and 2–36 in the Issue 4 manual should be modi-
fied as follows:
If necessary, an eight-wire MOD-TAP modular adapter
and an eight-wire reversing (inverting) line cord can be
used for special applications requiring hardware flow
control. The pin functions of the AXXESS CPU/MEM
Card, CPU020/PCM Card, andOptions Card RS-232-C
ports are listed in the following chart.
NOTE: The PC or output device RS-232-C ports must
be configured asData Terminal Equipment (DTE). The
AXXESS RS-232-C ports are always configured as
Data Carrier Equipment (DCE).
SIGNAL NAME
No Connection 1
No Connection 2
Signal Ground Reference Ground 3 5 7
Transmit Data (TXD) Data to Axxess 4 3 2
Data Term. Ready (DTR)* Signal to Axxess* 5 7 4
Receive Data (RXD) Data from Axxess 6 2 3
Data Set Ready (DSR) Signal from Axxess 7 6 6
Clear To Send (CTS) Signal from Axxess 8 8 5
*TheCPUCardRS--232--C port does not support DTR. All other
RS--232--C ports (MEM and CPU020/PCM) do support DTR.
FUNCTION PIN PIN PIN
(always true)
Softwareflow control adapters:The following wiring
diagrams can be used to build adaptersthat will, witha
line cord, connect one of the RS-232-C ports on the
CPU/MEM, CPU020/PCM, or Options Card(s) to the
DB9 or DB25 ports found on most PCs and output devices.
AXX. DB9 DB25
AXXESS RS-232-C PC/OUTPUT DB9
(inside jack)
1
2
3
4
5
6
7
8
*TheCPUCardRS--232--C port does not support DTR. All
other RS--232--C ports (MEM and CPU020/PCM) do support
DTR. DB9 internal jumpers: 7–8 and 4–6–1.
GND
TXD
DTR*
RXD
RTS
CTS
GND
TXD
DTR
DSR
DCD
RXD
7
8
5
3
4
6
1
2
Hardware flow control adapters: The following wiring diagrams can be used to build adapters that will,
with a line cord, connect one of the RS-232-C ports on
the CPU/MEM, CPU020/PCM, or Options Card(s) to
the DB9 or DB25 ports found on most PCs and output
devices.
AXXESS
*TheCPUCardRS--232--C port does not support DTR. All
RS-232-C PC/OUTPUT DB25
(inside jack)
1
2
3
4
5
6
7
8
other RS--232--C ports (MEM and CPU020/PCM) do support
DTR. DB25 internal jumpers: 6–8.
N/C
N/C
GND
TXD
DTR*
RXD
DSR
CTS
GND
TXD
RTS
RXD
DSR
DCD
CTS
7
2
4
3
6
8
5
AXXESS RS-232-C PC/OUTPUT DB25
(inside jack)
1
2
3
4
5
6
7
8
*TheCPUCardRS--232--C port does not support DTR. All
other RS--232--C ports (MEM and CPU020/PCM) do support
DTR. DB25 internal jumpers: 4–5 and 20–6–8.
GND
TXD
DTR*
RXD
RTS
CTS
GND
TXD
DTR
DSR
DCD
RXD
4
5
7
2
20
6
8
3
AXXESS
*TheCPUCardRS--232--C port does not support DTR. All
RS-232-C PC/OUTPUT DB9
(inside jack)
1
2
3
4
5
6
7
8
other RS--232--C ports (MEM and CPU020/PCM) do support
DTR. DB9 internal jumpers: 6–1.
N/C
N/C
GND
TXD
DTR*
RXD
DSR
CTS
GND
TXD
RTS
RXD
DSR
DCD
CTS
5
3
7
2
6
1
8
NOTE: When building adaptersfromthese diagrams,keep in mind thatthe connections between the AXXESS RS-232-C
port and the DB9 or DB25port includethemodular adapter and a line cord. The connection must be made as indicated
in the diagram (correct pins connected) regardless of whether a reversing or non-reversing line cord is used.
Page 36 of 73
Page 37

ADDENDUM TO ISSUE 4 OF THE AXXESS MANUAL OCTOBER 1997
Preventing Memory Shortages
Inter-Tel recommends that fully loaded AXXESS Systems, with a large number of trunks and heavy call traffic, have extended memory added on the CPU. The kit
(part number 828.1405) contains four RAM chips that
are installed in sockets on the CPU.
Without added memory on the CPU, fully loaded AXXESS Systems may periodically reset due to memory
shortages.The reset is the result ofthe CPU attempting
to recover memory.
New CPU020/PCM Card Configurations
New CPU020/PCM Card combination kits are now
available. Each kit includes a CPU020 Card, a PCM
Card, the proper bootROMand memory map PAL, and
any additional memory components required. The
combined cards are shipped pre-assembled, with the
current production version system software already
loaded.
The CPU020/PCM Card combinations available are:
CPU020/PCM COMBINATION PART NO.
CPU020-Q/PCM-F (CPU 512 Master) 550.9015
CPU020-X/PCM-F (CPU 512 Slave) 550.9016
CPU020-D/PCM-D (CPU 256) 550.9017
New CPU/MEM Card Configuration
A new CPU/MEM Card combination kit is now available. The kit includes a CPU Card and a MEM Card.
The combined cards are nowcompatible with both version 3.X and version 4.X systems.Only the appropriate
Premium ROMs need to be added.
CPU/MEM COMBINATION PART NO.
CPU/MEM (CPU 112) 550.9018
The MEM Card (550.2100), which is sold separately
and in the CPU/MEM Card combination, nowcontains
all of the components that were previously supplied in
kit number 828.1278 (a PAL and 2 RAM chips). This
makes it compatible with both version3.X and version
4.Xsystems.Inaddition,the MEMCard is alsoshipped
with the version 2 PAL so that it can be modified for
use on older systems.
Because the MEM Card now contains the latest U19
PAL (827.8387), that chip is no longer supplied with
the version 3.2 and 4.1 (or later) Premium ROMs.
New Options Card (OPC) Configuration
Each new Options Card (OPC) will now be equipped
with the two ROMs (from kit part no. 828.1279) that
allow the card to work with version 2 or later system
software. In addition, the part numbers of the two
ROMs in the kit have been changed from 827.8078
(U3) and 827.8073 (U29) to 827.8590 and 827.8599
respectively.
New T1 Card (T1C) Revision Level Changes
To work properly with version 4.X system software,
T1Cs must be at revision level “2.G” or later. To work
properly with the version 4.1 (or later) Primary Rate
Interface (PRI)feature and daughter card (aswell as all
older versions of system software), the T1Cs must also
be equipped with two special software components —
part nos. 827.8550 (U4) and 827.8551 (U5). Revision
level “3.K” or later T1Cs should have all of the necessary components already installed and will work with
any version of system software.
NOTE: Any revision level “2.G” or later T1Cs that
have U4 labeled 827.8376 and U5 labeled 827.8375
must first be equipped with an upgrade kit (part no.
828.1367) before using them with the version 4.1 (or
later) PRI feature. Revision level “2.F” or earlier T1Cs
cannot be upgraded; they must be replaced with new
T1Cs.
This information is summarized in the following chart:
T1C REV. LEVEL SYSTEM SOFTWARE LEVEL
up through 2.F v2 or v3 T1 only
2.G to 3.J v2–v4 T1, and v4.1 (or later)
PRI (if equipped with 828.1367
kit and PRI Daughter Card)
3.K or later v2–v4 T1, and v4.1 (or later)
PRI (if equipped with PRI
Daughter Card)
T1 Gain Control (TGC) Daughter Card
If experiencing excessive E&M gain levels on a T1
Card that is not equipped with a PRI Daughter Card,
two special software components and a TGC Daughter
Card (kit part no. 828.1397) canbe attached to the card
to provide 6dB of attenuation.
To use the TGC Daughter Card, the T1 Card must be at
revision level “2.G” or later.
Page 37 of 73
Page 38

ADDENDUM TO ISSUE 4 OF THE AXXESS MANUALOCTOBER 1997
DKSC-16 Extended Loop Length Modification
For longer station loop lengths (up to 154 ohms/3000
ft.), if necessary, an optional external power supply
with the following characteristics can be connected to
the DKSC-16 termination block:
•
36VDC
•
120mA per keyset (1.92A for all 16 circuits)
This option is available only on DKSC-16s that are at
revision level “2.0” or later or that have been modified
and labeled withFSM100995. The external power supplyisconnectedtopins50(+36V,V/SL)and25(GND,
SL/V) on the termination block. In addition, the strap
on jumper JP1 must be placed over pins 1 and 2 to enable the external power supply.
New Voice Processing Card (VPC) Models
The 4-Port and 8-Port VPCs described in the Issue 4
manual have been superseded by newer “mini-size”
models. Other than their smaller size, these new minisize cards install and function the same as the original
full-size cards. The part numbers of the new cards are
listed in the following table.
NEW VPCs PART NUMBERS
4-Port “Mini” VPC 550.5209
8-Port “Mini” VPC 550.5210
CPU020/PCM Card Software Installation Information
The following information will be useful when loading
CPU 512 Master and Slave software.
New Warning Message: A warning message will now
appear if you attemptto load CPU512 Master software
without a CPU 512 Slave Card installed and communicating.The message says, “WARNING,theSlaveCPU
is off-line. Uploading code without a Slave CPU may
cause serious system problems. Do you wish to continue with the upload?” You can continue the upload by
selecting Yes or abort the upload by selecting No. (If
you select Yes, you must install software on the CPU
512 Slave Card before it will function. Refer to page
3–73 in the manual for details.)
Checking Validity of Software On A Slave CPU:
You can use the following procedure to check the
validity of software on your CPU 512 Slave Card:
(1) Attach a terminal (or a PC using terminal emu-
lation software) to the serial port on the secon-
dary CPU in slot 24. (Communication parameters are: 9600 baud, no parity, 8 bits, 1 stop bit.)
(2) Turn off the secondary cabinets (slots 17–31).
(3) Turn on the secondary cabinets while watching
the power-up messages on the terminal. You
should see:
Boot Version 4.0 (827.8536 U25, CPU020-EXP, Slave)
AXXESS 4.
(4) If you do not see thecorrect information, upload
the version 4.X Premiumsoftware from the programming PC to the CPU020/PCMCard asoutlined on page 3–73 in the manual.
x
CallProcessing Quad
New FCC Part 68 PBX Rating
The AXXESS System is now officially rated as a PBX
systemby the FCC. The official registration number is:
BE2USA–24359–PF–E.This means the AXXESS System nowcarries all three ratings: KF(key system), MF
(hybrid system), and PF (PBX system).
New Fax Card Model
The optional Fax Card described in the Issue 4 manual
has been superseded by a newer model. (Note that the
part number for the newmodelcard remains550.5122).
If installing one of thesenewer model cards (whichcan
be identified by the drawing on page 40), use the instructions outlined below in place of step 8 on page
3–108 in the manual.
(1) If desired and if not already installed, install the
optional Fax Card as follows (refer to drawing
on page 40):
a. Remove the bracket that covers the opening
to the appropriate 16-bit (full-size) slot, and
set the bracket and screw aside. (Refer to
Figure 3–57 on page 3–111 in the manual for
a sample card slot arrangement.)
b. Check to make sure that a jumper strap is
placed over the middle two pins (IRQ9) of
interrupt jumper J503 (refer to drawing on
page 40).
c. Ensure that the eight address selection DIP
switches (SW1) are set to 320 hex: 1–3 &
5–6 = ON (down); 4 & 7–8 = OFF (up).
d. Check to make sure the two MVIPclock ter-
mination DIP switches (SW2) are set in the
OFF (up) position.
Page 38 of 73
Page 39

ADDENDUM TO ISSUE 4 OF THE AXXESS MANUAL OCTOBER 1997
e. Insert the Fax Card in the appropriate slot
and attach it to the chassis using the screw
removed in step 8a. Make sure the card is
securely attached to the PC Motherboard
and does not touch any adjacent cards.
f. Attach the next available connector on the
AIC-to-VPC interface cable to the 40-pin
connector on the Fax Card. (One end of the
cable was previously attached to the 40-pin
connector on the AIC.)
NOTE: Be sure that the colored edge of the
AIC-to-VPC interface ribbon cable aligns
with pin 1 on the connector.
Page 39 of 73
Page 40

ADDENDUM TO ISSUE 4 OF THE AXXESS MANUALOCTOBER 1997
FIGURE 5. OPTIONAL FAX CARD
SWITCHES
JUMPER
STRAP
J503
SW2
PIN 1
40-PIN CONNECTOR
TO AUDIO INTERFACECARD
SW1
Page 40 of 73
Page 41

ADDENDUM TO ISSUE 4 OF THE AXXESS MANUAL OCTOBER 1997
New PC Motherboard
The 80486 PC Motherboard described in the Issue 4
manual has been superceded by a newer 80486 model.
The part number for the new model motherboard is
550.5189. See the drawings below and on the nextpage
for diagrams of the new motherboard andits changes to
the layout on the back of the PC.
The new model has the floppyand hard disk controllers
built into the motherboard and therefore does not require a separate DiskController Card. Also, the COM2
serial port on the back of the PC now has a DB9 connector rather than a DB25 connector. (To usethe DB25
FIGURE 6. SAMPLE BACK OF ASSEMBLED AXXESSORY TALK PC
POWER CABLE
CONNECTOR
modular adapter from the optional SMDR retrieval
cable kit, first attach a straight-through DB9-to-DB25
converter.)
Config.sys File Change
The new version AXXESSORY Talk applicationssoftware modifies the PC’s config.sys file to use memory
address $D0000 rather than $E0000. This change was
necessary to support the new PC Motherboard model
(described in the previous section). Note that this new
address also works with all previous AXXESSORY
Talk PC Motherboards.
SAMPLE CARD SLOT
ARRANGEMENT
(PCM PORT)
OPTIONAL
FAX CARD
TO CPU
(PCM PORT)
TO OPC
PARALLEL
(FEMALE)
PRINTER
(COM2, MALE)
TO PC
KEYBOARD
CONNECTOR
TO RS-232-C
CARD
MONITOR
1ST VPC
2ND VPC
3RD VPC
(COM1)
AUDIO INTERFACE
CARD
NOTE: Depending on the m odel of PC being used, the sample card slot arrangement and connector
locations shown above could vary somewhat.
Page 41 of 73
Page 42

ADDENDUM TO ISSUE 4 OF THE AXXESS MANUALOCTOBER 1997
FIGURE 7. SAMPLE PC MOTHERBOARD CARD SLOT ARRANGEMENT
PARALLEL PORT CONNECTOR
TO PRINTER PORT ON THE CHASSIS
DISK CONTROLLER
CONNECTORS
TO FLOPPY AND HARD DRIVES
SIMM
1
1
2-PIN CONNECTOR
TO RESET CONNECTOR
ON AIC
AUDIO INTERFACE
CARD (AIC)
1
OPTIONAL FAX
CARD
1
1
1
3RD VPC
2ND VPC
1ST VOICE PROCESSING
CARD (VPC)
COM PORT CONNECTORS
TO COM1 AND COM2 ON THE CHASSIS
MONITOR CARD
5-PIN DIN CONNECTOR
TO KEYBOARD
12-PIN CONNECTOR
TO POWER SUPPLY
NOTE: Depending on the model of PC Motherboard being used, the sample card slot arrangement
and the location of the reset c onnector shown above could vary somewhat.
Page 42 of 73
Page 43

ADDENDUM TO ISSUE 4 OF THE AXXESS MANUAL OCTOBER 1997
ACD Agent IDs
There is a new ACD hunt group option that allows the
use of Agent ID numbersin place of station extensions
in the hunt group list.
NOTE: For optimum system performance, there
should not be more than 1000 Agent IDs in any hunt
group and no more than 2000 Agent ID entries in all
hunt groups combined.
ACD hunt group members are referred to as “agents.”
Agents log in to the ACD hunt group to receive calls
and log out to haltACD hunt group calls.An ACD hunt
group can now be programmed to circulate calls to
agents in two ways:
•
Agent IDs: If the hunt group is programmed touse
ACD Agent IDs, each agent is assigned an Agent
ID number to enter during the login procedure (described below). The hunt group calls are routed to
logged in agents, according to theirAgent ID number instead of their station extension. Because the
Agent ID is not associated with any station extension, the agent can use any station in the system to
log in and does not have to use the same station
every time.
•
Members: If the hunt group is not programmed to
useAgentIDs,itwillhavealist of stationsandwill
send calls to the stations where agents are logged
in.
There can be up to 1000 Agent IDs in the system.
ACD Agent IDs can be included in Extension Lists.
This allows several ACD Agents to receive a call at
once.
The ACD Hunt Groups premium feature must be enabled for this feature to be used.
When a call camps on to an ACD hunt group that uses
Agent IDs, only the agents currently logged in to the
hunt group will receive camp-on indications.
ACD hunt group supervisors will receive visual campon displays if they are programmed as members of the
hunt group and have the ACD Agent Logout feature enabled.
ACD Agent Login Changes
With the additionofthe ACD Agent IDfeature, the log
in and log out procedures changed. They are described
on page 4–18 in the manual. (The log out procedure
using the code described on page 4–19 of the manual
did not change.)
There are twofeature codes that can be usedforlogging
in to the ACD hunt groups:
•
ACD Agent Login: This performs only the logging in operation.
•
ACD Agent Login/Logout: This is a toggle feature code that logs the station in or out of all
associated ACD hunt groups at once.
If the ACD Login/Logout feature code is programmed
in a user-programmable key with a lamp, the lamp will
be lit when the agent is logged in to any ACD hunt
group, and unlit when the agent is logged out of all
ACD hunt groups.
The new procedures are as follows:
TO LOG OUT OF ALL OF YOUR ACD HUNT GROUPS AT ONCE
USING THE LOGIN/LOGOUT FEATURE CODE:
While on or off hook (single-line users must lift
the handset), enter the ACD Agent Login/Logout feature code (328). The display shows
AGENT LOGGED OUT OF ALL ACDS and
you hear a c onfirmation tone. Hang up if off
hook.
TO LOG IN TO ALL OF YOUR ACD HUNT GROUPS ATONCEUSING THE LOGIN/LOGOUT FEATURE CODE:
(1) While on or off hook (single-line users must lift
the handset), enter the ACD Agent Login/Logout feature code (328). If you were already
logged in, the display shows AGENT LOGGED
OUT OF ALL ACDS and you hear a confirmation tone. If you were not logged in, continue to
the next step.
(2) The display shows AGENT LOGIN AGENT
ID. Do one of the following:
To log into all ACD hunt groups for which
you have an Agent ID: Enter your Agent
ID. The display shows AGENT LOGGED
INTO ALL ACDS. You are logged into only
the ACD hunt group(s), that use the Agent
ID that you entered. Hang up if off hook. If
another agent is already logged in at this
station, you hear reorder tones and the dis-
play shows DIFFERENT AGENT ID ALREADY USED. You must have the other
agent log out before you can use that station.
To log into all of your ACD hunt groups
that donot use Agent IDs: Press #. The dis-
play shows AGENT LOGGED INTO ALL
ACDS. You are logged into only the ACD
hunt group(s) that do not use Agent IDs.
Hang up if off hook.
Page 43 of 73
Page 44

ADDENDUM TO ISSUE 4 OF THE AXXESS MANUALOCTOBER 1997
TO LOG IN TO ONE OR MORE HUNT GROUPS USING THE ACD
AGENT LOGIN FEATURE CODE:
(1) While on or off hook (single-line users must lift
the handset), enter the ACD Agent Login feature code (326). The display shows AGENT
LOGIN ACD NUMBER.
(2) Enter the pilot number of the desired ACD hunt
group. (Or you can press # to log in to several
ACD hunt groups at once.)
If you entered an invalid hunt group number, the
display shows NOT AN ACD HUNT GROUP
and you hear reorder tones.
(3) The display shows AGENT LOGIN AGENT
ID. Then do one of the following:
To log into to ACD hunt group(s) using
Agent IDs: Enter your Agent ID. The dis-
play shows AGENT LOGGED INTO ALL
ACDS. You are logged into only the ACD
hunt group(s) that you requested in step 2,
that use the Agent ID that you entered in
this step. If another Agent ID is already
logged in at this station, you hear reorder
tones and the display shows DIFFERENT
AGENT ID ALREADY USED. You must
have the other agent log out before you can
use that station.
To log into to ACD hunt group(s) that do
not use Agent IDs: Press #. The display
shows AGENT LOGGED INTO ALL
ACDS. You are logged into only the ACD
hunt group(s) that you requested in step 2,
that do not use Agent IDs.
If you were already logged in,the display shows
ALREADY LOGGED INTO <hunt group>.
If you are not a member of the entered hunt
group, the display shows NOT AN AGENT IN
THIS HUNT GROUP and you hear reorder
tones. Start over.
(4) If off hook, hang up. Repeat this procedure to
log into additional ACD groups, if necessary.
Page 44 of 73
Page 45

ADDENDUM TO ISSUE 4 OF THE AXXESS MANUAL OCTOBER 1997
ACD Agent ID Programming
The “ACD Agent IDs” programming option appears in
the main screen (shown on page 6–23 of the manual)
when you select System-Wide Programming. The new
option is located between “Account CodeInformation”
and “ARS Programming.” The abbreviated command
for ACD Agent IDsis “AGID” (other a bbreviated commands are shown on page 6–25 in the manual).
New program planning sheets for Hunt Groups and
Agent IDs are included on page 49.
When you select the ACD Agent IDs option from the
System-Wide Programming menu, the window shown
above appears. Use the following procedures to create,
program, or delete Agent IDs.
PROGRAM or CREATE: To create a new ACD
Agent ID, select the Create command button. Or, to
program an existing Agent ID, highlight the Agent ID
to be programmed and select the Program c ommand
button. The Window at the right appears:
•
AGENT ID/PICK AGENT ID: Enter an Agent ID
number of up to five digits. If desired, you can use
the Pick AgentID command buttonto view a list of
available numbers and select your Agent ID from
the list. (Do not enter the same number as an exist-
ing Agent ID, or you will receive an error message
when you try to exit.)
•
DESCRIPTION: Enter a description for theAgent
ID. You can use up to 20 characters.
•
OK/CANCEL: When you have entered the Agent
ID and its description, select the OK command button to exit and save the information. Or, to exit
without saving your entry, select the Cancel command button.
DELETE: To delete one or more AgentIDs, select the
Delete command button. A window appears as shown
on the next page.
Page 45 of 73
Page 46

ADDENDUM TO ISSUE 4 OF THE AXXESS MANUALOCTOBER 1997
When you select the Delete commandbutton shown on
the previous page, the window above appears.
AGENT IDs TO DELETE/PICK LIST: Agent IDs
are listed in the Pick List box. To select the IDs to be
deleted, use the following command buttons:
•
ADD/ALL: Use the Add command button to move
the highlighted ID from the Pick List to the Agent
IDsToDeletelist,orusetheAll commandbuttonto
place all IDs in the Delete list.
•
REMOVE/NONE: To remove an Agent ID from
the Delete list, highlight it and select the Remove
command button. Or, to remove all Agent IDs, use
the None command button.
OK/CANCEL: When the Agent IDs To Delete listappears as desired, select the OK command button to delete the selected IDs. Or, to exit without deleting any
IDs, select the Cancel command button.
Page 46 of 73
Page 47

ADDENDUM TO ISSUE 4 OF THE AXXESS MANUAL OCTOBER 1997
ACD Agent ID Extension List Programming
Thereisnowa new type of extension list for AgentIDs,
as shown in the screen below. This type of extension
NEW OPTION
↑
list includes only ACD hunt group Agent IDs. The lists
are programmed as described on page 6–78 of the
manual. If no Agent IDs have been created, this option
cannot be used.
Page 47 of 73
Page 48

ADDENDUM TO ISSUE 4 OF THE AXXESS MANUALOCTOBER 1997
ACD Hunt Group Programming For Agent IDs
ACD Hunt groups can now be programmed to route
calls on the basis of Agent IDs, as shown in the new
hunt group screen below. ACD Agent IDs can be included in Extension Lists, which allows several Agent
IDs to receive a call at once.
NEW OPTION
The new hunt group flag is “USE ACD AGENT IDs.”
If the ACD Hunt Group Option is checked, you can
choose to route calls according to ACD Agent ID numbers instead of station extensions. When the Use ACD
AgentIDs optionis checked, the “Members” command
button changes to an “Agents” command button. The
Agent ID list i s programmed exactly as described for
the member list on page 6–93 of the manual.
→
Page 48 of 73
Page 49

ADDENDUM TO ISSUE 4 OF THE AXXESS MANUAL OCTOBER 1997
Hunt Group Program Planning Sheet
TO USE: (Make sufficient copies of this page and fill in information for each hunt group.)
Hunt Group Number:
Description:
Username:
Extension Number:
Announcement Station:
Overflow Station:
Recall Destination:
Analog Voice Mail? Yes or No
ACD? Yes or No
Use ACD Agent IDs? Yes or No
Camp On Allowed? Yes or No
Priority Level:
Search Type: Linear or Distributed or Longest Idle or Bal-
anced
Supervisor(s):
Agent ID Program Planning Sheet
TO USE: (Make sufficient copies of this page and fill in information for each Agent ID.)
AGENT ID NUMBER DESCRIPTION
Page 49 of 73
Page 50

ADDENDUM TO ISSUE 4 OF THE AXXESS MANUALOCTOBER 1997
Primary Rate T1 Service
Primary Rate T1 service is already described in the
Issue 4 manual. (See pages 2–22, 3–68, 4–21, 4–22,
6–138, 6–139, 6–143, 6–252, 6–262, 7–4, and 8–3.)
However, the following additional information may be
helpful in installingand programming PrimaryRate T1
Service.
Specifications
On the AXXESS System, primaryrate T1 servicemust
be 23B+D. Primary Rate service is available only on
AXXESS Systems equipped with CPU020/PCM cards.
It cannot be used on systems with CPU/MEM cards.
NOTE:For version 4.1 and 4.2 Software: Foroptimal
system performance, no more than four T1 Cards
should be equipped with PRI Daughter Cards. For ver-
sion 4.3 Software: For optimal system performance, no
more than six T1 Cards should be equipped with PRI
Daughter Cards.
The available ISDN services are shown in the chart below. They are divided into twocategories:servicessupported by AXXESS and unsupported services. If the Bchannel trunks provide an unsupported service, the
system will still function properly. However, it will not
make use of the service.
SUPPORTED BY AXXESS UNSUPPORTED
•
Automatic Number
Identification (ANI)
•
B-Channel Negotiation
•
On-Demand B-Channel Selection
•
Dialed Number Identification Service
(DNIS)
•
Calling Party Number
•
D-Channel Backup
•
Flexible Billing
•
Network Ring Again
•
Non-Facility Associated Signaling
(NFAS)
•
Primary Rate Interface Nodal/Centrex
Express
•
PRI & Private Line
Integration
•
Switched Digital Services
•
User-To-User Information
• WideAreaACD
• AT&T Call-By-Call
Service Selection
The AXXESS System is designed to support only
AT&T 4ESS, AT&T 5ESS (not 5ESSNational ISDN),
and DMS-100/250 switch types. No other switch types
are currently supported by the AXXESS system.
NOTE: PrimaryRate trunks that are not subject to toll
restriction will not return dial tone. This is because
these unrestricted trunks are treated as if they are connected to another AXXESS System. Therefore, no dial
tone is provided, no digitsarecollected, and the setupis
immediate.
When ordering Primary Rate Interface services, refer to
the following chart for the informationyour carrier will
need to know:
Protocol Custom ISDN only (we do not
support National ISDN)
Signaling Clear Channel 64Kbs
Framing ESF
Coding B8ZS
Jack Type RJ48C
Data Normal (not inverted)
Glare CPE Yields on Incoming Calls
Terminology
Some common terms associated with PrimaryRateand
ISDN include the following:
2B+D: A 2B+D circuit is divided into two 64 kbps Bchannelsthat can carryvoice, video, or data. It alsohas
a 16 kbps D-channel for low-speed data and signaling.
There are two types of 2B+D interfacesthat use different wiring: the “U” interface uses a single twisted pair
and the “S/T” interface uses two twisted pairs. This is
also referred to as “Basic Rate Interface (BRI).” Thisis
not supported in AXXESS version 4.X software.
23B+D: A 23B+D circuit is divided into 23 B-channels
(64 kbps each) that can carry voice, data, and video simultaneously. It also has a 64 kbps D-channel for outof-band signaling, call control, and packet data.
(NOTE: The AXXESS System does not support the
use of the D-channel for packet data.). This interface
uses two twisted-pairs of wire. This is also referred to
as “Primary Rate Interface (PRI).”
30B+D: This is the standard European ISDN interface.
A 30B+D circuit is divided into 30 B-channels (64
kbps) t hat can carry voice, data, and video simultaneously. It also has a 64 kbps D-channel for out-ofband signaling and call control, and one framing channel. This interface uses two twisted-pairs of wire.
Page 50 of 73
Page 51

ADDENDUM TO ISSUE 4 OF THE AXXESS MANUAL OCTOBER 1997
Automatic Call Number Identification (ANI): Auto-
matic Numbering Identification (ANI) i nformation
identifiesthecaller’stelephone number. The systemre-
ceives a specified number of digits. *ANI* is another
type of ANI that doesnot require a specified number of
digits. The system receives a star (*) before the ANI
digits to signal the beginning of the caller’s telephone
number. Then there is another star after the digits to
signal the end of the ANI information.
B-Channel: The B-channel, or “bearer” channel, is the
basic component of ISDN interfaces. A B-channel can
transmitor receive voice or data atup to 64,000 bits per
second (64 kbps).
B-Channel Negotiation: This allows the AXXESS
Systemto request the channelthat will be used foreach
call. When the AXXESS System requests a specific Bchannel for an outgoing call, the network decides
which channel will be used. However, if the channel
selected by the network is not the requested channel,
the AXXESS System will release that channel (if
seized) and attempt to re-initiate the call using the
channel specified by the network. (For an incoming
call, the AXXESS System does need to request a
channel.)
Bandwidth: The bandwidth of a device determinesthe
frequency range it can handle. Different types of communications use different bandwidths. For example,
telephone communication requires a relatively narrow
bandwidth, while video requires a wide bandwidth.
Basic Rate Interface (BRI): Also called 2B+D, BRI
provides two 64 kbps B-channels that can carry voice
or data and a 16 kbps D-channel for low-speed data and
signaling.This can be usedfor homesand Centrex sites
that do not require PRI. This is not supported in AX-
XESS version 4.X software.
of the B-channels in the entirenetwork. This is not supported in AXXESS version 4.X software.
DedicatedService:Dedicated service reserves a group
of B channels for a specific function, such as outgoing
calls. The AXXESS system uses trunk group programming to determine how the channels are used. Therefore, the system would require a separate trunk group
for each function. The installer can create “PBX-provided” dedicated service on call-by-call circuits
through database programming (such as incoming only
or accessible only to a group of users) or the service
provider can determine the dedicated service.
Dialed Number Identification Service (DNIS): DNIS
identifies the number that the caller dialed to reach
your location. The system receivesa base number anda
specifiednumber of digits that identifythe dialed number. *DNIS* is a form of DNIS that does not have a
specified number of digits. The system receives a star
(*) before the DNISdigits to signal the beginning of the
dialed number. Then there is another starafter the digits to signal the end of the DNIS information.
Flexible Billing: Flexible billing allows a 900 subscriber to modify a call’s billing rate while speaking
with the caller. This is not supported in AXXESS ver-
sion 4.X software.
H0 and H11: These are switched digital service types
that combine contiguous B-channels into a single bit
stream. H0 combines six channels into a 384 kbps bit
stream. H11 c ombines 24 channels into a 1536 kbps bit
stream. Applications for these services include video
conferencing and LAN connections. This is not sup-
ported in AXXESS version 4.X software.
Integrated Services Digital Network (ISDN): ISDN
is a network of channels that can provide simultaneous
voice, data, and video communication.
CallingParty Number Service:This service provides
the calling party’s line number (not billing number) to
the called party. This is not supported in AXXESS ver-
sion 4.X software.
D-Channel: The data channel, or D-channel, carries
the signaling information at 64 kbps for the B-channels
in a Primary Rate Interface orat 16 kbps in a BasicRate
Interface.
D-Channel Backup: Because the D-channel supports
the other channels in the ISDN network, loss of the Dchannel would cause loss of access to the ISDN circuits. D-channels can be backed up to provide protection in the event of D-channel loss. D-channel backup
is especially important in Non-Facility Associated
Signaling (NFAS), because the D-channel supports all
Page 51 of 73
Multi-Rate ISDN: This type of switched digital service allows the user to dial up, ondemand, any number
of combined B-channels. This is not supported in AX-
XESS version 4.X software.
N X 64 kbps: This switched digital service type combines the B-channels into a single bit stream. Applications for this service include video conferencing and
LAN connections. This is not supported in AXXESS
version 4.X software.
Network Ring Again: Network ring again is like the
AXXESS queue feature that allows a caller to queueon
to a busy station and then be called when the station is
available. However,networkringagain allowsqueuing
between twoPBXs that are on the same ISDN network.
This is not supported in AXXESS version 4.X software.
Page 52

ADDENDUM TO ISSUE 4 OF THE AXXESS MANUALOCTOBER 1997
Non-Facility Associated Signaling (NFAS): When a
site uses severalPrimary Rate Interfacecircuits, the Dchannel on one circuit can support the B-channels on
other circuits, providing one additional B-channel per
circuit (that is, 24 B-channels instead of 23B+D). This
is called Non-Facility Associated Signaling or NFAS.
This arrangement alsorequires D-channel backup. This
is not supported in AXXESS version 4.X software.
On-Demand B-Channel Selection: This feature allows on-demand allocation of B-channels. With on-demand B-channel selection, all B-channel trunks can be
assignedto one trunkgroup and t hen programmed to be
used as needed (ARS, outgoing access, etc.). This feature takes full advantage of the AXXESS System features (trunk groups, ARS, and call routing) and allows
maximum on-demand use of the bandwidth. This can
be combined with Dedicated Service.
Primary Rate Interface (PRI): This is the ISDN circuit that provides B-channelsthat can carry voice,data,
andvideosimultaneously. It also hasoneD-channelfor
out-of-band signaling and packet data. (NOTE: The
AXXESS System does not support the use of the Dchannel for packet data.) See also 23B+D and 30B+D.
Primary Rate Interface Nodal/Centrex Express:
This service type allows communication between a
PBX system and a Centrex system. This is not sup-
ported in AXXESS version 4.X software.
Private Line Integration: This allows the system to
have private lines using individual channels. The Dchannel is not used on the private lines. This is not sup-
ported in AXXESS version 4.X software.
Switched Digital Services: Switched digital services
provide ISDN over a single telephone line by combining several B-channels into a single bit stream.
Switched digital servicetypes include H0, H11,Multirate, and N X 64 kbps. This is not supportedinAXXESS
version 4.X software.
Two-Stage Caller Identification (*ANI*DNIS*):
This is a two-stage address service that provides both
the caller’s telephone number and the dialed number.It
combines the *ANI* and the *DNIS* features described above.
User-To-User Information (UUI): This type of ISDN
service allows two users to share and manipulate data
over the D-channel while maintaining a voice connectionona B-channel.Forexample,bothpartiescanview
the same document, discuss it, edit it and see the
changes as they are made. This is not supported in AX-
XESS version 4.X software.
Wide Area Automatic Call Distribution (ACD):
Like the AXXESS ACD feature, this service can distribute calls to provide faster service. However, Wide
Area ACD allows the calls to be sent to other PBXs in
the network. This is not supported in AXXESS version
4.X software.
Page 52 of 73
Page 53

ADDENDUM TO ISSUE 4 OF THE AXXESS MANUAL OCTOBER 1997
Customized AXXESSORY Talk Prompts
All of the pre-recorded prompts in AXXESSORY Talk
can now be customized, using the Voice Mail System
Administrator’s mailbox.
If the Multilingual feature is enabled, and the Japanese
prompts have been loaded, the System Administrator
can change either the English prompts or the Japanese
prompts. When the System Administrator’s keyset is in
English mode, the English prompts will be changed
when the following procedure is performed. If the System Administrator’s keyset is in Japanese mode, the
Japanese prompts will be changed.
Re-Recording System Prompts
TO RECORD CUSTOM SYSTEM PROMPTS (OR RESTORE SYSTEM
PROMPTS):
(1) Dial the Voice Mail application access number.
You hear the main menu.
(2) During or after the greeting, press
yourself as a subscriber.
(3) Enter the System Administrator mailbox num-
ber and password.
9
(4) Press
to access the System Administrator’s
Menu.
(5) When you hear the System Administrator
6
Menu, press
toselect the System PromptRe-
placement option.
(6) Enter the desired prompt number (001–545)fol-
#
lowed by
or ACCEPT. If the number is valid, the current system and/or custom prompt is
played. (If the number is not valid, you hear an
error message and must choose another prompt
number.)
(7) Do one of the following:
To hear the prompt again, press
If you wish to replacethe current system or cus-
tom promptwitha new custom prompt,press
and continue to the next step.
To delete a customprompt and reinstate the sys-
9
tem prompt, press
.
If you wish to leave the prompt unchanged and
return to the previous menu, press
(8) Record the new prompt. (To pause while re-
cording the prompt, press
press any key.)
toidentify
*
1
.
.
*
2
. To continue,
3
If the AXXESSORY Talk PC disk is full, a
prompt will notify you that it cannot acceptyour
prompt. Hang up and try again later.
(9) When you have completed recording your
prompt, you have the following options:
If you are satisfied with your prompt, hang up.
1
If you wish to hear your prompt, press
If you wish to add to your prompt, press
.
2
and
continue your prompt as described in step 3.
To erase and re-record your prompt, press
3
Default System Prompts
The following is a list of all pre-recorded prompt numbers and their text. The Japanese prompts have the
equivalent text in the same prompt numbers. If you
change any of the prompts, you should create a chart
like this one, showing the new text.
NOTE: If you change the text of the prompts, be sure
you keep the content similar to the default text. Otherwise, the prompts will not make sense to the listeners
when played by AXXESSORY Talk.
# PROMPT
001 To leave a message, please enter a mailbox
number.
002 For the directory, press POUND.
003 To reach an operator, press 0.
004 I’m sorry...
005 ...is not available.
006 The number entered is not valid.
007 Using the keys on your telephone, please
spell the last name of the person, then press
POUND. For the letter Q, press 7. For the
letter Z, press 9.
008 To exit the directory, press STAR.
009 Mailbox number...
010 If this is correct, press POUND.
011 For the previous name in the directory,
press 1.
012 To hear additional information, press 2.
013 To hear the next directory name, press 3.
014 To spell a new name, press 4.
015 Extension number...
017 ...is not a valid choice.
018 Please try again.
.
Page 53 of 73
Page 54

ADDENDUM TO ISSUE 4 OF THE AXXESS MANUALOCTOBER 1997
# PROMPT
019 After the tone, please record your message.
When finished, you may hang up to deliver
the message or press POUND for more op-
tions.
020 Message delivered.
021 To replay, press 1.
022 To erase and re-record, press 3.
023 To append this recording, press 2.
024 To accept, press POUND.
025 Please record after the tone. To end, press
POUND.
026 Recording erased.
027 Recording stopped.
028 Please begin speaking after the tone.
029 Message play stopped. To continue, press
POUND.
030 Enter the destination mailbox or group list
number.
031 Logon canceled.
032 Enter your password. Then press POUND.
033 There have been 3 invalid attempts to log
onto your mailbox.
034 Invalid password.
035 Thank you for calling. Good-bye.
036 To access voice mail features, you must
change your system-assigned password.
037 You have not finished setting up your mail-
box.
038 Subscriber access denied.
039 Because this is the first time you are enter-
ing your mailbox, you must record your
name for the company directory.
040 Since you are entering your mailbox for the
first time, you should be aware of a few
standard features. To cancel an option you
have accessed and return to the previous
menu, press STAR. To accept your record-
ing or dialing sequence, or to advance to
your next message, press POUND. For help,
you may press 0 at any time you are at a
menu and voice mail will replay the current
menu and or give you additional informa-
tion. Certain voice mail features such as
remote messaging are available from your
mailbox only if authorized by your system
administrator. Your mailbox is now fully set
up.
# PROMPT
041 Your password may be up to 12 digits.
042 Enter your new password, then press
POUND. If you don’t want a password,
press POUND now.
043 You new password is...
044 The number entered is too long.
045 To accept this entry, press POUND.
046 To erase and re-enter, press 3.
047 Password erased.
048 Password saved.
049 Your mailbox is full a nd cannot receive any
new messages. Please delete old messages.
052 Your mailbox is almost full. Please delete
any messages you no longer need so new
messages may arrive.
053 You have...
054 You have one new message.
055 ...new messages.
056 ...of which is priority.
057 You have no new messages.
058 You have one saved message.
059 ...saved messages.
060 Remote messaging is currently enabled.
061 To listen to new messages, press 1.
062 To record a message, press 2.
063 To listen to saved messages, press 3.
064 For personal options, press 4.
065 To setup remote messaging, press 5.
066 For your primary setup, press 1.
067 For your alternate setup, press 2.
068 If this is the correct destination, press
POUND.
069 To send this message now, press POUND.
070 For special delivery options, press 9.
071 To return to the previous menu, press
STAR.
072 Message canceled.
073 To mark this message private, press 1.
074 To mark this message for certified delivery,
press 2.
075 To mark this message priority, press 3.
Page 54 of 73
Page 55

ADDENDUM TO ISSUE 4 OF THE AXXESS MANUAL OCTOBER 1997
# PROMPT
076 Message marked private.
077 Message marked certified.
078 Message marked priority.
079 To send this message to additional mail-
boxes, press POUND.
080 To backup within your message or record-
ing, press 1.
081 To pause at any time, press 2.
082 To advance press 3.
083 To lower the voice mail volume, press 4.
084 To increase volume, press 6.
085 To save this message, press 7.
086 To delete this message, press 9.
087 To skip to the end of your message or re-
cording, press POUND.
088 To return to the main menu, press STAR.
089 To reply to this message, press 2.
090 To forward a copy of this message to anoth-
er destination, press 3.
091 To skip back to the previous message, press
4.
092 To replay the message envelope, press 5.
093 To listen to your next message, press 6.
094 There are no previous messages.
095 Message saved.
096 Message deleted.
097 There are no further messages.
098 Message received...
099 ...at...
100 ...from...
101 ...totaling...
102 ...minutes...
103 ...minute...
104 ...seconds...
105 ...second...
106 Message received from an outside caller.
107 To record an introduction with a copy of
this message, press 1.
108 To change your personal greeting, press 1.
109 To change your name in the directory, press
2.
# PROMPT
110 To change your password, press 3.
111 To change your message envelope, press 4.
112 To replay the message, press 1.
113 To use your primary greeting, press 1.
114 To select your alternate greeting, press 2.
115 To select the system greeting, press 3.
116 After the tone, please record your greeting,
then press POUND.
117 Greeting saved.
118 After the tone, please record your name,
then press POUND.
119 Name saved.
120 Your message envelope is currently set to
return...
121 ...all information.
122 ...time and date...
123 ...message source...
124 ...and...
125 ...message length...
126 To turn on all envelope options, press 4.
127 For message source, press 2.
128 For message length, press 3.
129 This option is now off.
130 This option is now on.
131 For time and date, press 1.
132 Your message envelope will play all op-
tions.
133 ...is turned on t o call you at...
134 AM
135 PM
136 ...Extension ID number...
137 ...Every day.
138 ...Monday through Friday.
139 Sunday
140 Monday
141 Tuesday
142 Wednesday
143 Thursday
144 Friday
Page 55 of 73
Page 56

ADDENDUM TO ISSUE 4 OF THE AXXESS MANUALOCTOBER 1997
# PROMPT
145 Saturday
146 To turn this number on or off, press 1.
147 To change the phone number, press 2.
148 To change times of day, press 2.
149 To change days of the week, press 3.
150 For pager notification, press 1.
151 For personal phone notification, press 2.
152 For notification of all new messages, press
1.
153 For priority-only, press 2.
154 Please enter the destination telephone num-
ber and wait for further instructions.
155 The new number is...
156 Please enter the start time.
157 Please enter the stop time.
158 I’m sorry. You must program a telephone
number first.
159 Invalid time.
160 For AM, press 1.
161 Please select the days of the week on which
you wish to be notified.
163 Please enter your mailbox number.
164 Today
165 Yesterday
166 January
167 February
168 March
169 April
170 May
171 June
172 July
173 August
174 September
175 October
176 November
177 December
178 First
179 Second
180 Third
181 Fourth
# PROMPT
182 Fifth
183 Sixth
184 Seventh
185 Eighth
186 Ninth
187 Tenth
188 Eleventh
189 Twelfth
190 Thirteenth
191 Fourteenth
192 Fifteenth
193 Sixteenth
194 Seventeenth
195 Eighteenth
196 Nineteenth
197 Twentieth
198 Twenty-first
199 Twenty-second
200 Twenty-third
201 Twenty-fourth
202 Twenty-fifth
203 Twenty-sixth
204 Twenty-seventh
205 Twenty-eighth
206 Twenty-ninth
207 Thirtieth
208 Thirty-first
209 ...the voice mail system.
210 The system is set to notify you between...
211 ...is turned off.
212 ...is turned on t o call your pager at...
213 ...with all new messages.
214 ...with all priority messages.
215 ...starting at...
216 ...ending at...
217 For mailbox and group list maintenance,
press 2.
218 To send a message to all subscribers, press
1.
Page 56 of 73
Page 57

ADDENDUM TO ISSUE 4 OF THE AXXESS MANUAL OCTOBER 1997
# PROMPT
219 To make a custom recording, press 1.
220 To select a custom recording, press 2.
222 Please enter the recording number.
223 After the tone, please record. Then press
POUND.
224 Recording saved.
225 To continue recording, press POUND.
227 No saved messages.
228 To change and spell the first name, press 5.
229 To change and spell the last name, press 5.
230 Using the keys on your telephone, please
spell the first name of the person. Then
press POUND. For the letter Q, press 7. For
the letter Z, press 9.
231 No message left.
232 ...last...
233 ...an outside caller at...
234 Message was sent from...
235 This matches the mailbox of...
236 ...an unknown caller.
237 To turn off the envelope, press 5.
238 To accept the changes, press POUND.
239 The envelope is turned off.
240 Please enter the application extension num-
ber.
241 To select a day recording, press 1.
242 To select a night recording, press 2.
243 If this is the correct recording, press
POUND.
244 Warning, no recording has been made.
245 Invalid application entered.
246 ...is not a valid recording number.
253 This is a return receipt verifying the mes-
sage sent has been heard.
254 I’m sorry. Private messages cannot be for-
warded.
255 This is the message center calling for...
256 If you are the correct person, press POUND.
257 ...One
258 ...Two
259 ...Three
# PROMPT
260 ...Four
261 ...Five
262 ...Six
263 ...Seven
264 ...Eight
265 ...Nine
266 ...Ten
267 ...Eleven
268 ...Twelve
269 ...Thirteen
270 ...Fourteen
271 ...Fifteen
272 ...Sixteen
273 ...Seventeen
274 ...Eighteen
275 ...Nineteen
276 ...Twenty
277 ...Thirty
278 ...Forty
279 ...Fifty
280 ...Sixty
281 ...Seventy
282 ...Eighty
283 ...Ninety
284 ...Hundred
285 This mailbox is currently full and cannot
receive new messages.
286 Oh
287 ...of which are priority.
288 Priority message received...
289 Otherwise, press STAR.
290 When you are finished entering mailbox
numbers, press POUND.
291 Otherwise, press POUND.
292 For PM, press 2.
293 For Sunday, press 1.
294 For Monday, press 2.
295 For Tuesday, press 3.
296 For Wednesday, press 4.
Page 57 of 73
Page 58

ADDENDUM TO ISSUE 4 OF THE AXXESS MANUALOCTOBER 1997
# PROMPT
297 For Thursday, press 5.
298 For Friday, press 6.
299 For Saturday, press 7.
300 For Monday through Friday service, press 1.
301 For all the days of the week, press 2.
302 Thousand
303 The hard disk is...
304 ...percent full.
305 I’m sorry. Voice mail is full and cannot re-
cord any messages.
306 Zero
307 POUND
308 STAR
309 Group list number...
310 Please speak louder.
311 You have recorded for the maximum time
permitted.
313 Resuming playback.
314 You have one priority message.
315 Use 2 digits for the hour and 2 digits for the
minutes.
318 You have chosen not to have a password.
319 I’m sorry. This mailbox is currently in use
and cannot be accessed. Please try again
later.
321 If you are calling from a rotary-type tele-
phone, please stay on the line and your call
will be answered.
322 You can not reply to a system sent mes-
sage.
323 Zero is not a valid entry. To spell a name,
please press one number on the telephone
key pad for each letter of the person’s name
you are entering. For the letter A, press the
number 2 key one time and for the letter F,
press the number 3 key one time. When you
are finished, press POUND.
324 Zero is not a valid entry. To spell a name,
please press the associated number on the
telephone keypad with the desired letter of
the person’s name you are entering. For the
letter A, press the number 2 key once. for
the letter B, press it twice and for the letter
C, three times. When you are finished, press
POUND.
# PROMPT
325 Please select the days of the week.
326 To select individual week days, press 3.
327 Service is set for Monday through Friday.
328 Service is set for each day of the week.
329 Recording canceled.
330 The system was busy and could not deliver
message notification at the specified time.
331 The system was unable to deliver message
notification due to a programming error.
332 Extension ID...
333 ...the operator.
334 ...the operator...
335 Remote Messaging will call...
336 To change a cascade level, press 1.
337 To select a message notification category,
press 4.
338 Please enter the cascade level you wish to
program.
339 ...with a pager number of ...
340 To change the pager dial string, press 3.
341 To call an internal extension, press 1.
342 To call an outside number, press 2.
344 Please enter the digits for your digital pager
and wait for further instructions.
345 The new pager number is ...
346 Mailbox Number
347 New Message Count
348 Pause
349 You must program a telephone number first.
350 You have chosen not to have a pager num-
ber.
351 Cascade Level...
352 You did not enter a valid document number.
353 This document is currently unavailable.
354 ... is not a valid document number.
355 You have already selected that document.
356 To cancel, press STAR.
357 You have selected the maximum number of
documents allowed.
358 To send your fax, press pound.
359 You have selected one document.
Page 58 of 73
Page 59

ADDENDUM TO ISSUE 4 OF THE AXXESS MANUAL OCTOBER 1997
# PROMPT
360 You haven’t selected any documents yet.
361 You may select one more document during
this call.
362 You may select up to ...
363 ... more documents during this call.
364 Selections Canceled.
365 The number that will appear on your fax
cover sheet is...
366 You have chosen not to have your extension
appear on your cover sheet.
367 If you would like to have your fax automat-
ically delivered to you later, press pound.
368 To re-enter the number, press 3.
369 If you wish to have your extension appear
on your cover sheet, enter the extension fol-
lowed by the POUND key.
370 If you are calling from your fax machine,
press 1.
371 Press the start button on your fax machine
now.
372 All of our fax lines are currently busy.
373 Please try again later.
374 Your fax will be delivered to ...
375 Your fax will be delivered shortly.
376 I am unable to communicate with your fax
machine. Please make sure it is operating
properly and try again.
377 Please enter the 10 digit area code and tele-
phone number of your fax machine.
378 The number you enter may be up to twenty
digits in length.
379 Your fax is scheduled to be delivered at...
380 Please enter a document number.
381 When you have finished importing docu-
ments, press star.
382 Document number...
383 ...is currently in use.
384 ...already exists.
385 To replace this document, press POUND.
386 Document received.
387 Press POUND to continue.
388 To import a fax document, press 4.
# PROMPT
389 If this is an international call, enter 011 fol-
lowed by your country code and your fax
number. Then, press POUND.
390 I’m sorry. I’m not allowed to dial that num-
ber.
391 To receive your documents, please hang up
and call from your fax machine.
392 The system does not have enough disk
space to import your document.
393 The system is unable to import your docu-
ment because it will exceed the Maximum
Fax Library Size.
394 For recording options, press 3.
395 There are...
396 ... calls ahead of you.
397 Your call should be answered within...
398 You have selected...
399 ...documents.
400 Hello, you’ve reached our voice messaging
system.
401 Hello, you’ve reached our automated call
handling system.
500 If you know your party’s extension number,
enter it now.
501 To leave a message, press 1.
502 To try another extension, press 2.
503 Please hold while your call is being trans-
ferred to...
505 To return to the menu, press 2.
506 Your fax is scheduled to be delivered on...
507 The system already contains the maximum
number of fax documents allowed.
508 The system does not have enough disk
space to import any more documents.
509 The system is currently at or above the
Maximum Fax Library Size.
510 Levels 1 through 9 are currently disabled.
511 Your call will be answered in the order it
was received.
512 There is one call ahead of you.
513 To change your transfer method, press 5.
514 Your current transfer method is unan-
nounced.
515 Your current transfer method is screened.
Page 59 of 73
Page 60

ADDENDUM TO ISSUE 4 OF THE AXXESS MANUALOCTOBER 1997
# PROMPT
516 Your current transfer method is announce
only.
517 To select unannounced transfers, press 1.
518 For screened transfers, press 2.
519 For announce only, press 3.
520 Who should I say is calling?
521 To replay the announcement, press 1.
522 To send this call to voice mail, press 2.
523 To forward this call to another extension,
press 3.
524 To accept this call, press POUND.
525 To refuse this call, press STAR.
526 You have a call from...
535 Please enter the extension number.
536 Time updated.
537 Date updated.
538 For system prompt replacement or reinstate-
ment, press 6.
539 Please enter the number of the system
prompt.
540 The system prompt has been replaced by
the following custom prompt...
541 The original system prompt is...
542 To replace this system prompt with a cus-
tom prompt, press 3.
543 ...is not a valid system prompt number.
544 To delete the custom prompt and reinstate
the system prompt, press 9.
545 To replace this custom prompt with a new
custom prompt, press 3.
Digital Keyset Enhancements
The Executive, Standard, and Basic Digital Keysets
have the following enhancements:
•
The Executive, Standard, and Basic Digital Keysetsare now available withred/green LEDs. These
new keysets have a slightlydifferent faceplate layout than the previous versions. The new layouts
and key values are shown on the next page. In the
4.0 software version, the FWD, SPKR, MUTE, and
MSG keys were fixed-function keys and could not
be programmed. In version 4.2 and 4.3 software,
all keyset keys are programmable. (See pages
4–49, 6-54, and 6–59 in the manual for a list of de-
fault key values.)
•
The red/green LED functions are described in
more detail in the LED chart shown on page 62.
This replaces the chart on page 4–51 of the manual.
•
On these new keysets, an illustration on the key
(that looks like this
higher and lower volume levels. Press the lower
end in place of the down arrow and the higher end
in place of the up arrow.
•
The new red/green LED keysetsalsohave a different keycap on the Special Key; instead of
the keys have
•
The new red/green LED Standard and Basic key-
∞
on the keycap.
sets also have an extended volume range. The volume settings now range from 1 to 7, with db levels
of –12, –8, –4,0, +4, +8, and +12 respectively.The
Executive keyset volume range is unchanged, with
settings from 1–8 (db levels of –12, –8, –4, 0, +3,
+6, +9, and +12 respectively).
•
The red/green LED Executive keysets do not have
the six display-oriented keys (PREVIOUS, NEXT,
BACKSPC, FORWARD, CLEAR, CANCEL).
•
Standard Digital Keysetsare nowavailable as display models only.
) represents
SPCL
,
•
Page 60 of 73
Only digital keysets can be usedfor viewing Japanese prompts. Analog keysets do not support Japanese displays.
Page 61

ADDENDUM TO ISSUE 4 OF THE AXXESS MANUAL OCTOBER 1997
Digital Keyset Layouts:
EXECUTIVE KEYSET
123456
789101112
STANDARD KEYSET
1
2
3
4
5
6
10
11
12
7
8
9
1
2
3
4
BASIC KEYSET
5
6
12
11
13 14
15 16
32
27
3130
26
28 29
13 14
15 16
32
27
28 29
3130
26
13 14
15 16
32
27
28 29
3130
26
The keys are numbered to show the functions of the keys on the various maps. (Note that when a key is changed on
one map, the corresponding key on any other keyset t ype in that map is automatically changed to match.) Blank keys
are not programmable. The keys are defined as follows in the default key maps shown above:
KEY DEFINITION
1 Call Key 1
2 Call Key 2
3 Call Key 3
4 Call Key 4
5 IC (Intercom)
6 Programmable Key 1: Do-Not-Disturb
7 Programmable Key 2: Undefined
8 Programmable Key 3: Undefined
9 Programmable Key 4: Undefined
10 Programmable Key 5: Undefined
11 Programmable Key 6: Undefined
12 Programmable Key 7: Conference
13 Programmable Key 8: Individual Hold
14 Programmable Key 9: Transfer To Ring
15 Programmable Key 10: System Speed Dial
16 Programmable Key 11: Redial
26 Forward
27 Special (SPCL)
28 Answer
29 Outgoing
30 Speakerphone On/Off
31 Message
32 Microphone Mute
Page 61 of 73
Page 62

Keyset Light-Emitting Diode (LED) Indications
ADDENDUM TO ISSUE 4 OF THE AXXESS MANUALOCTOBER 1997
DATA
IC
SPKR
CNF
MUTE
FWD
MSG
DND
SPEED
DIAL or
DSS
HUNT
GROUP
CALL
TRUNK
STEADY
0IPM
Auto--dial modem is
dialing and the data
port is unavailable.
(Red LED)
Speakerphone is on
or ready for use. Or,
station programming
is in progress. (Red
LED)
Microphone is
muted. (Red LED)
Calls are being for-warded. (Red LED)
Station is in alphanu-meric mode. (Red
LED)
Your station is in
do--not--disturb. (Red
LED)
Station is busy or
unplugged. (Red
LED)
All stations in hunt
group are unavail-able. (Red LED)
Trunk is in use at
another station, in a
conference at your
station, or is un-plugged. (Red LED)
SLOW
30 IPM
Intercom call is in
progress. (Green
LED*)
Conference is in
progress. (Green
LED*)
Station is in do--not-disturb. (Red LED)
Call is active at your
station. (Green
LED*)
Trunk is in use at
your station. (Green
LED*)
MEDIUM
120 IPM
Recalling intercom
call is camped on.
(Green LED*)
Conference is recal-ling your station.
(Green LED*)
Message is waiting.
(Red LED)
Call is recalling from
hold or transfer.
(Green LED*)
Trunk is recalling
from hold or trans-fer. (Red LED)
FAST
240 IPM
Ring signal is being
sent to the data de-vice. (Red LED)
Intercom call is
camped on (waiting).
(Green LED*)
Station has a call
ringing in. (Red
LED)
Hunt group has a
call camped on. (Red
LED)
Call or queue call-back is ringing in or
camped on (waiting).
(Green LED*)
Trunk is ringing in
or camped on (wait-ing). (Red LED if on
another station or
green if at your sta-tion*)
Or, busy trunk queue
callback to your sta-tion. (Green LED*)
FLUTTER
60/960 IPM
Data call is in prog-ress and accessible.
A continuous flutter
indicates that the
data device is off
hook. (Red LED)
Intercom call is on
hold. (Green LED*)
A conference party
is on conference wait
hold. (Green LED*)
Continuous flutter
indicates that the sta-tion was left off
hook. (Red LED)
Call is on hold.
(Green LED*)
Trunk is on hold.
(Red LED if on
another station or
green if at your sta-tion*)
*This applies only to keysets with red/green LEDs.
Page 62 of 73
Page 63

ADDENDUM TO ISSUE 4 OF THE AXXESS MANUAL OCTOBER 1997
←
NEW OPTION
“Enable Database Server Compression”
Preferences Flag
As shown above, a new “Enable DatabaseServerCompression” flag was added to the Preferences drop-down
menu in the Main programming screen. W hen this flag
is checked, database programming information going
through the CPU to the AXXESSORY Talk PC will be
compressed to speed up data transfers.
When the system is in the default state, the database
information from the AXXESSORY Talk PC to the
CPU is also compressed. This can be decompressed by
entering a command at the AXXESSORY Talk PC.
The command is _dbcompression=1<RETURN> for
compression and _dbcompression=0<RETURN> for
non-compression.
CAUTION: At default, data compression is enabled
both through the CPU and through the AXXESSORY
Talk PC. You should not disable either flag unless
instructed to do so by Inter-Tel personnel.
Page 63 of 73
Page 64

ADDENDUM TO ISSUE 4 OF THE AXXESS MANUALOCTOBER 1997
←
NEW FLAG
“Forced Delayed Major Reset” System
Flag
As shown above, a new “ForcedDelayed Major Reset”
flag was added to the System Flags screen.
Normally, the system will not perform a major reset if
there are any active calls. However, if this flag is enabled, the system will force a major reset at a specified
time. The time is either the default delayed major time
or the user-specified delayed major time programmed
in the MiscellaneousSystem-WideInformation screen.
The default for this flag is “Disabled.”
The major reset willcauseall active calls on thesystem
to be dropped. Because of this, the flag should be used
only on systems which run on a 24-hour basis and do
not have a consistent time, when all resources are idle,
during which a normal delayed major reset can be performed.
This flag affects any request to perform a major reset,
whetherit be by the systemitselffor resource reconciliation, or requested by the programmer through the Database Save/Restore screen, Reset System command.
NOTE: If this flag is enabled, the installer should inform the customer that enabling this flag will drop all
active calls at the specified delayed major time, should
a major reset be necessary. This will not happen every
day, but it will happen occasionally. The customers
should be aware of this so that they do not mistake the
reset for a system failure.
Page 64 of 73
Page 65

ADDENDUM TO ISSUE 4 OF THE AXXESS MANUAL OCTOBER 1997
NEW OPTION
→
“CO Provides Progress Tones” T1
Programming Flag
As shown above, the “CO Provides Progress Tones”
flag was added to the Trunk Programming — T1 Programmingscreen. This flag is used for T1C andT1/PRI
boards only.
This flag was added because, when the AXXESS System provides local ringback, some central offices take
too long to send the AXXESS System the connect messagewhenacall is received. (This is particularly true in
the UK.) When the CO connects a call too slowly, the
AXXESS user can answer before the caller is on the
line, causing the caller to miss the greeting (such as
“Welcome to Inter-Tel. How may I help you?”).
If this flag is enabled, the AXXESS System does not
provide local ringback. Instead, the AXXESS connects
the call to the line and the caller hears CO ringback.
That way, when the called party answers, the calling
party is already on the line.
The flag is shown disabled in the sample screen above,
because it is disabled by default. Most siteswill not require this flag and it is best to leave it disabled unless
the delayed-connect problem occurs.
Page 65 of 73
Page 66

Canadian Information
The AXXESS System has been tested and certified for
installation in Canada. Following is a list of Industry
Canada regulations which are similar to the FCCregulations already included in the manual.
INDUSTRY CANADA REGULATIONS
ADDENDUM TO ISSUE 4 OF THE AXXESS MANUALOCTOBER 1997
NOTICE: The Industry Canada label identifies certi-
fiedequipment.Thiscertificationmeansthattheequipment meets certain telecommunications network
protective, operational, and safetyrequirementsas prescribed in the appropriate Terminal EquipmentTechnical Requirements document(s). It does not guarantee
the equipment will operate to the user’s satisfaction.
1. Before installing this equipment, users should ensure that it is permissible to be connected to the
facilitiesofthelocal telecommunicationscompany.
The equipment must also be installed using an
acceptable method of connection. The customer
should be aware that compliance with the above
conditions may not prevent degradation of service
in some situations.
2. Repairs to certified equipment should be coordinated by a representative designated by the supplier. Any repairs or alterations made by the user to
this equipment, or equipment malfunctions, may
give the telecommunications company cause to request the user to disconnect the equipment.
3. Users should ensure for their own protection that
the electrical ground connections of the power utility, telephone lines and internal metallic waterpipe
system, if present, are connected together. This precaution may be particularly important inruralareas.
CAUTION: Usersshould not attempt to make such
connections themselves, but should contact the
appropriate electric inspection authority, or electrician, as appropriate.
4. The Ringer Equivalence Number (REN) of this
device is:
1.1
NOTICE: The REN assigned to each terminal device provides a n indication of the maximum number of terminals allowed to be connected to a telephone interface. The termination on an interface
may consist of any combination of devices subject
only to the requirement that the sum of the Ringer
Equivalence Numbers of all the devices does not
exceed 5.
5. The standardconnectingarrangementcodesforthis
equipment are:
CA11A
CA21A
CA81A
CA48C
Page 66 of 73
Page 67

ADDENDUM TO ISSUE 4 OF THE AXXESS MANUAL OCTOBER 1997
CHANGES AND CORRECTIONS TO THE ISSUE 4 AXXESS MANUAL
Please note the following changes and corrections to
Issue 4 of the manual.
Various locations throughout the manual: Japanese
prompts can be viewed only on “digital” display key-
sets. Analog keysets do not support Japanese displays.
Page xx, step 1: Add the following to the list of FCC
registration numbers: BE2USA–24359–PF–E.
Page xxi: The FCC chart at the top of the page should
contain the changes/additions shown in the chart at the
bottom of this page.
Page xxii: The AXXESS system is now product safety
certified by Canadian Standards Association (CSA)for
use in both the United States and Canada.
Page 1–9: The maximum number of AXXESSORY
Consoles that can be installed on the system (dual or
quad) is four.
Pages 2–2, 2–23, 3–74, 4–42, 4–53, and 8–2: The volume adjustment range of non-AIM and non-DVK analog keysets may not be suitable in all user environments. In such cases, Inter-TelrecommendsusingAIM
and/or DVK keysets, if possible.
Pages 2–5, 2–19, 3–68, and 6–142: Add the following
note to these pages. NOTE: In tri-/quad-cabinet installations, the master T1C (ifone exists) should be located
in the master dual-cabinet.
Page 2–6, paragraph 3.13: Some of the dimensions
listed for the new-style dual-cabinetKSUareincorrect.
The height should be 10.5 in. (26.7 cm.), the width
should be 33.0 in. (83.8 cm.), and the depth should be
11.5 in. (29.2 cm.).
Page 2–8, paragraph3.22,NOTE: Delete “automated
attendants” from this note. Automated attendants use
the DTMF receivers on the AXXESSORY Talk Voice
Processing Card(s).
Page 2–12, paragraph 3.52, first bullet: The relay
jack information for the CPU/MEM Card should read:
The output is two normally-open (deactivated) singlepole double-throw (SPDT) relays that are held closed
(activated) at the same time during system operation.
Page 2–14, first bullet: Add the following fiber-optic
cable specifications:
Fiber Diameter
62.5/125 (outer/inner
core in microns)
Mode Multi-mode
Wavelength 820nm
Maximum Attenuation 5db/km
Minimum Bandwidth 50MHz
Terminating Connector ST.
Pairs 1
Maximum Length 1km
B–L Product 20MHz
Page 2–14, second column, second bullet: The relay
jack information for the CPU020/PCM Card should
read: The output is one normally-open (deactivated)
double-pole double-throw (DPDT) relay (actually
wired as SPDT) that is held closed (activated) during
system operation.
Pages 2–24, 3–80, and 8–5: The original model
PCDPM (part no. 550.3014) has been replaced with a
new model (part no. 550.3018) that does not require an
external AC transformer. Refer to the revised installation instructions included with the new unit.
Pages 2–24, 3–83, and 8–5: The MDPM (part no.
550.3015) now includes an AC transformer; it no longer needs to be ordered separately.
Page 2–33, paragraph 5.2, second bullet: The second
sentence in the note following the bullet should be
changed to read: Also, for systems with 16 or more
ports, the PC Motherboard should be equipped with
16MB RAM.
Page 2–38, paragraph 6.20: Add the following note to
the drawing. NOTE: On the CPU020/PCM Card, R1C
is wired in parallel to R2C, R1NCiswiredin parallel to
R2NC, and R1NO is wired in parallel to R2NO.
Pages 3–39 and 3–45: The drawing on page 73 of this
addendum contains some additional grounding information from DITEK. (Inter-Tel’s Factored Products
division sells DITEK surge/spike protectors.)
TYPE OF PORT
INTERFACE
FACILITY INTERFACE
CODE (FIC)
RINGER EQUIV-
ALENCE NO. (REN)
SERVICE ORDER
CODE (SOC)
USOC JACK
CONNECTOR
2-Wire Loop 02LS2 0.6B — RJ21X
2-Wire Loop/Ground 02LS2/02GS2 3.6B/4.4B — RJ21X
Primary Rate 04DU9–1SN — 6.0Y RJ48C
Page 67 of 73
Page 68

ADDENDUM TO ISSUE 4 OF THE AXXESS MANUALOCTOBER 1997
Page 3–59, paragraph 8.18: The middle part of the
sentence should read: ...(as measured in step 6 on page
3–48, 3–51, or 3–54)...
Page 3–59, paragraph 8.18, step 2: The end of the
sentence should read: ...(see Figure 3–30, 3–31, or
3–32 on page 3–49, 3–52, or 3–55).
Page 3–75, step 11: Some keyset models (even newer
ones) do not have potentiometers.
Page 3–78, paragraph 9.10, step 4 and page 3–80,
paragraph 9.12, step 4: Add the following note to step
four. NOTE: If installing the unit on a digital keyset
equipped with red LEDs only, use the original
PCDPM-to-keyset interface cable (part no. 813.1567).
If installing the unit on one of the new digital keysets
equipped with both red and green LEDs, use the new
cable (part no. 813.1634) now included with each unit.
Page 3–78, paragraph 9.10, step 3 and page 3–80,
paragraph 9.12, step 3: Add the following informa-
tion to the note following step three:
Initially, some of thenew digital keysets equippedwith
both red and green LEDs did not have a plastic knockout in the upper portion of the back of the keyset to allow easy connection to the keyset control board.
Instead, you must open the back of the keyset (secured
by four screws) and route the cable through the plastic
knockout in the lower portion of the back housing, just
as you would if you were wall-mounting the keyset.
Page 3–107, step 5b: The first part of the sentence
should read: Depending onwhich number VPC(1–3)...
Page 3–121, paragraph 13.2, step 6a (the second
one): The end of the sentence should read: ...(default is
91000 for the CPU 256 or CPU 512 Master and 91001
for the CPU 512 Slave).
Page 4–6, Default Station feature code: The description should read: This single feature code cancels ac-
count code for all calls following, do-not-disturb,
manual call forwarding, background music, ring intercom always, and queue requests. It restores handsfree
mode, pages, hunt group calls, and system forwarding
and it returns keyset volumes to default values.
Page 4–11, paragraph 4. 3, second bullet: The first
sentence should be: If the call isnot seized and not sent
to a station, the caller will hear ringing until he or she
hangs up.
the primary attendant station and causes the CNF key
to flash...
Page 4–12, paragraph 4.15: Add the following sen-
tence: The Unsupervised CO timer is ignored and the
Abandoned Call timer is determines how long the call
will recall the station before it is disconnected.
Page 4–12, paragraph 5.4: Addthistotheendofthe
paragraph: There can be up to 5000 entries in a tripleor quad-cabinet system.
Page 4–13, paragraph 6.7: Several minor changes
have been made to make the hunt group explanation
clearer. The new information should read as follows:
Hunt group stations receive the following indications
when a call is ringing in:
•
Ifan outsidecall is ringing,thestation designatedto
receive the call first shows ring flash on the
associated individual trunk key (if it has one) or a
Call key until thecall is answered or the NoAnswer
Advance timer expires and the call moves to the
next station.
•
If hunt group camp on is allowed and all stations on
the hunt group list are unavailable (busy, in do-notdisturb, or with hunt group remove enabled), an intercom or outsidecall willcamp on and the stations
will receive the following indications:
— Busy stations receive hunt group camp-on tones
(if enabled) and display. If there is an individual
trunk key associated with the trunk, it shows
ring flash. (There is aprogrammable station flag
that can disable the camp-on tones for hunt
group calls. See PROGRAMMING, page 6–31.)
— Stations with Hunt Group Remove enabled re-
ceive camp-on tones and display. If there is an
individual trunk key associated withthe trunk, it
shows ring flash.
— Stations with Do-Not-Disturb enabled receive
no camp-on indications, but if there i s an individual trunk key associated with the trunk, it
shows ring flash.
— The first station that becomes availablereceives
ringing and a flashing trunk or Call key. The
camp-on and ring flash indications end at the
other stations. (The associatedtrunk key will be
steadily lit at those stations to show that the
trunk is busy.)
Page 4–12, paragraph 4.12: It should read as follows:
If a station user transfers or forwards an outside call to
an outside telephone number, it becomes an “unsuper-
vised” CO-to-CO call because no inside parties are involved. The CO-to-CO call is limited by the UnsupervisedCOtimer. When the timer expires, the callrecalls
Page 68 of 73
•
If hunt group camp on is not allowed and all stations on the hunt grouplist are unavailable, the hunt
group members will not have any camp-on indications. (See page 6–86 for camp-on flag programming information.) Callers will hear one of the following:
Page 69

ADDENDUM TO ISSUE 4 OF THE AXXESS MANUAL OCTOBER 1997
— Intercom callers will hear busy signals.
— Callers on a trunk that does not have to be
seizedforAXXESSto return busy signal (such as
a T1 E&M) will hear busy signals.
— Callers on a trunk that has to be seized for
AXXESS to returnbusy signal (such as a non-T1
loop-start) will hear ringing and the call will be
sent to the primary attendant.
Page 4–14, paragraph 6.11, second bullet: The first
sentence should read as follows: Stations that are busy
and have their calls unconditionally forwarded...
Page 4–14, paragraph 6.13, last bullet and page
6–87, last timer: The Average Connect Time Per Call
timer is available only in UCD hunt groups. ACD hunt
groups can onlyuse the timer if they are also flagged as
UCD.
Page 4–16, paragraph 6.31: This paragraph should
read as follows: UCD priority levels range from 0(low)
to 75 (high). If a station is a member of multiple hunt
groups that have the same priority level, calls received
by those hunt groups will be queued in the order they
were received by the phone system. (Non-UCD hunt
groups are treated as if they have a priority level of 0.)
Page 4–17, paragraph 6.33: Single-line stations can
be programmed as hunt group supervisors. Therefore,
the first sentence should read: In database programming, each hunt group can have one or more
assigned as the hunt group supervisor(s).
Page 4–17, paragraph 6.36: The first sentence should
read: If the supervisor attemptsto monitora station that
is not on an active call that allows monitoring, the system sends reorder tones and the supervisor must enter
the feature code again to try another number.
Page 4–17, paragraph6.37:Addthefollowing:Multiple supervisors can monitor the same station, providing
that a conference circuit is available for each supervisor.
Page 4–17, paragraph 6.39: In step 2, the MUTEkey
does not light. In step 3, remove the “OR” statement.
The step should read as follows:
(3) To monitor another hunt group member’s
call: Enter the Station Call Monitoring feature
code (321), and dial the extension number (or
press the speed-dial key).
Page 4–21, paragraph 7.3: The second sentence
should read as follows: While on a dial-pulse trunk, a
station user can switch from dial-pulse to DTMF signals by pressing the pound (#) or asterisk (*) keys.
stations
Page 4–28, paragraph7.39, third bullet: It should refer to page 6–31 instead of page 6–97.
Page 4–29, paragraph 7.42: The second sentence
should read as follows: If the camp-on feature is disabled, callers will hear continuous busy signals when
all trunks in the trunk group are in use or unavailable.
Page 4–30, paragraph 7.53, second sample: The first
sentence should say: This is an ANI table for various
area codes.
Page 4–33, paragraph7–55, third bullet: Add this information:IfSMDR is enabled, the modified telephone
number, not the dialed digits, appear in the SMDR call
record.
Page 4–34, paragraph 7.61: The third sentence should
read as follows: However, if the trunk is marked as
“subject to toll restriction” and the user attempting to
make the outgoing call dials one or more digits before
realizing that there is an incoming call, and the digits
dialed represent a restrictednumber for the station and
trunk group being used, the call will be dropped (unless
the “Drop Incomplete Outgoing Calls” flag is disabled
as described on page 6–98 in PROGRAMMING).
Pages 4–46, 6–54, and 6–59, descriptions of keys:
Change the descriptions for the following two keys:
•
Down Key: (This key type is not required for digital
keysets.) No further programming is necessary.
This key can be used scrolling backward through
displays. When the keyset is idle, it can be used for
adjusting volume, in place of the VOLUME key.
(Digital Keysets use the VOLUME DOWN key.)
•
Up Key: (This key type is not required for digital
keysets. It is intended for analog keyset use.) No
further programming is necessary. This key can be
used for scrolling forward through displays. When
the keyset is idle, it can be used for adjusting volume, in place of the VOLUMEkey. (Digitalkeysets
use the VOLUME UP key.)
Page 4–52, paragraph 8.65, second bullet and page
6–99, first bullet: The information should read as fol-
lows:
•
Use Green LEDs For Direct Ring: This flag determines whether direct ring-in calls cause a red or
green lamp. If the flag is enabled, direct ring-in
calls to your station will be green. If disabled, all
direct ring-in calls will cause the LED to be red. In
the default state, this flag is enabled.
Page 4–56, paragraph 8.90: The paragraph should
read as follows: With ring zones enabled, devices 1–3
on the card will ring first, 4–6 ring next, then 7–8.
Page 69 of 73
Page 70

ADDENDUM TO ISSUE 4 OF THE AXXESS MANUALOCTOBER 1997
Page 4–58, paragraph 9.3, NOTE: The last sentence
should read as follows: There can be upto 20 DSS/BLF
Units in the system.
Page 4–61, paragraph 12.4 and page 6–98, transfer
audio flag: Remove these paragraphs. The Transfer
Audio flag does not perform correctly, as described.
Callers will hear music-on-hold (or silence if a music
source is not available).
Page 4–87 to 4–88, paragraph 24.5, Step(5): There is
a cut-and-paste error in this step. The correct step is as
follows:
(5) Connect all waiting parties in the conference:
Executive Digital Keyset: Press the CONNECT TO CONFERENCE menu key. All parties are connected. (Display shows CNF IN
PROGRESS.) The CNFkeyanda Call key flash
slowly. You can use the following menu keys:
— HOLD: Press this key to place the confer-
ence on hold.
— DISCONNECT: Press this key to remove
your station from the conference. If there are
no other stations in the conference, all parties are disconnected. If there is still another
station in the conference, the parties remain
connected.
— ADD PARTY: This key appears only if you
have not reached the maximum number of
allowed parties. Press this key to leave the
conference parties connected while you
place another call to be added to the conference.
— MUTE: Press this key to turn the keyset mi-
crophone on or off during the conference.
— TRANSFER CNF: Press this key and enter
an extension number to transfer the conference to anotherstationor the Voice Mailapplication.
Other Keysets: Press the CNF key again. Or
press SPCL and enter 5 again. All parties are
connected. (Display keysets show CNF IN
PROGRESS.) The CNFkeyanda Call key flash
slowly.
Single-Line Set: When all partiesareonconference wait hold, hookflash and enter the Conference feature code (5). All parties are connected.
Page 4–90, paragraph 25.10 and page 6–215, paragraph: The Record-A-Call Maximum Message Length
overrides the mailbox’s maximum message length set-
ting. However, if a Record-A-Callmessage exceeds the
mailboxmaximummessagelength,themailboxwillbe
considered full until that Record-A-Call message isdeleted.
Page 4–92, paragraph 26.10: The first sentence
should be: If necessary, the requesting station in an
Agent Help call can use the Hold, Transfer, Record-ACall, or other features during the call, while the Agent
Help Extension is connected.
Page 4–98, paragraph 28.18: The paragraph should
read as follows: Stations with Forced Local Toll Call
and Forced Long-Distance Toll Call account codes
cannot forward calls to outside numbers.
Page 4–109, paragraph 32.6: Remove this paragraph.
It is not valid for the AXXESS System.
Page 4–114, paragraph 35.13, Keyset instructions:
The first sentence should read: Press the DND key or
press the SPCL key and then enter a Do-Not-Disturb
feature code (370 or 372).
Page 4–122, paragraph 40.16, step 4: Aportion of the
step is incorrect. The directionsforentering a complete
number should be as follows:
Enter acomplete number: Enter the extension
number using your keypad. When the circuit information is displayed, press # again to continue.
Page 4–124, paragraph 40.17, first bullet: The DoNot-Disturb messages are defined incorrectly. The correct messages are as follows:
01 DO--NOT--DISTURB 11 OUT OF TOWN ’TILL
02 LEAVE A MESSAGE 12 OUT OF OFFICE
03 IN MEETING UNTIL 13 OUT UNTIL
04 IN MEETING 14 WITH A CLIENT
05 ON VACATION ’TILL 15 WITH A GUEST
06 ON VACATION 16 UNAVAILABLE
07 CALL ME AT 17 IN CONFERENCE
08 AT THE DOCTOR 18 AWAY FROM DESK
09 ON A TRIP 19 GONE HOME
10 ON BREAK 20 OUT TO LUNCH
Page 4–125, paragraph 40.17, last bullet: The last
sentence should read: The new extension number cannot conflict with an existing number.
Page 4–131, Exempt From ARS and Subject to toll
restrictionprogramming instructions: The # after the
Yes or No response is not required. The instructions
should read as follows:
— Exempt from ARS: To program the Exempt from
ARS option, press 3 or the EXEMPT FROM
ARS menu key. When the display shows EXEMPT FROM ARS, press 1 or the YES menu
Page 70 of 73
Page 71

ADDENDUM TO ISSUE 4 OF THE AXXESS MANUAL OCTOBER 1997
key to enable the option. Or, press 2 or the NO
menukeyto disableit. Then press#or ACCEPT
to continue.
— Subject to toll restriction: To program the trunk
group Subject toToll Restriction option, press 4
or the SUBJECT TO TOLL menu key. When
the display showsSUBJECT TO TOLL, press 1
or the YES menu key to enable the option. Or,
press 2 or the NO menu key to disable it. Then
press # or ACCEPT to continue.
Page 4–131, Trunk List programming instructions:
In the last substep, the display should be ENTER
TRUNK EXTENSION (not STATION).
Page 4–140, paragraph 41.9: The Record All Incoming Calls option shouldsay: Records all incoming calls
that are answered, except DID/DNIS calls.
Page 4–142 DIALED DIGITS: Add this information:
If ARS was used to place the call, the modified telephone number, not the dialed digits, are shown.
Page 5–34, paragraph 9.5: The paragraph should read
as follows: If desired, the SMDR records can be retrieved and processed using Inter-Tel Inside Track, a
separate call accounting software package, to create
customized reports.
Page 6–4, section 28: Add the following entries tosection 28 of the table of contents.
G. System Serial Port Assignment 6–265...
H. System Serial Port Configuration 6–267.
I. T1 Diagnostics 6–269................
Page 6–44, paragraph 9.82, firstbullet:The fifth sen-
tence should say: COS designations 2–16 are program-
mable.
Page 6–47, paragraph 9.90: The first sentence should
say: The Voice Mail Information window is shown on
the next page.
Page 6–47, paragraph 9.91, firstbullet:There is not a
“None” option when programming a Record-A-Call
Mailbox. Therefore, the correct information is as follows:
•
Record-A-Call Mailbox and User Keyed Mailbox: Determine which mailbox, if any, will be
dialed automatically when the Record-A-Call feature is used. The Record-A-Call Mailbox can be
set to “Associated Mailbox” to call the mailbox
assignedto that station, orit can beset to any valid
mailbox number. If you do not want a mailbox
number dialed automatically when the Record-ACall feature is used at this station, enable the User
Keyed Mailbox flag. This overrides the automatic
entry and allows the station user to enter the desiredmailboxnumber.Theoperationof the feature
is determined by the programmed combination of
these flags, as shown in the chart at the bottom of
the page.
Page 6–86, last bullet: The first sentence should be:
Prepare a list of up to 75 hunt groups and the stations/
extension lists to be included in them.
Page 6–93, paragraph 11.92: The database allows up
to 15 “local” area codes (not three, as stated).
Page 6–102, paragraph 11.114: The first sentence
should say: Up to 200 unique forwarding paths
(001–200) can be programmed.
Page 6–114, Voice Mail Dial Delay Timer: This timer
is for analog voice mail hunt groups only.
Page 6–158, paragraph 17.4: The third sentence
should be: Enter the desired rate in the text box (0.00 to
99.99) and select the OK command button.
Page 6–159, paragraph 17.9: The Record All Incoming Calls flag should say: Selecting this check box includes all incoming calls, except DID/DNIS calls, in
the SMDR report.
Page 6–162, paragraph 18.3: The screen used for programming the AXXESSORY Talk communication
port has changed. The correct information i s: AXXESSORYTalk programming cannot beperformed until an
AXXESSORY Talk communications port has been established in the System Serial Port Assignment pro-
gramming window (shown on page 6–265).
RECORD-A-CALL MAILBOX USER KEYED MAILBOX RESULT
“Associated” or mailbox
number
“Associated” or mailbox
number
Disabled The Record-A-Call Mailbox is automatically called
when the feature code is entered.
Enabled The user i s prompted to enter the desired mailbox
number after the Record-A-Call feature code is entered. If a number is not entered before the dialing
timer expires, the programmed Record-A-Call Mailbox number is dialed automatically.
Page 71 of 73
Page 72

ADDENDUM TO ISSUE 4 OF THE AXXESS MANUALOCTOBER 1997
Page 6–163, first bullet: The information should read
as follows:
•
Voice Mail: This application handles all calls that
are directed to voice mail (other than to the Message Notification/Retrieval application) by subscribers and non-subscribers. Callers will hear the
main company greeting, followed by a menu of
available options. Stations can forward or t ransfer
calls directly to their mailbox using this application’s extension number.
Page 6–176, secondbullet, and page6–198, firstbullet: The second sentence should say: This a pplies to
calls transferred by Automated Attendant and Call
Routing Announcement applications, including transfers to the operator’s mailbox or extension ID.
Page 6–196, paragraph 23.22, second column, Notification Category and Call For Each New Message
bulletsand page 6–201, paragraphs23.33 and23.34:
To clarify how this feature works, the information
should read as follows:
Notification Category: Message notification
can be set to place the notification call for all
messagesor only when priority messages are received. (This defaults to all messages.)
Call For Each New Message: This determines
whether the AXXESSORY Talk should attempt
messagenotificationevery time amessageisreceived (that meets the notification category set
above), or only when a message is received and
no other messages are waiting to be picked up.
Page 6–205, paragraph 23.64 and page 6–208, paragraph 24.5: The second sentence should say: This
applies to transfers from Call Routing Announcement
applications that use the Transfer To Extension action
(as described on page 6–169).
Page 6–224, paragraph 26.2: The available baud rates
are 300, 1200, 2400, 4800, 9600, and 19200.
Page 6–225, paragraph 27.2: The last sentence should
read: If “Extension” is selected, any station, applica-
tion, or hunt group extension number can be selected.
Page 6–226, paragraph 27.8: The third sentence
should say: (Refer to the Save/Restore information on
page 6–231 for further AXXESSORY Talk informa-
tion.)
Page 6–231, Database Save AndRestore: Pleasenote
that performing a database Save or Restore operation
will cause the system to slow down. If at all possible,
these operations should not be performed during nor-
mal business hours when the system is being used to
place and receive calls.
Page 6–250, paragraph 28.53: Add the following
note.
NOTE: If multiple OPCs, T1Cs, T1Cs with PRI
Daughter Cards, and/or DKSC-16s are installed in expanded KSUs, resource blocking can be prevented by
splitting the cards between the cardfiles and/or installing them in the same cardfile as the LGCs or LSCs. In
tri-/quad-cabinet installations, the master T1C (if one
exists) should be located in the master dual-cabinet.
Page 6–253, paragraph 28.58, first bullet: The last
sentence should say:Keysets will be included in Keyset
Map #1.
Page 6–255, paragraph 28.65, third bullet and sixth
bullet: The correct capacities are as follows:
•
Up to 20 DSS/BLF units can be connected to
Executive or Standard keysets with PCDPMs.
Each of those keysets can have up to four DSS/
BLF Units in addition to using the Off-HookVoice
Announce feature that is available to all keysets
with PCDPMs. (See page 6–34 forkeyset attached
device programming information.)
•
Modem Data Port Modules (MDPMs) can be programmed for use on Executive or Standard keysets. An Executive or Standard keyset with an
MDPM and a PCDPM can use the off-hook voice
announce and have a single-line set or data device
connected.
Page 6–266, paragraph 28.114, second bullet: The
information should read as follows:
•
Level 2: The bidirectional support enhancedprotocol is running, using the RS-232C interface.
Page 8–2: Add the following part numbers to the list of
digital station instruments:
Basic Digital Keyset (with red/green LEDs)
— non-display 520.4300................
Standard Digital Keyset (with red/green LEDs)
— display 550.4400....................
Executive Digital Keyset (with red/green LEDs)
— display 550.4500....................
Page 8–3, Software: The AXXESSORY Talk Ap-
plications Software should read five floppy disks, not
nine.
Pages 8–5 and 8–6: The part number for the Digital
Signal Processor (DSP) chip has been changed from
834.2328 to 834.2566.
Page 72 of 73
Page 73

ADDENDUM TO ISSUE 4 OF THE AXXESS MANUAL OCTOBER 1997
FIGURE 8. GROUNDING GUIDELINES FROM DITEK
Page 73 of 73
 Loading...