

Page 1

Inter-Tel 7000
Model 8662 User Guide
Page 2

Page 3

QUICK REFERENCE GUIDE FOR
FREQUENTLY USED FEATURES
This guide provides basic instructions for frequently used system features. Refer
to the user guide for more information on these and other features.
PLACING AN EMERGENCY CALL
Before using your endpoint, contact your system administrator
IMPORTANT
to make sure your system is correctly configured for emergency service.
9
Dial ( / Eur.) to place an emergency call. You do
1 1
9
9 9
1
1 2
not have to select an outside line first.
If your endpoint is locked, you can still use it to dial emergency service numbers. Press
the call ( ). Otherwise, there will be a 4-second system pause
#
after dialing the emergency service number to immediately place
9
1 1 #
before the system places the call. Refer to Locking Your Endpoint in the
Advanced Features section of the user guide for more information.
PLACING AN INTERCOM CALL
With or without the handset lifted, dial the subscriber’s extension number. When
using Auto Answer, speak when the intercom (IC) confirmation appears.
PLACING AN OUTSIDE CALL
1. With or without the handset lifted, do one of the following:
• Press .
• Press
• Press the Outgoing Call access code ( ).
2. Dial the number. If you enter an incorrect digit, press to move
OUTGOING
the OUTGOING menu button.
9
MUTE
the cursor backward, deleting the last digit(s) entered.
ANSWERING A CALL
To answer a call, do one of the following:
• Lift the handset.
• Press .
• Press .
• Press the
• Press .
To answer a waiting call, either end your current call or place it on hold. Then
answer the call as described above.
LINE
ANSWER
ANSWER menu button.
© Inter-Tel (Delaware), Inc. October 2006 printed in U.S.
1
Part no. 835.3066
Page 4

R
EDIALING A NUMBER
To redial the last number called: Press or .
REDIAL
0
0
PLACING A CALL ON HOLD
While on the call, press or the HOLD menu button
To return to the call, press or the flashing
LINE
button.
TRANSFERRING A CALL
1. While on the call, press or the XFR menu button.
2. If you are transferring the call to a subscriber, dial the extension number.
If you are transferring the call to an outside number, press
9
to connect to an outgoing line, and then dial the number.
3. Wait for an answer, announce the call (if desired), and then hang up.
If the extension transferred to is unavailable, press the flashing button
to return to the caller.
TRANSFER
OUTGOING
LINE
or
PLACING A CONFERENCE CALL
1. While on the first call, press or the CNF menu button to place
the call on hold.
2. Add the conference parties:
If you are adding subscribers:
a. Dial the extension number, and then announce the conference.
b. Press the flashing button or the
CONF
party to the conference.
If you are adding outside parties:
a. Press
OUTGOING
9
or .
b. Dial the number, and then announce the conference.
c. Press the flashing button or the
CONF
party to the conference.
3. After gathering all conference parties, press the flashing button
or the
CONN TO CNF menu button to start the conference.
CONF
CNF menu button to add the
CNF menu button to add the
CONF
PAGING SUBSCRIBERS
5
1. Press or .
PAG E
7
2. Enter the page group number.
3. Place the page announcement, and then hang up.
2
Page 5
U
SING REACH ME
1. Press the REACH ME menu button or .
2. Press the
BROWSE menu button, and then NEXT/PREVIOUS menu button
5 6 0
or to scroll through the options.
3. Press the
If you selected
then press the
ACCEPT menu button or to accept the Reach Me setting.
FORWARD TO, enter the extension or outside number, and
ACCEPT menu button or to accept the setting.
#
#
USING HOT RULES
1. While on a call or while a call is ringing, press the HOT RULES menu button.
2. Do one of the following:
• Press the
• Press the
APPLY menu button or to accept the Hot Rule.
NEXT/PREVIOUS menu button or to scroll through
the options, and then press the
#
APPLY menu button or .
#
If you selected current location, enter the extension number, or press
OUTGOING
, and then enter the outside number.
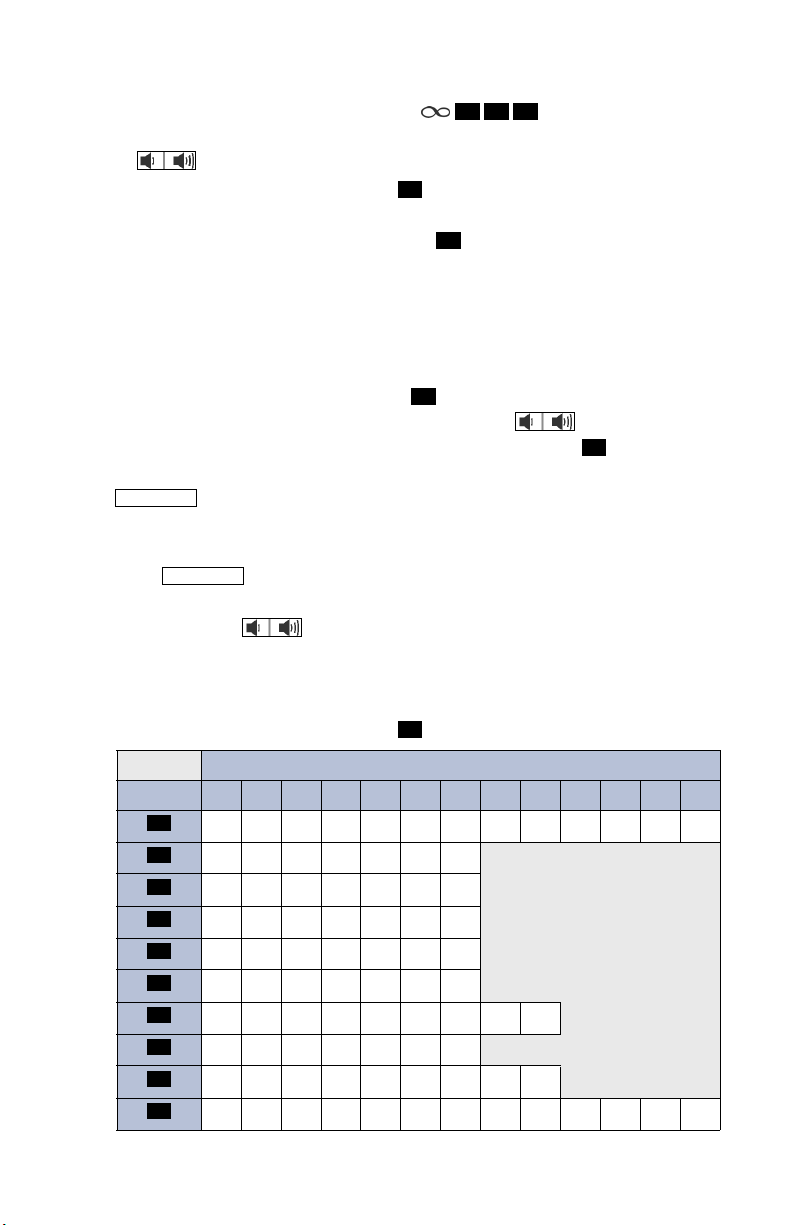
CHANGING YOUR STATUS
1. Press or the STATUS menu button.
2. Press the
3. Press the
STATUS
BROWSE menu button, and then press the NEXT/PREVIOUS
menu button or to scroll through the options.
If the status includes a time, date, or forwarding number, enter the informa-
tion using the dialpad buttons. See the following table for dialpad button
character descriptions.
#
BUTTON
1
2
3
4
5
6
7
8
9
0
ACCEPT menu button or to set the status.
NUMBER OF TIMES BUTTON IS PRESSED (IN ALPHA MODE)
1 2 3 4 5 6 7 8 9 10 11 12 13
1!|’:;,/\><)(
ABC2abc
DEF3de f
GHI4gh i
JKL5 j k l
MNO 6mn o
PQRS7 p q r s
TUV8 t uv
WX Y Z 9 w x y z
0.@#*-_&%=$~+
3
Page 6

L
EAVING TEXT MESSAGES
1. Do one of the following:
• Press , and then press the
• Press .
MESSAGE
5 2 0
LEAVE MESSAGE menu button.
2. Dial the extension number.
CANCELING A SENT TEXT MESSAGE
1. Do one of the following:
• Press , and then press the
• Press .
MESSAGE
5 2 2
CANCEL MESSAGE menu button.
2. Dial the extension number.
3. Press the
DELETE menu button or to cancel the message.
1
VIEWING, REPLYING TO, OR DELETING A TEXT MESSAGE
1. While the handset is on-hook, press or the VIEW MESSAGE
menu button. Then lift the handset if desired.
2. If there is more than one message, press the
to scroll through the messages. Press the
the message.
3. Press the
DELETE menu button or to delete the message.
REPLY menu button or to call the subscriber, or press the
2
MESSAGE
>>/<< menu button or
VIEW TEXT menu button to view
1
USING YOUR CALL LOG
1. Press or the CALLS menu button.
2. Select one of the following options:
3. Press the
4. If the call is from an outside caller, press the
CALL LOG
• Press
• Press
• Press
1
or the MISSED CALLS menu button for missed calls.
2
or the INCOMING menu button for incoming calls.
3
or the OUTGOING menu button for outgoing calls.
NEXT/PREVIOUS menu button or to scroll through the
options.
dial the number.
If the call is from a subscriber,
a. Press the
CONTACT menu button or to display the Outbound Com-
munication menu.
b. Press the
NEXT/PREVIOUS menu button or to scroll through
the options.
c. Press the
CONTACT menu button or to activate the selection.
CALL menu button or to
#
#
#
4
Page 7
A
CCESSING YOUR MAILBOX
The following instructions include Automatic Speech Recognition
NOTE
(ASR) spoken commands, which can be used instead of pressing
the dialpad buttons if ASR is enabled for your system.
Contact your system administrator for the voice mail number and password.
To access your mailbox: Dial the system voice mail number, and then enter
your password when prompted. If you are not prompted for your password,
press , and then enter your password. Press
#
to accept the entry.
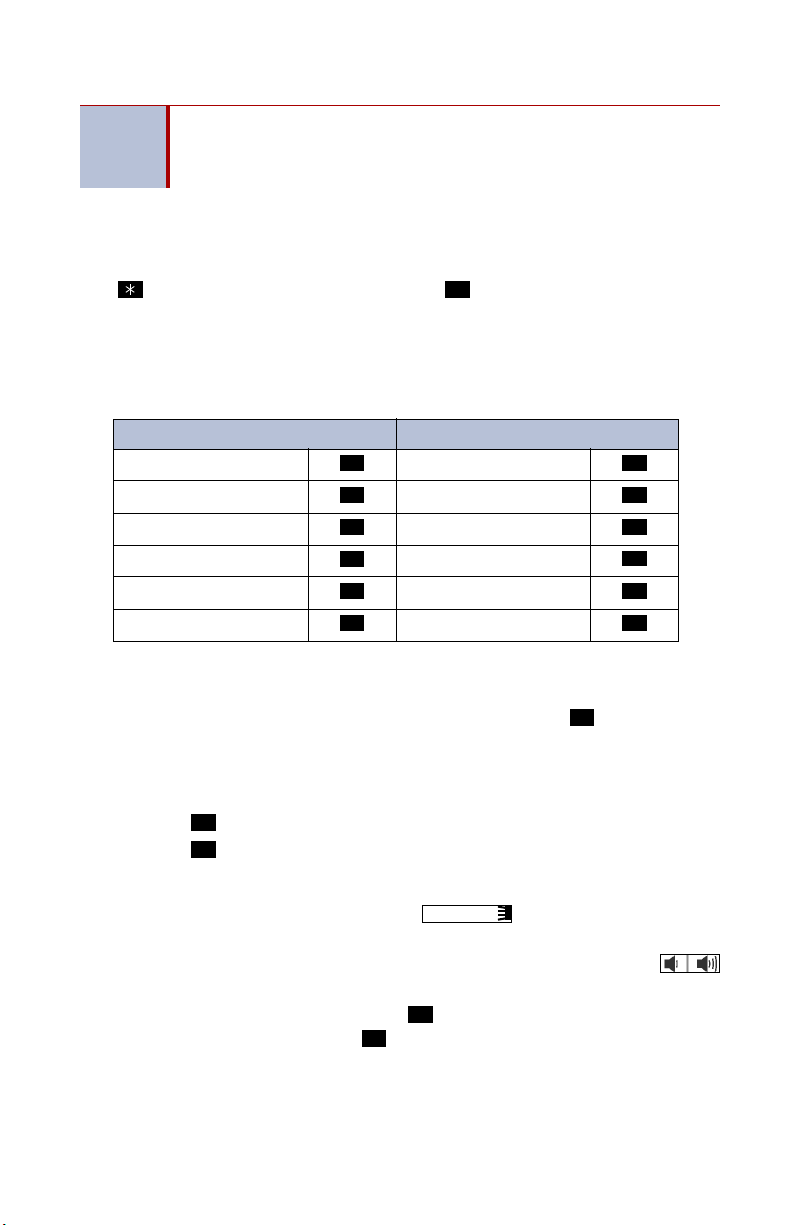
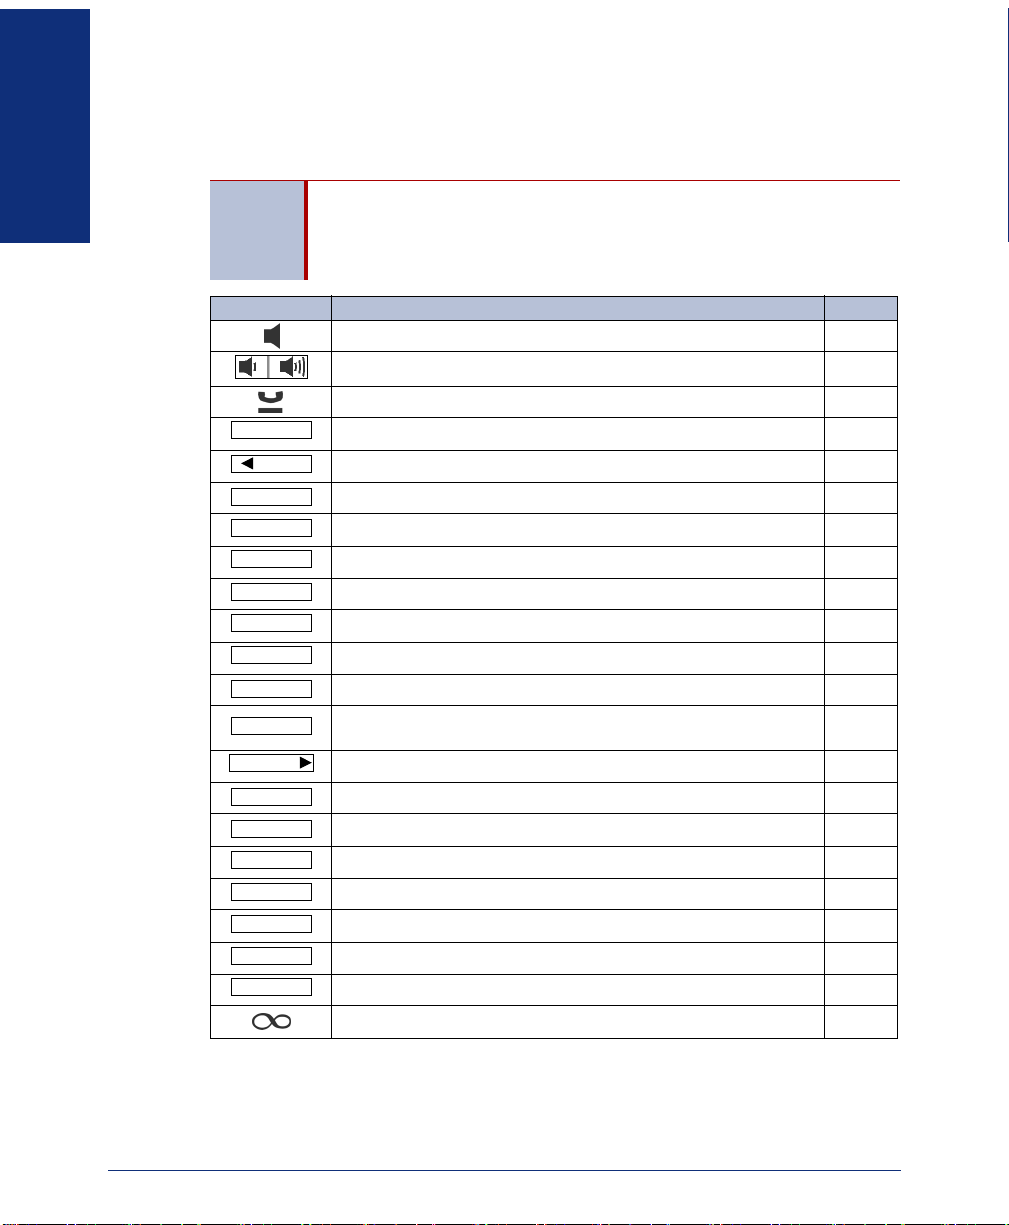
LISTENING TO VOICE MAIL MESSAGES
You can listen to all voice mail messages in your mailbox, or you can select a
specific (new) message.
DURING THE MESSAGE AFTER THE MESSAGE
BACK UP REPLAY
PAUSE FORWARD
MOVE FORWARD GO TO PREVIOUS
SAVE GO TO NEXT
DELETE SAVE
SKIP TO END DELETE
1 1
2 3
3 4
7 6
9 7
# 9
To listen to all messages:
1. Access your mailbox as described above.
1
2. If E-Mail Reader is enabled for your mailbox, press or
Mail
.”
say “Voice
If E-Mail Reader is not enabled for your mailbox, skip this step.
3. Select one of the following:
• Press
• Press
1
or say “New” to listen to new messages.
3
or say “Saved” to listen to saved messages.
To listen to a specific message (Message button and lamp are flashing):
1. While the handset is on-hook, press
MESSAGE
or the VIEW MESSAGE
menu button. Then lift the handset if desired.
2. If there is more than one message, press the
>>/<< menu button or
to scroll through the messages.
3. Press the
LISTEN menu button or to connect to your mailbox, enter
your password, and then press .
#
#
5
Page 8

F
EATURE CODES
Press before entering the feature code.
FEATURE NAME CODE FEATURE NAME CODE
Agent Help Request 84 Last Call Return 69
Agent Help Reject 62 LCD Contrast Level 39
Annoyance Call Trace 57 Location Information 610
Auto Answer Incoming – On/Off 432 Location Validation 611
Auto Answer Outgoing – On/Off 382 Lock Endpoint 31
Auto Line Answer – On/Off 322 Message Menu 521
Auto Redial 35 Mute – On/Off 33
Background Music – On/Off 51 Off-Hook Voice Announce 59
Barge-In 81 Outbound Caller ID – Block 67
Billing Code – Enable 50 Outbound Caller ID – Unblock 82
Caller ID On/Off 34 Page 75
Call Log – Select Type 410 Personal Assistant 64
Call Park 98 Queue (Callback) Request 44
Call Park Pick Up 99 Reach Me – Follow Rules 564
Clear Alarm – Current 631 Reach Me – Select Type 560
Clear Alarms – All 630 Record-A-Call 85
Conference 55 Record-A-Memo 58
Contacts – Search 301 Redial 00
Contacts – Select Type 300 Send to Destination 48
Direct Account Access 97 Silent Monitor 80
Direct Endpoint Access 96 Silent Monitor – Barge In 91
Directed Call Pickup 53 Speed Dial – Station 01–19
Display User Info/Time/Date 65 Speed Dial – System 2
Group Call Pickup 54 Station Monitor 83
Group Listen – On/Off 492 Status 89
Headset – On/Off 402 Text Message – Delete 522
Hold 36 Text Message – Send 520
Hot Desking – Log In/Log Out 872 Transfer on Connect 79
Hot Rules 42 Transfer to Hold 46
Hunt Group – Log In/Log Out 882 Transfer to Ring 45
Hunt Group – Wrap Up 86 Voice Mail Message – Leave 93
00–299
6
Page 9

NOTICE
This user guide is released by Inter-Tel, Inc. and provides information necessary to use
the Model 8662 endpoint. The guide contents, which reflect current Inter-Tel standards,
are subject to revision or change without notice.
Some features or applications mentioned may require a future release and are not available in the initial release. Future product features and applications are subject to availability and cost. Some features or applications may require additional hardware, software, or
system administrator assistance.
For sales, service, or technical support, contact your local authorized
Inter-Tel provider:
Comments about this user guide or other technical documentation should
be directed to Inter-Tel’s Technical Publications Department at:
All product names and services mentioned in this publication are the trademarks, service
marks, registered marks, or registered service marks of their respective owners.
Inter-Tel
Microsoft
Microsoft Corporation.
PowerSense™ is a trademark of Red Hawk/CDT, Incorporated.
© 2006 Inter-Tel (Delaware), Incorporated: Personal use of this material is permitted.
However, permission to reprint/republish this material for advertising or promotional purposes or for creating new collective works for resale or redistribution to servers or lists,
or to reuse any copyrighted component of this work in other works must be obtained
from Inter-Tel (Delaware), Incorporated.
®
is a registered trademark of Inter-Tel, Incorporated.
®,
Windows®, Internet Explorer®, and Outlook® are registered trademarks of
Enter provider information above
Tech_Pubs@inter-tel.com
Page 10

REGULATORY INFORMATION
Product Disposal Instructions
This symbol indicates that the product is classified as electrical or electronic
equipment and should not be disposed of with other commercial or household waste at the end of its working life. For appropriate disposal and recycling instructions, contact your local recycling authority or Inter-Tel
provider.
The Waste of Electrical and Electronic Equipment (WEEE) Directive (2002/96/EC) was established by the
European Union to minimize negative impact on the environment, control hazardous substances, and curtail
landfill expansion by using the best available recovery and recycling techniques.
FCC Regulations
This equipment has been tested and found to comply with the limits for a Class B digital
device, pursuant to Part 15 of the Federal Communications Commission (FCC) Rules.
These limits are designed to provide reasonable protection against harmful interference in
a residential installation. This equipment generates, uses, and can radiate radio frequency
energy and, if not installed and used in accordance with the instructions, may cause harmful interference to radio communications. However, there is no guarantee that interference will not occur in a particular installation. If this equipment does cause harmful
interference to radio or television reception, which can be determined by powering the
equipment off and on, the user is encouraged to try to correct the interference by one or
more of the following measures:
• Reorient or relocate the receiving antenna.
• Increase the separation between the equipment and receiver.
• Connect the equipment into an outlet on a circuit different from that to which the
receiver is connected.
• Consult the dealer or an experienced radio/TV technician for help.
Page 11

Table of Contents
Table of Contents
CONTENTS PAGE
GETTING STARTED . . . . . . . . . . . . . . . . . . . . . . . . . . . . . . . . . . . . . . . . . . . . . . . . . . . 1
Welcome. . . . . . . . . . . . . . . . . . . . . . . . . . . . . . . . . . . . . . . . . . . . . . . . . . . . . . . . . . . . . . . . . 1
Inter-Tel Personal Communicator . . . . . . . . . . . . . . . . . . . . . . . . . . . . . . . . . . . . . . . . . . . . 2
About Your Endpoint . . . . . . . . . . . . . . . . . . . . . . . . . . . . . . . . . . . . . . . . . . . . . . . . . . . . . . 3
Feature Buttons . . . . . . . . . . . . . . . . . . . . . . . . . . . . . . . . . . . . . . . . . . . . . . . . . . . . . . . 4
LCD and Menu Buttons . . . . . . . . . . . . . . . . . . . . . . . . . . . . . . . . . . . . . . . . . . . . . . . . . 5
What You See and Hear. . . . . . . . . . . . . . . . . . . . . . . . . . . . . . . . . . . . . . . . . . . . . . . . . 6
Endpoint Connectors . . . . . . . . . . . . . . . . . . . . . . . . . . . . . . . . . . . . . . . . . . . . . . . . . . . 6
Power Requirements . . . . . . . . . . . . . . . . . . . . . . . . . . . . . . . . . . . . . . . . . . . . . . . . . . . 7
Software and Firmware . . . . . . . . . . . . . . . . . . . . . . . . . . . . . . . . . . . . . . . . . . . . . . . . . 7
Endpoint Setup . . . . . . . . . . . . . . . . . . . . . . . . . . . . . . . . . . . . . . . . . . . . . . . . . . . . . . . . . . . 8
Adjusting the Viewing Angle. . . . . . . . . . . . . . . . . . . . . . . . . . . . . . . . . . . . . . . . . . . . . . 8
Adjusting the LCD Contrast Level . . . . . . . . . . . . . . . . . . . . . . . . . . . . . . . . . . . . . . . . . 8
Adjusting Volume Settings . . . . . . . . . . . . . . . . . . . . . . . . . . . . . . . . . . . . . . . . . . . . . . . 9
Changing Endpoint Ring Tones . . . . . . . . . . . . . . . . . . . . . . . . . . . . . . . . . . . . . . . . . . . 9
Listening to Background Music. . . . . . . . . . . . . . . . . . . . . . . . . . . . . . . . . . . . . . . . . . . 10
Resetting the Endpoint . . . . . . . . . . . . . . . . . . . . . . . . . . . . . . . . . . . . . . . . . . . . . . . . . 10
Using a Headset . . . . . . . . . . . . . . . . . . . . . . . . . . . . . . . . . . . . . . . . . . . . . . . . . . . . . . 10
Validating Your Location for Placing Emergency Calls . . . . . . . . . . . . . . . . . . . . . . . . 10
Voice Mail Setup . . . . . . . . . . . . . . . . . . . . . . . . . . . . . . . . . . . . . . . . . . . . . . . . . . . . . . . . . 11
Initializing Voice Mail . . . . . . . . . . . . . . . . . . . . . . . . . . . . . . . . . . . . . . . . . . . . . . . . . . 11
Recording Your Personal Greeting(s) . . . . . . . . . . . . . . . . . . . . . . . . . . . . . . . . . . . . . 12
STARTED
GETTING
FEATURES
BASIC
ADVANCED
FEATURES
BASIC FEATURES . . . . . . . . . . . . . . . . . . . . . . . . . . . . . . . . . . . . . . . . . . . . . . . . . . . 13
Answering Calls . . . . . . . . . . . . . . . . . . . . . . . . . . . . . . . . . . . . . . . . . . . . . . . . . . . . . . . . . 14
Using Auto Answer. . . . . . . . . . . . . . . . . . . . . . . . . . . . . . . . . . . . . . . . . . . . . . . . . . . . 14
Answering Waiting Calls. . . . . . . . . . . . . . . . . . . . . . . . . . . . . . . . . . . . . . . . . . . . . . . . 15
Using Automatic Line Answer. . . . . . . . . . . . . . . . . . . . . . . . . . . . . . . . . . . . . . . . . . . . 15
Using Call Drop . . . . . . . . . . . . . . . . . . . . . . . . . . . . . . . . . . . . . . . . . . . . . . . . . . . . . . 15
Placing Calls . . . . . . . . . . . . . . . . . . . . . . . . . . . . . . . . . . . . . . . . . . . . . . . . . . . . . . . . . . . . 16
Placing Emergency Calls . . . . . . . . . . . . . . . . . . . . . . . . . . . . . . . . . . . . . . . . . . . . . . . 16
Placing Intercom Calls . . . . . . . . . . . . . . . . . . . . . . . . . . . . . . . . . . . . . . . . . . . . . . . . . 16
Using Camp-on. . . . . . . . . . . . . . . . . . . . . . . . . . . . . . . . . . . . . . . . . . . . . . . . . . . . . . . 16
Placing an Off-Hook Voice Announce . . . . . . . . . . . . . . . . . . . . . . . . . . . . . . . . . . . . . 17
Queuing for a Subscriber . . . . . . . . . . . . . . . . . . . . . . . . . . . . . . . . . . . . . . . . . . . . . . . 17
Placing Outside Calls . . . . . . . . . . . . . . . . . . . . . . . . . . . . . . . . . . . . . . . . . . . . . . . . . . 18
Using Billing Codes . . . . . . . . . . . . . . . . . . . . . . . . . . . . . . . . . . . . . . . . . . . . . . . . . . . 18
Redialing a Phone Number . . . . . . . . . . . . . . . . . . . . . . . . . . . . . . . . . . . . . . . . . . . . . 18
Using Auto Redial. . . . . . . . . . . . . . . . . . . . . . . . . . . . . . . . . . . . . . . . . . . . . . . . . . . . . 18
Using Last Call Return . . . . . . . . . . . . . . . . . . . . . . . . . . . . . . . . . . . . . . . . . . . . . . . . . 18
Using Speed Dial . . . . . . . . . . . . . . . . . . . . . . . . . . . . . . . . . . . . . . . . . . . . . . . . . . . . . 19
© Inter-Tel (Delaware), Inc. October 2006 printed in U.S.
iii
VOICE MAIL
FEATURES
TROUBLESHOOTING
TOOLS
Page 12

CONTENTS PAGE
Features Used While on a Call. . . . . . . . . . . . . . . . . . . . . . . . . . . . . . . . . . . . . . . . . . . . . . 20
Placing Calls On Hold. . . . . . . . . . . . . . . . . . . . . . . . . . . . . . . . . . . . . . . . . . . . . . . . . . 20
Using Call Park. . . . . . . . . . . . . . . . . . . . . . . . . . . . . . . . . . . . . . . . . . . . . . . . . . . . . . . 20
Using the Mute Feature . . . . . . . . . . . . . . . . . . . . . . . . . . . . . . . . . . . . . . . . . . . . . . . . 21
Displaying Your User Information. . . . . . . . . . . . . . . . . . . . . . . . . . . . . . . . . . . . . . . . . 21
Displaying Caller ID Information. . . . . . . . . . . . . . . . . . . . . . . . . . . . . . . . . . . . . . . . . . 21
Blocking Outbound Caller ID Information . . . . . . . . . . . . . . . . . . . . . . . . . . . . . . . . . . . 21
Using Annoyance Call Trace . . . . . . . . . . . . . . . . . . . . . . . . . . . . . . . . . . . . . . . . . . . . 21
Transferring Calls . . . . . . . . . . . . . . . . . . . . . . . . . . . . . . . . . . . . . . . . . . . . . . . . . . . . . 22
Using Send to Destination . . . . . . . . . . . . . . . . . . . . . . . . . . . . . . . . . . . . . . . . . . . . . . 23
Using Directed Call Pickup. . . . . . . . . . . . . . . . . . . . . . . . . . . . . . . . . . . . . . . . . . . . . . 23
Using Group Call Pickup . . . . . . . . . . . . . . . . . . . . . . . . . . . . . . . . . . . . . . . . . . . . . . . 23
Placing Conference Calls . . . . . . . . . . . . . . . . . . . . . . . . . . . . . . . . . . . . . . . . . . . . . . . 24
Using Messages . . . . . . . . . . . . . . . . . . . . . . . . . . . . . . . . . . . . . . . . . . . . . . . . . . . . . . . . . 25
Using Text Messages . . . . . . . . . . . . . . . . . . . . . . . . . . . . . . . . . . . . . . . . . . . . . . . . . . 25
Leaving and Listening to Voice Mail Messages . . . . . . . . . . . . . . . . . . . . . . . . . . . . . . 26
Paging Subscribers . . . . . . . . . . . . . . . . . . . . . . . . . . . . . . . . . . . . . . . . . . . . . . . . . . . 26
ADVANCED FEATURES . . . . . . . . . . . . . . . . . . . . . . . . . . . . . . . . . . . . . . . . . . . . . . . 27
Presence Management . . . . . . . . . . . . . . . . . . . . . . . . . . . . . . . . . . . . . . . . . . . . . . . . . . . . 27
Changing Your Status . . . . . . . . . . . . . . . . . . . . . . . . . . . . . . . . . . . . . . . . . . . . . . . . . 27
Using Reach Me . . . . . . . . . . . . . . . . . . . . . . . . . . . . . . . . . . . . . . . . . . . . . . . . . . . . . . 29
Advanced Subscriber Features . . . . . . . . . . . . . . . . . . . . . . . . . . . . . . . . . . . . . . . . . . . . . 30
Locking Your Endpoint . . . . . . . . . . . . . . . . . . . . . . . . . . . . . . . . . . . . . . . . . . . . . . . . . 30
Using Direct Endpoint Access . . . . . . . . . . . . . . . . . . . . . . . . . . . . . . . . . . . . . . . . . . . 31
Using Direct Account Access . . . . . . . . . . . . . . . . . . . . . . . . . . . . . . . . . . . . . . . . . . . . 31
Using Hot Rules . . . . . . . . . . . . . . . . . . . . . . . . . . . . . . . . . . . . . . . . . . . . . . . . . . . . . . 31
Using Personal Assistant . . . . . . . . . . . . . . . . . . . . . . . . . . . . . . . . . . . . . . . . . . . . . . . 32
Using Record-A-Call. . . . . . . . . . . . . . . . . . . . . . . . . . . . . . . . . . . . . . . . . . . . . . . . . . . 32
Recording a Voice Memo . . . . . . . . . . . . . . . . . . . . . . . . . . . . . . . . . . . . . . . . . . . . . . . 33
Hot Desking . . . . . . . . . . . . . . . . . . . . . . . . . . . . . . . . . . . . . . . . . . . . . . . . . . . . . . . . . 33
Using Group Listen. . . . . . . . . . . . . . . . . . . . . . . . . . . . . . . . . . . . . . . . . . . . . . . . . . . . 34
Using Monitor Account . . . . . . . . . . . . . . . . . . . . . . . . . . . . . . . . . . . . . . . . . . . . . . . . . 34
Using the Outbound Communication Menu . . . . . . . . . . . . . . . . . . . . . . . . . . . . . . . . . 35
Using Your Call Log . . . . . . . . . . . . . . . . . . . . . . . . . . . . . . . . . . . . . . . . . . . . . . . . . . . 36
Using Contact Lists. . . . . . . . . . . . . . . . . . . . . . . . . . . . . . . . . . . . . . . . . . . . . . . . . . . . 37
Searching for a Contact . . . . . . . . . . . . . . . . . . . . . . . . . . . . . . . . . . . . . . . . . . . . . . . . 38
Using Inter-Tel Personal Communicator for Voice . . . . . . . . . . . . . . . . . . . . . . . . . . . . 39
Inter-Tel Personal Communicator for Voice Flowchart . . . . . . . . . . . . . . . . . . . . . . . . . . 42
Hunt Groups . . . . . . . . . . . . . . . . . . . . . . . . . . . . . . . . . . . . . . . . . . . . . . . . . . . . . . . . . . . . 43
Logging into and out of Advanced Hunt Groups. . . . . . . . . . . . . . . . . . . . . . . . . . . . . . 43
Wrapping Up a Hunt Group Call. . . . . . . . . . . . . . . . . . . . . . . . . . . . . . . . . . . . . . . . . . 43
Requesting Agent Help. . . . . . . . . . . . . . . . . . . . . . . . . . . . . . . . . . . . . . . . . . . . . . . . . 44
Using Bridged Line Appearance. . . . . . . . . . . . . . . . . . . . . . . . . . . . . . . . . . . . . . . . . . 45
iv
Page 13

CONTENTS PAGE
VOICE MAIL FEATURES . . . . . . . . . . . . . . . . . . . . . . . . . . . . . . . . . . . . . . . . . . . . . . . 47
About Voice Mail . . . . . . . . . . . . . . . . . . . . . . . . . . . . . . . . . . . . . . . . . . . . . . . . . . . . . . . . . 47
Mailbox Features. . . . . . . . . . . . . . . . . . . . . . . . . . . . . . . . . . . . . . . . . . . . . . . . . . . . . . . . . 48
Accessing Your Mailbox . . . . . . . . . . . . . . . . . . . . . . . . . . . . . . . . . . . . . . . . . . . . . . . . 48
Listening to Voice Mail Messages . . . . . . . . . . . . . . . . . . . . . . . . . . . . . . . . . . . . . . . . 48
Re-recording or Changing Your Directory Name . . . . . . . . . . . . . . . . . . . . . . . . . . . . . 48
Changing Your Voice Mail Password . . . . . . . . . . . . . . . . . . . . . . . . . . . . . . . . . . . . . . 49
Changing the Message Search Order . . . . . . . . . . . . . . . . . . . . . . . . . . . . . . . . . . . . . 49
Changing Your Message Envelope . . . . . . . . . . . . . . . . . . . . . . . . . . . . . . . . . . . . . . . 50
Recording and Sending Voice Mail Messages . . . . . . . . . . . . . . . . . . . . . . . . . . . . . . . 50
Canceling Unheard Voice Mail Messages . . . . . . . . . . . . . . . . . . . . . . . . . . . . . . . . . . 50
Using Special Delivery Options . . . . . . . . . . . . . . . . . . . . . . . . . . . . . . . . . . . . . . . . . . 51
Recovering Deleted Voice Mail Messages . . . . . . . . . . . . . . . . . . . . . . . . . . . . . . . . . . 51
Searching for a Voice Mail Contact . . . . . . . . . . . . . . . . . . . . . . . . . . . . . . . . . . . . . . . 51
Screening Calls . . . . . . . . . . . . . . . . . . . . . . . . . . . . . . . . . . . . . . . . . . . . . . . . . . . . . . 52
Programming Remote Messaging . . . . . . . . . . . . . . . . . . . . . . . . . . . . . . . . . . . . . . . . 52
Voice Mail Flowchart (without E-Mail Reader) . . . . . . . . . . . . . . . . . . . . . . . . . . . . . . . . . 54
E-Mail Reader . . . . . . . . . . . . . . . . . . . . . . . . . . . . . . . . . . . . . . . . . . . . . . . . . . . . . . . . . . . 55
Entering Your E-Mail Password . . . . . . . . . . . . . . . . . . . . . . . . . . . . . . . . . . . . . . . . . . 55
Using Main Menu E-Mail Reader Count . . . . . . . . . . . . . . . . . . . . . . . . . . . . . . . . . . . . 57
Accessing Fax Messages. . . . . . . . . . . . . . . . . . . . . . . . . . . . . . . . . . . . . . . . . . . . . . . 57
Voice Mail Flowchart (with E-Mail Reader) . . . . . . . . . . . . . . . . . . . . . . . . . . . . . . . . . . . . 58
TROUBLESHOOTING TOOLS . . . . . . . . . . . . . . . . . . . . . . . . . . . . . . . . . . . . . . . . . . . 59
Contact Information . . . . . . . . . . . . . . . . . . . . . . . . . . . . . . . . . . . . . . . . . . . . . . . . . . . . . . 59
Troubleshooting Tips . . . . . . . . . . . . . . . . . . . . . . . . . . . . . . . . . . . . . . . . . . . . . . . . . . . . . 60
Default Access Codes . . . . . . . . . . . . . . . . . . . . . . . . . . . . . . . . . . . . . . . . . . . . . . . . . . . . 64
Outside Line Access Codes . . . . . . . . . . . . . . . . . . . . . . . . . . . . . . . . . . . . . . . . . . . . . . . . . . 64
Speed Dial and Attendant Access Codes. . . . . . . . . . . . . . . . . . . . . . . . . . . . . . . . . . . 64
Feature Codes . . . . . . . . . . . . . . . . . . . . . . . . . . . . . . . . . . . . . . . . . . . . . . . . . . . . . . . . . . . 65
INDEX . . . . . . . . . . . . . . . . . . . . . . . . . . . . . . . . . . . . . . . . . . . . . . . . . . . . . . . . . . . . . . 69
v
Page 14

vi
Page 15
Getting Started
WELCOME
The instructions in this user guide are for using the
Model 8662 Session Initiation Protocol (SIP) end-
*
point
on the Inter-Tel® 7000 Network Communica-
tions Solution.
The removable Quick Reference Guide is an overview of frequently used features.
This guide includes the following sections:
• Getting Started: An overview of the endpoint,
how to set up your endpoint, and how to initialize your voice mail account.
• Basic Features: How to use common endpoint
features such as answering and placing calls,
features used while on a call, and using messages.
• Advanced Features: How to use advanced fea-
tures such as presence management, advanced
subscriber tools, and hunt groups.
• Voice Mail Features: How to use voice mail
features, including advanced voice mail tools such as Automatic Speech Recognition (ASR) and E-Mail Reader.
• Troubleshooting Tools: Tips and tools to help troubleshoot possible problems.
STARTED
GETTING
NOTICE
Because many endpoint features can be programmed to perform expanded or
different tasks, some features may work differently than the descriptions in this
guide. Contact your system administrator for more information on how your system
varies.
* The term “endpoint” describes an entity on one end of a Transmission Control Protocol/Internet Protocol
(TCP/IP) connection. In this context, this guide uses the term endpoint to describe the Inter-Tel 7000
family of digital and IP phones.
Inter-Tel® Model 8662 Endpoint User Guide
1
Page 16
GETTING
STARTED
INTER-TEL PERSONAL COMMUNICATOR
Inter-Tel Personal Communicator is an integrated software component of the Inter-Tel
7000 Network Communications Solution and adds advanced features to your system,
including:
• Presence management: Change your status and availability (see page 27).
• Call routing: Route calls based on preset conditions (see page 29).
• Contacts: Connect to others using contact features (see page 37).
• Messages: Contact other subscribers using text messages, voice mail messages,
and instant messages
• Feature options: Modify or add settings to system features.
Most Inter-Tel Personal Communicator features can be accessed from your endpoint,
however, some features or settings may require at least one of the following portals:
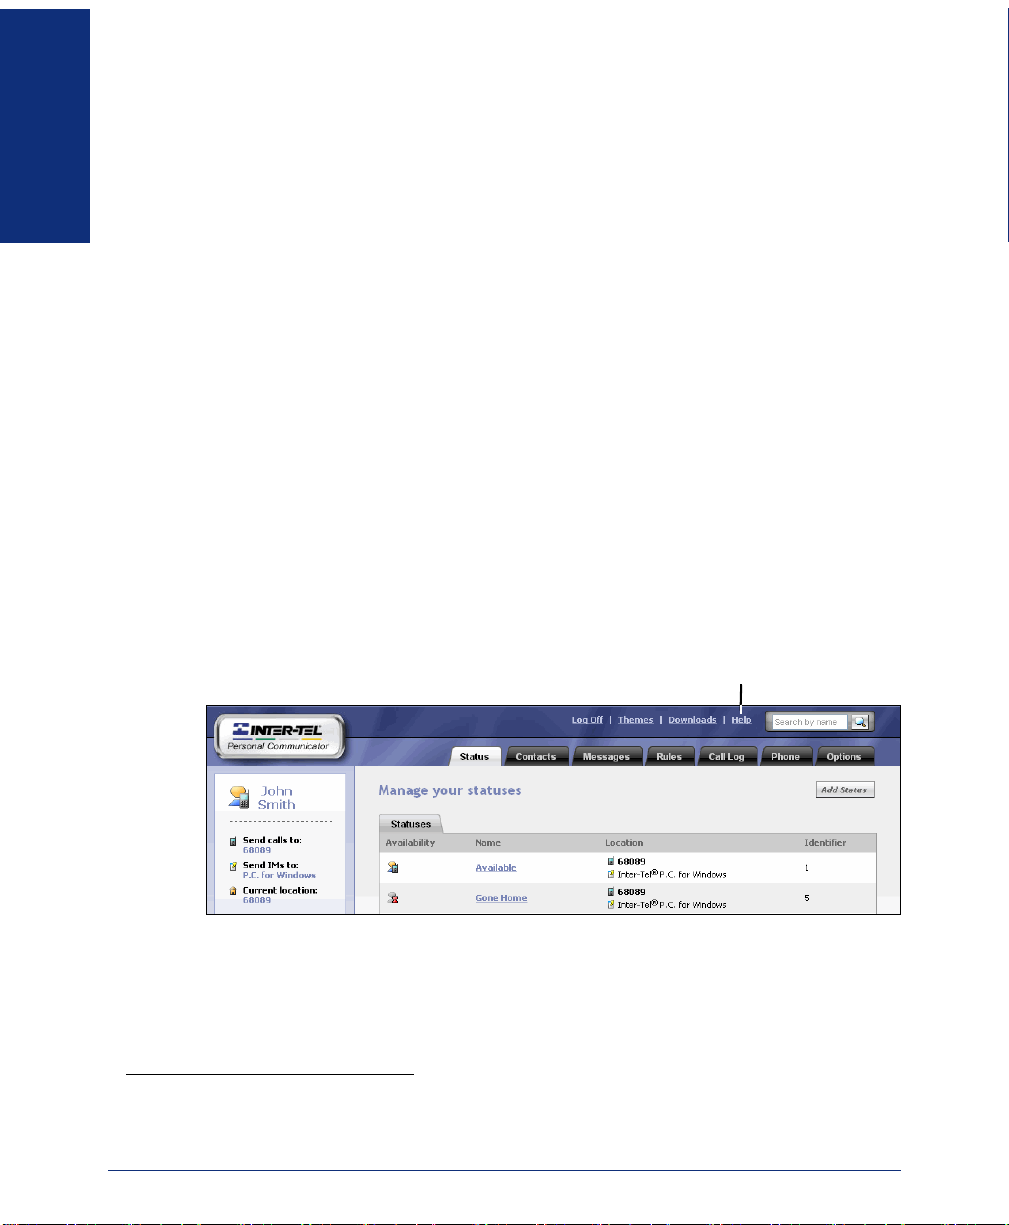
• Inter-Tel Personal Communicator for Web (shown below)
• Inter-Tel Personal Communicator for Windows
• Inter-Tel Personal Communicator for Internet Explorer
• Inter-Tel Personal Communicator for Outlook
• Inter-Tel Personal Communicator for Voice
Except for Inter-Tel Personal Communicator for Voice (see page 39), this user guide
does not include instructions for using portals. For portal instructions, refer to the
context-sensitive Help sections included in each portal.
*
(see page 25).
®
®
®
Help Link
* Instant messaging may or may not be enabled for your system. Contact your system administrator for
more information.
2
Inter-Tel® Model 8662 Endpoint User Guide
Page 17

ABOUT YOUR ENDPOINT
The model 8662 endpoint features include:
• Liquid crystal display (LCD): Displays user and system information and a fea-
ture menu.
• Message Indicator lamp: Indicates message activity.
• LCD menu buttons: Select feature options from the LCD.
• Hold button: Places calls on hold.
• Special button: Activates features.
• Feature buttons: Provide quick access to system features.
• Dialpad buttons: Used for entering numbers, letters, and symbols.
• Volume Control button: Changes volume settings—also used for scrolling
through feature options.
• Speaker button: Switches from handset to handsfree or headset calls.
• Handset: Includes a hearing aid-compatible speaker.
• External speaker and microphone: Allow handsfree calls (see page 14).
Handset
STARTED
GETTING
LCD
Message Indicator
Lamp
Menu Buttons
External Speaker
Speaker Button
Volume Control
Button
This is the default Model 8662 configuration. Your endpoint features
NOTE
Inter-Tel® Model 8662 Endpoint User Guide
may not be programmed or located as displayed above. Contact your
system administrator for more information.
Dialpad Buttons
Hold Button
Special Button
Feature Buttons
External Microphone
(behind slot on underside)
3
Page 18
GETTING
STARTED
Feature Buttons
Feature buttons provide quick access to commonly used endpoint features. Some
default feature buttons are described in the following table.
If your feature buttons are not labeled, or if they are labeled incor-
NOTE
BUTTON ACTION PAG E
LINE
MUTE
STATUS
PAG E
PERSONAL
DIR
REDIAL
CONF
TRANSFER
MESSAGE
FORWARD
PARK
PICKUP
CALL LOG
SEARCH
GROUP
ANSWER
OUTGOING
rectly, you can print new labels using Inter-Tel Personal Communicator
for Web. If necessary, contact your system administrator to have the
correct labels installed.
Switch between handset and handsfree calls. 14
Adjust volume settings or scroll through feature options. 9
Place a call on hold. 20
Select an outside line or answer a call. 16
Mute the microphone or backspace when entering dialpad digits. 21
Change status settings. 27
Place a page. 26
Access your Personal contact list. 37
Access the Directory contact list. 38
Redial the last number called. 18
Place a conference call. 24
Transfer a call. 22
View, leave, or retrieve messages or toggle between alpha and
numeric modes.
Forward calls or move forward when entering dialpad digits. 29
Park a call to an orbit number. 20
Pick up (answer) a parked call. 20
View recent missed, incoming, and outgoing calls. 36
Search the Directory contact list. 38
Browse Group contact lists. 37
Answer a call. 14
Place an outgoing call. 18
Activate a feature. 13
25
4
Inter-Tel® Model 8662 Endpoint User Guide
Page 19
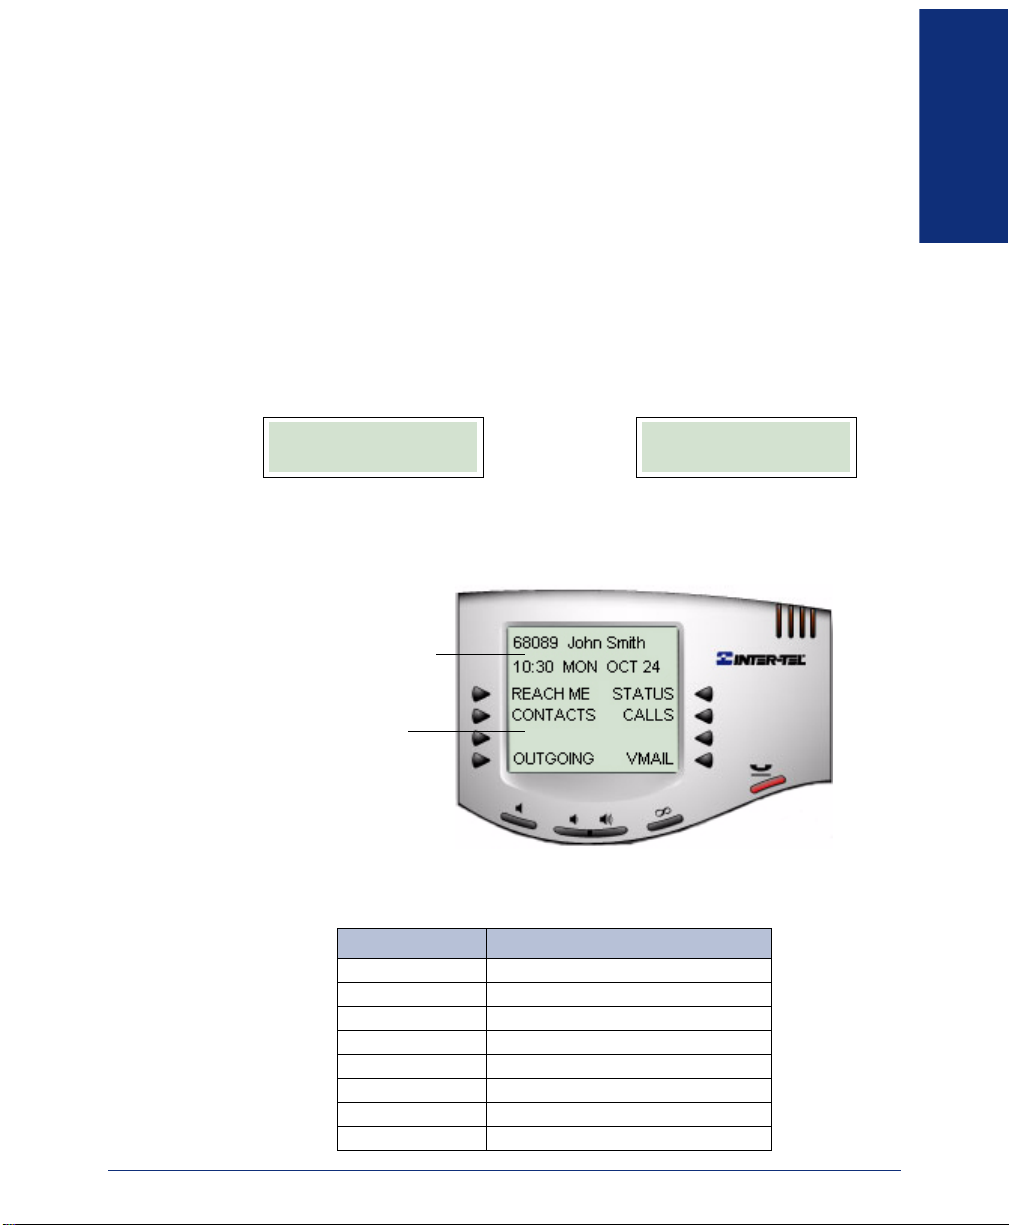
LCD and Menu Buttons
The Model 8662 has a six-line LCD. When the endpoint is idle, the top two lines
show user and system information, including:
• Extension number
• Subscriber name
• Time and date
• Call information (during a call)
• Message indication (after receiving messages)
If your status is not set to available (see page 27), your status setting displays on the
first line instead of your display name and extension number. The system time and
date or a status return time or date display on the second line.
STARTED
GETTING
68089 John Smith
10:30 MON OCT 24
Available Status Unavailable Status
Unavailable
9:00 WED OCT 26
The bottom four lines display a feature menu, which changes according to the feature
you are using. Press the menu button closest to an option to select it.
Display Name (or Status)
and System Information
Feature Menu
(default configuration,
your system may vary)
Some features displayed on the LCD may be abbreviated because the LCD displays
only 16 characters on each line. See the following table for feature abbreviations.
ABBREVIATION WORD/PHRASE
CNF Conference
CUR LOC Current Location
DCP Direct Call Pickup
HOLD CL Hold Call
LCR Last Call Received
PKUP Pickup
VMAIL Voice Mail
XFR Transfer
Inter-Tel® Model 8662 Endpoint User Guide
5
Page 20
GETTING
STARTED
What You See and Hear
The model 8662 has many audio and visual signals to indicate feature activity. The
following are a few helpful tips:
• Feature lamps may be unlit ( ), lit ( ), or flashing ( )
to indicate call or feature activity.
• A red lamp indicates that a call is ringing, holding, or active on your endpoint.
• All feature lamps illuminate at the same time for a few seconds when the end-
point is resetting or powering on (see page 10).
• The following errors may cause an error tone:
— Pressing an invalid button combination
— Trying to select a restricted feature
— Dialing a restricted or invalid number
— Dialing too slowly between digits
— Waiting too long before performing the next step
To correct, hang up and try again.
• Many features “time-out” if you wait too long before performing the next step. If
this happens, you must start over.
• “Off-hook” means the handset is lifted—“on-hook” means the handset is in the
cradle.
• The Message Indicator lamp flashes when there are waiting messages and duplicates the button signals.
LINE LINE LINE
MESSAGE
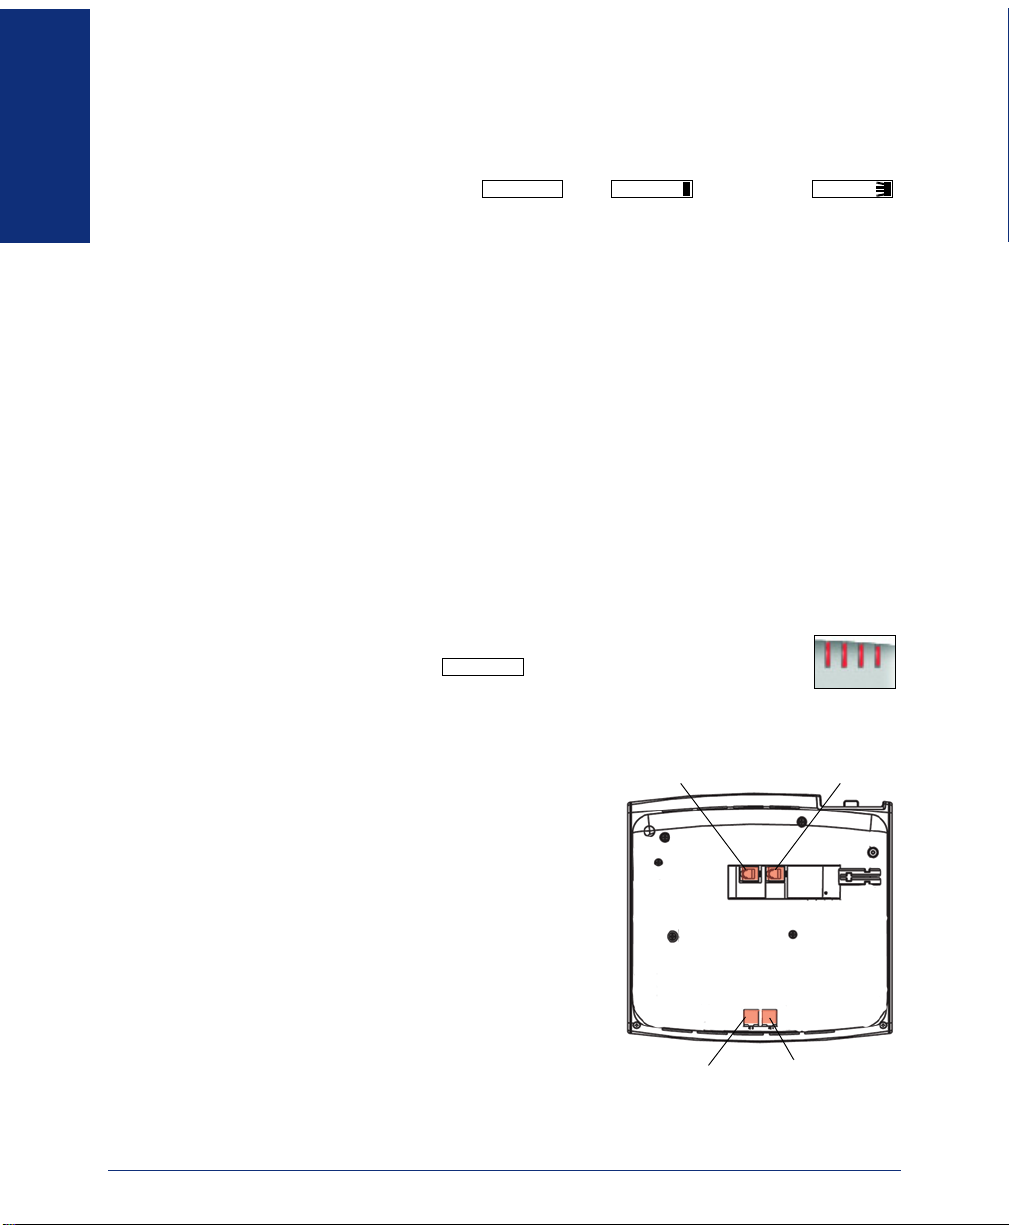
Endpoint Connectors
The Model 8662 endpoint connectors include:
• Handset jack: Connects to a handset.
• Headset jack: Connects to a headset.
• Personal computer (PC) port: Connects
to a PC or another 10/100 Ethernet device.
• LAN/Power jack: Connects to a power
supply.
Contact your network administrator for more
information about the endpoint connectors and
supported ethernet devices.
6
Headset Jack Handset Jack
PC Port LAN/Power Jack
Inter-Tel® Model 8662 Endpoint User Guide
Page 21

Power Requirements
CAUTION
Endpoint Damage Hazard. Make sure your endpoint is connected to the proper
power supply before using. Contact your system administrator if you have any
questions regarding power requirements.
The endpoint requires either an individual power supply unit or a centralized power
source. The following individual power supply units are compatible with the endpoint:
• Inter-Tel power supply unit (48-volt DC output)—part number 806.1114
(806.1117 in Europe)
• Red Hawk Single Port PowerSense
• An industry-standard IEEE 802.3af power supply unit
If your endpoint uses a centralized power over ethernet (PoE) source, DO NOT use an
individual power supply unit. If necessary, contact your system administrator for
assistance before connecting your endpoint to the centralized power source.
Make sure the endpoint is plugged into an uninterruptible power supply (UPS). If the
endpoint is not plugged into a UPS and the power fails, the current call is dropped and
the endpoint will not be usable until the power is restored.
™
(part number 901.0407)
STARTED
GETTING
Software and Firmware
CAUTION
Endpoint Damage Hazard. Do not use your endpoint or disconnect it from the
power supply during the downloading process.
The Model 8662 comes with preinstalled Inter-Tel software and firmware, but occasional software updates may be required when new versions are available. The endpoint is configured to download the updates automatically.
During the download process, several messages display on the LCD and the feature
button lamps illuminate. The download is complete and the endpoint is ready for use
when your user information appears.
Inter-Tel® Model 8662 Endpoint User Guide
7
Page 22
GETTING
STARTED
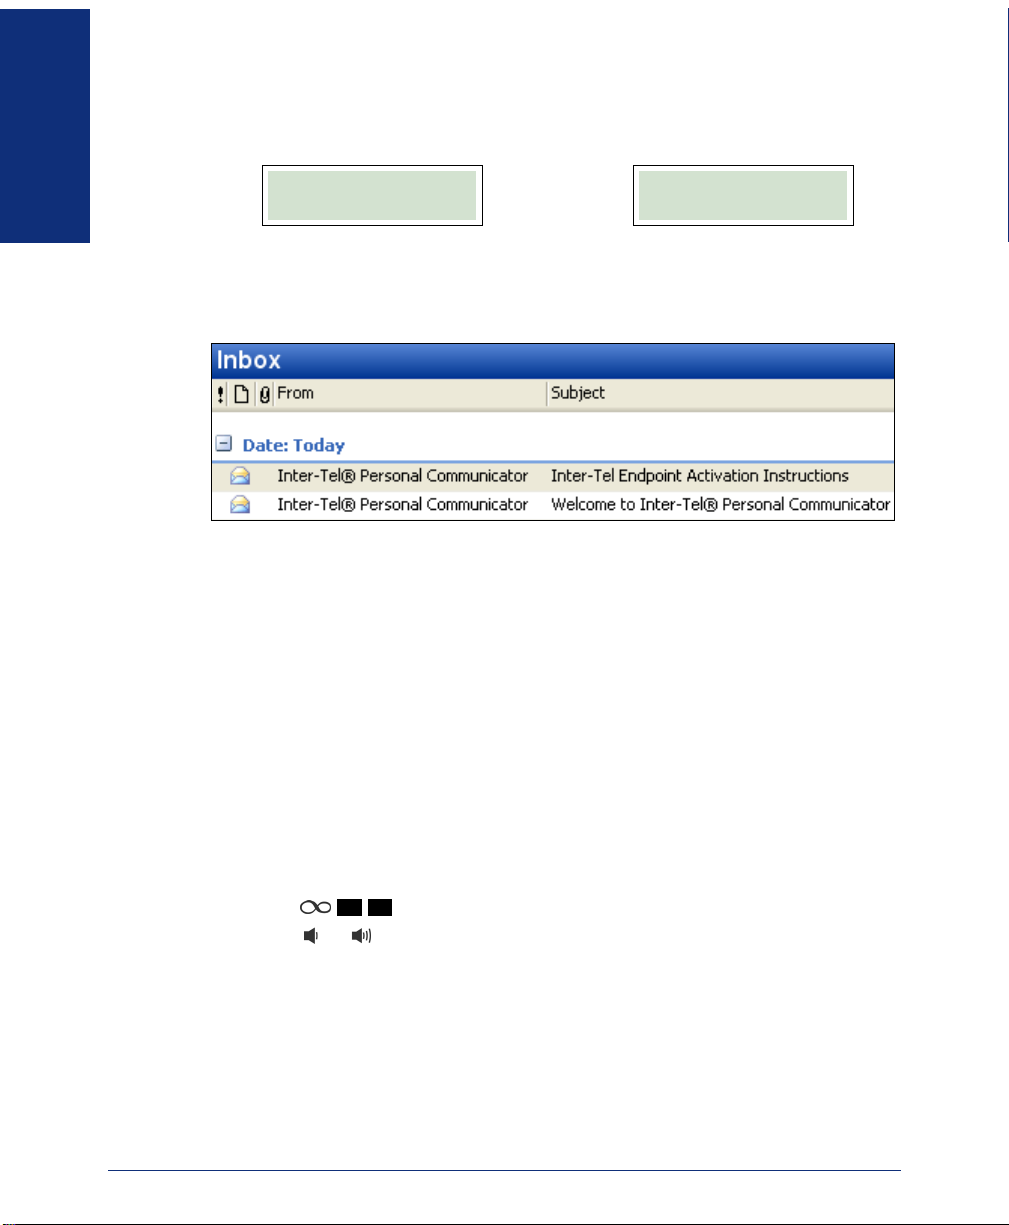
ENDPOINT SETUP
Your endpoint should be ready to use. If either of the following messages is displayed,
ENTER ACTIVATION
CODE
ENTER CONFIG
URL
contact your system administrator for assistance or refer to the Activation and Welcome e-mail messages (as shown in Microsoft
information to activate your endpoint and enable Inter-Tel Personal Communicator for
your account.
Adjusting the Viewing Angle
You can adjust the endpoint viewing angle according to your preference.
To adjust the viewing angle:
1. Position the endpoint on a flat surface.
2. Remove the support “feet” from the base holes.
3. Tilt the endpoint to the desired angle.
4. Replace the feet in the holes to secure the position.
Adjusting the LCD Contrast Level
You can adjust the LCD contrast according to your preference.
®
Outlook® below), which contain
To adjust the LCD contrast:
1. Press .
2. Press or to adjust the contrast. Press the center of the button to save the
setting.
8
3 9
Inter-Tel® Model 8662 Endpoint User Guide
Page 23

Adjusting Volume Settings
Volume settings for the following features may be adjusted individually as needed:
• Handset
• Headset
• External speaker
• Background music
• Ringer
You must be using the feature to change the volume setting. For example, if you want
to change handset volume setting, you must be using the handset.
To adjust a volume setting: While using the feature, press or . Press the center
of the button to save the setting.
Changing Endpoint Ring Tones
You can use Inter-Tel Personal Communicator for Web to change the endpoint ring
tones. There are 16 different ring tones.
To listen to ring tones:
1. Press , and then press the NEXT/PREVIOUS menu button or
2. Press the VIEW menu button, and then press the NEXT/PREVIOUS menu button
or to scroll to
3. Press the VIEW menu button to listen to ring tones. Press the NEXT/PREVIOUS
menu button or to scroll through and listen to all ring tones.
6 0 0
to scroll to
PHONE SETTINGS.
RING TONE SETTINGS.
STARTED
GETTING
To change ring tones:
1. Open Inter-Tel Personal Communicator for Web (see below).
2. Click the Phone tab, and then click the Phone Options sub tab.
3. Click on the Settings link for your endpoint type.
4. Select the ring tone(s) from the drop-down list(s), and then click Save to save
the changes
Inter-Tel® Model 8662 Endpoint User Guide
9
Page 24

GETTING
STARTED
Listening to Background Music
If your system is equipped with a music source, you can listen to background music
through the external speaker.
To enable/disable background music: Press
toggle).
Resetting the Endpoint
If your endpoint is not working properly, it may need to be reset. Contact your system
administrator before resetting your endpoint.
5 1
(Background Music on/off
To reset your endpoint: Press (at the same time) .
7 8
Using a Headset
When using a headset, press to connect/disconnect calls. You can switch to the
handset by lifting the handset from the cradle. Press before replacing the handset in
the cradle to switch back to the headset.
To connect and enable the headset:
1. Insert the headset plug into the headset jack (see page 6).
2. Do one of the following:
4
1
• Press
• Press
0
(Headset on).
4
2
0
(Headset on/off).
To disconnect and disable the headset:
1. Remove the headset plug from the headset jack.
2. Do one of the following:
4
0
• Press
• Press
0
(Headset off).
4
2
0
(Headset on/off).
Validating Your Location for Placing Emergency Calls
Before using your endpoint, make sure that it is validated in the system for placing
emergency calls. See page 16 for more information on placing emergency calls.
To validate the location: Press . Your location is validated if the following confirmation notice appears.
6 1 1
10
LOCATION
VALIDATED
If any other message appears, contact your system administrator.
Inter-Tel® Model 8662 Endpoint User Guide
Page 25

VOICE MAIL SETUP
See Voice Mail Features on page 47 for more information on using system voice mail
features.
Voice mail instructions include Automatic Speech Recognition (ASR) voice commands, which can be used instead of pressing the dialpad buttons if ASR is enabled
for your system (see page 47).
Initializing Voice Mail
If necessary, contact your voice mail administrator for the voice mail extension number and your voice mail password. Your voice mail password is also your personal
identification number (PIN), which is used for the following system features:
• Voice mail password
• Unlocking your endpoint (see page 30)
• Hot Desking (see page 33)
• Inter-Tel Personal Communicator for Voice (see page 39)
• Advanced hunt groups (see page 43).
NOTE Changing your voice mail password also changes your PIN.
To initialize your voice mail account:
Press during any voice mail operation to advance to the next step. Press to
#
return to the previous menu.
1. Dial the voice mail extension number, and then press .
2. Enter your system-generated voice mail password, and then press .
3. Enter your new password using dialpad buttons 0 through 9 (4 to 12 digits), and
then press .
4. Press or say “Accept” to accept the entry, or press or say “Erase” to erase
and re-enter your password. After accepting the new password, the system
prompts you to record your directory name.
5. After the tone, record your first and last name for the directory. When prompted,
select one of the following options:
• Press or say “Accept” to accept the name.
• Press or say “Replay” to replay the recorded name.
• Press or say “Append” to add to your name.
• Press or say “Re-record” to erase and re-record your name.
#
# 3
#
1
2
3
STARTED
GETTING
#
See page 49 to re-record or change your directory name.
After recording your name, the system plays a message that introduces you to voice
mail system features. To skip the introduction, press
Inter-Tel® Model 8662 Endpoint User Guide
#
or say “Skip.”
11
Page 26

GETTING
STARTED
Recording Your Personal Greeting(s)
Your personal greeting* informs callers why they have reached your voice mailbox,
so you may include some or all of the following information:
• Whether or not you are in the office and where you can be reached.
• When you will be returning calls.
• How to exit voice mail (for callers who do not want to leave a message). For
example, “Press to return to the operator.”
The following are sample greetings to help you plan your message:
• Hello, this is __________. I am either on another line or away from my desk and
cannot take your call at this time. If you need to speak to someone immediately,
please dial zero now. Otherwise, leave a detailed message, and I will return your
call as soon as possible. Thank you.
• Hello, this is __________. I will be away from the office from day/date until day/
date. If you need to speak to someone immediately, please dial zero now. Other-
wise, leave a detailed message, and I will return your call when I return. Thank
you.
If you do not record a greeting, a default system greeting is used.
To record or change your personal greeting:
1. Access your mailbox (see page 48).
2. Press or say “Personal” to select the Personal Options menu.
3. Press or say “Greeting” to record or change your personal greeting.
4. Select one of the following:
4
1
• Press or say “Primary” to record and/or enable your primary greeting.
• Press or say “Alternate” to record and/or enable your alternate greeting.
• Press or say “System” to enable the system default mailbox greeting.
If you selected the system greeting option, hang up.
If you already have a primary or alternate greeting, it is played when you select
primary or alternate.
If you selected the primary or alternate greeting option, record your greeting
when prompted, and then press to end the recording.
5. Then do one of the following:
• Press or say “Accept” to accept the greeting.
• Press or say “Replay” to replay the greeting.
• Press
• Press or say “Erase” to erase and re-record the greeting.
• Press or say “Cancel” to exit without changing your greeting.
0
1
2
3
#
#
1
2
or say “Append” to add to the greeting.
3
* Custom greetings can be created and assigned using Inter-Tel Personal Communicator for Web.
12
Inter-Tel® Model 8662 Endpoint User Guide
Page 27

Basic Features
Basic features include answering and placing calls, features used while on a call, and
using messages.
NOTE
Depending on system configuration, the features described in this user guide may or
may not be enabled. The following error message may appear if your system does not
support a feature or if a feature is not enabled.
If you are unable to use a feature or if a feature is not working properly, contact your
system administrator for more information.
Because the Model 8662 is dynamic and programmable, there may be multiple ways
to access and use features. For example, to answer a call you can:
• Lift the handset.
• Press the flashing
• Press .
• Press the
• Press .
For ease of use, when there are multiple ways to activate a feature, this user guide
may describe the most common method(s) only.
To activate a feature using the feature code: Press before entering the feature
code. You can also use , but this will not activate features while on a call. System
feature codes are listed on page 65.
Some features work only with Inter-Tel endpoints connected to the
Inter-Tel 7000 Network Communications Solution.
FEATURE NOT
ENABLED
LINE
button.
ANSWER
ANSWER menu button.
FEATURES
BASIC
To cancel a feature: Press the
Inter-Tel® Model 8662 Endpoint User Guide
EXIT menu button or while in the feature menu.
13
Page 28

BASIC
FEATURES
ANSWERING CALLS
Your endpoint may be preset to automatically answer intercom (internal) calls using
the Auto Answer feature (see below). After disabling Auto Answer, you can answer
calls using your handset or headset.
To answer a call: Lift the handset, or press to answer a call while using a headset
or to answer a call handsfree. If you are currently on a call, press the flashing
LINE
Using Auto Answer
Auto Answer automatically answers calls from other subscribers in handsfree mode
using the speakerphone
Outgoing, you must answer the call using your handset or by pressing , even if Auto
Answer Incoming is enabled on your endpoint.
For Auto Answer to work, the calling party must have Auto Answer Outgoing
enabled, and the receiving party must have Auto Answer Incoming enabled.
NOTES
button to answer waiting calls
You cannot use Auto Answer Incoming if you are using a headset or if
you have more than one endpoint assigned to an extension number.
Outside calls cannot be answered using Auto Answer unless routing
rules are set using Inter-Tel Personal Communicator for Web to allow
specific outside phone numbers to be answered automatically. You
can also enable and disable Auto Answer using Inter-Tel Personal
Communicator for Web.
(see page 15).
. However, if the calling subscriber has disabled Auto Answer
14
To enable Auto Answer Incoming, do one of the following:
3
• Press
• Press
4
4
1
(Auto Answer Incoming on).
3
2
(Auto Answer Incoming on/off).
To disable Auto Answer Incoming, do one of the following:
3
• Press
• Press
4
4
0
(Auto Answer Incoming off).
3
2
(Auto Answer Incoming on/off).
To enable Auto Answer Outgoing, do one of the following:
8
• Press
• Press
3
3
1
(Auto Answer Outgoing on).
8
2
(Auto Answer Outgoing on/off).
To disable Auto Answer Outgoing, do one of the following:
8
• Press
• Press
3
3
To temporarily disable Auto Answer Outgoing for an outgoing call: Press
0
(Auto Answer Outgoing off).
8
2
(Auto Answer Outgoing on/off).
#
before dialing the extension number.
Inter-Tel® Model 8662 Endpoint User Guide
Page 29

Answering Waiting Calls
If you receive a call while on another call, you hear a call waiting tone through your
handset or headset, and the Caller ID information (if available) displays.
To answer a waiting call and place the first call on hold: Press the flashing
LINE
button.
Using Automatic Line Answer
Automatic Line Answer automatically connects you to the caller when you pick up
the handset or press
abled, you must press the flashing button to answer the call.
(when using a headset). When Automatic Line Answer is dis-
LINE
FEATURES
BASIC
NOTE
Auto Answer overrides Automatic Line Answer and answers calls
handsfree (see page 14).
To enable Automatic Line Answer, do one of the following:
• Press
• Press
To disable Automatic Line Answer, do one of the following:
• Press
• Press
Using Call Drop
Call Drop immediately disconnects you from active or incoming calls.
To us e Cal l Dro p: While you are on the call or while the call is ringing, lift and
replace the handset or press the
3 2 1
(Automatic Line Answer on).
3 2 2
(Automatic Line Answer on/off).
3 2 0
(Automatic Line Answer off).
3 2 2
(Automatic Line Answer on/off).
END CALL menu button.
Inter-Tel® Model 8662 Endpoint User Guide
15
Page 30

BASIC
FEATURES
PLACING CALLS
The following instructions are for using basic features associated with placing emergency, intercom, and outside calls. You can also use the Station and System speed dial
features when placing a call (see page 19).
Placing Emergency Calls
Contact your system administrator to make sure your system
is correctly configured for emergency service before using
your endpoint. If an emergency call phone number is dialed from
IMPORTANT
a Session Initiation Protocol (SIP) endpoint located at a remote site
that is not correctly configured, the call will be placed from the location where the system is installed instead of the location where the
emergency call was placed. See page 10 for more information on
validating your location for emergency calls.
You do not have to press the Outgoing Call access code ( ) or an OUTGOING button to dial an emergency service number. In an emergency, dial the appropriate emergency service number directly ( U.S. or
Placing Intercom Calls
An intercom call is a call placed to another subscriber in the organization.
To place an intercom call: Dial the subscriber’s extension number. When using Auto
Answer (see page 14), speak after the intercom (IC) confirmation appears.
If the extension is busy, the following feature options are available:
• Camp-on to the busy extension until the subscriber is available (see below).
• Place an Off-Hook Voice Announce (see page 17).
• Queue for the subscriber (see page 17).
• Leave a text message (see page 25).
• Record a voice mail message (see page 26).
Using Camp-on
Use Camp-on to stay on the line and wait for the busy extension to become available.
9
1 1
IC TO JOHN SMITH
1:30 FRI DEC 16
9
9 9 9 1
/ Eur.).
1 2
16
use Camp-on: Stay on the line until the called extension becomes available (do not
To
hang up). Until the call is answered or sent to voice mail, the extension rings periodically and the display indicates the waiting call.
Inter-Tel® Model 8662 Endpoint User Guide
Page 31

Placing an Off-Hook Voice Announce
An Off-Hook Voice Announce (OHVA) connects you to a subscriber’s speakerphone
while the subscriber is on another call. This allows the subscriber to speak and listen
to you while on the active call.
to place an OHVA—you can also place an OHVA while the extension is idle.
If the called subscriber is on a handsfree call or on a call while using a headset, you
are camped-on to the extension until the call is terminated. The subscriber will then
receive the OHVA as an incoming call.
To place an OHVA:
5
1. Press .
9
If the extension is busy, you are automatically connected.
If the extension is idle, dial the extension number.
Confirmation notices briefly appear on both endpoints.
*
The subscriber’s extension does not have to be busy
FEATURES
BASIC
OHVA TO JOHN
1:30 FRI DEC 16
2. Place the voice announce. The called party hears the announcement over the
external speaker.
Queuing for a Subscriber
If a called extension is busy, queuing for the subscriber notifies you with a callback
when all endpoints assigned to the subscriber are idle and when the subscriber’s status
is available for calls. The system calls you when the subscriber is available.
To queue for the subscriber:
1. While on the call, press the QUEUE menu button or .
2. Enter the extension number, and then hang up.
To cancel the queue: Answer the callback, and then hang up.
OHVA CALL FROM
MARIA
4 4
* OHVA may or may not be enabled for your system. Shared (forked) extensions cannot use OHVA. Con-
tact your system administrator for more information.
Inter-Tel® Model 8662 Endpoint User Guide
17
Page 32

Placing Outside Calls
Outside calls are calls placed to parties outside of the organization.
To place an outside call:
1. With or without the handset lifted, do one of the following:
• Press .
• Press the
• Press the Outgoing Call access code. The default code is .
2. Dial the number. If you enter an incorrect digit, press to move the cur-
sor backward, deleting the last digit(s) entered.
OUTGOING
OUTGOING menu button.
9
MUTE
BASIC
FEATURES
Using Billing Codes
Billing codes are used to categorize calls. If they are used in your organization, you
may be prompted to enter a billing code when placing outside calls. Contact your system administrator for billing code information.
Redialing a Phone Number
The Redial feature automatically redials the last extension or outside number called.
To redial the last number called: Press or .
Using Auto Redial
Use Auto Redial to redial intercom or outside calls in timed intervals until answered.
To use Auto Redial:
3
1. Press .
2. Enter the number of attempts desired, and then press .
3. Enter the time-out period (the time between attempts), and then press .
To cancel Auto Redial, do one of the following:
• Lift and replace the handset.
• Press the
5
EXIT menu button or .
REDIAL
0
0
#
#
Using Last Call Return
You can automatically dial the last call received.
To use Last Call Return: Press
18
6
9
.
Inter-Tel® Model 8662 Endpoint User Guide
Page 33

Using Speed Dial
There are two types of speed dial that you can use to dial numbers:
• Station speed dial: A subset of contacts (up to 20) from your Personal contact
list which have access codes (
*
ing.
• System speed dial: A subset of contacts (up to 100) from your Company contact
list which are designated by the system administrator and have access codes
0 0
2
(
to ) assigned to them for speed dialing. Contact your sys-
tem administrator for System speed dial access codes.
To use Speed Dial: Press
ple:
• Press
• Press to call a company number (using System speed dial).
to call a personal contact (using Station speed dial).
2
0 1
2
9 9
1
0
to ) assigned to them for speed dial-
9
1
plus the access code assigned to the contact. For exam-
0 0
FEATURES
BASIC
* You can assign Station speed dial access codes using Inter-Tel Personal Communicator for Web or
Inter-Tel Personal Communicator for Windows. Contact your system administrator for more information.
Inter-Tel® Model 8662 Endpoint User Guide
19
Page 34

BASIC
FEATURES
FEATURES USED WHILE ON A CALL
The following features are primarily used for active or incoming calls.
Placing Calls On Hold
When you place a call on hold, the held party hears music on hold or silence, depending on your system configuration. While the call is on hold, the system periodically
rings your endpoint as a reminder.
To place a call on hold:
1. Press or the HOLD menu button.
2. Hang up or place another call.
To return to a held call:
1. Lift the handset or press (handsfree).
2. Press or the flashing button.
If more than one call is on hold, switch between held calls (call hop) by pressing the
flashing button assigned to the call.
LINE
Using Call Park
Use Call Park to place calls on hold to a designated “orbit” location. After the call is
parked to the orbit location, it can be picked up (answered) by any subscriber.
To use Call Park:
1. During the call, press or the PARK menu button.
2. Enter a 1- to 10-digit orbit number (for example, ), and then press .
A confirmation notice appears.
LINE
PARK
1 1 #
1
20
CALL PARKED
SUCCESSFULLY
3. Dial the extension number for which the parked call is intended, and then
announce the parked call and the orbit number.
4. Hang up. You are disconnected from both parties.
If the parked call is not picked up, it will be redirected to the subscriber who parked
the call after the Park Recall timer expires (about two minutes).
To pick up a parked call:
1. Press or the PKUP menu button.
2. Enter the orbit number, and then press .
PICKUP
#
Inter-Tel® Model 8662 Endpoint User Guide
Page 35

Using the Mute Feature
The Mute feature disables your microphone to prevent parties from hearing you.
To enable or disable the Mute feature: While on the call, press or the
MUTE/UNMUTE menu button.
Displaying Your User Information
You can temporarily display your user information and the system time and date.
6 5
To display user and system information: Press
.
Displaying Caller ID Information
Use Caller ID to display the caller’s name or number (if available) and the elapsed
time of the call, toggling between the name and number.
JOHN SMITH
:08
Caller Name on Caller Name off
To display caller ID information: Press
(Caller ID toggle).
3 4
Blocking Outbound Caller ID Information
You can block your Caller ID information from displaying on the current call.*
To block outbound Caller ID for the current call: Press
the number (the number is immediately dialed).
To unblock outbound Caller ID (if set to always blocked): Press
MUTE
480-961-9000
:08
6 7
, and then enter
8 2
.
FEATURES
BASIC
Using Annoyance Call Trace
Annoyance Call Trace identifies and records an unwelcome caller’s Caller ID information and the time of the call.
information. Annoyance Call Trace can be used during or immediately after the call.
To use Annoyance Call Trace: Press
* “All call” outbound Caller ID settings are enabled/disabled by the system administrator.
† Annoyance Call Trace may or may not be enabled for your system. Contact your system administrator
for more information.
Inter-Tel® Model 8662 Endpoint User Guide
†
You must contact your system administrator for the
5 7
. A confirmation notice appears.
CALL TRACE
SUCCEEDED
21
Page 36

BASIC
FEATURES
Transferring Calls
There are three ways to transfer calls:
• Transfer to Ring: Transfers the call to an extension or outside number.
• Transfer to Hold: Transfers the call to another subscriber and places the call on
hold.
• Transfer on Connect: Transfers the call to another phone and then disconnects
the call from your endpoint. For example, use Transfer on Connect to transfer a
call from your endpoint to your cell phone or personal digital assistant (PDA).
To use Transfer to Ring:
1. While on the call, press or the XFR menu button.
If you are transferring the call to an extension, dial the extension number.
If you are transferring the call to an outside number, press
going Call access code ( ), and then dial the number.
2. Do one of the following:
• Hang up to complete the transfer.
• Wait for an answer, announce the call (if desired), and then hang up. A con-
firmation notice appears.
To use Transfer to Hold:
1. While on the call, press .
2. Dial the extension number, and then do one of the following:
• Hang up to complete the transfer.
• Wait for an answer, announce the call if desired, and then hang up. A confir-
mation notice appears.
TRANSFER
9
TRANSFER
SUCCESSFUL
4 6
OUTGOING
or the Out-
22
TRANSFER
SUCCESSFUL
To use Transfer on Connect:
1. While on the call, press .
7 9
If you are transferring the call to an extension, dial the extension number.
If you are transferring the call to an outside number, press
9
, and then dial the
number.
2. After the call is answered, hang up. A confirmation notice appears.
FEATURE REQUEST
SUCCEEDED
Inter-Tel® Model 8662 Endpoint User Guide
Page 37

Using Send to Destination
Send to Destination allows you to send incoming calls to another extension or outside
number.
To use Send To Destination:
1. While a call is ringing, press the SEND TO DEST menu button or .
2. Do one of the following:
• If you are sending the call to an extension, dial the extension number.
• If you are sending the call to an outside number, press the Outgoing Call
access code ( ), and then enter the number. A confirmation notice appears.
9
4 8
FEATURES
BASIC
CALL FORWARDED
TO 1234
Extension Outside Number
Using Directed Call Pickup
Directed Call Pickup allows you to answer a call that is ringing or holding at another
endpoint (reverse transfer a call). For example, if you receive a call but you are away
from your desk, you can answer the call from any system endpoint.
To use Directed Call Pickup:
1. Press .
2. Dial the extension number where the call is ringing or holding to connect to the
5 3
caller. A confirmation notice appears.
SUCCESSFUL
If the call is for a hunt group (see page 43), enter the hunt group extension number to answer the call.
Using Group Call Pickup
A call group is a group of subscribers who have their own extensions.* Unlike hunt
groups (see page 43), call group members do not share an extension. Call group mem-
bers can answer ringing or holding calls for any other member of the call group. Calls
are answered based on the order they are received (first in, first answered).
TRANSFER
CALL FORWARDED
TO 4809619000
To use Group Call Pickup: Press . The first call received is answered.
* Call groups are configured by your system administrator.
Inter-Tel® Model 8662 Endpoint User Guide
5 4
23
Page 38

BASIC
FEATURES
Placing Conference Calls
You can place a conference call with subscribers and outside parties. The number of
parties who can be added to the conference depends on system configuration.
To place a conference call:
1. While on the first call, press or the CNF menu button to place the call
on hold.
2. Add the conference parties:
If you are adding subscribers:
a. Dial the extension number and announce the conference.
b. Press the flashing button or the CNF menu button to add the party
to the conference.
If you are adding outside parties:
a. Press or the Outgoing Call access code ( ).
b. Dial the number, and then announce the conference.
c. Press the flashing button or the CNF menu button to add the party
OUTGOING
to the conference.
3. After gathering the conference parties, press the flashing button or the
CONN TO CNF menu button to start the conference. A confirmation notice dis-
plays.
CONF
CONF
CNF IN PROGRESS
CONF
9
CONF
24
To place your endpoint on hold and remove yourself from the conference:
Press . This places your endpoint on hold without disconnecting the parties. To
return to the conference, press the flashing button.
LINE
To add a party to the conference:
1. Press or the ADD PARTY menu button. This leaves the conference
CONF
parties connected.
2. Call the party to be added to the conference, announce the conference, and then
press the
3. Press the flashing button or the CONN TO CNF menu button to recon-
CNF menu button or the flashing button.
CONF
CONF
nect to the conference with the added party.
To drop out of the conference: Press , and then hang up. This removes you
CONF
from the conference, but leaves the other parties connected.
To reconnect to the conference after dropping out: Lift the handset, and then press
the flashing
CONF
CONF
button or the CONN TO CNF menu button. (Press the flashing
button twice for handsfree calls.)
Inter-Tel® Model 8662 Endpoint User Guide
Page 39

USING MESSAGES
When you receive new text or voice mail messages, the Message Indicator lamp flashes, and the LCD shows the number of new messages.
Instant messages do not display on the endpoint and are not indicated by
the Message Indicator lamp or LCD.
Using Text Messages
You can send text messages to other subscribers. The default message is PLEASE
CALL ME
Personal Communicator for Windows to create and send your own text messages.
To send a text message:
1. Do one of the following:
2. Dial the extension number. A confirmation notice appears.
To cancel a sent text message:
1. Do one of the following:
2. Dial the extension number.
3. Press the DELETE menu button or to cancel the message. A confirmation
. You can also use Inter-Tel Personal Communicator for Web or Inter-Tel
• Press , and then press the
MESSAGE
• Press .
• Press , and then press the
MESSAGE
• Press .
notice appears.
5 2 0
5 2 2
*
LEAVE MESSAGE menu button.
MESSAGE LEFT FOR
JOHN SMITH
CANCEL MESSAGE menu button.
1
MESSAGE DELETED
FEATURES
BASIC
To view, reply to, or delete a text message (Message button and lamp are flashing):
1. While the handset is on-hook, press or the VIEW MESSAGE menu
MESSAGE
button. Then lift the handset if desired.
2. If there is more than one message, press the >>/<< menu button or to
scroll through the messages. Press the
VIEW TEXT menu button to view the
message.
3. Press the REPLY menu button or to call the subscriber, or press the DELETE
menu button or to delete the message.
* Instant messaging (IM) may or may not be enabled for your system. If enabled, use Inter-Tel Personal
Communicator for Web or Inter-Tel Personal Communicator for Windows for IM.
Inter-Tel® Model 8662 Endpoint User Guide
2
1
25
Page 40

BASIC
FEATURES
Leaving and Listening to Voice Mail Messages
Use voice mail to record a message and send it to a subscriber’s mailbox.
To leave a voice mail message:
1. Do one of the following:
• Press , and then press the
• Press
2. Dial the extension number.
3. Leave your voice mail message, and then hang up.
MESSAGE
9
3
.
LEAVE VMAIL menu button.
To listen to a new voice mail message (Message button and lamp are flashing):
1. While the handset is on-hook, press or the VIEW MESSAGE menu
MESSAGE
button. Then lift the handset if desired.
2. If there is more than one message, press the >>/<< menu button or to
scroll through the messages.
3. Press the LISTEN menu button or to connect to your mailbox, enter your
password, and then press .
To avoid entering your password each time you access your mailbox,
TIP
you can use Inter-Tel Personal Communicator for Web to enable Auto
Logon settings (Options tab - Preferences [Edit] - Voice Portal).
#
#
Paging Subscribers
26
A page is an announcement through endpoint speakers or external speakers. The Paging feature uses page groups to prevent announcements from transmitting through
every endpoint in the system. Contact your system administrator for page group numbers and list them below for your convenience.
PAGE GROUP NUMBER
To use the Page feature:
5
1. Press or .
2. Enter the page group number. A confirmation notice appears.
PAG E
7
PAGE IN PROGRESS
1:30 FRI DEC 16
3. Place the page announcement, and then hang up.
To cancel the page: Hang up or press the
END CALL menu button.
Inter-Tel® Model 8662 Endpoint User Guide
Page 41

Advanced Features
The Inter-Tel 7000 Network Communications Solution advanced features provide
you with the latest communication technologies.
PRESENCE MANAGEMENT
Presence management features enable you to:
• Inform subscribers of your availability and direct calls based on your status (see
below).
• Route incoming calls using Reach Me (see page 29).
• Use routing rules to set and change how your calls are routed based on the caller,
type of call, and destination (see page 29).
Changing Your Status
Your status reflects your availability. The seven default status settings are
shown in the following table.
IDENTIFIER STATUS
1
2
3
4
5
6
7
Available
Unavailable
Send Calls to <number>
In Meeting Until <time>
Out to Lunch
Gone Home
On Vacation Until <date>
ADVANCED
FEATURES
The IN MEETING UNTIL and ON VACATION UNTIL status settings allow you to enter
the time or date you will return. For example, if you select
your status setting and enter 3:30 as your return time, your endpoint displays
MEETING UNTIL 3:30
. The SEND CALLS TO status setting allows you to forward
incoming calls to another extension or outside number.
If your status is not set to
voice mail. However, you can change your default status settings or add statuses using
Inter-Tel Personal Communicator for Web.
Inter-Tel® Model 8662 Endpoint User Guide
IN MEETING UNTIL as
IN
AVAILABLE, default routing settings send your calls to
27
Page 42

ADVANCED
FEATURES
To change your status:
1. Press or the STATUS menu button.
2. Do one of the following:
STATUS
• Enter the status identifier from the table on page 27.
• Press the
BROWSE menu button, and then press the NEXT/PREVIOUS menu
button or to scroll through the options.
If the status includes a time, date, or forwarding number, enter the information
using the dialpad buttons. See the following table for dialpad button character
descriptions.
3. Press the ACCEPT menu button or to set the status.
NUMBER OF TIMES BUTTON IS PRESSED (IN ALPHA MODE)
BUTTON
1
2
3
4
5
6
7
8
9
0
1 2 3 4 5 6 7 8 9 10 11 12 13
1!|’:;,/\><)(
ABC2abc
DEF 3 d e f
GH I 4 g h i
JKL5 j k l
MNO 6mn o
PQRS7 p q r s
TUV8 t u v
WXYZ9wxyz
0.@#*-_&%=$~+
#
28
To use the dialpad to enter characters:
Press the dialpad buttons to enter characters. If the dialpad is currently set to enter
numeric characters (numbers), switch to alphanumeric (letters, numbers, and symbols) by pressing the
pressing the
Press
NUMERIC MODE menu button or .
<< or to move the cursor backward (deleting the last character[s]
entered), or press
For example, to enter
1. In numeric mode, press . Press the ALPHA MODE menu button.
2. In alpha mode, press five times, and then press the NUMERIC MODE menu
ALPHA MODE menu button or . Return to numeric by
MUTE
FORWARD
>> or to move the cursor forward.
1:30, you can use the following sequence:
1
1
MESSAGE
MESSAGE
button.
3. In numeric mode, press .
4. In numeric mode, press .
5. Press the ACCEPT menu button or to accept the entry.
3
0
#
Inter-Tel® Model 8662 Endpoint User Guide
Page 43

Using Reach Me
Use Reach Me to route calls to the following (default) destinations:*
• At my desk: Calls are sent to your current location based on your status setting.
• Voice mail: Calls are sent to voice mail.
• Forward to: Calls are sent to the extension or outside number entered as the for-
warding number.
• Follow rules: Calls or instant messages are routed based on default system rout-
ing rules or routing rules created using Inter-Tel Personal Communicator for
Web.
To use Reach Me:
1. Do one of the following:
• Press the
• Enter the feature code from the following table, and then go to step 3.
2. Press the BROWSE menu button, and then press the NEXT/PREVIOUS menu
button or to scroll through the options.
3. Press the ACCEPT menu button or to accept the Reach Me setting.
If you selected
press the
ACCEPT menu button or to accept the forwarding number.
REACH ME menu button or , and then go to step 2.
FEATURE CODE REACH ME SETTING
5 6 1
5 6 2
5 6 3
5 6 4
At My Desk
Voice Mail
Forward to <number>
Follow Rules
#
5 6 0
FORWARD TO, enter the extension or outside number, and then
#
ADVANCED
FEATURES
Changing your Reach Me setting also changes your status setting. For
example, changing your Reach Me setting to VOICE MAIL also
NOTE
changes your status setting to UNAVAILABLE. Changing your Reach
Me setting to AT M Y DESK also changes your status setting to
AVAILABLE.
* Routing rules can be added or changed using Inter-Tel Personal Communicator for Web. Contact your
system administrator for more information.
Inter-Tel® Model 8662 Endpoint User Guide
29
Page 44

ADVANCED SUBSCRIBER FEATURES
Advanced subscriber features allow you to:
• Lock your endpoint (see below).
• Bypass routing rules to contact other subscribers (see page 30).
• Redirect active or incoming calls using Hot Rules (see page 31).
• Find and call contacts using Personal Assistant (see page 32).
• Record calls and voice memos using Record-A-Call (see page 32).
• Log on to other endpoints using Hot Desking (see page 33).
• Allow multiple subscribers to listen to a caller using Group Listen (see page 34).
• Monitor other subscribers’ call activity using Monitor Account (see page 34).
• Contact subscribers using the Outbound Communication menu (see page 35).
• View or return recent calls using your Call Log (see page 36).
• Find and contact others using contact lists (see page 37).
• Access Inter-Tel Personal Communicator using the voice portal (see page 39).
Locking Your Endpoint
You can lock your endpoint to prevent others from using it.
ADVANCED
FEATURES
30
To lock your endpoint: Press
3 1
.
To unlock your endpoint: Enter your personal identification number (PIN), and then
press the
UNLOCK menu button or . If necessary, contact your system administra-
tor for your PIN
IMPORTANT
.
You can still use the endpoint to dial emergency service numbers
when it is locked ( U.S. or / Eur.).
Press after dialing the emergency service number to immediately place the call. Otherwise, there will be a 4-second system
pause before the system places the call, as described below.
#
#
9
1 1
9
9 9
1
1 2
To dial an emergency service number when the endpoint is locked: Do one of the
following:
• Dial the emergency service number, and then press (for example,
9
1 1 #
). The system immediately places the call.
#
• Dial the emergency service number. After a 4-second pause, the system
places the call.
Inter-Tel® Model 8662 Endpoint User Guide
Page 45

Using Direct Endpoint Access
Direct Endpoint Access allows you to call a subscriber’s extension and bypass all
routing rules enabled by the subscriber.
To use Direct Endpoint Access:
6
1. Press .
2. Dial the extension number.
9
Using Direct Account Access
Direct Account Access allows you to call a subscriber at the subscriber’s current location and bypass any other enabled routing rules.
To use Direct Account Access:
7
1. Press .
2. Dial the extension number.
9
Using Hot Rules
Use Hot Rules to redirect active or incoming calls.† If you are on an active call, Hot
Rules apply to the active call, not an incoming call. Hot Rules apply to incoming calls
only if the endpoint is idle. The default Hot Rules destinations are:
• Voice mail (
• Current location (
• Hold call (
V-MAIL): Sends the call to voice mail.
CUR LOC): Sends the call to your current location.
HOLD CL): Places the call on hold.
*
This ensures the extension endpoint is dialed.
ADVANCED
FEATURES
To us e Hot R ule s :
1. While on a call or while a call is ringing, press the HOT RULES menu button or
2
4
.
2. Do one of the following:
• Press the
• Press the
APPLY menu button or to accept the current Hot Rule.
NEXT/PREVIOUS menu button or to scroll through the
options, and then press the
#
APPLY menu button or to accept the rule.
#
If the call is active and you selected current location (CUR LOC), enter the extension number, or press
OUTGOING
or the Outgoing Call access code ( ), and then
9
enter the outside number.
* Direct Endpoint Access and Direct Account Access may or may not be enabled for your system. Contact
your system administrator for more information.
† Advanced routing for Hot Rules may or may not be enabled. If enabled, advanced Hot Rules routing can
be added or changed using Inter-Tel Personal Communicator for Web and can contain multiple steps
and perform other functions based on the person calling, such as hang up, play a greeting, or transfer
the call to another subscriber. Contact your system administrator for more information.
Inter-Tel® Model 8662 Endpoint User Guide
31
Page 46

Using Personal Assistant
ADVANCED
FEATURES
Personal Assistant allows you to place a call by saying the name, extension, or outside
number of the person you are calling.
To use Personal Assistant:
1. Press .
2. After hearing Personal Assistant’s introduction (“Who would you like to call?”),
6 4
say the name, extension, or outside number of the person you want to call. Personal Assistant verifies the information or asks you to repeat the request.
3. Say “Yes” to accept, or say “No” to start over.
Using Record-A-Call
Use Record-A-Call to record an ongoing call as a mailbox message.‡ You can then
retrieve the recording from your mailbox. Record-A-Call remains active after the
other party hangs up, allowing you to add to the recording if desired.
To use Record-A-Call:
1. While on the call, press .
2. Enter the mailbox number (if not preprogrammed), and then press the ACCEPT
menu button or . A confirmation notice appears.
3. After recording the conversation, append the message if desired, and then press
the
END REC menu button or hang up to end the call.
#
*
5
8
RECORDING IN
PROGRESS
†
To retrieve the recording: Retrieve the recording as a new message (see Listening to
Voice Mail Messages on page 48).
* Personal Assistant may or may not be enabled for your system. Contact your system administrator for
more information.
† The confirmation prompt can be disabled using Inter-Tel Personal Communicator for Web.
‡ Record-A-Call may or may not be enabled for your system. Contact your system administrator for more
information.
32
Inter-Tel® Model 8662 Endpoint User Guide
Page 47

Recording a Voice Memo
You can use Record-A-Memo to record a voice memo and save it to your mailbox or
another subscriber’s mailbox as a voice mail message.
To record a voice memo:
8
1. Press .
2. Enter the mailbox number (if not preprogrammed).
3. Record the message.
4. Press the END CALL menu button (or hang up) to stop recording.
5
To retrieve the recording: Retrieve the recording as a new message (see Listening to
Voice Mail Messages on page 48).
Hot Desking
Hot Desking allows you to log on to another system endpoint and transfer your
account profile (extension number, user name, status setting, contacts, etc.) to the endpoint on which you are logged on.
which you are logged on, unless your Reach Me settings have routed your calls to
another location. Hot Desking is often used when multiple subscribers share the same
endpoint or when a subscriber changes desks frequently.
Calls can still be made to the subscriber who was originally assigned
NOTE
to the endpoint using the subscriber’s extension number. Incoming
calls for the original subscriber are assigned to the fourth line button.
*
Incoming calls are routed to the endpoint(s) on
ADVANCED
FEATURES
To us e Hot D esk i ng:
1. Do one of the following:
7
• Press
• Press
2. Enter your login (account or extension) number, and then press the ACCEPT
8
(Hot Desking log on).
8
(Hot Desking log on/log off).
menu button or .
3. Enter your personal identification number (PIN), and then press the ACCEPT
menu button or . If necessary, contact your system administrator for your
1
7
2
#
#
PIN.
To log out of the endpoint and return it to the previous setting, do one of the following:
7
• Press
• Press
* Hot Desking may or may not be enabled for your system. If enabled, Hot Desking options can be modi-
fied using Inter-Tel Personal Communicator for Web. Contact your system administrator for more information.
Inter-Tel® Model 8662 Endpoint User Guide
8
(Hot Desking log off).
8
(Hot Desking log on/log off).
0
7
2
33
Page 48

Using Group Listen
Group Listen allows you and others to listen to a caller over the speaker while you use
the handset or headset to continue speaking. This allows other people in the room to
listen to the caller while the caller can hear you only. Because Group Listen uses the
external speaker, it cannot be used during a handsfree call.
To enable Group Listen during a call, do one of the following:
4
• Press
• Press
9 1
(Group Listen on).
4
9 2
(Group Listen on/off).
To disable Group Listen, do one of the following:
4
• Press
• Press
9 0
(Group Listen off).
4
9 2
(Group Listen on/off).
• Hang up.
Using Monitor Account
ADVANCED
FEATURES
Monitor Account allows you to assign feature buttons to other subscribers using InterTel Personal Communicator for Web.
*
When enabled, you can use your Monitor
Account buttons to:
• Call the subscriber by pressing the button assigned to the extension.
• Transfer a call to the subscriber by pressing the button (you do not have to dial
the extension number).
• Monitor the subscriber’s call activity.
The assigned feature button lamp indicates the subscriber’s call activity, as shown in
the following table.
LAMP INDICATION SUBSCRIBER ENDPOINT ACTIVITY
Off All of the subscriber’s endpoints are idle.
On One or more of the subscriber’s endpoints are busy.
Blinking Rapidly One or more of the subscriber’s endpoints are ringing.
Blinking Slowly
You can monitor your own account. The blinking feature button lamp
TIP
* Monitor Account may or may not be enabled for your system. Refer to the Help section provided in Inter-
Tel Personal Communicator for Web for instructions to enable Monitor Account feature buttons. Contact
your system administrator for more information.
will help to remind you to change your status from unavailable for calls
to available after you have been away from your desk.
The subscriber is not currently available for calls (as
specified by the subscriber’s current status).
34
Inter-Tel® Model 8662 Endpoint User Guide
Page 49

Using the Outbound Communication Menu
The Outbound Communication menu displays when using system features such as the
Call Log and contact lists. It allows you to quickly connect to subscribers using the
following system communication options:
•
FIND ME: Call the subscriber’s “At My Desk” location (see page 29).
•
MESSAGE: Leave a text message (see page 25).
•
V-MAIL: Leave a voice mail message (see page 26).
•
QUEUE: Queue for the subscriber (see page 17).
•
CALL <number>: Select a number to call from all numbers stored for the con-
*
tact.
To use the Outbound Communication menu:
1. While the subscriber’s name is displayed in a feature menu, press the CONTACT
menu button or to view the subscriber’s status and contact information. This
includes
the subscriber’s call and instant messaging (IM)
first line, with the call availability listed first.
#
†
availability on the
The letter
A stands for “available”—the letter U stands for “unavailable.” The
second line displays different ways to contact the subscriber:
IM Status
AU AVAILABLE
Call Status
2. Press the NEXT/PREVIOUS menu button or to scroll through the contact
FIND ME: 67890
options displayed on the second line.
3. Press the CONTACT menu button or to activate the selection.
* Contact numbers can be entered or changed using Inter-Tel Personal Communicator for Web.
† IM may or may not be enabled for your system. If enabled, Inter-Tel Personal Communicator must be
used for instant messaging. Contact your system administrator for more information.
#
Contact Options
ADVANCED
FEATURES
Inter-Tel® Model 8662 Endpoint User Guide
35
Page 50

ADVANCED
FEATURES
Using Your Call Log
Your Call Log is a record of recent missed, incoming, and outgoing calls (up to the
last 50 calls for each type). For each call, you can see who the call was from/to and
when the call occurred. You can also place calls from the Call Log.
To use the Call Log:
1. Do one of the following:
• Press or the
• Enter the feature code from the following table, and then go to step 3.
2. Select one of the following options:
• Press
• Press
• Press
3. Press the NEXT/PREVIOUS menu button or to scroll through the call list
(calls are listed in order of last to first).
The time and date of the call display on the first line, followed by the call type
([
M] for missed, [I] for incoming, [O] for outgoing) and the subscriber’s name (or
outside number) on the second line.
CALL LOG
FEATURE CODE CALL LOG OPTION
1
or the MISSED CALLS menu button for missed calls.
2
or the INCOMING menu button for incoming calls.
3
or the OUTGOING menu button for outgoing calls.
CALLS menu button, and then go to step 2.
4 1 1
4 1 2
4 1 3
Missed Calls
Incoming Calls
Outgoing Calls
36
Time and Date
Call Type
Time and Date
Call Type
01:30 FRI OCT 14
(I) SMITH, JOHN
Intercom Call
01:30 FRI OCT 14
(O) 4809619000
Outside Call
To place or return a call from the Call Log:
If the call is from or to a subscriber, press the
display the Outbound Communication menu (see page 37).
If the call is from or to an outside caller, press the
while the number is displayed.
Inter-Tel® Model 8662 Endpoint User Guide
Subscriber Name
Outside Number
CONTACT menu button or to
CALL menu button or
#
#
Page 51

Using Contact Lists
There are four types of contact lists:*
• Personal: A directory of your personal contacts. Station speed dial numbers (see
page 19) can be assigned from the Personal contact list.
• Group: A subset of your personal contacts which has been assigned to a particu-
lar group. The default groups are Family, Friends, VIP, and Blocked.
• Company: A directory of phone numbers entered by the system administrator.
System speed dial numbers (see page 19) are assigned from this contact list.
• Directory: A directory of all subscribers in the organization.
To place a call from a contact list:
1. Do one of the following:
• Press the
name menu button (
• Enter the feature code
CONTACTS menu button or , and then press the list
0 0
3
DIRECTORY, GROUP, COMPANY, or PERSONAL).
from the following table.
FEATURE CODE CONTACT LIST
0 1
3
0 2
3
0 3
3
0 4
3
0 5
3
Search for
Browse Groups
Personal
Directory
Company
ADVANCED
FEATURES
If you selected
then press the
If you selected
SEARCH FOR, enter the full or partial name of the person, and
SEARCH menu button or to start the search (see page 38).
#
BROWSE GROUPS, enter the group number, or press the
BROWSE menu button to select a group. Press the NEXT/PREVIOUS menu but-
ton or to scroll through the list. Press the
BROWSE menu button again to
select a group and display the group contacts.
2. Press the NEXT/PREVIOUS menu button or to scroll through the contact
list.
If the contact is a subscriber, press the
CONTACT menu button or to display
#
the Outbound Communication menu (see page 37).
If the contact is not a subscriber, all stored phone numbers for the contact display.
3. Press the CONTACT menu button or to activate the selection or dial the num-
#
ber.
To delete a contact: Press the
* You must use Inter-Tel Personal Communicator for Web to set up your Personal and Group contact lists.
Groups can be added using Inter-Tel Personal Communicator for Web.
Inter-Tel® Model 8662 Endpoint User Guide
DELETE menu button while the name is displayed.
37
Page 52

ADVANCED
FEATURES
Searching for a Contact
You can search for a contact name by entering either all or part of the name using the
dialpad buttons. See the following table for dialpad button character descriptions.
NUMBER OF TIMES BUTTON IS PRESSED (IN ALPHA MODE)
BUTTON
1
2
3
4
5
6
7
8
9
0
To use the dialpad to enter characters:
Press the dialpad buttons to enter characters. If the dialpad is currently set to enter
numeric characters (numbers), switch to alphanumeric (letters, numbers, and symbols) by pressing the
pressing the
Press
entered), or press
1 2 3 4 5 6 7 8 9 10 11 12 13
1!|’:;,/\><)(
ABC2abc
DEF 3 d e f
GH I 4 g h i
JKL5 j k l
MNO 6mn o
PQRS7 p q r s
TUV8 t u v
WXYZ9wxyz
0.@#*-_&%=$~+
ALPHA MODE menu button or . Return to numeric by
NUMERIC MODE menu button or .
<< or to move the cursor backward (deleting the last character[s]
MUTE
FORWARD
>> or to move the cursor forward.
MESSAGE
MESSAGE
38
To search for a directory name:
1. Do one of the following:
• Press
• Press the
SEARCH
.
CONTACTS menu button, and then press SEARCH.
2. Enter all or part of the name using the dialpad buttons, and then press the
SEARCH menu button or .
#
3. Press the NEXT/PREVIOUS menu button or to scroll through the list.
4. After finding the name:
If the contact is a subscriber, press the
CONTACT menu button or to display
#
the Outbound Communication menu (see page 37).
If the contact is not a subscriber, all stored phone numbers for the contact display.
5. Press the CONTACT menu button or to activate the selection or dial the num-
#
ber.
Inter-Tel® Model 8662 Endpoint User Guide
Page 53

Using Inter-Tel Personal Communicator for Voice
Inter-Tel Personal Communicator for Voice is a “voice portal” that allows you to call
into the system from any endpoint or phone and access Inter-Tel Personal Communicator features.
Speech Recognition (ASR) technologies to activate and play feature selections, it is
accessed and used similarly to using your voice mail account. You can activate voice
portal features by pressing the touch-tone dialpad buttons on your endpoint or phone,
or by issuing voice commands (if speech recognition is enabled).
Use Inter-Tel Personal Communicator for Voice to:
• Get or change your status setting (see page 27).
• Check messages and return calls (see page 25).
• Place a call from a contact list (see page 37).
• Access your Call Log (see page 36).
• Browse contact groups and place calls (see page 37).
• Review or change your call routing setting (see page 29).
If ASR is enabled for your system (see page 47), you can use voice commands to activate features. After you access the voice portal, the following voice prompts play
when you access your account and indicate whether ASR is enabled for your system:
• If ASR is not enabled, you hear “Please press 1 for the Status Menu.” See the
flowchart on page 42 for step sequences to activate features using the dialpad
buttons.
*
Because the voice portal uses Text-To-Speech (TTS) and Automatic
†
ADVANCED
FEATURES
• If ASR is enabled, you hear “How may I help you today?” (See pages 40 and 41
for more information about using voice commands to activate features.)
If you use speech for the first command, ASR is used to activate
NOTE
menu options. If you use the dialpad buttons for the first command,
continue to use the dialpad buttons to activate menu options.
A few tips when using voice commands:
• Speak clearly and loudly to help the system understand your request. Background
noise may also make it difficult for the system to understand your request.
• In many menus there is more than one way to say a command (see page 40).
• Numbers like “1000” can be said as “one thousand” or as “one, zero, zero, zero.”
* Inter-Tel Personal Communicator for Voice may or may not be enabled for your system. Contact your
system administrator for more information. Some preference settings can be enabled using Inter-Tel
Personal Communicator for Web.
† If E-Mail Reader is enabled, you can also check your e-mail and fax messages (see page 55).
Inter-Tel® Model 8662 Endpoint User Guide
39
Page 54

ADVANCED
FEATURES
The voice recognition system understands a variety of word combinations when activating menu commands (see the following table).
MENU OPTION POLITE QUESTION CHANGE OPTIONAL
“Status” “Please” “What is” “Set” “My”
“Availability” “May I” “Give me” “Change“ “Current”
“Messages” “Can I” “Tell me” “Modify” “Place”
“Place Call” “I need to” “Get“
“Call Log” “I would like to” “Retrieve”
“Look Up” “I want to”
“Browse” “Could I” “To”
“Routing” “Call”
“Add Contact”
“Make”
“A”
“At”
The following examples are word combinations from the previous table used in voice
commands.
To get your status, you can say “What is my current status?”
Question
Words
Optional
Words
Menu
Option
Or the command can be as simple as “Get Availability.”
Question
Word
Menu
Option
40
To call a contact, you can say “Please place a call to John Smith.”
Polite Optional Contact
Word Words Name
Or the command can be as simple as “Call John Smith.”
Optional
Word
Contact
Name
• Say “Back” from any menu to return to the previous menu.
• Say “Main Menu” from any menu to return to the main menu.
• Say “Help” from any menu to get help information for the given menu.
• Say “Good-bye” from any menu to log off and disconnect from the call.
• Say “Replay” to replay the entry.
• Say “Previous to hear the previous entry.
• Say “Next” to hear the next entry.
• Say “Enable” to enable the given rule.
• Say “Disable” to disable the given rule.
Inter-Tel® Model 8662 Endpoint User Guide
Page 55

To activate a feature from the voice portal using voice commands:
1. If necessary, contact your system administrator for the voice portal number and
your PIN. Dial the voice portal number, enter your PIN, and then press .
If you are calling from another system endpoint, press
your password.
Then enter your mailbox number, PIN, and then press . The
when prompted for
#
#
system asks, “How may I help you today?”
2. Say one of the following menu options, and then follow the voice prompts:
“Status”: Change your status. If your status requires a time, date, or forwarding
number, say the information after the status. For example, “In meeting until
3:00.” See page 27 for more information on changing your status settings.
“Messages”: Listen and reply to messages. See page 25 for more information on
using messages. The following types of messages are available:
– Text (see page 25).
– Voice mail (if voice mail is enabled, see page 26).
– E-mail (if E-Mail Reader is enabled, see page 55).
– Fax (if E-Mail Reader is enabled, see page 55).
“Place Call”: Place a call to a contact. See page 37 for more information on con-
tacts and contact lists.
“Call Log”: Listen to Call Log entries. If the entry is a subscriber, you are
directed to the Outbound Communication voice menu. See page 36 for more
information on the Call Log—see page 37 for more information on the Outbound
Communication menu.
“Look Up (contact)”: Look up and call a contact. If the contact is a subscriber,
you are directed to the Outbound Communication voice menu. See page 37 for
more information about using contact lists—see page 37 for more information on
the Outbound Communication menu.
“Add Contact”: Add a contact to your Personal contact list. See page 37 for
more information on contact lists. The system asks for the following information,
spelled one letter at a time. Say “Skip” or press to skip an entry option.
#
– First name
– Middle name
– Last name
– Company name
– Company phone number
“Browse (group)”: Search for and call a group contact. See page 37 for more
information on Group contact lists.
“Routing”: Review or change routing rule options based on default system routing rules or routing rules created in Inter-Tel Personal Communicator for Web.
*
ADVANCED
FEATURES
* You can enable Auto Logon using Inter-Tel Personal Communicator for Web (see page 48).
Inter-Tel® Model 8662 Endpoint User Guide
41
Page 56

INTER-TEL PERSONAL COMMUNICATOR FOR VOICE FLOWCHART
The following flowchart provides step sequences for activating voice portal features when using
the dialpad buttons. Press
in any menu to go back one menu level. Press to accept an entry
without waiting for the time-out. Contact your system administrator for the voice portal number.
Dial the voice portal number, enter your PIN, and then press . If you are calling from another system endpoint, press
when prompted for your password. Then enter your mailbox number, PIN, and then press .
ing options:
Status
1
Messages
#
2
Place Call
3
#
#
Then select one of the follow-
Routing
4
ADVANCED
FEATURES
SET STATUS (page 27)
Get Current Status
Change Status
1
2
Return to Main Menu
CHANGE STATUS (page 27)
Available
Unavailable
Send Calls To
In Meeting Until
Out to Lunch
Gone Home
On Vacation Until
SELECT MESSAGE TYPE
Voice Mail (below)
Text
E-Mail and Fax (below)
1
2
3
4
5
6
7
1
2
3
Return to Main Menu
For voice mail, e-mail, and fax
messages, see the appropriate Voice Mail flowchart on
page 54 (without E-Mail
Reader) or page 58 (with EMail Reader) for the step
sequences.
HEAR TEXT MESSAGE (page 25)
Replay Text Message
Reply to Text Message
Previous Message
Next Message
Delete Message
1
2
4
6
9
Previous Menu
SELECT A CALL OPTION
Browse Group
Dial a Number
Call Log
1
2
3
Return to Main Menu
DIAL A NUMBER
Enter the number, and then
#
press .
Place Call
Re-enter Number
1
2
Previous Menu
BROWSE BY GROUP (page 37)
Family
VIP
Friends
Blocked
1
2
3
4
Previous Menu
CALL LOG OPTION (page 36)
Missed Calls
Incoming Calls
Outgoing Calls
1
2
3
Previous Menu
SELECT ENTRY OPTION
Replay Entry
Return Call
Previous Entry
Next Entry
1
2
4
6
Previous Menu
ROUTING OPTION (page 29)
Change Reach Me
Review Routing Rules
1
2
Return to Main Menu
SELECT REACH ME OPTION
Current Location
Voice Mail
Phone Number
Follow Routing Rules
1
2
3
4
Previous Menu
ROUTING RULES OPTIONS
Replay Rule
Enable Rule
Disable Rule
Previous Rule
Next Rule
1
2
3
4
6
Previous Menu
CONTACT OPTIONS (page 37)
If the contact is not a subscriber, the system automatically places the call. If the
entry is a subscriber, the Outbound Communication voice
menu is activated (below).
Find Me
Leave Text Message
Leave Voice Mail
Call Primary Number
1
2
3
4
42
Inter-Tel® Model 8662 Endpoint User Guide
Page 57

HUNT GROUPS
Your system may be programmed for hunt groups. A hunt group is a group of subscribers who share a common extension in addition to having individual extensions.
This allows calls to be directed to anyone in the hunt group (using the hunt group
extension number) or to a subscriber in the hunt group (using the subscriber’s extension number).
There are two types of hunt groups:
• Basic: You are automatically logged in to the hunt group. You cannot log out of a
basic hunt group.
• Advanced: You must log in and out of any hunt group in which you are a mem-
ber, allowing you to enable or disable hunt group calls to your extension.
Logging into and out of Advanced Hunt Groups
To log into an Advanced hunt group:
1. Do one of the following:
8
• Press
• Press
2. Enter the hunt group number.
To log out of an Advanced hunt group:
1. Do one of the following:
• Press
• Press
2. Enter the hunt group number.
8
(Hunt Group log in).
8
8
(Hunt Group log in/log out).
8
8
(Hunt Group log out).
8
8
(Hunt Group log in/log out).
*
1
2
0
2
ADVANCED
FEATURES
Wrapping Up a Hunt Group Call
The Wrap-up timer starts each time you end an Advanced hunt group call. You will
not receive another hunt group call until the timer expires, but you can still receive
other non-hunt group calls or transfers. You can end the wrap-up session before the
timer expires.
8
To end the wrap-up session before the timer expires: Press
* Hunt groups may or may not be enabled for your system. Contact your system administrator for more
information.
Inter-Tel® Model 8662 Endpoint User Guide
6
.
43
Page 58

Requesting Agent Help
ADVANCED
FEATURES
Using Agent Help, you can request help from a designated Agent Help extension
(usually a supervisor) during a call.
*
When activated, the “helper” can hear you and
the other party, but the other party cannot hear the helper.
To use Agent Help:
1. While on the call, press .
2. Dial the Agent Help extension number (if not preprogrammed
3. Based on whether the call is accepted or rejected, a confirmation notice appears.
AGENT HELP
IN PROGRESS
8 4
AGENT HELP
FAILED
†
).
If the Agent Helper’s line is busy, you receive a notice confirming that the request has
been sent and that the call is proceeding.
AGENT CALL
PROCEEDING
When you receive an Agent Help request, your display indicates the request.
AGENT HELP CALL
FROM JOHN SMITH
To accept an Agent Help request: Press
ACCEPT or the flashing button.
LINE
To reject an Agent Help request: Press
REJECT or .
6 2
If the outside caller hangs up, the subscriber who sent the request and the Agent
Helper remain connected as a conference call.
CNF IN PROGRESS
To end an Agent Help session: Hang up.
* Agent Help may or may not be enabled for your system. Contact your system administrator for more
information.
† Agent Help extensions are assigned to feature buttons by your system administrator.
44
Inter-Tel® Model 8662 Endpoint User Guide
Page 59

Using Bridged Line Appearance
Bridged Line Appearance (BLA) allows a subscriber’s endpoint(s) to be monitored by
one or more other subscribers, or BLA group members (secondary extensions).
When the subscriber (primary extension) receives a call, it is offered to all BLA group
members. Any BLA group member can answer incoming or held calls at the primary
extension by pressing an assigned BLA feature button.
If a BLA group member answers a call from the primary extension, other BLA group
members can monitor the status of the call. While the call is in progress, BLA group
members cannot pick up the call. However, if the primary extension or a BLA group
member places the call on hold, another BLA group member can then pick up the call.
Calls placed on hold for transfer or conference cannot be answered by
other BLA group members.
After a call is picked up by a BLA group member, it can be transferred
NOTES
or connected to a conference if the required additional lines are available. (Two lines of the primary extension must be available on the
secondary extension to transfer calls. Three lines of the primary extension must be available on the secondary extension to conference
other subscribers.)
Unlike Monitor Account, BLA group members cannot use the assigned BLA feature
button to place a call to or transfer calls to the primary extension
. However, the BLA
feature button can be used as a “line” button. This allows you to press the BLA feature button and place calls from the primary (not the secondary) extension.
BLA feature buttons indicate call activity like the Monitor Account feature (see the
following table).
*
ADVANCED
FEATURES
LAMP INDICATION SUBSCRIBER ENDPOINT ACTIVITY
Off All of the subscriber’s endpoints are idle.
On One or more of the subscriber’s endpoints are busy.
Blinking Rapidly One or more of the subscriber’s endpoints are ringing.
Blinking Slowly
* Bridged Line Appearance must be enabled by your system administrator. If enabled, refer to the Help
section provided in Inter-Tel Personal Communicator for Web for instructions to enable Bridged Line
Appearance feature buttons. Contact your system administrator for more information.
Inter-Tel® Model 8662 Endpoint User Guide
The subscriber is not currently available for calls (as
specified by the subscriber’s current status).
45
Page 60

ADVANCED
FEATURES
46
Inter-Tel® Model 8662 Endpoint User Guide
Page 61

Voice Mail Features
ABOUT VOICE MAIL
NOTE
See page 11 in the Getting Started section to set up your voice mail
account and to select and record personal greetings.
Voice mail is an electronic mailbox that usually corresponds to your extension number. However, you can have a mailbox that does not correspond to an extension (for
agents or other personnel who do not have a permanent office).
Your mailbox may also include and E-Mail Reader and Automatic Speech Recognition (ASR), which are advanced voice mail features.
*
E-Mail Reader accesses your email through your voice mail account, allowing you to “hear” your e-mail (see
page 55). You can also save, delete, or forward fax messages using E-Mail Reader.
ASR allows you to issue voice commands instead of pressing dialpad buttons when
accessing voice mail options.
When using ASR, follow these guidelines for best results:
• Use the handset when issuing voice commands. External microphones pick up
background noise, which may cause misinterpreted voice commands.
• Do not say “Pound” or “Hash” when using ASR. The silence that follows your
voice command replaces the button.
#
• Use the dialpad buttons when recording a message. Because ASR is disabled
while recording a message, your recording will include any voice commands.
• Use the dialpad buttons when entering mailbox and E-Mail Reader pass-
words. To prevent your password from being heard by others, you cannot use
ASR.
If the system fails to understand an ASR command three times in a
NOTE
row, it will ask if you want to press to transfer to the dialpad button
menu.
VOICE MAIL
FEATURES
To temporarily disable ASR:
1. Access your mailbox (see page 48).
2. In the main menu, press or say “Disable” to disable ASR for the current call.
8
To enable ASR after disabling it:
1. Press until you return to the main menu.
2. Press to enable ASR.
* ASR and E-Mail Reader may or may not be enabled for your system. Contact your system administrator
for more information.
Inter-Tel® Model 8662 Endpoint User Guide
8
47
Page 62

MAILBOX FEATURES
Some of the following features may not be enabled for your system. Contact your system administrator for more information.
Accessing Your Mailbox
Contact your voice mail administrator for the system voice mail and message notification/retrieval (MNR) numbers. The system voice mail number provides access to all
voice mail features. The MNR number is used to access messages only.
To avoid entering your password each time you access your mailbox,
TIP
To access your mailbox using the system voice mail number: Dial the system voice
mail number, press , and then enter your password. Press
To access your mailbox using the MNR number: Dial the MNR number, and then
enter your password. Press
To access your mailbox from another system endpoint: Dial either number as
described above. Press when prompted for your password. Then enter your mailbox number and password. Press to accept the entry.
Listening to Voice Mail Messages
you can use Inter-Tel Personal Communicator for Web to enable Auto
Logon settings (Options tab - Preferences [Edit] - Voice Portal).
#
to accept the entry.
#
#
to accept the entry.
FEATURES
VOICE MAIL
48
You can listen to all messages or you can select a specific (new) message.
To listen to all voice mail messages: Access your mailbox (see above), and then follow the voice menu prompts and use the appropriate Voice Mail flowchart on page 54
(without E-Mail Reader) or page 58 (with E-Mail Reader) for the step sequence.
To listen to a specific voice mail message (Message button and lamp are flashing):
1. While the handset is on-hook, press or the VIEW MESSAGE menu
MESSAGE
button. Then lift the handset if desired.
2. Press the >>/<< menu button or to scroll through the messages.
3. Press the LISTEN menu button or to connect to your mailbox, enter your
password, and then press .
#
#
Re-recording or Changing Your Directory Name
You can re-record or change your mailbox directory name.
To re-record or change your directory name: Access your mailbox (see above),
and then follow the voice menu prompts and use the appropriate Voice Mail flowchart
on page 54 (without E-Mail Reader) or page 58 (with E-Mail Reader) for the step
sequence.
Inter-Tel® Model 8662 Endpoint User Guide
Page 63

Changing Your Voice Mail Password
You can change your voice mail password. Your voice mail password is also your personal identification number (PIN), which is used for the following system features:
• Voice mail password (see page 11)
• Unlocking your endpoint (see page 30)
• Hot Desking (see page 33)
• Inter-Tel Personal Communicator for Voice (see page 39)
• Advanced hunt groups (see page 43).
NOTE Changing your voice mail password also changes your PIN.
To change your mailbox password:
1. Access your mailbox (see page 48).
2. Press to select the Personal Options menu.
3. Press to select the Password menu.
4. Enter the new password (4 to 12 numeric digits), and then press .
5. Press to accept the password, or press to erase and re-enter the password.
4
3
# 3
Changing the Message Search Order
You can change the order in which you retrieve your new and saved messages based
on the date and time in which they are received. When more than one message is left
in your mailbox, the search order can be configured as first in/first out or last in/first
out. If E-Mail Reader is enabled for your mailbox, changing the message search order
applies to your voice mail, e-mail, and fax messages.
#
When you call the system voice mail number to access your mailbox, by default your
messages are prioritized as first in/first out. However, when you use a Message button
to access your mailbox to listen to a specific message, by default your messages are
prioritized as last in/first out. To synchronize your account, change the message
search order to last in/first out (see below).
If you do not change your message search order to last in/first out,
NOTE
you may hear the “There are no further messages” prompt even when
you have additional messages.
To change the message search order: Access your mailbox (see page 48), and then
follow the voice menu prompts and use the appropriate Voice Mail flowchart on
page 54 (without E-Mail Reader) or page 58 (with E-Mail Reader) for the step
sequence.
Inter-Tel® Model 8662 Endpoint User Guide
49
VOICE MAIL
FEATURES
Page 64

Changing Your Message Envelope
When you receive a voice mail (or an e-mail or fax message if applicable), an “envelope” is played. The envelope contains the information about the message, including:
• Time and Date: The time and date the message was received
• Source: The source of the voice mail, e-mail, or fax message
• Length: The length of the message (voice mail messages only)
• Subject: The text in the subject field (e-mail messages only)
• Pages: The number of pages included (faxes only)
By default, all envelope options are enabled for each type of message. However, you
can change your envelope options to select options, or you can disable the message
envelope entirely.
To change your message envelope: Access your mailbox (see page 48), and then fol-
low the voice menu prompts and use the appropriate Voice Mail flowchart on page 54
(without E-Mail Reader) or page 58 (with E-Mail Reader) for the step sequence.
Recording and Sending Voice Mail Messages
You can record and send voice mail messages by using the record option on the mailbox main menu.
(see page 26)
To record and send a voice mail message:
Access your mailbox (see page 48), and then follow the voice menu prompts and use
the appropriate Voice Mail flowchart on page 54 (without E-Mail Reader) or page 58
(with E-Mail Reader) for the step sequence.
You can also use the Messaging feature to send voice mail messages
.
FEATURES
VOICE MAIL
50
If E-Mail Reader is enabled for your mailbox, you can send a recorded
NOTE
message as a reply to an e-mail. The recorded message is attached
to the sent e-mail as an audio file.
Canceling Unheard Voice Mail Messages
You can cancel unretrieved voice mail messages that you have sent to other subscriber’s mailboxes. You cannot cancel unheard messages sent to call groups or hunt
groups.
To cancel unheard voice mail messages: Access your mailbox (see page 48), and
then follow the voice menu prompts and use the appropriate Voice Mail flowchart on
page 54 (without E-Mail Reader) or page 58 (with E-Mail Reader) for the step
sequence.
Inter-Tel® Model 8662 Endpoint User Guide
Page 65

Using Special Delivery Options
You can add special delivery options to voice mail messages sent to other subscribers.
The following options are available after recording the message:
• Private: This prevents the recipient from forwarding it to other subscribers.
• Certified: When the recipient listens to the message, you receive a receipt notice.
• Priority: This places your message ahead of all other waiting messages in the
receiving mailbox.
To use special delivery options: Access your mailbox (see page 48), and then follow
the voice menu prompts and use the appropriate Voice Mail flowchart on page 54
(without E-Mail Reader) or page 58 (with E-Mail Reader) for the step sequence.
Recovering Deleted Voice Mail Messages
You can retrieve deleted voice mail messages within a specific time frame before they
are erased from the system (the time frame is programmed by your system administrator). Any retrieved messages are then restored as saved messages in your mailbox. If
E-Mail Reader is enabled for your mailbox, you can also recover deleted e-mail and
fax messages.
To recover deleted voice mail messages: Access your mailbox (see page 48), and
then follow the voice menu prompts and use the appropriate Voice Mail flowchart on
page 54 (without E-Mail Reader) or page 58 (with E-Mail Reader) for the step
sequence.
Searching for a Voice Mail Contact
To search for a voice mail contact:
Access your mailbox (see page 48) and then follow the voice menu prompts. You can
also search for a contact using the contact lists (see page 38).
Inter-Tel® Model 8662 Endpoint User Guide
51
VOICE MAIL
FEATURES
Page 66

Screening Calls
You can screen outside calls that are transferred to you from the system Auto Attendant. Calls can be transferred using the following methods:
• Unannounced Calls: Calls are sent directly to your extension.
• Announce-Only Calls: Before Auto Attendant transfers a call to you, a prompt
asks the caller to record his or her name. When you answer, you hear “You have a
call from (caller’s name).” Then the call is sent to your extension.
• Screened Calls: Before Auto Attendant transfers a call to you, a prompt asks the
caller to record his or her name. When you answer, you hear “You have a call
from (caller’s name).” You can then choose whether or not to accept the call.
After receiving a screened call, you have the following options:
• Press or say “Accept” to accept the call.
• Press or say “Replay” to replay the announcement.
• Press or say “Voice Mail” to send the call to voice mail.
• Press
• Press or say “Refuse” to refuse the call.
To change the call screening transfer method: Access your mailbox (see page 48),
and then follow the voice menu prompts and use the appropriate Voice Mail flowchart
on page 54 (without E-Mail Reader) or page 58 (with E-Mail Reader) for the step
sequence.
#
1
2
3
or say “Forward,” and then dial the extension number to forward the
call to another extension.
FEATURES
VOICE MAIL
* Remote messaging may or may not be enabled for your system. Contact your system administrator for
52
Programming Remote Messaging
Remote Messaging is supported for voice mail messages only. If E-
NOTE
Using Remote Messaging, you can program voice mail to call you when your mailbox
receives new voice mail messages.
phone numbers, the voice mail system will call each number until it successfully connects to a device (for example, a pager or cell phone).
You can use primary and alternate cascades to program messages for different time
periods. For example, you can use a primary cascade to notify you of new voice mail
messages from 5:00 P.M. to 10:00 P.M. on weekdays. You can also use an alternate
cascade to notify you of new messages on weekends. See page 53 to set up Remote
Messaging.
more information.
Mail Reader is enabled for your mailbox, you cannot use Remote
Messaging for e-mail and fax messages.
*
Using “cascade levels,” a series of up to nine
Inter-Tel® Model 8662 Endpoint User Guide
Page 67

To set up Remote Messaging for voice mail messages:
1. Access your mailbox as described on page 48.
2. Press or say “Personal” to select the Personal Options Menu.
3. Press or say “Remote” to select Remote Messaging.
4
5
4. Select one of the following options:
• Press or say “Primary” to set up a primary cascade.
• Press or say “Alternate” to set up an alternate cascade.
5. Press or say “Level,” and then enter or say the number (1 to 9) of the level
1
2
1
you want to program. Then select one of the following options:
• To set up or change an extension or outside number: Press or say
2
“Number,” and then select one of the following options:
– Press or say “Internal” for an extension number, and then say or
1
enter the number.
– Press or say “Outside” for an outside number, and then say or enter
2
the number.
• To set up or change pager notification, select one of the following
options:
– Press or say “Pager.”
– Press or say “Personal.”
Then press or say “Change” to enable or disable the number.
6. Press or say “Days,” and then select one of the following options:
3
• Press or say “Weekdays” for Monday through Friday.
• Press or say “Days” for all days.
• Press or say “Days” to select individual days. You are prompted to say or
1
2
1
1
2
3
press numbers 1 to 7 which correspond to the days Sunday through Saturday.
7. Press or say “Time.” Then say or enter the times you want the message noti-
2
fication to start and stop. Enter or say the times with two digits for the hour and
two digits for the minutes (for example, 0900 = 9:00 A.M.). If entering the time
in 12-hour format:
• Press or say “AM” for A.M.
• Press or say “PM” for P.M.
1
2
For 24-hour notification, program the starting and ending times to be the same.
8. Press or say “Category.” You have the following options:
9. Press or hang up to save the settings and exit.
4
• Press or say “All Messages” for all messages.
• Press or say “Priority” for priority messages only.
1
2
#
VOICE MAIL
FEATURES
If the system is unable to reach you using Remote Messaging, you
NOTE
will receive a voice mail message stating that notification could not be
completed.
Inter-Tel® Model 8662 Endpoint User Guide
53
Page 68

VOICE MAIL FLOWCHART (WITHOUT E-MAIL READER)
n most menus, you can press or say “Cancel” to return to the previous menu, or press or
ay “Accept” to accept the option.
#
FEATURES
VOICE MAIL
54
MAILBOX ACCESS
1. Press the Message button to
listen to a specific message,
or dial the voice mail extension number.
2. Enter your password, and then
press .
#
If you are not prompted for
your password, press ,
enter your mailbox number
and password, and then press
.
#
SUBSCRIBER MAILBOX MENU
“New” Message
“Record”
“Saved” Messages
“Personal” Options
“Message” Options
“Disable” ASR
RECORDING OPTIONS
• Dial the mailbox number,
reply to a message, or forward a message.
• “Record” your message.
Pause
“Continue”
Erase
• After recording:
“Replay”
“Append”
“Erase,” re-record
“Copy”
Delivery “Options”
DELIVERY OPTIONS
“Private”
“Certified”
“Priority”
“Send”
Send and Exit Hang Up
2
#
3
1
2
3
4
9
PERSONAL OPTIONS
Record “Greeting”
“Primary” Greeting
“Alternate” Greeting
“System” Greeting
(See Recording Options)
Record Directory “Name”
(See Recording Options)
Record/Change “Password”
Change “Envelope” Settings
1
2
3
4
5
8
1
2
3
#
“Time, Date”
Message “Source”
Message “Length”
“All Options”
“None”
“Remote” Messaging
“Primary” Cascade
“Alternate” Cascade
“More” Options
Fax “Number”
Message “Order”
“Transfer” Method
MESSAGE ORDER
“New” Messages
“Saved” Messages
First In/First Out
Last In/First Out
TRANSFER METHOD
“Unannounced”
“Screened”
“Announce” Only
MESSAGE OPTIONS
Cancel “Unheard” Messages
“Recover”Deleted Messages
“Listen”
“Recover” All
“Purge” All
Inter-Tel® Model 8662 Endpoint User Guide
1
1
2
3
2
3
4
1
2
3
4
5
5
1
2
9
1
2
5
1
2
1
2
1
2
3
1
2
1
2
3
LISTENING TO MESSAGES
While the message is playing:
“Back Up”
“Pause”
Move “Forward”
“Lower” Volume
Play the “Envelope”
“Higher” Volume
“Save” the Message
“Delete” the Message
“Skip” to the End
After the message:
“Replay” Message
“Reply” to the Message
“VoiceMail”Message
“Call Back”
“Forward” a Copy
(See Recording Options)
Go to “Previous” Message
Play the “Envelope”
Go to “Next” Message
“Save” the Message
“Delete Message”
REMOTE MESSAGING
Program Cascade “Level”
Enter cascade level number, then:
“Change”
“Personal” #
“Pager” #
Enter “Time” of Day
Set “Days” of Week
“Weekdays”
All “Days”
Individual “Day” 1–7
Select Message “Category”
“All Messages”
“Priority” Messages
1
2
3
4
5
6
7
9
#
1
2
1
2
3
4
5
6
7
9
1
1
2
3
2
3
1
2
3
4
1
2
Page 69

E-MAIL READER
Using E-Mail Reader, you can access voice mail, e-mail, and fax messages from your
mailbox.
*
E-Mail Reader uses Text-to-Speech (TTS) to convert the text in an e-mail
message to an audio file. After you listen to your message, you have the same options
for saving, forwarding, deleting, etc. as in voice mail.
When you reply to an e-mail message, you are prompted to record a message, and
then your reply is sent as an audio file attachment in an e-mail to the receiver. If the email has multiple recipients, you have the option of replying to just the sender or to
all of the recipients. When you forward an e-mail message, the e-mail is converted to
a fax and forwarded to the fax destination number you specify.
E-Mail Reader does not distinguish between e-mail messages and meeting invitations
and responses. Therefore, e-mail messages and meeting messages (including invitations, cancellations, and responses) can be accessed from your mailbox.
You cannot forward an e-mail message to a voice mailbox or group
list. When you forward an e-mail message, the e-mail is converted to a
NOTES
fax and forwarded to the fax destination number that you specify.
If an e-mail message includes a hyperlink, E-Mail Reader will read the
hyperlink as text.
Entering Your E-Mail Password
You may be prompted to enter your E-Mail Reader account password (usually your
network password) whenever you or your voice mail administrator set up your e-mail
account mailbox or change your e-mail password.
Use the following tips when entering your e-mail password:
• If enabled, do not use Automatic Speech Recognition (ASR). To prevent others
from overhearing your password, use the dialpad buttons on your endpoint to set
up your e-mail password.
• Enter password characters correctly. E-mail passwords are case-sensitive and can
contain special characters. Your entry must match the case and characters exactly.
If necessary contact your voice mail administrator for assistance.
* E-Mail Reader may or may not be enabled for your system. Contact your system administrator for more
information.
Inter-Tel® Model 8662 Endpoint User Guide
55
VOICE MAIL
FEATURES
Page 70

To enter your e-mail password:
FEATURES
VOICE MAIL
To repeat menu instructions, say “Help” or press at any time.
0
If you enter an incorrect password, or if you choose to skip setting a
NOTES
new E-Mail Reader password, the Main Menu E-Mail Reader Count
option (see page 57) is automatically disabled to prevent having to
hear the invalid password prompt for each subsequent login and to
protect against being locked out of your e-mail account.
1. Access your mailbox as described on page 48. The system announces that it was
unable to retrieve your e-mail and fax messages, and gives you the following
options:
• Press or say “Continue” to access voice mail only.
• Press or say “Password” to enter your new e-mail password.
• Press or say “Help” for a description of special character locations.
#
1
2
When prompted, enter your e-mail password using the dialpad buttons. The number of times you press a button determines which character is entered, as shown
in the following table. Press to move the cursor backward (deleting the
last character entered), or press to move the cursor forward.
NUMBER OF TIMES BUTTON IS PRESSED (IN ALPHA MODE)
BUTTON
1
2
3
4
5
6
7
8
9
0
1 2 3 4 5 6 7 8 9 10 11 12 13
1!|’:;,/\><)(
ABC2abc
DEF 3 d e f
GH I 4 g h i
JKL5 j k l
MNO 6mn o
PQRS7 p q r s
TUV8 t u v
WXYZ9wxyz
0.@#*-_&%=$~+
MUTE
FORWARD
56
2. Your new password is played. You have the following options:
• Press or say “Accept” to accept the password.
• Press or say “Re-enter” to erase and re-enter the password.
#
3
Inter-Tel® Model 8662 Endpoint User Guide
Page 71

Using Main Menu E-Mail Reader Count
After you set up your E-Mail Reader account, the system announces the number of
voice mail, e-mail, and fax messages you have each time you access your mailbox
before you can listen to your messages. The voice prompt that indicates the number of
e-mail and fax messages is the “Main Menu E-Mail Reader Count” option. (Voice
mail message prompts are not included in Main Menu E-Mail Reader Count and will
always be played when you access your mailbox.)
You can disable the Main Menu E-Mail Reader Count option in your mailbox.
Disabling the Main Menu E-Mail Reader Count option defers e-mail and fax prompts
until you select the E-Mail or Fax message option from the main menu. Disabling
Main Menu E-Mail Reader Count does not disable E-Mail Reader. It only defers the
voice prompts until the appropriate option is selected.
To disable or enable the Main Menu E-Mail Reader Count option:
1. Access your mailbox as described on page 48.
2. Press or say “Personal” to select the Personal Options menu.
3. Press or say “More” to select More Options.
4. Press or say “E-Mail Reader Count” to select the E-Mail Reader Count tog-
4
9
4
gle option.
5. If E-Mail Reader Count is enabled, press or say “Disable” to disable.
If E-Mail Reader Count is disabled, press
1
1
or say “Enable” to enable.
Accessing Fax Messages
When you access a fax message, E-Mail Reader announces the fax message according
to the envelope option (see page 50). Because a fax message is received by your email account as an image attachment, E-Mail Reader cannot read the text in a fax. To
view the fax and read it, you must access it from your e-mail account. However, you
can save, delete, and forward a fax to a fax number that you specify.
To access fax messages or program a fax number: Access your mailbox (see
page 48), and then follow the voice commands and use the Voice Mail flowchart on
page 58 for the step sequence.
Inter-Tel® Model 8662 Endpoint User Guide
57
VOICE MAIL
FEATURES
Page 72

VOICE MAIL FLOWCHART (WITH E-MAIL READER)
n most menus, you can press or say “Cancel” to return to the previous menu, or press or
ay “Accept” to accept the option.
“Voice Mail”
“Record”
“E-Mail”
“Personal” Options
Message “Options”
“Facsimile”
“Disable” ASR
FEATURES
VOICE MAIL
58
MAILBOX ACCESS
1. Press the Message button to
listen to a specific message,
or dial the voice mail extension number.
2. Enter your password, and then
press .
#
If you are not prompted for
your password, press ,
enter your mailbox number
and password, and then press
.
#
SUBSCRIBER MAILBOX MENU
1
2
3
4
5
6
8
RECORDING OPTIONS
• Dial the mailbox number,
reply to a message, or forward a message.
• “Record” your message.
Pause
“Continue”
Erase
• After recording:
“Replay”
“Append”
“Erase,” re-record
“Copy”
Delivery “Options”
DELIVERY OPTIONS
“Private”
“Certified”
“Priority”
“Send”
Send and Exit Hang Up
2
#
3
1
2
3
4
9
#
PERSONAL OPTIONS
Record “Greeting”
“Primary” Greeting
“Alternate” Greeting
“System” Greeting
(See Recording Options)
Record Directory “Name”
(See Recording Options)
Record/Change “Password”
Change “Envelope” Settings
“Time, Date”
Message “Source”
“Length/Subj./Pages”
“All Options”
“None”
“Remote” Messaging
“Primary” Cascade
“Alternate” Cascade
“More” Options
Fax “Number”
Message “Order”
“E-Mail Rdr. Count”
“Transfer” Method
MESSAGE ORDER
“New” Messages
“Saved” Messages
First In/First Out
Last In/First Out
TRANSFER METHOD
“Unannounced”
“Screened”
“Announce” Only
1
2
3
#
MESSAGE OPTIONS
Cancel “Unheard” Messages
“Recover”Deleted Messages
“Voice Mail”
“E-Mail”
“Facsimile”
Inter-Tel® Model 8662 Endpoint User Guide
1
1
2
3
2
3
4
1
2
3
4
5
5
1
2
9
1
2
4
5
1
2
1
2
1
2
3
1
2
1
2
3
ACCESSING MESSAGES
NOTE: Options vary by media
type.
While the message is playing:
“Back Up”
“Pause”
Move “Forward”
“Lower” Volume
Play the “Envelope”
“Higher” Volume
“Save” the Message
“Delete” the Message
“Skip” to the End
After the message:
“Replay” Message
“Reply” to the Message
“VoiceMail”Message
“Call Back”
“Forward” a Copy
(See Recording Options)
Go to “Previous” Message
Play the “Envelope”
Go to “Next” Message
“Save” the Message
“Delete Message”
REMOTE MESSAGING
Program Cascade “Level”
Enter cascade level number, then:
“Change”
“Personal” #
“Pager” #
Enter “Time” of Day
Set “Days” of Week
“Weekdays”
All “Days”
Individual “Day” 1–7
Select Message “Category”
“All Messages”
“Priority” Messages
1
2
3
4
5
6
7
9
#
1
2
1
2
3
4
5
6
7
9
1
1
2
3
2
3
1
2
3
4
1
2
Page 73

Troubleshooting Tools
This section includes information to help solve problems that you may be experiencing with your endpoint. Refer to this section before contacting your provider or system administrator. Troubleshooting topics include:
• Contact information: Provides information about system administrator contacts.
• Troubleshooting tables: Present possible problems and suggest methods to solve
them.
• Feature and access code tables: Provide feature and access codes used with the
Inter-Tel 7000 system.
CONTACT INFORMATION
Contact the appropriate administrator (system, voice mail, or network) first with questions that are not covered in this user guide. If you need further assistance, contact
your local authorized Inter-Tel
found on the Inter-Tel Web site at www.inter-tel.com. Inter-Tel sales, service, and sup-
port are best supported at the local level.
Your system administrators can help you with many of the questions that you may
have regarding using your endpoint, such as changing your settings or modifying endpoint features. Types of administrators are as follows:
• System Administrator: Performs certain Inter-Tel 7000 system functions,
including:
— Adding new user accounts
— Setting the date and time
— Programming System speed dial numbers
— Making database changes, such as changing user names and extension num-
bers
• Voice Mail Administrator: Performs tasks associated with the voice mail sys-
tem, including:
— Adding new voice mail accounts
— Performing mailbox maintenance
— Customizing voice mail prompts
• Network Administrator: Performs network-related tasks
If you are a system administrator or if you need additional information not covered in
this user guide, refer to your system administrator guide (part number 590.8000) or
contact your local provider for more information.
®
provider. Providers’ contact information can be
TROUBLESHOOTING
TOOLS
Inter-Tel® Model 8662 Endpoint User Guide
59
Page 74

TROUBLESHOOTING TIPS
The table below includes troubleshooting tips for endpoint and system features. The
table on page 63 includes tips for voice mail features. Refer to the tables before contacting your system administrator or local Inter-Tel provider.
TROUBLESHOOTING TIPS – ENDPOINT AND SYSTEM FEATURES
PROBLEM SOLUTION
The endpoint is not working properly.
I cannot use one or more of the
features described in this guide.
I am unable to enter time or date
information for my status settings.
I cannot program System speeddial numbers.
I cannot change the time and date
on the endpoint display.
I am experiencing audio problems
on my endpoint such as echo, distorted sound, or choppiness.
My endpoint is located in my home,
I use a cable modem, and I cannot
download new firmware upgrades.
I cannot route calls with the endpoint.
I don’t have any messages, but the
Message lamp continues to flash.
My status changes automatically,
and I don’t know why.
Reset the endpoint (see page 10). If the endpoint continues to fail,
contact your system administrator.
The feature may not be enabled. Contact your system administrator for
more information.
The “Prompt me for additional descriptive text each time I choose this
status” in the Status section of Inter-Tel Personal Communicator for
Web may need to be enabled.
System speed dial numbers are programmed by the system administrator.
The time and date are set by the system administrator. Contact your
system administrator if you notice that the date and time are incorrect.
Contact your system administrator if you are having audio problems.
Unplug the endpoint from the router and plug it directly into the cable
modem, bypassing the router completely. After downloading the
upgrades, you can reconnect the endpoint to the router.
Use Inter-Tel
call routing.
Press to disable the lamp. (This works only if there
are no messages and a system error is causing the lamp to flash.)
Your status may be set to change when your personal computer is idle
or when an event scheduled in your Microsoft
changes your status “map” settings.
To check the idle setting: From the system tray, right-click on , and
then click Options - Status (tab). Then check the setting in the When
my computer becomes idle panel.
To check the calendar “map” settings: From Inter-Tel Personal Communicator for Web, click Options (tab) - Preferences (Edit) - Calendar
Status Triggers.
®
Personal Communicator for Web to enable or modify
5 2 3
®
Outlook® calendar
TOOLS
TROUBLESHOOTING
60
Inter-Tel® Model 8662 Endpoint User Guide
Page 75

TROUBLESHOOTING TIPS – ENDPOINT AND SYSTEM FEATURES
PROBLEM SOLUTION
I am unable to see my Inter-Tel
Personal Communicator toolbar(s)
in Microsoft
I get the following error message: The feature code entered does not exist. Retry using the correct fea-
I get the following error message: Your system does not support the feature or the feature is disabled.
®
Outlook®.
INVALID
FEATURE CODE
FEATURE NOT
ENABLED
Right-click in the toolbars area of Outlook. If the toolbars are available
in the list, select the appropriate toolbar(s) you want to display. If they
are not listed, try using the following method:
1.From the Microsoft Outlook Help menu, select “About Microsoft Outlook.”
2.On the About window, click the “Disabled Items” button.
3.On the resulting window, select Inter-Tel Personal Communicator for
Outlook, and then click Enable.
4.Close the window and restart Outlook.
If the toolbars are still not visible, contact your system administrator or
refer to http://support.microsoft.com/kb/329098/EN-US/.
ture code (see page 65).
Contact your system administrator for more information.
I get the following error message: Your system does not support the feature or the feature is disabled.
FEATURE ACCESS
I get the following error message: The feature is enabled but other feature-related conditions were not
I get the following error message: The feature is enabled but other feature-related conditions were not
I get the following error message: The extension number entered does not exist. Retry using a valid
I get the following error message: A network connection error occurred. Reset the endpoint (see
Inter-Tel® Model 8662 Endpoint User Guide
DENIED
CANNOT ACCESS
FEATURE
FEATURE ACCESS
BLOCKED
INVALID
DESTINATION
NETWORK
ERROR
Contact your system administrator for more information.
met. Retry making sure that all feature-related conditions are met.
met. Retry making sure that all feature-related conditions are met.
extension number.
page 10). If the endpoint does not work properly after resetting, contact
your system administrator.
TROUBLESHOOTING
TOOLS
61
Page 76

TROUBLESHOOTING TIPS – ENDPOINT AND SYSTEM FEATURES
PROBLEM SOLUTION
I get the following error message: The system licensing is not configured properly. Contact your system
INVALID
LICENSE
administrator for assistance.
I get the following message: Remote Survivability mode is enabled. The following features will work
REMOTE
SURVIVABILITY ON
in Remote Survivability mode:
• Place and answer intercom and outside calls
• Place emergency calls (if a Session Initiation Protocol [SIP] gate-
way is enabled for your system)
• Transfer calls
• Place conference calls
• Send calls to (forward)
• Place calls on hold
• Page subscribers
• Redial calls
• Use Last Call Return
• Send and receive text messages
• Send, delete, and forward voice mail messages
TOOLS
TROUBLESHOOTING
62
Inter-Tel® Model 8662 Endpoint User Guide
Page 77

TROUBLESHOOTING TIPS – VOICE MAIL FEATURES
PROBLEM SOLUTION
I cannot use one or more of the
voice mail features described in this
guide.
I get a “Mailbox almost full or full”
message.
I get a “Mailbox quota grace limit
reached” message.
My e-mail password has expired for
my e-mail client and I have to
change it. Do I also have to update
it for my mailbox?
I cannot retrieve deleted messages.
I do not have e-mail and fax messages in my mailbox.
Your system may not support the feature, or your system administrator
may not have enabled the feature. Contact your voice mail administrator for more information.
No new messages can be received until waiting or saved messages
are deleted.
The voice mail system grace limit has reached its capacity. This feature allows a mailbox to “overfill” beyond normal capacity. When the
quota grace limit has been reached, this announcement is played.
Contact your voice mail administrator for assistance.
If you change your e-mail password, you will be prompted to update it
for E-Mail Reader. See page 55 for additional information about entering your e-mail password.
Voice mail may have erased your message. After a programmed
amount of time has lapsed, voice mail automatically erases all deleted
messages (see page 51). If you attempted to undelete a voice mail
within this time frame but you were unsuccessful, your voice mail system may not have sufficient space enabled to store deleted messages.
If your mailbox is does not have E-Mail Reader, (see page 55), you will
not receive e-mail and fax messages. Contact your voice mail administrator to determine if E-Mail Reader is enabled for your mailbox.
I get the wrong response when I try
to complete a task by saying a
command.
I cannot set the number of rings
before a call is sent to voice mail.
Inter-Tel® Model 8662 Endpoint User Guide
Several factors affect the system response to voice commands. One
reason the system may not be responding to voice commands is that
Automatic Speech Recognition (ASR) is not enabled on your system. If
your system’s voice prompts do not include the option to “say” a command, then ASR is not enabled. See page 47 for additional ASR
guidelines.
This feature is set by the system administrator.
TROUBLESHOOTING
TOOLS
63
Page 78

DEFAULT ACCESS CODES
The following are default system access codes.
Outside Line Access Codes
ACCESS CODE NAME ACCESS CODE NEW CODE
Emergency Call (Default) 911 (999/112 Europe)
Outgoing Call (Default) 9
Speed Dial and Attendant Access Codes
ACCESS CODE NAME ACCESS CODE NEW CODE
Station Speed Dial 01 to 19
System Speed Dial 200 to 299
Attendant 0
TOOLS
TROUBLESHOOTING
64
Inter-Tel® Model 8662 Endpoint User Guide
Page 79

FEATURE CODES
The following are default system feature codes and may be changed by your system
administrator. If you are notified that a feature code has been changed, record the new
code in the “New Code” column for reference.
FEATURE NAME DEFAULT CODE NEW CODE
Agent Help Request 84
Agent Help Reject 62
Annoyance Call Trace 57
Auto Answer Incoming – Off 430
Auto Answer Incoming – On 431
Auto Answer Incoming – On/Off 432
Auto Answer Outgoing – Off 380
Auto Answer Outgoing – On 381
Auto Answer Outgoing On/Off 382
Automatic Line Answer – Off 320
Automatic Line Answer – On 321
Automatic Line Answer – On/Off 322
Auto Redial 35
Background Music – On/Off 51
Barge-In 81
Billing Code – Enable 50
Call Log – Incoming Calls 412
Call Log – Missed Calls 411
Call Log – Outgoing Calls 413
Call Log – Select Type 410
Call Park 98
Call Park Pick Up 99
Caller ID – On/Off 34
Clear Alarm – Current 631
Clear Alarms – All 630
Conference 55
Contacts – Browse Groups 302
Contacts – Company 304
Contacts – Directory 305
TROUBLESHOOTING
TOOLS
Inter-Tel® Model 8662 Endpoint User Guide
65
Page 80

FEATURE NAME DEFAULT CODE NEW CODE
Contacts – Personal 303
Contacts – Search 301
Contacts – Select Type 300
Direct Account Access 97
Direct Endpoint Access 96
Directed Call Pickup 53
Display User Info/Time/Date 65
Group Call Pickup 54
Group Listen – Off 490
Group Listen – On 491
Group Listen – On/Off 492
Headset – Off 400
Headset – On 401
Headset – On/Off 402
Hold 36
Hot Desking – Log Off 870
Hot Desking – Log On 871
Hot Desking – Log On/Log Off 872
Hot Rules 42
Hunt Group – Log In 881
Hunt Group – Log Out 880
Hunt Group – Log In/Log Out 882
Hunt Group – Wrap Up Terminate 86
Last Call Return 69
LCD Contrast Level 39
Location Information 610
Location Validation 611
Lock Endpoint 31
Message Menu 521
Mute – On/Off 33
Off-Hook Voice Announce 59
Outbound Caller ID – Block 67
Outbound Caller ID – Unblock 82
TOOLS
Page 75
TROUBLESHOOTING
66
Inter-Tel® Model 8662 Endpoint User Guide
Page 81

FEATURE NAME DEFAULT CODE NEW CODE
Personal Assistant 64
Queue (Callback) Request 44
Reach Me – At My Desk 561
Reach Me – Browse 560
Reach Me – Follow Rules 564
Reach Me – Forward To 563
Reach Me – Voice Mail 562
Record-A-Call 85
Record-A-Memo 58
Redial 00
Send to Destination 48
Silent Monitor 80
Silent Monitor – Barge In 91
Speed Dial – Station 01 to 19
Speed Dial – System 200 to 299
Station Monitor 83
Status 89
System Mode – Default 681
System Mode – Default/Night Toggle 680
System Mode – Night 682
Text Message – Delete Message 522
Text Message – Send Message 520
Transfer on Connect 79
Transfer to Hold 46
Transfer to Ring 45
Update Configuration 607
Voice Mail Message – Leave 93
Inter-Tel® Model 8662 Endpoint User Guide
TROUBLESHOOTING
TOOLS
67
Page 82

TOOLS
TROUBLESHOOTING
68
Inter-Tel® Model 8662 Endpoint User Guide
Page 83

Index
A
Access codes 64
Accessing your mailbox 48
Activation code 8
Adding a party to conference calls 24
Administrators, types 59
Alternate greeting, recording 12
Annoyance Call Trace, using 21
Answering a waiting call 15
Answering calls 14
Audio problems 60
Auto Answer Incoming, enabling and disabling 14
Auto Answer Outgoing, enabling and disabling 14
Auto Answer, using 14
Auto Line Answer, using 15
Auto logon 26, 41, 48
Automatic Speech Recognition 11, 47
B
Background music
volume, adjusting 9
Billing codes, using 18
Bridged Line Appearance, using 45
Buttons
dialpad 3
dialpad button descriptions 28, 38, 51, 56
feature 3
feature, descriptions 4
Hold 3
LCD menu 3, 5
Mute 21
Speaker 3
Special 3
Star 13
Volume Control 3
C
Call Drop, using 15
Call Log, using 36
Call Park, using 20
Call Screening Transfer Method, changing 52
Caller ID
blocking outbound 21
displaying 21
Calls
Annoyance Call Trace, using 21
answering 14
Auto Answer Incoming 14
Auto Answer Outgoing 14
Auto Answer, using 14
Auto Line Answer, using 15
Bridged Line Appearance, using 45
Call Drop, using 15
Call Log, using 36
Call Park, using 20
Camp-on, using 16
conference
dropping out of 24
hold, placing on 24
party, adding a 24
placing 24
Directed Call Pickup 23
emergency, placing 16
Group Call Pickup, using 23
Group Listen, using 34
hold, placing a call on 20
hold, returning to on 20
internal, placing 16
Last Call Return 18
Mute button, using 21
Off-Hook Voice Announce, placing 17
Outgoing Call Access Code 16
outside, placing 18
paging 26
Record-A-Call, using 32
routing
using Hot Rules 31
using Reach Me 29
screening 52
Send to Destination, using 23
subscriber, queuing for 17
transferring 22
Directed Call Pickup 23
Send to Destination, using 23
transfer on connect 22
Transfer to Ring 22
transferring and placing on hold 22
voice memo, recording a 33
waiting, answering 15
Inter-Tel® Model 8662 Endpoint User Guide
69
Page 84

Camp-on, using 16
Canceling a feature 13
Changing your personal greeting 12
Codes
access 64
billing, using 18
default system access 64
feature 65
Outgoing Call Access Code 16
Company contact list 37
Conference calls
dropping out of 24
hold, placing on 24
party, adding a 24
placing 24
Configuration URL 8
Connectors
endpoint 6
handset jack 6
headset jack 6
LAN/Power jack 6
Personal Computer (PC) port 6
Contact information 59
Contact lists
Company 37
Directory 37
Group 37
Personal 37
using 37
Contact name, searching for 38
Contrast, adjusting LCD 8
D
Default system access codes 64
Dialpad button descriptions 28, 38, 51, 56
Dialpad buttons 3
Direct Account Access, using 31
Direct Endpoint Access, using 31
Directed Call Pickup 23
Directory contact list 37
Directory name, recording your 49
Dropping out of a conference call 24
E
E-Mail Reader
fax destination, programming 57
Main Menu E-Mail Reader Count, using 57
password, entering 55
Emergency calls, placing 16
Endpoint
connectors 6
Direct Account Access, using 31
Direct Endpoint Access, using 31
features 3
Dialpad buttons 3
external speaker 3
Feature buttons 3, 4
handset 3
headset 10
Hold button 3
lamp indications 6
liquid crystal display (LCD) 3, 5
Message Indicator lamp 3, 6
Speaker button 3
Special button 3
Volume Control button 3
locking 30
power requirements 7
resetting 10
ring tones, changing 9
setup 8
troubleshooting tips 60
upgrades from home 60
Error messages 61
Error tones 6
External speaker 3
F
Fax destination number, programming 57
Feature buttons 3
descriptions 4
Feature codes 65
70
Inter-Tel® Model 8662 Endpoint User Guide
Page 85

Features
available while in Remote Survivability 62
canceling 13
endpoint 3
time-out 6
Firmware, updating 7
Flowchart
Inter-Tel Personal Communicator for Voice 42
voice mail (with E-Mail Reader) 58
voice mail (without E-Mail Reader) 54
G
Greeting
alternate 12
personal 12
personal, changing your 12
primary 12
system 12
Group Call Pickup, using 23
Group contact list 37
Group Listen, using 34
H
Handset 3
jack 6
off-hook 6
on-hook 6
volume, adjusting 9
Headset
jack 6
using 10
volume, adjusting 9
Hold
call, returning to 20
conference, placing on 24
placing a call on 20
Hold button 3
Hot Desking, using 33
Hot Rules, using 31
Hunt groups
advanced 43
basic 43
logging in and out of 43
wrap-up timer, using 43
I
Initializing voice mail 11
Instant messaging 25
Internal calls, placing 16
Inter-Tel
7000 system 1
contact information 59
Personal Communicator 2
Personal Communicator for Voice flowchart 42
Personal Communicator for Voice, using 39
L
LAN/Power jack 6
Last Call Return, using 18
LCD
contrast, adjusting 8
menu buttons 3, 5
Location, validating 10
Locking Your Endpoint 30
M
Mailbox password, changing 49
Mailbox, accessing 48
Main Menu E-Mail Reader Count, using 57
Menu buttons 3, 5
Message envelope, changing 50
Message Indicator lamp 3, 6, 25
Message Notification/Retrieval (MNR) 48
Message search order, changing 49
Messages
error 61
instant 25
text
canceling 25
replying to 25
using 25
voice mail
leaving 26
listening to 26, 48
Microphone 3
Monitor Account, using 34
Mute button 21
Inter-Tel® Model 8662 Endpoint User Guide
71
Page 86

O
Off-hook 6
Off-Hook Voice Announce, placing 17
On-hook 6
Outbound Caller ID
blocking 21
Outgoing Call Access Code 16
Outside calls, placing 18
P
Page groups 26
Paging subscribers 26
Personal Assistant, using 32
Personal Computer (PC) port 6
Personal contact list 37
Personal greeting, recording your 12
PIN, changing 49
Power requirements 7
Power supply 7
Presence management 27
Primary greeting 12
Q
Queuing for a subscriber 17
R
Reach Me
At My Desk 29
Follow Rules 29
Forward To 29
using 29
Voice Mail 29
Record-A-Call, using 32
Recording your directory name 49
Recording your personal greeting 12
Remote Messaging, programming 52
Remote Survivability 62
Resetting the endpoint 10
Ring tones, changing 9
Ringer volume, adjusting 9
Software, updating 7
Speaker button 3
Speaker, external 3
Speakerphone volume, adjusting 9
Special button 3
Speed dial
Station, using 19
System, using 19
using 19
Star button 13
Station speed dial, using 19
Status
change automatically 60
time and date 60
Subscriber
Direct Account Access 31
System greeting 12
System speed dial 19
T
Text messages
canceling 25
replying to 25
using 25
Time and date
status settings 60
system 60
Time-out, features 6
Toolbars, Outlook® 61
Transfer on Connect 22
Transferring calls 22
Directed Call Pickup 23
hold, placing on 22
Send to Destination, using 23
Transfer on Connect 22
Transfer to Ring 22
Troubleshooting tips
endpoint 60
voice mail 63
U
S
Send to Destination, using 23
72
Uninterruptible power supply 7
Updates, software and firmware 7
User information, displaying 21
Inter-Tel® Model 8662 Endpoint User Guide
Page 87

V
Viewing angle, adjusting 8
Voice mail
Call Screening Transfer Method, changing 52
deleted messages, recovering 51
directory name, changing 49
E-Mail Reader 55
flowchart (with E-Mail Reader) 58
flowchart (without E-Mail Reader) 54
greetings
alternate 12
personal, changing your 12
primary 12
recording your 12
system 12
initializing 11
mailbox, accessing 48
message envelope, changing 50
Message Notification/Retrieval 48
message search order, changing 49
messages
leaving 26
listening to 48
recording and sending 50
unheard, canceling 50
password, changing your 49
quota grace limit 63
Remote Messaging, programming 52
screening calls 52
searching for a contact 51
setup 11
special delivery options 51
troubleshooting tips 63
unheard messages, canceling 50
Voice mail messages
listening to 48
recording and sending 50
recovering deleted 51
Voice memo, recording 33
Volume Control button 3
Volume, adjusting
background music 9
handset 9
headset 9
ringer 9
speakerphone 9
W
Wrap-up timer, using 43
Inter-Tel® Model 8662 Endpoint User Guide
73
Page 88

74
Inter-Tel® Model 8662 Endpoint User Guide
Page 89

Page 90

Part No. 590.8004
Issue 1, October 2006
A6:1/9115A
 Loading...