

Interquartz IQ333D Quick Start Manual

INTERQUARTZ IQ333, IQ333EHS and IQ333D QUICK START-UP GUIDE
The IQ3 33 seri es offe rs 3 m odels: two head set sup porting models IQ333,
IQ333EHS and the standard version IQ333D (which replaces the Headset socket
with a Data port).
• IQ333 is designed for usage with wired-headset or wireless headset together
with the handset l ifter.
• IQ333EHS is sp ecially designed to suit most of the popular Plantr onics
wireless he adset models via EHS port connection an d provision of an OLI
port to supp ort Plantr onics OL I vi sual indi catio n m odule . Th e EH S
functionality allows the t elephone on/off hook state to be contro lled by the
headset. This allows the headset to both answer incoming calls and end all
calls without the n eed to carry out any action o n the telephone keyboa rd.
• IQ333D provides the convenience of a Data port ( replaces Headset sock et
with a Data port).
To view/download a complete list of features and a more detaile d user manual,
please visit www.interquartz .com.au
INSTALLATION
Install th e IQ333, I Q333EHS or IQ333D on a desk, table or shelf away from
excessive heat, damp, dust, direct s unlight, vibration, and sources o f electrical
or electromagnetic or radio frequenci es. Try to keep the wireless headset base
unit separate from the telephone (as far away as the supplied cords comfortably
allow). If the unit i s to b e wall- mounted, use th e IQ235 WALL MOUN TING
BRACKET or Wall Mount Ki t No. 3 (please order separate ly).
UNPACKING
The carton contains the following:
• Telephone body and handset
• Coiled cord, line cord and Interquartz EHS Cable (for IQ333EHS only)
• This Quick Start-U p Guide.
GENERAL SETTING UP
1.F it the coiled c ord to the approp riate sockets in the handset and te lephone
base.
2.F it the line cord to the rear socket and to y our telephone network outlet.
3.S et the Ringer Volume
4.S ee following sections t o complete the inst allation.
HEADSET CONNECTION
CORDED HEADSET INSTALLATION
Connect a headset to t he headset so cket at the rear, and set the HEADSET
POLARITY SWITCH and HEADSET MIC ADJUST CONTROL described in this
section.
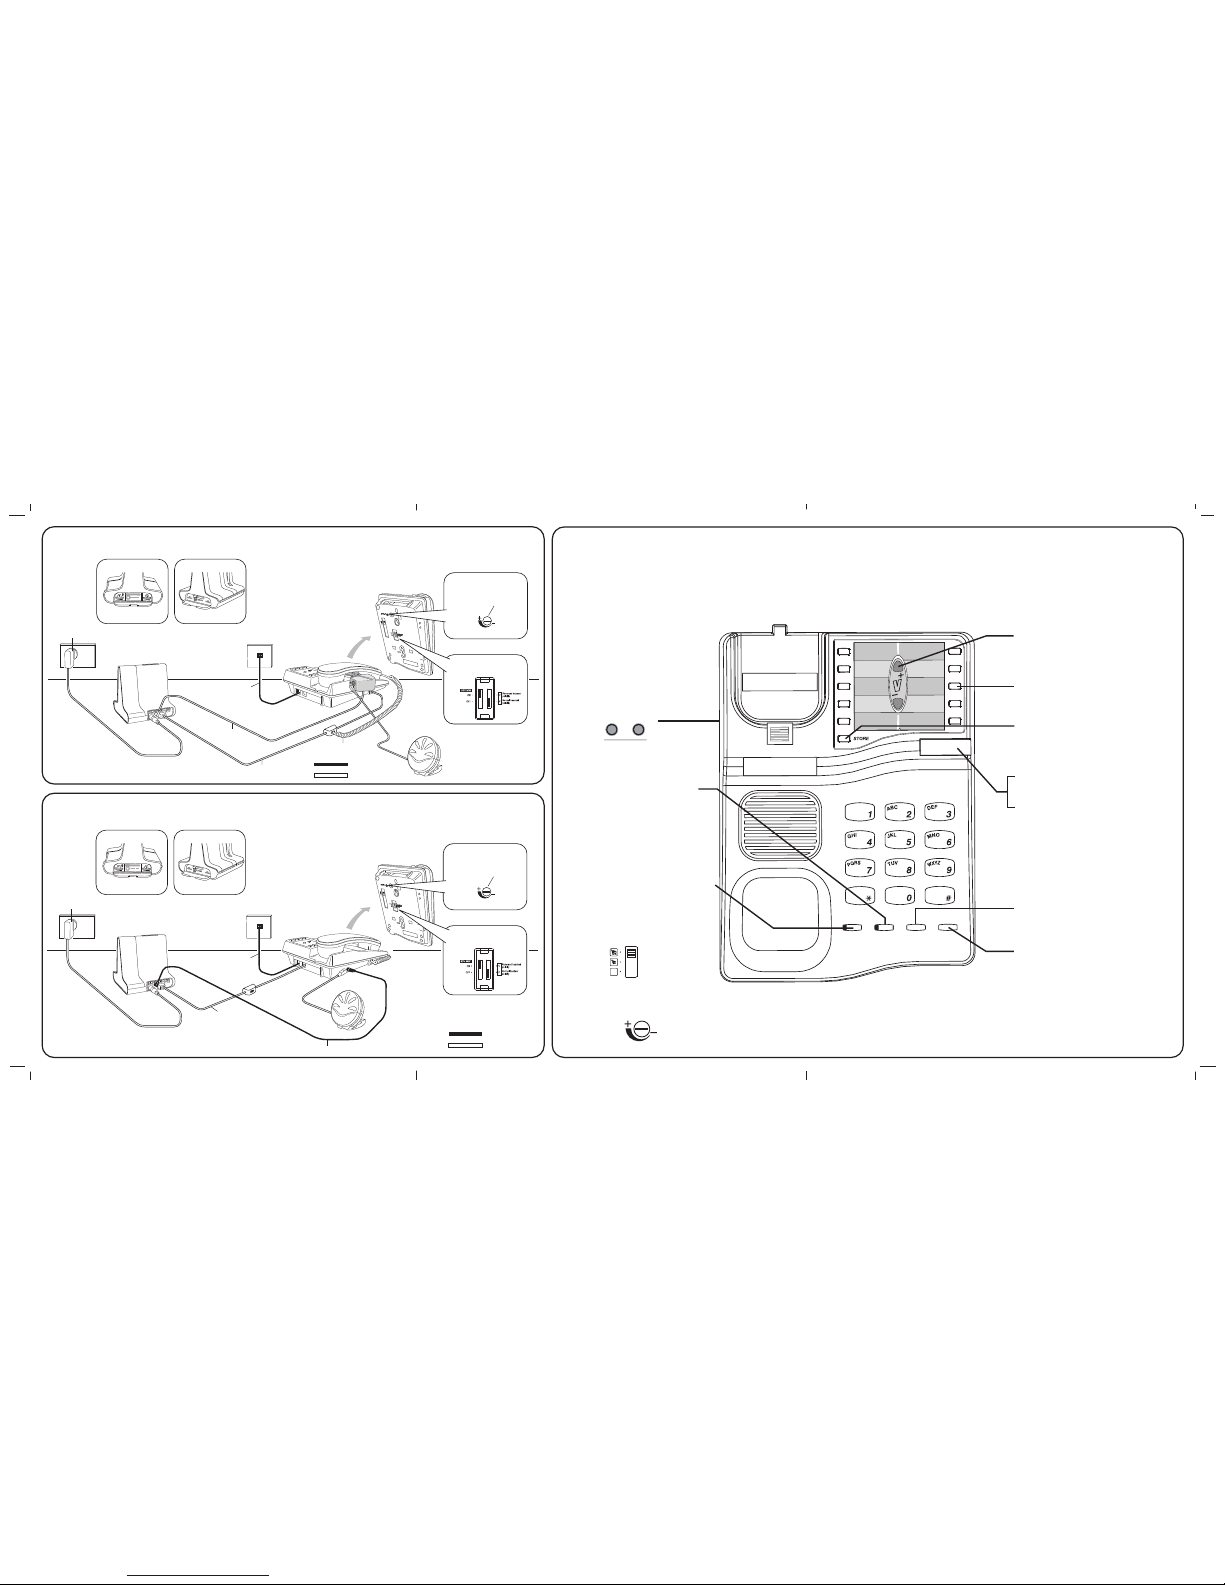
WIRELESS HEADSET*, HANDSET LIFTER* and OLI* INSTALLATION
Connect the headset as sho wn in Fig 1. The conn ections shown illustrat e the
Plantronics Savi series and the use of an optional handset lifter (a Plantronics
accessory) and are to be used as a gu ide. Connections using other headse ts
and lifters are s imilar.
WIRELESS HEADSET* EHS and OLI * INSTALLATION
Connect the headset as sho wn in Fig 2. The conn ections shown illustrat e the
Plantronic s Savi seri es and the us e of the I nterquartz EH S cable (sup plied
with the IQ3 33EHS) and are to be used as a guide. Conn ections using other
headsets are similar. More details of set tings for other headset models can be
obtained from Inte rquartz.
* Note: items marked with " " not manufactured by Interquartz
Plantronics is a t rademark or registered tr ademark of Plantronics, Inc.
HEADSET POLARITY SWITCH - (Fig. 4)
Located on th e underside of the telephone, this switch pro vides compatibili ty
with the two commo nly-used headset wirin g standards.
• Corded Headse ts: Po sition "V" suits Plantron ics Vi sta Co rds and other
Headsets wired in the same configurati on (also known as "re versed" wiring
mode)
• Corded Headsets: Position "P" suits Plantronics P cords and other Headsets
(including those u sing "smart" cords) wired in the same config uration (also
known as "normal" wiring mode)
• Wireless Headsets: to decide the correct position of the switch, please consult
the connec tion diagr ams i n the INS TALLATIO N sect ion or c heck with
Interquartz or an aut horised reseller.
Note: the recommen ded settings in Fig 1 & 2.
Fig. 4 HEADSET PO LARITY SWITCH
HEADSET MIC ADJUST Control - (Fig. 5)
This control allows many different headsets on the Australian market to function
correctly with the telephone by adjusting the Headset's Microph one sensitivity.
The control is located on the un derside of the te lephone. The adjustmen t can
be made by a small screwdriver or similar implement that wi ll fit into the control
slot.
To make a headset microphone leve l adjustment:
1.W ith the heads et connected as per the ins tructions in this manual, put the
headset on and lift the handset to your other ear and make an out-going cal l.
2.P ressing HANDSFREE /HEADSET, swap betwe en Handse t and H eadset
mode (the in dicator will illuminate whe n the headset is in use) a few times
while speaking to t he other party.
3.Wit h the other party's help decide i f your voice level is the same when using
the handset and headset.
Lastly, if you sound too loud on the headset, adjust th e microphone sensitivity
(turn anti-clockwise) so that your voice level when using the headset matches
that of the handset. Clockwis e rotation increases the headset mic out put level.
Fig. 5 HEADSET MIC ADJUS T CONTROL
BASIC OPERATION
IQ333, IQ33 3EHS or I Q333D can be used in the same wa y as a nor mal
telephone; simply lift the Handset to answer an incoming call, or lift the Handset
and dial on the Keypad to commence an outgoing call. Please refer to other
sections for more abou t Handsfree, Headset and Memor y operations.
Please see th e Quick Sta rt-up Guide overleaf for information regarding
general operati on and controls. Sho uld you require assist ance or have any
queries, please send an email to enquiries@interquar tz.com.au
MESSAGE WAITING LIGHT COMPATIBILITY
All variants of IQ333 o ffer the following built -in options:
1.80 VDC ty pe
The Message Waiting switch shown in Fig 4 (when set in the "ON" position)
suits an 80V DC type me ssage w aiting s ignal fr om the host s ystem (e g.
NEC, FUJITSU, ALCATEL, later HYBREX and NORTEL). It should be set to
the OFF position w hen the telephone is used on other syste ms.
2.Pol arity Reversal (eg. Ericsson BP250)
This function is permanently enabled and will not conflict with other features
when the telephone is used on other systems with different Message Waiting
requirements.
3.Eri csson MD110 (MX-One) or Siemens Hi -Path
NOTE: If this telephone is config ured to "Message Waiting" mod e please note
that i t is only i ntended for PAB X syste ms (co ntact yo ur ven dor for
clarifica tion). I f so, it may not be connected to any other t elephone
sys tem or n etw ork wi tho ut t he a uth ori ty o f th e Au str ali an
Telecommunications Aut hority. For direc t line use, please disable the
message waiting f eature using the swi tch on the telephon e underside
(see Fig. 4).
HEADSET OPERATION (models IQ333 and IQ333EHS)
The telephone can be configured to suit many different headsets. Please consult
the INSTALLATION secti on for details to get the best performance from your
headset.
Model IQ333 Headset Operation
Note: This section applies to model IQ333 only (for IQ333EHS operation, please
see the next section ). Model IQ333 can be used with corde d headsets and
wireless headsets wi th/without a handset lifter.
USING A CORDED HEADSET
To make or receive an outgoing call using the headset, the he adset should be
connected to the he adset jack at the rear of the IQ333:
• Press HANDSFREE/HE ADSET. Dial tone will be heard in the headset
• If you are making an out going call, dial the r equired number on t he keypad
• Lifting the handset during headset mode will revert to handset mode operation
• To revert back to he adset m ode op eration durin g hand set mo de, pr ess
HANDSFREE/HEADSET
• To hang up, press HANDSFREE/HEA DSET or replace the handset.
SWITCHING MODES DURING A CALL
A call can be switche d between Headset/Hand sfree and Han dset modes by
pressing HEADSET/HAN DSFREE or by lifting the handset.
The H EADSET /HANDSF REE k ey has auto- detect ion f unction . Whe n the
headset is connected, the Handsfree function is disabled to allow the HEADSET/
HANDSF REE t o wor k in Headse t mod e. Unpl ug th e head set t o rev ert t o
Handsfree mode (even dur ing a call).
TRAINEE/SUPERVISOR M ODE
Allows for the Handset and a Headset to be used in tandem. This will enable a
supervisor to monitor a t rainee's progr ess during a call, or "take over" a cal l.
The following procedures assume that the trainee is wearing the Headset and a
call is in progr ess.
Training Mode
Allows a supervisor to monitor a traine e during a call.
1.D uring a tra inee's call the superv isor may l ift the Hands et (HANDSFR EE/
HEADSET indicator w ill turn off).
2.Q uickly press HANDSFREE /HEADSET and the indicat or will illuminate.
3.Th e trainee may continue the conversation with the supervisor only listening
to the call.
Supervisor Mode
Allows a superviso r to "take over" a call between a trainee and another party.
1.D uring a cal l, the supe rvisor may l ift t he hand set to cont inue a norma l
conversati on with t he other party, while the train ee listens to its progress
through the headset.
2.To return th e call to the trainee, pr ess HANDSFREE/HEADSET and replace
the handset in the cr adle.
USING A WIRELESS HEADSET WITH HAN DSET LIFTER
Note: This section specifically applies to Plantronics Wireless Headsets. Please
see the connectio n diagrams in the INSTALLATION sect ion for detailed set up
instructions.
To answer or start a call : press the Head set's Ca ll Contr ol butto n (this is
typically the bu tton on the headse t's earpiece: see Headset User Guide). The
lifter will lift the handset. If you h ave connected an OLI, i t will illuminate.
To end a call: press the Headset's Ca ll Control button. The lifter will lower the
handset.
Switching modes duri ng a call
A call can be switched between Headset and Handset by the following method:
1.L ift the handset to yo ur spare ear.
2.P ress the headset's cal l control button to release the call to the handset.
3.To end th e call, replace the handset in the cradle.
SILENT RINGING FEATURE
Designed for Call Centers or any application where ca ll-related noise is to be
kept to a minimum, this feature allows incoming calls to ring silently; the operator
is awar e of t he inco ming ca ll, but the t elephone does n ot add to the room
noise.
To use the telephone in Si lent Ringing mode:
1.Se t the RINGER VOLUME SWITCH to OFF position (signified by the sq uare
symbol without a bell symbol inside it .
2.Pu t your headset on and wait for the next incoming call.
3.W hen a call arrives , the Multifuncti onal Indicator wil l flash and the operato r
will hear the ringing tone at a low level in the headset.
4.P ress HANDSFREE/HEADSE T to answer the call.
VOLUME CONTROL (ELECTR ONIC)
To adjust vo lume of sound in the headse t earpiece , press the up and down
volume buttons loc ated in the middle of the memory card .
CLARIA "ALERT" FEATURE
The telephone is designed to support the "Ale rt" feature available on the Claria
headset. When pressing HANDSFREE/HEADSET on the telephone, the "Alert"
indicator on the Claria heads et will illumi nate, signifyi ng that the u ser is on a
call. This feature can b e used effectively in call center applications so that the
user's colleagues will be aware that the user has a call in progress. In addition,
the Multifunctional Indicator will illum inate during the call .
Model IQ333EHS Headset Operation
Model IQ333 EHS can be u sed with bo th corded and wireless hea dsets. The
benefit of the EHS fun ctionality i s to integr ate the headse t and telephon e so
that the hookswitch can be contr olled by the headset. This allows t he headset
to both answe r incoming c alls and end a ll calls wit hout the need to carry o ut
any action on the telephone keyboard.
The instructions below assume that all connections have been carried out according
to the Connection Diagrams i n the INSTALLATION section (see Fig 2).
USING A CORDED HEADSET
Please see "CO RDED HEADS ET" above in the "Mo del IQ333 Hea dset
Operation" section.
USING A WIRELESS HEADSET I N EHS MODE
Note: 1. This sect ion specifically applies to Plantronics Wireles s Headsets.
Note: 2. When the EHS c able is connected please note that the HANDSFREE
key is disabled.
Note 3: If you are using a Handset Lifter instead of the EHS connection ( which
is possible with IQ333EHS), please see "USING A WIRELESS HEADSET WITH
HANDSET LIFTER" in the "Model IQ333 H eadset Operation" secti on.
To answer o r start a call : press the Head set's Ca ll Contr ol butto n (this is
typically the button on the headset's earpiece: se e Headset User Guide). If you
have connected an OLI, it will illuminate.
During the call:
• The MU TE Key will n ot respo nd when presse d (use the he adset's mute
function instead).
• The HANDSFREE Key wi ll not respond when pres sed.
• The red indicator on the HANDSFREE/HEADSET Key, when ON, wi ll signify
that the telephone i s in use via the headset .
• The Handset, if lifted off the cradle, will not interrupt the headset and c annot
disconnect the call if replaced in the cradle. There will be n o audio to or from
the handset.
• If a Plantronics On-Line Indicator Light model is connected to the telephone's
OLI port (see Fig 2), the OLI will be illuminated when the telephone is in use.
To end a c all: pres s the Hea dset's Cal l Control button. The tel ephone wil l
resume its normal functions except that the HANDSFREE will no t respond until
the EHS cable is removed.
Switching modes durin g a call
A call can be switched between Headset and Handset by the following method:
1.L ift the handset.
2.P ress the headset's cal l control button to release the call to the handset.
3.To end th e call, replace the handset in the cradle.
SILENT RINGING FEATURE
Designed for Call Centers or any application where cal l-related noise is to be
kept to a minimum, this feature allows incoming calls to ring silently; the operator
is awar e of t he inco ming ca ll, but the t elephone does n ot add to the room
noise.
To use the telephone in Sil ent Ringing mode:
1.S et the R INGER VOLUM E SWITCH to the O FF positio n (signifi ed by the
square symbol without a bell symbol insi de it).
2.Pu t your headset on and wait for the next incoming c all.
3.W hen a call arrives , the Multifuncti onal Indicator wil l flash and the operato r
will hear the ringing tone at a low level in the headset.
4.P ress HANDSFREE/HEADSE T to answer the call.
HANDSFREE OPERATION
HANDSFREE MICROPHONE
Located at the front of the phone (Fig 1), i ts function is to reproduce your voice
as you speak to the o ther party while yo ur telephon e is in Handsfree mo de.
Positioni ng of th e telepho ne, and t herefore t he Microp hone, is important to
ensure the best reprod uction of your voice.
USING THE HANDSFREE/HEADSET KEY
To com mence a Handsf ree call press the HAN DSFRE E/HEA DSET; the
telephone wil l activate the line, the S peaker, and the Handsf ree Microphone ,
and the Indicator will switch on to provide confirma tion. Dialing and speech can
then commence. Pr essing the key again will terminate the call.
Incoming calls u sing Handsfree:
1.Telephone rin gs
2.P ress HANDSFREE/HEADSE T
3.C ommence your Handsfree con versation.
Changing from HANDSFREE to HANDSET during a call
Lift the handset and resume your conversation; the Handsfree function will switch
off automatica lly.
Changing from HANDSET to HA NDSFREE during a call
1. Press HANDSFREE /HEADSET
2. Replace handset
3. Resume your conv ersation using the Handsf ree function.
Outgoing calls using HANDSFREE (manual or memory dialing)
1.P ress HANDSFREE/HEADSE T
2.D ial required number on Alpha-Numeric Keypad or press desired MEMORY
3.Sp eak as required.
HINTS FOR HANDSFREE OPERATION
As a courte sy, tell the ot her party th at you are using the Hand sfree function .
He/she may or may not want people other than you to hear the conversat ion. A
quiet enviro nment ensures best Handsfree performance. Whe n Handsfree is
used in a noisy room or near a noise gen erating device (for example, a TV set)
all or part of the message may be interrupted and cannot be heard. To eliminate
this problem try to lower the noise lev el in the room.
During the handsfree conversation, your telephone will give priority to the person
who speaks louder when both people are talking simultaneously. Speak ONLY
after the other p erson pauses or sto ps.
If the other per son comp lains abou t poor t ransmission , talk di rectly a t your
telephone and from a closer distance as necessary, or lower the speaker volume
control.
If the ope ration of t he Handsfree f eature is not correct, re fer to the failure to
operate section fro m full User Manual at www.interquartz.com.au
ADVANCED NETWORK OPERATION
Where this telephone is used on an intelligent network such as Telstra's Business
Links, Customn et, Centel, a PABX or other ne twork the follo wing information
may be useful.
PAUSE FUNCTION WHEN DIALING
Depending on your teleph one system, this may or may not be required. If in
doubt, check with your system supplier or Interquartz dealer, as failure to observe
your system's req uirements may lead t o difficulty in makin g outgoing extern al
calls. If you hav e determin ed that a pause i s required by your host sys tem,
please refer to the REDIAL/PAUSE Key section (Fig 3) to ensure correct usage
of the PAUSE button.
HOLDING AND TRANSFERRING CALLS
The method used for these functions is dependent on your system type, so you
will need to check your system's Extension User Guide. The RECALL is typically
used to transfe r calls. It is affected by the setti ng of the ad justment swit ches
described in the INSTALLATION section of this manual. They must be correctly
set to suit your system for correct ope ration.
USING THE MEMOR IES
Many differ ent numb ers and c odes can be stored . You may find it useful to
store some of your favourite n etwork facilit y commands in the tel ephone for
fast, convenient access to those facilities (e.g. diversi on, call forward, call back
etc). Consult your s ystem User Guide for the c odes that you need t o store.
USING THE MEMORIES
Located a t the top of the keyboard, the One-Touch Memory p rovide easy
dialing of often-used numbers. Each memory can store 32 digits and can store
, , Pause and commands.
STORING A NUMBER:
1. Lift handset or pr ess HANDSFREE/HEADSE T
2. Press STORE
3. Enter the telepho ne number
4. Press STORE
5. Press desired me mory key
6. Replace HANDSET o r press HANDSFREE/ HEADSET.
DIALING A NUMBER:
1. Lift handset or p ress HANDSFREE/HEADSE T
2. Press desire d memory key.
CASCADE DIALING
The contents of any memory can be "cascaded" or added together with additional
manual dia ling or other mem ories. In cascade d ialing, mak e sure t hat each
dialing sequence is completed before activati ng the next.
DIGIT CAPACITY
All memor ies can stor e up to 32 digits each , compris ing any com bination o f
1-9,0,
and .
STORAGE TIME
All memories are retained permanently without batteries (non-volatile memories).
THUNDERSTORMS
The telephone, in common with household electrical appliances, can be a source
of el ectric and ac oustic shock duri ng th underst orms. The p ossibil ity o f a
telephone user experiencing a shock is minimal. Nevertheless, customers should
be aware of some simple precautions to foll ow during thundersto rms:
Use your telephone only for calls of the utmost urg ency. Keep these calls brief.
Whilst using your telephone keep clear of electrical appliances and metal fixtures
such as: stoves, air con ditioners, refrigera tors, window frames and sinks.
WARRANTY - 5 YEARS
Terms of Warranty
Interquartz (A’Asia) Pty Ltd warrants the original purchaser against failure under
normal usage r esulting from de fective material and wor kmanship. Proof o f
purchase an d date of purch ase are r equired for dete rmining validity of this
warranty. This warranty does not cover def ects or damage due to normal wear
and tea r, neg ligence , accid ents, exposu re to radia tion, misuse , impr oper
maintenance , lightni ng strike s or una uthorised repairs or modific ations and
excludes freight or postage costs to/ from your local au thorised service ce ntre
unless otherwise arranged. Consequential loss not included. Notification of any
defect must be made within the warranty period before a warranty repair can be
effected.
This guarantee is an addit ion to all other Warranties or Guarantees expressed
or implied by the Trade Practices Act or other Commonwealth or State laws and
all other obligatio ns and liabilities on the par t of Interquartz (A’ Asia) Pty Ltd.
Warranty Coverage
The warranty period is five (5) years. Please contact Interquartz for confirmation
of the coverage of your product, or consult the documentation supplied with the
unit. Freight costs in sending goods t o Interquartz and returni ng the goods to
the owner, are not incl uded in the warranty cove rage.
Warranty Claim and Non-Warranty Repair Procedur e
1.C ontact Interquartz to discuss the symptoms o f the problem. Our staff can
assist to determin e whether the product is sus pect or whether the problem
may be elsewhere in the network.
2.I f recommen ded by In terquartz, return t he suspect unit to the Int erquartz
delivery point belo w, enclosing in your package the following:
a) Proof of purchase
b) Docume ntation to indic ate your (or th e end u ser’s) c ontact det ails
(phone, fax and email) and return address.
c) A fault report to assist our tec hnical s taff to locate t he fault or pay
particular attention to the function or feature reportedly malfunctioning.
d) If required (e.g. if the unit is not under warranty or has been damaged
due to ab use) please i nclude a r equest for a repair quotation i n the
package with the returne d goods.
e) Any other relevant material to establish the warranty claim if applicable.
3.R epairs to the unit will be carried out accordin g to pres cribed In terquartz
factory -endor sed proced ures to r eturn the tele phone to a se rviceab le
condition.
4. The repaired or replaced unit will be returned or made available for collection
once the repair is complete. Dead On Arrival (DOA) warranty repairs returned
within one w eek of purchase w ill be returne d at the expe nse of Interqu artz
and at the discretion of Interquartz.
Return Delivery Address (Repairs only):
Service Division
Interquartz (A’Asia) Pty Ltd
25 Northgate Drive
Thomastown VIC 3074
Telephone: (03) 9464 3333
Fax: (03) 9464 3466
Email: enquiries@interquartz.com.au
Additional Support Servi ces
Upon requ est, site visits can be arrange d to reso lve diffic ult servic e or faul t
issues at the disc retion of Interquartz .
Units sufferin g from Radio Interference due to cl ose proximity to radio or TV
transmitters cannot be modi fied and the warranty does not cover such work.
Workshop Service Fees
For all r epairs exclud ed from the warranty pr ovisions a service fee , plus the
cost of parts or materials, will apply. Bulk repair prices are ne gotiable.
Quotations
Repair quotatio ns can be arranged upon request and do not attract any extra
charge for the quota tion service.
Note: No undertaking is g iven or implied to au tomatically provide replacement
units as a result of warranty cla ims (as we ma y prefer to repair t he returned
unit) and Interqua rtz reser ves the right at all times to dete rmine all matters
related to warranty claims within the scope of the state d Terms of Warranty.
SERVICE
Please call 1800 6 IQTEL (1800 647 835) from anywhere in Australia to arrange
service or repair of your telephone.
3C933301S03B
#
#
#
#
#
#
#
#
*
MODEL IQ333, IQ333EHS & IQ333D QUICK REFERENCE GUIDE
Should you require further assistance, please email
enquiries@interquartz.com.au
www.interquartz.com.au
STORE Key
Press STORE to store a number in the Memory. Any memory
can store 32 digits.
RECALL Key
For use with the ho st telephone system to invoke special
network facilities such as Call Hold or Call-Transfer available in
your system.
REDIAL/PAUSE Key
Press the key to redial the last num ber (max 32 digits), or direct
redial of an unsuccessful number dialed without going off line.
Pause may be required if your pho ne is connected to any
network where a momentary pause is needed during dialing. Lift
Handset, dial any dig its required b efore the pa use, press
PAUSE, and dial remaining digits. Pause is also storable in a
memory.
MEMORY Keys
Many different numbers and codes can be stored via 10 Direct
Access One-Touch Memory Keys.To store, lift Handset, press
STORE to store a number in the Memory. Any memory can
store 32 digits.
ELECTRONIC VOLUME CONTROL Keys
For the adjustment of the receive volume of the HANDSET,
HEADSET (wired and wire less headsets) o r HANDSFREE
hearing level in 4 steps. Press the up and down arrow keys
(v- and v+) located in the centre of the memory card to adjust
the volume. A djusting these c ontrols does n ot affect your
outgoing voice level.
MUTE Key and Indicator
When pressed, it cu ts off tran smission from the han dset,
handsfree and headset microphones to allow user privacy. The
red light indicates when the mute condition is active. To release
the mute condition press MUTE again.
HEADSET MIC ADJUST CONTROL
To adjust the headset's microphone sensitivity. The control is
located on the underside of the telephone.
HANDSFREE / HEADSET Key and Indicator
(with auto-detection)
When the HANDSFREE/HEADSET key is pres sed a red
indicator will glow to indicate that the HANDSFREE mode or
HEADSET mode is activated and the unit is on line.
In IQ333EHS model, when the EHS control cable is connected
to unit, its HANDSFREE/HEADSET key function will be disabled
and controlled via the wireless headset.
HEADSET
MIC ADJUST
Figure 2 - Savi Office Connection Diagram for IQ333EHS
Figure 1 - Savi Office & Lifter Connection Diagram for IQ333 & IQ333D
H
ANDSFREE/
H
EADSET
MUTE
RED
IA
L/
P
A
USE
RECALL
Ringer Indicator
Flashes when the telephone rings with an incoming call.
Message Waiting Indicator
Illuminates when a message is waiting in your voicemail system
(depends on system compatibility). The built-in Message
Waiting function offers compatibility with various systems, while
other system types require optional extras to be fitted to the
IQ333 by Interquartz at time of order.
OLI & EHS Jacks
PMJ FIT
Figure 3
Ringer Volume Switch (Hi/Low/Off)
The three available positions allow selection of OFF (no sound),
LOW volume, and HIGH volume of the t elephone's ringing
sound during an incoming call.
Telephone
Network
Outlet
Plantronics Telephone
Interface Cable
Interquartz EHS Cable
IQ333EHS
Savi Office
(WO100, WO200 etc)
Interquartz
Line Cord
Interquartz Cable
Plantronics Cable
Plantronics
Base Power Supply
Mains
Power
Outlet
OLI
Set Headset Polarity Switch to "P"
Step 1
Set Configuration Switch to "A"
Step 3
HEADSET
MIC ADJUST
Step 2
Set Headset Mic Adjust Control
fully clockwise to Recommended
Setting Position as shown
Set Desk Phone Speaking Volume
to "1" and Desk Phone Listening
Volume to "3"
Step 4
Telephone
Network
Outlet
IQ333
Savi Office
(WO100, WO200, W7 Series)
Interquartz
Line Cord
Interquartz Cable
Plantronics Cable
Plantronics
Base Power Supply
Mains
Power
Outlet
OLI
Set Headset Polarity Switch to "P"
Step 1
Set Configuration Switch to "A"
Step 3
HEADSET
MIC ADJUST
Step 2
Set Headset Mic Adjust Control
fully clockwise to Recommended
Setting Position as shown
Set Desk Phone Speaking Volume
to "1" and Desk Phone Listening
Volume to "3"
Step 4
Plantronics Telephone
Interface Cable
Plantronics
Lifter Power Cord
Interquartz
Handset Cord
H
L
10
Lifter
 Loading...