

Interquartz E2, E3 User Manual

1
CONTENTS
FEATURES........................................................................................................... 4
IMPORTANT NOTES............................................................................................ 5
SETTING UP......................................................................................................... 6
Unpacking
Installation
Programming the Clock
Line Connection
TECHNICAL ADJUSTMENTS - FOR CORRECT OPERATION........................... 8
PBX Recall Button Settings
Location
Wall Mounting
Wall-mount bracket ( Optional not included with phone )
GENERAL CONTROLS AND INDICATORS........................................................13
Handsfree Button ( E3 only )
On Hook Dial Button ( E2 only )
Mute Button
Store Button
Redial Button
Clock/Time and Start/Stop Buttons
Ringer Indicator
Ringer Volume Switch
Ringer Pitch Control
Tone / Pulse Switch
Hang-up Function
Alpha-Numeric Keypad
SPECIAL FUNCTIONS .........................................................................................16
PBX Recall Button
Mute Button
Tone/Pulse Switch
Memories
Saving the Last Number
3C583011-XA03B Size : 204 mm (H) x 157 mm (W) A583-67.PM5 Page 11 / 40 Sheets
A583-67.pm6 4/9/99, AM 10:111

32
GENERAL CARE AND MAINTENANCE..............................................................34
Cleaning
Failure to Operate and Service Difficulties
THUNDERSTORMS.............................................................................................. 35
WARRANTY .........................................................................................................36
SERVICE CENTRES.............................................................................................36
GLOSSARY ..........................................................................................................37
Speed - dialling
Storage Procedure
Preservation of memory contents
Cascadable Memories
Tone Button
Backspace Button ( < )
Pause Button & Automatic Pause Insertion
EEprom Memory Feature
E3/E2 QUICK REFERENCE GUIDE.....................................................................18
OPERATION-OUTGOING CALL..........................................................................27
Handset Operation
Handsfree and On Hook Dial Operation
Preview Dialling
Redial Button
Using A Memory
OPERATION-INCOMING CALL ........................................................................... 29
Handset Operation
Handsfree Operation ( E3 Only )
HANDSFREE FEATURE OPERATION ................................................................30
Volume Slider
Handsfree Microphone
Handsfree Button and Indicator
Hints for Handsfree Operation
EASYCALL AND CUSTOMNET USAGE ............................................................. 32
Making Outgoing Calls
Holding and Transferring Calls
* And # Buttons
Using the Memories
Compatibility Adjustments
Easycall and Customnet
Special Codes
A583-67.pm6 4/9/99, AM 10:112-3
54
IMPORTANT NOTES
This Interquartz telephone has been manufactured to very high standards and is
very easy to use. Please read this manual carefully to find out how to use the
features.
Conditions of Use
This Interquartz telephone is approved for use on private branch exchange
extensions, business or private direct exchange lines. The Austel approval
label is located on the telephone.
The Austel permit no. for these products are A93/34M/0470 (E2)
A93/30C/0471 (E3)
The REN number of these telephones is 1.0.
If you wish to connect any other equipment to the line, add the REN
numbers of each piece together and ensure that the total does not exceed 3.
If too many phones are connected to the line, the circuit may be overloaded
and your telephone may not ring.
Not all telephone devices have the same REN.
Emergency Calls
"000" calls can be made on this telephone, for the purpose of making calls to
the emergency service. An access code may also be required before
dialling the emergency number, if the phone is connected to a PABX.
FEATURES
* Alpha-numeric Keypad
* Large 16 digit LCD Display
* 10 one-touch repertory dialling memories
* 5 one-touch/two-touch repertory dialling memories
* Last number redialling
* Direct Redial feature allows the re-try of a busy number
* On Hook dialling operation (E2) or Handsfree operation (E3) with speaker
volume control
* Mute Function
* Back Space Editing for stored telephone number
* Storable Time-Break Recall or Manual Earth Recall
* User Selectable four PBX Time-Break Recall Timings
* Manual and storable access pause
* Automatic insertion of pause for PBX trunk access
* Call progress monitoring (On-Hook Dialling) with automatic 60s time-out with
off-line warning beep for automatic termination of unanswered call
* Storable On Hook, Off Hook & On Hook Dial Function
* Ringer indicator & Ringer Hi/Lo/Off volume control
* Ringer pitch control
* User programmable 12/24 hour real-time clock display
* " Timer " function provided for call duration indication
* Manual Earth Recall
* Special pre-programming service available to provide pre-determined memory
contents. Impossible to accidentally erase.
* Preview dialling option.
A583-67.pm6 4/9/99, AM 10:114-5

76
7. if you decide to cancel the pause function described in item 6 above,
repeat step 6 but skip step b.
7. press CLOCK / TIMER,
a "beep" tells you the new time will be displayed,
a "boop" tells you the
old time will be displayed - there was an error in your
procedure, please try again.
LINE CONNECTION
This telephone is supplied with a "Telecom-style " plug Type 603 for
connection to the network via a complementary Type 610 socket (not
supplied ). Pins 2 and 6 comprise the speech and dialling pair, with pin 1
being reserved for earth recall where required. The type 603 plug can be
removed to utilise the RJ45 plug also provided. Other types of plugs and
cords are available on request.
5. if PM, enter 1,
6. if you prefer 24-hour mode, enter 2,
PROGRAMMING THE CLOCK
Example: 5:09
1. press STORE,
2. enter the hour, eg. 5,
3. enter the minutes (must be two digits), eg. 09,
4. if AM, enter 0,
SETTING UP
UNPACKING
The carton contains the following :
* telephone body and handpiece,
* coiled cord and line cord,
* operating manual,
* batteries ( 2 for E2, 4 for E3 ).
INSTALLATION
This telephone is designed to plug into the telephone socket using the line
cord provided. Other types of line cords and plugs are available on request.
Please follow the steps below.
1. connect the handset cord and line cord to the appropriate Modular Jacks
(see Fig. 5).
2. fit the batteries to the BATTERY COMPARTMENT. Locate the battery
compartment on the base of the telephone, marked "WARNING: unplug the
connection to the network before opening this cover". You will need to insert
a small pointed tool in the hole next to the compartment. Press down and
slide the cover open. Insert the AA batteries, making sure that they are the
correct way round. Expose and press the RESET button (See Fig. 8)
3. set the PULSE/TONE, RINGER VOLUME, SPEAKER VOLUME to their
correct settings to suit your application,
4. set the hidden switches located under the lower memory index card and in
the switch compartment on the phone's underside to suit your application
(consult INTERQUARTZ for the proper settings), see later in this section
for details of the settings available.
5. connect the LINE CORD to your phone system's socket or outlet,
6. if your telephone system requires a pause after the first digit while an
outside line is selected for you, use the following sequence so that the
telephone will remember to insert the pause for you;
a. press STORE,
b. press the digit you normally dial for the outside line (usually 0),
c. press STORE again,
d. press * (star)
a "beep" tells you the number will be stored,
a "boop" tells you the number
won't be stored - there was an error in your
procedure, please try again,
A583-67.pm6 4/9/99, AM 10:116-7
98
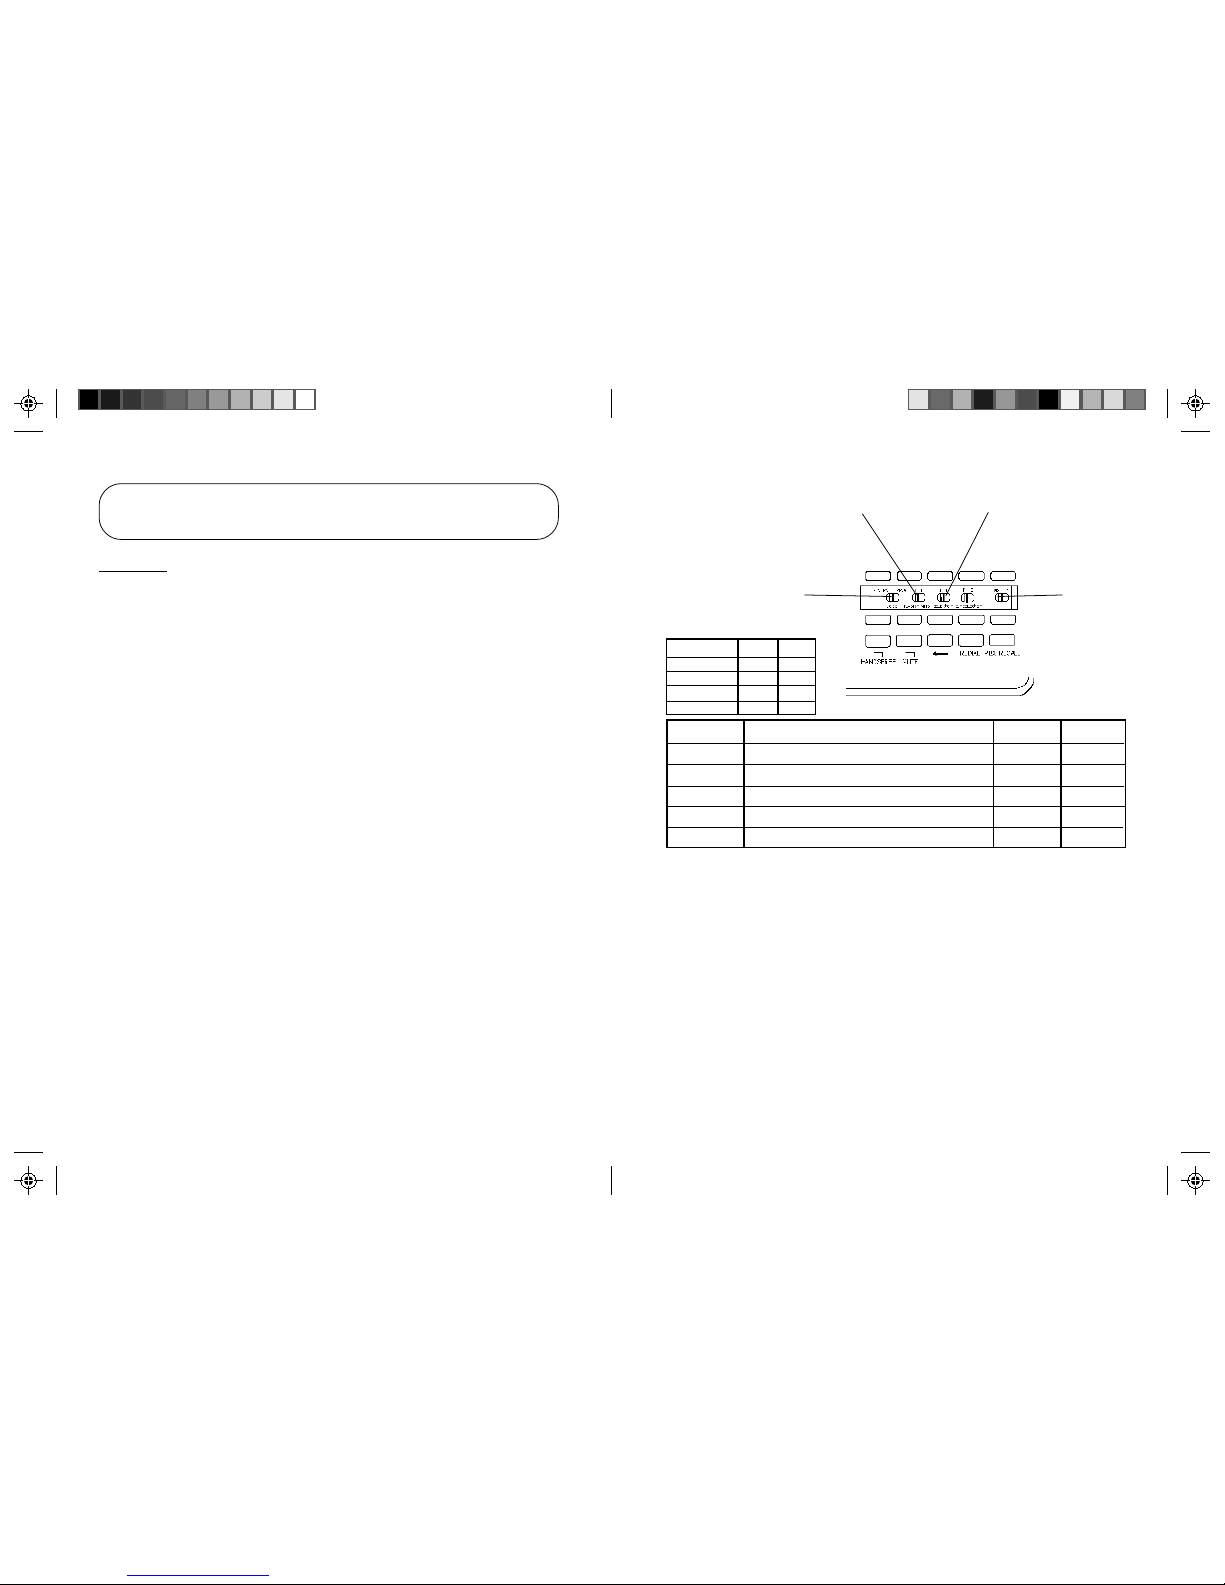
TABLE 1 TIMED
BREAK OPTIONS
SWITCH A
100MS
200MS
350MS
700MS
LEFT
LEFT
RIGHT
TABLE 2
SWITCHES
LEFT
RIGHT
LEFT
RIGHT
RIGHT
SWITCH B
DESCRIPTION
RIGHT
LEFT
LCD PROMPT
F/E SELECT
TIMING
SWITCH B
TIMING
SWITCH A
GENERAL/
EEPROM
ENABLES/DISABLES THE LCD PROMPTS-SEE TOP OF THIS
PAGE FOR LOCATION OF PROMPTS
SELECTS FLASH OR EARTH RECALL MODE OF PBX RECALL
TIMED BREAK TIMING SELECTION
TIMED BREAK TIMING SELECTION
GENERAL
SEE TABLE 1
SEE TABLE 1
DISABLE
FLASH
EEPROM
SEE TABLE 1
SEE TABLE 1
EARTH
ENABLE
SELECTS WHETHER THE EEPROM CONTROLS THE TOP 5
MEMORY BUTTONS OR NOT
SELECTS EEPROM
MODE IF REQUIRED
FLASH TIMING
SELECTORS SWITCH A (SEE TABLE 1)
FLASH TIMING
SELECTORS SWITCH B (SEE TABLE 1)
TECHNICAL ADJUSTMENTS - FOR CORRECT
OPERATION
CAUTION : Please exercise care when adjusting all selectors described, as they and
their surrounding electronic components may be damaged by rough treatment. It is also
recommended that all adjustments be made with the telephone disconnected from the line.
PBX RECALL BUTTON SETTINGS
To achieve compatibility with all systems, the PBX RECALL button may be
selected to execute either Earth Recall or Timed Break ( Hook Flash ) by
switches on the telephone's underside.
1. Determine the setting required for your system.
2. Set HF/E switch as required.
3. If HF is selected set the HF TIME switch to suit your system (if in doubt,
contact your systems supplier).
The telephone, unless pre-set by your dealer, will be factory-set on HF and 100ms.
A583-67.pm6 4/9/99, AM 10:118-9
1110
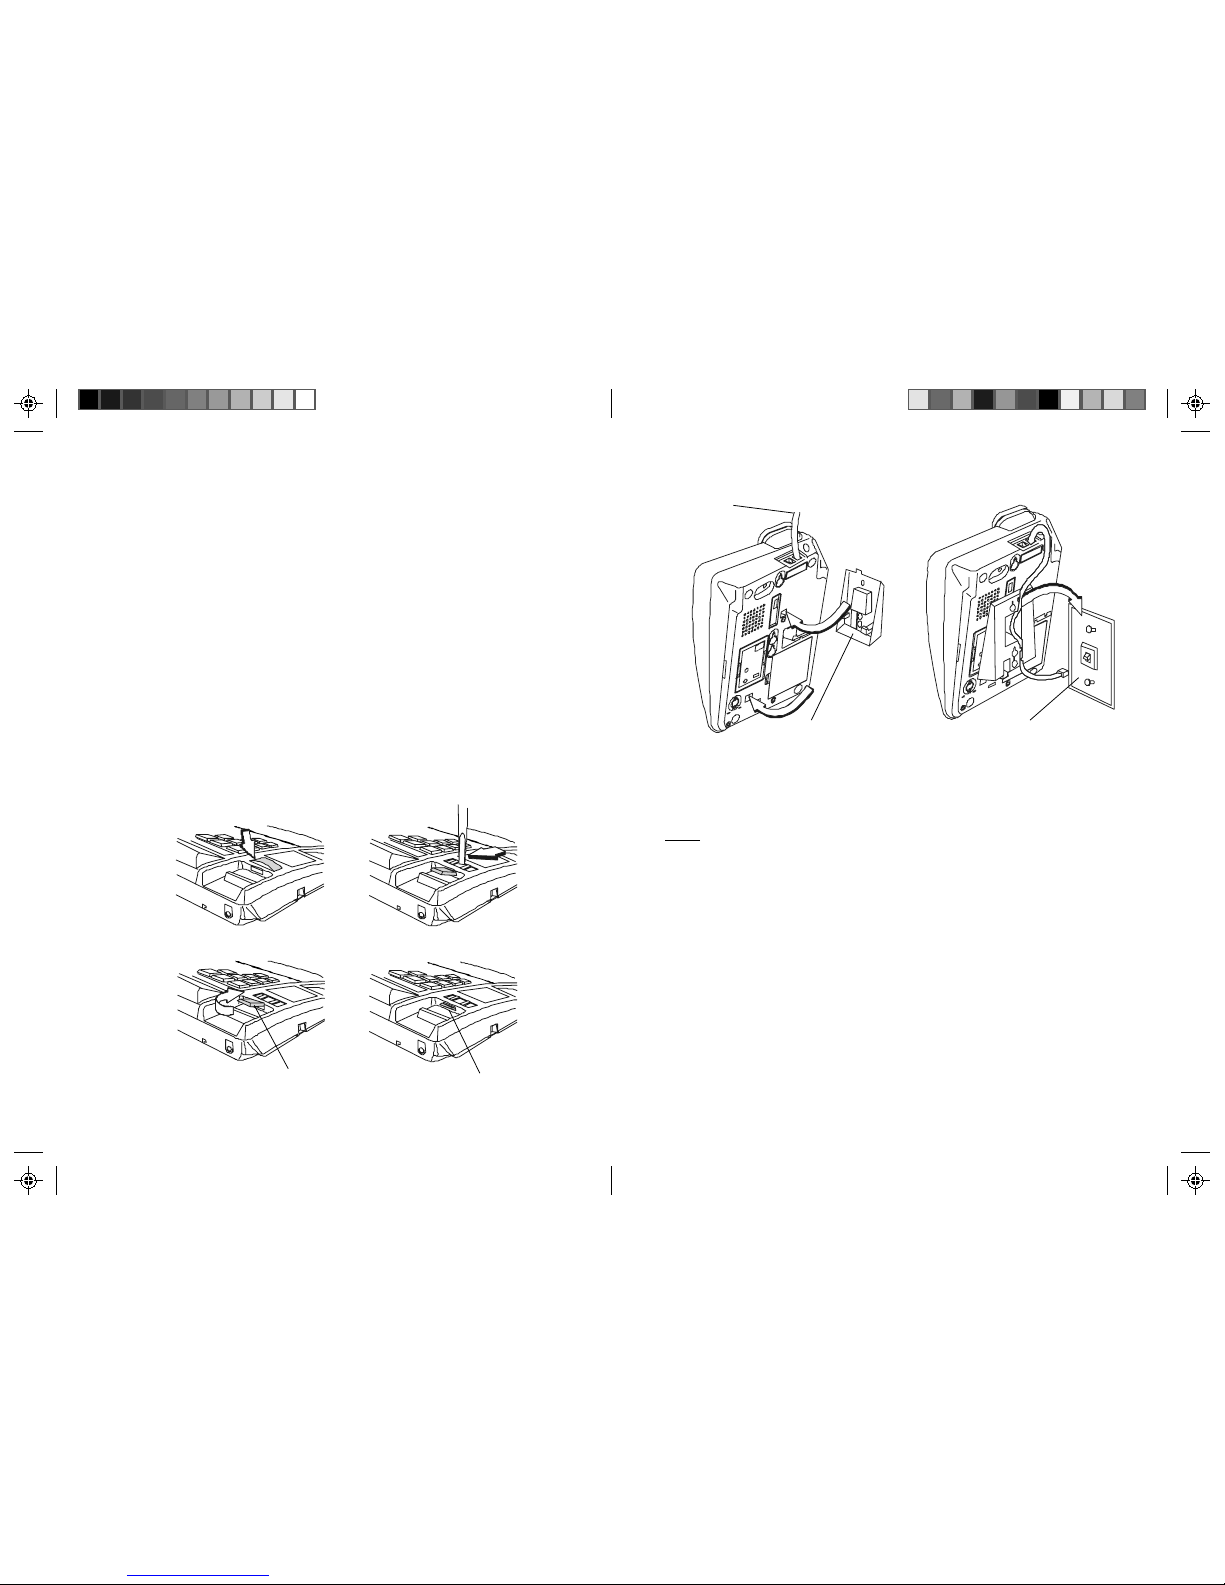
WALL-MOUNT BRACKET (Optional not included with phone)
NOTE : The WALL MOUNT BRACKET and MODULAR WALL JACK illustrated are
available from your authorised Interquartz dealer.
FIGURE 3
TELEPHONE
LINE CORD
WALL MOUNT BRACKET
(OPTIONAL, NOT SUPPLIED)
MODEL IQ 235
LOCATION
The telephone should be placed on a desk, table or shelf where it is not likely to
be pushed off. If the unit is to be wall-mounted, it should be seated securely on
the WALL MOUNTING BRACKET. Avoid excessive heat, damp, dust, direct
sunlight, vibration, and other appliances or devices which may transmit or emit
electrical or electromagnetic radio frequency noise or signals (e.g. computers,
welders, pagers).
WALL MOUNTING
1. Fit the optional WALL MOUNT BRACKET (optional, not supplied) to the wall
and attach the WALL MOUNT BRACKET to the underside of telephone,
2. To enable the HANDSET to be supported in the cradle, follow the procedure
shown in Figure 2 to reverse the HANDSET RETAINER.
1. Release
Phone number Plate
HANDSET
RETAINER
2. Insert Screw Driver into
slot and then pry to
release HANDSET RETAINER
4. HANDSET RETAINER
3. Insert the HANDSET
RETAINER for wall
mount
FIGURE 2
WALL MOUNT BRACKET
(OPTIONAL, NOT SUPPLIED)
MODEL IQ 235
A583-67.pm6 4/9/99, AM 10:1110-11
 Loading...