

Page 1
User manual
Page 2

SUMMARY
7. MESH INTERCOM 10
1. ABOUT 4
1.1 Product details .................................................................................4
1.2 Package contents ............................................................................4
2. HOW TO INSTALL 5
2.1 Install main unit ............................................................................... 5
3. GETTING STARTED 6
4. PAIRING WITH OTHER BLUETOOTH
®
DEVICES 6
4.1 Pairing with Mobile phone / TFT systems ......................................... 6
4.2 Second mobile phone pairing ......................................................... 7
4.3 GPS Pairing .................................................................................... 7
4.4 Advanced Selective Pairing: Hands-Free or A2DP Stereo .................. 8
4.4.1 Phone Selective Pairing - Hands-Free Prole ......................................8
4.4.2 Media Selective Pairing - A2DP Prole ..............................................8
7.1 What is Mesh Intercom? ................................................................. 10
7.2 OPEN MESH mode ........................................................................ 10
7.3 Start mesh intercom in OPEN MESH mode ....................................... 11
7.3.1 OPEN MESH channel selection ........................................................... 11
7.4 Group Mesh (only available if “Advanced Features”
is activated on the APP) ................................................................. 11
7.4.1 Creating a group “Group Mesh” .......................................................... 11
7.5 Reset Mesh (only available if “Advanced Features”
is activated on the APP) .................................................................12
7.6 Toggle Open Mesh / Group Mesh modes .........................................12
7.7 Enable / disable microphone ...........................................................12
®
8. BLUETOOTH
INTERCOM 13
8.1 Intercom pairing .............................................................................13
8.2 Two-way Intercom Conversation ....................................................14
5. MOBILE PHONE USAGE 8
5.1 Making and Answering Calls ............................................................8
5.2 Siri and Google Assistant ................................................................. 8
5.3 Speed Dialing ................................................................................. 8
5.3.1 Using preset speed dial numbers .........................................................8
6. MUSIC 9
6.1 Playing Music with Bluetooth
®
Devices .............................................9
6.2 Music sharing .................................................................................9
6.2.1 Bluetooth® Intercom Music Sharing ....................................................9
2
6.2.2 Mesh Intercom Music Sharing ............................................................ 9
8.3 Multi-user Intercom Conference .....................................................14
8.3.1 Starting a Three-way Intercom Conference .......................................14
8.3.2 Starting a four-way intercom conference ..........................................15
8.3.3 Stop Multi-user Intercom ...................................................................15
8.4 Three-Way Conference Phone Call with Intercom Users ..................15
8.5 Group Intercom .............................................................................16
8.6 Mesh Intercom Conference with Bluetooth
®
Intercom Participant ....16
8.7 Old Interphone Series ..................................................................... 17
8.8 Anycom .........................................................................................17
8.9 Mesh Intercom with Anycom ..........................................................17
Page 3

9. FM RADIO 18
12.2.13 Smart Volume Control (Default: Disable) .......................................22
9.1 FM Radio features ...........................................................................18
9.2. Radio Stations memory .................................................................18
9.3 Region Selection ............................................................................18
9.4 Storing temporary stations (with "Advanced Features"
activated by APP or Device Manager) .............................................18
10. VOICE COMMANDS 19
11. FUNCTION PRIORITY AND FIRMWARE UPGRADES 20
11.1 Function Priority ...........................................................................20
11.2 Firmware Upgrades ...................................................................... 20
12. CONFIGURATION SETTING 20
12.1 Headset Conguration Setting ...................................................... 20
12.1.1 Delete all pairings ..............................................................................20
12.2 Device settings ............................................................................. 21
12.2.1 Speed dial ..........................................................................................21
12.2.14 Sidetone (Default: Disable) ............................................................. 22
12.2.15 Voice Prompt (Default: Enable) ....................................................... 22
12.2.16 RDS AF Setting (Default: Disable) ..................................................22
12.2.17 FM Station Guide (Default: Enable) ................................................22
12.2.18 Advanced Noise Control™ (Default: Enable) .................................22
13. TROUBLESHOOTING 23
13.1 Fault reset .................................................................................... 23
13.2 Factory reset ....................................................................................... 23
12.2.2 Channel Setting (Default: channel 1) .................................................21
12.2.3 Unit Language ...................................................................................21
12.2.4 Audio Equalizer (Default: O) ...........................................................21
12.2.5 VOX Phone (Default: Enable) ............................................................21
12.2.6 VOX Intercom (Default: Disable) .......................................................21
12.2.7 VOX Sensitivity (Default: 3) ...............................................................21
12.2.8 Bluetooth
®
Intercom Audio Multitasking (Default: Disabled) ...........21
12.2.9 Intercom-Audio Overlay Sensitivity (Default: 3) .............................. 22
12.2.10 Audio Overlay Volume Management (Default: Disable) ................22
12.2.11 HD Intercom (Default: Enable) .........................................................22
12.2.12 HD Voice (Default: Enable) ............................................................. 22
3
Page 4
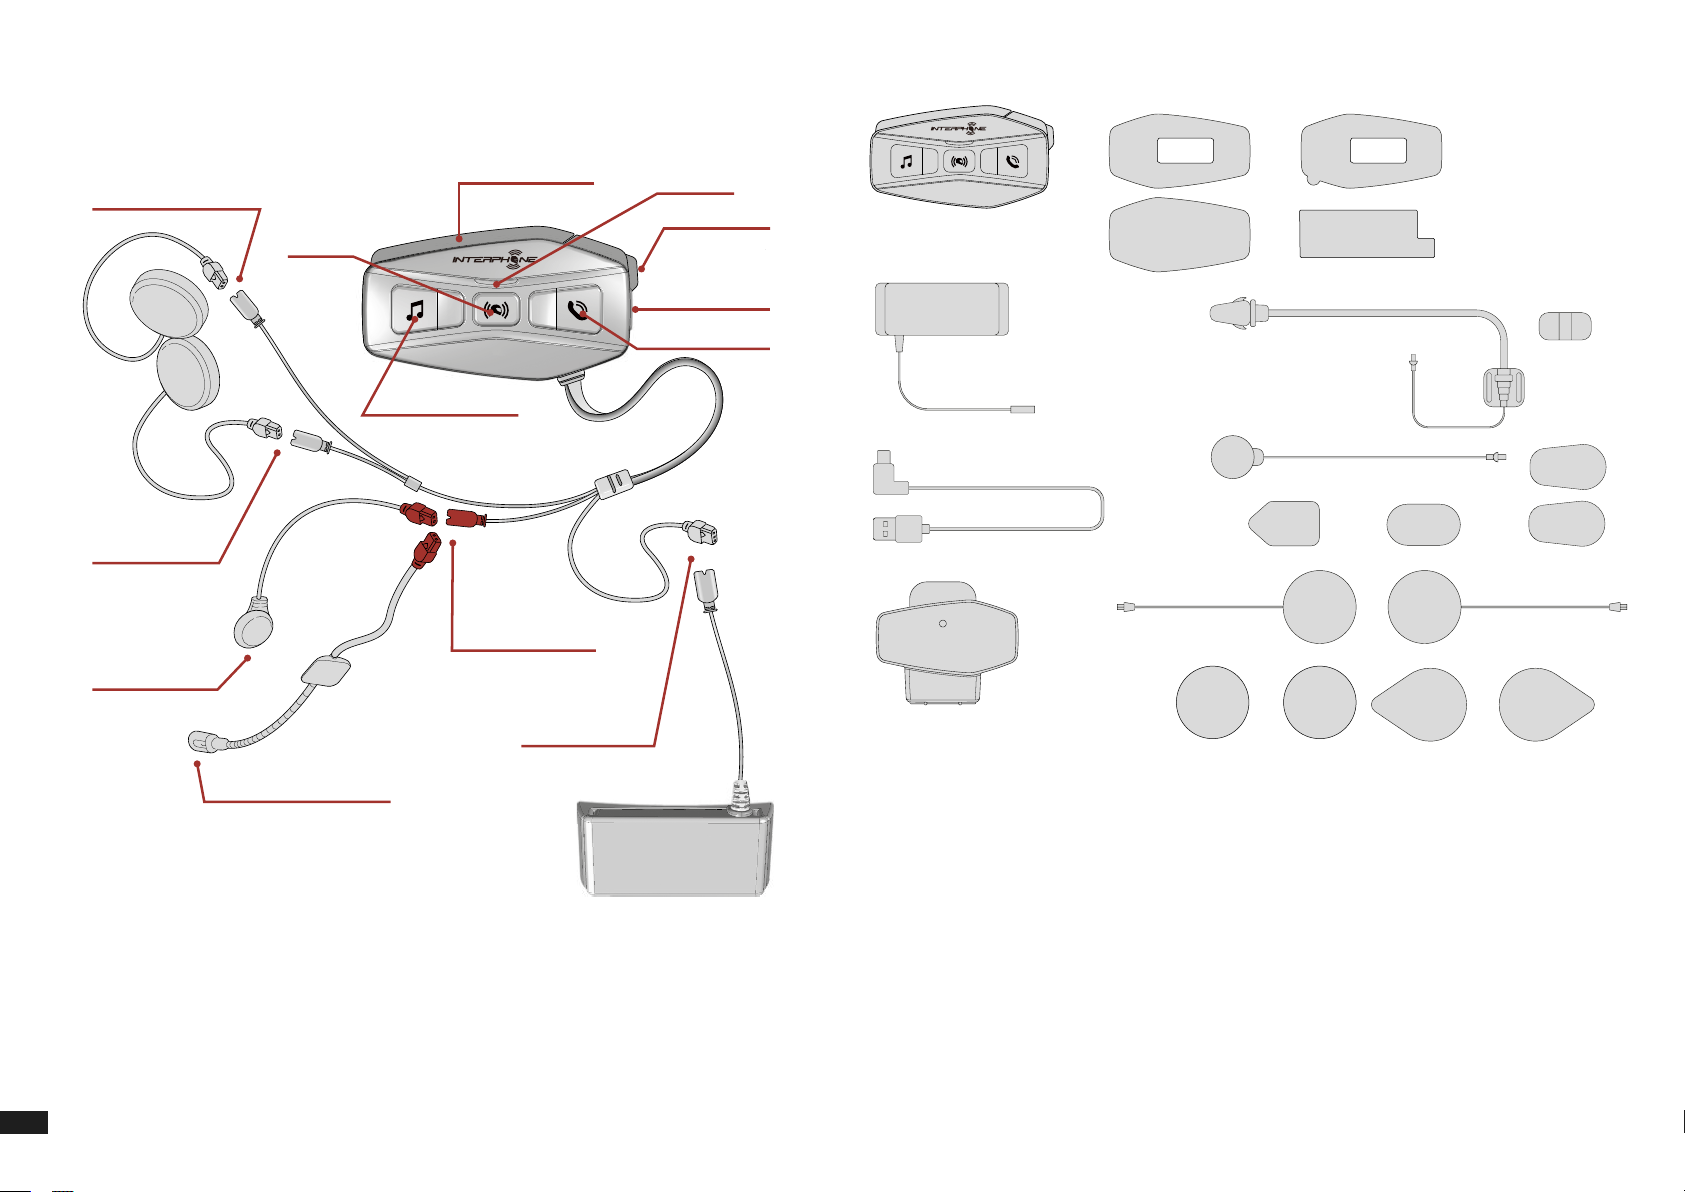
1. ABOUT
1.1 Product details
1.2 Package contents
Right speaker
2 way connector
Left speaker
2 way connector
Wired microphone
for fullface helmet
Intercom
Intercom antenna
Music & Volume +
2 way connector
Microphone
Battery 3 way
connector
Status led
Intercom MESH
DC Power
Charging &
Firmware Upgrade
Phone & Volume –
Por t
A E F
B
H
I
C
L M
O
D
P
G
R
N
Q
Boom microphone for
ip-up & jet helmet
A) Main unit
B) Battery with bracket
C) Data/charge cable usb type C
D) Main unit bracket
E) Main unit Velcro
F) Main unit adhesive
G) Battery bracket adhesive
H) Boom microphone
I) Wired microphone
L) Boom microphone Velcro
M) Wired microphone Velcro a
N) Boom microphone foam cover
O) Speakers
P) Spacers for speakers
Q) Speakers Velcro
4
R) Boom microphone holder
Page 5
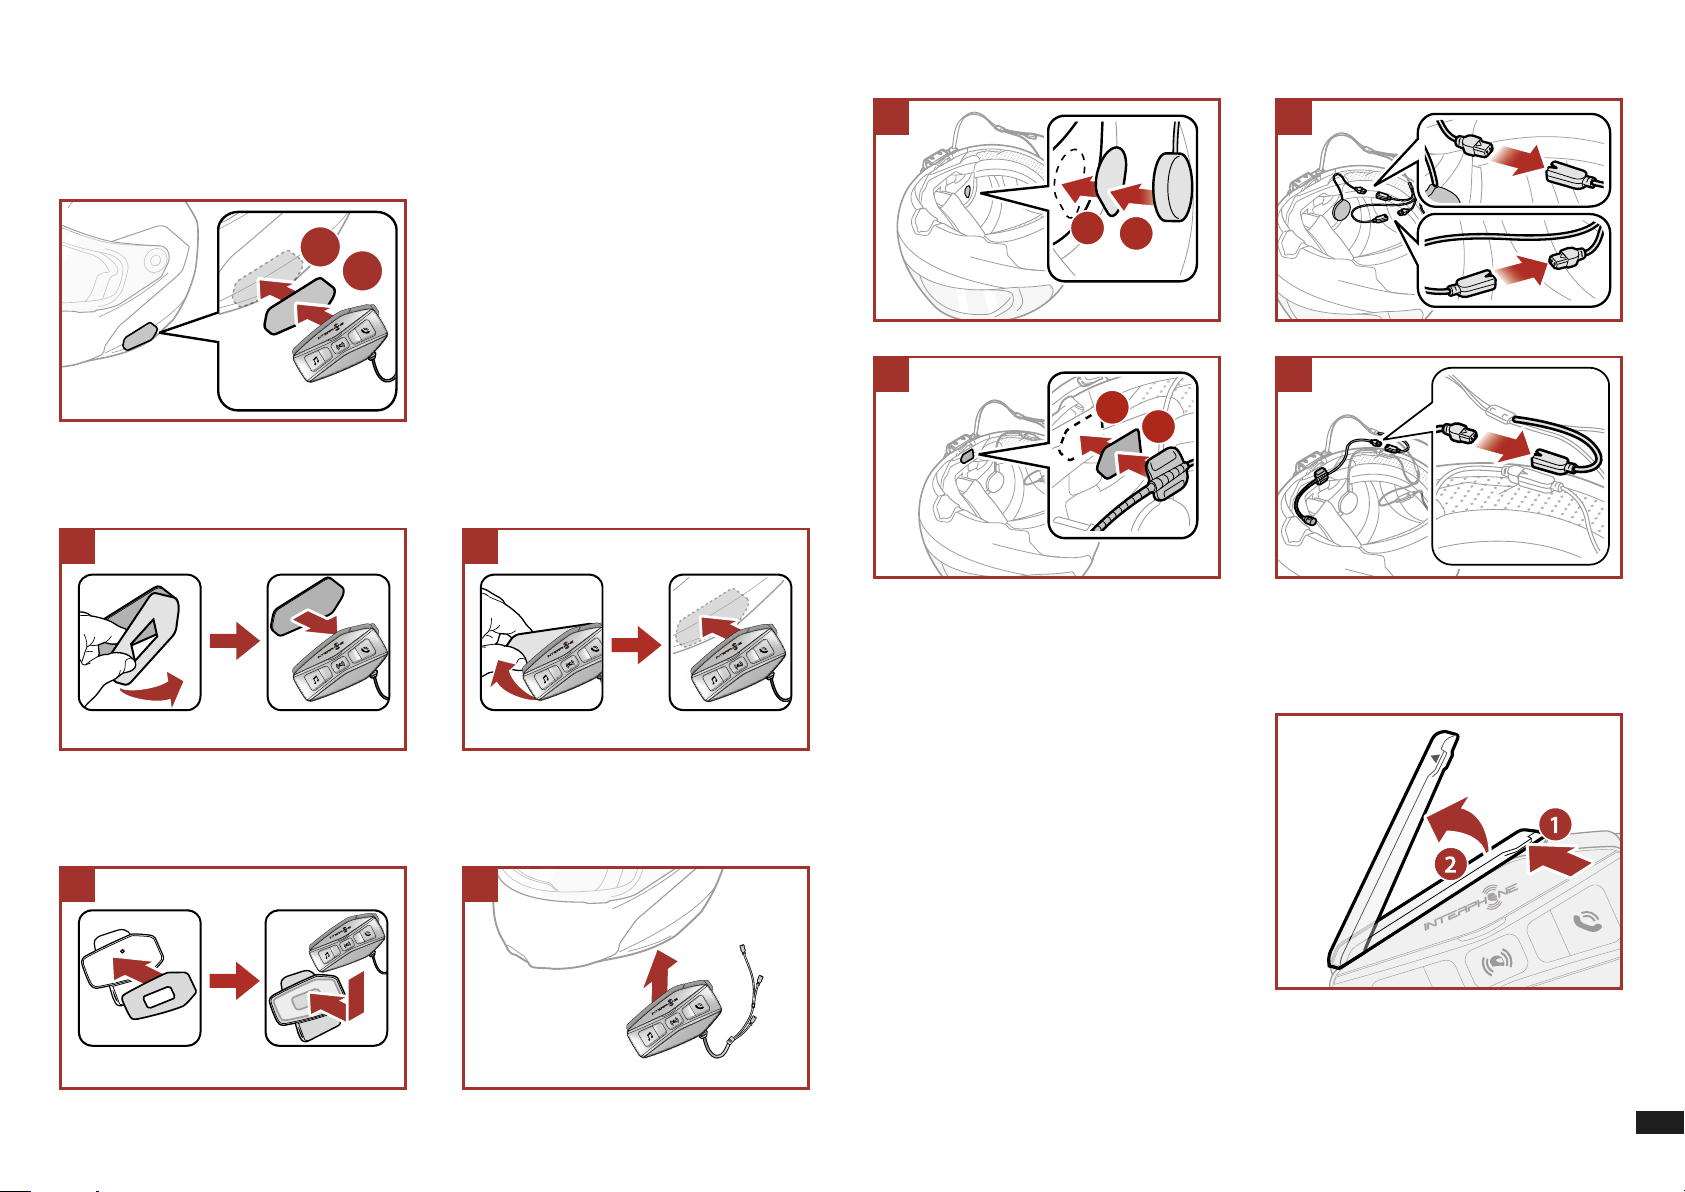
2. HOW TO INSTALL
1
2
Installing the speakers and the microphone
2.1 Install main unit
Using the hook and loop fasteners for main unit
Using the double sided adhesive tapes for main unit
1
2
1
1
2
3
1
2
2
4
Using the clamp for main unit
1
Mesh Intercom Antenna
Pull the mesh intercom antenna
inwards slightly to unfold it.
2
5
Page 6
3. GETTING STARTED
UCOM16
Bluetooth
UCOM16
Bluetooth
UCOM16
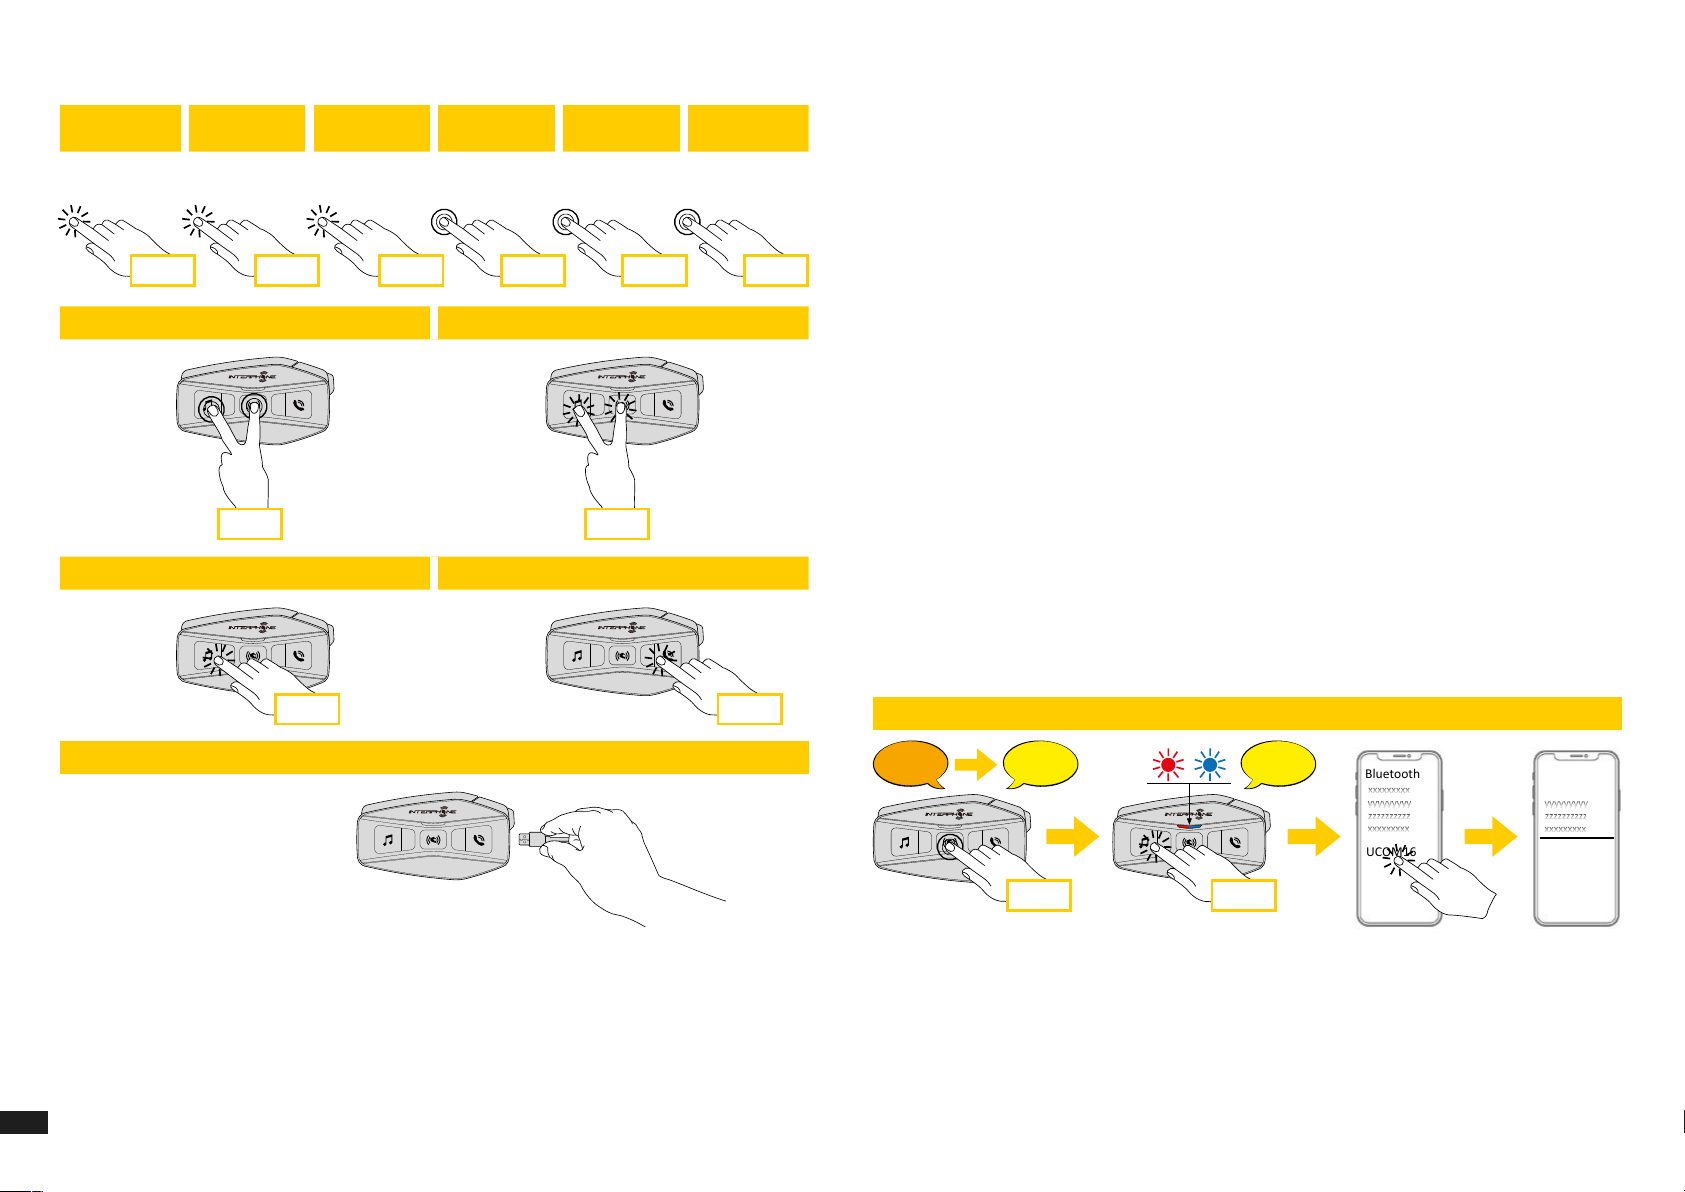
4. PAIRING WITH OTHER BLUETOOTH® DEVICES
Press once Press twice
x 1 x 2 x 3
Power on Power o
1 sec
Volume increase Volume decrease
Press three
times
Press and hold
for 1 sec
1 sec 5 sec 10 sec
Press and hold
for 5 sec
x 1
Press and hold
for 10 sec
When using the headset with other Bluetooth® devices for the rst time, they
will need to be “paired.” This enables them to recognize and communicate
with one another whenever they are within range.
U-COM 16 can be paired to max 3 U-COM units.
U-COM 16 can be paired to Bluetooth
®
devices such as mobile phones, GPS
Satnav and TFT motorcycle multimedia systems.
4.1 Pairing with Mobile phone / TFT systems
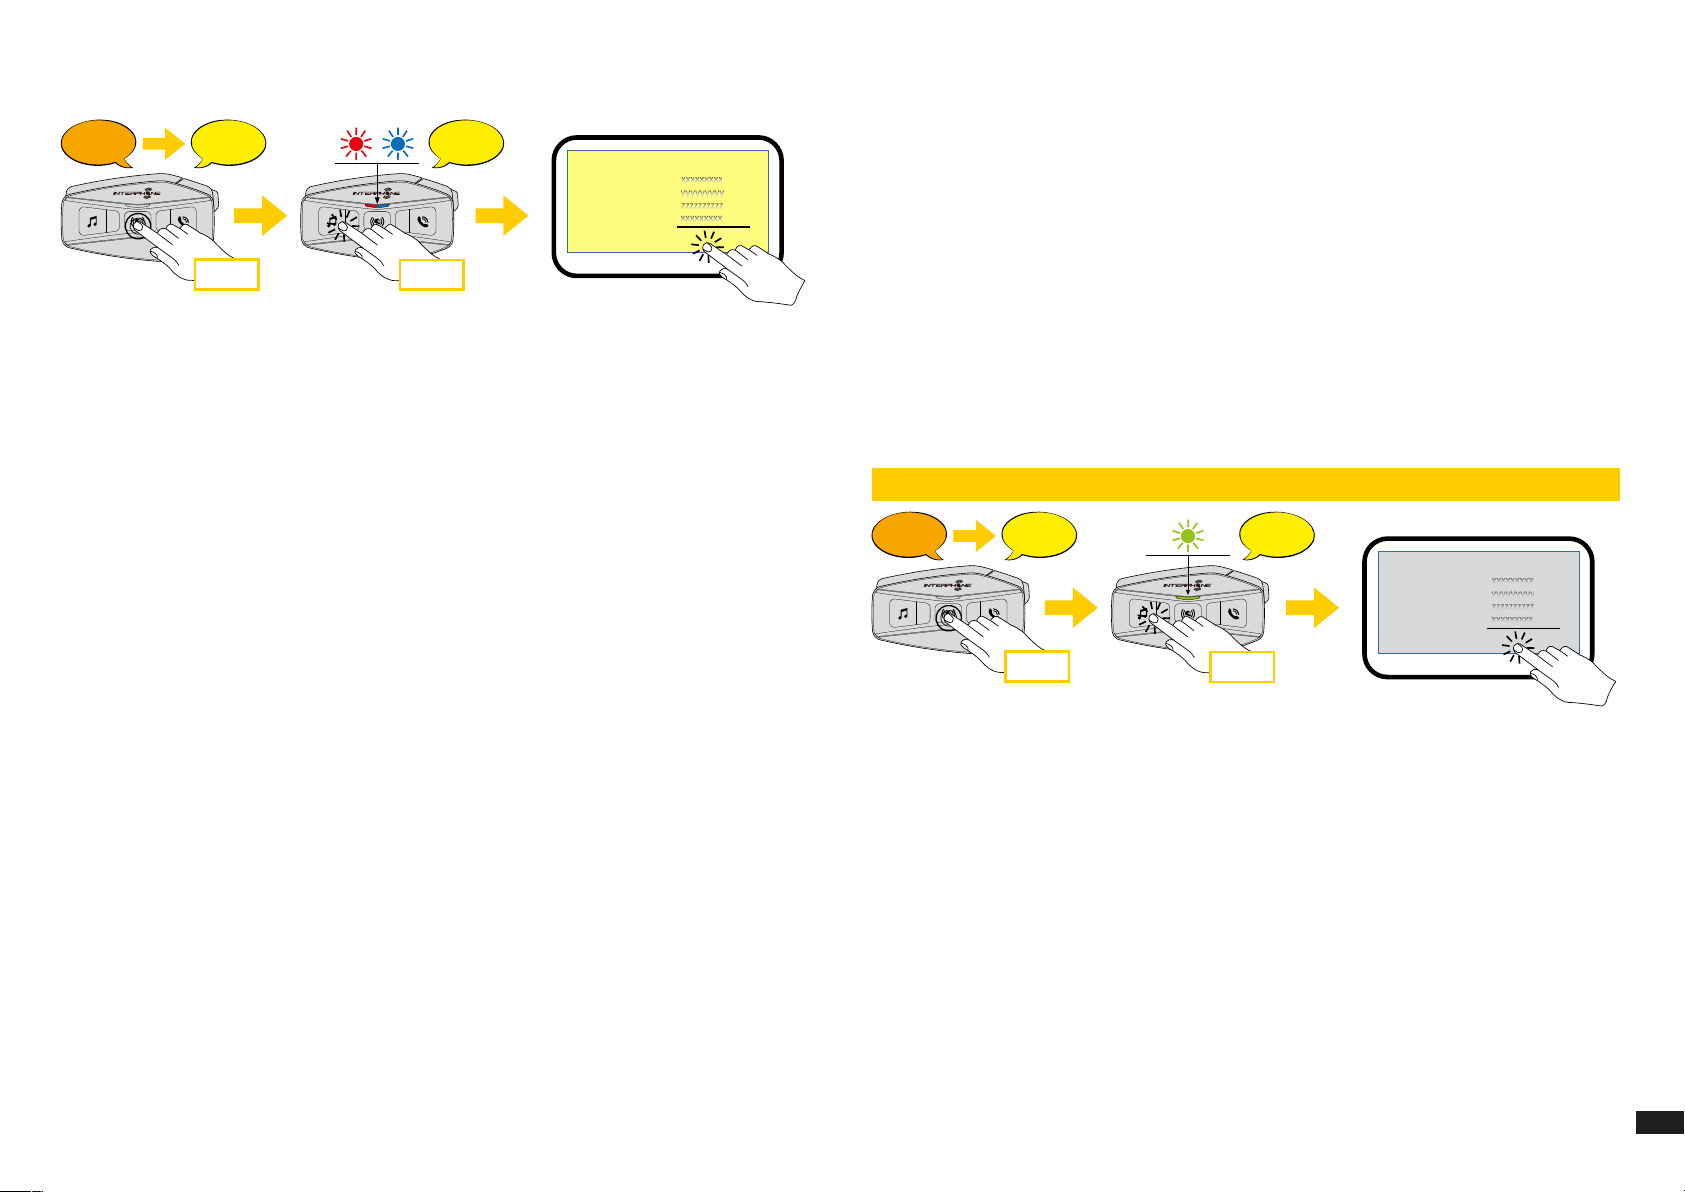
1. Switch on Bluetooth® service on your phone (check device manual for
more details).
2. With U-COM 16 on, press and hold central button for 10 seconds, to enter
settings menu. Don’t release the button until the led light is blue.
3. Press once MUSIC button to start phone pairing mode.
4. On your phone search for new Bluetooth
5. In few moments the phone will list “U-COM 16 vx.x” among available
devices to pair. Select this item.
6. If prompted for a PIN or code, enter 0000 (four times zero ).
7. U-COM Voice guide will conrm the successful pairing.
8. If your smartphone asks for additional authorization please conrm.
®
devices.
x 1 x 1
Charging
Note:
• U-COM 16 use a fast charging technology, via USB-C connector. Charging
for 30 minutes will give 6h of intercom talking in Bluetooth
in Mesh mode.
®
mode or 3,5h
• Any USB charger with FCC, CE, IC or any local approval can be used.
• U-COM 16 is compatible only with USB device with 5V DC input.
6
Intercom
pairing
Con guration
menu
10 sec
Main phone pairing (to be done with unit on)
Phone
pairing
x 1
UCOM16
Page 7
Bluetooth
UCOM16
Bluetooth
UCOM16
GPS
UCOM16
UCOM16
UCOM16
Bluetooth
UCOM16
Bluetooth
UCOM16
TFT
UCOM16
Cascopilota
COLLEGAMENTI
TFT
UCOM16
Rider’shelmet
CONNECTIONS
Multimedia TFT system of motorcycle must be paired with “PHONE
PAIRING”:
Intercom
pairing
Con guration
menu
Phone
pairing
COLLEGAMENTI
CONNECTIONS
Cascopilota
Rider’shelmet
4.3 GPS Pairing
1. Switch on Bluetooth® service on your GPS (check device manual for more
details).
2. With U-COM 16 on, press and hold central button for 10 seconds, to enter
settings menu. Don’t release the button until the led light is blue.
UCOM16
10 sec
x 1
TFT
Note: There is an alternative way, to pair only the rst phone (main
telephone). With the control unit o, press and hold at the same time the
MUSIC key together with the CENTRAL key, until the red / blue LED ashes.
The primary phone will have priority over the second phone, in case of
simultaneous call reception on both phones.
4.2 Second mobile phone pairing
1. Switch on Bluetooth® service on your phone (check device manual for
more details).
2. With U-COM 16 on, press and hold central button for 10 seconds, to enter
settings menu. Don’t release the button until the led light is blue.
3. Press the MUSIC button twice to activate Second mobile phone pairing
mode.
4. Start the search for new Bluetooth
5. In few moments the phone will list “U-COM 16 vx.x” among available
devices to pair. Select this item.
6. If prompted for a PIN or code, enter 0000 (four times zero ).
®
devices on the mobile phone.
3. Press the MUSIC button 5 times to activate GPS pairing mode.
4. Start the search for new Bluetooth
5. In few moments the device will list “U-COM 16 vx.x” among available
®
devices on the GPS.
devices to pair. Select this item.
6. If prompted for a PIN or code, enter 0000 (four times zero).
7. UCOM Voice guide will conrm the successful pairing.
8. If your device asks for additional authorization please conrm.
Gps SATNAV & TFT pairing (to be done with unit on)
Intercom
pairing
Con guration
menu
10 sec
x 5
GPS pairing
Bluetooth
UCOM16
GPS
7. UCOM Voice guide will conrm the successful pairing.
8. If your smartphone asks for additional authorization please conrm.
7
Page 8
4.4 Advanced Selective Pairing: Hands-Free or A2DP Stereo
5.2 Siri and Google Assistant
Phone Pairing allows the headset to establish two Bluetooth® proles:
Hands-Free or A2DP Stereo. Advanced Selective Pairing allows the headset
to separate the proles to enable connection with two devices.
4.4.1 Phone Selective Pairing - Hands-Free Prole
Execute Phone Selective Pairing in the Conguration Menu.
4.4.2 Media Selective Pairing - A2DP Prole
Execute Media Selective Pairing in the Conguration Menu.
5. MOBILE PHONE USAGE
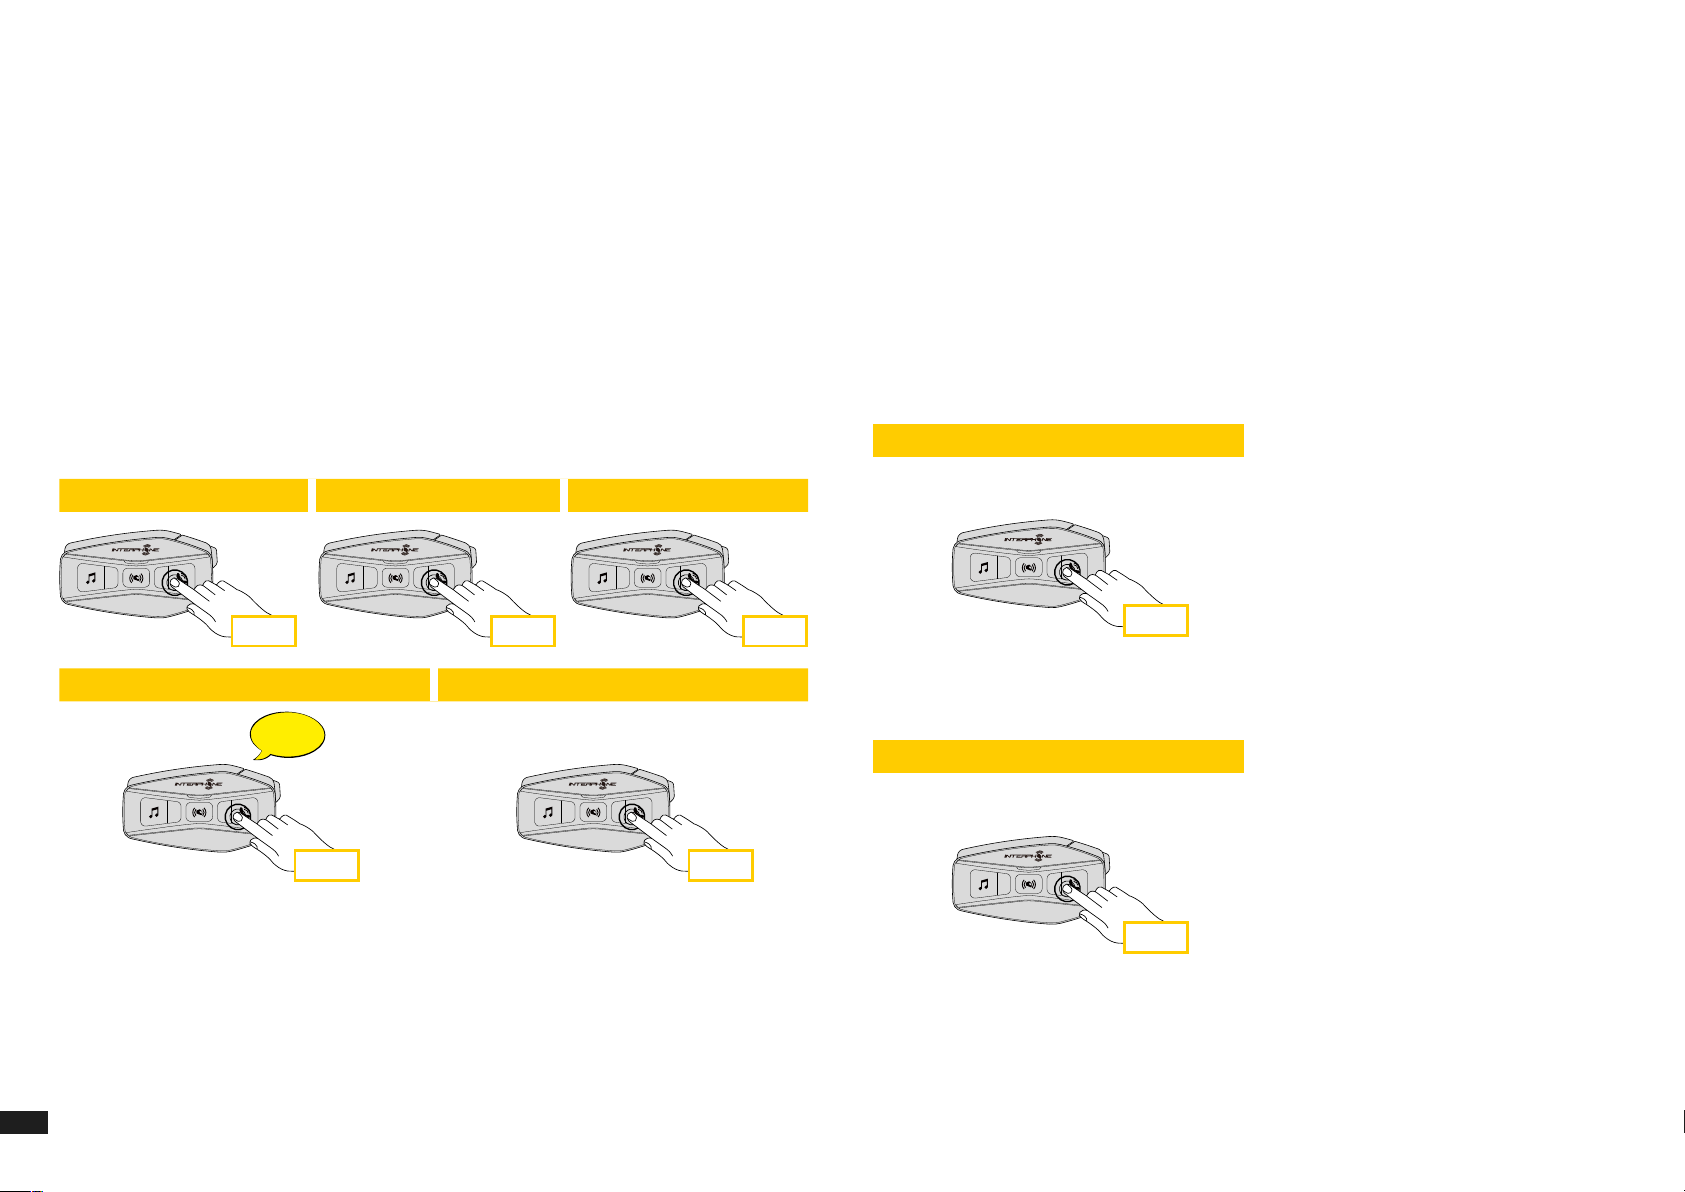
5.1 Making and Answering Calls
Incoming call answer End call Reject incoming call
1 sec 2 sec 2 sec
Phone assistant trigger Speed dial
Beep
Beep
U-COM 16 supports the Siri and Google Assistant access directly. You can
activate the Siri or Google Assistant using the voice through the headset’s
microphone, a wake word will be used. This is a word or groups of words
such as “Hey Siri“ or “Hey Google”.
5.3 Speed Dialing
It is possible to store up to 3 telephone numbers (if "advanced mode" is
active) to be used as speed dials. You can set the speed dial numbers via
UNITE APP or INTERPHONE Device Manager.
5.3.1 Using preset speed dial numbers
How to activate speed dial (with ADVANCED FEATURES o)
Speed dial
3 sec
How to activate speed dial (with ADVANCED FEATURES on)
1. Enter into the Speed Dial menu.
Speed dial
2 sec 3 sec
Note: If you have a GPS device connected, you will not hear its voice
navigations during a phone call.
8
3 sec
Page 9
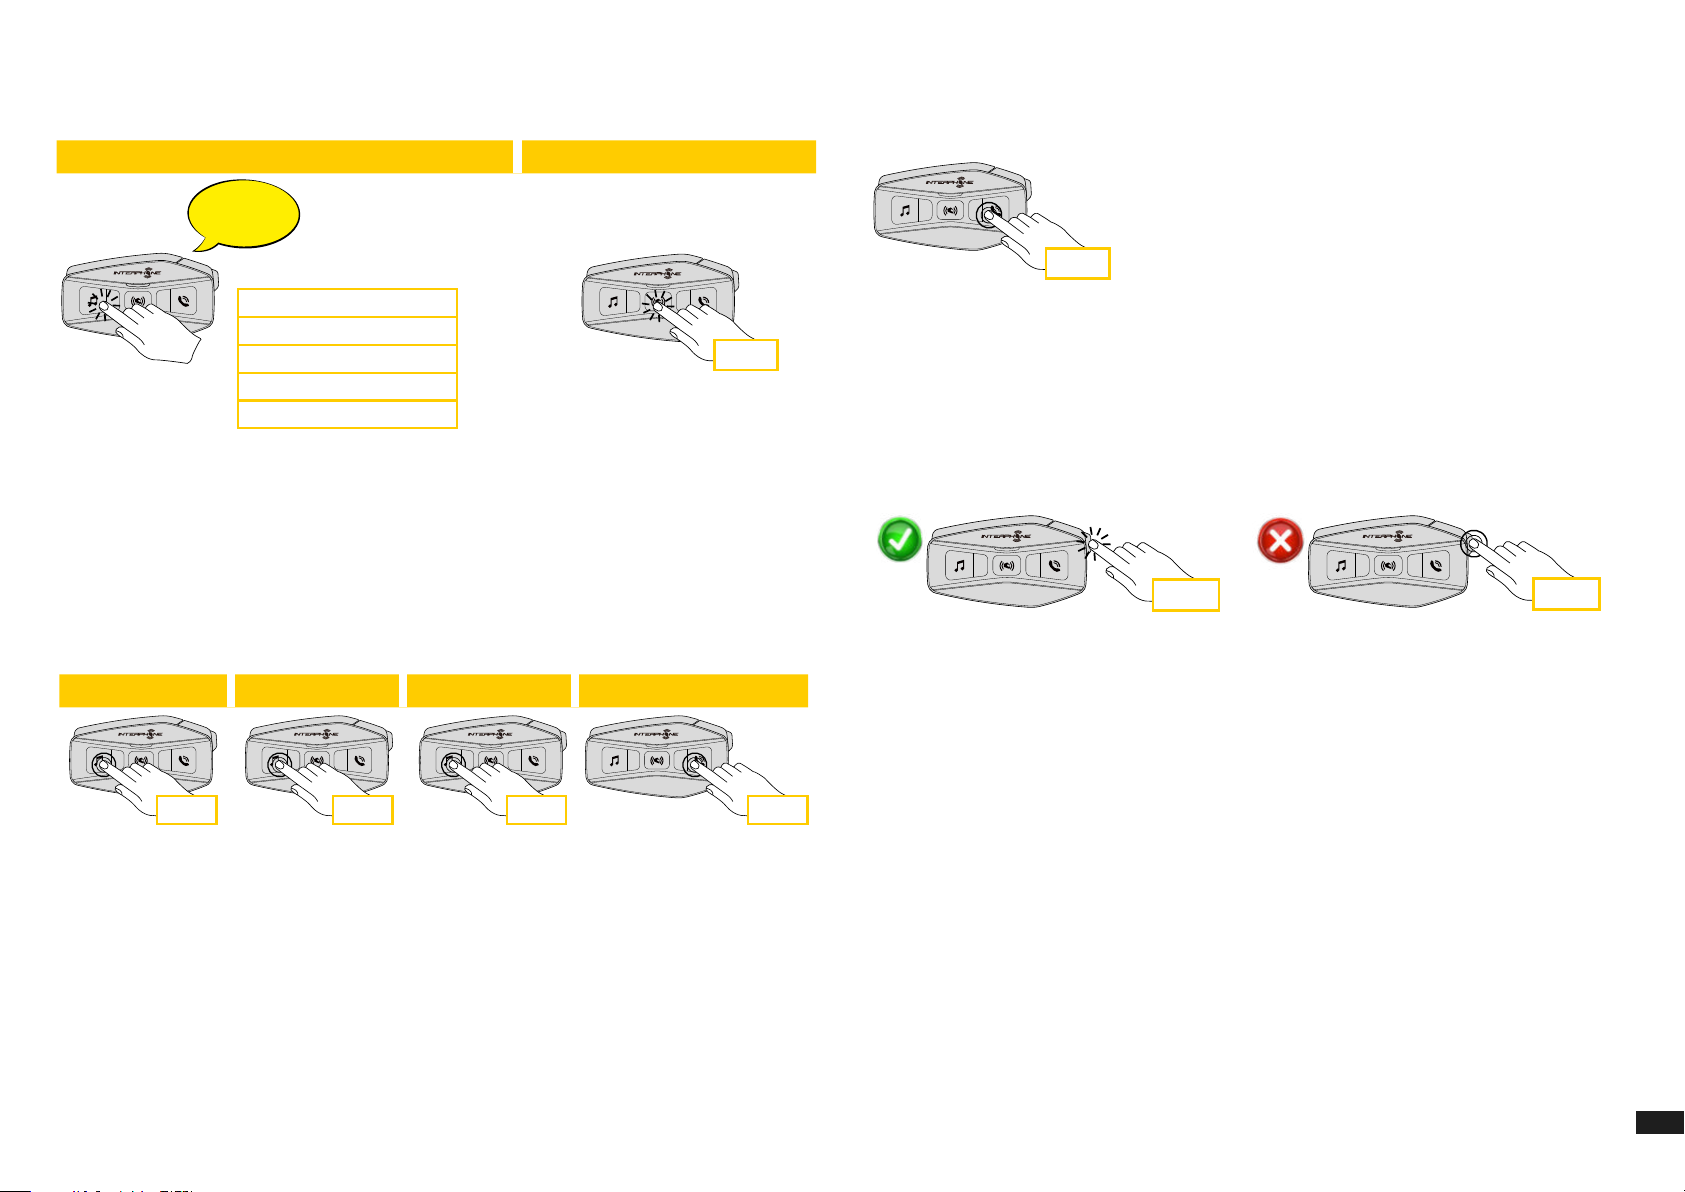
2. Navigate between the Speed Dial Preset with MUSIC and PHONE
buttons, as indicated in picture here below. Select the wanted feature
with CENTRAL button.
Select one function Conrm selected funcion
Last number redial
Speed dial #1
Speed dial #2
...
6.2.1 Bluetooth® Intercom Music Sharing
To start / stop sharing music, activate rst the intercom conversation, then
press the PHONE button for 3 seconds.
3 sec
Last number redial
Speed dial #1
Speed dial #2
Speed dial #3
Cancel (exit from menu)
x 1
6. MUSIC
6.1 Playing Music with Bluetooth® Devices
Interphone U-COM 16 can play music from Bluetooth® devices
(smartphones, MP3 players, Motorcycle TFTs etc ...) equipped with the
A2DP prole. To play music you need to pair these devices to INTERPHONE
U-COM 16.
Music play Music pause Next track Previous track
1 sec 2 sec 1 sec 1 sec
6.2 Music sharing
6.2.2 Mesh Intercom Music Sharing
To start / stop sharing music, activate the intercom conversation, then press
the PHONE button for 3 seconds.
On the second unit, a voice prompt will ask to accept music sharing.
Press the MESH button once to accept, hold for 1 second the MESH button
to reject.
x 1
1 sec
You can start sharing the music received from your phone with another
U-COM control unit, during a two-way intercom conversation.
Both control units can control the playback of music, eg example go to the
next track or the previous track.
Only with MESH intercom conversation, it is possible to listen shared music
in the background.
9
Page 10
7. MESH INTERCOM
ch3
7.2 OPEN MESH mode
7.1 What is Mesh Intercom?
U-COM 16 is equipped with MESH 2.0 technology.
MESH 2.0 is the latest evolution of MESH intercom communication, which
allows you to speak freely without having to do any pairing and without any
position constraints within the group.
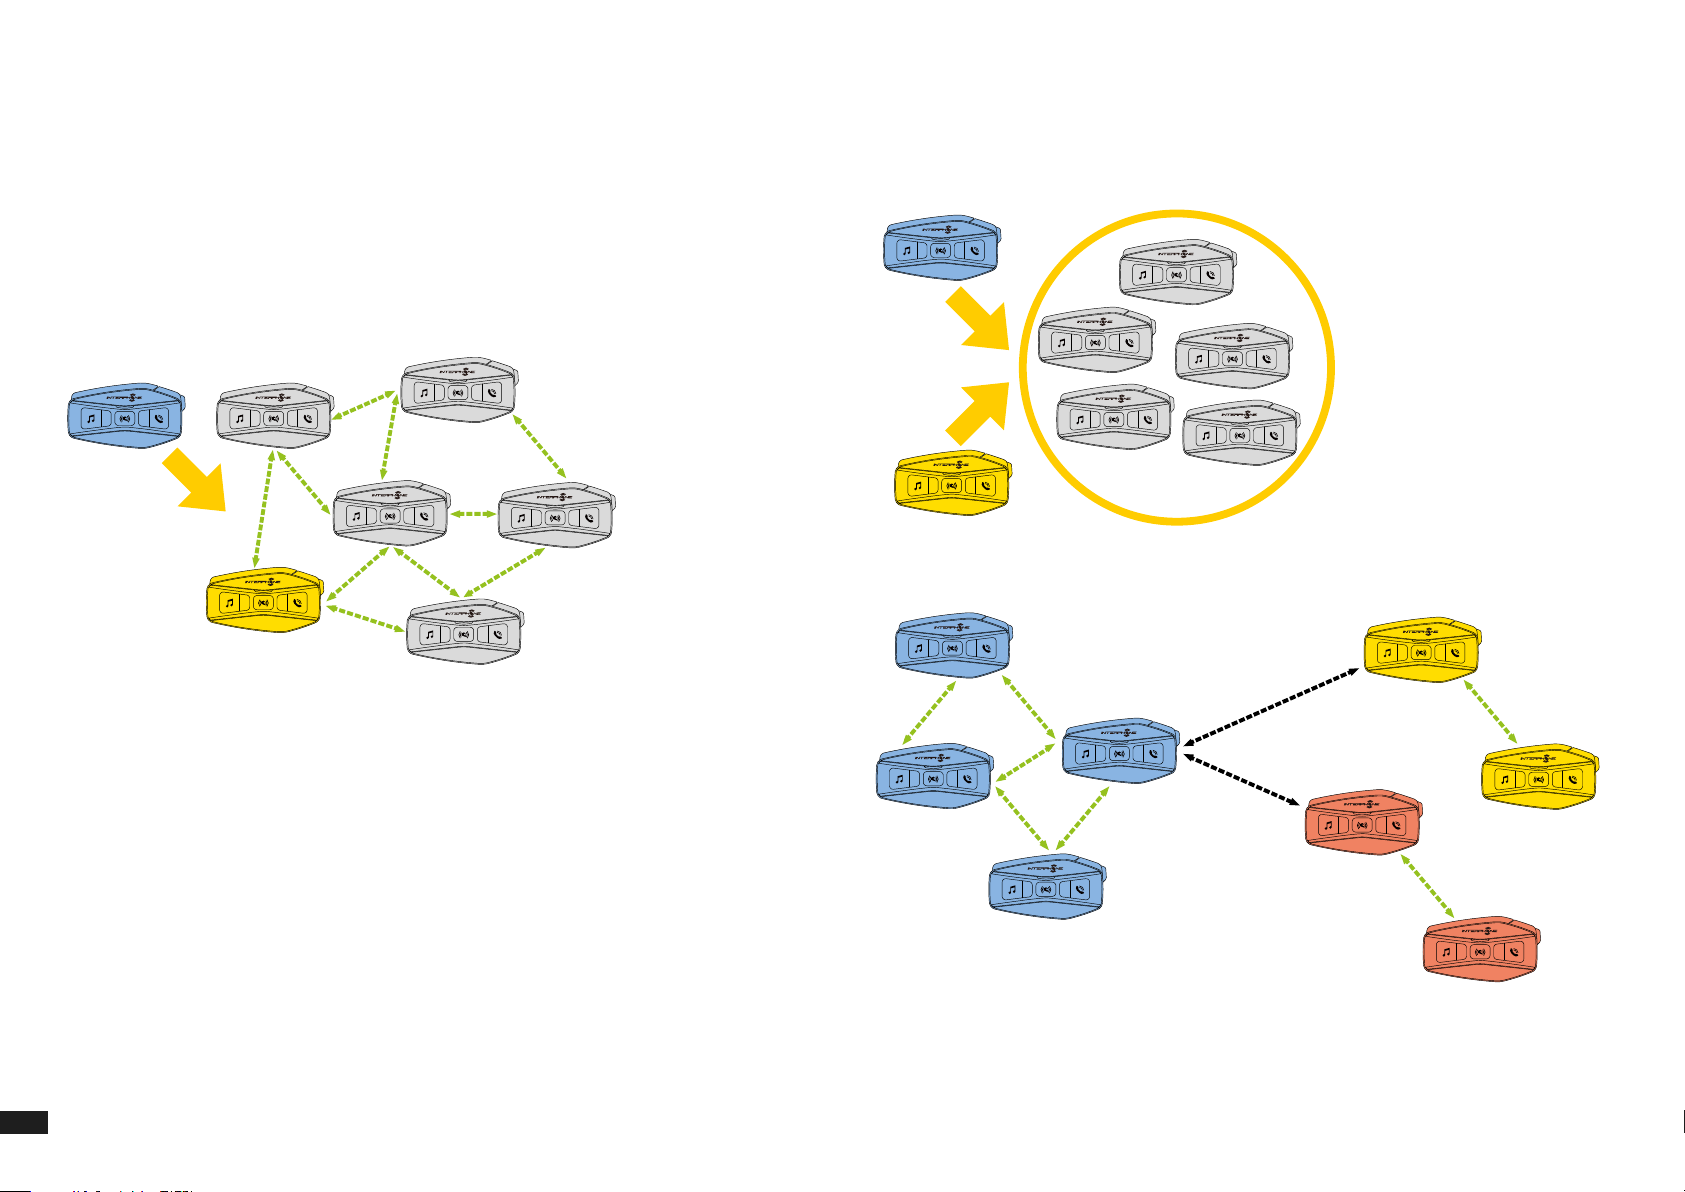
Within the same Open Mesh ™ channel or the same private group in
Group Mesh ™, users can talk and enjoy at the same time a conversation of
excellent quality.
The OPEN MESH mode allows free communication, in public mode, up
to a maximum of 24 connected users. To talk, devices can only be within
range, with the MESH mode active. OPEN MESH mode is active as a factory
default mode.
You can choose the MESH channel (from 1 to 9) to be used for
communication.
ch1
ch2
X
ch1
ch1
ch1
10
X
ch2
ch3
Page 11
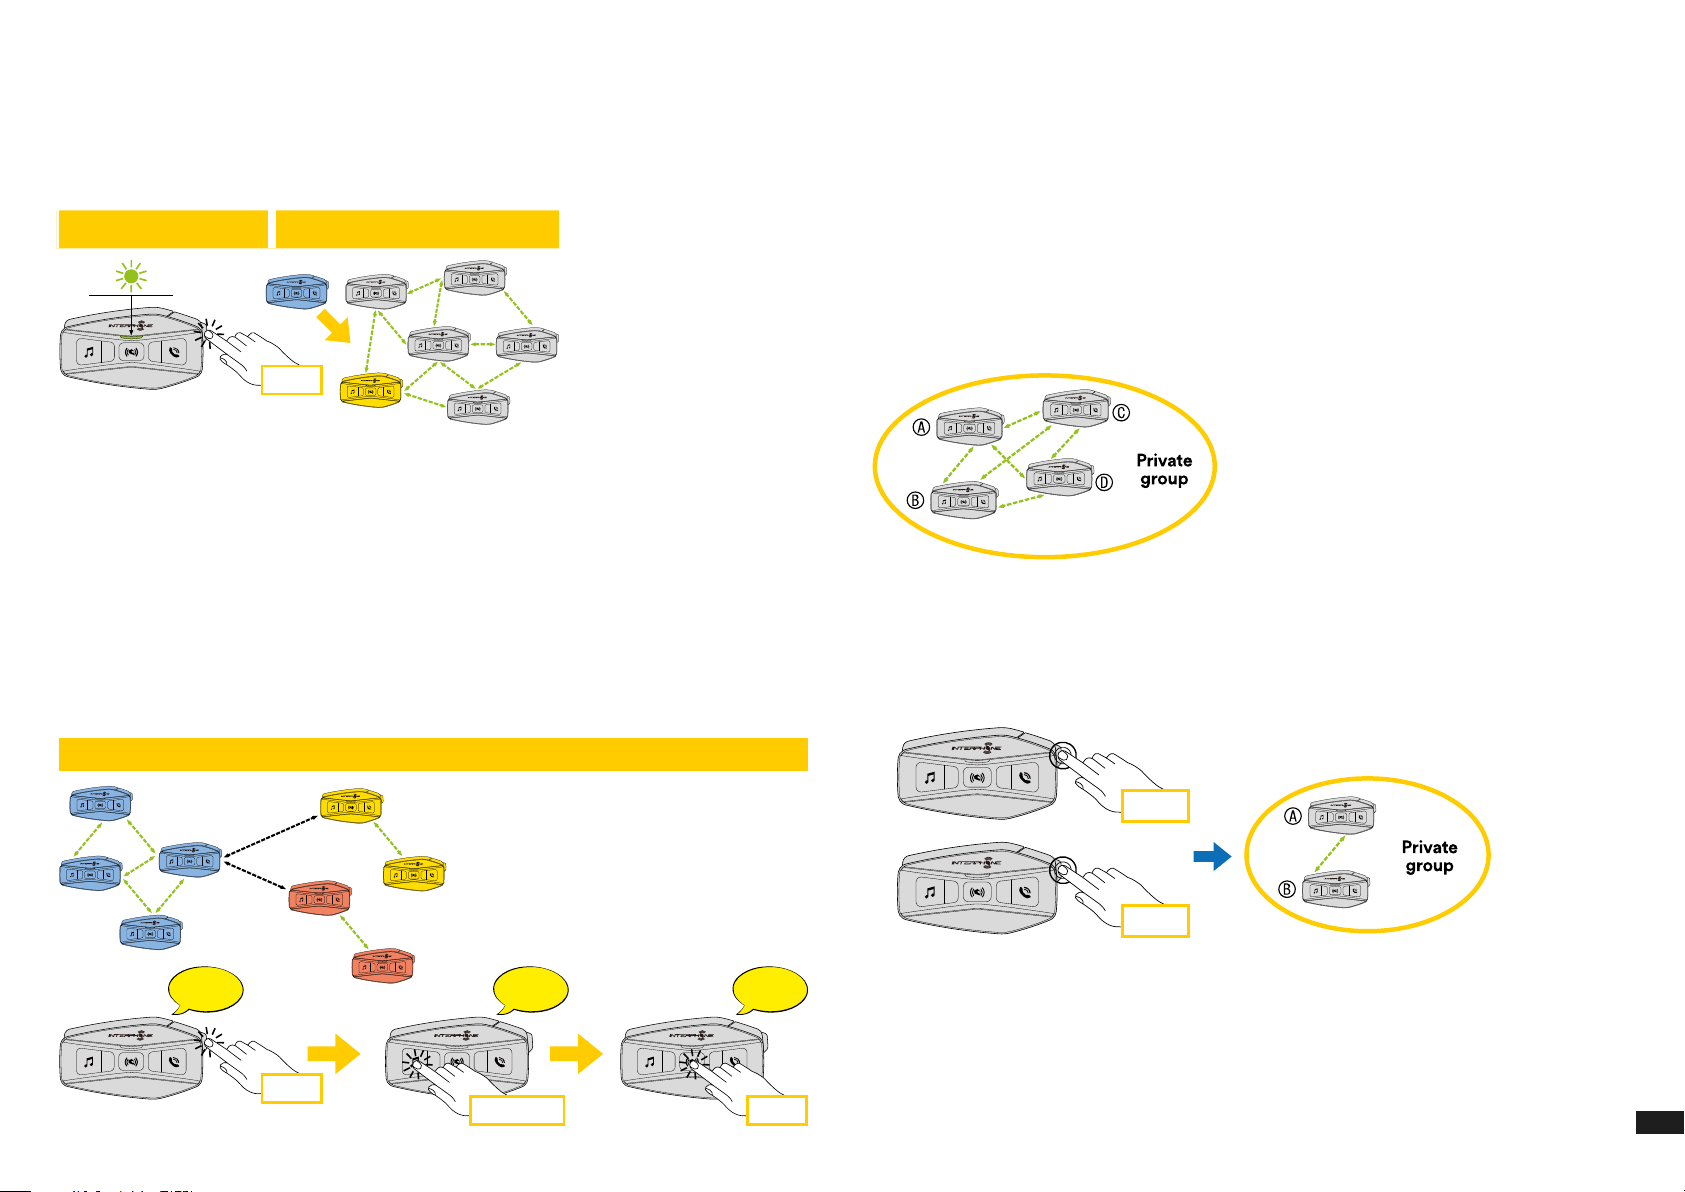
7.3 Start mesh intercom in OPEN MESH mode
With U-COM 16 on, press the MESH button on each control unit, to activate
the communication mode. Each control unit automatically will connect to
other units simply by speaking into the microphone. Adjust the volume of
mesh communication according to your needs.
7.4 Group Mesh (only available if “Advanced Features” is activated on the APP)
Group Mesh is an intercom function, which allows users to join a closed /
private group conversation (as opposed to OPEN MESH which is open /
public), limited to members of that group only.
Start/stop intercom
OPEN MESH
Intercom connection OPEN MESH
x 1
7.3.1 OPEN MESH channel selection
By activating OPEN MESH, the default factory setting is Channel1.
Only the control units working on the same channel will be able to connect
together.
You can choose a dierent channel to manage dierent conversation
groups.
To change channel, press the MESH button twice, change the channel by
pressing the MUSIC button (each press advances one channel), conrm the
channel selected by pressing the INTERCOM (central) button.
Change intercom channel OPEN MESH 1 > 2 > 3 > 4 > 5 > 6 > 7 > 8 > 9 > Exit > 1 > 2 >...)
ch1
ch2
X
ch1
ch1
ch1
Channel
setting
X
ch3
ch3
ch2
One-Two-
Three-…
Channel
is set
Users belonging to the group can freely communicate with each other when
they are in the same Group Mesh private group, taking advantage of all
benets of MESH 2.0 technology.
For a private intercom conversation using Group Mesh, rst step is to create
the group by users. When users create a private group in Group Mesh, the
intercom switches automatically from Open Mesh a Group Mesh mode.
7.4.1 Creating a group “Group Mesh”
Creating a Group Mesh requires two or more “Open Mesh” users.
1. Activate the GROUP MESH function on the control units by pressing the
MESH key on both control units for 5 seconds.
A
5 sec
B
5 sec
Units will complete the group creation and switch automatically from Open
Mesh to Group Mesh mode.
x 2
x 1x 1, 2, 3...
11
Page 12
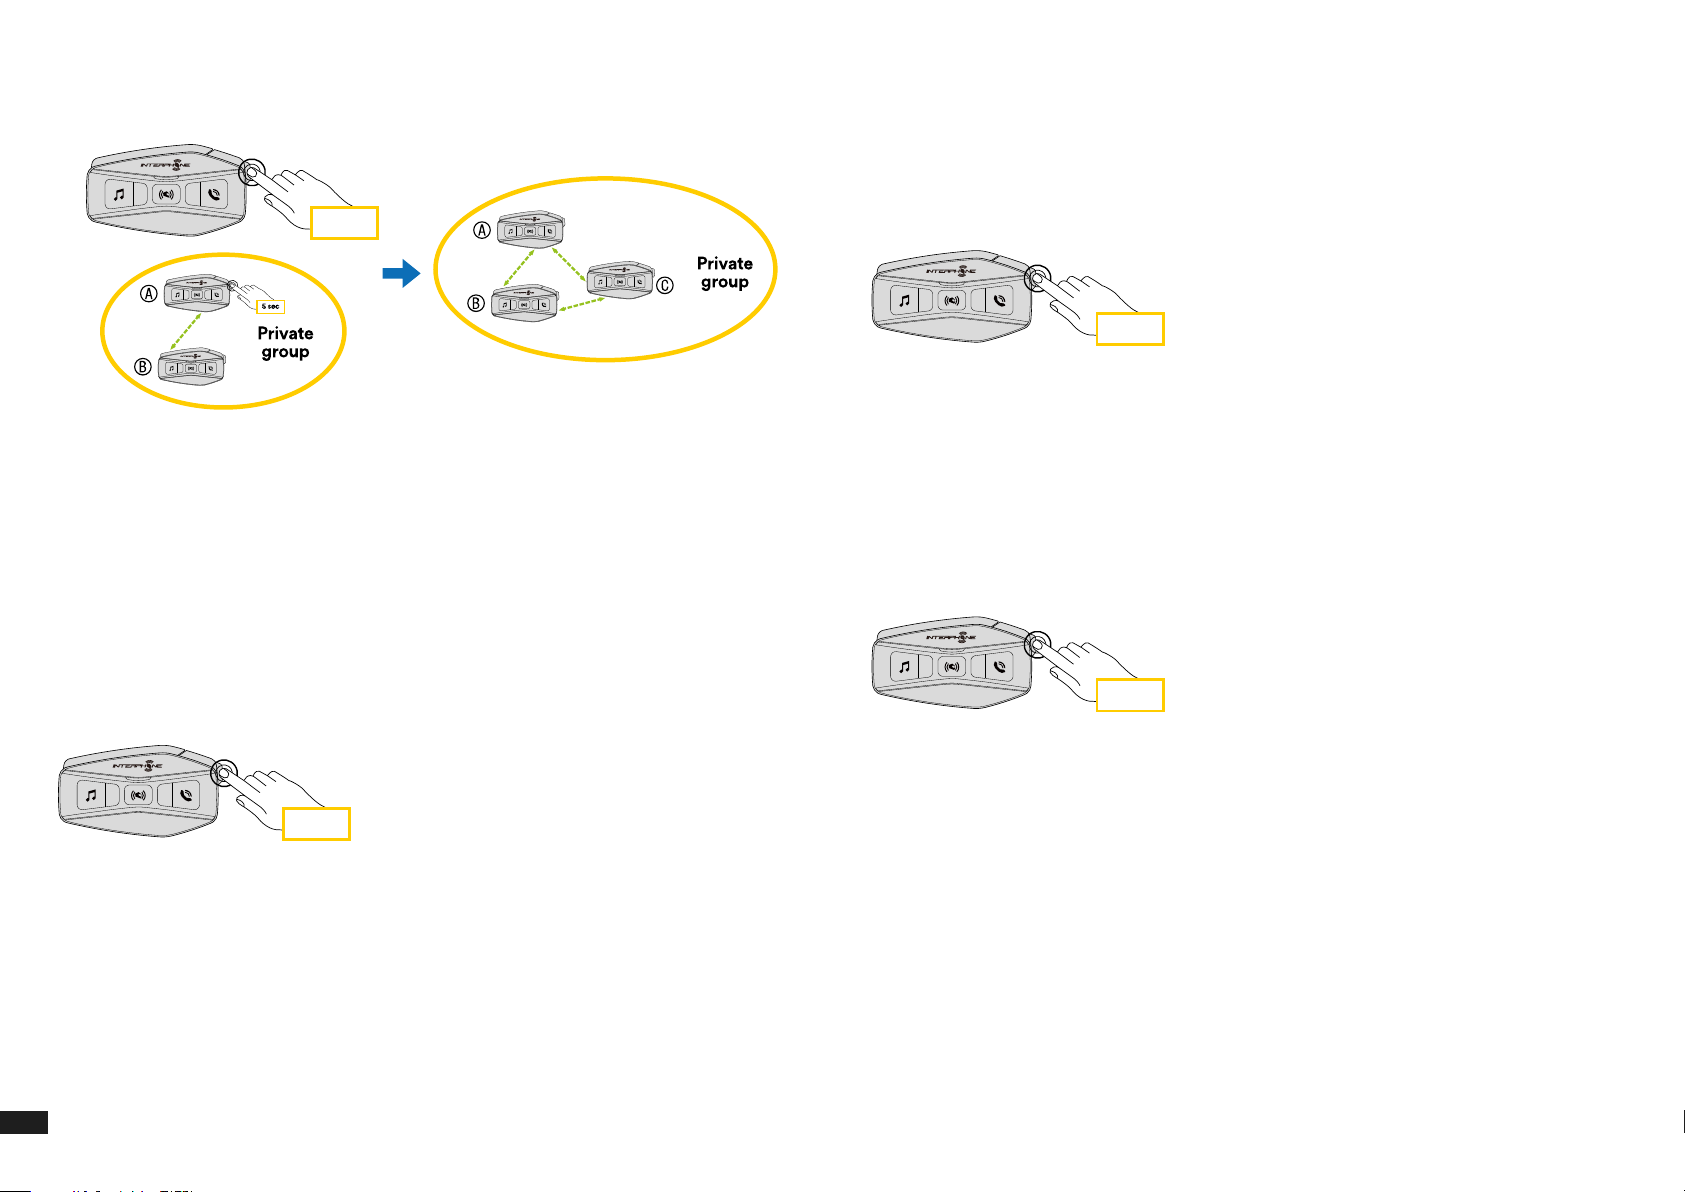
2. One of the members of an existing Group Mesh, by pressing 5 seconds
the MESH button, can allow new members to join to the existing Group
Mesh.
7.6 Toggle Open Mesh / Group Mesh modes
Users can toggle between Open Mesh and Group Mesh and vice versa
without reset the Mesh. This allows users to retain their private Group Mesh
connection information while they are in Open Mesh.
C
5 sec
Units will complete the new group, adding the new member. The new
member switches automatically from Open Mesh to Group Mesh and a
voice prompt will conrm it.
3. Repeat the operation of point 2. for each control unit to be added to
private group.
7.5 Reset Mesh (only available if “Advanced Features” is
activated on the APP)
If a Mesh reset command is activated on a device, it returns automatically to
Open Mesh mode (default channel 1). To start MESH reset, press the MESH
button for 8 seconds .
To switch from Open Mesh to Group Mesh and vice versa, press the MESH
button for 3 seconds.
3 sec
Note: If you have never joined Group Mesh before, you cannot switch
between Open Mesh to Group Mesh and vice versa. The voice prompt is
output “No groups available”.
7.7 Enable / disable microphone
Users can mute the microphone during a mesh intercom conversation.
The same command is used to reactivate the microphone.
Press the MESH button for 1 second.
1 sec
8 sec
12
Page 13
8. BLUETOOTH® INTERCOM
A
B
A
C
A
D
8.1 Intercom pairing
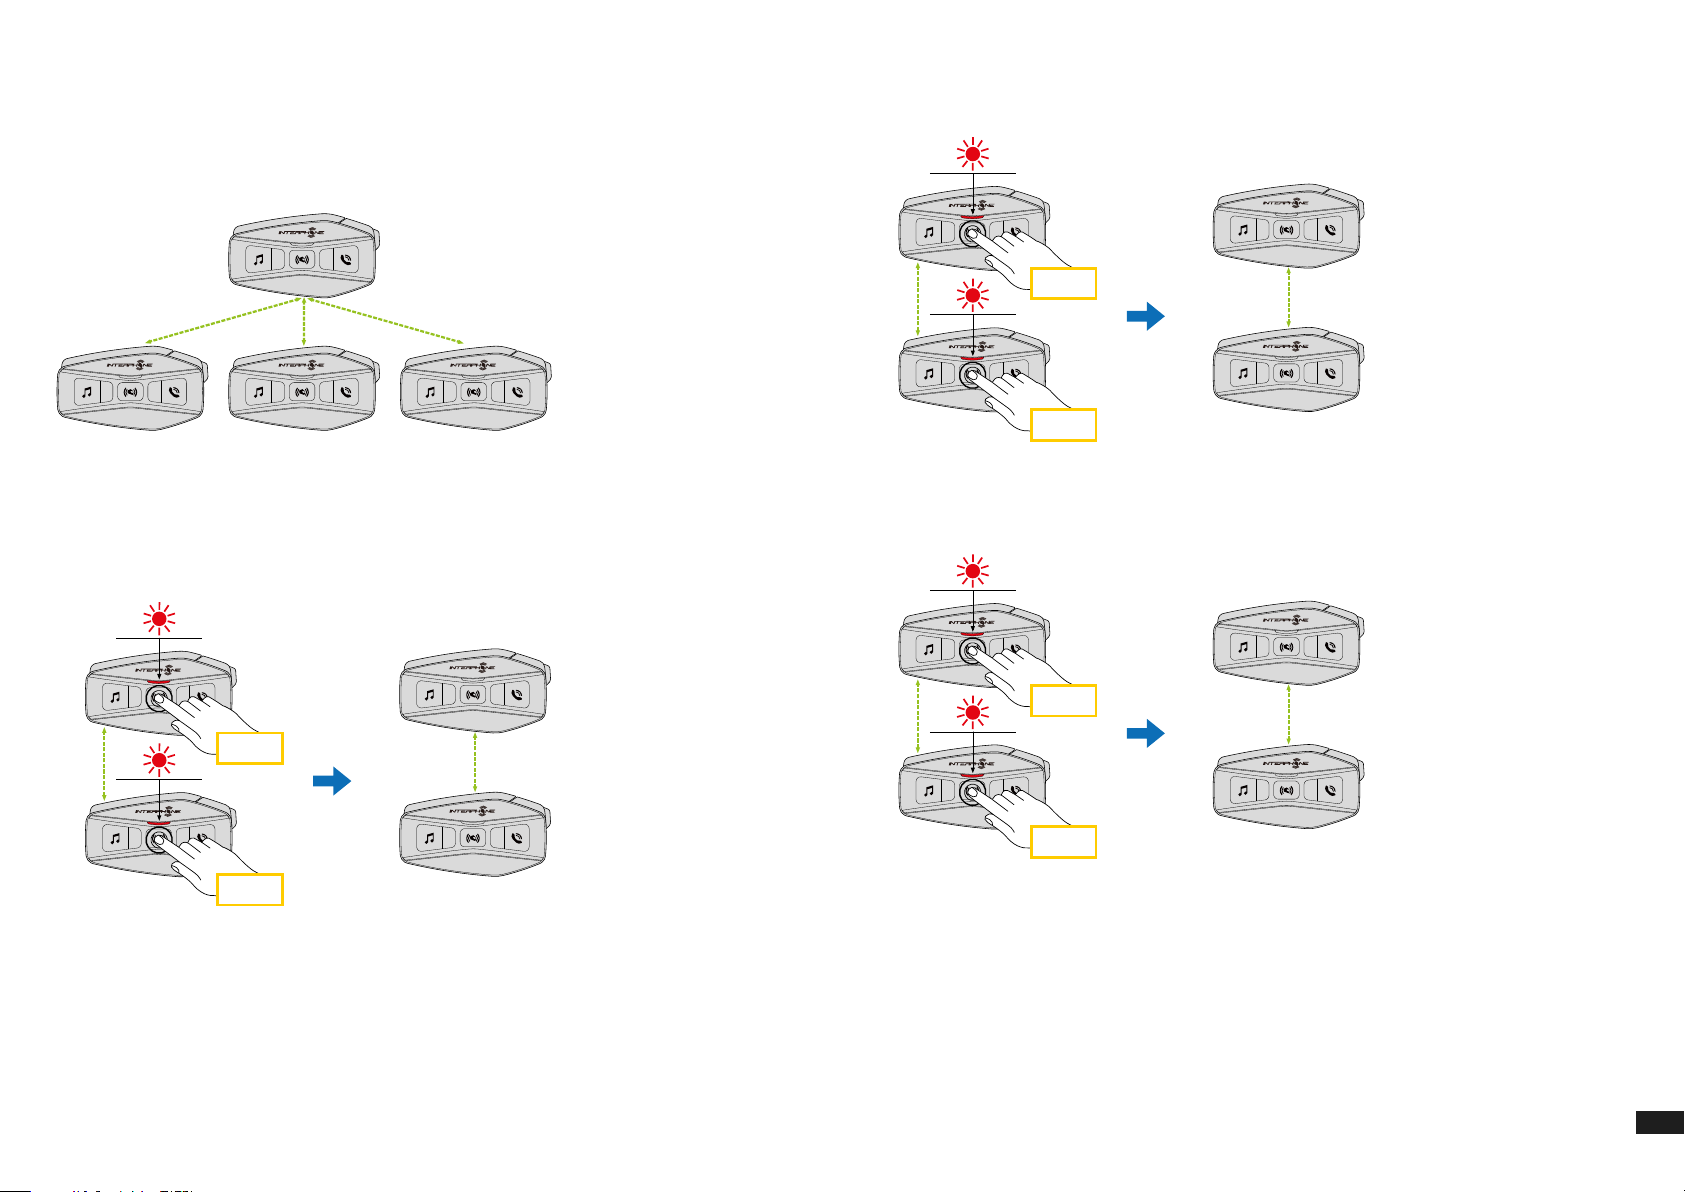
U-COM 16 can be paired with up to 3 other UCOM units (or Sena units), as
shown in the following picture.
A
B C D
2. Repeat the previous step again, pressing the center button (intercom)
on the two units A and C for 5 seconds until you hear the voice prompt
“Intercom pairing”.
A
5 sec
C
5 sec
The pairing is only necessary the rst time, then the control units will
automatically recognize each other.
1. Press and hold the center button (intercom) on boht units A and B for 5
seconds, until you hear the voice prompt “intercom pairing”. The light
ashing red indicates the device is now visible.
A
5 sec
B
5 sec
After few seconds the units will be paired and they will start the intercom
communication. The light on both units will ash blue twice.
3. Repeat the procedure again, pressing the centre button (intercom) of
the two units A and D for 5 seconds until you hear the voice prompt
“Intercom pairing”.
A
5 sec
D
5 sec
13
Page 14
8.2 Two-way Intercom Conversation
8.3 Multi-user Intercom Conference
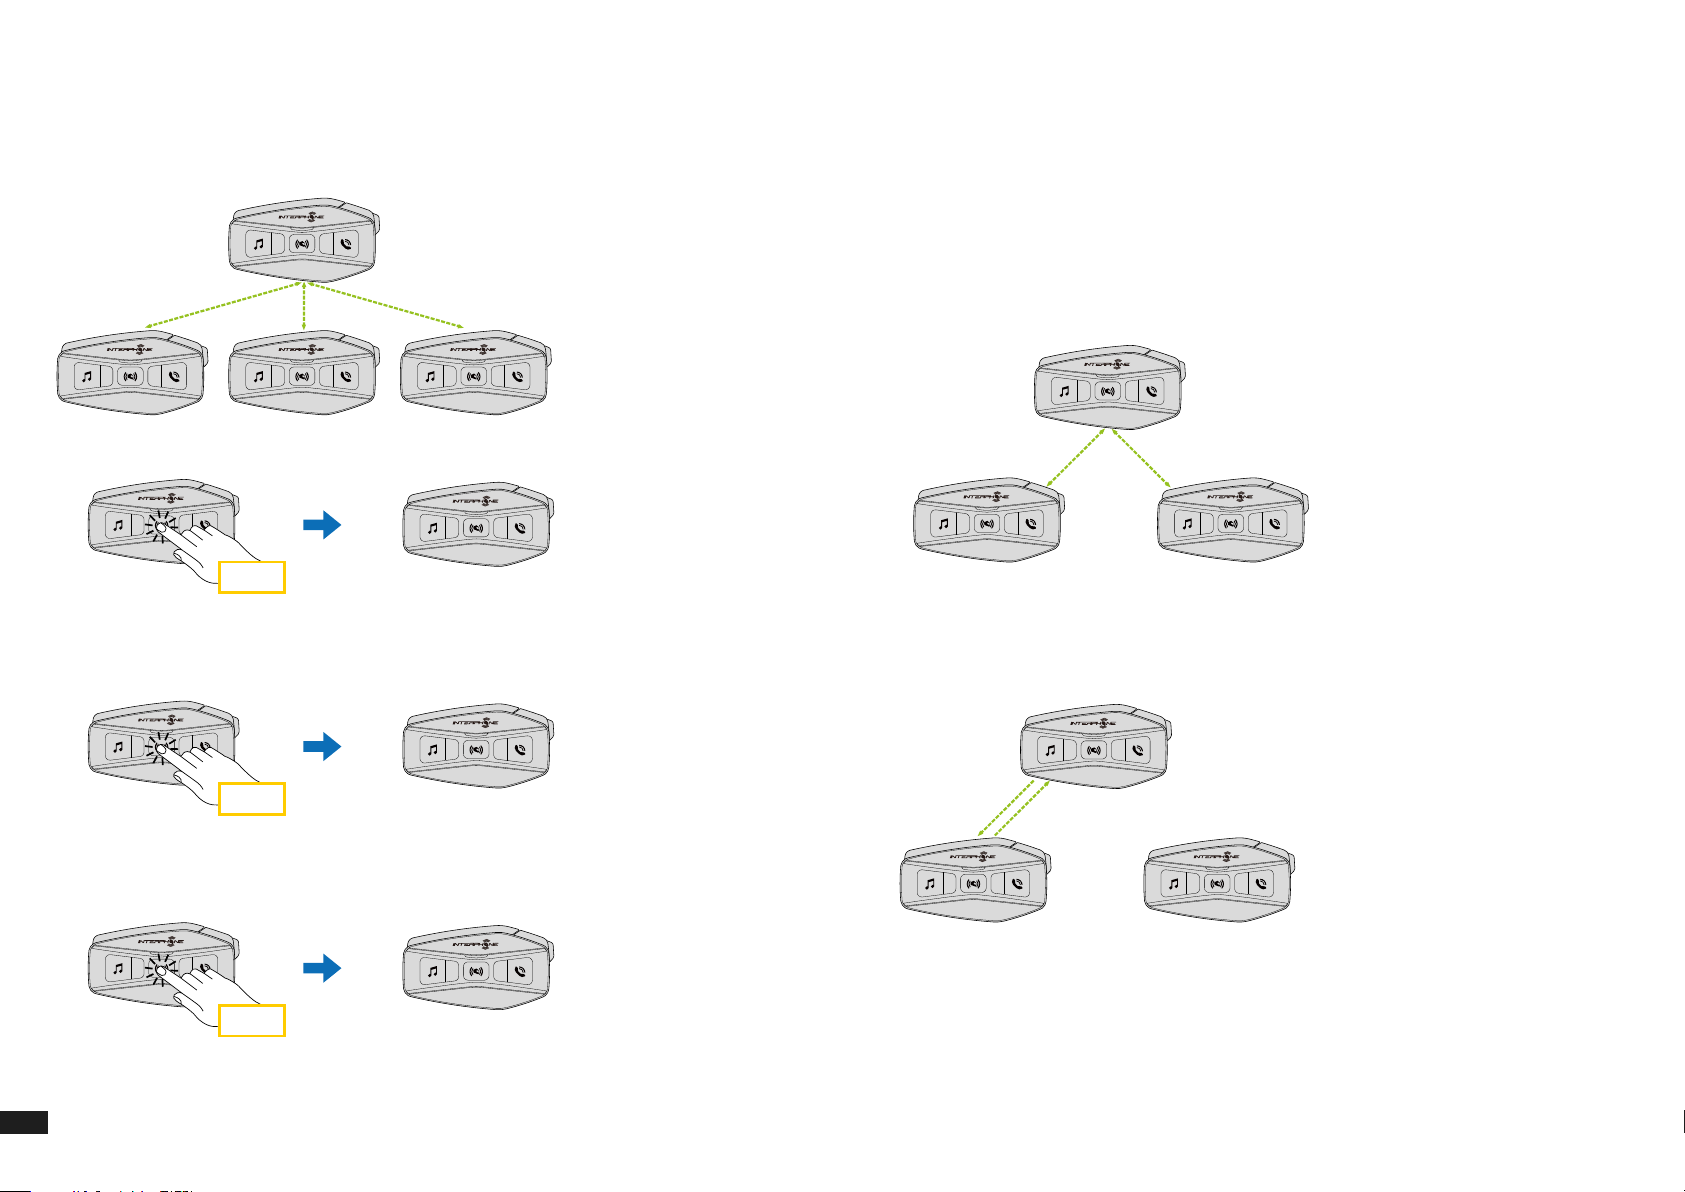
After pairing the control units, communication can be started, by pressing
the INTERCOM button (center button), according to the diagram below.
1. Press once to connect the control unit D.
A
B C D
Start/stop intercom connection with unit "D"
A
x 1
2. Press twice to connect the control unit C.
Start/stop intercom connection with unit "C"
D
Conference conversations can be activated with up to three other units at
the same time.
During the three-way or four-way intercom conversation, any mobile phone
is temporary disconnected. However, as soon as the conversation ends, the
connection with the mobile phone is automatically re-established.
8.3.1 Starting a Three-way Intercom Conference
User (A) can create a three-way intercom conference with two other units (B
and C) by establishing two intercom connections at the same time.
A
B C
1. Pair the intercom (A) with other two (B and C).
2. Start an intercom conversation with one of the two units in the intercom
group. For example (A) can initiate an intercom conversation with (B).
Alternatively (B) can initiate an intercom call with (A).
A
x 2
3. Press three times to connect the control unit B.
Start/stop intercom connection with unit "B"
A
x 3
14
C
B
A
B C
Page 15
3. Then (A) can call (C), or (C) can join the conversation by making an
A
A
A
intercom call to (A).
A
B C
4. Now user (A) and two friends (B and C) will have a three-way intercom
conference.
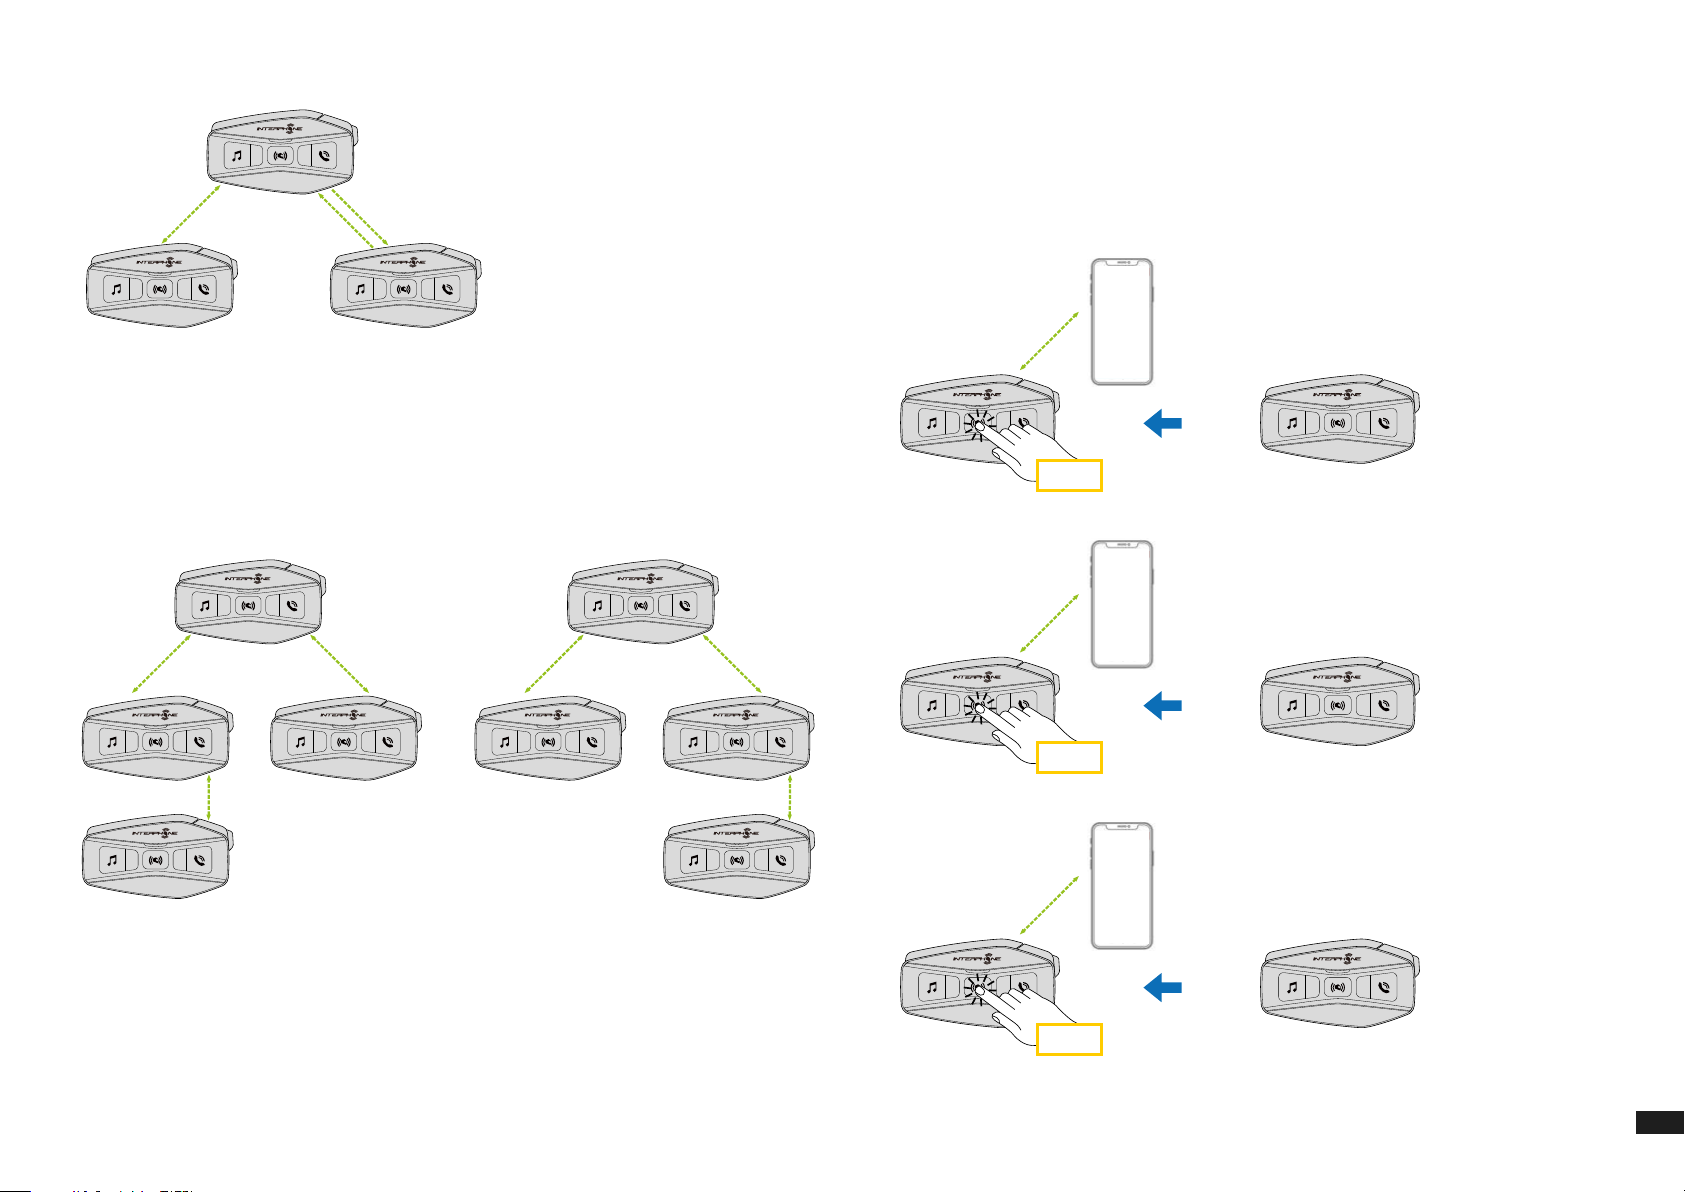
8.4 Three-Way Conference Phone Call with Intercom Users
You can have a three-way Conference-Phone Call by adding an intercom
user to the mobile phone conversation.
During a mobile phone call, tap the center button once, twice or three times,
to invite one of the intercom units (previously paired) to the conversation.
Press once to add unit D to the conference.
8.3.2 Starting a four-way intercom conference
Pair the rst three units A, B, C as indicated in chap. 8.3.1.
Pair D to B or to C. The new participant D can join the other three previously
connected friends, creating a four-way conference, making an intercom call
to B or C.
B
D
A
C
or
B
A
C
D
8.3.3 Stop Multi-user Intercom
To stop all intercom connections, press and hold the center button for 3
seconds until the beep.
D
x 1
Press twice to add unit C to the conference.
C
x 2
Press three times to add unit B to the conference.
B
x 3
Repeat the same command to disconnect intercom unit from the
phonecall conference.
15
Page 16
To disconnect the mobile phone call during a conference phone call, press
and hold the Center Button for 2 seconds.
3. When all of the headsets are connected together, everyone will hear a
voice prompt, “Group intercom connected”.
Note: When you have an incoming intercom call during a mobile phone call,
you will hear high tone double beeps.
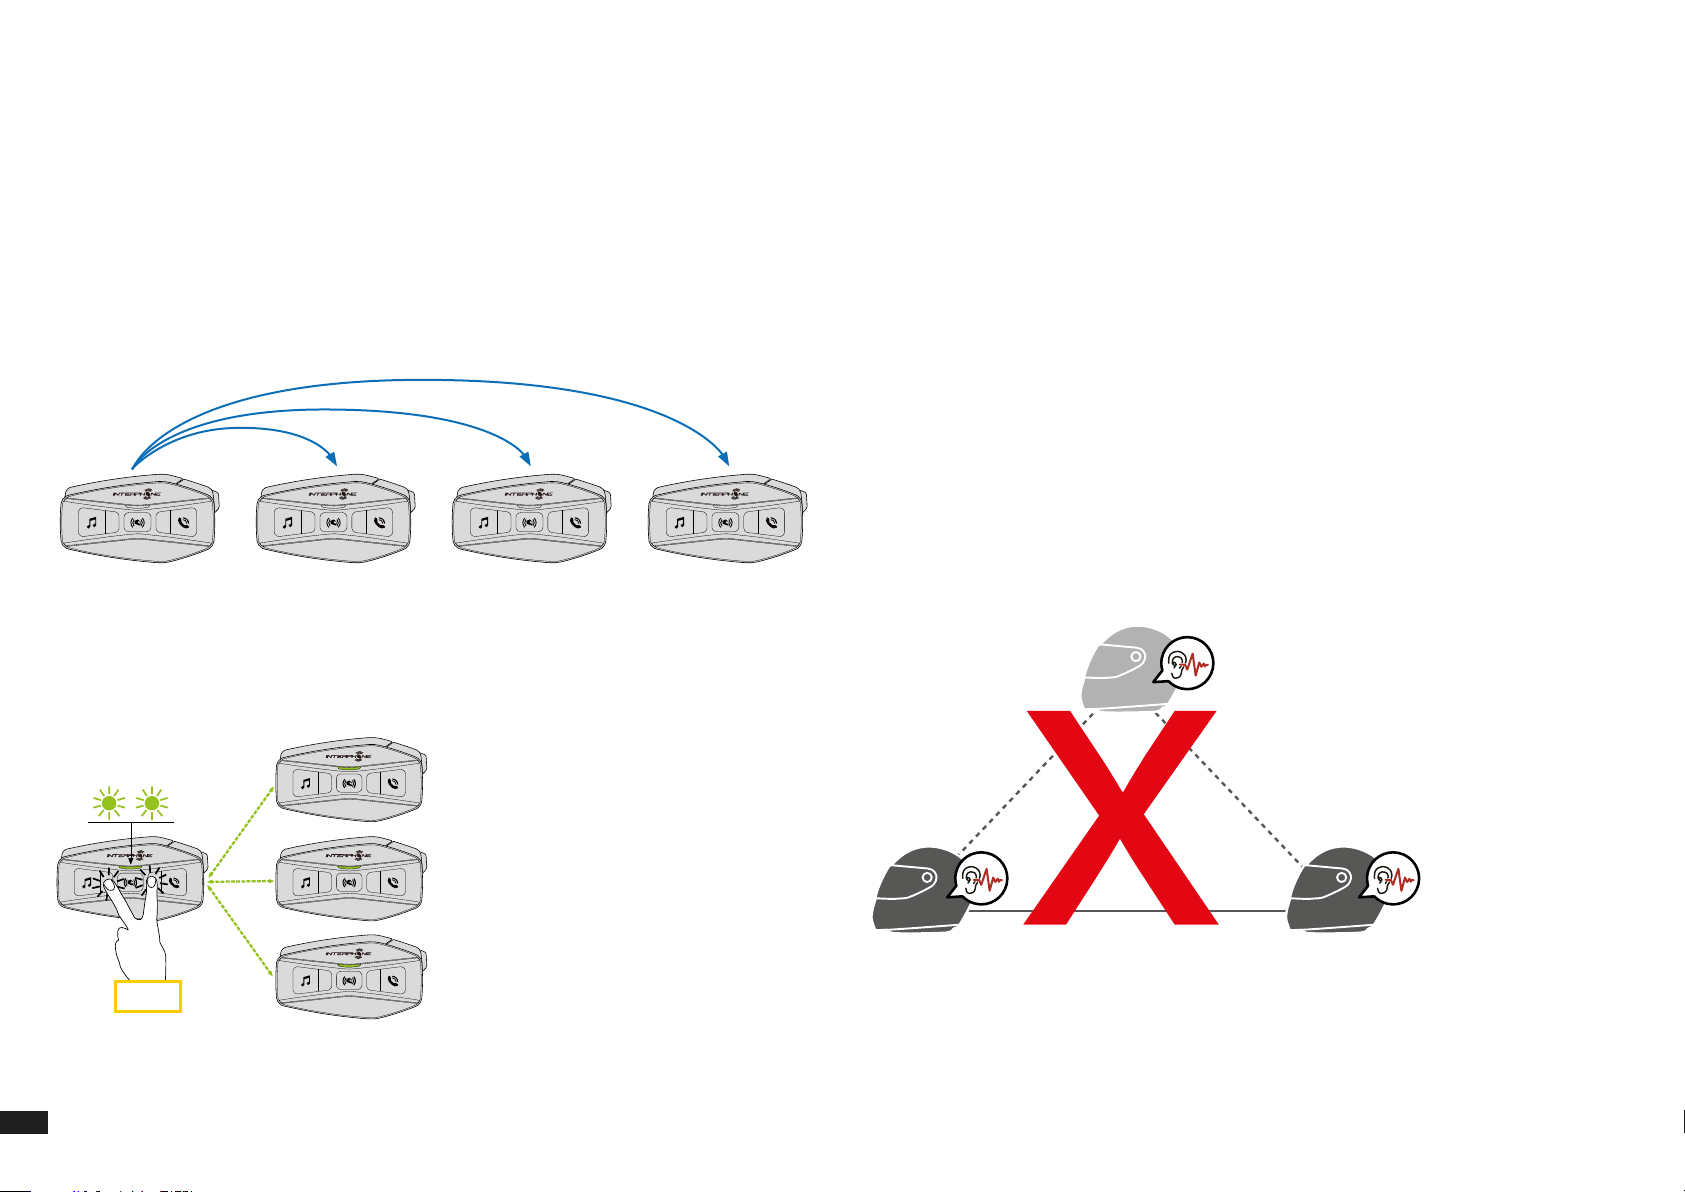
8.5 Group Intercom
Group Intercom is a command that allows you to instantly start a Multi-Way
Conference Intercom with three of the most recently paired headsets.
The rst unit is the one which will activate the connection of all the
members of the group.
Connection will be established with same logic of normal 4 way conference.
A B C D
1. Go through intercom pairing with up to three headsets you want to have
Group Intercom with.
2. Tap the MUSIC Button and PHONE Button together to begin Group
Intercom. The LED will ash green and you will hear a voice prompt,
“Group intercom”.
4. To stop Group Intercom, press and hold the Center Button for 5 seconds
during Group Intercom. You will hear a voice prompt, “Group intercom
terminated”.
8.6 Mesh Intercom Conference with Bluetooth® Intercom
Participant
Users can use the existing Bluetooth® intercom and Mesh Intercom function
at the same time. In this case, it is recommended to communicate with
other U-COM 2 or U-COM 4 headsets (or Sena Bluetooth® only devices)
via Bluetooth® intercom connection and use Mesh Intercom between
U-COM 16 devices (or Sena mesh headsets). An user who is in Open Mesh
or Group Mesh when using Mesh Intercom is able to include up to 3 of their
Bluetooth® intercom friends. You can start a two-way Intercom conversation
with one of your three Intercom Friends to include them in the Mesh.
Note:
• The audio quality will be reduced if a U-COM 16 connects to 2 or more
Bluetooth® intercom friends while in Open Mesh or Group Mesh when
using Mesh Intercom.
• If a closed loop is created, as shown below, each user will experience
severe noise issues. We recommend to avoid this kind of closed loop.
- - - - - - - - Bluetooth® Intercom
x 1
16
________
Mesh Intercom
Page 17
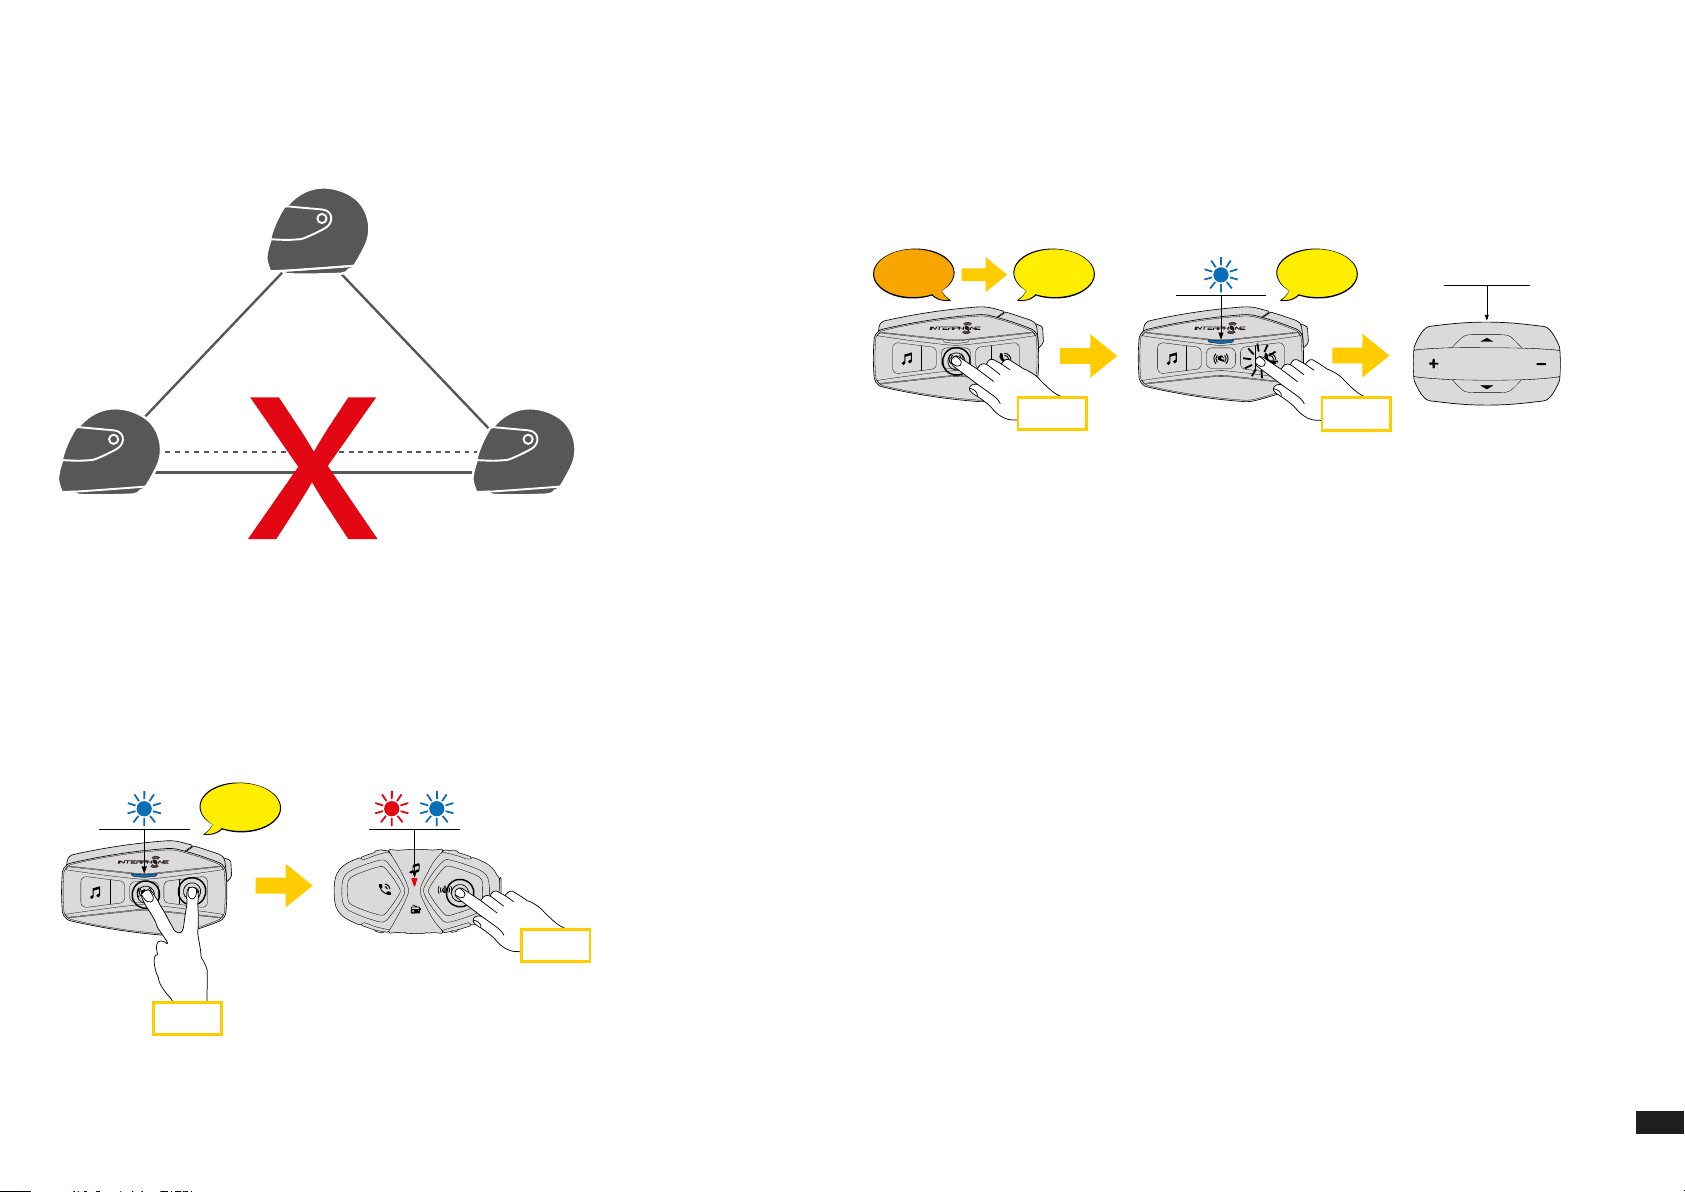
• If Bluetooth® intercom is accidentally activated during Mesh Intercom
communication between U-COM 16 headsets, as shown below, you will
hear a voice prompt, “Mesh intercom disabled, Bluetooth® intercom
connected” every 1 minute. If you turn o the Bluetooth® Intercom or turn
o the Mesh Intercom, the voice prompt will no longer come out.
8.8 Anycom
Anycom feature allows intercom conversations with other intercom brands.
It is possible to pair the intercom with only one non-Interphone device at a
time. The intercom distance depends on the performance of the connected
Bluetooth® intercom. When a not-Interphone device is paired with the
Interphone device, if another Bluetooth® device is paired via the second
mobile phone pairing, it will be disconnected.
- - - - - - - - Bluetooth® Intercom
________
Mesh Intercom
8.7 Old Interphone Series
It is possible to pair previous Interphone series devices by pressing, with the
unit on, the INTERCOM and TELEPHONE buttons for 5 seconds. Then start
pairing mode on the second unit, usually pressing the power button (with
the control unit o) until the led ashes red/blue.
Interphone
pairing
Intercom
pairing
Con guration
menu
Anycom
pairing
Mobile phone
pairing
?
10 sec
1. With U-COM 16 on, enter the conguration menu by pressing the central
button for 10 seconds. Do not to release the button before the led turns
blue.
2. Press the PHONE button 3 times to activate the ANYCOM pairing mode.
3. Set the not-Interphone intercom to mode Phone pairing.
8.9 Mesh Intercom with Anycom
Users can use the existing Two-way Anycom Intercom and Mesh Intercom
function at the same time. In this case, it is recommended to communicate
with non-Interphone headset via Two-way Anycom connection and use
Mesh Intercom between U-COM 16 headsets.
A user who is in Open Mesh or Group Mesh when using Mesh Intercom is
able to include one Anycom Intercom. You can start a Two-way Anycom
conversation with your Anycom Intercom to include it in the Mesh.
x 3
5 sec
6 sec
17
Page 18
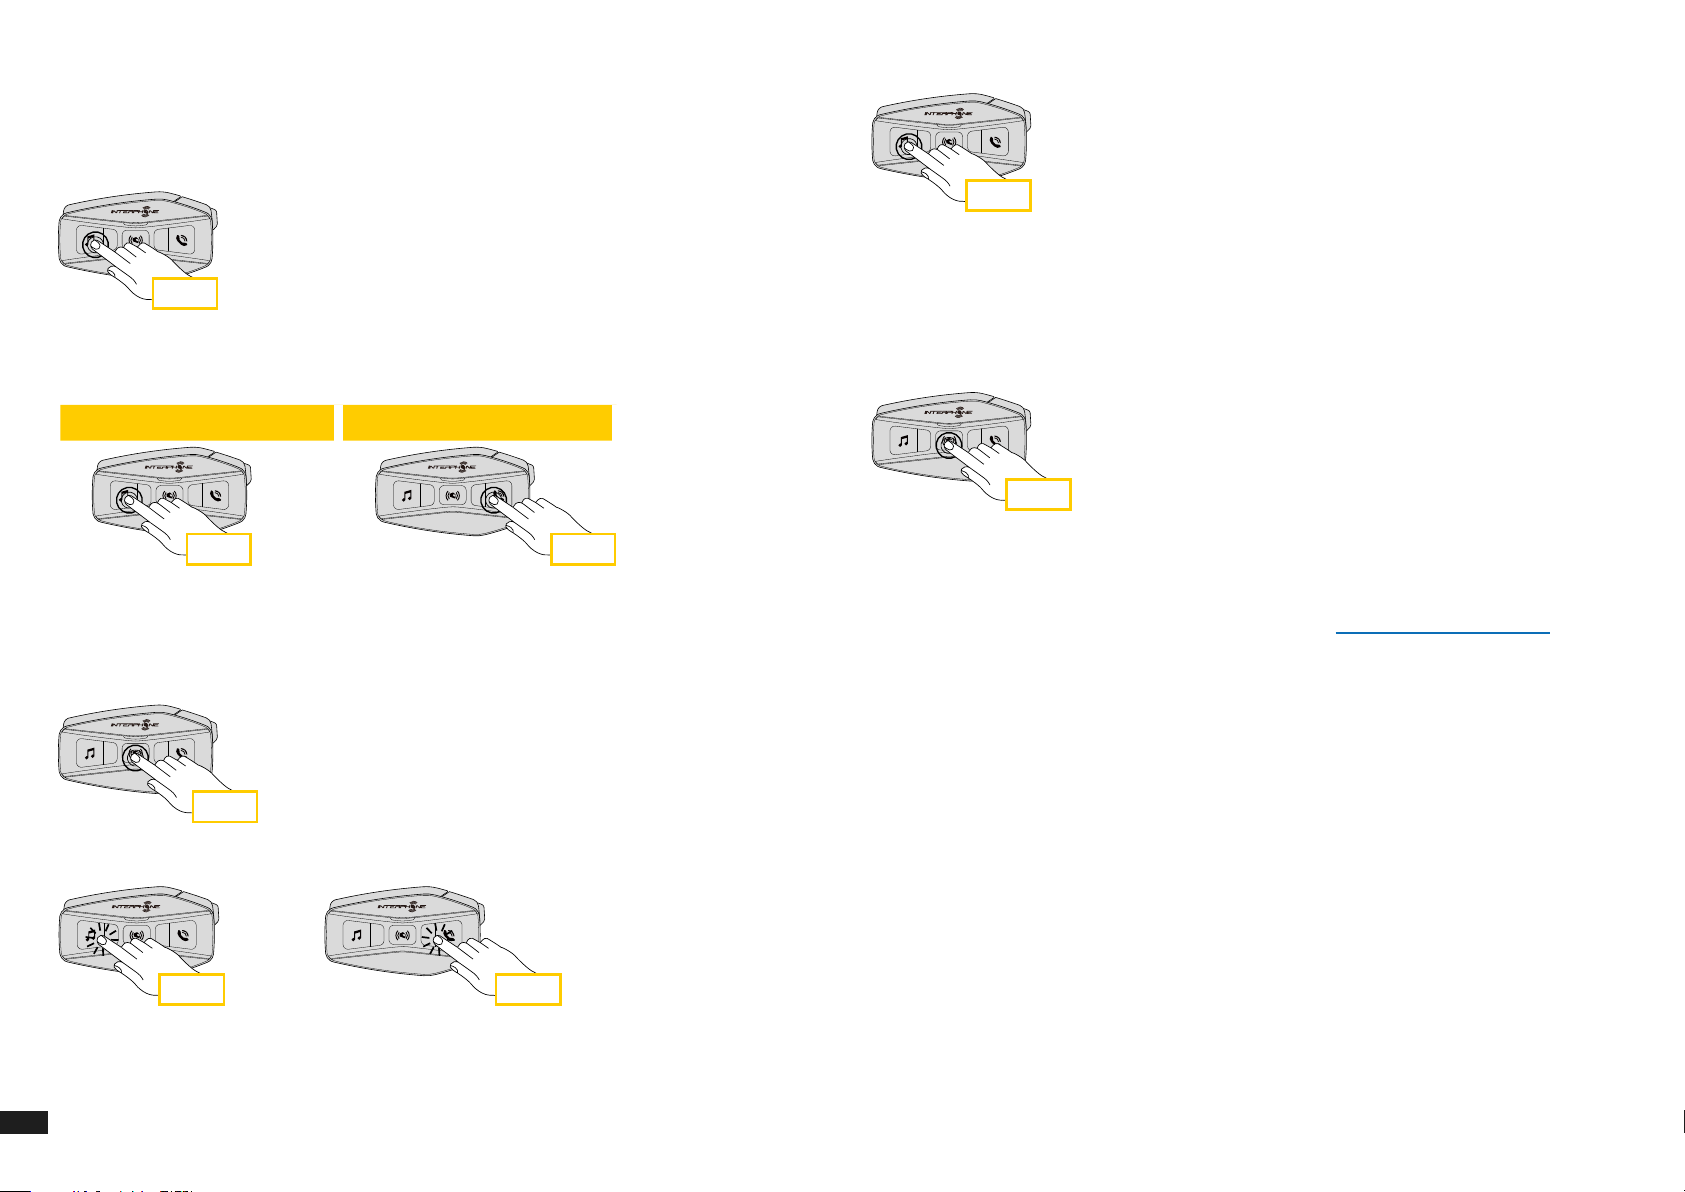
9. FM RADIO
9.1 FM Radio features
Press MUSIC button for 3 seconds to switch ON/OFF the FM RADIO.
Press MUSIC button for one second to save station.
1 sec
Any existing station will be overwritten.
3 sec
1. To start searching for radio stations, press the music key or the phone key
for one second.
Next station Previous station
1 sec 1 sec
9.2. Radio Stations memory
Tune on station you want to save into memeries. Press for three seconds the
central button to start saving procedure.
3 sec
Up to 10 stations can be stored on U-COM 16. You can navigate through the
saved stations by pressing the central button for one second, advancing one
memory at a time.
1 -> 2 -> 3 -> 4 -> 5 -> 6 -> 7 -> 8 -> 9 -> 10 -> 1 -> 2 -> 3 -> ...
1 sec
9.3 Region Selection
You can select the proper FM frequency range for your location from the
Device Manager (available for PC and MAC on www.interphone.com) or the
INTERPHONE UNITE App. Using the region setting, you can optimize the
seek function to avoid unnecessary frequency ranges.
SETTINGS:
Worldwide 76.0 ~ 108.0MHz ± 100kHz
North America, South America and Australia 87.5 ~ 107.9MHz ± 200kHz
Asia and Europe 87.5 ~ 108.0MHz ± 100kHz
Japan 76.0 ~ 95.0MHz ± 100kHz
Navigate through the preset numbers that you want to store.
x 1 x 1
18
9.4 Storing temporary stations (with "Advanced Features" activated by APP or Device Manager)
The TEMPORARY STORE feature automatically searches and saves the 10
nearest radio stations, without changing the preset stations existing.
To activate the function, press the MUSIC button 3 times quickly.
The temporary preset stations are canceled when the intercom is restarted.
Page 19

10. VOICE COMMANDS
The voice command of the intercom allows you to perform certain
operations using only the voice. You can control the intercom completely
hands-free using the recognition vocal. You can set another language on the
UNITE Interphone app. If you set a language that does not support voice
commands, voice commands will only work in English. It's possible see the
list of voice commands of another language from the Interphone UNITE app.
Voice command performance may vary depending on environmental
conditions, such as the speed of riding, the type of helmet and
environmental noises.
To improve performance, minimize wind noise on the microphone using a
foam microphone cover and closing the helmet visor. It is recommended
to keep a normal tone of voice even in conditions of strong ambient noise,
the command recognition has lower performance if commands come say
screaming loud, if the microphone is too close or too far from the mouth.
Voice command list
Action Command
Start Mesh intercom Hey Interphone, Mesh On
Stop Mesh intercom Hey Interphone, Mesh O
Set Open Mesh mode Hey Interphone, Open Mesh
Set private Mesh mode Hey Interphone, Group Mesh
Group creation for private Mesh Hey Interphone, Mesh Grouping
Action Command
Bluetooth® intercom pairing Hey Interphone, Pairing Intercom
Connect intercom one Hey Interphone, Intercom one
Connect intercom two Hey Interphone, Intercom two
Connect intercom three Hey Interphone, Intercom three
Stop intercom Hey Interphone, end Intercom
Action Command
Phone pairing Hey Interphone, phone pairing
Answer a phone call Hello
Reject a phone call Ignore
Start Google assistant Hey Google
Start Siri Hey Siri
Action Command
Music play via Bluetooth
Music stop Hey Interphone, stop music
Start FM radio Hey Interphone, FM radio on
Stop FM Radio Hey Interphone, FM radio o
Track/Station next Hey Interphone, next
Track/Station previous Hey Interphone, previous
Check battery level Hey Interphone, check battery
Increase listening volume Hey Interphone, volume up
Decrease listening volume Hey Interphone, volume down
®
Hey Interphone, play music
19
Page 20
11. FUNCTION PRIORITY AND FIRMWARE
10 sec
Intercom
pairing
Con guration
menu
12. CONFIGURATION SETTING
UPGRADES
11.1 Function Priority
The headset prioritizes connected devices in the following order:
1. (Highest) Mobile phone
2. Voice command mode
3. Mesh Intercom/ Bluetooth
4. Music sharing via Bluetooth
5. FM radio
®
6. Bluetooth
stereo music
A lower-priority function gets interrupted by a higher-priority function. For
example, stereo music will be interrupted by an Intercom Conversation; an
Intercom Conversation will be interrupted by an incoming mobile phone call.
11.2 Firmware Upgrades
The headset supports rmware upgrades. Using the Device Manager utility
(available for PC and MAC on www.interphone.com) you can upgrade
rmware.
The USB Power & Data Cable (USB-C) must be connected to your computer,
then start Device Manager on computer and follow instructions step by step.
Interphone Unite APP can check the rmware version present on the
headset and inform you in case of a newer available rmware, but APP can't
ash the new rmware to headset.
®
Intercom
®
stereo
12.1 Headset Conguration Setting
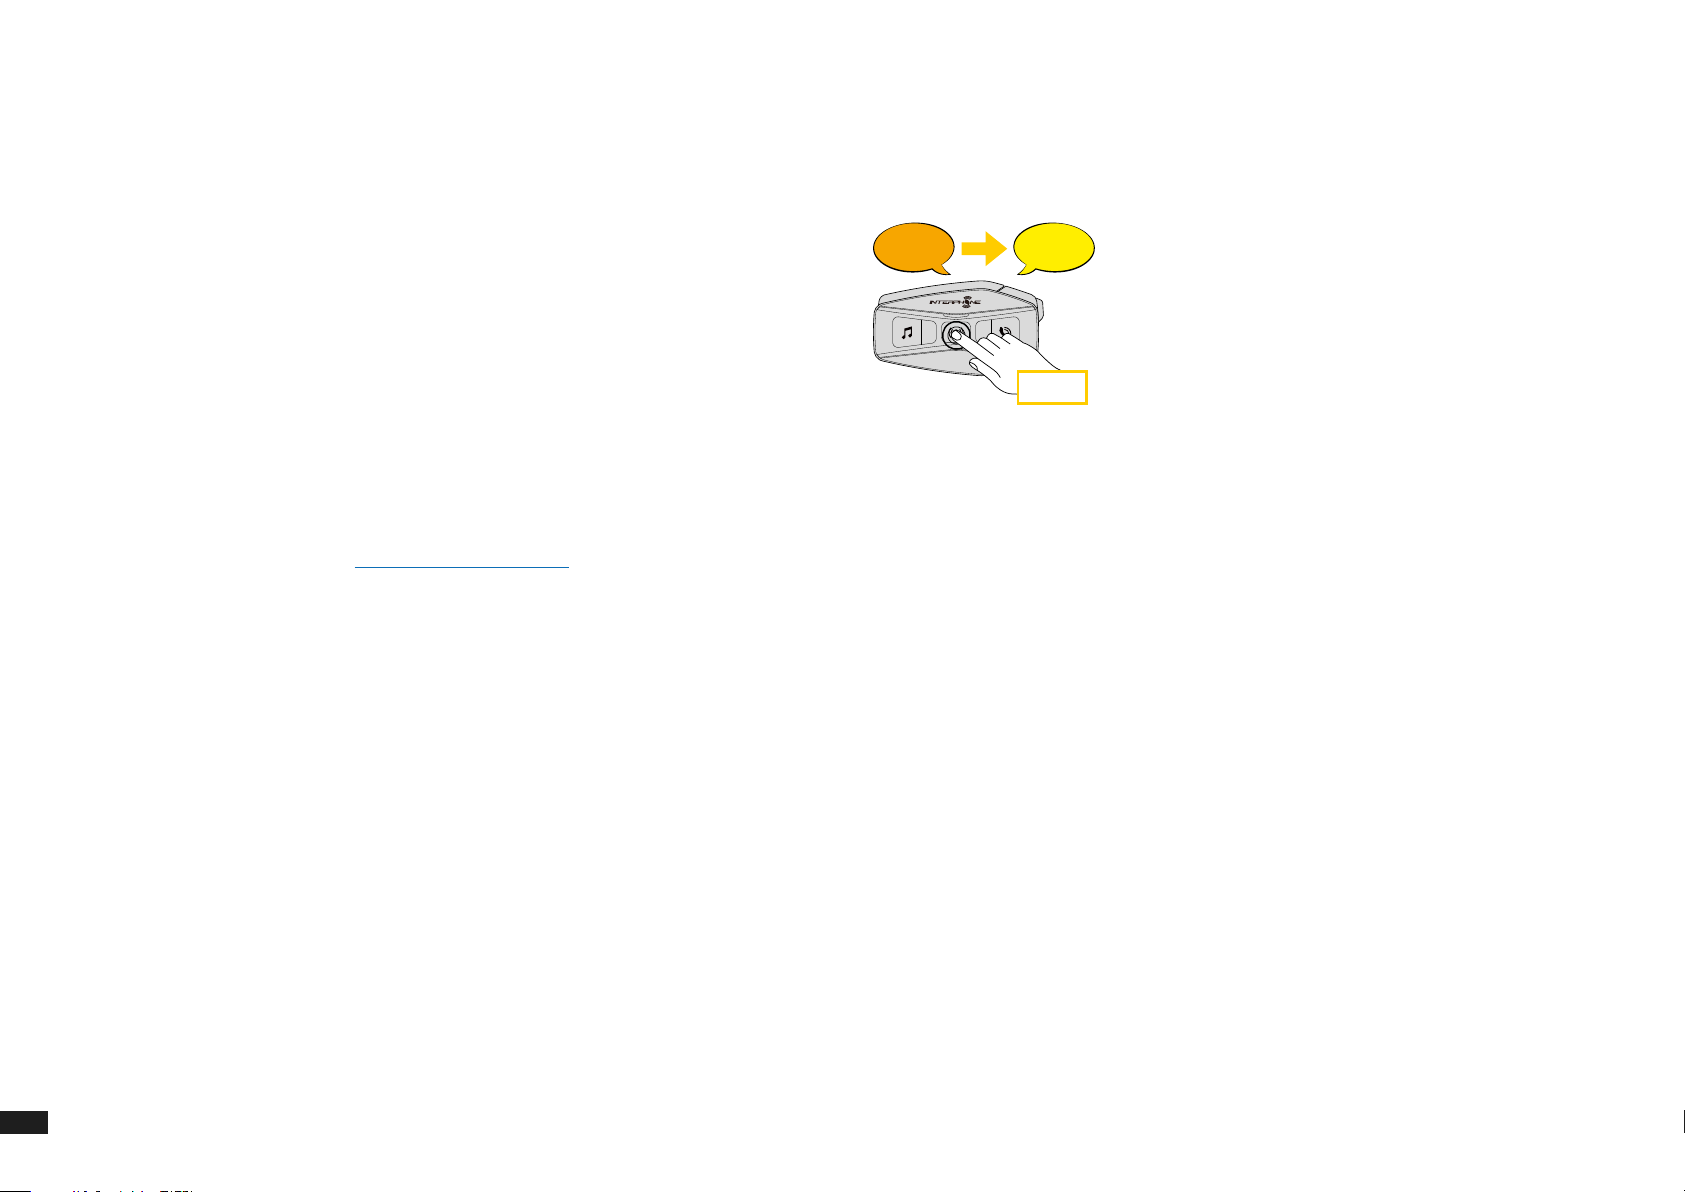
With U-COM 16 on, press and hold central button for 10 seconds, to enter
settings menu. Don't release the button until the led light is blue.
To navigate through the settings, press once the MUSIC button or the
PHONE button.
1. Phone pairing
2. Second Mobile Phone Pairing
3. Phone selective pairing (pair a device with HFP prole only)
4. Media selective pairing (pair a device with the A2DP prole only)
5. GPS pairing
To conrm the following conguration menu options, press the CENTER
button once.
6. Delete all pairings
7. Anycom pairing
8. Factory reset
9. Exit
20
12.1.1 Delete all pairings
Delete all Bluetooth® pairings stored in the device.
Page 21

12.2 Device settings
12.2.6 VOX Intercom (Default: Disable)
You can change the device settings from the Device Manager utility
(available for PC and MAC on www.interphone.com) or from the Interphone
UNITE app.
Attention: the setting "Advanced Features" will enable the following
headeset features:
• The private MESH mode called “GROUP MESH”
• Reset Mesh
• Phone multiple speed dial
• Conference intercom + phonecall
• Smart FM station seek
12.2.1 Speed dial
Assign phone numbers for speed dialing to make a phone call quickly.
12.2.2 Channel Setting (Default: channel 1)
If the Open Mesh communication experiences interference because other
groups are also using the channel 1 (default), change the channel. You can
select one of 1 to 9 channels.
12.2.3 Unit Language
You can select the device language. The selected language is maintained
even when the headset is rebooted
If VOX Intercom is enabled, you can initiate an intercom conversation with
the last connected intercom by voice. When you want to start intercom, say
a word such as “Hello” loudly or blow air into the microphone. If you start an
intercom conversation by voice, the intercom terminates automatically when
you and your intercom friend remain silent for 20 seconds. However, if you
manually start an intercom conversation by tapping the Center Button, you
have to terminate the intercom conversation manually. However, if you start
the intercom by voice and end it manually by tapping the Center Button, you
will not be able to start intercom by voice temporarily. In this case, you have
to tap the Center Button to restart the intercom. This is to prevent repeated
unintentional intercom connections by strong wind noise. After rebooting
the headset, you can start the intercom by voice again.
12.2.7 VOX Sensitivity (Default: 3)
VOX sensitivity can be adjusted depending on your riding environment.
Level 5 is the highest sensitivity setting and level 1 is the lowest.
12.2.8 Bluetooth® Intercom Audio Multitasking (Default: Disabled)
Audio Multitasking ( Bluetooth® Intercom Audio Multitasking and Mesh
Intercom Audio Multitasking) allows you to have an intercom conversation
while simultaneously listening to music, FM radio, or GPS instructions. The
overlaid audio is played in the background with reduced volume whenever
there is an intercom conversation and will return to normal volume once the
conversation is nished.
12.2.4 Audio Equalizer (Default: O)
You can use the Audio Equalizer to increase/decrease the decibel level of
dierent frequency ranges of audio.
• Balance will adjust all of the frequency ranges to be the same volume
level (0 dB).
• Bass Boost will increase the bass range of audio (20 Hz - 250 Hz).
• Mid Boost will increase the mid range of audio (250 Hz - 4 kHz).
• Treble Boost will increase the high range of audio (4 kHz - 20 kHz).
12.2.5 VOX Phone (Default: Enable)
If this feature is enabled, you can answer incoming calls by voice. When
you hear a ringtone for an incoming call, you can answer the phone by
saying a word such as “Hello” loudly or by blowing air into the microphone.
VOX phone is temporarily disabled if you are connected to intercom. If this
feature is disabled, you have to tap the Center Button to answer an incoming
call.
The Mesh Intercom Audio Multitasking feature is always on.
Note:
• For Bluetooth
power the headset o and on. Please restart the headset.
• Bluetooth
intercom conversations with a headset that also supports this feature.
• Some GPS devices may not support this feature.
• The Audio Multitasking feature can be congured through the IntercomAudio Overlay Sensitivity and the Audio Overlay Volume Management
settings.
®
Intercom Audio Multitasking to work properly, you need to
®
Intercom Audio Multitasking will be activated during two-way
21
Page 22

12.2.9 Intercom-Audio Overlay Sensitivity (Default: 3)
12.2.13 Smart Volume Control (Default: Disable)
The music, FM radio and GPS volume will be lowered to play in the
background if you talk over the intercom while the overlaid audio is
playing. You can adjust the intercom sensitivity to activate this background
audio mode. Level 1 has the lowest sensitivity and level 5 has the highest
sensitivity.
Note: If your voice is not louder than the sensitivity of the selected level, the
overlaid audio will not be lowered.
12.2.10 Audio Overlay Volume Management (Default: Disable)
The music, FM radio and GPS overlaid audio reduces in volume whenever
there is an ongoing intercom conversation. If Audio Overlay Volume
Management is enabled, the volume level of the overlaid audio will not be
reduced during an intercom conversation.
12.2.11 HD Intercom (Default: Enable)
HD Intercom enhances the two-way intercom audio from normal quality to
HD quality. HD Intercom will become temporarily disabled when you enter
into a multi-way intercom. If this feature is disabled, the two-way intercom
audio will change to normal quality.
Note:
• The intercom distance of HD Intercom is relatively shorter than normal
intercom.
• HD Intercom will become disabled temporarily when Bluetooth
Audio Multitasking is enabled.
®
Intercom
12.2.12 HD Voice (Default: Enable)
HD Voice allows you to communicate in high-denition during phone calls.
This feature increases the quality so that the audio will be crisp and clear
during phone call conversations.
Enabling Smart Volume Control automatically changes the level of the
speakers volume based on the level of the environment noise. You can
enable it by setting the sensitivity to low, medium or high.
12.2.14 Sidetone (Default: Disable)
Sidetone is audible feedback of your own voice. It helps you to naturally
speak at the correct level according to varying helmet noise conditions.
If this feature is enabled, you can hear what you are speaking during an
intercom conversation or a phone call.
12.2.15 Voice Prompt (Default: Enable)
You can disable voice prompts by software conguration settings, but the
following voice prompts are always on.
- Headset conguration settings menu, battery level indicator, speed dial,
FM radio functions.
12.2.16 RDS AF Setting (Default: Disable)
Radio Data System (RDS) Alternative Frequency (AF) Setting allows a
receiver to re-tune to the second frequency location when the rst signal
becomes too weak. With RDS AF enabled on the receiver, a radio station
with more than one frequency can be used.
12.2.17 FM Station Guide (Default: Enable)
When FM Station Guide is enabled, FM station frequencies are given by
voice prompts as you select preset stations. When FM Station Guide is
disabled, the voice prompts on FM station frequencies will not be given as
you select preset stations.
12.2.18 Advanced Noise Control™ (Default: Enable)
Three-Way Conference Phone Call with Intercom Participant will not be
available if HD Voice is enabled.
Note:
• Refer to the manufacturer of your Bluetooth
to the headset to see if it supports HD Voice.
• HD Voice is active only when Bluetooth
disabled.
22
®
device that will be connected
®
Intercom Audio Multitasking is
When Advanced Noise Control is enabled, the background noise is reduced
during an intercom conversation. When it is disabled, the background noise
is mixed with your voice during intercom.
Page 23

13. TROUBLESHOOTING
10 sec
Intercom
pairing
Con guration
menu
Please visit www.interphone.com for video tutorials and answers to
frequently asked questions.
13.1 Fault reset
When the intercom does not work properly, it is possible to reset the unit
easily, simply by disconnecting the battery for few seconds.
Note: Reset after error will not restore the intercom to factory settings.
13.2 Factory reset
To erase all of your settings and start fresh, the headset can be restored to
factory default settings using the Factory Reset feature.
With U-COM 16 on, enter the conguration menu by pressing the power
key for 10 seconds. Be careful not to release the button before the LED turns
blue, you will hear the message conrming activation of the conguration
menu.
Press the PHONE button twice until you hear the message “Factory reset”,
press once the CENTRAL button to conrm. A voice announcement will be
issued to conrm: "Reset headphones, goodbye".
23
 Loading...