

Page 1
Quick Start
Guide
PK80F
80-Column
Printer
PK80F 80-Column Fixed Mount Printer Quick Start Guide
1
Page 2

Packing List
Checktoensurethatyoureceivetheseitems:
S Intermec
S Printer Ribbon Cartridge
S Compliance Statement
S Warranty Card
S PK80F 80-Column Fixed Mount Printer Quick Start Guide
Common Accessories List
Cable Part Number
4 Foot Power Cable 226-215-001
8 Foot Power Cable 206-875-002
16 Foot Power Cable 206-875-006
22 Foot Power Cable 206-875-009
“Y” Power Cable 226-325-001
Cleaning Supplies Part Number
MICRO-CLEAN II 901-438-001
Guide Shaft Cleaner 901-439-001
R
PK80F 80-Column Printer
External Power Supply Part Number
External DC Power Supply 851-064-001
Paper Part Number
1-Ply 816-027-111
2-Ply 816-027-012
3-Ply 816-027-013
Ribbons Part Number
Purple Ribbon Cartridge 806-060-002
Black Ribbon Cartridge 805-060-001
Documentation Part Number
PK80 Series 80-Column User’s Manual 961-018-004
PK80 Series 80 -Column Installation Instructions 962-018-022
2 PK80F 80-Column Fixed Mount Printer Quick Start Guide
Page 3

Introduction
The IntermecR PK80F 80-Column Fixed Mount Printer can
hang on a wall, on a mounting plate secured to a wall, or secured directly to a wall. Mobile computers communicate with
this printer through a wireless radio or a wired serial connection.
There is no internal paper tray, thus paper is loaded from a separate dashboard mount, compact paper tray, or a box. The printer mechanism is permanently attached inside the printer.
PK80F 80-Column Fixed Mount Printer Quick Start Guide
3
Page 4
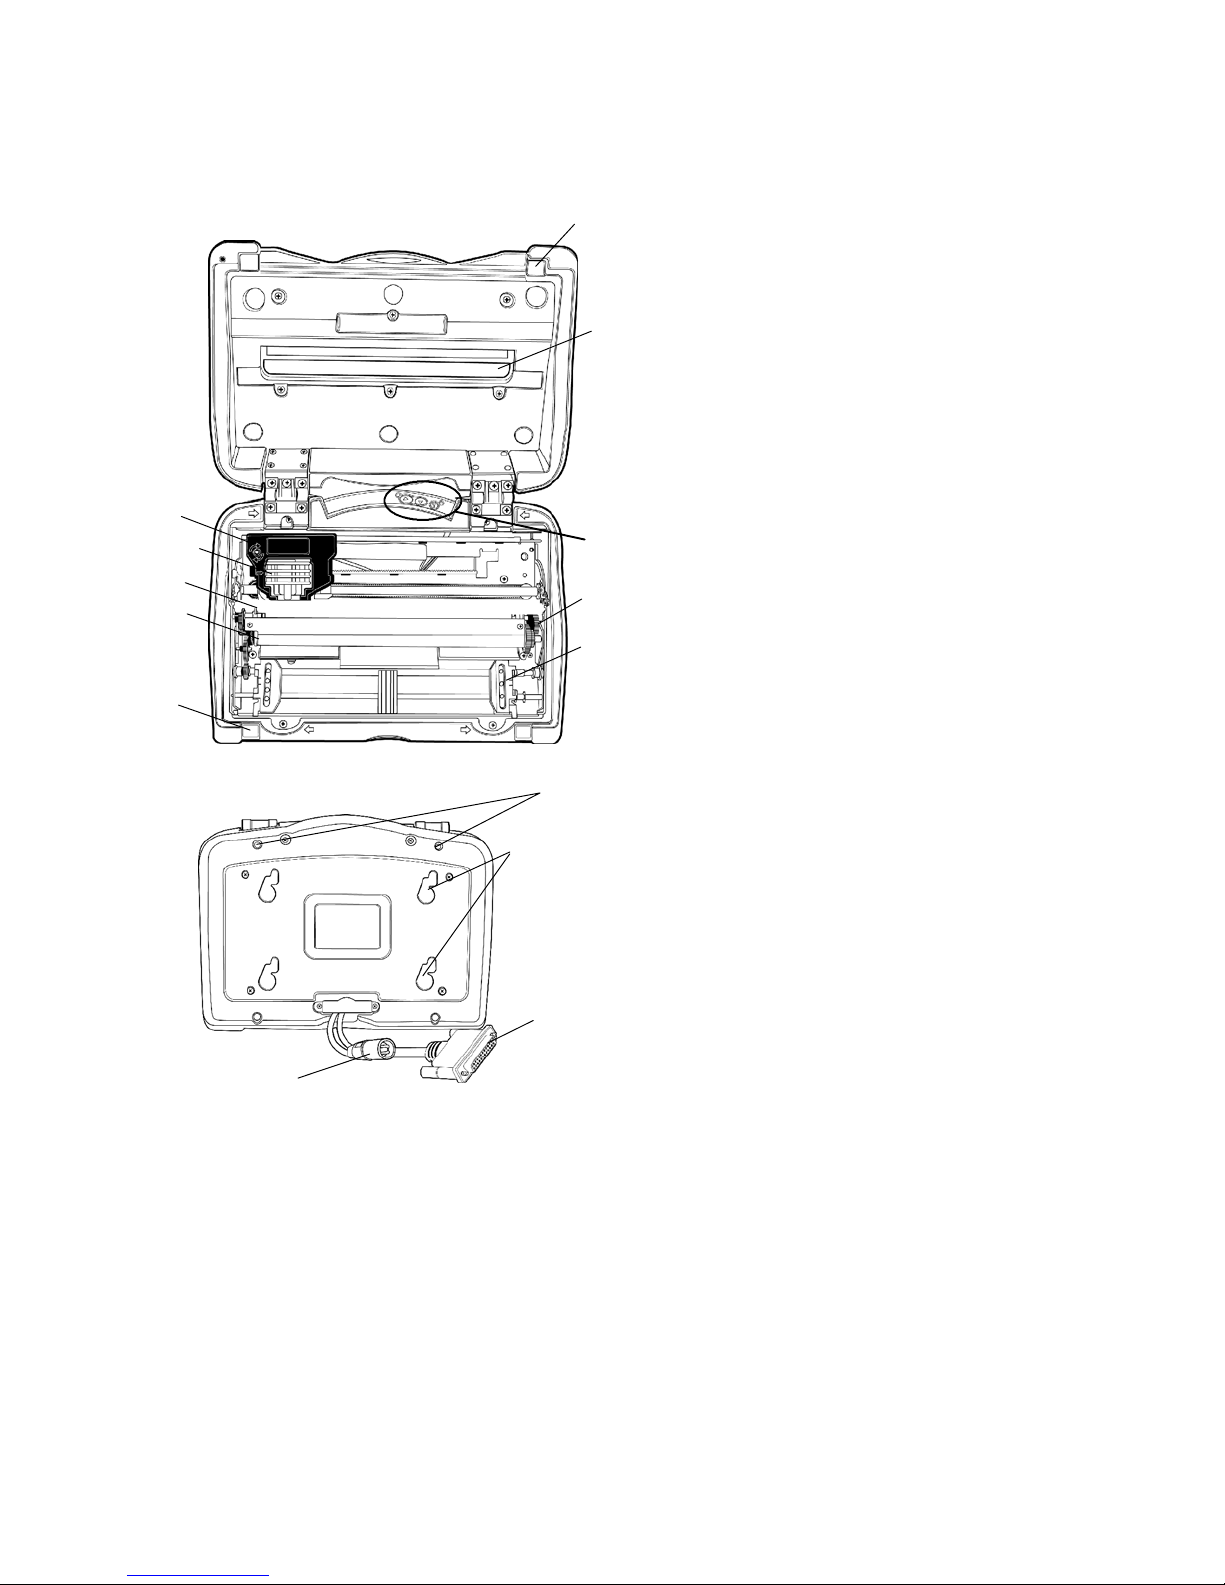
Getting Started
Ribbon
cartridge
Case latch insets
(one on each side)
Top cover
paper path
opening
Printer head
Paper bail
Platen
Case
latches
(one on
each side)
User panel
Thumb
Wheel
Pinfeed paper
holder
(one on each
side)
Direct mount holes
(punch through
plastic)
Mounting plate
mount points
DB25-pin data
communications
cable
DC power cable
4 PK80F 80-Column Fixed Mount Printer Quick Start Guide
Page 5

User Panel
The PK80F Printer user panel is located in the center top of the
printer and has three buttons and two Light-Emitting Diodes
(LEDs).
Reverse Button
Forward
Button
Radio Button
Power LED
Radio LED
Forward and Reverse Buttons
Use the Forward and Reverse buttons to power the printer On
or Off.
Forward (Left) Button
S Press to turn printer On.
S Press button to feed one line.
S Press and hold button longer to feed up to five lines, one line
at a time.
S Press and hold this button longer than five feed lines to do a
Form Feed, which moves the paper to the top of the next
page, or form. Press this button again during a Form Feed to
stop the paper feed.
S Press this button any time during a printing job to cancel the
current data buffer being printed.
S When there is a paper out, press this button to clear the paper
out mode. Insert the paper, then continue to press this button to feed the paper into the printer.
PK80F 80-Column Fixed Mount Printer Quick Start Guide
5
Page 6

Reverse (Right) Button
S PressbuttontoturnprinterOn.
S Press and hold this button to do a Back Feed, which pulls the
paper back into the printer line-by-line.
Both Forward and Reverse Buttons
Press both buttons to power Off the printer.
Power LED
The power (left) LED shows a steady green when the power is
plugged in and a steady green when the printer is awake after
coming out of a sleep mode.
Radio Button
Press the third button, the Radio Button, to toggle the radio
On or Off.
S If the button is pressed when the RF power is Off, then the
printer emits one short beep before turning On the RF power.
S If this button is pressed when the RF power is On, the print-
er emits two short beeps before turning Off the RF power.
Single Color (Blue) Radio LED
The single-color (blue) LED indicator shows the current status
of the RF power for this printer as follows:
Printer State Radio State Radio Power State
Asleep Off Off
Awake Off Off
Asleep Momentary flash at 1 every
5seconds
Awake On On
6 PK80F 80-Column Fixed Mount Printer Quick Start Guide
On
Page 7

Single Color (Green) Power LED
Thesinglecolor(green) LEDindicatorshowsthecurrentstatus
of the printer power as follows:
Printer State Color LED and Meaning
Asleep Off
Awake Green
Remote Connections
A printer and a mobile computer, using the Personal Area Network (PAN) radio, can operate while up to 30 feet (10 meters)
apart.
Vehicle Battery
Powerisprovidedtotheprinterthroughacablepermanently
installed in the vehicle.
External Power Supply
Using your printer in a settlement room environment power
may be provided to the printer through an external DC power
supply.
Paper
The printer works with 1–3 ply carbonless paper that is singleedge glued and designed for sprocket feed. Standard paper size is
8.5 x 11” or 8. 5 x 12” (241 x 305 mm international). Use 3-ply
forms up to a maximum of 0.009 inch (0.23 mm) thick.
PK80F 80-Column Fixed Mount Printer Quick Start Guide
7
Page 8
Before Using Your Printer The First Time
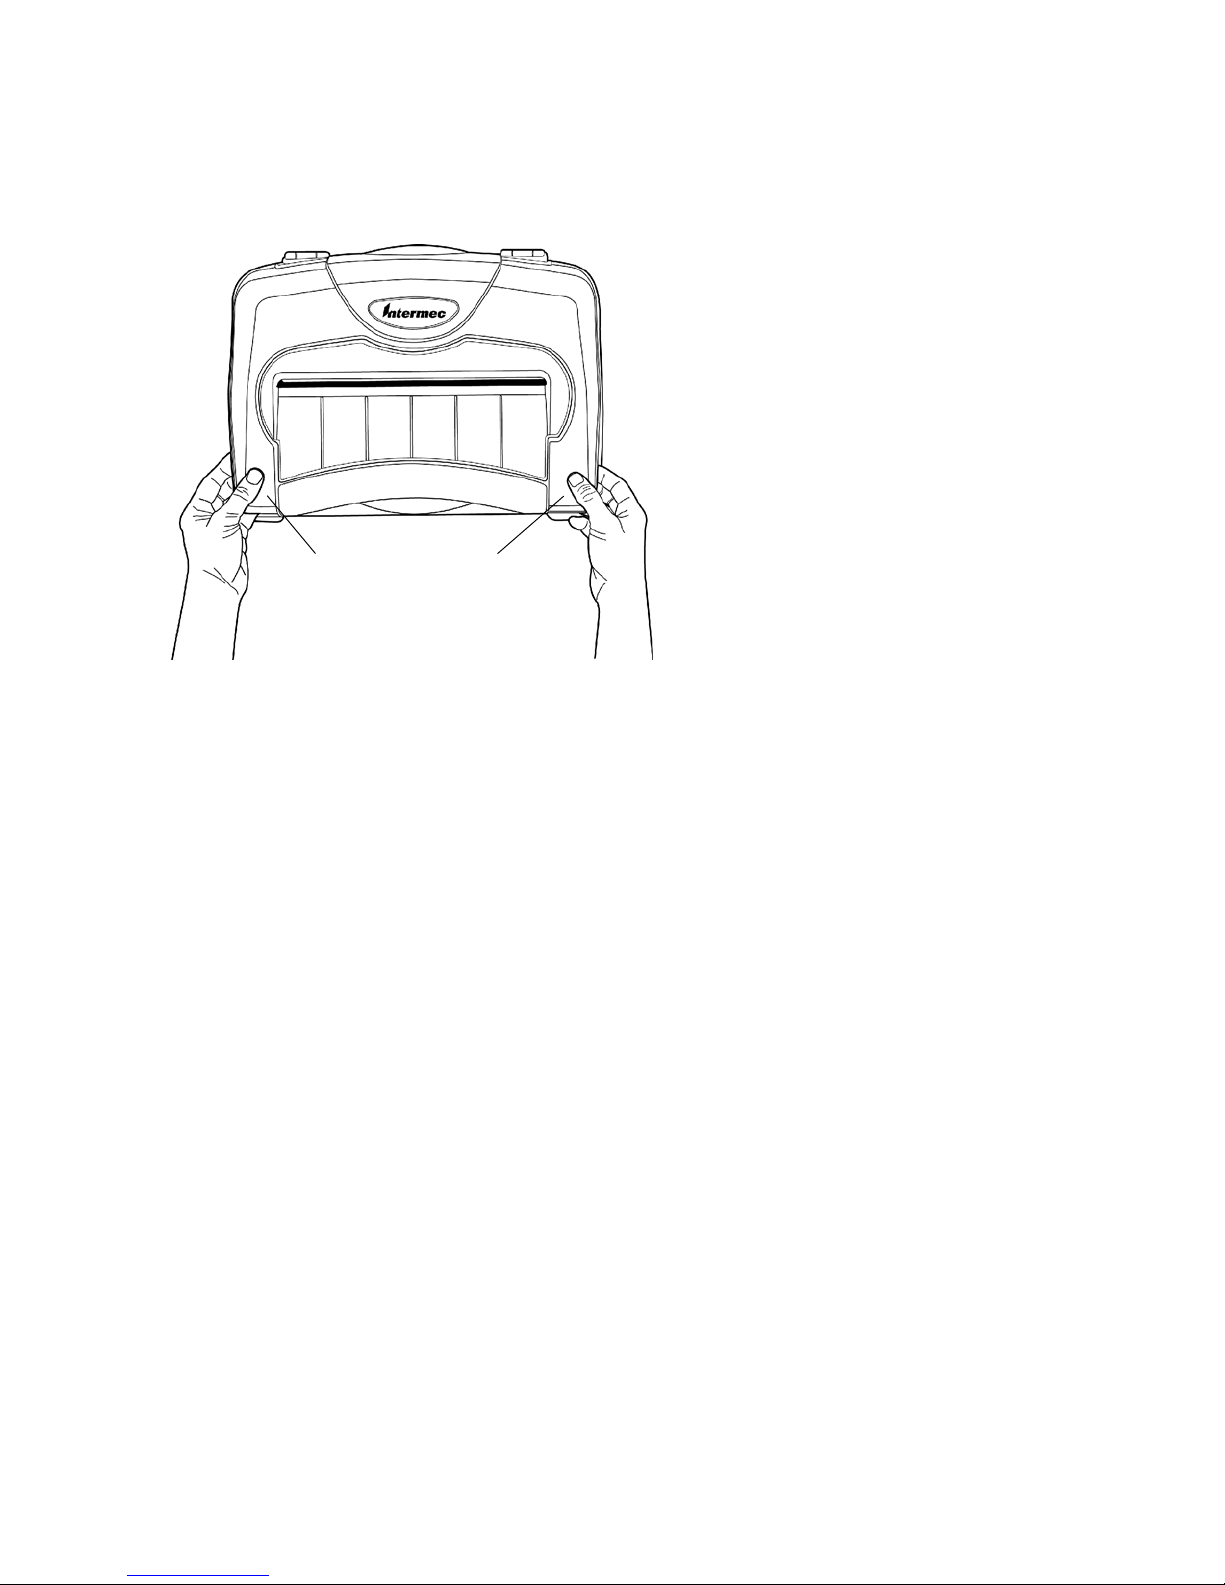
1 Open the printer lid and remove the twist tie from the print
head.
Open the printer lid by
lifting from both corners
2 Install the ribbon cartridge.
3 Secure printer to the mounting bracket you are using.
4 Load paper into the paper tray or box.
5 Feed the paper into the printer
8 PK80F 80-Column Fixed Mount Printer Quick Start Guide
Page 9
Installing The Ribbon Cartridge
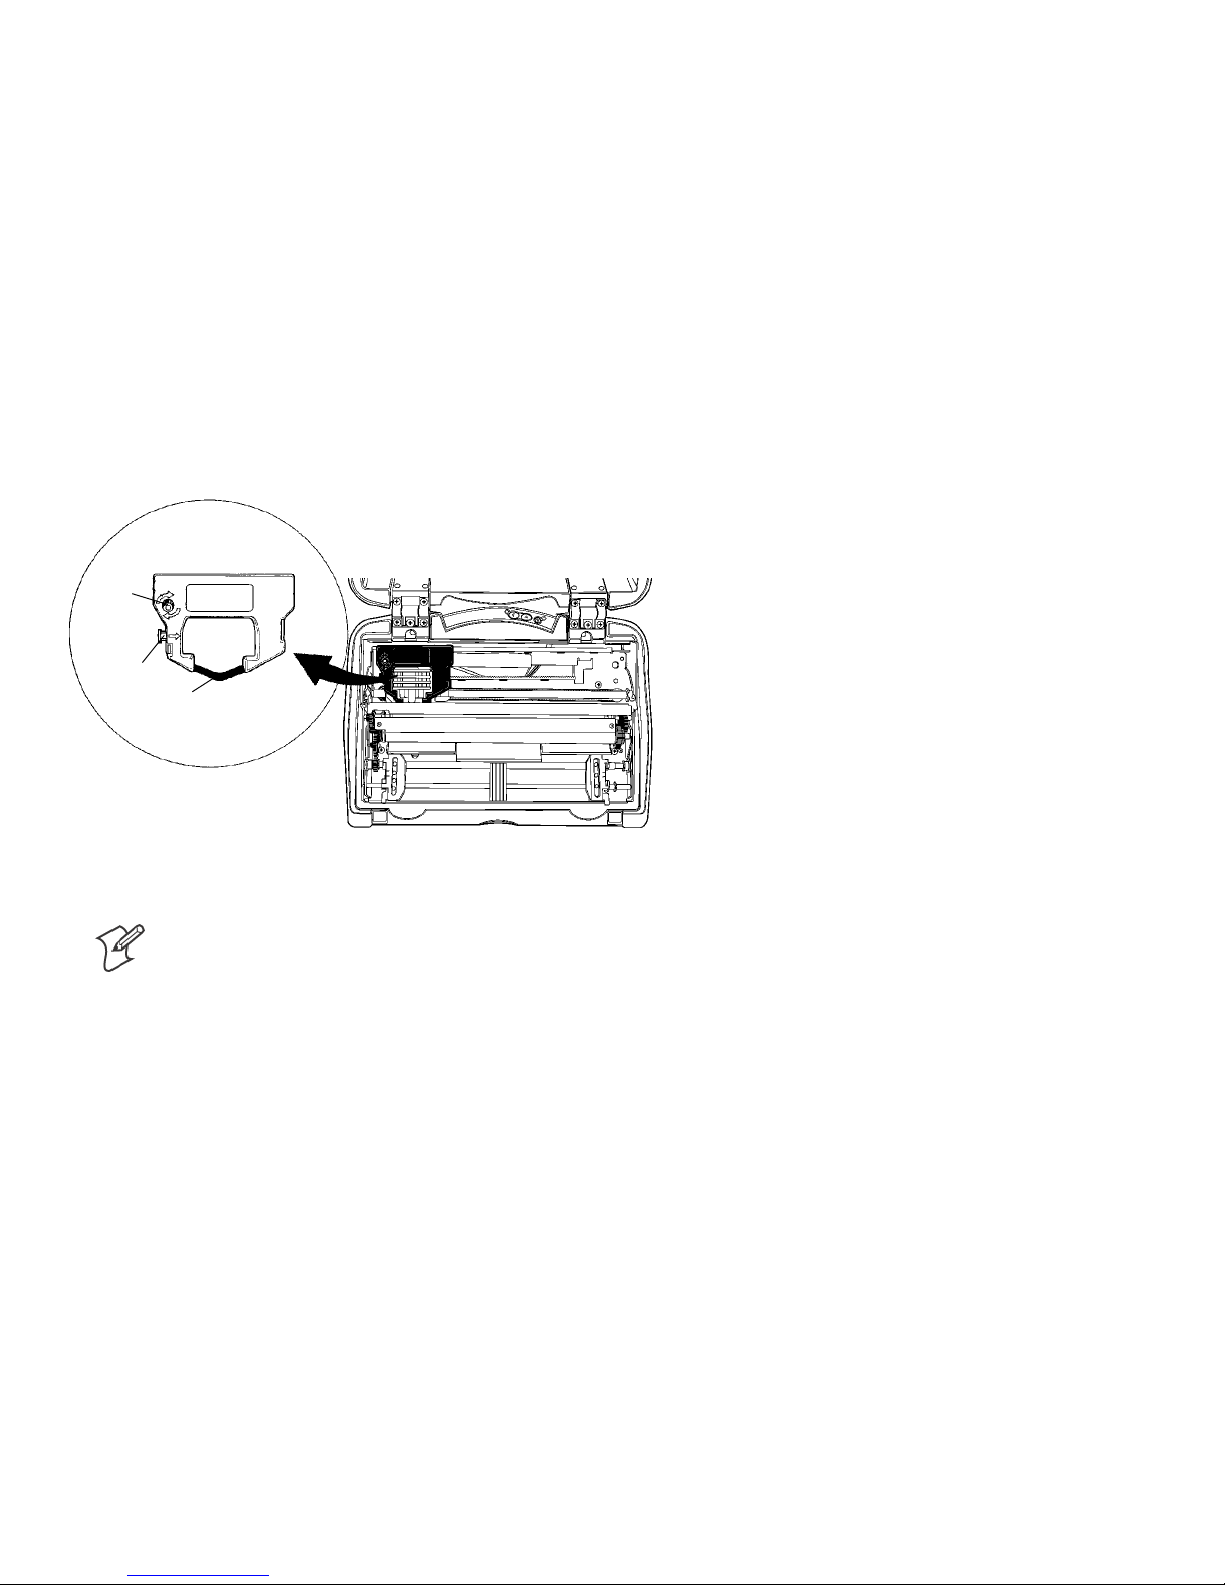
Ensure that there is a ribbon cartridge in your printer before
using.
1 Turn the ribbon advance knob in the direction of the raised
arrows to remove any slack in the cartridge.
2 Squeeze the ribbon cartridge locking tab into the cartridge,
then lower the cartridge over the print head.
3 Lower the tab side of the cartridge until it clicks.
4 Release the tab and press down on the arrow to fully seat the
ribbon cartridge. The tab clicks outward.
5 Turntheribbonadvanceknobtoaligntheribboninfrontof
the print head.
Advance
knob
Locking tab
Ribbon
Load Paper Tray
Note: Do not exceed the recommended amounts of
paper quantity or thickness. When loading multiplesheet paper, be sure to have the original faced up,
with the leading edge towards the rear of the printer.
Load the Compact Paper Tray
If you have a compact paper tray attached to your PK80F Printer, hold a stack of paper, up to 2.5 inches (6 cm) thick, with the
PK80F 80-Column Fixed Mount Printer Quick Start Guide
9
Page 10

original facing you, and lay the stack flat into the tray. Pull the
top form out to load into the printer.
Load the Dashboard Paper Tray
If your PK80F Printer is attached to a dashboard mount, do the
following to load paper into that tray:
1 With the original facing you, insert a stack of paper inside the
box from the front of the dashboard mount.
2 From the back of the dashboard tray, pull the top form out,
then over the printer into the mechanism.
Load Paper into Printer
Follow these steps to load the paper into the
printer, or paper jams may occur.
Paper for the PK80F Series Printer has perforated strips that fit
onto the pinfeed holder pins, guiding the paper into the printer.
Adjust the Pinfeed Holders
Note: There are two pinfeed holders, one next to the
green thumb wheel and one opposite the same wheel.
Always loosen the pinfeed holder opposite the green
thumb wheel.
Adjusting the pinfeed holder next to the green thumb wheel
may cause information to print in the wrong place. I f this
pinfeed holder is moved, correct its location by releasing the
pinfeed holder tab, moving the pinfeed holder as close to the
green thumb wheel as possible, then locking the pinfeed holder
tab, before adjusting the opposite pinfeed holder.
If the paper does not properly fit on the two pinfeed holder follow these steps to adjust the pinfeed holders.
1 With the pinfeed holders open, release the locking tab on the
pinfeed holder opposite the green thumb wheel.
2 Adjust the pinfeed holders to align the pins with the paper.
3 Close the pinfeed holder.
10 PK80F 80-Column Fixed Mount Printer Quick Start Guide
Page 11
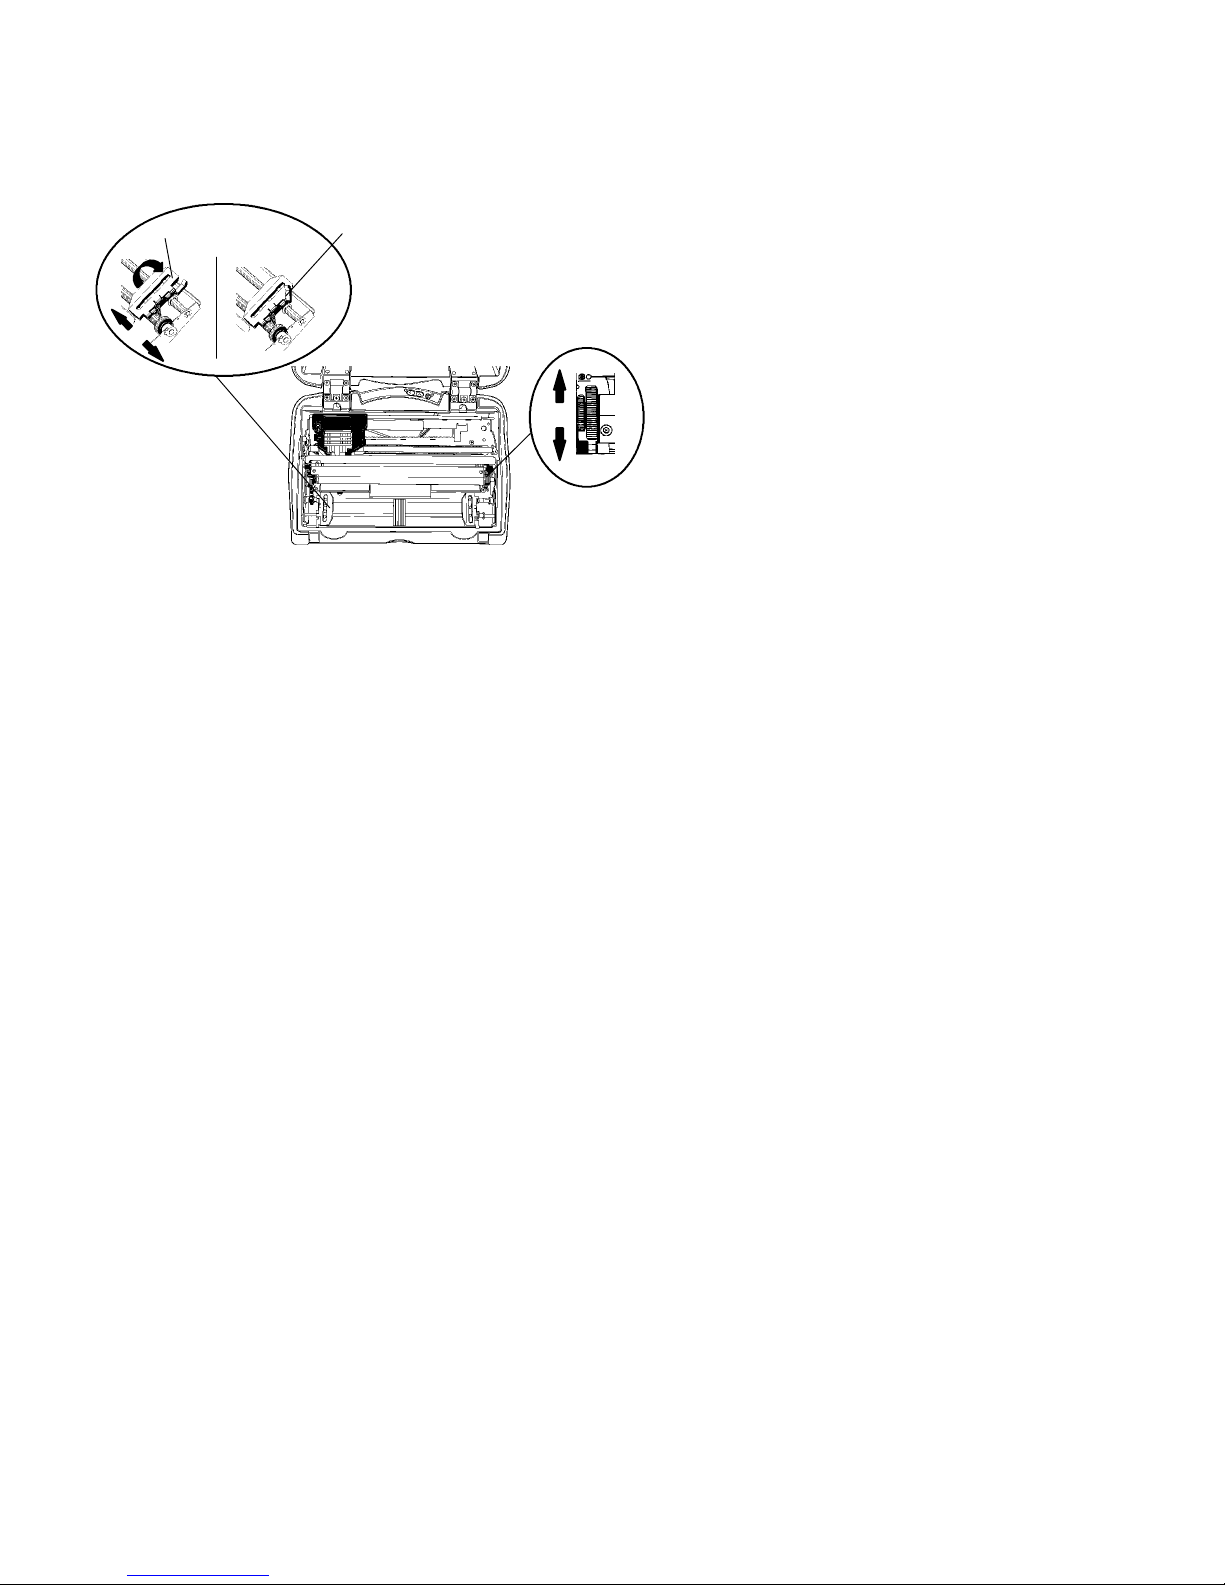
4 Ensure that the paper is smooth (no folds, bulges, bows, etc.)
between the pinfeed holders. Then push the locking tab
down on the pinfeed holder that you adjusted.
Pinfeed holder
1
Locking tab
Thumb wheel
Position the Paper
1 Open the pinfeed holders outward.
2 Take the top edge of the sheet of paper and position it, origi-
nal side facing down, over the pinfeed holder pins.
3 Align the first few holes of the paper, on each side of the pa-
per, onto the pinfeed holder pins.
4 Close the pinfeed holders.
5 Raise the paper bail.
Set the Paper
Do the following to feed the paper into the printer:
1 Press, and h old, the Forward button on the user panel to feed
the paper into the printer.
2 Lowerthepaperbail.Thetopofthepageshouldbeapproxi-
mately 1/4” (6.4 mm) above the paper bail.
3 Close the printer lid. Ensure the paper passes through the
paper slot when the printer starts printing.
Adjusting The Print Head Gap
When the printer is powered On or awakened, the print head
will find home by advancing away from home, then returning to
PK80F 80-Column Fixed Mount Printer Quick Start Guide
11
Page 12
home, or by returning to home if starting from another location,
such as where it stopped when the last printing job was complete.
When printing is complete, the print head remains where it
stopped with a low hold energy applied to the print head. Further printing activity begins from this stopped point. If there is
no activity after ten seconds, the print head returns to its home
positionandisnolongerheldinplace.Iftheprintheadis
moved from this position, the printer will relocate to home position before printing again.
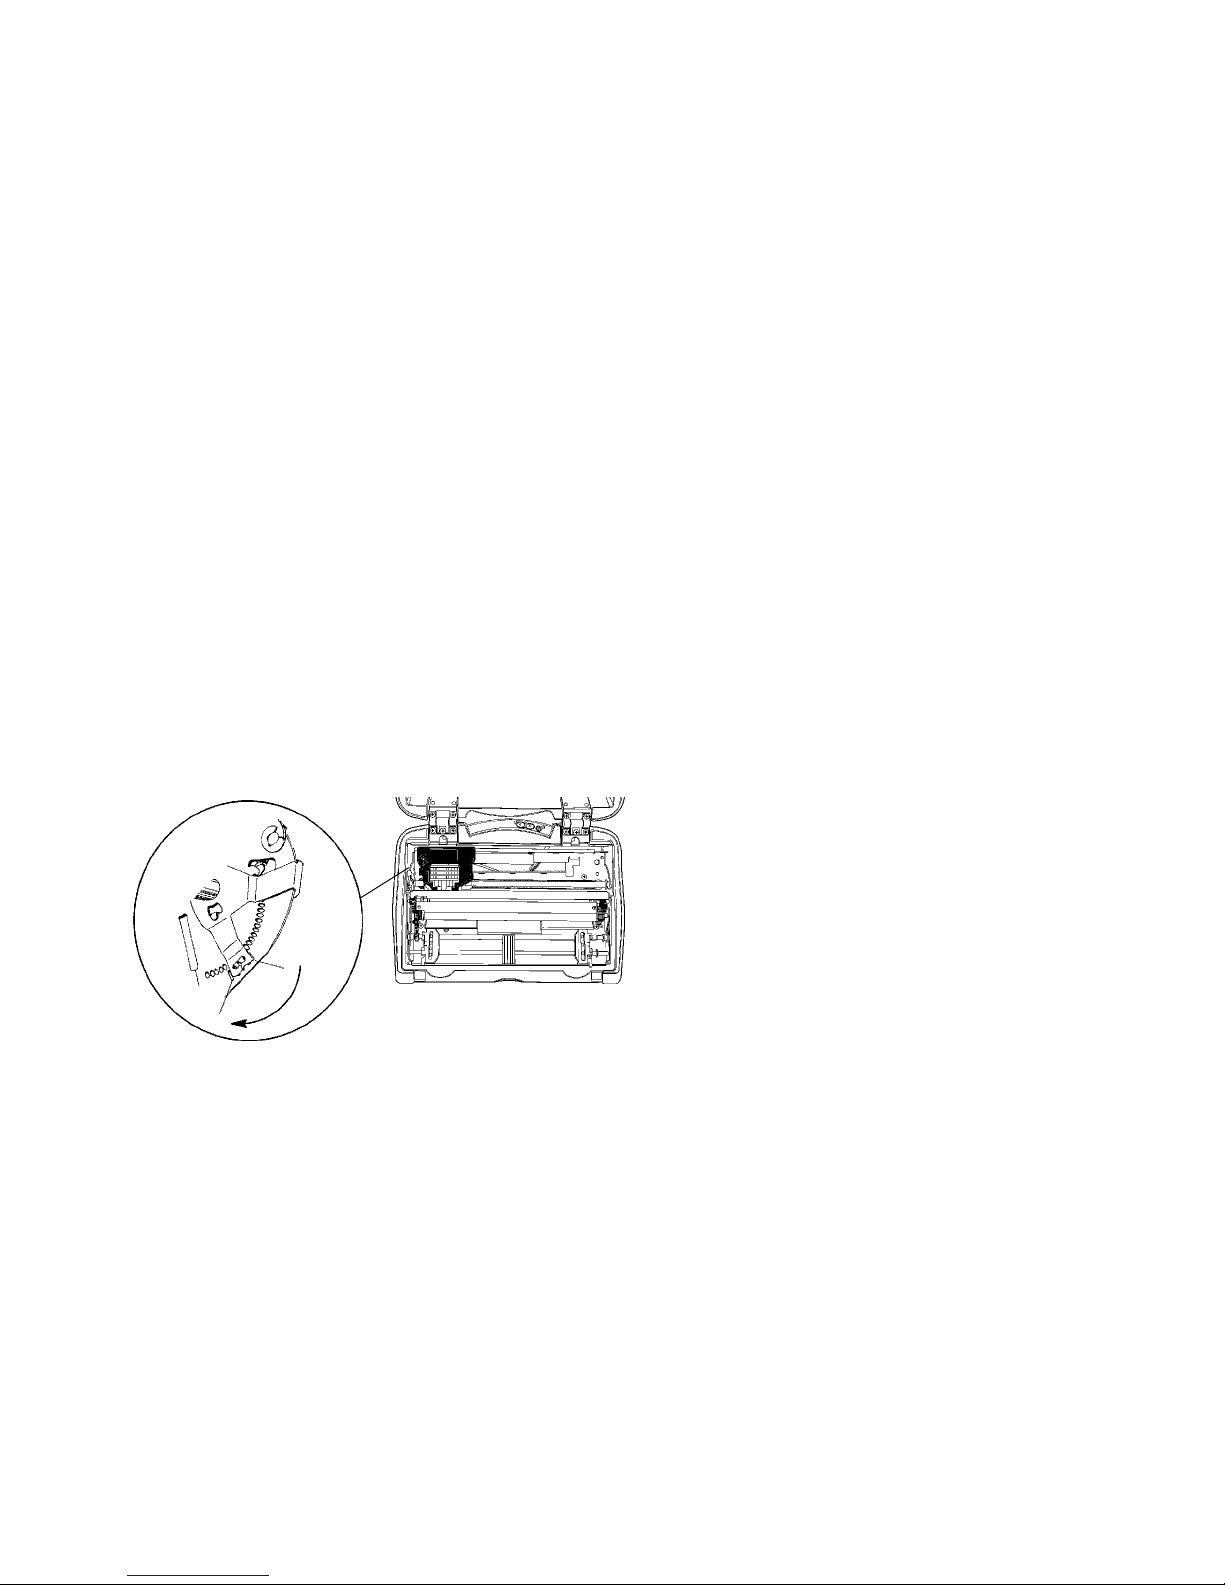
The head gap adjuster is near the printer mechanism on the side
opposite the green thumb wheel. The print head adjuster has
five notches between the print head and the platen for different
paper thicknesses.
Verify the thickness of the paper loaded into the printer.
S If you are using single-sheet forms, set the head gap adjuster
to the third notch away from the paper.
S If you are using multiple-sheet forms (2-ply or 3-ply), set the
head gap adjuster to the fourth notch away from the paper.
S If you experience frequent head jams, set the head gap adjust-
er to the fifth notch away from the paper. This may stop the
head jams.
S If the 2-ply and 3-ply paper have light printing, setting the
gap adjuster to a closer setting darkens the print.
1
5
12 PK80F 80-Column Fixed Mount Printer Quick Start Guide
Page 13

Check the Power Source
The printer will automatically power down after a configurable
period of inactivity. Activity is either sending data or pressing a
button. The timer resets during printing. You can awaken the
printer either by sending data or pressing the Forward or the
Reverse buttonontheuserpanel.
If there is power, the power LED turns On and the print head
moves to its home or starting position. If the printer emits beeps
and power LED lights up or flashes, observe the number of
beeps and flashes and refer to the Troubleshooting table (see
page 16), the Printer LED table (see page 13), or the PK80 Se-
ries 80-Column User’s Manual p/n: 961-018-004.
If there is no reaction from the printer after pressing a button on
theuserpanel,oronlythepowerLEDblinks,verifythatthe
power cables are properly connected between the printer and its
power source. If neither of these steps “wake” up the problem
printer, then return the printer for service.
S Vehicle cable:
Attach the printer to another vehicle power cable.
S AC power:
Plug the printer into another outlet.
Printer LED Indicators
If the power LED is green, but the printer is not printing, press
andholdboththeForward and Reverse buttons. If the power
LED light up, refer to the following table:
Printer Failure Indicators
Sets of Beeps Meaning
1 set of 13 beeps Configuration error.
2 sets of 3 beeps Paper Out.
3 sets of 4 beeps Home switch failure.
4 sets of 2 beeps Head Jam.
4 sets of 4 beeps Flash write error.
12 sets of 12 beeps Operating system software failure.
PK80F 80-Column Fixed Mount Printer Quick Start Guide
13
Page 14

Printer Self-Test
A Self-Test is performed by pressing and holding the Forward
button through a form feed (more than five lines). I f it is still
held down at the end of the form feed, it prints a self-test.
TheresultoftheSelf-Testisaonepagereportwhichishelpful
when diagnosing and troubleshooting printer problems.
Refer to the PK80 Series 80-Column Printer User’s Manual p/n:
961-018-004 for a complete description of the Self-Test report.
Operation Guidelines
Things to Do
n Ensure that your mobile computer remains connected
to the printer throughout a printing operation.
n Ensure the printer cover is closed except during
maintenance procedures or paper loading.
n Ensure that the paper is properly installed.
n Disconnect the printer power cable when jump
starting your vehicle.
n Keep your printer clean.
Things NOT to do
n Spill liquids or food crumbs into the printer.
n Sit or stand on the printer.
n Usesolventsorabrasivecleanersonyourprinter.
n Rest objects on, under, or against the printer.
n Allow the printer to be knocked over or physically
damaged.
n Start or stop the vehicle engine while printing.
n Overload paper tray (paper jams will occur).
n Use objects to remove paper from between the print
head and the platen (damage to mask spring and print
head will occur).
14 PK80F 80-Column Fixed Mount Printer Quick Start Guide
Page 15

General Cleaning
Do not use glass cleaners with ammonia.
Permanent damage to the printer cover will occur
if such glass cleaners are used.
Do not use abrasives or solvents (or any product
containing these substances) to clean any part of
the unit. Permanent damage to the printer will
occur if such substances are used.
Never use ketonic solvents (acetone or ketone) or
aromatic solvents (toluene or xylene) to clean any
part of the printer. Doing this can damage the
printer.
Note: MICRO-CLEAN II is the only cleaner recommended for this purpose. Other cleaners can
damage the case.
Note: GUIDE SHAFT CLEANER is recommended for cleaning your printer guide shafts.
Cleaning the printer guide shaft can reduce the
number of head jams caused by dirt and buildup.
Both cleaners are sold separately. Order these products by calling Intermec Inside S ales Department
1-800-255-6292.
Periodic cleaning helps maintain the appearance and reliability
of the printer. When cleaning the printer, inspect both the outside and the inside for obvious signs of damage, wear, or impending failure.
Outside Cleaning
Do not pour liquid cleaners directly on the printer case. Instead,
dampen a soft, lint-free cloth with a quality cleaner and clean
the exterior su rfaces with this cloth. Do not use solvent solutions. Inspect all cables and the remote terminal holder or vehicle dock for damage.
Inside Cleaning
Let the printer cool before you clean the inside of
the printer, or you may burn your fingers.
PK80F 80-Column Fixed Mount Printer Quick Start Guide
15
Page 16

Open the printer cover and inspect the ribbon cartridge and all
visible moving parts on the printer mechanism for signs of wear
or damage.
Use a low-pressure, dry air source, such as “canned air” available
at electronic supply houses and typewriter repair facilities, or a
vacuum, to remove accumulated paper dust from the printer
mechanism.
The printer ribbon contains a special lubricant to ensure that
the fine dot wires inside the print head receive adequate lubrication. Replace the ribbon frequently to prolong the life of the
print head. The printer requires no additional user-applied lubrication.
Troubleshooting
Possible Printer Problems
Printer does not communicate w ith the mobile computer.
Incorrect protocol selection. Contact Customer Support
800-755-5505.
Printeremits1or2beepsorblinkinggreenlightisthe
only indicator.
Printer mechanism does not have adequate power for printing.
The12voltmaybeunderorovervoltagefault.Errorlightsdo
not flash if you have a high voltage condition.
Check power supply if one is used, adjust supply voltage to
11-15 volts. Check the vehicle charge cable (see the PK80 Se-
ries 80-Column Printer Installation Instructions for information.
Printer emits 2 sets of 3 short beeps.
Printer out of paper. Press the Forward button to stop the
beeps. Reload paper.
Printer does not work.
1) No Voltage. Adjust supply voltage to 11-15 volts.
2) Voltage too high or low. Adjust supply voltage to 11-15
volts.
3) No data input. Tighten computer connections.
16 PK80F 80-Column Fixed Mount Printer Quick Start Guide
Page 17

Possible Printer Problems (continued)
Printer is emittin g fo ur se ts of two b ee ps a nd has
stopped printing.
The printer detected a paper jam during homing. Power Off
the printer, clear the paper jam, then power up the printer.
No paper feed (paper jam). When pulling the paper
toward the roller the paper resists.
1) Paper tray or dashboard mount may be too full. Ensure less
than 200 3-ply sheets are in the paper tray or dashboard
mount.
2) The paper perforation may be torn. Remove the torn paper,
load and center a clean stack of paper, then adjust the pinfold
holders.
3)Thepapermaybewrinkled,creased,moist,orperforations
maybemissing.Replacethepaper.
No paper feed (head jam). When I move the print head
manually from side to side the print head is resistant.
1) Ribbon may be jammed. Remove the ribbon cartridge and
turn knob. If ribbon resists, replace ribbon cartridge.
2) Mask spring may be bent or damaged. Refer to the PK80
Series 80-Column Printer User’s Manual p /n: 961-018-004 for
instructions on replacing the mask spring.
3) Print head gap adjuster may be too low. Adjust the print
head gap.
4) Paper scraps are found in the printer mechanism or around
platen. If the ribbon cartridge bumps against the inside of the
printer, check the white ribbon cable, home position sensor,
and four screws. Remove any paper scraps and do a cleaning.
5) Printer still does not work. Contact Customer Service
800-755-5505.
PK80F 80-Column Fixed Mount Printer Quick Start Guide
17
Page 18

Specifications
Note: Various print fonts do affect the print speed.
Printer Specifications
Item Spec Detail
Print Speed 230 characters p er second (cps)
Weight 11.09 lb (5 kg) printer
Temperature:
Operating
Storage
Humidity 90% non-condensing
Electrical:
Voltage
Current
Warranty One year, includes print head. Ex-
-4° to +140°F(-20° to +60°C)
-22° to +149°F(-30° to +65°C)
12 volts dc (nominal)
100 mA (sleep mode)
tended warranty available.
Global Services and Support
To request technical support, on-site repair service, return your
equipment for factory repair, arrange to have a site survey or
product installation or check on service contract status, you may
select one of the following options:
Technical Support
To request technical support on your Intermec product call
1-800-755-5505.
Global Services and Support
S Factory Repair and On-site Repair
To request a return authorization number for one of our authorized service centers, or to request an on-site repair technician, call 1-800-755-5505, then select option 1.
S Technical Support
For technical support on your Intermec product, call
1-800-755-5505, then select option 2.
S Service Contract Status
To inquire about an existing contract, or to renew a contract,
call 1-800-755-5505, then select option 3.
18 PK80F 80-Column Fixed Mount Printer Quick Start Guide
Page 19

S Schedule Site Surveys or Installations
To schedule a site survey, or to request a product or system
installation, call 1-800-755-5505, then select option 4.
Web Support
Visit our Web site at http://www.intermec.com to download
many of our current manuals in PDF format.
Visit our technical knowledge base (Knowledge Central) at
http://intermec.custhelp.com to review technical information or
to request technical help for all Intermec products.
Product Warranty
We warrant that Intermec Technologies Corporation products
will be free from defects in manufacturing materials and workmanship for one (1) year from date of shipment. This one year
warranty applies to the PK80F Printer only.
To Obtain Warranty Service
1 Purchaser must obtain a Return Authorization (RA) number
from the Intermec Service Center (1-800-755-5505) within
the warranty period.
2 Purchaser will provide a written, detailed description of the
defect.
3 The product must be promptly returned to the designated
Intermec Service Center, freight prepaid by Purchaser.
4 Upon examination of the product, Intermec must agree that
the defect exists and is covered by this warranty. Warranty
repairs will be completed at the Service Center and returned
to the Purchaser by prepaid surface freight.
The foregoing is a summary of the standard warranty, which
shall be purchaser’s sole remedy. Complete warranty details can
be found in your purchase agreement or obtained from your
local Intermec sales office.
In no event shall Intermec Technologies Corporation nor its
suppliers be liable for any special, consequential or incidental
damages.
PK80F 80-Column Fixed Mount Printer Quick Start Guide
19
Page 20

Corporate Headquarters
6001 36th Avenue We st
Everett, W ashington 98203
tel 425.348.2600
fax 425.355.9551
www.intermec.com
E 2003 by Intermec Technologies Corporation. All rights reserved.
PK80 80-Column Printer Quick Start Guide April 2004
*962018021D*
962018021D
20 PK80F 80-Column Fixed Mount Printer Quick Start Guide
 Loading...