

Page 1

RR
PEN*KEY
6632 Pen Computer
USER’S GUIDE
" " " " " " " " " " " " " " " " " " " " " " " " " " " "
PN: 961-028-103
Revision A
August 1998
Page 2

"
NOTICE This publicationcontains information proprietary to Intermec Technologies Corpo-
ration. It is being supplied to you with the express understanding that the information contained herein is for the benefit of the contracting party only,and
may not be copied, distributed, or displayed to third parties without the express
written consent of Intermec Technologies Corporation, and shall be returned to
Intermec Technologies Corporation upon written request. If a purchase, license, or
nondisclosure agreement has been executed, the terms of that agreement shall
govern this document.
This publication is furnished for information only, and the information in it is
subject to change without notice. Although every effort has been made to provide
complete and accurate information, Intermec Technologies Corporation assumes
no responsibility or liability for any errors or inaccuracies that may appear in this
document.
Disclaimer of Warranties. Thesample source code included in this document is
presented for reference only. The code does not necessarily represent complete,
tested programs. The code is provided “AS IS WITH ALL FAULTS.” ALL
WARRANTIES ARE EXPRESSLY DISCLAIMED, INCLUDING THE
IMPLIED WARRANTIES OF MERCHANTABILITY AND FITNESS FOR A
PARTICULAR PURPOSE.
Wewelcome your comments concerning this publication. Although every effort has
been made to keep it free of errors, some may occur. When reporting a specific
problem, please describe it briefly and include the book title and part number,as
well as the paragraph or figure number and the page number.
Send your comments to:
Intermec Technologies Corporation
Publications Department OR05
550 Second Street SE
Cedar Rapids, IA 52401
INTERMEC, NORAND, PEN*KEY, PEN*VIEW are trademarks of Intermec
Technologies Corporation.
Ó 1998 Intermec Technologies Corporation. All rights reserved.
This publication printed on recycled paper.
Acknowledgments
Handwriter is a registered trademark of Communication Intelligence Corporation.
Microsoft, MS, and MS-DOS, and Windows, are registered trademarks and Visual
Basic for Windows, and Windowsfor Pen are trademarks of Microsoft Corporation.
PenRight! and PenRight! Pro are trademarks of PenRight Corporation.
IBM, IBM PC, PS/2, are trademarks of International Business Machines Corporation.
The IrDA trademark is owned and licensed by the Infrared Data Association.
Sound Blaster Pro is a registered trademark of Creative Labs, Inc.
Page 3

"
NOTICE This equipment meets Class B digital device limits per Part 15 of FCC Rules.
These limits protect against interference in a residential area. It emits, uses, and
can radiate radio frequency energy. If you do not install and use the equipment
according to its instructions, it may interfere with radio signals. However, there is
no guarantee that interference will not occur in a particular installation.
If this equipment does cause harmful interference to radio or television reception,
which can be determined by turning our equipment off and on, the user is encouraged to try to correct the interference by one or more of the following measures:
" Reorient or relocate the radio or television receiving antenna.
" Increase the separation between the computer equipment and receiver.
" Connect the equipment into an outlet on a circuit different from that to
which the radio or television receiver is connected.
" Consult the dealer or an experienced radio or television technician for
help.
FCC Spread Spectrum Radio Certification
"
NOTICE This device is certified to operate under Part 15, Subpart C, Section 15.247 of the
FCC rules for Intentional Radiation Products. This certification includes Docket
87-389 covering rules effective June 1994. It may not cause interference to authorized radio communication devices, and must accept any interference caused by
those devices.
Canadian Computer Compliance
This Class B digital apparatus meets all requirements of the Canadian Interference-Causing Equipment Regulations.
Cet appareil numérique de la classe B respecte toutes les exigences du Reglèment
sur le material boilleur du Canada.
Page 4

Telephone Installation Warning Notices
The following notices apply to equipment that may be connected to telephone lines
or systems. For your personal safety, and to protect this equipment from potential
electrical or physical damage, do NOT connect equipment to telephone lines or
data communication equipment unless the following warnings have been read,
understood, and complied with.
" Never install telephone wiring during a lightning storm.
" Never install telephone jacks in wet locations unless the jack is specifi-
cally designed for wet locations.
" Never touch uninsulated telephone wires or terminals unless the tele-
phone line has been disconnected at the network interface.
" Use caution when installing or modifying telephone lines.
" Avoidusing a telephone (other than cordless type) during an electrical
storm. There may be a remote risk of electric shock from lightning.
" Do not use the telephone to report a gas leak in the vicinity of the leak.
Installation du téléphone : avertissements
Les avertissements qui suivent s’appliquent à tout équipement qui peut être
branché aux lignes ou systèmes téléphoniques. Pour votre sécurité personnelle et
pour protéger l’équipement de tout dommage électrique ou physique potentiel, NE
PASbrancher un ordinateur tablette électronique ou ses périphériques aux lignes
téléphoniques ou équipements avant que les avertissements suivants aient été lus,
compris et observés :
" Ne jamais installer de câblage téléphonique pendant un orage électrique.
" Ne jamais installer de prise téléphonique dans un endroit humide à
moins que la prise ait été spécifiquement conçue pour être utilisée dans
les endroits humides.
" Ne jamais toucher les fils de téléphone ou de l’équipement terminal non
isolés à moins que la ligne téléphonique n’ait été débranchée de l’interface réseau.
" User de prudence lors de l’installation ou de la modification de lignes
téléphoniques.
" Éviter d’utiliser un téléphone (autre qu’un appareil téléphonique sans
fil) pendant un orage électrique. Il pourrait y avoir un faible risque d’électrocution par la foudre.
" Ne pas utiliser le téléphone afin de signaler une fuite de gaz à proximité
de la fuite.
B
CAUTION: Intermec Technologies Corporation suggests you buy cables from us
to connect with other devices. Our cables are safe, meet FCC rules,
and suit our products. Other cables may not be tested. They may
cause problems from electrostatic discharge or induced energy. Our
warranties do not cover loss, injury, or damage from other cables.
Page 5

B
CAUTION: Intermec Technologies Corporation recommends that you only
purchase Norand Mobile Systems Division certified modems.
Intermec does not certify all modems available in the marketplace.
Intermec does not warrant noncertified modems; furthermore, these
modems may cause problems from electrostatic discharge and may
not conform to FCC regulations. For a list of Norand Mobile Systems
Division certified modems call Customer Support at 1-800-221-9236 in
United States or (country code) 800-633-6149 in Canada.
WARNING: The lithium ion battery may explode if replaced incorrectly. Replace
only with the same or equivalent type.
ADVERTISSEMENT: La batterie au lithium peut exploser si elle est replacée de manière
incorrecte. Elle ne doit être remplacée que par une batterie
identique ou similaire.
WARNING: Lithium ion batteries may explode or catch fire if overcharged due to
improper dock installation.
ADVERTISSEMENT: Les batteries au lithium peuvent exploser ou prendre feu si elles
sont trop changées à cause d’une mauvaise installation de la
station d’accueil.
Page 6

Page 7

CONTENTS
CONTENTS
" " " " " " " " " " " " " " " " " " " " " " " " " " " "
SECTION 1 1-1. . . . . . . . . . . . . . . . . . . . . . . . . . . . . . . . . . . . . . . . . .
Overview 1-1. . . . . . . . . . . . . . . . . . . . . . . . . . . . . . . . . . . . . . . . . . .
Introduction: About this Manual 1-1. .. . . .. . . .. . . .. . . .. . . .
Summary of Sections 1-2. .. . . .. . . .. . . .. . . .. . . .. . . .. . . .. . .
Section 1, General Information 1-2. .. . . .. . . .. . . .. . . .. .
Section 2, Using the Pen Computer for the First Time 1-2
Section 3, Software 1-2. .. . . .. . . .. . . .. . . .. . . .. . . .. . . ..
Section 4, Operating the Pen Computer 1-2. .. . . .. . . .. .
Section 5, Connecting Peripheral Equipment 1-2. .. . . ..
Section 6, Troubleshooting 1-3. .. . . .. . . .. . . .. . . .. . . .. .
Overview 1-4. . .. . . .. . . .. . . .. . . .. . . .. . . .. . . .. . . .. . . .. . . .
The PEN*KEY 6632 Pen Computer 1-4. .. . . .. . . .. . . .. .
Computer Description 1-6. .. . . .. . . .. . . .. . . .. . . .. . . .. . . ..
Opening the Top Cover 1-6. .. . . .. . . .. . . .. . . .. . . .. . . ..
Lock 1-7. .. . . .. . . .. . . .. . . .. . . .. . . .. . . .. . . .. . . .. . . .. .
Removing the Top Cover 1-9. .. . . .. . . .. . . .. . . .. . . .. . . .. . .
Top Cover Release Lever 1-9. .. . . .. . . .. . . .. . . .. . . .. . . .
Front View 1-11.. . .. . . .. . . .. . . .. . . .. . . .. . . .. . . .. . . .. . . .. .
Power Button 1-11. .. . . .. . . .. . . .. . . .. . . .. . . .. . . .. . . .. .
Power Lamp 1-13. .. . . .. . . .. . . .. . . .. . . .. . . .. . . .. . . .. . .
Battery Lamp 1-13. .. . . .. . . .. . . .. . . .. . . .. . . .. . . .. . . .. .
Speaker 1-13. .. . . .. . . .. . . .. . . .. . . .. . . .. . . .. . . .. . . .. . .
Pen Stylus 1-14. .. . . .. . . .. . . .. . . .. . . .. . . .. . . .. . . .. . . ..
Side View 1-15. .. . . .. . . .. . . .. . . .. . . .. . . .. . . .. . . .. . . .. . . ..
Rear View 1-16. . . . . . . . . . . . . . . . . . . . . . . . . . . . . . . . . . . . . . . . . . .
Infrared Communications Port 1-16. .. . . .. . . .. . . .. . . .. .
Right Mouse Button 1-16. .. . . .. . . .. . . .. . . .. . . .. . . .. . . .
Bottom View 1-17. .. . . .. . . .. . . .. . . .. . . .. . . .. . . .. . . .. . . .. .
RESET Switch 1-18. .. . . .. . . .. . . .. . . .. . . .. . . .. . . .. . . ..
AC Adapter/Recharger 1-19. .. . . .. . . .. . . .. . . .. . . .. . . .. . . ..
Power lamp 1-19. .. . . .. . . .. . . .. . . .. . . .. . . .. . . .. . . .. . . .
Internal/External Battery Pack Charging Lamps 1-20. ..
PEN*KEY 6632 Pen Computer User’s Guide i
Page 8

CONTENTS
SECTION 2 2-1. . . . . . . . . . . . . . . . . . . . . . . . . . . . . . . . . . . . . . . . . .
Using the Pen Computer for the First Time 2-1. . . . . . . . . . . .
Connecting the AC Adapter/Recharger 2-2. .. . . .. . . .. . . .. .
Stylus Pen Input 2-4. .. . . .. . . .. . . .. . . .. . . .. . . .. . . .. . . .. .
Selecting an Item (pointing) 2-4. .. . . .. . . .. . . .. . . .. . . ..
Moving Items/Resizing Windows 2-4. .. . . .. . . .. . . .. . . .
Inputting Text 2-4. .. . . .. . . .. . . .. . . .. . . .. . . .. . . .. . . ..
System Startup 2-5. .. . . .. . . .. . . .. . . .. . . .. . . .. . . .. . . .. . . .
Startup 2-5.. . .. . . .. . . .. . . .. . . .. . . .. . . .. . . .. . . .. . . ..
SECTION 3 3-1. . . . . . . . . . . . . . . . . . . . . . . . . . . . . . . . . . . . . . . . . .
Software 3-1. . . . . . . . . . . . . . . . . . . . . . . . . . . . . . . . . . . . . . . . . . . .
General Information 3-1. .. . . .. . . .. . . .. . . .. . . .. . . .. . . .. . .
Software Included with the 6632 Pen Computer 3-1. .. .
Windows 95 3-1. .. . . .. . . .. . . .. . . .. . . .. . . .. . . .. . . .. . . .. . .
MS--DOS Screen 3-2. .. . . .. . . .. . . .. . . .. . . .. . . .. . . .. . . .. . .
MS--DOS Prompt 3-2. .. . . .. . . .. . . .. . . .. . . .. . . .. . . .. .
MS--DOS Mode 3-2. .. . . .. . . .. . . .. . . .. . . .. . . .. . . .. . . .
Windows 95 Help 3-3. . . .. . . .. . . .. . . .. . . .. . . .. . . .. . . .. . . .
Help With Operating Procedures 3-3. .. . . .. . . .. . . .. . . .
Contents 3-4. .. . . .. . . .. . . .. . . .. . . .. . . .. . . .. . . .. . . .. .
Keyword 3-4. . . .. . . .. . . .. . . .. . . .. . . .. . . .. . . .. . . .. . . .
Help Regarding Items on the Screen 3-5. .. . . .. . . .. . . ..
Changing the Screen Background 3-6. .. . . .. . . .. . . .. . . .. . .
Setup Utility 3-7.. . . . . . . . . . . . . . . . . . . . . . . . . . . . . . . . . . . . . . .
PEN*KEY Tool 3-8. . . . . . . . . . . . . . . . . . . . . . . . . . . . . . .
Adjusting the Backlight and Checking the Remaining
Battery Capacity 3-9.. . . . . . . . . . . . . . . . . . . . . . . . .
Suspend Execution 3-10. .. . . .. . . .. . . .. . . .. . . .. . . ..
Changing the Numeric Keypad Assignments 3-11.. . .
Checking the Version of the PEN*KEY Tool 3-12. .. . .
Exiting the PEN*KEY Tool 3-12. .. . . .. . . .. . . .. . . .. .
CIC Handwriting Recognition 3-12. .. . . .. . . .. . . .. . . .. . . .. .
ii PEN*KEYR6632 Pen Computer User’s Guide
Page 9

CONTENTS
SECTION 4 4-1. . . . . . . . . . . . . . . . . . . . . . . . . . . . . . . . . . . . . . . . . .
Operating the Pen Computer 4-1. . . . . . . . . . . . . . . . . . . . . . . . .
Battery Packs 4-1. . .. . . .. . . .. . . .. . . .. . . .. . . .. . . .. . . .. . . .
Charging Battery Packs 4-1. . . . . . . . . . . . . . . . . . . . . . . . . .
Charging Battery Packs in the AC Adapter/Recharger 4-3
Charging a Battery Pack in the Pen Computer 4-4. .. . . .
Charging Battery Packs in the Pen Computer and the AC
Adapter/Recharger 4-5. .. . . .. . . .. . . .. . . .. . . .. . . ..
Installing the Battery Pack 4-6. .. . . .. . . .. . . .. . . .. . . ..
Remaining Battery Pack Capacity Display 4-7. .. . . .. . .
Confirming the Remaining Battery Pack Capacity 4-7
Insufficient Remaining Battery Pack Capacity 4-9. .. . . .
Charging and Operating Times 4-10. . . . . . . . . . . . . . . . . . . .
PC Cards 4-11.. . .. . . .. . . .. . . .. . . .. . . .. . . .. . . .. . . .. . . .. . .
Fax/modem Card 4-11.. . .. . . .. . . .. . . .. . . .. . . .. . . ..
Network Interface Card 4-11.. . .. . . .. . . .. . . .. . . .. . .
SCSI Interface Card 4-11.. . .. . . .. . . .. . . .. . . .. . . .. .
ATA Device 4-11.. . .. . . .. . . .. . . .. . . .. . . .. . . .. . . .. .
SRAM Memory Card 4-12. .. . . .. . . .. . . .. . . .. . . .. . . .
Flash Memory Card 4-12. .. . . .. . . .. . . .. . . .. . . .. . . .
Inserting a PC Card 4-13. .. . . .. . . .. . . .. . . .. . . .. . . .. . . .. . .
Removing a PC Card 4-15. .. . . .. . . .. . . .. . . .. . . .. . . .. . . .. . .
SECTION 5 5-1. . . . . . . . . . . . . . . . . . . . . . . . . . . . . . . . . . . . . . . . . .
Connecting Peripheral Equipment 5-1. . . . . . . . . . . . . . . . . . . .
Notes on Handling the Equipment 5-2. .. . . .. . . .. . . .. . . .. .
Storing the battery packs 5-2. .. . . .. . . .. . . .. . . .. . .
Connecting Peripheral Equipment 5-3.. . . . . . . . . . . . . . . . . . .
Serial Devices 5-4. .. . . .. . . .. . . .. . . .. . . .. . . .. . . .. . . ..
Serial Port Setting 5-4. .. . . .. . . .. . . .. . . .. . . .. . . .. . . ..
Connectors 5-5.. . .. . . .. . . .. . . .. . . .. . . .. . . .. . . .. . . .. . . .. .
Keyboard/Mouse 5-6. .. . . .. . . .. . . .. . . .. . . .. . . .. . . .. . .
Connecting Speakers/Microphone/Headset 5-6. .. . . .. . .
PEN*KEY 6632 Pen Computer User’s Guide iii
Page 10

CONTENTS
SECTION 6 6-1. . . . . . . . . . . . . . . . . . . . . . . . . . . . . . . . . . . . . . . . . .
Troubleshooting 6-1. . . . . . . . . . . . . . . . . . . . . . . . . . . . . . . . . . . .
The power lamp is off even though power is on. 6-2. .. . .
The display is blank. 6-2. . . . . . . . . . . . . . . . . . . . . . . . . . . . .
The system will not start up. 6-2. . . .. . . .. . . .. . . .. . . .. .
The correct date and time are not displayed. 6-3. .. . . .. .
Data cannot be written to or read from a floppy disk. 6-4
Data cannot be written to or read from the hard disk. 6-5
The message “Not a system disk” or a disk error message
appears. 6-5.. . .. . . .. . . .. . . .. . . .. . . .. . . .. . . .. . . .. . . ..
An expansion or peripheral device does not function. 6-5
Output cannot be directed to the printer. 6-6. .. . . .. . . ..
The device connected to the RS--232C connector does not
work. 6-7. . . . . . . . . . . . . . . . . . . . . . . . . . . . . . . . . . . . . . . . . . .
Infrared communications do not work. 6-7. .. . . .. . . .. . .
PC Cards Do Not Function (in MS--DOS Mode) 6-8. .. . .
FIGURES
Figure 1-1 The PEN*KEY 6632 Pen Computer 1-4. .. . . .. . .
Figure 1-2 Top Cover 1-6. . . . . . . . . . . . . . . . . . . . . . . . . . . . . . . .
Figure 1-3 Locking the Top Cover 1-7. .. . . .. . . .. . . .. . . .. . .
Figure 1-4 Top Cover Stand 1-8. . . . . . . . . . . . . . . . . . . . . . . . .
Figure 1-5 Top Cover Release Lever 1-9. .. . . .. . . .. . . .. . . ..
Figure 1-6 Removing the Top Cover 1-10. .. . . .. . . .. . . .. . . .
Figure 1-7 Front View 1-11.. . .. . . .. . . .. . . .. . . .. . . .. . . .. . .
Figure 1-8 Pen Removal 1-14. .. . . .. . . .. . . .. . . .. . . .. . . .. . .
Figure 1-9 Side View 1-15. . . . . . . . . . . . . . . . . . . . . . . . . . . . . . . .
Figure 1-10 Rear View 1-16. . .. . . .. . . .. . . .. . . .. . . .. . . .. . . .
Figure 1-11 Bottom View 1-17.. . . . . . . . . . . . . . . . . . . . . . . . . . . .
Figure 1-12 Reset Switch 1-18.. . . . . . . . . . . . . . . . . . . . . . . . . . . .
Figure 1-13 AC Adapter/Recharger 1-19. . . . . . . . . . . . . . . . . . . .
Figure 2-1 AC Adapter/Recharger 2-3. .. . . .. . . .. . . .. . . .. .
Figure 2-2 Pen Operation 2-5. .. . . .. . . .. . . .. . . .. . . .. . . .. .
Figure 4-1 Battery Pack Capacity Check 4-2.. . . .. . . .. . . .. .
Figure 4-2 Inserting the Battery 4-3. .. . . .. . . .. . . .. . . .. . . .
Figure 4-3 Charging Batteries in the Pen Computer 4-4. .. .
Figure 4-4 Charging Battery Packs 4-5. .. . . .. . . .. . . .. . . .. .
Figure 4-5 Inserting the Battery 4-6. .. . . .. . . .. . . .. . . .. . . .
Figure 4-6 Battery Pack Capacity 4-7. . . . . . . . . . . . . . . . . . . . .
Figure 4-7 Inserting the PC Card 4-14. .. . . .. . . .. . . .. . . .. . .
iv PEN*KEYR6632 Pen Computer User’s Guide
Page 11

CONTENTS
Figure 4-8 Card Eject Button 4-15. .. . . .. . . .. . . .. . . .. . . .. . .
Figure 5-1 Printer/Floppy Drive Connectors 5-3. .. . . .. . . .. .
Figure 5-1 Side View Connections 5-5. . . . . . . . . . . . . . . . . . . . .
PEN*KEY 6632 Pen Computer User’s Guide v
Page 12

Page 13

Section 1
Overview
" " " " " " " " " " " " " " " " " " " " " " " " " " " "
Introduction: About this Manual
This manual is divided into six sections.
" Section 1 Overview
" Section 2 Using the Pen Computer for the First
Time
" Section 3 Software
" Section 4 Operating the Pen Computer
" Section 5 Connecting Peripheral Equipment
" Section 6 Troubleshooting
PEN*KEYR6632 Pen Computer User’s Guide
1-1
Page 14

Summary of Sections
Section 1, General Information
Provides a general description of the Pen*Key 6632 Pen
Computer, including its main functions.
Section 2, Using the Pen Computer
for the First Time
Provides a step--by--step explanation of how to set up and
operate the pen computer so that you can begin to use it
quickly.
Section 3, Software
This section describes how to use the setup utility, and also
provides an overview of the software included with the pen
computer, and an explanation of the power management
functions, etc.
SECTION 1Overview
Section 4, Operating the Pen
Computer
This section explains the operation of the power supply, the
hard disk drive, the display system, the PC card slots, and
other functions.
Section 5, Connecting Peripheral
Equipment
This section tells how to expand the system, including how
to connect a printer or a floppy disk drive.
1-2 PEN*KEYR6632 Pen Computer User’s Guide
Page 15

SECTION 1 Overview
Section 6, Troubleshooting
This section explains what to check if the pen computer
does not operate correctly.
PEN*KEYR6632 Pen Computer User’s Guide
1-3
Page 16
Overview
SECTION 1Overview
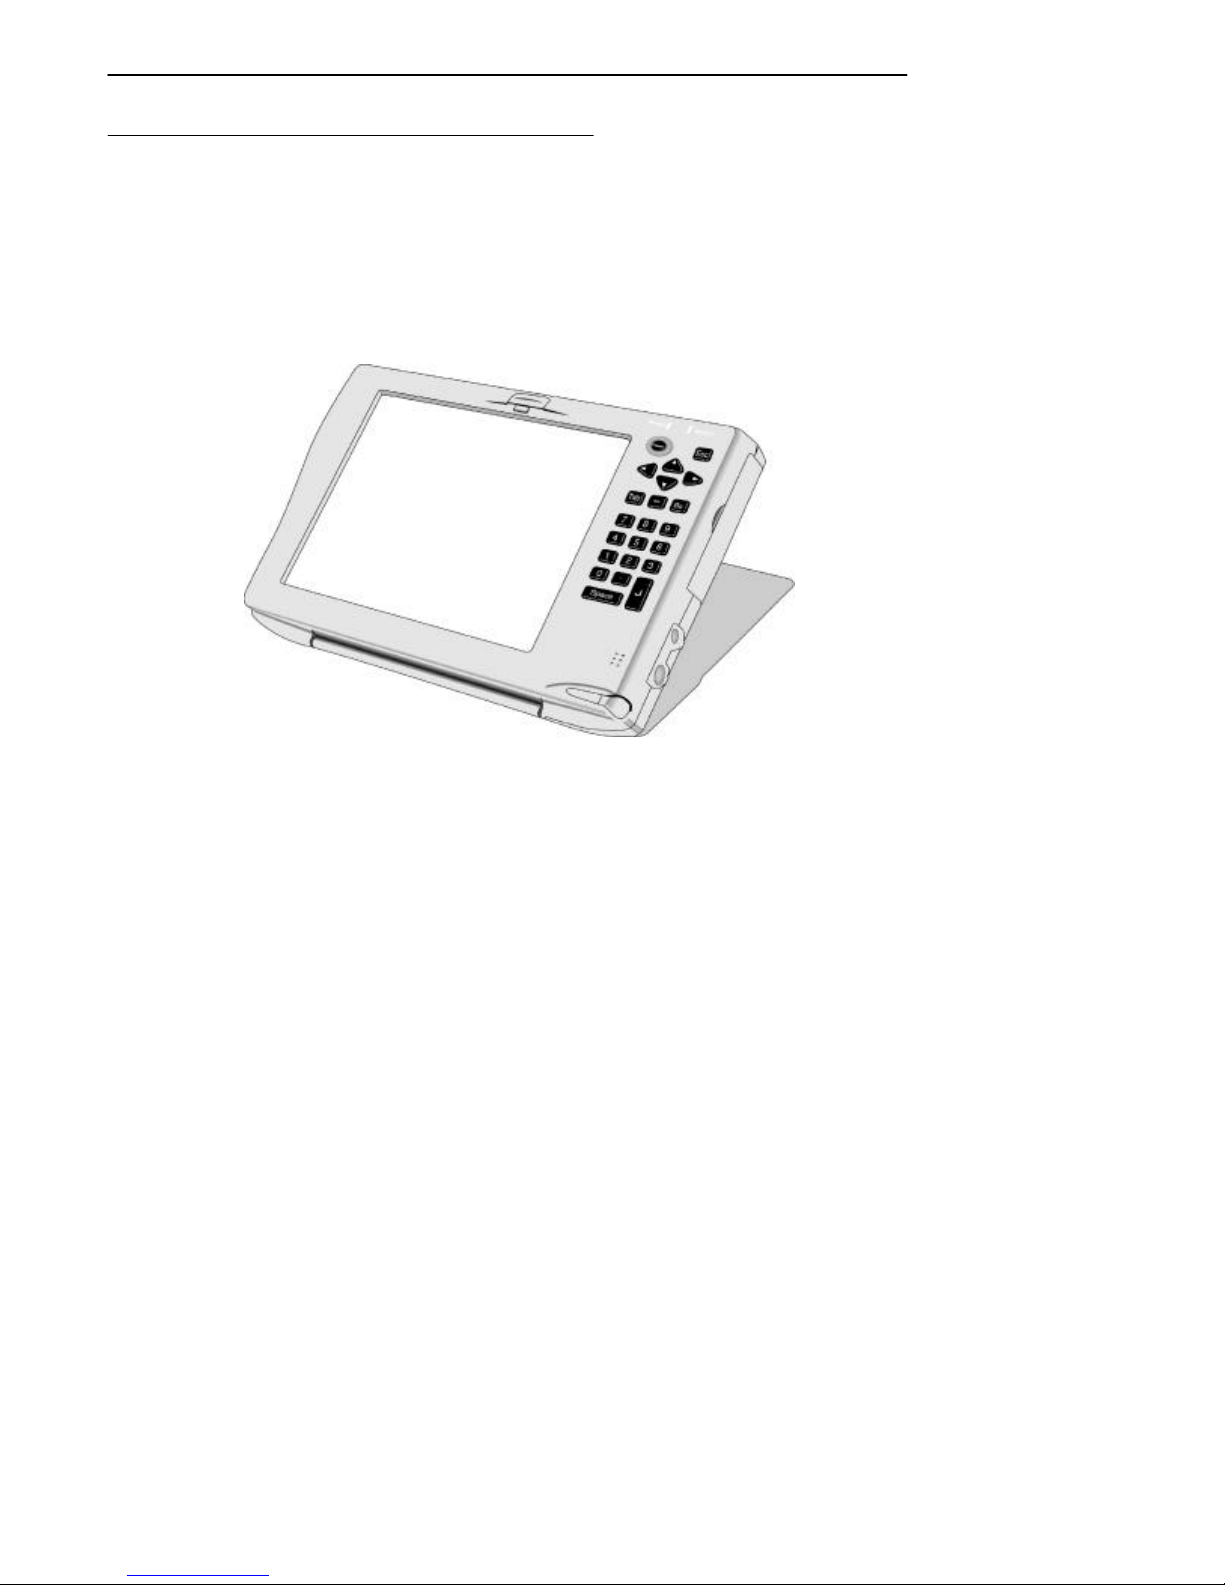
The PEN*KEYR6632 Pen Computer
Figure 1-1
The PEN*KEY 6632 Pen Computer
The PEN*KEY 6632 Pen Computer is a compact, lightweight mobile computer. It features:
" Windows 95 operating system, and supports a variety
of commercial software development environments.
" Sophisticated power management functions that conserve
battery power by automatically blocking the supply of
power and clock signals to peripheral devices and system
components that are not currently in use.
1-4 PEN*KEYR6632 Pen Computer User’s Guide
Page 17

SECTION 1 Overview
" Serial and parallel devices, a floppy disk drive support,
an external keyboard and an external mouse.
" PC Card slots that can accommodate Type I/II or Type
III PC Cards.
" Sound Blaster Pro and Windows sound system-com-
pliant 16-bit audio system, an audio input/output jack,
and a monaural speaker.
" 8.4-inch color TFT liquid crystal display with 640 x
480 dots that can display up to 65,536 colors.
" Numeric keypad input
" Accepts pen input thanks to its highly effective hand-
writing recognition capabilities.
" Support for IrDA for infrared communications.
PEN*KEYR6632 Pen Computer User’s Guide
1-5
Page 18
Computer Description
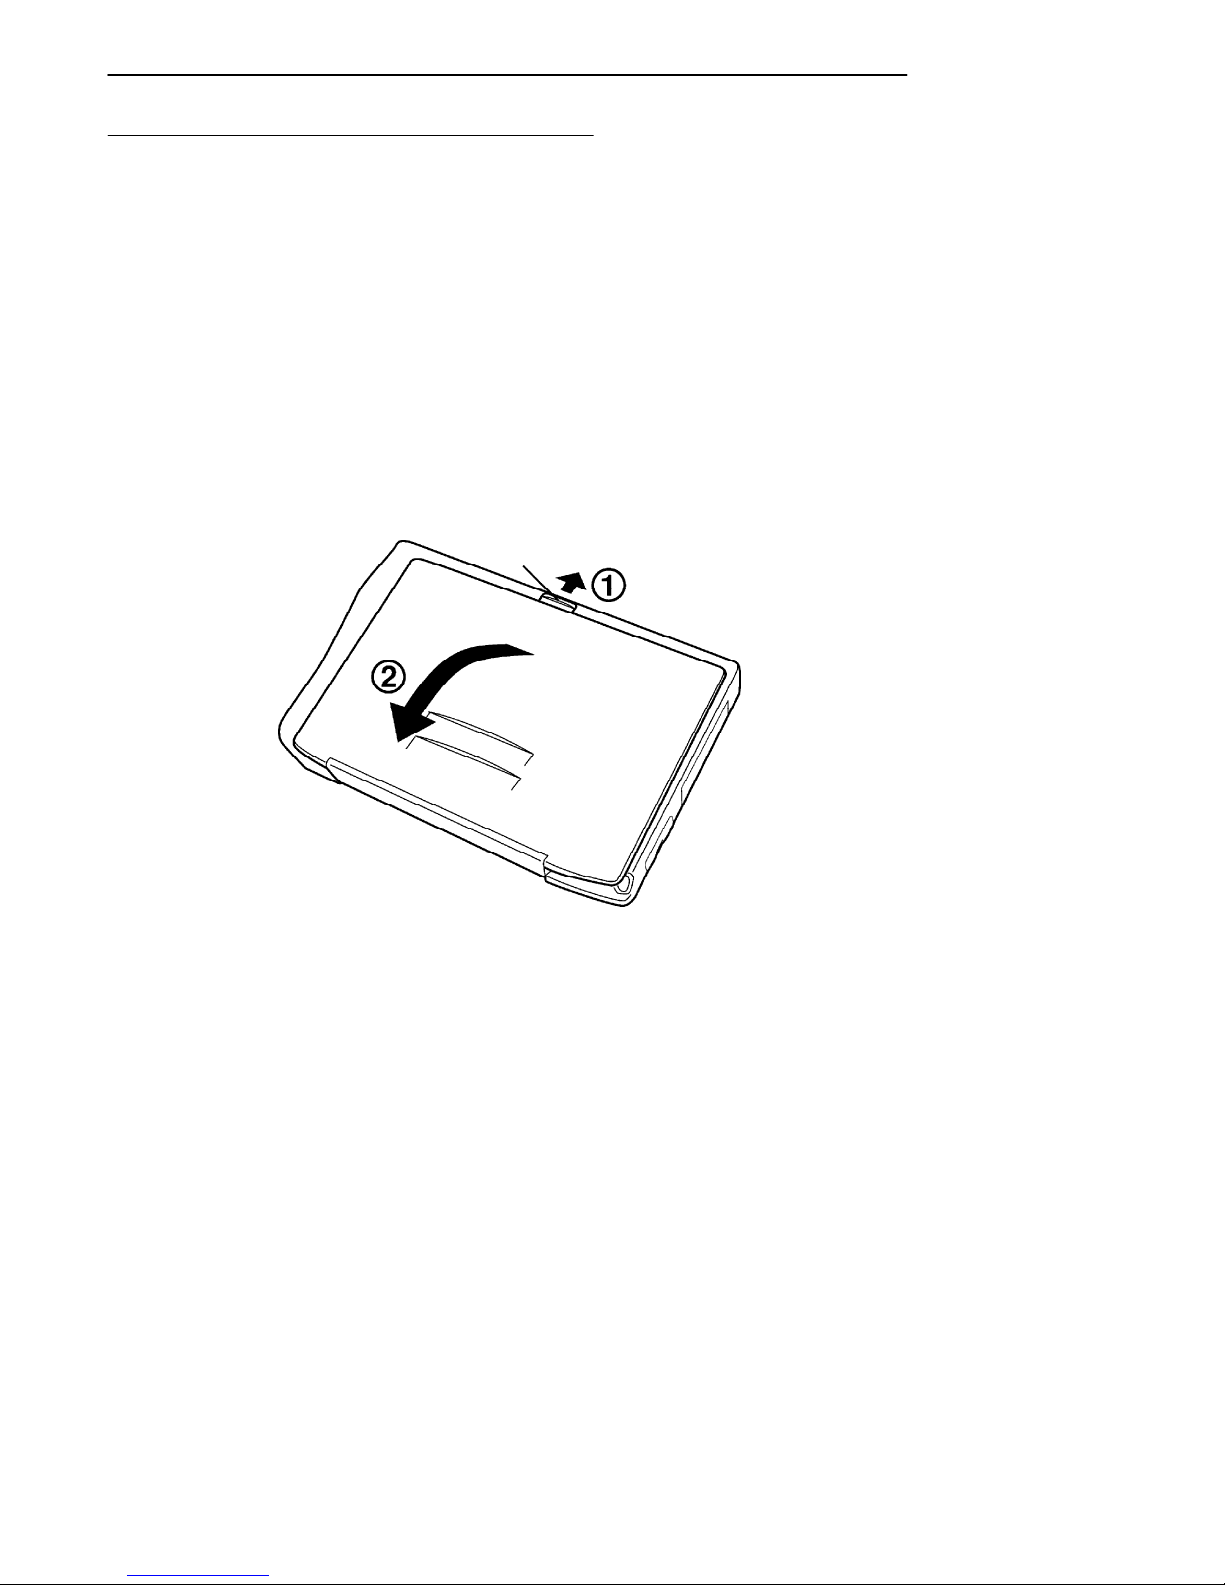
Opening the Top Cover
Perform the procedure described below to open the top cover.
1. Slide open the lock located on the top cover of the pen
computer, then open the cover.
Lock
SECTION 1Overview
1-6 PEN*KEYR6632 Pen Computer User’s Guide
Figure 1-2
Top Cover
Page 19
SECTION 1 Overview
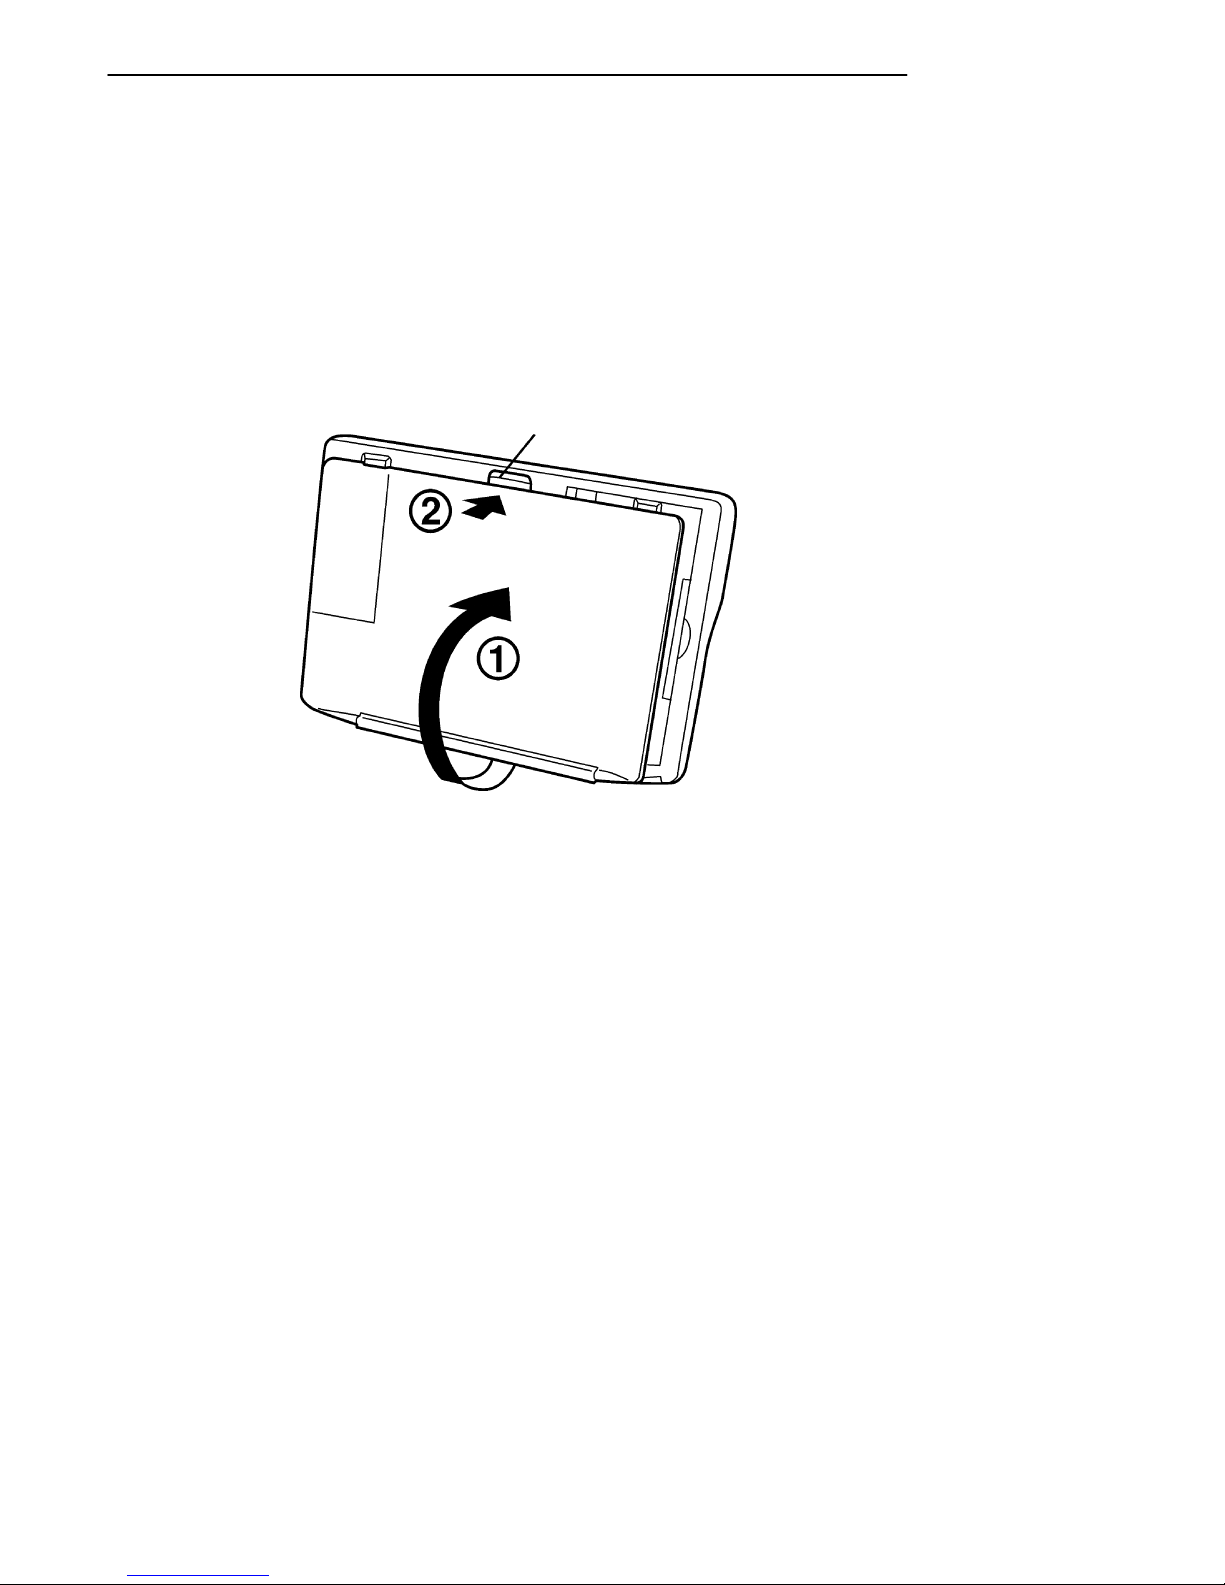
Lock
2. Swing the top cover around until the lock on the bottom
of the pen computer clicks, indicating the top cover is
secured in place.
Lock
Figure 1-3
Locking the Top Cover
B
CAUTION: Do not block the air vents on the bottom of the pen computer
with the top cover for an extended period of time. Doing so
could cause the internal temperature of the pen computer to
rise, resulting in damage to it.
PEN*KEYR6632 Pen Computer User’s Guide
1-7
Page 20
SECTION 1Overview
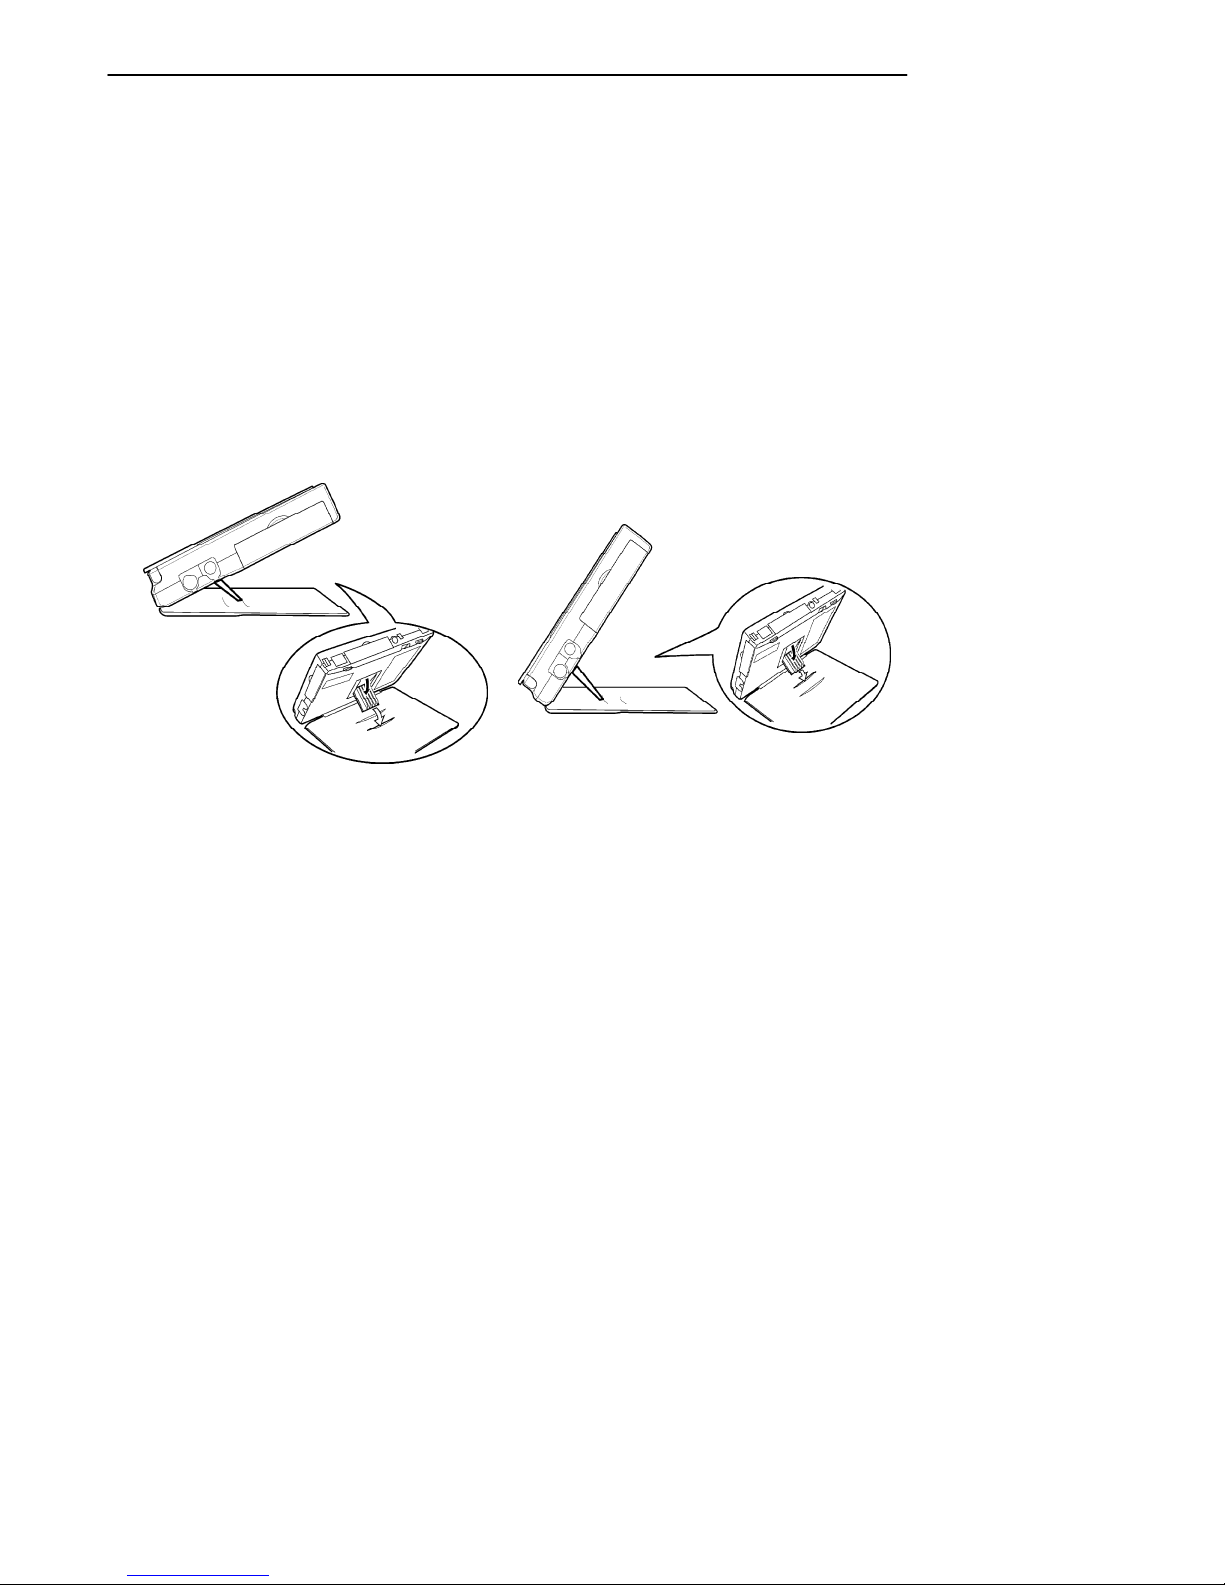
When using the pen computer on a desk, unfold the stand
so that the unit is raised.
"
NOTE: To close the top cover, slide open the lock on the bottom of the pen
computer, and then reverse the process of opening the top cover.
The top cover can also be used as a base for the stand.
Unfold one of the stands on the bottom of the pen computer,
and then set it in one of the notches on the top cover.
The stands can be adjusted so that the pen computer stands
at an angle of 35_ or 55_.
Figure 1-4
Top Cover Stand
1-8 PEN*KEYR6632 Pen Computer User’s Guide
Page 21
SECTION 1 Overview
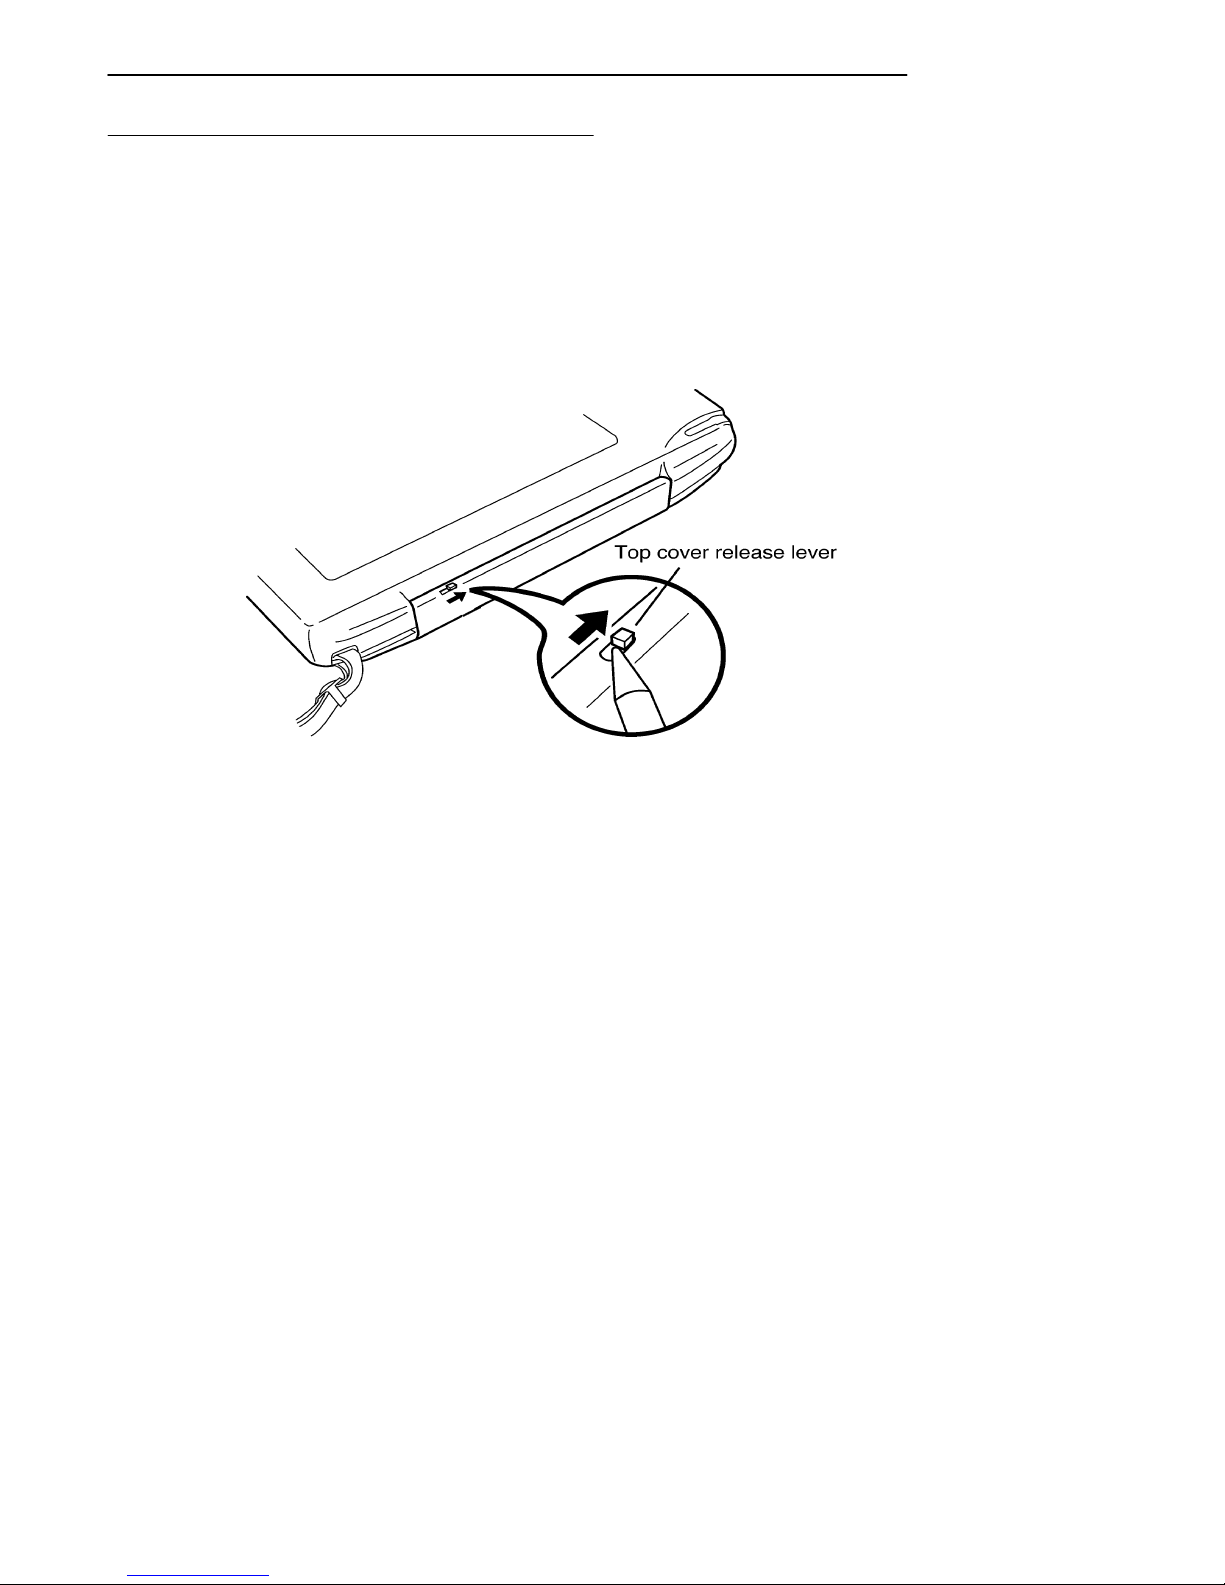
Removing the Top Cover
Perform the procedure described below to remove the top
cover.
Figure 1-5
Top Cover Release Lever
Top Cover Release Lever
" Slide the release lever in the direction indicated by the
arrow, then release the top cover.
" To re-attach the top cover, simply reverse the process
by which you removed it.
PEN*KEYR6632 Pen Computer User’s Guide
1-9
Page 22
SECTION 1Overview
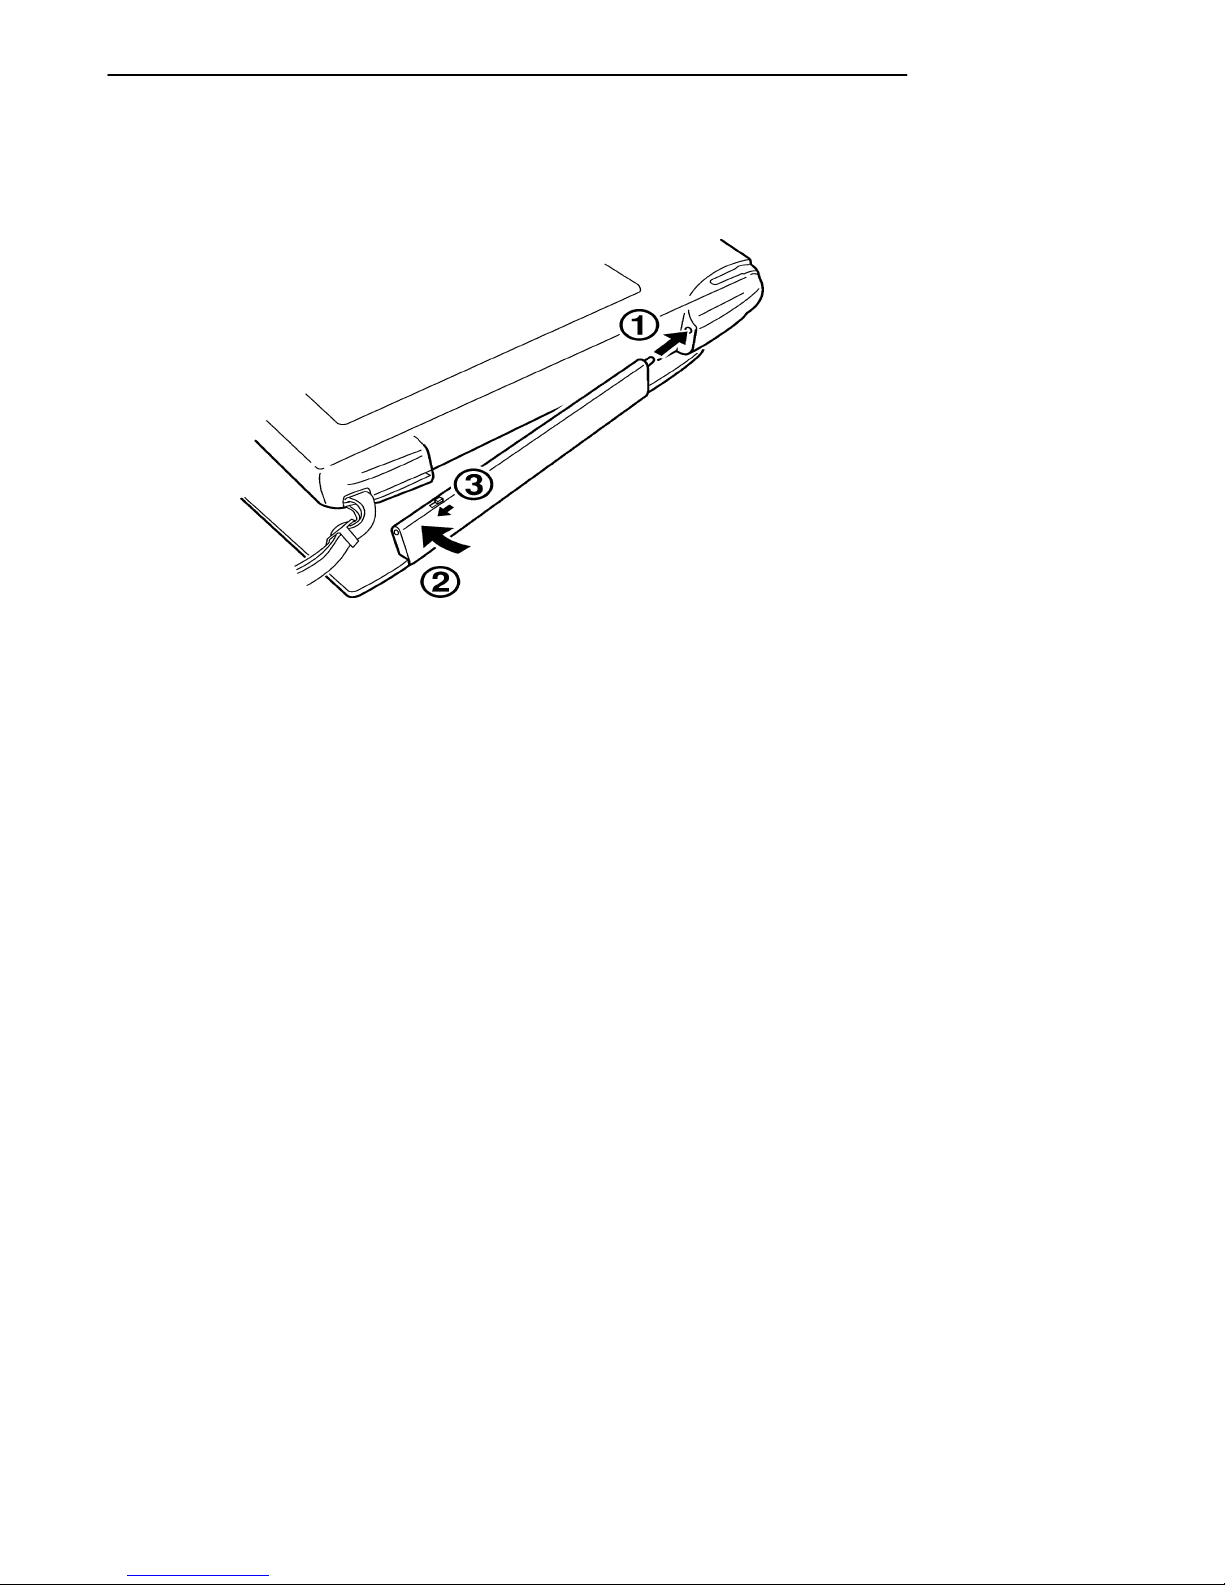
Figure 1-6
Removing the Top Cover
B
CAUTION: When carrying the pen computer, be careful not to let it bump
into things. Bumping the display in particular can damage the
LCD.
1-10 PEN*KEYR6632 Pen Computer User’s Guide
Page 23
SECTION 1 Overview
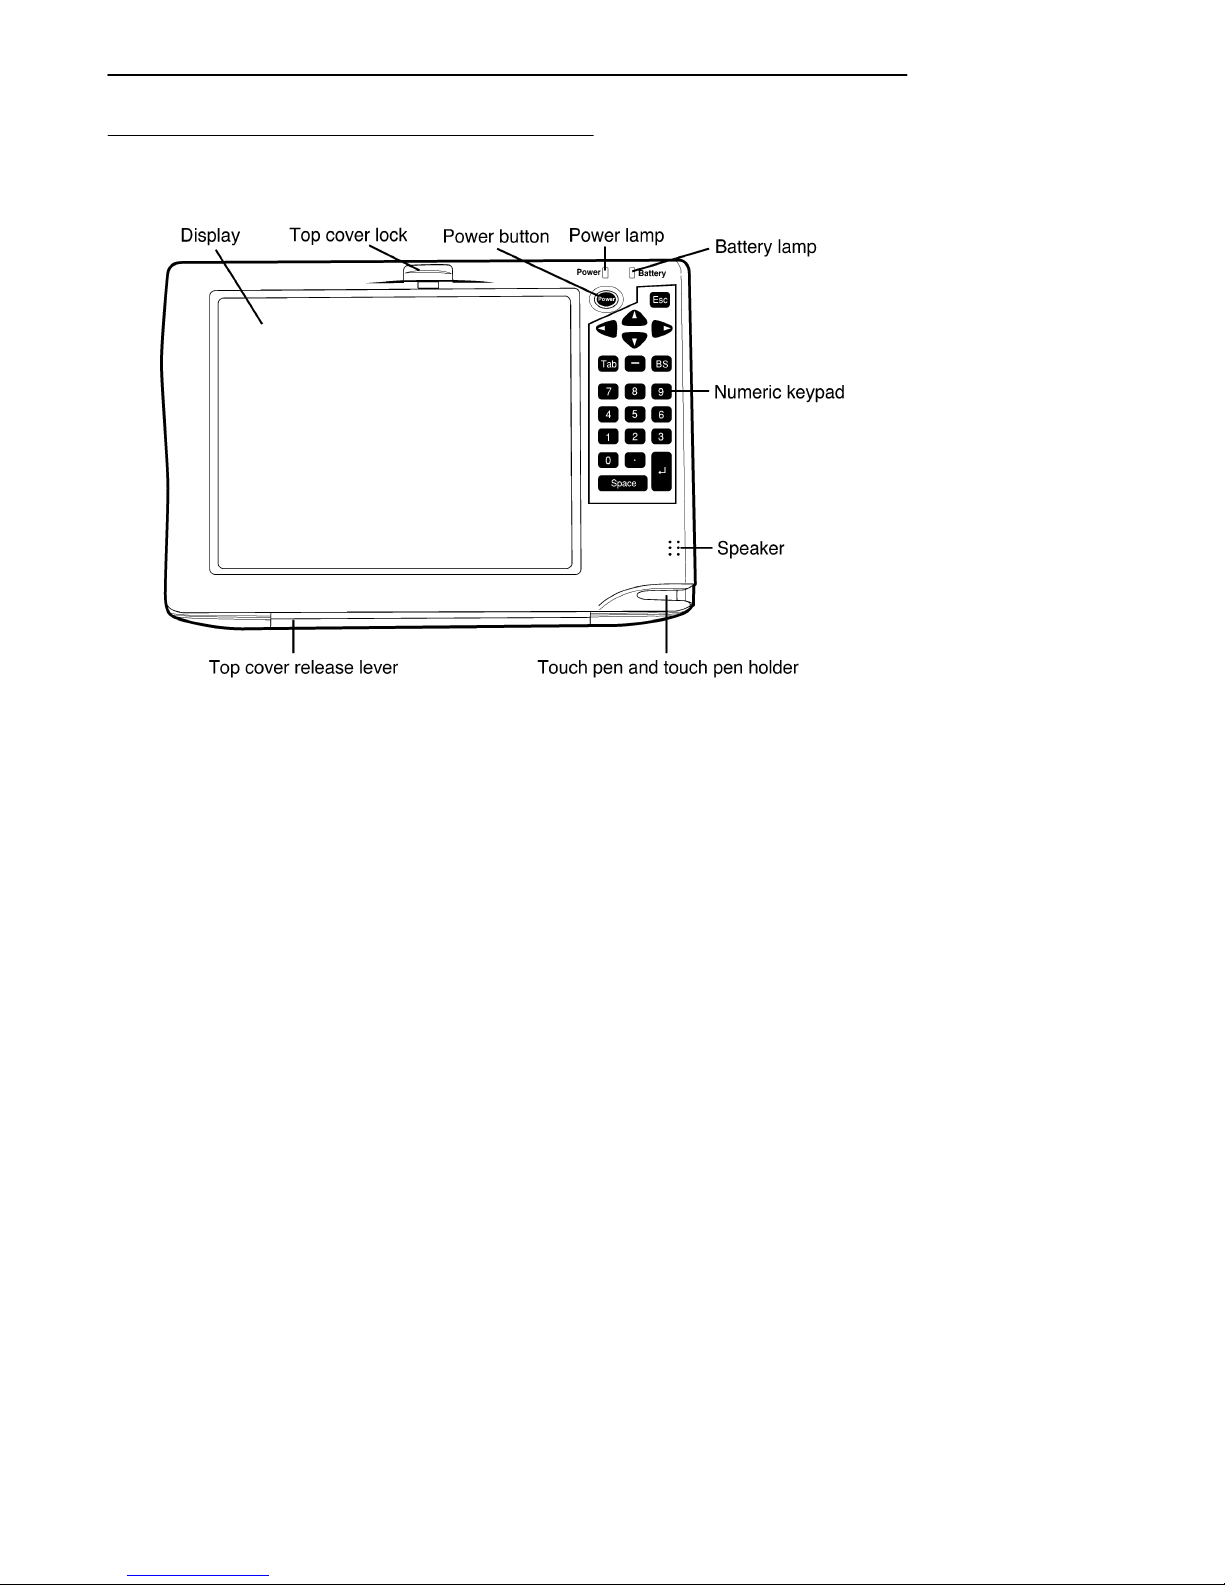
Front View
Figure 1-7
Front View
Power Button
In addition to turning the power on and off, the power button
can be used as a suspend/resume switch, based on the setup
settings.
Depending on the state that the pen computer is in, the power
button might not function. In that case, use the RESET switch
on the bottom of the pen computer to turn off the power.
"
NOTE: WAIT AT LEAST 10 SECONDS BEFORE PRESSING THE POWER
BUTTON AGAIN AFTER PLACING THE PEN COMPUTER INTO
“SUSPEND.”
PEN*KEYR6632 Pen Computer User’s Guide
1-11
Page 24

SECTION 1Overview
See page 1-17 for a description of the bottom of the pen computer.
If pressing the RESET switch also fails to turn off the power, the
pen computer is malfunctioning. Disconnect the AC adapter and
the internal battery pack, and then contact your sales representative or an Intermec service center.
1-12 PEN*KEYR6632 Pen Computer User’s Guide
Page 25

SECTION 1 Overview
Power Lamp
When this lamp is green, the pen computer is operating.
When this lamp is red, the pen computer is in the suspend-
to-RAM state.
When this lamp is green, and the red lamp is flashing, the
pen computer is accessing the hard drive.
If this lamp is off, the pen computer is either not operating
or is in the suspend-to-disk state.
B
CAUTION: Do not disconnect both the AC adapter/recharger and the
battery pack while the power lamp is red or green. Doing so will
cause the program and data in memory to be lost.
Battery Lamp
When this lamp is green, it indicates that power is being
supplied by the AC adapter/recharger. In addition, if the
battery pack is installed in the pen computer, the battery
pack is being charged too.
When this lamp is off, it indicates that the pen computer is
running off battery power.
When this lamp is red, it indicates that the battery voltage has
dropped and that there is little battery capacity remaining.
Speaker
The speaker outputs audio from the internal SoundBlastercompatible chipset. When the audio input/output jack is
used for headphones or line output, the internal speaker is
disconnected.
B
CAUTION: Do not place a floppy disk, hard disk, or other magnetic media
on top of the speaker. The magnet in the speaker could damage
data on the disk.
PEN*KEYR6632 Pen Computer User’s Guide
1-13
Page 26
SECTION 1Overview
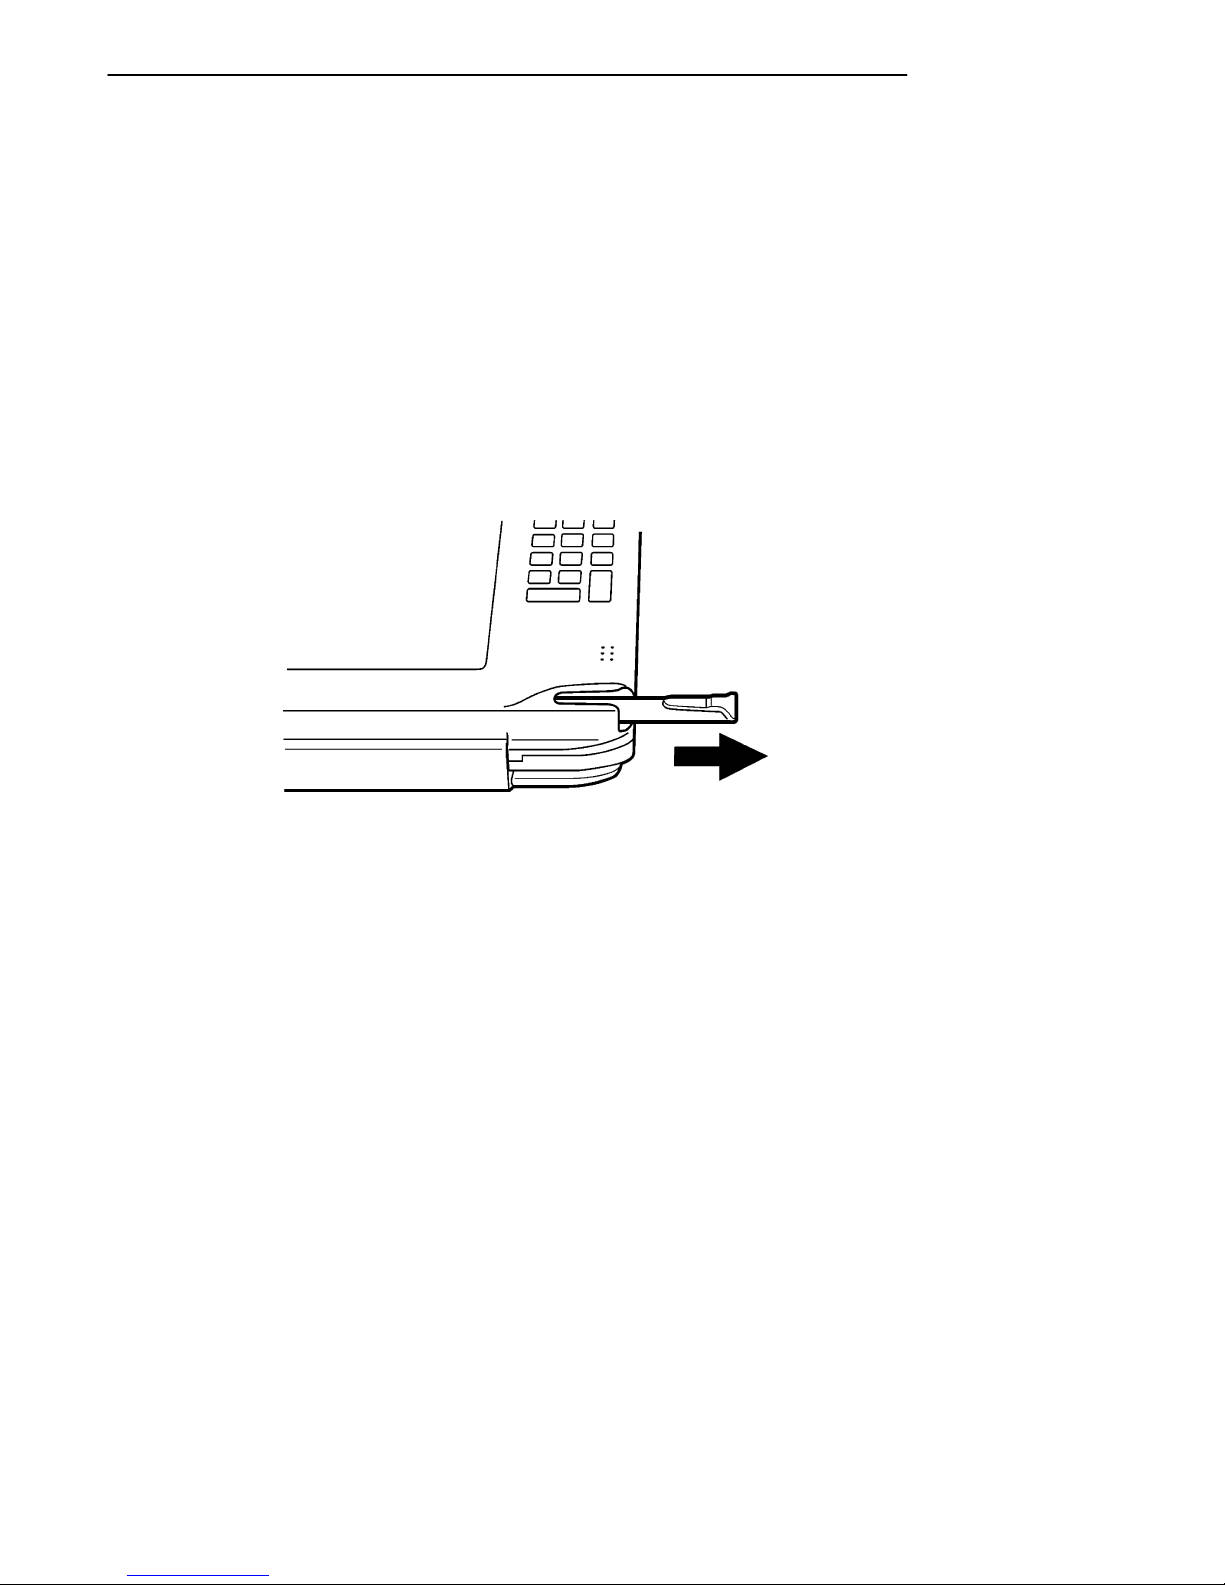
Pen Stylus
To remove the pen stylus, pull it straight out to the right.
To place the pen back in the pen holder, align the projection on
the pen with the groove in the pen holder and then gently
slide the pen into the holder. Make sure that you push the
pen all of the way in until it locks in place, so that it will not
fall out unexpectedly.
Figure 1-8
Pen Removal
"
NOTE: Clean the tip of the pen stylus and the screen before using the it on
the screen. If you use the pen on the screen while either is dirty, the
display could become scratched or the pen might not move smoothly
on the display surface.
B
CAUTION: Use only the pen provided. Do not use a wood pencil,
mechanical pencil, or any other sharp object. Doing so will
scratch the screen.
1-14 PEN*KEYR6632 Pen Computer User’s Guide
Page 27
SECTION 1 Overview
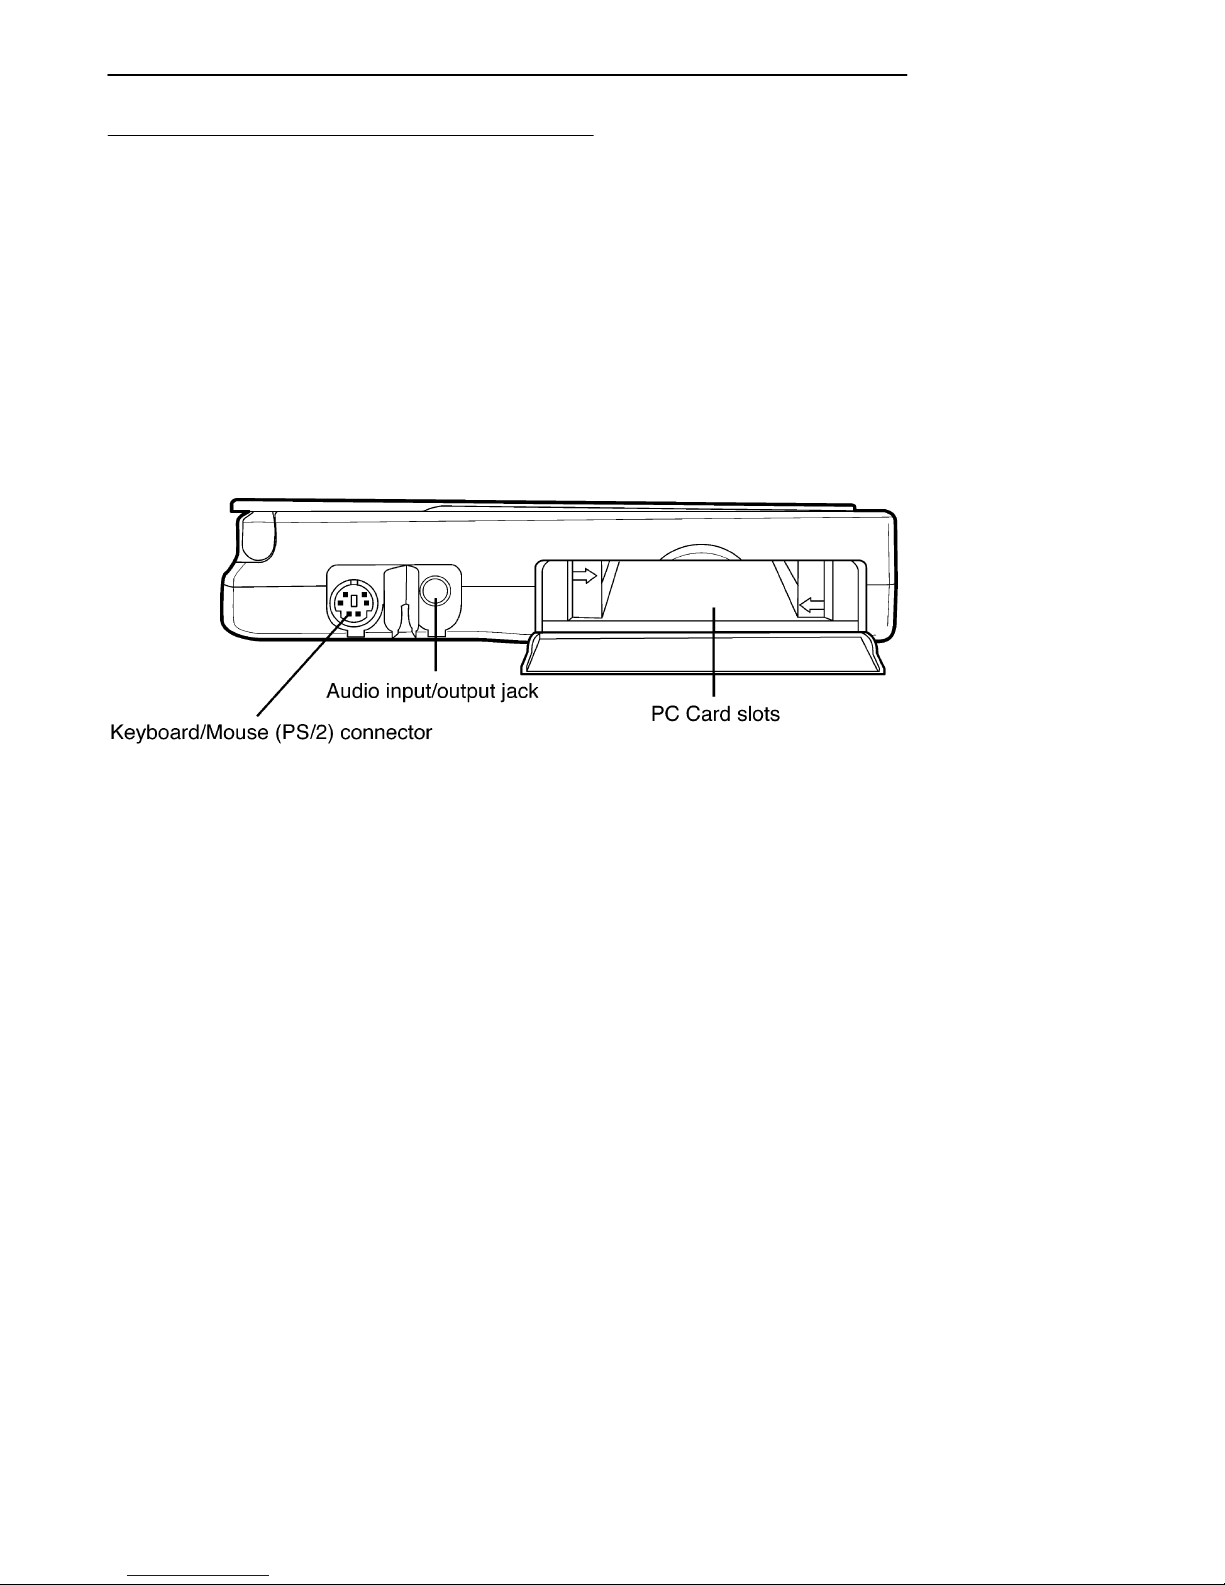
Side View
Figure 1-9
Side View
PEN*KEYR6632 Pen Computer User’s Guide
1-15
Page 28
Rear View
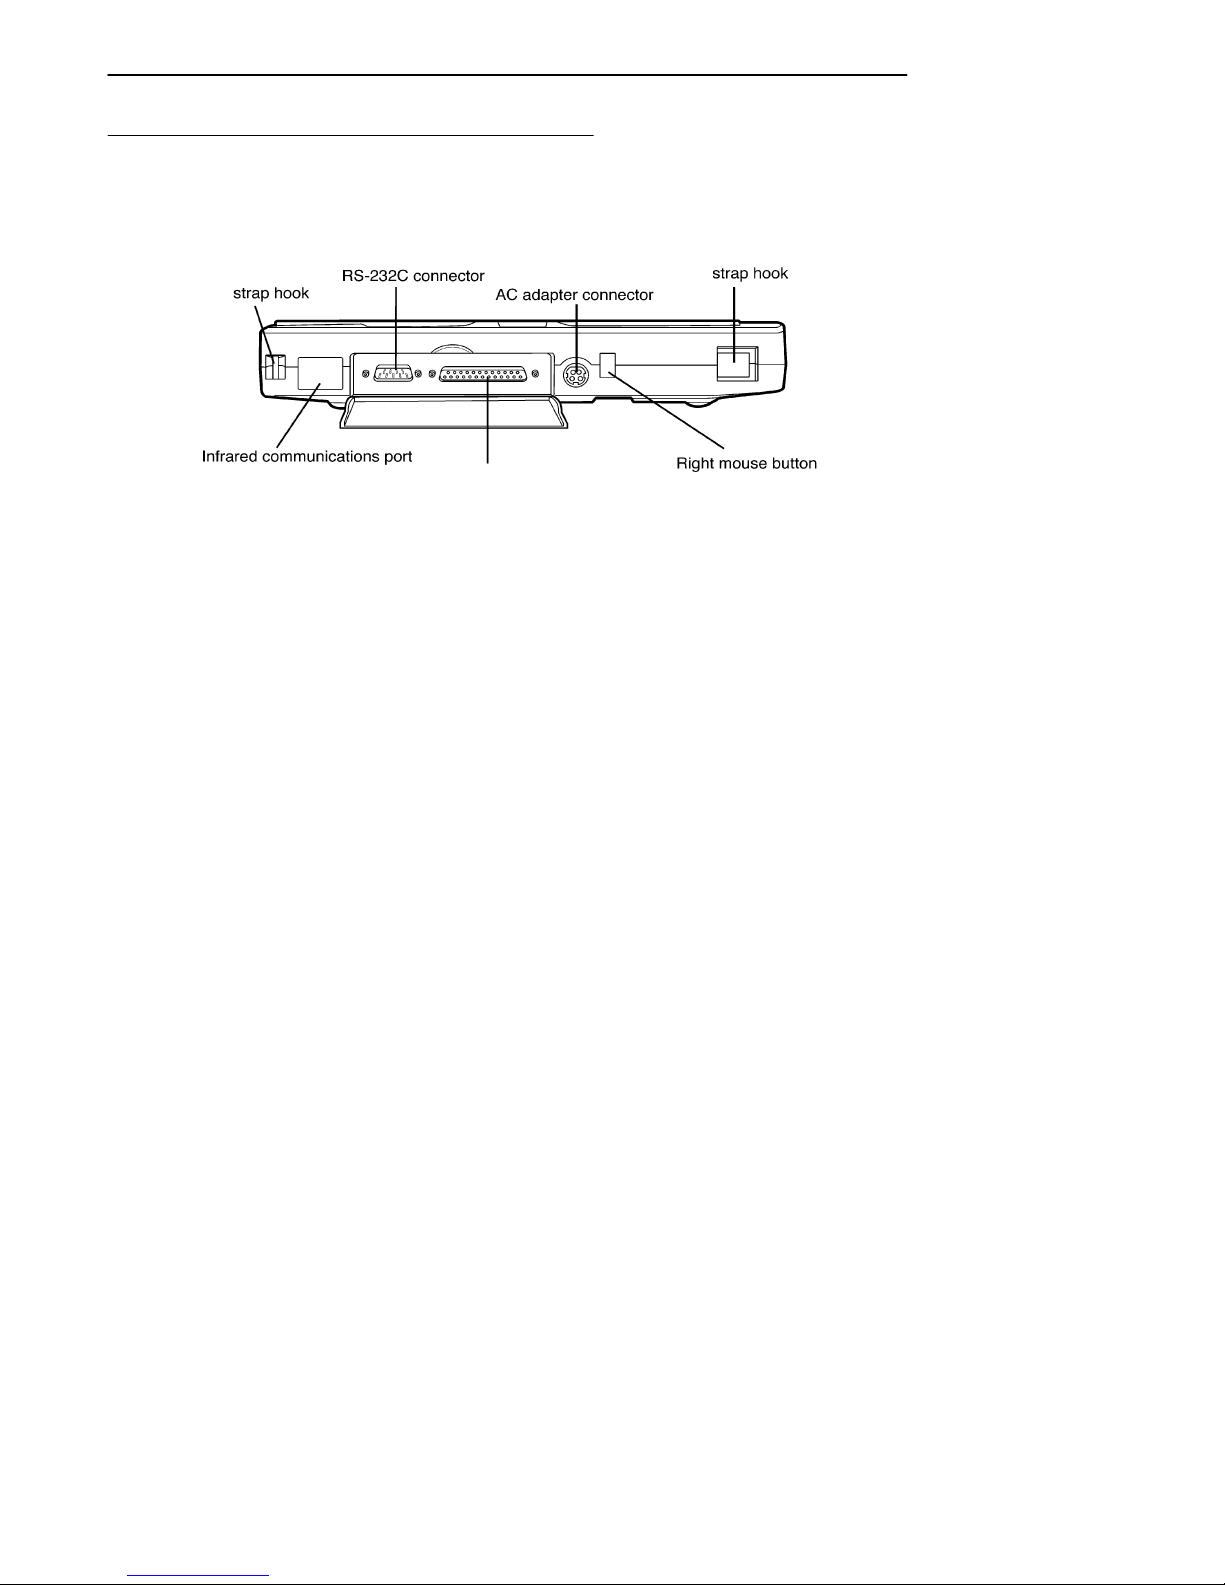
SECTION 1Overview
Parallel Port
Figure 1-10
Rear View
Infrared Communications Port
This port is used by devices that use infrared communications, such as a PDA (personal digital assistant), or certain
other computers and IR printers.
"
NOTE: The PEN*KEY 6632 infrared communications capabilities cannot be
used while the floppy disk drive is operating, and vice versa.
"
NOTE: If the infrared communications port is dirty, wipe it with a dry, soft
cloth. Communications errors may result if the port is used while it is
dirty.
Right Mouse Button
Holding down this button and then tapping the screen has
the same function as clicking the right mouse button on a
two button mouse.
1-16 PEN*KEYR6632 Pen Computer User’s Guide
Page 29
SECTION 1 Overview
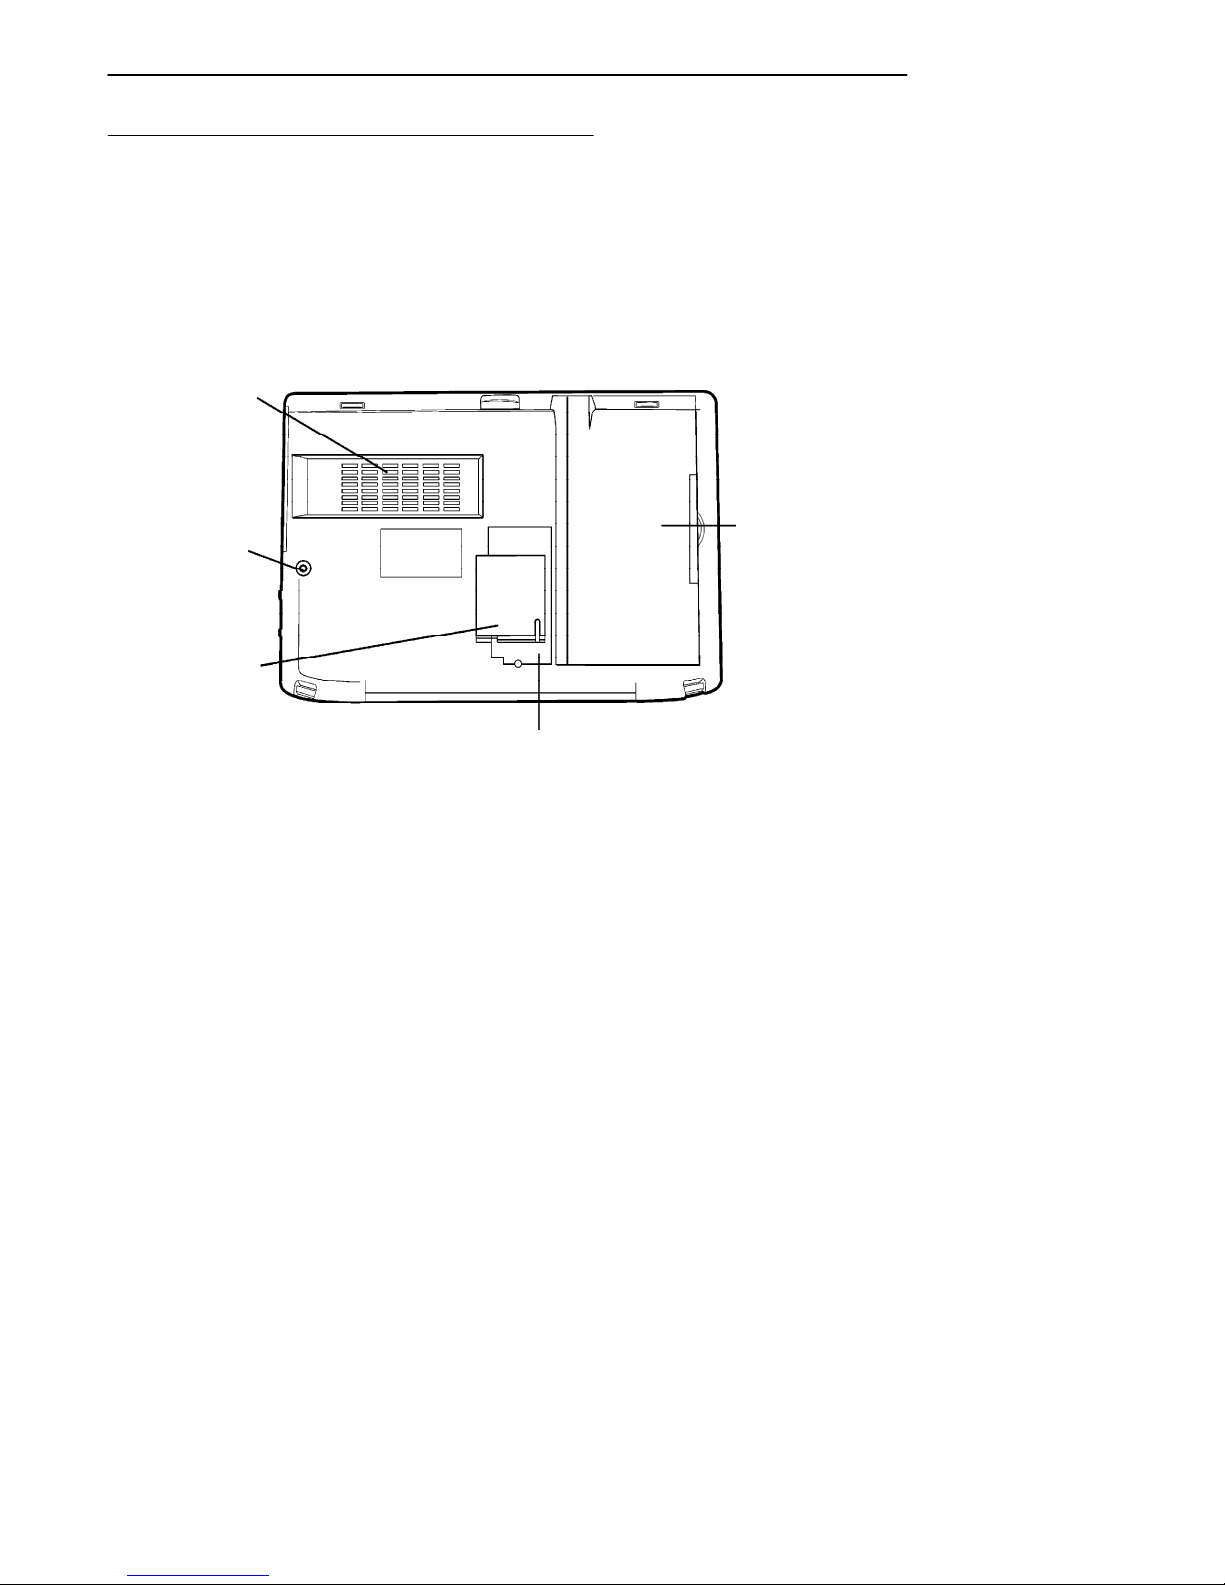
Bottom View
Air Vents
Battery pack cover
RESET switch
Stand
Memory expansion cover
Figure 1-11
Bottom View
The air vents allow the pen computer to dissipate internal
heat. Do not block these vents with the top cover, or other
materials, for an extended period of time.
PEN*KEYR6632 Pen Computer User’s Guide
1-17
Page 30
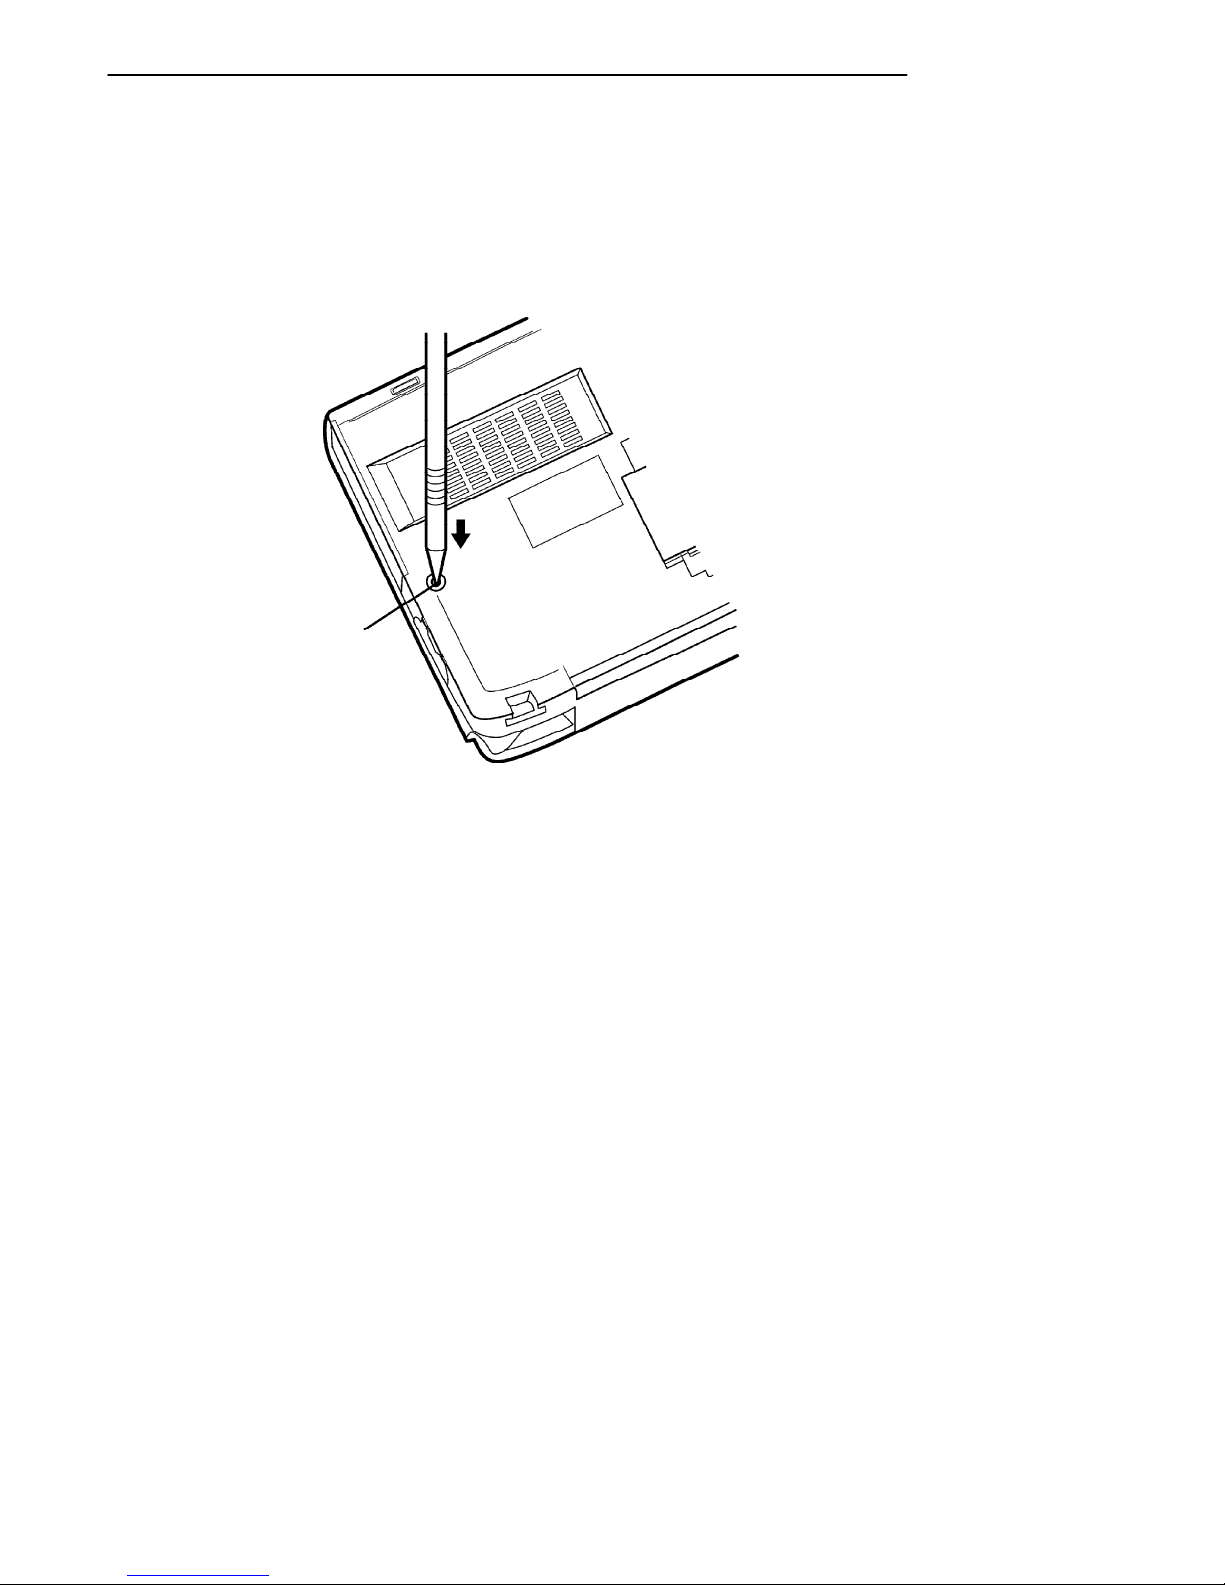
RESET Switch
If the power button and software reset do not work, press
this switch with the tip of the stylus pen in to turn off the
power.
RESET switch
SECTION 1Overview
Figure 1-12
Reset Switch
"
NOTE: If the RESET switch is pressed, any data in memory is lost.
1-18 PEN*KEYR6632 Pen Computer User’s Guide
Page 31
SECTION 1 Overview
AC Adapter/Recharger
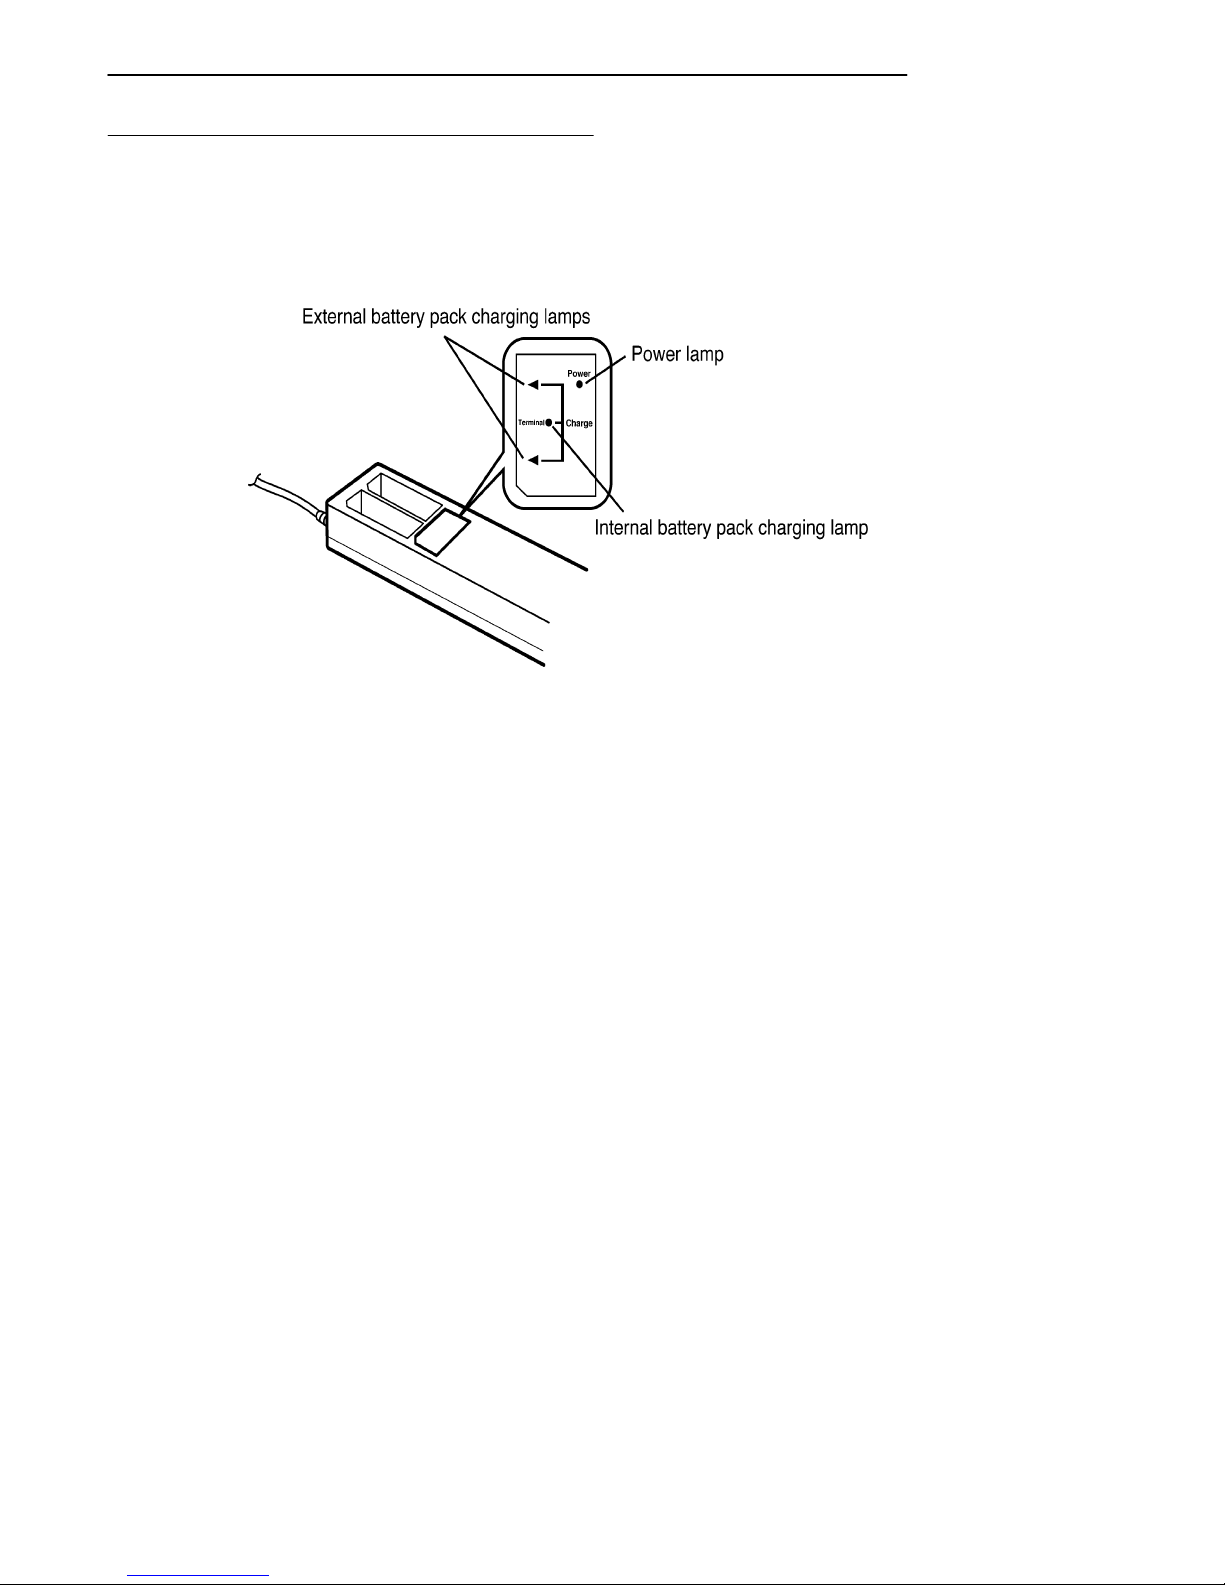
Figure 1-13
AC Adapter/Recharger
Power lamp
When this lamp is green, the AC adapter/recharger is connected
to an AC power supply.
When this lamp is off, the AC adapter/recharger is not connected
to an AC power supply.
If flashing, an abnormality has occurred. Unplug the AC adapter/recharger, wait at least 10 seconds, and then plug it back in. If
this lamp still flashes, a malfunction has occurred. Disconnect
the AC adapter/recharger and the battery packs, and then contact your sales representative or an Intermec service center.
PEN*KEYR6632 Pen Computer User’s Guide
1-19
Page 32

SECTION 1Overview
Internal/External Battery Pack
Charging Lamps
When any of these lamps is orange, the battery pack in
question is being charged.
If any of these lamps is off, either charging is complete, or
charging will be completed within one hour. These lamps
are also off when no battery pack is connected.
If the internal battery pack lamp is flashing slowly, the battery
pack in the pen computer is charging. If one of the external
battery pack lamps is flashing slowly, the corresponding battery packs installed in the AC adapter/recharger is waiting for
charging. If any of these lamps is flashing quickly (at about a
0.3--second interval), an abnormality has occurred. Make sure
that the battery packs are installed correctly and that there is
no foreign matter on any of the battery terminals. Then unplug the AC adapter/recharger, wait at least 10 seconds, and
then plug it back in. If any of the lamps still flashes, a malfunction has occurred. Disconnect the AC adapter/recharger
and the battery packs, and then contact your Intermec service
center.
1-20 PEN*KEYR6632 Pen Computer User’s Guide
Page 33

Section 2
Using the Pen Computer for the
First Time
" " " " " " " " " " " " " " " " " " " " " " " " " " " "
This section provides essential information that you need to
know before using the pen computer and also explains the
necessary start up procedures.
2-1PEN*KEYR6632 Pen Computer User’s Guide
Page 34

SECTION 1Using the Pen Computer for the First Time
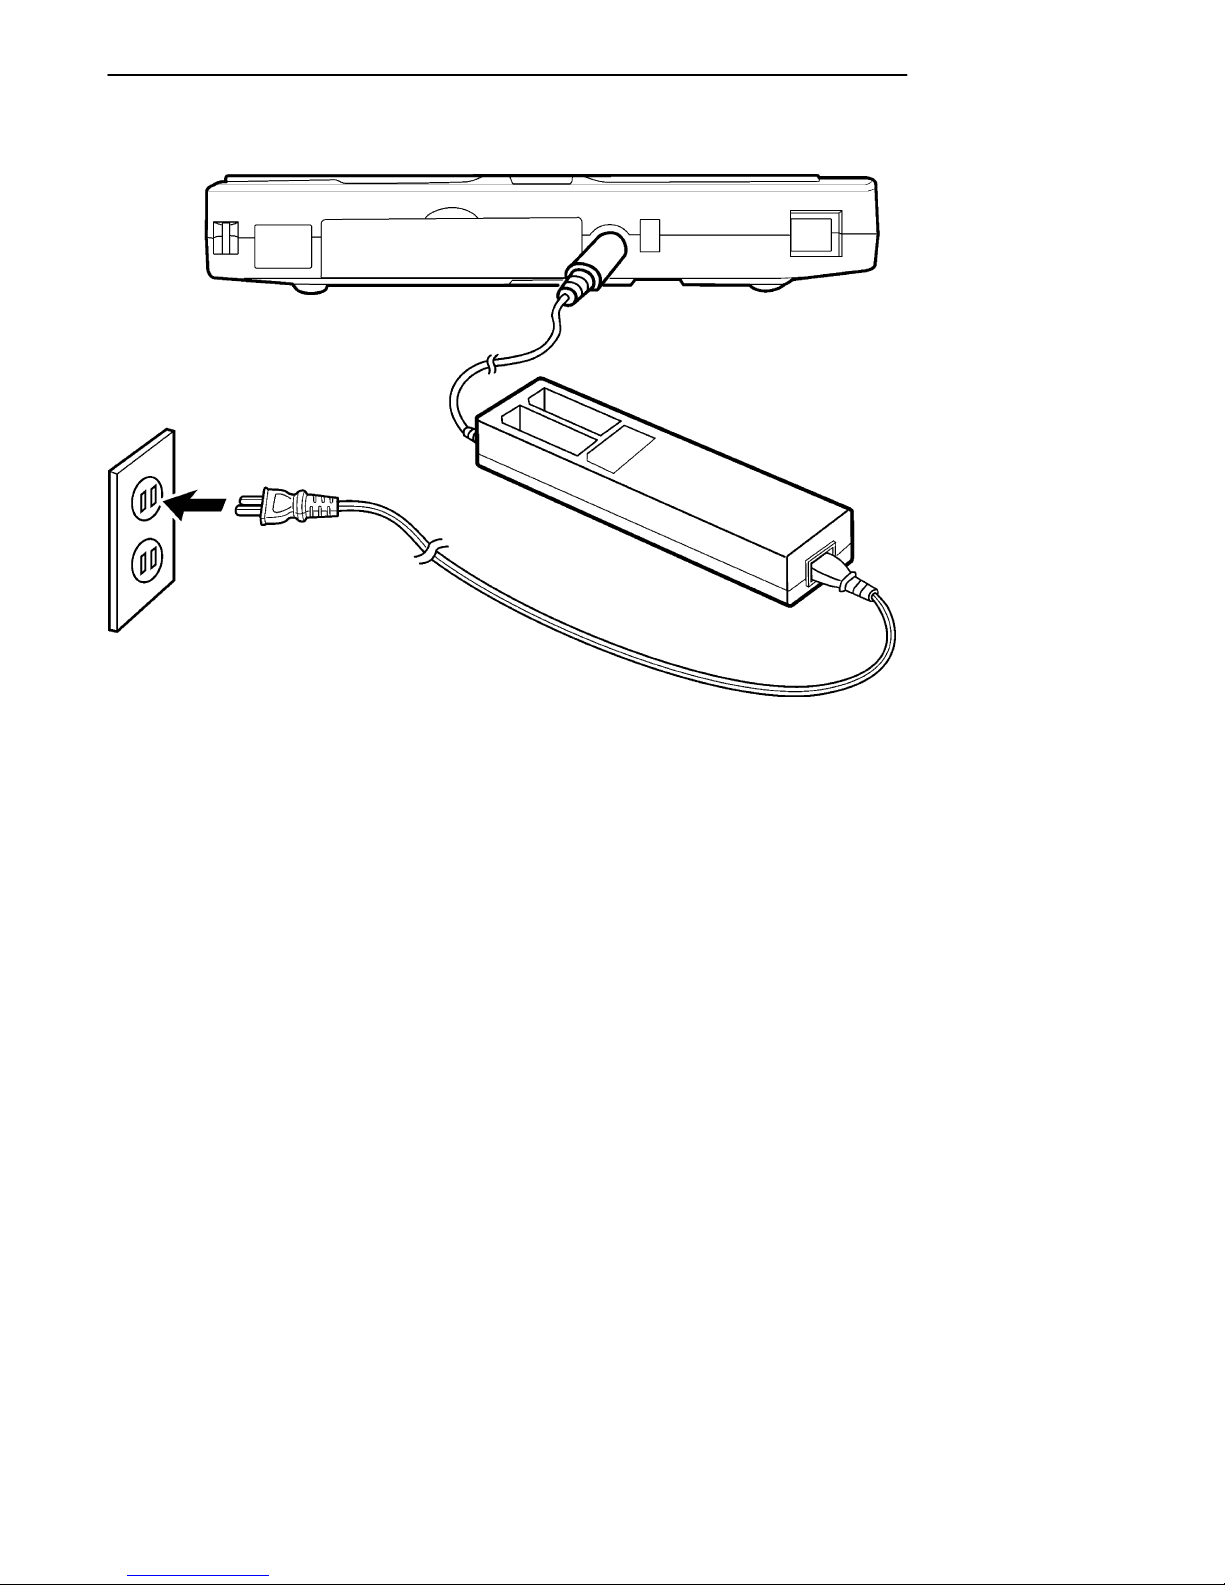
Connecting the AC Adapter/Recharger
Connect the AC adapter/recharger provided with the
PEN*KEYR6632 Pen Computer to the AC adapter connector
on the pen computer.
B
CAUTION: Use the included power cord, or use a minimum 6 foot or 10
foot long maximum UL approved type SPT--2, 2/18 AWG cord
which is in conformity with NEC and rated plug 125V 10A and
connector 125V 7A.
B
CAUTION: Always grasp the plug when plugging in or unplugging the
power cord.
B
CAUTION: In order to prevent data from being damaged due to a power
failure, etc, when using an AC power supply, always have at
least one battery pack installed if possible. (Refer to “Battery
Packs” on page 4-1.)
2-2 PEN*KEYR6632 Pen Computer User’s Guide
Page 35
SECTION 2 Using the Pen Computer for the First Time
Figure 2-1
AC Adapter/Recharger
2-3PEN*KEYR6632 Pen Computer User’s Guide
Page 36

Stylus Pen Input
The PEN*KEY 6632 Pen Computer is equipped with a pen
stylus to select items displayed on the LCD screen and to
input text and drawings.
Selecting an Item (pointing)
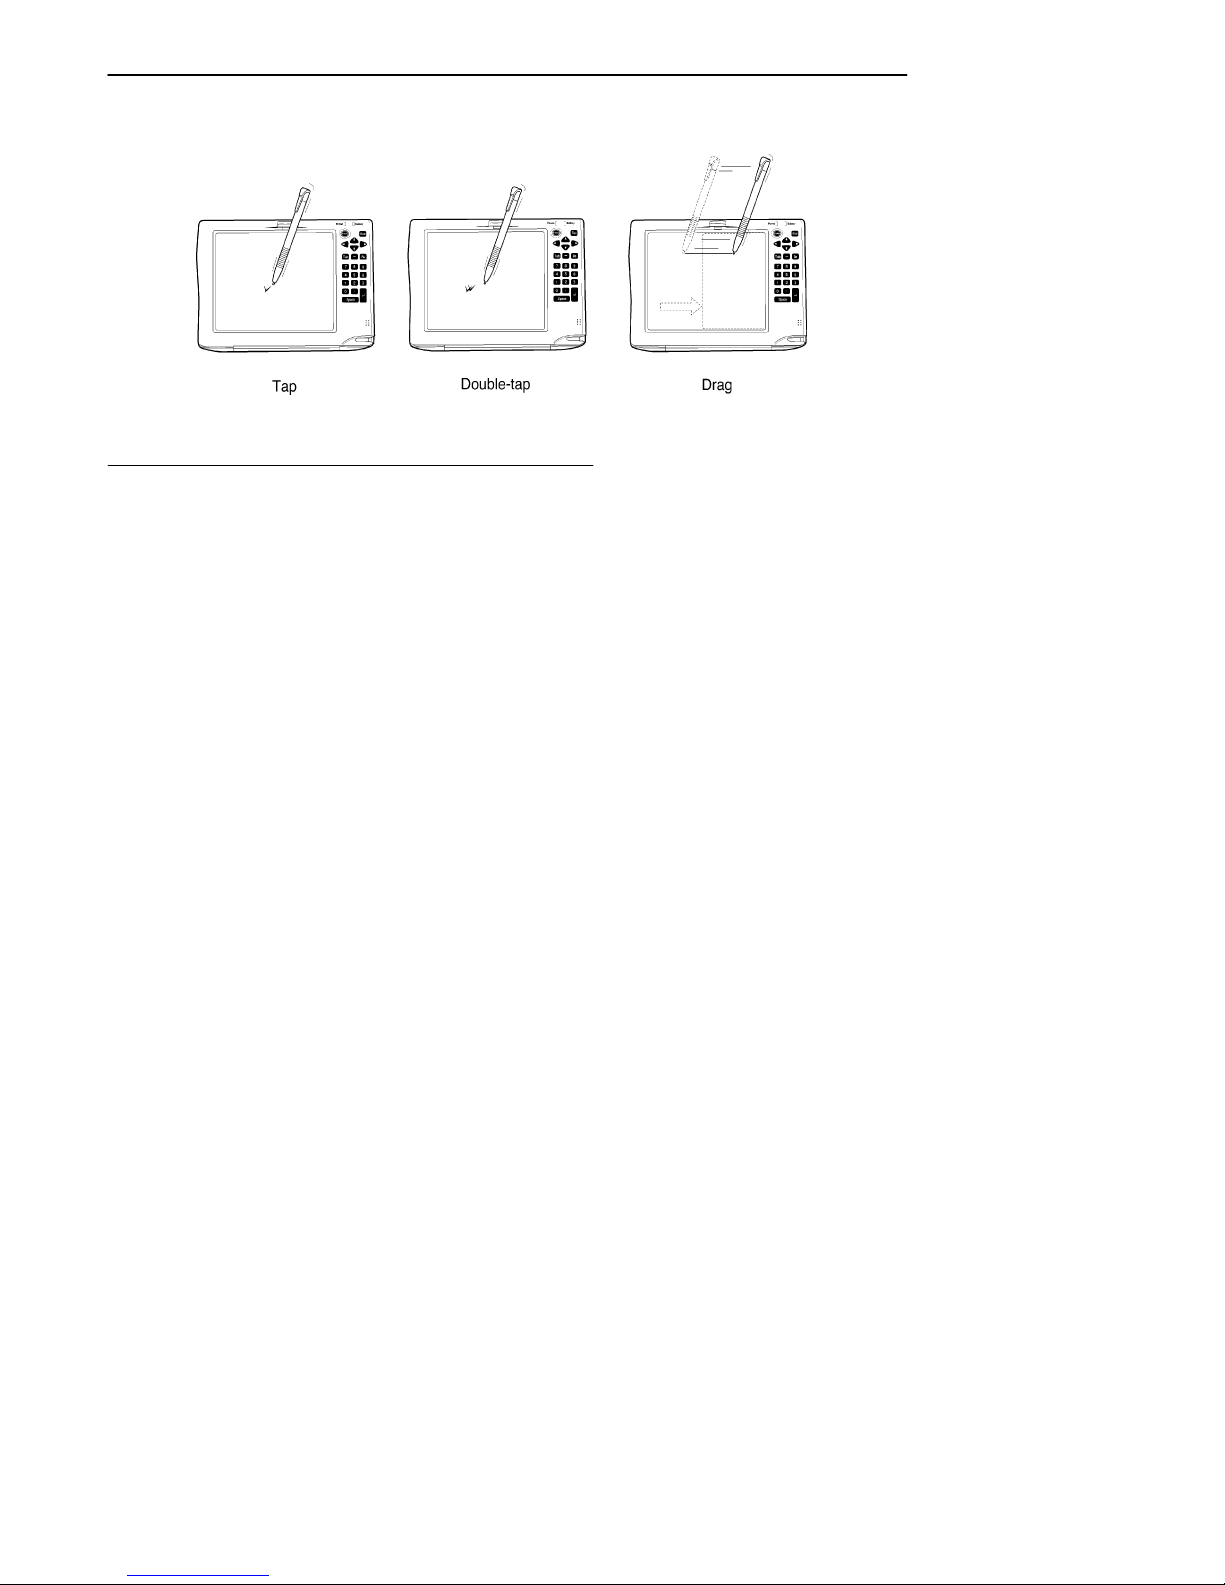
To select an item, press the pen on the item to be selected
and then remove the pen, without moving it on the display.
This operation is called “tapping”, and is equivalent to clicking the left mouse button. This operation is used to select
menu items, click buttons and select icons.
Making two consecutive taps is called “double--tapping.” A
double--tap is equivalent to double--clicking the left mouse
button. This operation is used to start up programs or select
functions.
SECTION 2Using the Pen Computer for the First Time
Moving Items/Resizing Windows
To move an item, touch the pen to the item and then slide
the pen over the screen (keeping it in contact with the
screen) to the desired location. This operation is called
“dragging.” This operation is equivalent to dragging with a
mouse, and is used to move windows, etc.
To resize a window, drag the window edge.
Inputting Text
If your application supports handwriting recognition, you
may input text directly with the pen stylus, much like writing with paper and pencil. An optional PS/2 type keyboard
is available for QWERTY input.
"
NOTE: Because resistive film technology is used in the pen computers’
touch panel, the pen will not work properly if you place your hand on
the screen while writing with the pen stylus.
2-4 PEN*KEYR6632 Pen Computer User’s Guide
Page 37
SECTION 2 Using the Pen Computer for the First Time
Figure 2-2
Pen Operation
System Startup
Startup
1. Press the [POWER] button.
The pen computer automatically executes its Power On
Self--Test (POST). This test checks the pen computer’s
memory, system board and other devices before initiating
normal operation.
2. Windows 95 starts up.
3. The first time Windows 95 starts up, perform the Windows 95 setup process. To set up Windows, follow the
instructions displayed on the screen.
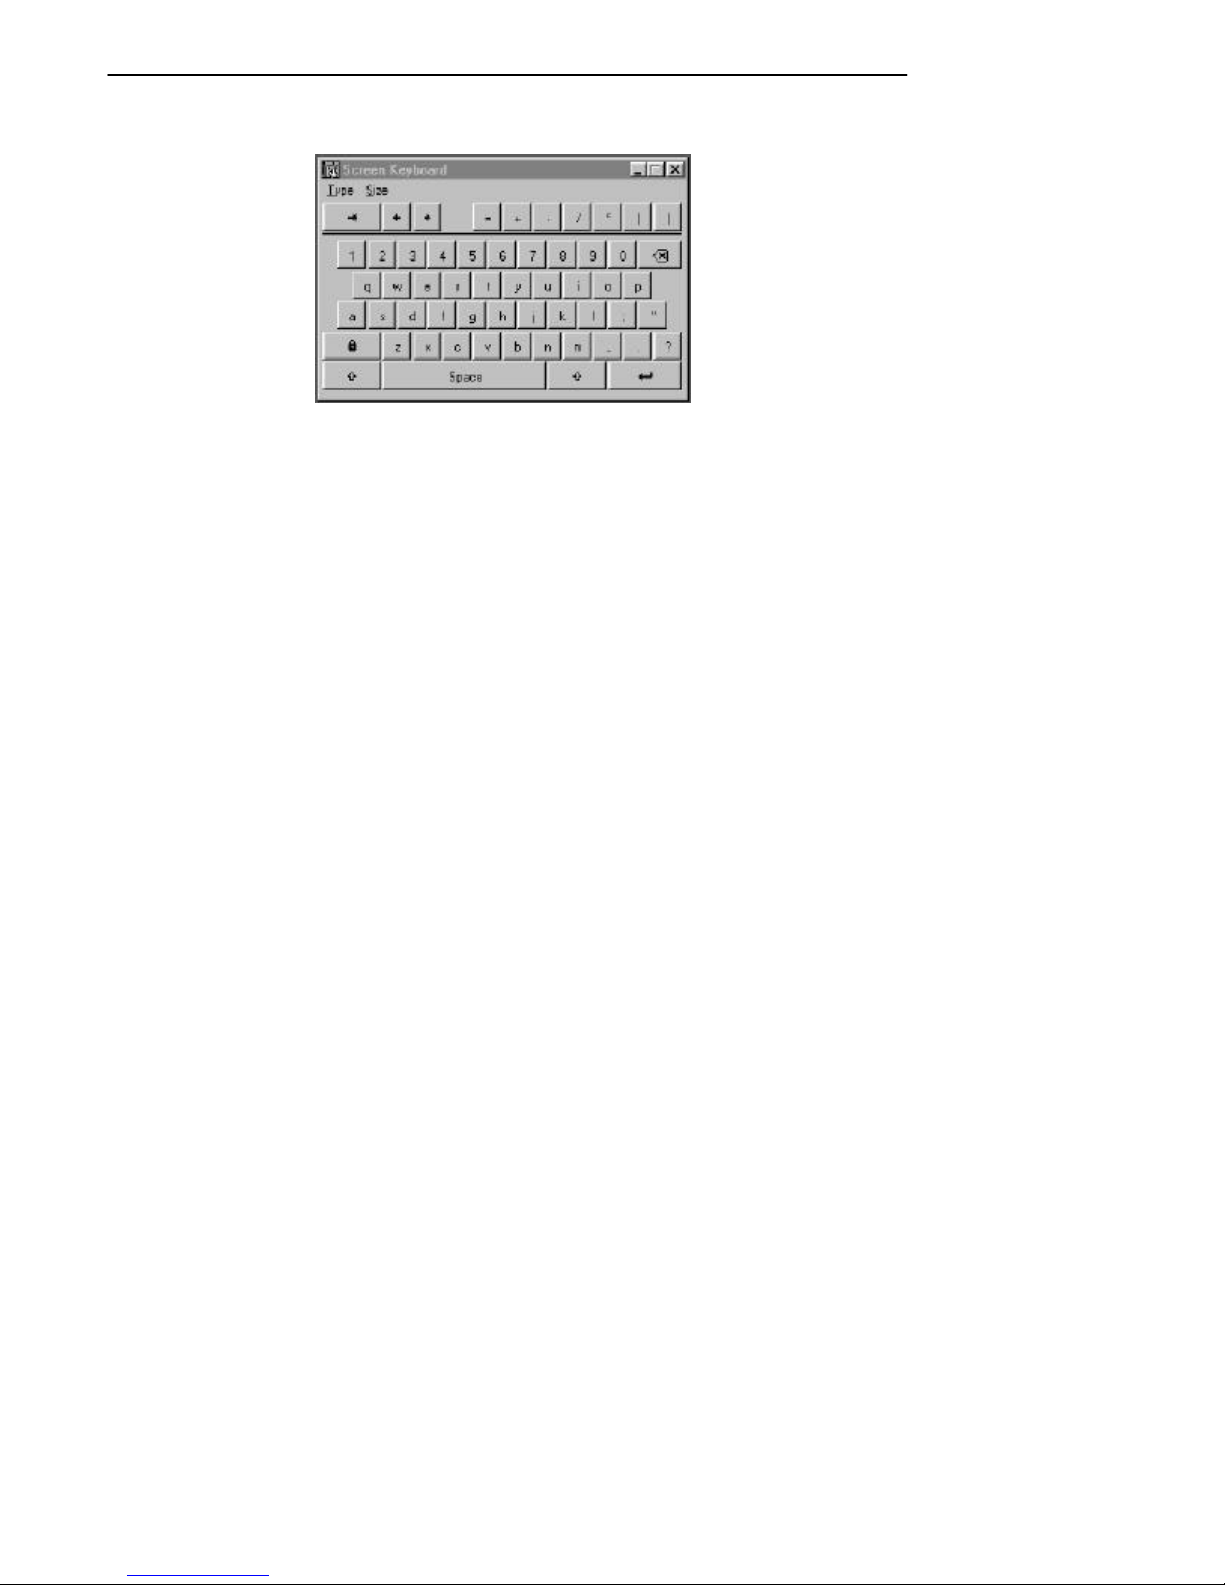
An icon named “Onscreen Keyboard” is displayed on the
setup screen. If you double-click this icon, a keyboard displays on the screen that you can use to input items.
If the keyboard is obstructing part of the display, you can
tap the center icon, which appears in the upper right corner
of the keyboard; tapping [--] closes up the keyboard so that
only the icon is displayed.
2-5PEN*KEYR6632 Pen Computer User’s Guide
Page 38
SECTION 2Using the Pen Computer for the First Time
4. Input your name, company name, and the product ID
from the “Certificate of Authenticity.”
5. Indicate your acceptance of the licensing terms for using
Windows 95.
6. Make environment settings, such as the printer, date
and time, etc.
After completing the setup process, restart your system.
2-6 PEN*KEYR6632 Pen Computer User’s Guide
Page 39

Section 3
Software
" " " " " " " " " " " " " " " " " " " " " " " " " " " "
General Information
The PEN*KEY 6632 pen computer includes a setup utility
that stores the basic system configuration and the power
management settings. This section explains how to use the
setup utility to set up the pen computer and the
PEN*KEYRtool.
Software Included with the 6632
Pen Computer
The 6632 pen computer hard disk is preconfigured with the
operating system and software before it is shipped from the
factory.
The folders on the hard disk are organized as shown below.
" Windows ---- Windows 95 system
" CIC handwriting recognition
Windows 95
A computer’s operating system is the basic software that controls the computer so that it can run application software.
PEN*KEYR6632 Pen Computer User’s Guide
3-1
Page 40

The pen computer uses Microsoft’s Windows 95 as its operating system. Application software must be compatible with
this operating system in order to run on the pen computer.
For details on Windows 95, refer to the Windows 95 Help
function.
MS-DOS Screen
Windows 95 provides two types of environments that allows
you to start up MS--DOS applications. The symbol “C:>”
displayed on these screens is called the “MS--DOS prompt.”
This prompt indicates that MS--DOS is awaiting input.
MS-DOS Prompt
The MS--DOS prompt is displayed by tapping “MS--DOS
Prompt” under “Programs” in the Start menu.
SECTION 1Software
With the MS--DOS prompt, it is possible to make settings
such as the font and window size; it is also possible to cut
and paste text between MS--DOS applications.
MS-DOS Mode
The MS--DOS mode is displayed by tapping “Restart the
computer in MS--DOS mode?” in the dialog box when “Shut
Down” is selected from the Start menu.
Compared to the MS--DOS prompt, MS--DOS mode offers
better compatibility with MS--DOS applications.
"
NOTE: For details on the MS--DOS prompt and MS--DOS mode, refer to the
Windows 95 Help function.
3-2 PEN*KEYR6632 Pen Computer User’s Guide
Page 41

SECTION 3 Software
Windows 95 Help
The Help function is one of the main information resources
for Windows 95. There are two types of help: help that explains specific operating procedures, and help that explains
an item displayed on the screen.
Help With Operating Procedures
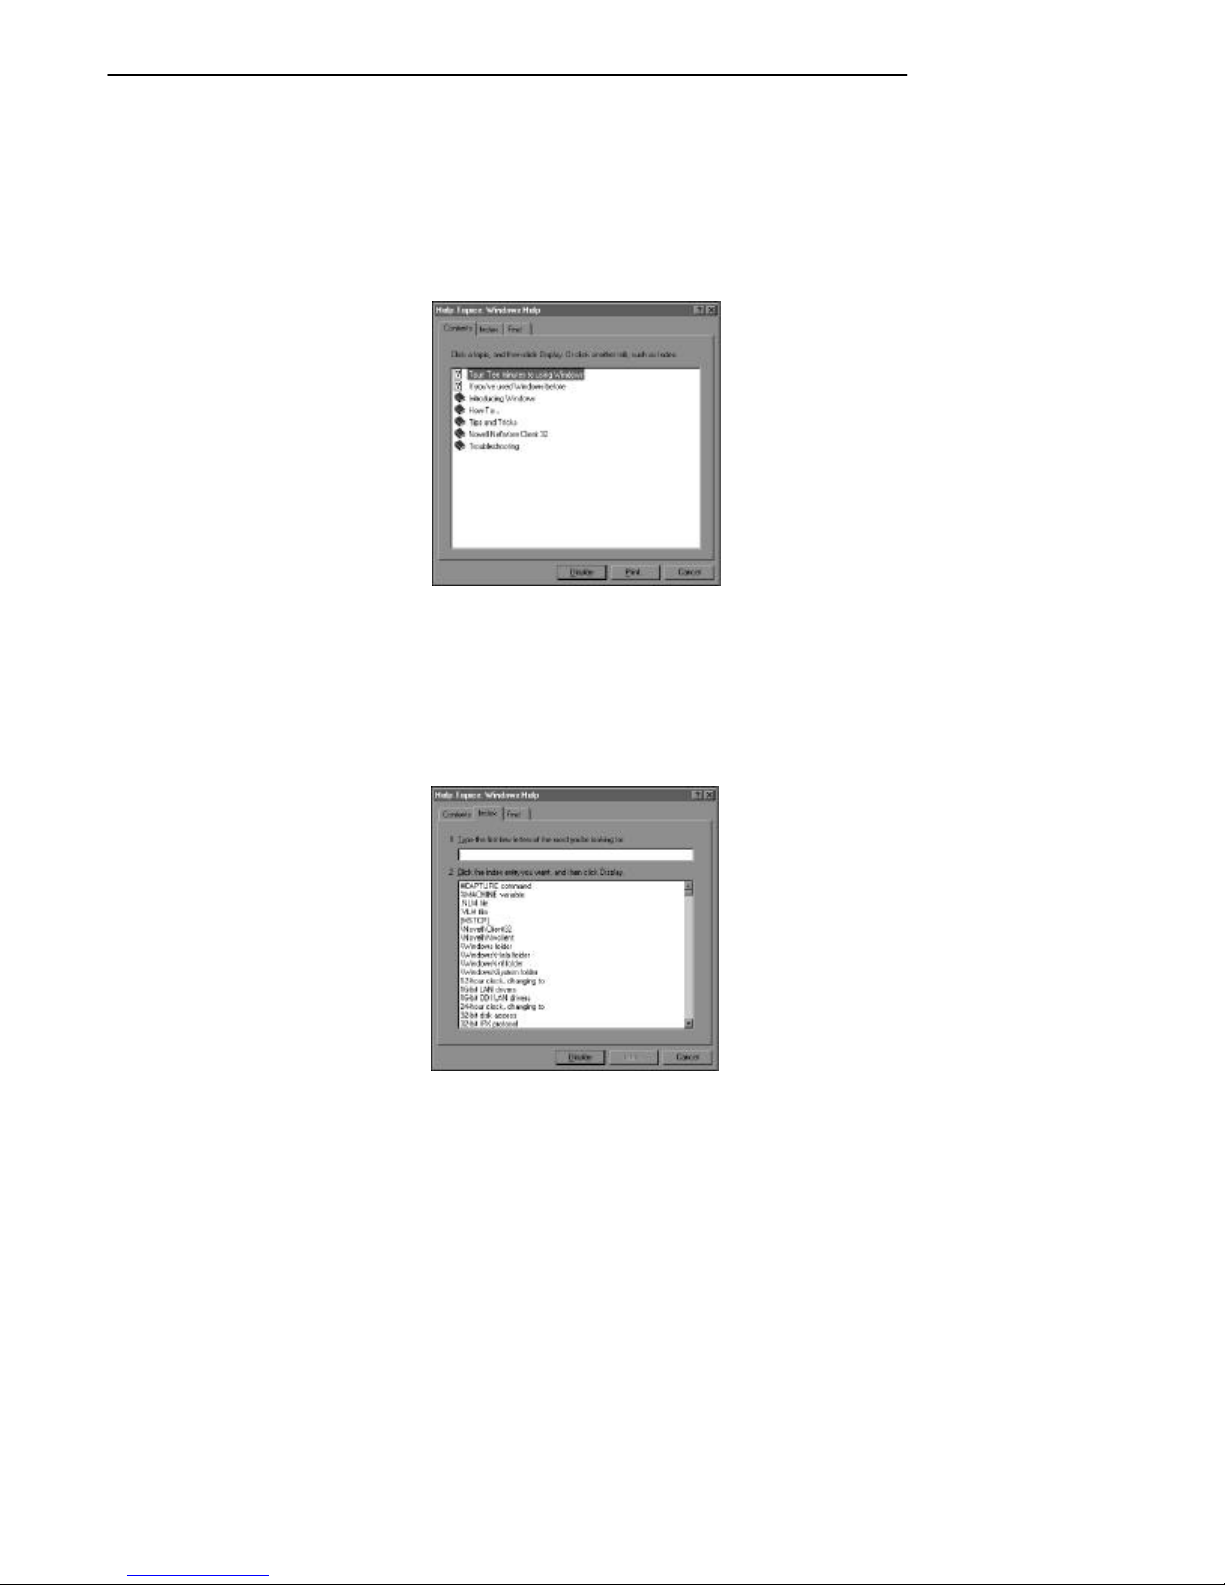
A list of help topics is displayed when you tap on “Help” in
the Start menu. The window changes to a search window if
you tap on either the “Contents” or the “Keyword” tab at
the top of the dialog box.
PEN*KEYR6632 Pen Computer User’s Guide
3-3
Page 42
SECTION 3Software
Contents
Use this to find information from a list of topics grouped by
area.
Keyword
Use this to input the first few letters of the target word and
to search for the desired information from an alphabetized
list of keywords.
3-4 PEN*KEYR6632 Pen Computer User’s Guide
Page 43
SECTION 3 Software
Help Regarding Items on the
Screen
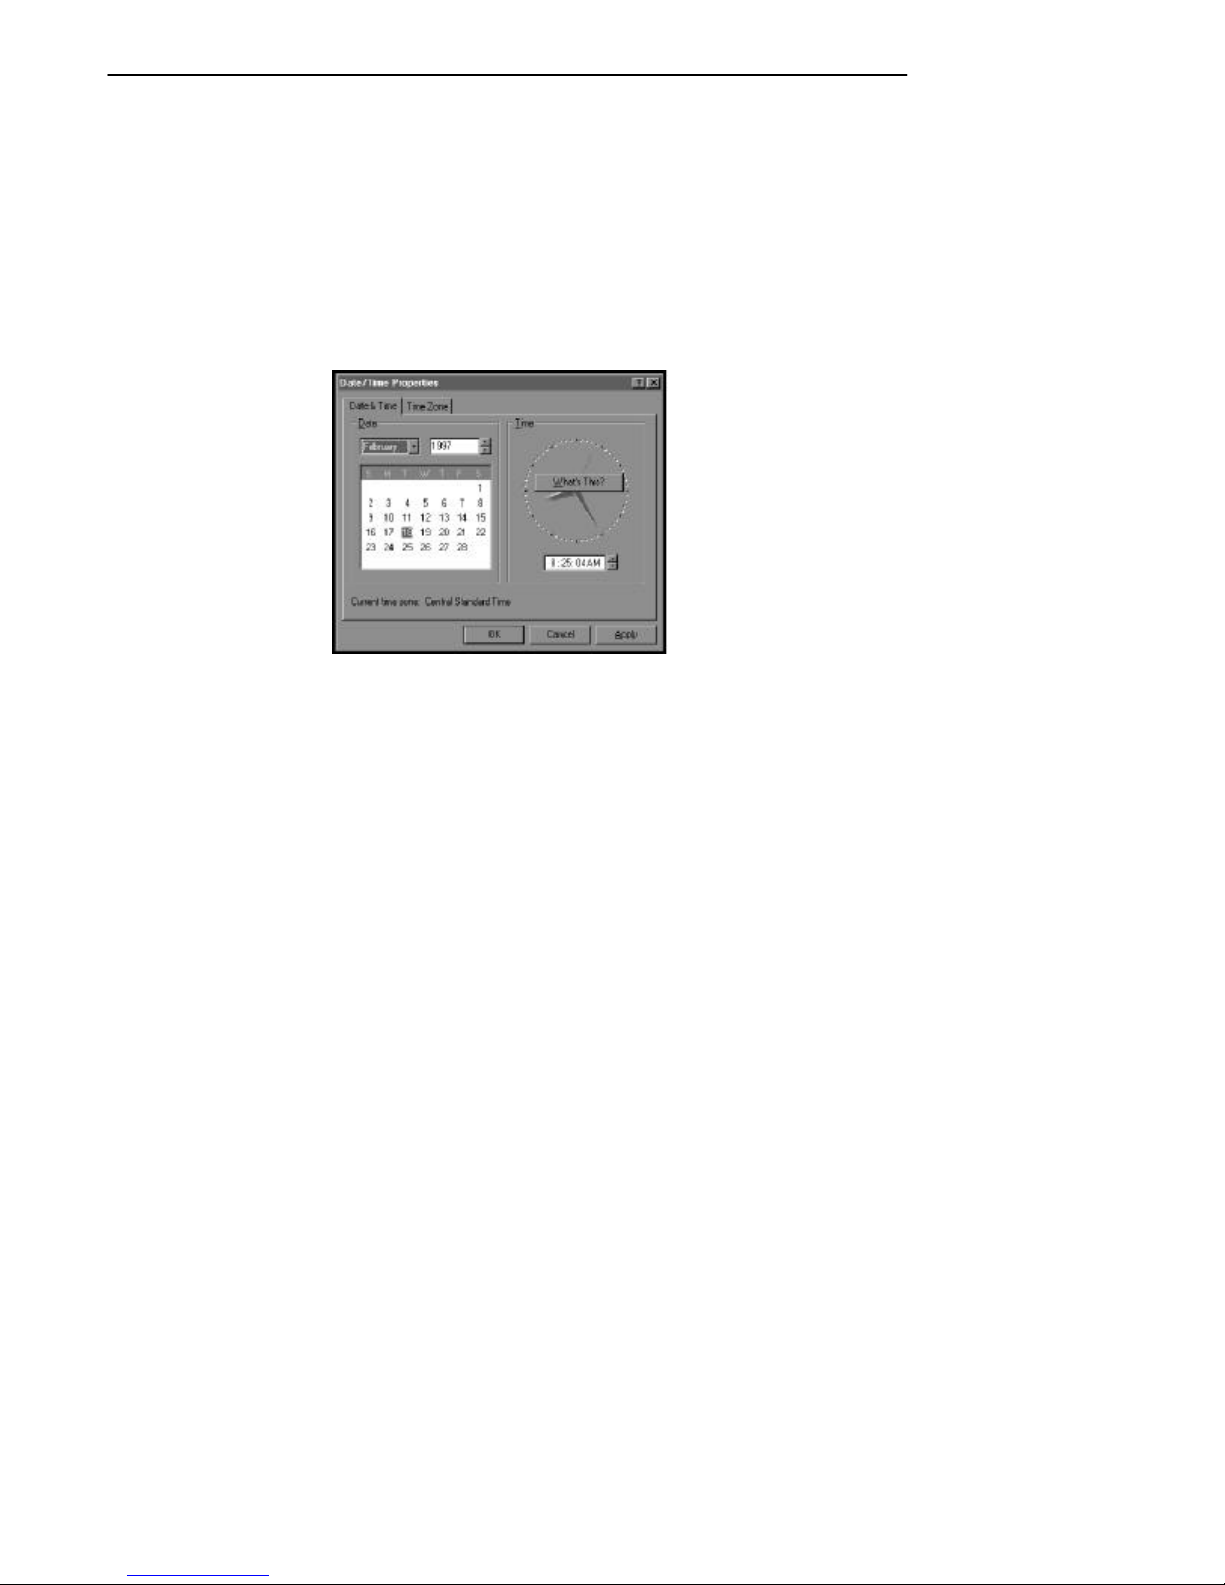
If a window has a [?] button, you can use it to see explanations
of various items on the screen. Tap [?] and then tap the item
in question.
PEN*KEYR6632 Pen Computer User’s Guide
3-5
Page 44

SECTION 3Software
Changing the Screen Background
A variety of different types of “wallpaper” (bit--mapped files
for display in the background) are included in the pen computer. You can select whichever one suits your own taste.
1. Under “Settings” on the Start menu, tap “Control Panel.”
2. Double--tap “Display.”
3. Specify a file from the “Wallpaper” list.
The names of wallpaper files created for the pen computer
are listed below. You can use “Browse” to specify one of
these files.
" 4) Tap [OK].
"
NOTE: Because the 1.6 million-color wallpapers use a lot of memory, some
application software might not run if one of these is selected. In that
event, specify a different type of wallpaper.
3-6 PEN*KEYR6632 Pen Computer User’s Guide
Page 45

SECTION 3 Software
Setup Utility
" The Setup utility is used to change settings in the
following types of situations:
" When setting the date or time
" When making power management settings
" When expanding the system by adding peripherals
"
NOTE: The settings made through the setup utility are stored in a special
type of memory called ”CMOS RAM.” Because the contents of this
memory are maintained by the internal backup battery, these settings
are not lost even if the power is turned off or the system is reset.
When the system power is turned on, the system reads the information stored in CMOS RAM and compares the information with that
obtained through the environment check performed by the Power On
Self--Test (POST). If an error is detected, an error message is displayed on the screen and instructions to execute the Setup utility are
also displayed.
"
NOTE: The pen computer has an internal lithium ion battery that it uses as a
backup power supply for CMOS RAM. If the pen computer is not
used for an extended period (at least six months), the backup battery
may become exhausted and the contents of CMOS RAM will be lost.
The backup battery can be recharged in about eight hours, either by
installing a fully charged battery pack (PN:871-006-020) in the pen
computer, or by connecting the AC adapter/recharger.
PEN*KEYR6632 Pen Computer User’s Guide
3-7
Page 46
SECTION 3Software
PEN*KEY Tool
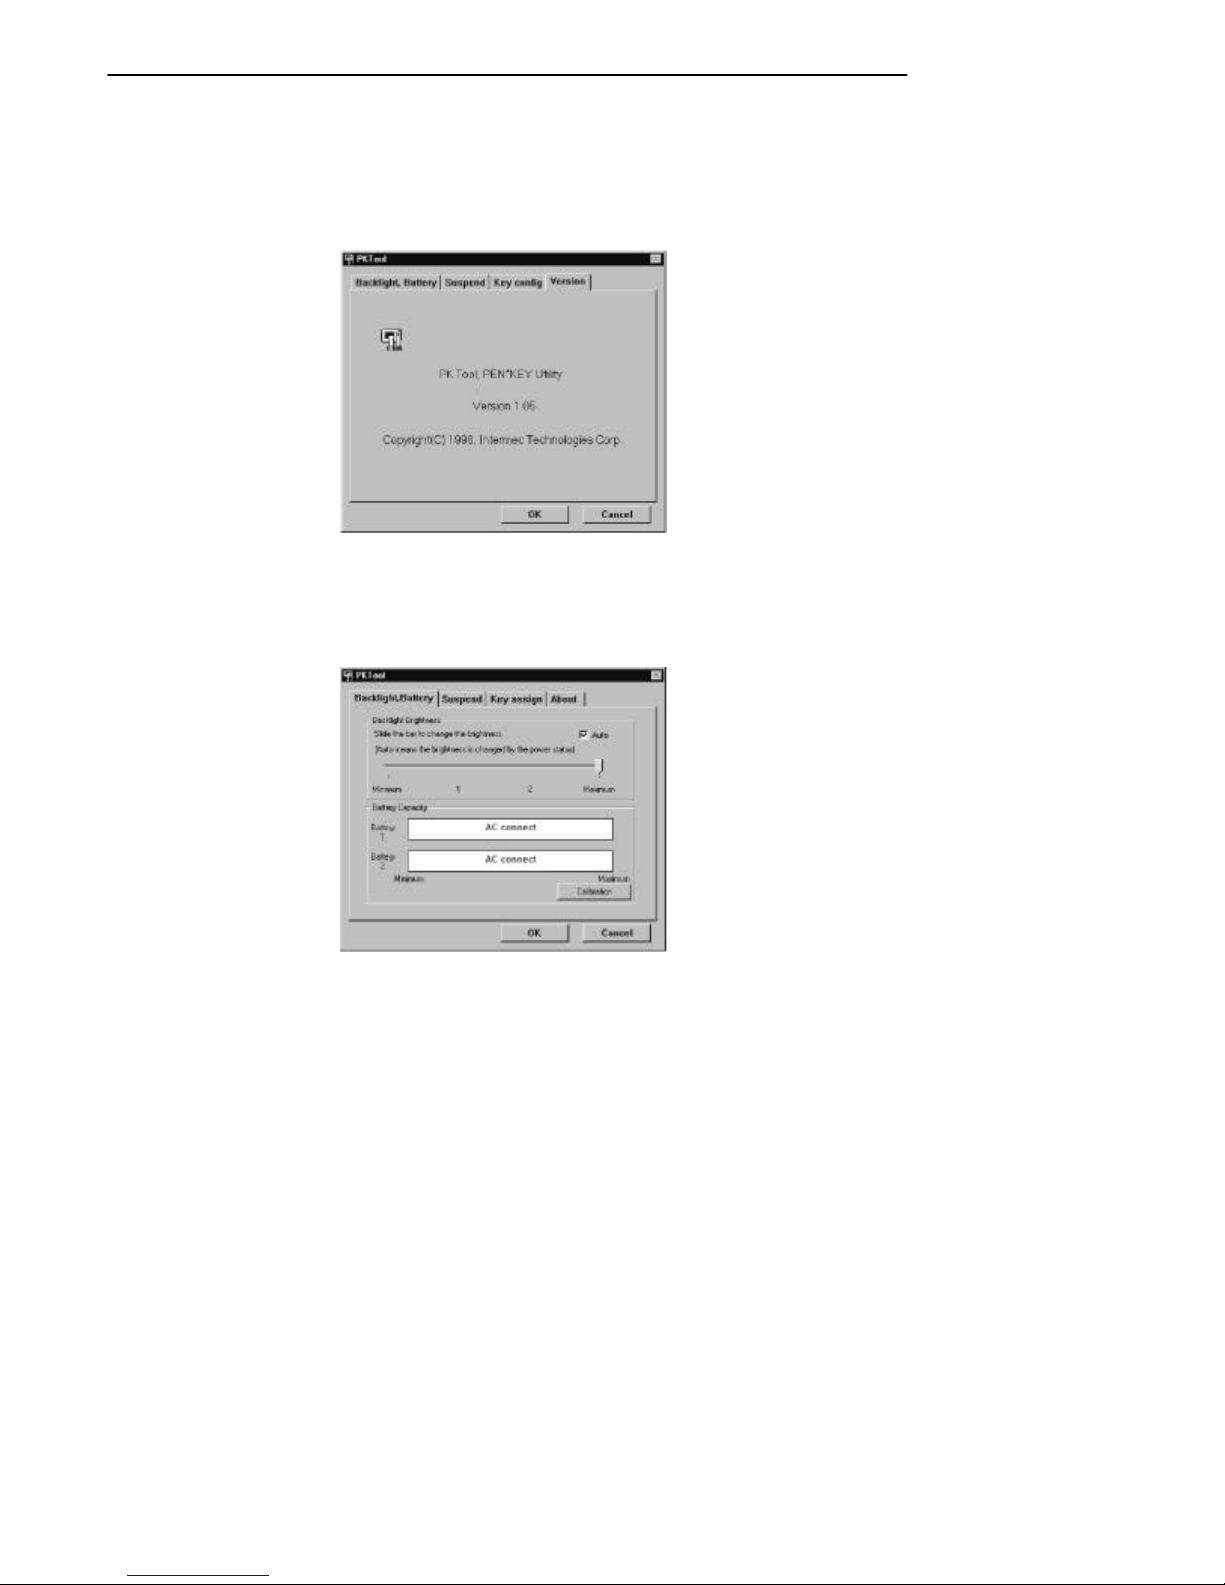
The PEN*KEY tool confirms and sets the backlight, the
battery, suspend execution, key changes, etc.
There are two methods for starting up this tool:
" Tap on either the battery icon or the PEN*KEY tool
icon in the Windows 95 taskbar, if they are displayed.
When the system is running off of AC power:
" Tap the PEN*KEY tool in the Program menu under
the Start menu.
3-8 PEN*KEYR6632 Pen Computer User’s Guide
Page 47
SECTION 3 Software
Adjusting the Backlight and Checking the
Remaining Battery Capacity
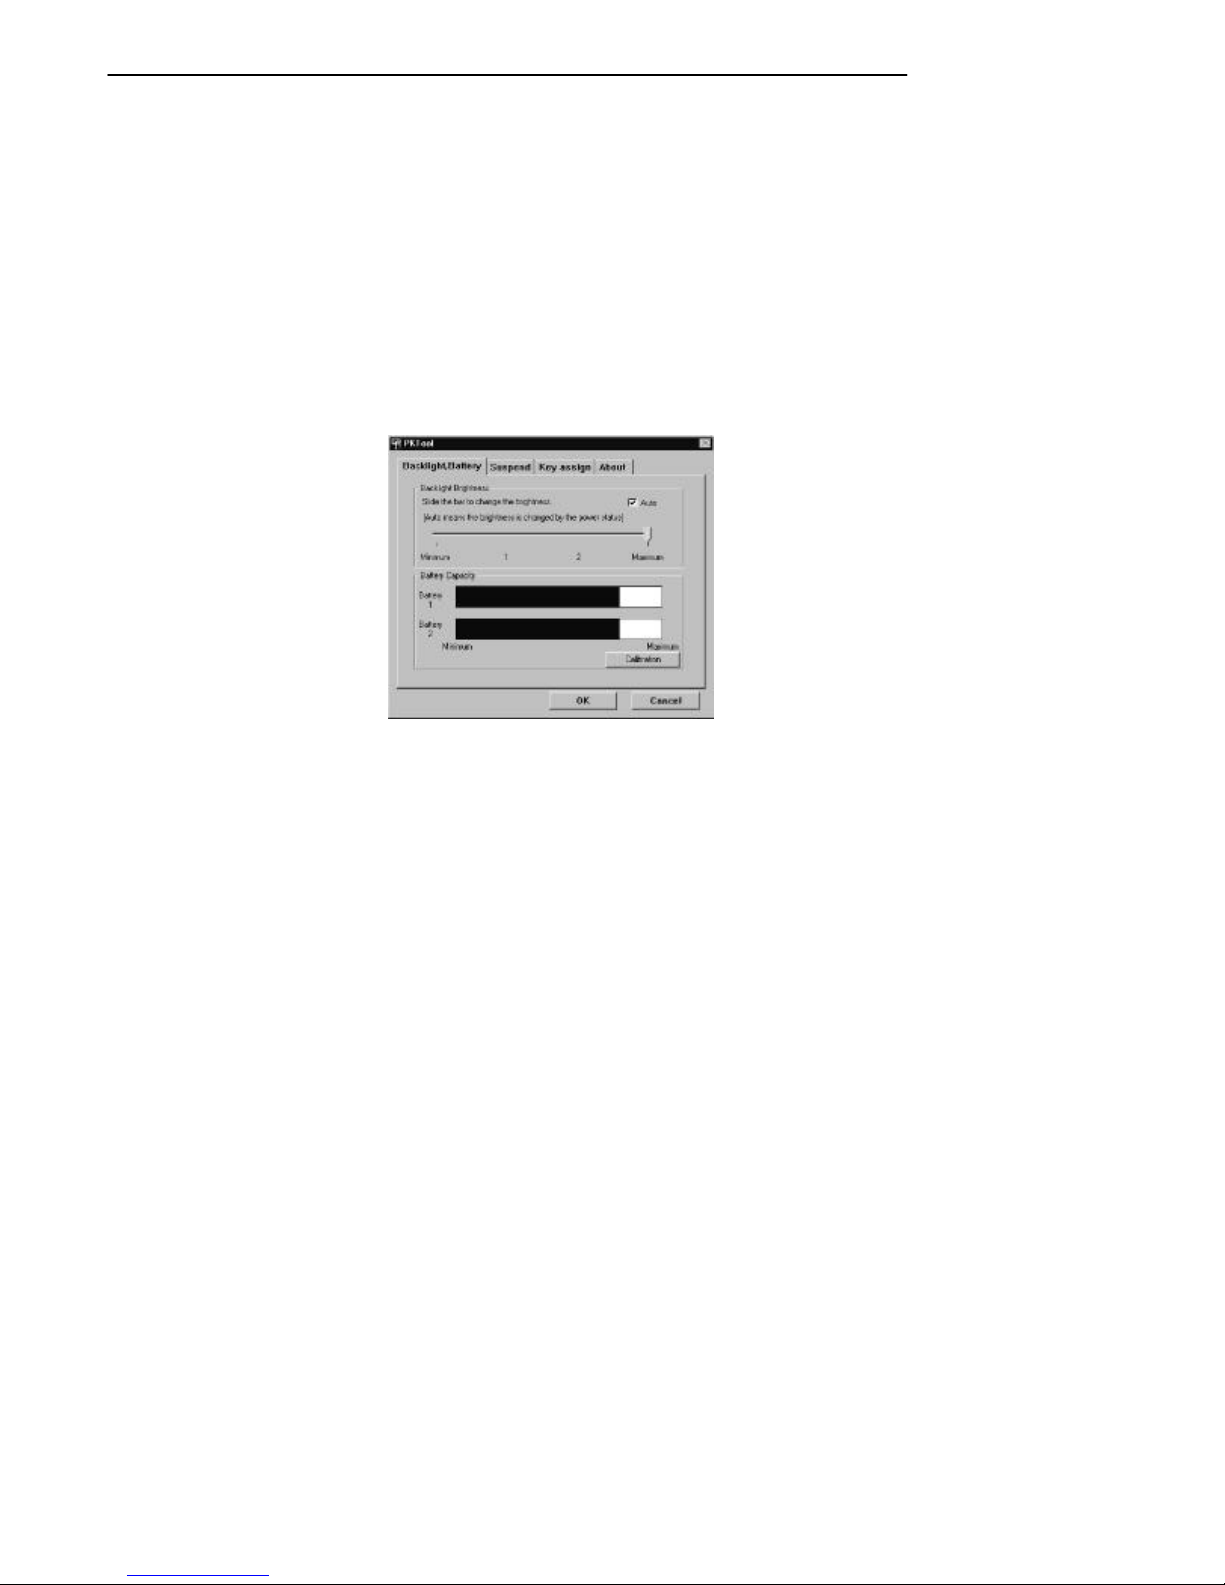
" 1) Tap on the Backlight/Battery tab.
" 2) The backlight brightness can be set to one of four
levels. To adjust the brightness, tap the desired level.
" 3) To adjust the brightness to that level, tap
[OK]. To keep the previous level of brightness
without making any changes, tap [Cancel].
When the system is running off of battery power:
The Autocheck button changes the brightness of the backlight when AC power is connected, in the same way as the
“Auto” setting in the BIOS setup. If this checkbox is
checked, the backlight brightness cannot be adjusted.
"
NOTE: The remaining battery capacity is not displayed if the AC adapter/
recharger is connected.
"
NOTE: For details on how to check the remaining capacity of a battery pack,
refer to “Remaining Battery Pack Capacity Display” on page 4-7.
"
NOTE: The backlight brightness can be adjusted temporarily by holding
down the ”right mouse button” on the rear of the pen computer while
pressing [LEFT ARROW] and [RIGHT ARROW]. However, there are
some cases where the brightness cannot be set in this manner, and
the setting cannot be saved.
PEN*KEYR6632 Pen Computer User’s Guide
3-9
Page 48
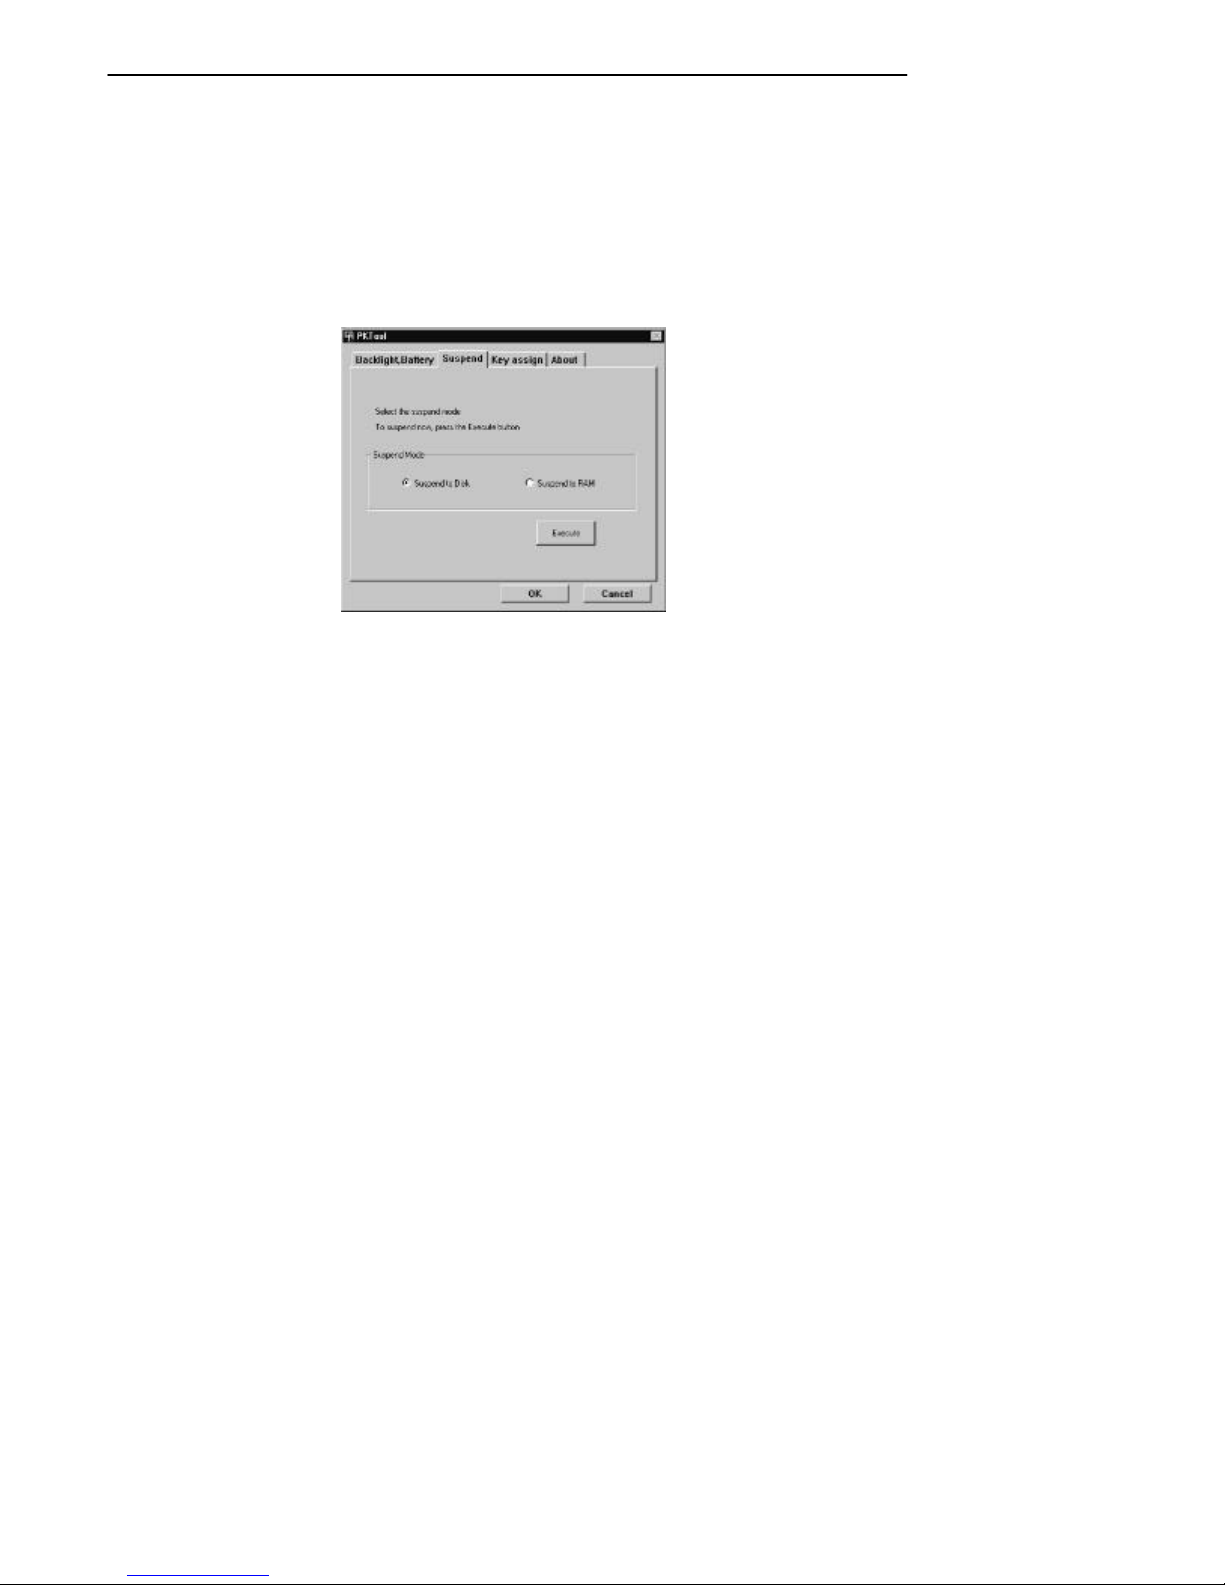
Suspend Execution
1. Tap the Suspend Execution tab.
2. Tap the circle in front of “Suspend.”
3. Tap “Execute Suspend.”
4. The suspend operation is executed.
SECTION 3Software
3-10 PEN*KEYR6632 Pen Computer User’s Guide
Page 49
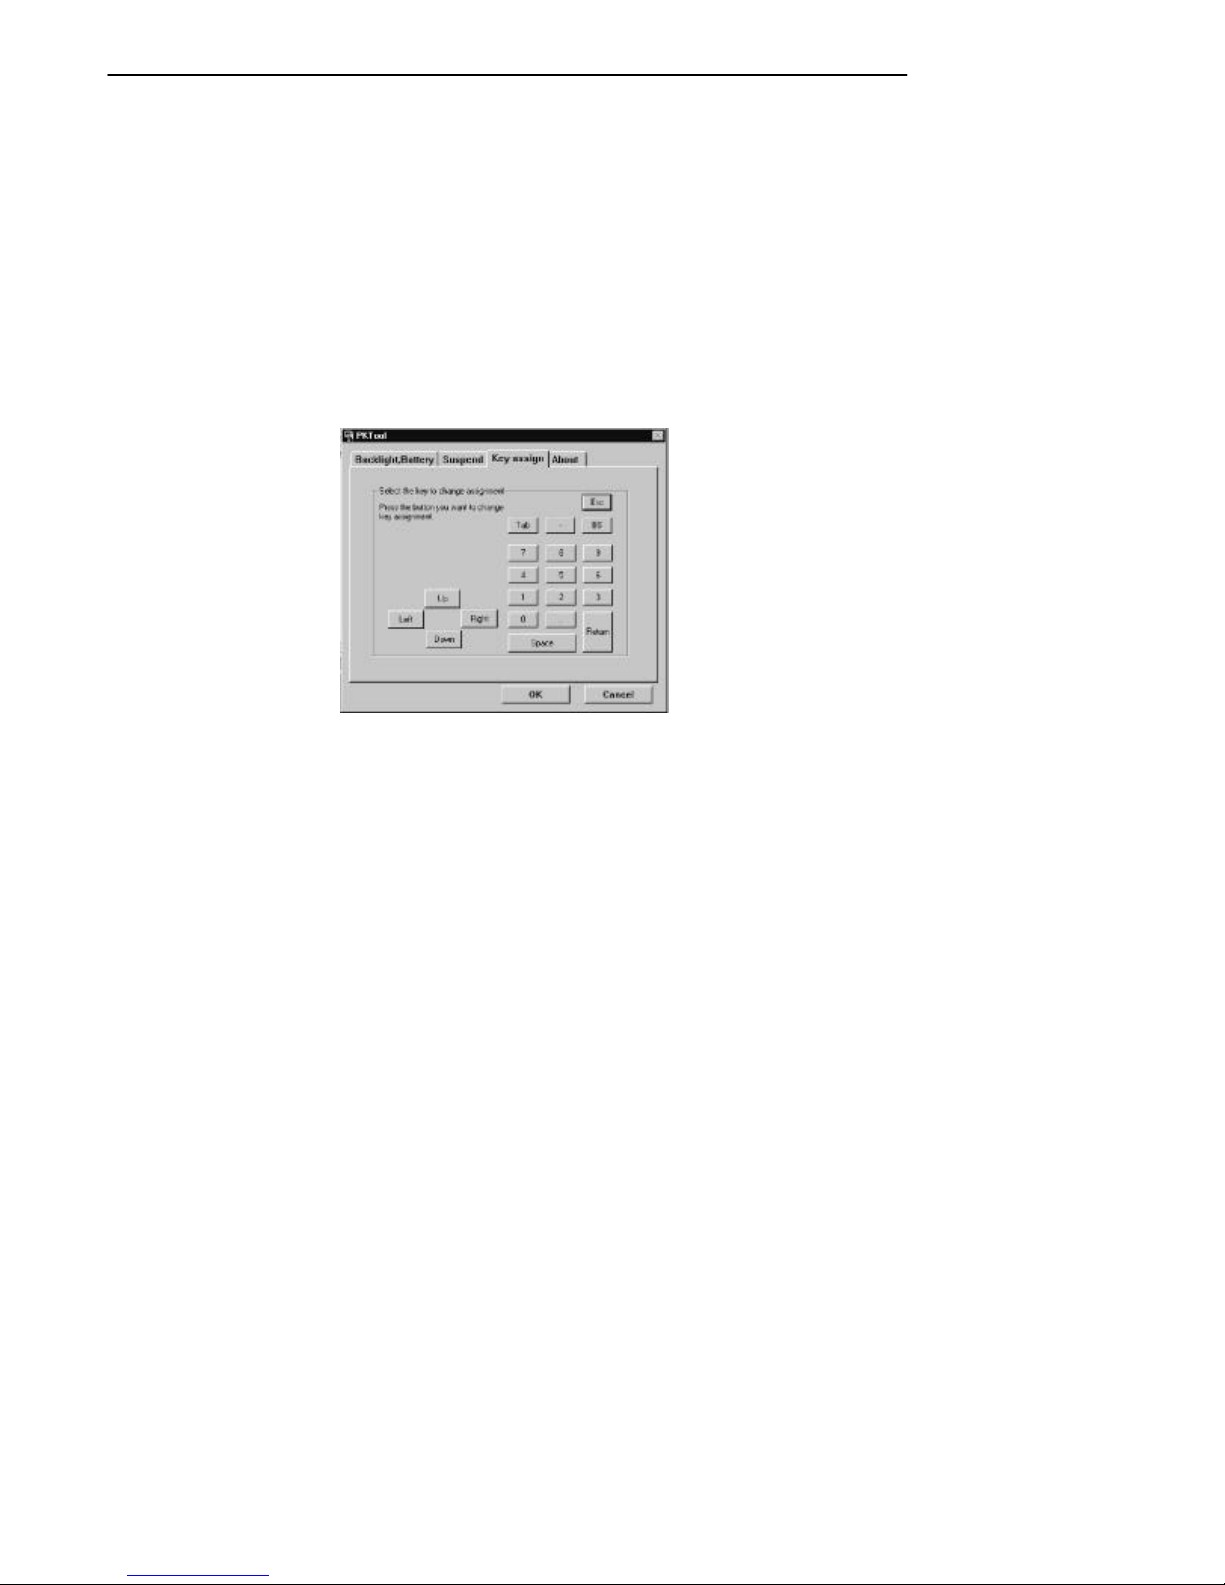
SECTION 3 Software
Changing the Numeric Keypad Assignments
Changing the assignments of the keypad to the right of the
display can be performed by doing the following. For example, if an application requires “function” keys, the “1” key
could be changed to F1, the “2” key could be changed to
“F2”, etc.
1. Tap the Key Change tab.
2. Tap the button for the key that is to be changed.
3. Confirm which pen computer key is to be changed.
4. Tap the circle in front of the type: function key, alphanumeric key, or other.
5. Tap the key to be assigned.
6. After confirming the key to be changed, the type, and
the assigned key, tap “Execute.”
To redo any of the selections, tap [STOP].
"
NOTE: The changed assignments will still be in effect the next time the system
is started up.
PEN*KEYR6632 Pen Computer User’s Guide
3-11
Page 50
Checking the Version of the PEN*KEY Tool
" Tap the About tab.
"
NOTE: The version of the PEN*KEY tool is displayed. This is not the ver-
sion of the PEN*KEY hardware.
Exiting the PEN*KEY Tool
Tap either “OK” or “Cancel” at the bottom of the PEN*KEY
tool screen.
CIC Handwriting Recognition
The HandwriterRRecognition System software (HRS) is
preinstalled on the PEN*KEY 6632 and is used with software products enabled for handwriting recognition and verification.
SECTION 3Software
The HRS is supported by Windows for Pen Computing or
Windows 95 Pen Services.
3-12 PEN*KEYR6632 Pen Computer User’s Guide
Page 51

Section 4
Operating the Pen Computer
" " " " " " " " " " " " " " " " " " " " " " " " " " " "
This section explains the functions and usage of the pen
computer.
Battery Packs
The first time that you install a fresh battery pack, it is
necessary to charge it.
WARNING: Use only battery pack PN: 871-006-020 for the PEN*KEYR6632
Pen Computer. Use of other battery packs or AC
adapter/rechargers could result in fire or equipment damage.
"
NOTE: Even when using an AC power supply, you should always install at
least one battery pack in the pen computer to prevent data loss due to
a power failure.
Charging Battery Packs
There are three ways to charge battery packs:
" Install a battery pack in the AC adapter/recharger.
" Install a battery pack in the pen computer.
" Install battery packs in both the pen computer and the
AC adapter/recharger.
When charging more than one battery pack, the battery
pack in the pen computer is charged first.
PEN*KEYR6632 Pen Computer User’s Guide
4-1
Page 52
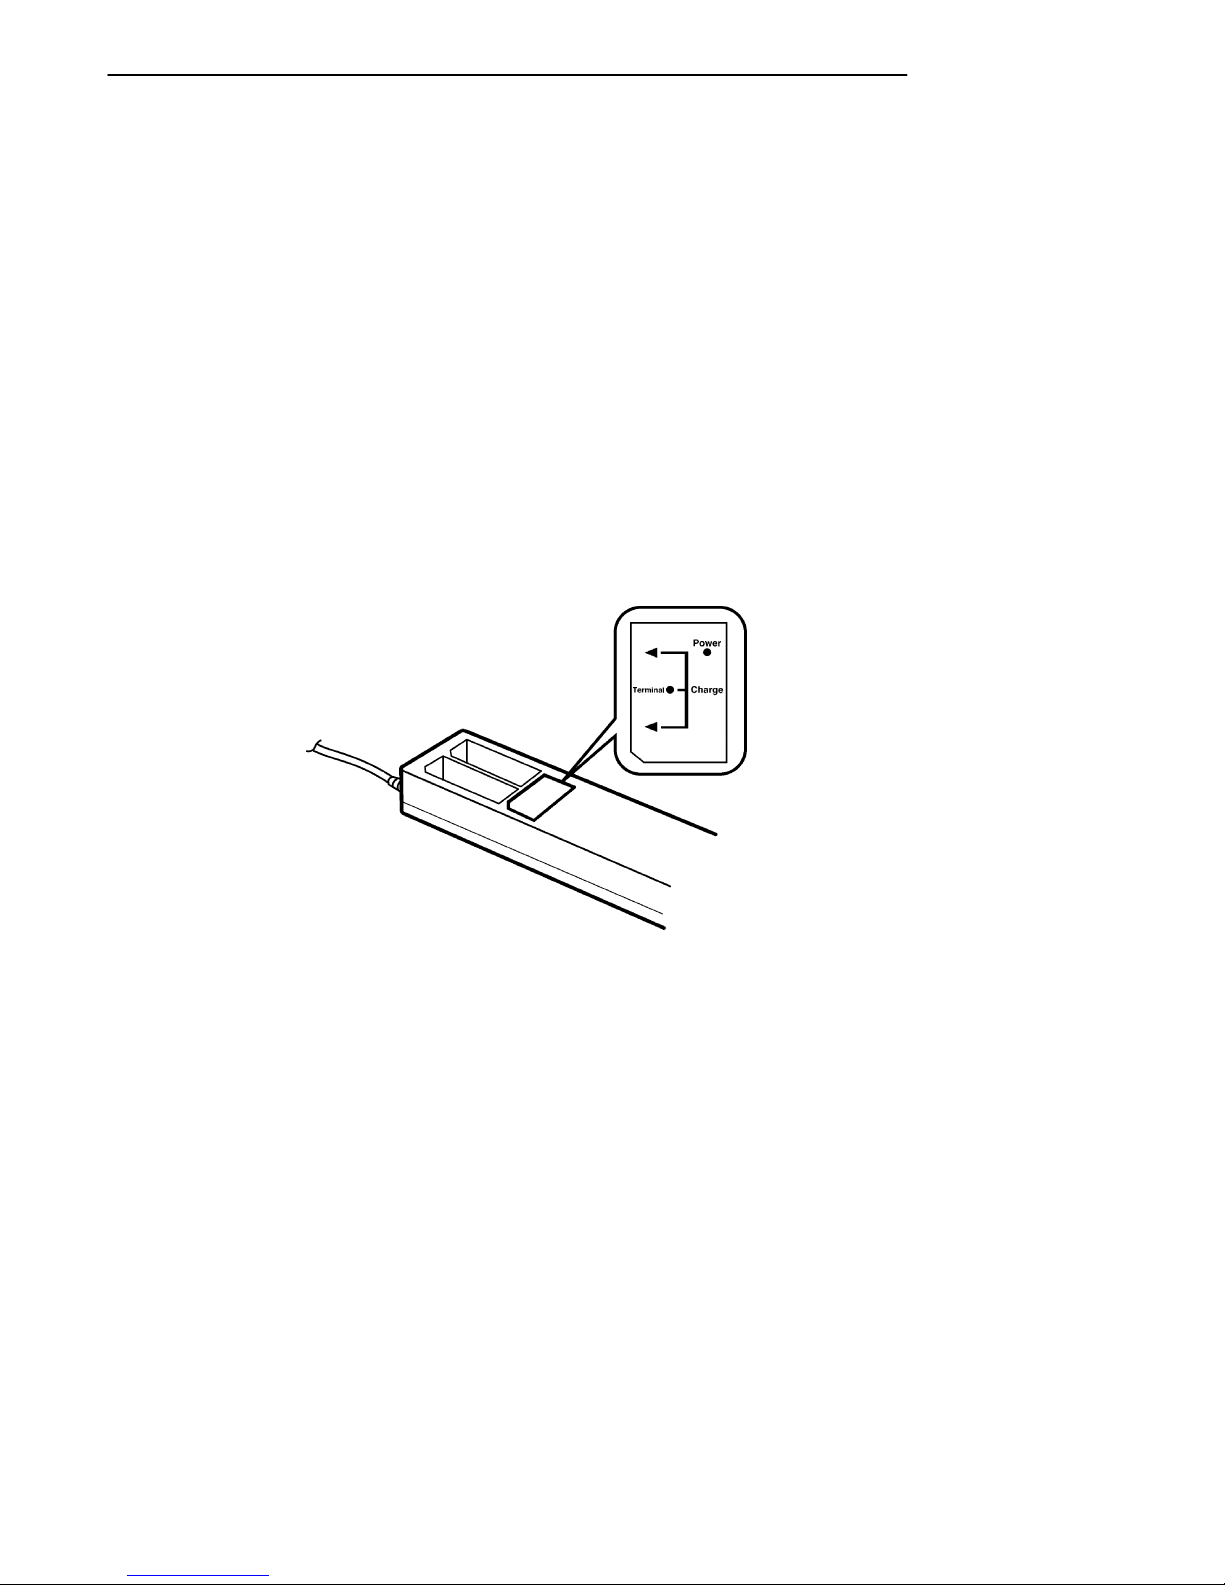
SECTION 1Operating the Pen Computer
When battery packs are installed in both the pen computer
and the AC adapter/recharger, normally the internal battery pack charging lamp on the AC adapter/recharger lights
orange to indicate that the internal battery packs (in the
pen computer) are being charged, and the external battery
pack charging lamps flash slowly (at about a 0.9--second interval) to indicate that the battery packs in the AC adapter/
recharger are waiting to be charged.
Once the battery packs in the pen computer are fully
charged, the internal battery pack charging lamp turns off
and the external battery pack charging lamps light orange,
indicating that the battery packs in the AC adapter/recharger are now being charged. Because the battery packs
are still not fully charged after the lamps turn off, allow
charging to continue for at least an additional hour.
4-2 PEN*KEYR6632 Pen Computer User’s Guide
Figure 4-1
Battery Pack Capacity Check
Page 53
SECTION 4 Operating the Pen Computer
Charging Battery Packs in the AC
Adapter/Recharger
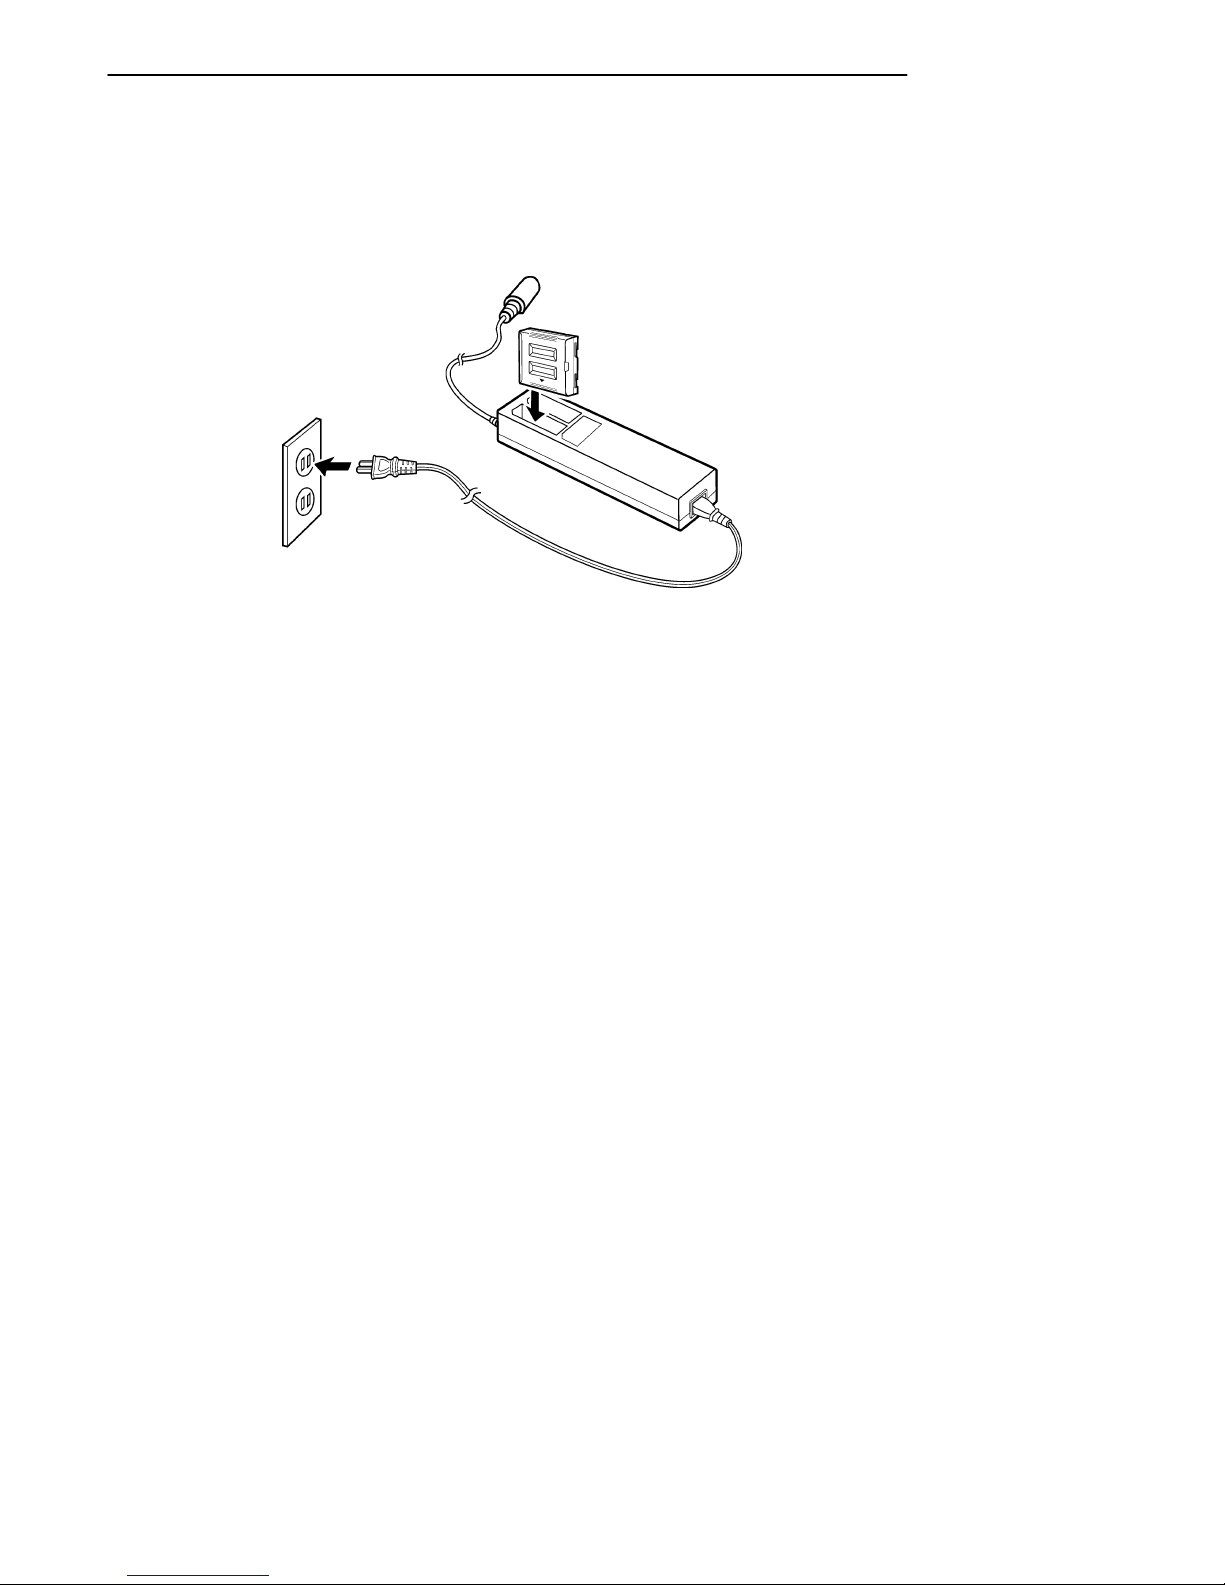
Figure 4-2
Inserting the Battery
1. Plug the AC power cord of the AC adapter/recharger
into an AC power outlet. The power lamp lights
green.
2. Install a battery pack in the AC adapter/recharger oriented as shown in the diagram.
3. The external battery pack charging lamp lights
orange.
4. When charging is complete, the charging lamp turns
off. Because the battery packs are still not fully
charged after the lamps turn off, allow charging to
continue for at least an additional hour.
About 3.5 hours are required to charge two fully discharged
battery packs.
PEN*KEYR6632 Pen Computer User’s Guide
4-3
Page 54
SECTION 4Operating the Pen Computer
Charging a Battery Pack in the Pen
Computer
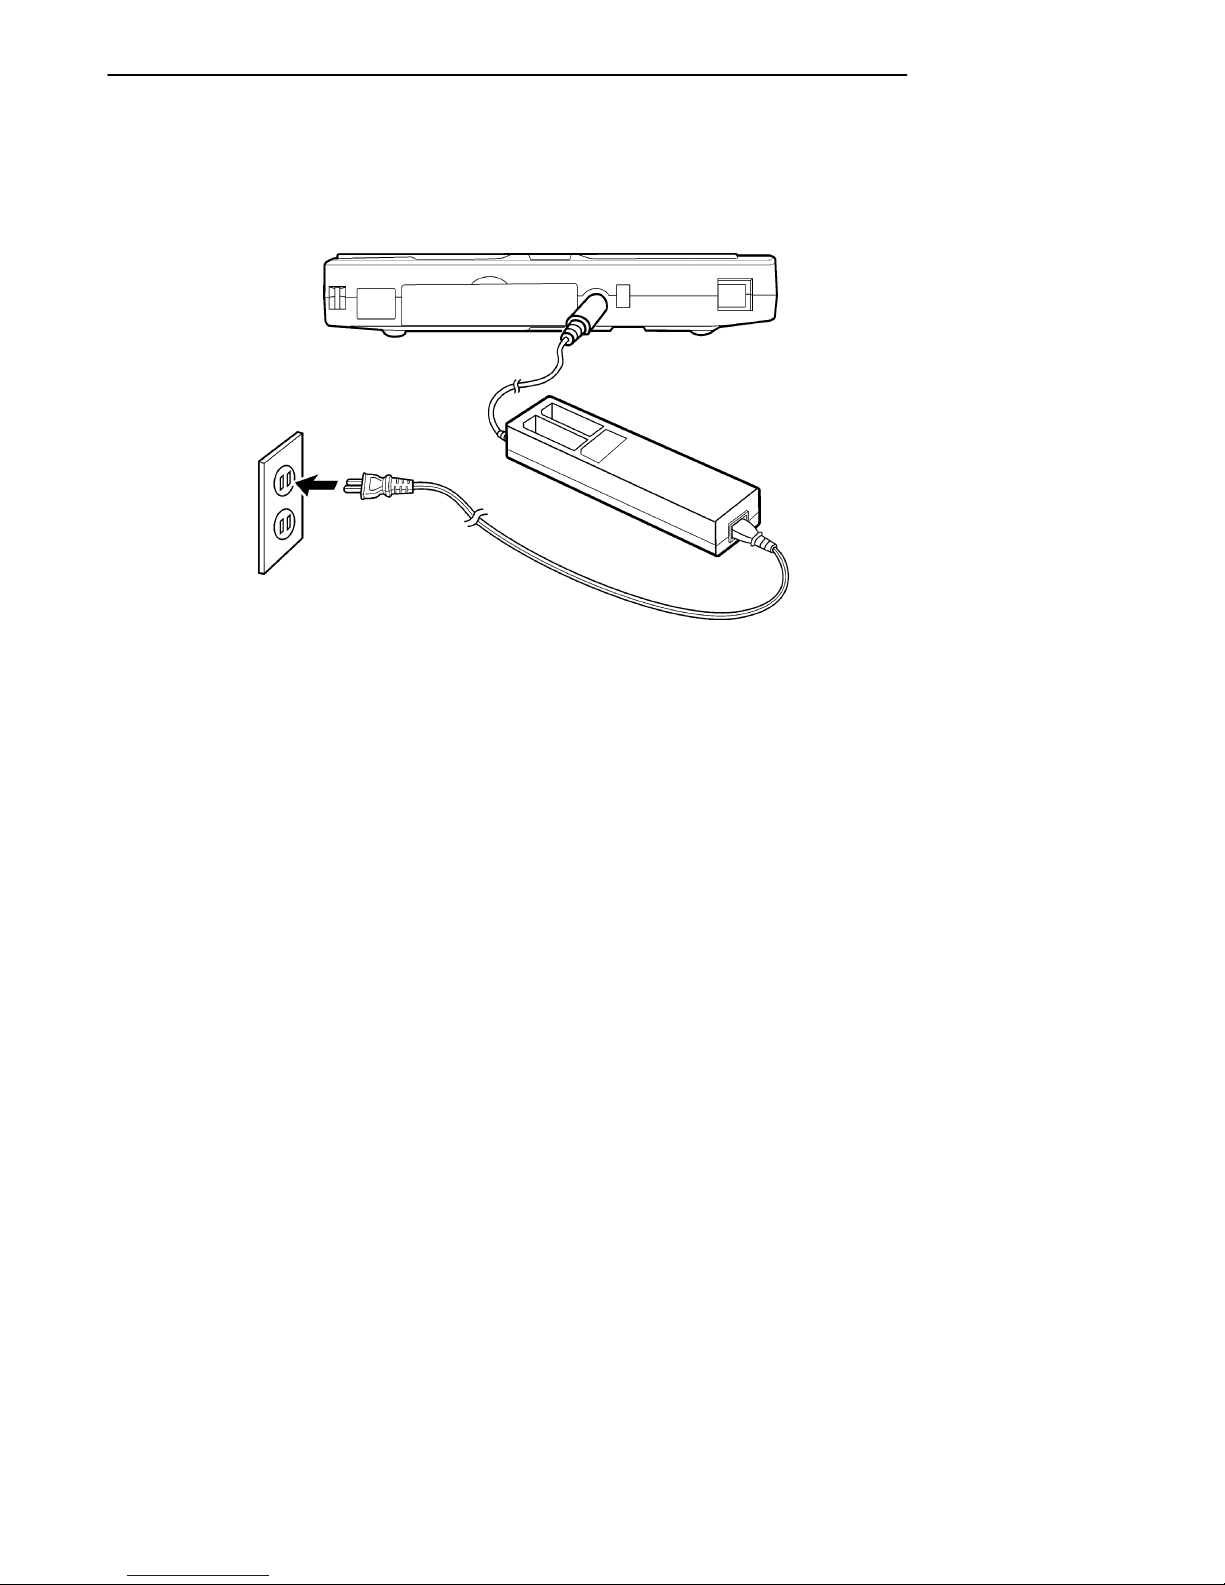
Figure 4-3
Charging Batteries in the Pen Computer
1. Plug the AC power cord of the AC adapter/recharger
into an AC power outlet. The power lamp lights
green.
2. Connect the AC adapter/recharger to the pen computer
(with a battery pack already installed in the pen computer).
3. The internal battery pack charging lamp lights
orange.
4. When charging is complete, the charging lamp turns
off.
4-4 PEN*KEYR6632 Pen Computer User’s Guide
Page 55
SECTION 4 Operating the Pen Computer
Charging Battery Packs in the Pen
Computer and AC Adapter/Recharger
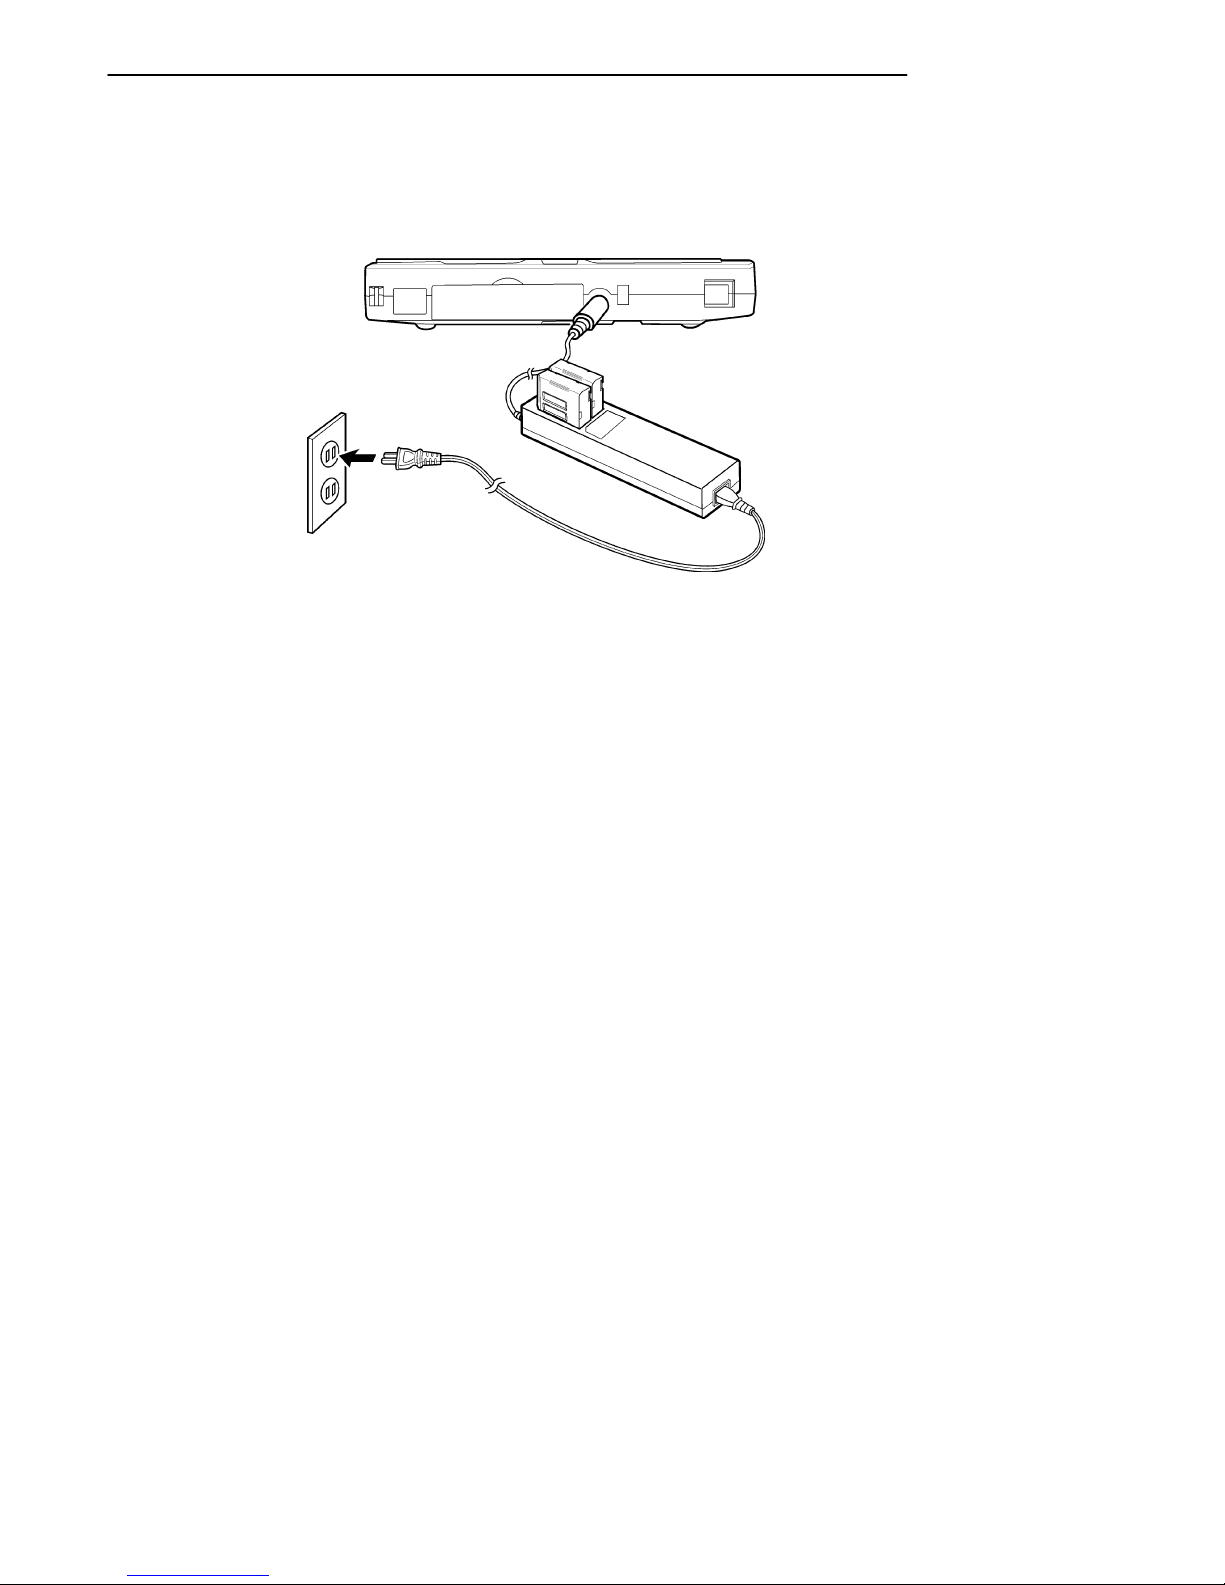
Figure 4-4
Charging Battery Packs
1. Plug the AC power cord of the AC adapter/recharger
into an AC power outlet. The power lamp lights green.
2. Connect the AC adapter/recharger to the pen computer
(with a battery pack already installed in the pen computer).
3. Install a battery pack in the AC adapter/recharger.
4. The internal battery pack charging lamp lights orange,
and the external battery pack charging lamps start
flashing slowly. Once the internal battery packs in the
pen computer is charged, the internal battery pack
charging lamp turns off. The external battery pack in
the AC adapter/recharger is charged next.
5. The external battery pack charging lamp lights orange.
When charging is complete, the external battery pack
charging lamp turns off. Because the battery packs are
still not fully charged after the lamps turn off, allow
charging to continue for at least an additional hour.
"
NOTE: The battery packs in the pen computer are always charged first.
PEN*KEYR6632 Pen Computer User’s Guide
4-5
Page 56
SECTION 4Operating the Pen Computer
Installing the Battery Pack
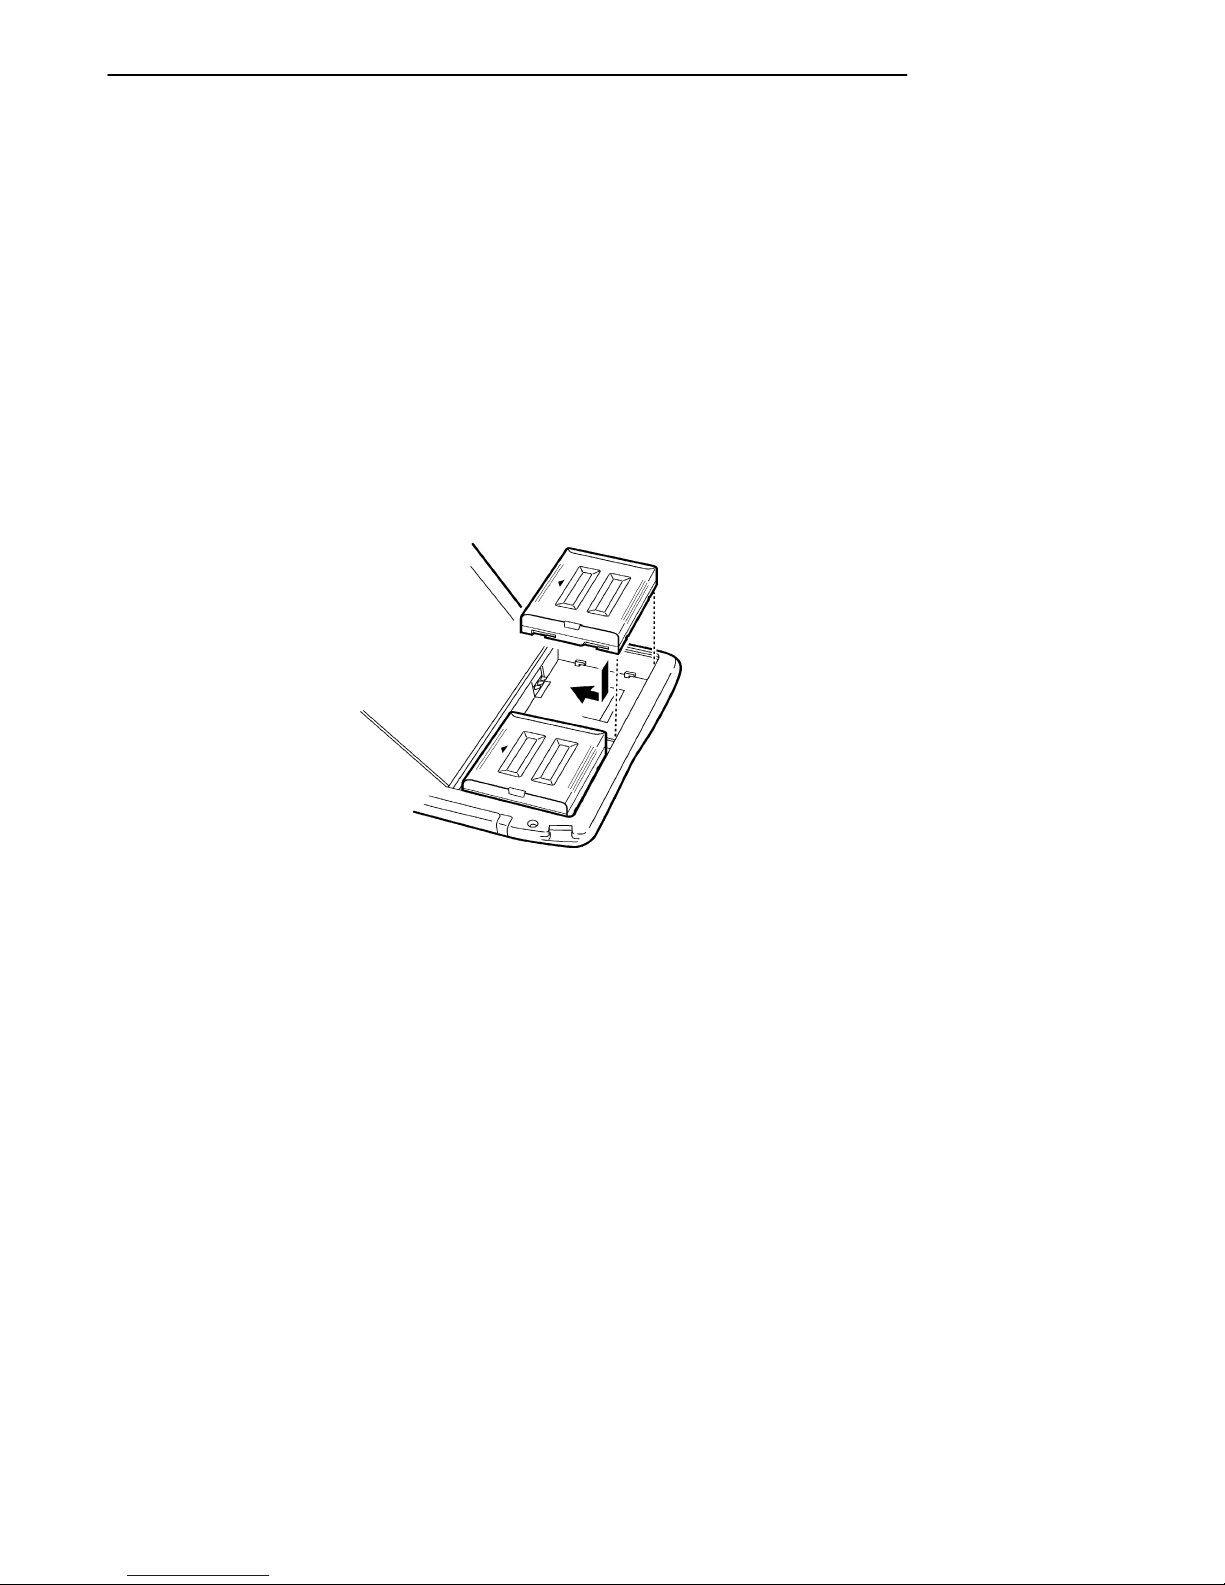
Install and replace battery packs described in the procedure
below.
1. Turn off the pen computer and disconnect the AC
adapter/recharger.
2. Place the pen computer face down on a flat surface.
3. Release the catch on the battery pack cover with your
finger and open the cover.
4. Insert the battery pack(s) facing in the direction indicated by the arrow.
5. Close the battery pack cover.
Figure 4-5
Inserting the Battery
B
CAUTION: If a battery pack is inserted incorrectly, damage to the battery
pack or a fire could result.
B
CAUTION: Always be sure to use the specified type of battery pack (PN:
871-006-020).
"
NOTE: To remove the battery pack, simply reverse the installation procedure.
4-6 PEN*KEYR6632 Pen Computer User’s Guide
Page 57
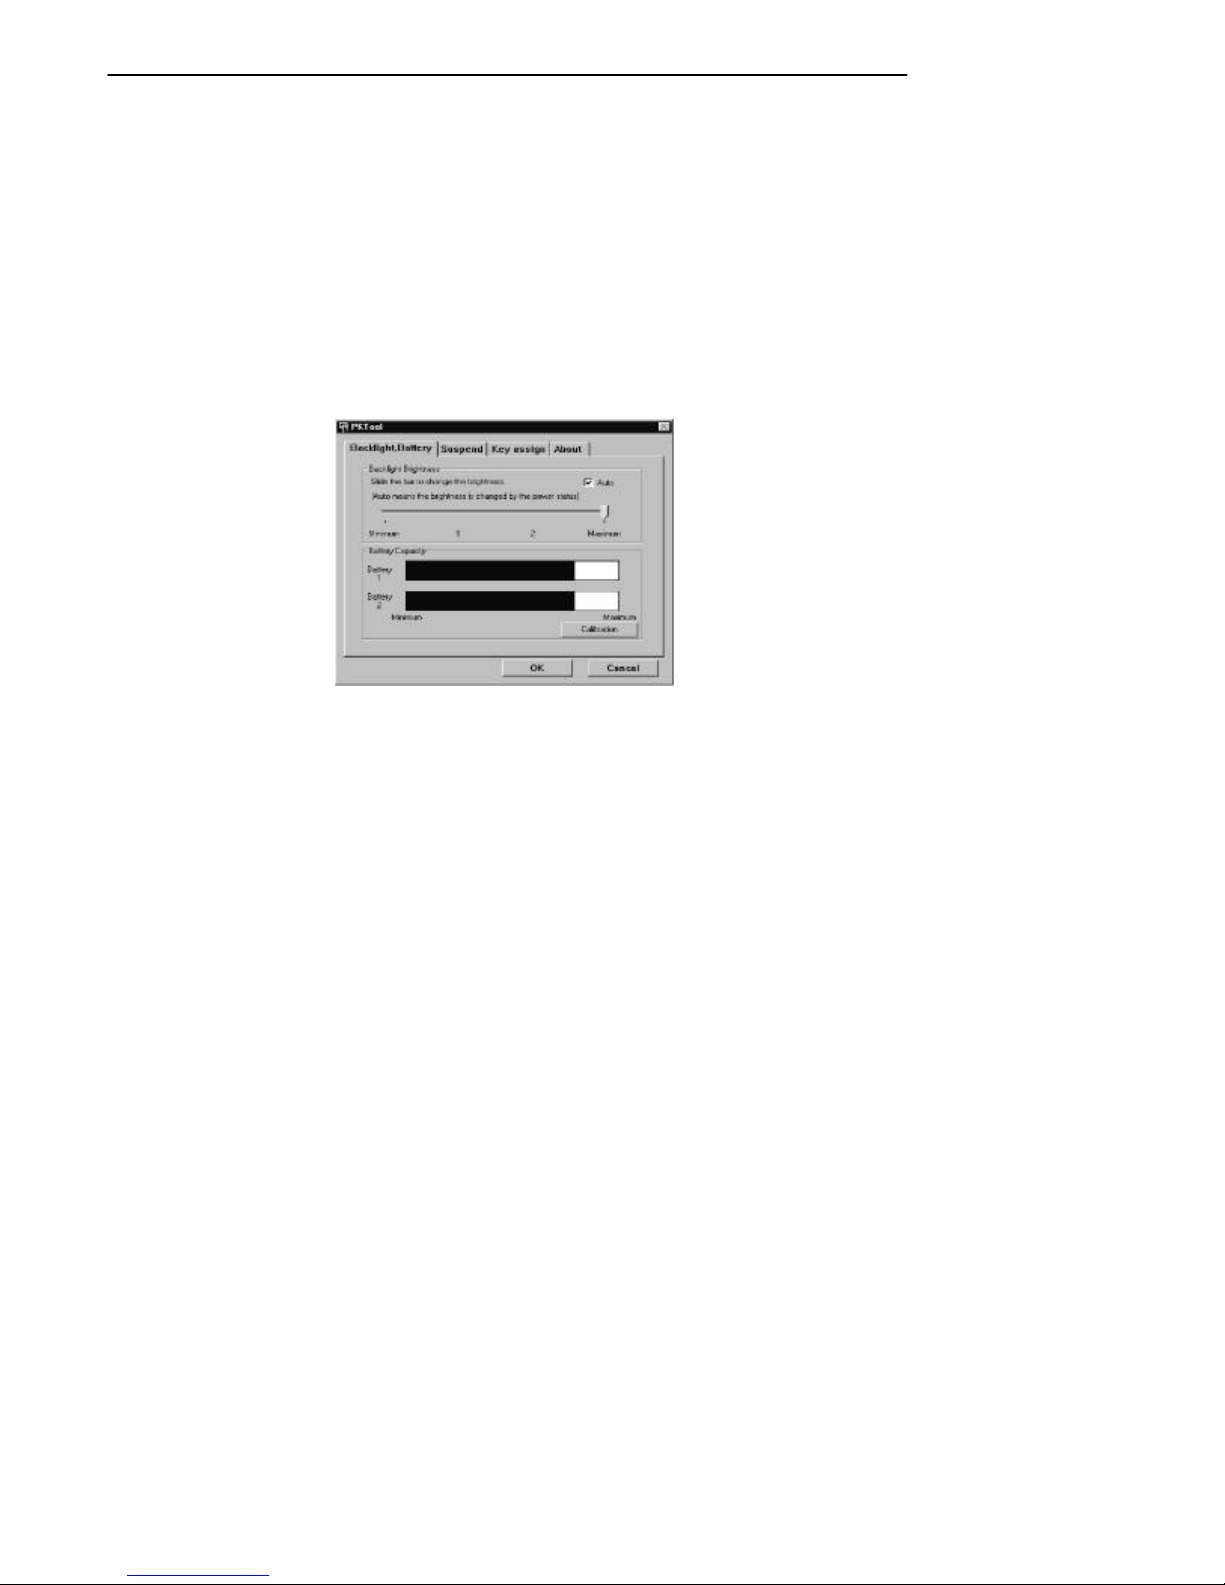
SECTION 4 Operating the Pen Computer
BatteryPackCapacity
Remaining Battery Pack Capacity
Display
Confirming the Remaining Battery Pack Capacity
" With the pen computer power off, hold down the [POWER]
button; the remaining battery pack capacity is displayed.
(When you release the [POWER] button, the pen computer
power will turn on.)
Figure 4-6
In Windows 95, the remaining battery pack capacity can be
checked by the following method.
" The battery icon on the taskbar shows a rough check of
the remaining battery pack capacity.
The battery mark on the left indicates the remaining capacity
of battery 1, and the battery mark on the right indicates the
remaining capacity of battery 2.
The remaining capacity of each is indicated by the following
colors:
" Light blue: 100% to 75%
" Yellow: 75% to 50%
" Red: 50% to 0%
PEN*KEYR6632 Pen Computer User’s Guide
4-7
Page 58

SECTION 4Operating the Pen Computer
Tapping on the battery icon starts up the Pen*Key tool,
which can be used to obtain more detailed battery information. (In addition to checking the remaining battery pack
capacity, the Pen*Key tool can also adjust the backlight
brightness, set suspend execution, etc. In addition, the icon
changes to an AC charger icon when the pen computer is
being powered by the AC adapter/recharger. For details,
refer to “Pen*Key Tool” on page 3-8.)
The remaining capacity of each of the two battery packs can
be checked by tapping on “Control Panel” under “Settings”
in the Start menu and then double--tapping the “Power
Management” icon.
If the AC adapter/recharger is connected, the remaining
capacity of the battery packs is not displayed.
" Double--tapping on the battery setting panel icon dis-
plays the battery meter.
"
NOTE: The remaining capacity that is displayed is based on the battery volt-
age; some error in the reading might be present under certain conditions. The length of time a battery can power the system will also
vary according to how the system is used and which applications are
being run, so the indications of the remaining battery capacity should
only be used as a rough guide.
"
NOTE: If a battery pack is being recharged, the display of the remaining
battery capacity will not be accurate.
4-8 PEN*KEYR6632 Pen Computer User’s Guide
Page 59

SECTION 4 Operating the Pen Computer
Insufficient Remaining Battery Pack
Capacity
If the system decides that the battery packs will be exhausted
within a few minutes, the battery lamp on the pen computer
lights red. The timing by which the insufficient remaining
battery pack capacity warning is issued is based on the pen
computer’s estimate. If a lot of power is being used because
the PC card slots, the hard disk drive, or the floppy disk drive
are in use, the battery packs may exhaust their remaining capacity faster than the system estimates. If you continue to
use the pen computer after the insufficient remaining battery
pack capacity warning is issued, the pen computer automatically executes a suspend-to-disk (regardless of the setup setting) and then shuts off the power. The contents of memory
are saved in the suspend-to-disk partition on the hard disk.
Afterwards, do not turn on the pen computer power until you
have either connected the AC adapter/recharger or you have
installed a fully charged battery pack.
PEN*KEYR6632 Pen Computer User’s Guide
4-9
Page 60

SECTION 4Operating the Pen Computer
Charging and Operating Times
The charging and operating times based on the number of
battery packs installed, are shown in the following table.
The operating time varies according to the power management settings, the application software being used, etc.
Number of Battery Packs Used
One battery pack Approximately 2.5
Two battery packs Approximately 3.5
Charging Time
(from fully depleted to fully
charged)
hours
hours
Operating Time
(from fully
charged state)
Approximately 0.8 to
1.5 hours
Approximately 1.5 to
3 hours
The total charging time when there are two battery packs
installed in the pen computer and two battery packs
installed in the AC adapter/recharger (for a total of four
battery packs, the maximum) is seven hours.
B
CAUTION: The lithium ion batteries used in these battery packs suffer a
clear deterioration in performance if they are exposed to high
temperatures for an extended period of time. These batteries
should be stored in a cool, dry location.
B
CAUTION: In order to prevent the batteries from deteriorating, they should
be charged at least once every six months, even if they are not
being to be used.
4-10 PEN*KEYR6632 Pen Computer User’s Guide
Page 61

SECTION 4 Operating the Pen Computer
PC Cards
The pen computer has two PC card slots that can accept Type
I/II and Type III cards that conform with PCMCIA Rev.
2.1/JEIDA Ver. 4.2. Some examples are described below.
Fax/modem Card
This device allows the pen computer to be connected to a telephone line and used as a fax or modem.
Network Interface Card
This device allows the pen computer to connect to a local area
network (LAN), such as an Ethernet or an IBM 3270 network.
SCSI Interface Card
This device is used to connect SCSI devices such as CD--ROM
drives and scanners.
ATA Device
An AT attachment, functions similar to an IDE hard disk drive,
is either a rotating or a solid state mass storage device. Even
when an ATA device is removed from the pen computer ’s PC
card slot, it does not require an external power supply in order
to retain its internal data.
PEN*KEYR6632 Pen Computer User’s Guide
4-11
Page 62

SECTION 4Operating the Pen Computer
"
NOTE: Because these cards require a comparatively large amount of current,
the AC adapter/recharger should be used to supply power to the system
when they are installed in the pen computer.
SRAM Memory Card
This is a static RAM memory device that can be formatted as a
floppy disk; a write--protect switch is located on the edge of the
card. Even when an SRAM memory card is removed from the
pen computer ’s PC card slot, the card’s built--in battery protects
the data in the card.
Flash Memory Card
This is a solid state storage device that works in the same
manner as a floppy disk; a write--protect switch is located
on the edge of the card. Even when a flash memory card is
removed from the pen computer ’s PC card slot, it does not
require an external power supply in order to retain its internal data.
4-12 PEN*KEYR6632 Pen Computer User’s Guide
Page 63

SECTION 4 Operating the Pen Computer
Inserting a PC Card
" Type I/II cards: These types of cards can be installed
in either the top or bottom slot. Up to two cards can
be installed (one in the top, one in the bottom).
" Type III cards: These types of cards can only be
installed in the bottom slot. When one of these cards
is installed, the top slot cannot be used.
" ZV--port compliant cards: Only the lower slot can be
used.
" CardBus compliant cards: These types of cards can be
installed in either the top or bottom slot. Up to two
cards can be installed (one in the top, one in the bottom).
"
NOTE: Before inserting a PC card, observe proper orientation and refer to
the manual that comes with the PC card.
"
NOTE: Select an unused available IRQ if the PC card requires one. PC
cards that use COM3 or COM4 will not work properly in MS--DOS
mode because they conflict with COM1 and COM2 on the pen computer.
"
NOTE: PC cards requiring COM3 port should have the “”COM Port” setting
disabled in the advanced menu setup utility. PC cards requiring
COM4 port should have the “”IR Port” disabled in the advancd menu
setup utility.
PEN*KEYR6632 Pen Computer User’s Guide
4-13
Page 64
SECTION 4Operating the Pen Computer
"
NOTE: The first time that you use a particular PC memory card or ATA card,
it is necessary to format them.
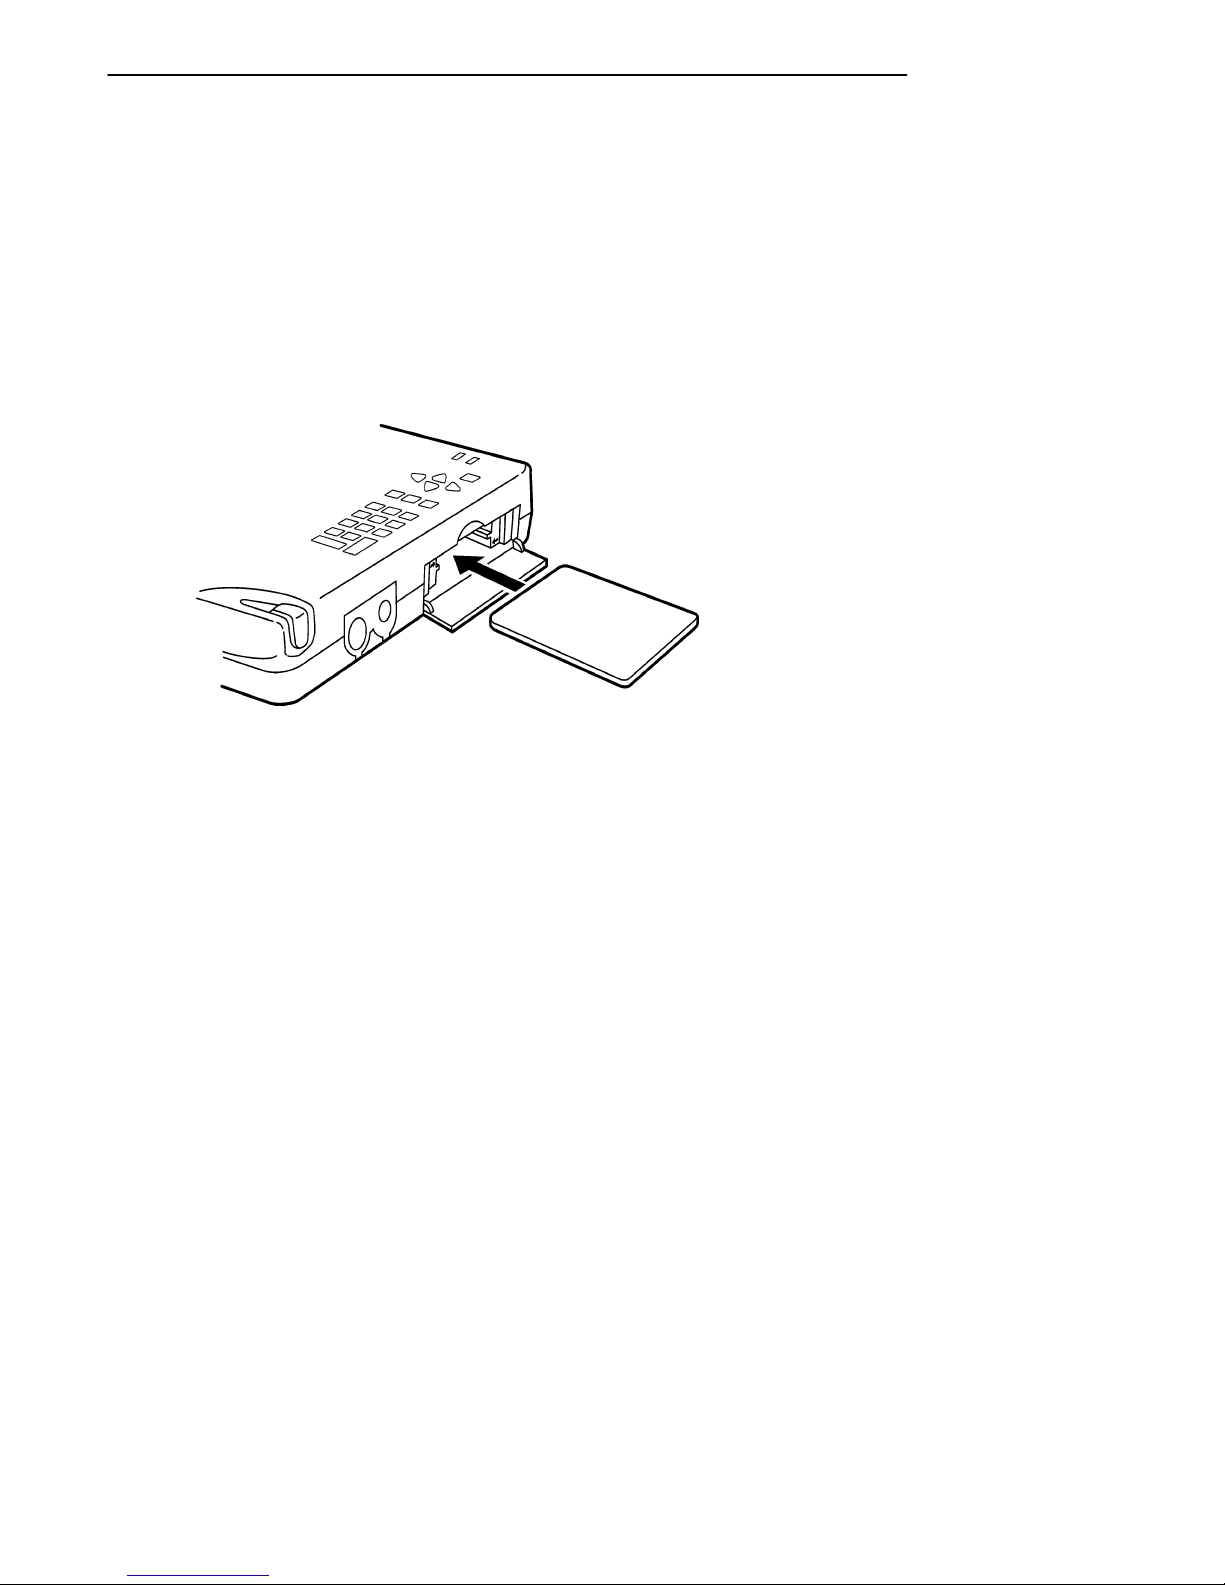
1. Open the PC card slot cover on the right side of the
pen computer.
2. Insert the card into the slot, pushing it in as far as it
will go.
3. When the card is inserted, the eject button pops out.
Insert the card with the
manufacturer’s label facing up.
Figure 4-7
Inserting the PC Card
4-14 PEN*KEYR6632 Pen Computer User’s Guide
Page 65
SECTION 4 Operating the Pen Computer
Removing a PC Card
" 1) Tap “Control Panel” under “Settings” in the Start
menu.
" 2) Double--tap “PC Card (PCMCIA).”
" 3) In the list, tap the name of the PC card that you
want to remove, and then tap [EXIT].
" 4) If the message “This device can be safely removed”
is displayed, tap [OK].
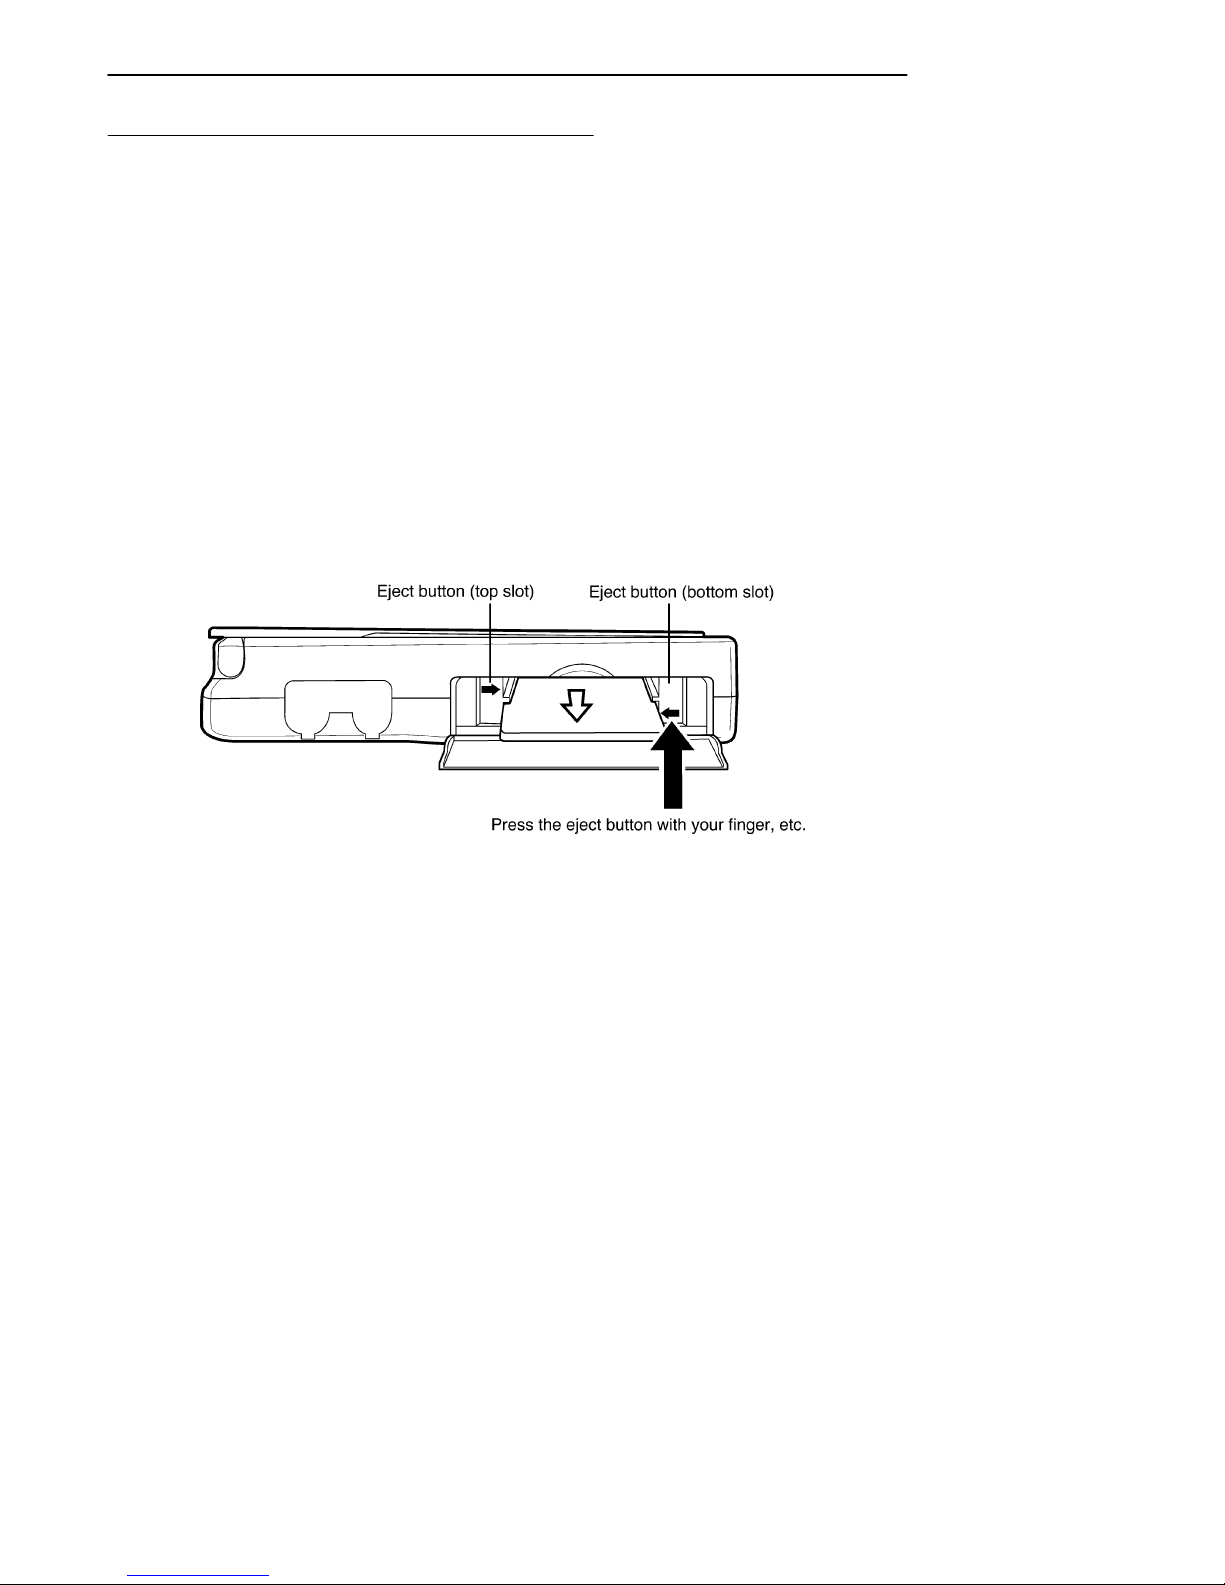
" 5) Press the PC card slot eject button. When the edge
of the card pops out of the slot, pull out the card and
store it properly.
Figure 4-8
Card Eject Button
PEN*KEYR6632 Pen Computer User’s Guide
4-15
Page 66

SECTION 4Operating the Pen Computer
4-16 PEN*KEYR6632 Pen Computer User’s Guide
Page 67

Section 5
Connecting Peripheral Equipment
" " " " " " " " " " " " " " " " " " " " " " " " " " " "
This chapter explains how to connect peripheral devices to the
PEN*KEYR6632 pen computer. Practically any peripheral
devices that can be connected to a serial port, a parallel port,
or a PS/2 port can be connected to the pen computer, including
a printer, a keyboard, and a mouse.
PEN*KEYR6632 Pen Computer User’s Guide
5-1
Page 68

Notes on Handling the Equipment
The pen computer components are vulnerable to damage
from static electricity. When handling or connecting any of
the equipment, observe the following precautions.
" Before adding a device to the system, always be sure to
turn off the power and to disconnect the AC adapter/
recharger.
" Components in expansion devices and the pen computer
can be damaged by static electricity. Before installing an
expansion device, first touch a metal object in order to
drain away any static electric charge built up in your
body.
" While installing a device, be careful not to touch the
pins or connectors of the expansion device.
" Do not remove any antistatic material covering an
expansion device until the last possible moment before installing the device.
SECTION 1Connecting Peripheral Equipment
" When storing an expansion device, cover it with the
original antistatic material or with other conductive,
protective material such as aluminum foil.
" After removing a RAM board from its anti--static bag,
place it on a grounded surface.
" Do not touch the integrated circuits on a RAM board.
Storing the battery packs
The lithium ion batteries used in the battery packs suffer a
clear deterioration in performance if they are exposed to
high temperatures for an extended period of time. These
batteries should be stored in a cool, dry location.
In order to prevent the batteries from deteriorating, they
should be charged at least once every six months, even if
they are not going to be used.
5-2 PEN*KEYR6632 Pen Computer User’s Guide
Page 69
SECTION 5 Connecting Peripheral Equipment
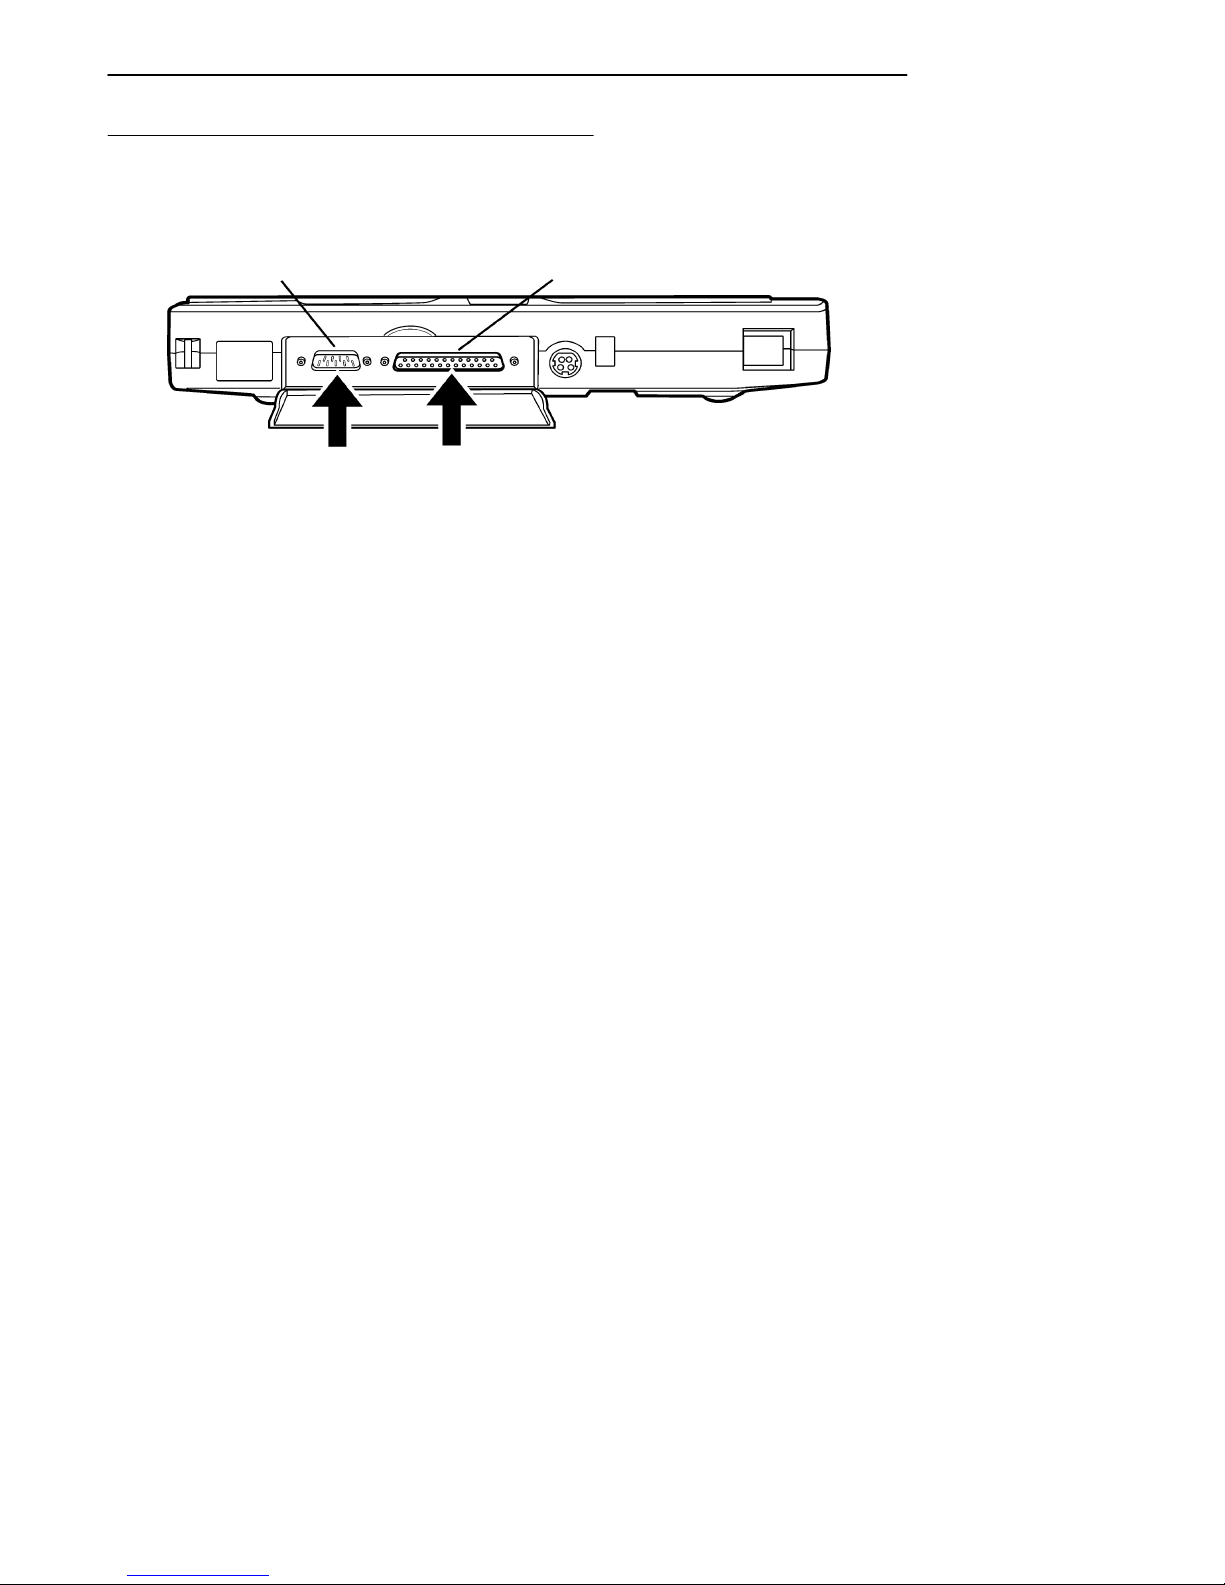
Connecting Peripheral Equipment
RS232 Connector
Printer/Floppy Drive Connectors
B
CAUTION: When connecting devices and cables, always be sure to turn off
the power for the pen computer first.
Parallel Port
Figure 5-1
1. Turn off the power for both the pen computer and the
peripheral device.
2. Open the connector cover on the back of the pen computer, and confirm which connector you want to use.
3. Connect the cable for the peripheral device to the pen
terminal.
4. Tighten the two screws on the cable connector.
5. Turn on the power for both the pen computer and the
peripheral device.
PEN*KEYR6632 Pen Computer User’s Guide
5-3
Page 70

SECTION 5Connecting Peripheral Equipment
Serial Devices
Serial devices include: mouse, serial printer, bar code reader,
or measuring device.
Read the manual provided with the serial device and make
the necessary operating environment settings so that the
device will be recognized.
Serial Port Setting
The settings for the pen computer’s serial port depend on
the settings made by the Setup utility. When connecting a
serial mouse to the serial port, set “COM Port” to “COM1”
in the “Advanced” menu of the Setup utility.
5-4 PEN*KEYR6632 Pen Computer User’s Guide
Page 71
SECTION 5 Connecting Peripheral Equipment
Connectors
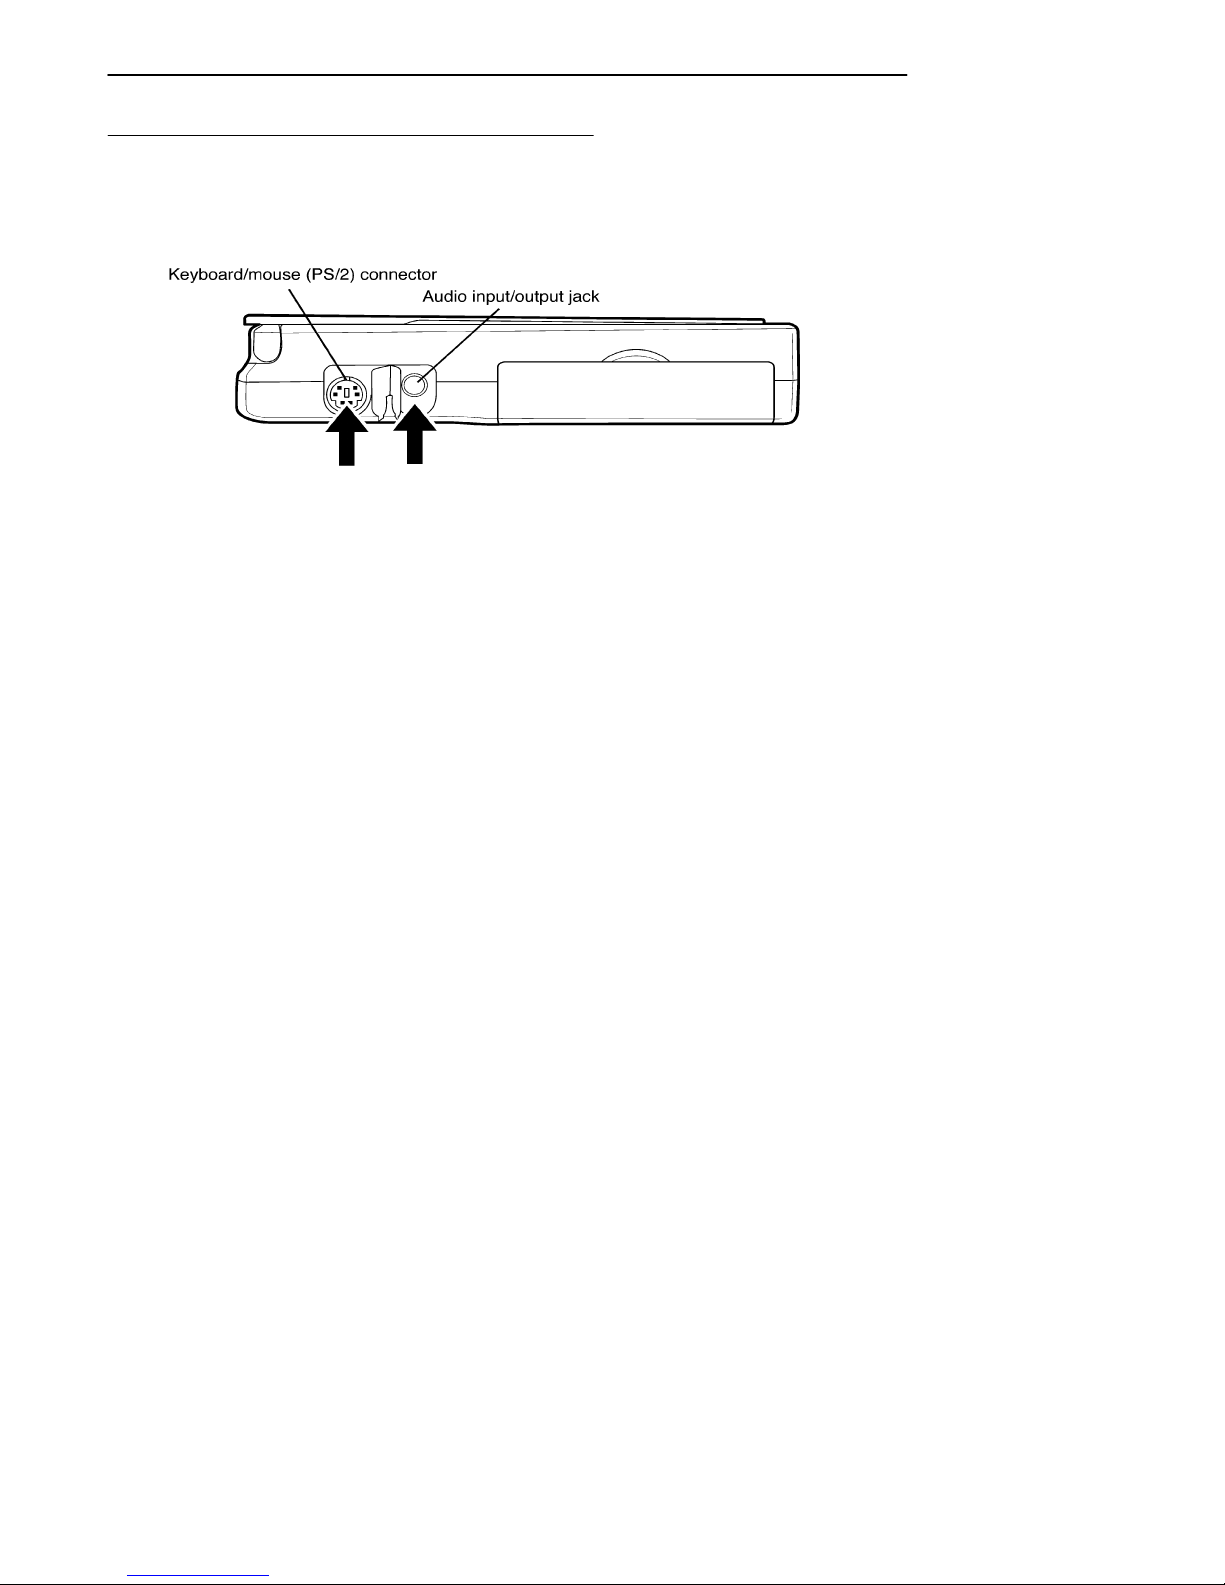
Figure 5-1
Side View Connections
" Keyboard, mouse, speaker, microphone, headset, etc.
" Keyboard/mouse (PS/2) connector
" Audio input/output jack
1. Turn off the power for both the pen computer and the
peripheral device.
2. Open the connector and jack cover on the right side of
the pen terminal, and confirm the connector or jack
that you want to use.
3. Connect the cable for the peripheral device to the pen
computer connector or jack.
4. Turn on the power for both the pen computer and the
peripheral device.
PEN*KEYR6632 Pen Computer User’s Guide
5-5
Page 72

SECTION 5Connecting Peripheral Equipment
Keyboard/Mouse
"
NOTE: Do not connect a PS/2 device or disconnect a PS/2 device to the pen
computer while the power is on. Doing so will cause erratic operation.
Connecting
Speakers/Microphone/Headset
"
NOTE: If external stereo speakers are connected to the pen computer, the
audio will be output from the right channel only.
5-6 PEN*KEYR6632 Pen Computer User’s Guide
Page 73

Section 6
Troubleshooting
" " " " " " " " " " " " " " " " " " " " " " " " " " " "
Sometimes, a careful check will reveal that what you
thought was a malfunction actually was not. Before
requesting repairs, carefully consult this section and
try to resolve the problem.
PEN*KEYR6632 Pen Computer User’s Guide
6-1
Page 74

SECTION 1Troubleshooting
The power lamp does not light
even though the power is turned
on.
" Confirm that the power cord is connected properly.
" Connect another electric device to the power outlet in
order to confirm that power is flowing from the outlet.
The display is blank.
" Push the Power button to confirm that the power man-
agement function is not currently enabled.
" Check the power lamp and confirm that power is being
supplied to the pen computer.
" Check that there is power remaining in the battery
pack(s) and confirm proper battery installation in the
pen computer.
" Check the brightness of the display.
" If you try all of the above measures and the display is
still blank, turn off the pen computer, wait 10 seconds,
and then turn the power back on.
The system will not start up.
" Confirm that the floppy disk in the floppy disk drive, if
any, contains the operating system.
" Confirm that the system files have not been deleted
from the hard disk.
6-2 PEN*KEYR6632 Pen Computer User’s Guide
Page 75

SECTION 6 Troubleshooting
The correct date and time are not
displayed.
" Connect the AC adapter/recharger for at least eight
hours in order to charge the backup battery.
" Use the Setup utility to set the correct date and time.
" Use the Date and Time command of the operating sys-
tem to correct the date and time.
" If the correct date and time are still not displayed,
contact your dealer and have the backup battery on
the system board replaced.
PEN*KEYR6632 Pen Computer User’s Guide
6-3
Page 76

SECTION 6Troubleshooting
Data cannot be written to or read
from a floppy disk.
" Confirm that the floppy disk drive is connected proper-
ly.
" Confirm that the drive specification is correct.
" Confirm that the file name specification is correct.
" If a file cannot be read, confirm that the floppy disk
has not been formatted. The floppy disk may be damaged.
" If it is not possible to write to the floppy disk, it is pos-
sible that the floppy disk is in the write--protected
state. Eject the floppy disk, and make sure that the
write--protect switch on the floppy disk is in the “write
enabled” position.
" If it is not possible to write to the floppy disk, it is pos-
sible that the floppy disk is full. Try using a different
floppy disk.
" Confirm that, under the Main menu of the Setup util-
ity, “Diskette A” is set to “Auto.”
" Confirm that, under the Security menu of the Setup
utility, “Diskette access” is not set to “Supervisor.”
" Check whether the floppy disk in the floppy disk drive
is a boot disk or not. The system cannot start up from
a floppy disk that has an error or that does not have
the operating system installed on it. Change floppy
disks.
" Check the operation of the floppy disk drive. If the
floppy disk still cannot be used even after trying the
solutions described above, contact your dealer.
6-4 PEN*KEYR6632 Pen Computer User’s Guide
Page 77

SECTION 6 Troubleshooting
Data cannot be written to or read
from the hard disk.
" Confirm that the hard disk has been formatted properly
and that the areas have been setup properly with the
FDISK command. If these cannot be performed properly, make sure that, under the Security menu of the Setup utility, “Fixed disk boot sector” is not set to “Write
Protect.”
" Confirm that the drive specification is correct.
" Confirm that the file name specification is correct.
" Confirm that the hard disk has enough free space.
The message “Not a system disk”
or a disk error message appears.
" Check whether the drive type is correct or not in the
Setup utility.
" If the message is displayed when starting up from a
hard disk drive, insert a boot floppy disk, start up the
system, and then check the status of the hard disk
drive.
An expansion device or peripheral
device does not function.
" Confirm that the device is installed properly. Refer to
Section 5, “Connecting Peripheral Equipment.”
" Confirm that the device driver required by the expan-
sion device has been installed in the system.
PEN*KEYR6632 Pen Computer User’s Guide
6-5
Page 78

SECTION 6Troubleshooting
Output cannot be directed to the
printer.
" Confirm that the printer power is on.
" Confirm that the printer is connected properly to the
pen terminal.
" Confirm that the printer is in the on--line state.
" Confirm that paper has been loaded in the printer
properly.
" Confirm that under Integrated Peripherals in the Ad-
vanced menu of the Setup utility, “Parallel Port” is set
to “Bi--directional.”
6-6 PEN*KEYR6632 Pen Computer User’s Guide
Page 79

SECTION 6 Troubleshooting
The device connected to the
RS-232C connector does not work.
" Confirm that the correct connecting cable is being
used.
" Confirm that the application software supports the
RS--232C interface functions.
" Confirm that in the Advanced menu of the Setup util-
ity, “COM Port” is not set to “Disabled.”
Infrared communications do not
work.
" Confirm that in the Advanced menu of the Setup util-
ity, “IR Port” is not set to “Disabled.”
" Confirm that the mode that is set agrees with the other
device. The mode is set through “IR Type” in the Advanced menu of the Setup utility.
" When attempting communications with another com-
puter: IrDA1.0 or IrDA1.1, confirm that the infrared
communications ports on the pen computer and the
other device are directly facing each other, that they
are separated by only 5 to 30cm (2 to12”), and that
there are no obstructions between the two ports.
" When attempting communications with a PDA (per-
sonal digital assistant) device, confirm that there are
batteries in the PDA and that it is set to “personal
computer linking” mode.
PEN*KEYR6632 Pen Computer User’s Guide
6-7
Page 80

SECTION 6Troubleshooting
PC Cards Do Not Function
(in MS-DOS Mode)
" Confirm that there are no conflicts involving COM3,
which is used by cards, and COM1, which is used by
other devices. This is because COM1 is already used
by other pen computer devices. Use the Setup utility
to change the COM port settings. When a PC card
uses COM3, set the “COM Port” item to “Disabled.”
6-8 PEN*KEYR6632 Pen Computer User’s Guide
 Loading...