

Page 1

User’s
Manual
Hand-Held Computer (4MB)
™
JANUS
2010
P/N 065714-001
Page 2

Intermec Corporation
6001 36th Avenue West
P.O. Box 4280
Everett, WA 98203-9280
U.S. service and technical support: 1-800-755-5505
U.S. media supplies ordering information: 1-800-227-9947
Canadian service and technical support: 1-800-688-7043
Canadian media supplies ordering information: 1-800-268-6936
Outside U.S. and Canada: Contact your local Intermec service supplier.
The information contained herein is proprietary and is provided solely for the purpose of allowing
customers to operate and/or service Intermec manufactured equipment and is not to be released,
reproduced, or used for any other purpose without written permission of Intermec.
Information and specifications in this manual are subject to change without notice.
1997 by Intermec Corporation
All Rights Reserved
The word Intermec, the Intermec logo, JANUS, IRL, TRAKKER, Antares, Duratherm, Precision
Print, PrintSet, Virtual Wedge, and CrossBar are either trademarks or registered trademarks of
Intermec Corporation.
CardID™ and CardSoft™ are trademarks of SystemSoft Corporation. Some of the information in this
manual is based on copyrighted material contained in the CardSoft™ 3.1 Software User’s Guide,
published by SystemSoft Corporation, 1992-1994, Natick, Massachusetts.
Throughout this manual, trademarked names may be used. Rather than put a trademark (™ or )
symbol in every occurrence of a trademarked name, we state that we are using the names only in an
editorial fashion, and to the benefit of the trademark owner, with no intention of infringement.
Page 3

Contents
Contents
Before You Begin xix
Warranty Information xix
Safety Summary xix
Warnings and Cautions xx
About This Manual xx
Suggested Reading xxvi
Getting Started
1
2
What Is the JANUS 2010 Reader? 1-3
Accessories for the Reader 1-4
JANUS 2010 Models and Options 1-5
Using the Reader for the First Time 1-6
Unpacking the Reader 1-6
Charging the NiCad Battery Pack 1-7
Installing the NiCad Battery Pack 1-8
Turning On the Reader for the First Time 1-9
Setting the Time and Date 1-10
Attaching a Wand or Scanner 1-11
Verifying That the Reader Is Operating Correctly 1-12
Turning the Reader On and Off 1-13
Where Do You Go From Here? 1-14
Learning How to Use the Reader
JANUS 2010 Features 2-3
Using the Alphanumeric Keypad 2-4
Finding the Special Keys 2-5
How to Type the Characters Printed on the Keypad 2-6
How the Ctrl, Alt, and Shift Keys Work 2-7
How the Compound Function Key Works 2-8
Capitalizing All Characters 2-10
Learning How to Use the Cursor Keys 2-11
Using the Number Pad 2-13
Finding Out If the Number Pad Is Enabled or Disabled 2-16
How to Enter ASCII Characters 2-16
iii
Page 4

JANUS 2010 Hand-Held Computer User’s Manual (4MB)
Using the Large Numeric Keypad 2-17
Finding the Special Keys 2-17
How to Type the Characters Printed on the Keypad 2-18
How to Type Other Characters 2-19
How to Use the Reader’s Display 2-20
Choosing the Display Sizes and Parameters 2-21
Using Text or Graphics Mode 2-23
Using the Display as a Viewport 2-23
Trying Out the Viewport 2-24
What Are Viewport Movement Steps? 2-25
Moving the Viewport 2-25
If You Cannot See the Cursor 2-27
Adjusting the Display From the DOS Prompt 2-27
Understanding the Icons 2-29
Understanding the Reader’s Audio Signals 2-31
Demonstrating the Reader’s Audio Signals 2-33
Using a Headphone or Earphone 2-33
3
Locating the Communications Ports 2-34
Learning About the Reader’s Batteries 2-35
Lithium Bridge Battery 2-35
How to Maximize the Internal Bridge Battery Life 2-35
Installing the Battery Pack 2-36
Removing the Battery Pack 2-37
Checking the Power Remaining in the NiCad Battery Pack 2-38
Charging the Battery Pack 2-39
Disposing of the NiCad Battery Pack 2-39
Recognizing a Low or Discharged Battery 2-40
Managing Your Battery Power 2-41
Using an External Power Supply 2-42
Defining the Reader’s Drives 2-43
Managing the Reader’s Memory and Disk Space 2-44
Learning About the Software
What Software Is Provided With the Reader? 3-3
What Software Is Provided on the Companion Disks? 3-5
Using DOS Commands 3-6
iv
Page 5

Defining the Startup Files 3-7
AUTOEXEC.BAT File 3-7
CONFIG.SYS File 3-9
MS-DOS Startup Menu 3-11
Learning How to Change the Contents of Drive C 3-11
Using Auto-Loader to Change Drive C 3-14
Installing Auto-Loader on Your Host Computer 3-14
Using an External Power Supply 3-16
Adding or Editing Files on Drive C 3-16
Replacing All Files on Drive C 3-18
Deleting Files From Drive C 3-19
Copying One Image File to More Than One Reader 3-21
Using MakeDisk and PutDisk to Change Drives C or D 3-24
Deciding Where to Run MakeDisk 3-24
Creating and Filling the Working Source Directory 3-25
Creating the New Image File 3-26
Loading the New Image File 3-26
Examples of Using MakeDisk and PutDisk 3-28
Contents
Creating and Using a Physical RAM Drive 3-32
Understanding When Files Are Saved or Lost 3-32
Deciding How Much Memory to Use for RAM Drives 3-33
Creating a RAM Drive 3-33
Programming for the Reader 3-35
Using JANUS PSK and JANUS Application Simulator 3-36
Using IRL and PC-IRL 3-36
Making PSK Applications That Work With BFT 3-37
Preparing Applications to Recover From Lockups 3-37
Using Reader Services in Applications 3-37
Making More Memory Available on the Reader 3-38
Not Installing the PC Card Drivers 3-39
Unloading and Loading Reader Wedge TSR 3-39
Understanding the Bar Code Wedge 3-40
Enabling Direct Hardware Wedge Functions 3-40
Using the Wedge Configuration Program 3-41
v
Page 6

JANUS 2010 Hand-Held Computer User’s Manual (4MB)
Using PC Cards in the Reader
4
Learning About PC Cards 4-3
What Is PCMCIA? 4-3
Features of the JANUS PC Card Software 4-4
Locating the PC Card Drives 4-4
Which PC Cards Are Supported by JANUS? 4-5
Which Expansion Cards Are Recommended? 4-5
Which Memory PC Cards Are Recommended? 4-5
Configuring the Reader to Reset the Type I Drive 4-6
Inserting and Removing PC Cards 4-8
Inserting Cards Into the Type I PC Card Drive 4-8
Inserting Cards Into the Type II Drive 4-11
Reader Beeps for PC Cards 4-14
Configuring, Formatting, and Using PC Cards 4-14
Preparing to Use ATA Cards 4-15
Initializing and Formatting an ATA Card 4-16
Using an ATA Card 4-17
Preparing to Use Flash Cards 4-18
Erasing a Previously Formatted Flash PC Card 4-18
Formatting a Flash PC Card 4-19
Using a Flash PC Card 4-21
Preparing to Use I/O Cards 4-21
Configuring the JANUS device to Use an I/O Card 4-22
Resetting the PC Card Drive for I/O Cards 4-22
Preparing to Use SRAM Cards 4-23
Formatting an SRAM PC Card 4-23
Using the SRAM PC Card 4-24
Replacing Lithium Batteries in an SRAM Card 4-24
Managing the Power on the PC Card Drive 4-25
Managing the PC Card Drivers in the Startup Files 4-27
Drivers in CONFIG.SYS 4-27
Drivers in AUTOEXEC.BAT 4-28
Tips for Enabling PC Card Drivers 4-28
vi
Page 7

Configuring the Reader
Contents
5
About the Configuration Parameters 5-3
Choosing the Symbologies the Reader Will Decode 5-3
Specifying How the Reader Will Communicate 5-4
Controlling How the Reader Will Operate 5-4
About the Configuration Files 5-4
Configuring the Reader With Configuration Files 5-4
Creating Configuration Files 5-5
Creating Multiple Configuration Files 5-5
Backing Up Your Configuration Files 5-6
How to Configure the Reader 5-6
Using the Interactive Configuration Application 5-7
Selecting Menus and Commands 5-8
Filling In Fields, Marking Check Boxes, and Saving Changes 5-8
Using a Series of Screens to Configure a Parameter 5-9
Using Multiple Configuration Files 5-9
Configuring the Reader by Scanning Bar Codes 5-11
Configuring the Reader With IRL Z Commands 5-12
Configuring the Reader With PSK Functions 5-12
Sending Commands From a Host Computer 5-12
Editing a Configuration File 5-13
Loading a Configuration File From the DOS Prompt 5-14
Loading a Configuration File Whenever You Boot 5-15
6
Restoring the Reader’s Default Configuration 5-16
Recording Your Reader’s Configuration 5-16
Networking the Reader
How the JANUS 2010 Fits Into Your Network 6-3
Working With JANUS COM Ports 6-6
Identifying JANUS COM Ports 6-6
Examining the COM1 Optical Port Signals 6-7
Understanding How IRQs Affect COM Ports 6-7
Designating the Scanner Port as COM2 6-8
Planning the Network Connection 6-9
Choosing a Communications Application 6-9
Choosing a Communications Protocol 6-10
Choosing a Protocol Handler 6-11
vii
Page 8

JANUS 2010 Hand-Held Computer User’s Manual (4MB)
Configuring the Reader for Communications 6-12
Selecting the COM Port 6-13
Configuring the Communications Protocols 6-13
Multi-Drop Protocol Parameters 6-14
PC Standard Protocol Parameters 6-14
Point-to-Point Protocol Parameters 6-14
Polling Mode D Protocol Parameters 6-14
User-Defined Protocol Parameters 6-15
Activating One Communications Protocol 6-15
Loading and Unloading a Protocol Handler 6-15
Loading and Unloading a Protocol Handler at the DOS Prompt 6-16
Loading a Protocol Handler When You Boot the Reader 6-16
Loading and Unloading a Protocol Handler With a Batch File 6-17
Loading and Unloading a Protocol Handler With an Application 6-18
Specifying a Value for the FIFO Control Register 6-18
Connecting the Reader to Another Device 6-21
Running Interlnk to Transfer Files 6-23
Differentiating Between Client and Server 6-23
Example of Using Interlnk 6-24
Interlnk System Requirements 6-26
Installing Interlnk on the Host Computer 6-26
Making the Host Computer the Client 6-27
Making the Reader the Client 6-29
Interpreting the Server’s Status Screen 6-30
Redirecting Drives From the DOS Prompt 6-32
Exiting Interlnk 6-33
Restarting Interlnk 6-33
Running Communications Manager 6-34
Using Communications Manager Menus 6-34
Selecting Menus and Commands 6-36
Moving Around the Screen and Filling In Fields 6-36
Exiting Screens and Saving Changes 6-37
Using a Series of Screens to Configure a Parameter 6-37
Exiting Communications Manager 6-37
Typing Commands at the DOS Prompt 6-38
Downloading Applications Across the Network 6-38
Examples of Using BFT 6-39
Examining a Typical BFT Session 6-41
Preparing the Reader and Host Computer for BFT 6-42
Differentiating Between Client and Server 6-43
Starting an Application When the FTA Terminates 6-45
Using FTA Commands on the Reader 6-45
viii
Page 9

Typing FTA Commands on the Reader 6-45
Learning the Syntax of FTA Commands 6-46
Editing the FTA Initialization File 6-48
Working With IRL
Contents
7
Learning About IRL 7-3
Using the IRL Desktop 7-4
Opening the IRL Desktop 7-4
Closing the IRL Desktop 7-5
Exploring the IRL Desktop User Interface 7-5
Selecting Menus and Commands 7-7
Moving the Cursor Through the Screen 7-7
Exiting a Screen 7-7
Practicing With the IRL Desktop User Interface 7-7
Executing Commands in the IRL Desktop 7-8
Running an IRL Program 7-8
Pausing an IRL Program 7-9
Exiting an IRL Program 7-9
Downloading an IRL Program 7-10
Transmitting IRL Files 7-10
Receiving IRL Files 7-11
Clearing IRL Data Files 7-11
Specifying the Path for Programs and Data Files 7-12
Setting the Path With an Environment Variable 7-13
Including a Data File Path in the OPEN Command 7-14
Selecting the Path From the IRL Desktop 7-14
Resuming IRL Programs 7-15
Exiting a Program So You Can Resume It Later 7-15
Resuming a Program From the DOS Prompt 7-16
Resuming a Program From the IRL Desktop 7-16
Freeing Enough Memory to Run an IRL Program 7-17
IRL Reader Commands 7-18
ix
Page 10

JANUS 2010 Hand-Held Computer User’s Manual (4MB)
Preparing the Reader for International Use
8
Configuring the Reader for a Language 8-3
Installing Auto-Loader on Your Host Computer 8-3
Choosing a Method to Configure a Language 8-5
Using the LOADADD Batch File With the NLS Option 8-5
Using the LOADNEW Batch File 8-6
Using the LOADLANG Batch File 8-8
Using an International Keypad 8-9
Finding the Special Keys 8-9
How to Type the Characters Printed on the Keypad 8-10
Typing the Characters On and Above the Alphabetic Keys 8-10
Typing the Characters On and Above the Numeric Keys 8-11
Typing Diacritical or Accent Marks 8-12
Using the Alt Key 8-12
Capitalizing All Characters 8-13
Using the Number Pad 8-13
Using DOS Code Pages 8-14
Using the French Keypad 8-15
Using the German Keypad 8-16
Using the Italian Keypad 8-17
Using the Spanish Keypad 8-18
Booting and Resetting the Reader
9
x
Booting the JANUS Reader 9-3
Warm Booting the Reader 9-3
Cold Booting the Reader 9-4
Resetting the Reader 9-5
Forcing the Reader to Turn Off 9-5
Breaking Out of an Application 9-5
Displaying the Boot Loader Menu 9-6
Limiting Access to Advanced Reader Commands 9-8
Using Storage Mode to Preserve the Bridge Battery 9-9
Dumping the Reader’s 640K Conventional Memory 9-11
Loading Flash Memory 9-13
Page 11

Troubleshooting
Contents
10
How to Use This Chapter 10-3
Powering Up or Booting the Reader 10-4
Operating the Reader 10-7
Saving the Contents of the RAM Drive 10-14
Networking or Communicating With the Reader 10-15
Running IRL Programs 10-17
Using PC Cards 10-19
Using DOS Commands and Applications 10-22
Using MakeDisk 10-25
Using PutDisk 10-27
Scanning Bar Code Labels 10-30
Problems With the NiCad Battery Pack 10-32
11
Reader Command Reference
Using Reader Commands 11-3
Backlight On and Off 11-4
Backspace 11-5
Change Configuration 11-5
Clear 11-6
Command Override 11-6
Enter 11-7
Enter and Exit Accumulate Mode 11-8
IRL File, Clear 11-9
IRL File, Receive 11-10
IRL File, Transmit 11-10
xi
Page 12

JANUS 2010 Hand-Held Computer User’s Manual (4MB)
IRL Program, Download 11-11
IRL Program, Exit 11-12
IRL Program, Resume 11-12
IRL Program, Run 11-13
Laser On and Off 11-13
Prepare for Reboot 11-14
Reboot 11-15
Viewport Movement 11-15
Viewport Down 11-16
Viewport Up 11-16
Viewport Left 11-17
Viewport Right 11-17
Viewport End 11-18
Viewport Home 11-18
Viewport Page Down 11-19
Viewport Page Up 11-19
Viewport to Cursor 11-20
Cursor to Viewport 11-20
xii
12
Configuration Command Reference
Using Configuration Commands 12-3
Configuration Commands Listed by Category 12-4
Entering Variable Data in a Configuration Command 12-6
Address, Multi-Drop 12-7
AFF (Affirmative Acknowledge) 12-8
Automatic Shutoff 12-9
Baud Rate 12-11
Beep Duration 12-12
Beep Frequency 12-13
Beep Volume 12-15
Page 13

Codabar 12-16
Code 11 12-17
Code 16K 12-18
Code 2 of 5 12-19
Code 39 12-21
Code 49 12-25
Code 93 12-27
Code 128 12-27
Command Processing 12-28
Disabling or Enabling Command Override and Enter 12-33
Defining the Reader Commands 12-34
Contents
Communications Dock Port 12-35
Communications Port, Choose Scanner or COM2 12-35
Communications Port, Select COM Port 12-36
Communications Port, UART Restore 12-37
Communications Protocol 12-38
Configure 12-38
Activate 12-41
Multi-Drop, User-Defined 12-42
Data Bits 12-42
Decode Security 12-43
Display Backlight Timeout 12-44
Display Contrast 12-46
Display Mode, IRL 12-47
Display Setup 12-48
EOF (End of File) 12-51
EOM (End of Message) 12-52
EOR (End of Record) 12-55
xiii
Page 14

JANUS 2010 Hand-Held Computer User’s Manual (4MB)
Flow Control 12-56
Intercharacter Delay 12-57
Interleaved 2 of 5 12-58
Internal Drive Reset After Battery Change 12-60
IRL BAK (Bad Program Acknowledge) 12-61
IRL End Program Block 12-62
IRL EOP (End of Program) 12-63
IRL PAK (Program Acknowledge) 12-64
IRL PSS (Program Statement Separator) 12-65
IRL Run 12-66
IRL SOP (Start of Program) 12-67
Key Code Look-Up Table 12-68
Keypad Caps Lock 12-69
Keypad Clicker 12-70
Keypad Ctrl Key Functions 12-70
Keypad, Numeric 12-71
LRC 12-72
MSI 12-72
NEG (Negative Acknowledge) 12-74
Parity 12-75
Plessey 12-76
POL 12-77
Postamble 12-78
Preamble 12-79
Records Per Block 12-80
REQ (Request for Acknowledge) 12-82
xiv
Page 15

RES (Reset) 12-83
Scan Ahead 12-84
Scanner Devices 12-84
Scanner Mode 12-85
Scanner Redundancy 12-86
Scanner Timeout 12-87
Scanner Trigger 12-88
SEL (Select) 12-89
SOM (Start of Message) 12-90
Stop Bits 12-91
Contents
A
Timeout Delay 12-92
Transmit Abort Timeout 12-93
Turnaround Delay 12-95
UPC/EAN 12-96
Viewport Movement Keys 12-99
Viewport Movement Mode 12-99
Viewport Movement Steps 12-100
Reader Specifications
Physical and Environmental Specifications A-3
Cables for Data Communications A-5
Keypad Options A-5
Default Configuration A-6
Configuration Commands by Syntax A-10
Types of Memory Used in the Reader A-14
Conventional Memory (0 Through 640K) A-15
Upper Memory Area A-15
xv
Page 16

JANUS 2010 Hand-Held Computer User’s Manual (4MB)
High Memory Area (HMA) A-17
User Flash Memory A-17
Application Flash Memory A-17
Reader Keypad Charts
B
C
Using the Reader Keypad Charts B-3
English (U.S.) Alphanumeric Keypad B-3
Large Numeric Keypad B-8
Configuration and Full ASCII Charts
Entering ASCII Control Characters C-3
Configuration Options for User-Defined Protocol C-6
POL and SEL Combinations for Multi-Drop Protocol C-7
Key Codes C-8
Full ASCII Table C-14
Full ASCII Bar Code Chart C-17
Control Characters C-17
Symbols and Punctuation Marks C-18
Numbers C-20
Uppercase Letters C-20
Lowercase Letters C-21
Scanning Bar Codes to Select Menu Options C-23
Creating Your Own Key Code Bar Code Labels C-24
Software Utility Reference
D
xvi
Interlnk D-3
INTERLNK.EXE D-4
Intersvr D-7
POWER.EXE D-9
Page 17

G
Contents
Auto-Loader Batch Files D-10
Learning How to Use Auto-Loader D-10
Moving the Batch Files D-11
Using an External Power Supply D-11
Using LOAD_USA D-11
Using LOADLANG D-12
Using LOADADD D-12
Using LOADIMG D-14
Using LOADNEW D-14
Using LOADXIMG D-15
Using MAKE_USA D-15
Using MAKELANG D-15
Using MAKENEW D-16
Glossary
I
Index
xvii
Page 18

Page 19

Before You Begin
This section introduces you to standard warranty provisions, safety
precautions, warnings and cautions, formatting conventions used in this
manual, and sources of additional product information.
Warranty Information
To receive a copy of the standard warranty provision for this product, contact
your local Intermec sales organization. In the U.S. call 1-800-755-5505, and in
Canada call 1-800-688-7043. Otherwise, refer to the Worldwide Sales & Service
list shipped with this manual for the address and telephone number of your
Intermec sales organization.
Safety Summary
Your safety is extremely important. Read and follow all warnings and cautions
in this manual before handling and operating Intermec equipment. You can be
seriously injured, and equipment and data can be damaged if you do not
follow the safety warnings and cautions.
Before You Begin
Do not repair or adjust alone Do not repair or adjust energized equipment alone
under any circumstances. Someone capable of providing first aid must always
be present for your safety.
First aid Always obtain first aid or medical attention immediately after an
injury. Never neglect an injury, no matter how slight it seems.
Resuscitation Begin resuscitation immediately if someone is injured and stops
breathing. Any delay could result in death. To work on or near high voltage,
you should be familiar with approved industrial first aid methods.
Energized equipment Never work on energized equipment unless authorized
by a responsible authority. Energized electrical equipment is dangerous.
Electrical shock from energized equipment can cause death. If you must
perform authorized emergency work on energized equipment, be sure that you
comply strictly with approved safety regulations.
xix
Page 20

JANUS 2010 Hand-Held Computer User’s Manual (4MB)
g
y
p
p
pp
g
y
y
p
p
pp
g
nugget
WARNING
code39
helconital
Warnings and Cautions
The warnings and cautions in this manual use this format:
Warning
A warnin
statement that must be strictl
the
Avertissement
Un avertissement vous alerte d’une
méthode, d’un état ou d’un ra
éviter l’occurrence de mort ou de blessures
l’équipement.
Caution
A caution alerts
statement that must be strictl
destruction, or corru
warns you of an operating procedure, practice, condition, or
ersons working on the equipment.
observed to avoid death or serious injury to
rocédure de fonctionnement, d’une
ort qui doit être strictement respecté pour
raves aux personnes manupulant
ou to an operating procedure, practice, condition, or
observed to prevent equipment damage or
tion or loss of data.
Conseil
récaution vous alerte d’une procédure de fonctionnement, d’une méthode,
Une
d’un état ou d’un ra
l’endomma
perte de données.
ement ou la destruction de l’équipement, ou l’altération ou la
ort qui doit être strictement respecté pour empêcher
About This Manual
The JANUS 2010 User’s Manual (4MB) describes the reader’s features and
explains how you can operate, configure, network, and create programs for the
4MB JANUS reader.
This manual was written for two audiences:
• Users can read Chapters 1 through 4 for help operating the reader.
• Analysts and programmers can use the entire manual to manage the
JANUS reader, its applications, and its connection to the data collection
system. You should understand data collection programming, data
communications, and DOS (commands, file structure, startup files, and
device drivers).
xx
Page 21

Before You Begin
What You Will Find in This Manual
This table summarizes the information in each chapter and appendix.
Chapter What You Will Find
1 Summarizes the reader’s features, functions, and accessories. Describes
how to unpack your new reader and get it started for the first time.
2 Explains how to use the reader’s keypad, display, batteries, drives, and
scanner.
3 Explains how to use, manage, and program the software shipped with
the reader.
4 Explains how to use PC cards with the reader.
5 Explains how to change the reader’s configuration.
6 Introduces networking concepts and explains how to use your reader to
communicate with other devices.
7 Explains how to create, run, and transmit IRL programs.
8 Explains how to configure the reader to operate in any DOS NLS
language and use the matching keypad.
9 Explains how to warm boot, cold boot, and reset the reader. Also
describes how to enable/disable a password, enter Storage mode, dump
conventional memory, and load flash memory.
10 Lists solutions for the problems you may encounter while operating the
reader.
11 Describes the commands that change the reader’s operation.
12 Describes the commands that change the reader’s configuration.
A Presents the reader’s specifications, lists the configuration command
names and syntax, and describes the reader’s default configuration
settings.
B Lists all of the keystroke combinations you can enter on the reader’s
keypad.
C Contains reference tables for configuring communications protocols,
using key codes, and using the full ASCII chart.
D Describes the syntax for Interlnk, POWER.EXE, and the Auto-Loader
batch files.
G Glossary of terms used in this manual.
I Index.
xxi
Page 22

JANUS 2010 Hand-Held Computer User’s Manual (4MB)
nugget
code39
helconital
Terminology
You should be aware of how these terms are being used in this manual:
Term Description
Reader The generic term “reader” indicates any JANUS 2010
IC.EXE The Interactive Configuration application (IC.EXE) was
PC cards “PC cards” were called “PCMCIA cards” in previous
Type I PC card drive “Type I PC card drives” were called “internal PC card
Type II PC card drive “Type II PC card drives” were called “external PC card
reader. More specific terms, such as “J2010 with an RF
back,” indicate a specific type of JANUS 2010 reader.
called “the configuration application” in previous
versions of this manual.
versions of this manual. Intermec no longer uses the
name of the Personal Computer Memory Card
International Organization (PCMCIA) to refer to this type
of PC card.
drives” in previous versions of this manual.
drives” in previous versions of this manual.
“For help, see your
JANUS PSK reference
manual.”
This manual does not refer to a specific PSK manual
because you may have one or more PSK manuals,
depending on the programming language(s) you use.
For definitions of the technical terms used in this manual, see the glossary.
xxii
Page 23

Before You Begin
Format Conventions for Input From a Keyboard or Keypad
This table describes the formatting conventions for input from PC or host
computer keyboards and reader keypads:
Convention Description
Special
Italic
Bold text Indicates the keys you must press on a PC or host computer
@
> < A
A
-
text
text Indicates that you must replace the parameter with a value. See
<
Shows the command as you should enter it into the reader. See
“Format Conventions for Commands” later in this chapter.
“Format Conventions for Commands” later in this chapter.
keyboard. For example, “press Enter” means you press the key
labeled “Enter” on the PC or host computer keyboard.
Shows the key you must press on the reader. For example, “press
@
” directs you to press the key labeled “Enter” on the reader
keypad.
Shows a series of reader keys you must press and release in the
order shown. For example, “Press > < A to boot the
reader.”
Shows a series of reader keys you must press simultaneously.
Also, you must press and hold the keys in the order shown. For
example, “Press A - < to enter Control mode.”
Format Conventions for Bar Codes
You can scan the bar codes listed in this manual to enter data or perform a
command. Each bar code includes the name and human-readable
interpretation. For example:
Change Configuration
*$+*
*$+*
2010U.073
Name
Bar code (Code 39)
Human-readable
interpretation
xxiii
Page 24
JANUS 2010 Hand-Held Computer User’s Manual (4MB)
nugget
code39
helconital
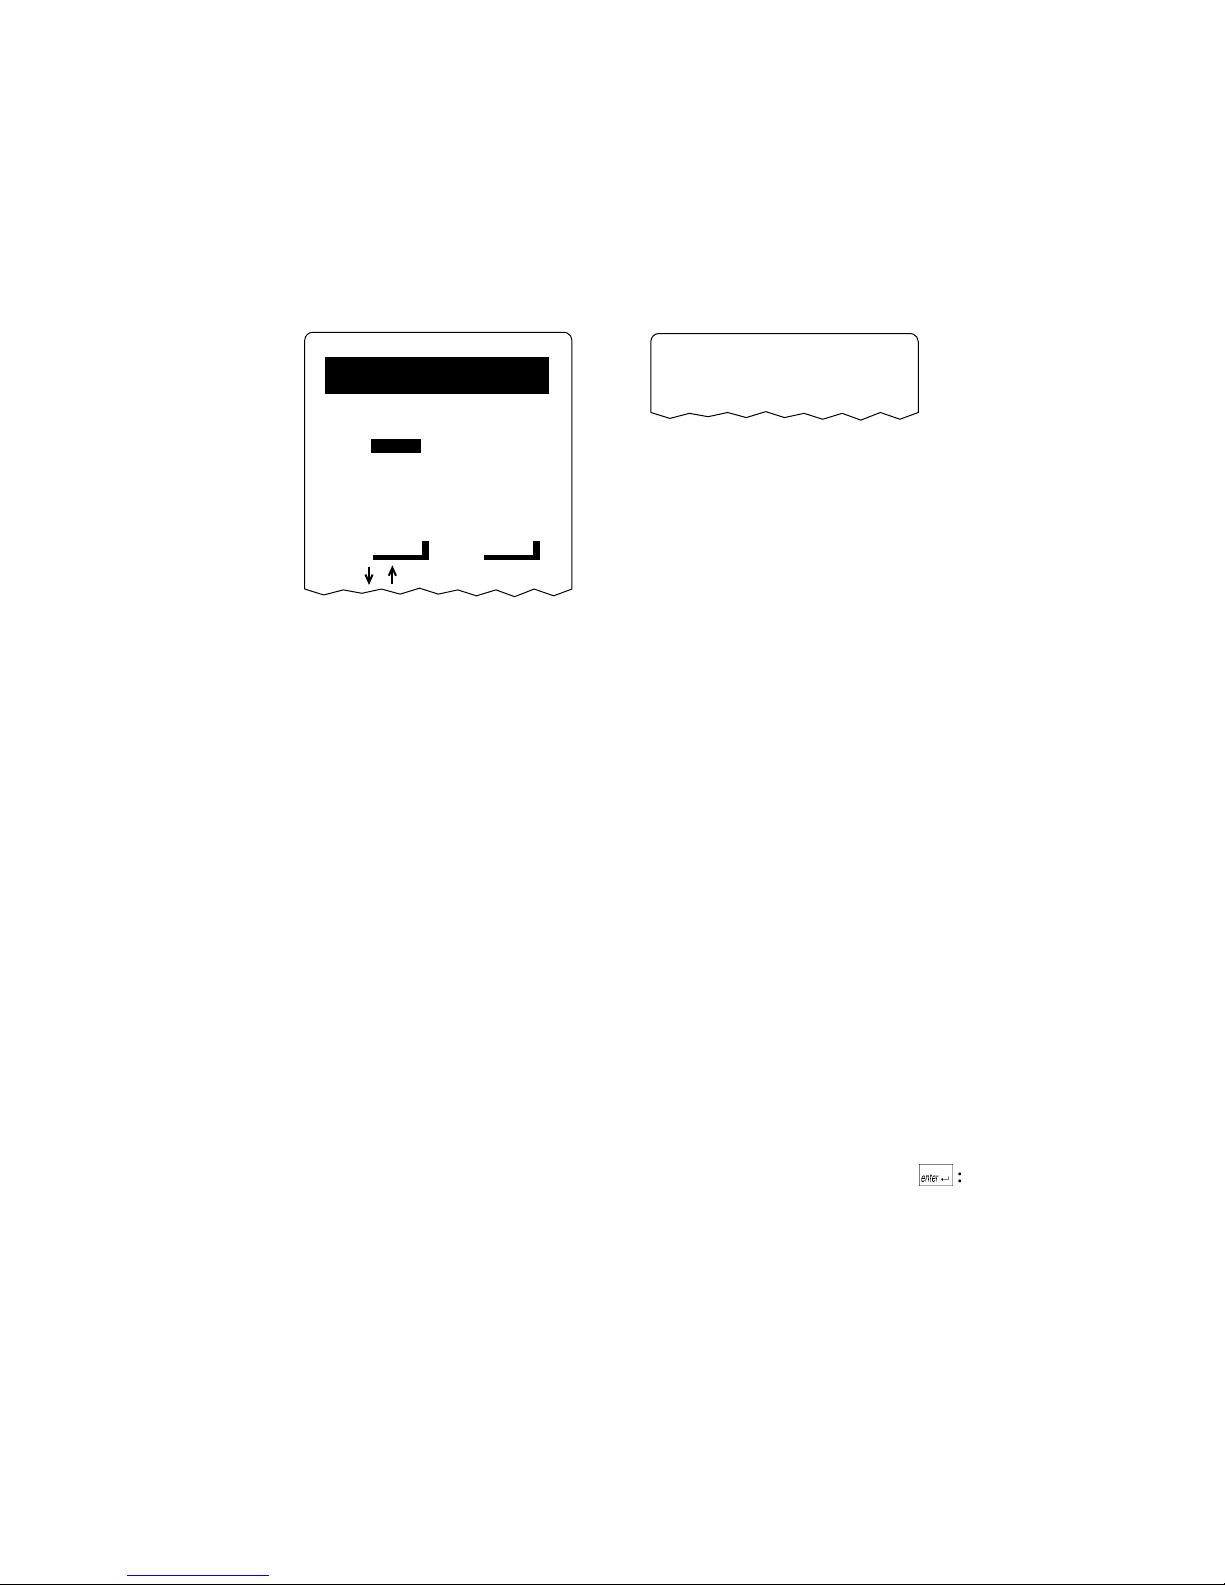
Format Conventions for Software Screens and Messages
This manual includes illustrations that represent how the JANUS displays
software screens and messages. Here are two examples:
Configuration
COM1/User-Defined
(2 of 5)
DELAYS
INTERCHARACTER:
0 ms
TURNAROUND:
0 ms
TIMEOUT:
10 sec
TRANSMIT ABORT
00000 ms
NEXT PREV
?
Format Conventions for Commands
This manual includes sample commands that are shown exactly as you should
type them on your reader. The manual also describes the syntax for many
commands, defining each parameter in the command. This example illustrates
the format conventions used for commands:
Transmitting...
2010U.069
2010U.063
When you use the LOADADD command, follow this syntax:
loadadd [
path\]filename [path\filename path\filename...
where:
path
is the drive and directory of the file(s) to include in the
image file. If you do not include a path, the current
directory is used.
filename
is the name of the file or files to include in the image file
and load to the reader.
You can include multiple path\filename and path\*.* parameters in the
command. The path\*.* parameter loads all the files in a directory. For
example, type this command at the DOS prompt and press @:
loadadd c:\janus\config.sys c:\atadrv\*.* c:\data\*.*
]
xxiv
Page 25

Before You Begin
This table defines the conventions used in the example:
Convention Description
Special font
Italic text
[ ] Brackets enclose a parameter that you may omit from the
Required parameters If a parameter is not enclosed in brackets [ ], the
where This word introduces a list of the command’s parameters
Commands appear in this font. You enter the command
exactly as it is shown.
Italics indicate a variable, which you must replace with a
real value, such as a number, filename, or keyword.
command. Do not include the brackets in the command.
parameter is required. You must include the parameter
in the command; otherwise, the command will not
execute correctly.
In previous versions of this manual, required parameters
Note:
were enclosed in braces
and explains the values you can specify for them.
{ }
.
xxv
Page 26

JANUS 2010 Hand-Held Computer User’s Manual (4MB)
nugget
code39
helconital
Suggested Reading
You may need to refer to the manuals listed below. To order additional
manuals, contact your local Intermec representative or distributor.
Manual
0100 Access Point User’s Manual
0110 Access Point User’s Manual
The Bar Code Book
Data Communications Reference Manual
DOS user’s manual 064673
IRL Programming Reference Manual
JANUS 2.4 GHz Installation Utility (4MB) User’s Manual
JANUS 2.4 GHz Terminal Emulation Quick Reference Guide
JANUS 900 MHz Radio Frequency Quick Reference Guide
JANUS 2010 and 2020 Optical Link Adapter Quick Reference Guide
Intermec
Part No.
062367
065053
051241
044737
048609
064673
063682
060207
058431
JANUS 2020 Battery Charger Quick Reference Guide
JANUS 2020 Communications Dock Quick Reference Guide
JANUS Application Simulator User’s Manual
JANUS PSK for Ada Reference Manual
JANUS PSK for Basic Reference Manual
JANUS PSK for C++ Reference Manual
JANUS 900 MHz Terminal Emulation Quick Reference Guide
PC-IRL Reference Manual
RF System/9180 User’s Manual
059955
059954
062778
062038
063191
062133
062178
049212
054292
If you are using the JANUS PSK, you may have one or more of the JANUS PSK
manuals listed above, depending on the programming language you use. Refer
to your PSK manual when you see these instructions:
“For help, see your JANUS PSK reference manual.”
xxvi
Page 27

nugget
code39
helconital
1
Getting Started
Page 28

nugget nugget
code39 code39
helconital
Page 29
nuggnugg
This chapter introduces the JANUS 2010 reader and explains how to get your new
reader up and running.
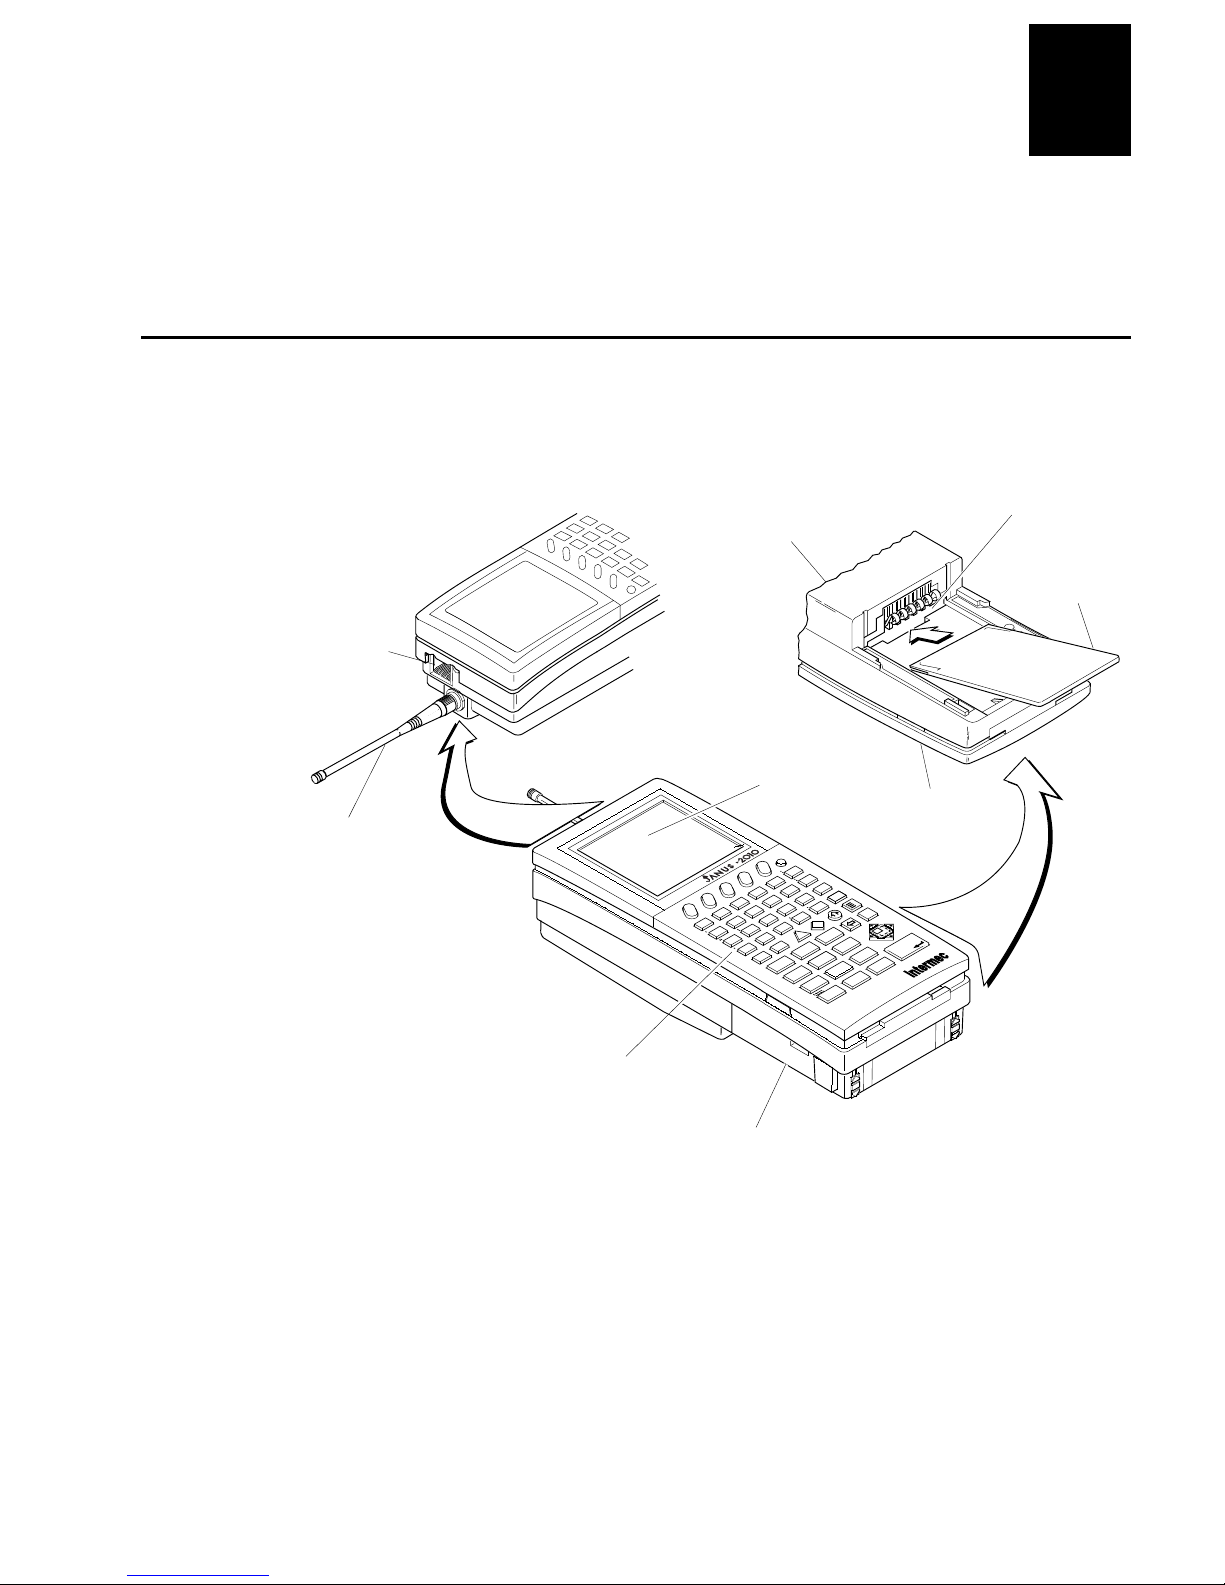
What Is the JANUS 2010 Reader?
The JANUS 2010 is a combination hand-held bar code reader and computer. It
contains a 386 microprocessor, contains Microsoft MS-DOS, and is
PC-compatible.
Scanner or
COM2 port
CODECODEhelcdGetting Started
Bottom of reader
1
Type I PC
card drive
PC card
to store files
Antenna for radio
frequency communications
Features
• PC-compatible
• 640K conventional memory
• Three internal memory drives
• Specialized for bar code
data collection
• DOS operating system
and file structure
• Runs PC applications
c:\>dir
F7
F1
F6
AB
~
Keypad supports all
102 keys available
on a PC
16 line by 20 character
CGA display
I
/
O
TM
F5
F4
F9 F10
}
R
F8
F2 F3
+
—
–
GHI
MN
{
CDEF
–
–
S
][
JKL
<
OPQ
\
TU
Z
Y
home
&
+
7
–
>
V
Ctrl
*
4
$
end
!
?
/
X
W
Caps
Alt
pg up
(
/
^
89
56
%
*
2
enter
@
ins
1
space
f
pg dn
#
del
0
(
Rechargeable NiCad
battery pack
Esc
3
>
num lock
enter
.
Keypad
2010U.106
1-3
Page 30
JANUS 2010 Hand-Held Computer User’s Manual (4MB)
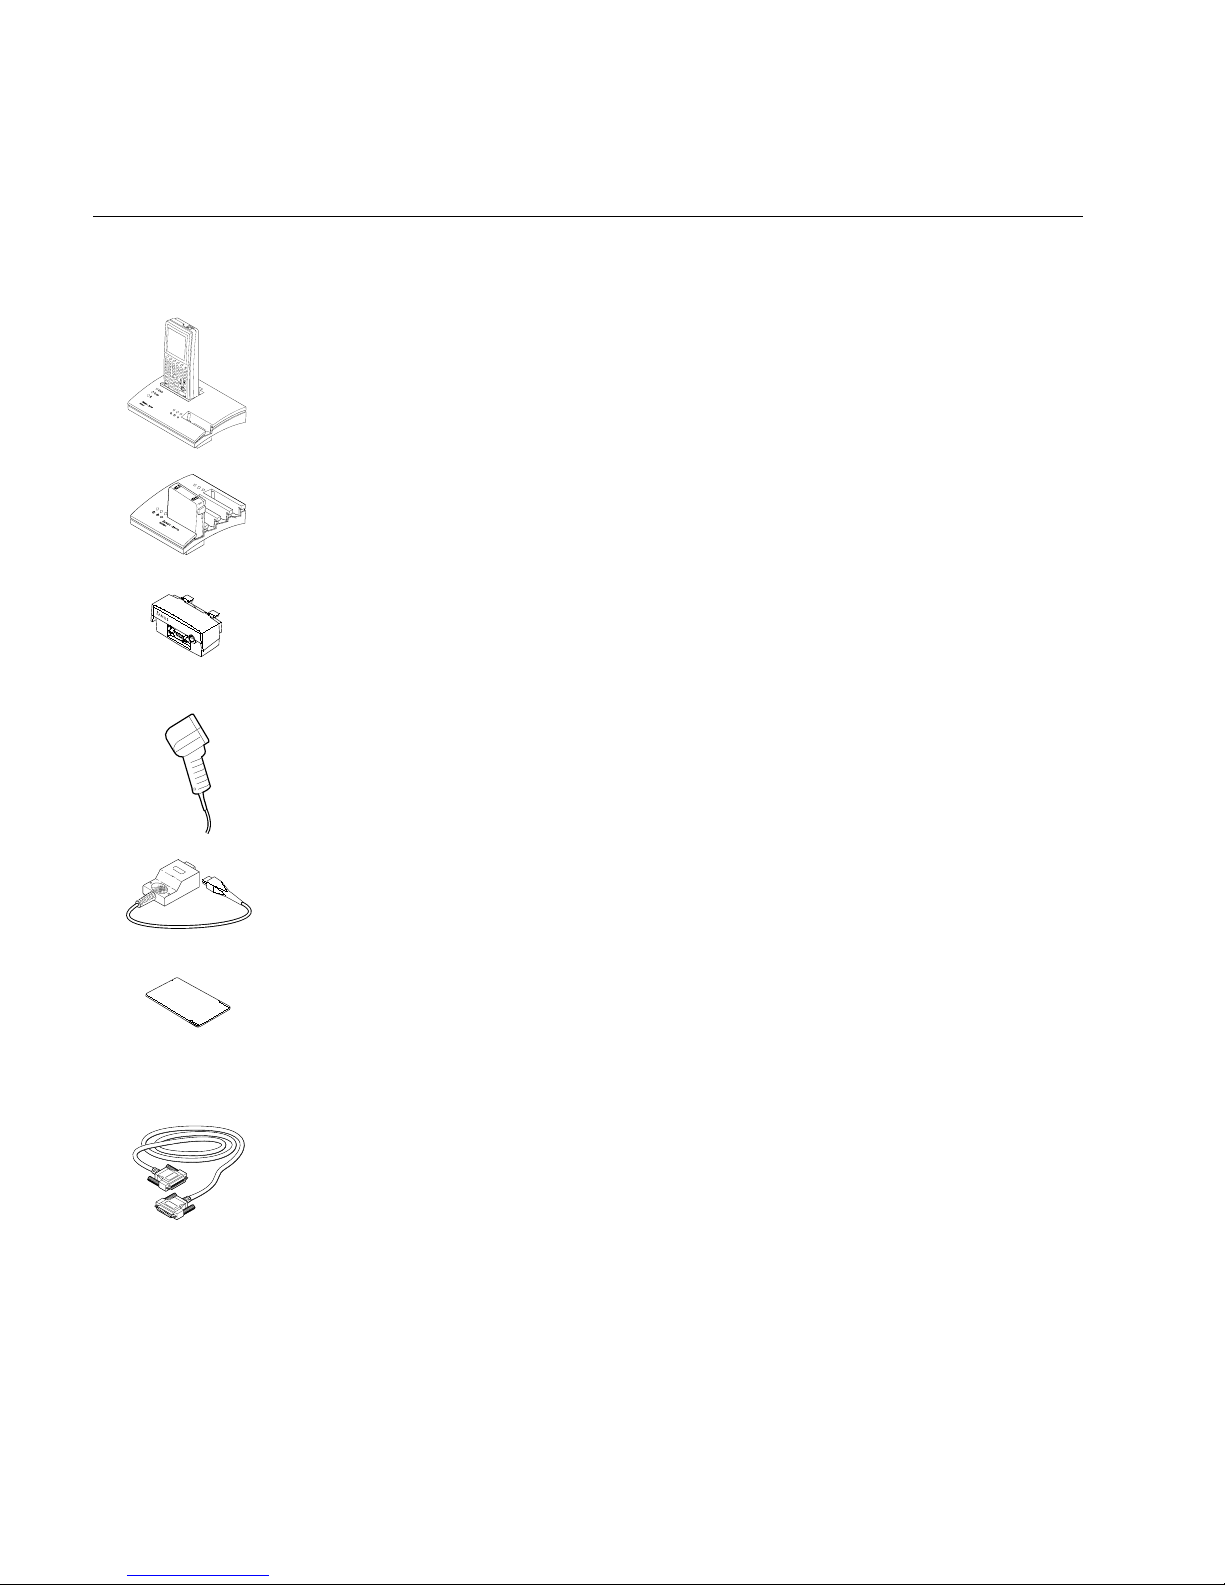
Accessories for the Reader
You can use these accessories with the JANUS 2010 reader:
nuggnugg
CODECODEhel
JD2010 Communications Dock
The dock allows the reader to communicate
with a host computer and other devices through two serial ports, while
TM
simultaneously charging the NiCad battery pack in the reader. The dock also
has a slot to charge a spare NiCad battery pack.
JZ2010 Battery Charger
The charger lets you charge up to four NiCad battery
packs at one time. The battery charger senses when a battery pack is fully
charged and will not overcharge it.
JL2010 Optical Link Adapter
The optical link adapter allows the reader to
communicate with a host computer or other device by means of an RS-232
serial port. You can also connect a power supply to the optical link adapter to
operate the reader and charge the NiCad battery pack.
Wands and Scanners
You can attach a wand or scanner to enter bar code data
with the reader. For a list of input devices you can use, see “Attaching a
Wand or Scanner” later in this chapter.
COM2 Hardware Adapter
The COM2 hardware (serial) adapter (Part No.
061799) lets you use the scanner port as COM2 if you do not need an input
2010U.084
device.
1-4
PC Cards
Intermec has certified third-party Type I and Type II PC cards,
including memory, modem, and network cards. Memory cards you use in the
JANUS reader provide additional disk storage space, not executable
conventional memory. Contact your local Intermec sales representative for
ordering information.
Cables
You may need to purchase cables for serial data communications
between the reader and peripheral devices. For help, see “Physical and
Environmental Specifications” in Appendix A.
Page 31

nuggnugg
CODECODEhelcdGetting Started
1
JANUS 2010 Models and Options
The JANUS family of 2010 readers includes these models:
J2010
The basic reader is a combination hand-held programmable data
collection computer. The reader has a Type I PC card drive for Type I memory
cards and uses a serial port for data communications.
J2010 with 900 MHz RF Back or JG2010 with 2.4 GHz Radio
This reader
complements the functionality of the basic reader with an optional RF back,
which allows the reader to communicate with a host computer over a radio
frequency (RF) network.
J2010 with a PCMCIA Back
This reader complements the functionality of the
basic reader with an optional Type II PC card drive that accepts Type I or
Type II memory and I/O cards.
I
/
F7
F1
~
TMTM
F9 F10
F3
F8
F2
+
—
–
ABC
G
MNO
F4
{
–
–
HI
S
DE
\
Y
F5
}
JK
<
TU
home
&
O
][
PQ
Z
+
7
–
F
>
$
end
L
?
W
V
Alt
pg up
Ctrl
89
*
%
*
4
1
!
R
/
X
Caps
(
/
^
56
2
enter
@
ins
space
f
Esc
num lock
enter
3
pg dn
#
.
del
>
0
(
F6 F7
I
/
O
TMTM
F
F4 F5
L
}
?
R
][
F8 F9 F10
{
/
X
>
F7
JK
F2 F3
+
CDE
–
F1
–
F6
—
–
AB
~
GHI
\
MNO
S
TU
Y
home
f
W
<
PQ
Caps
Esc
V
Alt
pg up
Ctrl
(
num lock
/
Z
^
89
+
*
7
&
4
–
$
end
%
*
1
!
56
2
enter
@
ins
space
enter
3
pg dn
#
.
del
>
0
(
F6
I
/
O
TMTM
F4 F5
F9 F10
L
}
?
][
F8
{
/
X
>
JK
F2 F3
+
CDEF
–
F1
–
—
–
HI
AB
~
NO
G
\
M
S
TU
Y
home
<
PQR
Z
7
&
–
+
$
V
Ctrl
89
*
*
4
end
!
W
Caps
Alt
pg up
(
56
%
enter
1
space
f
Esc
num lock
/
^
enter
3
pg dn
#
.
del
>
2
@
0
(
ins
2010U.092
J2010
J2010 with 900 MHz RF Back
or JG2010 with 2.4 GHz Radio
J2010 with a
PCMCIA Back
These options are available for all the reader models:
• Alphanumeric keypad that is available in English, French, German, Italian,
and Spanish.
• Large numeric keypad that is available in English.
• Terminal emulation (TE) software and keypads that let the reader emulate
an IBM 3270 or 5250 terminal (or display station).
• Radio frequency communications available for 900 MHz or 2.4 GHz
networks.
This manual tells you how to use the basic features in all models of the JANUS
reader. Special information about TE and RF are included in the quick reference
guides that are shipped with this manual or with your 2.4 GHz installation kit.
1-5
Page 32

JANUS 2010 Hand-Held Computer User’s Manual (4MB)
nuggnugg
Using the Reader for the First Time
Follow these steps to get your new JANUS 2010 reader up and running:
1. Unpack the reader, carrying case, NiCad battery pack, companion disks,
and documentation.
2. Charge the NiCad battery pack.
3. Install the charged NiCad battery pack.
4. Turn on the reader for the first time.
5. Set the time and date.
6. Connect a wand or scanner.
7. Verify that the reader is operating correctly.
Unpacking the Reader
When you remove the reader from its box, save the box and shipping material
in case you need to ship or store the reader. Check the contents of the box
against the invoice for completeness and contact your Intermec representative
if there is a problem.
CODECODEhel
Carrying
case
JANUS 2010
TM
NiCad battery
pack
2010U.081
Worldwide Sales
and Service
JANUS 2010
Manual Supplement
JANUS Bridge Battery
Information Sheet
JANUS 2010
Getting Started Guide
Software
companion disks
Look on the Boot Utilities companion disk 1 for a README.DOC file. This file
may contain information about the reader that was not available when this
manual was published. View or print this file with any text editor.
1-6
Page 33

nuggnugg
CODECODEhelcdGetting Started
1
Charging the NiCad Battery Pack
The reader’s nickel-cadmium (NiCad) battery pack is shipped to you
completely discharged of power, so you must charge the battery pack before
you can use the reader. There are four ways to charge the battery pack. For
help, see the JANUS accessory quick reference guides.
Note:
To learn about using and maximizing the reader’s battery power, see
“Managing Your Battery Power” in Chapter 2.
Method Description Time to Charge
Place the battery pack in the battery slot
D
D
2010U.010
–
—
2010U.008
of the communications dock.
Place the battery pack in the battery
charger.
Install the battery pack in the reader,
place the reader in the communications
dock, and connect an external power
supply to the dock.
Install the battery pack in the reader,
attach the optical link adapter to the
reader, and connect an external power
supply to the optical link adapter.
About 2 hours
About 2 hours
About 15 hours (with
the reader turned off)
About 15 hours (with
the reader turned off)
1-7
Page 34

JANUS 2010 Hand-Held Computer User’s Manual (4MB)
Installing the NiCad Battery Pack
You must install the newly charged battery pack into the reader.
To install the battery pack
1. Make sure the two yellow battery pack locks on the end of the battery pack
are pushed down in the unlocked position.
2. Place the two battery pack tabs under the reader’s back.
IntermecIntermec
IntermecIntermec
nuggnugg
CODECODEhel
Reader
Battery pack
tab (2 places)
Battery
pack
2010U.112
Reader
Battery
pack lock
(2 places)
3. Slide the battery pack into the back of the reader until it snaps into place.
4. Push the two battery pack locks up to lock the battery pack in place.
Note:
The battery pack locks must be closed to use the reader.
1-8
Page 35

nuggnugg
CODECODEhelcdGetting Started
1
Turning On the Reader for the First Time
When you turn on the reader for the first time, you need to perform an
initialization sequence to prepare the reader for operation.
To turn on the reader for the first time
1. After you install the charged battery pack, turn on the reader by pressing
the yellow
2. The Boot Loader menu appears, and the Reboot command is selected.
BOOT LOADER
Reboot
Password
Dump
Load
Resume
Storage
Off
Can Not Resume
Please Reboot
L
key on the top right of the keypad.
2010U.019
Press @ to reboot the reader. The reader performs a cold boot, which is
described in “Cold Booting the Reader” in Chapter 9.
Note:
If you do not press a key within 60 seconds after the reader displays a screen,
the reader shuts off and you have to start over at Step 1.
BACKUP BATTERY
Backup Battery
Tests Good
Storage Mode is On
Please Press
Enter to Continue
Esc to Go Off
2010U.030
3. The Backup Battery screen appears, describing the status of the lithium
bridge battery.
Press
@
to continue booting the reader.
The reader continues booting and displays the DOS prompt when it
finishes.
1-9
Page 36

JANUS 2010 Hand-Held Computer User’s Manual (4MB)
Setting the Time and Date
Next, you set the current time and date.
To set the time and date
1. Type this command at the DOS prompt and press @:
time
2. Type the current time in the format HH:MM:SS and then press @.
To type a colon on an alphanumeric keypad, press A %. To type a colon
on a large numeric keypad, press A N.
3. Type this command at the DOS prompt and press @:
date
4. Type the current date in the format MM-DD-YY and then press @.
To type a dash on an alphanumeric keypad, press A '. To type a dash on
a large numeric keypad, press A A A &.
nuggnugg
CODECODEhel
Press A ' to type the dashes. Then press @.
1-10
Page 37

nuggnugg
g
p
p
CODECODEhelcdGetting Started
1
Attaching a Wand or Scanner
To enter bar code data, you need to attach an input device to the reader. You
can use one of these Intermec input devices with the JANUS 2010:
• 1260-series, 1270-series, and 1280-series digital wands
• 146x CCD scanners
• 1500 infrared, 151x , 1545, and 155x visible laser scanners
• 1354 and 1355 badge scanners
To attach a wand or scanner to the reader
1. Turn off the reader by pressing
Caution
Attachin
and/or in
Conseil
N'attachez
cela pourrait endommager le lecteur et/ou le périphérique d'entrée.
2. Locate the modular connector on the top of
the reader. The connector is designed so
you can insert the input device cable only
one way. Make sure the connector snaps
into place securely.
Note:
10-pin modular connector, you can order an
adapter cable from your Intermec
representative.
3. Turn on the reader by pressing
an input device while the reader is on could damage the reader
ut device.
as de périphérique d'entrée pendant que le lecteur est actif car
If the wand or scanner does not have a
L
L
.
2010U.001
.
For helpful tips on scanning bar codes, see
the wand or scanner manual.
1-11
Page 38

JANUS 2010 Hand-Held Computer User’s Manual (4MB)
Verifying That the Reader Is Operating Correctly
Once you have turned on the reader and attached an input device, your JANUS
reader is ready for operation. You can enter data by typing on the keypad or by
scanning bar code labels.
For example, to view the contents of the reader’s current drive, type this
command at the DOS prompt and press @:
dir
Or scan this bar code:
*DIR*
*DIR*
The directory of the current drive appears on the reader display.
nuggnugg
CODECODEhel
FTL EXE 47206
INITENV EXE 8325
MCFORMAT EXE 56140
MS-FLASH SYS 35836
MTDDRV EXE 23152
MTI1 EXE 7552
MTI2 EXE 5898
MTSRAM EXE 5608
14 file(s)
C:\>
2010U.180
If you cannot see the cursor after you enter the DIR command, scan this bar
code to move to the cursor’s position in the reader’s display area:
*/-*
*/-*
To learn more about the reader’s display and the position of the cursor, see
“How to Use the Reader’s Display” in Chapter 2.
1-12
Page 39

Turning the Reader On and Off
The reader’s Suspend/Resume key is the yellow L key in the upper right
corner of the keypad, as shown in this illustration:
nuggnugg
CODECODEhelcdGetting Started
1
When you press L to turn the reader
off, the reader does not shut off but
goes into a Suspend mode. This mode
is referred to as “off” in the rest of this
manual.
In Suspend mode, the reader saves all
memory and turns off the power to
most hardware, including the CPU.
When you press L to turn the reader
on, the reader resumes exactly where it
was when you turned it off.
If a program was running when you
turned off the reader, the program
continues running from the same point
when you turn the reader on.
If you change the battery pack while the
reader is turned off, the reader resumes
exactly where it was the next time the
reader is turned on.
Note:
You do not boot the reader by
turning it off and on. To learn how and
when to boot the reader, see “Booting the
JANUS Reader” in Chapter 9.
Suspend/Resume key
turns the reader on
and off
F6 F7 F8 F9 F10
F1
F2 F3 F4 F5
{
<
V
pg up
(
/
^
pg dn
#
3
>
}
][
>
Alt
.
~
ABCDEF
GH I JK L
MNOPQR
S
YZ
home
&
7
–
$
4
end
!
1
space
+
—
–
–
–
\
T
U
Ctrl
+
89
*
*
%
56
enter
@
2
ins del
)
0
I
O
?
/
WX
Caps
f
Esc
num lock
enter
2010U.113
1-13
Page 40

JANUS 2010 Hand-Held Computer User’s Manual (4MB)
nuggnugg
CODECODEhel
Where Do You Go From Here?
Now that your new JANUS reader is up and running, you can use this manual
to learn how to perform these tasks:
For Help With This Task See This Chapter
To learn to use the reader’s keypad, display, audio
signals, batteries, COM ports, drives, and scanner
To learn to use the reader’s software and manage its
disk space and memory
To learn to use PC cards in the reader’s PC card drive
or drives
To learn about configuration files and ways to change
the reader’s configuration
To add the reader to your data collection system and
learn how to communicate with other devices
To run IRL programs on the reader Chapter 7, “Working With IRL”
To configure the reader for an international language
and learn to use the matching keypad
To learn to boot the reader, solve problems, and
respond to error messages
Chapter 2, “Learning How to Use the Reader”
Chapter 3, “Learning About the Software”
Chapter 4, “Using PC Cards in the Reader”
Chapter 5, “Configuring the Reader”
Chapter 6, “Networking the Reader”
Chapter 8, “Preparing the Reader for International
Use”
Chapter 9, “Booting and Resetting the Reader,” and
Chapter 10, “Troubleshooting”
1-14
Page 41

nugget
code39
helconital
2
Learning How to Use the Reader
Page 42

nugget
code39
helconital
Page 43

This chapter describes and explains how to use the reader’s keypad, display, audio
signals, communications port, batteries, and drives.
JANUS 2010 Features
This chapter tells you about these features on the JANUS 2010 reader:
Scanner or COM2 port
You can scan bar code
data by attaching either
a wand or a scanner, or
use the port as COM2.
Drives
The reader has three internal
memory drives and one or
two PC card drives to run
applications and store data.
Communications port
You can use radio
frequency (RF) on the
J2010 with an RF Back.
Batteries
The reader uses a
rechargeable NiCad battery
pack and a lithium bridge
battery to provide power. You
can also attach an external
power supply.
Learning How to Use the Reader
Display
The reader display is 16 lines by
20 characters. You can use the
viewport feature to move around
a virtual PC-size screen.
I
/
O
TM
F2 F3
+
F1
F6 F7 F8 F9 F10
—
–
AB
~
GHI
MNO
F4 F5
CD
–
–
{
S
}
\
TU
Y
home
EF
][
>
JK
<
PQ
Z
+
7
&
–
$
end
2010U.014
L
?
R
/
W
Caps
V
Alt
pg up
Ctrl
(
89
*
56
%
*
enter
4
1
!
X
f
Esc
num lock
/
^
@
ins
space
pg dn
2
(
#
del
0
enter
3
.
>
2
Keypad
There are three keypad
options: an alphanumeric
keypad that is available in
five languages, a large
numeric keypad, and
terminal emulation keypads.
Communications port
You can use the optical
port on the reader
to communicate with other
devices.
2-3
Page 44

JANUS 2010 Hand-Held Computer User’s Manual (4MB)
Using the Alphanumeric Keypad
The JANUS 2010 reader has three keypad options:
• Alphanumeric keypad
• Large numeric keypad
• Terminal emulation keypads
The alphanumeric keypad is an all-purpose keypad with 52 keys. Although the
keypad is smaller than a regular PC keyboard, you use special keys on the
reader’s keypad and press key combinations to access all 102 keys that are
available on a PC keyboard.
The alphanumeric keypad is available in English, French, German, Italian, and
Spanish. For help with an international keypad, see Chapter 8, “Preparing the
Reader for International Use.”
The large numeric keypad has 34 keys and is available in English. The number
keys are larger to make it easier to enter a lot of numeric data. For help using
the large numeric keypad, see “Using the Large Numeric Keypad” later in this
chapter.
Optional terminal emulation (TE) keypads come with the JANUS 2010 TE
reader. The TE keypads are similar to the alphanumeric keypad, but contain
additional keys available on an IBM 3270 or 5250 keyboard. For help using
your TE keypad, see your JANUS TE documentation.
2-4
Page 45

Learning How to Use the Reader
2
Finding the Special Keys
Before you use the reader’s alphanumeric keypad, make sure you can find all
of the different types of keys on the keypad.
Function keys
Alphabetic
keys
Numeric
keys
F6 F7 F8 F9 F10
F1
F2 F3 F4 F5
{
pg up
(
/
^
pg dn
#
>
<
V
Alt
.
}
][
>
WX
Caps
num lock
enter
~
ABCDEF
GH I JK L
MNOPQR
S
YZ
home
&
7
–
$
4
end
!
123
space
2010U.195
+
—
–
–
–
\
T
U
Ctrl
+
89
*
*
%
56
enter
@
ins del
)
0.
erases or deletes the
character to the left
of the cursor
Suspend/Resume key
I
turns the reader on
O
and off
Control key
?
/
Alt key
Compound Function key
to access characters or
perform functions that do
f
not have an actual key
Esc
on the keypad
Shift key
Viewport key moves the
cursor and viewport up,
right, down, and left
Enter keyBackspace key
2-5
Page 46

JANUS 2010 Hand-Held Computer User’s Manual (4MB)
How to Type the Characters Printed on the Keypad
There are three types of characters and symbols printed on the alphanumeric
keypad:
Third
character
*
Second
character
Character Description To Type the Character
%
5
First
character
First The first character is the one in the
middle or lower right corner of the key.
If there are two characters printed on
the key, it is the larger character. Every
key on the keypad has a first character.
Second The second character is the one in the
upper left corner of the key. Some keys
do not have a second key. The
alphabetic keys (A to Z) do not show
the second key, but it is the uppercase
version of the letter.
Third The third character is the one that
appears just above the key, printed on
the top cover of the JANUS reader.
Some keys (such as Y and Z) do not
have a third character.
•
Press the key the
character appears on.
1. Press O.
2. Press the key the
character appears on.
1. Press A.
2. Press the key the
character appears above.
2-6
Page 47

Learning How to Use the Reader
5
%
*
To practice using an alphanumeric keypad, type these characters
• To type a lowercase f, press %.
2
F
• To type an uppercase F, press O. Press %.
• To type a colon (:), press A. Press %.
• To type the number 5, press .
• To type the percent sign (%), press O. Press .
• To type the asterisk (*), press A. Press .
How the Ctrl, Alt, and Shift Keys Work
The JANUS keypad does not have an actual key for every character and
function available. You use the Ctrl, Alt, and Shift keys to access characters or
perform functions that do not have an actual key on the keypad. You also use
the Shift key to type uppercase alphabetic characters.
The Ctrl, Alt, and Shift keys work differently on the JANUS keypad than on a
regular PC keyboard. On a PC keyboard, you press and hold key combinations
that require the Ctrl, Alt, or Shift keys. On the reader’s keypad, you do not
hold down these keys.
When you press >, <, or O, the key is
held in a buffer until you press another
key. The icon appears on the reader’s
display to remind you that the key is being
held in the buffer. When you press another
key, the key combination is entered into the
reader and the icon disappears.
Ctrl
Alt
Shift
2010U.119
To flush the >, <, or O key from the buffer without performing any action,
just press the key again. The icon disappears from the display.
If you are programming or using applications that require a right and left Ctrl,
Alt, or Shift key, you can access these keys on the reader’s keypad. To enter a
right Ctrl, Alt, or Shift key, press >, <, or O on the keypad. To enter a left
Ctrl, Alt, or Shift key, use the key combination from the “Reader Keypad
Charts” in Appendix B.
2-7
Page 48

JANUS 2010 Hand-Held Computer User’s Manual (4MB)
To use the Ctrl, Alt, and Shift keys
1. Press >, <, or O. The Ctrl, Alt, or Shift icon appears on the reader’s
display.
For example, press O. The Shift icon
appears on the reader’s display.
2. Press the second key. For example, press
to type the uppercase letter A. The Shift icon
disappears from the reader’s display.
Or, to flush the key from the keypad buffer without performing any action,
press >, <, or O again. The icon disappears from the reader’s display.
How the Compound Function Key Works
The Compound Function key is a special key on the JANUS keypad. You use
the A key to access characters or perform functions that do not have an actual
key on the keypad.
2010U.120
The A key works like the >, <, and O keys.
When you press A, the key is held in a buffer
and the Compound Function key icon appears
on the reader’s display.
f
2010U.139
Once you press a key other than A, the key combination is entered into the
reader and the icon disappears from the display. For example, you press A
to type the colon (:) character printed above the % key.
The A key has three levels to access additional key combinations that are not
displayed on the keypad. You can press A up to three times and then press
one more key to access a wide range of key combinations. For example, you
can access the F11 key, F12 key, or the Ctrl-Break function.
%
2-8
Page 49

Learning How to Use the Reader
2
For a complete list of key combinations, see Appendix B, “Reader Keypad
Charts.”
To use the Compound Function key
Press
f
or
Press twice
f
or
Press three times
f
or
Press four times
f
Display
shows
f
Display
shows
f
Display
shows
f
Display
shows
Press the
second key
F
Press the
third key
F1
Press the
fourth key
C
When you press the
you flush the keypad buffer without
entering any key combination.
Display
shows
C:\>:
Enters the F11
function key. The
display shows
C:\>
On a reader with
a large numeric
keypad, the
display shows
C:\>+
key four times,
f
Note:
To enter the third key combination shown above, A A A ", you must use a
large numeric keypad.
2010U.122
2-9
Page 50

JANUS 2010 Hand-Held Computer User’s Manual (4MB)
Capitalizing All Characters
To type all alphabetic characters as uppercase letters, you can press O before
every letter you type, or you can enable the Caps Lock feature.
To enable Caps Lock
1. Press A.
2. Press O. The Caps Lock icon disappears from the reader’s display.
c:\>F
2010U.123
3. Type an alphabetic character. The letter appears as a lowercase letter on the
reader’s display.
To disable Caps Lock
1. Press A.
2. Press O. The Caps Lock icon disappears from the reader’s display.
3. Type an alphabetic character. The letter appears as a lowercase letter on the
reader’s display.
Note:
You can also use the Keypad Caps Lock configuration command to enable or
disable Caps Lock on the reader. For help, see the “Keypad Caps Lock” command in
Chapter 12.
2-10
Page 51

Learning How to Use the Reader
2
Learning How to Use the Cursor Keys
You can press keys to move the cursor around the reader’s display screen. The
reader’s cursor keys work the same as the cursor keys on a regular PC
keyboard. You can use the cursor keys to move around the reader’s screen if
you are running a program, entering data in a screen, editing a file, or editing a
command at the DOS prompt.
Cursor keys on
(home)
(-)
(+)
(*)
(pg up)
(/)
Esc
JANUS 2010
(end)
(enter)
(pg dn)
(ins)(tab)
(del)
num lock
enter
Cursor keys on
PC keyboard
!2@3#4$5%6^7&8*9(0)-_=+
~
1
`
Q W E R T Y U I O
A S D F G H J K L
CapsLock
Z X C V B N M
Shift Shift
Alt Alt CtrlCtrl
P
:
;
<.>/?
,
{
[
"
'
Insert Home Page
|
}
]
\
Enter
Up
Delete End Page
Down
Num
/
Lock
7 8 9
Home PgUp
4 5 6
1 2 3
End
PgDn
0
Ins Del
2010U.006
.
-
+
Enter
.
There are two ways to use cursor keys on the keypad:
• Use the cursor keys and the viewport keys with the reader’s number pad
disabled.
• Use the cursor keys with the reader’s number pad enabled and the Num
Lock turned off. For help, see “Using the Number Pad” later in this chapter.
The next table explains how to use each cursor key with the number pad
disabled.
2-11
Page 52

JANUS 2010 Hand-Held Computer User’s Manual (4MB)
Cursor Key To Use the Key Description
Home Press A
End Press
Page up Press
Page down Press
Insert Press
Delete Press
A
A
A
A
A
Moves the cursor to the top left corner of the display. If
you are at the DOS prompt, moves the cursor to the
beginning of the line.
Moves the cursor to the end of the last line displayed on
the screen.
Moves the cursor up one screen. If you are at the DOS
prompt and the DOSKEY command is enabled, scrolls up
one page of DOS commands.
Moves the cursor down one screen. If you are at the DOS
prompt and the DOSKEY command is enabled, scrolls
down one page of DOS commands.
Each character you type is inserted after the cursor until
you exit Insert mode by pressing
Normally, you type text in Overwrite mode. Characters
are typed over the existing characters on the screen.
Deletes or erases the character displayed above the
cursor.
A
again.
Arrow up Press
Arrow down Press
Arrow right Press
Arrow left Press
C
E
D
B
Moves the cursor up one row or line. If you are at the
DOS prompt and the DOSKEY command is enabled,
scrolls up to the previous DOS command.
Moves the cursor down one row or line. If you are at the
DOS prompt and the DOSKEY command is enabled,
scrolls down to the next DOS command.
Moves the cursor one character to the right.
Moves the cursor one character to the left.
2-12
Page 53

Learning How to Use the Reader
2
Using the Number Pad
You can use the number pad to move the cursor around the screen and to type
numbers and mathematical symbols. The reader’s number pad is designed to
work like the number pad on a regular PC keyboard. If you are programming
or using an application that requires the scan code for a character from the PC’s
number pad, you need to use the reader’s number pad.
For example, you must use the PC’s number pad to type a character from the
extended ASCII character set. You cannot use the number keys above the
alphabetic characters. You must also use the reader’s number pad to type
characters from the extended ASCII character set.
+
Number pad
on JANUS 2010
789
–
*
456
enter
123
/
Esc
num lock
space enter
0.
Number pad on
PC keyboard
!2@3#4$5%6^7&8*9(0)-_=+
~
1
`
Q W E R T Y U I O
A S D F G H J K L
CapsLock
Z X C V B N M
Shift Shift
Alt Alt CtrlCtrl
P
<.>/?
,
{
[
:
"
;
'
Insert Home Page
|
}
]
\
Enter
Up
Delete End Page
Down
Num
/
Lock
7 8 9
Home PgUp
4 5 6
1 2 3
End
PgDn
0
Ins Del
2010U.124
.
-
+
Enter
.
A PC keypad has a key labeled Num Lock. When you press the Num Lock key
on a PC, a light turns on to tell you that the Num Lock is turned on and you
can type numbers and mathematical symbols. When you press the Num Lock
key again, the light turns off and the number pad becomes a cursor keypad.
The reader’s number pad works the same way. You can turn the Num Lock on
and off from the number pad.
There are two ways to type numbers and mathematical symbols:
• Use the number keys 0 through 9 with the number pad disabled.
• Use the number keys 0 through 9 with the number pad enabled and the
Num Lock turned on.
2-13
Page 54

JANUS 2010 Hand-Held Computer User’s Manual (4MB)
To enable the number pad
Press A A @.
To turn Num Lock on
Press A @.
To turn Num Lock off
Press A @.
To disable the number pad
Press A A @.
With the number pad enabled, you press A @ to toggle back and forth
between Num Lock on and off.
To type these keys with the number pad enabled and Num Lock turned on
To type the characters in this figure, press
a key on the number pad. For example, to
789
type the number 2, press .
You can also type any ASCII character in
456
the extended character set. For help, see
“How to Enter ASCII Characters” later in
this chapter.
123
space
0.
To use the cursor keys in this figure, press
O
and then press a key on the number
(home)
( )
(pg up)
pad. For example, to page up (pg up),
press O .
( ) ( )
(end) (pg dn)
space
( )
(ins) (del)
Esc
num lock
enter
2010U.126
Esc
num lock
enter
2010U.127
2-14
Page 55

Learning How to Use the Reader
To type these keys with the number pad enabled and Num Lock turned off
To use the cursor keys in this figure, press
a key on the number pad. For example, to
(home)
( )
(pg up)
move to the home position on the display,
press .
( ) ( )
2
Esc
(end) (pg dn)
space
( )
(ins) (del)
num lock
enter
To type the characters in this figure, press
O
and then press a key on the number
789
pad. For example, to type the number 6,
press O .
456
123
space
0.
num lock
enter
To type these keys with the number pad enabled and Num Lock turned on or off
To type the characters or use the cursor
keys in this figure, press A and then press
(home)
(+)
(pg up)
a key on the number pad. For example, to
type a plus (+) sign, press A .
(-)
(*)
(/)
2010U.127
Esc
2010U.126
Esc
Note:
You cannot type the secondary character printed on each numeric key (0-9) with
the number pad enabled. You must disable the number pad to type these characters:
& * ( $ % ^ ! @ # ) >
(end)
(enter)
(ins)(tab)
(pg dn)
(del)
num lock
enter
2020U.125
2-15
Page 56

JANUS 2010 Hand-Held Computer User’s Manual (4MB)
Finding Out If the Number Pad Is Enabled or Disabled
You can turn the Num Lock on and off on the number pad. On the reader, it
may be difficult to tell when the number pad and Num Lock are enabled. You
can type a character to find out if the number pad is enabled or disabled.
To find out if the number pad is enabled or disabled
1. Press O and release it.
2. Press .
3. Use this table to find out if the number pad is enabled or disabled, and if
Num Lock is turned on or off.
Displays Status of the Number Pad
% Number pad is disabled.
5 Number pad is enabled with Num Lock turned off.
blank Number pad is enabled with Num Lock turned on.
How to Enter ASCII Characters
You can type any ASCII character in the ASCII extended character set. For
help, see any DOS book for a chart with the values you can enter.
To enter an ASCII character
1. Press O to find out the status of the number pad.
Displays What Do You Do Next?
% Press = to erase the character. Press A A @ to enable the
number pad. Press
=
5 Press
Lock on.
blank Go to Step 2.
to erase the character. Press A @ to turn the Num
2. Press and hold <.
3. Type the three-digit decimal ASCII value for the character. The value
cannot be larger than 255. For example, type for the @ symbol.
4. Release the < key. The ASCII character appears on the reader’s display.
5. To exit and disable the number pad, press A A @.
A @
to turn the Num Lock on.
2-16
Page 57

Using the Large Numeric Keypad
The number keys on the large numeric keypad are larger to make it easy for
you to type a lot of numeric data. The large numeric keypad is available only in
an English version.
The large numeric keypad has 34 keys, and you can access all 102 keys
available on a PC keyboard by pressing combinations of keys. For a list of key
combinations, see Appendix B, “Reader Keypad Charts.” This section describes
how to use the large numeric keypad.
Finding the Special Keys
Make sure you can find these special keys on the large numeric keypad.
Function keys
F7 F8 F9F6 F10
Alt
Ctrl
Q
56
VW
3
Alphabetic
keys
Numeric
keys
F1 F2 F3 F4 F5
HIJKLM
ABCDEF
N:
G
OP
789
RS T
4
U
12
XY Z
Learning How to Use the Reader
Suspend/Resume key
I
\
Esc
turns the reader on
and off
O
Control key
Alt key
Compound Function key
to access characters or
f
perform functions that do
not have an actual key
on the keypad
Shift key
Viewport key moves the
cursor and viewport up,
right, down, and left
2
space
2010U.130
0
Backspace key
erases or deletes the
character to the left
of the cursor
enter
.
Enter key
2-17
Page 58

JANUS 2010 Hand-Held Computer User’s Manual (4MB)
How to Type the Characters Printed on the Keypad
There are four types of characters and symbols printed on the large numeric
keypad:
First and
Second
character
Third and
Fourth character
K
D
Character Description To Type the Character
First The first character is the one in the
middle of the key. Every key on the
keypad has a first character.
Second The second character is not shown
on the key, but it is the uppercase
version of the alphabetic key (A
through G). The other keys do not
have a second key.
Third The third character is the one that
appears just above the key, printed
on the top cover of the JANUS
reader. Some keys, such as Esc, do
not have a third character.
Fourth The fourth character is not shown
above the key, but it is the
uppercase version of the alphabetic
key (H through Z). The other keys
do not have a fourth key.
•
Press the key the character
appears on.
1. Press O.
2. Press the key the character
appears on.
1. Press A.
2. Press the key the character
appears above.
1. Press O.
2. Press A.
3. Press the key the character
appears above.
2-18
Page 59

Learning How to Use the Reader
To practice using a large numeric keypad, type these characters
2
4
R
D
• To type the number 4, press .
• To type the lowercase r, press A. Press .
• To type the uppercase R, press O. Press A. Press .
• To type a lowercase d, press #.
K
• To type an uppercase D, press O. Press #.
• To type a lowercase k, press A. Press #.
• To type an uppercase K, press O. Press A. Press #.
How to Type Other Characters
The large numeric keypad does not have an actual key for every character and
function available. You use the >, <, O, and A keys to access characters or
perform functions that do not have an actual key on the keypad. This table tells
you where to find more information about using the keys on the large numeric
keypad.
Key Where to Find More Information
>
A
home, pg up, pg dn,
end,
For a list of the keystrokes you use to access every character or function on the
large numeric keypad, see Appendix B, “Reader Keypad Charts.”
O
<
C, D, E, B
through
See “How the Ctrl, Alt, and Shift Keys Work” earlier in this
chapter.
See “How the Compound Function Key Works” earlier in
this chapter.
See “Learning How to Use the Cursor Keys” earlier in this
chapter. This section explains how to use the cursor keypad
on an alphanumeric or large numeric keypad.
For the key combinations to access the cursor keys on a large
numeric keypad, see Appendix B, “Reader Keypad Charts.”
See “Using the Number Pad” earlier in this chapter. This
section explains how to enable and disable the number pad
on an alphanumeric or large numeric keypad.
For the key combinations to access the number pad keys and
cursor keys on a large numeric keypad, see Appendix B,
“Reader Keypad Charts.”
2-19
Page 60

JANUS 2010 Hand-Held Computer User’s Manual (4MB)
D:\>c:
C:\>dir
Volume in drive C is MS-ROMDRIVE
Directory of C:\
ATADRV EXE 14677 01-25-95 12:03p
ATAINIT EXE 12734 01-25-95 12:03p
AUTOEXEC BAT 3602 04-25-96 9:36a
AUTOINST BAT 3355 02-17-95 7:10p
CARDINFO EXE 21052 04-28-94 6:56p
CONFIG SYS 3525 06-14-95 1:49p
FTL EXE 47206 12-14-94 4:23p
INITENV EXE 8325 04-17-95 9:35a
MCFORMAT EXE 56140 10-26-94 2:31p
MS-FLASH SYS 35836 12-25-93 2:45a
MTDDRV EXE 23152 04-17-95 9:31a
MTI1 EXE 7552 11-17-95 9:30A
MTI2 EXE 5898 01-20-95 4:13p
MTSRAM EXE 5608 04-17-95 9:30a
14 file(s) 266689 bytes
246400 bytes free
C:\>
2010U.025
Icons to monitor
the reader's status
f
CGA-compatible
display shows
16 lines by
20 characters
How to Use the Reader’s Display
You can use the JANUS reader’s display to enter data, view or list files, run
programs, monitor the reader’s status, and for many other functions. The
reader’s display is 16 lines by 20 characters and is CGA compatible.
You can use these features of the display:
• Choose different display sizes and video modes.
• Use Text mode or Graphics mode to support different types of applications.
• Use the reader’s screen as a viewport to see a full PC-size screen of 25 lines
by 80 characters.
• Adjust the display’s contrast, backlight, screen scrolling, character height,
or character width.
• Use the reader’s icons to monitor the status of special keys, battery power,
PC card drive, RF communications, and viewport movement.
Each display feature is explained in the next sections.
2-20
Page 61

Learning How to Use the Reader
2
Choosing the Display Sizes and Parameters
By default, the reader’s display is configured with these values:
• 25 lines by 80 characters (full-sized virtual screen)
• Normal width characters
• Scroll at line 16
• Normal height characters
You can configure the reader’s display to the sizes and parameters listed in the
next table. If you select the 25 x 80 display size, you can customize the
character width, character height, and the line at which the display scrolls;
otherwise, those parameters are preset to match the display size.
One reason you may want to configure the display is to support the
applications you run on the reader. For example, if you are running a JANUS
PSK application designed to fit the reader’s 16 x 20 screen, you may choose the
16 x 20 display size.
For help changing the configuration, see Chapter 5, “Configuring the Reader,”
or the “Display Setup” command in Chapter 12.
Note:
If you are working at the DOS prompt, Intermec recommends that you set the
display size to 25 x 80 or you may see inconsistent display results.
2-21
Page 62

JANUS 2010 Hand-Held Computer User’s Manual (4MB)
List of Display Sizes and Parameters
Display Size Parameters
25 x 80
(25 lines by 80 characters)
16 x 20
(16 lines by 20 characters)
8 x 20
(8 lines by 20 characters)
You can set these parameters:
Video Mode:
Scroll Line:
Character Height:
These parameters are automatically set:
Video Mode:
Scroll Line:
Character Height:
These parameters are automatically set:
Video Mode:
Scroll Line:
Set normal- or double-width characters. If you use
double-width characters, the display size is 25 x 40. For
each character width, you can also choose either
Monochrome or Color mode. For help, see the “Display
Setup” command in Chapter 12.
Set the line at which the display scrolls to 8, 16, or 25.
If you run an application that uses a 25 line by 80
Note:
character display, the reader display will scroll at line 25.
Set normal- or double-height characters.
Normal-width characters
Line 16
Normal-height characters
Normal-width characters
Line 8
16 x 10
(16 lines by 10 characters)
8 x 10
(8 lines by 10 characters)
2-22
Character Height:
These parameters are automatically set:
Video Mode:
Scroll Line:
Character Height:
These parameters are automatically set:
Video Mode:
Scroll Line:
Character Height:
Double-height characters
Double-width characters
Line 16
Normal-height characters
Double-width characters
Line 8
Double-height characters
Page 63

Learning How to Use the Reader
2
Using Text or Graphics Mode
You can use Text mode or Graphics mode on the reader. By default, the reader
uses Text mode and you can set the display size to 25 x 80, 16 x 20, 8 x 20,
16 x 10, and 8 x 10. If your application only recognizes DOS mode, you must
use a display size of 25 x 80 or 25 x 40. Other display sizes are not DOS
standard and are for use only with custom applications. You can program
applications to use blinking and reverse video characters in Text mode.
To use Graphics mode, your application needs to set Graphics mode when you
start the application on the reader. As you exit the application, set Text mode
again before returning to the DOS prompt. When the reader is set to use
Graphics mode, you see a 128 x 160 pixel display size. You can use the reader’s
CGA display as a viewport to move around and see a 200 x 640 pixel virtual
display. In Graphics mode, you automatically use the reader’s virtual display
(PC-size screen).
For help programming the reader or setting Graphics mode, see your JANUS
PSK reference manual.
Using the Display as a Viewport
You can see one section of a PC-size screen on the reader’s smaller display for
applications that need to be PC compatible. You will only see 16 lines and 20
characters of data at one time. However, you can use the reader’s display as a
viewport to move around and see the entire screen. By moving the viewport,
you use the reader’s virtual display of 25 lines by 80 characters—the same size
as a PC screen.
In the reader’s default configuration, the display size is configured for 25 x 80.
The first time you turn the reader on, it displays the upper left corner of the
virtual display. This is the viewport’s home position. Any line of data that is
longer than 20 characters is in the unseen area of the virtual display. You move
the viewport to see each part of the virtual display.
When you move the viewport out of the home
position (upper left corner), the Viewport icon
displays until the viewport is returned to its
home position.
Note:
To use the display as a viewport, you must configure the reader display size to
25 x 80. For help, see the “Display Setup” command in Chapter 12.
2010U.133
2-23
Page 64

JANUS 2010 Hand-Held Computer User’s Manual (4MB)
Trying Out the Viewport
When you display a directory list, you need to use the viewport to see all of the
information in the list.
D:\>c:
C:\>dir
Volume in drive C is MS-ROMDRIVE
Directory of C:\
ATADRV EXE 14677 01-25-95 12:03p
ATAINIT EXE 12734 01-25-95 12:03p
AUTOEXEC BAT 3602 04-25-96 9:36a
AUTOINST BAT 3355 02-17-95 7:10p
CARDINFO EXE 21052 04-28-94 6:56p
CONFIG SYS 3525 06-14-95 1:49p
FTL EXE 47206 12-14-94 4:23p
INITENV EXE 8325 04-17-95 9:35a
MCFORMAT EXE 56140 10-26-94 2:31p
MS-FLASH SYS 35836 12-25-93 2:45a
MTDDRV EXE 23152 04-17-95 9:31a
MTI1 EXE 7552 11-17-95 9:30A
MTI2 EXE 5898 01-20-95 4:13p
MTSRAM EXE 5608 04-17-95 9:30a
14 file(s) 266689 bytes
246400 bytes free
C:\>
Viewport icon
Virtual PC
screen
f
7
1
9
5
3
0
2010U.134
To try using the viewport
1. Change to drive C. Type this command and press @.
c:
2. To see a directory list, type this command and press @.
dir
3. Press A D. The viewport moves one “step” to the right to display the next
part of the directory list. The Viewport icon appears on the reader’s display.
4. Repeat Step 3 to move the viewport to the right again if you still cannot see
all of the directory information.
5. Press A A . The viewport moves to the cursor and you see the C:>
prompt. The Viewport icon disappears from the reader’s display.
2-24
Page 65

Learning How to Use the Reader
2
What Are Viewport Movement Steps?
When you press A followed by an arrow key or scan the equivalent bar code
label, the viewport moves one “step” in that direction. You can set the number
of characters and lines the viewport moves in a single move or step. You can
configure the reader to:
• Move the viewport right or left from 1 to 20 characters (or columns) in a
single step. The default horizontal step is 10 characters.
• Move the viewport up or down from 1 to 9 lines (or rows) in a single step.
The default vertical step is 9 lines.
For help, see the “Viewport Movement Steps” command in Chapter 12.
Moving the Viewport
You can configure the reader to have the:
• viewport automatically follow the cursor.
• operator manually move the viewport.
For help, see the “Viewport Movement Mode” command in Chapter 12.
Even if you configure the reader to automatically follow the cursor, you may
want to move around the 25 x 80 screen to see other information. You can
manually move the viewport by pressing the key combinations or scanning the
bar code labels listed in the next table.
To Move the Viewport Press These Keys Or Scan This Bar Code
One step to the right
A D
Viewport Right
*.-*
*.-*
One step to the left
A B
Viewport Left
*%-*
*%-*
Up one step
A C
Viewport Up
*%/*
*%/*
Down one step
A E
Viewport Down
*%+*
*%+*
2-25
Page 66

JANUS 2010 Hand-Held Computer User’s Manual (4MB)
To Move the Viewport Press These Keys Or Scan This Bar Code
To the lower right corner of the
virtual display
To the upper left corner of the
virtual display
Up one page
Down one page
Moves the viewport to the cursor.
This command may not work if
you are using the reader in
Graphics mode.
Moves the cursor to the viewport.
This command does not work on
applications that have different
definitions for cursor movement
and you may erase unentered
data if you move the cursor
backward.
A A
A A
A A
A A
A A
A A
Viewport End
*..%.*
*..%.*
Viewport Home
*..%/*
*..%/*
Viewport Page Up
*..%+*
*..%+*
Viewport Page Down
*..%-*
*..%-*
Viewport to Cursor
*/-*
*/-*
Cursor to Viewport
*..%%*
*..%%*
Note:
If you are using a large numeric keypad, see Appendix B, “Reader Keypad
Charts,” for the viewport movement keystrokes.
2-26
Page 67

Learning How to Use the Reader
2
If You Cannot See the Cursor
If you have moved the viewport and cannot see the cursor, try entering one of
these two options:
To See the Cursor Press These Keys Or Scan This Bar Code
Move the viewport to the cursor’s
position. This command may not
work if you are using the reader
in Graphics mode.
Bring the cursor to the viewport.
This command does not work on
applications that have different
definitions for cursor movement
and you may erase unentered
data if you move the cursor
backward.
A A
A A
Viewport to Cursor
*/-*
*/-*
Cursor to Viewport
*..%%*
*..%%*
Adjusting the Display From the DOS Prompt
You can change several parameters to adjust the display:
• Make the screen contrast lighter or darker.
• Turn the display backlight on or off.
• Change the line at which the display scrolls.
• Change the height of the characters.
• Select automatic or manual viewport movement.
• Make the beep volume quieter or louder.
There are three ways to change these parameters:
• Use the reader’s Control mode as described next.
• Use the Interactive Configuration application (IC.EXE). For help, see
Chapter 5, “Configuring the Reader.”
• Use the configuration commands to change each parameter. For help, see
Chapter 12, “Configuration Command Reference.”
2-27
Page 68

JANUS 2010 Hand-Held Computer User’s Manual (4MB)
You can use Control mode to change the display parameters at the DOS
prompt or when you are running an application. You should only change the
scroll line at the DOS prompt.
To use Control mode
1. To enter Control mode, press and hold A, press <, and then release both
keys. The A and < icons appear on the reader’s display.
2. Press any of these key sequences to adjust the display.
Press To Adjust the Display
C
E
@
B
D
Make the display contrast darker.
Make the display contrast lighter.
Turns the display backlight on or off.
Change the scroll line to line 8.
Change the scroll line to line 16.
Change the scroll line to line 25.
Change the characters to normal height.
Change the characters to double height.
Change the viewport to automatically follow the cursor.
Change the viewport so that you must manually move it.
Make the beep volume quieter.
Make the beep volume louder.
3. Press ? to exit Control mode. The A and < icons disappear from the
reader’s display.
Note:
The display parameters you set in Control mode are reset to the default
configuration value when you warm boot the reader. Display Contrast is reset only
when you cold boot the reader.
2-28
Page 69

Learning How to Use the Reader
2
Understanding the Icons
You can use the reader’s icons to monitor the status of special keys, battery
power, PC card drive, viewport movement, and RF communications. As you
use the reader, the icons are turned on and off in the top line of the reader
display to indicate the current status.
Ctrl This icon appears when you press >.
The key is stored in the keypad buffer until you
2010U.135
2010U.136
press another key. When you press a second
key, the key combination is entered into the
reader and the icon disappears.
Alt This icon appears when you press <.
The key is stored in the keypad buffer until you
press another key. When you press a second
key, the key combination is entered into the
reader and the icon disappears.
Shift This icon appears when you press O.
The key is stored in the keypad buffer until you
2010U.120
2010U.138
f
2010U.139
press another key. When you press a second
key, the key combination is entered into the
reader and the icon disappears.
Caps Lock This icon appears when you press
O
to enable the Caps Lock feature and type all
alphabetic characters as uppercase letters. When
you press A O to disable Caps Lock, the icon
disappears.
Compound Function This icon appears when
you press A. You can press A up to three times
plus one more key to access a wide range of key
combinations. Each time you press A, an
additional line appears on the Compound
Function key icon to indicate the number of
times you pressed the key. Once you press a key
other than A, the key combination is entered
into the reader and the icon disappears.
A
2-29
Page 70

JANUS 2010 Hand-Held Computer User’s Manual (4MB)
*
Connected This icon contains an asterisk. It
blinks on the display of a J2010 with an RF back
2010U.140
when the RF interface is either actively channel
searching or trying to reestablish RF
communications with the network controller.
When the Connect icon stays on, the RF
interface is connected to a network controller.
When RF communications are not enabled or
are not possible, the Connect icon is turned off.
For help, see your JANUS RF documentation.
•
Data This icon contains a period. It appears on
the display of a J2010 with an RF back when
2010U.141
data is buffered in the RF interface. The data is
either being transmitted to the network
controller, or received data has not been
accepted by the reader’s application. When no
data is being buffered in the RF interface, the
Data icon is turned off. For help, see your
JANUS RF documentation.
Battery This icon turns on and stays on when
the NiCad battery pack has approximately
2010U.142
15 to 45 minutes of power left. If you are using a
J2010 with an RF back, you should replace or
recharge the battery pack immediately because
you will soon lose RF communications. For help,
see your JANUS RF documentation.
2-30
If you continue to operate the reader without
replacing or recharging the battery pack, the
battery pack charge becomes very low. The
Battery icon stays on, the reader chirps every
5 seconds, and then turns off after 1 minute. The
laser scanner (or wand) and RF communications
are turned off 15 seconds after the first chirp.
You cannot turn the reader on until you replace
the battery pack. The Battery icon disappears
when you replace or recharge the NiCad battery
pack.
Page 71

2010U.143
Learning How to Use the Reader
Disk Write This icon appears when you read
from and write to a PC card in the PC card
drive. The icon disappears once the reader is
finished reading from or writing to the PC card.
The disk write icon also blinks if the lithium
battery on an SRAM card is low. The speed of
the blinking indicates whether the card is in the
reader’s Type I or Type II PC card drive:
• The icon blinks every 1 second if the battery
is low on the SRAM card in the Type I PC
card drive.
• The icon blinks every 2 seconds if the battery
is low on the SRAM card in the Type II PC
card drive.
For help changing the SRAM card’s battery, see
“Replacing Lithium Batteries in an SRAM Card”
in Chapter 4.
2
Viewport This icon appears when you move the
viewport out of the upper left corner of the
2010U.133
virtual display, which is the viewport’s home
position. When you move the viewport back to
the home position, the icon disappears.
Understanding the Reader’s Audio Signals
The JANUS reader has a beeper and internal speakers to sound audio signals
or beep sequences as you use the reader. For example, you hear a low beep
tone each time you enter or scan a valid command. The next table explains the
purpose of each beep sequence you may hear.
You can change the beep volume, frequency, and duration to meet the needs of
your working environment. For example, use a quiet beep in a library, a loud
beep in a manufacturing plant, or a unique beep to distinguish the reader from
other devices. For help, see the beeper commands in Chapter 12,
“Configuration Command Reference.”
2-31
Page 72

JANUS 2010 Hand-Held Computer User’s Manual (4MB)
Description of JANUS Reader Beep Sequences
Beep Sequence Description
Low beep You entered a valid command or the data you entered was stored.
If the reader sounds a low beep after you insert a PC card, the reader
recognized the card, but cannot read it. You need to configure the
reader or format the card. For help, see Chapter 4, “Using PC Cards in
the Reader.”
High beep You entered valid data, the reader decoded a label, or the reader
decoded the last row of a two-dimensional symbology. When you cold
boot the reader, you hear a high beep once the power-on self test
(POST) has executed successfully.
Three low beeps You entered an invalid command or data, or the reader detected an
IRL syntax error while compiling. For help, see “Running IRL
Programs“ in Chapter 10.
Low beep, high beep, low beep The reader detected an IRL runtime error (a nonfatal error). For help,
see “Running IRL Programs” in Chapter 10.
High beep, low beep, high beep There is an input or output (I/O) error. For help, see “Networking or
Communicating With the Reader” in Chapter 10.
Three high beeps There is a configuration error or a fatal IRL error. For help, see
“Running IRL Programs” in Chapter 10.
Two low beeps, two high beeps You updated the reader’s configuration.
Medium beep, high beep The reader recognized the PC card that you inserted. You can begin
using the card.
High beep, medium beep You hear this beep sequence when you remove a PC card.
Click The reader clicks each time you press a key. You can disable the
keyclick. For help, see the “Keypad Clicker” command in Chapter 12.
The reader also clicks while you are scanning a two-dimensional
symbology (Code 16K or Code 49) bar code label.
Chirp (every 5 or 15 seconds) The reader chirps every 5 seconds when the NiCad battery pack is
low, or every 15 seconds when the lithium bridge battery is low. For
help, see “Learning About the Reader’s Batteries” later in this chapter.
Double (shadow) beep or click The reader sounds a double-beep when you enter a valid command or
data and the NiCad battery pack or lithium bridge battery is low. You
also hear a double-click when you press a key. The second beep or
click is a lower tone that shadows the first. For help, see “Learning
About the Reader’s Batteries” later in this chapter.
2-32
Page 73

Learning How to Use the Reader
2
Demonstrating the Reader’s Audio Signals
You can use the IMBEEP.EXE program on companion disk 3 to make the
reader sound each signal listed in the table above.
1. Copy the IMBEEP.EXE file from Application companion disk 3 to a drive
on the reader. For help, see Chapter 3, “Learning About the Software.”
2. Change to the drive where IMBEEP.EXE is stored.
3. Type this command and press @:
imbeep
Or scan this bar code:
*IMBEEP*
*IMBEEP*
4. Follow the instructions on the screen. Press a letter from to + to listen
to each audio signal the reader sounds.
5. Press , to exit the program.
Using a Headphone or Earphone
When the reader is in a noisy environment, you can use a miniature
headphone or earphone to hear the reader’s audio signals.
Plug the headphone or earphone into the audio connector at the top of the
reader, next to the scanner port.
2010U.190
Note:
When a headphone or earphone is plugged into the audio connector, the reader’s
external beeper is silent.
2-33
Page 74

JANUS 2010 Hand-Held Computer User’s Manual (4MB)
Locating the Communications Ports
Communications ports, also called COM ports, are locations from which data is
passed into and out of the JANUS reader. You use serial communications
through a COM port, which means that data is transmitted one bit at a time
over a single line from one computer to another.
You can use the reader’s COM ports to communicate with other RS-232
devices, such as modems and terminals, through COM1 by using one of these
accessories or methods:
• JD2010 Communications Dock
• JL2010 Optical Link Adapter
• Line up the optical ports of two JANUS readers
You can communicate with other devices in an RF network through the logical
COM4. You can also communicate over telephone lines through COM4 when
you have a modem card inserted in the PC card drive. For help, see Chapter 6,
“Networking the Reader.”
This illustration shows the locations of the COM ports on a J2010 with a
PCMCIA Back and a J2010 with an RF Back:
COM2
Scanner port
COM4
Type II
PC card drive
containing
a modem card
TMTM
F4
F9 F10
F3
{
F7 F8
F2
CDE
+
–
F1
–
F6
—
–
AB
~
GH
MNO
S
J2010 with
a PCMCIA Back
I
/
O
F5
F
}
][
>
<
PQ
IJKL
V
Ctrl
\
TU
Z
+
*
Y
7
home
&
4
–
$
end
!
?
R
/
X
W
Caps
Alt
pg up
(
/
^
89
56
%
*
enter
@
ins
1
space
pg dn
2
(
f
#
0
Esc
num lock
enter
3
.
del
>
Logical COM4
F6
J2010 with
an RF Back
COM1
Optical port
F1
~
F7 F8
F2 F3
—
AB
TMTM
F4
F9 F10
{
CDEF
+
–
–
–
NO
GHI
M
S
F5
}
\
TU
Y
home
I
/
O
][
>
JKL
<
PQ
V
Ctrl
Z
+
*
7
&
4
–
$
end
!
?
R
/
X
W
Caps
Alt
pg up
(
/
^
89
56
%
*
enter
@
ins
1
space
pg dn
2
(
f
Esc
num lock
3
#
.
del
>
0
2010U.087
enter
Note:
A basic J2010 reader has neither a COM4 nor logical COM4 port.
2-34
Page 75

Learning How to Use the Reader
Learning About the Reader’s Batteries
There are two batteries in the JANUS 2010 reader:
Lithium bridge battery This battery backs up the RAM and clock when the
NiCad battery pack is discharged or removed from the reader.
NiCad (nickel-cadmium) battery pack This battery provides the main power
source to operate the reader.
These batteries are discussed in the next sections.
Lithium Bridge Battery
Your JANUS reader contains an internal rechargeable bridge battery that is
designed to maintain your data (RAM) and clock while you change the NiCad
battery pack.
Note:
The internal bridge battery is NOT user-serviceable. You must return the
JANUS device to Intermec to replace the battery.
2
How to Maximize the Internal Bridge Battery Life
Your lithium bridge battery will maintain data for 72 hours if you follow these
guidelines:
• If you are not using the reader for a period of time (more than 60 hours),
press
reader.
pack installed, the internal bridge battery will discharge and you will lose any data
left in RAM.
partially or fully charged main battery.
• Remove any PC cards in the device.
• If the NiCad battery pack charge becomes low, insert another charged
NiCad battery pack or attach an external power supply. Use the
communications dock or the optical link adapter to attach external power.
• If you are not going to use the reader for
important that you put the reader in Storage mode. For help, see “Using
Storage Mode to Preserve the Bridge Battery” in Chapter 9.
• Discharge durations of greater than one month will not damage the ability
of the bridge battery to be recharged , but will cause loss of Time, Date and
data in RAM. More than 30 such cycles will gradually lower the 72 hour
data retention period.
discharges or the device repeatedly reports a low backup battery.
to turn the reader off. Keep a charged NiCad battery pack in the
L
If you leave the reader without at least a partially charged NiCad battery
The bridge battery will recharge after you insert another
more than 1 week
You need to reset the Date and Time settings for such
, it is very
2-35
Page 76

JANUS 2010 Hand-Held Computer User’s Manual (4MB)
g
p
p
p
f
Caution
The lithium brid
technician. O
the internal com
e battery can only be replaced by a trained Intermec service
ening the unit will void the warranty and may cause damage to
onents.
Conseil
ile au lithium ne peut être remplacée que par un technicien de service
La
Intermec. Le
ait d’ouvrir l’unité annule la garantie et peut endommager les
pièces internes.
Installing the Battery Pack
1. Make sure the two yellow battery pack locks on the end of the battery pack
are pushed down in the unlocked position.
2. Place the two battery pack tabs under the reader’s back.
Reader
Battery pack
tab (2 places)
Battery
pack
IntermecIntermec
IntermecIntermec
2010U.112
Reader
Battery
pack lock
(2 places)
3. Slide the battery pack into the back of the reader until it snaps into place.
4. Push the two battery pack locks up to lock the battery pack in place and
engage the interlock switch.
Note:
The battery pack locks must be closed to activate the interlock switch and
allow you to use the reader.
2-36
Page 77

Learning How to Use the Reader
g
p
2
Removing the Battery Pack
The battery pack is on the lower back side of the reader.
Caution
Removin
Conseil
Ne détachez
entraîner la perte de données.
To remove the battery pack
1. Turn off the reader by pressing L.
2. Push the yellow two battery pack locks down and away from the reader to
unlock the battery pack.
3. Press and hold the two release buttons on each side of the battery pack.
the battery pack while the reader is on may cause loss of data.
as le jeu de piles pendant que le lecteur est actif car cela pourrait
4. Slide the battery pack out of the reader.
Reader
Intermec
Intermec
Battery pack
release button
(2 places)
Reader
Battery pack
2010U.017
Battery
pack lock
(2 places)
Battery pack
2-37
Page 78

JANUS 2010 Hand-Held Computer User’s Manual (4MB)
Checking the Power Remaining in the NiCad Battery Pack
You can use the POWER.EXE utility to check the power remaining in the
reader’s NiCad battery pack. To display the current power status, type this
command at the DOS prompt and press @:
power
Or scan this bar code:
*POWER*
*POWER*
The Power Management Status screen appears similar to this example:
Power Management Status
----------------------Setting = ADV: MIN
CPU: idle 36% of time
AC Line Status : OFFLINE
Battery Status : High
Battery life (%) :
80
2010U.012
These fields help you estimate the power left in the NiCad battery pack:
AC Line Status Tells you if external power is attached to the reader. ONLINE
means the reader is using an external power supply. OFFLINE means the
reader is using the NiCad battery pack for power.
Battery Status Tells you if the NiCad battery pack is high, low, or charging.
High power means the battery pack has more than 50% power remaining. Low
power means there is less than 50% power remaining.
Battery Life (%) Gives you an estimate of the amount of power remaining in
the NiCad battery pack. This estimate is accurate to ± 10%. For example, if the
battery life is at 20%, the battery pack is getting low and you need to replace it
soon. The accuracy of the estimate depends upon variables such as the
temperature, use, and age of the battery pack. When the AC Line Status is
ONLINE, the Battery Life (%) is always 100%, even if the battery pack is not
fully charged.
You may find that POWER.EXE performs differently for each battery pack. For
example, you may find that one battery pack uses power at a faster rate and
reaches 20% battery life sooner than a new battery pack. For a detailed
description of POWER.EXE, see Appendix D, “Software Utility Reference.”
Note:
You can also use the IRL FP command to determine the power remaining in the
reader’s NiCad battery pack. For help, see the
2-38
IRL Programming Reference Manual
.
Page 79

Learning How to Use the Reader
2
Charging the Battery Pack
You can recharge the NiCad battery pack using any of these JANUS 2010
accessories:
• Communications dock
• Battery charger
• Optical link adapter connected to a power supply
You do not need to discharge the battery pack every time before recharging the
battery pack. Only discharge the battery pack if you notice problems with the
battery pack’s ability to hold a charge. The communications dock and battery
charger use a charging method that maximizes battery life and prevents the
loss of battery capacity due to the memory effect associated with NiCad
batteries. For help about charging battery packs, see the accessory quick
reference guides.
Note:
Battery packs charged in a room temperature of 68°F (20°C) have a higher
charge capacity and more charging cycles than battery packs charged at a higher
temperature.
Disposing of the NiCad Battery Pack
The materials used in the construction of the JANUS 2010 battery pack are
recyclable. Intermec strongly urges that you recycle the battery packs when
they reach the end of their useful lives.
Additionally, the Environmental Protection Agency has classified worn out or
damaged NiCad batteries or battery packs to be hazardous waste. Several
states have passed legislation that prohibits discarding these batteries into the
municipal waste stream.
If you have any question on how to recycle or dispose of the NiCad battery
packs, contact your local, county, or state hazardous waste management office.
2-39
Page 80

JANUS 2010 Hand-Held Computer User’s Manual (4MB)
y
p
p
p
Recognizing a Low or Discharged Battery
If the Battery icon appears or the reader chirps, the NiCad battery pack or lithium bridge battery are
almost discharged. Use this table to find out which battery is low or discharged:
Low NiCad or Lithium Battery Warning What You Need to Do
• The Battery icon appears. For a J2010, replace the battery pack
2010U.142
NiCad battery pack is low
(15 to 45 minutes left).
soon.
For a J2010 with an RF back,
immediately replace the battery pack or
you will soon lose RF communications.
2010U.142
NiCad battery pack is
critically low (1 minute left).
Lithium battery is critically
low (1 minute left).
• The Battery icon remains on.
• The reader chirps every
5 seconds for 1 minute and
then turns off.
• The reader double-beeps
when you enter valid data
and double-clicks when you
press any key.
• The Battery icon does not
appear.
• The reader chirps every
15 seconds for 1 minute and
then turns off.
• The reader double-beeps
when you enter valid data,
and double-clicks when you
press any key.
• The Backup Battery screen
appears each time you turn the
reader on.
Immediately replace the battery pack or
attach an external power supply.
The laser scanner (or wand) and RF
communications are turned off
15 seconds after the first chirp.
You must keep a charged NiCad battery
pack in the reader. You can also attach
an external power supply. Save your
data and back up all your files from
drive E.
Contact your Intermec service
representative to replace the lithium
battery.
Caution
When the Batter
as soon as
Conseil
Quand l’icône de la
iles aussitôt que possible, sinon vous pourriez perdre des données.
de
2-40
icon appears, save your data and replace the battery pack
ossible, or you may lose your data.
ile apparaît, enregistrez vos données et remplacez le jeu
Page 81

Learning How to Use the Reader
2
Managing Your Battery Power
To maximize the life of the reader’s lithium bridge battery and NiCad battery pack, use these power
management features.
Situation Ways to Save Battery Power Description
You will not use the
reader again for
5 minutes, a few hours,
or up to a week.
You will not use the
reader again for 1 week
or longer.
You are operating the
reader and the NiCad
battery pack charge
becomes low.
• Put the reader in Suspend
mode.
• Use the Automatic Shutoff
feature.
• Put the reader in Storage
mode and remove the
NiCad battery pack.
• Remove the battery pack
and insert another charged
battery pack.
• Attach an external power
supply to charge the
battery pack installed in the
reader.
• Put the reader in Storage
mode.
Suspend mode saves the NiCad battery pack’s
power. Press L to put the reader in Suspend
mode. For help, see “Turning the Reader On
and Off” in Chapter 1. Make sure the battery
pack is charged (not in a low battery state).
Automatic Shutoff puts the reader in Suspend
mode when there is no activity on the reader
for the length of time you set. For help, see the
“Automatic Shutoff” command in Chapter 12.
Storage mode saves the lithium bridge
battery’s power. When you put the reader
into Storage mode, you must remove the
NiCad battery pack. For help, see “Using
Storage Mode to Preserve the Bridge Battery”
in Chapter 9.
Unless the reader is in Storage mode, you
need to keep a charged battery pack installed
in the reader to save the lithium bridge
battery’s power. For help, see “Learning
About the Reader’s Batteries” earlier in this
chapter.
You are using RF
communications.
• Use the Duty Cycle
parameters.
Duty Cycle automatically alternates RF
communications between Receiving and
Standby mode. In Standby mode, a J2010 with
an RF back uses less NiCad battery pack
power. For help, see the
Radio Frequency Quick Reference Guide.
JANUS 900 MHz
2-41
Page 82

JANUS 2010 Hand-Held Computer User’s Manual (4MB)
Using an External Power Supply
You can operate the reader using an external power supply with the following
JANUS 2010 accessories:
• Communications dock
• Optical link adapter connected to a power supply
You can use the external power supply and charge the reader’s NiCad battery
pack at the same time. For help, see the accessory quick reference guides.
D
2010U.010
–
—
2010U.008
2-42
Page 83

Defining the Reader’s Drives
The reader has three standard memory drives, a Type I PC card drive, and
(optionally) a Type II PC card drive to run applications and store data.
Learning How to Use the Reader
512K ROM drive
resident in flash memory
2
2MB ROM drive
Type I PC card drive
Drive C is a 512K ROM drive that resides in flash memory. Drive C is
upgradeable, has limited write capability, and uses the file allocation table
(FAT) type format. You can store files and applications on drive C; the
AUTOEXEC.BAT and CONFIG.SYS startup files are stored on drive C. You
must use special utilities to add, edit, or delete files on drive C. For help, see
“Learning How to Change the Contents of Drives C” in Chapter 3.
Drive C
256K physical RAM drive
Drive D
Drive E
Type II PC card drive
Drive F
Drive G
2010U.090
Drive D is a 2MB ROM drive that uses a FAT-type format. The reader’s DOS
system files and applications are on drive D. You cannot modify drive D. For
help, see “Learning How to Change the Contents of Drives C” in Chapter 3.
Drive E is a physical RAM drive and uses a FAT-based file format. You can use
this drive to store data files and user applications. You can reduce or eliminate
Drive E to free extended memory and use it for an application. For help, see
“Creating and Using a Physical RAM Drive” in Chapter 3.
2-43
Page 84

JANUS 2010 Hand-Held Computer User’s Manual (4MB)
Drive F is a Type I PC card drive that is similar to a disk drive on a PC. You can
use memory cards that comply with PCMCIA (Personal Computer Memory
Card International Association) Standard 2.1. You can use memory cards to
store applications or data files. For help, see Chapter 4, “Using PC Cards in the
Reader.”
Drive G is an optional Type II PC card drive that is similar to a disk drive on a
PC. You can use memory or input/output (I/O) cards that comply with
PCMCIA Standard 2.1. You can use memory cards to store applications or data
files. You can use I/O cards (such as a modem card) to connect the reader to
another device for communications. For help, see Chapter 4, “Using PC Cards
in the Reader.”
Managing the Reader’s Memory and Disk Space
You can store applications and data on the reader’s drives. The memory you
need for an application usually depends on the application and the types of
memory available on the reader. Use these guidelines to store and run
applications on the reader.
Data storage Use drive E to store data if the files are less than 256K. If you
need to store data files larger than 256K, use a PC card in drive F or G. For help
on selecting a PC card, see Chapter 4, “Using PC Cards in the Reader.”
Applications and lookup tables Use drive C or E to store all applications and
lookup tables. You can use drive C to store applications that do not write to the
same drive and read-only tables. Use drive C to store files that do not need to
be changed often. If you need more memory or disk space, use a PC card in
drive F or G. For help selecting a PC card, see Chapter 4, “Using PC Cards in
the Reader.”
Large applications You may develop a large application that requires more
conventional memory than you have available on the reader. You can remove
any device drivers and TSRs that you do not need on the reader. For help, see
“Making More Memory Available on the Reader” in Chapter 3. You can also
purchase a DOS extender and develop your application so it can run using
both conventional and extended memory.
2-44
Page 85

nugget
code39
helconital
3
Learning About the Software
Page 86

Page 87

CODECODENUGNUGLearning About the Software
This chapter describes how to use and manage the software that comes with the
JANUS reader, how to change files on drive C, how to create programs for the reader,
how to make more conventional memory available for the software you run on the
reader, and how to upgrade the reader.
What Software Is Provided With the Reader?
The JANUS reader comes with this software:
Auto-Loader Use this utility to change the contents of drive C. You can also
use it to configure the reader to operate in any language supported by DOS
National Language Support (NLS). For help, see “Learning How to Change the
Contents of Drive C” later in this chapter and Chapter 8, “Preparing the Reader
for International Use.”
Binary file transfer (BFT) Use BFT in a 900 MHz CrossBar or RF network to
connect a host computer to one or more readers in order to transfer binary files
or change the contents of the reader’s drive C. For help, see “Downloading
Applications Across the Network” in Chapter 6.
3
Boot Loader menu Use this menu to reboot the reader, dump the reader’s
conventional memory, reload or upgrade the reader’s software, or use Storage
mode. For help, see Chapter 9, “Booting and Resetting the Reader.”
Communications Manager Use the Communications Manager to
transmit/receive files and to see the status of the reader’s COM port. For help,
see “Running Communications Manager” in Chapter 6.
Configuration Manager Use Configuration Manager to configure the reader.
Configuration Manager consists of several programs that let you change the
reader’s configuration by running the Interactive Configuration application
(IC.EXE), using Control mode, scanning bar code labels, typing commands at
the DOS prompt, and receiving commands over an RF link. For help, see
Chapter 5, “Configuring the Reader.”
DOS Use DOS commands and utilities to transfer files, create and run
programs, create a RAM drive, and access files on PC cards. The reader
supports many standard DOS 5.0 commands. For help using DOS, see any
DOS manual.
Interactive Configuration application (IC.EXE) Use IC.EXE to configure the
reader. With menus and dialog boxes, this application simplifies the
configuration process. For help, see Chapter 5, “Configuring the Reader.”
Interlnk Use this DOS communications program to access the drives on a host
computer as if they were on the reader, and vice versa. For help, see “Running
Interlnk to Transfer Files” in Chapter 6.
3-3
Page 88

JANUS 2010 Hand-Held Computer User’s Manual (4MB)CODECODENUGGNUGG
y
y
p
y
p
p
prog
p
IRL Desktop Use the IRL Desktop to transmit, receive, and clear data files, and
to download and run IRL programs. For help, see Chapter 7, “Working With
IRL.”
MakeDisk and PutDisk MakeDisk creates an image file containing the files you
want on the drive, and PutDisk places the new image on the JANUS drive.
MakeDisk supports the creation of subdirectories on drives C and D. For more
information, see “Using MakeDisk and PutDisk to Change Drives C or D” later
in this chapter.
Direct Hardware Wedge The Direct Hardware Wedge is a new feature of
JANUS 4.0 software that provides hardware level PC compatibility. It provides
bar code data to PC applications that directly access the hardware. The existing
Virtual Wedge is a software wedge that is ten times faster than going through
the PC hardware. Use the Virtual Wedge for maximum performance. Use the
Direct Hardware Wedge for maximum PC compatibility.
PC card utilities and drivers Use these drivers and utilities to access the reader’s
PC card drive, customize the reader to use the PC card software, and provide
you with helpful tools. For help, see Chapter 4, “Using PC Cards in the
Reader.”
Reader Services Reader Services are programs that are part of the reader’s
system software. These programs decode bar codes, process data input and
output, configure the reader, and handle power management. You can create
applications that use Reader Services. For help, see “Using Reader Services in
Applications” later in this chapter.
Caution
Do not run an
IC.EXE) on
interru
t extensions or libraries on your PC. These programs will lock up your
PC and ma
Intermec-provided JANUS 2010 application programs (such as
our PC. Also, do not run any .EXE programs that use Intermec
corrupt the PC BIOS.
Conseil
N'exécutez
as sur votre PC de programmes d'application JANUS 2010 fournis
ar Intermec (tels que IC.EXE). N'exécutez pas non plus sur votre PC de
rammes .EXE qui utilisent des bibiothèques ou des extensions
d'interru
tion car ces programmes bloqueront votre PC et pourraient
corrompre le BIOS du PC.
3-4
Page 89

CODECODENUGNUGLearning About the Software
What Software Is Provided on the Companion Disks?
A set of companion disks are provided with your JANUS reader. The disks
contain files that may help you use the reader more efficiently. You can use
Interlnk to copy files from the companion disks to the reader. For help, see
“Running Interlnk to Transfer Files” in Chapter 6.
You can use a PC and the DOS DIR command to learn exactly what files are
stored on the companion disks. Here are general descriptions of each disk:
Companion disk 1 The Boot Utilities companion disk contains the files you
need to load or upgrade the reader’s system software. This disk also contains
the README.DOC, a text file that describes important information about the
reader that was unavailable when this manual was published. This disk also
contains a batch file, INSTALL.BAT, that you can use to install Auto-Loader
onto a host computer. Auto-Loader lets you change the contents of drive C.
Companion disk 2 The MS-DOS Programs companion disk contains commands
and device drivers. Some of these commands and drivers are already installed
on the reader. This disk also contains applications, such as INTERLNK.EXE,
MakeDisk, and PutDisk.
3
Companion disk 3 The Application companion disk contains applications such
as Communications Manager and IRLXDESK.EXE. This disk also contains PC
card drivers and utilities that control the reader’s operation, prepare the reader
to use the different types of PC cards, customize the reader to use the PC card
software, and provide you with helpful tools.
Note:
Companion disk 3 also contains LDKEYTAB.EXE and a .KTB file. Only an
authorized Intermec service technician should use these files to load the keypad scan
code table.
3-5
Page 90

JANUS 2010 Hand-Held Computer User’s Manual (4MB)CODECODENUGGNUGG
Using DOS Commands
Your JANUS device uses the MS-DOS operating system, and you can use DOS
commands on the JANUS device just as you do on a PC. From the DOS
prompt, you type a DOS command and press
example:
dir
Or, you can create and scan bar code labels that contain DOS commands:
DIR Command
*DIR*
*DIR*
For help using DOS commands, see any DOS manual.
All DOS commands provided with the JANUS device are available on the
MS-DOS Programs companion disk 2. The most commonly used commands
are also stored on drive D. See the README.DOC for a list of the files on
drive D.
@
to execute the command. For
Note:
The DOS commands available on drive D are a subset of the DOS commands
that are available on the MS-DOS companion disk. You can add or replace DOS
commands on drive D as needed.
Your 4MB JANUS device supports these commands, but you cannot use them
on drives C or D because they are ROM (read only memory) drives:
CHKDSK (You can analyze, but not fix, drives C and D with CHKDSK)
DISKCOMP
DISKCOPY
SCANDISK (You can analyze, but not fix, drives C and D with SCANDISK)
DEFRAG (DEFRAG will not work on drives C and D)
3-6
Page 91

Defining the Startup Files
JANUS devices use two startup files to control how DOS uses hardware,
memory, and files: AUTOEXEC.BAT and CONFIG.SYS. AUTOEXEC.BAT
loads programs and defines paths. CONFIG.SYS loads device drivers and
reserves memory for processing information. The commands in the startup
files execute when you warm boot or cold boot the JANUS device.
You may modify the startup files for a variety of reasons:
• To change the default JANUS Startup menu.
• To support applications you will run on your JANUS device.
• To load drivers for your PC cards.
• To create physical RAM drives.
• To configure your JANUS device to operate in another language.
Because AUTOEXEC.BAT and CONFIG.SYS are stored on drives C or D, you
must use Auto-Loader, binary file transfer (BFT), or MakeDisk and PutDisk to
replace them.
CODECODENUGNUGLearning About the Software
3
The next sections illustrate what the two startup files may contain when your
4MB JANUS device arrives from the factory.
AUTOEXEC.BAT File
The AUTOEXEC.BAT file on your 4MB JANUS device should look like this one:
Command Line Definition
echo off
cls
if not exist autoinst.bat goto T2
call autoinst
goto T3
:T2
if exist d:\autoinst.bat call
d:\autoinst
:T3
set prompt=$p$g
The AUTOEXEC.BAT commands are not displayed on
the screen as they are executed.
Clears the screen.
These commands call the AUTOINST.BAT file, enabling
you to update drives C or D with Auto-Loader.
Do not remove these commands.
Do not delete AUTOINST.BAT from drives C or D.
Sets the DOS prompt to display the current drive and
directory, followed by the > symbol.
set path=c:\;d:\;e:\;
Directs DOS to look for commands and programs in the
root directories of drives C, D, and E. Do not add drive
G to the path, or else errors will occur when you do not
have a PC card installed.
3-7
Page 92

JANUS 2010 Hand-Held Computer User’s Manual (4MB)CODECODENUGGNUGG
AUTOEXEC.BAT File (continued)
Command Line Definition
set temp=e:\
set im_errpath=e:\
d:
d:\ipm_4m.exe
REM d:\apm_4m.exe
if exist d:\loaduma.exe d:\loaduma
d:\im_disp.exe
d:\ic /0 e:\janus.ini
d:\kwc.com 0
A temp directory is required for MORE.COM to work
correctly on ROM drives.
Tells the JANUS device to write the configuration error file
JANUS.ERR to drive E. The JANUS device must execute this
command before it calls LOADUMA.EXE.
IPM_4M and APM_4M work with card services to manage
the power on the PC card drive when you suspend and
resume the JANUS device.
Note:
Do not load both at the same time, but you must
load one.
Loads Reader Services, Configuration Manager TSR, and the
decode and scanner utilities that let the JANUS device
operate as a bar code reader.
Loads software required for the display.
Loads the JANUS.INI configuration file if it exists.
Sets the bar code wedge options. The default configuration
is 0. Configuration parameters are:
rfph 4
3-8
0 Virtual wedge and expanded keyboard enabled.
1 Direct Hardware wedge and expanded keyboard
enabled.
2 Direct Hardware wedge enabled and expanded
keyboard disabled.
3 Virtual Wedge enabled and expanded keyboard
disabled.
4 Display status.
Loads the RF protocol handler for COM4 only if you are
using a JANUS RF device.
Page 93

CODECODENUGNUGLearning About the Software
AUTOEXEC.BAT File (continued)
Command Line Definition
3
if not exist c:\fta.exe goto
DOS_PROMPT
e:
fta.exe checkhost; exit
%IM_APPLICATION%
:DOS_PROMPT
c:
cls
Runs the FTSERVER batch file if it is on drives C or D.
FTSERVER runs FTA.EXE, which provides binary file
transfer (BFT) on the JANUS device. If a host is trying to
initiate a BFT session, FTA continues running; if not, FTA
stops running.
After FTA terminates, %IM_APPLICATION% runs any
application identified by the DOS environment variable
IM_APPLICATION.
Resets the JANUS device to drive C or D.
Clears the screen.
CONFIG.SYS File
The CONFIG.SYS file on your 4MB JANUS device should look like this one:
Command Line Definition
[menu]
menuitem=sram, Load PCCard
menuitem=ata, ATA PCCard
menuitem=flash, Flash PCCard
menuitem=io, I/O PCCard
menuitem=no, No PCCard
menucolor=15,0
menudefault=sram, 20
Creates the Startup menu.
shell=command.com /e:2000 /p
device=d:\himem.sys /testmem:off
dos=high
device=d:\power.exe /low
device=d:\sramdisk.sys 256 512 /e
install=d:\card_sr.exe
Increases the size of the environment space to 2000 bytes.
This line is required for Auto-Loader.
Loads the DOS extended memory manager, HIMEM.SYS.
You must load HIMEM before you load device drivers.
Loads APM power management.
Creates the 256K RAM drive E.
Loads software required for the PC card drives.
3-9
Page 94

JANUS 2010 Hand-Held Computer User’s Manual (4MB)CODECODENUGGNUGG
CONFIG.SYS File (continued)
Command Line Definition
[sram]
device=d:\cs.exe /poll:1
device=d:\csalloc.exe
d:\csalloc.ini
device=mtsram.ext
device=mtddrv.exe
[ata]
device=d:\cs.exe /poll:1
device=d:\csalloc.exe
d:\csalloc.ini
device=\atadrv.exe /s:2
device=mtddrv.exe
device=d:\cardid.exe
[flash]
device=d:\cs.exe /poll:1
device=d:\csalloc.exe
d:\csalloc.ini
device=d:\mti1.exe
device=d:\mti2p.exe
device=mtddrv.exe
device=d:\ftl.exe
[io]
device=d:\cs.exe /poll:1
device=d:\csalloc.exe
d:\csalloc.ini
device=mtsram.exe
device=mtddrv.exe
device=d:\cardid.exe
Loads software required for PC cards. CSALLOC is a DOS
program that scans the system for available memory, I/O
port, and interrupt request queue (IRQ) resources.
Loads software required for ATA cards.
Loads software required for flash cards.
Loads software required for SRAM and I/O cards.
[no]
[common]
device=d:\interlnk.exe /drives:7
/noprinter /com:1 /auto
buffers=10
files=50
stacks=9,256
3-10
Loads Interlnk as a resident device driver only if Intersvr
is executing on a host computer that is connected to the
JANUS device. Do not remove. Auto-Loader uses this line.
Sets the amount of memory that DOS reserves for data
transferred to and from a disk.
Sets the number of files that can be open at one time.
You need this command for IRL support.
Sets the amount of memory that DOS reserves to process
hardware interrupts.
Page 95

CODECODENUGNUGLearning About the Software
J
J
MS-DOS 6.2 Startup
1. SRAM PCCard
2. ATA PCCard
3. Flash PCCard
4. I/O PCCard
5. No PCCard
Enter a choice:
F5=Bypass startup
file
20X0A.002
MS-DOS Startup Menu
The default JANUS startup menu is defined in
the menu configuration block in the
CONFIG.SYS file. It defines several different PC
Card configurations that you can enable on your
ANUS device. You can modify or disable the
ANUS startup menu by removing or changing
parameters in the menu configuration. Refer to
any MS-DOS 6.2 manual for more information on
setting up or changing the startup menu.
Learning How to Change the Contents of Drive C
Drive C contains the reader’s AUTOEXEC.BAT and CONFIG.SYS startup files,
as well as software for the PC card drive. You can use the remaining space on
drive C to store applications and data files. In general, drive C should contain
files that you often read or execute, but do not often write to or replace.
3
Drive C is a 512K ROM drive implemented in flash memory. It is upgradeable, but
has limited write capability. You can use DOS commands to read from drive C, but
you cannot use DOS commands to write to drive C.
To write to drive C, you must use one of these special utilities:
• Auto-Loader
• MakeDisk and PutDisk
• Binary file transfer (BFT)
These utilities let you create an image file that contains an “image” or
“snapshot” of all the files you want on drive C.
Then you use the utilities to load the image file to drive C.
Once you load the image file to drive C, the image file becomes transparent.
For example, when you use the DOS DIR command for a directory listing on
drive C, all you see are the individual files that were contained in the image
file. You cannot directly add, edit, or delete individual files on drive C. Instead,
you must replace the entire image.
3-11
Page 96

JANUS 2010 Hand-Held Computer User’s Manual (4MB)CODECODENUGGNUGG
g
p
p
g
p
p
g
p
g
y
p
pp
g
g
You can use these utilities to create an
image file and copy it to drive C:
Auto-Loader Auto-Loader creates an
ima
e file that contains the files you
want
and then re
drive C ima
laced on the reader’s drive C,
laces the reader’s old
e file with the new one.
You run Auto-Loader on a host
uter connected to the reader’s
com
COM1 port.
Binary File Transfer (BFT) Use BFT in a
900 MHz CrossBar or RF network to
connect a host com
uter to one or
more devices in order to transfer files
or chan
hel
e the contents of drive C. For
, see “Downloading Applications
Across the Network” in Chapter 6.
MakeDisk and PutDisk MakeDisk
creates an ima
ou want on the drive, and
files
PutDisk
JANUS drive. MakeDisk su
e file containing the
laces the new image on the
orts the
creation of subdirectories on drives C
and D. For more information, see
“Usin
Chan
MakeDisk and PutDisk to
e Drives C or D” later in this
chapter.
AUTOEXEC.BAT
AUTOINST.BAT
Drive C
Image file
CONFIG.SYS
MTSRAM.EXE
2020U.212
The next table shows the tasks you can perform with Auto-Loader, BFT, and
MakeDisk and PutDisk.
3-12
Page 97

CODECODENUGNUGLearning About the Software
Summary of Methods for Changing the Contents of Drive C
Task You Want to Do Use These Utilities For Complete Instructions
3
Configure the reader to
use a language.
Add or edit files on drive
C without deleting all
existing files.
Replace some files on
drive C without deleting
all existing files.
Replace all of the files on
drive C.
Deleting some files from
drive C without deleting
all existing files.
Auto-Loader See “Configuring the Reader for a Language” in
Chapter 8.
Auto-Loader
or
MakeDisk/PutDisk See “Usin g Mak eDisk and Put D isk t o Change
Auto-Loader
or
MakeDisk/PutDisk See “Usin g Mak eDisk and Put D isk t o Change
Auto-Loader
or
MakeDisk/PutDisk See “Usin g Mak eDisk and Put D isk t o Change
Auto-Loader
or
See “Adding or Editing Files on Drive C” later in
this chapter.
Drives C or D” late r i n this cha p te r.
See “Adding or Editing Files on Drive C” later in
this chapter.
Drives C or D” late r i n this cha p te r.
See “Replacing All Files on Drive C” later in this
chapter.
Drives C or D” late r i n this cha p te r.
See “Deleting Files From Drive C” later in this
chapter.
Copy one image file to
multiple readers.
MakeDisk/PutDisk See “Usin g Mak eDisk and Put D isk t o Change
Drives C or D” late r i n this cha p te r.
Auto-Loader
or
BFT
or
MakeDisk/PutDisk See “Usin g Mak eDisk and Put D isk t o Change
See “Copying One Image File to More Than One
Reader” later in this chapter.
See “Downloading Applications Across the
Network” in Chapter 6.
Drives C or D” late r i n this cha p te r.
3-13
Page 98

JANUS 2010 Hand-Held Computer User’s Manual (4MB)CODECODENUGGNUGG
Using Auto-Loader to Change Drive C
As noted on the previous page, you can use Auto-Loader to perform these
tasks:
• Adding or editing files on drive C
• Replacing some files on drive C
• Replacing all of the files on drive C
• Deleting files from drive C
First you must install Auto-Loader onto the host computer.
Installing Auto-Loader on Your Host Computer
If you want to use Auto-Loader, you must install Auto-Loader from the Boot
Utilities companion disk 1 onto your host computer. Before you start installing
Auto-Loader, make sure you have:
• A copy of companion disk 1, which contains the Auto-Loader software.
• DOS 3.3 or higher running on the host computer.
• COM1 or COM2 available on the host computer.
• The host computer environment space, which is reserved by the SHELL
command in CONFIG.SYS, should be at least four times the length of the
pathname where the installation will copy the required files.
Note:
If you want the reader to operate in another language, you must install AutoLoader according to the instructions in Chapter 8, “Preparing the Reader for
International Use.”
To install Auto-Loader on your host computer
1. Insert companion disk 1 into a disk drive on your host computer.
2. Create the directory where you want to install Auto-Loader. Make that
directory your current working directory.
Note:
Do not use the drive C root directory or install Auto-Loader on a pseudo-
drive created with a third-party file compression software utility.
3-14
Page 99

CODECODENUGNUGLearning About the Software
3. At the DOS prompt on the host computer, type this command:
3
source
where:
source
port
Here are two examples:
• If companion disk 1 is in drive A, the reader is connected to the host
• If companion disk 1 is in drive B, the reader is connected to the host
4. Wait for the installation procedure to finish and follow any instructions on
the host computer’s display.
The installation creates the C_FILES\COMMON directory that contains the
reader’s default AUTOEXEC.BAT, CONFIG.SYS, and AUTOINST.BAT startup
files. You can edit these startup files before loading them onto the reader. Do
not remove or alter clearly commented statements required for Auto-Loader.
:install [-
is the disk drive where you inserted companion disk 1.
is the number of the host computer’s COM port that the
reader is connected to. This parameter is optional; the
default is COM1.
computer’s COM1, and you want the reader to operate in English, type
this command on the host computer:
a:install
computer’s COM2, and you want the reader to operate in English, type
this command on the host computer:
b:install -com2
port
]
The installation also copies eight batch files into the directory you created for
Auto-Loader. The next sections describe how to use five of the batch files:
LOADADD, LOADNEW, MAKENEW, LOADIMG, and LOADXIMG. To learn
how to use the other batch files, see “Auto-Loader Batch Files” in Appendix D.
Because the batch files are customized for the drive and directory where they
are installed, you must reinstall Auto-Loader to move the files. Also, these
batch files are customized for English because you did not specify a country
when you installed Auto-Loader. If you want the reader to operate in another
language, you must install Auto-Loader according to the instructions in
Chapter 8, “Preparing the Reader for International Use.”
3-15
Page 100

JANUS 2010 Hand-Held Computer User’s Manual (4MB)CODECODENUGGNUGG
p
y p
g
p
f
j
ff
f
Using an External Power Supply
When you use Auto-Loader, you must connect an external power supply to the
communications dock or optical link adapter.
Auto-Loader uses MakeDisk and PutDisk software. Because PutDisk requires
an external power supply, Auto-Loader also requires an external power
supply.
Caution
The reader should be
PutDisk command in case the batter
erased. If the power goes down when using PutDisk, the reader locks u
bein
and the system flash must be reloaded from the Boot Loader menu and you will
lose data.
Conseil
aut alimenter le lecteur par une source de courant AC lors de l'exécution de
Il
la commande PutDisk dans le cas où le
acement du flash. Si le courant est coupé lors de l'exécution de PutDisk,
l'e
le lecteur se verrouille, le
(Boot Loader) et vous perdez des données.
owered by an AC power source when you use the
ack goes low while the flash memory is
eu de piles s'affaiblit pendant
lash système doit être rechargé du menu d'amorçage
In the next procedures, Step 2 directs you to connect the power supply to the
communications dock or the optical link adapter. You must perform this step.
Adding or Editing Files on Drive C
You can add or edit some files on your reader’s drive C without overwriting all
the files on drive C.
To add or edit files on drive C
Note:
All files on drive C remain intact unless they are replaced by new files with the
same name.
1. Connect the reader to the host computer through a communications dock
or optical link adapter. If you use the communications dock, you must
connect the dock to the host computer with a 3-wire (2, 3, and 7) cable for
Interlnk to operate properly.
2. Connect the power supply to the communications dock or the optical link
adapter.
3. Create a working directory on the host computer.
3-16
 Loading...