

Page 1

Tutorial
P/N 066449-003
™
EZBuilder
Page 2

Page 3

Intermec Technologies Corporation
6001 36th Avenue West
P.O. Box 4280
Everett, WA 98203-9280
U.S. technical and service support: 1-800-755-5505
U.S. media supplies ordering information: 1-800-227-9947
Canadian technical and service support: 1-800-687-7043
Canadian media supplies ordering information: 1-800-267-6936
Outside U.S. and Canada: Contact your local Intermec service supplier.
The information contained herein is proprietary and is provided solely for the purpose of allowing customers
to operate and/or service Intermec manufactured equipment and is not to be released, reproduced, or used for
any other purpose without written permission of Intermec.
Information and specifications in this manual are subject to change without notice.
2000 by Intermec Technologies Corporation
All Rights Reserved
The word Intermec, the Intermec logo, EZBuilder, JANUS, IRL, Trakker Antares, Adara, Duratherm,
Precision Print, PrintSet, Virtual Wedge, and CrossBar are trademarks of Intermec Corporation. Microsoft,
Active X, Visual C++, Windows, Win32s, the Windows logo, and Windows NT are either registered
trademarks or trademarks of Microsoft Corporation.
Throughout this manual, trademarked names may be used. Rather than put a trademark (
™
or ®) symbol in
every occurrence of a trademarked name, we state that we are using the names only in an editorial fashion, and
to the benefit of the trademark owner, with no intention of infringement.
Page 4

Manual Change Record
This page records the changes to this manual, which was originally released as version 001.
Version Date Description of Change
002 07/98 The manual was updated and reformatted. Sample applications were added
as an appendix.
003 08/00 The manual was updated to support EZBuilder v 2.3, which adds support
for 6400 hand-held devices.
Page 5

Contents
Contents
Introduction
1
Introducing the EZBuilder Code Generator 1-3
Overview of How EZBuilder Works 1-3
Overview of EZBuilder Windows 1-3
Menus and Toolbar Window 1-4
Object Manager 1-5
Viewport 1-5
Overview of EZBuilder Components 1-6
Applications 1-6
Menus 1-6
Moving Between Fields 1-6
Screens 1-6
Selecting an Item 1-7
Transactions 1-7
View Resource Dialog Box 1-7
Overview of the EZBuilder Simulator 1-8
Introducing the Tutorial 1-8
Tutorial Organization 1-9
Tutorial Time 1-10
Chapter Summary 1-10
What's Next 1-10
Creating Menus
2
Getting Started 2-3
Exercise 1: Creating the Main Menu 2-3
Exercise 2: Creating Menu Items for User Options 2-8
Creating a Menu Item 2-8
Creating a Second Menu Item 2-10
Creating a Third Menu Item 2-11
Exercise 3: Creating a Hidden Menu Item 2-11
Chapter Summary 2-12
v
Page 6

EZBuilder Tutorial
Creating Screens
3
Overview 3-3
Exercise 4: Designing the MM_Help Screen 3-3
Labeling the MM_Help Screen 3-3
Creating a Multi-Line Object to Contain Help Data 3-4
Exercise 5: Designing the JobOn Screen 3-7
Labeling the JobOn Screen 3-7
Exercise 6: Defining and Labeling Data Fields 3-8
Defining the Badge Identification Number Field 3-8
Labeling the Badge Identification Number Field 3-9
Defining the Part Number Field 3-9
Labeling the Part Number Data field 3-9
Creating the Order Number Field 3-10
Wrapping Data 3-10
Exercise 7: Programming the Function Keys 3-11
Exercise 8: Programming the Beep Sound 3-14
Exercise 9: Creating the JobOff Screen 3-15
Copying the JobOn Screen 3-15
Changing the Duplicate Screen 3-16
vi
4
Exercise 10: Completing the Data_Help Screen 3-18
Chapter Summary 3-20
Creating Transactions
Overview 4-3
Exercise 11: Creating a Transaction 4-3
Exercise 12: Creating the JOF_Tran (Job Off) Transaction 4-8
Exercise 13: Finishing the Transactions 4-10
Exercise 14: Creating the CopyBadge Transaction 4-12
Exercise 15: Creating Toggle Capability 4-15
Chapter Summary 4-16
Page 7

Testing Your Program on the Simulator
Contents
5
Overview 5-3
Exercise 16: Building the Program 5-3
Exercise 17: Testing the Program 5-6
Suggested Tests 5-6
Example Data 5-8
Record Identification Codes 5-8
Record Data Order 5-8
Automatic Data Entered into the Record 5-8
Example Output Listing 5-9
Exercise 18: Downloading Your Program 5-9
Chapter Summary 5-12
Where Do You Go From Here? 5-13
Using the Simulator Editor 5-13
Using the Example Applications 5-13
Using the Online Help 5-13
Using EZBuilder Features
A
Using the Example EZBuilder Applications A-3
Working With User Functions and Libraries A-5
Reviewing the Example Application A-6
Building a Static Library From the Function A-7
Placing Function Calls in the EZBuilder Application A-8
Configuring EZBuilder to Link With Your Library A-8
Parsing a Single Scanned Label Into Multiple Fields A-9
Scrolling Through a File and Selecting a Record A-11
Clearing All Fields on a Screen at One Time A-13
Transferring Data Between a TCP/IP Server and a Trakker Antares TCP/IP Terminal A-15
Transmitting a File from a Trakker Antares TCP/IP Terminal to a TFTP Server Using
Static Filenames A-17
vii
Page 8

EZBuilder Tutorial
Transferring Files Between a Trakker Antares TCP/IP Terminal and a TFTP Server A-19
Transferring Files Between a TCP Server and a Trakker Antares TCP/IP Terminal Using
Dynamic Filenames A-22
Troubleshooting
B
Troubleshooting Error Messages B-3
viii
Page 9

1
Introduction
Page 10

dsf
Page 11

This chapter introduces the EZBuilder code, defines some basic EZBuilder terms, and
introduces the EZBuilder tutorial exercise.
Introducing the EZBuilder Code Generator
EZBuilder is a software code generator product that provides a quick and easy way to
create application programs for the Trakker Antares terminals, the T2090, and the 6400.
Overview of How EZBuilder Works
After telling EZBuilder you want to create a new application (or enhance an existing
one), you give simple commands to create menus, screens, and transactions and to
define menu items, labels, and data fields. You can set appropriate attributes and other
parameters as properties for these objects; define function keys to cause specific actions
to occur when keys are pressed; and specify other processes, such as calculations, as
needed for your application.
When you have completed your application and give the Build command, EZBuilder
generates the application code for you. Using the Simulator tool, you can then test the
program on your computer. When your application is ready to use, download your
generated application program to your terminal.
asdIntroduction
1
Menus and
Toolbar Window
Object Manager
Overview of EZBuilder Windows
This section illustrates and describes the Menus and Toolbar window, the Object
Manager, and the Viewport. Other windows and dialog boxes are illustrated later in this
document, as needed.
Viewport
1-3
Page 12

EZBuilder Tutorialasd
Menus and Toolbar Window
EZBuilder commands are available by selecting from drop-down menus or by clicking
toolbar buttons.
Menus
The EZBuilder commands are grouped under menu headings File, Edit, View, Default,
Options, Build, Tools, and Help. Before beginning the tutorial, you should take a
moment to open each menu and read which commands are available on each. Most of
the commands listed on these menus are included in the tutorial.
Applications recently opened in EZBuilder are shown at the bottom of the File menu.
This list helps you quickly locate and open EZBuilder applications you have recently
developed or edited.
Toolbar
EZBuilder toolbar buttons are located beneath the menu headings. Toolbar buttons
provide quick access to many EZBuilder commands. Some toolbar buttons are available
only as needed for the creation of certain objects.
You can often access menu commands using a toolbar button. To learn the function of
any toolbar button while using EZBuilder, move the mouse pointer over the button and
read the description that appears.
The toolbar buttons are identified below:
New Application
Open Application
Save Application
Build
Simulate Trakker and Run
Application
Download
New Math Process
New Screen
New Transaction
Add Label to
Screen/Menu
Add Field to Screen
Add Menu Item to Menu
Add Scrolling Section to
Screen
Add Horizontal Line to
Screen/Menu
Add Vertical Line to
Screen/Menu
Add Box to Screen/Menu
New Menu
1-4
Page 13

asdIntroduction
1
Object Manager
The Object Manager has three separate parts: the Object List field, the Properties and
Actions area, and three tabs labeled Properties, On Entry, and On Exit. These main
parts are briefly described below. When you make changes to the value of a field in the
Object Manager, you must move to another field to cause those changes to take effect.
Object List
Applications, screens, menus, and transactions that are created as you work in
EZBuilder are called objects, as are menu commands, data fields, and their respective
labels. The Object List, located near the top of the Object Manager, lists these objects
when you click the Object List down arrow. Altogether, objects are generally called
resources.
Objects are also listed in the View Resource dialog box, which is described and
illustrated later in this tutorial.
Properties and Actions Area
The Properties and Actions Area shows the default of each object selected in the
Viewport. In this tutorial, the Properties and Actions Area is referred to as the Object
Manager.
Properties, On Entry, On Exit Tabs
At the bottom of the Object Manager are three tabs labeled Properties, On Entry, and
On Exit. Click any of these tabs to view its respective screen.
The Properties screen shows the values, or properties, of items—menus, menu items
(commands and labels), screens, data items (data fields and their labels), and
transactions—that you create. Use the Properties screen to enter the values for the
object being defined and the actions, if any, caused by specific objects being selected,
entered, exited, or executed by the application user.
The On Entry screen shows parameters used when entering an application or data field.
The On Exit screen shows parameters used when exiting an application or data field.
Details and illustrations of each of these screens are provided throughout the tutorial.
Viewport
The Viewport shows your application as it will appear to your users. When you begin
an application in EZBuilder, the Viewport is blank; when you open an existing
application, the Viewport shows that application. How your application looks in the
Viewport depends upon your device type and terminal characteristics.
The Viewport has row and column coordinates that you use to specify the location of
items. The upper left corner is Row 0 and Column 0. This tutorial demonstrates how to
move items in the Viewport (and, subsequently, in your final application) by changing
Row and Column values.
1-5
Page 14

EZBuilder Tutorialasd
Overview of EZBuilder Components
In addition to understanding the EZBuilder windows, you need to know a few basic
EZBuilder terms and characteristics before you start the tutorial exercise.
Applications
From the information you provide, EZBuilder generates an application program with
built-in verification functions. For example, you could build applications for
•
•
•
High-level component resources of an application include menus, screens, and
transactions. Each of these components (objects) can include other objects, such as
menu commands, data fields, and their labels.
Menus
A menu usually contains an identification label and a list of user options. These options
are called menu items in EZBuilder, but they are called menu commands by your users.
factory automation systems.
inventory control.
labor time records.
You can create your menus so the user can choose to execute a menu command in a
variety of different ways. For example, the user can
press a function key (such as F1, F2, F3, and so on).
•
use the up and down arrow keys, and then press Enter.
•
enter text or numbers using the keyboard (such as “EXIT”).
•
scan text characters (such as “SFCLBR”) using the terminal’s wand or some other
•
scanning device.
Moving Between Fields
In the Object Manager, use the Tab key to move the cursor to the next field, and the
Back Tab function (Shift+Tab) to move the cursor to the previous field.
Screens
An EZBuilder screen is the software display of information shown in the Viewport. An
identification label is usually included at the top of a screen.
In this tutorial, there are two main types of screens: data entry screens and help screens.
You can also create a screen to show results of calculated data or other processing.
1-6
Page 15

asdIntroduction
1
Selecting an Item
To edit an item, you must first select it. You can select an item in one of two ways:
Double-click the item in the Viewport.
•
Open the View Resource dialog box, click the object once, and then click Edit to
•
return to the Viewport. For more information about the View Resource dialog box,
see “View Resource Dialog Box” below.
Selected objects appear in the Viewport with small boxes, or “handles, ” around them.
Transactions
An identification label is usually included at the top of a transaction screen.
The variable data that is scanned or keyed in by the user is accepted in the data fields
(shown on data entry screens), and then packaged as transactions. The packaging
process can append data from the system, including the current date and time or
calculated data.
Transactions can be handled in different ways. They can be
sent to or received from the RF network.
•
sent to or received from a COM (communications) port.
•
saved to or read from a record in a file.
•
sent to another field or fields.
•
In this tutorial, each transaction is saved as a record and sent to a file that later can be
printed for review and analysis.
View Resource Dialog Box
The View Resource dialog box graphically shows the interaction of current components
of your application. To open the View Resource dialog box, click Resource from the
View menu.
1-7
Page 16

EZBuilder Tutorialasd
View Resource Dialog Box
Overview of the EZBuilder Simulator
A simulator allows one device (such as your computer) to act like or emulate another
device (such as your terminal).
EZBuilder comes complete with a Simulator tool so you can run the application that
you create with EZBuilder on your computer for program testing and debugging as well
as for training and demonstration purposes.
The simulator lets you check out all the menus, screens, transactions, and other
processing that you defined in EZBuilder before you download your generated
application program to the terminal.
Introducing the Tutorial
In this tutorial, you will develop a simple application to collect the start and end times
of factory workers as they perform various activities or projects (called “jobs” in this
document). Factory workers keep track of the time they spend on each job by scanning
the SFCLBR (Start Factory Labor) bar code printed on work orders when they begin
the job (producing the Job On transaction). They scan the EFCLBR (End Factory
Labor) bar code when they end the job (producing the Job Off transaction). As
alternates to scanning, the SFCLBR and EFCLBR codes can be entered as text on the
keyboard, or they can be selected from the menu using the up and down arrow keys and
the Enter key.
Each transaction is packaged as one data output record and sent to a file. The data
record will show the worker’s Badge ID Number, the Part Number, and the Order
Number. In addition, it will show the automatic date and time stamps and the Job On or
Job Off transaction identification code (JOTRAN or JOFTRAN).
1-8
Page 17

asdIntroduction
1
An overview of the process for a Job On transaction (currently being scanned by a
worker with Badge ID Number B714) is illustrated next.
Job On Transaction Process
2
Transaction packaged in a record with data fields delimited
1
Data scanned or
entered into terminal
Job On
Badge B714
Part WIDGET1
234
Order 22
4
Transaction data file listed for
management upon request
by commas; TRAN code, date, time automatically added
JOTRAN,B714,WIDGET1234,22,04-23-1997 02:04:30
Transaction
code
3
Transaction record
sent to a disk file
Date Time
JOTRAN,B714,WIDGET1008,21,04-23-1997 01:00:30
JOFTRAN,B714,WIDGET1008,21,04-23-1997 02:00:25
JOTRAN,B714,WIDGET1234,22,04-23-1997 02:04:30
EZB.001
Tutorial Organization
This tutorial includes several exercises. EZBuilder offers different ways to accomplish
some tasks; however, new users should follow the exercises described in this tutorial in
the order presented, entering the data and building the application step-by-step as
directed.
The exercises for this tutorial are presented over four chapters.
In Chapter 2, you create a main menu and its menu items to provide navigation
•
options to users. This chapter includes an exercise to create hidden menu items that
can be useful during program development.
In Chapter 3, you create screens and their data fields. This chapter includes creation
•
of scrolling sections for help text as well as data entry fields where your user will
enter Badge ID, Part Number, and Order Code for the tutorial’s example
application. This chapter includes an exercise to program function key actions.
1-9
Page 18

EZBuilder Tutorialasd
•
•
Tutorial Time
Depending upon how thoroughly you study the material and check each screen result in
this tutorial, you can complete the basic tutorial exercises and build and test your
program in less than two hours. Allow more time if you want to explore EZBuilder to
expand on information in the tutorial as you go along.
Note:
with your own enhancements.
In Chapter 4, you create transactions that process the scanned or keyed data for
both Job On and Job Off records. Records of these transactions are saved in a file
that can be listed for management who might want to analyze the time spent for
each job and factory worker.
In Chapter 5, you build and test your application. You will instruct EZBuilder to
build the application’s program code, and then you will use the EZBuilder
Simulator to test your application. This chapter includes information about
downloading your generated application program files to your terminal.
We recommend that you complete the entire tutorial once before experimenting
Chapter Summary
This chapter introduced you to EZBuilder: its purpose, window descriptions, and
definitions of major terms related to creating and using EZBuilder applications. This
chapter also introduced you to the tutorial and its organization.
What's Next
The remainder of this document provides simple tutorial exercises designed to quickly
teach you the basic features of EZBuilder.
An overview of the EZBuilder components included in the tutorial is illustrated next.
This illustration is repeated at the end of each chapter, with the components that you
have created up to that point shaded. Use the illustration at the end of each chapter to
see completed and upcoming exercises.
1-10
Page 19

Tutorial Exercise Summary
Upon completion of this tutorial, you will know and understand the basic functions of
EZBuilder. Building upon this foundation, you can easily learn additional features
during experimentation and study of example applications included with EZBuilder
(see the
asdIntroduction
Application: EZBTUTRL
Menu Screens Transactions
(Chapter 2)
Tasks 1, 2 and 3
MainMenu
EZBuilder Getting Started Guide
(Chapter 3)
Task 4
MM_Help
Task 5
JobOn
Task 6
JobOff
Task 7
Data_Help
).
(Chapter 4)
Task 8 and 10
JON_Tran
Task 9 and 10
JOF_Tran
Task 11
CopyBadge
1
EZB.002
Before you begin the tutorial, ensure that
EZBuilder has been properly installed on your computer (see the
•
Started Guide
a RAM drive (E drive) has been created on your terminal. This is the disk drive to
•
for more information).
EZBuilder Getting
which you may want to send your output file when your application program is
executed (see the
EZBuilder Getting Started Guide
for details).
You are now ready to start the tutorial! Go to Chapter 2 to learn how to create a menu.
1-11
Page 20

Page 21

2
Creating Menus
Page 22

df
Page 23

This chapter describes how to create menus and begins the tutorial that provides an
easy way for you to learn the basic features of EZBuilder.
Getting Started
The first time you start EZBuilder, the Viewport and Object Manager screens appear. If
each of these screens is blank (as shown below), go to “Exercise 1: Creating the Main
Menu” to begin the tutorial. If these screens do not appear as shown below, you have
opened an existing application. Select New Application from the File menu to clear
EZBuilder, and then go to “Exercise 1: Creating the Main Menu” to begin the tutorial.
Creating Menus
2
Exercise 1: Creating the Main Menu
When you start a new application in EZBuilder, you can create either a menu or a
screen. In this tutorial exercise, you will create a main menu.
To create the Main Menu
1. Choose New Menu from the File menu. The New Menu default values appear in
the Object Manager.
2-3
Page 24

EZBuilder Tutorial
2. The default menu name, Menu0, is shown in the Name field in the Object Manager.
Rename the menu by selecting Menu0 and typing MainMenu.
You cannot use spaces in object names.
Note:
To create a screen identification label
1. Choose Add Label from the File menu. The label appears as two dots in the
Viewport, and its default values appear in the Object Manager.
All new objects appear as dots in the Viewport.
Note:
2-4
Page 25

Creating Menus
2. Type Main Menu in the Caption field. The label automatically widens to
accommodate the length of the caption, and the change appears in the Viewport.
3. In the Object Manager, change the Row value to 1 and the Column value to 6 to
center the Main Menu label.
2
4. Click the Display Attribute field to activate it. A down arrow appears.
2-5
Page 26

EZBuilder Tutorial
5. Click the down arrow in the Display Attribute field. A pop-up list appears.
6. Select BOLD from the pop-up list. The label appears in bold in the Viewport.
To create a box around a label
1. Select the label in the Viewport, and click Add Draw Box from the File menu. The
box appears in the Viewport, and its default values appear in the Object Manager.
2-6
Page 27

Creating Menus
2. In the Object Manager, change the Row value to 0, the Column value to 4, the
Height in Rows value to 3, and the Width in Columns value to 13. The box appears
around the Main Menu label in the Viewport.
At this point, you have created
an empty application named “Default.”
•
2
a menu named “MainMenu” that contains a label but no menu items.
•
Before moving on to Exercise 2 in this tutorial, you should save your application.
To save your application
1. Choose Save Application As from the File menu. The Save default As dialog box
appears.
2. Choose a drive for your application in the Save in field, and type a name for your
application in the File name box. Click OK. The Confirm dialog box appears asking
if you want to continue even though the MainMenu is empty.
3. Click Yes. The file is saved.
2-7
Page 28

EZBuilder Tutorial
Congratulations! You have completed Exercise 1. Continue with Exercise 2 to create
menu items.
Exercise 2: Creating Menu Items for User Options
The main menu of your application should include a number of command options that
allow your users to choose between operations. For example, a menu item can bring up
another menu.
•
a screen where data is entered.
•
a screen where help text is reviewed.
•
When creating a menu item, look at the Viewport and think about where you want to
put an item (Row, Column), what you want to call it (Caption), and any function key
(Activation Key) or string (String to Activate) that will be used to cause an action.
Creating a Menu Item
In this exercise, you will create three menu items for your Main Menu. You will then
set the properties and actions of those items.
The first menu item you create will bring up the online help screen when users press
. You will first set the Activation Key, which tells EZBuilder which key stroke will
F1
bring up the screen; then you will set the Call Screen, which tells EZBuilder which
screen to bring up when the Activation Key is pressed.
To create a menu item
1. Click the Object List down arrow. A drop-down menu appears.
2. Choose Menu: Main Menu. The Main Menu appears in the Viewport.
3. To create a new menu item, choose Add Menu Item from the File menu. A blank
menu item appears in the upper left corner of the Viewport, and the New Menu
Item default values appear in the Object Manager.
2-8
Page 29

Creating Menus
4. Change the Row value of the new menu item to 4, and change the Column value to
2. The blank menu item moves to the new location in the Viewport.
5. Type “F1 - Help” in the Caption field. This caption tells users that F1 will bring up
the help screen. The change appears in the Viewport.
2
6. Type “F1” in the Activation Key field. The Activation Key is the key that will
bring up a particular screen.
2-9
Page 30

EZBuilder Tutorial
7. Type “MM_Help” in the Call Screen field. The Call Screen is the screen EZBuilder
will call when the key specified in the Activation Key field is pressed. Press Tab to
move to another field and accept the changes.
Since screen MM_Help does not yet exist in your application, an Information
dialog box appears asking if you would like to create it.
8. Click Yes. A blank screen titled “MM_Help” is created. To view this screen, click
the Object List down arrow and choose Screen: MM_Help. Return to the Main
Menu screen when you are finished.
Creating a Second Menu Item
The second menu item you create will start the JobOn transaction (you will create this
transaction later in the tutorial).
The steps below are more abbreviated than the steps in the previous task (Creating a
Menu Item). Refer back to the previous task if you need more detail or illustrations.
To create the second menu item
1. From the File menu, choose the Add Menu Item command.
2. Position the new menu item at Row 6 and Column 2.
3. Create the caption “F2 - Job On.”
4. Type “SFCLBR” in the String to Activate field.
5. Type “F2” in the Activation Key field.
2-10
Page 31

Creating Menus
6. Type “JobOn” as the Call Screen, and click Yes when prompted to create the
JobOn screen.
You have now created two screens—“MM_Help” and “JobOn.” These screens are
blank and set with default properties. Their structures were created when you entered
their names as Call Screen properties. To view either of these screens, click the Object
List down arrow, and choose either of them from the resulting drop-down list. Return to
the Main Menu screen when you are finished.
2
Creating a Third Menu Item
The third menu item you create will start the JobOff transaction (you will create this
transaction later in the tutorial).
The steps below are more abbreviated than the steps in the previous task. Refer back to
the previous task if you need more detail or illustrations.
To create the third menu item
1. From the File menu, choose the Add Menu Item command.
2. Position the new menu item at Row 8 and Column 2.
3. Create the caption “F3 - Job Off. ”
4. Type “EFCLBR” in the String to Activate field.
5. Type “F3” in the Activation Key field.
Congratulations! You have completed Exercise 2. Before continuing with Exercise 3,
save your work by choosing Save Application from the File menu.
Exercise 3: Creating a Hidden Menu Item
Hidden menu items, which are not seen by the user, offer some flexibility while you are
programming your application. Menu items are considered hidden when they do not
appear on the screen (the Caption field is empty) and they cannot be selected by the
Tab key or up or down arrow keys (the Screen Nav Allowed field is False [disabled]).
You can use a hidden item to
create a branch to an unfinished part of the program.
•
add data items that will always be accessed by scanning a bar code, rather than
•
cluttering up the screen with many small objects.
end the program.
•
This type of labor data collection application is normally always on and never
Note:
exited, so no Exit key is indicated on the main menu; however, you can use this hidden
menu item to exit the program when testing your application during development.
2-11
Page 32

EZBuilder Tutorial
In this exercise, you will create a hidden menu that will return you to the previous menu
in the application.
To create a hidden menu item
1. Create a new menu item with a Row value of 12 and a Column value of 2.
2. Click the Screen Nav Allowed field. A down arrow appears.
3. Click the Screen Nav Allowed down arrow, and choose False from the resulting
drop-down list. Setting the Screen Nav Allowed field to False disables the item and
ensures that the Tab key or the up and down arrow keys will not select it.
4. If the Caption field is not empty, delete its contents.
5. Because the default Length field value is 1, the object may be difficult to select. To
more easily select the object in the future, change the Length value to 2. Two
spaces appear in the object in the Viewport.
You can select an object (make it active) in one of two ways:
Note:
Double-click the object in the Viewport.
•
Open the View Resource dialog box and click the object name once to highlight
•
it, and then click Edit to return to the Viewport.
6. Click the Call Screen field. A down arrow appears.
7. Click the Call Screen down arrow. A drop-down menu appears.
8. Choose <Return to Previous Menu>.
9. Type “F4” in the Activation Key field.
10. Type “EXIT” in the String to Activate field.
Congratulations! You have completed Exercise 3. Save your work before continuing.
Chapter Summary
In this chapter, you learned how to create
menus.
•
menu items.
•
hidden menu items.
•
The EZBuilder components covered up to this point in the tutorial are shaded in the
illustration next. If you feel unclear about any of these components, go back through the
appropriate exercises now. When you feel comfortable with these components,
continue with Chapter 3 to learn how to create screens.
2-12
Page 33

Tutorial Exercise Summary
Creating Menus
Application: EZBTUTRL
Menu Screens Transactions
(Chapter 2)
Tasks 1, 2 and 3
MainMenu
(Chapter 3)
Task 4
MM_Help
Task 5
JobOn
Task 6
JobOff
Task 7
Data_Help
(Chapter 4)
Task 8 and 10
JON_Tran
Task 9 and 10
JOF_Tran
Task 11
CopyBadge
2
EZB.003
2-13
Page 34

Page 35

3
Creating Screens
Page 36

asd
Page 37

Overview
Creating Screens
This chapter describes how to complete the screens you created in Chapter 2, how to
copy one screen and adjust it to make a new screen, and how to create a fourth
screen.
In Chapter 2, you created two screens:
MM_Help
•
JobOn
•
In Exercise 2, you created two menu items (commands) on the Main Menu and
indicated the above screen names as Call Screen properties for them. The Call Screen
properties indicate the screens that will be brought up when one of the menu commands
is chosen.
When EZBuilder checked for those screens in your Object List, it found the screens
were not yet created, and you were prompted as to whether or not you wanted to create
the screens. Each screen was created when you responded Yes to the prompt. Although
you didn’t see the screens at that time, they were added to the Object List.
3
Remember:
the Object List down arrow to see a list of these components.
The MM_Help and JobOn screens were created with default settings, but without data
fields or labels. Now you will design the two screens you already created, adding data
fields and labels, and you will create a third and fourth screen.
The Object List shows the high-level components you have created. Click
Exercise 4: Designing the MM_Help Screen
In this exercise, you will label the MM_Help screen in the same manner that you
labeled the Main Menu in Exercise 1. You will provide a scrolling section in that
screen, and you will enter the help text into that section.
Labeling the MM_Help Screen
1. Click the Object List down arrow, and choose Screen: MM_Help from the resulting
drop-down list.
2. Choose Add Label from the File menu. The label object appears in the Viewport,
and the Label default values appear in the Object Manager.
3. Reposition the label by changing the Row value to 1 and the Column value to 4.
Remember:
Viewport, you must move to another field in the Object Manager.
4. Type “Main Menu Help” in the Caption field. The caption appears in the Viewport.
To cause changes made in the Object Manager to appear in the
3-3
Page 38

EZBuilder Tutorial
5. Change the Display Attribute value to BOLD.
6. Select the Main Menu Help label in the Viewport, and choose Add Draw Box from
the File menu. A box appears in the Viewport, and the Box default values appear in
the Object Manager.
7. In the Object Manager, change the Row value of the box to 0, the Column value to
0, the Height in Rows value to 3, and the Width in Columns value to 20. The
changes appear in the Viewport.
Creating a Multi-Line Object to Contain Help Data
A multi-line object (called a “scrolling section” in this tutorial) allows your users to
scroll up and down through text as needed. Create a scrolling section when you need to
present more text than can be displayed at one time on the screen. A scrolling section is
often used for help text, as demonstrated in this exercise.
To create a scrolling section
1. Choose Add Scrolling Section from the File menu. A blank scrolling section
appears in the Viewport, and its default values appear in the Object Manager.
3-4
Page 39

Creating Screens
2. Change the Row value to 4, and change the Lines to Display value to 11.
3. Click the Viewport outside of the scrolling section to deselect the scrolling section.
You cannot enter the help text until the scrolling section is deselected.
Note:
3
4. Click once in the scrolling section to place the text cursor in the scrolling section.
5. Enter the following text:
Job On allows the operator to log onto a job. To select
Job On, scan SFCLBR.
Job Off allows the operator to log off the job to
capture the time spent. To select Job Off, scan EFCLBR.
Press F10 to return to the Main Menu.
When you have finished, use the up and down arrow keys on your keyboard to
scroll up and down, and correct any typing errors.
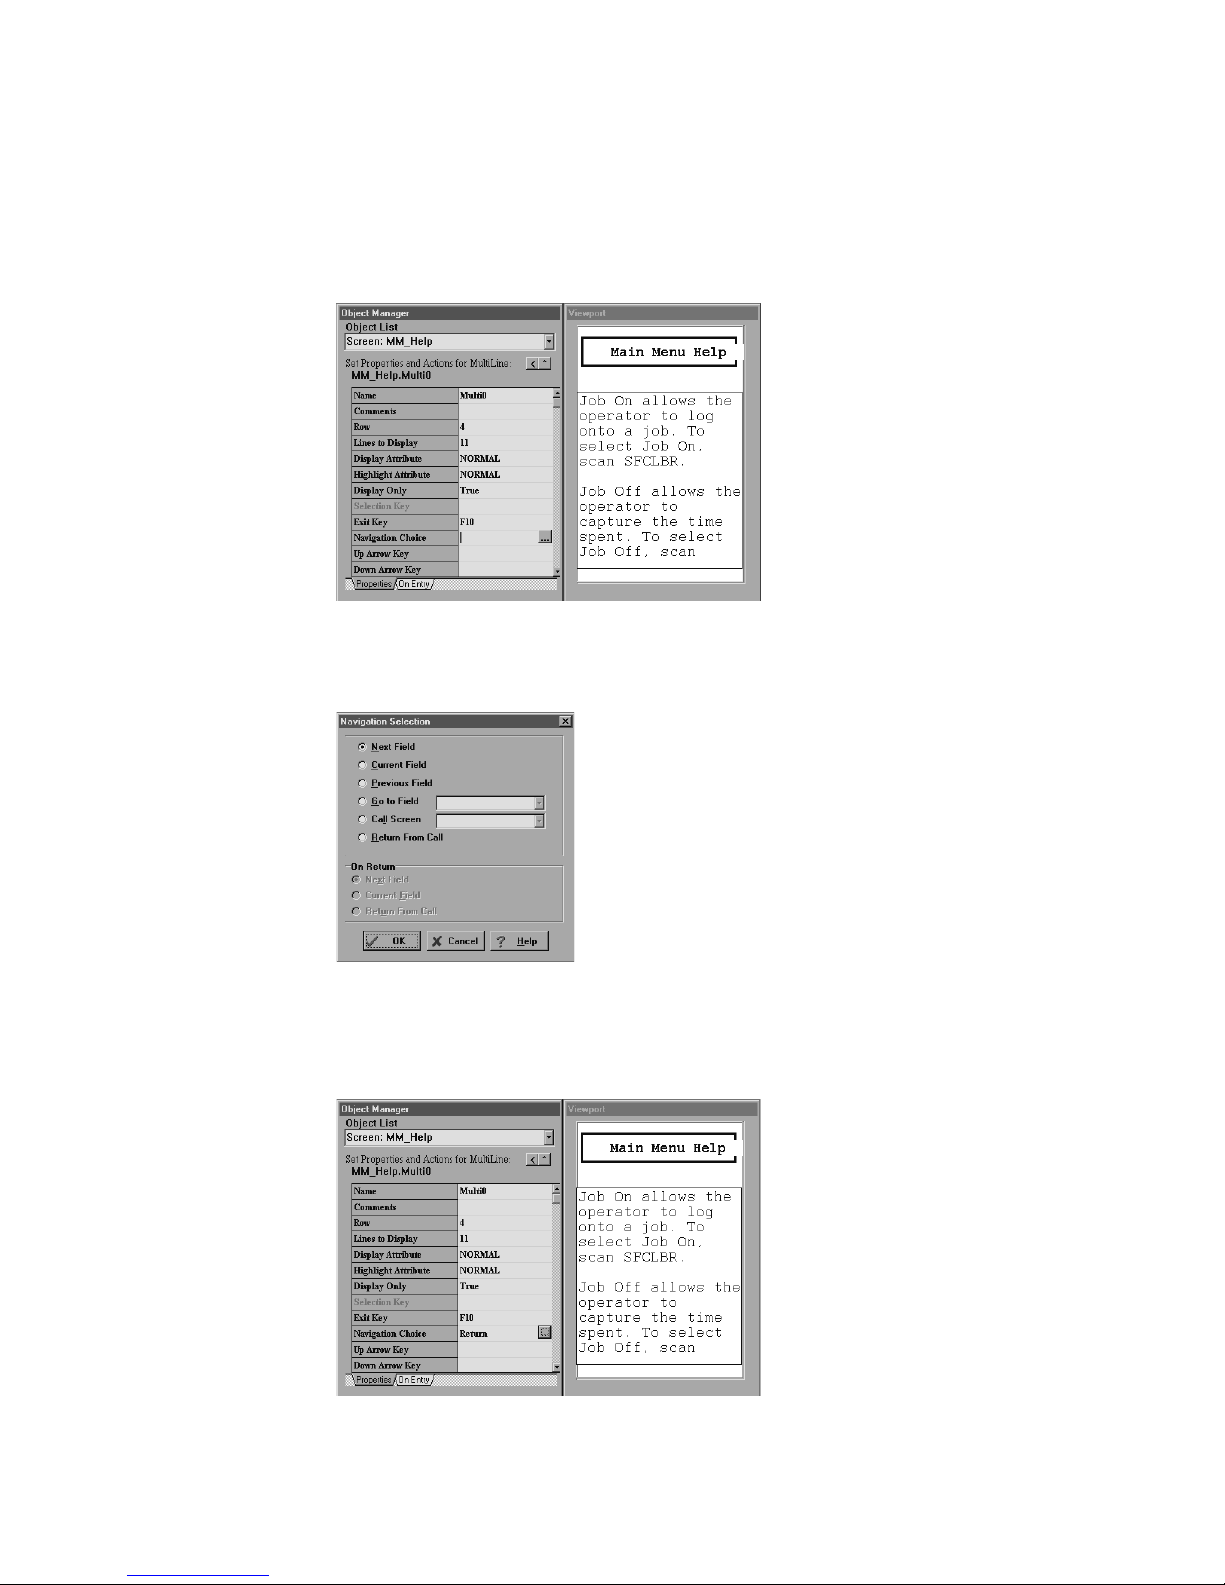
6. In the Object Manager, change the Display Only value to True, and type “F10” in
the Exit Key field.
3-5
Page 40
EZBuilder Tutorial
7. Click the Navigation Choice field. A button showing three dots (the field button)
appears.
8. Click the field button in the Navigation Choice field. The Navigation Selection
dialog box appears.
9. Click the Return From Call radio button, and then click OK. The Navigation
Choice value in the Object Manager is Return, meaning that your users will return
to the previously viewed screen (in this case, the Main Menu) when they press F10.
3-6
Page 41

Congratulations! You have completed Exercise 4. Save your file before continuing with
Exercise 5.
Exercise 5: Designing the JobOn Screen
In this exercise, you will make a label for the top of the JobOn screen, and then you will
define three data fields (input areas) for the screen.
Labeling the JobOn Screen
The steps below contain fewer illustrations than the similar steps you followed
Note:
when you created labels for the Main Menu and MM_Help screens. Refer back to
Exercise 1 in Chapter 2 if you need more detail or illustrations.
To make a screen identification label for the JobOn screen
1. Choose Screen: JobOn from the Object List.
Creating Screens
3
2. Add a label with the caption “Job On, ” a Row value of 1, and a Column value of 7.
3. Change the Display Attribute of the Job On label to BOLD.
4. Add a box around the Job On label with a Row value of 0, a Column value of 0, a
Height in Rows value of 3, and a Width in Columns value of 20.
Congratulations! You have completed Exercise 5. Save your file before continuing with
Exercise 6.
3-7
Page 42

EZBuilder Tutorial
Exercise 6: Defining and Labeling Data Fields
In this exercise, you will define and label three data fields in your application: a Badge
Identification Number field, a Part Number field, and an Order Number field.
This tutorial instructs you to define each data field before defining its label;
Note:
however, you may prefer to define the label before defining the data field.
Defining the Badge Identification Number Field
The first of three input data fields needed for the Job On transaction is the Badge
Identification Number field. Your users will enter or scan Badge Identification Number
data into this field.
To define the Badge ID Number field
1. Choose Screen: JobOn from the Object List.
2. Choose Add Field from the File menu.
3. Type “BadgeNo” in the Name field.
4. Change the Row value to 4, the Column value to 9, and the Length value to 10. The
Viewport reflects these changes.
5. Change the Display Attribute field to INVERSE. The field becomes gray in the
Viewport.
Although creating a field with a Display Attribute value of NORMAL
Note:
creates an outline of the field in the Viewport, this outline does not appear on your
user’s terminal; therefore, ensure that all data fields you add to your applications
are INVERSE.
3-8
Page 43

Creating Screens
3
Labeling the Badge Identification Number Field
Next, you will create and define a label for the input data field you just created.
To create the Badge ID Number label
1. Add a label to the JobOn screen with a Row value of 4 and a Column value of 1.
2. Type “Badge” in the Caption field. This label tells your users what kind of data
should populate the corresponding field (the shaded area in the Viewport).
Defining the Part Number Field
The second input data field needed for the Job On transaction is the Part Number field.
Your users will enter or scan Part Number data into this field.
To create the Part Number field
1. Add an inverse field to the JobOn screen with a Row value of 7, a Column value of
9, and a Length value of 25.
2. Type “PartNum” in the Name field.
Labeling the Part Number Data field
Next, you will create and define a label for the field you just created.
To create the Part Number label
1. Add a label to the JobOn screen with a Row value of 7 and a Column value of 1.
2. Type “Part” in the Caption field.
3-9
Page 44

EZBuilder Tutorial
Creating the Order Number Field
The third input data field needed for the Job On transaction is the Order Number field.
Your users will enter or scan Order Number data into this field.
To create the Order Number field
1. Add an inverse field to the JobOn screen with a Row value of 10, a Column value
of 9, and a Length value of 9.
2. Type “OrderNo” in the Name field.
To create the Order Number label
1. Add a label to the JobOn screen with a Row value of 10 and a Column value of 1.
2. Type “Order” in the Caption field.
Wrapping Data
The above illustration shows the 25-character PartNum field continuing off the right
edge of the Viewport instead of wrapping around to another row. For users to see the
entire contents of the field, you must set it to wrap; however, you cannot set an
individual field to wrap. Instead, you must set all the fields on a screen to wrap.
In this exercise, you will set all the fields on the JobOn screen to wrap.
To set all JobOn data fields to wrap
1. Choose Screen: JobOn from the Object List.
2. Change the Wrap at Edge value to True. This change is not visible in the Viewport;
however, it is visible when your application is run on the Simulator or a terminal.
3-10
Page 45

Up to 240 characters can be wrapped.
Note:
Congratulations! You have completed Exercise 6. Save your file before continuing with
Exercise 7.
Exercise 7: Programming the Function Keys
Function keys can be a great asset to your users. By programming a few function keys,
you can provide your users quick access to information about your program's
components or help them navigate through your application.
You can program a function key to
return to the previous data field (a process you began in Exercise 4).
•
return to the beginning of the same data field.
•
bring up a help screen that describes the characteristics of a data field (the first task
•
in this exercise).
Creating Screens
3
To associate a help screen with a function key
1. If the JobOn screen is not showing in the Viewport, choose Screen: JobOn from the
Object List.
2. In the Viewport, select the Badge field.
Remember:
3. Click the KP/Events tab in the Object Manager. The settings for this tab appear in
the Object Manager.
To select an item, double-click it in the Viewport.
4. Click the F1 field. The field button appears.
3-11
Page 46

EZBuilder Tutorial
5. Click the field button in the F1 field. The Key Action Selection Editor appears.
6. Click the Call Screen radio button, and then click the Call Screen down arrow. A
drop-down list appears showing the screens associated with your application. The
screen in the Call Screen field is the screen that will be called when users press the
associated key (in this case, the F1 key).
7. Click the Call Screen field, and type “Data_Help.” This is now the screen that will
be called when users press the F1 key in the Badge field.
8. Click OK. Because the Data_Help screen has not been created, the Information
dialog box appears asking if you want to create the screen.
3-12
Page 47

Creating Screens
9. Click Yes to create the Data_Help screen. This screen is now the screen that will be
called when users press the F1 key. You will complete the Data_Help screen in
Exercise 10 later in this chapter.
The Object Manager appears, and the F1 field is <SET>.
10. Check the Object List to verify that the Data_Help screen is listed. If it is not,
repeat steps 3 through 7 to create it.
11. In the Viewport, select the PartNum field. Repeat Steps 3 through 7 to call the
Data_Help screen when F1 is pressed in the PartNum field.
12. In the Viewport, select the OrderNo field. Repeat Steps 3 through 7 to call the
Data_Help screen when F1 is pressed in the OrderNo field.
To return to a previous field
1. If the JobOn screen is not showing in the Viewport, choose Screen: JobOn from the
Object List.
2. Select the BadgeNo data field in the Viewport.
3
3. Click the KP/Events tab in the Object Manager. The settings for this tab appear in
the Object Manager.
4. Click the F4 field. The field button appears.
5. Click the button in the F4 field. The Key Action Selection Editor appears.
6. Click the Go to Field radio button, and then click the Go to Field down arrow. A
drop-down list appears showing the fields and labels associated with your
application.
7. Choose JobOn.PartNum. The Part field is now the field the cursor will be set to
when users press F4 in the Badge field.
8. Click OK. The Object Manager appears, and the F4 field is <SET>.
9. Repeat steps 2 through 6 to set the F4 key to return to the OrderNo field from the
PartNum field and to return to the BadgeNo data field from the OrderNo field.
This “hot key” approach bypasses all exit validation and field exit action. If a
Note:
field exit action is desired, you must associate an Exit Field choice from the Do
Standard Action drop-down list available from the Key Action Selection Editor.
Congratulations! You have completed Exercise 7. Save your file before continuing with
Exercise 8.
3-13
Page 48

EZBuilder Tutorial
Exercise 8: Programming the Beep Sound
You can add a beep sound to your application to alert users to certain actions; for
example, you may want a beep to sound when a field is exited or an error occurs. You
can set the beep on or off, and you can set it to sound whenever a function key is
pressed.
In this exercise, you will set the Tab key beep to Success, meaning that the beep will
sound when that key is pressed. You will then set the Tab key beep to None, meaning
that the beep will not sound when the key is pressed.
To set the Tab key beep sound
1. If the JobOn screen is not showing in the Viewport, choose Screen: JobOn from the
Object List.
2. In the Viewport, select the BadgeNo field.
3. In the Object Manager, click KP/Events.
4. Click the Tab field. The field button appears.
5. Click the field button in the Tab field. The Key Action Selection Editor appears.
6. Click the Do Standard Action down arrow, and choose Exit Field from the dropdown list that appears.
7. Click OK to exit the Key Action Selection Editor. The Tab key field is <SET>.
8. Click the On Exit tab, and then click the On Val Succeed tab.
9. Click the Beep field. A down arrow appears.
10. Click the Beep field down arrow and choose <Success> from the drop-down list
that appears. The beep is now set to sound when the Tab key is pressed.
3-14
Page 49

To turn off the Tab key beep
1. Follow steps 1 through 8 above.
2. At step 9, instead of choosing <Success> from the Beep field drop-down list,
choose <None>. The beep will not sound when the Tab key is pressed.
Congratulations! You have completed Exercise 8. Save your file and continue with
Exercise 9.
Exercise 9: Creating the JobOff Screen
In this task, you will create a new screen for Job Off transactions. The JobOff screen
will resemble the JobOn screen you created and designed earlier in the tutorial. Both
screens will
show the same data fields (BadgeNo, PartNum, and OrderNo) and labels.
•
have fields set to wrap.
•
be programmed to bring up the Data_Help screen when users press the F1 key.
•
Creating Screens
3
Apart from their unique names (JobOn and JobOff), the two screens are identical
except that the F4 key will be set to bring up different results in each screen.
In this exercise, you will first copy the JobOn screen; then you will revise the copy to
create the JobOff screen.
Copying the JobOn Screen
Because of their similarity, you can create the JobOff screen by copying the JobOn
screen and revising the screen’s label and the function keys.
To copy the JobOn screen
1. Choose Screen: JobOn from the Object List.
2. Click anywhere in the blank part of the Viewport (not on a label or field).
3. Choose Copy Object from the Edit menu. The JobOn screen and its fields and
labels are saved to the clipboard.
3-15
Page 50
EZBuilder Tutorial
4. Choose Paste Object from the Edit menu. The duplicate JobOn screen is pasted to
the Viewport and the new name, JobOn0, appears in the Object Manager.
Changing the Duplicate Screen
Except for their screen names, the two screens (JobOn and JobOn0) are currently exact
duplicates. You will now change the JobOn0 screen to become the JobOff screen.
To rename the JobOn0 screen
1. If the JobOn0 screen is not showing in the Viewport, choose Screen: JobOn0 from
the Object List.
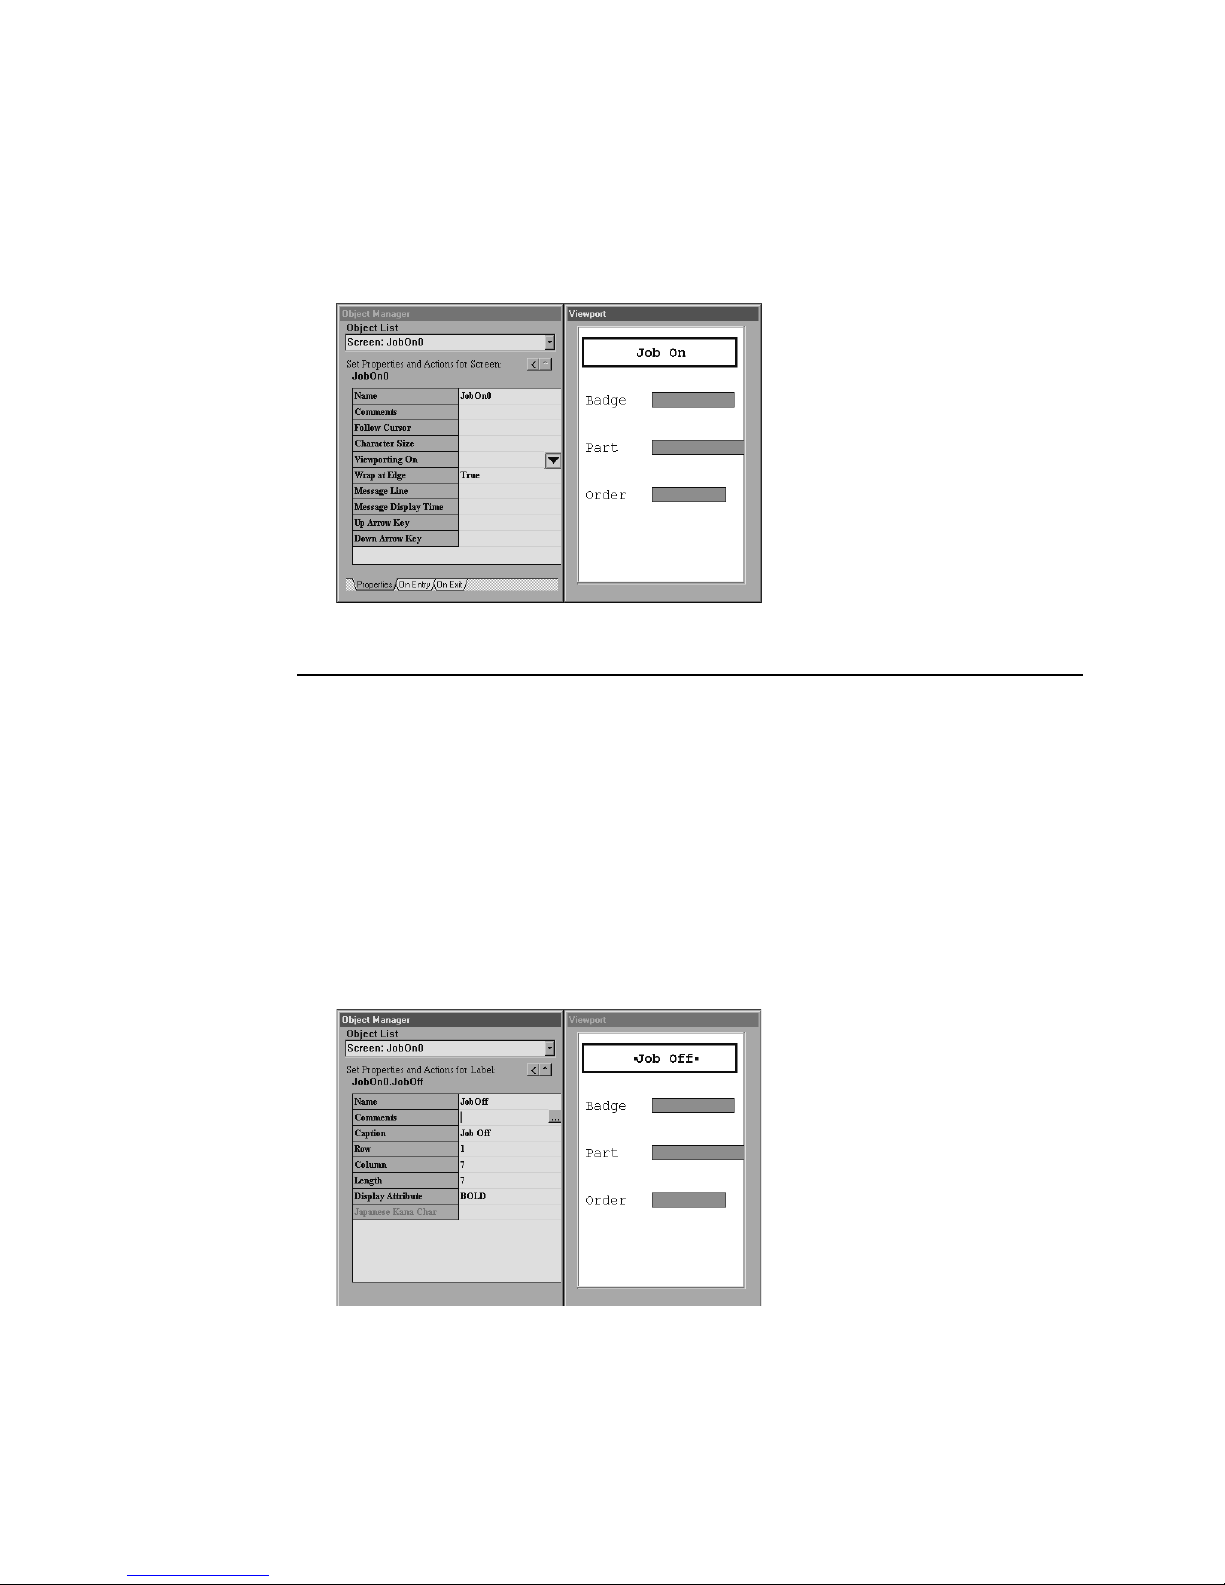
2. In the Object Manager, change the Job On caption to “Job Off.”
3. In the Object Manager, rename the screen “JobOff.”
4. In the Object List, verify that both the JobOn and JobOff screens are listed.
3-16
Page 51
Creating Screens
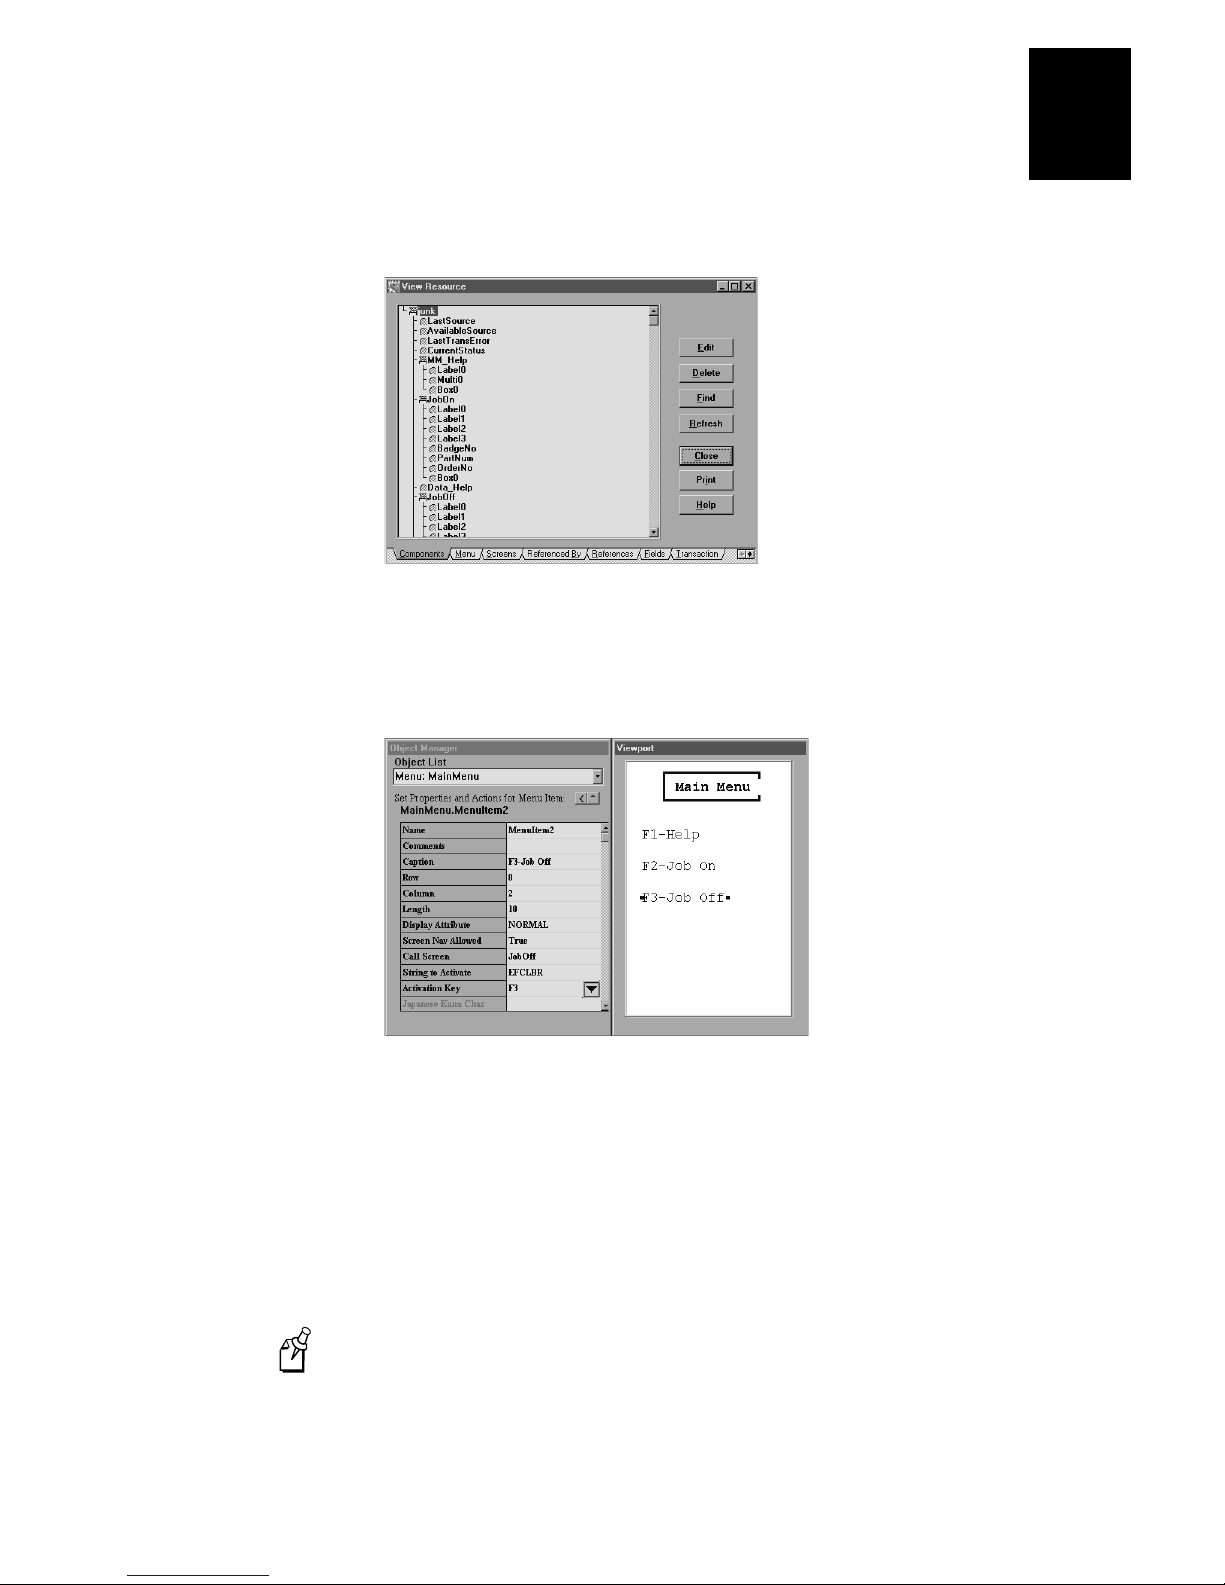
5. Choose Resource from the View menu. The View Resource dialog box appears.
6. Scroll down the View Resource dialog box, and select MenuItem2 from
MainMenu.
7. Click Edit. The Viewport reappears showing the Main Menu. MenuItem2 (F3 - Job
Off), which you highlighted in the View Resource dialog box, is selected.
3
8. Click the View Resource dialog box to bring it forward, and then click Close to
close it.
9. Click in the Call Screen field. A down arrow appears.
10. Click the Call Screen down arrow, and choose JobOff from the resulting list. The
JobOff screen is the screen that will be called when users press F3 in the Main
Menu.
11. Choose Screen: JobOff from the Object List. The JobOff screen appears in the
Viewport.
Note:
similar steps in Exercise 7. If you need details or illustrations, see Exercise 7.
The following steps are given in a brief form because you have already done
3-17
Page 52

EZBuilder Tutorial
12. In the Viewport, select the BadgeNo field. Click the KP/Events tab in the Object
Manager. Click the F4 key field, and then click its button to bring up the Key
Action Selection Editor.
13. From the Go To Field’s drop-down list, choose JobOff.PartNum. Click OK.
14. In the Viewport, select the PartNum data field. Click the KP/Events tab in the
Object Manager. Click the F4 key field, and then click its button to bring up the
Key Action Selection Editor.
15. From the Go To Field’s drop-down list, choose JobOff.OrderNo. Click OK.
16. In the Viewport, select the OrderNo data field. Click the KP/Events tab in the
Object Manager. Click the F4 key field, and then click its button to bring up the
Key Action Selection Editor.
17. From the Go To Field’s drop-down list, choose JobOff.BadgeNo. Click OK.
Congratulations! You have completed Exercise 9. Save your file, and continue with
Exercise 10.
Exercise 10: Completing the Data_Help Screen
In this exercise, you will add one boxed screen identification label and one scrolling
field with help text to the blank Data_Help screen you created in Exercise 7.
The following steps are brief because you have already done similar steps in
Note:
earlier exercises. Refer back to earlier exercises if you need more details.
3-18
Page 53

Creating Screens
To complete the Data_Help screen
1. Choose Data_Help from the Object List.
2. Add a label to the screen with the caption “Data Help.”
3. Change the Row value to 1 and the Column value to 6.
4. Change the Display Attribute to BOLD.
5. Add a box around the label with a Row value of 0, a Column value of 0, a Height in
Rows value of 3, and a Width in Columns value of 20.
6. Add a scrolling section with a Row value of 4 and a Lines to Display value of 11.
7. Click in the Viewport window to be sure the scrolling section is not selected, then
click once inside the scrolling section to position the cursor in it.
8. Enter the following text in the scrolling section:
Each data field is alphanumeric data.
Badge is employee's ID number and is 10 characters.
Part Number is 25 characters maximum.
3
Order Number is 9 characters maximum.
To re-enter data, press F4, Tab, or Shift-Tab keys.
Press F10 to return to the Job On or Job Off screen.
9. Change the Display Attribute to NORMAL.
10. Change the Highlight Attribute to NORMAL.
11. In the Object Manager, scroll to the Selection Key field, and type “F10” as the Exit
Key.
12. In the Object Manager, scroll to the Navigation Choice property and click its button
to bring up the Navigation Selection dialog box.
13. Select the Return from Call option.
14. Click OK to close the Navigation Selection dialog box. Return appears in the
Navigation Choice field.
15. Choose Resource from the View menu and see that the Data_Help screen now has
three components (one label, one multi-line scrolling field, one box). Close the
View Resource dialog box.
Congratulations! You have completed Exercise 10. Save your application before
continuing on to Chapter 4.
3-19
Page 54

EZBuilder Tutorial
Chapter Summary
In this chapter, you learned how to
create screens, data entry fields, and their respective labels.
•
wrap data and program function keys for various navigation needs.
•
add and remove beep sounds.
•
duplicate and adjust a screen as a quick way of creating a new screen that is similar
•
to an existing screen.
The EZBuilder components covered up to this point in the tutorial are shaded in the
next illustration.
Tutorial Exercise Summary
Menu Screens Transactions
(Chapter 2)
Tasks 1, 2 and 3
MainMenu
Application: EZBTUTRL
(Chapter 3)
Task 4
MM_Help
Task 5
JobOn
Task 6
JobOff
Task 7
Data_Help
(Chapter 4)
Task 8 and 10
JON_Tran
Task 9 and 10
JOF_Tran
Task 11
CopyBadge
3-20
EZB.004
Page 55

4
Creating Transactions
Page 56

ds
Page 57

This chapter describes how to create transactions which are packaged as output data
records containing Job On and Job Off data and sent to a disk file.
Overview
In Chapter 3, you designed the screens you created earlier, and you copied a screen to
create a new screen. You also programmed function keys and the beep sound.
In Chapter 4, you will create transactions. A transaction is an object that contains and
moves data. You can send a transaction to a host, into a file on the terminal, or into a
field in the application. You can also receive a transaction from a host, file, or field.
When you create a transaction, you must specify the data it will contain, the format of
the data, and the destination/source/direction of the transaction.
When users run your application at the start of a job, data collected for the Job On
transaction includes a constant value (“JOTRAN”), the worker’s Badge ID Number, the
Part Number, the Order Number, the date, and the time.
Exercise 11: Creating a Transaction
Creating Transactions
4
In this exercise, you will create a transaction called JON_Tran.
To create the JON_Tran transaction
1. Choose Screen: JobOn from the Object List.
2. Choose New Transaction from the File menu. The Transaction Editor dialog box
appears.
4-3
Page 58

EZBuilder Tutorial
The Transaction Editor dialog box consists of the following:
An area where you can enter a Constant Value
•
A list of the Available Fields you have created
•
An area where you can create a list of Transaction Fields
•
The Transaction Editor also contains five arrow buttons.
The first arrow button (>) moves the Constant Value into the Transaction
•
Fields list.
The second arrow button (>) moves selected fields from the Available Fields
•
list into the Transaction Fields list.
The third button (>>) moves ALL fields in the Available Fields list into the
•
Transaction Fields list.
The fourth button (<) moves selected fields from the Transaction Fields list
•
back to the Available Fields list.
The fifth button (<<) moves ALL fields from the Transaction Fields list back to
•
the Available Fields list.
3. In the Object Manager, name the transaction “JON_Tran.”
4. In the Object Manager, click the Transfer Direction field.
5. Click the Transfer Direction button. The Transaction Direction Editor dialog box
appears.
6. Click the Transaction To radio button. Click OK to return to the Object Manager.
7. In the Transaction Editor dialog box, type “JOTRAN” in the Constant Value field.
Click the Constant Value arrow button to move the JOTRAN value into the
Transaction Fields list.
JOTRAN as the first output data item in a transaction record identifies the
Note:
data record as a Job On transaction.
4-4
Page 59

Creating Transactions
8. In the Available Fields list, select JobOn.BadgeNo, JobOn.OrderNo,
JobOn.PartNum, <DATE>, and <TIME>. (Hold down the Ctrl key on your
keyboard to select multiple fields.)
9. Click the Available Fields > button to move the highlighted fields into the list of
Transaction Fields.
You can also drag Available Fields selections into the Transaction Field list,
Note:
or you can double-click the items in the Available Fields list.
You should now have six items in the Transaction Fields list: JOTRAN, three data
input fields (JobOn.BadgeNo, JobOn.OrderNo, and JobOn.PartNum), <DATE>, and
<TIME>.
To adjust Date properties for the JON_Tran transaction
1. In the Transaction Fields list, click <DATE>. The <DATE> default values appear
in the Object Manager.
4
2. In the Override field, double-click False to change it to True. The Length field
value changes to 10.
Remember:
changes to take effect.
Note:
override the current property settings; set Override to False to ensure that the
current property settings cannot be changed.
3. Set the Delimiter to one space character by clicking the Delimiter field and pressing
the space bar on your keyboard once. This setting inserts a space after the Date
field, separating it from the Time field in the output record.
4. Click the Formatting field. A down arrow appears.
You must move to another field in the Object Manager to cause field
The Override field has two settings: True and False. Set Override to True to
4-5
Page 60

EZBuilder Tutorial
5. Click the Formatting down arrow, and choose MM-DD-YYYY.
To adjust Time properties for the JON_Tran transaction
1. In the Transaction Fields list, click <TIME>. The <TIME> default values appear in
the Object Manager.
2. In the Override field, double-click False to change it to True. The Length field
changes to 8.
3. Click the Delineation field. A down arrow appears.
4. Click the Delineation down arrow, and choose Length from the drop-down list that
appears.
Every record ends with a carriage return. Because <TIME> is the last field
specified for the output record (see the Transaction Fields list), setting the
Delineation to Length places that carriage return at the end of the Time field.
5. Click the Formatting field. A down arrow appears.
6. Click the Formatting down arrow, and choose HH:MM:SS from the resulting list.
4-6
Page 61
Creating Transactions
To adjust Transfer Direction for the JON_Tran transaction
The default Transfer Direction sends your transactions to the network. You will now
tell EZBuilder to send the transactions to a file.
1. Choose Trans: JON_Tran from the Object List.
2. In the Object Manager, click the Transfer Direction field.
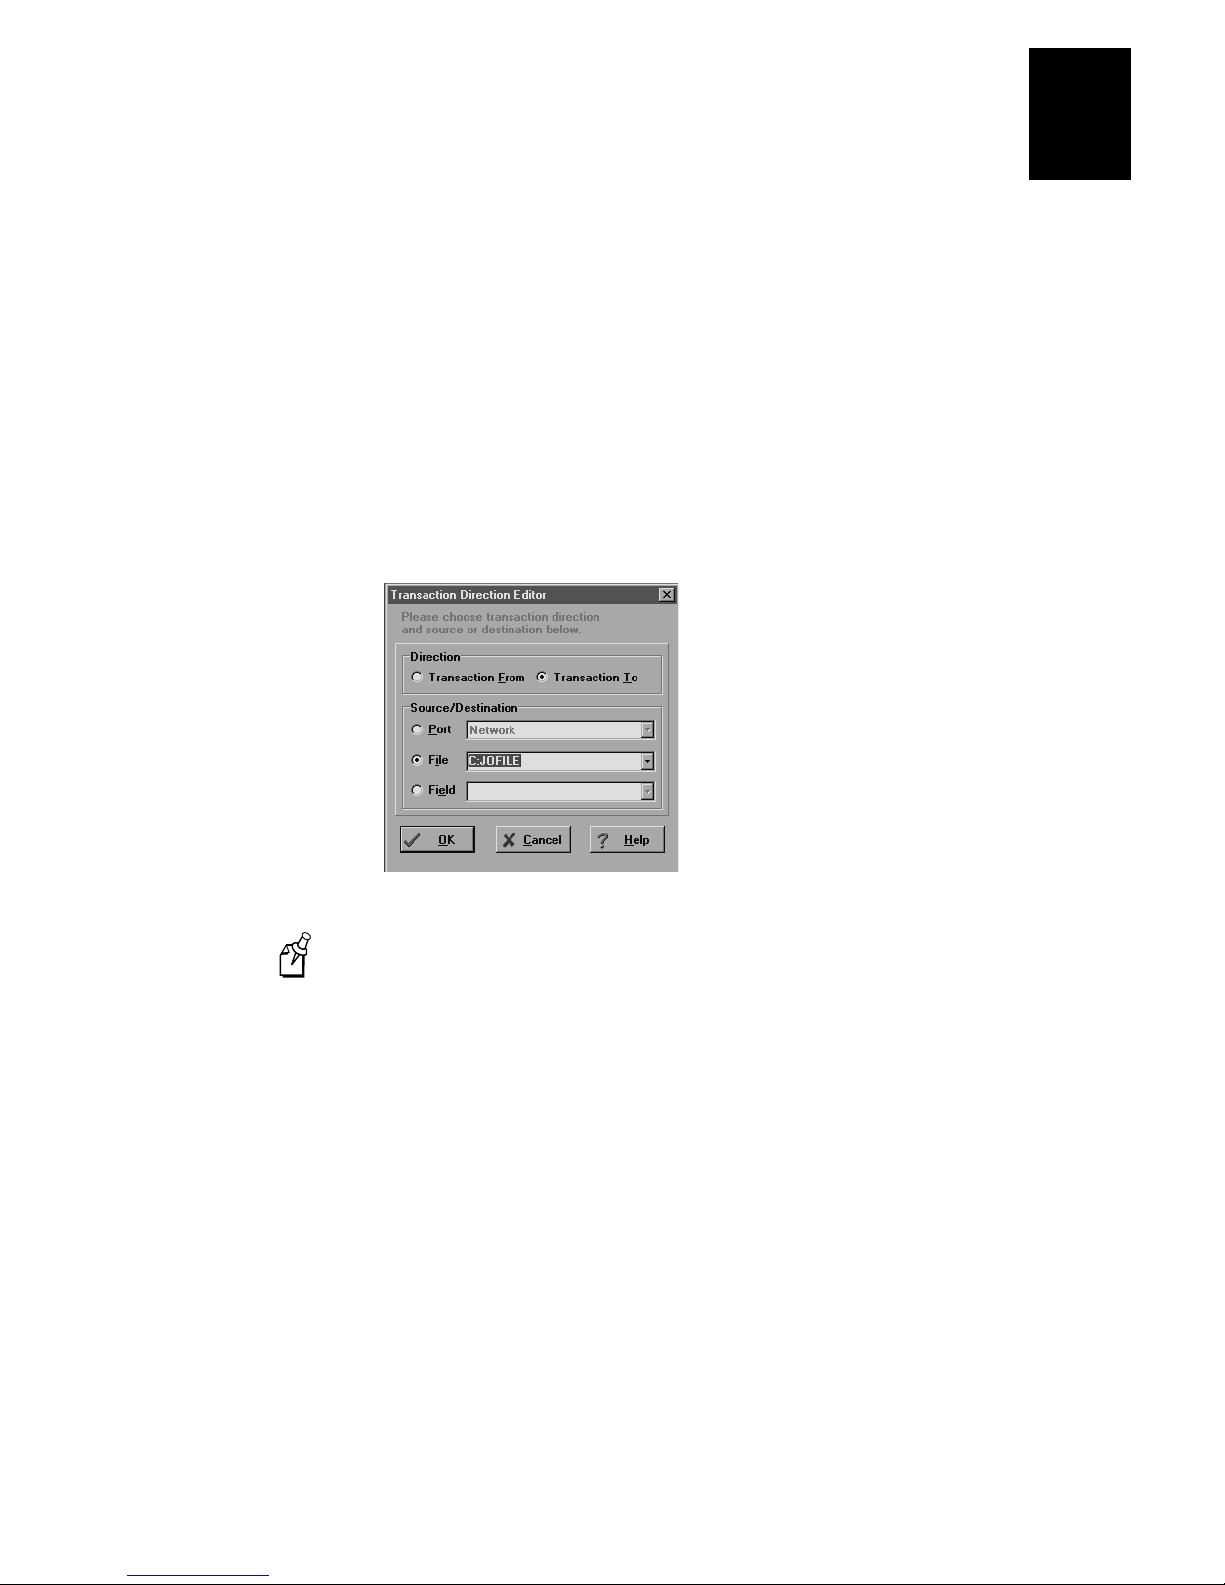
3. Click the button that appears in the Transfer Direction field, and click the File radio
button.
4. In the File field, enter the drive and filename to which you want to send the
transactions (the Job On and Job Off data). An example filename, C:JOFILE, is
shown below.
4
The file named here will be located in the Output path that you specify in the
Note:
Build Options dialog box in Chapter 5. The C drive is a Flash drive; the E drive is
used if you plan to download to a RAM drive; the G drive is used as an extended
storage drive. For file management and RAM drive details, see the
Getting Started Guide
.
EZBuilder
4-7
Page 62

EZBuilder Tutorial
5. Click OK. The drive and filename you specified appears in the Transfer Direction
field in the Object Manager.
Congratulations! You have completed Exercise 11. Save your file, and continue with
Exercise 12.
Exercise 12: Creating the JOF_Tran (Job Off) Transaction
When users run your application at the end of a job, data collected for the Job Off
transaction includes a constant value (JOFTRAN), the worker’s Badge ID Number, the
Part Number, the Order Number, the date, and the time.
In this exercise, you will create a transaction called JOF_Tran.
To create the JOF_Tran transaction
The next several steps are brief because they are similar to those you did for the
Note:
JOTRAN transaction. Refer back to Exercise 11 for details.
1. Choose New Transaction from the File menu. The new transaction and its default
values appear.
2. Rename the transaction “JOF_Tran.”
3. In the Object Manager, change the Transfer Direction field value to To Network.
4-8
Page 63

Creating Transactions
4. In the Transaction Editor dialog box, enter “JOFTRAN” as the Constant Value, and
move the “JOFTRAN” value to the Transaction Fields list. As the first field in the
data record, “JOFTRAN” will identify the record as a Job Off transaction.
5. Move JobOff.BadgeNo, JobOff.OrderNo, JobOff.PartNum, <DATE>, and <TIME>
from the Available Fields list to the Transaction Fields list.
4
Like the JON_Tran transaction that you completed earlier, the current properties
remain as they are for all the Transaction Fields except the <DATE> and <TIME>
fields in the JOF_Tran transaction. These two fields will be changed the same way
you changed them for the JON_Tran transaction.
To adjust Date properties for the JOF_Tran transaction
1. Change the <DATE> Override field to True.
2. Change the Delimiter property to one blank character.
3. Choose the MM-DD-YYYY Formatting option.
To adjust Time properties for the JOF_Tran transaction
1. Change the <TIME> Override field to True.
2. Change Delineation to Length.
3. Choose the HH:MM:SS Formatting option.
To adjust Transfer Direction for the JOF_Tran transaction
1. In the Object List, choose Trans: JOF_Tran.
2. Click the Transfer Direction field, and then click its button to bring up the
Transaction Direction Editor.
4-9
Page 64

EZBuilder Tutorial
3. In this exercise, both JON_Tran and JOF_Tran transactions go to the same output
file. Change the Destination from the Port option (showing “Network”) to the File
option, and enter the same drive and filename that you used in the JON_Tran
transaction. When you have finished, click OK to close the Transaction Direction
Editor dialog box.
When the program is run, there will be one JOTRAN (Job On) transaction for a
Note:
specific job, followed by that job’s JOFTRAN (Job Off) transaction. These transactions
will be followed by other pairs of JOTRAN and JOFTRAN transaction records as
further jobs are finished. (See Chapter 5 for example output.)
Congratulations! You have completed Exercise 12. Save your file, and continue with
Exercise 13.
Exercise 13: Finishing the Transactions
As your program stands right now, users will enter or scan the Badge ID Number, the
Part Number, and the Order Number, in that order. The program still needs to be told
that upon exiting the scan (or entering the last keystroke) of the Order Number (the last
data field), all the gathered information must be packaged by the transaction and sent to
the file.
In this exercise, you will finish the Job On and Job Off transactions.
To finish the Job On Transaction
1. Choose Screen: JobOn from the Object List.
2. In the Viewport, select the Order field.
3. In the Object Manager, click the On Exit tab.
4. Click the Do Transaction field, and then click the resulting down arrow. A dropdown list box appears.
4-10
Page 65

Creating Transactions
5. Choose JON_Tran. Setting the Do Transaction to JON_Tran tells EZBuilder that
you want the finished application to generate a Job On transaction when the user
exits the Order data field.
In other words, when users finish scanning or entering the Order data, an output
record is sent to the file. The record starts with the JOTRAN identifier to indicate it
is a Job On Transaction. The record also contains the Badge, Part, and Order data,
as well as the Date and Time of the transaction. (See Chapter 1 for an illustration of
this process; see Chapter 5 for example data.)
4
To finish the Job Off Transaction
These steps are similar to the ones you just followed. Refer back to the previous
Note:
steps if you need more detail.
1. Choose Screen: JobOff from the Object list.
2. In the Viewport, select the Order field.
3. In the Object Manager, click the On Exit tab to open the Validation dialog box.
4. Choose JOF_Tran in the Do Transaction field. Setting the Do Transaction to
JOF_Tran tells EZBuilder that you want the finished application to generate a Job
Off transaction when users exit the Order data field.
In other words, when users finish scanning or entering the Order data, an output
record is sent to the file. This record will start with the JOFTRAN identifier to
indicate it is a Job Off Transaction. The record will also contain the Badge, Part,
and Order data as well as the Date and Time of the transaction. (See Chapter 1 for
an illustration of this process; see Chapter 5 for example data.)
Congratulations! You have completed Exercise 13. Save your file, and continue with
Exercise 14.
4-11
Page 66

EZBuilder Tutorial
Exercise 14: Creating the CopyBadge Transaction
Before continuing, we will review the tutorial application. Upon starting a new job, the
user scans a bar code or enters the letters “SFCLBR” (Start Factory Labor). This input
data tells the terminal that a JobOn transaction is started and automatically sends the
JOTRAN constant value into the JON_Tran Transaction Fields list.
The user then enters or scans the other Job On transaction data—the Badge ID Number,
Part Number, and Order Number—in that order. Following that, the user performs the
job.
Upon ending the job, the user scans a bar code or enters the letters “EFCLBR” (End
Factory Labor). This input data tells the terminal that a JobOff transaction is started and
automatically sends the JOFTRAN constant value into the JOF_Tran Transaction
Fields list. The user again enters or scans the same data—Badge ID Number, Part
Number, and Order Number data—in that order.
With the exception of the SFCLBR and EFCLBR codes, the same three data fields are
entered or scanned twice—at the start of a job and at the end of a job.
Suppose the same three data fields were automatically entered at the end of the job?
The user saves time, having to only enter or scan the EFCLBR at the end of the job to
generate the Job Off transaction. Not only does it save time, it ensures accuracy as
well—especially if data is keyed in by the worker.
This exercise is optional, but it presents a way for you to help your users save time
when running this type of application. We recommend that you complete this exercise.
In this exercise, you will set up your application to automatically copy data from one
field (JobOn.BadgeNo) into another field (JobOff.BadgeNo).
To save time in this exercise, we show you how to create only the CopyBadge
transaction. You can then use the steps to help you create the CopyPart and CopyOrder
transactions.
To create the CopyBadge Transaction
1. Choose Screen: JobOn from the Object List.
2. In the Viewport, select the BadgeNo field.
3. Click the On Exit tab in the Object Manager.
4. Type “CopyBadge” in the Do Transaction field.
4-12
Page 67

Creating Transactions
5. Double-click CopyBadge. The CopyBadge transaction is created (and shown in the
Object List), and the CopyBadge transaction values appear in the Object Manager
and the Transaction Editor dialog box.
JOFTRAN appears in the Constant Value area (as previously illustrated) if
Note:
you have continued your tutorial exercise without exiting since entering that value.
The Constant Value is a temporary value that is not saved when you exit
EZBuilder; therefore, your screens may look slightly different unless you work
straight through the exercise—as we did to create the screen pictures for this
document. In addition, do not let the Constant Value “JOFTRAN” confuse you.
The Constant Value is not part of the transaction you are now defining; only those
objects you move into the Transaction Fields list become part of the current
transaction you are defining.
4
6. Move JobOn.BadgeNo from the Available Fields list to the Transaction Fields list.
7. Click the Transfer Direction field, and then click the resulting button to open the
Transaction Direction Editor.
8. In the Transaction Direction Editor, click the Field radio button, and then click the
Field down arrow, and choose JobOff.BadgeNo from the drop-down list.
4-13
Page 68

EZBuilder Tutorial
9. Click OK to close the Transaction Direction Editor.
With the above method, when the user selects the Job On transaction from the
Note:
Main Menu and enters the Badge ID Number into the JobOn.BadgeNo field, that data is
automatically entered into the Job Off transaction’s JobOff.BadgeNo field as well. If
desired, you could also code Part Number and Order Number data to automatically
move from the JobOn data fields to their corresponding JobOff fields.
The CopyBadge transaction you just completed sets your application to copy when the
user enters data on the JobOn screen; however, the JobOff default is to clear all fields
from a previous JobOff transaction (as typically desired). Because you want to save the
JobOff.BadgeNo data, you must go back to the Job Off screen and set EZBuilder to
stop clearing that data. The next few steps explain that process for the Badge ID
Number data, but if you have also coded Part Number and Order Number to be
automatically entered into the JobOff transaction, you will want to do these next few
steps for those fields as well.
To stop automatically clearing data
1. Choose Screen: JobOff from the Object List.
2. In the Viewport, select the Badge field.
3. In the Object Manager, scroll to the Clear on Screen Entry field.
4. Click the Clear on Screen Entry field, and then double-click to change the field
value to False.
Repeat Steps 2 through 4 for the PartNum and OrderNo fields if you had coded
EZBuilder to automatically move their JobOn transaction data into the JobOff
transaction fields.
Congratulations! You have finished Exercise 14. Save your file, and continue with
Exercise 15.
4-14
Page 69

Exercise 15: Creating Toggle Capability
Your application is currently coded so users view the Main Menu and press F2 to bring
up the JobOn screen where data is captured at the start of a job. Users then press Esc to
return to the Main Menu where F3 can be pressed to bring up the JobOff screen so data
can be captured at the end of the job.
In this exercise, which is optional, you will code your application so users can go back
and forth, or “toggle,” between the JobOff and JobOn screens without having to first
return to the Main Menu.
To create toggle capability from JobOff to JobOn screen
1. Choose Screen: JobOff from the Object List.
2. In the Viewport, select the OrderNo field.
3. In the Object Manager, choose the On Exit tab, and then choose the On Val
Succeed tab.
4. Click in the Navigation Choice field, and then click the resulting button to bring up
the Navigation Selection dialog box.
Creating Transactions
4
5. In the Navigation Selection dialog box, click the Go to Field radio button.
6. Click the Go to Field down arrow button, and choose JobOn.BadgeNo from the
resulting drop-down list.
7. Click OK to close the Navigation Selection dialog box.
To create toggle capability from JobOn to JobOff screen
1. Choose Screen: JobOn from the Object List.
2. In the Viewport, select the OrderNo field.
3. In the Object Manager, choose the On Exit tab, and then choose the On Val
Succeed tab.
4. Click the Navigation Choice field, and then click the resulting button to bring up
the Navigation Selection dialog box.
5. In the Navigation Selection dialog box, click the Go to Field radio button.
6. Click the Go to Field down arrow button, and choose JobOff.BadgeNo from the
resulting drop-down list.
7. Click OK to close the Navigation Selection dialog box.
Congratulations! You have completed Exercise 15. Save your file before continuing.
4-15
Page 70

EZBuilder Tutorial
Chapter Summary
In this chapter, you learned how to create a transaction by creating the Job On, Job Off,
and CopyBadge transactions. You also learned how to format the system date and time
for automatic date and time stamps, and how to transfer the collected data to a file. You
learned how to transfer input data entered on one transaction (JobOn.BadgeNo) into
another transaction’s field (JobOff.BadgeNo) to be saved for output. In addition, if you
chose to do the optional Exercise 15, you learned how to create toggle capability.
The EZBuilder components covered up to this point in the tutorial are shaded in the
next illustration. You now have finished everything necessary for EZBuilder to
generate your application program
When you are ready to build and test your application program, continue with Chapter
5, which provides example data output and information about downloading your
application program to the terminal.
Tutorial Exercise Summary
Application: EZBTUTRL
Menu Screens Transactions
(Chapter 2)
Tasks 1, 2 and 3
MainMenu
(Chapter 3)
Task 4
MM_Help
Task 5
JobOn
Task 6
JobOff
Task 7
Data_Help
(Chapter 4)
Task 8 and 10
JON_Tran
Task 9 and 10
JOF_Tran
Task 11
CopyBadge
EZB.005
4-16
Page 71

5
Testing Your Program on the Simulator
Page 72

ds
Page 73

Testing Your Program on the Simulator
This chapter describes how to the build your application program using the EZBuilder
code generator and how to test it using the Simulator. It also provides information on
downloading your program to your terminal and points you to some example
applications available for study.
Overview
In earlier chapters, you learned how to create menus, screens, and transactions, as well
as data fields, labels, and various actions.
In this chapter, you will test your application program (your .IMP file), and you will set
certain options. You will also have EZBuilder build, or “compile,” your executable
program (an .EXE file). Using the Simulator, you can test your program immediately
after it is compiled. You will also learn how to download your application to your
terminal and test it again from there.
Exercise 16: Building the Program
In this exercise, you will build your program.
5
To set your Build options
1. Choose Build from the Options menu.
You can use one of three Categories, or “modes,” to build your program.
Debug mode. This mode adds the debugging information required by
•
CodeView Debugger to the executable file. Generally, debug mode is used only
by C programmers. Because the debug information is included, this mode
produces a larger application.
•
Normal mode. This mode produces the most efficient executable file.
5-3
Page 74

EZBuilder Tutorial
Min externs (minimal external functions). This mode produces the smallest
•
executable file.
If you add any C program code to the program after EZBuilder generates its
Note:
code, be aware that when recompiling in EZBuilder, EZBuilder will regenerate all
code, rewriting over any C program code changes you may have made outside of
EZBuilder.
2. Select the Normal radio button.
3. In the Build Options dialog box, click the Paths tab.
EZBuilder searches for the compiler and certain libraries as it builds your program.
You must indicate correct paths to these components, and you must also indicate
where you want your generated EZBuilder application output file (your executable
C program) stored.
The Compile path indicates the location of the Microsoft Visual C++ compiler
•
on your computer. Make sure the path is correct.
The PSK path indicates the location of the PSK libraries and Simulator on your
•
computer. Make sure the path is correct.
The Output path indicates the location where you want your generated
•
application program to be stored after EZBuilder has built it. This path
specifies where the Simulator will look for all files opened in your application
as well as all files used to simulate COM or network input and output. Make
sure the path is correct.
You will find some EZBuilder example applications on output path
C:\INTERMEC\EZBUILD\EXAMPLES. For more information on these examples,
see the EZBuilder Getting Started Guide.
4. Click OK to build the program.
5-4
Page 75

Testing Your Program on the Simulator
To build (compile) your application program
1. Choose Build from the Build menu. The Build Status dialog box appears, showing
the status of the build.
If you build your program in Debug mode rather than Normal mode and receive
warnings, run your program anyway to test it.
5
If you receive errors when building, you will not be able to run your program until
you have debugged it.
2. Click Close.
Congratulations! You have completed Exercise 16. Save your work, and continue with
Exercise 17.
5-5
Page 76

EZBuilder Tutorial
Exercise 17: Testing the Program
After EZBuilder has built your program, test it using the EZBuilder Simulator.
To test the program using the Simulator
From the Tools menu, choose the Trakker Simulator command (choose this
•
command for Trakker, 6400, or T2090). The Simulator screen appears showing the
Main Menu of your program.
You can choose to perform tests in any order, but you must test everything you coded.
Some suggested tests are listed in the “Suggested Tests” section.
While testing your program on the JobOn and JobOff screens, use the
to the Main Menu. You can exit your program and return to Windows 95, Windows 98,
Windows NT, and Windows 2000 at any time by pressing
For online help, you can access the Simulator Editor, as described in the EZBuilder
Getting Started Guide.
Ctrl-C
twice.
key to return
Esc
Suggested Tests
The following are some suggested tests to get you started. Depending on your options
in coding the tutorial application (or your enhancements you made), you should think of
additional tests. In testing a program, every branch, data field, action, screen, menu,
transaction, and programmed function key should be thoroughly tested before the
program is deemed ready for users.
1. From the Main Menu, test the use of the functions keys on your keyboard to see if
the program branches correctly to the MM_Help screen, the JobOn screen, and the
JobOff screen, respectively. Test to see that
the JobOn and JobOff screens.
returns you to the Main Menu from
Esc
5-6
Page 77

Testing Your Program on the Simulator
You can bring up the JobOn and JobOff screens from the Main Menu by moving to
the appropriate option and pressing
2. From the JobOn screen, select the three data fields, one at a time, and use the F1
key to see if the Data_Help screen appears for each data field.
3. From the JobOff screen, repeat the test described in Step 2.
If you created the CopyBadge transaction, as soon as you entered the Badge
Note:
ID number for a JobOn transaction, it was automatically entered into the JobOff
transaction’s storage place for Badge ID Number. Remember, you do not need to
key it again for your JobOff transaction records. (Optionally, you may have coded
the same logic for automatically moving Part and Order data.)
4. From the MM_Help screen, use the up and down arrow keys on your keyboard to
test the scrolling section to be sure you can read all of the help text. Check for any
typing, logic, or semantic errors; if you find any, make a note to correct them later
in EZBuilder and to recompile.
5. From the Data_Help screen, repeat the test described in Step 4.
6. On the JobOn screen, enter data for the three fields. When you completely fill the
Badge field, it automatically goes to the Part field for data. Test with shorter Badge
ID data, and use F4 or
regarding automatic entry of data.)
to move to the Part field. (See the Note in Step 3
Tab
. Test that these navigation options work.
Enter
5
7. Use F4 to tab back to previous fields so you can re-enter data.
8. Test the Part Number field by entering 25 characters to see that it wraps to the next
line. Also, test by entering shorter Part data, and then use F4 to move to the Order
field and enter that data.
9. From the JobOn screen, test how you can use the right and left arrow keys to move
to certain characters in the data to correct those characters.
10. When you finish testing and have made notes on how you want to enhance or
correct your program, press
11. Go to the location where your program files are kept (as per your Output search
path), and see how many files were generated by EZBuilder.
12. List your JOFILE output file on your screen or a printer, and look at your JOTRAN
and JOFTRAN records. Are they correct as per the data you entered? Did you plan
and write down your test data before testing? If not, repeat the tests using the
example data listed on the next page.
You should make your program available for others to use on the terminal only
Note:
after you are satisfied with your test results and you have enhanced your program as
needed. To make your program available to others, you must download your executable
program to the terminal. This process is described in Exercise 18 later in this chapter.
Ctrl-C
twice to exit the program.
5-7
Page 78

EZBuilder Tutorial
Example Data
Whether you are testing your program with test data or your user is executing your
program with real data, the three input data terms Badge ID Number, Part Number, and
Order Number data can either be keyed on a keyboard or scanned with a terminal. The
data is stored as output records and sent to a file that can be listed to your screen or
printed, depending on your device capabilities.
The output file contains two types of transaction records: Job On transactions and Job
Off transactions.
Record Identification Codes
The first item in each record is the six- or seven-letter identification code.
JOTRAN identifies the record as having Job On transaction data.
•
JOFTRAN identifies the record as having Job Off transaction data.
•
Without the identification code, it is impossible to tell the two records apart.
Record Data Order
In the record, the identification code (in this case, JOTRAN or JOFTRAN) is always
the first item. The identification code is followed by a comma, the Badge ID Number, a
comma, the Part Number, a comma, the Order Number, a comma, the system date, a
space character, and the system time. Except for the space between date and time, the
data fields are run together and delimited by commas, as shown here by their field
names:
IDCode,BadgeNo,PartNum,OrderNo,Date Time
Because a carriage return ends the record after the Time data, each record can be
printed on one line in a listing.
Automatic Data Entered into the Record
Aside from data entered or scanned for the BadgeNo, PartNum, and OrderNo fields,
some information (other than the identification code) is automatically attached to the
record when the transaction is packaged (prepared for output).
As soon as the user completes the Order Number for a transaction, the date, time,
•
and carriage return characters are automatically appended before the transaction
record is sent to the output file.
If your program includes any optional copy transactions (CopyBadge, CopyPart,
•
CopyOrder), the appropriate data for a JobOn transaction is sent to its
corresponding place in the JobOff Transaction as soon as it is entered by the user.
This saves operator time and ensures accuracy.
5-8
Page 79

Testing Your Program on the Simulator
5
Example Output Listing
You can list your output file and see one transaction record per line on the listing. The
data fields will be in the same order in which you listed them in the JobOn and JobOff
Transaction Fields lists.
An example listing of eight transactions follows. Your test data may be different.
JOTRAN,1234567890,1111133333444,2342345,04-23-1997 04:30:00
JOFTRAN,1234567890,1111133333444,2342345,04-23-199 04:45:02
JOTRAN,22222,2339AB-345473-XYZ,04-23-1997,5678990 04:48:00
JOFTRAN,22222,2339AB-345473-XYZ,04-23-1997,5678990 05:30:10
JOTRAN,35353,ASMCJK-234-88,04-23-1997,1526125 05:35:17
JOFTRAN,35353,ASMCJK-234-88,04-23-1997,1526125 07:02:00
JOTRAN,67612,22222333334444488,4837573,04-23-1997 08:15:01
JOFTRAN,67612,22222333334444488,4837573,04-23-1997 08:55:10
Congratulations! You have completed Exercise 17. You can go back to EZBuilder and
make any modifications you want to your program, or you can begin a new program.
Save your work before continuing with Exercise 18.
Exercise 18: Downloading Your Program
When your EZBuilder application program has been built and thoroughly tested,
download it to your terminals for users.
In this exercise, you will connect to the terminal and download your program.
To prepare for a download
1. Connect your terminal to the development PC or host computer. Be sure to note the
computer’s COM port to which you are connecting the cable. For help, see your
user's manual.
Refer to your terminal’s documentation for complete details on the physical
connection.
2. Open your EZBuilder application. Be sure you know your filenames and directory
paths.
5-9
Page 80

EZBuilder Tutorial
3. Choose Download from the Tools menu. The Download Application dialog box
appears.
4. From the Communications dialog box, make sure the Communications settings
shown on the screen and those shown on the terminal are the same.
The COM2 port is listed in the above example. Be sure you know the COM
•
port on your computer to which your cable is connected. Make sure your
terminal setting matches the setting used by your computer.
The default (19200) Baud Rate is shown in the example. The baud rate must
•
match the setting on the terminal; change it if necessary.
Terminal Drive C is the only drive from which you can run your EZBuilder
•
application on the terminal. Do not change this drive. (For more information,
see the EZBuilder Getting Started Guide.)
From the Download Application dialog box, you can choose whether or not to run
the program when you download it. To run the program, be sure Run Program is
selected.
The Default, Download, Exit, Cancel, and Help buttons (available on the
Note:
Download Application dialog box) are also available on the two other Download
Application dialog boxes (Data and Validation), so you can review the settings in
any order, and then download your program and run it when you are ready.
5-10
Page 81

Testing Your Program on the Simulator
5. Click the Data tab in the Download Application dialog box to review the Parity
Types, Data Bits, and Stop Bits.
6. On the Data tab screen, make sure the data settings shown on the screen and those
shown on the terminal are the same. Change them if necessary.
7. Click the Validation tab in the Download Application dialog box to review the
Validation settings.
5
8. On the Validation tab screen, make sure the Validation settings shown on the
screen and those shown on your terminal are the same. Change them if necessary.
Note:
must be changed to “Enabled” with or without TMF. Also, the EOM#1 must be set
(not blank).
If the terminal’s Commands Via Serial Port shows Disabled, the terminal
5-11
Page 82

EZBuilder Tutorial
To download EZBuilder applications and files
1. Click Download when you have verified that the computer and terminal settings
match. The Protocol Status dialog box appears, showing the progress of the
download.
2. The Information dialog box appears when your program has successfully
downloaded. Click OK to clear the message.
When your download is successful, you can test your program on the terminal in the
same manner that you previously tested it on the computer.
Congratulations! You have completed Exercise 18. Save your work before continuing.
Chapter Summary
In this chapter, you learned how to build, test, and download your program. You also
studied example applications. You have completed the EZBuilder Tutorial and are now
ready to run your application. Be sure to read Appendix A to learn about using
EZBuilder features.
5-12
Page 83

Where Do You Go From Here?
After you have completed this tutorial and enhanced it to your satisfaction, you may
want to develop your own application programs or you may want to learn more
possibilities.
Using the Simulator Editor
Icons have been created for the development tools located in your Intermec folder.
Look in that folder and note these two items:
Simulator Editor. This allows you to make changes to the Simulator characteristics.
•
For example, you may want to mimic host data (mostly network replies) to debug
your applications.
Simulator Editor Help. This provides help about Simulator characteristics that can
•
be changed using the Simulator Editor.
Using the Example Applications
Study the example applications that were included on the CD-ROM with your
EZBuilder package. These will supply you with further EZBuilder features.
Testing Your Program on the Simulator
5
Refer to the
EZBuilder Getting Started Guide
for descriptions of the examples.
Using the Online Help
EZBuilder offers online help, as described in Chapter 1 of this tutorial.
Now that you have some understanding of EZBuilder’s basic features, open a new
application and experiment. Use online help to direct you into some new features.
5-13
Page 84

abc
Page 85

A
Using EZBuilder Features
Page 86

Page 87

Using EZBuilder Features
This chapter provides examples of how you can solve problems and accomplish
common programming tasks using EZBuilder.
Using the Example EZBuilder Applications
A variety of EZBuilder examples are included in the EXAMPLES directory of the
EZBuilder CD-ROM. The following table provides a brief description of these
applications. Examples of using some of the applications are also provided later in this
chapter. This material assumes that you have a basic operating knowledge of EZBuilder
and Microsoft Visual C/C++ version 1.5X.
EZBuilder Example Applications
Name Usage
DEMO This application demonstrates the use of some less obvious
characteristics of EZBuilder, such as setting a call in the application
entry event to override the default of starting the application in the
first menu that was defined. This application also shows how to
create a login screen, how to compare a field's contents against a set
of constant values or file data, how to move data from multiple fields
into another field, and how to use one input field with data type
codes that indicate into which other fields the input data is to be sent.
Several other advanced techniques are included in this example
application.
A
CLRFLDS2 This application clears the contents of all input fields on a screen.
When the cursor leaves the last field and enters the first field again,
all fields are emptied. You can set each field to clear on entry;
however, this only clears the field that the cursor is in.
EZDIRTTCP This application transmits data to an echo server and receives the
response.
EZTFTP1 This application sets up a keypress action to send a file to a host. The
filenames are static—they must be set at compile time and cannot be
changed at runtime.
EZTFTP2 This application starts a transmit or receive by pressing a key. Using
the approach described here, the application can transmit and receive
files.
EZTFTP3 This application sets up a keypress action that begins the file transfer
and sets filenames dynamically at run time.
A-3
Page 88

EZBuilder Tutorial
Example Application Summary (continued)
Name Usage
FILEFND This application demonstrates two ways to search through a file and
FIN and WIP These two applications are used to perform a physical inventory of a
JUMPRET Jump Return shows you how you can call several levels deep and
find a record that matches a particular field. The first way is a simple
linear search, which is slow and should only be used on fairly short
files. The second way is a binary search, which is much faster for
large files, but requires that the data in the file be sorted by the field
of interest, and that the records be a fixed length.
cut and sew manufacturer of curtains and bedding goods. FIN
(Finished Goods) is used to scan cardboard boxes that store finished
goods; the scan rate is more than one carton per second. WIP (Work
in Progress) allows a rapid scan of bar coded tickets attached to the
goods. Both applications build data files with location and item
number data. WIP includes an optional quantity count (default = 00).
These applications include examples of validity checking of input
data.
still return to a main screen/menu without going through the
intermediate levels, and without overflowing the stack. Most of the
screens are used to create an arbitrary number of layers below the
main menu, but the information on how to get back is in the
comments in the field in the screen RETURN_TO_MAIN.
PARSE This application scans a single bar code with multiple fields and
parses the multiple fields in the EZBuilder application. This
approach assumes that each field within the bar code is a fixed length
or is delineated by a character.
SCRLFILE This application reads a file into a scrolling field and allows the user
to select a particular record.
SHOWHEX This application demonstrates using a user function from a user-
developed library.
TCPDEMO This application shows you how you can create an application that
uses the direct TCP/IP socket interface feature on the DCS 30X. On
the Trakker Antares terminal, you run TCPDEMO.IMP. The
application sends a transaction to the server and requests a direct
TCP/IP socket connection with a TCP/IP host. The DCS 30X acts as
a pass-through server between the host and a Trakker Antares UDP
Plus terminal running this EZBuilder application.
USERVAL Demonstrates use of user function im_set_validation_callback, and
the associated call back function to validate data as it is entered.
A-4
Page 89

Using EZBuilder Features
Example Application Summary (continued)
Name Usage
VTDEMO This application provides a complete VT100 screen mapping
demonstration using the DCS 30X and a Trakker Antares terminal.
On the DCS 30X, run a sample host application. On the terminal, run
VTDEMO.IMP. The DCS 30X contains the script file that provides
the instructions for mapping the transaction fields from the terminal
to the sample host application. When you run the demonstration, you
can watch the transaction fields being mapped to the host
application.
Working With User Functions and Libraries
This section describes how to develop, build, and use a user library with EZBuilder.
One of the actions that can be set for various action objects in EZBuilder is the user
function. You can set a User Function for a given object using
•
a standard Microsoft C function.
A
•
an Intermec Trakker Antares PSK function.
•
in-line C statements.
•
a user-defined function from a user-provided library.
If the functionality you want cannot be created with a C statement, a C function, or a
PSK function, then you may want to develop custom functions to be called from an
EZBuilder application.
To create a custom function
1. Design, code, and test the function.
2. Build a static library from the function.
3. Make function calls at the desired locations in the EZBuilder application.
4. Configure EZBuilder to link with the static library when building your applications.
5. Build your application.
A-5
Page 90

EZBuilder Tutorial
Reviewing the Example Application
Given a screen with two fields, show the data from the first field in the second field in a
hex format. Set this process statement in the EZBuilder Object Manager. The
EZBuilder application created for this example is on the EZBuilder CD-ROM with the
filename SHOWHEX.IMP.
Even though these fields are set up as numeric, they are strings. If you look at the
generated C code you will find declarations similar to the following:
static char Screen0_Field0_F[SCREEN0_FIELD0_FL +1]; //
static char Screen0_Field1_F[SCREEN0_FIELD1_FL +1]; //
static char Screen0_Field2_F[SCREEN0_FIELD2_FL +1]; //
In this example, we will create a user function to
accept as arguments, pointers to the two fields, each one of which is a string.
•
convert the first string to a long integer.
•
convert the resulting long integer back to a string in hex format.
•
place the result in the second field pointed to by the second argument.
•
Use Microsoft Visual C/C++ version 1.5X to develop a stand-alone application with the
desired functions and header files.
#include <stdlib.h>
#include "imt24lib.h"
#include <conio.h>
#include "imstdio.h"
void tohex(char *field1, /* pointer to first EZBuilder field */
char *fieldres /* pointer to the EZBuilder field to*/
/* place the results */
)
{
long field1long; /* long integer version of first field */
field1long = atol(field1); /* convert first to long */
A-6
Page 91

Using EZBuilder Features
/* convert sum back to string */
_ltoa(field1long, fieldres, 16);
}
void main()
{
char sum_str[20]; /* temp holding place for result */
im_clear_screen();
tohex("18", sum_str);
}
When the application is built and run on the Simulator, it produces the correct output so
we know that function works.
A
Building a Static Library From the Function
A library is just a collection of functions. To build a function library, you need to
remove the main program statements.
#include <stdlib.h>
#include "imt24lib.h"
void tohex(char *field1, /* pointer to first EZBuilder field */
char *fieldres /* pointer to the EZBuilder field to*/
/* place the results */
)
{
long field1long; /* long integer version of first field */
field1long = atol(field1); /* convert first to long */
/* convert sum back to string */
_ltoa(field1long, fieldres, 16);
}
To build a static library
1. In the Microsoft Visual C/C++ 1.5X Options menu, choose Project.
2. Set Project Type to Static library (.LIB).
A-7
Page 92

EZBuilder Tutorial
3. Set the following compiler options.
CPU 8086 / 8088*
Floating Point Calls Alternate Math
4. Choose Build from the Project menu, build the library, and copy it to your working
directory.
Placing Function Calls in the EZBuilder Application
Next, you need to place a call to the new function in the User Function activity in the
On Entry tab in the Object Manager.
The complete entry is shown below:
(1);tohex(Screen0_Field0_F,Screen0_Field2_F);
(1); Required in EZBuilder if the function does not return a value.
tohex Hex conversion function.
Screen0_Field0_F The name of the input field.
Screen0_Field2_F The name of the field that displays the value in hex.
Configuring EZBuilder to Link With Your Library
Next, you need to configure EZBuilder to link with your library.
To configure EZBuilder to link with your library
1. Open EZBuilder.
2. Choose Options from the Build menu.
3. In the Include Libraries field, add the name of the library
you created. The library must be included in the library
subdirectory.
A-8
Page 93

Using EZBuilder Features
4. Choose Build from the Build menu. If the application has no errors, run it in the
Simulator. Your screen should be similar to the previous example.
Click the Includes tab and add any header (.h) files you created.
Note:
Parsing a Single Scanned Label Into Multiple Fields
This section describes how to set up an EZBuilder application to scan a single bar code
with multiple fields and parse the multiple fields in the EZBuilder application. This
approach assumes that each field within the bar code is a fixed length or is delineated
by a character. The EZBuilder application created for this example is on the EZBuilder
CD-ROM with the filename PARSE.IMP.
To parse a single label into multiple fields
1. Create an input field for the scanned bar code that is at least the length of the bar
code.
A
2. Create the required number of input fields to receive each data field.
3. Create a transaction to move the contents of the first field into each of the other
fields.
4. Click the On Exit tab of the first field and set the Do Transaction action to call the
transaction you created.
To create an input field for the scanned bar code
1. With the desired screen displayed, choose Add Field from the File menu.
2. Set the field size and type to the desired settings. This field should be at least as
long as the bar code. You can set the field to be either visible or invisible
depending on your application needs.
A-9
Page 94

EZBuilder Tutorial
To create the required number of input fields to receive each field of data
1. With the desired screen displayed, create the fields that will contain the scanned
data.
2. Set the field size and type to the desired settings. These fields can be on the same
screen or other screens. They can also be visible or invisible depending on your
application needs.
To create a transaction to move the contents of the first field to the other fields
1. Set the Transfer Direction property to From Screen0.Field0 (source field name).
2. Set the Delineation property to Length or Delimiter depending on your
requirements.
3. If you use Delimiter, set the Delimiter property to the desired character (this
character must appear in the bar code to separate each field).
4. In the Transaction Editor, copy each of the destination fields from the Available
Fields list to the Transaction Fields list by double-clicking each destination field.
To set the Do Transaction to call the transaction you created
1. Go back to the screen with the first field on it, and double-click the first field.
2. Click the On Exit tab.
A-10
Page 95
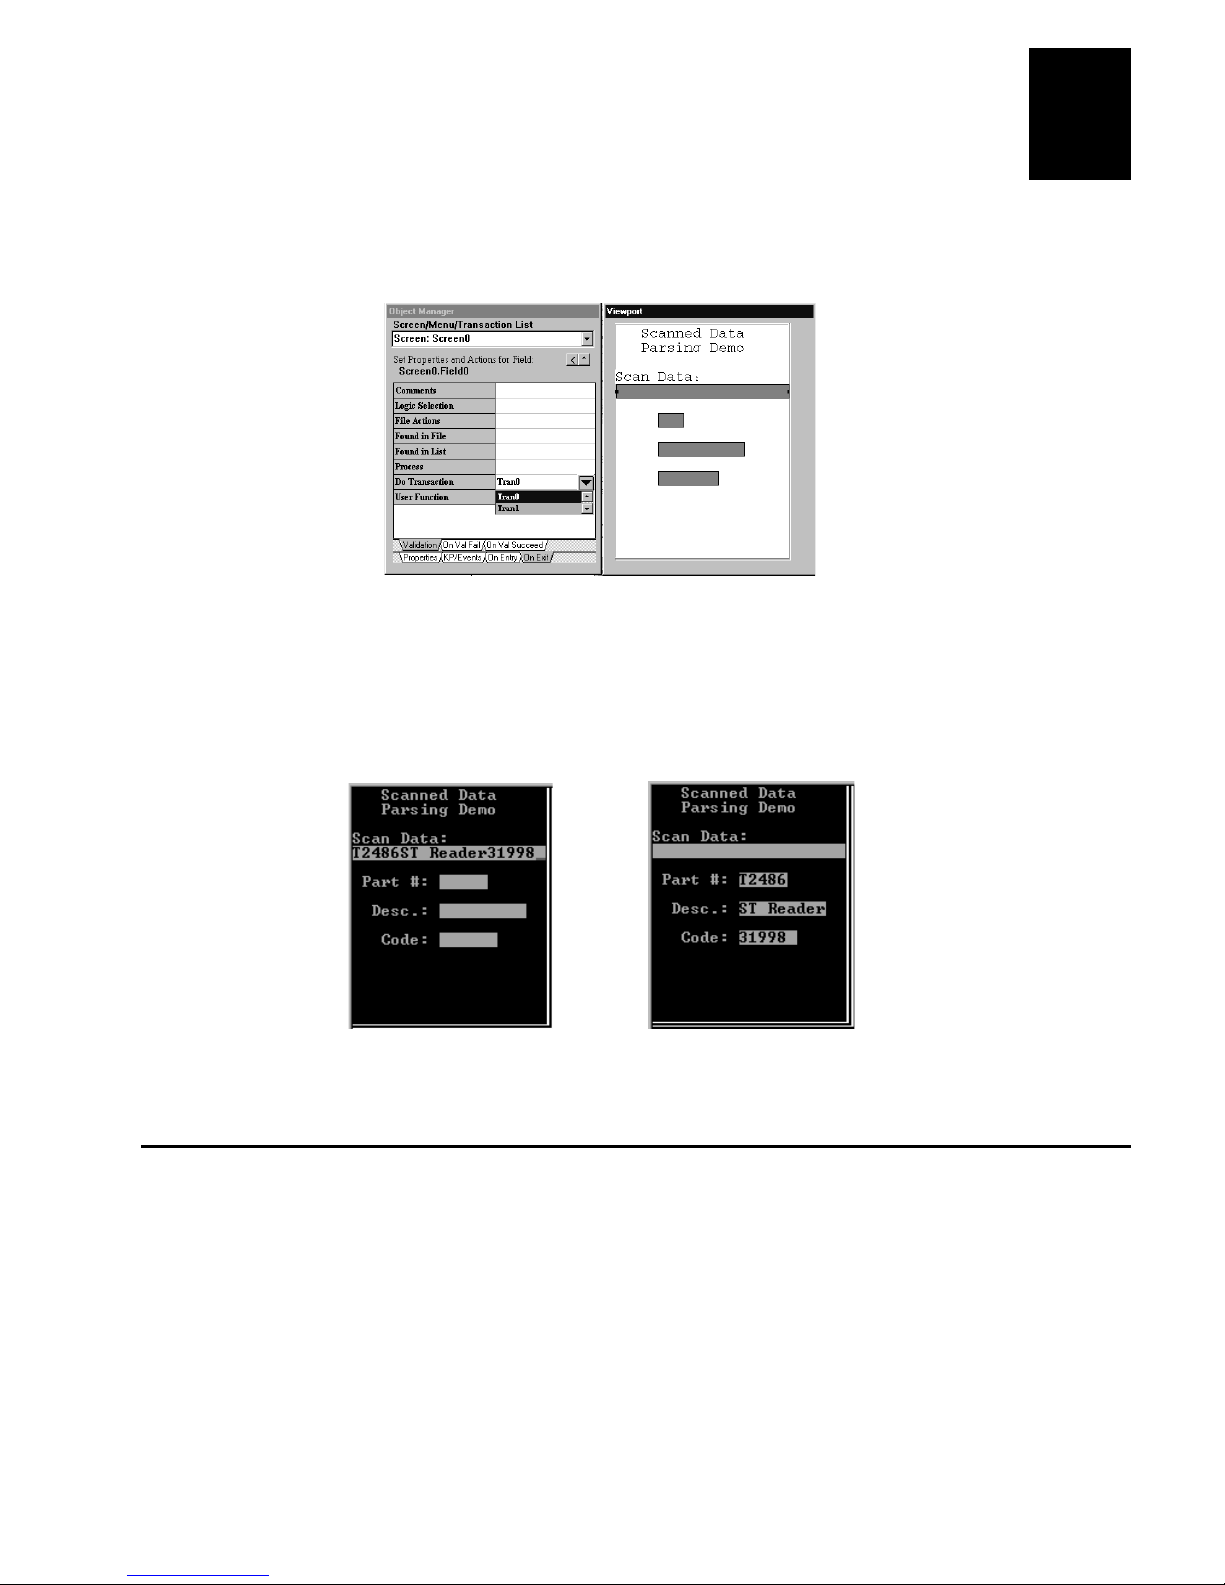
Using EZBuilder Features
3. In the Do Transaction field, enter the name of the transaction you just created,
Tran0.
4. Choose Build from the Build menu.
5. Choose Trakker Simulator from the Tools menu, and run the application.
When data is scanned or typed into the first field, it is parsed into the appropriate fields
and the cursor returns to the original field.
A
Scrolling Through a File and Selecting a Record
This section describes how to read a file into a scrolling field and allow the user to
select a particular record. You can find this example application on the EZBuilder CDROM with the filename SCRLFILE.IMP.
To read a file and select a record
1. On a given screen, choose Add Scrolling Selection from the File menu. The
Scrolling Selection field is added to the screen. Place it in the desired location and
adjust the size. Only the height can be adjusted.
A-11
Page 96

EZBuilder Tutorial
2. Click the Properties tab to set the following properties:
Selection Key This key makes the selection.
Exit
This key causes the cursor to exit the Scrolling Selection Field.
Navigation Choice
This is where the cursor moves upon exit of the Scrolling
Selection Field.
Highlight Attribute
This is the highlight bar that shows which record is being
pointed to currently. Typically, you will set this attribute to Inverse.
3. Click the On Entry tab.
4. Enter the name of your data file in Load From File.
5. Click the On Selection tab.
You may move the contents or the index of the selected record to another field. Set
the following actions:
A-12
Move Selection To Specifies the field that will hold the selected record. It can be
on the same screen or another screen.
Move Index To Specifies the field that will hold the index of the selected record.
This field must be a numeric field. It can be on the same screen or another screen.
Here is the output from this example:
Page 97
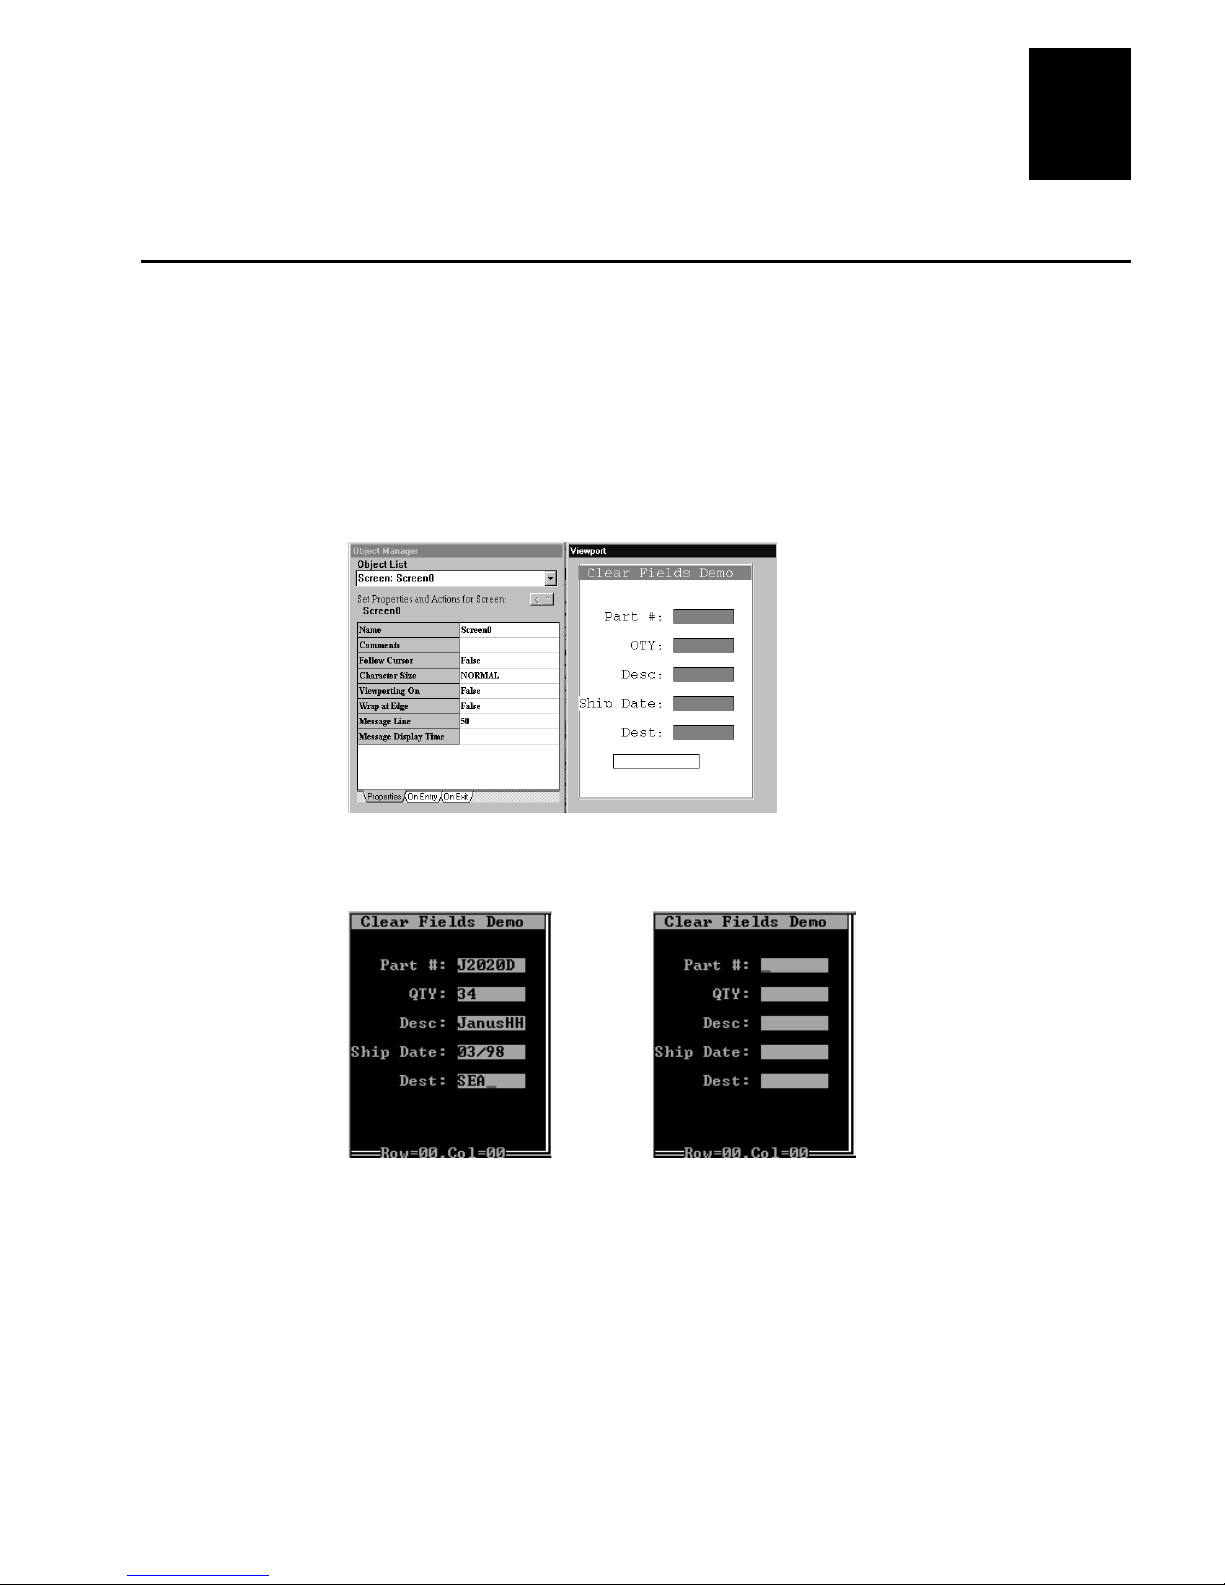
Using EZBuilder Features
Clearing All Fields on a Screen at One Time
This section describes one way of clearing the contents of all input fields on a screen.
In this example, when the cursor leaves the last field and enters the first field again, we
would like all fields to be empty. You can set each field to clear on entry; however, this
only clears the field that the cursor is in.
After the first round of entries the cursor is back in the first field which is clear, but the
rest of the fields still contain their data. When the last field is exited, we want all fields
on the screen to be cleared and the cursor placed in the first field. You can find this
example application on the EZBuilder CD-ROM with the filename CLRFLDS2.IMP.
A
Old Screen Screen With Fields Cleared
To clear fields on a screen
1. Choose Add Field from the File menu.
2. Set the following properties for this field.
Display Attribute Normal.
Visible False.
A-13
Page 98

EZBuilder Tutorial
Display Only True (this is so that the cursor will not navigate to this field).
Length Must be at least as long as the longest field on the screen.
3. Choose New Transaction from the File menu.
4. Click Transfer Direction, and then click the field button. The Transaction Direction
Editor dialog box appears.
5. Set the following parameters:
Direction box Click Transaction From.
Source/Destination box Click Field, and then choose the name of the hidden
field.
6. Click OK.
7. Copy each of the input fields from the Available Fields list to the Transaction
Fields list by double-clicking each input field.
Do not include the hidden field in the Transaction Fields list.
Note:
8. Activate the screen of fields in your viewport.
9. Double-click the last input field (not the hidden field) on the screen.
A-14
Page 99

Using EZBuilder Features
A
10. Click the On Exit tab
11. Set Do Transaction to the transaction you just created.
Now you can build and test the application.
.
Transferring Data Between a TCP/IP Server and a Trakker
Antares TCP/IP Terminal
Direct TCP is the way a client application running on a Trakker Antares terminal with
TCP/IP can open a direct TCP/IP socket with a host server application without using
the DCS 30X. You can accomplish this by transmitting data to the network port and
receiving data from the network port.
The following example describes an EZBuilder application that transmits data to an
echo server and receives the response. You can find this example application on the
EZBuilder CD-ROM with the filename EZDIRTCP.IMP.
To build an application to transmit data to an echo server and receive a response
1. On a given screen, add two fields, one for outgoing data (Field0) and one for
incoming data (Field1).
2. Add a new transaction (Tran0).
3. Set Transfer Direction to To Network.
4. In the Transaction Editor, copy Field0 (first field) from the Available Fields list to
the Transaction Fields List.
5. Add another transaction (Tran1).
6. Set Transfer Direction to From Network.
A-15
Page 100

EZBuilder Tutorial
7. In the Transaction Editor, copy Field1 (second field) from the Source Fields list to
the Transaction Fields List.
8. Go to Tran0 (first transaction) and click the Success tab.
9. Set Do Transaction to Tran1 (second transaction).
10. Go to Field0 (first field), and click the On Exit tab.
11. Click the Validation tab.
12. Set Do Transaction to Tran0 (first transaction).
When you exit Field0, Trans0 is called to move the data from Field0 to the network
port. If transmission was successful, then Trans1 is called to move data from the
network port to Field1 as shown below.
A-16
 Loading...