

Intermec EasyCoder PF4i, EasyCoder PF8, EasyCoder PM4i, EasyCoder PX4i, EasyCoder PX6i User Manual
...Page 1

EasyLAN
User’s Guide
Page 2

Intermec Technologies Corporation
Worldwide Headquarters
6001 36th Ave. W.
Everett, WA 98203
U.S.A.
www.intermec.com
e information contained herein is provided solely for the purpose of allowing
customers to operate and service Intermec-manufactured equipment and is
not to be released, reproduced, or used for any other purpose without written
permission of Intermec Technologies Corporation.
Information and specifi cations contained in this document are subject to
change without prior notice and do not represent a commitment on the part of
Intermec Technologies Corporation.
© 2004-2007 by Intermec Technologies Corporation. All rights reserved.
e word Intermec, the Intermec logo, Norand, ArciTech, Beverage Routebook,
CrossBar, dcBrowser, Duratherm, EasyADC, EasyCoder, EasySet, Fingerprint,
INCA (under license), i-gistics, Intellitag, Intellitag Gen2, JANUS, LabelShop,
MobileLAN, Picolink, Ready-to-Work, RoutePower, Sabre, ScanPlus, ShopScan,
Smart Mobile Computing, TE 2000, Trakker Antares, and Vista Powered
are either trademarks or registered trademarks of Intermec Technologies
Corporation.
ere are U.S. and foreign patents as well as U.S. and foreign patents pending.
Microsoft, Windows, and the Windows logo are registered trademarks of
Microsoft Corporation in the United States and/or other countries.
Torx is a registered trademark of Camcar Division of Textron Inc.
is product includes software developed by the OpenSSL Project for use in the
OpenSSL Toolkit (http://www.openssl.org/).
is product includes cryptographic software written by Eric Young (eay@
cryptsoft.com).
Page 3

EasyLAN User’s Guide iii
Document Change Record
is page records changes to this document. e document was
originally released as version -00.
Version Date Description of Change
-00 5/2003 Original version for Fingerprint v8.00 and IPL v2.00
-01 9/2003 For Fingerprint v8.10 and IPL v2.10
-02 12/2004 For Fingerprint v8.40 and IPL v2.40. Enhanced wireless
security, duplicate IP address handling and DDNS added.
Japan added as regional setting for EasyLAN Wireless.
-03 1/2007 Added information about features that were not previously
documented: Wi-Fi Protected Access (WPA), how to disable
Net1 queuing, and how to close non-printer initiated
TCP connections. Descriptions of the AUTH and ROAM
parameters were also added.
Page 4

iv EasyLAN User’s Guide
Page 5

EasyLAN User’s Guide v
Contents
Contents
Before You Begin ...........................................................................xi
Safety Information .......................................................... xi
Global Services and Support ........................................... xi
Warranty Information ...................................... xi
Web Support .................................................... xi
Telephone Support .......................................... xii
Who Should Read is Manual ..................................... xii
Related Documents ...................................................... xiii
1
Introduction ............................................................................... 1
Features and Functions ................................................................... 2
Network Connector .........................................................2
Raw TCP ......................................................................... 2
Alerts ............................................................................... 2
FTP ................................................................................. 2
Security ...........................................................................3
Web Server .....................................................................3
What’s on the CD? ......................................................................... 4
General ............................................................................ 4
Documentation ...............................................................4
Firmware .........................................................................4
Software Utilities .............................................................4
2
Setting Up the Printer in Windows ..........................5
Windows 95, 98, and ME ..............................................................6
Prerequisites .....................................................................6
Add a Printer ...................................................................6
Assigning the Printer to a Printer Port..............................8
Windows 2000 and XP ................................................................10
Add a Printer Port .......................................................... 10
Add a Printer .................................................................13
Windows NT 4.0 ........................................................................16
Add TCP/IP Printing Service ......................................... 16
Add a Printer Port .......................................................... 19
Add a Printer .................................................................21
Page 6

vi EasyLAN User’s Guide
Contents
3
Setting Up the Printer in UNIX and Linux .......25
Setting Up the Printer in UNIX ................................................... 26
Setting Up the Printer in Linux .................................................... 27
4
Using the EasyLAN Web Browser Interface ..... 31
Prerequisites .................................................................................32
Web Browser ................................................................................32
Confi guration ..............................................................................33
Viewing and Changing Printer Settings ......................... 34
Communication .............................................. 34
Media .............................................................. 35
Print Engine (Fingerprint only) ....................... 35
Web Shell (Fingerprint only) ........................... 37
Alerts ...............................................................38
Viewing and Changing Network Settings ......................40
General ...........................................................40
SNMP .............................................................44
DDNS ............................................................45
TCP/IP ...........................................................47
Avalanche ........................................................49
Wireless LAN ..................................................50
802.1x ............................................................. 52
Upgrading Firmware ....................................................................54
5
Basic Operations (Fingerprint and IPL) .............. 57
Using the EasyLAN FTP Server ...................................................58
Timeout ........................................................................58
User Access Control ...................................................... 58
Printing Labels (Fingerprint) .........................................59
Creating a Label File........................................59
Printing a Label File ........................................60
Printing Labels (IPL) .....................................................61
Creating a Label File........................................61
Printing a Label File ........................................62
Confi guring the Printer .................................................63
SNMP .........................................................................................63
Password Protection .....................................................................64
Default Settings .............................................................64
Page 7

EasyLAN User’s Guide vii
Contents
Forgotten Passwords ......................................................64
6
Advanced Confi guration ...............................................65
Printer File System (Fingerprint) .................................................. 66
Device Tree Structure .....................................................66
Devices and Directories .................................................67
Limitations .....................................................68
Accessing the Printer ....................................................................69
Raw TCP ....................................................................... 69
Connection Settings ........................................69
Std I/O and Application (Fingerprint only) .....69
TCP Port Number ..........................................69
Connecting .....................................................69
Closing a Connection ...................................... 70
Server .............................................................. 70
Maximum Connected Clients .........................70
Auto Install .....................................................70
Permissions......................................................70
Anonymous .....................................................70
Password Protected Users ................................71
Timeout ..........................................................71
Client (Fingerprint only) ................................. 71
Confi gure Printer through Fingerprint .........................................71
prt Section .....................................................................71
alerts Section ................................................................72
lan1 Section ................................................................... 72
wlan Section ..................................................................75
8021x Section ................................................................76
Customization (Fingerprint) ........................................................76
Web Style Guide Files ....................................................77
Content of a Web Style Guide File.................................77
Required Environment Variables .....................78
Optional Environment Variables .....................78
x-www-url-Encoding Syntax Rules .................. 79
Memory and Storage .......................................79
Creating a Web Style Guide File ....................................80
CGI-Scripts ................................................................................80
Identifying CGI-resources..............................................80
Page 8

viii EasyLAN User’s Guide
Contents
IPP ...............................................................................80
Application Specifi c CGI ............................................... 81
Other Files .....................................................................81
Fingerprint CGI-scripting ..............................................81
Fingerprint CGI Commands ......................................... 82
GETASSOC$ .................................................82
GETASSOCNAME$ ...................................... 83
MAKEASSOC ................................................ 83
ON HTTP GOTO .........................................84
RESUME HTTP ............................................84
Interrupt .........................................................84
Access to Running Fingerprint Applications .... 85
Mail Command ...........................................................................85
SNMP .........................................................................................87
Setting up the Printer for SNMP ...................................87
System Requirements for SNMP ...................................87
Adding Intermec MIBs to NMS Software ......................87
Using Odometer Count1 ............................................... 87
Restrict Functionality ...................................................................88
Accounts ........................................................................ 88
File System ....................................................................88
Restrictions .................................................................... 88
Display Current User ..................................................... 90
Changing User ...............................................................90
Changing Passwords ......................................................91
7
Troubleshooting ................................................................... 93
Diagnostics and Troubleshooting Procedures ................................ 94
Verifying Settings ........................................................... 94
PC Settings ....................................................................94
Printer Settings ..............................................................94
Network Card Not Responding ....................................95
Connection to the Network ............................95
Internal Cabling ..............................................95
Verifying IP Address ......................................................95
Verifying Subnet Mask ...................................................96
Pinging the Printer ........................................................96
Page 9

EasyLAN User’s Guide ix
Contents
A
Glossary ..................................................................................... 97
B
Technical Specifi cations ...............................................103
Page 10

x EasyLAN User’s Guide
Before You Begin
Page 11

EasyLAN User’s Guide xi
Before You Begin
Before You Begin
is section provides you with safety information, technical support
information, and sources for additional product information.
Safety Information
Your safety is extremely important. Read and follow all warnings and
cautions in this document before handling and operating Intermec
equipment. You can be seriously injured, and equipment and data can be
damaged if you do not follow the safety warnings and cautions.
is section explains how to identify and understand dangers, warnings,
cautions, and notes that are in this document.
A warning alerts you of an operating procedure, practice,
condition, or statement that must be strictly observed to
avoid death or serious injury to the persons working on the
equipment.
Note: Notes either provide extra information about a topic or
contain special instructions for handling a particular condition
or set of circumstances.
Global Services and Support
Warranty Information
To understand the warranty for your Intermec product, visit the
Intermec web site at www.intermec.com and click Service & Support >
Warranty.
Disclaimer of warranties: e sample code included in this document
is presented for reference only. e code does not necessarily represent
complete, tested programs. e code is provided “as is with all faults.” All
warranties are expressly disclaimed, including the implied warranties of
merchantability and fi tness for a particular purpose.
Web Support
Visit the Intermec web site at www.intermec.com to download our
current manuals (in PDF). To order printed versions of the Intermec
manuals, contact your local Intermec representative or distributor.
Visit the Intermec technical knowledge base (Knowledge Central) at
Page 12

xii EasyLAN User’s Guide
Before You Begin
intermec.custhelp.com to review technical information or to request
technical support for your Intermec product.
Telephone Support
ese services are available from Intermec:
Services Description
In the USA and Canada
call 1-800-755-5505 and
choose this option
Order Intermec
products
Place an order.
Ask about an existing order.
•
•
1 and then choose 2
Order Intermec Media Order printer labels and
ribbons.
1 and then choose 1
Order spare parts Order spare parts. 1 or 2 and then choose 4
Technical Support Talk to technical support about
your Intermec Product.
2 and then choose 2
Service Get a return authorization
number for authorized
service center repair.
Request an on-site repair
technician.
•
•
2 and then choose 1
Service contracts Ask about an existing
contract.
Renew a contract.
Inquire about repair billing
or other service invoicing
questions.
•
•
•
1 or 2 and then choose 3
Outside the U.S.A. and Canada, contact your local Intermec
representative. To search for your local representative, from the Intermec
web site, click Contact.
Who Should Read This Manual
is User’s Guide is for the person who is responsible for setting up,
using and maintaing the EasyCoder PF/PM/PX printer equipped with
an EasyLAN network interface.
Page 13

EasyLAN User’s Guide xiii
Before You Begin
Before you work with the EasyLAN network interface, you should be
familiar with your network and general networking terms, such as IP
address.
Related Documents
is table contains a list of related Intermec documents and their part
numbers.
Document Title Part Number
EasyLAN Wireless Kit Installation Instructions
1-960610-XX
Fingerprint Programmer’s Reference Manual 937-005-XXX
IPL Programmer’s Reference Manual 066396-XXX
e Intermec web site at www.intermec.com contains our documents (as
PDF fi les) that you can download for free.
To download documents
Visit the Intermec web site at www.intermec.com.
Click Service & Support > Manuals.
In the Select a Product fi eld, choose the product whose
documentation you want to download.
To order printed versions of the Intermec manuals, contact your local
Intermec representative or distributor.
1
2
3
Page 14

xiv EasyLAN User’s Guide
Before You Begin
Page 15

EasyLAN User’s Guide 1
e Intermec EasyLAN interface is an optional device
that provides the printer with a network connection.
ere are two types of interface:
• EasyLAN Ethernet
• EasyLAN Wireless
Both interfaces can be either factory installed or fi eld
installed.
1
Introduction
Page 16

2 EasyLAN User’s Guide
Chapter 1 — Introduction
Features and Functions
e EasyLAN network interface card not only provides a network
interface, but also has features such as security, FTP server, web server,
and Alert handling.
Network Connector
e EasyLAN is designed for 10 Mbps Ethernet and 100 Mbps Fast
Ethernet networks. e EasyLAN connects to the network with a twisted
pair category 5 cable (10baseT and 100baseTX) or better using RJ-45
connectors, or through a wireless LAN interface using IEEE 802.11b
and 802.11g. e EasyLAN is equipped with an auto-sensing function
that detects the speed of the local network segment and varies the speed
of its data communication accordingly, between 10 Mbps and 100
Mbps.
Raw TCP
Raw TCP allows a user to connect to printers on the network. Using a
network terminal protocol, such as Telnet, you can start a remote session
by specifying an IP-address to connect to. When connected you can send
commands to the printer from your remote computer.
Alerts
You can confi gure EasyLAN to send alert notifi cations triggered by a
number of events. You can easily select what alerts you should be notifi ed
of and what the messages should include. Alerts can either be distributed
via e-mail or SNMP. For more information about Alerts, see Chapter 4.
FTP
e EasyLAN has a built-in FTP server, which allows you to transfer
and store fi les such as pictures and fonts. You can also print fi les by
sending them directly to the printer. FTP simplifi es confi guration when
addressing multiple printers since you can send premade confi guration
fi les directly to the printers. You will fi nd more information about FTP
in Chapter 6.
Page 17

EasyLAN User’s Guide 3
Chapter 1 — Introduction
Security
e use of the printer’s internal accounts and passwords are made easier
by the EasyLAN due to the possibilities to confi gure through a Web
interface.
Web Server
e Web server gives you an optional way to confi gure the printer,
through the easy-to-use Web interface accessed via the printers IP
address. For more information about confi guring the printer through the
Web interface, see Chapter 4.
e Web server also gives you the possibility to write your own program
and communicate with it through a Web interface. For more information
about advanced use of the Web Server, consult Chapter 6, “Advanced
Confi guration.”
Page 18

4 EasyLAN User’s Guide
Chapter 1 — Introduction
What’s on the CD?
e EasyLAN CD contains the following programs, fi les, and manuals.
General
• Navigation tool
• Product presentation
• Product profi le
Documentation
• Intermec EasyLAN Installation Instructions (Ethernet and Wireless)
• Intermec EasyLAN User’s Guide (this manual)
• Intermec EasyLAN Setup Wizard User’s Guide
• Intermec Fingerprint Programmer’s Reference Manual
• Intermec IPL Programming Reference Manual
Firmware
• Intermec Fingerprint and IPL printer fi rmware
Software Utilities
• Intermec InterDriver with ActiveX Controls
• Intermec PrintSet
• Intermec Network Setup wizard
• Intermec proprietary MIBs
• dptest.txt (test fi le for DP/FP)
• ipltest.txt (test fi le for IPL)
Note: e most current fi rmware and documentation can
always be found on the Intermec website.
Page 19

EasyLAN User’s Guide 5
2
Setting Up the Printer in
Windows
is section describes how to install the printer in a
Windows environment either through a generic
TCP/IP port or through Intermec Printer Monitor.
Before you can set up the printer in Windows you
must connect the printer to your network as described
in the installation guide provided with the network
interface.
You will need the appropriate printer drivers included
on the CD provided with your printer.
Page 20

6 EasyLAN User’s Guide
Chapter 2 — Setting Up the Printer in Windows
Windows 95, 98, and ME
Follow the procedure below to add the EasyCoder Printer to a computer
running Windows 95, 98, or Windows ME.
Prerequisites
Use Intermec Print Monitor for network printing in Windows 95, 98,
and ME environments. Install the Intermec Print Monitor software now
if you have not already done so. It is available on the CD provided with
the printer. You will fi nd it in the Software section on the CD.
Add a Printer
1 Select Settings – Printers from the start menu.
2 Double-click the Add Printer button and click Next to continue.
3 Select Local Printer, and click Next to continue.
Page 21

EasyLAN User’s Guide 7
Chapter 2 — Setting Up the Printer in Windows
4 Click the Have Disk button.
5 Insert the CD provided with your printer, and click the Browse
button.
6 Select the drive corresponding to your CD-reader and browse to the
folder \software\InterDrv\95 98 Me 2000 XP\. Click OK.
7 Select the printer from the window and click Next.
8 Select the File port (this will be changed later). Click Next.
9 Enter an appropriate name for your printer and click Finish.
Page 22

8 EasyLAN User’s Guide
Chapter 2 — Setting Up the Printer in Windows
Assigning the Printer to a Printer Port
1 Select Settings – Printers from the start menu.
2 Right click on your printer and select Properties.
3 Click the Details tab, and then click Add Port.
Page 23

EasyLAN User’s Guide 9
Chapter 2 — Setting Up the Printer in Windows
4 Click Other and select Intermec Print Monitor, then click OK.
5 Enter the printers IP address in the fi rst fi eld and type an appropriate
name in the second fi eld. Click OK.
6 To verify that the port and printer are correctly installed, select new
port in the “Print to the following port” list and click OK.
Page 24

10 EasyLAN User’s Guide
Chapter 2 — Setting Up the Printer in Windows
Windows 2000 and XP
Follow the procedure below to add the EasyCoder Printer to a computer
running Windows 2000 or Windows XP.
Add a Printer Port
1 In Windows 2000 select Settings > Printers from the start menu.
In Windows XP select Control panel > Printers and faxes from the
start menu.
2 From the File menu, select Server Properties.
Page 25

EasyLAN User’s Guide 11
Chapter 2 — Setting Up the Printer in Windows
3 Click the Ports tab.
4 Click the Add Port button. e Printer Ports dialog box appears.
5 Select Standard TCP/IP Port and then click New Port.
Page 26

12 EasyLAN User’s Guide
Chapter 2 — Setting Up the Printer in Windows
6 e Add Standard TCP/IP Printer Port Wizard will start, click Next
and enter IP number or Printer name. Click Next.
7 From the Standard device type list, select Generic Network Card.
8 Click Next, then click Finish.
9 Close the Printer Ports and Print Server Properties windows.
Page 27

EasyLAN User’s Guide 13
Chapter 2 — Setting Up the Printer in Windows
Add a Printer
1 In Windows 2000 select Settings > Printers from the start menu.
In Windows XP select Control panel > Printers and faxes from the
start menu.
2 Double-click the Add Printer button and click Next to continue.
3 Select Local Printer and uncheck the Automatically detect and install
my Plug and Play printer check box. Click Next to continue.
Page 28

14 EasyLAN User’s Guide
Chapter 2 — Setting Up the Printer in Windows
4 Scroll down and select the port named with the IP address of the
printer. Click Next.
5 Click Have Disk.
Page 29

EasyLAN User’s Guide 15
Chapter 2 — Setting Up the Printer in Windows
6 Insert the CD provided with your printer, select the CD drive and
click OK.
7 Select the printer from the list and click Next.
8 Enter an appropriate name for your printer and click Next.
9 Select whether you want to share the printer with other network
users and click Next.
10 To verify that the printer and port are correctly installed, select Yes.
11 When asked to print a test page, click Next.
12 Click Finish.
Page 30

16 EasyLAN User’s Guide
Chapter 2 — Setting Up the Printer in Windows
Windows NT 4.0
Add TCP/IP Printing Service
1 Right-click Network Neighbourhood and select Properties from the
menu.
2 Click the Services tab. If Microsoft TCP/IP Printing is already
available in the list, continue to the Add a printer port section next,
otherwise click Add.
Page 31

EasyLAN User’s Guide 17
Chapter 2 — Setting Up the Printer in Windows
3 Click Microsoft TCP/IP Printing and then click OK.
4 Specify the path to where the installation fi les can be found and click
Continue.
Page 32

18 EasyLAN User’s Guide
Chapter 2 — Setting Up the Printer in Windows
5 Click Close.
Page 33

EasyLAN User’s Guide 19
Chapter 2 — Setting Up the Printer in Windows
Add a Printer Port
1 Select Settings > Printers from the Start menu.
2 From the File menu, select Server Properties.
3 Click the Ports tab.
Page 34
20 EasyLAN User’s Guide
Chapter 2 — Setting Up the Printer in Windows
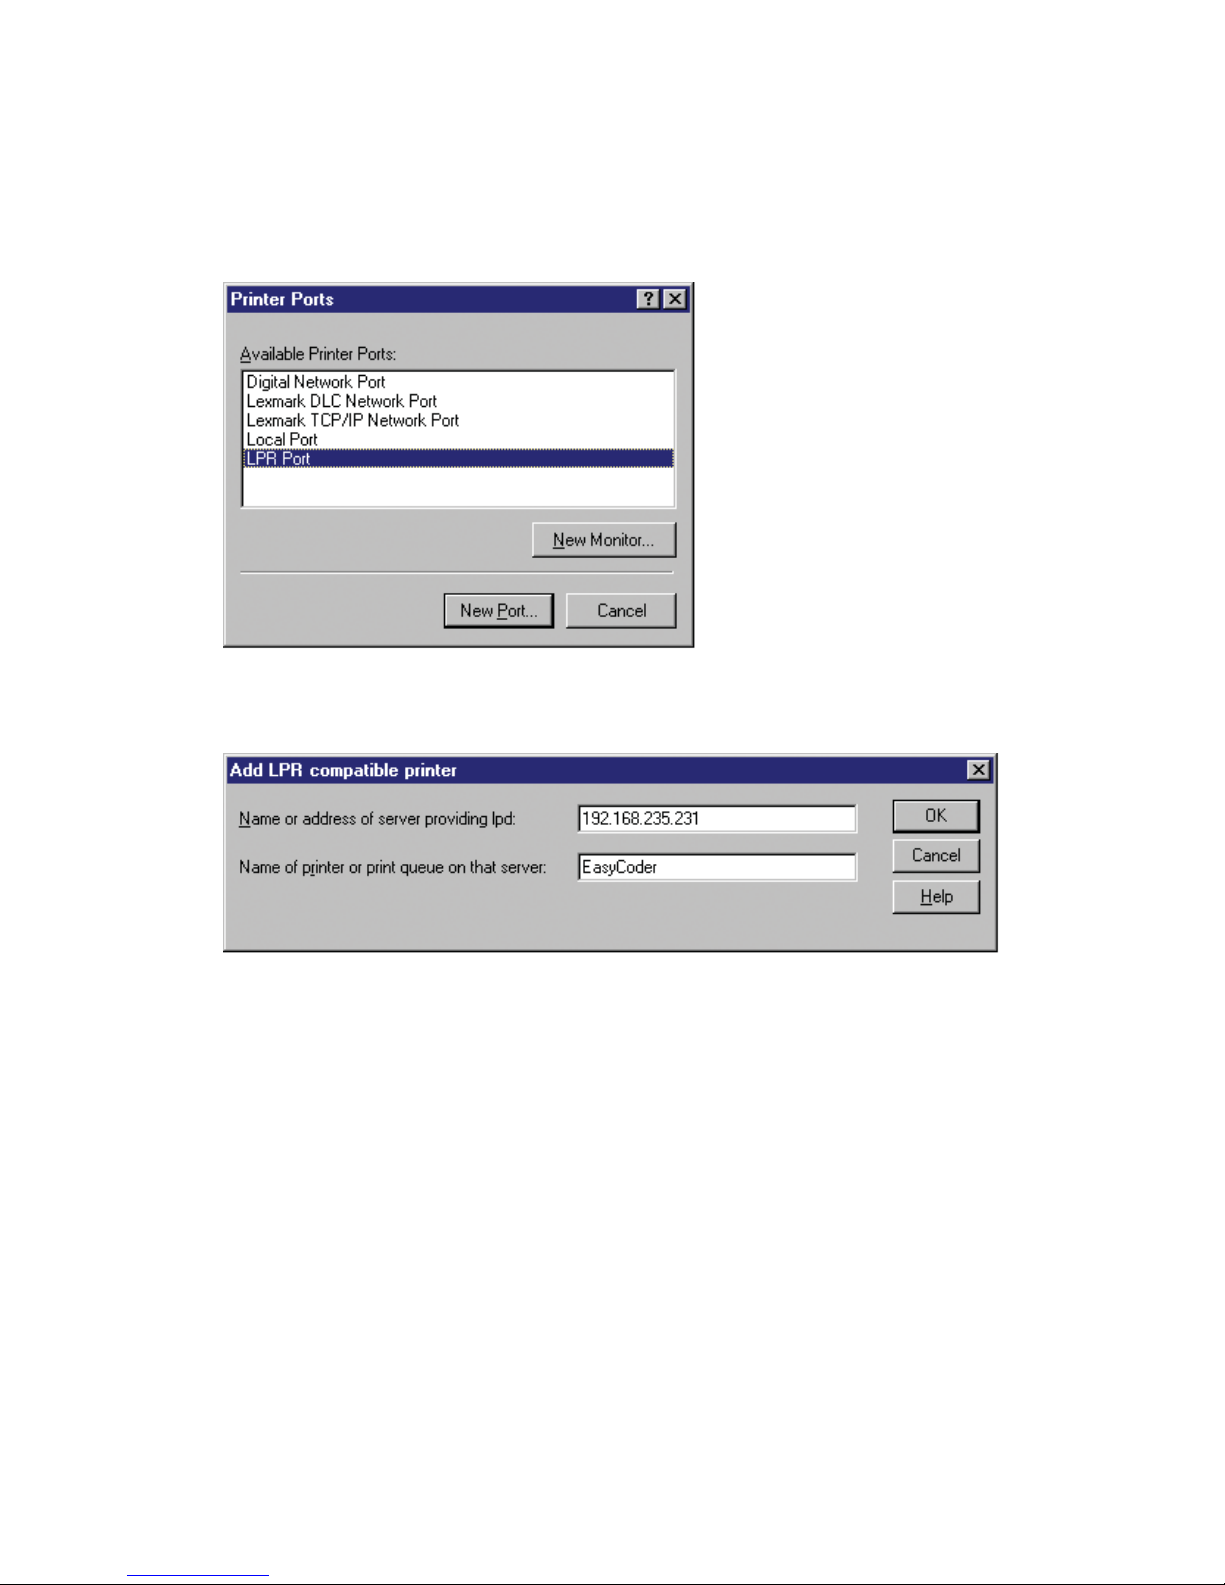
4 Click Add port.
5 Click the New Port button.
6 Select LPR Port and then click New Port.
7 Enter the IP-address of the printer in the name or address of server
providing lpd fi eld.
8 Enter an appropriate name for the printer port in the Name of printer
or print queue on that server fi eld and click OK.
9 Click Close.
Page 35

EasyLAN User’s Guide 21
Chapter 2 — Setting Up the Printer in Windows
Add a Printer
1 Select Settings > Printers from the Start menu.
2 Click Add Printer.
3 Select My Computer and click Next.
Page 36

22 EasyLAN User’s Guide
Chapter 2 — Setting Up the Printer in Windows
4 Select the port named with the IP-address of the printer and click
Next.
5 Click Have Disk.
Page 37

EasyLAN User’s Guide 23
Chapter 2 — Setting Up the Printer in Windows
6 Insert the CD provided with your printer, type the drive letter of the
CD drive and click OK.
7 Select the printer from the list and click Next.
8 Enter an appropriate name for your printer and click Next.
9 Select whether you want to share the printer with other network Users
and click Next.
10 To verify that the printer and port are correctly installed, select Yes
when asked to print a test page, click Finish.
Page 38

24 EasyLAN User’s Guide
Chapter 2 — Setting Up the Printer in Windows
Page 39

EasyLAN User’s Guide 25
3
Setting Up the Printer in
UNIX and Linux
is section describes how to install the printer in the
UNIX and Linux environment.
Before you can set up the printer in your UNIX or
Linux environment you must install the printer on
your network as described in the installation guide
provided with the network interface.
Page 40

26 EasyLAN User’s Guide
Chapter 3 — Setting Up the Printer in Unix and Linux
Setting Up the Printer in UNIX
e example below shows how to set up an EasyCoder PF4i printer in a
SunOS 5.7 environment.
1 Login as root.
2 Verify that the printer is online.
# ping <internet address>
<internet address> is alive
3 Edit the printer confi gfuration fi le on your system.
# vi /etc/printers.conf
# If you hand edit this file, comments and
# structure may change.
# The preferred method of modifying this file
# is through the use of
# lpset(1M) or fncraete_printer(1M)
#
pr1:\
:bsdaddr=<internet address>,raw:
4 Stop and start the Print services.
# /etc/init.d/lp stop
#/etc/init.d/lp start
5 Check the status of the printer.
# lpstat pr1
EasyCoder PF4i LPD
Status idle
6 Print out a test label.
# lp -d pr1 ./fptest.txt
request id is pr1-1 (1 file)
# lpstat -a pr1
pr1 accepting request since <date & time>
Page 41

EasyLAN User’s Guide 27
Chapter 3 — Setting Up the Printer in Unix and Linux
Setting Up the Printer in Linux
e example below shows how to set up an EasyCoder PF4i printer in a
RedHat Linux environment.
1 Become root on the machine.
2 Start your printer confi guration tool. In this example RedHat’s
“printtool” is used.
3 Add a new print queue by clicking New.
4 Click Next.
Page 42

28 EasyLAN User’s Guide
Chapter 3 — Setting Up the Printer in Unix and Linux
5 Enter a suitable name for the print queue, in this example it is
“EasyCoder.” Select LPD as protocol (“Unix printer”) and click Next.
6 Enter the IP address or DNS name (for example 192.168.235.137) of
the printer. Enter “pr1” in the Queue fi eld and click Next.
Page 43
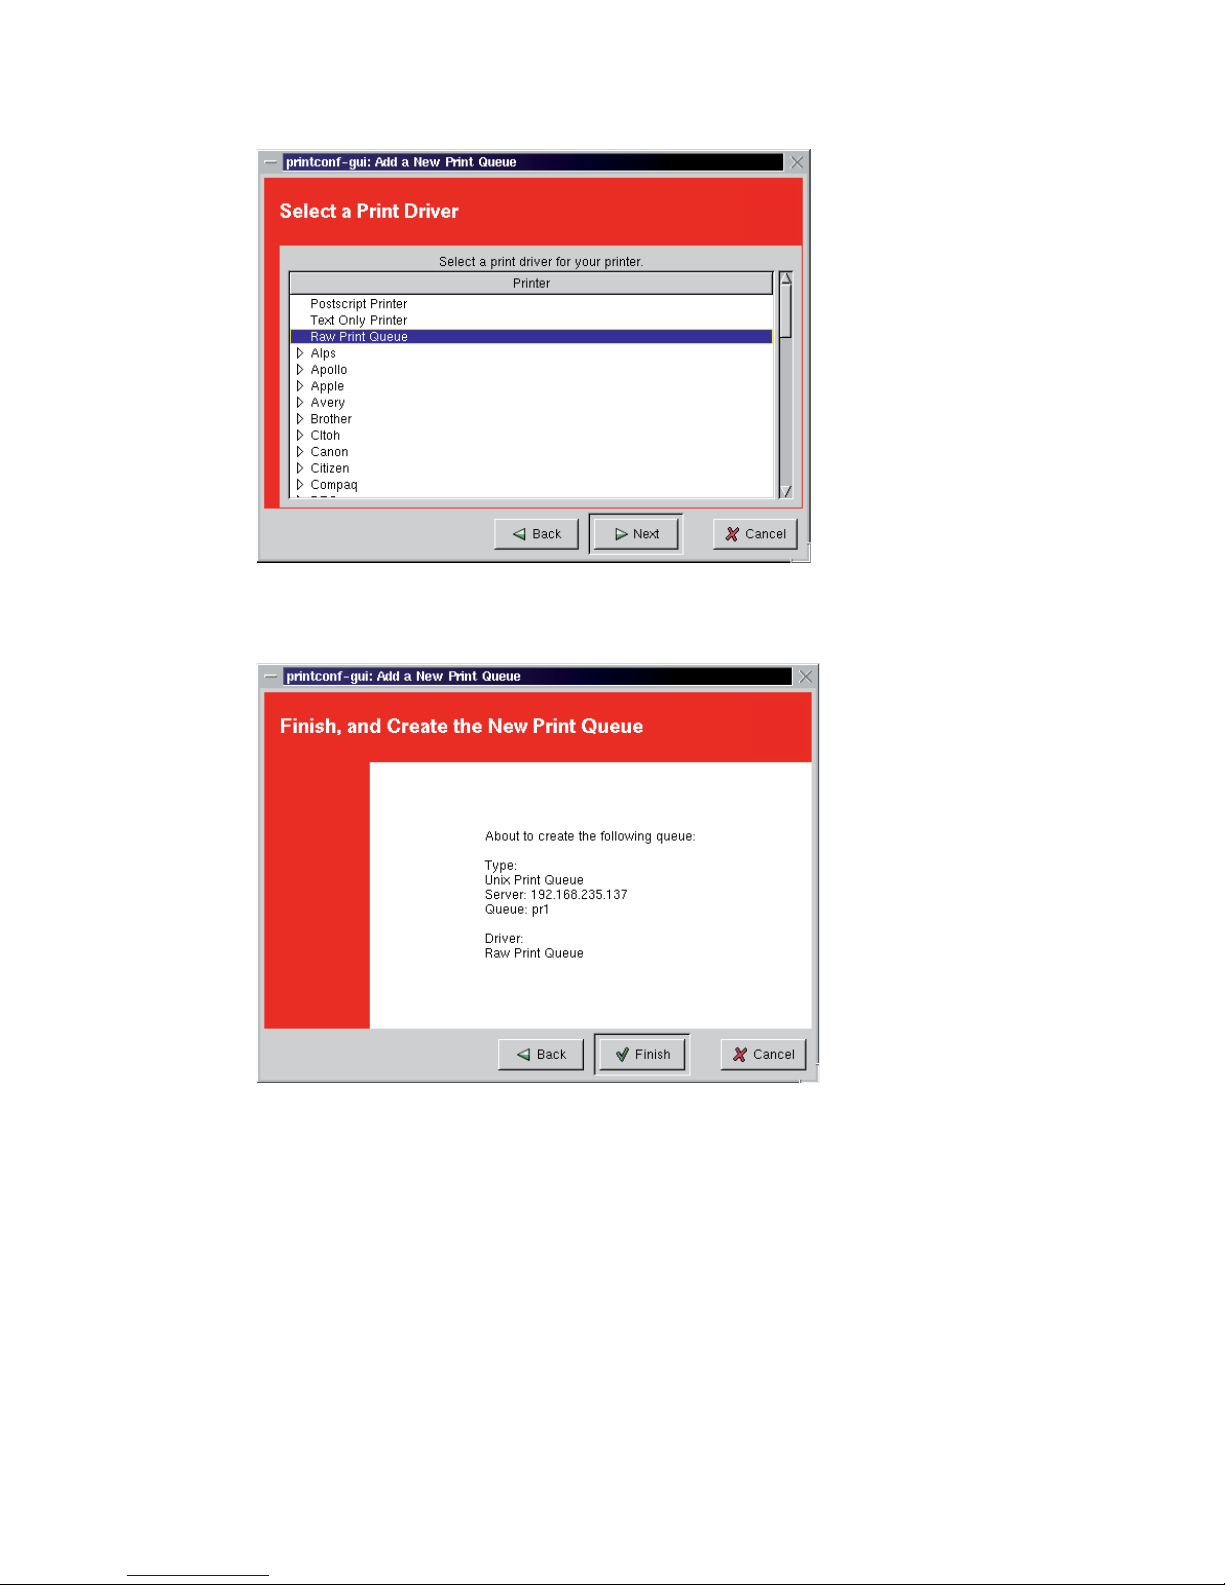
EasyLAN User’s Guide 29
Chapter 3 — Setting Up the Printer in Unix and Linux
7 Select “Raw Print Queue” and click Next.
8 Review the settings. Click Finish.
Page 44

30 EasyLAN User’s Guide
Chapter 3 — Setting Up the Printer in Unix and Linux
9 Save changes (File > Save Changes). Restart the queue by clicking
Apply.
10 Check that the queue was correctly confi gured, by issuing the
command
lpq -PEasyCoder (or the name of your print queue,
selected in step 5).
e response should be something like this:
EasyCoder PF4i LPD
Status: Idle
Page 45

EasyLAN User’s Guide 31
4
Using the EasyLAN Web
Browser Interface
is chapter explains how to use the EasyLAN web
browser interface to view and change your network
settings and upgrade the printer fi rmware.
Page 46

32 EasyLAN User’s Guide
Chapter 4 — Using the EasyLAN Web Browser Interface
Prerequisites
Make sure the printer is connected to the network and the printer
has received an IP address as described in the EasyLAN Installation
Instructions.
Web Browser
To access the internal homepage of the EasyLAN, start your web browser.
Type the IP address of the printer into the address fi eld of the browser
and press Enter. e EasyLAN home page for the printer appears.
The Home Page of the Printer
e home page shows the assigned name, fi rmware version, Active
Command Set, MAC address and IP address of the printer. It also
displays the contents of the image buff er, as well as the status of the
Ready-to-Work indicator.
Click a link in the home page to do these tasks:
• Click Confi guration to see the Confi guration web page and change
printer confi guration settings. For more information, see the next
Page 47

EasyLAN User’s Guide 33
Chapter 4 — Using the EasyLAN Web Browser Interface
section, “Confi guration.”
• Click Maintenance to see the Firmware Upgrade page and upgrade
the printer's fi rmware. For more information, see “Upgrading
Firmware” on page 52.
• Click Support to see the Support page, which includes a list of
Intermec links for technical support and customer service. For more
information, see “Contacting Intermec Support” on page 54.
Confi guration
is section shows the current confi guration of the printer. To change
settings, click a link in the left pane to see that page and make changes.
Confi guration Screen
For help with changing printer settings, see “Viewing and Changing
Printer Settings” on page 34.
For help with changing network settings, see “Viewing and Changing
Network Settings” on page 40.
Page 48

34 EasyLAN User’s Guide
Chapter 4 — Using the EasyLAN Web Browser Interface
Note: You will be prompted to enter your user name and
password. e default user name is admin and the default
password is pass.
Viewing and Changing Printer Settings
To view and change printer settings, click the Printer folder in the left
pane. A list of printer settings categories appears.
Communication
Click Communication to view and change the communication port
settings. For more information on communication settings, see the user’s
guide for your printer.
Communication Screen in the EasyLAN Web Browser Interface
Page 49

EasyLAN User’s Guide 35
Chapter 4 — Using the EasyLAN Web Browser Interface
Media
Click Media to view and change media settings such as the X-start
position, media type and contrast. For more information, see the user’s
guide for your printer.
Media Screen in the EasyLAN Web Browser Interface
Print Engine (Fingerprint only)
Click Print Engine to adjust the media feed direction (Start/Stop
positions), and print speed. e value of head resistance is read-only and
is measured by the printer’s fi rmware at startup. For more information,
see the user’s guide for your printer.
Page 50

36 EasyLAN User’s Guide
Chapter 4 — Using the EasyLAN Web Browser Interface
Print Engine Screen in the EasyLAN Web Browser Interface
Page 51

EasyLAN User’s Guide 37
Chapter 4 — Using the EasyLAN Web Browser Interface
Web Shell (Fingerprint only)
Click Web Shell to view and change a variety of test and default settings.
Web Shell Screen in EasyLAN Web Browser Interface
For more information on Web Shell settings, see the next table.
Web Shell Settings
Setting Description
Testfeed [value] Label Stop Sensor calibration and testfeed. is is equivalent to
issuing the TESTFEED command on the printer.
Ribbon Sensor
[value]
Calibration of the Ribbon Sensor. is will also be calibrated by
the testfeed. Only shown if the sensor is installed.
Paper Sensor
[value]
Calibration of the Paper Sensor (EasyCoder PM4i option; PX4/6i
standard). e paper sensor will also be calibrated by a testfeed.
Only shown if the sensor is installed.
Default Setup Revert back to factory default printer settings (Reverts all
confi gurations that can be done by using the EasyCoder internal
keyboard) by setting the PRT section to default. Passwords, alerts,
and selected application are not changed.
Reboot Reboots the printer.
Print Test Label Prints predefi ned test patterns.
Page 52

38 EasyLAN User’s Guide
Chapter 4 — Using the EasyLAN Web Browser Interface
Web Shell Settings (continued)
Setting Description
Application Defi nes the application to run as default on startup and takes
eff ect after the printer is restarted.
Standard I/O Defi nes the port the printer listens to and takes eff ect after the
printer is restarted.
After you make changes in the Web Shell screen, click Submit Changes
to send the changes to the printer.
Alerts
Click Alerts to view and change printer alert settings.
Alerts Screen in EasyLAN Web Browser Interface (IPL shown here)
Page 53

EasyLAN User’s Guide 39
Chapter 4 — Using the EasyLAN Web Browser Interface
To change alert settings:
• Choose Enable or Disable from the Setting drop-down list.
• Specify a Delay Repeat in the entry fi eld.
• Select seconds or occurrences in the Delay Unit drop-down list.
• Enter a message in the Message entry fi eld.
When you have made the necessary changes, click Submit Settings to
send the changes to the printer. For more information on Alert settings,
see the next table.
Note: Some alerts are supported by Fingerprint only.
Alert Settings
Alert Name Sent When
Label Not Taken
(Fingerprint only)
Printed label is not taken from the printer. is applies to
label and ticket media types and requires an optional label
taken sensor (LTS).
Cutter Error
Error related to the label cutter occurs.
Head Lifted Printer job is sent to the printer while the printhead is lifted.
Out of Ribbon ermal transfer ribbon is selected and printer is out of
ribbon.
Out of Paper Printer is out of media.
Ribbon Low e diameter of the remaining roll of ribbon is lower than a
specifi ed value. e value can be specifi ed under the Media
section.
Paper Low
(PM4i option)
e diameter of the remaining roll of media is lower than a
specifi ed value. e value is specifi ed in the Media page. Only
shown if the sensor is installed.
Pause Mode e diameter of the remaining roll of media is lower than a
specifi ed value. e value is specifi ed in the Media page. Only
shown if the sensor is installed.
Setup Mode Printer has been placed in Setup Mode (for example, after you
press the Setup key on the printer's internal keyboard).
Error Condition
(Fingerprint only)
An error occurs in a running Fingerprint application. Error
does not have to be critical to the print job for this alert.
Application Break
(Fingerprint only)
A running Fingerprint application is interrupted manually or
because of an error.
Page 54

40 EasyLAN User’s Guide
Chapter 4 — Using the EasyLAN Web Browser Interface
Alert Settings (continued)
Alert Name Sent When
Print Job Complete
(Fingerprint only)
Print job is successfully completed.
Odometer Count 1 e amount of media printed has reached a preset amount,
measured in meters or in number of labels. e Delay setting
represents how often the alert message will be sent when the
preset value is reached. For more information, see Chapter 6,
“Advanced Confi guration.”
Notifi cation Method Method by which an alert message is sent. Choose from mail,
SNMP-trap, or both.
Some alerts are sent when the error occurs, but there are some alerts
that are not sent until a PRINTFEED (PF in Fingerprint, or use Print
command in IPL) is executed. e out-of-paper alert is one example
of an error message that is sent only when the printer tries to execute a
print job.
Viewing and Changing Network Settings
To view and change network settings, click the Network Admin folder
in the left-hand pane. A list of network settings categories appears.
General
Click General in the left-hand pane to view the General Settings screen.
Page 55

EasyLAN User’s Guide 41
Chapter 4 — Using the EasyLAN Web Browser Interface
General Settings Screen in EasyLAN Web Browser Interface
To change general settings, enter information in the entry fi elds.
Note: To enter a new password, check the Set password box.
After you have made your changes, click Submit General settings to
send the changes to the printer.
For more information on General Settings, see the next table.
General Settings
Setting Description
Printer Name Network identifi cation name (WINS name). e default is
INTERMEC followed by the last six positions of the MAC
address. For example, IPNM (Intermec Printer Network Manager)
uses the printer name to identify individual printers in a network.
System Location (Optional) Printer location.
System Contact
(Optional) Printer administrator.
Set Password Must be checked when you want to change the admin password.
Page 56

42 EasyLAN User’s Guide
Chapter 4 — Using the EasyLAN Web Browser Interface
General Settings (continued)
Setting Description
Old Admin
Password
Old password. Required when changing to a new password.
New Admin
Password
New password.
Restrictions Sets restrictions on who is allowed to upgrade the printer fi rmware
or view and change certain network settings. Note that "admin"
cannot be removed from the list of authorized users.
Users allowed to update: Defi nes who may perform a fi rmware
upgrade via FTP, PrintSet, or IFAB. Has no eff ect when upgrading
from a Compact Flash card.
Users allowed to read/write protected LAN1 settings:
(Fingerprint only) Defi nes who may read/write settings in the
LAN1 section. For more information, see Chapter 6, “Advanced
Confi guration.”
Users allowed to change network settings: (Fingerprint only)
Defi nes who may change the network node in the setup. Not
supported when setting up the printer from its internal keyboard.
Users allowed to change wireless settings: Defi nes who may
change WLAN or 802.1x settings. For more information, see
Chapter 6, “Advanced Confi guration.”
Mail
Click Mail in the left-hand pane to view and change Email (SMTP)
server settings.
Page 57

EasyLAN User’s Guide 43
Chapter 4 — Using the EasyLAN Web Browser Interface
Mail Screen in EasyLAN Web Browser Interface
To change mail settings
1 Click an option button to choose a Mail (SMTP) setting.
2 Enter addresses in the entry fi elds.
3 Click Submit Mail Settings to send the changes to the printer. Or,
click Submit & Send test mail to send the changes to the printer and
test your new settings.
For more information on Mail settings, see the next table.
Page 58

44 EasyLAN User’s Guide
Chapter 4 — Using the EasyLAN Web Browser Interface
Mail Settings
Setting Description
Mail (SMTP)
Server
Choose a confi guration method for your mail server settings:
• SMTP settings from DHCP: Choose this setting if you want
the printer to receive settings automatically from your DHCP
server. is requires that you have chosen to use DHCP as IP
Selection in the TCP/IP section.
• Manual settings: Choose this option to manually confi gure
the Mail Server address and port. e default port is 25.
Mail addresses Defi nes the Email addresses to use when the printer sends alert
messages:
• From address: e address displayed as the sender of alert
messages. Email will be returned to this address if the recipient
is unreachable (for example, when a message bounces). To
prevent Email bounces when the recipient is unreachable, leave
this fi eld empty.
• To address: Recipient of alert messages. To enter several
addresses, separate them with a comma (,) or semicolon (;).
SNMP
Click SNMP in the left-hand pane to view and change SNMP settings.
SNMP Screen in EasyLAN Web Browser Interface
Page 59

EasyLAN User’s Guide 45
Chapter 4 — Using the EasyLAN Web Browser Interface
To change SNMP settings
Enter information in the entry fi elds.
1 Click Add to add trap settings. You can enable up to four
authentication failure traps.
2 After you add a trap, it appears in the Trap Address Settings list. To
edit or delete a trap, click the Edit/Delete button for that trap in
the list, and then click Edit to change settings for that trap, or click
Delete to delete the trap.
3 Click Submit SNMP Settings to send the changes to the printer. For
more information on SNMP settings, see the next table.
SNMP Settings
Setting Description
Read Community Community with rights to read the SNMP MIBs.
Read/Write
Community
Community with rights to read and write SNMP MIBs.
System Name Administrative name for the SNMP node.
Authentifi cation
Failure Trap
Defi nes if a trap is sent when an unauthorized SNMP request
(for example, a request from an unauthorized community) tries
to access the printer. Choose Enable to send the trap.
Trap Address
Settings
Click Add... to specify trap address settings:
• Trap Address: IP address to the receiver of SNMP traps.
You can specify up to four trap addresses.
• Trap Port: Port to which SNMP traps are sent. e default
is 162.
• Trap Community: Defi nes the community to which SNMP
traps will be sent.
• Friendly Name: User-specifi ed string identifying the trap.
• Trap Enable Status: Defi nes if the specifi ed trap is enabled.
DDNS
To use DDNS, BIND 9 or a compatible name server is recommended.
As a security mechanism, DDNS uses the symmetric transaction
authentication method TSIG. TSIG uses the current UTC time to sign
messages. If the time is incorrect, the name server rejects updates.
e only record types supported by DDNS are A (host-to-address) and
PTR (address-to-host).
Page 60

46 EasyLAN User’s Guide
Chapter 4 — Using the EasyLAN Web Browser Interface
Every IP address belongs to one zone. An IP appearing in diff erent zones
will cause unpredictable behavior.
Click DDNS to view and change Dynamic DNS settings.
DDNS Screen in EasyLAN Web Browser Interface
To change DDNS settings, enter information in the entry fi elds and click
Submit changes to send the changes to the printer.
For more information on DDNS settings, see the next table.
DDNS Settings
Setting Description
Enable Click to enable DDNS.
Enable with TSIG Click to enable DDNS using a transaction signature (TSIG).
Disable Click to disable DDNS.
Alias DNS name of the printer (maximum 63 characters).
Default is “”.
Zone Zone in which the printer will add/delete records.
Default is “”.
Page 61

EasyLAN User’s Guide 47
Chapter 4 — Using the EasyLAN Web Browser Interface
DDNS Settings (continued)
Setting Description
TSIG key Shared, secret key used when encrypting with TSIG (base 64
coded value). Default is “”.
TSIG key name Name of the TSIG encryption key. Default is “”.
Timeserver Timeserver IP or host name from which to retrieve the time.
Default is “time.nist.gov”.
Registered Indicates whether the DNS contains records about the printer,
indicating that the printer is active.
TCP/IP
Click TCP/IP to view and change TCP/IP network settings.
TCP/IP Screen in EasyLAN Web Browser Interface
To change TCP/IP settings, choose an IP selection method from the
drop-down list and enter information in the entry fi elds. Click Submit
TCP/IP settings to send the new settings to the printer.
For more information on TCP/IP settings, see the next table.
Page 62

48 EasyLAN User’s Guide
Chapter 4 — Using the EasyLAN Web Browser Interface
TCP/IP Settings
Setting Description
IP Selection Method by which an IP address will be assigned to the printer.
Choose DHCP, BOOTP, DHCP+BOOTP, or MANUAL.
If you choose DHCP, BOOTP, or DHCP+BOOTP, the currently assigned network values appear in the entry fi elds.
If you choose MANUAL, you need to enter network information in the entry fi elds as follows:
• IP Address: Manually assigned IP address for the printer.
• Netmask: Manually assigned netmask for the printer.
• Default router: IP address of the default router.
• Nameserver: Manually assigned name server address. is
fi eld must be set to use names instead of IP addresses when
setting up Email communication.
• Primary and Secondary WINS Server: IP address of primary and secondary WINS servers. If you chose DHCP or
BOOTP as the IP Selection method, the currently assigned
WINS IP addresses may appear here depending on how your
DHCP server is confi gured.
• net1 TCP Port Number: Port number for raw TCP. e
default is 9100.
Page 63

EasyLAN User’s Guide 49
Chapter 4 — Using the EasyLAN Web Browser Interface
Avalanche
Click Avalanche to view and change Wavelink Avalanche settings.
Avalanche Screen in EasyLAN Web Browser Interface
To change Avalanche settings, enter information in the entry fi elds and
click Submit Avalanche settings to send the changes to the printer.
For more information on Avalanche settings, see the next table.
Avalanche Settings
Setting Description
Avalanche enabler
settings
Click an option button:
• Disable: Disables Avalanche.
• Manual settings: Enables Avalanche. You need to enter the
Agent Address and Port in the entry fi elds.
• Find agent by broadcast: Enables Avalanche. EasyLAN
broadcasts to fi nd the agent.
Avalanche agent
authorization
Enter your user name and password in the entry fi elds.
Page 64

50 EasyLAN User’s Guide
Chapter 4 — Using the EasyLAN Web Browser Interface
Wireless LAN
Note: ese settings are available only if your printer has an
EasyLAN Wireless interface installed and is using Fingerprint
8.10 or later.
Click Wireless LAN to view and change 802.11 settings.
Wireless LAN Screen in EasyLAN Web Browser Interface
To change 802.11 settings, enter information in the entry fi elds and click
Submit 802.11 settings to send the changes to the printer.
For more information on Wireless LAN settings, see the next table.
Page 65

EasyLAN User’s Guide 51
Chapter 4 — Using the EasyLAN Web Browser Interface
Wireless LAN Settings
Setting Description
SSID Network name
WEP Key 1, WEP
Key 2, WEP Key 3,
WEP Key 4
Values for up to 4 WEP keys.
Active WEP key Choose an active WEP key.
WPA Set Wi-Fi Protected Access ON/OFF
WPA Pre-shared key Set the WPA Pre-shared key
Roaming Setting Set roaming reluctancy (1, 2 or 3)
Current channel (Read-only) Current active channel.
AP MAC Address (Read-only) MAC address of the access point to which the
printer is connected.
Signal strength (Read-only) Radio signal strength of the access point.
Speed (Read-only) Speed of the current connection.
Region Shows the currently selected region or country. Click to see
the Region/Country screen and choose a diff erent region/
country. You need the unlock code to select certain regions.
Page 66

52 EasyLAN User’s Guide
Chapter 4 — Using the EasyLAN Web Browser Interface
802.1x
Note: ese settings are available only if your printer has an
installed EasyLAN Wireless interface and is using Fingerprint
8.40 or later.
Click 802.1x to view and change 802.1x security settings.
802.1x Screen in EasyLAN Web Browser Interface
Page 67

EasyLAN User’s Guide 53
Chapter 4 — Using the EasyLAN Web Browser Interface
To change 802.1x security settings, choose options from the drop-down
lists or enter information in the entry fi elds. Click Submit 802.1x
settings to send the changes to the printer.
For more information on 802.1x security settings, see the next table.
802.1x Settings
Setting Description
EAP Type Choose the Extensible Authentication Protocol type:
• TTLS (default)
• LEAP,
• PEAP
• OFF (disables 802.1x security)
Inner authentication
(TTLS and PEAP only)
Choose the inner authentication method:
• PAP (TTLS only)
• MSCHAPv2
• EAP/MSCHAPv2
• EAP/MD5
• EAP/GTC
Outer name
(TTLS only)
Specify the EAP identity passed in the clear. e
default is “anonymous.”
Root Certifi cate e common name of the installed root CA certifi cate.
You can also specify a diff erent certifi cate (provided
that it has already been installed on the printer) by
entering the path to the new certifi cate in this fi eld. If a
pass phrase is required, add it to the end of the path in
the form of “@passphrase”.
Server Common Name #1,
Server Common Name #2
(TTLS and PEAP only)
Specify common names. If you specify one common
name, the server certifi cate common name must
match this name for authentication. If you specify two
common names, the server certifi cate common name
must match at least one of them. e default is “” (any
common name).
Server Certifi cate Validation
(TTLS and PEAP only)
Enables certifi cate validation. Specifi es whether or not
to check if the installed CA certifi cate is the root of the
server certifi cate.
Page 68

54 EasyLAN User’s Guide
Chapter 4 — Using the EasyLAN Web Browser Interface
Upgrading Firmware
Click Maintenance at the top of the screen. e Firmware Upgrade
screen appears.
Firmware Update Screen in EasyLAN Web Browser Interface
Enter the path to the fi rmware upgrade fi le in the entry fi eld, or click
Browse to browse to the location of the upgrade fi le. Double-click the
fi le and then click Upgrade. e printer fi rmware is upgraded.
Page 69

EasyLAN User’s Guide 55
Chapter 4 — Using the EasyLAN Web Browser Interface
Contacting Intermec Support
Click Support at the top of the screen. e Product Support page
appears.
The Intermec Support Page
e web page includes links to the main Intermec web site. You need an
Internet connection to view the links.
• Click Printer Support to view the Intermec Printer Support Page.
• Click Intermec Corporate to view the Intermec Technologies
Corporation home page.
• Click Knowledge Central to view the Intermec Knowledge Central
home page. Here you can fi nd information to help you resolve
problems with your printer.
• Click Global Directory to view information about contacting
diff erent Intermec offi ces and fi nding your local representative.
Page 70

56 EasyLAN User’s Guide
Chapter 4 — Using the EasyLAN Web Browser Interface
Page 71

EasyLAN User’s Guide 57
5
Basic Operations (Fingerprint and IPL)
is chapter gives you a summary of the basic
operations you can use to confi gure and monitor an
EasyCoder printer running either Fingerprint or IPL
through an Ethernet or Wireless network connection.
Page 72

58 EasyLAN User’s Guide
Chapter 5 — Basic Operations (Fingerprint and IPL)
Using the EasyLAN FTP Server
e EasyLAN has a built-in FTP server, which allows you to upload and
download fi les such as pictures and fonts. You can also print by sending
a fi le of printer commands directly to the printer’s command interpreter
("net1:" in Fingerprint) by storing the fi le as pr1 on the FTP server. e
printer then executes the commands, and performs the print job.
e EasyLAN FTP server supports most of the common FTP
functionalities and clients. To connect to the server use the assigned IPaddress and standard FTP port (21).
Timeout
For security reasons the printers internal FTP server has an idle time
limit to ensure that a connection is not left active. e timer will close
the FTP connection after 15 minutes of idle time.
User Access Control
ere are two default accounts on the printer: admin and user. By
default, the user account is permitted to send fi les to the printer port,
create directories and fi les on the server. e admin account has the
same permissions as the user account but as admin you can also change
Network settings, LAN settings and upgrade the printer’s software.
Note: When you log in as admin on the FTP server, the
current user in Fingerprint or IPL is not automatically
changed.
For more information about accounts, see “Restrict Functionality” on
page 86.
Page 73

EasyLAN User’s Guide 59
Chapter 5 — Basic Operations (Fingerprint and IPL)
Printing Labels (Fingerprint)
Creating a Label File
In order to test if the printer has been correctly installed and confi gured,
you could print a simple label. e fi le listed below is a text fi le
containing Intermec Direct Protocol commands.
First, create a label layout fi le in a text editor, such as Windows Notepad.
Example:
INPUT ON start direct protocol mode
BF ON enable bar code interpretation
BF "Swiss 721 BT",6 select bar code font
PP 10,10 insertion point for box fi eld
PX 430,340,15 create a box
PP 30,30 insertion point for image fi eld
PM "GLOBE.1" select image
PP 75,270 insertion point for bar code fi eld
BT "CODE39" select bar code type
PB "ABC" input data to bar code fi eld
PP 75,220 insertion point for text fi eld
FT "Swiss 721 BT",6 select text font
PT "My FIRST label" input data to text fi eld
PF print one copy
Save the fi le under a suitable name, for example
dptest.txt.
Page 74

60 EasyLAN User’s Guide
Chapter 5 — Basic Operations (Fingerprint and IPL)
Printing a Label File
Use the following instructions to print a sample of the label described on
the previous page.
You will need to know the name or IP address of the printer you want
to print to. Make sure that the printer is set to use "net1:" or "auto" as
standard IN channel.
1 Start an FTP application connected to the printer:
ftp xxx.xxx.xxx.xxx
2 Log on using the user account name and password.
3 Send the test fi le to the printer. For example:
put dptest.txt pr1
4 If the printing has been successful, the application returns “transfer
complete” and other information.
e printed label should look similar to the label below:
Page 75

EasyLAN User’s Guide 61
Chapter 5 — Basic Operations (Fingerprint and IPL)
Printing Labels (IPL)
Creating a Label File
In order to test whether the printer has been correctly installed and
confi gured, you can print a simple label fi le. e fi le listed below is a text
fi le containing IPL commands created in a text editor, such as Windows
Notepad.
For further information regarding IPL and IPL commands, please
consult the IPL Programming Reference Manual.
<STX><ESC>C<ETX> Select Advanced mode
<STX><ESC>P<ETX> Enter Program mode
<STX>E4;F4;<ETX> Erase format 4, create format 4
<STX>H0;o102,51;f0;c25;h20;w20;d0,30;<ETX>
Edit/create human-readable fi eld 0
<STX>L1;o102,102;f0;l575;w5;<ETX> Edit/create line fi eld 1
<STX>B2;o203,153;c0,0;h100;w2;i1;d0,10;<ETX>
Edit/create Code 39 bar code fi eld 2 with interpretive fi eld enabled
<STX>I2;h1;w1;c20;<ETX> Create interpretive fi eld
to go with bar code fi eld 2
<STX>R;<ETX> Save format and exit to Print mode
<STX><ESC>E4<ETX> Access format 4
<STX><CAN><ETX> Erase all data
<STX>THIS IS THE SAMPLE LABEL<CR><ETX> Data for
human-readable fi eld 0
<STX>SAMPLE<ETX> Data for bar code fi eld 2
<STX><ETB><ETX> Print
Note: e line breaks in the preceding example are shown
for formatting purposes only and do not necessarily represent
carriage returns.
Save the fi le under a suitable name, for example
ipltest.txt.
Page 76

62 EasyLAN User’s Guide
Chapter 5 — Basic Operations (Fingerprint and IPL)
Printing a Label File
Use the following instructions to print a sample from the windows
environment. You will need to know the name or IP address of the
printer you want to print to.
1 Start an FTP application connected to the printer:
ftp xxx.xxx.xxx.xxx
2 Log on using the user account name and password.
3 Send the test fi le to the printer. For example, type:
put ipltest.txt pr1
4 If the printing has been successful, the application returns “transfer
complete” and other information.
e printed label should look similar to the label below.
Page 77

EasyLAN User’s Guide 63
Chapter 5 — Basic Operations (Fingerprint and IPL)
Confi guring the Printer
Having assigned an IP address to your EasyLAN, as described in
the installation instructions manual, you can change the EasyCoder
parameter settings using the File Transport Protocol (FTP).
You can do this by using your preferred text editor to create a simple text
fi le containing the desired Fingerprint or IPL commands. e commands
are explained in detail in the programmer’s reference manuals for IPL
and Fingerprint.
After creating the fi le, you can send it to the printer by following the
steps below.
1 Start an FTP application connected to the printer:
ftp xxx.xxx.xxx.xxx
2 Log on using your user account name and password.
3 Send the confi guration fi le to the printer. For example, type:
put confi guration.txt pr1
SNMP
You can use SNMP (Simple Network Management Protocol) for
remotely monitoring and confi guring the EasyLAN. All major
functions for print servers are supported. SNMP refers to a set of
standards for network management, including a protocol, a database
structure specifi cation, and a set of data objects. e EasyLAN SNMP
implementation runs in the TCP/IP environment. e management
is handled by NMS (Network Management System) software running
on a host in your network. e NMS software communicates with
network devices, such as the printer by the means of messages, which
are references to one or more objects. A message can be a question or
an instruction to a device, or an alarm triggered by a specifi c event in a
device. Objects are contained in databases called MIBs (Management
Information Bases), where MIB-II is a standard database. e EasyLAN
supports all relevant parts of MIB-II and also includes Intermec MIBs.
For more information regarding SNMP, see Chapter 6, “Advanced
Confi guration.”
Page 78

64 EasyLAN User’s Guide
Chapter 5 — Basic Operations (Fingerprint and IPL)
Password Protection
Network users can easily access and change the network and printer
settings by entering the printer web pages. Intermec therefore strongly
suggests that you change the default password settings and thereby limit
the access possibilities and hazard of unauthorized changes of the printer
settings. Password changes are made through the internal web interface
(see “Confi guration” in Chapter 4).
Passwords are case sensitive and stored using encryption.
Default Settings
e factory default password settings are:
Account Password
User No Password
Admin Pass
Forgotten Passwords
A password that has been set and forgotten is not possible to retrieve in
any way. If the default password for the admin account is changed and
forgotten, you will need a Compact Flash card to revert the printer to the
default settings. Please contact your local Intermec dealer for support.
Page 79

EasyLAN User’s Guide 65
6
Advanced Confi guration
is chapter describes the more advanced features
of the printer such as the printer’s fi le structure,
customization of the web interfaces, and security
issues.
Page 80

66 EasyLAN User’s Guide
Chapter 6 — Advanced Confi guration
Printer File System (Fingerprint)
When accessing the printer through various means of communication,
you will encounter diff erent parts of the printer’s fi le system. In this
chapter you can fi nd a brief description of the diff erent devices and
directories of the fi le system.
Device Tree Structure
e image below shows the device tree structure of the printer.
/ (root)
c
ADMIN
boot
counter
card1
dev
lock
pffs
rom
images
secure
storage
tmp
Page 81

EasyLAN User’s Guide 67
Chapter 6 — Advanced Confi guration
Devices and Directories
e fi le system of the EasyCoder Printer is case-sensitive. is must be
taken into account since fi lenames in Fingerprint commands by default
are translated into capital letters. Directories or fi les named in lowercase
will be inaccessible for Fingerprint commands and programs.
Depending on what service you use to access the printer, you use
diff erent commands to navigate the fi le system. When accessing the
printer through an FTP client or a web browser you can easily navigate
through the diff erent devices and directories, regardless if they are named
in capital letters or lower case.
When accessing through raw TCP (“net1:”), you use Fingerprint
to communicate with the printer. As mentioned above, Fingerprint
commands are translated into capital letters, which restricts the usage to
devices and directories named in lowercase. For more information about
Fingerprint, please refer to the Fingerprint manuals.
/ (root)
e root node is write protected to preserve the device and fi le structure
of the printer.
/c
“/c” is the user fi le system. Here you can create directories and store fi les
such as programs, fonts, and images.
boot
is directory on the “/c” device contains the fi rmware, password fi le,
and other system information
ADMIN
is directory on the “/c” device is only accessible for the admin user.
It contains start order, Fingerprint restrictions, and other confi guration
parameters only confi gurable for admin.
counter:
When the electronic key hardware option is installed on the printer, this
directory is used to store software and data corresponding to the device.
card1:
Compact Flash fi le system, used to store large fonts, images, etc. is
device is also used to upgrade the on-board fi rmware of the printer.
Page 82

68 EasyLAN User’s Guide
Chapter 6 — Advanced Confi guration
/dev
is is where devices used for input/output, such as uart1, Flash, net1,
Centronics, etc. are located.
lock:
When the electronic key hardware option is installed on the printer, this
directory is used to store all electronic key items that has been specifi ed
as locks by means of special software.
pff s:
e power fail fi le system is used to store fi les that need to be saved at
power down.
/rom
is device is used to store a collection of fi les that are available as default
in the printer, for example the default web pages, fonts, and images.
images
is directory is used to store images used for the default web pages.
secure
is directory is used to store the password protected web pages.
storage:
When the electronic key hardware option is installed on the printer,
this directory is used as complementary storage for the software
corresponding to the key hardware.
tmp:
is is the printer’s temporary read/write memory. It will lose its content
when the power is switched off or at a power failure. us, do not use
“tmp:” to store valuable data. One advantage of using “tmp:” instead
of “/c” to temporarily store data is that data can be written to SDRAM
faster than to the fl ash memory.
Limitations
pff s
e /pff s device has a limitation. Files stored on this unit cannot exceed
the size of 256 bytes each, and the total size of the “pff s” unit is 32 KB.
Page 83

EasyLAN User’s Guide 69
Chapter 6 — Advanced Confi guration
Accessing the Printer
e printer can be accessed and confi gured through the web interface,
but there are other ways to access the printer using the network. In this
chapter you can fi nd information about these additional interfaces.
Raw TCP
Having assigned an IP address to your EasyLAN network interface card,
as described in the Installation Instructions, you can manage your printer
using Telnet and Fingerprint or IPL commands.
Connection Settings
ere are some settings that will aff ect your connection. One way,
and perhaps the easiest, is to manage these through the web interface.
Connect to your printer using a web browser.
When an application is running, it may alter the communication settings
and therefore interfere with raw TCP (telnet) communications. e
settings described below makes it possible to connect to the printer with
a telnet client.
Std I/O and Application (Fingerprint only)
When you have accessed the printer’s internal web pages, click on
Confi guration, Printer, and fi nally Web Shell.
Make sure that the standard I/O port is set to either auto or net1: and
that the application is set to Fingerprint. If you make changes, reboot the
printer for the settings to take eff ect.
TCP Port Number
When connected to the printer’s internal web pages, click on
Confi guration, Network Admin, and fi nally TCP/IP.
e net1 TCP Port Number, default set to 9100, is needed to connect
with the telnet client.
Connecting
Start your telnet client and connect to the printer using either Host
Name or IP Address follow by the TCP Port Number. For example:
Telnet 192.168.235.150 9100
is will open a connection, which can be used to issue commands to
manage the printer.
Page 84

70 EasyLAN User’s Guide
Chapter 6 — Advanced Confi guration
Closing a Connection
Closing the net1: connection is accomplished with the CLOSE command
if the connection was initiated by the printer.
A connection that was initiated by a remote host can only be closed with
the Fingerprint command
Setup, regardless of which communication
protocol you use (rawTCP, FTP or LPD). e following command string
closes the remote connection:
Setup "lan1", "+NET1_STATUS", "off"
FTP
In Fingerprint, the FTP functionality of the server consists of a server
and a client part, which allows Fingerprint programs both to put and to
get fi les from the printer. In IPL, there is no client part.
Server
e printers FTP server supports most of the common functionalities of
an FTP server. Some restrictions and special features are listed below.
Maximum Connected Clients
e maximum number of connected clients at the same time is 5. If you
are trying to connect to the FTP server when the maximum number
of connected clients is exceeded, the error message “230 Server too busy,
please try again later” displays.
Auto Install
Files uploaded (such as images and fonts) are installed automatically.
Also, removing an image or font through the FTP server will uninstall
the fi le automatically.
Permissions
e users and passwords are the same as for the rest of the printer’s
system and are set up the same way. e only exception is anonymous
login.
Anonymous
It is possible to log in as anonymous or ftp with your e-mail address as
password. e anonymous user is restricted to read access, and cannot
use pr1 as a print port, because it is considered a security risk. When
logging in as anonymous or ftp, the user is placed at the root of the
virtual fi le system (“/”).
Page 85

EasyLAN User’s Guide 71
Chapter 6 — Advanced Confi guration
Password Protected Users
If the user logs in with a password, the fi le system permissions determines
what the user has access to. e FTP server supports the users listed in
the password fi le.
Timeout
e FTP server has a 15 minute timeout.
Client (Fingerprint only)
e printer’s FTP client supports the transfer of fi les to and from the
printer using the Fingerprint statement TRANSFER NET, see Intermec
Fingerprint Programmer’s Reference Manual.
Confi gure Printer through Fingerprint
e following setup sections are used in connection with EasyLAN
network interface card and the Fingerprint SETUP command.
Information about confi guring the printer through Fingerprint
commands can be found in the Intermec Fingerprint Programmer’s
Reference Manual. is section does not apply to printers running IPL.
Setup Sections
prt e legacy section as it was before the introduction of sections. It
is the default section.
alerts Controls printer alerts in regard of individual enable/disable and
delay conditions for repeated traps.
lan1 Contains all variables available in the print server.
wlan Contains all basic wireless network confi guration
settings(EasyLAN Wireless with Fingerprint 8.10 or later).
8021x Contains all 802.1x security settings (EasyLAN Wireless with
Fingerprint 8.40 or later).
Setup objects are used in connection with EasyLAN. ere are diff erent
objects for each setup section:
prt Section
is is the default section. e syntax corresponds to the syntax of the
SETUP statement.
Page 86

72 EasyLAN User’s Guide
Chapter 6 — Advanced Confi guration
alerts Section
Objects enabled by default
- cutter Alerts if cutter error.
- headlifted Alerts if head lifted and printfeed.
- ribbonend Alerts if ribbon end and printfeed.
- paperend Alerts if paper end and printfeed.
- ribbonlow Alerts if ribbon low and printfeed.
- paperlow Alerts if paper low and printfeed.
Objects disabled by default
- lts Sends alert when the printer is waiting for a label to
be taken.
- pause Sends alert if a batch printing is paused.
- setup Sends alert if Setup Mode is entered via the printers
internal keyboard.
- error Sends alert when a Fingerprint/Direct Protocol error
occurs (before giving control to the error-handler).
- break Sends alert if the user breaks the program or if an error
breaks e running program, that is, it is not sent after
stop or breakpoint.
- job-complete Sends alert when all labels in a print feed batch are
started.
- odometer Alerts on diff erent service intervals depending
on the odometer count1 value.
Value Syntax
(enabled|disabled,<integer>,seconds|occurrences,
<text string>)
Example
SETUP "alerts","cutter","(enabled,9,seconds,Error
- Cutter Error)"
lan1 Section
Objects starting with a dot (.) cannot be read if the current user does
not have rights to read/set protected lan1 settings. Objects starting with
a plus sign (+) on the other hand, signify that all users can change the
setting.
Objects Description
ALERT_REC To address. Defi nes to whom the Alert
messages should be sent.
Page 87

EasyLAN User’s Guide 73
Chapter 6 — Advanced Confi guration
ALERT_SND From Address, the address that will be
displayed as the sender of alert messages.
is is the address that the e-mail will be
returned to if the recipient is unreachable
(for example when a e-mail bounce). If you
want to avoid e-mail bounces when the
recipient is unknown, leave this fi eld empty.
ALERT_SRV Should alerts be sent using e-mail or SNMP
traps.
DDNS DDNS status (“enable” or “disable”).
DDNS_ALIAS DDNS alias (name).
DDNS_REGISTERED (Read-only)Returns whether or not the
client (printer) is registered with the name
server.
DDNS_ZONE DDNS zone to which an alias will be added.
FAMILY ION family, used in ION XML settings
fi les.
IONC_ENABLE ION client for EasyADC. Set to “default”,
“on” (same as “default”), or “off ”.
NET1_REMOTE_HOST (Read-only) Remote host. IP address of a
computer accessing the printer through raw
TCP.
NET1_REMOTE_PORT (Read-only) e port of a remote computer
accessing the printer.
NET1_STATUS (Read-only) Status of Net1. Method by
which clients are currently connecting to the
printer (Raw TCP, lpd, ftp).
+
NET1_STATUS Status of the non-printer initiated TCP
connection. Can be set to “on” or “off “.
+
NET1_QUEUE Enable or disable Net1 queuing. Can be set
to “on” or “off “.
PS_NAME Network identifi cation name (WINS name).
Page 88

74 EasyLAN User’s Guide
Chapter 6 — Advanced Confi guration
.READ_COM Read Community. Community with rights
to read the SNMP MIBs.
RTEL_PR1 net1: TCP Port Number. e default port
number for raw TCP.
SMTP_ADDR E-mail (SMTP) server.
SNMP_AUT Authentifi cation Failure Trap, enabled/dis-
abled.
SMTP_INP Settings for SMTP Server (Manual or
DHCP).
SMTP_PORT E-mail (SMTP) port (default 25).
SYS_CONT System Contact (printer administrator)
(optional).
SYS_LOC System (printer) location (optional).
SYS_NAME SNMP Name. Administrative name for the
SNMP Node.
.TCT_LIMIT1 e variable to set the Odometer Count1
limit. Defi nes when an odometer count1
alert message shall be sent.
.TCT_UNIT1 ermal Counter Unit. is object is used
to set the unit of measurement to either
forms (labels) or meters for the Odometer
Counter. is object is used in combination
with the .TCT_LIMIT1 object and the
odometer count 1 alert.
TESTMAIL Submit test e-mail. When this variable is set
to yes, a test e-mail is generated and sent to
the default address. After the e-mail is sent,
the variable reverts back to default (no).
TIMESERVER Timeserver host name (for DDNS with
TSIG)
TRAP_COM Trap Community. is defi nes what
community the SNMP Traps should be sent
to.
TRAP_ENABLE Trap status (enable, disable, delete).
Page 89

EasyLAN User’s Guide 75
Chapter 6 — Advanced Confi guration
TRAP_TNAME Friendly trap names.
TRAPADDR Trap Address. is is the IP address of the
receiver of SNMP Traps.
TRAPPORT SNMP Trap port. Default port to send
SNMP Traps.
.TSIG_KEY TSIG key (for DDNS with TSIG)
.TSIG_KEYNAME Name of the TSIG encryption key.
WINS_ADDR1 Primary WINS Server.
WINS_ADDR2 Secondary WINS Server.
.WRT_COM Write Community. Community with rights
to read and write SNMP MIBs.
Example:
SETUP "lan1","RTEL_PR1","9100"
wlan Section
Objects starting with a dot (.) cannot be read if the current user does not
have rights to read/set protected wlan settings.
Objects Description
SSID Service Set Identifi er (0-32 characters).
WEP 1-4 WEP keys 1 to 4 (alphanumerical or
hexadecimal).
.WEP_KEY Select WEP key (0 disables WEP; 1-4 selects
transmission key).
AUTH Set the network authentication subtype to
Shared or Open.
WPA Set the status of WPA to “on” or “off ”.
WPA_PSK Set or remove the Pre-Shared Key (PSK).
ROAM Set the network adapter’s roaming
inclination (1-3, a high value will make the
adapter less inclined to switch access points)
CHANNEL
Read current channel.
Page 90

76 EasyLAN User’s Guide
Chapter 6 — Advanced Confi guration
AP_MAC Read MAC address of the associated access
point.
SIGNAL Read signal strength.
SPEED Read transmission speed.
.REGION Read region. Can be changed by authorized
personnel only.
Example:
SETUP "wlan","SSID","qwerty"
8021x Section
Objects starting with a dot (.) cannot be read if the current user does not
have rights to read/set protected 8021x settings.
Objects Description
EAP_TYPE Preferred EAP type (TTLS, LEAP, PEAP, or
OFF)
EAP_USER Logon user name.
EAP_PASS Logon password.
TTLS_USER TTLS outer name.
INNER_AUTH (TTLS/PEAP only) Inner authentication
type (PAP, MSCHAPv2, EAP/MSCHAPv2,
EAP/MD5, EAP/GTC)
CA_CERT (TTLS/PEAP only) Installs overriding CA
certifi cate.
.SERVER_CN1 (TTLS/PEAP only) Common name 1.
.SERVER_CN2 (TTLS/PEAP only) Common name 2.
VALIDATE Enables/disables server certifi cate validation.
Example:
SETUP "8021x","TTLS_USER","Manufacturing"
Customization (Fingerprint)
e easiest way to modify the appearance of the printer web page is to
create an HTML fi le called “INDEX.HTM” on the device “/c” with
custom designed logo and colors. From this fi le it is quite easy to link
Page 91

EasyLAN User’s Guide 77
Chapter 6 — Advanced Confi guration
to the printer’s confi guration pages. e web server generates these web
pages with dynamic information on the fl y. is process makes the
printer’s real time generated pages appear in the Intermec style. e
colors and logo of the customer will be ignored.
Web Style Guide Files
e EasyLAN is prepared for customization of the default web pages in
a more permanent way by changing the confi guration of the engine that
generates the pages. While generating the pages, the web server accesses
confi guration parameters, like the background color, the name of logos
to be displayed on the page and generates the HTML code. Default
confi guration of these parameters makes the printer’s web page appear in
the Intermec style, with corporate colors and logos. When changing the
parameters, the web pages are permanently customized. Customization
of these parameters has to be done in specifi c fi les called “Web Style Guide
Files”, assigning user defi ned values to several support environment
variables.
Web style guide fi les contains parameters to set web page content and
layout. ese fi les can be stored either on /c or pff s:.
In the fi le system, /c has priority over pff s:, which implies that if there is
a web style guide on /c (for example /c/webstyleguide.0), the printer will
not look for pff s:webstyleguide.1. We suggest that web style guides are
stored on pff s: to minimize the risk that they are accidentally removed.
Content of a Web Style Guide File
A Web Style Guide fi le has to contain a set of mandatory environment
variables and it can also contain optional variables. All variables have to
be lowercase, followed by a “=” sign and a consistent value. ere is no
specifi c order of the variables.
Page 92

78 EasyLAN User’s Guide
Chapter 6 — Advanced Confi guration
Required Environment Variables
In the reference table below are all required environment variables
described.
Variable Meaning
bgco Background color, BGCOLOR attribute of BODY tag
coli Copyright link, link to html fi le showing Copyright notes
cona Company name
loat Logotype attributes, contains all attributes for the IMG-tag to replace the
Intermec logo
trna Trade name, for example EasyCoder
Optional Environment Variables
e optional environment variables are used to specify extra parameters;
for instance, these variables permit to change the printer’s model name.
e web server only recognizes the following model names:
PF2i PF4i PM4i PX4i PX6i
e web server checks the available hardware and then displays the
correct model name in the web page. If the page has to show a diff erent
name of the printer and for instance the web page is running on an PF2i,
the web style guide fi le has to contain the optional variable PF2i=your
name.
Optional Variables Reference Table
Variable Meaning Comments
alco Active link color, ALINK attribute of BODY
tag
bgli Background image link, BACKGROUND
attribute of BODY tag
heon Help On, enables a help link on the page If this parameter is in the
webstyle guide fi le, then
the variables “heli” and
“hena” must have a value
heli Help Link, link associated to the Help tag
hena Help link Name, the label to be shown on
the web page
lico Link color, LINK attribute of BODY tag.
Page 93

EasyLAN User’s Guide 79
Chapter 6 — Advanced Confi guration
Optional Variables Reference Table (continued)
Variable Meaning Comments
suon Support link On, enables a support link on
the page
If this parameter is in the
webstyle guide fi le, then
the variables “suli” and
“suna” must have a value
suli Support Link, it is the link associated to the
support tag
suna Support link Name, it is the label to be
shown on the web page
teco Text color, TEXT attribute of BODY tag
vlco Visited link color
x-www-url-Encoding Syntax Rules
e value given to environment variables has to be specifi ed
respecting the x-www-url-encoding syntax rules. According to the
syntax rules, characters can be inserted using the notation %<ASCII
Hex>. For example, space in the ASCII table has the Hex number
20 so it corresponds to %20. For example, “Intermec Technologies
Corporation” corresponds to “Intermec%20Technologies%20Corporati
on” (it can also be written “Intermec+Technologies+Corporation”).
Colors are specifi ed according to the RGB syntax: %23cdcdcd
corresponds to #cdcdcd.
Any quotation marks (%22) must be preceded by a back slash (\).
e fi le must contain only one line, where the diff erent variables and
valuers are separated by ampersand (&) characters.
Memory and Storage
Web Style Guide fi les are designed to be placed on the printer’s pff s,
as mentioned. Due to the memory limits of the pff s the environment
variables have very short name (4 bytes), which may make them less user
friendly to use, but this allows more space to be used for the value of the
variable.
ere is also a size limit per fi le that is set to 256 bytes. In case the Web
Style Guide File you want to create is bigger than 256 bytes, the content
has to be split in more than one fi le.
e parser daemon will start looking for the fi rst Web Style Guide File
Page 94

80 EasyLAN User’s Guide
Chapter 6 — Advanced Confi guration
which has to be named “webstyleguide.0”, then it will try to read the
next fi le called “webstyleguide.1” and so on.
Creating a Web Style Guide File
Web Style Guide Files can be created with a standard text editor and
then transferred to the printer, however there are some rules that has to
be followed when creating a Web Style Guide File:
• e name has to be lowercase.
• e fi rst fi le has to have extension “.0”. e following fi les have to
have sequential extension number if one number is missing in the
sequence the parser will stop reading the fi les.
• e split point between one web style guide and the other cannot be
in the middle of a line. e last line of the fi le has to be consistent in
the syntax and the fi rst line of the following web style guide fi le has to
be a new line.
• If variables are specifi ed more than one time, the last value is the one
assumed.
Intermec recommends that you use the FTP server to transfer the fi les.
Example (the default Web Style Guide):
bgco=%23ffffff&loat=src%3d\%22/rom/images/itclogo1.
gif\%22+align%3dbottom+alt%3d\%22Intermec_
Technologies_Corporation\ %22+border%3d0
&cona=Intermec+Technologies+Corporation&coli=copyri
ght.htmf&suli=support.htmf&suna=Support&suon=t&trna
=EasyCoder
CGI-Scripts
Identifying CGI-resources
e web server is designed to recognize two types of CGI-resources: IPP
and application specifi c CGI.
IPP
IPP (Intermec Page Parser) are used to create dynamic contents on web
pages. e fi les are parsed and executed before the output is written to
Page 95

EasyLAN User’s Guide 81
Chapter 6 — Advanced Confi guration
stdout and then sent to the web browser. To be identifi ed as an IPPresource, the fi rst line in the fi le must contain options that tell which
command parser that should be used and how the HTTP request shall
be handled.
e options are x-www-url-encoded, that is, multiple arguments are
passed as name1=value1&name2=value2. Recognized options are ush for
command parser, rec_hdr and prot for arguments.
Application Specifi c CGI
Application specifi c CGI is a fi le identifi ed as CGI, which does not fall
into the previous category. To be identifi ed as a CGI resource, the fi rst
non-empty line in the fi le must contain Intermec-CGI/1.0: <option>.
e options are x-www-url-encoded, that is, multiple arguments are
passed as name1=value1&name2=value2. Recognized parameter names
are mode, send_hdr and prot.
Other Files
Files that do not fall into any of the previous categories are considered
regular fi les and are sent to the web browser without further inspection.
Fingerprint CGI-scripting
Fingerprint CGI-scripting is a kind of application specifi c CGI.
Fingerprint CGI-scripting has been inspired by concepts commonly
used in web programming and the web servers. When the web server
gets a request it sets environment variables to refl ect the request, and
redirects stdin and stdout to the TCP-connection established with the
web browser. en it starts the CGI program. When the program ends,
the web server (or OS) disconnects the TCP-connection. As a request
is received, a string-associative environment named ENV is created
to refl ect the nature of the request; stdin and stdout are redirected to
the web browser and control is given to the application layer. When
the application layer fi nishes, the web server disconnects the TCPconnection to the web browser.
e format of the parameter stream passed from the web browser follows
the standard formatting given by the HTTP and CGI standards. For
GET requests the arguments are given in the QUERY_STRING, and for
POST requests the arguments are passed on stdin. e numbers of bytes
to read on stdin are given by CONTENT_LENGTH. Decoded data is
Page 96

82 EasyLAN User’s Guide
Chapter 6 — Advanced Confi guration
given in the DATA stringassoc. environment.
For example:
"Intermec-CGI/1.0:mode=single&send_hdr=yes"
Parameters Meaning
mode=interrupt e program is run until it ends, servicing multiple requests via
ON HTTP GOTO/HTTP RESUME.
mode=single e program is started and ended once per HTTP request. e
TCP-connection to the web browser is open until the program is
ended. Output on STDOUT is transmitted to the HTTP client.
send_hdr=yes e program must produce headers, the web server does not pro-
duce any.
prot=list of users e program is protected, comma separated list of user that have
access.
Fingerprint CGI Commands
GETASSOC$
GETASSOC$ is a function for getting a value from a string association.
Syntax:
GETASSOC$ (<sexp1>,<sexp2>)
<sexp
1
> is the name of the association (case-sensitive).
<sexp2> is the name of a tuple in the association.
An association is an array of tuples, where each tuple consists of a name
and a value.
is example shows how a string, including three string names associated
with three start values, will be defi ned and one of them (time) will be
changed:
10 QUERYSTRING$="time=UNKNOWN&label=321&desc=DEF"
20 MAKEASSOC"QARRAY",QUERYSTRING$,"HTTP"
30 QTIME$=GETASSOC$("QARRAY","time")
40 QLABELS%=VAL(GETASSOC$("QARRAY","label"))
50 QDESC$=GETASSOC$("QARRAY","desc")
60 PRINT"time=";QTIME$,"LABEL=";QLABELS%,
"DESCRIPTION=";QDESC$
70 SETASSOC"QARRAY","time",time$
80 PRINT"time=";GETASSOC$("QARRAY","time")
Page 97

EasyLAN User’s Guide 83
Chapter 6 — Advanced Confi guration
e example yields the following when run:
time=UNKNOWN LABEL=321 DESCRIPTION=DEF
time=153355
GETASSOCNAME$
GETASSOCNAME$ is a function for traversing the tuples of a string
association.
Syntax:
GETASSOCNAME$(<sexp>,<nexp>)
<sexp> is the association to be traversed (case-sensitive).
<nexp> specifi es the tuple in the association.
<nexp> = 0 specifi es fi rst tuple.
<nexp> ≠ 0 specifi es next tuple.
An association is an array of tuples, where each tuple consists of a name
and a value. To get the fi rst position in the string association, <nexp>
should be zero. Consecutive calls to GETASSOCNAME$ witn <nexp>
non zero will traverse all variables in an undefi ned order. When a blank
string ("") is returned, the last variable has been traversed.
is example shows how “QARRAY" is traversed (run example from
GETASSOC fi rst):
10 LVAL$=GETASSOCNAME$("QARRAY",0)
20 WHILE LVAL$<>""
30 RVAL$=GETASSOC$("QARRAY",LVAL$)
40 PRINT LVAL$;"=";RVAL$
50 LVAL$=GETASSOCNAME$("QARRAY",1)
60 WEND
e example yields the following when run:
label=321
desc=DEF
time=153355
MAKEASSOC
MAKEASSOC is used to create associations.
Syntax:
MAKEASSOC <sexp1>,<sexp2>,<sexp3>
<sexp1> specifi es the name of the association to be created (case-
sensitive).
<sexp2> contains an argument list of parameter tuples according
to the convention in <sexp3>.
Page 98

84 EasyLAN User’s Guide
Chapter 6 — Advanced Confi guration
<sexp3 > should always be "HTTP" (case-sensitive).
Remarks: HTTP implies that the argument list in <sexp
2
> is encoded in
“x-www-url-encoding.”
ON HTTP GOTO
ON HTTP GOTO is used to defi ne the Fingerprint handler for the
CGI-request. When a request for an application CGI is received,
the current execution point will be pushed on to the stack and then
execution will commence in the handler with stdin and stdout redirected
from/to the web browser.
Syntax:
ON HTTP GOTO<ncon>|<line label>
<ncon> is the number of the line to which the program will
branch when the CGI request is received.
<line label> is the label of the line to which the program will branch
when the CGI request is received.
Remarks: is statement is used in connection with EasyLAN and
defi nes a Fingerprint subroutine that handles the CGI-request. Setting
the handler’s line number or line label to 0 disables it. When a request
for an application CGI is received, the current execution point will be
pushed on to the stack and then the execution will commence in the
handler with stdin and stdout redirected from/to the Web browser.
RESUME HTTP
When RESUME HTTP is executed, the application layer fi nishes
and the web server closes the TCP-connection and pops the execution
point so that the program continues where it was before the request was
received. Stdin and stdout will be restored to their original values.
Interrupt
If mode is set to interrupt but the program is not running, the error
message “Application not started” is shown when the resource is requested.
If ON HTTP GOTO is defi ned, the interrupt handler will be called
even for other Fingerprint CGI-programs, and it is up to the application
to handle/honor this.
To look-up which program that was requested, you should use
GETASSOC$("ENV","SCRIPT_NAME").
Example of Fingerprint program:
10 'Intermec-CGI/1.0: mode=interrupt&send_hdr=no
Page 99

EasyLAN User’s Guide 85
Chapter 6 — Advanced Confi guration
20 ON HTTP GOTO 200
30 BREAK 1 ON
40 GOTO 40
200 PRINT "<html><head><title>Fingerprint CGI
</title></head>"
201 PRINT "<body bgcolor="+CHR$(34)+"#FFFFFF"+
CHR$(34)+"> <h2>This is generated by Fingerprint
CGI</h2></body></html>"
210 RESUME HTTP
Access to Running Fingerprint Applications
e URL fp/running is an easy way to access the running application. If
the running application can be identifi ed as a Fingerprint CGI and it is
registered with mode=interrupt, the interrupt handler will be called.
A program that has not been given a name will not be able to run
through fp/running. To assign a name to the program, you should use
the SAVE command, or you can load it with LOAD or RUN. Otherwise
error messages like: “No Fingerprint application running”, “ e running
application is not registered as CGI”, or “ e running application is not
setup for interrupt mode” will be displayed on a web page.
Mail Command
e printer can be set up to generate alert mails as described in “Alerts”
in Chapter 4. It is also possible to send mail from Fingerprint using the
“run” command mail.
Syntax:
mail [-s subject] [-r from/reply-address] [-c cc-address] [-b bcc-address] [-a SMTP-address]
[-p SMTP-port] <to-address> [-f fi le | text]
Note: e mail command and the fl ags must be entered in
lowercase.
Several “to”, “cc”, and “bcc” addresses can be entered if separated by
commas.
If SMTP address and/or port are set (fl ags ’-a’ and ’-p’), the
corresponding printer setting will be changed accordingly. SMTP
address and port cannot be set if the user does not have rights to read/set
Page 100

86 EasyLAN User’s Guide
Chapter 6 — Advanced Confi guration
protected lan1 settings. See “Confi gure Printer through Fingerprint” in
Chapter 6.
Examples:
Below is a simple example of how to send a mail in Fingerprint.
10 RUN "mail -s 'Test mail' me@domain.com 'Just
testing.' "
e following example shows how variables and strings can be used to
create a mail.
10 A% = 10
20 A$ = "Apple"
30 SUB$ = "-s "+CHR$(34)+"A% and A$ in a mail"
+CHR$(34)
40 REC$ = CHR$(34)+"me@domain.com,you@domain.com"
+CHR$(34)
50 SND$ = "-r me@domain.com"
60 TXT$ = CHR$(34)+"A% = "+STR$(A%)+" and A$ = "
+A$+CHR$(34)
70 MAIL$= "mail "+SUB$+" "+SND$+" "+REC$+" "+TXT$
80 PRINT MAIL$
90 RUN MAIL$
 Loading...