

Page 1
TECHNICAL DATA
Input Voltage: Separate models available for
24V, 120V or 240VAC,
50-60 Hz input
Relay Switch Rating: 16A @ 24/250 VAC
Output Relay: SPDT dry contacts for each
channel
Power Consumption 5 VA
Battery Backup: 6 years, replaceable
Temperature Range: –13°F to 131°F (–25°C to 55°C)
Display: AM/PM LCD 1" x 1-11/16"
Weight: 18 oz.
Mounting:
Surface & DIN rail (NEMA 1 indoor &
NEMA 3R outdoor enclosures
available)
Shortest Switching Time: One second
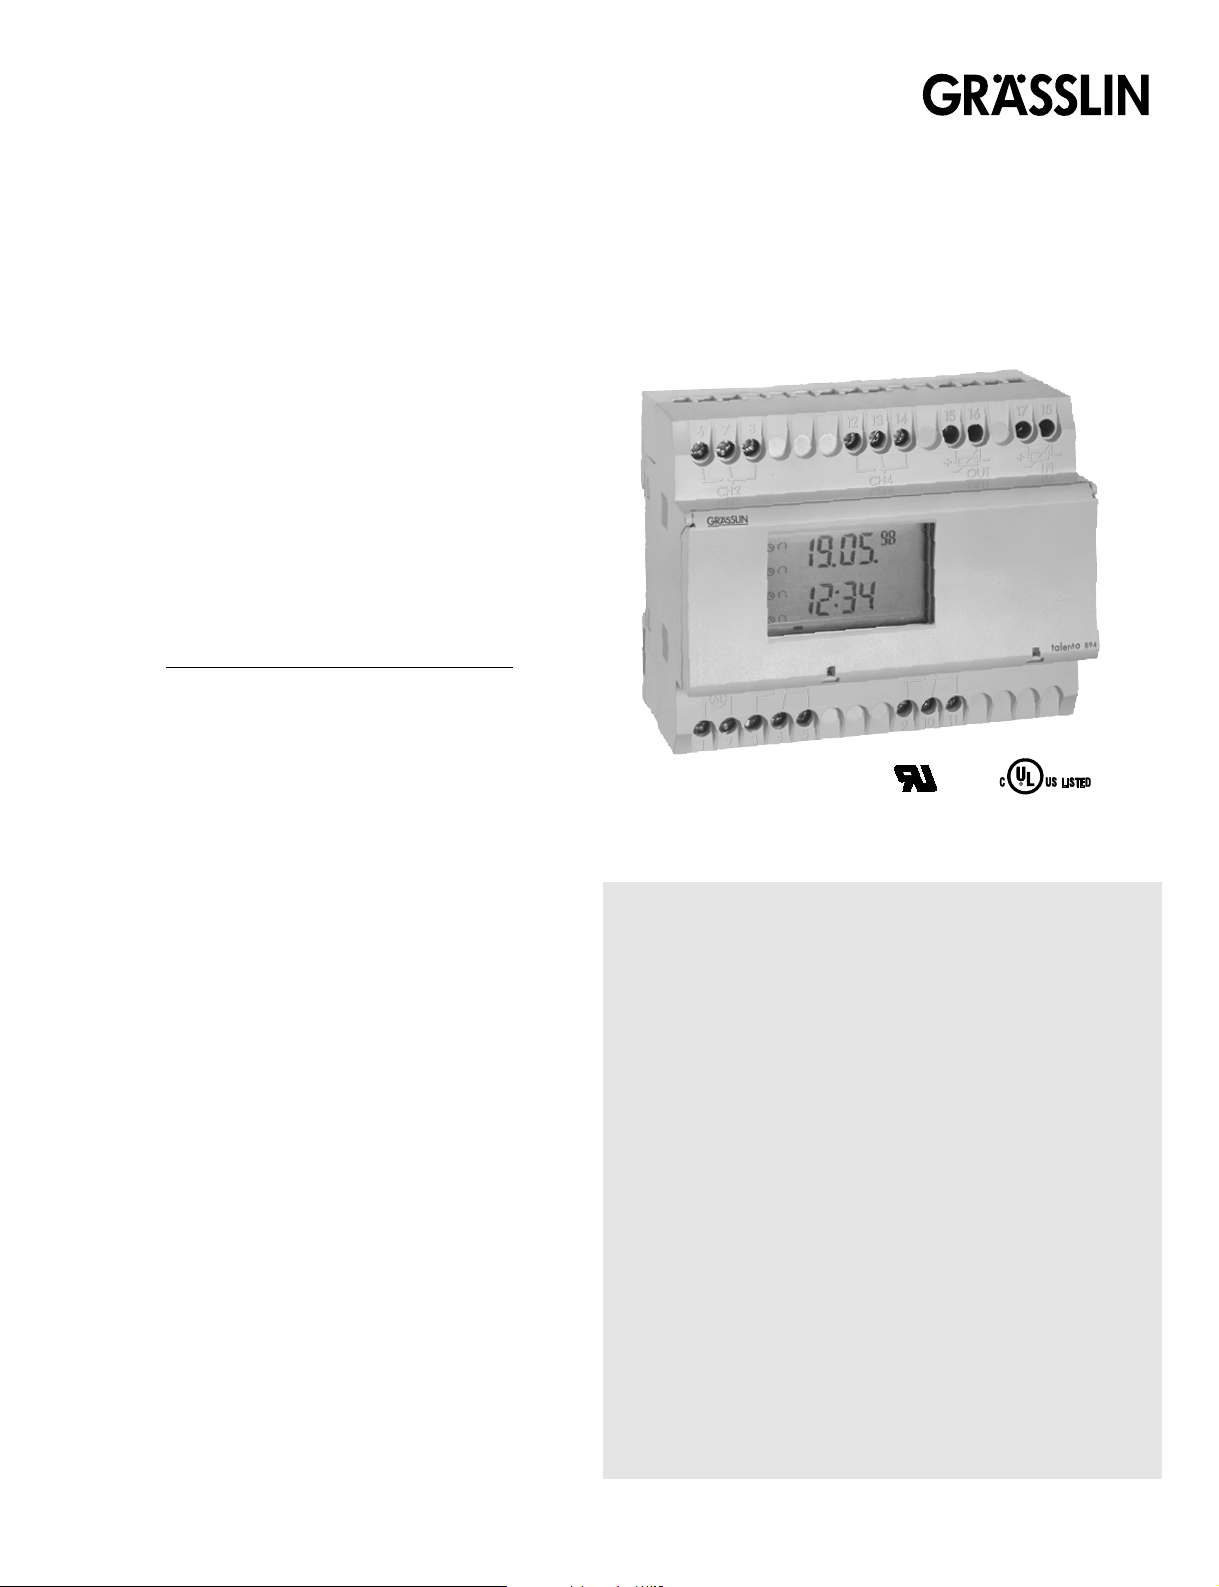
The talento 800 controls are one, two and four
channel electronic time switches with 365-day,
7-day and 24-hour programming. The channels are freely programmable with a total of
400 schedules. The load status, time of day,
and date are displayed on a large LCD readout. In addition to conventional On/Off programming, the unit provides a “Pulse” and
“Cycle” function.
Functional Description
The talento 800 time control can be programmed
with a 24-hour, 7-day, or a 365-day schedule (with
individual holidays or holiday/vacation periods.)
This control incorporates a calendar through the
year 2095 and also includes automatic leap year
adjustment. The annual daylight savings/standard
time changes can be programmed to occur automatically each year through 2095.
Please read these operating instructions carefully
so that you will be able to take full advantage of the
functions offered by the talento 800 time control.
TO THE INSTALLER:
1. Read operating instructions carefully.
2. Check the input voltage ratings marked on the
unit to make sure this product is suitable for
your power supply and application.
3. Disconnect power supply prior to installation to
prevent electrical shock.
4. Damage to the relay contacts caused by short
circuiting will void warranty.
5. Wire in accordance with National and Local
electrical code requirements.
OOppeerraattiinngg IInnssttrruuccttiioonnss
In Optional Enclosure
CUS
talento 800 Series
365-Day One, Two and Four Circuit
Electronic Time Controls
Page 2
PAGE 2
a) If possible, power to the electronic time switch
should be supplied from a phase different from
the one supplying power to the load.
b) INDUCTIVE-LOADS should have suitable VARIS-
TOR and RC network ( ) across the
supply terminals to reduce voltage spikes.
c) DC INDUCTIVE LOADS should have a diode
across their terminals to eliminate back EMF of
the inductor.
d) HIGHLY INDUCTIVE LOADS, especially fluores-
cent lights, may require a relay in which case (a)
and (c) apply.
e) IN HIGH LIGHTNING AREAS,a surge suppres-
sor should be installed.
KEYPAD DESCRIPTION
1 – 7 – Day selector (1 = Mon, 2 = Tue, etc.)
Reset* – “Restarts” microprocessor,
all programs are preserved
+1h – Switch for daylight savings time functions
Prior. – Sets priorities
Year – Sets year when setting actual time or DST
Day – Used to set the day of the month
Month – Used to set the month
Clear – To cancel program(s)
Prog. – Used to review/program/store
– Recalls actual time (Time of Day)
– S
ets the pulse (momentary contact)
command
– Sets the Cycle function (“repeating”
pulse command)
– Selects minute or second increments
– Used to set the date range
h– Hour advance
m– Minute advance
I/O – Manual override for each channel & sets
ON , OFF command for each
channel
*Recessed buttons—use a long pen point or pencil
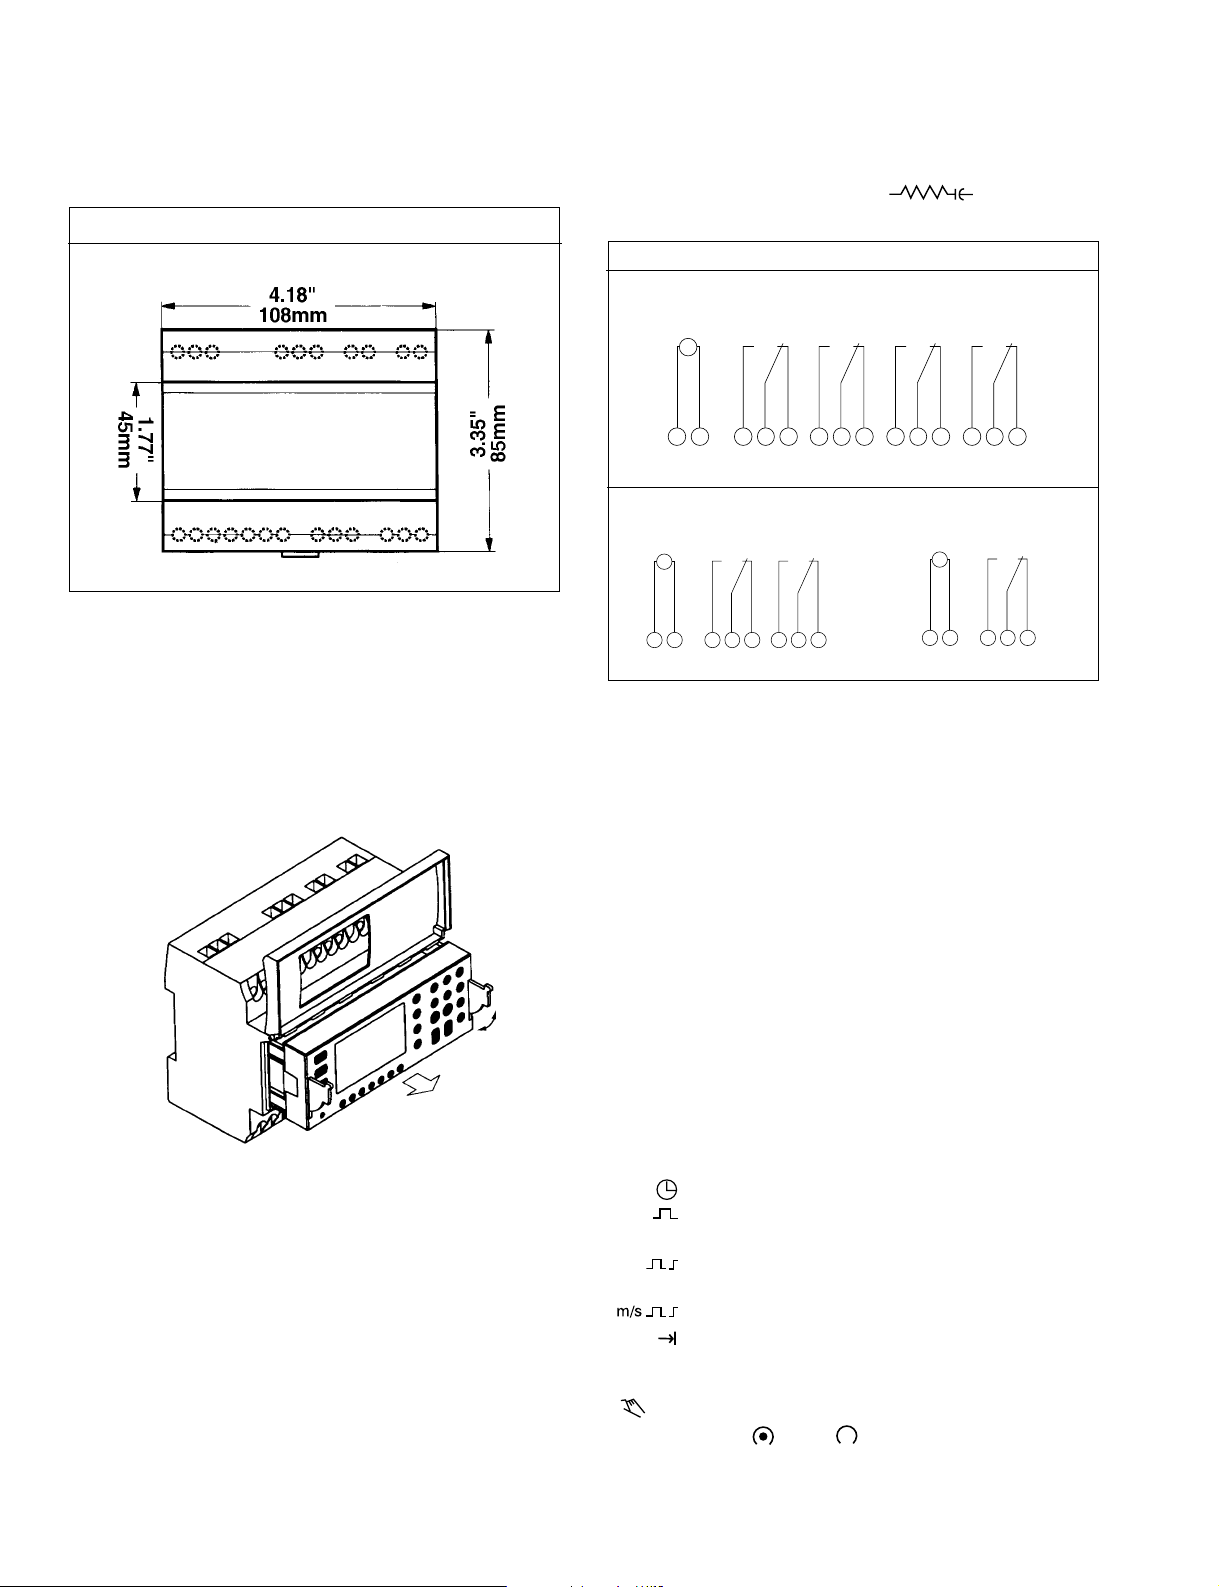
Installation
MOUNTING
Surface mounting the talento 800 inside a control panel
or enclosure is accomplished with a standard DIN rail.
Place the two protruding guides, which are on the top
of the rear rail cutout slot, over the top lip of the rail;
then snap the bottom into place.
For stand-alone installation use a Grasslin indoor/outdoor enclosure.
The timer module can be removed from the timer housing for programming or change-out purposes.
WIRING
Make certain to connect only to the supply voltage
designated on the unit itself. Warranty will be void if
wrong voltage is applied. Connect wires to the screw
terminals in accordance with the wiring diagram shown
(use 12 to 22 AWG wire).
INSTALLATION CHECKLIST
1. The time switch should have its own independent
circuit for power supply.
2. Since all electronic instruments are sensitive to voltage spikes, close attention must be paid to the following:
Dimensions
Terminal Connections
talento 894
talento 892
talento 891
3 4 51 2 6 7 8 9 10 11 12 13 14
NOINPUT
CH 1 CH 2 CH 3 CH 4
NC NO NC NO NC NO NC
M
~
3 4 51 2 6 7 8
NOINPUT
CH 1 CH 2
NC NO NC
M
~
3 4 51 2
NOINPUT
CH 1
NC
M
~
Page 3
PAGE 3
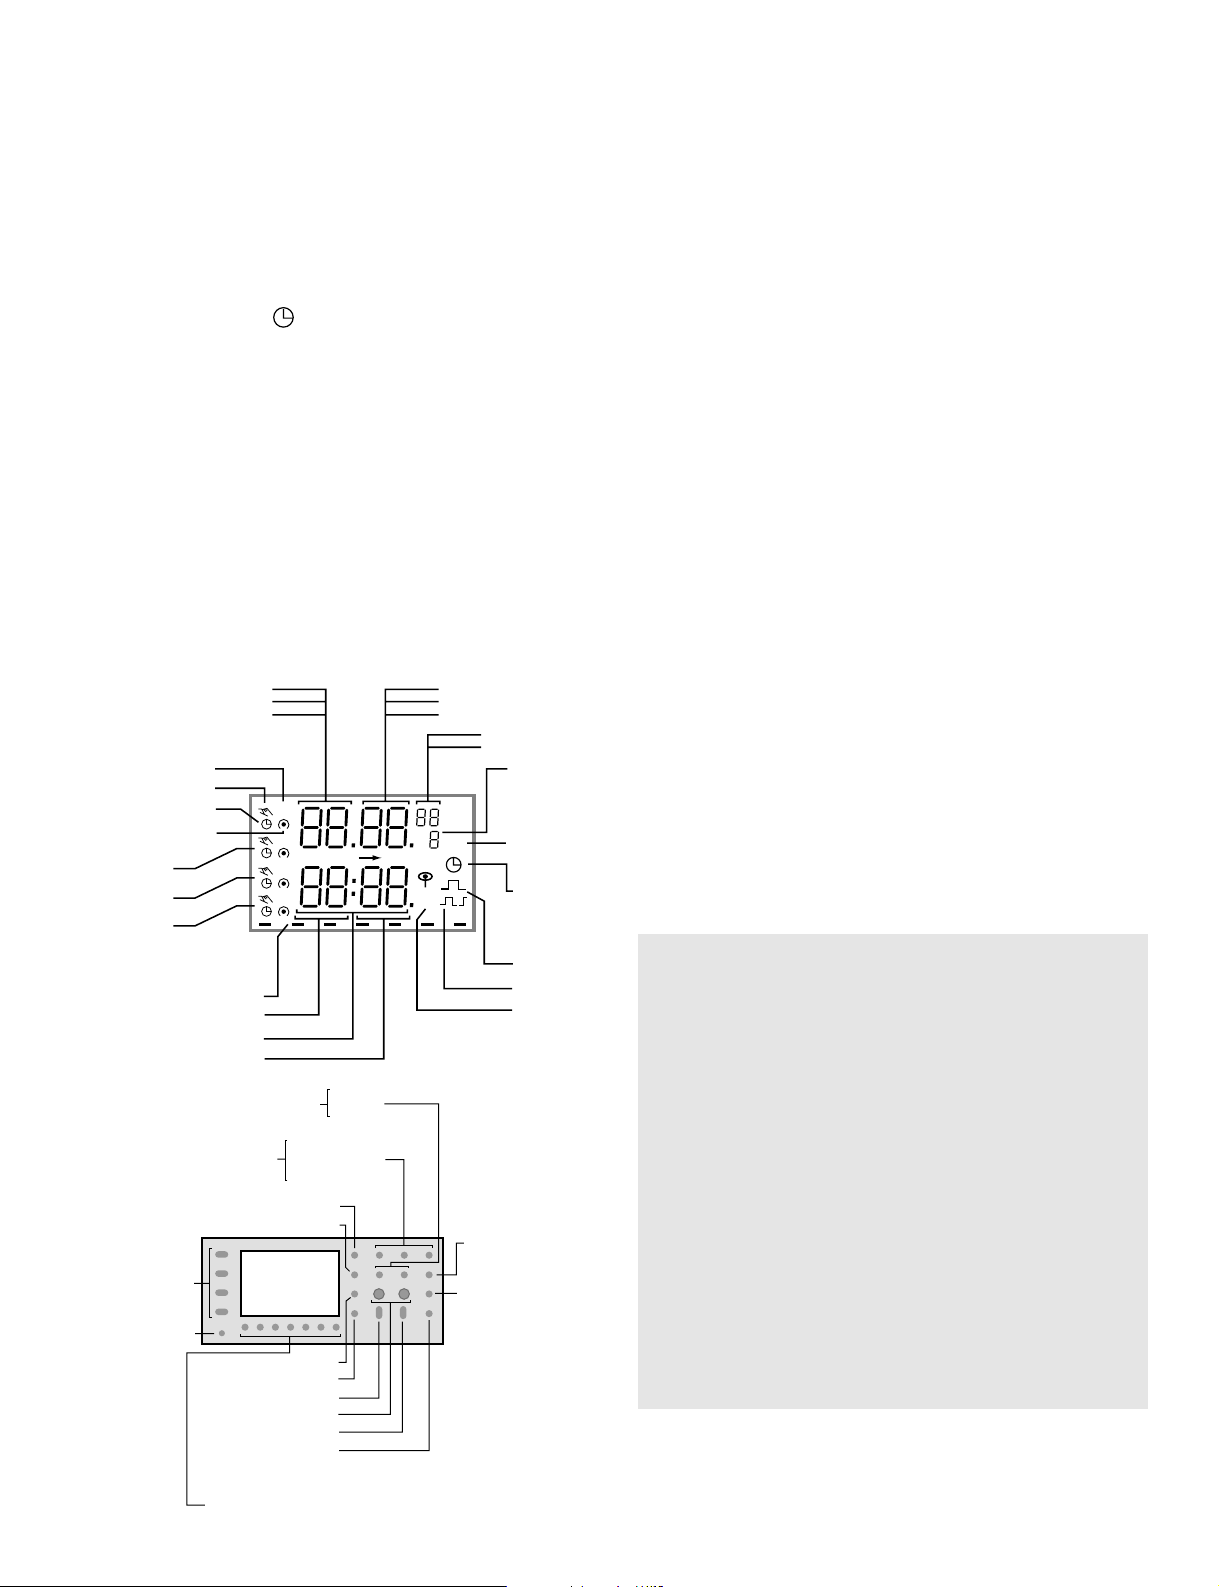
LCD DISPLAY ELEMENTS
The LCD incorporates a number of different elements to display various data and information.
A new feature of the talento 800 Series is the “Sleep”
Mode, an energy saving feature. This feature turns
off the LCD (when the unit is not powered) if no buttons are pressed for a period of two minutes. When
in the sleep mode the only character displayed is a
flashing Colon ( : ). To restore the full display simply
press the clock ( ) button one time.
BLOCK NUMBERS
Block numbers 00 through 99 are automatically
issued during programming. They cannot be
assigned or changed by the programmer. Switching
commands without a date assignment always
receive the block number 00 (priority 0 is always
assigned to block 00 – this cannot be changed). All
switching commands with a date assignment
receive block numbers from 01 to 99. These are
issued in ascending order.
Execution of Programs
At beginning of each day the microprocessor determines
which of the stored programs for that day have the highest priority. Only the highest priority program(s) will be
executed.
Once the talento 800 is programmed, it will automatically
“look back” and assume the correct ON or OFF switch
position.
PRIORITY
Switching commands with a single date or date range
assignment can be issued different priorities (priority 0 and
block 00 is always assigned to switching commands without a date or date range – this cannot be changed). Priority
2 is issued automatically if you start programming by entering a single date. Priority 1 is issued automatically if you
start programming by entering a date range. In either case,
the priority can be changed between 1 and 9 by pressing
the “priority” button during programming. Programs with a
higher number priority will be executed first
PROGRAM STORAGE CAPACITY
The talento 800 can store up to 400 programs. To view the
number of unused or “free” programs available, press the
“Prog.” button twice (3 times from the sleep mode). Every
“Date” or “Date Range” entered and each unique “On” or
“Off” command uses one program position. In other
words, each time the “Prog.” button is pushed a storage
position is used. An “On” or “Off” command assigned to
multiple days and/or multiple channels only utilizes one
program position. Therefore, an “On” event at 7:00 AM
Monday or 7:00 AM Monday through Friday uses only
one program position. Likewise, if it was assigned to two,
three or four channels it would still only constitute one
program.
Month Day
Pulse (seconds)
Cycle (seconds)
Year number
Block number
Priority
Daylight Savings
Switchover
Pulse
Cycle
AM/PM
Minute
Year number
Hours
1234567 = Day of the week
Automatic
operation
Pulse (minutes)
Cycle (minutes)
Channel 1
Channel 2
Channel 3
Channel 4
Continuous operation
Manual operation
Automatic operation
Switching state
Fix
Prog
+1h
PM
Fix
Fix
Fix
min date sec
Minutes
Hours
Years
Calendar month
Calendar day
set
set
up to, for date range
Daylight Savings switchover
Select minutes/seconds
for cycle/pulse functions
Clear
Priority
Begin program input
Current date, time settings
Select cycle
Select pulse
Reset
Hand switch
Select days of the week
1 = Monday
2 = Tuesday
3 = ...
Send/receive IR
PROGRAM INSTRUCTIONS
TABLE OF CONTENTS
Setting Time/Date Format................................Chart 1 (page 4)
Setting Daylight Changeover ..........................Chart 2 (page 4)
Setting Actual Time/Date.................................Chart 3 (page 5)
Setting 24 Hr./7 Day On/Off Schedule ............Chart 4 (page 5)
Setting 24 Hr./7 Day Pulse Schedule ..............Chart 5 (page 6)
Setting 24 Hr./7 Day Cycle Schedule..............Chart 6 (page 6)
Setting Date Specific (Holiday)
On/Off Schedule..............................................Chart 7 (page 7)
Setting Date Specific Pulse Schedule.............Chart 8 (page 8)
Setting Date Specific Cycle Schedule ............Chart 9 (page 9)
Complete Programming Instructions...........Chart 10 (page 10)
Page 4

PAGE 4
Programming
TIME/DATE
FORMAT
Programming
DAYLIGHT SAVINGS
CHANGEOVER
2
1
Press to exit
sleep mode
Full
Display
Appears
Selects
“AM/PM”
(AM or PM is
displayed) or
“Military Time”
Format
Selects
“Month/Day”
or
“Day/Month”
Format
“ :”
Stops
Flashing
“ :”
Flashes
Press a
second time to
enter Prog. mode
Press
“1” (Mon)
button
Press
“2” (Tue)
button
Press to store
and return to Run
mode
OK
OK
OK
OK
Press to exit
sleep mode
Full
Display
Appears
“”
Flashes
To select Daylight
Changeover Mode
1x – AU = Automatic
(European Dates)
2x – cHA = USA Dates
(Must be entered)*
3x - NO = No Changeover
Select Start
Month From
Chart Below*
Select End
Month From
Chart Below
Select End
Day From
Chart Below
To Store
and Return
to Run
Mode
“ :”
Stops
Flashing
Select
Start Day
From
Chart
Below
Press a
second time to
enter Prog. mode
Press
“+1h”
button
Press “Month”
button
Press
“Day” Button
OK
OK
OK
OK
Press button
Press “Month”
button
Press “Day”
button
Press
“Prog.”
OK
OK
OK
Complete Steps 1-3 Before
Programming Timer
END
END
START
START
*Daylight Savings Changeover Dates
2000: April 2, October 29
2001: April 1, October 28
2002: April 7, October 27
Page 5

PAGE 5
Programming
ACTUAL TIME/DATE
3
4
Press to exit
sleep mode
Full
Display
Appears
Time, Date &
Status
Displayed
Time, Date &
Status
Displayed
Display shows
“– – : – –”
Hours &
Minutes
Appear
Empty Program
Register
Displayed
No “–” Above 1-7
Indicates That The
Day Has Been
Omitted, 1=Mon,
2=Tue, etc
“ :”
Stops
Flashing
Set
Current
Time and
Date
Press a
second time to
enter Prog. mode
Press “Day”
Select 1-31
Press “Month”
Select 1-12
Press “Year”
Select 00-99
Press “h”
Select 1-12
“AM” or “PM”
Press “m”
Select 00-59
Press
Store/Return to Run
Mode
OK
OK
OK
OK
OK
OK
OK
Press 1-7
(Mon.-Sun.)
button(s) to
deselect
appropriate
days
Press
button to exit
sleep mode
Press Prog.
unti empty
program register
displayed
OK
OK
OK
OK
YES
OK
OK
YES
NO
NO
Press h/m
(to set event
time, hour
and minute)
Is
schedule the
same each
day of the
week?
Press I/O
for required
channel
On
Off
Press Prog.
Finished?
Press
button
Programming 24 Hour / 7 Day
“ON/OFF” SCHEDULES
END
END
START
START
Page 6

PAGE 6
Press 1-7
(Mon.-Sun.)
button(s) to
deselect
appropriate
days
Press
button to exit
sleep mode
Press Prog.
OK
OK
OK
OK
YES
OK
OK
YES
NO
NO
Press h/m
(to set event
time, hour
and minute)
Is
schedule the
same each
day of the
week?
Press I/O
for required
channel
On
Off
Press I/O
for required
channel
On
Off
Finished?
Press
button
Programming
24 Hour / 7 Day
PULSE
Press
button
OK
Press
button one
time for each
sec./min. pulse
duration.
OK
Press Prog.
Press 1-7
(Mon.-Sun.)
button(s) to
deselect
appropriate
days
Press
button to exit
sleep mode
Press Prog.
OK
OK
OK
OK
YES
OK
OK
YES
NO
NO
NO
Press h/m
(to set event
time, hour
and minute)
Is
schedule the
same each
day of the
week?
Press
button one time
for each
sec./min. of total
cycle required
Is end time
required?
Press
button
Programming
24 Hour / 7 Day
CYCLE
Press
button to set
on time
OK
OK
OKOK
Press Prog
YES
Press h/m
(to set event
end time)
Press I/O
twice to
select off
Finished?
Time, Date &
Status
Displayed
Empty
Program
Register
Displayed
Empty Program
Register Displayed
Hours &
Minutes
Appear
Time, Date &
Status
Displayed
Empty
Program
Register
Displayed
Hours &
Minutes
Appear
01 (Min. or Sec)
Displayed (Press
To Switch
Between Min./Sec.)
01 (Min. or Sec)
Displayed (Press
To Switch
Between Min./Sec.)
01 (Min. or Sec)
Displayed (Press
To Switch
Between Min./Sec.)
No _ Above 1-7
Indicates That The
Day Has Been
Omitted, 1=Mon,
2=Tue, etc
No _ Above 1-7
Indicates That The
Day Has Been
Omitted, 1=Mon,
2=Tue, etc
Empty
Program
Register
Displayed
Time, Date &
Status
Displayed
Empty
Program
Register
Displayed
Hours &
Minutes
Appear
Show “Off”
Symbol
Time, Date & Status
Displayed
END
END
START
START
56
Press Prog
Page 7

PAGE 7
Press
button to exit
sleep mode
Press Prog.
OK
OK
OK
NO
YES
NO
Press
Day/Month/
Year (to set
date/start
date)
Press Prog.
Finished
with block?
Press
button
OK
Press Prior
(if required)
OK
OK
Press
button
Press
Day/Month/
Year (to set
end date)
Programming Date
Specific (Holiday)
ON/OFF EVENTS
Is holiday
duration one
day?
Press h/m
(to set event
time, hour and
minute)
OK
OK
OK
OK
OR*
YES
Press Prog.
YES
Is holiday
duration
multiple
days?
Time, Date &
Status
Displayed
Empty
Program
Register
Displayed
Month, Day
& Year
Appear
Priority Advances 1-9
(Higher Numbers Take
Precedent Over Lower
Numbers)
Empty
Program
Register
Displayed
Hours &
Minutes
Appear
Empty
Program
Register
Displayed
Time, Date &
Status
Displayed
Flashes
Month, Day
& Year Are
Advanced
* If an identical switch schedule is required for
multiple dates (holidays).
END
START
7
Press I/O
for required
channel
On
Off
OROR
Page 8

PAGE 8
Programming Date
Specific (Holiday)
PULSE EVENTS
Press
button to exit
sleep mode
Press Prog.
OK
OK
OK
NO
YES
NO
Press
Day/Month/
Year (to set
date/start
date)
Press Prog.
Finished
with block?
Press
button
OK
Press Prior
(if required)
OK
OK
Press
button
Press
Day/Month/
Year (to set
end date)
Is holiday
duration one
day?
Press h/m
(to set event
time, hour and
minute)
OK
OK
OK
YES
OK
Press
button one
time for each
sec./min. pulse
duration.
OK
Press Prog.
YES
Is holiday
duration
multiple
days?
Time, Date &
Status
Displayed
Empty
Program
Register
Displayed
Month, Day
& Year
Appear
Priority Advances 1-9
(Higher Numbers Take
Precedent Over Lower
Numbers)
Empty
Program
Register
Displayed
Hours &
Minutes
Appear
Flashes
Month, Day
& Year Are
Advanced
01 (Min. or Sec)
Displayed (Press
To
Switch Between
Min./Sec.)
Empty
Program
Register
Displayed
Time, Date &
Status
Displayed
END
START
8
Press I/O
for required
channel
On
Off
OR
* If an identical switch schedule is required for
multiple dates (holidays).
OR*
Page 9

PAGE 9
Press
button to exit
sleep mode
Press Prog.
OK
OK
OK
Press
Day/Month/
Year (to set
date/start
date)
Press
button one
time for each
sec./min. of
“Total Cycle”
duration
required
Press
button to set
“On” duration
time
OK
OK
OK OK
YES
YES
NO
OK
OK
OK
YES
NO
NO
OK
OK
YES
Press Prog.
Press h/m
(to set event
end time)
Press Prog.
Press
button
Press I/O
twice to
select off
Press
Day/Month/
Year (to set
end date)
Pres Prog.
Press h/m
(to set event
time, hour and
minute)
OK
OK
Press Prior
(if required)
Press
button
Is holiday
duration one
day?
Is end time
required?
Finished
with block?
Is holiday
duration
multiple
days?
Programming Date
Specific (Holiday)
CYCLE EVENTS
Time, Date &
Status
Displayed
Empty
Program
Register
Displayed
Month, Day
& Year
Appear
Priority Advances
1-9 (Higher
Numbers Take
Precedent Over
Lower Numbers)
Flashes
Month, Day
& Year Are
Advanced
Empty
Program
Register
Displayed
Hours & Minutes
Appear
01 (Min. or Sec)
Displayed (Press
To Switch
Between Min./Sec.)
01 (Min. or Sec)
Displayed (Press
To Switch
Between Min./Sec.)
Show “Off”
Symbol
Time, Date &
Status
Displayed
END
START
9
OR
Empty Program
Register Displayed
* If an identical switch schedule is
required for multiple dates (holidays).
OR*
Page 10

PAGE 10
Press
button one
time for each
sec./min. of
total cycle
required
Press 1-7
(Mon.-Sun.)
button(s) to
deselect
appropriate
days
Press
button to exit
sleep mode
Press Prog.
Is
program
24-hr. or
7-day?
START
Complete
Programming
Instructions
talento 800 Series
OK
OK
NO
NO
YES
OK OK
NO
YES
OK
OK
YES
OK
YES
YES
YES
YES
YES
YES
OK
OK
OK
OK
OKOK
NO
OK
OK
OK
YES YES
NO
NO
NO
OK
NO
OK
NO
NO
END
Is
program
24-hr. or
7-day?
Is
program holi-
day?
Press
Day/Month/
Year (to set
date/start
date)
Press Prior
(if required)
Is holiday
duration one
day?
Is holiday
duration
multiple
days?
Press
button
Press
Day/Month/
Year (to set
end date)
Press Prog.
Is program
7-Day?
Press 1
(Monday) but-
ton once to
display cursor
above days
Is program
24-hour?
Press h/m
(to set event
time, hour
and minute)
Is
program
on/off or
pulse?
Press I/O
for required
channel
On
Off
Is
program a
cycle
function?
Press
button to set
on time
Press Prog.
Is end time
required?
Press Prog.
If additional programs
are required, return to “Is
program 12-hr or 7-day?“
Is program
on/off?
Is program
pulse?
Press h/m
(to set event
end time)
Press I/O
twice to
select off
Press
button
Press
button one
time for each
sec./min. pulse
duration.
10
Time, Date & Status
Displayed
Press to Switch
Between min./sec.
* If an identical switch
schedule is required
for multiple dates
(holidays).
OR*
Page 11

PAGE 11
MANUAL OVERRIDE
Each channel can be manually overridden by pressing
the appropriate “Hand switch”. There are two types of
manual overrides: “temporary” and “fixed”. A “temporary” override is in effect until the next programmed
switch command, at which point the automatic mode
takes over. A “fixed” override lasts indefinitely and
must be canceled by the user. The LCD displays the
operating mode of each channel as follows:
= Automatic “ON”
= Automatic “OFF”
=Temporary “ON”
=Temporary “OFF”
FIX = Fixed “ON”
FIX = Fixed “OFF”
PROGRAM REVIEW/EDIT/DELETE
With the full display in view:
1. Press the “Prog.” button once; a free program location is displayed.
2. Press the “Prog.” button a second time, the number
of free blocks and memory locations are displayed.
3. Press the “Prog.” button a third time, a free program
location is again displayed – additional programs
can be entered as described in the appropriate programming section.
4. Press the “Prog.” button a fourth time, the first program of the “Block” is displayed.
5. Continue pressing the “Prog.” button to review additional programs, one event at a time. To enter the
next “Block”, press and hold the “Prog.” button for
one (1) second. Review the events in the block by
pressing the “Prog.” button. When finished, press
the clock ( ) button one time to return to the operating mode.
6. To edit a particular command, scroll to its location
and change (or add) data as is done during a normal programming procedure – press the “Prog.”
button to store the change. When finished, press the
clock ( ) button one time to return to the operating
mode.
7. To delete a particular command, scroll to its location
and press the “Clear” button. Continue pressing the
“Prog.” button to view additional programs or press
the clock ( ) button to return to the operating
mode.
8. To delete all switching commands; press the “Prog.”
button until the number of free blocks and memory
locations are displayed. Press the “Clear” button
once, “cl” flashes in the display. Press the “Clear”
button until the display shows:
“Fr 99”
400
All switching commands are now cleared.
Press the clock ( ) button to return to the “Run”
mode.
BATTERY-POWERED RESERVE
In the event of a power failure, the built-in Lithium battery maintains the current time and date for up to 6
years. The switch program schedule is stored in EEPROM memory and is non-volatile.
NOTE:
If the display shows Er01, the battery must be
replaced as follows:
1. Remove control module
2. Remove battery casing
3. Remove battery
4. Installation is the reverse of removal
Page 12

1
2
3
4
5
6
7
8
9
10
1
2
3
4
5
6
7
8
9
10
80.10.0983.7/07/01
Event Chan.
Day(s)
Event Type
Num. Num. 1 2 3 4 5 6 7 Time On, Off, , Remarks (Imp./Cyc. Info)
Mo Tu We Th Fr Sa Su
SINGLE DATE/DATE RANGE PROGRAMS (HOLIDAYS)
Event Chan.
Date Range Event Type
Num. Num. From To Block Priority Time
On, Off, ,
Remarks (Imp./Cyc. Info)
TALENTO 800 PROGRAM WORK SHEET
DAILY/WEEKLY PROGRAM STEPS
BLOCK 00 PRIORITY 0
Intermatic, Inc.
7777 Winn Road
Spring Grove, IL 60081-9698
 Loading...