

Page 1
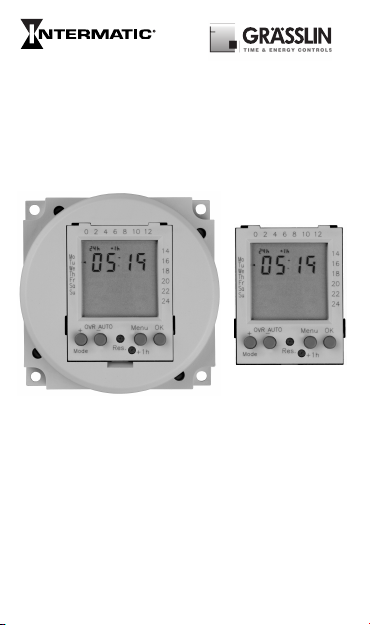
Instruction Manual
20 memories time switches
Page 2

Page 3

page
Safety precautions ..................................................................... 2
Program structure ......................................................................3
OK
reset
Symbols, keys .............................................................................5
Menu
Prog
Setting the timer ........................................................................6
Setting 24h or am/pm clock, time and weekday ..................... 7
Prog.
Pre-set programs ....................................................................... 9
P0x
prog
Selecting pre-set programs P01 to P03 .................................... 10
P--
prog
User defined programs .............................................................. 11
del
Deleting programs .....................................................................15
+1h
Daylight Savings time .................................................................. 16
Automatic
operation / fixed ON / fixed OFF .............................17
Warranty ...................................................................................... 18
1
Page 4

Safety precautions
· The connection and installation of electrical devices may only be
carried out by a qualified electrician.
· Interventions in and changes to the device result in the voiding of
the warranty claim.
· Observe your national regulations and the respective safety
provisions.
· Switch-off commands have priority over switch-on commands.
2
Page 5
Set time: Format 24h or am/pm
24h blinking, using +/- to select, then OK
Set time: Hour
Hour blinking, using +/- to select, then OK
Set time: Minute
Minute blinking, using +/- to select , then OK
Set time: Day
Monday blinking, using +/- to select , then OK
Set Program: P01 / P02 /
P03 or P-Using +/- to select, then OK
to set ON/OFF times
or
press Menu to terminate
programming
P01-03, P-Set switching times:
First free memory location
blinks.
Press ''-''to go back one
memory location.
Press OK for setting the
switching times
Prog01
Set switching times:
First free memory location
blinks.
Press OK for setting the
switching times
First installation setting Review/adjust
Menu
OKMenu
Note:
P01-03
are pre-set
3
Press Reset Button
Page 6

Set switching ON time: Hour
Hour blinking, using +/- to select, then OK
Set switching ON time: Minute
Minutes blinking, using +/- to select , then OK
Set switching ON time: Days
Mo-Su blinking, using +/- to select , then OK
Set switching OFF time: Hour
Hour blinking, using +/- to select, then OK
Set switching OFF time: Minute
Minutes blinking, using +/- to select , then OK/Menu
A maximum of 20 memory locations
can be occupied
10 switching ON times
10 switching OFF times
Menu
RUN
4
Page 7

OK
reset
: Overview of daily switching program
: Setting of 24h or am/pm
: Summer/winter clock changes
: Weekday display
: Switching status display ON/OFF
Mo
Tu
We
Th
Fr
Sa
Su
OVR AUTO
+ - Menu OK
Res.
+1h
+/-
: Adjustment keys: By pressing the key longer than 2 sec. you
can adjust the timer in steps of 5 units
Res.
: Reset
Menu
: By pressing the menu key programming is terminated and
the system reverts to automatic operation
OK
: Confirmation of programming
5
14
16
18
20
22
24
Page 8

Menu
Prog
Setting of this programmable timer is depending of the user preference to
use pre-set programs or defining own programming.
Using Pre-set programs (first time installation)
Using
Reset
key you can adjust the
OVR AUTO
+ - Menu OK
Res.
Mode
+1h
following values:
24h or am/pm: see pg 6
Time (hour and
minutes): see pg 6
Week day: see pg 7
Pre-set programs
P01 to P03: see pg 7
User defined programming by Menu mode
Using
Menu
key you can adjust /
OVR AUTO
+ - Menu O
Res.
Mode
+1h
review the following values:
K
24h or am/pm: see pg 6
Time (hour and
minutes): see pg 6
Week day: see pg 7
Programs P--: see pg 7
6
Page 9

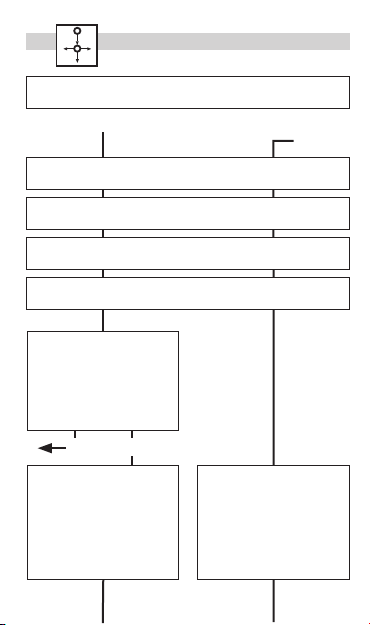
Sequence to follow after selecting programming by pre-set programs or
+ - Menu O
K
Menu mode.
Set display format 24h or am/pm
14
1 1 2
Mo
Tu
We
Th
Fr
Sa
Su
16
18
20
22
24
Select 24h or am/pm (
firm with
OVR AUTO
+ - Menu OK
Res.
Mode
OK
.
+1h
+/-
) and con-
Set hour
14
1 1 2
Mo
Tu
We
Th
Fr
Sa
Su
16
18
20
22
24
Mode
Select hour (
with
OK
.
OVR AUTO
+/-
Res.
+1h
) and confirm
7
Page 10

8
Set minutes
14
1 1 2
Mo
Tu
We
Th
Fr
Sa
Su
16
18
20
22
24
OVR AUTO
+ - Menu OK
Mode
Select minutes (
with
OK
.
Res.
+1h
+/-
) and confirm
Set week day
14
1 1 2
Mo
Tu
We
Th
Fr
Sa
Su
16
18
20
22
24
OVR AUTO
+ - Menu OK
Mode
Select week day (
with
OK
.
Res.
+1h
+/-
) and confirm
Page 11

Prog.
9
P01:
Mo - Su, 1 x ON/OFF
ON
0 246 22
P01:
Mo - Su, 2 x ON/OFF
ON
0
P01:
Mo - Su, 3 x ON/OFF
ON
0 247 1 812 14
Programs P01-03
The switching on and off times for
programs P01 to P03 are preset
(pre).
The user can change these pro
grams.
Individual program, P-Under the menu option P-- you have
247 2012 14
the option of creating a user-defined
program.
This program can be changed at
any time. There are up to 20 memory locations available for 10 OFF
2220
and 10 ON commands.
You can allocate a corresponding
weekday or week block to each
memory location.
-
Page 12

P0x
+ - Menu O
K
prog
Sequence to follow after setting time in the Reset mode.
1 1
14
Mo
Tu
We
Th
Fr
Sa
Su
16
18
20
22
24
OVR AUTO
+ - Menu OK
Mode
Select pre-set program (
10
Res.
+1h
+/-
).
Mo
Tu
We
Th
Fr
Sa
Su
Mo
Tu
We
Th
Fr
Sa
Su
14
16
18
20
22
Once selected the program desired
24
there are following options:
Menu
OK
to modify selection (any program
ON or OFF can be modified by using
''+''or ''-''keys and confirming with
14
OK
16
the next free memory location in
18
order to add new user defined pro
20
grams (see pg 30).
22
e.g. after selecting P02 you should
24
also program:
Sa-Su 22:30 ON (prog05)
23:00 OFF (prog06)
1a 1b
OVR AUTO
Res.
Mode
: terminate programming
: Going through pre-set programs
) or accept it withOKkey to go
+1h
-
Page 13

P--
+ - Menu O
K
prog
Sequence to follow after setting time and week day while running Menu
mode or adding programs to the pre-set P01 to P03.
Select program ON
14
Mo
Tu
We
Th
Fr
Sa
Su
Mo
Tu
We
Th
Fr
Sa
Su
Mo
Tu
We
Th
Fr
Sa
Su
16
18
20
22
24
OVR AUTO
+ - Menu OK
Mode
and confirm withOK.
Set hour ON
14
1 1 2
16
18
20
22
24
OVR AUTO
Mode
Select hour (
with
OK
.
Set minutes ON
14
1 1 2
16
18
20
22
24
OVR AUTO
+ - Menu OK
Mode
Select minutes (
with
OK
.
Res.
Res.
+/-
) and confirm
Res.
+/-
) and confirm
+1h
+1h
+1h
11
1
Page 14

P--
+ - Menu O
K
prog
12
Set week day ON
14
1 1 2
Mo
Tu
We
Th
Fr
Sa
Su
16
18
20
22
24
OVR AUTO
Mode
Select week day (
with
OK
.
Possible week blocks and individual days
1
2
3
4
5
6
7
Res.
+1h
+/-
) and confirm
Page 15

P--
+ - Menu O
K
prog
13
Set hour OFF
14
1 1 2
Mo
Tu
We
Th
Fr
Sa
Su
16
18
20
22
24
OVR AUTO
Mode
Select hour (
with
OK
.
Res.
+/-
) and confirm
+1h
Set minutes OFF
14
1 1 2
Mo
Tu
We
Th
Fr
Sa
Su
16
18
20
22
24
OVR AUTO
+ - Menu OK
Mode
Select minutes (
with
OK
.
Res.
+1h
+/-
) and confirm
Set week day OFF
14
1c 1b1a
Mo
Tu
We
Th
Fr
Sa
Su
16
18
20
22
24
OVR AUTO
+ - Menu OK
Mode
Should the OFF command be the
same day of ON command then
select
Menu
ming or select
program ON setting.
Res.
+1h
to terminate program -
OK
to go to a new
Page 16

P--
prog
Shift
Should the OFF command be the following day of ON command then
select ''
+
''key then select
Example:
Mo-Fr Mo-Fr
20:00 p.m. - 03:00 a.m. ON 20:00 p.m. - 03:00 a.m. ON
03:00 a.m. - 20:00 p.m. OFF
03:00 a.m. - 20:00 p.m. OFF
0 243 20 243 20
Monday
MenuorOK
ON
.
Tu-Sa
OFFOFF
Tuesday
14
Page 17

del
+ - Menu O
K
OVR AUTO
+ - Menu OK
Res.
Mode
Select
Menu
until getting onto the ON time of the
program you want to delete.
+1h
, then selectOKkey
15
21
Mo
Tu
We
Th
Fr
Sa
Su
Mo
Tu
We
Th
Fr
Sa
Su
14
16
18
20
22
Select ''
24
firm with
14
16
18
20
22
Note:
24
Switching programmes are deleted
in ON-OFF pairs. If you delete a sin
gle ON instruction, the correspond ing OFF instruction is also deleted.
11
OVR AUTO
Res.
Mode
--''
with (
+/-
) key and con-
OK
.
OVR AUTO
+ - Menu OK
Res.
Mode
+1h
2
+1h
-
Page 18

+1h
OVR AUTO
+ - Menu OK
Res.
14
Mo
Tu
We
Th
Fr
Sa
Su
16
18
20
22
24
Mode
The +1h key is for the change to
daylight savings time.
· By pressing the
added to the current time.
· +1h is shown on the display.
· By pressing
subtracted from the current time.
+1h key 1 hour is
+1h again 1 hour is
16
+1h
Page 19

7
Mode
17
14
Mo
Tu
We
Th
Fr
Sa
Su
OVR AUTO
OVR AUTO
16
18
20
22
24
OVR AUTO
+ - Menu OK
Res.
Mode
The ''+''key serves to change over
between automatic, AUTO to override (OVR) ON and override (OVR)
OFF (CH1).
+1h
Page 20

18
WARRANTY
If within one (1) year from the date of purchase, this product fails due to
a defect in material or workmanship, Intermatic Incorporated will repair
or replace it, at its sole option, free of charge. This warranty is extended
to the original household purchaser only and is not transferable. This
warranty does not apply to: (a) damage to units caused by accident,
dropping or abuse in handling, acts of God or any negligent use; (b) units
which have been subject to unauthorized repair, opened, taken apart or
otherwise modified; (c) units not used in accordance with instructions;
(d) damages exceeding the cost of the product; (e) sealed lamps and/
or lamp bulbs, LED’s and batteries; (f) the finish on any portion of the
product, such as surface and/or weathering, as this is considered
normal wear and tear; (g) transit damage, initial installation costs,
removal costs, or reinstallation costs.
INTERMATIC INCORPORATED WILL NOT BE LIABLE FOR INCIDENTAL
OR CONSEQUENTIAL DAMAGES. SOME STATES DO NOT ALLOW THE
EXCLUSION OR LIMITATION OF INCIDENTAL OR CONSEQUENTIAL
DAMAGES, SO THE ABOVE LIMITATION OR EXCLUSION MAY NOT
APPLY TO YOU. THIS WARRANTY IS IN LIEU OF ALL OTHER EXPRESS
OR IMPLIED WARRANTIES. ALL IMPLIED WARRANTIES, INCLUDING
THE WARRANTY OF MERCHANTABILITY AND THE WARRANTY OF
FITNESS FOR A PARTICULAR PURPOSE, ARE HEREBY MODIFIED TO
EXIST ONLY AS CONTAINED IN THIS LIMITED WARRANTY, AND SHALL
BE OF THE SAME DURATION AS THE WARRANTY PERIOD STATED
ABOVE. SOME STATES DO NOT ALLOW LIMITATIONS ON THE DURATION
OF AN IMPLIED WARRANTY, SO THE ABOVE LIMITATION MAY NOT
APPLY TO YOU.
This warranty service is available by either (a) returning the product
to the dealer from whom the unit was purchased, or (b) mailing the
product, along with proof of purchase, postage prepaid to the authorized
service center listed below. This warranty is made by: Intermatic
Incorporated/After Sales Service/7777 Winn Rd., Spring Grove, Illinois
60081-9698/815-675-7000 http://www.intermatic.com Please be sure
to wrap the product securely to avoid shipping damage.
INTERMATIC INCORPORATED
SPRING GROVE, IL 60081-9698
158--00697
 Loading...