

Page 1

LX T-04
Twinax
Connection
User's Guide
Document GM-001-5
Fifth edition of the Intermate LX T-04 Twinax Connection User’s Guide
Printed in Denmark
No part of this guide may be photocopied or reproduced in any way, except
where noted, without the written consent of LCI Intermate A/S.
© Copyright LCI Intermate A/S 1998 and 1999. All rights reserved.
Page 2

N o t i c e s
Notice
LCI Intermate A/S makes no warranty of any kind with regard to the contents
or use of this guide, and specifically disclaims any express or implied
warranties on merchant ability or fitness for any particular purpose.
LCI Intermate A/S shall not be liable for errors contained herein or for
incidental or consequential damages in connection with the performance or use
of this product.
Information in this guide is liable to change without notice and does not
represent a commitment on the part of LCI Intermate A/S.
Emission Notices
USA: This equipment generates, uses, and can radiate radio frequency energy
and if not installed and used in accordance with the instruction manual,
may cause interference to radio communications. It has been tested and
found to comply with the limits for a Class A computing device
pursuant to Subpart B of Part 15 of FCC rules, which are designed to
provide reasonable protection against such interference when operated
in a commercial environment. Operation of this equipment in a
residential area is likely to cause interference in which case the user at
his own expense will be required to take whatever measures may be
required to correct the interference. Shielded cables should be used with
this unit to ensure compliance with the Class A limits.
EU: This digital equipment fulfils the requirements for radiated emission
according to limit B of EN55022/1987, and the requirements for
immunity according to EN50082-1/1992 residential, commercial, and
light industry. (Compliance is not valid for unshielded network and
printer cables.)
2 U s e r ‘ s G u i d e
Page 3

N o t i c e s
Trademark Credits
Intermate is a registered trademark of LCI Intermate A/S.
IBM, Epson, Hewlett Packard and LaserJet are registered trademarks of the
respective holders.
Lexmark is a registered trademark of Lexmark International, Inc.
I n t e r m a t e L X T - 0 4 3
Page 4

N o t i c e s
4 U s e r ‘ s G u i d e
Page 5

C o n t e n t s
Contents
About this guide ...................................... 9
1. Introduction ...................................... 11
Theory of Operation ...................................... 11
ASCII Printer Driver...................................... 11
IBM Printer Emulation .................................... 12
2. Installation ....................................... 13
Unpacking.............................................. 13
Printer Attachment ....................................... 13
System Attachment ....................................... 15
3. Configuration..................................... 17
Configuration from a Terminal.............................. 17
Key Definitions.......................................... 18
Basic Configuration ...................................... 19
Select Printer Driver ............................................. 20
Select IBM Printer Emulation...................................... 21
Select System Language .......................................... 22
Save the Configuration .................................... 23
Exit the Configuration .................................... 24
4. Advanced Functions................................ 25
Extended Emulation Mode ................................. 25
Main Menu ............................................. 26
Configuration from the System.............................. 27
Transparency............................................ 28
Configuration and Transparency Sequences.................... 29
Define the Sequences ............................................ 30
Redefine the Sequences .......................................... 30
Edit Translation Tables.................................... 31
Character Translation ............................................ 32
User Defined Strings...................................... 34
Programming the Strings ......................................... 34
Using the Strings ............................................... 35
String Substitutions ....................................... 35
Programming String Substitutions from a Terminal ..................... 36
Programming String Substitutions from the System ..................... 37
I n t e r m a t e L X T - 0 4 5
Page 6

C o n t e n t s
Bar Codes..............................................38
Define Bar Codes...............................................38
Print Bar Code.................................................39
5. Solving Problems..................................41
Missing Printouts........................................41
Incorrect Host Printouts...................................42
Some Characters are Printed Incorrectly..............................42
Corrupted Printouts.............................................43
Incorrect Page Breaks............................................43
Host Communication Problem..............................43
Reporting Problems......................................44
Printing the Parameter List........................................44
Producing Hexdumps............................................45
Error messages..........................................46
Appendices.........................................49
A. The Parameter List.....................................49
Printout Example...............................................49
Printer Drivers.................................................50
Parameter Descriptions...........................................50
B. EBCDIC Character Table...............................55
C. Operating the LX T-04..................................57
The SYSTEM indicator..........................................57
The Address Switch.............................................57
Start Conditions................................................57
Device address.................................................58
Test Mode.....................................................58
Select IBM Printer Emulation......................................59
D. Updating the Software..................................61
Software that can be Updated......................................61
Checking if an update is available..................................61
Updating the Intermate LX T-04 Flash ROM..........................61
E. Euro Support.........................................65
Printer Firmware Requirements....................................65
Euro Support via Terminal Configuration............................66
Euro Support via Command Sequences..............................70
F. Technical Specifications.................................71
Supported Printers..............................................71
Attachments...................................................71
IBM Printer Emulation...........................................72
IBM System Features............................................72
Intermate LX T-04 Additional Features..............................73
Hardware Specifications..........................................73
Approvals EMC................................................73
6 U s e r ‘ s G u i d e
Page 7

C o n t e n t s
Operating Environment..........................................73
G. Related Publications....................................75
H. Customer Support.....................................77
Index.............................................79
I n t e r m a t e L X T - 0 4 7
Page 8

C o n t e n t s
8 U s e r ‘ s G u i d e
Page 9

A b o u t t h i s m a n u a l
About this guide
The guide applies to the Intermate LX T-04 with software release K12-xxxx
and to subsequent releases until otherwise notified.
The guide consists of five sections:
Introduction
Installation
Configuration
Advanced Functions
Solving Problems
Appendices
Every care has been taken in the preparation of this guide; if you detect any
inaccuracies or omissions, please inform LCI Intermate A/S at the address in
appendix H. Customer Support on page 77.
The Intermate LX T-04 and the concepts used in
this guide.
Connecting your Intermate LX T-04 to the printer
and the IBM system.
How to configure your Intermate LX T-04 from a
terminal.
How to use your printer beyond standard IBM
operation.
Checklist for identifying and solving problems.
Contains supplementary and other useful
information.
I n t e r m a t e L X T - 0 4 9
Page 10

A b o u t t h i s m a n u a l
10 U s e r ‘ s G u i d e
Page 11

I n t r o d u c t i o n
1. Introduction
The Intermate LX T-04 is a protocol converter, which makes it possible to
connect the Lexmark 23xx Plus, Lexmark 4227 and Lexmark 4227 Plus
printers to an IBM 5250 (Twinax) environment.
Theory of Operation
Print data from an IBM host is in a format that cannot be recognized by a PC
type printer. The Intermate LX T-04 converts IBM control and character codes
to ASCII control commands and characters, which are recognizable by the
Lexmark matrix printer. Together, the Intermate LX T-04 and the attached
printer appears to the IBM host as an original IBM twinax printer.
ASCII Printer Driver
The Intermate LX T-04 can utilize many of the functions resident in the
attached printer, such as underlining, page formatting and paper source
selections. The control commands for these functions reside in the Printer
Drivers. These cover the standard printer types. See Appendix A for a list of
available Printer Drivers.
I n t e r m a t e L X T - 0 4 11
Page 12

I n t r o d u c t i o n
IBM Printer Emulation
The following IBM printers can be emulated by the Intermate LX T-04 and the
attached Lexmark matrix printer:
IBM 4214 (default).
IBM 4230.
IBM 5256.
IBM 5224.
IBM 5225.
See Appendix F for technical specifications.
12 U s e r ‘ s G u i d e
Page 13

I n s t a l l a t i o n
2. Installation
Unpacking
Unpack and check all the items using the following check list. Contact your
dealer if anything is missing or damaged. All packing materials are recyclable.
The Intermate LX T-04 Hardware Pack (part no: 23564) contains:
Intermate LX T-04 Part no: 23564
Twinax cable Part no: 13851
Power Cable Assembly
Mounting screws
LX T-04 Twinax Connection Part no: GM-001-xx
User's Guide
LX T-04 Hardware Installation sheet Part no: GS-007-xx
Optional:
Flash loading cable Part no: 21353
Printer Attachment
First you establish contact between the Intermate LX T-04 and the Lexmark
matrix printer. Prepare this by checking that the LX T-04 is correctly installed.
Switch off the printer.
1.
Make sure that the Intermate LX T-04 is attached correctly to the
2.
printer. See separate sheet for details about installing the interface.
I n t e r m a t e L X T - 0 4 13
Page 14

I n s t a l l a t i o n
Set the address switch to position '9' (test printout function).
3.
Switch on the printer. The SYSTEM indicator flashes for a few seconds.
4.
The Intermate LX T-04 produces a test printout on the printer, which shows the
firmware revision and basic configuration. The default configuration is for a
IBM Proprinter emulation.
Printout:
******** TEST PRINTOUT ********
Intermate LX T-04 version: K12-xxxx
Printer Driver #32 IBM Proprinter
IBM Printer Emulation__________ IBM 4214 model 2
System Language________________ 500 International Set 5
ASCII Char. Set________________ PC-858
The default configuration supports Proprinter compatible printers. If you want
to change the configuration, you can do this later using Configuration from the
System when the Intermate LX T-04 has been installed towards the host. You
can also go to Section 3 before continuing with System Attachment.
The test printout shows if the Intermate LX T-04 has been configured for your
printer by the dealer/distributor.
Example:
The printout shows that this Intermate LX T-04 has already been configured for
another printer:
******** TEST PRINTOUT ********
Intermate LX T-04 version: K12-xxxx
Printer Driver #34 Epson LQ
IBM Printer Emulation__________ IBM 5225 model 1
System Language________________ 500 International Set 5
ASCII Char. Set________________ _PC-850
14 U s e r ‘ s G u i d e
Page 15

I n s t a l l a t i o n
System Attachment
When your Intermate LX T-04 is configured, and the configuration is verified
by a test printout, it is time to connect it to the IBM host.
The AS/400 configuration is easiest done using the Auto Configuration. The
LX T-04 then configures as a
Make sure that the printer is switched off and the T-cable and the twinax cables
are properly attached.
Then follow these steps to configure your AS/400 and the LX T-04.
Find a free device address by printing a device address chart using the
1.
CL command:
PRTDEVADR
Set the device address (0-6) on the LX T-04's address switch.
2.
Enable Auto Configuration using the CL command:
3.
*4214
printer device.
CHGSYSVAL SYSVAL(QAUTOCFG) VALUE('1')
Connect the LX T-04 to the network and switch the printer ON.
4.
If the device address has been changed from another valid value (0-6),
you must confirm by stepping the address switch one step forward, and
then back. The new device address is confirmed by a printed message.
Verify that the AS/400 has detected a new device type
5.
the CL command
continuously.
Start the Printer Writer for the device:
6.
STRPRTWTR DEV(PRT08)
I n t e r m a t e L X T - 0 4 15
WRKDEVD PRT*
and pressing F5 (refresh)
*4214
by using
Page 16

I n s t a l l a t i o n
Make a test printout:
7.
CHGJOB PRTDEV(PRT08)
PRTDEVADR CTLD(CTL01)
If you do not receive a printout, check if there is a message waiting on
the writer:
WRKWTR PRT*
Caution: Twinax cables are heavy. Please make sure that they are
sufficiently mechanically supported in order to avoid damage to
your Intermate LX T-04 or your printer.
The SYSTEM indicator flashes for a few seconds and is then constantly lit. To
verify the attachment, make a printout.
You have completed the installation procedure, and your Intermate LX T-04 is
ready for use. It does not need any attendance or service during normal
operation.
16 U s e r ‘ s G u i d e
Page 17

C o n f i g u r a t i o n
3. Configuration
Although the Intermate LX T-04 is prepared for operation at delivery, you may
want to change the configuration. A test printout verifies the current
configuration, see Section 2.
The configuration can be done in two ways:
Configuration from a Terminal
This is the method described in this section. The configuration
method requires a dedicated IBM 5250 terminal such as a 3180,
3179, 3197, 347x or 348x.
Configuration from the System
The Intermate LX T-04 can also be configured using downloaded
programming sequences from the system, see Section 4.
Configuration from a Terminal
The Intermate LX T-04 is equipped with a menu-driven Configuration Utility.
This provides a step-by-step method to adapt the Intermate LX T-04 to your
IBM host and printer. Follow these steps to start the configuration:
Switch off the printer.
1.
Connect a terminal to the Intermate LX T-04 using the T-cable, and
2.
switch the terminal on. The terminal should be terminated.
Set the address switch in position '7' and switch on the printer. Wait a few
3.
seconds after the SYSTEM indicator has stopped flashing.
Select position '9'. Wait until the SYSTEM indicator starts to flash.
4.
Select position '7' again.
5.
Within a few seconds, the Key Definitions Menu should appear on your
I n t e r m a t e L X T - 0 4 17
Page 18

C o n f i g u r a t i o n
terminal.
The rest of this section is a guide to the Configuration Utility. If you want to
restart the configuration, just switch the Intermate LX T-04 off and repeat from
step 3.
Key Definitions
==============================================================
Intermate LX T-04 4214 version: K12-xxxx 960103
==============================================================
KEY DEFINITIONS
_Right
Left
Up
Down
Enter
Assign Cursor keys Intermate International A/S 1996
The first menu is for assigning the specific keys to be used in the configuration.
No other keys than the five assigned can be used. Press the key you wish to
assign when the corresponding value is highlighted. The highlight moves to the
next value after the key has been assigned. Right, Left, Up and Down are
normally assigned to the cursor keys, and Enter to the 'Enter' or 'Return' key.
When you have assigned the five keys, the Main Menu is shown.
18 U s e r ‘ s G u i d e
Page 19

C o n f i g u r a t i o n
Basic Configuration
==============================================================
Intermate LX T-04 4214 version: K12-xxxx 960103
==============================================================
MAIN MENU
_Basic Configuration
View Configuration
Print Parameter List
Print EBCDIC to ASCII table
Edit Parameters
Set Factory Defaults
Save
Exit
Use <Up><Down> to move, <Enter> to Select
All entries are described in Section 4
The 'Basic Configuration' entry initiates a configuration procedure which
guides you through a sequence of submenus. You are prompted for selections
in the following order:
Printer Driver.
1.
IBM Printer Emulation.
2.
System Language.
3.
ASCII Character Set(Not valid for the LX T-04).
4.
Select 'Basic Configuration'
The Printer Driver submenu is shown.
Note: If you make an error during the Basic Configuration, press Enter
until the Main Menu appears, and enter the Basic Configuration.
I n t e r m a t e L X T - 0 4 19
Page 20

C o n f i g u r a t i o n
Select Printer Driver
This submenu is shown after you have selected 'Basic Configuration' in the
Main Menu.
==============================================================
==============================================================
PRINTER DRIVER
_Generic printer
IBM Graphics
IBM Proprinter
Epson FX/EX/DFX
Epson LQ
Fujitsu DL
IBM Matrix (PPDS)
HP LaserJet 4
Use <Up><Down> to move, <Enter> to Select
BASIC CONFIGURATION
A printer driver is a device driver containing all the variables, including
command sequences and character sets, required to drive a particular range of
printers.
The default printer driver is IBM Proprinter.
You can switch to another Printer Driver if you prefer.
In Laser emulation other printers are available.
See Appendix A for a list of available Printer Drivers.
20 U s e r ‘ s G u i d e
Page 21

C o n f i g u r a t i o n
Select IBM Printer Emulation
This submenu is shown after you have selected Printer Driver.
==============================================================
==============================================================
IBM PRINTER EMULATION
_IBM 4214 model 2
IBM 5256 model 1
IBM 4224 model 1
IBM 5225 model 1
IBM 4230 model 101
Use <Up><Down> to move, <Enter> to Select
BASIC CONFIGURATION
The Intermate LX T-04 together with the PC type printer appears to the IBM
system as an original IBM twinax printer. You have to select which IBM
printer emulation that should be used.
Select the IBM Printer Emulation matching your system configuration.
Note: Make sure the device address on the twinax port is configured
according to the IBM Printer Emulation.
It is also possible to select IBM Printer Emulation by using the address switch.
See Appendix C.
I n t e r m a t e L X T - 0 4 21
Page 22

C o n f i g u r a t i o n
Select System Language
This submenu is shown after you have selected IBM Printer Emulation.
==============================================================
==============================================================
SYSTEM LANGUAGE
037 US English/Canadian
273 Austrian/German
274 Belgian
275 Brazilian
276 CanadianFrench
277 Danish/Norwegian
278 Finnish/Swedish
280 Italian
281 Japanese English
282 Portuguese
284 Spanish Speaking
285 UK English
297 French
-500 International Set 5
871 Icelandic
Use <Up><Down> to move, <Enter> to Select
BASIC CONFIGURATION
You have to set up the Intermate LX T-04 for the System Language matching
your IBM system configuration in order to obtain correct language specific
characters.
The default System Language is 500 International Set 5’.
Select the System Language corresponding to your IBM system
configuration.
End of configuration
.
The Basic Configuration is now completed, and the Main Menu is displayed
again.
22 U s e r ‘ s G u i d e
Page 23

Save the Configuration
C o n f i g u r a t i o n
Select 'Save' in the Main Menu.
The following submenu is shown:
==============================================================
==============================================================
SAVE SETTINGS PERMANENTLY
_Yes
No
Use <Up><Down> to move, <Enter> to Select
SAVE
Select 'Yes' to save the current configuration permanently.
The system indicator stops flashing while save is in progress.
The Main Menu is displayed after a few seconds.
Note: The original configuration remains in the permanent memory until
you select 'Save'. If you exit without saving, the changes you have
made to the configuration are lost at the next power-off.
I n t e r m a t e L X T - 0 4 23
Page 24

C o n f i g u r a t i o n
Exit the Configuration
Select 'Exit' in the Main Menu.
The following submenu is shown:
==============================================================
==============================================================
EDIT CONFIGURATION
_Yes
No
Please remember to set the Device Address on the Address
Switch!
Power off before connecting to the system.
Use <Up><Down> to move, <Enter> to Select
SAVE
Select 'Yes' to exit the configuration.
The Configuration Utility is terminated and the screen is left blank.
Power off the printer, disconnect the terminal and connect the Intermate LX
T-04 to your IBM system.
If you select 'No' in this submenu the Main Menu is displayed again.
Note: If you exit without saving, the changes you have made to the
configuration are lost when the printer is switched off.
24 U s e r ‘ s G u i d e
Page 25

A d v a n c e d F u n c t i o n s
4. Advanced Functions
The Intermate LX T-04 supports a number of functions beyond standard IBM
printer operation.
During normal mode of operation, Intermate LX T-04, together with your
printer, emulates the IBM twinax printer selected in your configuration. In
addition, the Extended Emulation Mode gives you access to functions not
available in standard IBM printers.
The examples in this section are intended to give you an overview of how to
use the advanced functions in the Extended Emulation Mode.
Extended Emulation Mode
The advanced functions that you can access in the Extended Emulation Mode
are:
Transparency.
Configuration from the System.
Character Translation.
User Definable Strings.
String Substitutions.
Bar Code printing.
The functions are programmed, and called, by text sequences inserted into your
documents. The sequences are inserted between enter and exit commands that
control the Extended Emulation Mode.
I n t e r m a t e L X T - 0 4 25
Page 26

A d v a n c e d F u n c t i o n s
Main Menu
A number of the advanced functions can be programmed or edited using
Configuration from a Terminal. The Main Menu is displayed when the
configuration is started (See Configuration from a Terminal on page 16).
==============================================================
Intermate LX T-04 4214 version: K12-xxxx 960103
==============================================================
MAIN MENU
_Basic Configuration
View Configuration
Print Parameter List
Print EBCDIC to ASCII table
Edit Parameters
Set Factory Defaults
Save
Exit
Use <Up><Down> to move, <Enter> to Select
Basic Configuration - See Section 3.
View Configuration - display the basic configuration.
Print Parameter list - print the parameter list (Appendix A.)
Print EBCDIC to - print the translation table (Appendix
ASCII table B.)
Edit Parameters - modify the settings to meet specific needs.
Set Factory Defaults - reset the configuration to defaults.
Save - store current configuration permanently.
Exit - exit configuration.
26 U s e r ‘ s G u i d e
Page 27

A d v a n c e d F u n c t i o n s
Configuration from the System
This function allows you to configure the Intermate LX T-04 without
connecting it directly to a terminal as described in Section 3.
By inserting configuration commands in your document, you can tailor the
Intermate LX T-04 to meet special requirements your print jobs.
Document example:
%P
=207,32
=10,1
=54,4
=206
%
&&??000 (Resume normal emulation mode and save settings)
(Configuration lead-in sequence)
(Printer Driver= IBM Proprinter)
(System Language=US English/Canadian)
(ASCII Character Set= PC-850)
(Initialize settings)
(Configuration trailer sequence)
The example shows how to select a Printer Driver and program the Basic
Configuration parameters.
'%P' Tells the Intermate LX T-04 that configuration commands are to
follow, ie enters Extended Emulation Mode.
'=' Indicates a command line. Each command line has a function or
parameter number.
'207' Is a function number, followed by a comma and a value. '206' is
also a function number. Please refer to the Technical Reference
for a description of functions and their values.
'10' Is a parameter number, followed by a comma and a value. '54' is
also a parameter. See Appendix A for a description of the
parameters.
'%' Indicates the end of the configuration commands.
'&&??000' Exits the Extended Emulation Mode and saves the settings
permanently.
I n t e r m a t e L X T - 0 4 27
Page 28

A d v a n c e d F u n c t i o n s
Note: The comments (within brackets) should not be included in your
document.
Transparency
IBM PC Support Virtual Printer is one way of sending data transparent to the
printer. This method is always active and is not described in this guide.
This section describes the Intermate LX T-04 specific transparency methods.
The Transparency function allows you to send data directly to your printer
without any conversion (pass-through). The data could be ASCII printer
commands unsupported by the interface (eg underlined text), or even
downloaded fonts.
Be careful when using the Transparency function for generating printable
characters, selecting fonts or making text positioning. The Intermate LX T-04
supports these functions in normal emulation mode, and your settings may be
overridden by the system.
There are two types of Transparency, Single-byte and Multi-byte. The function
is accessed in Extended Emulation Mode.
The Single-byte Transparency function is called by a percent sign in your
document ('%') and it passes through one subsequent ASCII byte
(hexadecimal).
The Multi-byte function is started by two successive percent signs. When the
start sequence ('%%') is found, the Intermate LX T-04 assumes hexadecimal
data until a terminating percent sign occurs.
28 U s e r ‘ s G u i d e
Page 29

A d v a n c e d F u n c t i o n s
Document Example
(Multi-byte Transparency):
You want the text to have an underlined part in the middle. Assuming that you
have selected IBM Proprinter emulation, 'start underline' and 'stop underline'
are defined by the ASCII codes $1B,$2D,$31 and $1B,$2D,$30 respectively:
This is %%1B2D31%underlined%%1B2D30% text
Printout:
This is underlined text
Please refer to the manual for your PC type printer for information on ASCII
printer commands.
Note: To access the Transparency function, Extended Emulation Mode
must be entered.
Configuration and Transpare ncy Sequences
The Start and Stop Transparency and Configuration are controlled by three
string parameters:
Transparency Lead-In Sequence (#041), empty by default.
Configuration Lead-In Sequence (#042), empty by default.
Transparency/Configuration Trailer Sequence (#043), empty by
default.
See Appendix A for a description of the parameters. The parameters can be
redefined using Configuration from the System.
I n t e r m a t e L X T - 0 4 29
Page 30

A d v a n c e d F u n c t i o n s
Define the Sequences
The parameters are defined when Extended Emulation Mode is entered.
Example:
Enter Extended Emulation Mode and set the Transparency Lead-In Sequence to
'%%', the Configuration Lead-In Sequence to '%P' and the Trailer Sequence to
'%':
&&??%%P
(Enter Extended Emulation Mode and set parameters)
Redefine the Sequences
The parameters can be redefined using text sequences in the document.
Example:
Change the Transparency Lead-In Sequence from '%%' to '!?<' (EBCDIC codes
$4F,$6F,$4C).Also, change the Trailer Sequence from '%' to '>&' (EBCDIC
codes $6E,$50):
%P
=41,$4F,$6F,$4C (
=43,$6E,$50
=205
>&
(Configuration lead-in sequence)
New Transparency Lead-In)
(New Transparency Lead-Out)
(Save settings permanently)
(Initialize settings)
Note: - To redefine the sequences, Extended Emulation Mode must be
entered. The sequences are reset if you exit and re-enter
Extended Emulation Mode. See above.
- The sequences are redefined immediately. Therefore, the new
sequence '>&' must be used as Configuration Trailer Sequence in
the document.
30 U s e r ‘ s G u i d e
Page 31

A d v a n c e d F u n c t i o n s
Example:
Use the new sequences in the same example as in Section 4 (Multi-byte
Transparency in IBM Proprinter emulation):
This is !?<1B2D31>&underlined!?<1B2D30>& text
Printout:
This is underlined text
This results is the same printout as in the previous section.
Edit Translation Tables
Normally, there is no need to edit the translation tables. The character
translation tables activated by the Printer Driver and System Language
selections are designed to produce the same printouts as the emulated IBM
printer.
If you should need to make further adjustments, this section explains the
character translation process and how to modify the translation tables to meet
specific needs.
I n t e r m a t e L X T - 0 4 31
Page 32
A d v a n c e d F u n c t i o n s
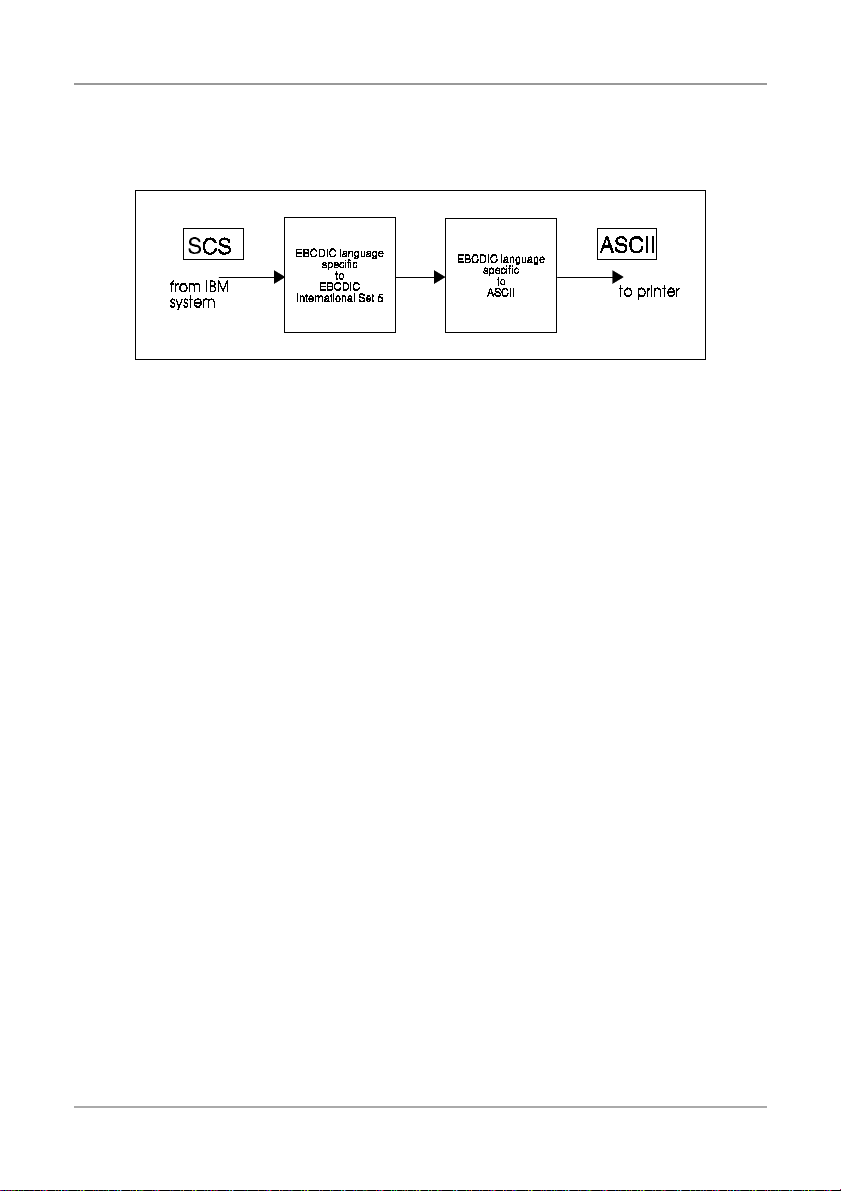
Character Translation
SCS data stream EBCDIC language specific characters are first translated into
EBCDIC International Set 5 characters. This is the internal character
representation in the Intermate LX T-04. The EBCDIC International Set 5
characters are then translated into ASCII codes, which are sent to the printer.
The EBCDIC language specific-to-EBCDIC International Set 5 translation
table is determined by the selected System Language.
The EBCDIC International Set 5-to-ASCII table is determined by the selected
Printer Driver.
You have access to the table that translates the EBCDIC International Set 5
codes to ASCII codes. Appendix B shows a printout of the characters for each
EBCDIC International Set 5 code.
To be able to edit the translation table you have to select the Editable Set. This
is done in the Basic Configuration (see Section 3) or as shown in the example
below. Before editing, the Editable Set equals the PC-850 character set.
Example:
To change a left bracket '[' (EBCDIC International Set 5 code $4A) to a left
bracket '{' which has ASCII value $7B. Insert the following programming
sequences in your document:
32 U s e r ‘ s G u i d e
Page 33

A d v a n c e d F u n c t i o n s
%P
=54,5
=203,$4A,$7B
=206
=205
%
(Configuration lead-in sequence)
(Select Editable Set)
(Translate EBCDIC Int. 5 $4A to ASCII $7B)
(Initialize settings)
(Save settings permanently)
'54' Is the Parameter number. '5' selects the Editable Set (see
Appendix A).
'203' Is the function number, '$4A' is the EBCDIC International
Set 5 code and '$7B' is the new ASCII value (old ASCII
value is deleted).
'206' and '205' Are also function numbers.
From now on, a left bracket '[' is replaced by '{' in printouts.
You can modify any number of cells in the table by adding lines with function
203 calls.
Note: To edit, Extended Emulation Mode must be entered.
In 4214 emulation, you can edit the Translation Table although you cannot
select ASCII Character Set.
I n t e r m a t e L X T - 0 4 33
Page 34

A d v a n c e d F u n c t i o n s
User Defined St rings
There are ten parameters in the Parameter List that can be programmed as User
Definable String (Parameters #120-#129). A common application is to program
and store various printer control commands, and send them to the printer using
string references rather than the commands themselves. Please refer to the
manual for your PC type printer for information on ASCII printer commands.
Programming the Strings
Example:
You want to store commands for underlining text. Assuming that you have
selected Epson emulation, 'start italic' and 'stop italic' are defined by the ASCII
codes $1B,$34 and $1B,$35 respectively:
%P
=120,$1B,$34
=121,$1B,$35
%
(Configuration lead-in sequence)
(Program parameter # 120 to "start underline")
(Program parameter # 121 to "stop underline")
The maximum String length is determined by the Free String Area.
'120' and '121' are the Parameter numbers. These are referred to as User
Definable Strings '0' and '1' respectively.
Note: Strings are programmed in Extended Emulation Mode.
34 U s e r ‘ s G u i d e
Page 35

A d v a n c e d F u n c t i o n s
Using the Strings:
To underline text in a document using strings number '0' and '1':
This is %Z0underlined text%Z1 text
Printout:
This is underlined text
Note: To use the Strings, Extended Emulation Mode must be entered.
String Substitutions
This function is useful when you want to print a document that is prepared for a
different PC type printer than yours.
The document contains control commands for a specific printer, and you have
to convert these commands in order to print this document with your printer.
Instead of changing the document, you can let the Intermate LX T-04 do the
conversion for you by using String Substitution.
The String Substitution function searches the data stream for a specified
sequence of ASCII characters and substitute them with another sequence. Note
that this function operates after the character and control code conversion.
I n t e r m a t e L X T - 0 4 35
Page 36

A d v a n c e d F u n c t i o n s
Example:
Assume that you have selected IBM Proprinter emulation. The document
is prepared for an HP LaserJet and contains 'start underline' and 'stop
underline' pass-through commands at several locations. To print the
document with an IBM Proprinter, the sequences must be converted.
To 'start underline', the IBM Proprinter uses ASCII value string $1B,
$2D, $31 and the HP LaserJet uses $1B, $26, $64, $44. 'Stop underline'
commands are $1B, $2D, $30 and $1B, $26, $64, $40 respectively.
The following pages show how to program these substitutions, both from a
Terminal and the System.
Programming String Substitutions from a Terminal
Start the Configuration from Terminal as described in Section 3.
Select the Edit Parameters entry in the Main Menu. Match and Substitute
1.
Strings start from parameter #150.
Edit the first two string substitution pairs. Use the cursor keys to edit.
2.
The Edit Parameters Menu now looks like this:
36 U s e r ‘ s G u i d e
Page 37

A d v a n c e d F u n c t i o n s
==============================================================
==============================================================
#150 Match String 1_____$1B,$26,$64,$44.
#151 Subst. String 1_____$1B,$2D,$31.
#152 Match String 2_____$1B,$26,$64,$40.
_#153 Subst. String 2_____$1B,$2D,$30.
#154 Match String 3_____ .
#155 Subst. String 3_____ .
#156 Match String 4_____ .
#157 Subst. String 4_____ .
#158 Match String 5_____ .
#159 Subst. String 5_____ .
Use cursor keys to edit, <Enter> to exit
EDIT PARAMETERS
Free String Area:
$1AA0
When a Match String is encountered in the ASCII data stream, it is replaced by
the subsequent Substitute String.
The maximum Match String length is 50 bytes. The maximum Substitute String
length is determined by the Free String Area.
Note: - Extensive use of Substitutions may slow down the printing
speed.
- Changing Printer Driver deletes all String Substitutions.
Programming String Substitutions from the System
The same programming example as above can also be obtained by inserting the
following lines into your document:
%P
=150,$1B,$26,$64,$44
=151,$1B,$2D,$31
=152,$1B,$26,$64,$40
=153,$1B,$2D,$30
=205
=206
%
I n t e r m a t e L X T - 0 4 37
(Configuration lead-in sequence)
(Start underline - HP LaserJet
(Start underline - IBM Proprinter)
(Stop underline - HP LaserJet)
(Stop underline - IBM Proprinter)
(Initialize settings)
(Save settings permanently)
(Configuration trailer sequence)
)
Page 38

A d v a n c e d F u n c t i o n s
Note: String Substitutions are programmed in Extended Emulation Mode.
Bar Codes
This function gives you easy access to a range of standard bar code types. You
can design every single bar code printout to meet your specific requirements,
such as width and height.
There are two functions and two parameters that are used for printing bar
codes:
Function '211' defines the bar code.
Function '212' prints the bar code.
Bar Code Driver #053, 4214.
Bar Code Attributes #054, 4214.
The definition has to be done before a bar code can be printed. See Appendix A
for a description of parameters.
Define Bar Codes
The function '211', which is to be inserted into a document, has the following
syntax:
211,value 1,value 2,value 3,value 4,value 5
The function number is followed by five bar code specification values. All five
values must be specified:
38 U s e r ‘ s G u i d e
Page 39

A d v a n c e d F u n c t i o n s
value 1:
value 2:
value 3:
value 4:
value 5:
Bar Code Type. Selectable values (in decimal):
1 = Code 39
3=UPC-A
8 = EAN8
9 = EAN13
12 = 2 of 5 Interleaved
13 = Codabar Matrix
17 = Code 128
Module Width as a multiple of 1/120 inch.
The value may range from 1 to 32 (in decimal).
Bar Code Height in number of lines (1/6 inch).
The value may range from 1 to 32 (in decimal).
Human Readable Text. Selectable values:
0 = No textline below the bar code
1 = Human readable textline below the bar code.
2 = Human readable textline below the bar code with
empty line in between.
Horizontal Bar Code Start Position in 1/12 inch steps. The range
for the value is from 1 to 255 (in decimal).
Note: When you set the horizontal width and start position, make sure that
the printout fits on the paper area.
Print Bar Code
The function '212' prints a bar code according to the settings in the bar code
definition. The syntax is as follows:
212,"bar code data"
I n t e r m a t e L X T - 0 4 39
Page 40

A d v a n c e d F u n c t i o n s
Document Example:
%P
=211,9,2,2,1,10
=212,"123456789012"
%
(Configuration lead-in sequence)
(Define Bar Code)
(Print Bar Code)
(Configuration trailer sequence)
Printout
Note: To Define and print bar code, Extended Emulation Mode must be
entered.
40 U s e r ‘ s G u i d e
Page 41

S o l v i n g P r o b l e m s
5. Solving Problems
This section helps you to solve any problems that might arise when installing or
using your Intermate LX T-04 interface. There are three major areas of
difficulty:
Missing printouts.
Incorrect printouts.
Host communication problems.
Use the following checklists to pinpoint the possible cause. If your problems
should continue, please contact your dealer/distributor.
Missing Printouts
In case of missing printout, check the following:
Is the printer on-line (Ready)?
1.
No: Set the printer on-line (see the printer manual).
Is the printer correctly attached?
2.
Make sure that the Intermate LX T-04 is connected properly to the
printer.
If your printer has both parallel and serial input ports, the printer must be
set up for the parallel connection.
I n t e r m a t e L X T - 0 4 41
Page 42

S o l v i n g P r o b l e m s
System printouts: Is the SYSTEM indicator on?
3.
No: The Intermate LX T-04 is not correctly connected to the system, or
the power-up routine has been disturbed. Restart the interface
(power-off/power-on). If this doesn't help, see Host Communication
Problem.
Flashing: The Intermate LX T-04 is in Test Mode. To exit set the address
switch to position '9', or switch the Intermate LX T-04 off and on.
Incorrect Host Printouts
There are three major types of incorrect printouts:
Some Characters are Printed Incorrectly
Characters like ä ü Ä Ü are printed as { } [ ]
Most likely an incorrect System Language has been selected. Select
the System Language matching your system configuration. see the
section Select System Language.
Characters like é ì ô ü are printed as e i o u
Your printer has not been set up for the character set matching the
ASCII Character Set selection. Make sure that you have selected
the correct Printer Driver and the correct ASCII Character Set in
the Basic Configuration.
If this doesn't help, your printer may not be able to print all the characters that
the system produces. Print out the EBCDIC-to-ASCII translation table (see
Appendix C), and compare this to the table in Appendix B. In some cases it is
possible to edit the translation table, or to select another character set in your
printer. Consult your distributor for further details.
42 U s e r ‘ s G u i d e
Page 43

S o l v i n g P r o b l e m s
Corrupted Printouts
This is generally caused by selecting a Printer Driver not matching your printer.
The control commands are then misinterpreted by the printer, causing corrupted
printouts. If changing Printer Driver does not help, you can use the ASCII
hexdump function (see Producing Hexdumps) to locate the control commands
causing the problem.
Incorrect Page Breaks
This may be caused by an incorrect Printer Driver selection. There may also be
a printer problem, causing it not to print all lines on a page.
Host Communication Problem
In case of missing system printouts, please follow this checklist.
Is the SYSTEM indicator lit?
1.
Yes: The printer may not be properly connected. Please refer to Section
2.
Is the device address correct?
2.
Make sure the address switch is set to the desired device address. Switch
the Intermate LX T-04 off and on. Valid values for the device address are
within the range 0 to 6.
Does the host configuration match the Intermate LX T-04 configuration?
3.
The Intermate LX T-04 must be configured according to the IBM printer
that has been defined for the device address on the twinax port.
I n t e r m a t e L X T - 0 4 43
Page 44

S o l v i n g P r o b l e m s
Has the print job been released from the host?
4.
Check that Vary On has been made and that the print job has been
released from the print queue. Ask your System Manager.
Is the twinax line terminated?
5.
The last unit on the twinax line must be terminated. Check that all units
along the twinax line are installed correctly and that the termination is
correct.
Are any cables broken?
6.
Check that the cables are properly connected and fully functional.
Reporting Problems
If you run into problems that you can't solve on your own, it is important that
you make an error report for your System Manager or distributor. The error
report should include:
A printout with a description of the errors.
If possible, a correct printout.
A Parameter List.
A System and ASCII hexdump.
If you need technical support, please contact your dealer. If they can't help you,
they forwards your request through the appropriate channels.
Printing the Parameter List
The Parameter List shows the complete configuration. A selection of
parameters are described in Appendix A. To print the Parameter List, do as
follows:
44 U s e r ‘ s G u i d e
Page 45

S o l v i n g P r o b l e m s
Make sure that your printer is on-line.
1.
Set the address switch to '9', and wait for approx. 3 seconds until the
2.
SYSTEM indicator starts to flash. You are now in the Test Mode.
Set the address switch to '8' to start the printout.
3.
Set the address switch to '9' when the printout is completed.
4.
The SYSTEM indicator stops flashing.
Select the device address to resume normal print operation.
5.
Producing Hexdumps
A hexdump is a printout where the input data stream is printed as hexadecimal
byte values rather than being interpreted as characters and control codes. The
Intermate LX T-04 features two different types of hexdump modes
System hexdump
This mode traps the input SCS data before the character and
control code conversion. The data is printed as EBCDIC
hexadecimal values.
ASCII hexdump
The input data is converted to ASCII hexadecimal values before
printing. This mode is useful if you want to see what printer
control command a certain IBM control code corresponds to.
The procedure for producing a hexdumpis as follows:
Switch the printer and Intermate LX T-04 off and on.
1.
Set the address switch to '9', and wait for approx. 3 seconds until the
2.
SYSTEM indicator starts to flash. You are now in the Test Mode.
I n t e r m a t e L X T - 0 4 45
Page 46

S o l v i n g P r o b l e m s
Select position '4' for system hexdump, or position '3' for ASCII
3.
hexdump.
Repeat your print job. The data is now printed in hexadecimal form.
4.
Set the address switch to '9' when the printout is completed.
5.
The SYSTEM indicator stops flashing.
Select the device address to resume normal print operation.
6.
Example of ASCII hexdump:
Intermate LX T-04 4214 version: K12-xxxx 960103
Printer Driver #32 IBM Proprinter
0001 1B 26 61 33 36 30 48 1B 26 61 35 32 38 56 1B 26 "-&a360H-&a528V-&"
0002 61 33 36 30 48 1B 26 61 35 32 38 56 54 45 53 54 "a360H-&a528VTEST"
Error messages
There are several error conditions that causes the Intermate LX T-04 to print an
error message on your printer:
61-UNPRINTABLE CHARACTER
This message is caused by invalid character codes or LAC buffer overflow.
64-RESET COMMAND RECEIVED FROM HOST
This message is caused by bad communication lines or colliding device
addresses. The Intermate LX T-04 tries to re-establish host communication
after 10 seconds.
BD-SOFTWARE/HARDWARE ERROR
The software cannot run in the current hardware. Contact your dealer.
46 U s e r ‘ s G u i d e
Page 47

S o l v i n g P r o b l e m s
BE-BAR CODE ERROR
Incorrect or insufficient bar code definition. The bar code must be specified
with five values. See Section 4.
E2-PERMANENT MEMORY CHECKSUM ERROR, FACTORY DEFAULTS SET
This message indicates that the non-volatile memory has been corrupted. The
Intermate LX T-04 is automatically set to factory default state (your
configuration is lost). If the message does not re-appear after
power-off/power-on, configure the Intermate LX T-04. See Section 3.
This message also appears as a normal consequence of a change between laser
and matrix emulation.
E6-MEMORY OVERFLOW: FREE STRING AREA EXHAUSTED
The available string area is exhausted. You must remove some strings from
your configuration. The size of the available string area is printed in the
Parameter List header, and is also displayed in all string programming menus.
F1-TWINAX TRANSCEIVER ERROR
Hardware error. Contact you dealer/distributor.
I n t e r m a t e L X T - 0 4 47
Page 48

S o l v i n g P r o b l e m s
48 U s e r ‘ s G u i d e
Page 49

A p p e n d i c e s
Appendices
A. The Parameter List
The Parameter List shows the available configuration of the Intermate LX
T-04. Each parameter contains a value or string that is used to determine how
the Intermate LX T-04 should behave towards the host and towards the printer.
Printout Example
This printout shows the beginning of a Parameter List (the header and the first
10 parameters) for the IBM Proprinter printer driver. Your own printout may
differ depending on printer driver selection, firmware revision and customized
configuration.
Intermate LX T-04 4214 version: K12-xxxx 960103
Printer Driver #32 IBM Proprinter
Device Address: 0
Free String Area: $1d99
#001 Form Length________________ 48
#002 Char. Density______________ 10
#003 Line Density_______________ 6
#004 Sheet Feeder_______________ 0
#005 Print Quality______________ 1
#006 Lock CPI___________________ No
#007 Lock LPI___________________ No
#008 Lock Feeder Type___________ No
#009 Lock Print Quality_________ No
#010 System Language____________ 9
I n t e r m a t e L X T - 0 4 49
Page 50
A p p e n d i c e s
Printer Drivers
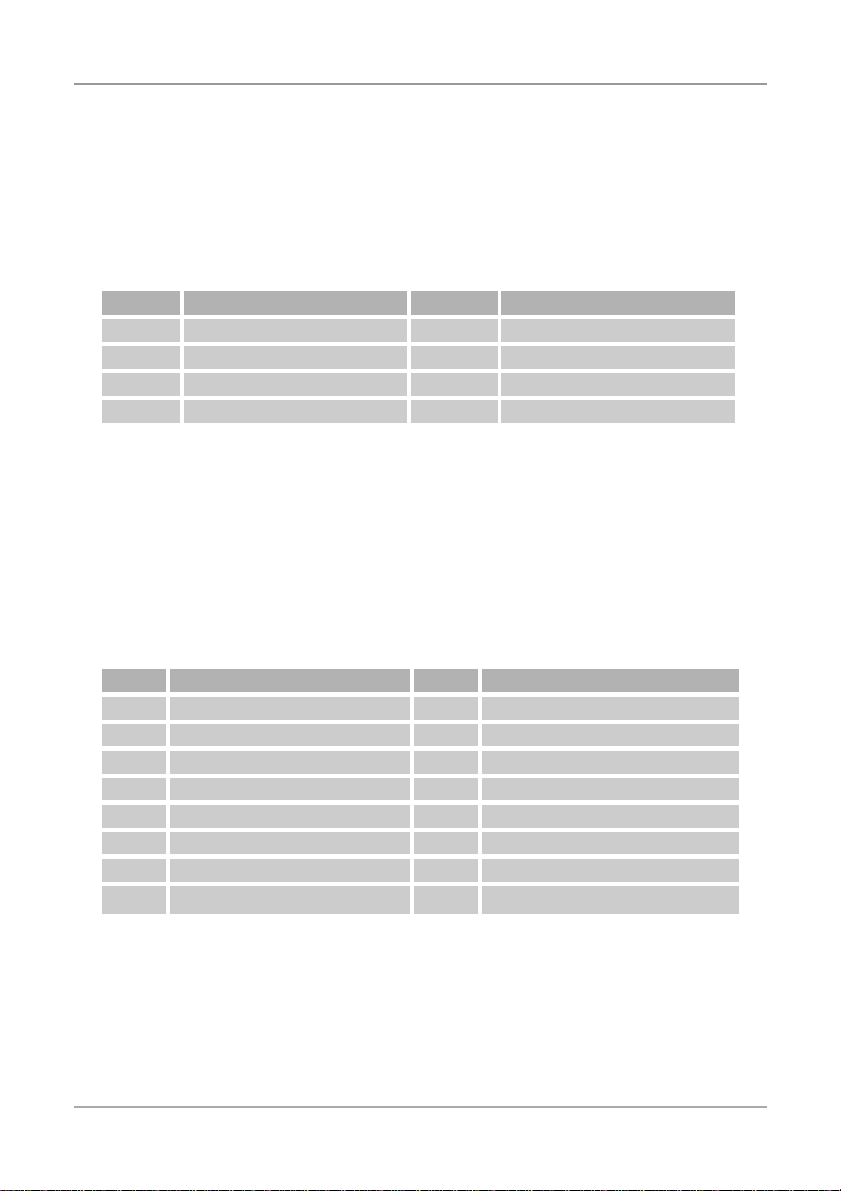
A printer driver is a device driver containing all the parameters required to
drive a particular range of printers. The following printer drivers are available
in IBM 4214 emulation:
No Title No Title
*30 Generic Printer (default) 34 Epson LQ
31 IBM Graphics 35 Fujitsu DL (DPL24C)
32 IBM Proprinter 44 IBM Matrix (PPDS)
33 Epson FX/EX/DFX 48 HP LaserJet
Parameter Descriptions
#10 System Language
This parameter makes the EBCDIC language specific to International 5
translation table match the System Language configuration of your IBM
System.
Value Description Value Description
1 037 US Engli sh/Canadian *9 500 Internati onal S et 5 (default)
2 272 German/Austrian 10 280 Italian
3 274 Belgian 11 281 Japanese English
4 275 Brasilian 12 282 Portuguese
5 276 Canadian French 13 284 S pani sh Speaking
6 277 Danish/ Norwegian 14 285 UK English
7 278 Finnish/Swedish 15 871 Icel andi c
8 297 French
50 U s e r ‘ s G u i d e
Page 51
A p p e n d i c e s
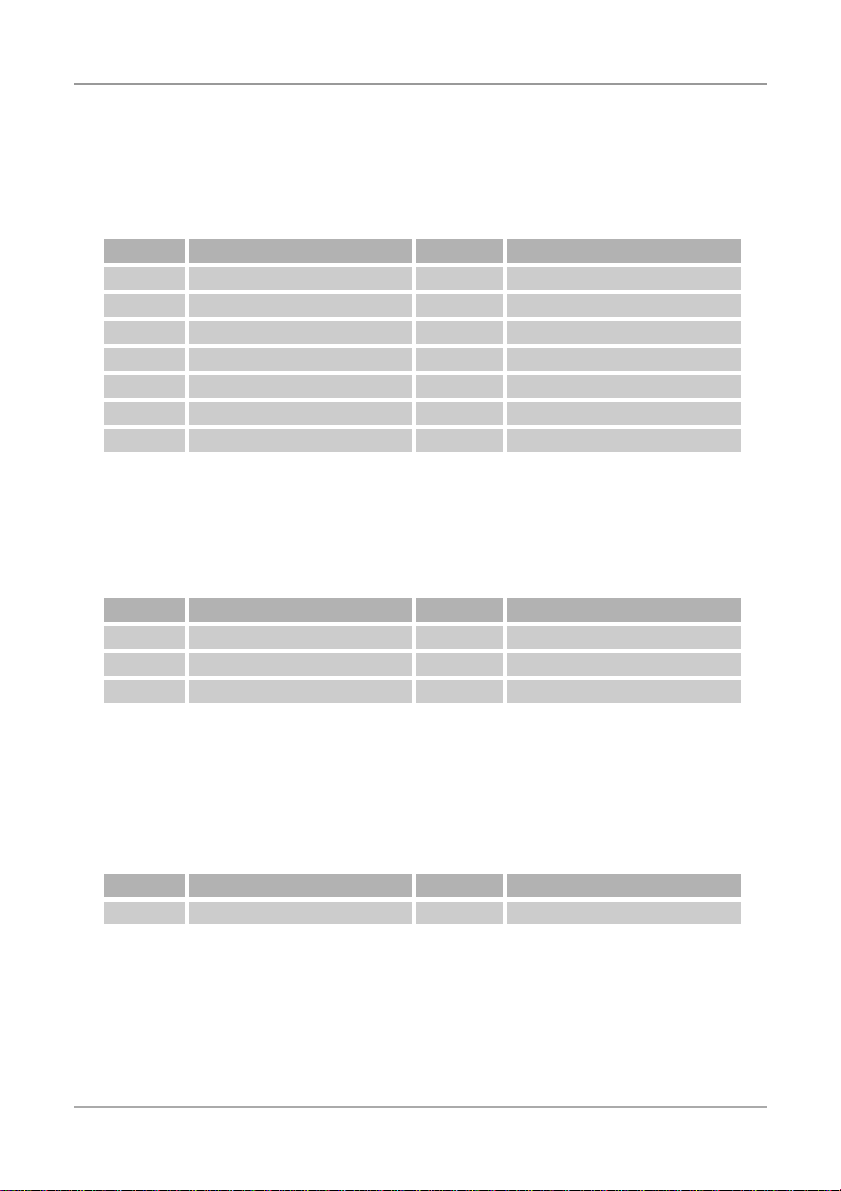
#15 ASCII Character Set
Selects the ASCII Character Set to be used in the printer.
Value Description Value Description
0 US ASCII 7 Spanish
1 Swedish/Finnish 8 Japanese
2 Danish/Norwegian 9 PC-8
3 German/Austrian 10 Roman-8
4 UK English 11 PC-850
5 Italian 12 Xerox 3700
6 French/Belgian 13 PC 858 (Euro Support)
#26 IBM Printer Emulation
Selects the IBM Printer emulation.
Value Description Value Description
*0 IBM 4214 model 2 (default) 3 IBM 5225 model 1
1 IBM 5256 model 1 5 IBM 4230 model 101
2 IBM 5224 model 1
#40 Escape Character
Select the EBCDIC character code used for Single-byte Transparency and User
Definable Strings.
Value Description Value Description
$40-$FF (one character code) *$00 (undefined def ault)
I n t e r m a t e L X T - 0 4 51
Page 52

A p p e n d i c e s
#41 Transparency Lead-In Sequence
Starts Multi-byte Transparency Mode.
Value Description Value Description
<any seq> (max 8 character c odes) *<empty> (default)
#42 Configuration Lead-In Sequence
Starts Configuration Mode.
Value Description Value Description
<any seq> (max 8 character c odes) *<empty> (default)
#43 Transp./Config. Trailer Sequence
Terminates the Transparency Multi-byte and Configuration Modes.
Value Description Value Description
<any seq> (max 8 character c odes) *<empty> (default)
#45 Job Time-out
Timer value starting after a host job has ended. If the time-out value is reached
before any new data arrives at the Cobra+, the Start of Job Sequence (#046),
the Power-up Sequence (#090) and current emulator settings are sent before
next host job.
Value Description Value Description
0 off (default) 1-255 Value in seconds.
52 U s e r ‘ s G u i d e
Page 53

A p p e n d i c e s
#46 Start of Job Sequence
Sent before next host printout if timer Job Time-out has elapsed.
Value Description Value Description
<any seq> (length and contents free of
choice)
*<empty> (default)
#53 Bar Code Driver
Selects the graphics driver used for bar code printing. The default
value depends on the selected Printer Driver.
Value Description Value Description
0 Off 2 Epson LQ/Fujitsu DPC24C
1 IBM Proprinter/Epson FX 8 HP-PCL
#54 Bar Code Attributes
Adjust bar code printout quality to paper and printer conditions.
Value Description Value Description
*0 Normal (default) 2 Bold
1 Thin 3 Thin and Bold
#120-#129 User Definable Strings
Programming and use are described in section 4.
Value Description Value Description
<any seq> (any length and content s) *<empty> (default)
I n t e r m a t e L X T - 0 4 53
Page 54

A p p e n d i c e s
#150-#189 String Substitutions
Programming and use are described in section 4.
Value Description Value Description
<any seq.> (any lengt h and contents) *<empty> (default)
54 U s e r ‘ s G u i d e
Page 55
A p p e n d i c e s
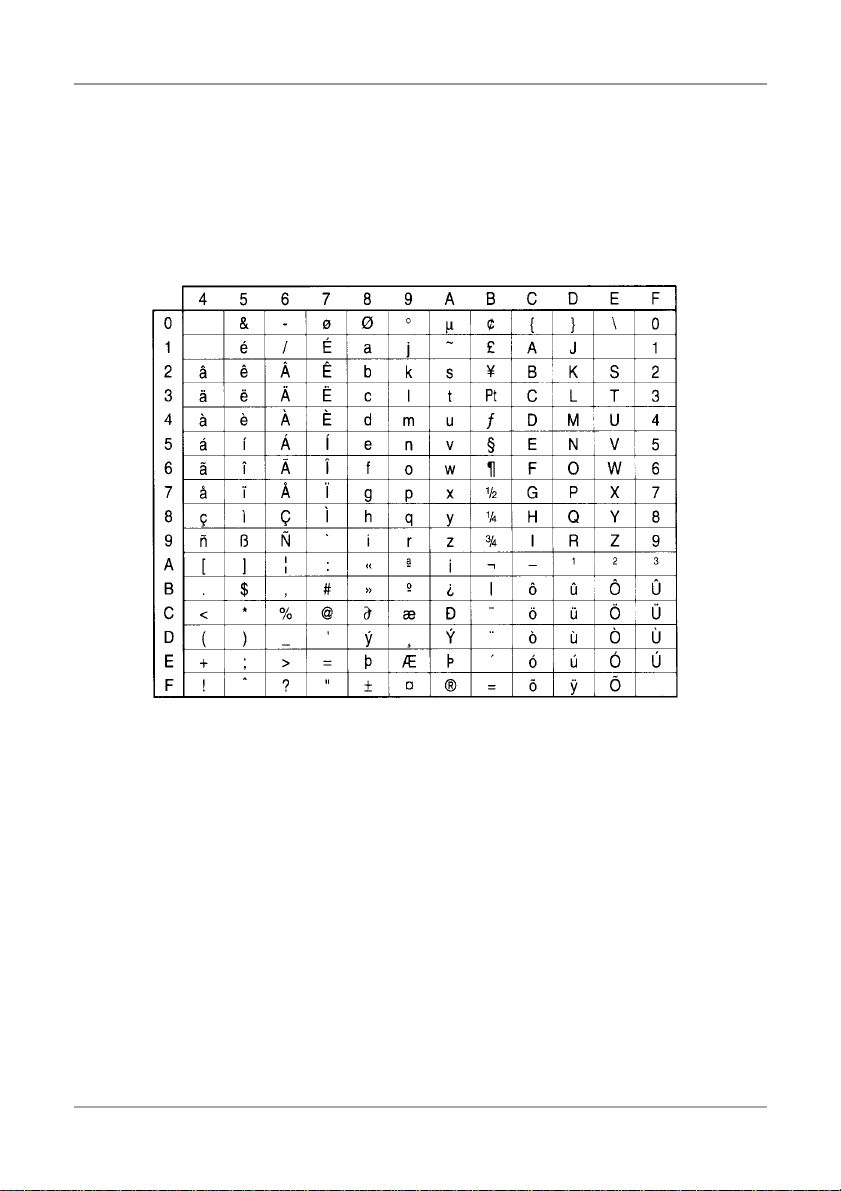
B. EBCDIC Character Table
This table (EBCDIC International Set 5) shows the internal character
representation in the Intermate LX T-04.
Read each EBCDIC code as a column and row position. For example EBCDIC
International Set 5 code $81 represents the character 'a'.
Note: If Euro Support has been enabled, the international currency
symbol “¤” symbol at position $9F is replaced with the Euro
symbol “€”.
I n t e r m a t e L X T - 0 4 55
Page 56

A p p e n d i c e s
56 U s e r ‘ s G u i d e
Page 57

A p p e n d i c e s
C. Operating the LX T-04
The SYSTEM indicator
This indicator (green) is lit when the Intermate LX T-04 is connected to your
IBM system. It can also flash under the following conditions:
Flash during a few seconds at power up.
Flash in Test Mode. Described later in this chapter.
Rapid flash during test function execution and during flash loading
of new software.
Note: If the power up flashing continues, a hardware error has occurred.
Contact your dealer/ distributor.
The Address Switch
The ten-position address switch is used to set the device address for the
Intermate LX T-04. It is also used to set start conditions and to select and
execute test functions during operation.
Start Conditions
The action when the Intermate LX T-04 is switched on is determined by the
setting of the address switch, as follows:
Pos. Description
0 - 6 Divice address i n normal print operation.
7 Reserved.
8 Select IBM 4214 Printer emulation,
9 Perform a test printout.
I n t e r m a t e L X T - 0 4 57
Page 58

A p p e n d i c e s
Device address
Follow these steps to change the device address:
Switch the Intermate LX T-04 off.
1.
Select a new device address (positions 0-6).
2.
Switch the Intermate LX T-04 on.
3.
A warning for change of device address is printed.
Step the address switch one position forward, and then back.
4.
The new device address is confirmed by a printed message.
Test Mode
Test Mode is reached from normal print operation. It is used to access a number
of internal functions. Normal print operation is inhibited.
Make a note of the current Address Switch position (device address).
1.
Set the address switch to position '9'. When the SYSTEM indicator starts
2.
to flash, you can select one of the following Test Mode functions:
58 U s e r ‘ s G u i d e
Page 59

A p p e n d i c e s
Pos. Test Mode Function
0
1
2
3
4
5 Reserved.
6 Not used.
7
8
9
Restart
- same as power off/power on.
Set Factory Defaults
Print Character Translation Table
ASCII Hex Dump Mode
and control commands as hexadecimal values.
System Hex Dump Mode
characters and control codes as hexadecimal values.
Terminal Set-up Mode
attached 5250 terminal, see
Print Parameter List
Exit Test Mode
- abandon the current configuration. See note.
Appendix B
- see
- trap the outgoing data stream and pri nt characters
- trap the incoming data s t ream and print
- run the Configuration Utility using a directly
Section 3
- print the complete c onfiguration, see
- resume normal print operat i on.
.
.
Appendix A.
Do not forget to set the address switch to the current device address again for
normal print operation. Switch the Intermate LX T-04 off and on.
Note: To set factory default configuration requires a two-step operation
to avoid accidental activation and loss of configuration settings:
Set the address switch to position '1'.
1.
Within 2 seconds, set the address switch to position '2'.
2.
Select IBM Printer Emulation
You can select IBM Printer Emulation by using the address switch. This
section applies to the IBM 4214 emulation only. Proceed as follows:
Switch the Intermate LX T-04 off. Note the current device address.
1.
Select the position '8' on the address switch.
2.
Switch the Intermate LX T-04 on. A printed message indicates the current
3.
IBM Printer Emulation.
I n t e r m a t e L X T - 0 4 59
Page 60

A p p e n d i c e s
Press the printer's ONLINE/OFFLINE key twice to change emulation.
4.
The new emulation is confirmed by a printed message. Repeat until the
required emulation mode is achieved. Refer to the list in Section 1.
Switch the Intermate LX T-04 off to save the current emulation.
5.
Set the device address and switch the Intermate LX T-04 on for normal
6.
print operation.
60 U s e r ‘ s G u i d e
Page 61

A p p e n d i c e s
D. Updating the Software
Software that can be Updated
The Intermate LX T-04 software held in Flash ROM.
A specific cable is needed to upgrade the firmware.
Checking if an update is available
Contact your dealer to check if a new firmware release is available. You should
have the printer's current firmware release number ready to compare against the
latest software release from LCI Intermate A/S.
Alternatively you can visit the Intermate web site:
http://www.intermate.com
Here you can download the latest firmware version.
Updating the Intermate LX T-04 Flash ROM
You can carry out an update to your Flash ROM through the parallel printer
port of the Intermate LX T-04.
How to update the firmware
Note: If the LX T-04 is attached to the system and operating, then the
current address switch position represents the device address
assigned to the LX T-04. Write this number down and save it.
Power Off the printer.
1.
Disconnect the LX T-04 from the system, ie remove the cable inserted in
2.
the DB9 connector.
I n t e r m a t e L X T - 0 4 61
Page 62

A p p e n d i c e s
Disconnect the LX T-04 from the printer, ie disconnect the ribbon cable
3.
from the printer.
Make sure the PC has been powered Off.
4.
Attach the download cable to the PC’s LPT1 port. Contact your dealer
5.
for further information on the download cable.
Connect the LX T-04 to the download cable.
6.
Make sure the the power cable from the PCB is connected with the 5V
7.
power cable assembly mounted in the printer.
Attach the power supply to the download cable at the PC, ie supply the
8.
cable with power.
Power On the PC.
9.
Power On the printer.
10.
Copy the firmware file K12-xxxx.bin to the PC’s hard drive.
11.
Start a DOS session and go to the directory where you placed the
12.
firmware file.
Download the firmware with the binary switch (/b).
13.
copy K12-xxxx.bin lpt1 /b
Monitor the download by watching the LED on the interface. This
14.
flashes fast two times a second for approximately 20 - 30 seconds during
the download.
The download is complete when the LED flashes slowly once every
15.
fourth second.
Power Off the printer.
16.
Power Off the power supply for the download cable.
17.
62 U s e r ‘ s G u i d e
Page 63

Disconnect the interface from the download cable.
18.
Connect the interface to the printer, ie connect the ribbon cable and the
19.
power cable.
Mount the interface on the back of the printer.
20.
Set the switch on the side of the interface case to “9" (= test printout
21.
function).
Power On the printer.
22.
Look at the test printout to confirm the update of the firmware.
23.
Note: The error message printed after the test printout text can be
ignored. This is because new firmware has been downloaded
and the entire configuration has been reset to default values.
Power Off the printer.
24.
Set the switch on the side of the LX T-04 to the device address (0-6)
25.
previously held by the LX T-04.
A p p e n d i c e s
The upgrade is now complete and the printer can be reconnected to the system.
I n t e r m a t e L X T - 0 4 63
Page 64

A p p e n d i c e s
64 U s e r ‘ s G u i d e
Page 65

A p p e n d i c e s
E. Euro Support
Support for the Euro symbol can be achieved in two ways. Either by updating
the LX T-04 firmware and selecting the Euro character set or by making a
permanent character substitution in the interface. Both approaches require that
the printer firmware supports the Euro symbol and are covered by this
appendix.
The interface firmware release K12-8491 and above supports the Euro symbol
via the new ASCII character set "PC-858". This is achieved by replacing the
international currency “¤” symbol with that of the Euro symbol “€”. The
character set is selected via the terminal configuration method.
Permanent substitution of the international currency symbol with the Euro
symbol is done by sending a command sequence to the interface. This approach
does not require the interface firmware to be updated, as only the character
number is sent to the printer.
Printer Firmware Requirements
In order to be able to print the Euro symbol, the printer firmware has to meet
the minimum firmware requirement listed in the below table.
Printer model Required firmware
Lexmark 23xx version 1.7 (or great er)
Lexmark 4227 Versi on 3.1 (or greater)
Lexmark 4227 Plus There is no minimum firmware
requirement for this printer.
Refer to your printer’s User’s Guide for instructions on how to check and
upgrade the firmware.
I n t e r m a t e L X T - 0 4 65
Page 66

A p p e n d i c e s
Euro Support via Terminal Configuration
The Euro symbol is contained in the ASCII character set “PC-858". This is also
the default character set for the firmware release K12-8491. Euro Support is
disabled by selecting an ASCII character set other than “PC-858" for the
current printer driver.
Printer driver ASCII character set (with
IBM Proprinter
Epson FX/EX/DFX
Epson LQ
Euro Support - default)
PC-858 PC-850
PC-858 PC-850
PC-858 PC-850
ASCII character set
(without Euro Support)
If you are unsure whether your LX T-04 firmware is equal to or greater than
K12-8491, you should make a test printout. This is done by turning the printer
Off, setting the LX T-04's address switch to position "9" and turning the printer
On.
The Intermate LX T-04 version number is printed at the top of the printout.
This should be K12-8491 or greater. The last four digits represent the firmware
revision number. The higher this number is, the newer is the firmware.
Contact your dealer if the firmware needs upgrading. Alternatively, a zipped
file containing the firmware can be downloaded from the Intermate web site
(
www.intermate.com
section. Download the file called K12-xxxx.zip. You will need a decompressing
tool like WinZip
). Search for "K12" in the Support section's Download
®
to extract the file.
Refer to appendix D. Updating the Software on page 61 for details on how to
update the firmware.
How to disable Euro support
This procedure requires that the LX T-04 has been updated with the firmware
K12-8491 or greater.
Switch Off the printer and disconnect it from the network.
1.
66 U s e r ‘ s G u i d e
Page 67

Make sure the Intermate LX T-04 is attached correctly to the printer. See
2.
separate sheet for details about installing the interface.
Note: If the LX T-04 was attached to the system and operating,
then the current address switch position represents the device
address assigned to the LX T-04. Write this number down
and save it.
Set the address switch to position “9". This generates a test printout at
3.
the next power On.
Switch On the printer. The SYSTEM indicator flashes for a few
4.
seconds.
Study the test printout. It shows the firmware number and the default
5.
settings. Note whether the ASCII character set is set to “PC-858", which
means Euro Support is active.
******** TEST PRINTOUT ********
Intermate LX T-04 version: K12-8491
Printer Driver #32 IBM Proprinter
IBM Printer Emulation__________ IBM 4214 model 2
System Language________________ 500 International Set 5
ASCII Char. Set________________
PC-858
A p p e n d i c e s
Switch Off the printer.
6.
Connect a terminal to the Intermate LX T-04 using the T-cable, and
7.
switch the terminal On. The terminal should be terminated.
Set the address switch to position “7" and switch On the printer. Wait a
8.
few seconds after the SYSTEM indicator has stopped flashing.
Select position “9". Wait until the SYSTEM indicator starts to flash.
9.
I n t e r m a t e L X T - 0 4 67
Page 68

A p p e n d i c e s
Select position “7" again. Within a few seconds, the Key Definitions
10.
menu should appear on your terminal.
==============================================================
Intermate LX T-04 4214 version: K12-8491 981130
==============================================================
KEY DEFINITIONS
Right
Left
Up
Down
Enter
Assign Cursor keys Intermate International A/S 1996
Assign the on-screen navigation keys according to your preferences.
11.
The Main Menu appears after the assignment of the keys.
12.
==============================================================
Intermate LX T-04 4214 version: K12-8491 981130
==============================================================
MAIN MENU
Basic Configuration
View Configuration
Print Parameter List
Print EBCDIC to ASCII table
Edit Parameters
Set Factory Defaults
Save
Exit
Use <Up><Down> to move, <Enter> to Select
68 U s e r ‘ s G u i d e
Page 69

A p p e n d i c e s
Select the “Edit Parameters” menu item. This brings up the following
13.
screen.
==============================================================
==============================================================
Printer Driver: IBM Proprinter
001 Form Length____________ 48
002 Char. Density__________ 10
003 Line Density___________ 6
004 Sheet Feeder___________ 0
005 Print Quality__________ 1
006 Lock CPI_______________ No
007 Lock LPI_______________ No
008 Lock Feeder Type_______ No
009 Lock Print Quality_____ No
010 System Language________ 6
011 Max. Print Pos.________ 132
012 Left Margin____________ 1
014 Lock Max. Print Pos.___ No
015 ASCII Char. Set________ 13
016 Color-String to Send___ 10
017 UDS-String to Send_____ 10
EDIT PARAMETERS
Free String Area: $1D99
Use cursor keys to edit, <Enter> to exit
Set the “ASCII Char. Set” parameter to a value other than “13" to
14.
disable Euro Support. Refer to the option description on page 51.
Press <Enter> to return to the Main Menu.
15.
Select “Save” and answer “Yes” to save the settings permanently.
16.
Select “Exit” on the Main Menu and answer “Yes” to leave the
17.
configuration utility.
Power Off the printer and disconnect the LX T-04 from the terminal.
18.
Set the address switch to the device address (0-6) previously held by the
19.
LX T-04.
I n t e r m a t e L X T - 0 4 69
Page 70

A p p e n d i c e s
Connect the LX T-04 to the network and power the printer On.
20.
Euro Support via Command Sequence s
Note: This approach does NOT require that the LX T-04 has been updated
with the firmware K12-8491 or greater. This is because the substitution
of the international currency with the Euro symbol takes place after the
character set has been chosen in the LX T-04.
Send one of the below command sequences to the printer to disable or enable
Euro Support.
Disable Euro Support Enable Euro Support
&&??%%P
%P
=54,5
=203,$9F,$CF
=206
=205
%
&&??000
&&??%%P
%P
=54,5
=203,$9F,$D5
=206
=205
%
&&??000
70 U s e r ‘ s G u i d e
Page 71

F. Technical Specifications
Supported Printers
Lexmark 23xx Plus
Lexmark 4227
Lexmark 4227 Plus
Attachments
IBM System/34.
IBM System/36.
IBM System/38.
IBM System AS/400.
A p p e n d i c e s
IBM 5259 Migration Data Link.
IBM 5294 Control Unit.
IBM 5394 Control Unit.
IBM 5251 Model 12 Control Unit.
IBM 5299 Terminal Multiconnector.
I n t e r m a t e L X T - 0 4 71
Page 72

A p p e n d i c e s
IBM Printer Emulation
IBM 4214 model 2(default).
IBM 5256 model 1,2 and 3.
IBM 5224 model 1 and 2.
IBM 5225 model 1,2,3 and 4.
IBM 4230 model 101.
IBM System Features
SCS and FFT Data stream.
Page Presentation Media.
Cut Sheet Feeder Command.
PC/Support Virtual Printer.
Multiple Bin Support.
15 National Languages.
Additional IBM 4214 feature
Graphics Support Through LAC.
72 U s e r ‘ s G u i d e
Page 73

Intermate LX T-04 Additional Features
Configuration from a Terminal or from the System.
Editable Character Translation Table.
10 User Definable Strings.
Programmable Transparency Function (data pass-through).
Predefined Printer Drivers for all major ASCII printers, fully editable.
Bar Codes.
String Substitutions.
Hardware Specifications
Size: 29x55x100 mm / 1.2"x2.2"x4.0".
A p p e n d i c e s
Weight: 0.15 kg/ 0.3 lb.
Power: 5 VDC, min 170 mA(applied by the printer).
Approvals EMC
CE: EN 55022/1987, EN 50082-1/1992. FCC Class A.
Safety: EN 60950, UL, CSA.
Operating Environment
Temp.: 5-40(C / 40-105(F.
Humidity: 20-80% non-condensing.
I n t e r m a t e L X T - 0 4 73
Page 74

A p p e n d i c e s
74 U s e r ‘ s G u i d e
Page 75

A p p e n d i c e s
G. Related Publications
Title Part Number
IBM System/36 Functions Reference Guide SA -21-9436-05
IBM AS/400 Guide to Programming for Pri nting SC21-8194-0
IBM AS/400 Printing GG24-3452-00
IBM AS/400 Programming: Advanced Printer Function Guide SC21-9668-0
IBM AS/400 Utilities: BGU User’s Guide and Reference SC09-1167-02
Document Content Architecture Final-Form-Text Ref erence SC23-0757-1
IBM 4214 Printer Model 2 Product Decription GC31-2582-1
I n t e r m a t e L X T - 0 4 75
Page 76

A p p e n d i c e s
76 U s e r ‘ s G u i d e
Page 77

A p p e n d i c e s
H. Customer Support
If you cannot find answers in this guide about using the Intermate LX T-04,
please contact your point of purchase, your local Lexmark office, or call the
Lexmark Technical Support line.
North America: Lexmark International, Inc.
740 New Circle Road
Lexington, KY 40550
Phone:1-800-Lexmark or 606-232-3000
Fax: 606-232-2873
Europe: Lexmark International S.A.
B.P. 9001
45910 Orleans Cedex 9
France
Phone:+33 238 71 1559
Fax: +33 238 83 4483
Worldwide: For worldwide Lexmark support phone numbers,
visit the Lexmark web site at
http://www.lexmark.com
If you have changes or comments to this guide, please inform LCI Intermate
A/S in writing at one of the below addresses.
LCI Intermate A/S
Odinsvej 19
2600 Glostrup
Denmark
E-mail: [email protected]
Internet: www.intermate.com
I n t e r m a t e L X T - 0 4 77
.
Page 78

A p p e n d i c e s
78 U s e r ‘ s G u i d e
Page 79

Index
I n d e x
A
About this guide ............. 9
Additional IBM 4214 feature . . 72
Address Switch ............57
Advanced functions .........25
Appendices................ 49
Approvals EMC ............73
ASCII character set .........51
ASCII printer driver.........11
Attachments ............... 71
B
Bar Codes.................38
Attributes ..........38, 53
Define Bar Codes .......38
Driver ................38
Example ..............40
Printout ...............40
Basic configuration .........19
C
Character Translation........32
Configuration ..............17
Exit ..................24
Lead-In Sequence ....29, 30
Save..................23
Trailer Sequence .....29, 52
Configuration and transparency
sequences .................29
Configuration from a terminal . 17
Configuration from the system . 27
Cursor keys ............18, 68
Customer support ...........77
D
Disabling euro support .... 66, 70
E
EBCDIC Character Table ....55
Editing translation tables .....31
Emission notices ............2
Emulation Mode............ 25
Enabling euro support ....66, 70
Error messages.............46
Corrupted Printouts......43
Incorrect Host Printouts . . 42
Incorrect Page Breaks ....43
Missing Printouts .......41
Euro support ............55, 65
Euro support via command
sequences .................70
Euro support via terminal
configuration ..............66
Exiting the configuration .....24
Extended Emulation Mode....25
F
Firmware revision number....66
Flash ROM................61
H
Hardware specifications...... 73
Hexdump .................45
Host communication problem . 43
I n t e r m a t e L X T - 0 4 79
Page 80

I n d e x
I
IBM Printer Emulation
.................12, 21, 51, 72
IBM system features ........72
Incorrect host printouts ......42
Installation ................13
Intermate LX T-04 additional
features...................73
Introduction ............... 11
K
Key definitions.............18
M
Main menu ................26
Missing printouts ...........41
Multi-byte Transparency ..... 29
O
Operating environment.......73
Operating the LX T-04.......57
#40 Escape Character51
#41 Transparency Lead-
In Sequence............52
#42 Configuration
Lead-In Sequence .......52
#43
Transparency/Configuration
Trailer Sequence ........52
#45 Job Time-out . . 52
#46 Start of Job
Sequence..............53
#53 Bar Code Driver 53
#54 Bar Code Attributes
..........................53
Parameter printout example . . . 49
Printer Attachment..........13
Printer Driver ........11, 19, 20
Printer drivers.............. 50
Printer firmware requirements for
euro support ...............65
R
Related publications.........75
Reporting problems ......... 44
P
Parameter descriptions .......50
Parameter List ............. 49
#10 System Language50
#120-#129 User Definable
Strings................53
#15 ASCII Character
Set ...................51
#150-#189 String
Substitutions ...........54
#26 IBM Printer
Emulation .............51
80 U s e r ‘ s G u i d e
S
Saving the configuration ..... 23
Selecting IBM printer emulation59
Solving problems ...........41
start conditions.............57
Start of Job Sequence........52
String Substitutions . . . 35-37, 54
Strings ................... 34
Match ................36
String Substitutions ......35
Supported printers ..........71
System Attachment .........15
Page 81

SYSTEM indicator
...........14, 16, 42, 45, 57, 67
System Language ........ 22, 50
T
Technical specifications...... 71
Test Mode .............57, 58
test printout ...............14
Theory of operation .........11
Trademark credits............3
Translation Table ...........31
Transparency ..............28
Lead-In Sequence .......30
Multi-byte .............28
Multi-byte Transparency . . 29
Single-byte ............28
Trailer Sequence .....29, 52
U
Unpacking ................13
Updating firmware..........61
Updating the Software .......61
User Definable Strings.......53
User defined strings .........34
I n d e x
W
Warranty notice .............2
I n t e r m a t e L X T - 0 4 81
 Loading...