

Page 1

Intermate100 / Intermate101
10/100 Mbit Ethernet Multi-Protocol
Externally Attached Print Serv er s
Print Server Administration Manual
7th Edition
Document gs-100-07. 25 June 2002.
Separate "Printing Environment Guides" are provided for IBM Mainframes and IBM OS/400
systems.
This manual applies to the following firmware code components:
Intermate100: Main code G22. Boot code G21.
Intermate101: Maincode G32. Bootcode G31. Rescue Main G33.
Intermate101-JScribe: Maincode G34.Bootcode G31. Rescue Main G33.
No part of this manual may be photocopied or reproduced in any way , except where noted,
without the written consent of Intermate A/S.
© Copyright Intermate A/S 2002. All rights reserved
Kongevejen 194A Pease International Tradeport
3460 Birkeroed 222 Interna tional Drive, Suite #195
Denmark Portsmouth, NH 03801
E-mail:
E-mail:
Page 2

NOTICES
Disclaimer
LCI Intermate A/S makes no warranty of any kind with regard
to the contents or use of this guide, and specifically disclaims
any express or implied warranties on merchant ability or fitness
for any particular purpose.
LCI Intermate A/S shall not be liable for errors contained herein
or for incidental or consequential damages in connection with
the performance or use of this product.
Information in this guide is liable to change without notice and
does not represent a commitment on the part of LCI Intermate
A/S
Trademarks
Intermate is a registered trademark of LCI Intermate A/S.
AFP, AIX, AS/400, IBM, IPDS, LAN Server, OS/2, OS/400,
Print Services Facility, PSF and WIN-OS/2 are registered
trademarks of International Business Machines Corporation.
HP Open View and PCL are registered trademarks of Hewlett-
Packard Company.
Windows 95 / 98, Windows NT, and Windows2000 and are
registered trademarks of Microsoft Corporation.
®
WinZip
Novell, NDS, NetWare and NWAdmin are registered trade-
marks of Novell, Inc.
Any other trademarks appearing in this document are the prop-
erty of their respective owners.
is a registered trademark of Nico Mak Computing Inc.
Intermate100 and Intermate101 Print Server Administration Manual 2
Page 3

INTRODUCTION
Intermate100 and Intermate101 Print Server Administration Manual 3
Page 4

Introduction: Target Audience and Products
1. Introduction
1.1. Target Audience and Products
1.1.1. Target Audience
You are a “ printer admi n is t ra to r” with respon sibility fo r co nf i gu r ing and administrating printers and print servers. You may also
be a “network administrator”, and if not, you will sometimes
need to talk with one.
The information in this manual does not cover special option
settings intended for our partners. Please contact our support
department if you need information about the special “OEM”
settings.
1.1.2. Print Servers, Component Codes and Release Levels
Tip:
Everything in our documentation is applicable to the
Intermate1xx, meaning all variants of the Intermate100 and the
Intermate101 unless stated otherwi s e.
See
“What the Firmware File Names Mean” [page 198]
if you need help to understand the component and
firmware level codes.
• Main code G22 covers the Intermate100
• Main code G32 covers the Intermate101
• Main code G34 covers the Intermate101-JScribe
model. Everything applicable to G32—except IPDS—is
also applicable to G34.
About release levels for major releases of G22 and G32
The manual includes comments showing when features have
been added or significantly changed so that those who continue to use older versions can see if they might want to
upgrade, and those who have converted up from older versions can see where there might be problems.
Our release notes, which can always be found on our web site,
are detailed and cumulative.
Intermate100 and Intermate101 Print Server Administration Manual 4
Page 5

Introduction: Target Audience and Products
Summary overview of major changes
1071-1143 (spring 2001):
• These releases introduced the Network Destination
Option (NDO) and quite a number of changes made
necessary by this new function, especially changes to
how the IPDS settings work.
1252 (August 2001): IPP
1391 (October 2001): ThinPrint
• Initially, a key was required. ThinPrint became standard
starting with release level 2171.
1491 (December 2001):
• Major changes were made in how the HTTP menu is
organized. The documentation follows this new
structure.
• This was the final release with IPX/SPX-based Novell
NetWare print support for Bindery and NDS modes.
2021 (January 2002): IPX/SPX removed
IPX/SPX-based Novell NetWare print support for Bindery and
NDS modes is not included in print servers purchased after 4
January 2002. Due to license issues in connection with Novell
Netware, down-grading a an Intermate100 purchased after 4
January 2002 (G22_2021 and higher) will constitute a copyright violation. Owners of the older models of G22-based servers can use the separate printing environment guide for
IPX/SPX.
See
“Novell Netware (LPR via pure IP)” [page 50]
if you need to
print from a NetWare platform based on pure IP, such as that in
NetWare 5 (released in 1998).
2041 (late January 2002): Beta release of G32
2171 (April 2002):
• Major changes were made in how the HTTP menu is
organized and the documentation was changed to
follow this new structure.
• ThinPrint was made available as standard.
Intermate100 and Intermate101 Print Server Administration Manual 5
Page 6

Introduction: Target Audience and Products
• NDO functions were changed to allow direct choice of
a target printer without having to use a logical printer.
• The possibilities for bi-directional communication
with the local target printer were significantly improved
(among other things Nibble mode for printers not
capable of ECP). See
[page 135]
.
“[Local Printer Parallel Port]”
2251 / higher (June 2002):
• This is the first fully public release of G32-based print
servers.
• G32-based print servers include NDO at no extra
charge.
• On G32-based print servers, ThinPrint users can now
direct output freely to network destination printers.
Note, however, that an NDO key on G22-based print
servers does not give ThinPrint access to network
destinations.
• All print servers: From IBM mainframe hosts running
VPS/Secure from Levi, Ray & Shoup, Inc. (see
www.lrs.com), it is possible to enable secure printing for
IPDS as well as for jobs directed to up to five different
raw socket ports, thus allowing e.g. secure PCL and
PostScript printing .
Intermate100 and Intermate101 Print Server Administration Manual 6
Page 7

1.2. Types of Documentation
1.2.1. Manual and Guides
The CD includes the Print Server Administration Manual (this
book) and the Printing Environment Guides, all of which are
also found on our web site where you will also find updates.
Print Server Administration Manual
The Print Server Administration Manual tells you how to
• set up printers in most supported environments
(however, IBM Mainframes and IBM OS/400 Systems
are covered in separate guides, see below)
• configure server-wide settings (with more information
on IP-configuration than is provided in Getting Started
or the Quick Guide)
• configure the basic printing services: Raw Socket, LPR,
FTP Print, IPP, and ThinPrint.
It also describes tools you can use for monitoring/managing,
troubleshooting and maintenance.
Note:
All information on license keys, firmware upgrade
and customer support is collected in the Print Server
Administration Manual. This includes keys for the
Host Print Options described below.
Introduction: Types of Documentation
Special Printing Environment Guides: IBM Mainframe Hosts
and IBM OS/400 Systems with Host Print Options
Each special IBM guide contains all necessary information for
using the applicable Host Print Options (the HPOs), encompassing AFP/IPDS, SCS TN3270E (Mainframe), and SCS
TN5250E (OS/400 systems).
In addition, the guide for IBM OS/400 Systems covers Raw
Socket, LPR, and FTP.
The guide for IBM Mainframe Hosts includes information on
secure printing (ISPP) for IPDS. Secure Raw Socket print is
covered in this manual because it is so integrated with Raw
Socket configuration.
Intermate100 and Intermate101 Print Server Administration Manual 7
Page 8

A separate “IDB Technical Reference” is provided for
advanced users of SCS TN3260E and SCS TN5250E.
HPOs Please note the following restrictions on the HPOs:
• “IPDS Option”. If you enable and use this option without
having a license key , each page will be overwritten with
a “Demo/Test Mode” banner.
• “TN5250E Option”. If you enable this option and use it
to print SCS jobs or jobs using Host Print Transform
without having a license key, the last line on each
printed page will be overwritten with a “demo mode”
message.
• “TN3270E Option”. If you enable this option and use it
to print SCS jobs without having a license key, the last
line on each printed page will be overwritten with a
“demo mode” message.
1.2.2. Other Types of Documentation
There are three other types of documentation:
• Product Overview is a sheet included with the
package.
It lists what is in the package, including the contents of
the CD-ROM and information on updates.
Introduction: Types of Documentation
• Getting Started is a brochure included with the
package, covering hardware installation, information
on getting IP-connected and information on how to start
printing from a Windows 2000 platform.
• Quick Guide is a mini-manual in text-format which can
be printed directly from the print server. It is meant
especially to rescue users who don’t have anything
else at hand.
All three of these documentation-types are also inc lu ded on
the CD-ROM and available on our web-site.
Intermate100 and Intermate101 Print Server Administration Manual 8
Page 9

Introduction: Conventions Used in the Manual and Guides
1.3. Conventions Used in the Manual and Guides
The notation used is based on what you see in the HTTPbased dialog for management and configuration.
This dialog has a left menu divided into group, sub-groups and
items. When we refer to such groups, sub-groups or items, we
use “double quotes” and connect the levels with a right angled
bracket >.
“Configuration > Input Control > LPR” is an example of
“Group > Sub-Group > Item”.
Many of the items open a configuration page. In descriptions of
how to do the configuration, the name of a configuration page
is put into [square brackets].
“Input Control” > [LPR] is an example of
“Group” > [Configuration Page].
The individual fields and buttons on a configuration page are
usually identified by putting the field name or button name in
“double quotes” unless the meaning is clear enough that no
special signs are needed.
<Expressions within angled brackets>
are used in two ways:
• <key on the keyboard>
•
<parameter name> which is to be replaced by a specific
parameter value when you type in various kinds of
commands.
Intermate100 and Intermate101 Print Server Administration Manual 9
Page 10

1.4. Top ics in This Manual
The rest of this manual is divided into the following main sections:
• Printing Environments: How to set up printer definitions
in Windows 2000 (and XP), Windows NT 4.0, Windows
95/98, Novell NDPS Gateway (pure IP), Apple Laser
Writer, AIX, and OS/2. As mentioned above, there are
separate Printing Environment Guides for IBM
Mainframes, IBM OS/400 Systems and (only for print
servers purchased before 4 January 2002) Novell
(IPX/SPX).
Note:
• Tools for Management and Configuration
• Initial Contact (getting TCP/IP connected)
• Configuring the “Basic” and “Permissions” Sub-Groups
Descriptions of printer definitions in the various
environments assume that you have already
established initial contact with the print server and
set a host name, the IP address, subnet mask and
default gateway.
Introduction: Topics in This Manual
• Configuring Services and Host-Sessions
• Information and Monitoring Possibilities
• Upgrades and Maintenance
• Appendices
Each main section has several chapters.
Purpose of
the
“About”
informa-
tion
Intermate100 and Intermate101 Print Server Administration Manual 10
The following information about each main section is meant to
help you to decide which chapters you need to use and to
determine whether there are special pre-requisites you need to
fulfill before proceedin g.
Page 11

Introduction: Topics in This Manual
1.4.1. About the Supported Printing Environments
Note:
The following environments are covered in this manual:
These descriptions assume that you have already
established contact with the print server and set the
IP address, subnet mask and default gateway. If you
need help to do this, consult the Getting Started
brochure, the Quick Guide, or
Initial Contact” [page 88]
in this manual.
“IP Assignments for
“Windows 2000 and Windows XP” [page 23]
•
•
“Raw Socket Printing (Standard TCP/IP Port)” [page 24]
•
“LPR” [ page 27]
—native or using the Intermate Print
Port [note *1]
•
“Internet Print Protocol” [page 30]
•
“Windows NT 4.0” [page 32]
•
“Using an Intermate Print Port for Raw Socket or LPR”
[page 33]
•
“Native LPR” [page 38]
•
“Windows 95/98” [page 42]
[note *1]
[note *1]
• Raw Socket (Port 9100, Reverse T elnet) and LPR [note
*1] using the Intermate Print Port
[*1] LPR is rarely the best choice in Windows environments.
This is explained in the three Windows chapters.
•
“Novell Netware (LPR via pure IP)” [page 50]
•
“Apple LaserWriter (LPR only)” [page 51]
•
“AIX” [page 54]
•
“LPR (ASCII)” [page 55]
•
“FTP” [page 56]
•
“IPDS with PSF/6000” [page 57]
This section only covers defining an IPDS printer. Use
the Printing Environment Guide for IBM Mainframes for
information on IPDS settings in the print server.
Intermate100 and Intermate101 Print Server Administration Manual 11
Page 12

Introduction: Topics in This Manual
•
“OS/2 2.x and OS/2 Warp” [page 59]
•
“LPR (ASCII data, e.g. PCL and Postscript)” [page 60]
•
“IPDS from PSF/2” [page 64]
This section only covers defining an IPDS printer. Use
the Printing Environment Guide for IBM Mainframes for
information on IPDS settings in the print server.
About the FTP Print protocol
This protocol is primarily provided for UNIX users. It can also
be used in other environments, especially if you want to print
small jobs controlled manually. For example, a txt file can be
FTP’ed to a printer via the print server’s IP address. For further
information see
“FTP Print” [page 164]
in the chapter on services in “Input Control” where there is a generalizable example
from AIX environments.
1.4.2. About Tools for Management and Configuration
Descriptive
Framework
• Chapter 9
The Intermate1xx has an HTTP server in it which you attach
to using a browser. Because the HTTP-based menu is the
“HTTP (Browser)” [page 67]
most comprehensive configuration tool, we use it as the
framework all descriptions of how to configure and use the
print server. The HTTP-based menu also gives access to
status information (described mainly in the chapters within
“Management— Information and Monitoring Possibilities”
starting on
page 169
) and to “actions” not obtainable in any
,
other way.
• Chapter 10
“Configuration Using a Telnet Client”
[page 75]
If there are very strong reasons for not using a Windowsbased configuration tool, you can use a Telnet client. The
menu presented to a T elnet client is does not include status
or actions (except for reboots), and the dialog is much more
difficult to use than either the HTTP-based menu or the
configuration tool presented in the following chapter.
Intermate100 and Intermate101 Print Server Administration Manual 12
Page 13

Introduction: Topics in This Manual
• Chapter 11
“The Intermate Management and
Configuration Utility (IMCU)” [page 78]
Powerful
Multi-
This chapter covers how to install and use this powerful
Windows-based utility which is included on the CD-ROM.
Purpose
Utility
As a tool for configuring a single unit, the IMCU is especia lly
useful in establishing initial contact. Most users will find
other tools more useful for configuring the other parameters
and options.
As a monitoring tool, the IMCU can give you an overview
over many different kinds of network devices and their
network status (such as “not available”, “sleeping”, ready);
for printers, you can also see “page count”. These
possibilities are also introduced in Chapter 11, in the
section
“Device List / Available Agents” [page 83]
As a firmware upgrade tool, the IMCU can be used not only
for upgrading single units, but also for bulk upgrade as well
as for copying configuration files from one unit to one or
more other units; see
on
page 196
.
1.4.3. About Initial Contact
Getting
TCP/IP-
Connected
This main section consists of one large chapter, Chapter 12
Assignments for Initial Contact” [page 88]
It contains comprehensive information on how to choose a
method for assigning TCP/IP-related information (IP address,
subnet mask, default gateway and host name)—and how to
use the chosen method. It is especially meant to help those
whose situation cannot be easily handled with the information
in Getting Started or the Quick Guide. Thi s chap ter can al so be
used as a replacement for those guides.
.
“Upgrades and Maintenance”
.
, starting
“IP
Intermate100 and Intermate101 Print Server Administration Manual 13
Page 14

Introduction: Topics in This Manual
1.4.4. About Configuring the “Basic” and “Permission” SubGroups
The chapters in this main section are organized according to
configuration pages in the HTTP-based menu.
The HTTP-based menu is divided into four groups:
• Actions
• Configurations
•Status
•Help
Within the “Configurations” group on the menu, there are a
number of sub-groups. Each sub-group has a number of configuration pages. Each chapter title in [Square Brackets] indicates a configuration page.
The order i n whic h the se p ages a re pr esent ed ref lec ts a typica l
order for first time use. This may differ from the order on the
HTTP menu, where the least frequently used pages are at the
bottom of the “Configurations” group.
The “Basic” sub-group has three configuration pages
•
“[TCP/IP]” [page 103]
Besides IP address, subnet mask, default gateway, and host
name (covered in Chapter 12), the [TCP/IP] page allows you
to specify a WINS server to which this information will be sent.
It also allows you to register the IP address of a DNS server on
which the unit can look up the addresses of named servers on
other configuration pages.
•
“[General]” [page 106]
This configuration page includes a number of purely
administrative parameters: What will you call the device,
who is responsible for it and where it is located?
It also includes a parameter to designate the “System Target
Printer”, which is where information about the system is
printed; and there is a parameter defining whether or not front
panel messages should be enabled on that printer.
Intermate100 and Intermate101 Print Server Administration Manual 14
Page 15

Introduction: Topics in This Manual
•
“[Network]” [page 110]
This configuration page allows you to adjust “Speed /
Duplex” (needed very rarely). In addition, it gives you the
possibility of setting a “Local MAC addre ss” .
The “Permissions” sub-group has two configuration pages
•
“[Password Change]” [page 113]
•
“[License Key]” [page 114]
1.4.5. About Configuring Services and Host-Sessions
Key Concepts
The Intermate1xx allows you to print over a LAN to a designated printer from a number of different environments, using
your choice of protocol.
* Input control and HP Os
This is an umbrella term for protocols and printing methods. In
connection with the IBM Host Print Options (HPOs), there are
a great many possible settings. The HPOs are AFP/IPDS, SCS
TN5250E and SCS TN3270E.
* Target printer
The target printer is the physical printer. A target printer can be
chosen directly (newer release levels) or through a logical
printer (all release levels). “Newer” release levels in this connection are G22_2111 or higher and G32 (or G34)_2041 or
higher.
* NDO
The Network Destination Option (NDO) allows you to use just
one intelligent multi-protocol print server to control jobs to up to
four network printers with inexpensive basic network-cards. In
addition, the NDO provides load-balancing among the network
destinations. In order to ensure bi-directional communication, a
network destination printer should support the status informa-
Intermate100 and Intermate101 Print Server Administration Manual 15
Page 16

Introduction: Topics in This Manual
tion nodes defined in the Printer MIB (RFC1759) and some
host information nodes of the Host Resources MIB (RFC1518).
NDO is included standard in G32-based products. Users of
G22-based products may purchase a key for activating NDO.
* Logical printer
This is a queue you can use in order to get pre- and post-job
processing carried out, and/or to define string-substitutions
within a jo b. A lo gica l pr inter def ini tio n a lways poi nts to a t ar get
printer.
Processing Facilities
The information in the chapter on
[page 1 17]
explains how all these concepts fit together. Some
“Processing Facilities”
of the information may seem abstract until you have tried your
hand at configuring, so you may well return to this chapter
many times.
Configuration Pages for Output and Input
The rest of the chapters within “Configuring Services and HostSession” are organized according to sub-groups of configuration pages in the HTTP-based menu.
Each title in [Square Brackets] indicates a configuration page.
“Output Control”
Because each input must point to an output, it is often convenient to have output control configured before configuring
input.
Output has two dimensions—physical and logical. The “Output
Control” sub-group has four pages: two for the physical dimension and two for the logical.
The Physical Dimension of Output: Target Printer(s)
•
“[Local Printer Parallel Port]” [page 135]
[Local Printer Parallel Port] is the configuration page for
important settings to the local printer. This is the printer
to which the print server is attached.
Intermate100 and Intermate101 Print Server Administration Manual 16
Page 17

Introduction: Topics in This Manual
•
“Network Destination Option” [page 144]
Skip this chapter if you only intend to use a local printer.
This chapter tells you how to configure up to four
network destinations. If you define and use a network
destination on a G22-based product without having a
key, the print will be sent to the local printer (local
printer is the one to which the print server is attached).
Note:
Configuring the settings on the [Network Destination
Option] page is only a part of setting up your print
server for NDO. The other things that need to be
done are covered in the chapter on
Facilities” [page 117]
,
“Processing
The Logical Dimension of Output
The practical details of configuration are covered in
•
“[Logical Printers 1-8]” [page 151]
•
“[Substitution Strings]” [page 157]
.
The information needed to understand how these things work
and how to use them is in the chapter on
[page 1 17]
.
“Processing Facilities”
Input: Five Sub-Groups
“Input” is the umbrella term for protocols and printing methods.
The individual menu items for configuring input are found in the
following five sub-groups on the browser menu:
• “Input Control” Sub-Group
“Services in “Input Control”” [page 159]
covers the
configuration of five basic print services, which are protocol
and methods requiring very little configuration: Raw Socket,
LPR, FTP Print, IPP and ThinPrint.
Note that the menu item
for ISPP Po r t o n ly a p p lies to IBM Mainframes.
You can create up to four different definitions for Raw
Intermate100 and Intermate101 Print Server Administration Manual 17
Page 18

Introduction: Topics in This Manual
Socket by defining different TCP ports, and you can define
up to eight LPR queues. So in all, you can configure 15
services on these five configuration pages.
Y ou must, of course, also establish printer definitions which
can use these services. How to do this is covered in all
relevant chapters explaining the supported printing
environments.
• “TN5250E Option” Sub- Gro u p is covered in the
Printing Environment Guide for IBM OS/400 Systems.
• “TN3270E Option” Sub- Gro u p is covered in the
Printing Environment Guide for IBM Mainframe Hosts.
• “IPDS Option” Sub-Group is covered fully in each of
the separate IBM Printing Environme nt Guide s.
Note that printer definitions for IPDS under OS/2 and
AIX are covered in this manual; use the guide for IBM
Mainframe Hosts to configure IPDS in the print server.
• “Novell Netware” Sub-Group, for support of
IPX/SPX-based printing in NDS and Bindery modes, is
covered in a Printing Environment Guide published in
December 2001. This feature is only available on
Intermate100s sold before 4 January 2002, up to and
including code level G22_1491.
1.4.6. “Other Configurations”
The sub-group “Other Configurations” is found in the
Intermate101-JScribe model (G34). Consult CCP’s manual for
information on these possibilities.
Note that JScribe must always be run through the logical
printer layer.
Intermate100 and Intermate101 Print Server Administration Manual 18
Page 19

Introduction: Topics in This Manual
1.4.7. About Information and Monitoring Possibilities
•
“Printed Information Available” [page 170]
“Print Main Status Pages” is the most important item.
.
“Standard Monitoring Information” [page 173]
•
covers all
of the “Status” information you can get printed to the
screen. “System Log” is the most important item.
Note that you can get a hard copy of the System Log by
printing the Main Status Pages.
•
“Configurable Monitoring T ools” [page 178]
tells you
• How to enable / create an IMCUagent
• How to enable and configure e-mail notification about
what is happening with printer(s) served by any given
Intermate1xx.
•
“Configure [SNMP]” [page 180]
and configure the Intermate1xx
tells you how to enable
so that you can use a
fully featured SNMP-based network management tool
(such as HP OpenView) to manage many printers and
monitor their activity in detail.
•
“Printer and Job Status via “Finger” (External Tool)”
[page 194]
tells you how to use the TCP/IP “Finger”
command from a Windows management environment
(NT or more advanced) or from a UNIX (or similar)
management environment.
Intermate100 and Intermate101 Print Server Administration Manual 19
Page 20

1.4.8. About Upgrades and Maintenance
Chapters on upgrades and maintenance
Starting on
things you can upgrade, explains the file-version naming- and
numbering-system, and tells you how to proceed using three
different methods. How to do bulk upgrades is also explained.
Maintenance-related items on the HTTP menu
The “Actions” group on the HTTP menu has three items dealing with maintenance:
• two kinds of reboots (for information on these, see
“Activating New Values By Rebooting” [page 73]
• restoring “All defaults” (for information on this, see
“Overview of Types of Resets” [page 221]
The “Links” group has two items, both of which are meant to
help you keep your software and documentation up to date:
page 197
, this main section tells you what kinds of
Introduction: Topics in This Manual
).
• “Contact Information” = Start Page
• “Update/Utilities” = A direct link to a relevant web site.
If you want this opened in a new browser instance, hold
down the <shift> key on your keyboard while clicking on
the link.
Intermate100 and Intermate101 Print Server Administration Manual 20
Page 21

1.4.9. About the Appendices
The Appendices include reference information which can be
useful in several different context s:
Introduction: Topics in This Manual
“Customer Support” [page 227]
•
•
“Technical Information” [page 229]
.
, including emission
notices. This repeats and expands the information
included on the product overview sheet.
•
“Hardware Installation” [page 233]
—this repeats the
information included in the “Getting Started” brochure.
“Information from LEDs and from the TEST Button”
•
[page 234]
. This repeats and greatly expands the
information included in the “Getting Started” brochure
and in the “Quic k Gu ide” txt file.
•
“US ASCII 7-bit Character Set: Decimal Values 32 - 126”
[page 237]
—these are the characters which are
(almost) always sure to be printable; 33-122 are as
good as 100% consistent in all kinds of code pages.
•
“String Syntax” [page 239]
for pre-processing, post-
processing and string substitution.
“Configuration Checklists” [page 241]
•
for the whole
configuration process and for the configuration of each
single service or host-sess i on.
•
“Troubleshooting” [page 245]
is a new appendix
focussing on what to investigate if you can’t print a job
and if you can’t ping the print server.
Intermate100 and Intermate101 Print Server Administration Manual 21
Page 22

PRINTING ENVIRONMENTS
Intermate100 and Intermate101 Print Server Administration Manual 22
Page 23

Windows 2000 and Windows XP: Introduction
2. Windows 2000 and Windows XP
2.1. Introduction
The following protocols are supported
• “Standard TCP/IP Port” = Raw Socket (Port 9100,
Reverse Telnet) using the native Port 9100 protocol.
See
page 24
• LPR using either the native LPR or Intermate LPR Print
Port. See
Note that the LPR port is best suited to servers that need to
communicate with host computers such as UNIX or VAX
machines by way of RFC 1 179 . For com puters that need to
submit print jobs to host computers, the standard TCP/IP
port should be used in most cases.
A network-connected printer must have a card that
supports LPD for TCP/IP printing to work properly.
.
page 27
.
What is a
“printer”
• Internet Print Protocol. See
In Windows, the definition of a “printer” consists of three elements:
page 30
.
a a physical printer from a specific printer
manufacturer and of a specific type or model,
with a specific IP address
b a specific driver to be used (this driver may or
may not be from the same manufacturer)
c the port name to be used (port names are often
in themselves composed of two parts, for
example an IP address and a port).
Once defined, printers appear on the “Settings > Printer” function and they are presented on the list of printers you can
choose from whenever you use a Windows application on your
PC/ work station.
Intermate100 and Intermate101 Print Server Administration Manual 23
Page 24

Windows 2000 and Windows XP: Raw Socket Printing (Standard TCP/IP Port)
2.2. Raw Socket Printing (Standard TCP/IP Port)
Important! As explained in
[page 160]
services on your print server. If you have more than one service defined on the print server, you must, in fact, use different
port number values for each of them.
If you want to be sure of achieving bidirectional communication
with the physical target printer, please see
uration Tip: Ensuring Bidirectional Communication” [page 162]
Procedure Choose Settings > Printers > Add Printer.
Follow the instructions given by the “Add Print Wizard”.
The important things to notice are listed below.
“Raw Socket (= “Port 9100" = Reverse Telnet)”
, you can configure up to four different Raw Socket
1 Choose local printer (yes, local, even though the print
server is attached to the LAN and not directly to your PC/
work station). Clear the Automatically detect my printer
check box before going on to click Next.
2 Add a new port.
This is defined as a combination of a given IP address (in
our example 192.168.0.227) and a port type.
Available port types are displayed on the “Type” pull down
list. At this point, you cannot directly specify Raw Socket,
but must choose the heading “Standard TCP/IP Port”; you
may have to scroll down a bit to find this heading on the list.
Choosing this port type starts the “Add Standard TCP/IP
Printer Port Wizard”.
3 About the Port Name:
As you type in the IP address for the print server, the Printer
Port Wizard will generate a Port Name consisting of the IP
address pre-fixed with the string “IP_”. For example:
IP_192.168.0.227
You may change the name. If (as allowed for in the next
step) you want to use a port 29100 instead of 9100, you
could, for example, change the name to:
IP_192.168.0.227:29100
“Raw Socket Config-
.
Intermate100 and Intermate101 Print Server Administration Manual 24
Page 25

Windows 2000 and Windows XP: Raw Socket Printing (Standard TCP/IP Port)
so you can easily see how you have configured the printer
definition. The name has no effect on what the system
does, but can be a great help in your administration.
4 Windows has no special knowledge of our print server.
When asked for additional information about the device
types, choose “Standard: Generic Network Card”. Its
default settings are SNMP activated with the “Raw/Port
9100" protocol.
Note:
At this point in your setup, you cannot change the
port number value from 9100; we will return to this
issue below on
page 26
.
5 After a bit of a wait, you will be returned to the Add Printer
Wizard, where you will indicate the manufacturer and type
of printer. You may have to take a detour to fetch a type not
already available on the list.
6 If you already have a printer definition for this printer type,
you will be asked whether or not you want to keep the
existing driver. We advise your doing so.
Note:
Should you want to use a new driver or make other
adjustments to the printer definition, wait until you
are finished with the “Add Printer” procedure
described here. Choose Settings > Printer, rightclick on the new printer you have defined, and
choose “Properties”. There are six tabs full of
settings you can change.
7 You will be asked to “Name Your Printer.” If you have
several different “printer” definitions for the same physical
printer in your network, choose a name which will help to
keep track of them. On the same window you will be asked
whether or not you want the printer to be default for your
PC/work station.
8 Decide whether or not to share the printer. Click Next.
The rest of the instructions here assume that you do not
share the printer.
9 Decide whether or not you want a test page printed. Click
Next. The test page will not print until after the next step is
completed.
Intermate100 and Intermate101 Print Server Administration Manual 25
Page 26

Windows 2000 and Windows XP: Raw Socket Printing (Standard TCP/IP Port)
10 The final window will be presented. Click “Finish”.
11 If you have chosen to print a test page in Step
9
, you will be
presented with a window explaining what is going on. If the
printout is ok, click OK. If you should need to choose
Troubleshoot, follow the on-line help instructions.
What if you want the printer definition to use a different port
value from 9100?
Choose Settings > Printer, right-click on the new printer you
have defined, and choose “Properties”.
1 Select the Ports tab.
2 Highlight the line for the port and printer you have already
marked for this printer and click “Configure Port”.
3 This will bring up a “Port Settings” Window. Change what is
entered in the Port Number field (in the “Raw Settings”
block), for example to 29100 (a setting which must also
exist in the print server). This explains the logic in the
naming example given above in the note to step
7, page 25
Note that you cannot change the port name. You can
change the IP address, but doing so will create a mismatch
to the information in the print server, so don’t!
4 Complete the “Port Settings” by clicking OK.
.
Tip:
It is possible to use the Intermate “Port 9100" Print
Port instead of the Windows native protocol. This
has the advantage that you can designate a port
other than 9100 without having to go back and reconfigure. Just follow the instructions in
Print Protocol” [page 30]
instead of “LPR” in step
, but choose “Port 9100"
3
. The “Port Name”
“Internet
generated will look something like this:
IMA_192.168.0.227:9100
and if you, for example, designate port 29100, the name generated will look like this:
IMA_192.168.0.227:29100
Intermate100 and Intermate101 Print Server Administration Manual 26
Page 27

2.3. LPR
2.3.1. Native LPR
Windows 2000 and Windows XP have a native LPR, but it
requires that you have installed Print Services for Unix. If you
choose this alternative, use the instructions provided in the
“Settings > Printers” help function. When you fill out the name
or address of the server providing LPD, use the IP address or
host name of your Intermate print server. If you use the host
name, a mapping of the name and IP address must be entered
in the hosts file. This is found in the directory
\<systemroot>\SYSTEM32\DRIVERS\ETC
The definition of <systemroot> depends on where your operat-
ing system is installed and the name given to the top-level
folder. A typical <systemroot> is C:\windows.
2.3.2. Intermate Print Port
The Print Port is a native 32 bit application included on the Intermate
Documentation and Utilities
rights to install this utility on NT, 2000, or XP.
After you execute the file
choose an
Intermate Raw Socket (“Port 9100") Port) just as you would
choose any other type of port when you install or modify the
properties of a printer definition
Choose Settings > Printers > Add Printer.
Follow the instructions given by the “Add Print Wizard”.
The important things to notice are listed below.
Intermate LPR Print Port (or, for that matter, an
CD.
P17-xxxx.exe
.
Windows 2000 and Windows XP: LPR
You need administrative
, you will be able to
1 Choose local printer (yes, local, even though the print
server is attached to the LAN and not directly to your PC/
work station). Clear the “Automatically detect my printer”
check box before going on to click Next.
2 Add a new port. This is defined as a combination of a given
IP address (in our example 192.168.0.227) and a port type.
Available port types are displayed on the “Type” pull down
list. Choose “Intermate Print Port”
Intermate100 and Intermate101 Print Server Administration Manual 27
Page 28

Windows 2000 and Windows XP: LPR
3 A little window will pop up present you with a choice of two
protocols. Choose “Intermate LPR” and click OK.
4 The little window will then present you with three fields to fill
out.
a IP-address. Type in the IP-address for the print
server.
b Print Queue: A default name PAR_B is shown.
This is a “binary” queue type which will print to
Logical Printer 0. See
Protocol)” [page 163]
queue types or want to change the queue
name. See
[page 159]
Logical Printer 0 is and how you can choose
another alternative.
“Services in “Input Control””
if you need help to understand what
“LPR Print Queues (LPD
if you need information on
c Port Name: When you click on this field, a
name will be generated according to this
syntax:
<print queue name>:<ip address>
You can change this name
Finish by clicking OK.
5 The little window will close.
6 The main window will then shift back to the Add Printer
Wizard, where you will indicate the manufacturer and type
of printer.
7 If you already have a printer definition for this printer type,
you will be asked whether or not you want to keep the
existing driver. We advise your doing so. Should you want
to use a new driver or make other adjustments to the printer
definition, wait until you are finished with the “Add Printer”
procedure described here. Choose “Settings > Printer”,
right-click on the new printer you have defined, and choose
“Properties”.
8 You will be asked to “Name Your Printer.” If you have
several different “printer” definitions for the same physical
printer in your network, choose a name which will help to
Intermate100 and Intermate101 Print Server Administration Manual 28
Page 29

Windows 2000 and Windows XP: LPR
keep track of them. On the same window you will be asked
whether or not you want the printer to be default for your
PC/work station.
9 Decide whether or not to share the printer. Click Next.
The rest of the instructions here assume that you do not
share the printer.
10 Decide whether or not you want a test page printed. Click
Next. The test page will not print until after the next step is
completed.
11 The final window will be presented. Click “Finish”.
12 If you have chosen to print a test page in Step
9
, you will be
presented with a window explaining what is going on. If the
printout is ok, click OK. If you should need to choose
Troubleshoot, follow the on-line help instructions.
Intermate100 and Intermate101 Print Server Administration Manual 29
Page 30

2.4. Internet Prin t Protocol
1 Start the Add Printer Wizard (Start >Settings > Printers >
Add Printer). Click Next.
2 When asked whether the new printer should be a local
printer or a network printer, choose Network Printer with the
radio button. Click Next.
3 You will be then asked what you want to do in order to
locate the printer. Use the radio-button to select Connect to
a Printer on the Internet or on your Intranet. Fill in the IP
address for the Intermate print server followed by the port
and service name, using the following syntax:
<URL>: <port>/<print service name>. The port number is
fixed (631) and the print service name is also fixed (printer).
Example:
http://192.168.0.227:631/printer
Click Next.
4 On Windows 2000, this will bring up a ! warning message
box telling you that server does not have the correct driver.
Click OK to configure a so-called local printer. XP skips this
interesting step.
Windows 2000 and Windows XP: Internet Print Protocol
5 Now you will be presented with a list of manufacturers and
printer models.Select a combination of manufacturer and
model
6 Note that you will not be given a choice of printer name.
The generated name will follow this syntax
<print driver name> on http://<URL:port>
The following example assumes installation of an HP Laser
Jet 4Si driver which, in fact, can be used on many different
physical printer models.
HP LaserJet 4Si on http://192.168.0.227:631.
7 You will not be given the opportunity to share the printer.
8 Decide whether or not you want a test page printed. Click
Next. The test page will not print until after the next step is
completed.
9 The final window will be presented. Click “Finish”.
Intermate100 and Intermate101 Print Server Administration Manual 30
Page 31

Windows 2000 and Windows XP: Internet Print Protocol
10 If you have chosen to print a test page in Step
8
, you will be
presented with a window explaining what is going on. If the
printout is ok, click OK. If you should need to choose
Troubleshoot, follow the on-line help instructions.
If you cannot connect to your printer using the general URL format above, please see your printer's documentation or contact
your network administrator.
Intermate100 and Intermate101 Print Server Administration Manual 31
Page 32

3. Windows NT 4.0
3.1. Introduction
The following protocols are supported
• “Standard TCP/IP Port” = Raw Socket (Port 9100,
Reverse Telnet) using the Intermate Port 9100 Print
Port.
• LPR (for standard ASCII data, e.g. PCL and PostScript)
using the Intermate LPR Print Port.
Windows NT 4.0: Introduction
What is a
“printer”
• LPR using the native LPR in Windows NT 4.0 (
LPR” [page 38]
In this chapter, the two types of protocols available on the
Intermate Print Port are covered first in the section
Intermate Pr int Port for Raw S o cket or LPR” [page 33]
In order to print properly from an LPR queue, a TCP/IP network-connected printer must have a card that supports LPD.
Note that the LPR port is best suited to servers that need to
communicate with host computers such as UNIX or VAX
machines by way of RFC 1179. For computers that need to
submit print jobs to host computers, the standard TCP/IP port
should be used in most cases.
In Windows, the definition of a “printer” consists of three elements:
.
“Native
“Using an
.
a a physical printer from a specific printer
manufacturer and of a specific type or model,
with a specific IP address
b a specific driver to be used (this driver may or
may not be from the same manufacturer)
c the port name to be used (port names are often
in themselves composed of two parts, for
example an IP address and a port).
Once defined, printers appear on the “Settings > Printer” function and they are presented on the list of printers you can
choose from whenever you use a Windows application on your
Intermate100 and Intermate101 Print Server Administration Manual 32
Page 33

Windows NT 4.0: Using an Intermate Print Port for Raw Socket or LPR
PC/ work station.
3.2. Using an Intermate Print Port for Raw Socket or LPR
3.2.1. Install the Print Port Program
The Print Port is a native 32 bit application included on the Intermate
Documentation and Utilities
rights to install this utility on NT, 2000, or XP.
After you execute the file
choose an
Socket (“Port 9100") Port just as you would choose any other
type of port when you install or modify the properties of a
printer definition
Intermate LPR Print Port or an Intermate Raw
.
3.2.2. Define Printer and Port
Note:
If you already have a printer definition installed and
wish to use it for printing via Raw Socket or LPR, you
can edit the port properties for this instead of
installing a new “printer driver”. This is done by rightclicking the printer's icon in the Printers window.
Select "Properties" from the drop-down menu.
Locate the port properties in the dialog box. Press
the “Add Port...” button. Perform steps
and click the “OK” button.
P17-xxxx.exe
CD.
You need administrative
, you will be able to
6
- 11 below
1 Open the Control Panel, for example by choosing "Settings
> Control Panel" from the Windows Start menu.
2 Open the Printers window by double-clicking the Printers
icon.
3 In the Printers window launch the Add Printer Wizard by
double-clicking the Add Printer icon.
Intermate100 and Intermate101 Print Server Administration Manual 33
Page 34
Windows NT 4.0: Using an Intermate Print Port for Raw Socket or LPR
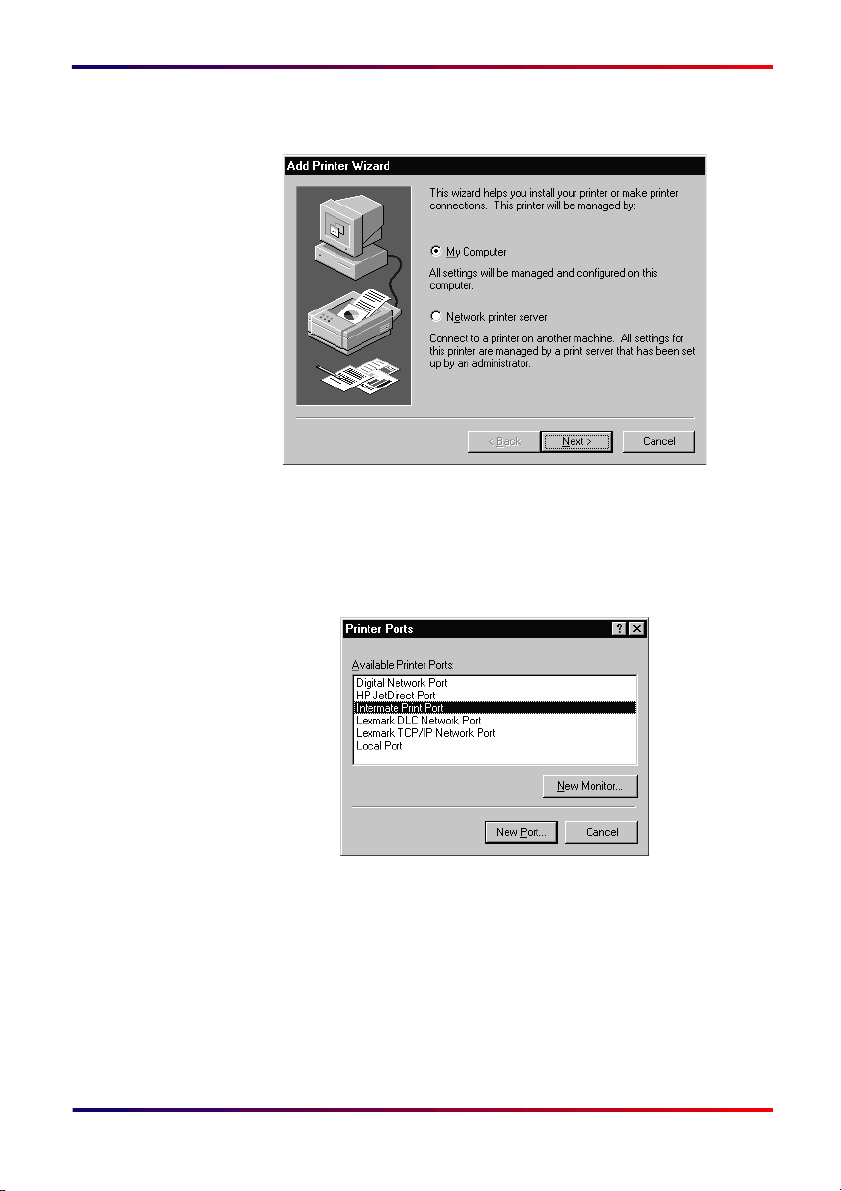
4 Choose “My Computer” (not “Network printer server”) and
then “Next”.
5 This will bring up a window prompting you for a port. Click
the “Add Port” button.
6 The Printer Ports dialog box opens. Select the "Intermate
Print Port" and click “New Port.”.
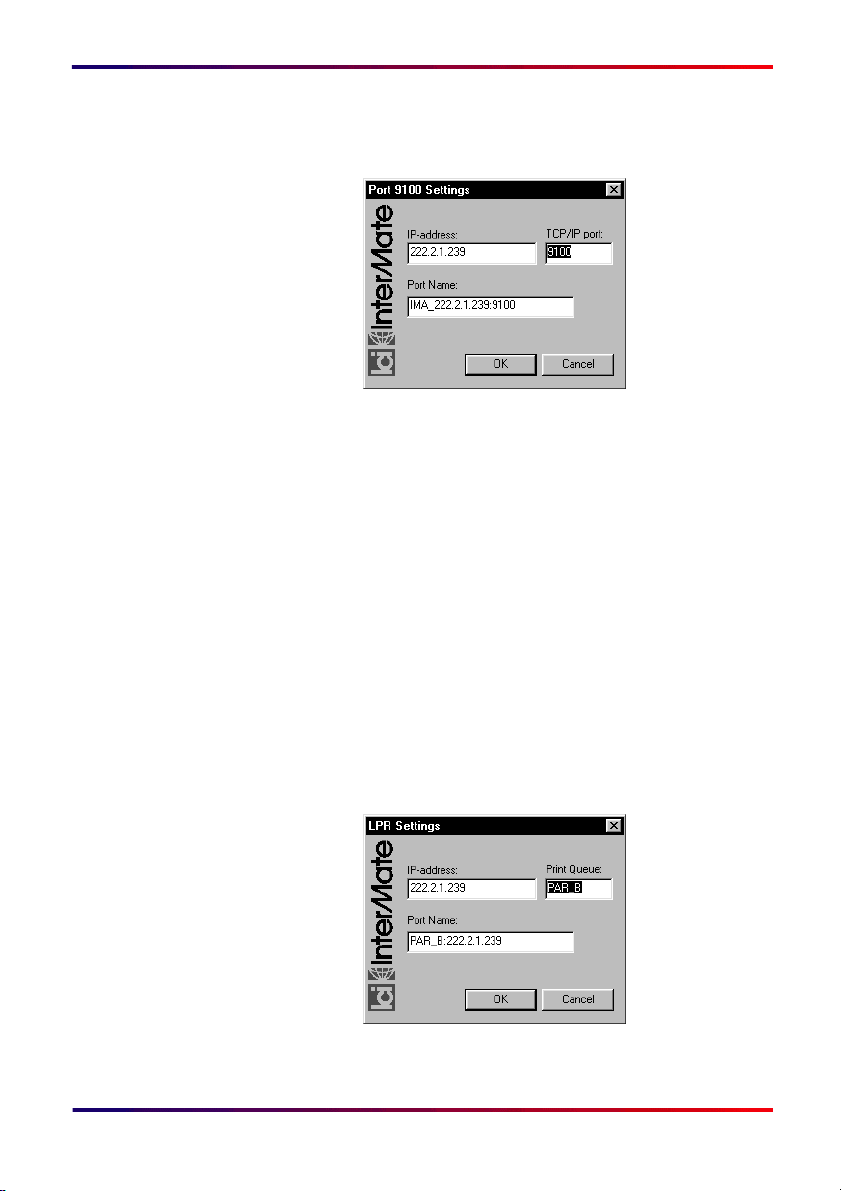
7 A small window will appear for configuring an Intermate
Print Port. Select a print protocol and click “OK”.
8 Now you will be presented with a small window for entering
the relevant values for the type of port selected.
9 For both types of ports, you will type the IP-address of the
Intermate100.
Intermate100 and Intermate101 Print Server Administration Manual 34
Page 35
Windows NT 4.0: Using an Intermate Print Port for Raw Socket or LPR
10 Configure the details for the protocol you selected in step
Setting up a Raw Socket Port (“Port 9100"
As explained in
[page 160]
“Raw Socket (= “Port 9100" = Reverse Telnet)”
, you can configure up to four different Raw Socket
)
7
services on your print server, and they cannot all be on the
actual printer port 9100. Correspondingly, you can type in any
valid port number in the “TCP/IP Port” field.
The “Port Name” generated will look something like this:
IMA_192.168.0.227:9100
and if you, for example, designate port 29100, the name generated will look like this:
IMA_192.168.0.227:29100
If you want to be sure of achieving bidirectional communication
with the physical target printer, please see
uration Tip: Ensuring Bidirectional Communication” [page 162]
“Raw Socket Config-
.
.
Setting up an LPR port
Intermate100 and Intermate101 Print Server Administration Manual 35
Page 36
Windows NT 4.0: Using an Intermate Print Port for Raw Socket or LPR
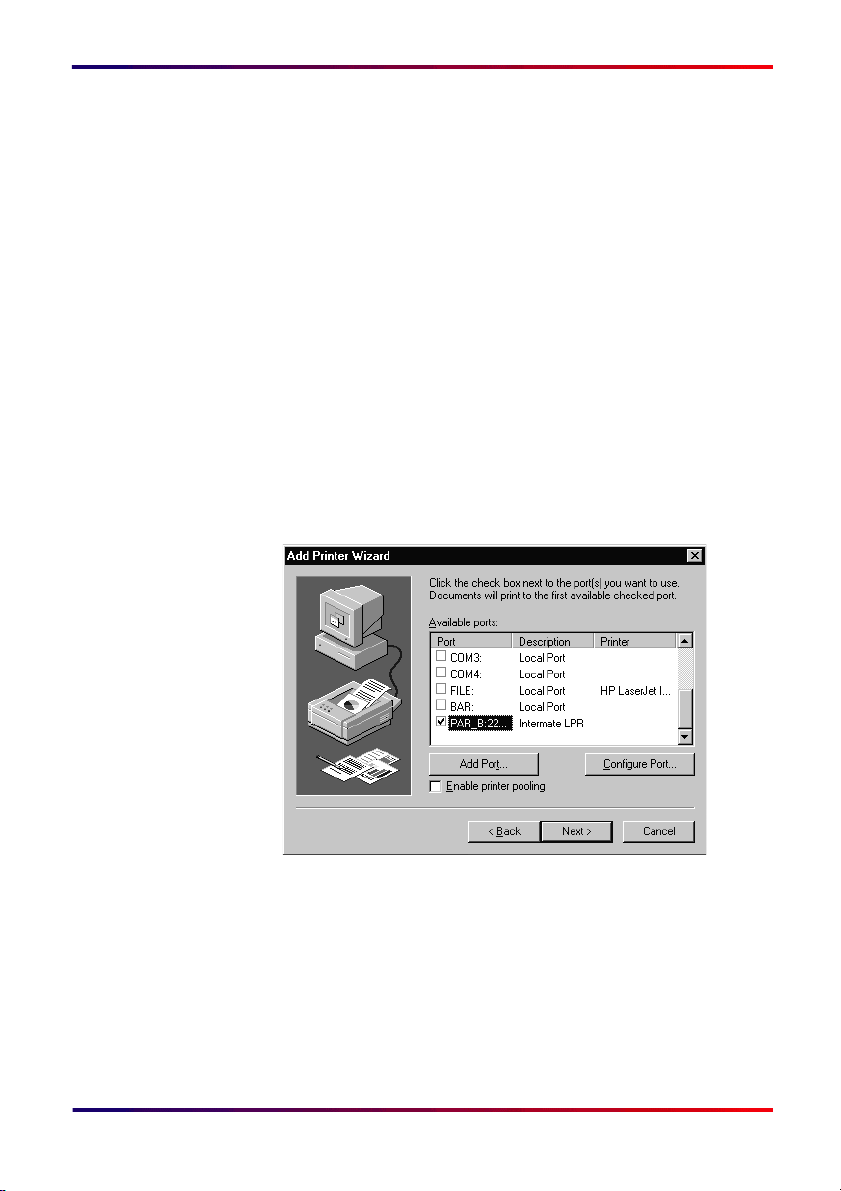
Print Queue: A default name PAR_B is shown. This is a
“binary” queue type which will print to Logical Printer 0. See
“LPR Print Queues (LPD Protocol)” [page 163]
if you need
information on queue types or want to change the queue
name. See
“Services in “Input Control”” [page 159]
if you
need help to understand what Logical Printer 0 is and how
you can choose another alternative.
Port Name: When you click on this field, a name will be
generated according to this syntax:
<print queue name>:<ip address>
You can change this name
11 Finish by clicking ”OK”. This will close the small window and
return you to the Add Printer Wizard.
12 A list of available ports appears next. Note that the new port
has been added to the list (the example below shows an
LPR port). Select it, if it is not already selected.
Click Next.
13 After a bit of a wait, you will be returned to the Add Printer
Wizard, where you will indicate the manufacturer and type
of printer. You may have to take a detour to fetch a type not
already available on the list.
Intermate100 and Intermate101 Print Server Administration Manual 36
Page 37

Windows NT 4.0: Using an Intermate Print Port for Raw Socket or LPR
14 If you already have a printer definition for this printer type,
you will be asked whether or not you want to keep the
existing driver. We advise your doing so.
Note:
Should you want to use a new driver or make other
adjustments to the printer definition, wait until you
are finished with the “Add Printer” procedure
described here. Choose “Settings > Printer”, rightclick on the new printer you have defined, and
choose “Properties”. There are six tabs full of
settings you can change.
15 You will be asked to “Name Your Printer.” If you have
several different “printer” definitions for the same physical
printer in your network, choose a name which will help to
keep track of them. On the same window you will be asked
whether or not you want the printer to be default for your
PC/work station.
16 Decide whether or not to share the printer. Click Next.
The rest of the instructions here assume that you do not
share the printer.
17 Decide whether or not you want a test page printed. Click
Next. The test page will not print until after the next step is
completed.
18 The final window will be presented. Click “Finish”.
19 If you have chosen to print a test page in Step
be presented with a window explaining what is going on. If
the printout is ok, click OK. If you should need to choose
Troubleshoot, follow the on-line help instructions.
Intermate100 and Intermate101 Print Server Administration Manual 37
17
, you will
Page 38
3.3. Native LPR
Prerequisite
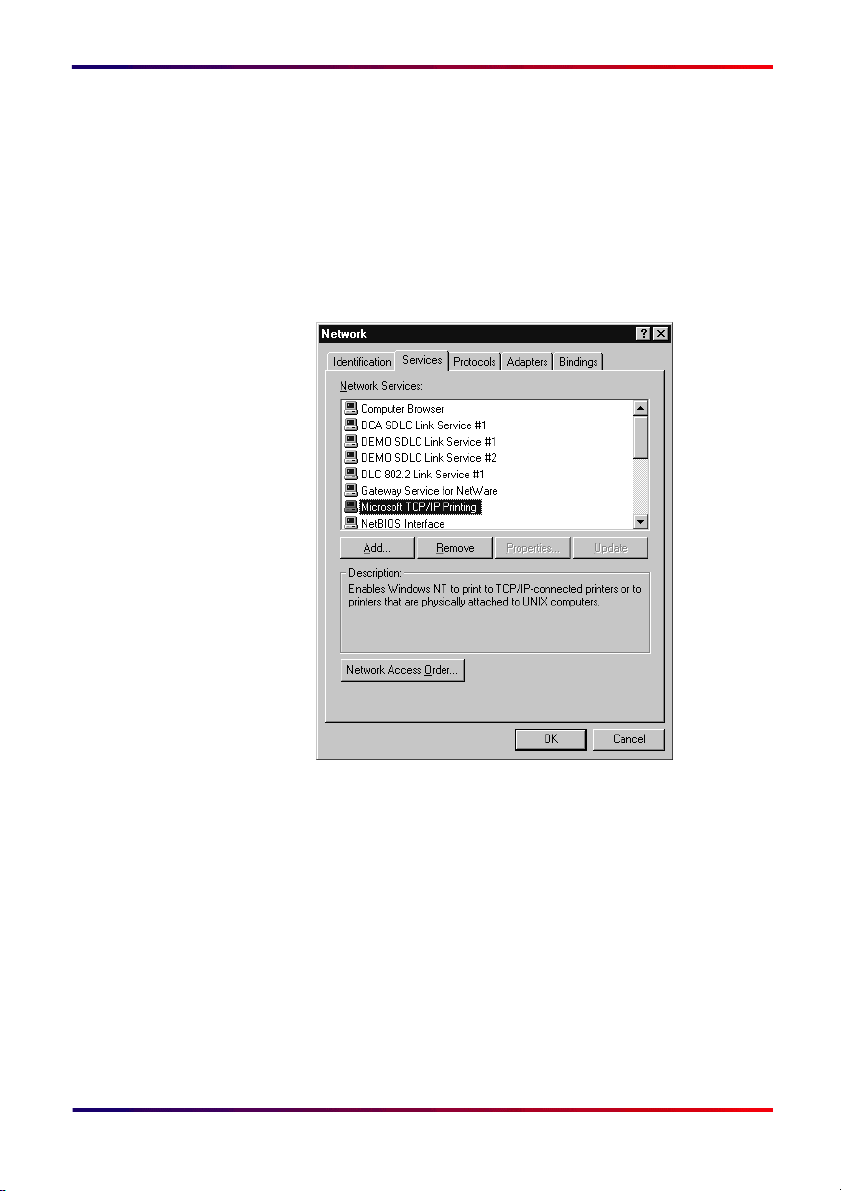
Using the Native LPR for Windows NT requires that you have
installed the Microsoft TCP/IP Printing network service. This is
done by clicking "Start > Settings > Control Panel > Network"
and choosing the “Services” tab.
.
Windows NT 4.0: Native LPR
If the service is not installed, then install it by clicking the
“Add..” button and following the on-screen instructions.
Setting up an LPR printer
1 Open the Control Panel, for example by choosing Settings
> Control Panel from the Windows Start menu.
2 Open the Printers window by double-clicking the Printers
icon.
3 In the Printers window launch the Add Printer Wizard by
double-clicking the Add Printer icon.
Intermate100 and Intermate101 Print Server Administration Manual 38
Page 39
Windows NT 4.0: Native LPR
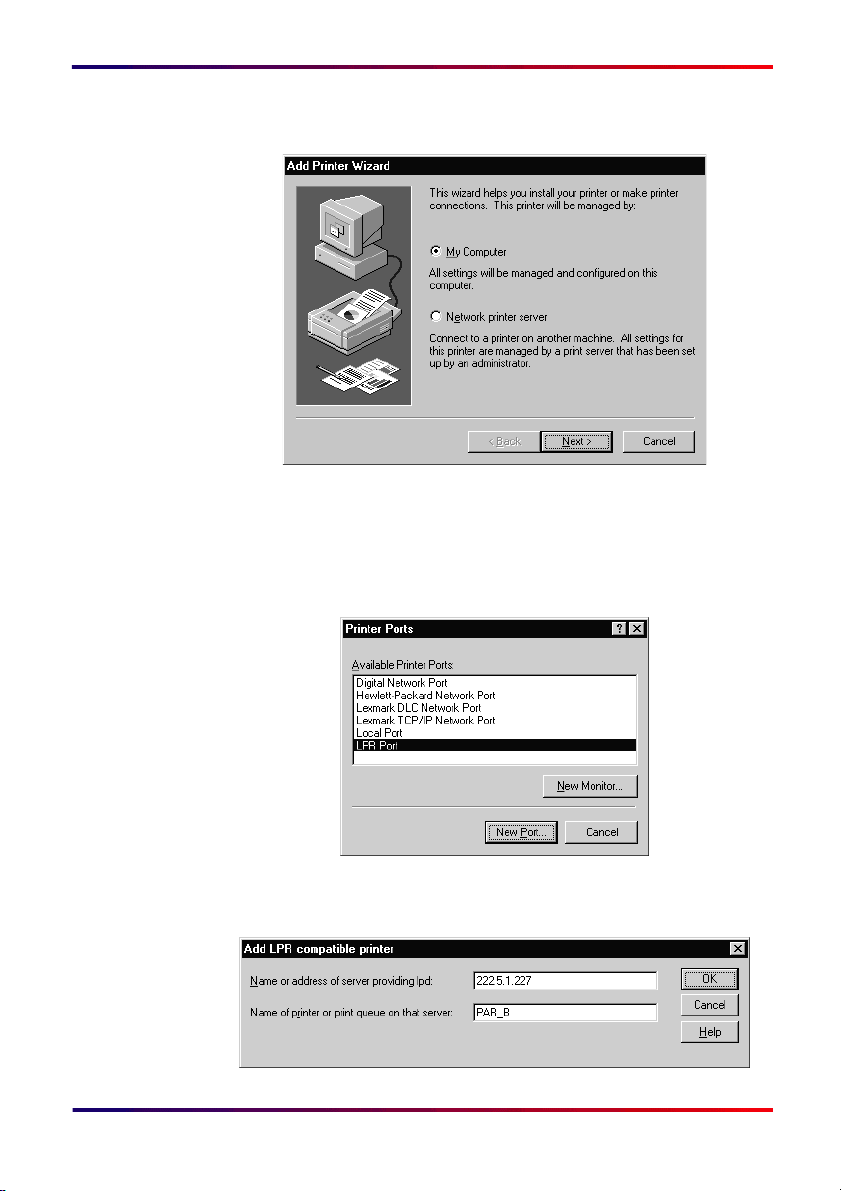
4 Choose “My Computer” (not “Network printer server”) and
then “Next”.
5 This will bring up a window prompting you for a port. Click
the “Add Port” button.
6 In the Printer Ports dialog box select the "LPR Port" and
click “New Port”.
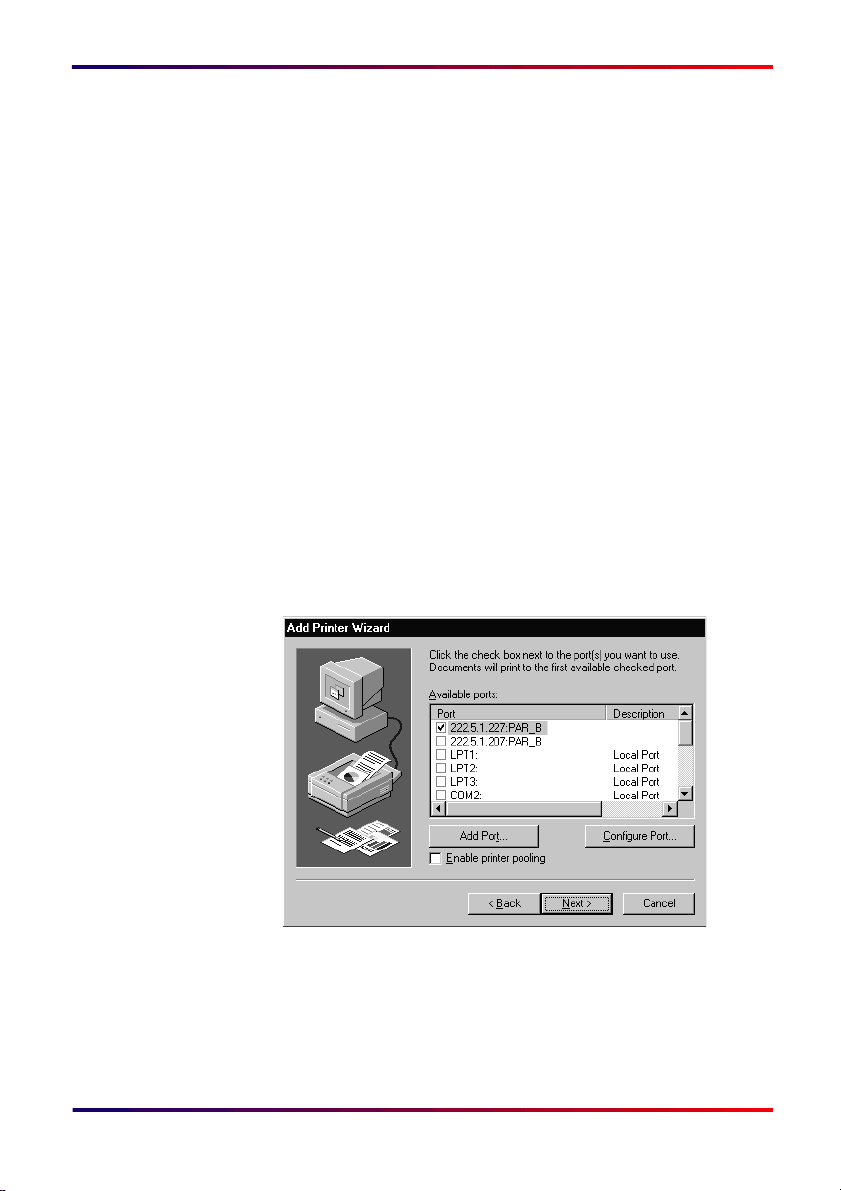
This will open the “Add LPR compatible printer” box.
7
Intermate100 and Intermate101 Print Server Administration Manual 39
Page 40
Windows NT 4.0: Native LPR
Type in the IP address or host name of the Intermate100 in
the “Name or address of...” field. If you use the host name,
a mapping of the name and IP address must be entered in
the hosts file. This is found in the directory
\<systemroot>\SYSTEM32\DRIVERS\ETC
The definition of <systemroot> depends on where your
operating system is installed and the name given to the toplevel folder. A typical <systemroot> is C:\winnt.
In the same box, enter a name for Print Queue.
If you have no special requirements, type in PAR_B.
This is a “binary” queue type which will print to Logical
Printer 0. See
“LPR Print Queues (LPD Protocol)” [page 163]
for information on permissible names and queue types.
Finish by pressing the |OK| button.
8 You will be returned to the Printer Ports dialog box, which
you will Close. This returns you to the listing of available
ports.
9 Choose the new port inserted in the list and click Next.
Intermate100 and Intermate101 Print Server Administration Manual 40
Page 41

Windows NT 4.0: Native LPR
10 After a bit of a wait, you will be returned to the Add Printer
Wizard, where you will indicate the manufacturer and type
of printer. You may have to take a detour to fetch a type not
already available on the list. Continue as shown in steps
19
, pages 37-37.
-
14
Intermate100 and Intermate101 Print Server Administration Manual 41
Page 42

4. Windows 95/98
4.1. Introduction
The following protocols are supported, provided that you install
the Intermate Print Port (
• Raw Socket (Port 9100, Reverse Telnet).
• LPR (for standard ASCII data, e.g. PCL and PostScript)
IN order to print properly from an LPR queue, a TCP/IPnetwork-connected printer must have a card that
supports LPD.
Note that the LPR port is best suited to servers that need to
communicate with host computers such as UNIX or VAX
machines by way of RFC 1179. For computers that need to
submit print jobs to host computers, the standard TCP/IP port
(such as Raw Socket) should be used in most cases.
The the installation process is split up like this:
•
“New “Printer”” [page 44]
already have a printer defined that you want to reconfigure
Windows 95/98: Introduction
page 43
).
; this can be skipped if you
“Add the Intermate Port 9100 or LPR printer port”
•
[page 46]
What is a
“printer”
In Windows, the definition of a “printer” consists of three elements:
a a physical printer from a specific printer
manufacturer and of a specific type or model,
with a specific IP address
b a specific driver to be used (this driver may or
may not be from the same manufacturer)
c the port name to be used (port names are often
in themselves composed of two parts, for
example an IP address and a port).
Once defined, printers appear on the “Settings > Printer” function and they are presented on the list of printers you can
Intermate100 and Intermate101 Print Server Administration Manual 42
Page 43

choose from whenever you use a Windows application on your
PC/ work station.
4.2. Install the Print Port Program
The Print Port is a native 32 bit application included on the Intermate
Documentation and Utilities
rights to install this utility on NT, 2000, or XP.
After you execute the file
choose an
Intermate LPR Print Port or an Intermate Raw
P17-xxxx.exe
Socket (“Port 9100") Port just as you would choose any other
type of port when you install or modify the properties of a
printer definition
.
CD.
Windows 95/98: Install the Print Port Program
You need administrative
, you will be able to
Intermate100 and Intermate101 Print Server Administration Manual 43
Page 44
4.3. New “Printer”
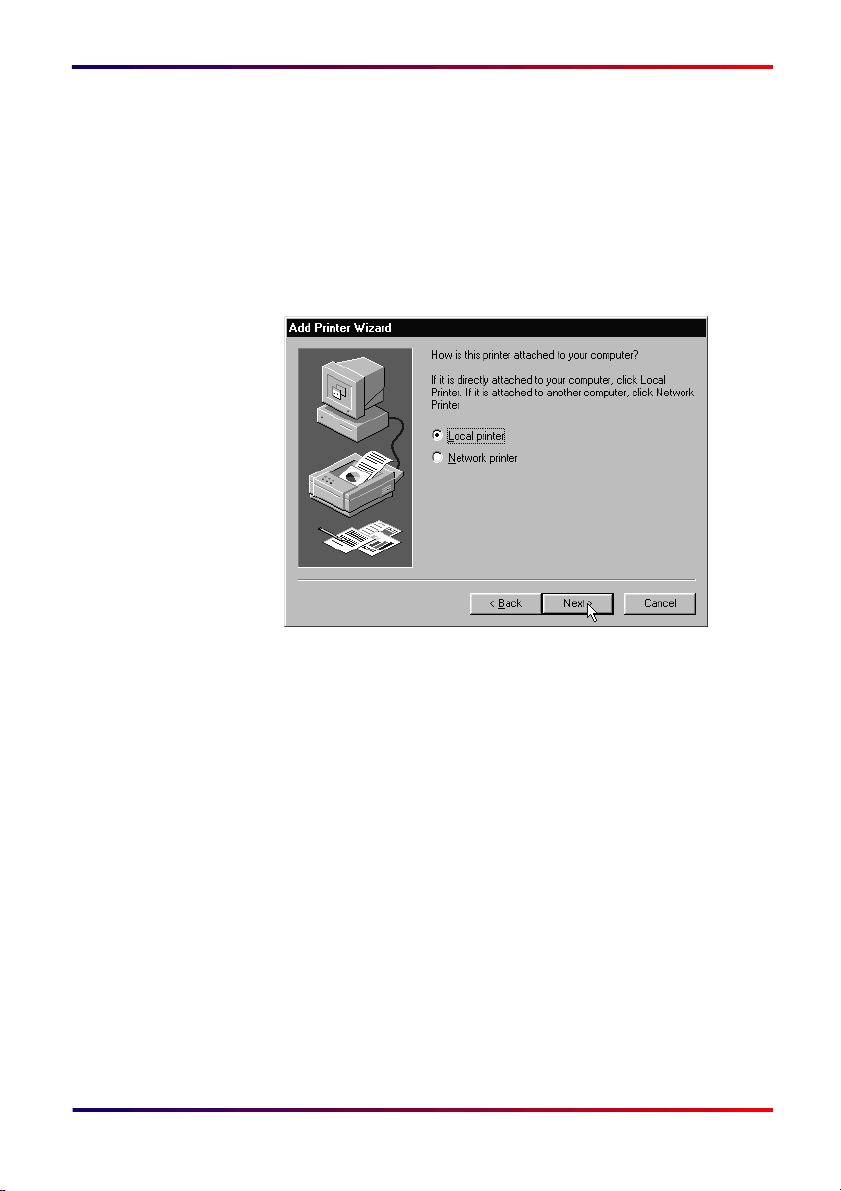
1 Open the Control Panel by choosing Start > Settings >
Control Panel. Double-click the Printers icon.
2 Double-click the Add Printer icon. This launches the Add
Printer Wizard. Click the "Next>" button.
3 Mark the "Local printer" option in the printer attachment
screen. Click "Next>".
Windows 95/98: New “Printer”
Intermate100 and Intermate101 Print Server Administration Manual 44
Page 45
Windows 95/98: New “Printer”
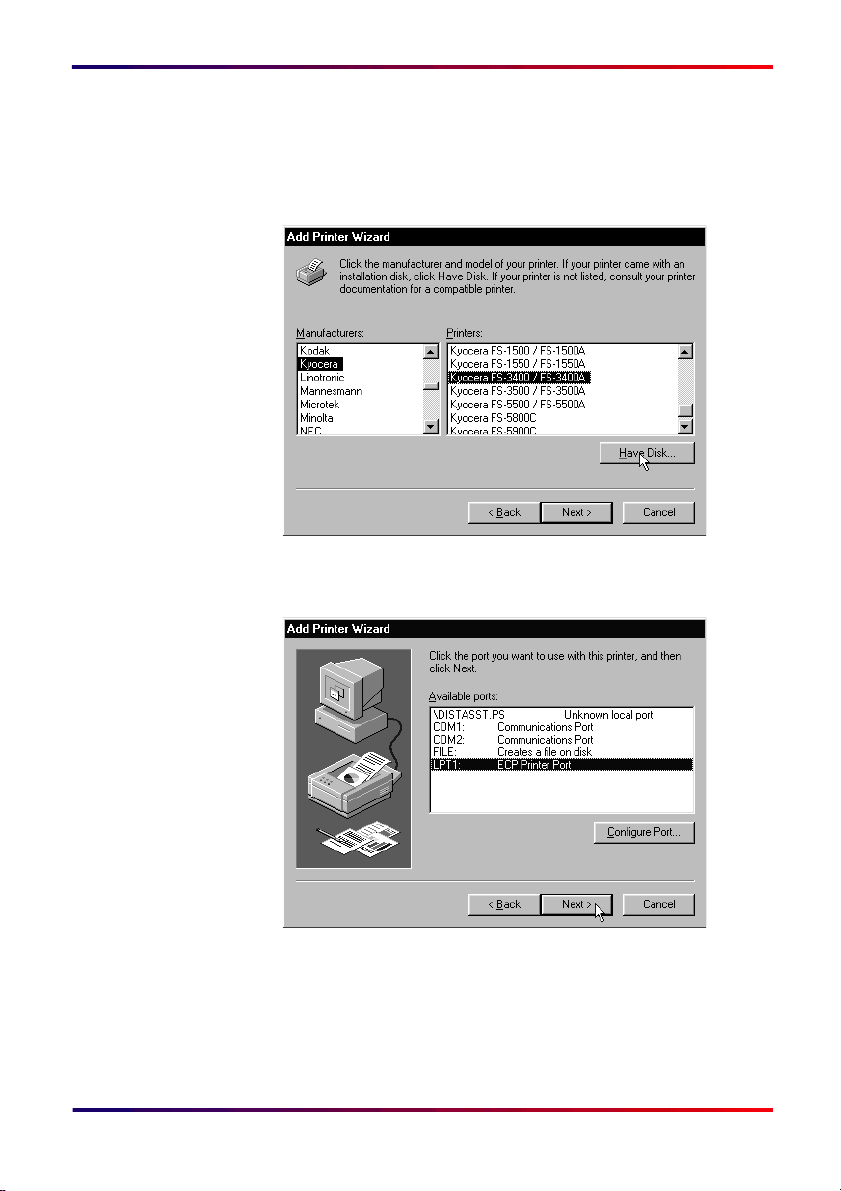
4 Choose the manufacturer of your printer and select the
printer type. If your printer is not in the list, click the “Have
Disk...” button and insert the media (e.g. the printer driver
CD, a floppy disk, a directory path etc.) which holds your
printer driver information. Click “Next>”.
5 Highlight the "LPT1" printer port in the list of available ports.
Click "Next>".
6 Type a suitable printer name in the dialog box appearing
next, e.g. Kyocera FS-3700+. Specify if you want the
printer to be the Windows default printer. Click ”Next”.
7 Answer "No" to printing of a test page. Click “Finish”.
Intermate100 and Intermate101 Print Server Administration Manual 45
Page 46
Windows 95/98: Add the Intermate Port 9100 or LPR printer port
8 If a printer driver is not installed on your PC, you are asked
to insert the Windows 95/98 CD-ROM.
9 Wait for the printer driver to be copied to your PC. The new
printer is created in the Printers window.
The printer driver is now installed on your system. Continue
with the procedure below.
4.4. Add the Intermate Port 9100 or LPR printer port
1 Open the Printers window.
2 Right-click the icon of the printer you wish to set up. Choose
"Properties" in the drop-down menu.
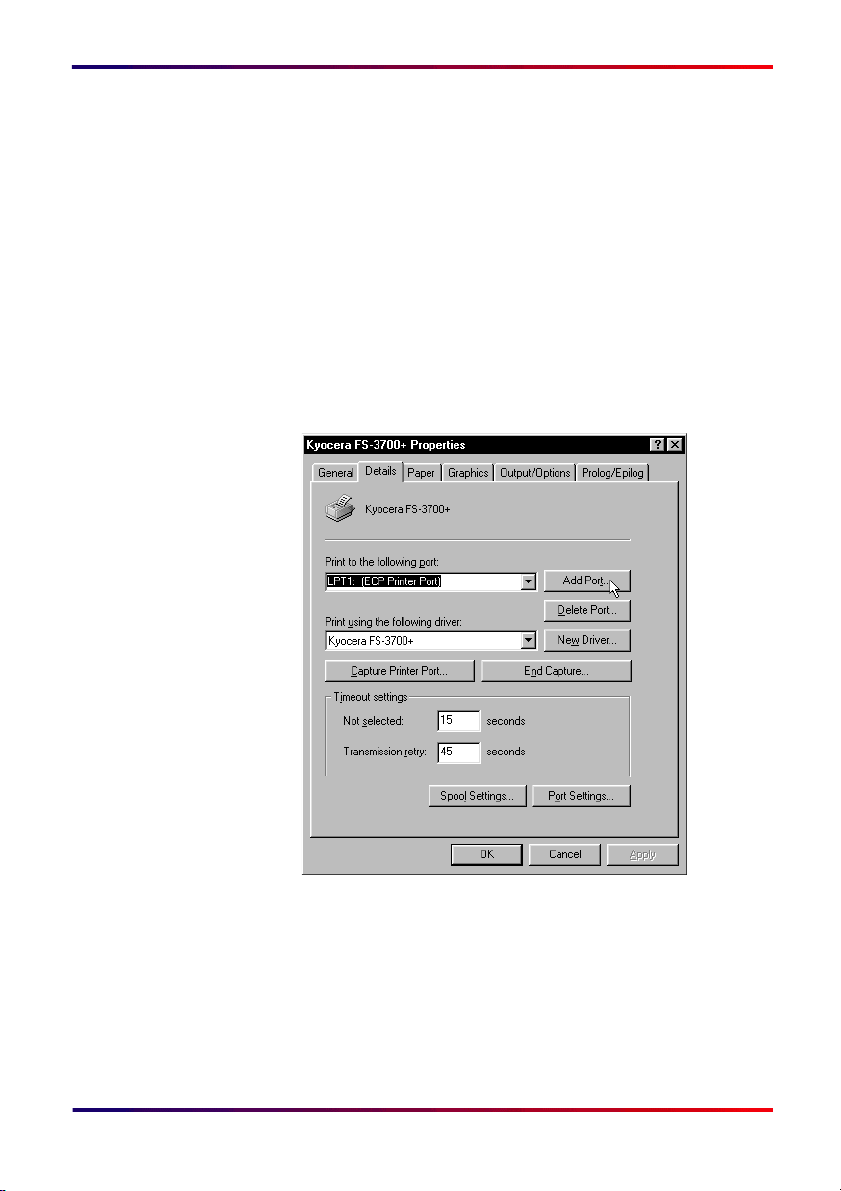
3 Click the “Add Port...” button. Here it is found in the
"Details" section.
Intermate100 and Intermate101 Print Server Administration Manual 46
Page 47
Windows 95/98: Add the Intermate Port 9100 or LPR printer port
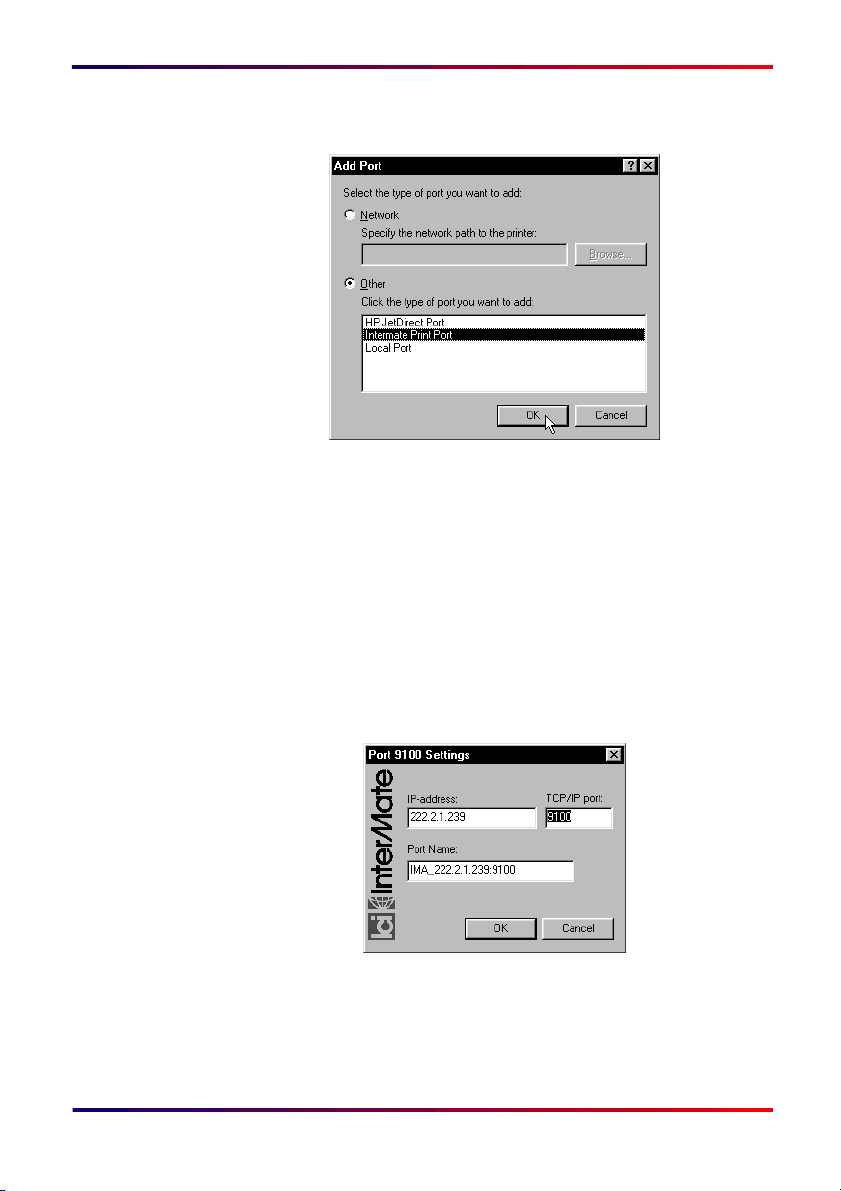
4 Choose "Other" and highlight the "Intermate Print Port" in
the "Add Port" dialog box. Click the “OK” button.
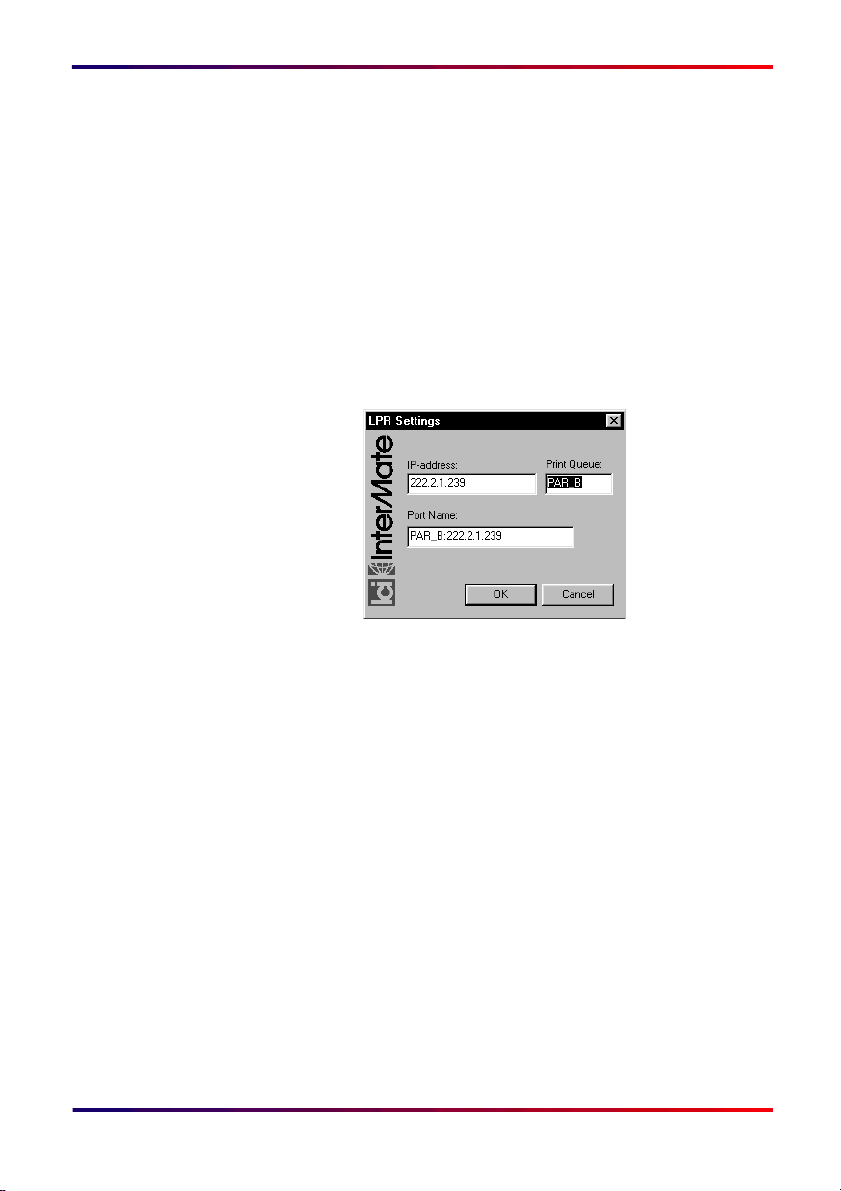
5 A small window will appear for configuring an Intermate
Print Port. Select a print protocol and click “OK”.
6 Now you will be presented with a small window for entering
the relevant values for the type of port selected.
7 For both types of ports, you will type the IP-address of the
Intermate100.
8 Configure the details for the protocol you selected in step
Setting up a Raw Socket Port (“Port 9100"
As explained in
[page 160]
“Raw Socket (= “Port 9100" = Reverse Telnet)”
, you can configure up to four different Raw Socket
)
5
services on your print server, and they cannot all be on the
actual printer port 9100. Correspondingly, you can type in any
Intermate100 and Intermate101 Print Server Administration Manual 47
.
Page 48
Windows 95/98: Add the Intermate Port 9100 or LPR printer port
valid port number in the “TCP/IP Port” field.
The “Port Name” generated will look something like this:
IMA_192.168.0.227:9100
and if you, for example, designate port 29100, the name generated will look like this:
IMA_192.168.0.227:29100
If you want to be sure of achieving bidirectional communication
with the physical target printer, please see
uration Tip: Ensuring Bidirectional Communication” [page 162]
“Raw Socket Config-
.
Setting up an LPR port
Print Queue: A default name PAR_B is shown. This is a
“binary” queue type which will print to Logical Printer 0. See
“LPR Print Queues (LPD Protocol)” [page 163]
if you need
information on queue types or want to change the queue
name. See
“Services in “Input Control”” [page 159]
if you
need help to understand what Logical Printer 0 is and how
you can choose another alternative.
Port Name: When you click on this field, a name will be
generated according to this syntax:
<print queue name>:<ip address>
You can change this name
9 Finish by clicking OK.
10 Continue with any further customizing of the printer
properties. Click “OK” to finish.
11 Wait while the printer device is created.
Intermate100 and Intermate101 Print Server Administration Manual 48
Page 49

Windows 95/98: Add the Intermate Port 9100 or LPR printer port
12 Make a test print-out from a Windows application. Check
the page is okay.
This completes the setup of the printer.
Intermate100 and Intermate101 Print Server Administration Manual 49
Page 50

Novell Netware (LPR via pure IP):
5. Novell Netware (LPR via pure IP)
The combination of standard LPD and SNMP implementations
in the print server will support the standard NDPS Gateway
delivered with NetWare 5, thus providing a controlled bi-directional print method.
Consult your NetWare documentation for help in setting up a
printer agent and setting up the printer in the Novell Print Manager.
Note:
For information on LPD in your Intermate print server, see
“LPR Print Queues (LPD Protocol)” [page 163]
Pre-requisites are that IP has been set up on the
Novell file server; and that NDPS Broker and NDPS
Manager have been set up and started.
in this manual.
Intermate100 and Intermate101 Print Server Administration Manual 50
Page 51

Apple LaserWriter (LPR only): Introduction
6. Apple LaserWriter (LPR only)
6.1. Introduction
The LPR printing protocol is based on TCP/IP, which requires
the LaserWriter 8.5.1 printing software installed on the computer from which print jobs are sent.
The LaserWriter software is available on Mac OS 8.1.
Mac OS 7.5 through Mac OS 7.6.1 require separate installation
of the LaserWriter 8.5.1 printing software; see
Earlier” [page 53]
An appropriate print driver must be installed on your computer
before proceeding with the steps shown below.
.
“Mac OS 7.5 or
Intermate100 and Intermate101 Print Server Administration Manual 51
Page 52

6.2. Mac OS 8.1 (and higher)
To set up for printing
1 Launch the Desktop Printer Utility.
2 Select “Printer (LPR)” and click the “OK” button.
3 View the PostScript Printer Descripti on (PPD) File section
and click “Change...”.
4 Select the PPD for your printer.
5 In the Internet Printer section click “Change...”.
6 “Printer Address”: Enter the IP address of the print server.
7 “Queue Name”: This name must be known to the print
server; see
8 Click “Verify” to verify that the printer can be found.
9 Click the “OK” button.
10 Go to the File menu and select “Save”.
“LPR Print Queues (LPD Protocol)” [page 163]
Apple LaserWriter (LPR only): Mac OS 8.1 (and higher)
.
11 Enter the name and location of the desktop printer icon.
The default name is the IP address of the printer and the
default location is the desktop. Click the “OK” button.
12 Quit.
Intermate100 and Intermate101 Print Server Administration Manual 52
Page 53

6.3. Mac OS 7.5 or Earlier
On operating systems older than Mac OS 7.5, the LPR protocol is not supported. For these systems a LPR client has to be
installed. LPR clients are available as freeware and as commercial programs from third party vendors. Look for example at
the below addresses on the Internet.
http://www.tucows.com/perl/tucowsSearch?word=LPR&key=all&platform=mac
http://aos.ascend.com/aos:/gennavviewer.html?doc_id=0900253d80006cfa&doc_header=terminal
Refer to the help provided with the software for information on
installation and usage.
Apple LaserWriter (LPR only): Mac OS 7.5 or Earlier
Intermate100 and Intermate101 Print Server Administration Manual 53
Page 54

7. AIX
7.1. Topics Covered
Basic services without emulations
•
“LPR (ASCII)” [page 55]
•
“FTP” [page 56]
IPDS
Unless you have a license key for this Host Print Option
(HPO), IPDS prints in “Demo/Test” mode with a banner printed
across each printed page .
•
“IPDS with PSF/6000” [page 57]
• For settings on the print server, please consult the
IPDS sections in the Printing Environment Guide for
IBM Mainframes or in the Printing Environment Guide
for OS/400 Systems.
AIX: Topics Covered
Finally, there is a section on
“General Printing Problems for AIX” [page 58]
Intermate100 and Intermate101 Print Server Administration Manual 54
.
Page 55

7.2. LPR (A SCII)
The AIX platform integrates the LPD protocol seamlessly into
the normal print spooling system. Setting up an LPD print
queue is therefore easy.
Initialization Screen
On the host, execute the command smit mkqu to get the initialization screen for a new remote print queue. Fill in the fields
described below.
Field Comments
Name of queue to add: A name for the print queue you want to add to the
AIX: LPR (ASCII)
system. Any name that complies with syntax
requirements will do.
Destination Host:
Name of remote queue: Typed in. You can use one of the pre-configured LPR
Name of device to add:
192.168.0.227
The IP address you have assigned to the print server.
queues, al l of wh ich will direct the ou tp u t to Log i ca l
Printer 0.
PAR_A
PAR_B
PAR_AF
PAR_BF
Or you can define your own name (max 8 characters)
for any one of the eight configurable queues and
associate the desired characteristics as explained in
“LPR Print Queues (LPD Protocol)” (page 163)
PAR_BFd
Insert a name for th e q ue u e de vi ce to crea te for th e
print queue. Any name will do. For instance the queue
name with a 'd' ap p e nd e d.
ASCII tran sfe r (LF = > LF- C R
conversion).
Binary transfer, no conversion.
Same as ASCII transfer but wi th
Form Feed.
Same as binary but with Form Feed.
Leave the remaining fields at their default values and press
<Enter> to activate the new settings.
Intermate100 and Intermate101 Print Server Administration Manual 55
Page 56

7.3. FTP
AIX: FTP
How to Print LPD
You can now use qprt to place jobs in the print queue.
lpr and lp commands are also supporte d.
We do not recommend using FTP for printing over this print
server
manually from the command line. The required steps for each
job are described in
A better way of getting the AIX system to send print jobs using
the FTP protocol is be utilizing the script capabilities of the AIX
to make automatic handling possible.
because using it can only be done by giving a command
“FTP Print” [page 164]
.
Intermate100 and Intermate101 Print Server Administration Manual 56
Page 57

7.4. IPDS with PSF /60 00
AIX: IPDS with PSF/6000
Tip:
See the chapter Installing a TCP/IP-attached IPDS
printer in the PSF/6000 Print Administration manual
for further information.
7.4.1. Create a new IPDS printer definition
To create a new IPDS printer definition in PSF/6000 execute
the command smit psf_add_prt_tcpip to get the PSF/6000 SMIT
Printer Definition for TCP/IP attached IPDS printers.
Fill in the fields described below.
Field Comments
Printer Name:
Internet Address:
Port Number:
No. of Queue
Devices:
IMA100
Enter a name for the IPDS printer. This name is also used for the print queue
associated with the printer.
192.168.0.227
Enter the Host name (preferred) or the IP address you have assigned to the
Intermate100.
If you use the Host name PSF/6000 resolves it into an IP address either through the
hosts file or through a Domain Name Server (DNS).
5001
Always leave this entry at
4
Initially leave this at the default value. You can tune the option later, according to the
throughput of the printer.
5001
.
Connect Timeout:
30
Initially leave this at the default value. Refer to the PSF/6000 on-line help for
information about when to increase this value.
Press <Enter> to create the new IPDS printer definition.
Intermate100 and Intermate101 Print Server Administration Manual 57
Page 58

AIX: General Printing Problems for AIX
7.4.2. Checking and Using the IPDS Connection
You can check the connection by using the enq command to
place jobs in the queue.
enq -P'psfqueue' -odatat='AFPDS'
/home/afpjobs/afpguide.afp
You can also use the command smit psf_data_type_sel to
enqueue the job.
7.5. General Printing Problems for AIX
Check the following areas, if you encounter problems when
printing from an AIX system and the general troubleshooting
procedures listed in
helped.
1 Check the BOOTP setup in the/etc/bootptab file.
• Did the print server receive a host name and IP address?
2 Try to refresh or stop and start the Inetdaemon
(stopsrc -s inetd and startsrc -s inetd).
“Troubleshooting” [page 245]
have not
3 Check that the BOOTP server is active.
• use smit inetdconf to verify.
• use smit mkinetdconf to append BOOTP.
4 Are the host name, IP address and hardware address set
up correctly?
• see /etc/hosts for host name / IP address relation.
• use arp -a for hardware address / host name or IP
address relations.
5 LPD: Is the queue correctly configured?
• use smit, qchk, lpq or lpstat.
• see /etc/qconfig
You may need to refer to the AIX manual Problem Solving
Guide and Reference, document no. SC23-2204, chapter 8
Intermate100 and Intermate101 Print Server Administration Manual 58
Page 59

8. OS/2 2.x and OS/2 Warp
8.1. Topics Covered
Basic services without emulations
•
“LPR (ASCII data, e.g. PCL and Postscript)” [page 60]
OS/2 2.x and OS/2 Warp: Topics Covered
• FTP. For information on FTP printing, please see
Print” [page 164]
IPDS
Unless you have a license key for this Host Print Option
(HPO=, IPDS prints in "Demo/T est" mode with a banner printed
across each printed page .
• The sec tion on
to define an IPDS printer.
• For settings on the print server, please consult the
IPDS sections in the Printing Environment Guide for
IBM Mainframes or in the Printing Environment Guide
for OS/400 Systems.
.
“IPDS from PSF/2” [page 64]
“FTP
covers how
Intermate100 and Intermate101 Print Server Administration Manual 59
Page 60
OS/2 2.x and OS/2 Warp: LPR (ASCII data, e.g. PCL and Postscript)
8.2. LPR (ASCII data, e.g. PCL and Postscript)
8.2.1. Create a new printer and queue
1 Select the OS/2 Template folder.
2 Right-click the Printer icon and drag it on to the desktop,
while holding down the mouse button. Release the mouse
button.
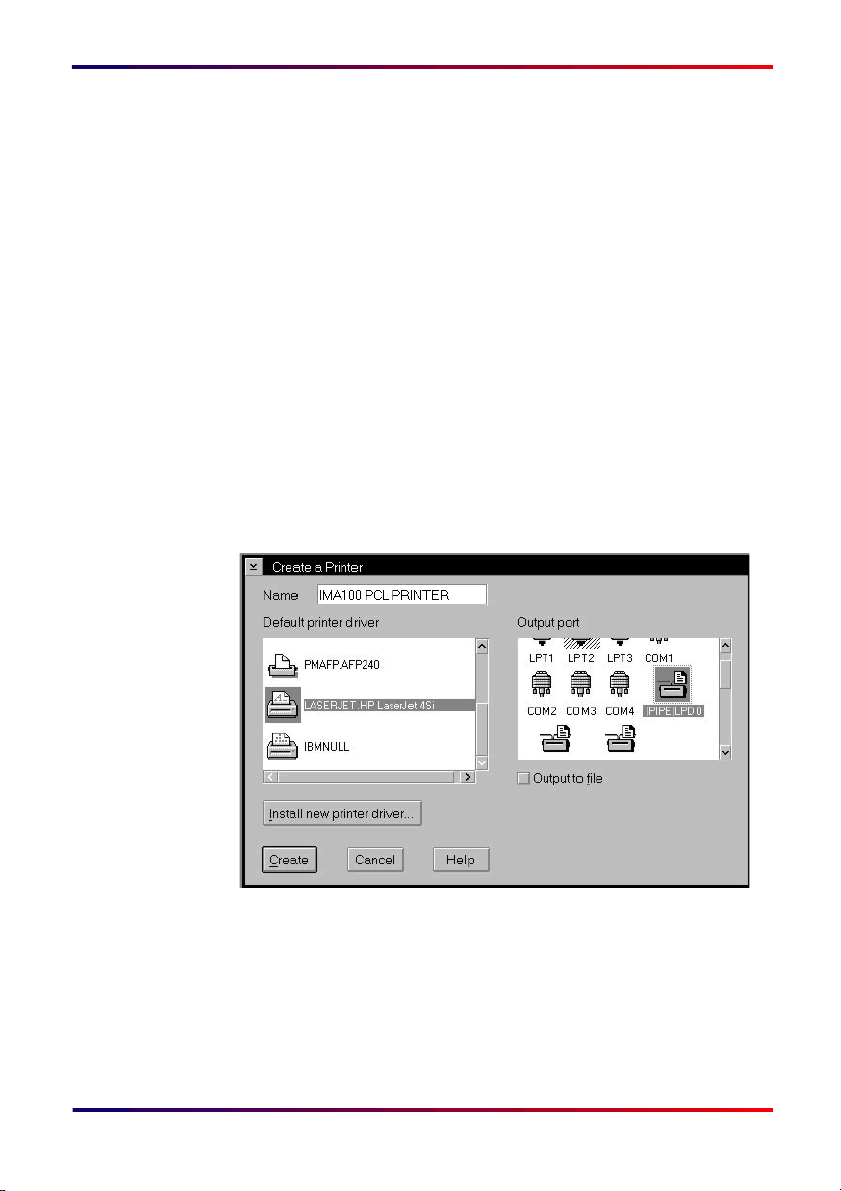
3 In the Create Printer dialog enter the printer name and
select the "Default printer driver" to use with the printer.
Tip:
If you need to install a new printer driver, then click
on the “Install new printer driver..” button. Select an
"Output Port". The port has to be one of the LPD
pipes \PIPE\L PD(X) . If there is no free LPD pipe the
number of pipes can be increased in the TCP/IP
Configuration menu
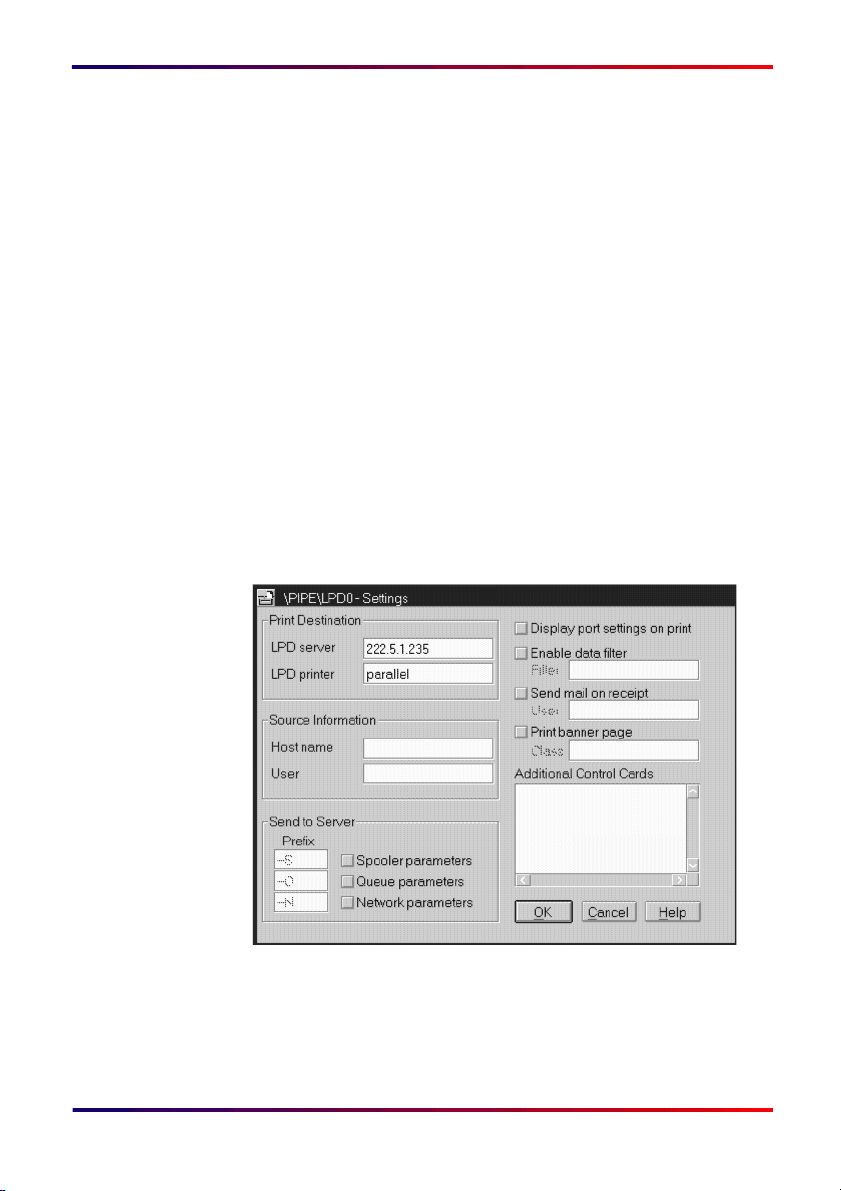
4 The \PIPE\LPD(X) - Settings dialog box will present itself
(see next page). Define “Print Destination” with two
parameters:
a LPD server = the Intermate100 by IP address
or the Host name.
Intermate100 and Intermate101 Print Server Administration Manual 60
Page 61
OS/2 2.x and OS/2 Warp: LPR (ASCII data, e.g. PCL and Postscript)
b LPD printer = queue name. Type in one of the
queue names defined in the print server. You
can use one of the pre-configured LPR
queues, all of which will direct the output to
Logical Printer 0.
• PAR_A
ASCII transfer (LF => LF-CR conversion).
• PAR_B
Binary transfer, no conversion.
• PAR_AF
Same as ASCII transfer but with Form Feed.
• PAR_BF
Same as binary but with Form Feed.
Or you can define your own name (max 8 characters)
for any one of the eight configurable queues and
associate the desired characteristics as explained in
“LPR Print Queues (LPD Protocol)” [page 163]
.
.
5 Click “OK”, which will return you to “Create Printer”, and
finish by clicking “Create”.
Intermate100 and Intermate101 Print Server Administration Manual 61
Page 62

OS/2 2.x and OS/2 Warp: LPR (ASCII data, e.g. PCL and Postscript)
6 An OS/2 printer device and queue is now created and the
print server is ready to receive print from any OS/2
application.
8.2.2. Print using LPR command from the Command Line
When printing from the OS/2 command line the command LPR
can be used.
LPR -b -s<server> -p<queue> <file>
Element Replace with
<server>
<queue>
<file>
The IP address or the Host name of the print server.
a queue name as defined in 4b above,
The name of the file to print.
page 60
.
Example: Type the following line to print the file config.sys
from the command line, using the default pre-configured queue
name (PAR_B) from the print server.
LPR -b -s192.168.0.227 -ppar_b config.sys
8.2.3. Print from WIN-OS/2 using the LPRMON command
The LPRMON command is used to monitor one of the parallel
ports LPT1 - LPT3 and to redirect print data from the parallel
port to the TCP/IP LPD port. If you want to print from WINOS/2, and you do not have the DOS/Windows TCP/IP access
kit, you can use the LPRMON command.
LPRMON -b -s<server> -p<queue> LPT<n>
Element Replace with
<server>
<queue>
<n>
The IP address or the Host name of the printer.
a queue name as defined in 4b above,
Number of the parallel port to redirect.
page 60
Example: Type the following command to redirect the LPT3
port to the TCP/IP LPD port.
LPRMON -b -s192.168.0.227 -ppar_b LPT3
Intermate100 and Intermate101 Print Server Administration Manual 62
Page 63

OS/2 2.x and OS/2 Warp: LPR (ASCII data, e.g. PCL and Postscript)
8.2.4. To obtain status from the TCP/IP LPD connected printer
The command LPQ can be used to obtain the status of the
printer.
LPQ -l -s<server> -p<queue>
Element Replace with
<server>
<queue>
8.2.5. Troubleshoo ting
Sending a print job to an LPR print queue when the lprportd
program is not running, results in an error indication. To solve
the problem the print job has to be deleted from the queue, and
the lprportd program has to be started afterwards. If this does
not help, the server will probably have to be rebooted.
The IP address or the Host name of the printer.
a queue name as defined in 4b above,
page 60
Intermate100 and Intermate101 Print Server Administration Manual 63
Page 64

8.3. IPDS from PS F/2
This section deals with how to set up PSF/2 which makes it
possible to print IPDS data to a LAN attached printer with an
installed Intermate100 using TCP/IP.
If you need to know how to connect PSF/2 to an IBM host to
receive AFP and IPDS data, please refer to your PSF/2 documentation,
System requirements
• OS/2 version 2.11 or newer
• DB/2 version 1.0 or newer
• PSF/2 version 1.1 or newer (check with your point of
purchase for recommended CSD levels or contact
support)
• TCP/IP version 2.0 (CSD UN56401) or newer
To create a new printer
1 Start the PSF/2 control panel by selecting PSF/2 Folder >
PSF/2 - Control Panel icon.
OS/2 2.x and OS/2 Warp: IPDS from PSF/2
2 In the Control Panel select Profile > New. The PSF/2 New
Device dialog box appears.
Enter the "Device Name" and the "Description". Select the
desired IPDS "Device Resolution" (240 dpi or 300 dpi).
Do NOT select a resolution which is not supported. Note
that the default resolution in the Intermate100 is 300 dpi.
3 Select TCP/IP as "Attachment Type" and click on the
"Settings" button. The "TCP/IP Settings" dialog box
appears.
Enter the IP address of the printer. The TCP/IP Port
Number has to be 5001. Select "OK" and then "Create".
The PSF/2 printer device is now created and is ready to
print from a PSF/2 connected IBM host.
4 In the PSF/2 - Control Panel select the "Options > Setup
Queues". The "Setup Queues" dialog box appears.
Intermate100 and Intermate101 Print Server Administration Manual 64
Page 65

OS/2 2.x and OS/2 Warp: IPDS from PSF/2
5 Enter the "Queue name" and "Description". Select the
"Device". Click on “Setup”.
An OS/2 print queue is now created and the printer is ready
to print IPDS from OS/2 and a PSF/2 connected host.
Note:
Y ou can check the connection using the PSF/2 Print
Submitter. A number of AFP print files are delivered
with the PSF/2 package. Any of these files can be
submitted to the newly created print queue.
For settings on the print server, please consult the IPDS sections in the Printing Environment Guide for IBM Mainframes or
in the Printing Environment Guide for OS/400 Systems.
Intermate100 and Intermate101 Print Server Administration Manual 65
Page 66

TOOLS FOR MANAGEMENT
AND CONFIGURATION
Intermate100 and Intermate101 Print Server Administration Manual 66
Page 67

9. HTTP (Browser)
9.1. Prerequisites
The following description assumes that you have already
assigned an IP address to the Intermate1xx.
If the instructions in the brochure Getting Started or the onboard Quick Guide haven’t met your needs, refer to
Chapter 13
tary explanations and instructions for other methods.
You may have to set up an IP-route in order for the browser to be
able to connect to the
network administrator.
You need a browser which supports frame-sets and Java
Script.
“[TCP/IP]” [page 103]
Intermate1xx
HTTP (Browser): Prerequisites
where there are supplemen-
. If you are in doubt, ask your
Intermate100 and Intermate101 Print Server Administration Manual 67
Page 68

9.2. How T o Connect
Type the IP address for the Intermate1xx in the address field of
the browser. For example:
http://192.168.0.227
The browser’s Title Bar will show the print server name and
brand followed by a hardware address in parentheses; the
name of the browser usually concludes the information on the
Title Bar.
The hardware address shown will be the global MAC address
(as described in
set a “local MAC Address” (as described in
Address” [page 11 1]
“Hardware” [page 229]
.
HTTP (Browser): How To Connect
unless you choose to
“Enable Local MAC
Intermate100 and Intermate101 Print Server Administration Manual 68
Page 69

HTTP (Browser): Menu Items and Groups Before Login
9.3. Menu Items and G roups Before Login
The menu items are presented in the following four groups:
• Actions
•Status
•Help
•Links
“Actions”
In the starting menu, the only action listed is “login”. After your
login, the content of “Actions” will change and a whole new
group, “Configurations”, will be added.
The menu items in the next three groups remain constant and
the groups remain placed at the bottom of the menu bar, so
after login, you may need to scroll down to find them.
•“Status” includes several parti al or speciali zed types of
status which are displayed on screen. We will return to
these in the chapter on Monitoring, starting with
“Status” Group on the HTTP Menu” [page 173]
“The
•“Help” includes one item, the Quick Guide.
The Quick Guide can alternatively be printed directly
out from TEST Button by pressing it in when the unit is
Ready (green LED is lit) and holding for more than 3
seconds.
•“Links” includes two items:
• [Contact info] is the same information that is displayed
when you attach to the print server, before you login.
• [Updates/Utilities] hops to the product web site from
which you can download firmware upgrades, utilities,
and updated documentation.
Intermate100 and Intermate101 Print Server Administration Manual 69
Page 70

HTTP (Browser): Login with User Name and Password
9.4. Login with User N ame and Passwo r d
Choose “Actions > Login”.
Type in values for “User name” and “Password.” Both are
case-sensitive.
If you are not a partner, there is only one possible “User name”
(account), and this is
The default password for the “admin” account is
It can be changed after a successful login.
Tip:
If the Intermate1xx has been accessed before from the
computer running the web browser, you should use the
browser’s “Refresh” or equivalent button unless you
are sure that the browser has been set not to use
cached information
Tip:
If several different administrators and/or super-users
are permitted to log on to the Intermate1xx, it is
possible that someone has changed the password and
forgotten to tell you. So, if you are blocked after the first
try, stop, and sort out who has changed the password
before continuing.
admin.
admin.
Intermate100 and Intermate101 Print Server Administration Manual 70
Page 71

HTTP (Browser): Menu Items and Groups After Login
9.5. Menu Items and G roups After Login
After a successful login, the “Actions” group with its single
“Login” menu item will be replaced with two main groups of
items:
•“Actions”
• “Configurations”—as listed in
[page 10]
“Topics in This Manual”
“Actions” always give you the chance to “Cancel” or “Confirm” on an [<Action>] page before the system carries an action
out. You can use “Actions” for the following things.
• Reboot There are two kinds of [Reboot], as explained
below, in
[page 73]
“Activating New Values By Rebooting”
.
• “Print Main Status Pages”. These pages show
configuration, i.e. all currently active settings for all
parameters on the print server (except for certain
configurations for the SCS HPOs).
In addition, the Main Status Pages include information
from the System Log which is filled from reboot to
reboot.
It is a good idea to document each configuration change by
printing the Main Status Pages.
• Print several different kinds of status pages for 5250
(shown only if the TN5250E HPO is enabled).
• G22 only: Stop traces started through an FTP
session—depending on which options—TN5250E,
TN3270 and/or IPDS, if any—have been activated.
• “Restore All Defaults.” This affects every single
parameter , includin g identifyi ng informat ion, such as IP
address, although some configurations for SCS HPOs
are excepted.
Intermate100 and Intermate101 Print Server Administration Manual 71
Page 72

HTTP (Browser): How to Change Settings on Configuration Pages
9.6. How to Change Settings on Configuration Pages
When you choose a menu item for configuration, you will be
presented with a page containing a number of parameters. In
some cases, a configuration page can require scrolling down
several screens. There are also some complex configurations
which are presented as a sub-group of menu items, each with
its own configuration page.
New settings for any given parameter are selected from a
drop-down menu, selected by choosing a radio button, or
typed into an input field. For many of the fields, you will find
printed texts showing valid range s. You may also find an “onmouse-over”/”walk-over” description with additional information
on the parameter in question.
You can save some mouse-clicks by using the <Tab> key to
move from one parameter to another.
At the bottom of each configuration page are three buttons:
•“Save & Cont.” validates and saves the new settings.
You can save a mouse-click by using the < Enter> key
on your keyboard instea d.
If you type an invalid value in an input field, the
configura ti o n page will be r eplaced with a page telli n g w it h
the following message
“Error in input field '<parameter name>
Press the Browser’s Back Button”
When you do that, you will be presented with the
configuration page again. Y ou will probably have to look in
the manual to correct your error.
•“Undo” restores the most recently saved settings. So if
you have already saved your current work, you cannot
use this button to move back to the previous values.
•“Fact ory Defau lt” restores the default settings for the
parameters on the configuration page in question—and
only on that page.
Saved settings are not activated until you reboot; the next section explains how to do this.
Intermate100 and Intermate101 Print Server Administration Manual 72
Page 73

HTTP (Browser): A ctivating New Values By Rebooting
If you are changing settings on more than one configuration
page, it is usually a good idea to wait until you’re done with
everything before rebooting.
9.7. Activating New V a lues By Rebooting
New values can be activated remotely by clicking one of the
two “Reboot” items in the Main Group "Actions”.
•“
Reboot (immediate)
immediately, terminating any current print job and. Jobs
queued after a terminated job are not affected.
” reboots the Intermate1xx
Reboot (controlled)
•“
” performs a delayed reboot. A
reboot command is added to the job queue. The reboot
is carried out when there are no more jobs known to the
Intermate1xx.
Intermate100 and Intermate101 Print Server Administration Manual 73
Page 74

9.8. Logout
Log out from the Intermate1xx by closing the browser window.
Changing to another web address while running the same
browser instance does
not
terminate the HTTP session.
HTTP (Browser): Logout
Intermate100 and Intermate101 Print Server Administration Manual 74
Page 75

Configuration Using a Telnet Client: Connecting
10. Configuration Using a Telnet Client
10.1. Connecting
Platform Prerequisites
Any T elnet client supporting NVT can be used to connect to the
Intermate1xx. This includes common platforms like Windows,
UNIX and AS/400.
NVT is a minimum requirement for the client. The Intermate1xx
defaults to NVT when connected with VT52 or VT100/ANSI.
Setting Up Telnet Terminal Preferences
We recommend enabling "Local Echo" on the client in order to
display the entries. The "Buffer size" should also be checked,
as some values otherwise can disappear from the screen. A
value of 50 or more is recommended.
Logging On
A line-based Telnet client connects like this.
c:\telnet 192.168.4.170
===>telnet ’192.168.4.170’
When a Telnet session is started, the Intermate1xx presents
itself with the log-on screen.
Type the
Type the password followed by <CR/Enter>. The default pass-
word is admin. (You can change this from the menu, “Password”. The password is case-sensitive).
Once you are logged in, the “Main Menu” appears.
You will be able to set everything except IP-address, Host-
name and license keys—but, as mentioned in the introduction
to this guide, it is clumsy to use.
Intermate100 and Intermate101 Print Server Administration Manual 75
user
name:
admin followed by <CR/Enter>.
(Windows example)
(AS/400 example)
Page 76

Configuration Using a Telnet Client: Menu Items and Settings
10.2. Menu Items and Settings
“Main Menu”
For the most part, each item corresponds to a configuration
page in the HTTP interface. For example:
1. General
2. Network.
...
The list ends with a display of the syntax for two kinds of save
(S and C) and for exiting the Telnet session (Q). There is a timeout function that breaks the connection to the Intermate1xx
after about a minute of inactivity.
As indicated above, each item is numbered.
Select an item by typing the number of the item to the prompt >
and pressing the <Enter> key.
Configuration Menus
When you have chosen an item on the main menu, you will be
presented with a sub-menu with a heading, a numbered list of
parameters and the message “R. Return to main menu”.
Examples of parameters in the sub-menu called “Raw Socket
Menu”:
1. TCP Port 1 <9100>
2. Use Logical Printer 1 <PR0>
3. TCP Port 2 <9100>
4. Use Logical Printer 2 <PR4>
...
As you can see in the example above, each parameter line finishes by showing the current setting in angled brackets.
Select the parameter you want to change by typing in the number and pressing the <Enter> key.
You will then be shown the name of the parameter, the current
setting, and information on possible values which are either
chosen by item numbers or typed in. Pressing the <Enter> key
finishes your data entry and returns you to the sub-menu (“previous menu”).
Intermate100 and Intermate101 Print Server Administration Manual 76
Page 77

Configuration Using a Telnet Client: Activating New Values By Rebo oting
The sub-menu will show that you can use p (followed by
<Enter>) to return to the previous menu, but sometimes entering p without first having entered a value can result in an error.
You can, however, always enter r (followed by <Enter>) to
return to the Main Menu directly from the list of parameters on
a configuration menu.
If the number of items does not fit on the screen, the text string
Press <Return> is added to the default prompt. This means
that <Enter> has to be pressed to view the next screen of
items.
10.3. Activating New Values By Rebooting
New settings are saved and activated by selecting one of the
two possible reboots.
Note:
In the commands below, “interface” means the
Intermat e1xx print server
• "S. Save changes and reboot interface (immediate)”
This terminates any current print job and reboots the
Intermate1xx immediately. Jobs queued after a
terminated job are not affected.
• "C. Save changes and reboot interface (controlled)"
This performs a delayed reboot. A reboot command is
added to the job queue. The reboot is carried out when
there are no more jobs known to the Intermate1xx.
Intermate100 and Intermate101 Print Server Administration Manual 77
Page 78

The Intermate Management and Configuration Utility (IMCU): What the IMCUIMCU is and how It works
11. The Intermate Managem e nt an d Configuration Utility (IMCU)
11.1. What the IMCUIMCU is and h o w It works
The Intermate Management and Configuration Utility (IMCU) is
a web server based tool for detection, monitoring and configuration of Intermate LAN devices in IP networks.
The system consists of an HTTP-based Windows NT service,
with software agents distributed across the network to communicate with print servers on each physical LAN.
Management, installation of printers, installation and administration of agents are all done from a web browser. This means
that you can administer printers locally from the IMCU server or from another network-attached PC - or even from a remote
connection via the Internet. Thus, it is possible for the system,
network or printer administrator to gain access to all printers
from his or her home office.
The agents detect devices using UDP, which means even print
servers with no IP addresses can be monitored and configured. This approach enables a network/printer administrator to
configure devices with mis- or unconfigured IP settings anywhere in the network, using a standard web browser. This is
why it can be used for the initial assignment of an IP address
as described in the Getting Started brochure, the Quick Guide
and the section on
[page 100]
Limited SNMP support is available for the detecting and monitoring third party or legacy Intermate print servers.
in this book.
“Static IP Assignment Using the IMCU”
The IMCU is free. An installation file (P19-xxxx.exe) is included
on the Documentation and Utilities CD. New versions of the
utility will be made available on our web site.
Intermate100 and Intermate101 Print Server Administration Manual 78
Page 79

The Intermate Management and Configuration Utility (IMCU): This Chapter Covers Installation and Basic Use
11.2. This Chapter Covers Installation and Basic Use
This chapter presents only how to install the IMCU and lists the
kind of information you can monitor with it.
Special uses of the IMCU are presented in other places in the
documentation, directly in connection with the specific contexts
in which it can be used. These uses are as follows:
• Configuration:
• Initial contact as explained in
Using the IMCU” [page 100]
• Upgrading firmware, fonts and special configuration
files (see
“Upgrade Components” [page 197]
the IMCU for Maintenance” [page 21 1]
• Management and editing of IDB (configuration) files for
TN5250E. This feature was added (in beta) in
P19_1491 (released 14 December 2001). See the
Printing Environment Guide for IBM OS/400 Systems.
“Static IP Assignment
.
).
and
“Using
Intermate100 and Intermate101 Print Server Administration Manual 79
Page 80

The Intermate Management and Configuration Utility (IMCU): Installation of the Various Elements
11.3. Installation of the Various Elements
The IMCU server installs on Windows95/98/NT4.0/2000/XP as
a service where it detects, monitors and upgrades print servers
in large segmented IP networks. Note that TCP/IP must be
installed. You can configure the kind of information you want
displayed.
An agent must be installed on a host on each IP segment having devices you wish to monitor through the IMCU server. An
agent can reside on either a PC or on an Intermate1xx print
server.
Each Intermate1xx print server contains an IMCU client
through which the agent can detect and configure first time IP
settings, upgrade firmware and link to the print server’s own
web page.
Intermate100 and Intermate101 Print Server Administration Manual 80
Page 81

The Intermate Management and Configuration Utility (IMCU): Establishing an IMCU Server
11.4. Establishing an IMCU Server
Remember that you must be logged on to the computer with a
Windows NT account with administrative rights if you will be
installing on Windows NT, Windows 2000 or Windows XP.
The IMCU server program is installed by copying the installation program to a PC running Windows and executing it. This
installs the program files and starts the IMCU service.
The installation program will give you the possibility of installing
a server, an agent, or both. It is a good idea to choose both,
especially if the machine is on the segment where you will be
installing the Intermate1xx, because you will then be sure to
have an agent that can detect the unit.
During server installation, the program asks for a port number
for the server (default is 80). Change the port number if
another service already uses it.
Tip:
You can check to see the ports your PC is listening to
by using the command netstat -an.
Agent installation: Unless you have a very good reason for
doing so, do not change the default port for the agent (8888).
Intermate100 and Intermate101 Print Server Administration Manual 81
Page 82

The Intermate Management and Configuration Utility (IMCU): How to Log In and Out
11.5. How to Log In and Out
Log in:
Type the IP address of the PC running the server program in
the address field of the web browser.
Example—when the IMCU server is not on your own work station.
http://192.168.0.38 (default port)
http://192.168.0.38:81 (alternative port)
If the IMCU server is on your own work station, use the loopback IP:
http://127.0.0.1 (default port)
http://127.0.0.1:81 (alternative port)
When you are attached, you will be presented with the login
dialog.
On a previously unused IMCU server, the user name/
account is admin (and cannot be changed). The initial
password is admin. Both user name and password are casesensitive.
If the IMCU has been used before, the first user may have
used an alternative user name, namely imcu. This account
name cannot be changed. If they have not changed the password, it will be imcu. User name and password are case-sensitive.
Log out from the IMCU server
by closing the browser window.
Changing to another web address while running the same
browser instance does
Intermate100 and Intermate101 Print Server Administration Manual 82
not
terminate the HTTP session.
Page 83
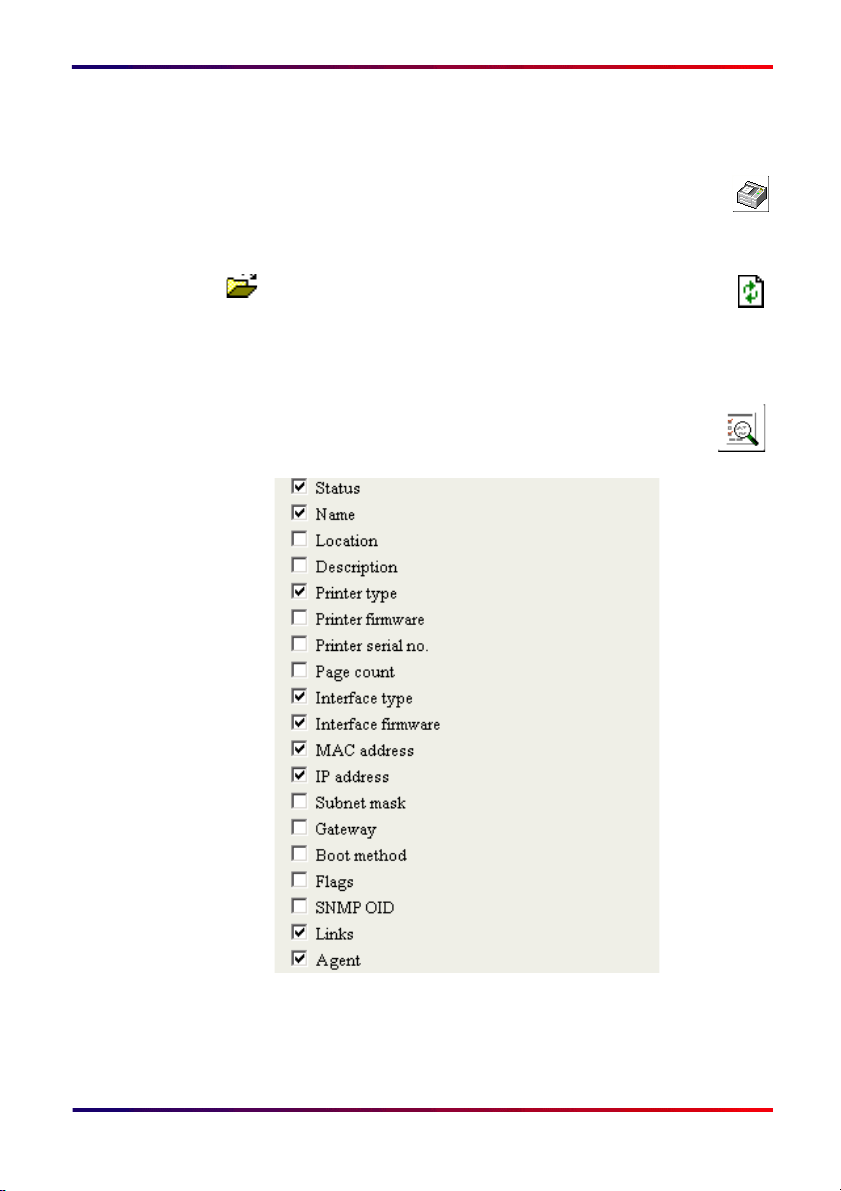
The Intermate Management and Configuration Utility (IMCU): Device List / Available Agents
11.6. Device List / Available Agents
The device list is your entry way to using the IMCU server.
The screen is selected by clicking the “Device list” button
in the top toolbar. You will be presented w ith a two column list showing “Agent” and “Devices”, however the
“Devices” will be empty.
Use the “Expand” icon to bring forth a list of the
devices discovered on that segment.
Before proceeding to use the information on the list, use the
“Refresh” icon to refresh the list; the browser’s “refresh” is not
good enough.
The “column selection” button, allows you to tailor the
device list to your wishes.
Figure 1. IMCU Column Selection.
A sample device list is shown on the next page.
Intermate100 and Intermate101 Print Server Administration Manual 83
Page 84
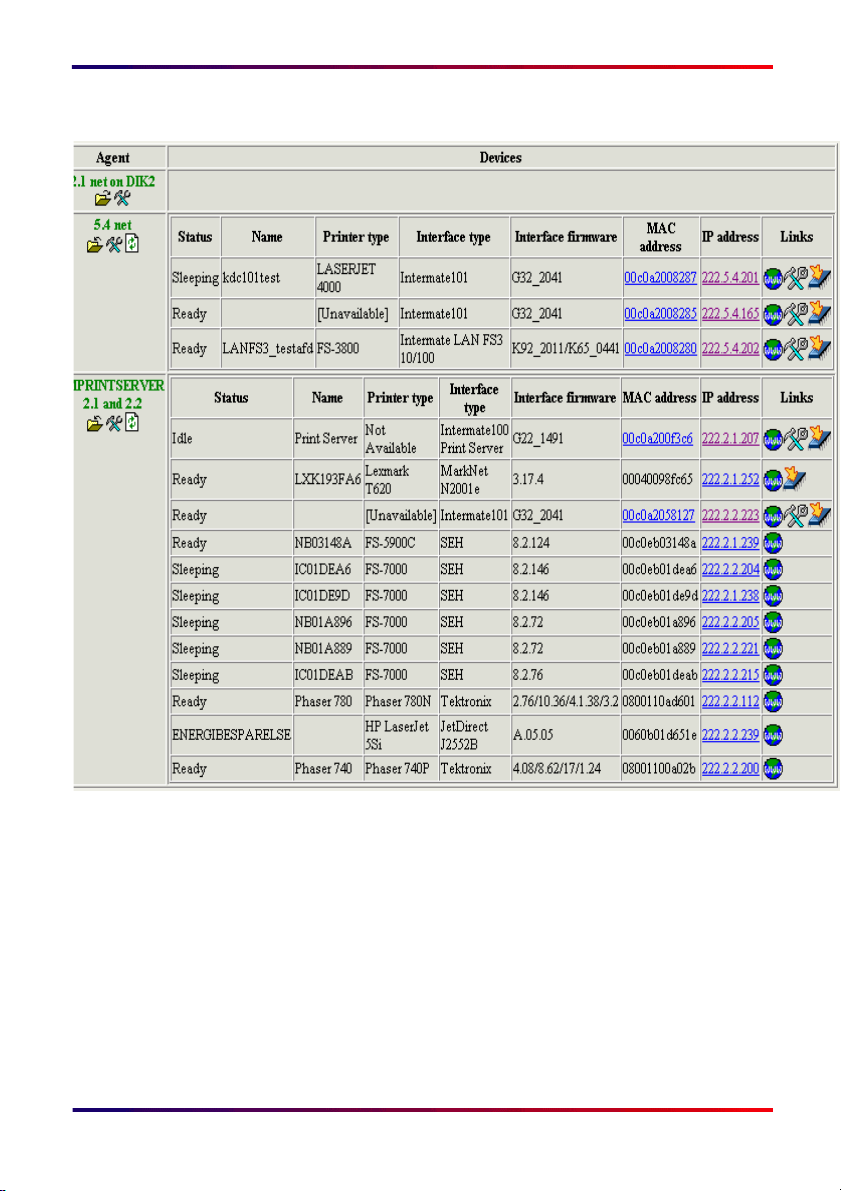
The Intermate Management and Configuration Utility (IMCU): Device List / Available Agents
Figure 2. Device List
Intermate100 and Intermate101 Print Server Administration Manual 84
Page 85

The Intermate Management a nd Configuration Utility (IMCU): Installing Agents
11.7. Installing Ag ents
If there is an agent on the segment where your Intermate1xx is
placed, you are ready to use the IMCU.
If you do not know whether someone in your network environment has already established an agent on the segment where
your Intermate1xx is placed, log in to the IMCU server and use
the Device List as described in the previous section. If the
MAC address for your Intermate1xx does not show up on any
of the agents, you need to install one.
Unless you have a very good reason for doing so, do not
change the default port for the agent (8888).
Note that it is possible to have several agents installed on the
same physical network segment, but only one agent per host.
The agent can be hosted on a PC or on an Intermate print
server.
1 1.7.1. Remote Installation of an Agent from the IMCU
If both the IMCU server and the PC which is to host the agent
are running NT 4.0 or higher (Windows 2000, Windows XP),
you can install an agent remotely.
Select Agent Management
Select “New”. Fill out the necessary information and
then select “Install”.The necessary information is:
• “IP address” of the PC to host the agent.
• “Agent Name” (unless you are satisfied with the host IP
address as the agent name). Try to choose a name
which is meaningful for your administration.
• “Port” contains the port number the agent uses for
communication with the IMCU server. Default is 8888.
Do not change this without a very good reason.
• You will probably not want to change the refresh or
timeout intervals; check the on-line help if you are in
doubt
After you select Install, you will be asked to enter a Windows
NT account with administrative rights on the PC. You must
enter Domain, Username, and Password. Click Install again.
server
Intermate100 and Intermate101 Print Server Administration Manual 85
Page 86

The Intermate Management a nd Configuration Utility (IMCU): Installing Agents
1 1.7.2 . Direct Installation of an Agent on a PC
If your setup does not fulfill the system requirement for remote
installation, you will have to install an IMCU agent directly on a
PC on the desired segment, for example your own work station. Perform this installation with the IMCU Installation Program, choosing “Agent Only”.
Afterwards, return to the IMCU server.
Select Agent Management
Select “New”. Fill out the necessary information and
then select “Install”.The necessary information is:
• “IP address” of the PC to host the agent.
• “Agent Name” (unless you are satisfied with the host IP
address as the agent name). Try to choose a name
which is meaningful for your administration.
• “Port” contains the port number the agent uses for
communication with the IMCU server. Default is 8888.
Do not change this without a very good reason.
• You will probably not want to change the refresh or
timeout intervals; check the on-line help if you are in
doubt
Finish by selecting “Add” (instead of “Install”).
11.7.3. Troubleshooting Agent Installation on a PC
If the agent was not created, click the browser's “back” button
and check the information typed in. A typical problem is the IP
Address. If the address cannot be reached, it may be because
an IP route needs to be set up. Other common mistakes are
misspelling of the Domain, Username or Password. Ask your
system administrator for further details. The IMCU server has
quite a lot of on-line help available.
11.7.4. Embedded Agent on the Intermate1xx
If you already have given this (or another) Intermate print
server an IP address using another method, you can activate
the embedded agent on it. See
Intermate100 and Intermate101 Print Server Administration Manual 86
“[IMCU Agent]” [page 178]
.
Page 87

INITIAL CONTACT
Intermate100 and Intermate101 Print Server Administration Manual 87
Page 88

IP Assignments for Initial Contact: Introduction
12. IP Assignments for Initial Contact
12.1. Introduction
You must change the IP address from the factory default
(0.0.0.0). Additional IP settings that may need configuration
are the Subnet Mask (default 255.255.255.0) and the Gateway
address (default 0.0.0.0). Note that the Intermate1xx supports
classless routing.
The methods available for setting the IP address vary depending on how your LAN environment is administered. When we
discuss choosing a method, we are talking about the administration, and not the print platforms you will be using.
In fact, some of these platforms, notably IBM Mainframes
(such as S/390) and Mid-Range (such as AS/400) have no
management facilities of this type. This is no cause for concern. Most LANs are administered from a Windows work station, an OS/2 work station or a work station running UNIX, AIX
or Novell Netware.
Intermate100 and Intermate101 Print Server Administration Manual 88
Page 89

IP Assignments for Initial Contact: Information Needed Before Starting
12.2. Information Needed Before Starting
If you haven’t already done so, you must have the following
information from (or cleared by) your network administrator:
* IP address - in most of the examples we will use
192.168.0.227
(DHCP: You need a temporary static address)
* Network Mask - in the examples we will use 255.255.255.0
(DCHP: Not necessary)
* Default Gateway (unless Auto-Routing (RIP) is used).
(DCHP: Not necessary)
You also need to know the MAC address (= IEEE address =
hardware adapter address) address of the unit. This is written
on the label. If the label is damaged or gone, you can find the
MAC address on the Main Status Pages. In most of the exam-
ples, we will use 00c0a200801e.
Host Name:
You should choose a host name which will identify the unit in
the LAN environment, and you must do so if you will using
DHCP to assign an IP address to the print server. There are a
number of print environments, for example OS/400 systems,
that also need to use a host name for the print server.
The unit will generate a default host name by attaching the last
six digits from the MAC address to a prefix such as IM or IMA
(depending on the product and model).
You may use, modify, or totally replace this name. If you use
the following guidelines, you will avoid conflicts caused by differing protocols found in today's typically mixed network environments:
• Name length: minimum 2 and maximum 16 ASCII
characters from the restricted list below.
• Do not use any tabs or character spaces (“blanks”)
• There is no distinction made between upper and lower
case.
Intermate100 and Intermate101 Print Server Administration Manual 89
Page 90

IP Assignments for Initial Contact: Information Needed Before Starting
• You can make the name DNS qualified by adding a
company domain name and a top domain, for example
im00801e.mycompany.com.
• Permissible characters: alpha (A-Z), numeric (digits 0-
9), minus sign (-), underscore (_) and period (.)—
subject to the following additional restrictions:
• Periods are only allowed when they serve to delimit
components of DNS qualified names (“domain style
names”).
• The first character must be alpha.
• The last character must not be a minus sign, an
underscore or a period.
Finally, if you will be using a method for initial contact
which does not work across routers you must do the following:
Find the IP address for your the PC or terminal from which you
will be configuring the Intermate1xx.
Tip:
DOS commands for Windows users
winipcfg (Windows 95/98) or
ipconfig (Windows NT 4.0, Windows 2000 or XP)
Determine whether or not your PC's or terminal’s IP address is on
the same net-segment as the address chosen for the
Intermate1xx
.
If there is a router or a gateway between the two, then you must
get them both on the same segment or choose a method for
assigning an address to the unit which can work across a router
with the help of an IP static route.
How to find the group of settings called [TCP/IP]:
• Browser user: [TCP/IP] is in the "Basic” sub-group of
the “Configurations” group.
• Telnet user: TCP/IP is a point on the main menu.
Intermate100 and Intermate101 Print Server Administration Manual 90
Page 91

12.3. Method Overvie w
• Delivery from a BOOTP server. Management
environments: Novell Netware, AIX, UNIX, AIX, OS/2.
Instructions for using BOOTP start on page
• Delivery from an RARP server. Management
environments: UNIX only. Instructions start on page
The RARP daemon does not work across routers or
gateways.
• Dynamic delivery from a DHCP server. This is mainly
used to deliver IP addresses to PCs and work-stations,
rather than to servers, but can be used to deliver an IP
address to a print server such as the Intermate1xx. This
can save on the use of valuable IP-addresses. In order
to work, the Intermate1xx must have a host name
which can be entered in a DNS table.
If you are required by your network administration to let
a DHCP server assign an address to the unit, you will
need to use a static assignment method (see below) to
make initial contact with it, and then enable DHCP
afterwards. Instructions start on page
IP Assignments for Initial Contact: Method Overview
93
.
95
.
97
.
• Static Assignment. Three methods are available for
this:
• “ARP and PING” can be used in any of the LAN
management environments mentioned, but should not
be used if your system administrator requires the use of
a BOOTP server or an RARP server. Instructions start
on page
98
. ARP does not work across routers or
gateways.
• The Intermate Management and Configuration Utility
(IMCU) can be used in environments running under a
Windows operating system (Windows 95/98, NT 4.0,
Windows 2000). Instructions start on page
100
.
Because the IMCU detects network devices at the
hardware level you can set an IP address for a segment
unreachable from your work station (as long as there is
Intermate100 and Intermate101 Print Server Administration Manual 91
Page 92

IP Assignments for Initial Contact: Method Overview
an agent on your own segment), do all or most of your
configurations, and then move the Intermate1xx to the
segment containing that IP address. For information on
how to install the IMCU, see
“The Intermate
Management and Configuration Utility (IMCU)” [page 78]
• Addresses can be typed in to the input fields in the
“Configuration [TCP/IP]” page . For obvious reasons,
this cannot be used to establish initial contact with the
print server
As default in the Intermate1xx, RARP and BOOTP are enabled
while DHCP is disabled. It is a good idea to make sure that
only the method you use is enabled, while all other possibilities
are disabled, because the unit uses a fixed boot-sequence.
The order of look up is DHCP, BOOTP, and RARP. There will
be a time-out in connection with each unsuccessful wait to be
contacted by a server of IP addresses.
After finding that there is no RARP server on the network, the
unit will then check the current IP address. If it is 0.0.0.0, the
system will wait for an ARP/PING mapping its MAC address to
an IP address. If the current IP address is different from
0.0.0.0, the system will use whatever address is stored cur-
rently.
.
When you are finished establishing contact as explained
below, you can continue with your configurations following the
order of the chapters in this book. It is often a good idea to print
the Main Status Pages to document your configurations.
Intermate100 and Intermate101 Print Server Administration Manual 92
Page 93

IP Assignm ents for Initial Contact: Assignment Using BO OTP
12.4. Assignment Using BOOTP
1
Power Off the Intermate1xx. If the unit is attached to a printer,
it is best that the printer is powered On.
2 Edit the [ /etc/bootptab ] file on the host. If this file does not
exist on your system, it must be created manually using an
ASCII file editor. Insert the following sequence in the
[ /etc/bootptab ] file:
Syntax (written on a single line; it will rarely be possible to
write the whole string on a single line, and you can usually
use backslash at the end of each line to indicate that the
definition continues)
<host name>: ht=<hardware type>: ha=<hardware
address>: hn: ip=<IP address>: sm=<subnet mask>:
gw=<gateway field>
Example:
ím00801e: ht=ether: ha=00c0a200801e: hn: \
ip=192.168.0.227: sm=255.255.255.0: gw=192.168.0.1
3 Save the [ /etc/bootptab ] file.
Note:
On platforms other than OS/2, you may need to
reinitialize the BOOTP-server every time you make
changes to the [ /etc/bootptab ] file in order to be
sure the changes take immedia t e effect.
For the AIX platform, however, it is sufficient to
refresh the intetd subsystem. Syntax:
refresh -s inetd
4 Make sure the Intermate1xx is attached to the LAN and
power it on.
5 Connect and Login to the unit with a browser or Telnet
client.
6 Choose [TCP/IP].
Intermate100 and Intermate101 Print Server Administration Manual 93
Page 94

IP Assignm ents for Initial Contact: Assignment Using BO OTP
7 Disable RARP and check to be sure that DHCP is still
disabled.
Note that the BOOTP delivers not only the IP address, but
also the subnet mask and the default gateway.
8 Save your work and reboot. You can, of course, wait to
reboot until finishing other configurations you want to make.
Intermate100 and Intermate101 Print Server Administration Manual 94
Page 95

IP Assignments for Initial Contact: Assignment Using RARP
12.5. Assignment Using RARP
1
Power Of f the
it is best that the printer is powered On.
2 Add the following lines to the [ /etc/ethers ] file or
[ /etc/rarpd.cf ] file: Note that the MAC address is written
with colons : as separators between every two characters.
[ /etc/ethers ] file
Intermate1xx.
If the unit is attached to a printer,
<Hardware address> <Host name>
00:c0:a2:00:80:1e ima101-a
Or
[ /etc/rarpd.cf ] file
<IP address> <Hardware address>
192.168.0.227 00:c0:a2:00:80:1e
(syntax)
(example)
(syntax)
(example)
c Update your host table and alias name data
bases.
d Start the RARP daemon, if it is not already
running.
rarpd -a
3 Make sure the Intermate1xx is attached to the LAN and
power it on.
4 Connect and Login to the unit with the tool of your choice.
5 Choose [TCP/IP].
a Disable BOOTP and check to be sure that
DHCP is still disabled.
b If it is not possible for Intermate1xx to obtain
the mask from the network, you must type in a
Subnet Mask.
c If automatic routing (RIP) is not used in your
environment, type in the Default Gateway.
Intermate100 and Intermate101 Print Server Administration Manual 95
Page 96

IP Assignments for Initial Contact: Assignment Using RARP
6 Save your work and reboot. You can, of course, wait to
reboot until finishing other configurations you want to make.
Intermate100 and Intermate101 Print Server Administration Manual 96
Page 97

IP Assignments for Initial Contact: Assignment Using DHCP
12.6. Assignment Using DHCP
1 You must first assign an address statically using ARP and
PING or the IMCU, as described in one of the sections
below. When you continue from there, do the following:
2 Connect and Login to the unit with the tool of your choice.
3 Choose [TCP/IP].
a Disable BOOTP and RARP. Enable DHCP.
b If it is not possible for Intermate1xx to obtain
the mask from the network, you must type in a
Subnet Mask.
c If automatic routing (RIP) is not used in your
environment, type in the Default Gateway.
d Fill out a host name as described on
Name:” [page 89]
.
“Host
4 Save your work and reboot. You can, of course, wait to
reboot until finishing other configurations you want to make.
5 Remember to coordinate things with your network
administrator so that the host name gets registered in an
appropriate DNS table.
Intermate100 and Intermate101 Print Server Administration Manual 97
Page 98

IP Assignments for Initial Contact: Static IP Assignment Using “ARP and PING”
12.7. Static IP Assignment Using “ARP and PING”
1 Make sure that you own PC or terminal is on the same
network segment as planned for the Intermate1xx
2 Power the printer and your Intermate1xx On.
3 Check the Main Status Pages to find the current IP address
for your Intermate1xx. You can print them by pressing the
TEST Button for 1-2 seconds, if the unit is attached to a
printer.
If the unit has already been assigned an IP address
different from 0.0.0.0, you must re-set it in order to use the
ARP command. For instructions, see
Defaults: TEST Button” [page 223]
“Restore Factory
.
4 Insert the relationship between the IP address and the
hardware adapter (MAC) address in the ARP cache. The
syntax varies according to your system environment. The
examples below use the sample IP address 192.168.0.227.
From Windows environments
arp -s 192.168.0.227 00-c0-a2-00-80-1e
Tip:
Windows 95 does not add an entry in the ARP table if it
is empty. So, if your ARP command doesn’t work, ping
in another IP device in the network and then enter the
ARP command again
.
From UNIX, AIX, OS/2
arp -s 192.168.0.227 00:c0:a2:00:80:1e
Tip:
If you wish to assign a host name to the Intermate1xx,
you can insert the relationship between the IP address
and the host name in your system host table. For
example: 192.168.0.227 ima101-a
Then the host name can be used instead of the IP
address in the ARP command above.
Intermate100 and Intermate101 Print Server Administration Manual 98
Page 99

IP Assignments for Initial Contact: Static IP Assignment Using “ARP and PING”
5 Ping the new IP address to store the address. Example:
ping 192.168.0.227
6 Pinging causes the Intermate1xx to reboot automatically.
Wait for the reboot to finish.
7 Connect and Login to the unit with the tool of your choice
a Choose [TCP/IP]
b Check to see that the BOOTP and RARP
protocols are disabled (this should happen
automatically when you use the ARP-PING
method).
c If you will are only using the IP address as a
stepping stone to DHCP, enable DHCP.
Otherwise, set the Subnet Mask and the
Gateway (if auto-rooting (RIP) is used, you can
leave the Gateway as 0.0.0.0)
8 Save your work and reboot. You can, of course, wait to
reboot until finishing other configurations you want to make.
Intermate100 and Intermate101 Print Server Administration Manual 99
Page 100

IP Assignments for Initial Contact: Static IP Assignment Using the IMCU
12.8. Static IP Assignment Using the IM CU
Prerequisites
See
“The Intermate Management and Configuration Utility
(IMCU)” [page 78]
use this free utility program.
If your working place already uses the IMCU, check to be sure
that the following things are in place.
• Find out what the IMCU server’s IP address is as well
as what its port number has been set to (default is 80,
but a network administrator or another printer
administrator might have changed this to avoid
colliding with another service).
• The server must be running; you may have to ask
another administrator or super-user about this.
• There must be an agent enabled on the net segment
your Intermate1xx is connected to. If you are unsure
about this, please consult
for information on how to acquire, install and
“Installing Agents” [page 85]
.
Steps
1
Make sure that the printer and Intermate1xx are powered
On.
2 Log in to the IMCU server with a web browser (as instructed
in
“How to Log In and Out” [page 82]
.
3 Use the “Device List” screen to find the agents known to the
server.
4 Select and expand the agent monitoring the IP segment the
print serverIntermate1xx
the devices detected by the agent.
is on. This wil l give you a list of all
5 Refresh the list. If everything is as it should be, you should
find a line for a device showing the MAC address for your
print serverIntermate1xx
. Double-click the MAC address.
6 This will open a “Device Configuration” window with the
following fields:
Intermate100 and Intermate101 Print Server Administration Manual 100
 Loading...