

Page 1
UltraView Monitor Series
Color TFT LCD monitor 26 in./ 32 in./
42 in.
EN User manual
FR Manuel d'utilisation
DE Benutzerhandbuch
IT Manuale dell’utente
NL Gebruikershandleiding
ES Manual de usuario
PT Manual do Utilizador
PL Instrukcja obsługi
RU Руководство пользователя
TR Kullanım Kılavuzu
P/N 1065905E • REV 5.0 • ISS 24MAY11
Page 2
Copyright
Trademarks
and patents
Manufacturer
© 2011 UTC Fire & Security. All rights reserved.
Interlogix, UltraView names and logos are trademarks of UTC Fire &
Security.
Other trade names used in this document may be trademarks or
registered trademarks of the manufacturers or vendors of the
respective products.
UTC Fire & Security Americas Corporation, Inc.
2955 Red Hill Avenue, Costa Mesa, CA 92626 5923, USA
Authorized EU manufacturing representative:
UTC Fire & Security B.V.
Kelvinstraat 7, 6003 DH Weert, The Netherlands
Certification
FCC
Regulation
CLASS B
COMPUTING
statement
European
Union
directives
This equipment has been tested and found to comply with the limits for
a class B digital device, pursuant to Part 15 of the FCC Rules. These
limits are designed to provide reasonable protection against harmful
interference in a residential installation. This equipment generates,
uses and can radiate radio frequency energy and, if not installed and
used in accordance with the instruction, may cause harmful
interference to radio communications. However, there is no guaranty
that interference will not occur in a particular installation. If this
equipment does cause harmful interference to radio or television
reception, which can be determined by turning the equipment off and
on, the user is encouraged to try to correct the interference by on or
more of the following measures:
․ Reorient or relocate the receiving antenna.
․ Increase the separation between the equipment and receiver.
․ Connect the equipment into an outlet on a circuit different from that
to which the receiver is connected.
․ Consult the dealer or an experienced radio / TV technician for help.
12004/108/EC (EMC directive): Hereby, UTC Fire & Security declares
that this device is in compliance with the essential requirements and
other relevant provisions of Directive 2004/108/EC.
2002/96/EC (WEEE directive): Products marked with this symbol
cannot be disposed of as unsorted municipal waste in the European
Union. For proper recycling, return this product to your local supplier
upon the purchase of equivalent new equipment, or dispose of it at
designated collection points. For more information see:
www.recyclethis.info
European representative for manufacture (EMC): UTC Fire & Security
B.V., Kelvinstraat 7, 6003 DH Weert, The Netherlands.
Page 3
Contact
information
2006/66/EC (battery directive): This product contains a battery that
cannot be disposed of as unsorted municipal waste in the European
Union. See the product documentation for specific battery information.
The battery is marked with this symbol, which may include lettering to
indicate cadmium (Cd), lead (Pb), or mercury (Hg). For proper recycling,
return the battery to your supplier or to a designated collection point. For
more information see: www.recyclethis.info.
www.utcfireandsecurity.com or
www.utcfssecurityproducts.eu
Page 4

Page 5

English
Contents
Preface............................................................................................................................2
Safety terms and symbols................................................................................................ 2
Important safeguards ................................................................................................2
Introduction ..................................................................................................................5
Product features..................................................................................................................... 5
Unpacking.................................................................................................................................. 5
Cleaning the product........................................................................................................... 5
Product dimensions...................................................................................................6
Installing the base stand..........................................................................................7
Control panel................................................................................................................8
Operating instructions..............................................................................................9
Selecting the input signal ................................................................................................. 9
Selecting the audio and video settings .................................................................... 9
Accessing the onscreen display (OSD) menus .................................................. 9
On-screen display (OSD) menus ............................................................................. 10
Using the remote control .......................................................................................14
Battery instructions............................................................................................................ 15
Connecting a video signal to the monitor........................................................15
Specifications ............................................................................................................17
UltraView Color TFT LCD monitor 26 in./ 32 in./ 42 in. 1 • EN
Page 6
Preface
This is the UltraView Color TFT LCD monitor 26 in./ 32 in./ 42 in. User
manual. Read these instructions and all ancillary documentation entirely
before installing or operating this product.
Safety terms and symbols
These terms may appear in this manual:
CAUTION: Cautions identify conditions or practices that may result in
damage to the equipment or other property.
WARNING: Warnings identify conditions or practices that could result in
equipment damage or serious personal injury.
Important safeguards
1. Read, follow, and retain these instructions: All safety and user
instructions should be read and followed before using this unit.
Retain the instructions for future reference.
2. Installation cautions:
Do not block any ventilation openings. Install in accordance with
the manufacturer’s instructions. Do not insert any metal objects into
the ventilation holes of the monitor case and be careful not to spill
liquids over this product as this could result in severe injury.
Always ensure that the monitor is located in a well-ventilated area
to prevent the unit from overheating.
Only use accessories specified by the manufacturer or those sold
with the product.
When standard base is not used, for safety reasons, please use
the M4 screws with flat washers and spring washers provided,
length between 8 to 10 mm.
AVOID operating or placing the monitor in the following
environments:
Extremes of temperatures, both hot and cold.
2 • EN UltraView Color TFT LCD monitor 26 in./ 32 in./ 42 in.
Page 7

• High humidity.
• Direct sunlight.
• Excessively dusty surroundings.
• Avoid close proximity to other equipment that generates a
strong magnetic field.
3. Water and moisture: Do not use this appliance near water. To
reduce the risk of fire or electric shock, do not expose this unit to
rain or moisture.
4. Power cord and power cord protection: Power cords should be
routed so that they not likely to be walked on or pinched. Pay
particular attention to the location of cords and plugs, convenience
receptacles, and the point of exit from the appliance.
Do not overload the power cord or adapter.
Do not put the power cord or signal cable in humid places.
5. Product care: Do not touch the screen directly with fingers. The
oils from your skin may leave marks on the surface of the screen,
which are difficult to be removed and may damage the screen
permanently. Do not apply pressure to the LCD screen. The LCD is
very delicate and fragile component.
6. Cleaning: Clean only with a dry cloth.
7. Servicing: Do not attempt to service this unit yourself. Opening or
removing covers may expose you to dangerous voltage or other
hazards. Refer all servicing to qualified service personnel.
Unplug the unit from the main AC power source and refer
servicing to qualified service personnel under the following
conditions:
• When the power-supply cord or plug is damaged.
• If liquid has been spilled or an object has fallen into the unit.
• If the unit has been exposed to rain or moisture.
• If the unit does not operate normally.
• If the unit has been dropped.
8. Lightning: For added protection during a lighting storm or when
this unit is left unattended and unused for long periods of time,
UltraView Color TFT LCD monitor 26 in./ 32 in./ 42 in. 3 • EN
Page 8
unplug the unit from the wall outlet and disconnect the cable
system. This will prevent damage to the unit due to lightning and
power line surges.
9. Mains plug (2 pin/3 pin):
1. Do not remove the grounding or earth connection from the
power supply / mains plug.
2. Always remember to unplug the LCD monitor from the power
supply under the following circumstances:
• If the monitor will not be used for a long period of time.
• If the power supply cable or plug / connector is damaged.
• Please refer to the user manual when connecting and
disconnecting the LCD monitor from any power supply or
other systems and before making any adjustments to the
monitor. In the event of any unexpected situation occurring
whilst operating the monitor, please switch off the power
supply and remove the power cable. If the problem is not
explained in the user manual, please contact your local
supplier.
• If the monitor housing is damaged or broken.
CAUTION: Do not attempt to dismantle this product. Any attempt to
dismantle or remove the covers from this product will invalidate the warranty
and may also result in serious injury.
4 • EN UltraView Color TFT LCD monitor 26 in./ 32 in./ 42 in.
Page 9

Introduction
This product uses 26 in./ 32 in./ 42 in. color active matrix TFT (thin-film
transistor) monitor, providing high quality display images. The maximum
achievable resolution is 1366 x 768, which enables complex and high
quality images to be displayed. In addition, the monitor also provides
access to the new OSD (On Screen Display) controls and has built-in multimedia speakers.
Product features
High contrast color TFT LCD monitor supports VGA resolution up
to resolution 1366 x 768, video signal resolution up to 500 TVL.
Embedded video signal BNC terminal, S-Video terminal, and
component signal RCA terminal and audio signal RCA jack.
A complete OSD function optimizes the screen display.
Unpacking
Standard package includes the following:
26 in./32 in./42 in. TFT LCD monitor
Remote controller
VGA cable
DVI-I cable
User manual
Cleaning the product
To remove dust or dirt from the screen, use a soft clean cotton
cloth and wipe gently.
Do not apply pressure to the screen surface while wiping.
Do not use any water or chemical detergent to clean the surface.
Chemical detergents may damage the surface of the LCD.
UltraView Color TFT LCD monitor 26 in./ 32 in./ 42 in. 5 • EN
Page 10

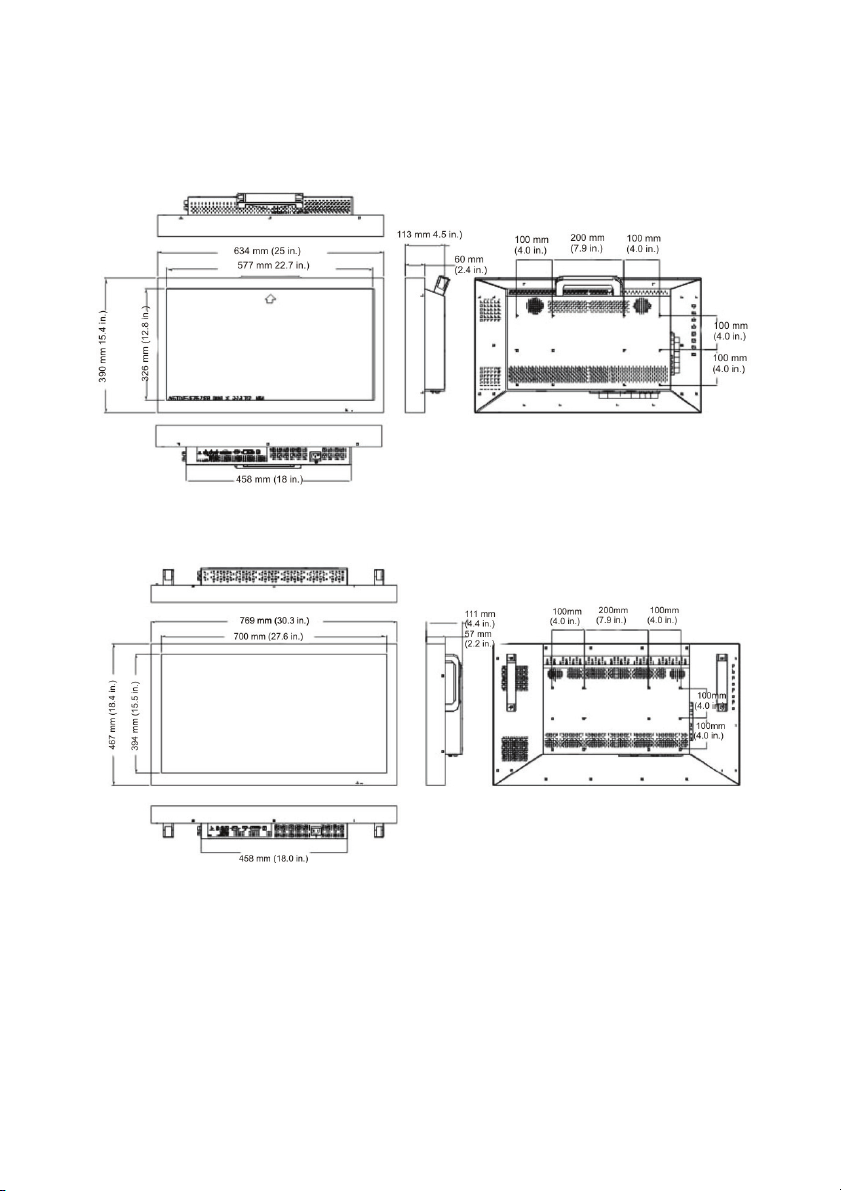
Product dimensions
26-inch monitor
32-inch monitor
6 • EN UltraView Color TFT LCD monitor 26 in./ 32 in./ 42 in.
Page 11
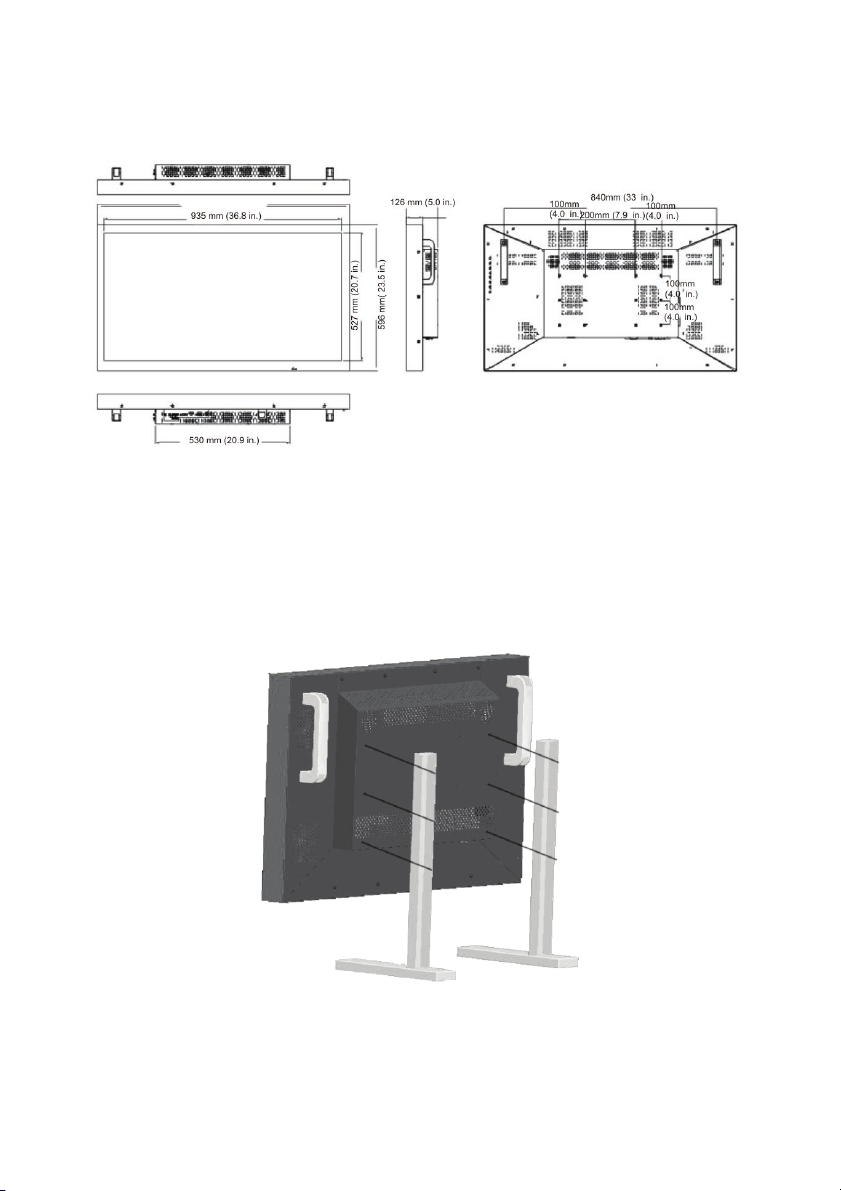
42 inch monitor
Installing the base stand
See Figure 1 for instructions.
Figure 1. Installing the base stand
UltraView Color TFT LCD monitor 26 in./ 32 in./ 42 in. 7 • EN
Page 12
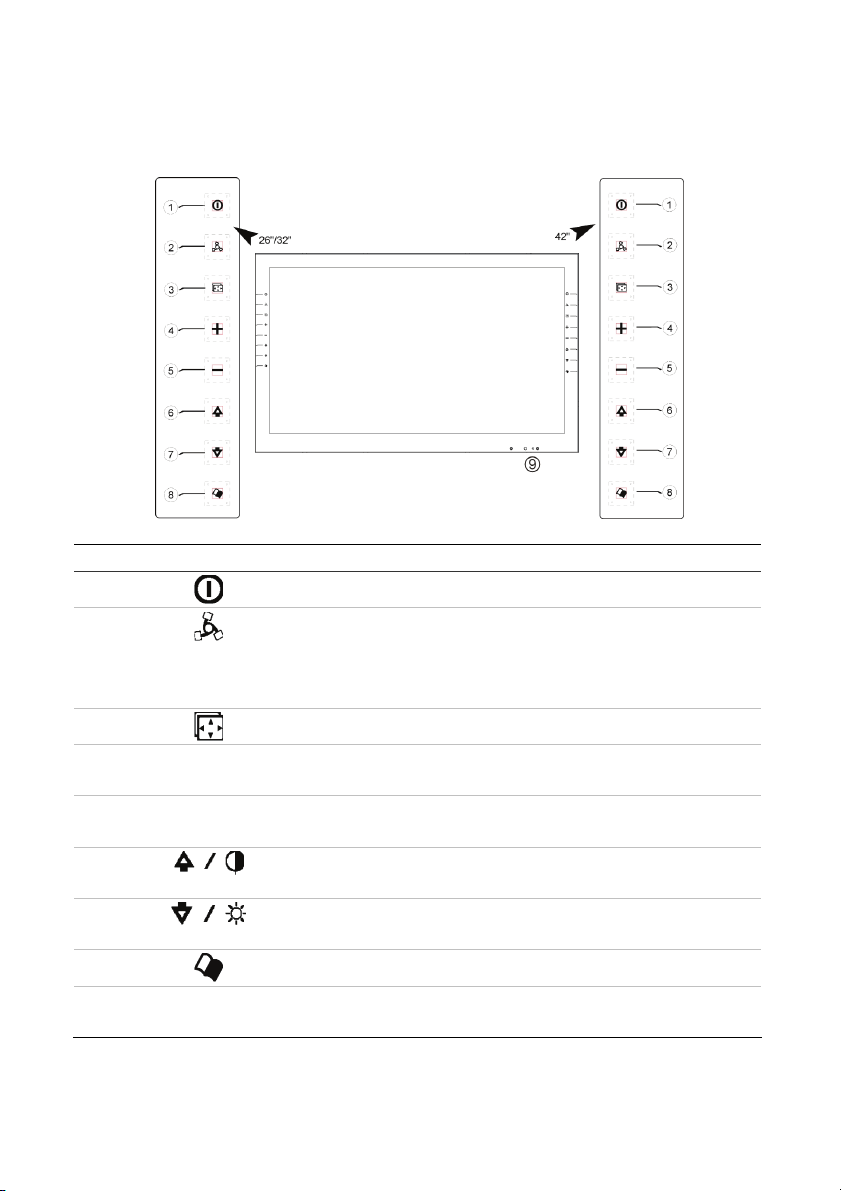
Control panel
Figure 2. Description of the control panel
Legend Button Description
1.
2.
3.
4.
5.
6.
7.
8.
9.
+
-
LED
indicator
POWER: Press to switch monitor on/off.
MODE Press to select input signal.
Note: When pressed initially, the OSD of the current signal
is displayed. Before it disappears, press again to change the
mode.
AUTO: Press to auto adjust VGA signal.
PLUS: Press to increase the value of the OSD option
selected; Press to increase volume.
MINUS: Press to decrease the value of the OSD option
selected; Press to decrease volume.
UP: Press to scroll up OSD option list; Press to adjust
contrast.
DOWN: Press to scroll down OSD option list; Press to adjust
brightness.
MENU: Recall or close OSD display, enter option selection.
Green: Power on; Orange: No signal; Red: Power saving;
NA: Power off
8 • EN UltraView Color TFT LCD monitor 26 in./ 32 in./ 42 in.
Page 13
Operating instructions
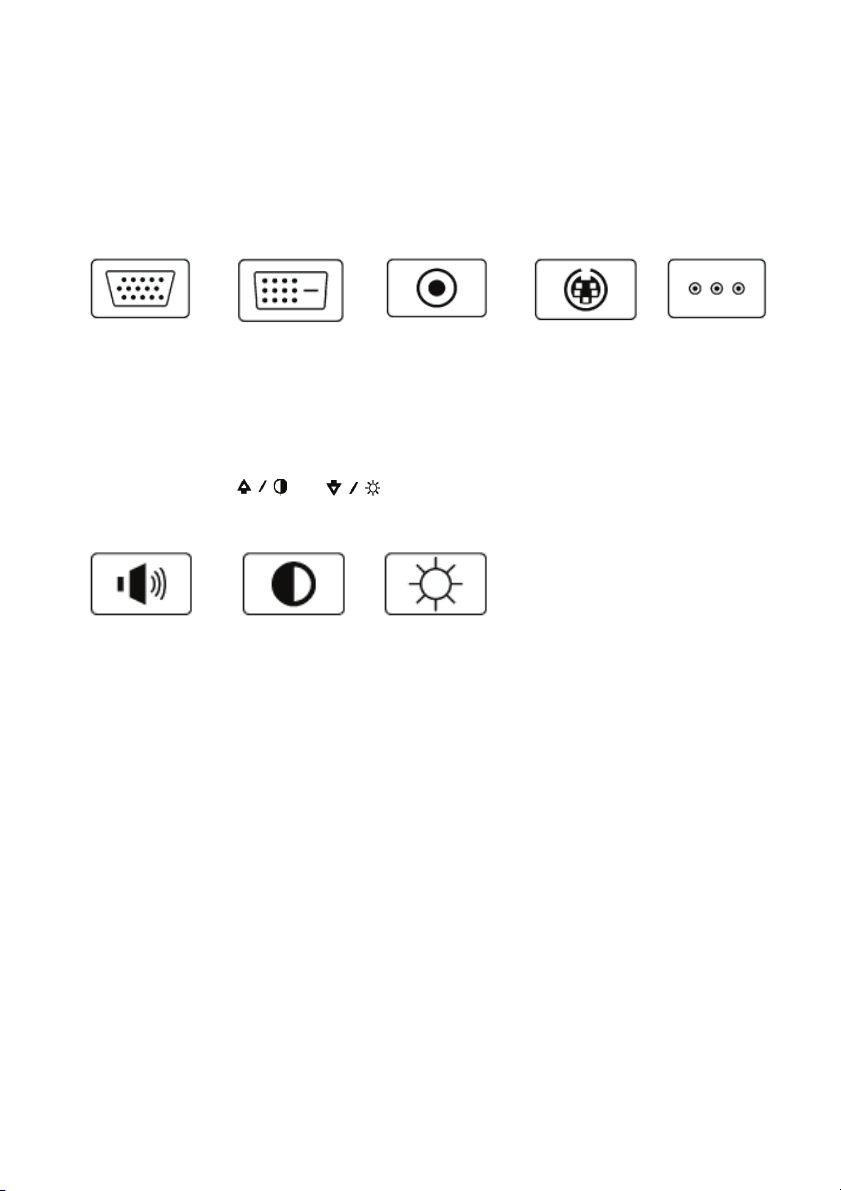
Selecting the input signal
Press the MODE button to scroll through these options onscreen.
VGA signal DVI signal Composite
signal
S-VIDEO
signal
Component
signal
Selecting the audio and video settings
Press the +, -, , or buttons to scroll through these options
onscreen and quickly adjust the value.
Volume
adjustment
Contrast
adjustment
Brightness
adjustment
Accessing the onscreen display (OSD) menus
1. Press the MODE button to select your input signal.
2. Press the MENU button to obtain the OSD menus for that input
signal.
3. Press the UP or DOWN button to scroll the OSD list displayed.
4. Before the OSD disappears, press MENU again to accept the
changes.
UltraView Color TFT LCD monitor 26 in./ 32 in./ 42 in. 9 • EN
Page 14

On-screen display (OSD) menus
1. Press the MENU button to obtain the OSD menus.
2. Before the OSD disappears, press MENU again to change the
mode.
3. Press the UP or DOWN button to scroll the OSD list
displayed.
VGA/DVI signal display
1 Brightness 50
2 Contrast 60
3 H-Position 50
4 V-Position 39
5 Clock 25
6 Phase 1
7 Color Temp. User
8 User Color R 50
9 User Color G 50
10 User Color B 50
11 OSD H-Pos. 50
12 OSD V-Pos. 50
13 Volume 50
14 Sub Source Video 1
15 Language English
16 Power Saving Off
17 Pixel Saver Mode On
18 Recall
10 • EN UltraView Color TFT LCD monitor 26 in./ 32 in./ 42 in.
Page 15
Sub menu: PIP/POP
PIP/POP
PIP/POP Off
Sub Source Composite 1
PIP Size Large
PIP H-Pos 0
PIP V-Pos 0
Swap
Table 1. Description of VGA/DVI options
Menu
options
Brightness Adjusts the background black level of the screen image (range 0
Contrast Adjusts the foreground white level of the screen image (range 0
H-Position * Adjusts the left or right position of the screen image (range 0 to
V-Position * Adjusts the up or down position of the screen image (range 0 to
Clock * Adjusts the horizontal sync width of the screen image (range 0 to
Phase * Adjusts the clarity of the screen image (range 0 to 100).
Color Temp. Press (+) or (-) to choose three types of color temperature
User Color R Adjusts the red color’s intensity of the screen image (range 0 to
User Color G Adjusts the green color’s intensity of the screen image (range 0
User Color B Adjusts the blue color’s intensity of the screen image (range 0 to
OSD H-Pos. Adjusts the left or right position of the OSD (range 0 to 100).
OSD V-Pos Adjusts the up or down position of the OSD (range 0 to 100).
Volume Adjusts the volume control.
PIP/POP View the video input screen image on the left-top screen. Press
Description
to 100).
to 100).
100).
100).
100).
9300°K , 6500°K , User Color
100).
to 100).
100).
UltraView Color TFT LCD monitor 26 in./ 32 in./ 42 in. 11 • EN
Page 16
Menu
options
Sub Source Select the source of the sub picture.
PIP Size Select the size of the sub picture.
PIP H-Pos Adjust the left or right position of the sub picture.
PIP V-Pos Adjust the up or down position of the sub picture.
Swap Swap the picture in picture.
Language Selects the language of the OSD text: English, Traditional
Power Saving Power saving mode selection;
Pixel Save
Mode
Recall Press (+) or (-) recall the default value.
Description
(+) or (-) to choose four types of PIP/POP: Composite, S-Video,
Component, Off.
Chinese, Simplified Chinese, French, German, Spanish, Italian,
Portuguese, Russian, and Japanese.
This is an active method to help stave off screen burn by rotating
the image slightly every 12 hours.
Note: Items marked * have different values after auto-tuning. However, DVI cannot
be adjusted.
VIDEO (Composite / S-Video) signal display
1
2
3
4
5
*
6
7
8
9
10
11
12
Brightness 50
Contrast 50
Tint 50
Color 50
Color Temp Standard
Sharpness 50
Scan Full
OSD H-Position 50
OSD V-Position 50
Volume 50
PIP/POP >
Language English
12 • EN UltraView Color TFT LCD monitor 26 in./ 32 in./ 42 in.
Page 17
13
14
* Color Temp depends on the region.
# 26 in. monitor sharpness default value is 19”.
Pixel Saver Mode On
Recall
Table 2. Description of VIDEO options
Menu options Description
Brightness Adjusts background black level of the screen image (range
0 to 100).
Contrast Adjusts foreground white level of the screen image (range
0 to 100).
Tint Adjusts the color tint. (NTSC only) (range 0 to 100)
Color Adjusts the color density (range 0 to 100).
Color Temp. Press (+) or (-) to choose three types of color temperature
9300°K, 6500°K , Standard.
Sharpness Adjusts the clarity and focus of the screen image (range 0
to 100).
Scan Press (+) or (-) to choose four type of over scan or under
scan or full scan or 1 : 1 scan.
H-Position Adjusts the up or down position of the screen image (range
0 to 100).
V-Position Adjusts the left or right position of the screen image (range
0 to 100).
Volume Adjusts the volume control.
PIP/POP View the video input screen image on the left-top screen.
Press (+) or (-) to choose three types of PIP : VGA, DVI,
Off.
Sub Source Select the source of the sub picture.
Size Select the size of the sub picture
PIP H-Pos Adjust the left or right position of the sub picture.
PIP V-Pos Adjust the up or down position of the sub picture.
Swap Swap the picture in picture.
Language Selects the language of the OSD text: English, Chinese,
French, German, Spanish, Italian or Japanese.
UltraView Color TFT LCD monitor 26 in./ 32 in./ 42 in. 13 • EN
Page 18
Menu options Description
Pixel Saver Mode This is an active method to help stave off screen burn by
rotating the image slightly every 12 hours.
Recall Press (+) or (-) recall the default value.
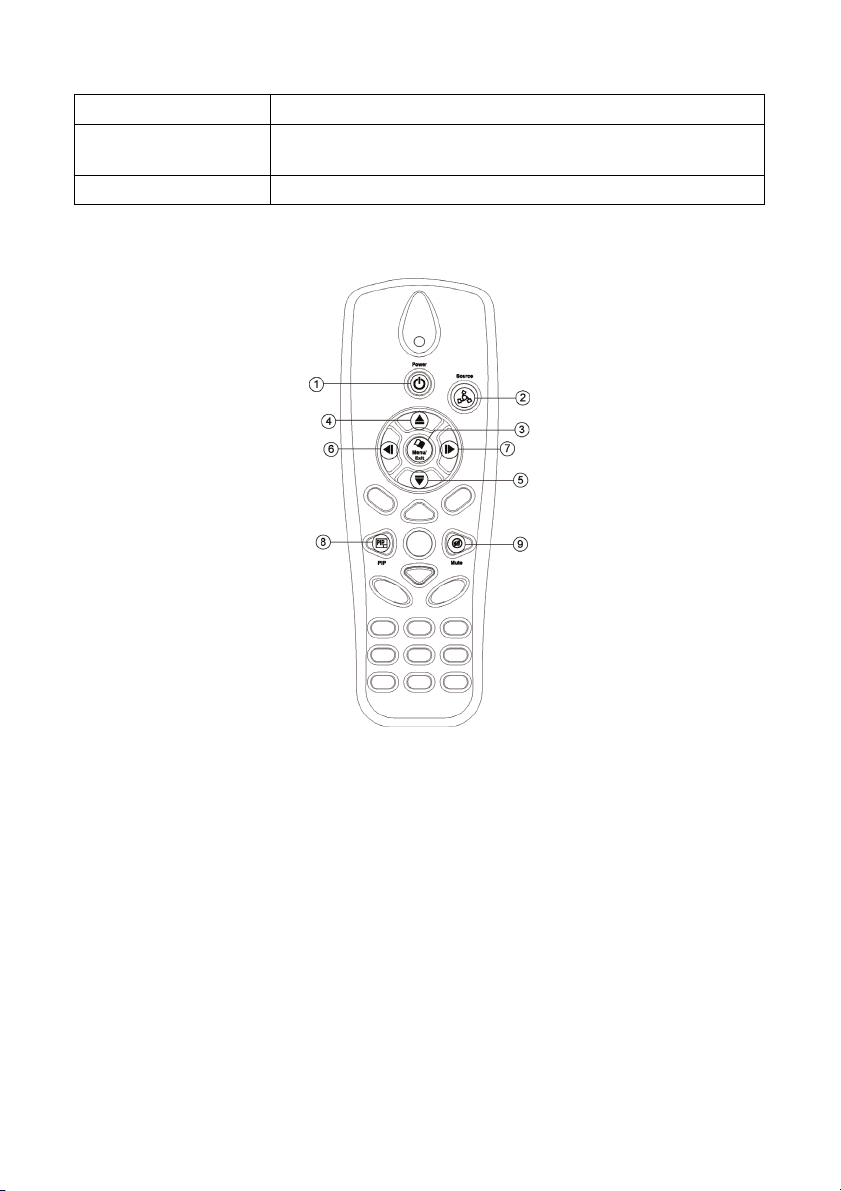
Using the remote control
1. Power Switch: Press to switch monitor on / off.
2. Source: Select input source - VGA, DVI, BNC1, BNC2, Y/C, Y
Cb Cr.
3. Menu/Exit: Recall or close OSD display, enter or return selection.
4. Up: Scroll up the OSD options.
5. Down: Scroll down the OSD options.
6. Left: Press to decrease the value of OSD option selected.
7. Right: Press to increase the value of OSD option selected.
14 • EN UltraView Color TFT LCD monitor 26 in./ 32 in./ 42 in.
Page 19
8. PIP: Press to select PIP function OSD menu.
9. Mute: Press to mute/unmute.
Battery instructions
The remote control provided with the product comes with one lithium
battery. To remove this battery, detach the control’s back cover, replace it
with another battery, and reattach the cover. For proper recycling, dispose
of all batteries as required by local ordinances or regulations.
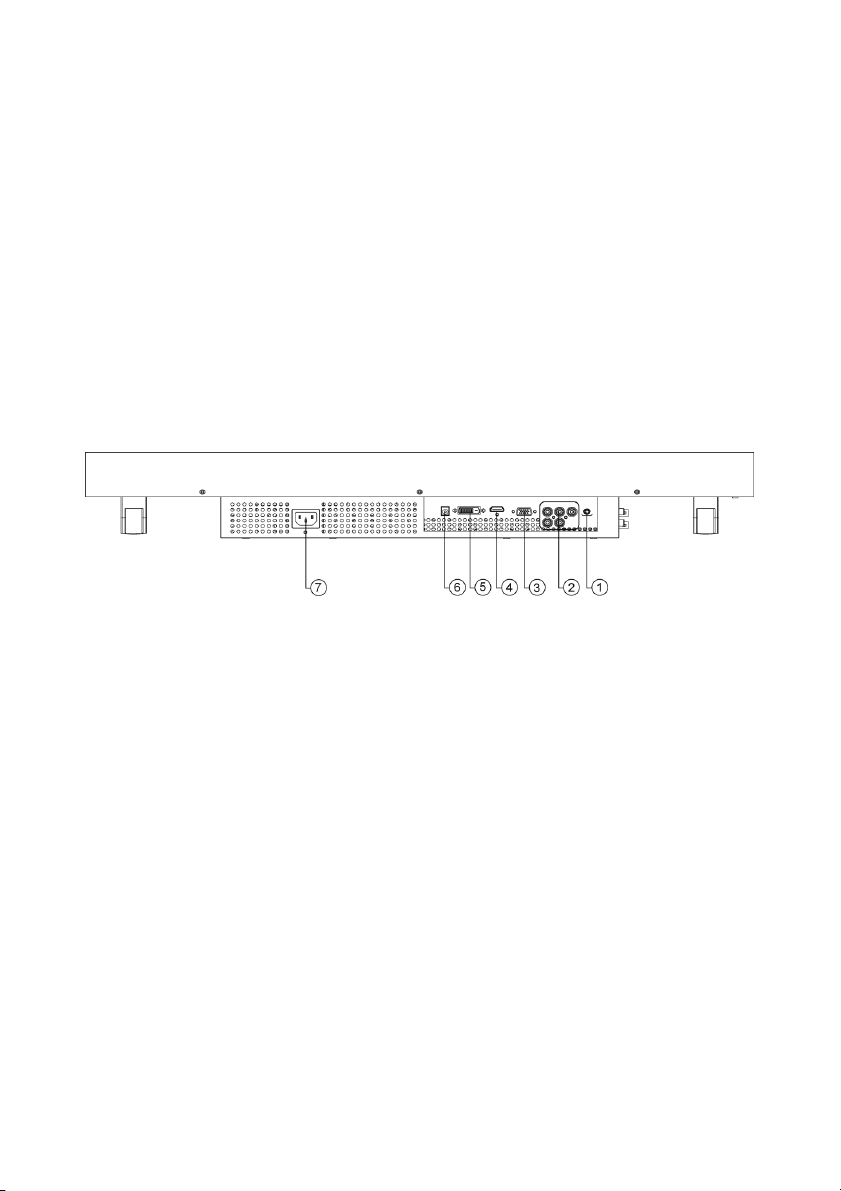
Connecting a video signal to the monitor
Figure 3. Input/Output interface
1.
VGA / DVI Audio Line In: Audio source with YPBPr.
2.
YPBPr / LR In (RCA jack): Connect to the I/O terminal of video equipment
such as a DVD.
3.
VGA In: Connect to an analog RGB output terminal such as the display card
output VGA terminal of the personal computer.
4.
HDMI: Option.
5.
DVI In: Connect to an analog RGB output terminal such as the display card
output DVI terminal of the personal computer..
6.
DC out for camera: Connect 12 VDC out for single camera power (max.
500mA).
7.
AC IN connector: Connect the AC power cord to the AC input connector and
wall socket.
UltraView Color TFT LCD monitor 26 in./ 32 in./ 42 in. 15 • EN
Page 20
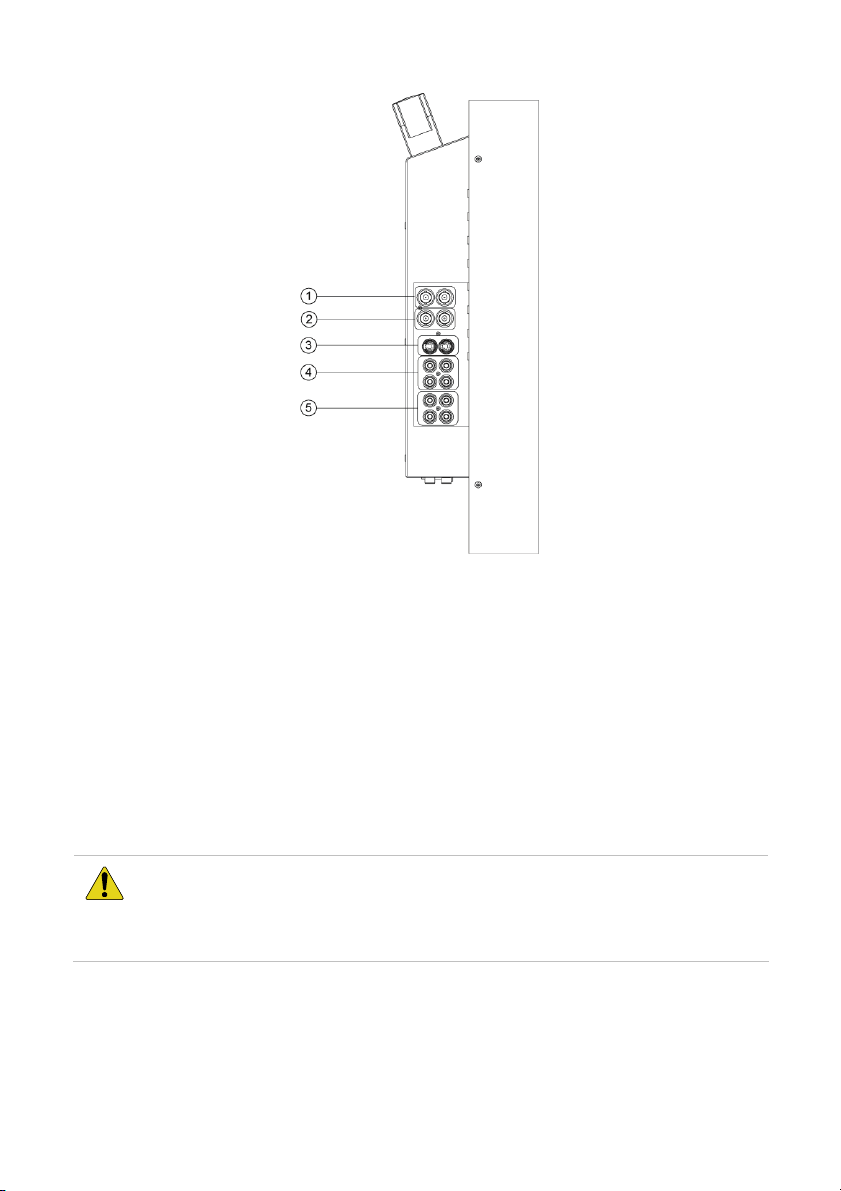
1.
VIDEO In / Out (2) (BNC-TYPE) : Connect to the output / input terminal of
video equipment, such as a VCR or a color video camera.
2.
VIDEO In / Out (1) (BNC-TYPE) : Connect to the output / input terminal of
video equipment, such as a VCR or a color video camera.
3.
Y/C In / Out (4-Pin mini-Din) : Connect to the Y/C output / input terminal of
camera VCR or other video equipment.
4.
Audio In / Out (RCA Jack) : Audio input / output terminal for BNC1.
5.
Audio In / Out (RCA Jack) : Audio input / output terminal for BNC2.
Note: It takes about 4 to 5 seconds to change mode. When the mode is changed,
the monitor shows a blue screen then enters signal input, or shows the message
“No Signal”.
CAUTION: AVOID directly pulling any cables when disconnecting
devices from the monitor. Always disconnect devices carefully by
firmly gripping the metal or plastic connector body and gently easing
the connector from its socket.
16 • EN UltraView Color TFT LCD monitor 26 in./ 32 in./ 42 in.
Page 21
Specifications
Model 26 in. 32 in.
Pixel pitch (H × V mm) 0.4215 × 0.4215 0.51075 × 0.51075
VGA / DVI 1366 × 768 pixel 1366 × 1024 pixel Maximum
resolution
Dimensions (W × H × D) 634 × 390 × 114 mm
Packing dimensions (W × H × D) 755 × 655 × 335 mm
Display mode VGA, DVI, Composite, S-VIDEO, Component
Signal connector DC 12V Out, VGA In, DVI In, BNC1 In/Out,
Front control panel buttons Power switch, Mode, Up (Contrast adjust),
OSD menu
Power input AC Input : 100 to 240 V (±10%) , 50 to 60 Hz
Operating conditions Temperature: 0 to 40°C (0 to 104°F),
Storage conditions Temperature: -20 to +60°C (-4 to 140°F),
VIDEO NTSC / PAL
769 × 467 × 112
(24.9 × 15.3 × 4.8 in.)
(29.7 × 25.8 × 13.2 in.)
BNC2 In/Out, Y/C In/Out, Y/C In/Out, Y PbPr,
Audio1 In/Out, Audio2 In/Out
Down (Brightness adjust), Menu, Auto, LED
indicator, Increase (Volume increase),
Decrease (Volume decrease)
VGA/DVI Brightness, Contrast, H-Position, V-Position,
Clock, Phase, Color Temp., User Color R, User
Color G, User Color B, OSD H-Position, OSD
V-Position, Volume, Language, PIP, PIP
Size/Pos., Source SWAP, Pixel Saver Mode,
Recall
VIDEO Color, Color Temp, Tint (NTSC only),
Brightness, Contrast, Sharpness, Volume,
OSD H-Position, OSD V-Position, Language,
Scan (1:1, Under Scan, Over Scan, Full Scan,
4:3, 16:9), PIP, PIP Size/Pos., Source SWAP,
Pixel Saver Mode, Recall
Relative humidity: 20 to 80%
Relative humidity: 15 to 85%
(30.3 × 18.3 × 4.4 in.)
921 × 725 × 359 mm
(36.2 × 28.5 ×
14.1 in.)
UltraView Color TFT LCD monitor 26 in./ 32 in./ 42 in. 17 • EN
Page 22

Model 26 in. 32 in.
Power consumption 80 W (max.) 100 W (max.)
Weight
Model 42 in.
Pixel pitch (H × V mm) 0.681 × 0.681
resolution
Dimensions (W × H × D) 993 × 598 × 126 mm
Packing dimensions (W × H × D) 1145 × 855 × 367 mm
Display mode VGA, DVI, Composite, S-VIDEO, Component
Signal connector CD 12V Out, VGA In, DVI In, BNC1 In/Out,
Front control panel buttons Power switch, Mode, Up (Contrast adjust),
OSD menu
Power input AC Input : 100 to 240 V (±10%) , 50 to 60 Hz
Net weight
(adapter
included)
Gross weight 17.3 kg (38. lb.) 27.5 kg (60.6 lb.)
VGA / DVI 1366 × 768 pixel Maximum
VIDEO NTSC / PAL
VGA/DVI/HDMI Brightness, Contrast, H-Position, V-Position,
VIDEO Color, Color Temp, Tint (NTSC only),
11.42 kg (25.2 lb.) 21.0 kg (46.3 lb.)
(39.0 × 23.5 × 4.5 in.)
(45.1 × 33.6 × 14.5 in.)
BNC2 In/Out, Y/C In/Out, Y PbPr, Audio1
In/Out, Audio2 In/Out
Down (Brightness adjust), Menu, Auto, LED
indicator, Increase (Volume increase),
Decrease (Volume decrease)
Clock, Phase, Color Temp., User Color R, User
Color G, User Color B, OSD H-Position, OSD
V-Position, Volume, Language, PIP, PIP
Size/Pos., Source SWAP, Pixel Saver Mode,
Recall
Brightness, Contrast, Sharpness, Volume,
OSD H-Position, OSD V-Position, Language,
Scan (1:1, Under Scan, Over Scan, Full Scan,
4:3, 16:9), PIP, PIP Size/Pos., Source SWAP,
Pixel Saver Mode, Recall
18 • EN UltraView Color TFT LCD monitor 26 in./ 32 in./ 42 in.
Page 23
Model 42 in.
Operating conditions Temperature: 0 to 40°C (0 to 104°F),
Relative humidity: 20 to 80%
Storage conditions Temperature: -20 to +60°C (-4 to 140°F),
Relative humidity: 15 to 85%
Power consumption 250 W (max.)
Weight
Net weight
(adapter
included)
Gross weight 43.1 kg (95.0 lb.)
32.5 kg (71.6 lb.)
UltraView Color TFT LCD monitor 26 in./ 32 in./ 42 in. 19 • EN
Page 24

20 • EN UltraView Color TFT LCD monitor 26 in./ 32 in./ 42 in.
Page 25

Français
Table des matières
Préface............................................................................................................................2
Termes et symboles de sécurité.................................................................................. 2
Mises en garde importantes....................................................................................2
Introduction ..................................................................................................................5
Caractéristiques de l'appareil......................................................................................... 5
Déballage................................................................................................................................... 5
Nettoyage de l'appareil...................................................................................................... 5
Dimensions du produit .............................................................................................6
Installation du support de base .............................................................................7
Centrale de détection incendie ..............................................................................8
Instructions d'utilisation ..........................................................................................9
Sélection du signal d'entrée............................................................................................ 9
Sélection des paramètres audio et vidéo ............................................................... 9
Accès aux menus de l'affichage à l'écran (OSD)............................................... 9
Menus OSD (affichage à l'écran) ............................................................................. 10
Utilisation de la télécommande............................................................................14
Instructions relatives à la pile...................................................................................... 15
Connexion d'un signal vidéo au moniteur .......................................................15
Spécifications ............................................................................................................17
UltraView Moniteur couleur TFT LCD 26 po./ 32 po./ 42 po. 1 • FR
Page 26
Préface
Ceci est le Manuel d'utilisation du Moniteur couleur TFT LCD 26 po./ 32
po./ 42 po. d'UltraView. Lire entièrement ces instructions et toute la
documentation annexe avant d'installer ou d'utiliser ce produit.
Termes et symboles de sécurité
Ces termes peuvent apparaître dans le présent manuel :
ATTENTION : Le terme Attention identifie les conditions ou les manœuvres
pouvant endommager l’équipement ou toute autre propriété.
AVERTISSEMENT : Les avertissements identifient les conditions ou les
manœuvres pouvant endommager l’équipement ou entraîner des blessures
corporelles graves.
Mises en garde importantes
1. Lisez, suivez et conservez ces instructions : toutes les
instructions utilisateur et les mises en garde doivent être lues avant
toute utilisation de cet appareil. Conservez ces instructions pour
pouvoir vous y référer ultérieurement.
2. Précautions d'installation :
N'obstruez pas les orifices d'aération. Procédez à l'installation
conformément aux instructions du fabricant. N'insérez pas d'objets
métalliques dans les orifices d'aération du moniteur et veillez à ne
pas renverser de liquide sur l'appareil sous peine de blessures
sévères.
Assurez-vous que le moniteur est installé dans un endroit
correctement aéré pour éviter toute surchauffe de l'appareil.
N'utilisez que les accessoires spécifiés par le fabricant ou ceux
vendus avec l'appareil.
Si vous n'utilisez pas la base standard, pour des raisons de
sécurité, utilisez les vis M4 avec les rondelles plates et les
rondelles élastiques fournies, d'une longueur de 8 à 10 mm.
EVITEZ de placer et de faire fonctionner le moniteur dans les
environnements suivants :
températures extrêmes, chaudes ou froides
• forte humidité
FR • 2 UltraView Moniteur couleur TFT LCD 26 po./ 32 po./ 42 po.
Page 27

• lumière directe du soleil
• endroits excessivement poussiéreux
• à proximité de tout autre équipement générant un champ
magnétique puissant
3. Eau et humidité : n'utilisez pas cet appareil à proximité de l'eau.
Pour réduire les risques d'incendie ou d'électrocution, n'exposez
pas l'appareil à la pluie ou à l'humidité.
4. Protection des cordons d'alimentation : les cordons
d'alimentation doivent être placés dans un endroit où ils ne risquent
pas d'être piétinés ou coincés. Vérifiez avec un soin particulier
l'emplacement des cordons et des fiches, des prises de courant et
du point de sortie de l'appareil.
Ne surchargez pas le cordon d'alimentation ou l'adaptateur.
Ne placez pas le cordon d'alimentation ou le câble de l'écran
dans un endroit humide.
5. Entretien de l'appareil : ne touchez pas l'écran avec vos doigts.
Les huiles sécrétées par votre peau peuvent laisser des marques à
la surface de l'écran. Ces marques sont difficiles à nettoyer et
peuvent endommager l'écran irrémédiablement. N'exercez pas de
pression sur l'écran LCD. Ce composant est très fragile.
6. Nettoyage : ne nettoyez l'appareil qu'avec un chiffon sec.
7. Réparation : n'essayez pas de réparer cet appareil vous-même.
En ouvrant ou en retirant les caches de l'appareil, vous vous
exposez à des risques d’électrocution et autres dangers.
L’entretien doit être effectué par du personnel qualifié.
Débranchez l'appareil et confiez-le à un service de réparation
qualifié si l'un de ces événements se produit :
• Le cordon d'alimentation ou la fiche sont endommagés.
• Du liquide a été renversé ou un objet est tombé dans l'appareil.
• L'appareil a été exposé à la pluie ou à l'humidité.
• L'appareil ne fonctionne pas correctement.
• L'appareil a été renversé.
8. Foudre : pour une protection optimale en cas d'orage ou lorsque
l'appareil reste inutilisé pendant une période prolongée,
UltraView Moniteur couleur TFT LCD 26 po./ 32 po./ 42 po. 3 • FR
Page 28
débranchez-le de la prise murale et déconnectez le câblage.
L'appareil sera ainsi protégé contre la foudre et les surtensions.
9. Prise secteur (2 broches/3 broches) :
1. Ne retirez pas la connexion à la terre de la prise
d'alimentation/secteur.
2. N'oubliez pas de débrancher le moniteur LCD de sa source
d'alimentation dans les cas suivants :
• Le moniteur va rester inutilisé pendant une période
prolongée.
• Le cordon d'alimentation ou la fiche sont endommagés.
• Veuillez vous référer au manuel d'utilisation lorsque vous
connectez ou déconnectez le moniteur LCD de sa source
principale ou de tout autre système et lorsque vous
effectuez des réglages. Si un événement imprévu survient
lorsque l'appareil est sous tension, débranchez l'appareil
et retirez le cordon d'alimentation. Si le problème n'est pas
expliqué dans le manuel d'utilisation, contactez votre
revendeur local.
• Le boîtier du moniteur a été endommagé.
ATTENTION : n'essayez pas de démonter cet appareil. Toute tentative de
démontage ou de retrait du boîtier de protection de cet appareil entraîne
une annulation de la garantie et peut également engendrer de graves
blessures.
FR • 4 UltraView Moniteur couleur TFT LCD 26 po./ 32 po./ 42 po.
Page 29

Introduction
Cet appareil utilise un moniteur TFT (transistor à couches minces) couleur
à matrice active 26/32/42 po., pour une qualité d'image supérieure. La
résolution maximale est de 1366 x 768, ce qui garantit des images
complexes et d'excellente qualité. De plus, ce moniteur vous donne
également accès aux nouvelles commandes OSD (affichage à l'écran). Il
est également muni de haut-parleurs multimédia intégrés.
Caractéristiques de l'appareil
Moniteur TFT-LCD couleur haut contraste avec prise en charge de
la résolution VGA jusqu'à 1366 x 768, résolution du signal vidéo
jusqu'à 500 lignes TV.
Borne BNC pour signal vidéo, borne S-Vidéo et borne RCA pour
signal composant intégrées ainsi que prise jack RCA pour signal
audio.
Fonction OSD complète pour un affichage optimal à l'écran.
Déballage
Le coffret standard inclut les éléments suivants :
Moniteur TFT-LCD 26/32/42 po.
Télécommande
Câble VGA
Câble DVI-I
Manuel d'utilisation
Nettoyage de l'appareil
Pour nettoyer ou dépoussiérer l'écran, utilisez un chiffon doux en
coton et essuyez délicatement.
N'exercez pas de pression sur l'écran lorsque vous l'essuyez.
N'utilisez ni eau, ni détergent chimique pour nettoyer la surface de
l'écran. Les détergents chimiques risquent de l'endommager.
UltraView Moniteur couleur TFT LCD 26 po./ 32 po./ 42 po. 5 • FR
Page 30
Dimensions du produit
Moniteur 26 pouces
Moniteur 32 pouces
FR • 6 UltraView Moniteur couleur TFT LCD 26 po./ 32 po./ 42 po.
Page 31

Moniteur 42 pouces
Installation du support de base
Voir la Figure 1 pour les instructions.
Figure 1. Installation du support de base
UltraView Moniteur couleur TFT LCD 26 po./ 32 po./ 42 po. 7 • FR
Page 32

Centrale de détection incendie
Figure 2. Description de la centrale de détection incendie
Légende Bouton Description
1.
2.
3.
4.
5.
6.
7.
8.
9.
LED
POWER (Alimentation) : met l'appareil sous tension ou hors
tension.
MODE permet de sélectionner le signal d'entrée.
Remarque : Lorsqu'on appuie sur ce bouton la première fois,
l'OSD du signal actuel s'affiche. Avant qu'il ne disparaisse,
appuyez à nouveau pour changer de mode.
AUTO : permet de régler le signal VGA automatiquement.
PLUS : permet d'augmenter la valeur de l'option sélectionnée sur
+
l’OSD ainsi que le volume.
MINUS (MOINS) : permet de diminuer la valeur de l'option
sélectionnée sur l’OSD ainsi que le volume.
-
UP (HAUT) : permet de naviguer dans la liste d'options de l’OSD
et de régler le contraste.
DOWN (BAS) : permet de naviguer dans la liste d'options de
l’OSD et de régler la luminosité.
MENU : permet d'afficher ou de fermer l'affichage OSD, et
d’entrer dans la liste de sélection des options.
Verte : Sous tension ; Orange : Pas de signal ; Rouge : Economie
d'énergie ; Eteinte : Unité non alimentée
FR • 8 UltraView Moniteur couleur TFT LCD 26 po./ 32 po./ 42 po.
Page 33

Instructions d'utilisation
Sélection du signal d'entrée
Appuyez sur la touche MODE pour naviguer entre ces options à l'écran.
Signal VGA Signal DVI Signal
Composite
Signal SVIDEO
Signal
composant
Sélection des paramètres audio et vidéo
Appuyez sur le bouton +, -, , ou pour faire défiler ces options
à l'écran et régler rapidement la valeur.
Réglage du
volume
Réglage du
contraste
Réglage de la
luminosité
Accès aux menus de l'affichage à l'écran (OSD)
1. Appuyez sur le bouton MODE pour sélectionner votre signal
d'entrée.
2. Appuyez sur le bouton MENU pour afficher les menus de l’OSD
pour ce signal d'entrée.
3. Appuyez sur les boutons HAUT ou BAS pour naviguer dans la liste
OSD affichée.
4. Avant que l'OSD ne disparaisse, appuyez à nouveau sur le bouton
MENU pour accepter les changements.
UltraView Moniteur couleur TFT LCD 26 po./ 32 po./ 42 po. 9 • FR
Page 34

Menus OSD (affichage à l'écran)
1. Appuyez sur le bouton MENU pour afficher les menus de l’OSD.
2. Avant que l'OSD ne disparaisse, appuyez à nouveau sur le bouton
MENU pour changer de mode.
3. Appuyez sur le bouton HAUT ou BAS pour naviguer dans la
liste OSD affichée.
Affichage du signal VGA/DVI
1 Luminosité 50
2 Contraste 60
3 Position H 50
4 Position V 39
5 Horloge 25
6 Phase 1
7 Temp. couleur User (Utilisateur)
8 Couleur utilisateur R 50
9 Couleur utilisateur V 50
10 Couleur utilisateur B 50
11 Pos. H OSD 50
12 Pos. V OSD 50
13 Volume 50
14 Source secondaire Vidéo 1
15 Langue English (Anglais)
16 Economie d'énergie Off (Arrêt)
17 Mode économiseur de pixels On (Marche)
18 Réinitialisation
FR • 10 UltraView Moniteur couleur TFT LCD 26 po./ 32 po./ 42 po.
Page 35

Sous-menu : PIP/POP
PIP/POP
PIP/POP Off (Arrêt)
Source secondaire Composite 1
Taille PIP Large (Grande)
Pos. H PIP 0
Pos. V PIP 0
Echange
Tableau 1. Description des options VGA/DVI
Options de menu Description
Luminosité Règle le niveau de noir de l'arrière-plan de l'image à l'écran (entre 0
et 100).
Contraste Règle le niveau de blanc de l'avant-plan de l'image à l'écran (entre 0
et 100).
Position H* Règle la position horizontale de l’image à l'écran (entre 0 et 100).
Position V * Règle la position verticale de l’image à l'écran (entre 0 et 100).
Horloge * Règle la largeur de la synchronisation horizontale de l'image à l'écran
(entre 0 et 100).
Phase * Règle la clarté de l'image à l'écran (range 0 to 100).
Temp. couleur Les touches (+) ou (-) permettent de choisir entre trois types de
température de couleur : 9300°K, 6500°K, User Color.
Couleur utilisateur R Règle l'intensité de la couleur rouge de l'image à l'écran (entre 0 et
100).
Couleur utilisateur V Règle l'intensité de la couleur verte de l'image à l'écran (entre 0 et
100).
Couleur utilisateur B Règle l'intensité de la couleur bleue de l'image à l'écran (entre 0 et
100).
Pos. H OSD Règle la position horizontale de l’affichage (OSD) (entre 0 et 100).
Pos. V OSD Règle la position verticale de l’OSD (entre 0 et 100).
Volume Règle le volume.
PIP/POP Affiche l'image d'entrée vidéo dans le coin supérieur gauche de
l'écran. Les touches (+) et (-) permettent de choisir parmi quatre types
d’options PIP/POP : Composite, S-vidéo, composant, arrêt.
Source secondaire Sélectionne la source de l'image secondaire.
UltraView Moniteur couleur TFT LCD 26 po./ 32 po./ 42 po. 11 • FR
Page 36

Options de menu Description
Taille PIP Sélectionne la taille de l'image secondaire.
Pos. H PIP Règle la position horizontale de l'image secondaire.
Pos. V PIP Règle la position verticale de l'image secondaire.
Echange Echange l'incrustation d'image
Langue Sélectionne la langue du texte de l’OSD : anglais, chinois traditionnel,
chinois simplifié, français, allemand, espagnol, italien, portugais,
russe ou japonais.
Economie d'énergie Sélection du mode Economie d'énergie ;
Mode économiseur
de pixels
Réinitialisation Appuyez sur (+) ou (-) pour réinitialiser la valeur par défaut.
Il s'agit d'une méthode active qui permet de réduire la brûlure d'écran
en tournant légèrement l'image toutes les 12 heures.
Remarque : Les valeurs des éléments marqués d'un astérisque (*) changent après
un réglage automatique. En revanche les DVI ne peuvent pas être réglés.
Affichage du signal VIDEO (Composite / S-Video)
1
2
3
4
*
5
6
7
8
9
10
11
12
13
14
* La température de couleur dépend de la région.
La valeur de netteté par défaut du moniteur 26 po. est de 19”.
Luminosité 50
Contraste 50
Teinte 50
Couleur 50
Temp. couleur Standard
Netteté 50
Balayage Full (plein)
Position H OSD 50
Position V OSD 50
Volume 50
PIP/POP >
Langue English (Anglais)
Mode économiseur de pixels On (Marche)
Réinitialisation
FR • 12 UltraView Moniteur couleur TFT LCD 26 po./ 32 po./ 42 po.
Page 37

Tableau 2. Description des options VIDEO
Options de menu Description
Luminosité Règle le niveau de noir de l'arrière-plan de l'image à l'écran
(range 0 to 100).
Contraste Règle le niveau de blanc de l'avant-plan de l'image à
l'écran (entre 0 et 100).
Teinte Règle la teinte de la couleur. (NTSC uniquement) (entre 0
et 100)
Couleur Règle la densité de la couleur (entre 0 et 100).
Temp. couleur Les touches (+) ou (-) permettent de choisir entre trois
types de température de couleur : 9300°K, 6500°K,
Standard.
Netteté Règle la clarté et la mise au point de l'image à l'écran
(entre 0 et 100).
Balayage Les touches (+) et (-) permettent de choisir parmi quatre
types de surbalayage, de sous-balayage, de balayage
complet ou de balayage 1:1.
Position H Règle la position verticale de l’image à l'écran (entre 0 et
100).
Position V Règle la position horizontale de l’image à l'écran (entre 0 et
100).
Volume Règle le volume.
PIP/POP Affiche l'image d'entrée vidéo dans le coin supérieur
gauche de l'écran. Les touches (+) et (-) permettent de
choisir parmi trois types d’options PIP : VGA, DVI, arrêt.
Source secondaire Sélectionne la source de l'image secondaire.
Taille Sélectionne la taille de l'image secondaire.
Pos. H PIP Règle la position horizontale de l'image secondaire.
Pos. V PIP Règle la position verticale de l'image secondaire.
Echange Echange l'incrustation d'image
Langue Sélectionne la langue du texte de l’OSD : anglais,
mandarin, français, allemand, espagnol, italien ou japonais.
Mode économiseur
de pixels
Réinitialisation Appuyez sur (+) ou (-) pour réinitialiser la valeur par défaut.
Il s'agit d'une méthode active qui permet de réduire la
brûlure d'écran en tournant légèrement l'image toutes les
12 heures.
UltraView Moniteur couleur TFT LCD 26 po./ 32 po./ 42 po. 13 • FR
Page 38

Utilisation de la télécommande
1. Bouton marche/arrêt : met l'appareil sous tension ou hors
tension.
2. Source : Sélectionne la source d'entrée - VGA, DVI, BNC1,
BNC2, Y/C, Y Cb Cr.
3. Menu/Sortie : permet d'afficher ou de fermer l'affichage OSD, et
d’entrer ou de retourner dans la liste de sélection.
4. Haut : Fait défiler les options OSD vers le haut.
5. Bas : Fait défiler les options OSD vers le bas.
6. Gauche : permet de diminuer la valeur de l'option sélectionnée sur
l’OSD.
7. Droite : permet d'augmenter la valeur de l'option sélectionnée sur
l’OSD.
8. PIP : permet de sélectionner la fonction PIP du menu OSD.
9. Sourdine : Appuyer pour désactiver/activer le son.
FR • 14 UltraView Moniteur couleur TFT LCD 26 po./ 32 po./ 42 po.
Page 39

Instructions relatives à la pile
La télécommande fournie avec le produit est dotée d'une pile au lithium.
Pour enlever cette pile, démontez le couvercle arrière de la télécommande,
remplacez la pile par une autre pile et replacez le couvercle. Pour
permettre leur recyclage correct, éliminez toutes les piles dans le respect
des réglementations ou ordonnances locales.
Connexion d'un signal vidéo au moniteur
Figure 3. Interface Entrée/Sortie
1.
Entrée audio VGA / DVI : Source audio avec YPBPr.
2.
Entrée YPBPr / LR (jack RCA ) : reliez cette borne à la borne de
sortie/d'entrée du matériel vidéo, comme un lecteur DVD.
3.
Entrée VGA : reliez cette borne à une borne de sortie RVB analogique, tel
que la borne VGA de sortie de la carte d'affichage du PC.
4.
HDMI : Option.
5.
Entrée DVI : reliez cette borne à une borne de sortie RVB analogique, tel que
la borne DVI de sortie de la carte d'affichage du PC.
6.
Sortie DC pour caméra : raccordez cette borne à une sortie 12 VDC pour
alimenter une seule caméra (max. 500 mA).
7.
Connecteur d'entrée AC : Branchez le cordon d’alimentation AC au
connecteur d’entrée AC et à une prise murale.
UltraView Moniteur couleur TFT LCD 26 po./ 32 po./ 42 po. 15 • FR
Page 40

1.
Entrée / Sortie VIDEO (2) (type BNC) : reliez cette borne à la borne de
sortie/d'entrée du matériel vidéo, comme par exemple un magnétoscope ou
une camera vidéo couleur.
2.
Entrée/sortie VIDEO (1) (type BNC) : reliez cette borne à la borne de
sortie/d'entrée du matériel vidéo, comme par exemple un magnétoscope ou
une camera vidéo couleur.
3.
Entrée/sortie Y/C (4-Pin mini-Din) : reliez cette borne à la borne de
sortie/d'entrée Y/C d'un appareil photo, d'un magnétoscope ou d'un autre
appareil vidéo.
4.
Entrée/sortie Audio (jack RCA) : borne d'entrée/de sortie audio pour BNC1.
5.
Entrée/sortie Audio (jack RCA) : borne d'entrée/de sortie audio pour BNC2.
Remarque : un changement de mode prend 4 à 5 secondes. Lorsque le mode
change, le moniteur affiche un écran bleu, puis le message « Signal Input » (Entrée
signal) ou « No Signal » (Aucun signal).
ATTENTION : EVITEZ de tirer sur les câbles pour les débrancher du
moniteur. Saisissez fermement la fiche en métal ou en plastique du
connecteur et sortez-la de la prise en douceur.
FR • 16 UltraView Moniteur couleur TFT LCD 26 po./ 32 po./ 42 po.
Page 41

Spécifications
Modèle 26 po. 32 po.
Pas de pixel (H x V mm) 0.4215 × 0.4215 0.51075 × 0.51075
VGA / DVI 1366 x 768pixels 1366 × 1024 pixels Résolution
maximum
Dimensions (l/H/P) 634 × 390 × 114 mm 769 × 467 × 112
Dimensions de l'emballage (l/H/P) 755 × 655 × 335 mm 921 × 725 × 359 mm
Mode d'affichage VGA, DVI, Composite, S-VIDEO, Composant
Connecteur signal Sortie DC 12V, Entrée VGA, Entrée DVI,
Boutons du panneau de
commande avant
Menu OSD
Entrée d'alimentation Entrée AC : 100 à 240 V (±10%) , 50 à 60 Hz
Conditions de fonctionnement Température : 0 à 40°C,
Conditions de stockage Température : -20 à +60°C,
VIDEO NTSC/PAL
Entrée/sortie BNC1, Entrée/sortie BNC2,
Entrée/sortie Y/C, Entrée/sortie Y/C, Y PbPr,
Entrée/sortie Audio1, Entrée/sortie Audio2
Alimentation, Mode, Haut (réglage du
contraste), Bas (réglage de la luminosité),
Menu, Auto, LED, Augmenter (augmentation du
volume), Diminuer (diminution du volume)
VGA / DVI Luminosité, Contraste, Position H, Position V,
Horloge, Phase, Temp. couleur, Couleur
utilisateur R, Couleur utilisateur V, Couleur
utilisateur B, Position H OSD, Position V OSD,
Volume, Langue, PIP, Taille/Pos. PIP,
ECHANGE source, Mode économiseur de
pixels, Réinitialisation
VIDEO Couleur, Temp. couleur, Teinte (NTSC
uniquement), Luminosité, Contraste, Netteté,
Volume, Position H OSD, Position V OSD,
Langue, Balayage (1:1, Sous-balayage,
Surbalayage, Balayage plein, 4:3, 16:9), PIP,
Taille/Pos. PIP, ECHANGE source, Mode
économiseur de pixels, Réinitialisation
Humidité relative : 20 à 80%
UltraView Moniteur couleur TFT LCD 26 po./ 32 po./ 42 po. 17 • FR
Page 42

Modèle 26 po. 32 po.
Humidité relative : 15 à 85%
Consommation 80 W (max.) 100 W (max.)
Poids
Modèle 42 po.
Pas de pixel (H x V mm) 0.681 × 0.681
maximum
Dimensions (l/H/P) 993 × 598 × 126 mm
Dimensions de l'emballage (l/H/P) 1145 × 855 × 367 mm
Mode d'affichage VGA, DVI, Composite, S-VIDEO, Composant
Connecteur signal Sortie DC 12V, Entrée VGA, Entrée DVI,
Boutons du panneau de
commande avant
Menu OSD
Entrée d'alimentation Entrée AC : 100 à 240 V (±10%) , 50 à 60 Hz
Poids net
(adaptateur
inclus)
Poids total 17,3 kg 27,5 kg
VGA / DVI 1366 x 768pixels Résolution
VIDEO NTSC/PAL
VGA/DVI/HDMI Luminosité, Contraste, Position H, Position V,
VIDEO Couleur, Temp. couleur, Teinte (NTSC
11,42 kg 21,0 kg
Entrée/sortie BNC1, Entrée/sortie BNC2,
Entrée/sortie Y/C, Y PbPr, Entrée/sortie
Audio1, Entrée/sortie Audio2
Alimentation, Mode, Haut (réglage du
contraste), Bas (réglage de la luminosité),
Menu, Auto, LED, Augmenter (augmentation du
volume), Diminuer (diminution du volume)
Horloge, Phase, Temp. couleur, Couleur
utilisateur R, Couleur utilisateur V, Couleur
utilisateur B, Position H OSD, Position V OSD,
Volume, Langue, PIP, Taille/Pos. PIP,
ECHANGE source, Mode économiseur de
pixels, Réinitialisation
uniquement), Luminosité, Contraste, Netteté,
Volume, Position H OSD, Position V OSD,
Langue, Balayage (1:1, Sous-balayage,
Surbalayage, Balayage plein, 4:3, 16:9), PIP,
Taille/Pos. PIP, ECHANGE source, Mode
économiseur de pixels, Réinitialisation
FR • 18 UltraView Moniteur couleur TFT LCD 26 po./ 32 po./ 42 po.
Page 43

Modèle 42 po.
Conditions de fonctionnement Température : 0 à 40°C,
Humidité relative : 20 à 80%
Conditions de stockage Température : -20 à +60°C,
Humidité relative : 15 à 85%
Consommation 250 W (max.)
Poids
Poids net
(adaptateur
inclus)
Poids total 43,1 kg
32,5 kg
UltraView Moniteur couleur TFT LCD 26 po./ 32 po./ 42 po. 19 • FR
Page 44

FR • 20 UltraView Moniteur couleur TFT LCD 26 po./ 32 po./ 42 po.
Page 45

Deutsch
Inhalt
Vorwort .......................................................................................................... 2
Sicherheitshinweise und -symbole....................................................... 2
Wichtige Sicherheitsvorkehrungen ............................................................ 2
Einführung..................................................................................................... 5
Produkteigenschaften........................................................................... 5
Lieferumfang......................................................................................... 5
Reinigung des Produkts ....................................................................... 5
Produktabmessungen.................................................................................. 6
Installieren des Standfußes......................................................................... 7
Bedienelement ..............................................................................................8
Bedienungshinweise.................................................................................... 9
Auswählen des Eingangssignals:......................................................... 9
Auswählen der Audio- und Videoeinstellungen.................................... 9
Zugreifen auf die OSD-Menüs.............................................................. 9
OSD-Menüs........................................................................................ 10
Verwenden der Fernbedienung................................................................. 14
Anweisungen zur Batterie .................................................................. 15
Verbinden eines Videosignals mit dem Monitor...................................... 15
Technische Daten....................................................................................... 17
UltraView TFT-LCD-Farbmonitor 26''/ 32''/ 42'' 1 • DE
Page 46

Vorwort
Dies ist das Benutzerhandbuch für den UltraView TFT-LCD-Farbmonitor
26''/ 32''/ 42''. Lesen Sie diese Anweisungen und die gesamte
Begleitdokumentation durch, bevor Sie dieses Produkt installieren oder
bedienen.
Sicherheitshinweise und -symbole
Folgende Begriffe können in diesem Handbuch vorkommen:
ACHTUNG: „Achtung“ verweist auf Bedingungen oder Vorgehensweisen, die
zu Geräteschäden oder Schäden an anderen Gegenständen führen können.
WARNUNG: „Warnung“ verweist auf Bedingungen oder Vorgehensweisen,
die zu Geräteschäden oder schweren Verletzungen führen könnten.
Wichtige Sicherheitsvorkehrungen
1. Lesen und befolgen Sie die folgenden Anweisungen und
bewahren Sie sie auf: Alle Sicherheits- und Benutzerhinweise
sollten vor der Benutzung dieses Geräts gelesen und befolgt
werden. Bewahren Sie dieses Benutzerhandbuch auf, damit Sie
bei Bedarf Hinweise nachschlagen können.
2. Sicherheitshinweise für die Installation:
Verdecken Sie nie die Lüftungsöffnungen. Führen Sie die
Installation gemäß den Hinweisen des Herstellers aus. Achten Sie
darauf, dass keine metallischen Gegenstände in die
Belüftungsöffnungen gelangen und dass Sie keine Flüssigkeiten
über dem Gerät verschütten, da dies zu schweren Verletzungen
führen kann.
Achten Sie darauf, dass der Monitor immer in einer gut belüfteten
Umgebung steht, damit er nicht überhitzt.
Benutzen Sie ausschließlich Zubehör, dass vom Hersteller
empfohlen oder dass zusammen mit dem Gerät verkauft wird.
Wenn der Standard-Monitorständer nicht benutzt wird, sollten aus
Sicherheitsgründen M4-Schrauben (Länge 8 bis 10 mm) und die
mitgelieferten Unterlegscheiben und Federscheiben verwendet
werden.
Achten Sie darauf, dass der Monitor am Aufstell- oder Lagerort vor
folgenden Bedingungen geschützt ist:
DE • 2 UltraView TFT-LCD-Farbmonitor 26''/ 32''/ 42''
Page 47

Extreme Temperaturen, sei es heiß oder kalt.
• Hohe Luftfeuchtigkeit.
• Direktes Sonnenlicht.
• Übermäßig staubige Umgebungen.
• Unmittelbare Nähe zu Geräten, die ein starkes Magnetfeld
erzeugen.
3. Wasser und Feuchtigkeit: Benutzen Sie dieses Gerät nicht in der
Nähe von Wasser. Um das Risiko eines Brands oder elektrischen
Schocks zu vermeiden, sollten Sie das Gerät nicht Regen oder
Feuchtigkeit aussetzen.
4. Sicherheitsmaßnahmen für das Stromkabel: Stromkabel sollten
so verlegt werden, dass möglichst niemand auf sie tritt und sie
nicht eingeklemmt werden. Achten Sie auf Kabel, Stecker,
Steckdosen und auf die Austrittsstellen der Kabel am Gerät.
Das Stromkabel oder der Adapter sollten nie überlastet
werden.
Das Strom- oder Signalkabel sollte nie Feuchtigkeit ausgesetzt
werden.
5. Umgang mit dem Produkt: Berühren Sie den Bildschirm nicht
direkt mit den Fingern. Der Talg auf der Haut kann Abdrücke auf
dem Schirm hinterlassen, die schwer zu entfernen sind und die den
Schirm dauerhaft beschädigen können. Üben Sie keinen Druck auf
den LCD-Bildschirm aus. Der LCD-Bildschirm ist sehr empfindlich.
6. Reinigung: Reinigen Sie das Gerät nur mit einem trockenen Tuch.
7. Wartung: Versuchen Sie nicht, das Gerät zu warten, sondern
überlassen Sie dies Fachleuten. Wenn Sie das Gehäuse öffnen
oder Abdeckungen entfernen, droht unter anderem Gefahr durch
hohe Stromspannungen. Alle Servicearbeiten sind qualifizierten
Fachkräften zu überlassen.
In den folgenden Fällen sollten Sie das Gerät von der
Hauptstromversorgung trennen und von qualifizierten
Fachkräften warten lassen:
• Wenn das Stromkabel oder der Stecker beschädigt ist.
• Wenn Flüssigkeit über dem Gerät verschüttet wurde oder ein
Gegenstand in das Innere des Geräts gelangt ist.
• Wenn das Gerät Regen oder Feuchtigkeit ausgesetzt wurde.
• Wenn das Gerät nicht normal funktioniert.
• Wenn das Gerät fallen gelassen wurde.
UltraView TFT-LCD-Farbmonitor 26''/ 32''/ 42'' 3 • DE
Page 48

8. Blitzeinschlag: Während eines Gewitters oder wenn das Gerät
über einen längeren Zeitraum unbeaufsichtigt gelassen oder nicht
benutzt wird, sollten Sie es von der Wandsteckdose und vom
Kabelsystem trennen. Dadurch vermeiden Sie Schäden, die durch
Blitzseinschlag oder Spannungsanstiege verursacht werden
können.
9. Hauptstecker (2-polig/3-polig):
1. Die Erdung darf nie von der Stromversorgung bzw. vom
Hauptstecker entfernt werden.
2. In den folgenden Fällen sollten Sie den LCD-Monitor immer
von der Stromversorgung trennen:
• Wenn der Monitor über einen längeren Zeitraum nicht
benutzt wird.
• Wenn das Stromkabel oder der Stecker beschädigt ist.
• Bitte lesen Sie zuerst die entsprechenden Hinweise im
Handbuch nach, wenn Sie den LCD-Monitor an die
Stromversorgung oder an andere Systeme anschließen,
wenn Sie den Monitor von der Stromversorgung oder von
anderen Systemen trennen, und wenn Sie Einstellungen
am Monitor vornehmen. Falls während des Betriebs eine
unerwartete Situation auftritt, sollten Sie das Gerät
ausschalten und von der Stromversorgung trennen. Wenn
das Problem nicht im Benutzerhandbuch erklärt wird,
wenden Sie sich bitte an den Händler vor Ort.
• Wenn das Monitorgehäuse beschädigt ist.
ACHTUNG: Versuchen Sie nicht, dieses Gerät in seine Bestandteile zu
zerlegen. Wenn Sie versuchen, das Gerät in seine Bestandteile zu zerlegen
oder Abdeckungen zu entfernen, erlischt die Garantie und es drohen
schwere Verletzungen.
DE • 4 UltraView TFT-LCD-Farbmonitor 26''/ 32''/ 42''
Page 49

Einführung
Dieses Produkt enthält einen 26"/32"/42" Active Matrix TFT-Farbmonitor,
der eine qualitativ hochwertige Bildschirmanzeige liefert. Die maximale
Auflösung ist 1366 x 768. Dies ermöglicht eine komplexe und qualitativ
hochwertige Bildschirmanzeige. Außerdem verfügt der Monitor über die
neuen OSD (On-Screen-Display)-Steuerungen und über integrierte
Multimedia-Lautsprecher.
Produkteigenschaften
TFT-LCD-Farbmonitor mit hohem Kontrastverhältnis. Unterstützt
VGA-Auflösung bis 1366 x 768, Videosignal-Auflösung bis zu
500 TVL.
Integrierter BNC-Anschluss für Videosignal, S-Video-Anschluss
sowie Cinch-Anschluss (Component-Signal) und Cinch-Buchse für
Audiosignal.
Die vollständige OSD-Funktion optimiert die Bildschirmanzeige.
Lieferumfang
Die Standardverpackung enthält Folgendes:
26"/32"/42" TFT-LCD-Monitor
Fernbedienung
VGA-Kabel
DVI-I-Kabel
Benutzerhandbuch
Reinigung des Produkts
Um Staub oder Schmutz vom Bildschirm zu entfernen, sollten Sie
ein weiches, sauberes Baumwolltuch benutzen und den Schirm
vorsichtig abwischen.
Üben Sie beim Abwischen keinen Druck auf den Bildschirm aus.
Verwenden Sie kein Wasser oder chemische Reinigungsmittel, um
die Oberfläche zu säubern. Chemische Reinigungsmittel können
die Oberfläche der LCD-Anzeige beschädigen.
UltraView TFT-LCD-Farbmonitor 26''/ 32''/ 42'' 5 • DE
Page 50

Produktabmessungen
26"-Monitor
32"-Monitor
DE • 6 UltraView TFT-LCD-Farbmonitor 26''/ 32''/ 42''
Page 51

42"-Monitor
Installieren des Standfußes
Eine Anleitung finden Sie unter Installieren des
Abbildung 1. Installieren des Standfußes
UltraView TFT-LCD-Farbmonitor 26''/ 32''/ 42'' 7 • DE
Page 52

Bedienelement
Abbildung 2. Beschreibung des Bedienelements
Erklärung
der Symbole
1.
2.
3.
4.
5.
6.
7.
8.
9.
DE • 8 UltraView TFT-LCD-Farbmonitor 26''/ 32''/ 42''
Taste Beschreibung
NETZ: Drücken Sie hier, um den Monitor an- oder
auszuschalten.
MODUS Drücken Sie hier, um das Eingangssignal
auszuwählen.
Hinweis: Beim ersten Drücken wird das OSD des aktuellen
Signals angezeigt. Drücken Sie die Taste erneut, bevor es
ausgeblendet wird, um den Modus zu ändern.
AUTO: Drücken Sie hier, damit das VGA-Signal automatisch
angepasst wird.
PLUS: Drücken Sie hier, wenn Sie den Wert der gewählten
+
-
LED-
Anzeige
OSD-Option vergrößern oder die Lautstärke erhöhen wollen.
MINUS: Drücken Sie hier, wenn Sie den Wert der gewählten
OSD-Option verkleinern oder die Lautstärke reduzieren wollen.
AUF: Drücken Sie hier, um in der OSD-Optionsliste nach
oben zu scrollen und um den Kontrast einzustellen.
AB: Drücken Sie hier, um in der OSD-Optionsliste nach
unten zu scrollen und um die Helligkeit einzustellen.
MENÜ: Drücken Sie hier, um das OSD-Menü aufzurufen
oder zu schließen oder um eine Option auszuwählen.
Grün: Eingeschaltet; Orange: Kein Signal; Rot:
Energiesparen; nicht verfügbar: Ausgeschaltet
Page 53

Bedienungshinweise
Auswählen des Eingangssignals:
Wenn Sie die MODUS-Taste betätigen, können Sie auf dem Bildschirm
durch diese Optionen scrollen.
VGA-Signal DVI-Signal Composite-
Signal
S-VIDEOSignal
ComponentSignal
Auswählen der Audio- und Videoeinstellungen
Drücken Sie die Tasten +, -, oder , um auf dem Bildschirm
durch diese Optionen zu scrollen und den jeweiligen Wert schnell
anzupassen.
Anpassung der
Lautstärke
Anpassung
des Kontrasts
Anpassung der
Helligkeit
Zugreifen auf die OSD-Menüs
1. Drücken Sie die MODUS-Taste, um das Eingangssignal
auszuwählen.
2. Betätigen Sie die MENÜ-Taste, um für das Eingangssignal auf die
OSD-Menüs zuzugreifen.
3. Betätigen Sie die Taste AUF oder AB, um durch die angezeigte
OSD-Liste zu scrollen.
4. Drücken Sie die MENÜ-Taste erneut, bevor das OSD
ausgeblendet wird, um die Änderungen zu übernehmen.
UltraView TFT-LCD-Farbmonitor 26''/ 32''/ 42'' 9 • DE
Page 54

OSD-Menüs
1. Betätigen Sie die Taste MENÜ, um auf die OSD-Menüs
zuzugreifen.
2. Drücken Sie die Taste MENÜ erneut, bevor das OSD
ausgeblendet wird, um den Modus zu ändern.
3. Betätigen Sie die Taste AUF 궐 oder AB 궐, um durch die
angezeigte OSD-Liste zu scrollen.
Anzeige des VGA-/DVI-Signals
1 Helligkeit 50
2 Kontrast 60
3 H-Position 50
4 V-Position 39
5 Uhr 25
6 Phase 1
7 Farb Temp Benutzer
8 User Color R 50
9 User Color G 50
10 User Color B 50
11 OSD H-Pos. 50
12 OSD V-Pos. 50
13 Lautstärke 50
14 Quelle Video 1
15 Sprache Deutsch
16 Energiesparen Off (Aus)
17 Pixelschonmodus On (Ein)
18 Zurücksetzen
DE • 10 UltraView TFT-LCD-Farbmonitor 26''/ 32''/ 42''
Page 55

Untermenü: PIP/POP
PIP/POP
PIP/POP Off (Aus)
Quelle Composite 1
PIP-Größe Groß
PIP H-Pos. 0
PIP V-Pos. 0
Tauschen
Tabelle 1. Beschreibung der VGA-/DVI-Optionen
Menüoption Beschreibung
Helligkeit Passt den Schwarzanteil im Hintergrund der Bildschirmanzeige
an (Bereich 0 bis 100).
Kontrast Passt den Weißanteil im Vordergrund der Bildschirmanzeige an
(Bereich 0 bis 100).
H-Position * Verschiebt die Bildschirmanzeige nach links oder rechts
(Bereich 0 bis 100).
V-Position * Verschiebt die Bildschirmanzeige nach oben oder unten
(Bereich 0 bis 100).
Uhr * Passt die Breite der Bildschirmanzeige an (Bereich 0 bis 100).
Phase * Passt die Klarheit der Bildschirmanzeige an (Bereich 0 bis
100).
Farb Temp Mit (+) oder (-) können Sie zwischen drei Farbtemperaturtypen
wählen: 9300°K, 6500°K, User Color (Benutzerfarbe).
User Color R Passt den Rotanteil der Bildschirmanzeige an (Bereich 0 bis
100).
User Color G Passt den Grünanteil der Bildschirmanzeige an (Bereich 0 bis
100).
User Color B Passt den Blauanteil der Bildschirmanzeige an (Bereich 0 bis
100).
OSD H-Pos. Verschiebt das OSD nach links oder rechts (Bereich 0 bis 100).
OSD V-Pos. Verschiebt das OSD nach oben oder unten (Bereich 0 bis 100).
Lautstärke Passt die Lautstärke an.
PIP/POP Zeigt links oben auf dem Bildschirm das Videoeingangssignal
an. Mit (+) oder (-) können Sie vier PIP/POP-Typen einstellen:
Composite, S-Video, Component, Aus.
UltraView TFT-LCD-Farbmonitor 26''/ 32''/ 42'' 11 • DE
Page 56

Menüoption Beschreibung
Quelle Wählt die Quelle des PIP-Bildes.
PIP-Größe Wählt die Größe des PIP-Bildes.
PIP H-Pos. Verschiebt das PIP-Bild nach links oder nach rechts.
PIP V-Pos. Verschiebt das PIP-Bild nach oben oder nach unten.
Tauschen Tauschen des Bildes im Bild.
Sprache Sie können die Sprache des OSD-Texts einstellen. Englisch,
Traditionelles Chinesisch, Vereinfachtes Chinesisch,
Französisch, Deutsch, Spanisch, Italienisch, Portugiesisch,
Russisch und Japanisch.
Energiesparen Auswahl des Energiesparmodus;
Pixelschonmodus Es handelt sich um eine aktive Methode zur Vermeidung von
Pixeleinbrennungen durch leichtes Drehen des Bildes alle 12
Stunden.
Zurücksetzen Mit (+) oder (-) kann der Standardwert abgefragt werden.
Hinweis: Menüeinträge, die mit * gekennzeichnet sind, ändern ihre Werte nach der
automatischen Anpassung. DVI kann jedoch nicht angepasst werden.
Anzeige des VIDEO-Signals (Composite/S-Video)
1
2
3
4
5
*
6
7
8
9
10
11
12
13
14
* Die Farbtemperatur hängt von der Region ab.
DE • 12 UltraView TFT-LCD-Farbmonitor 26''/ 32''/ 42''
Helligkeit 50
Kontrast 50
Farbton 50
Farbe 50
Farb Temp Standard
Bildschärfe 50
Scan Vollständig
OSD H-Position 50
OSD V-Position 50
Lautstärke 50
PIP/POP >
Sprache Deutsch
Pixelschonmodus On (Ein)
Zurücksetzen
Page 57

# 26"-Monitor-Standardwert für Bildschärfe ist 19".
Tabelle 2. Beschreibung der VIDEO-Optionen
Menüoption Beschreibung
Helligkeit Passt den Schwarzanteil im Hintergrund der
Bildschirmanzeige an (Bereich 0 bis 100).
Kontrast Passt den Weißanteil im Vordergrund der
Bildschirmanzeige an (Bereich 0 bis 100).
Farbton Passt den Farbton an. (nur NTSC) (Bereich 0 bis 100)
Farbe Passt die Farbdichte an (Bereich 0 bis 100).
Farb Temp Mit (+) oder (-) können Sie zwischen drei
Farbtemperaturtypen wählen: 9300°K, 6500°K, Standard.
Bildschärfe Passt die Klarheit und Schärfe der Bildschirmanzeige an
(Bereich 0 bis 100).
Scan Mit (+) oder (-) können Sie Over-Scan, Under-Scan, Full
Scan oder 1 einstellen. 1 Scan.
H-Position Verschiebt die Bildschirmanzeige nach oben oder unten
(Bereich 0 bis 100).
V-Position Verschiebt die Bildschirmanzeige nach links oder rechts
(Bereich 0 bis 100).
Lautstärke Passt die Lautstärke an.
PIP/POP Zeigt links oben auf dem Bildschirm das
Videoeingangssignal an. Mit (+) oder (-) können Sie drei
PIP-Typen einstellen: VGA, DVI, Aus.
Quelle Wählt die Quelle des PIP-Bildes.
Größe Wählt die Größe des PIP-Bildes.
PIP H-Pos. Verschiebt das PIP-Bild nach links oder nach rechts.
PIP V-Pos. Verschiebt das PIP-Bild nach oben oder nach unten.
Tauschen Tauschen des Bildes im Bild.
Sprache Sie können die Sprache des OSD-Texts einstellen.
Englisch, Chinesisch, Französisch, Deutsch, Spanisch,
Italienisch oder Japanisch.
Pixelschonmodus Es handelt sich um eine aktive Methode zur Vermeidung
von Pixeleinbrennungen durch leichtes Drehen des Bildes
alle 12 Stunden.
Zurücksetzen Mit (+) oder (-) kann der Standardwert abgefragt werden.
UltraView TFT-LCD-Farbmonitor 26''/ 32''/ 42'' 13 • DE
Page 58

Verwenden der Fernbedienung
1. Netzschalter: Drücken Sie hier, um den Monitor an- oder
auszuschalten.
2. Source (Quelle): Eingangsquelle auswählen: VGA, DVI, BNC1,
BNC2, Y/C, Y Cb Cr.
3. Menu/Exit (Menü/Beenden): Drücken Sie die Taste, um das OSD-
Menü aufzurufen oder zu schließen oder die Auswahl einzugeben
oder zurückzugeben.
4. Auf: In den OSD-Optionen nach oben scrollen.
5. Ab: In den OSD-Optionen nach unten scrollen.
6. Links: Drücken Sie die Taste, um den Wert der ausgewählten OSD-
Option zu verringern.
7. Rechts: Drücken Sie die Taste, um den Wert der ausgewählten
OSD-Option zu erhöhen.
8. PIP: Drücken, um das OSD-Menü für die PIP-Funktion auszuwählen.
DE • 14 UltraView TFT-LCD-Farbmonitor 26''/ 32''/ 42''
Page 59

9. Mute (Stumm): Drücken, um die Stummschaltung zu
aktivieren/deaktivieren.
Anweisungen zur Batterie
Die mit dem Produkt bereitgestellte Fernbedienung ist mit einer
Lithiumbatterie versehen. Um diese Batterie zu entfernen, nehmen Sie die
rückwärtige Abdeckung der Fernbedienung ab, ersetzen Sie Batterie durch
eine andere und bringen Sie die Abdeckung wieder an. Um die
ordnungsgemäße Wiederverwertung zu gewährleisten, entsorgen Sie alle
Batterien gemäß den geltenden Vorschriften.
Verbinden eines Videosignals mit dem
Monitor
Abbildung 3. Eingangs-/Ausgangsschnittstelle
1.
VGA-/DVI-Audio-Eingang: Audioquelle mit YPBPr.
2.
YPBPr / LR In (RCA-Buchse): Verbinden Sie diesen Anschluss mit dem
Video-I/O-Anschluss des Videogeräts, z. B. DVD.
3.
VGA In: Verbinden Sie diese Schnittstelle mit einem analogen RGB-Ausgang,
z. B. mit der Schnittstelle für die VGA-Ausgabe am PC.
4.
HDMI: Option.
5.
DVI In: Verbinden Sie diese Schnittstelle mit einem analogen RGB-Ausgang,
z. B. mit der Schnittstelle für die DVI-Ausgabe am PC.
6.
DC-Ausgang für Kamera: 12-VDC-Ausgang für Einzelkameraleistung
(max. 500mA).
7.
Netzeingangsanschluss: Schließen Sie das Netzkabel an den
Netzeingangsanschluss und eine Wandsteckdose an.
UltraView TFT-LCD-Farbmonitor 26''/ 32''/ 42'' 15 • DE
Page 60

1.
VIDEO In / Out (2) (TYP BNC): Verbinden Sie diesen Anschluss mit dem
Video-Ausgangs-/Eingangsanschluss des Videogeräts (z. B. Videorekorder
oder Farbvideokamera).
2.
VIDEO In / Out (1) (TYP BNC): Verbinden Sie diesen Anschluss mit dem
Video-Ausgangs-/Eingangsanschluss des Videogeräts (z. B. Videorekorder
oder Farbvideokamera).
3.
Y/C In / Out (4-Pol Mini-DIN): Verbinden Sie diesen Anschluss mit der Y/CAusgangs-/Eingangsschnittstelle der Kamera, des Videorekorders oder eines
anderen Videogeräts.
4.
Audio In / Out (RCA-Buchse): Eingangs-/Ausgangsschnittstelle für BNC1.
5.
Audio In / Out (RCA-Buchse): Eingangs-/Ausgangsschnittstelle für BNC2.
Hinweis: Der Wechsel zu einem anderen Modus dauert etwa vier bis fünf
Sekunden. Nach einem Moduswechsel wird der Bildschirm zunächst blau und zeigt
dann das Eingabesignal oder die Meldung „Kein Signal“ an.
ACHTUNG: VERMEIDEN Sie es, direkt an den Kabeln zu ziehen, wenn Sie
Geräte vom Monitor trennen. Wenn Sie Geräte vom Monitor trennen, sollten
Sie den Metall- oder Plastikstecker fest halten und ihn vorsichtig aus der
Buchse ziehen.
DE • 16 UltraView TFT-LCD-Farbmonitor 26''/ 32''/ 42''
Page 61

Technische Daten
Modell 26" 32"
Pixelabstand (H × V mm) 0,4215 × 0,4215 0,51075 × 0,51075
VGA/DVI 1366 x 768 Pixel 1366 x 1024 Pixel Maximale
Auflösung
Abmessungen (B × H × T) 634 × 390 ×
Verpackungsabmessungen
(B × H × T)
Anzeigemodus VGA, DVI, Composite, S-VIDEO,
Anschlüsse DC 12V Out, VGA In, DVI In, BNC1 In/Out,
Bedienelemente der Vorderseite Netzschalter, Modus, Auf
OSD-Menü
Eingangsspannung Wechselstromeingang: 100 bis 240V
Betriebsbedingungen Temperatur: 0 bis 40°C
Lagerbedingungen Temperatur: -20 bis +60°C
VIDEO NTSC / PAL
769 × 467 × 112mm
114mm
755 × 655 ×
335mm
Component
BNC2 In/Out, Y/C In/Out, Y/C In/Out, Y
PbPr, Audio1 In/Out, Audio2 In/Out
(Kontrasteinstellung), Ab
(Helligkeitseinstellung), Menü, Auto, LEDAnzeige, Lautstärke erhöhen, Lautstärke
verringern
VGA/DVI Helligkeit, Kontrast, H-Position, V-Position,
Uhr, Phase, Farb Temp, User Color R, User
Color G, User Color B, OSD H-Position,
OSD V-Position, Lautstärke, Sprache, PIP,
PIP-Größe/Pos., Tauschen,
Pixelschonmodus, Zurücksetzen
VIDEO Farbe, Farb Temp., Farbton (nur NTSC),
Helligkeit, Kontrast, Bildschärfe, Lautstärke,
OSD H-Position, OSD V-Position, Sprache,
Scan (1:1, Under-Scan, Over-Scan, Full
Scan, 4:3, 16:9), PIP, PIP-Größe/Pos.,
Tauschen, Pixelschonmodus, Zurücksetzen
(±10%), 50 bis 60Hz
Relative Luftfeuchtigkeit: 20 bis 80%
921 × 725 × 359mm
UltraView TFT-LCD-Farbmonitor 26''/ 32''/ 42'' 17 • DE
Page 62

Modell 26" 32"
Relative Luftfeuchtigkeit: 15 bis 85%
Leistungsaufnahme Max. 80W Max. 100W
Gewicht
Nettogewicht
11,42kg
(einschl. Adapter)
Bruttogewicht 17,3kg 27,5kg
Modell 42"
Pixelabstand (H × V mm) 0,681 × 0,681
VGA/DVI 1366 x 768 Pixel Maximale
Auflösung
VIDEO NTSC / PAL
Abmessungen (B × H × T) 993 × 598 × 126mm
Verpackungsabmessungen
1145 × 855 × 367mm
(B × H × T)
Anzeigemodus VGA, DVI, Composite, S-VIDEO,
Component
Anschlüsse DC 12V Out, VGA In, DVI In, BNC1 In/Out,
BNC2 In/Out, Y/C In/Out, Y PbPr, Audio1
In/Out, Audio2 In/Out
Bedienelemente der Vorderseite Netzschalter, Modus, Auf
(Kontrasteinstellung), Ab
(Helligkeitseinstellung), Menü, Auto, LEDAnzeige, Lautstärke erhöhen, Lautstärke
verringern
OSD-Menü
VGA/DVI/HDMI Helligkeit, Kontrast, H-Position, V-Position,
Uhr, Phase, Farb Temp, User Color R, User
Color G, User Color B, OSD H-Position,
OSD V-Position, Lautstärke, Sprache, PIP,
PIP-Größe/Pos., Tauschen,
Pixelschonmodus, Zurücksetzen
VIDEO Farbe, Farb Temp., Farbton (nur NTSC),
Helligkeit, Kontrast, Bildschärfe, Lautstärke,
OSD H-Position, OSD V-Position, Sprache,
Scan (1:1, Under-Scan, Over-Scan, Full
Scan, 4:3, 16:9), PIP, PIP-Größe/Pos.,
Tauschen, Pixelschonmodus, Zurücksetzen
Eingangsspannung Wechselstromeingang: 100 bis 240V
21,0kg
DE • 18 UltraView TFT-LCD-Farbmonitor 26''/ 32''/ 42''
Page 63

Modell 42"
(±10%), 50 bis 60Hz
Betriebsbedingungen Temperatur: 0 bis 40°C
Relative Luftfeuchtigkeit: 20 bis 80%
Lagerbedingungen Temperatur: -20 bis +60°C
Relative Luftfeuchtigkeit: 15 bis 85%
Leistungsaufnahme
Nettogewicht
(einschl. Adapter)
Bruttogewicht 43,1kg
Max. 250W
32,5kg Gewicht
UltraView TFT-LCD-Farbmonitor 26''/ 32''/ 42'' 19 • DE
Page 64

DE • 20 UltraView TFT-LCD-Farbmonitor 26''/ 32''/ 42''
Page 65

Italiano
Indice
Prefazione...................................................................................................... 2
Termini e simboli di sicurezza ..............................................................2
Precauzioni importanti................................................................................. 2
Introduzione ..................................................................................................5
Caratteristiche del prodotto .................................................................. 5
Apertura della confezione..................................................................... 5
Pulizia del prodotto............................................................................... 5
Dimensioni del prodotto .............................................................................. 6
Installazione della base................................................................................ 7
Pannello di controllo .................................................................................... 8
Istruzioni per l'uso........................................................................................ 9
Selezione del segnale di ingresso........................................................ 9
Selezione delle impostazioni audio e video ......................................... 9
Accesso ai menu visualizzati su schermo (OSD) ................................ 9
Menu OSD (su schermo).................................................................... 10
Utilizzo del telecomando............................................................................ 15
Istruzioni per la batteria ...................................................................... 16
Collegamento del segnale video al monitor ............................................16
Specifiche tecniche .................................................................................... 18
UltraView Monitor LCD TFT a colori da 26/32/42" 1 • IT
Page 66

Prefazione
Il presente è il manuale dell’utente dei Monitor LCD TFT a colori da
26/32/42" della serie UltraView. Leggere a fondo le presenti istruzioni e
tutto il resto della documentazione allegata prima di installare o mettere in
funzione il prodotto.
Termini e simboli di sicurezza
Nel manuale possono comparire le seguenti indicazioni:
ATTENZIONE: la dicitura Attenzione indica condizioni o azioni che possono
avere come conseguenza il danneggiamento delle attrezzature o di altre
proprietà.
AVVERTENZA: la dicitura Avvertenza indica condizioni o azioni che
possono provocare danni alle attrezzature o lesioni personali gravi.
Precauzioni importanti
1. Leggere, seguire e conservare queste istruzioni: leggere e
seguire tutte le istruzioni di sicurezza e uso prima di utilizzare
l'apparecchio. Conservare le istruzioni per consultazioni future.
2. Precauzioni di installazione:
Non bloccare i fori di ventilazione. Attenersi scrupolosamente alle
istruzioni di installazione fornite dal produttore. Non inserire oggetti
metallici nei fori di ventilazione dell'involucro del monitor e fare
attenzione a non versare liquidi sul prodotto: ne potrebbero
derivare gravi lesioni personali.
Verificare sempre che il monitor sia collocato in un'area ben
ventilata per prevenire il surriscaldamento dell'apparecchiatura.
Utilizzare solo accessori specificati dal produttore o acquistati
insieme al prodotto.
Se non si utilizza la base standard, per ragioni di sicurezza
utilizzare le viti M4 con le rondelle piatte e le rondelle a molla in
dotazione, di lunghezza compresa tra 8 e 10 mm.
IT • 2 UltraView Monitor LCD TFT a colori da 26/32/42"
Page 67

NON utilizzare o collocare il monitor in ambienti con le seguenti
caratteristiche:
Temperature estreme (alte o basse)
• Umidità elevata
• Luce solare diretta
• Presenza di polvere eccessiva
• Presenza nelle immediate vicinanze di apparecchi che
generano forti campi magnetici
3. Acqua e umidità: non utilizzare l'apparecchio in prossimità di
acqua. Per ridurre il rischio di incendi e scosse elettriche, non
esporre l'apparecchio a pioggia o umidità.
4. Cavo di alimentazione e relativa protezione: posizionare i cavi di
alimentazione in modo tale che non possano essere facilmente
calpestati o schiacciati. Prestare particolare attenzione al
posizionamento di cavi e connettori, alle prese e al punto di uscita
del cavo dall'apparecchio.
Non sovraccaricare il cavo di alimentazione o l'alimentatore.
Non posizionare il cavo di alimentazione o il cavo segnale in
luoghi umidi.
5. Cura del prodotto: non toccare lo schermo direttamente con le
mani. Il grasso naturalmente presente sulla pelle potrebbe lasciare
impronte difficili da rimuovere senza danneggiare lo schermo in
modo permanente. Non esercitare pressione sullo schermo LCD:
gli schermi a cristalli liquidi sono molto fragili e delicati.
6. Pulizia: utilizzare solo un panno asciutto.
7. Manutenzione e riparazione: non effettuare operazioni di
manutenzione personalmente. L'apertura o la rimozione delle
coperture può esporre a tensioni pericolose o ad altri pericoli.
Demandare tutti gli interventi di assistenza a personale qualificato.
In particolare, scollegare l'apparecchio dalla presa di
alimentazione CA e rivolgersi a personale di assistenza
qualificato se si verificano le seguenti condizioni:
UltraView Monitor LCD TFT a colori da 26/32/42" 3 • IT
Page 68

• Danneggiamento della spina o del cavo di alimentazione
• Versamento di liquidi o caduta di oggetti sull'apparecchio
• Esposizione dell'apparecchio a pioggia o umidità
• Malfunzionamenti dell'apparecchio
• Urti o cadute dell'apparecchio
8. Fulmini: per maggiore sicurezza durante temporali con fulmini o
quando viene lasciato incustodito o inutilizzato per periodi
prolungati, scollegare l'apparecchio dalla presa a muro e
scollegare il sistema di cavi. Questa precauzione consente di
evitare che l'apparecchio subisca danni a seguito di fulmini o picchi
di tensione.
9. Spina di alimentazione (a 2 o 3 poli):
1. Non rimuovere il contatto di messa a terra dalla spina di
alimentazione.
2. Scollegare sempre il monitor LCD dall'alimentazione nelle
seguenti circostanze:
• Il monitor non verrà utilizzato per periodi di tempo
prolungati.
• La spina o il cavo di alimentazione sono danneggiati.
• Consultare il manuale dell'utente per collegare o
scollegare il monitor LCD dall'alimentazione o da altri
apparecchi e prima di effettuare qualsiasi regolazione del
monitor. In caso di situazioni impreviste durante l'utilizzo
del monitor, spegnere l'apparecchio e rimuovere il cavo di
alimentazione. Se il problema non è descritto nel manuale
dell'utente, rivolgersi al rivenditore locale.
• L'involucro del monitor è danneggiato o rotto.
ATTENZIONE: non tentare di disassemblare il prodotto. Qualsiasi tentativo
di disassemblare il prodotto o di rimuoverne le coperture comporta
l'annullamento della garanzia e può provocare lesioni personali gravi.
IT • 4 UltraView Monitor LCD TFT a colori da 26/32/42"
Page 69

Introduzione
Questo prodotto è un monitor a colori a matrice attiva TFT (Thin-Film
Transistor, transistor a pellicola sottile) da 26/32/42 pollici in grado di
produrre immagini di alta qualità. La risoluzione massima di 1366 x 768
consente di visualizzare immagini complesse di alta qualità. Il monitor
consente inoltre l'accesso ai nuovi controlli OSD (On Screen Display) ed è
dotato di altoparlanti multimediali incorporati.
Caratteristiche del prodotto
Il monitor LCD TFT a colori ad elevato contrasto supporta una
risoluzione VGA massima di 1366 x 768 e una risoluzione del
segnale video massima di 500 linee TV.
Terminale BNC del segnale video, terminale S-Video, terminale
RCA del segnale dei componenti e jack RCA del segnale audio
integrati.
Funzionalità OSD completa per l'ottimizzazione della
visualizzazione.
Apertura della confezione
La confezione standard contiene:
Monitor LCD TFT da 26/32/42 pollici
Telecomando
Cavo VGA
Cavo DVI-I
Manuale utente
Pulizia del prodotto
Per rimuovere polvere o sporco dallo schermo, passare
delicatamente un panno di cotone morbido e pulito.
Non esercitare pressione sullo schermo durante la pulizia.
Non utilizzare acqua o detergenti chimici per la pulizia dello
schermo. I detergenti chimici possono danneggiare lo schermo
LCD.
UltraView Monitor LCD TFT a colori da 26/32/42" 5 • IT
Page 70

Dimensioni del prodotto
Monitor da 26 pollici
Monitor da 32 pollici
IT • 6 UltraView Monitor LCD TFT a colori da 26/32/42"
Page 71

Monitor da 42 pollici
Installazione della base
Per le istruzioni, vedere la Figura 1.
Figura 1. Installazione della base
UltraView Monitor LCD TFT a colori da 26/32/42" 7 • IT
Page 72

Pannello di controllo
Figura 2. Descrizione del pannello di controllo
Legenda Pulsante Descrizione
1.
2.
3.
4.
+
5.
-
6.
7.
8.
ALIMENTAZIONE: consente di accendere e spegnere il
monitor.
MODALITÀ: consente di selezionare il segnale di ingresso.
Nota: se si preme questo pulsante all'inizio, viene
visualizzato l'OSD del segnale corrente. Prima che
scompaia, premere nuovamente il pulsante per modificare
la modalità.
AUTO: consente di eseguire la regolazione automatica del
segnale VGA.
PIÙ: consente di aumentare il valore dell'opzione OSD
selezionata; consente di aumentare il volume.
MENO: consente di diminuire il valore dell'opzione OSD
selezionata; consente di diminuire il volume.
SU: consente di scorrere verso l'alto nell'elenco delle
opzioni OSD; consente di regolare il contrasto.
GIÙ: consente di scorrere verso il basso nell'elenco delle
opzioni OSD; consente di regolare la luminosità.
MENU: consente di aprire o chiudere la visualizzazione
OSD, oppure di effettuare una selezione.
IT • 8 UltraView Monitor LCD TFT a colori da 26/32/42"
Page 73

9.
Spia
Verde: monitor acceso; Arancione: nessun segnale; Rosso:
modalità di risparmio energia; Nessuna spia: monitor
spento
Istruzioni per l'uso
Selezione del segnale di ingresso
Premere il pulsante MODALITÀ per scorrere le seguenti opzioni sullo
schermo.
Segnale VGA Segnale DVI Segnale
composito
Segnale
S-Video
Segnale dei
componenti
Selezione delle impostazioni audio e video
Premere i pulsanti +, -, o per scorrere tra queste opzioni su
schermo e regolare rapidamente il valore.
Regolazione
del volume
Regolazione
del contrasto
Regolazione
della luminosità
Accesso ai menu visualizzati su schermo (OSD)
1. Premere il pulsante MODALITÀ per selezionare il segnale di
ingresso.
2. Premere il pulsante MENU per visualizzare i menu OSD per quel
segnale di ingresso.
3. Premere i pulsanti SU o GIÙ per scorrere l'elenco OSD
visualizzato.
UltraView Monitor LCD TFT a colori da 26/32/42" 9 • IT
Page 74

4. Prima che l'OSD scompaia, premere nuovamente il pulsante
MENU per accettare le modifiche.
Menu OSD (su schermo)
1. Premere il pulsante MENU per visualizzare i menu OSD.
2. Prima che l'OSD scompaia, premere nuovamente il pulsante
MENU per modificare la modalità.
3. Premere i pulsanti SU o GIÙ per scorrere l'elenco OSD
visualizzato.
Visualizzazione del segnale VGA/DVI
1 Luminosità 50
2 Contrasto 60
3 H-Posizione 50
4 V-Posizione 39
5 Orologio 25
6 Fase 1
7 Color Temp. Utente
8 Taratura Rosso 50
9 Taratura Verde 50
10 Taratura Blu 50
11 OSD H-Pos. 50
12 OSD V-Pos. 50
13 Volume 50
14 Suc Fonte Video 1
15 Lingua Italiano
16 Risparmio energia Off
17 Pixel Saver Mode [Modalità risparmio pixel] On
18 Richiamo
IT • 10 UltraView Monitor LCD TFT a colori da 26/32/42"
Page 75

Sottomenu: PIP/POP
PIP/POP
PIP/POP Off
Suc Fonte Composito 1
PIP Dimensione Large
PIP H-Pos. 0
PIP V-Pos. 0
Scambio
Tabella 1. Descrizione delle opzioni VGA/DVI
Opzioni del
menu
Luminosità Consente di regolare il livello di nero di sfondo dell'immagine
Contrasto Consente di regolare il livello di bianco in primo piano
H-Posizione * Consente di regolare la posizione orizzontale (destra e sinistra)
V-Posizione * Consente di regolare la posizione la posizione verticale (alto e
Orologio *
Fase * Consente di regolare la chiarezza dell'immagine visualizzata
Color Temp. Mediante (+) o (-) è possibile scegliere tra le 3 opzioni di
Taratura
Rosso
Taratura Verde Consente di regolare l'intensità del colore verde dell'immagine
Taratura Blu Consente di regolare l'intensità del colore blu dell'immagine
OSD H-Pos. Consente di regolare la posizione orizzontale (destra e sinistra)
OSD V-Pos. Consente di regolare la posizione verticale (alto e basso) dei
Volume Consente di regolare il volume.
PIP/POP Consente di visualizzare l'immagine video in ingresso nell'angolo
Descrizione
visualizzata (gamma da 0 a 100).
dell'immagine visualizzata (gamma da 0 a 100).
dell'immagine visualizzata (gamma da 0 a 100).
basso) dell'immagine visualizzata (gamma da 0 a 100).
Consente di regolare la larghezza della sincronizzazione
orizzontale dell'immagine visualizzata (gamma da 0 a 100).
(gamma da 0 a 100).
temperatura colore disponibili: 9300°K, 6500°K, Taratura Col.
Consente di regolare l'intensità del colore rosso dell'immagine
visualizzata (gamma da 0 a 100).
visualizzata (gamma da 0 a 100).
visualizzata (gamma da 0 a 100).
dei menu OSD (gamma da 0 a 100).
menu OSD (gamma da 0 a 100).
in alto a sinistra dello schermo. Utilizzando (+) o (-), consente di
scegliere tra le 4 opzioni della modalità PIP/POP: Composito, S-
UltraView Monitor LCD TFT a colori da 26/32/42" 11 • IT
Page 76

Opzioni del
menu
Suc Fonte Consente di selezionare la fonte della sottoimmagine.
PIP
Dimensione
PIP H-Pos. Consente di regolare la posizione orizzontale (destra e sinistra)
PIP V-Pos. Consente di regolare la posizione verticale (alto e basso) della
Scambio Consente di scambiare il PIP.
Lingua Consente di selezionare la lingua dei menu OSD: inglese, cinese
Risparmio
energia
Pixel Saver
Mode
[Modalità
risparmio pixel]
Richiamo Consente di richiamare il valore predefinito utilizzando (+) o (-).
Nota: gli elementi contrassegnati dall'asterisco (*) hanno valori differenti dopo la
regolazione automatica. Non è tuttavia possibile regolare la modalità DVI.
Descrizione
Video, Componenti, Off.
Consente di selezionare le dimensioni della sottoimmagine.
della sottoimmagine.
sottoimmagine.
tradizionale, cinese semplificato, francese, tedesco, spagnolo,
italiano, portoghese, russo e giapponese.
Selezione della modalità risparmio energia.
Si tratta di un metodo attivo che consente di evitare la bruciatura
dello schermo ruotando leggermente l'immagine ogni 12 ore.
IT • 12 UltraView Monitor LCD TFT a colori da 26/32/42"
Page 77

Visualizzazione del segnale Video (Composito/S-Video)
1 Luminosità 50
2 Contrasto 50
3 Ombreggiatura 50
4 Colore 50
* 5 Color Temp. Standard
6 Nitidezza 50
7 Scansione Completa
8 OSD H-Pos. 50
9 OSD V-Pos. 50
10 Volume 50
11 PIP/POP >
12 Lingua Italiano
13 Pixel Saver Mode [Modalità risparmio pixel] On
14 Richiamo
* La temperatura colore dipende dalla regione.
# Monitor da 26 pollici: il valore predefinito della nitidezza del monitor è 19.
Tabella 2. Descrizione delle opzioni VIDEO
Opzioni del menu Descrizione
Luminosità Consente di regolare il livello di nero di sfondo
dell'immagine visualizzata (gamma da 0 a 100).
Contrasto Consente di regolare il livello di bianco in primo piano
dell'immagine visualizzata (gamma da 0 a 100).
Ombreggiatura Consente di regolare l'ombreggiatura del colore (solo
NTSC) (gamma da 0 a 100)
Colore Consente di regolare la densità del colore (gamma da 0 a
100).
Color Temp. Mediante (+) o (-) è possibile scegliere tra le 3 opzioni di
temperatura colore disponibili: 9300°K, 6500°K, Standard.
Nitidezza Consente di regolare la chiarezza e la messa a fuoco
dell'immagine visualizzata (gamma da 0 a 100).
Scansione Mediante (+) o (-) è possibile scegliere tra le 4 opzioni di
scansione disponibili: superiore, inferiore, completa o 1: 1.
UltraView Monitor LCD TFT a colori da 26/32/42" 13 • IT
Page 78

Opzioni del menu Descrizione
H-Posizione Consente di regolare la posizione verticale (alto e basso)
dell'immagine visualizzata (gamma da 0 a 100).
V-Posizione Consente di regolare la posizione orizzontale (destra e
sinistra) dell'immagine visualizzata (gamma da 0 a 100).
Volume Consente di regolare il volume.
PIP/POP Consente di visualizzare l'immagine video in ingresso
nell'angolo in alto a sinistra dello schermo. Utilizzando (+) o
(-), consente di scegliere tra le 3 opzioni della modalità
Picture-In-Picture: VGA, DVI, Off.
Suc Fonte Consente di selezionare la fonte della sottoimmagine.
Dimensioni Consente di selezionare le dimensioni della sottoimmagine.
PIP H-Pos. Consente di regolare la posizione orizzontale (destra e
sinistra) della sottoimmagine.
PIP V-Pos. Consente di regolare la posizione verticale (alto e basso)
della sottoimmagine.
Scambio Consente di scambiare il PIP.
Lingua Consente di selezionare la lingua dei menu OSD: inglese,
cinese, francese, tedesco, spagnolo, italiano o giapponese.
Pixel Saver Mode
[Modalità risparmio
pixel]
Richiamo Consente di richiamare il valore predefinito utilizzando (+) o
Si tratta di un metodo attivo che consente di evitare la
bruciatura dello schermo ruotando leggermente l'immagine
ogni 12 ore.
(-).
IT • 14 UltraView Monitor LCD TFT a colori da 26/32/42"
Page 79

Utilizzo del telecomando
1. Interruttore di accensione: consente di accendere e spegnere il
monitor.
2. Sorgente: selezionare la sorgente di ingresso - VGA, DVI,
BNC1, BNC2, Y/C, Y Cb Cr.
3. Menu/Uscita: consente di aprire o chiudere la visualizzazione
OSD, oppure di effettuare una selezione.
4. Su: consente di scorrere le opzioni OSD verso l'alto.
5. Giù: consente di scorrere le opzioni OSD verso il basso.
6. Sinistra: premere questo pulsante per diminuire il valore
dell'opzione OSD selezionata.
7. Destra: premere questo pulsante per aumentare il valore
dell'opzione OSD selezionata.
8. PIP: premere per selezionare il menu OSD della funzione PIP.
9. Mute: premere per attivare/disattivare l'audio.
UltraView Monitor LCD TFT a colori da 26/32/42" 15 • IT
Page 80

Istruzioni per la batteria
Il telecomando fornito insieme al prodotto include una batteria al litio. Per
rimuovere la batteria, rimuovere il coperchio posteriore del telecomando,
sostituire la batteria con una nuova e riposizionare il coperchio al suo
posto. Per un adeguato riciclaggio, smaltire le batterie come richiesto dalle
norme o dai regolamenti locali.
Collegamento del segnale video al monitor
Figura 3. Interfaccia di ingresso/uscita
1.
Ingresso linea audio VGA/DVI: sorgente audio con YPbPr.
2.
Ingresso YPBPr/LR (jack RCA): consente il collegamento al terminale di
uscita/ingresso dell'apparecchiatura video,, ad esempio DVD.
3.
Ingresso VGA: consente il collegamento a un terminale di uscita RGB
analogica, come ad esempio il terminale VGA di uscita della scheda video del
PC.
4.
HDMI: opzione.
5.
Ingresso DVI: consente il collegamento a un terminale di uscita RGB
analogica, come ad esempio il terminale DVI di uscita della scheda video del
PC.
6.
Uscita CC per telecamera: uscita a 12 VCC per la connessione
all'alimentazione di una singola videocamera (max 500mA).
7.
Connettore di ingresso CA: consente di collegare il cavo di alimentazione
CA al connettore di ingresso CA e a una presa a muro.
IT • 16 UltraView Monitor LCD TFT a colori da 26/32/42"
Page 81

1.
Ingresso/uscita VIDEO (2) (TIPO BNC): consente il collegamento al
terminale di ingresso/uscita dell'apparecchiatura video, ad esempio un
videoregistratore o una videocamera a colori.
2.
Ingresso/uscita VIDEO (1) (TIPO BNC): consente il collegamento al
terminale di ingresso/uscita dell'apparecchiatura video, ad esempio un
videoregistratore o una videocamera a colori.
3.
Ingresso/uscita Y/C (mini-DIN a 4 pin): consente il collegamento al
terminale di ingresso/uscita Y/C di una videocamera, un videoregistratore o
altra apparecchiatura video.
4.
Ingresso/uscita audio (jack RCA): terminale di ingresso/uscita audio per
BNC 1.
5.
Ingresso/uscita audio (jack RCA): terminale di ingresso/uscita audio per
BNC 2.
Nota: il cambio di modalità richiede 4-5 secondi. Una volta cambiata la modalità,
viene visualizzata una schermata blu, quindi l'ingresso del segnale oppure viene
visualizzato il messaggio “No Signal” (Nessun segnale).
ATTENZIONE: per scollegare i dispositivi dal monitor, NON tirare
direttamente i cavi, ma estrarre delicatamente il connettore dalla presa
afferrandone saldamente il corpo in plastica o metallo.
UltraView Monitor LCD TFT a colori da 26/32/42" 17 • IT
Page 82

Specifiche tecniche
Modello 26 pollici 32 pollici
Pixel (O x V mm) 0.4215 × 0.4215 0.51075 × 0.51075
VGA/DVI 1366 × 768 pixel 1366 × 1024 pixel Risoluzione
massima
Dimensioni (L x A x P) 634 × 390 × 114 mm 769 × 467 × 112 mm
Dimensioni confezione (L x A x P) 755 × 655 × 335 mm 921 × 725 × 359 mm
Modalità di visualizzazione VGA, DVI, composito, S-Video, componenti
Connettore segnale Uscita CC 12 V, Ingresso VGA, Ingresso DVI,
Pulsanti del pannello di controllo
frontale
Menu OSD
Ingresso alimentazione Ingresso CA: da 100 a 240 V (±10%), da 50 a
Condizioni di funzionamento Temperatura: da 0 a 40°C
Condizioni di immagazzinamento Temperatura: da -20 a +60°C
VIDEO NTSC/PAL
Ingresso/uscita BNC1, Ingresso/uscita BNC2,
Ingresso/uscita Y/C, Ingresso/uscita Y/C,
Ingresso Y PbPr, Ingresso/uscita Audio1,
Ingresso/uscita Audio2
Accensione, Modalità, Su (regolazione
contrasto), Giù (regolazione luminosità), Menu,
Auto, spia,
+ (aumento volume), - (diminuzione volume)
VGA/DVI Luminosità, Contrasto, H-Posizione, V-
Posizione, Orologio, Fase, Color Temp.,
Taratura Rosso, Taratura Verde, Taratura Blu,
OSD H-Pos.,
OSD V-Pos., Volume, Lingua, PIP, PIP
Dimensione/Pos., Scambio, Pixel Saver Mode
[Modalità risparmio pixel], Richiamo
VIDEO Colore, Color Temp., Ombreggiatura (solo
NTSC), Luminosità, Contrasto, Nitidezza,
Volume,
OSD H-Pos., OSD V-Pos., Lingua, Scansione
(1:1, superiore, inferiore, completa, 4:3, 16:9),
PIP, PIP Dimensione/Pos., Scambio, Pixel
Saver Mode [Modalità risparmio pixel],
Richiamo
60 Hz
Umidità relativa: da 20 a 80%
IT • 18 UltraView Monitor LCD TFT a colori da 26/32/42"
Page 83

Modello 26 pollici 32 pollici
Umidità relativa: da 15 a 85%
Consumo 80 W (max) 100 W (max)
Peso
Modello 42 pollici
Pixel (O x V mm) 0.681 × 0.681
massima
Dimensioni (L x A x P) 993 × 598 × 126 mm
Dimensioni confezione (L x A x P) 1145 × 855 × 367 mm
Modalità di visualizzazione VGA, DVI, composito, S-Video, componenti
Connettore segnale Uscita CC 12 V, Ingresso VGA, Ingresso DVI,
Pulsanti del pannello di controllo
frontale
Menu OSD VGA/DVI/HDMI Luminosità, Contrasto, H-Posizione, V-
Peso netto
(adattatore
incluso)
Peso lordo 17,3 kg 27,5 kg
VGA/DVI 1366 × 768 pixel Risoluzione
VIDEO NTSC/PAL
11,42 kg 21,0 kg
Ingresso/uscita BNC1, Ingresso/uscita BNC2,
Ingresso/uscita Y/C, Ingresso Y PbPr,
Ingresso/uscita Audio1, Ingresso/uscita Audio2
Accensione, Modalità, Su (regolazione
contrasto), Giù (regolazione luminosità), Menu,
Auto, spia,
+ (aumento volume), - (diminuzione volume)
Posizione, Orologio, Fase, Color Temp.,
Taratura Rosso, Taratura Verde, Taratura Blu,
OSD H-Pos.,
OSD V-Pos., Volume, Lingua, PIP, PIP
Dimensione/Pos., Scambio, Pixel Saver Mode
[Modalità risparmio pixel], Richiamo
UltraView Monitor LCD TFT a colori da 26/32/42" 19 • IT
Page 84

Modello 42 pollici
VIDEO Colore, Color Temp., Ombreggiatura (solo
NTSC), Luminosità, Contrasto, Nitidezza,
Volume,
OSD H-Pos., OSD V-Pos., Lingua, Scansione
(1:1, superiore, inferiore, completa, 4:3, 16:9),
PIP, PIP Dimensione/Pos., Scambio, Pixel
Saver Mode [Modalità risparmio pixel],
Richiamo
Ingresso alimentazione Ingresso CA: da 100 a 240 V (±10%), da 50 a
60 Hz
Condizioni di funzionamento Temperatura: da 0 a 40°C
Umidità relativa: da 20 a 80%
Condizioni di immagazzinamento Temperatura: da -20 a +60°C
Umidità relativa: da 15 a 85%
Consumo 250 W (max)
Peso
Peso netto
(adattatore
incluso)
Peso lordo 43,1 kg (95.0 lb.)
32,5 kg
IT • 20 UltraView Monitor LCD TFT a colori da 26/32/42"
Page 85

Nederlands
Inhoudsopgave
Voorwoord.....................................................................................................................2
Veiligheidstermen en -symbolen.................................................................................. 2
Veiligheidsinformatie.................................................................................................2
Inleiding..........................................................................................................................5
Productkenmerken............................................................................................................... 5
Uitpakken................................................................................................................................... 5
Het product reinigen............................................................................................................ 5
Productafmetingen.....................................................................................................6
De basisstandaard bevestigen...............................................................................7
Bedieningspaneel.......................................................................................................8
Bedieningsinstructies ...............................................................................................9
Het ingangssignaal selecteren...................................................................................... 9
De audio- en videoinstellingen selecteren............................................................. 9
De menu’s op het scherm (OSD) openen.............................................................. 9
Schermmenu’s (OSD)..................................................................................................... 10
De afstandsbediening gebruiken ........................................................................14
Batterij-instructies .............................................................................................................. 15
Een videosignaal aansluiten op de monitor....................................................15
Specificaties ...............................................................................................................17
UltraView TFT LCD-kleurenmonitor 26 inch / 32 inch / 42 inch 1 • NL
Page 86

Voorwoord
Dit is de UltraView TFT LCD-kleurenmonitor 26 inch / 32 inch / 42 inch
Gebruikershandleiding. Lees deze instructies en alle bijbehorende
documentatie volledig voordat u dit product installeert of in gebruik neemt.
Veiligheidstermen en -symbolen
De volgende terminologie komt in deze handleiding voor:
LET OP: Wordt gebruikt om omstandigheden of praktijken te identificeren
waardoor de apparatuur of andere eigendommen beschadigd kunnen raken.
WAARSCHUWING: Waarschuwing wordt gebruikt om omstandigheden of
praktijken aan te geven waardoor de apparatuur beschadigd kan raken of u
ernstig lichamelijk letsel kunt oplopen.
Veiligheidsinformatie
1. Lees, volg en bewaar de onderstaande instructies: Lees en volg
alle veiligheids- en gebruikersinstructies voordat u deze eenheid gaat
gebruiken. Bewaar de instructies voor het geval u ze later nog nodig
hebt.
2. Installatiewaarschuwingen:
Zorg dat er geen ventilatieopeningen worden geblokkeerd. U moet
de installatie uitvoeren in overeenstemming met de instructies van de
fabrikant. Plaats geen metalen objecten in de ventilatieopeningen
van de monitorbehuizing en pas op dat u geen vloeistoffen over het
product morst, omdat dit ernstig letsel kan veroorzaken.
Zet de monitor op een goed geventileerde plaats om te voorkomen
dat de eenheid oververhit raakt.
Gebruik alleen accessoires die door de leverancier worden
opgegeven of bij het product worden geleverd.
Wanneer de standaardbasis uit veiligheidsoverwegingen niet wordt
gebruikt, gebruikt u de bijgeleverde M4-schroeven met platte en
verende sluitringen van 8 tot 10 mm lang.
Gebruik of plaats de monitor NIET in onderstaande omgevingen:
Omgevingen met extreme temperaturen, zowel lage als hoge
NL • 2 UltraView TFT LCD-kleurenmonitor 26 inch / 32 inch / 42 inch
Page 87

• Omgeving met hoge luchtvochtigheid
• Omgeving met rechtstreeks zonlicht
• Extreem stoffige omgeving
• In de nabijheid van apparatuur met een sterk magnetisch veld
3. Water en vocht: Dit apparaat is gevoelig voor water en vocht. Stel
deze eenheid dus niet bloot aan regen of vocht om het risico op
brand of elektrische schokken te minimaliseren.
4. Voedingskabel en voedingskabelbeveiliging: Stroomsnoeren
moeten zo worden geleid dat er niet eenvoudig over wordt gelopen
en ze niet beklemd kunnen raken. Let vooral op de locaties van
kabels en stekkers, contactdozen en de uitgangen van de
apparatuur.
Zorg dat de voedingskabel of de adapter niet wordt overbelast.
Plaats de voedingskabel of signaalkabel niet op vochtige
plaatsen.
5. Productbescherming: Raak het scherm niet met de vingers aan.
Huidsmeer laat strepen achter op het scherm, die moeilijk te
verwijderen zijn en het scherm permanent kunnen beschadigen.
Zorg ook dat u geen druk uitoefent op het LCD-scherm. Het
scherm is erg kwetsbaar.
6. Reinigen: Gebruik een schone doek voor het reinigen.
7. Onderhoud: Probeer nooit zelf onderhoud uit te voeren. Het
openen van kap of behuizing kan leiden tot blootstelling aan
gevaar van elektrische schokken of andere riskante situaties. Alle
onderhoud moet worden uitgevoerd door gekwalificeerd
servicepersoneel.
In de volgende situaties verwijdert u de stekker uit de
hoofdvoedingsbron en laat u alle verdere acties over aan
gekwalificeerde onderhoudsmedewerkers:
• Als het elektriciteitssnoer of de stekker beschadigd is.
• Als er vloeistof in het product is gemorst of als er voorwerpen
in de behuizing terecht zijn gekomen.
• Als het product is blootgesteld aan regen of water.
• Als het product niet normaal functioneert.
• Als iemand het product heeft laten vallen.
UltraView TFT LCD-kleurenmonitor 26 inch / 32 inch / 42 inch 3 • NL
Page 88

8. Onweer: Als het product langere tijd niet wordt gebruikt of tijdens
onweer, is het raadzaam de stekker uit het stopcontact te halen en
het kabelsysteem los te koppelen. Op die manier voorkomt u
mogelijke schade door stroomstoten of onweer.
9. Netstekker (2-pins/3-pins):
1. Haal de aardaansluiting niet uit de
voedingseenheid/netstekker.
2. Vergeet nooit het LCD-scherm onder de volgende
omstandigheden los te koppelen van de voedingsbron:
• Als de monitor langere tijd niet zal worden gebruikt.
• Als de elektriciteitskabel of stekker/connector beschadigd
is.
• Zie de gebruikershandleiding bij het aansluiten op en het
loskoppelen van het LCD-scherm van een willekeurige
voedingsbron of ander systeem en voordat u wijzigingen
op de monitor aanbrengt. Indien er een onverwachte
situatie optreedt tijdens het gebruik van de monitor,
schakelt u de voedingsbron uit en verwijdert u de
voedingskabel. Als het probleem niet in de
gebruikershandleiding staat beschreven, raadpleegt u de
lokale leverancier.
• Als de behuizing van de monitor beschadigd of kapot is.
LET OP: Probeer nooit zelf onderhoud uit te voeren. Elke poging om de
behuizingen van dit product te demonteren of te verwijderen, maakt de
garantie ongeldig en kan bovendien ernstig letsel veroorzaken.
NL • 4 UltraView TFT LCD-kleurenmonitor 26 inch / 32 inch / 42 inch
Page 89

Inleiding
Dit product gebruikt een 26/32/42 inch TFT-kleurenmonitor (Thin Film
Transistor) met actieve matrix, die een beeld van hoge kwaliteit biedt. De
maximaal bereikbare resolutie is 1366 x 768, waarmee complexe beelden
en beelden van hoge kwaliteit kunnen worden weergegeven. Bovendien
bevat de monitor ook de nieuwe OSD-knoppen en ingebouwde
multimedialuidsprekers.
Productkenmerken
TFT LCD-monitor met hoog contrast; ondersteunt een maximale
VGA-resolutie van 1366 x 768, maximale videosignaalresolutie van
500 TVL.
Ingebouwde BNC- en S-videoaansluitingen, en componentsignaal
RCA-aansluiting en RCA-geluidsuitgang.
Een volledige OSD-functie optimaliseert de schermweergave.
Uitpakken
Het standaardpakket bevat het volgende:
26 / 32 / 42 inch TFT LCD-monitor
Afstandsbediening
VGA-kabel
DVI-I-kabel
Gebruikershandleiding
Het product reinigen
Gebruik een zachte, schone katoenen doek om stof of vuil
voorzichtig van het scherm te vegen.
Zorg tijdens het vegen dat u geen druk uitoefent op het scherm.
Gebruik hierbij geen water of chemisch reinigingsmiddel.
Chemische reinigingsmiddelen kunnen het oppervlak van het LCDscherm beschadigen.
UltraView TFT LCD-kleurenmonitor 26 inch / 32 inch / 42 inch 5 • NL
Page 90

Productafmetingen
26-inch monitor
32-inch monitor
NL • 6 UltraView TFT LCD-kleurenmonitor 26 inch / 32 inch / 42 inch
Page 91

42 inch monitor
De basisstandaard bevestigen
Zie Afbeelding 1 voor instructies.
Afbeelding 1. De basisstandaard bevestigen
UltraView TFT LCD-kleurenmonitor 26 inch / 32 inch / 42 inch 7 • NL
Page 92

Bedieningspaneel
Afbeelding 2. Beschrijving van het frontpaneel
Legenda Knop Beschrijving
1.
2.
3.
4.
5.
6.
7.
8.
9.
+
-
LED-
indicatielampje
POWER: Hiermee schakelt u de monitor in of uit.
MODE Hiermee selecteert u het ingangssignaal.
Opmerking: Wanneer de knop voor de eerste keer wordt
ingedrukt, wordt de OSD van het huidige signaal getoond.
Druk voordat het scherm verdwijnt opnieuw om de modus te
wijzigen.
AUTO: Hiermee wordt het VGA-signaal automatisch
aangepast.
PLUS: Hiermee verhoogt u de waarde van de geselecteerde
OSD-optie en verhoogt u het volume.
MINUS: Hiermee verlaagt u de waarde van de geselecteerde
OSD-optie en verlaagt u het volume.
OMHOOG: Hiermee schuift u omhoog in de OSD-optielijst en
past u het contrast aan.
OMLAAG: Hiermee schuift u omlaag in de OSD-optielijst en
past u de helderheid aan.
MENU: Hiermee opent of sluit u de OSD-weergave en voert u
een optieselectie in.
Groen: Voeding ingeschakeld; Oranje: Geen signaal; Rood:
Energie besparen; N.v.t.: Stroomtoevoer uit
NL • 8 UltraView TFT LCD-kleurenmonitor 26 inch / 32 inch / 42 inch
Page 93

Bedieningsinstructies
Het ingangssignaal selecteren
Druk op de knop MODE om de volgende opties op het scherm te
doorlopen.
VGA-signaal DVI-signaal Composiet-
signaal
S-VIDEOsignaal
Component
-signaal
De audio- en videoinstellingen selecteren
Druk op de knoppen +, -, of om de volgende opties op het
scherm te doorlopen en de waarden aan te passen.
Volumeregeling
Contrastinstelling
Helderheidsinstelling
De menu’s op het scherm (OSD) openen
1. Druk op de knop MODE om uw ingangssignaal te selecteren.
2. Druk op de knop MENU om de OSD-menu’s voor het
desbetreffende ingangssignaal te openen.
3. Druk op de knop OMHOOG of OMLAAG om door de weergegeven
lijst te schuiven.
4. Druk voordat de weergegeven lijst verdwijnt opnieuw op MENU om
de wijzigingen te accepteren.
UltraView TFT LCD-kleurenmonitor 26 inch / 32 inch / 42 inch 9 • NL
Page 94

Schermmenu’s (OSD)
1. Druk op de knop MENU om de OSD-menu's te openen.
2. Druk voordat de weergegeven lijst verdwijnt opnieuw op MENU om
de modus te wijzigen.
3. Druk op de knop OMHOOG of OMLAAG om door de
weergegeven lijst te schuiven.
VGA/DVI-signaalweergave
1 Brightness (Helderheid) 50
2 Contrast 60
3 H-Position (Horizontale positie) 50
4 V-Position (Verticale positie) 39
5 Clock (Klok) 25
6 Phase (Fase) 1
7 Color Temp. (Kleurtemperatuur) User
8 User Color R (Gebruikerskleur Rood) 50
9 User Color G (Gebruikerskleur Groen) 50
10 User Color B (Gebruikerskleur Blauw) 50
11 OSD H-Pos. (Horizontale positie OSD) 50
12 OSD V-Pos. (Verticale positie OSD) 50
13 Volume 50
14 Sub Source (Subbron) Video1
15 Language (Taal) English
16 Power Saving (Energie besparen) Off
17 Pixel Saver Mode (Pixelbesparingsmodus) On
18 Recall (Herstellen)
NL • 10 UltraView TFT LCD-kleurenmonitor 26 inch / 32 inch / 42 inch
Page 95

Submenu: PIP/POP
PIP/POP
PIP/POP Off
Sub Source (Subbron) Composite 1
PIP Size (PIP-formaat) Large
PIP H-Pos (Horizontale positie PIP) 0
PIP V-Pos (Verticale positie PIP) 0
Swap (Wisselen)
Tabel 1. Beschrijving van OSD-opties van VGA/DVI
Menuopties Beschrijving
Brightness (Helderheid) Past het zwartniveau van de achtergrond van het beeld aan
(bereik 0 tot 100).
Contrast (Contrast) Past het witniveau van de voorgrond van het beeld aan (bereik
0 tot 100).
H-Position * (Horizontale
positie)
V-Position * (Verticale
positie)
Clock * (Klok) Past de horizontale synchronisatiebreedte van het beeld aan
Phase * (Fase) Past de helderheid van het beeld aan (bereik 0 tot 100).
Color Temp.
(Kleurtemperatuur)
User Color R
(Gebruikerskleur Rood)
User Color G
(Gebruikerskleur Groen)
User Color B
(Gebruikerskleur Blauw)
OSD H-Pos (Horizontale
positie OSD)
OSD V-Pos (Verticale
positie OSD)
Volume (Volume) Past de volumeregeling aan.
PIP/POP Geeft het videobeeld linksboven op het scherm weer. Druk op
Past de positie van de linker- of rechterkant van het beeld aan
(bereik 0 tot 100).
Past de positie van de boven- of onderkant van het beeld aan
(bereik 0 tot 100).
(bereik 0 tot 100).
Druk op (+) of (-) om drie typen kleurtemperaturen te kiezen:
9300 °K, 6500 °K en User Color (Gebruikerskleur)
Past de intensiteit van rood van het beeld aan (bereik 0 tot
100).
Past de intensiteit van groen van het beeld aan (bereik 0 tot
100).
Past de intensiteit van blauw van het beeld aan (bereik 0 tot
100).
Past de positie van de linker- of rechterkant van de OSD aan
(bereik 0 tot 100).
Past de positie van de boven- of onderkant van de OSD aan
(bereik 0 tot 100).
(+) of (-) om vier typen PIP/POP te kiezen: Composite
(Composiet), S-Video, Component, Off (Uit).
UltraView TFT LCD-kleurenmonitor 26 inch / 32 inch / 42 inch 11 • NL
Page 96

Menuopties Beschrijving
Sub Source (Subbron) Selecteert de bron van het subbeeld.
PIP Size (PIP-formaat) Selecteert het formaat van het subbeeld.
PIP H-Pos (Horizontale
positie PIP)
PIP V-Pos (Verticale
positie PIP)
Swap (Wisselen) Verwisselt het beeld in het beeld.
Language (Taal) Hiermee selecteert u de taal van de OSD-tekst: De beschikbare
Power Saving (Energie
besparen)
Pixel Saver Mode
(Pixelbesparingsmodus)
Recall (Herstellen) Druk op (+) of (-) om de standaardwaarde te herstellen.
Opmerking: Items die gemarkeerd zijn met * hebben na de auto-afstemming andere
waarden. DVI kan echter niet worden gewijzigd.
Past de linker- of rechterkant van het subbeeld aan.
Past de boven- of onderkant van het subbeeld aan.
talen zijn Engels, Chinees (Traditioneel en Vereenvoudigd),
Frans, Spaans, Italiaans, Portugees, Russisch en Japans.
Hiermee selecteert u de energiebesparingsmodus;
Dit is een actieve manier om het inbranden van het scherm te
voorkomen, door het beeld om de 12 uur een klein beetje te
draaien.
VIDEO (Composite / S-Video)-signaalweergave
1 Brightness (Helderheid) 50
2 Contrast 50
3 Tint 50
4 Color (Kleur) 50
5 Color Temp (Kleurtemperatuur) Standard
*
6 Sharpness (Scherpte) 50
7 Scan Full
8 OSD H-Position (Horizontale positie OSD) 50
9 OSD V-Position (Verticale positie OSD) 50
10 Volume 50
11 PIP/POP >
12 Language (Taal) English
13 Pixel Saver Mode (Pixelbesparingsmodus) On
14 Recall (Herstellen)
* De kleurtemperatuur hangt af van de regio.
# Bij 26 inch-monitoren is de standaardwaarde voor scherpte 19.
NL • 12 UltraView TFT LCD-kleurenmonitor 26 inch / 32 inch / 42 inch
Page 97

Tabel 2. Beschrijving van VIDEO-opties
Menuopties Beschrijving
Brightness (Helderheid) Past het zwartniveau van de achtergrond van het beeld
aan (bereik 0 tot 100).
Contrast (Contrast) Past het witniveau van de voorgrond van het beeld aan
(bereik 0 tot 100).
Tint (Tint) Past de kleurtint aan. (alleen NTSC) (bereik 0 tot 100)
Color (Kleur) Past de kleurdichtheid aan (bereik 0 tot 100).
Color Temp.
(Kleurtemperatuur)
Sharpness (Scherpte) Past de helderheid en de scherpte van het beeld aan
Scan (Scannen) Druk op (+) of op (-) om een van de vier scantypen te
H-Position (Horizontale
positie)
V-Position (Verticale
positie)
Volume Past de volumeregeling aan.
PIP/POP Geeft het videobeeld linksboven op het scherm weer.
Sub Source (Subbron) Selecteert de bron van het subbeeld.
Size (Formaat) Selecteert het formaat van het subbeeld
PIP H-Pos (Horizontale
positie PIP)
PIP V-Pos (Verticale
positie PIP)
Swap (Wisselen) Verwisselt het beeld in het beeld.
Language (Taal) Hiermee selecteert u de taal van de OSD-tekst: De
Pixel Saver Mode
(Pixelbesparingsmodus)
Recall (Herstellen) Druk op (+) of (-) om de standaardwaarde te herstellen.
Druk op (+) of (-) om een van de drie typen
kleurtemperaturen te kiezen: 9300 °K, 6500 °K of
Standard (Standaard).
(bereik 0 tot 100).
kiezen: over-scan, under-scan, full-scan of 1: 1-scan.
Past de positie van de boven- of onderkant van het beeld
aan (bereik 0 tot 100).
Past de positie van de linker- of rechterkant van het beeld
aan (bereik 0 tot 100).
Druk op (+) of (-) om drie typen PIP te kiezen: VGA, DVI,
Off.
Past de linker- of rechterkant van het subbeeld aan.
Past de boven- of onderkant van het subbeeld aan.
beschikbare talen zijn Engels, Chinees, Frans, Duits,
Spaans, Italiaans of Japans.
Dit is een actieve manier om het inbranden van het
scherm te voorkomen, door het beeld om de 12 uur een
klein beetje te draaien.
UltraView TFT LCD-kleurenmonitor 26 inch / 32 inch / 42 inch 13 • NL
Page 98

De afstandsbediening gebruiken
1. Power (Aan/uit)-schakelaar: Hiermee schakelt u de monitor in of
uit.
2. Source (Bron): Hiermee selecteert u de ingangsbron: VGA, DVI,
BNC1, BNC2, Y/C, Y Cb Cr.
3. Menu/Exit: Hiermee opent of sluit u de OSD-weergave en voert u
een selectie in.
4. Omhoog: Hiermee schuift u omhoog door de OSD-opties.
5. Omlaag: Hiermee schuift u omlaag door de OSD-opties.
6. Links: Hiermee verlaagt u de waarde van de geselecteerde OSD-
optie.
7. Rechts: Hiermee verhoogt u de waarde van de geselecteerde OSD-
optie.
8. PIP: Hiermee selecteert u het schermmenu van de PIP-functie.
NL • 14 UltraView TFT LCD-kleurenmonitor 26 inch / 32 inch / 42 inch
Page 99

9. Mute: Hiermee dempt u het volume of schakelt u het volume
opnieuw in.
Batterij-instructies
De afstandsbediening die bij het product wordt geleverd beschikt over een
lithiumbatterij. Als u de batterij wilt verwijderen, maakt u de achterkant van
de afstandsbediening los, vervangt u de batterij en plaatst u de achterkant
weer terug. Lever alle batterijen in bij een daarvoor aangewezen
afvalinzamelingspunt, zoals dit door de gemeentelijke en milieuwetgeving
wordt vereist.
Een videosignaal aansluiten op de monitor
Afbeelding 3. Ingangs-/uitgangsinterface
1.
VGA / DVI Audio Line In: Audiobron met YPbPr.
2.
YPBPr / LR In (RCA-aansluiting): Aansluiting op de I/O-uitgang van
videoapparatuur, zoals een dvd-speler.
3.
VGA In: Aansluiting op een analoge RGB-uitgang, zoals de VGA-uitgang van
de videokaart van de PC.
4.
HDMI: Optioneel.
5.
DVI In: Aansluiting op een analoge RGB-uitgang, zoals de DVI-uitgang van
de videokaart van de PC.
6.
DC-uitgang voor camera: Uitgang van 12 VDC voor voeding van één
camera (max. 500mA).
7.
AC IN-aansluiting: Sluit de voedingskabel aan op de AC-ingangsaansluiting
en het stopcontact.
UltraView TFT LCD-kleurenmonitor 26 inch / 32 inch / 42 inch 15 • NL
Page 100

1.
VIDEO In / Out (2) (BNC-TYPE): Sluit deze aan op de uitgang/ingang van
videoapparatuur, zoals een videorecorder of kleurenvideocamera.
2.
VIDEO In / Out (1) (BNC-TYPE): Sluit deze aan op de uitgang/ingang van
videoapparatuur, zoals een videorecorder of kleurenvideocamera.
3.
Y/C In / Out (4-Pin mini-Din): Sluit deze aan op de Y/C uitgang/ingang van
een camera, videorecorder of andere videoapparatuur.
4.
Audio In / Out (RCA-aansluiting): Audio ingang/uitgang voor BNC1.
5.
Audio In / Out (RCA-aansluiting): Audio ingang/uitgang voor BNC2.
Opmerking: Het duurt ongeveer 4 tot 5 seconden om van mode te wisselen.
Wanneer de mode is gewijzigd, verschijnt er een blauw scherm en wordt een
andere signaalingang geactiveerd. Mogelijk verschijnt het bericht "No Signal" (geen
signaal).
LET OP: Koppel apparaten NIET los van de monitor door aan hun kabel te
trekken. Koppel ze voorzichtig los door de metalen of plastic
connectorbehuizing stevig vast te pakken en de connector voorzichtig uit de
aansluiting te trekken.
NL • 16 UltraView TFT LCD-kleurenmonitor 26 inch / 32 inch / 42 inch
 Loading...