

Page 1
UltraView IP PTZ 36X
Camera Quick Start
Guide
EN
UltraView IP PTZ 36X Camera Quick Start Guide
DE
UltraView IP PTZ 36X-Kamera - Kurzanleitung
ES
Guía de inicio rápido de la cámara UltraView IP PTZ 36X
FR
Guide de démarrage rapide de la caméra UltraView IP PTZ
36X
IT
Guida di avvio rapido telecamera UltraView IP PTZ 36X
NL
UltraView IP PTZ 36X‑camera Beknopte handleiding
PL
Skrócona instrukcja obsługi kamery UltraView IP PTZ 36X
PT
Guia Rápido da Câmara UltraView IP PTZ 36X
RU
Краткое руководство по началу работы с камерой
UltraView
IP PTZ 36X
TR
UltraView IP PTZ 36X Kamera Hızlı Başlangıç Kılavuzu
P/N 1071694D-Multilingual • ISS 07DEC12
Page 2

Copyright
© 2012 UTC Fire & Security Americas
Corporation, Inc.
Interlogix is part of UTC Climate Controls &
Security, a unit of United Technologies
Corporation. All rights reserved.
Contact
information
www.interlogix.com
www.utcfssecurityproducts.eu
Page 3
UltraView IP PTZ 36X Camera 1 EN
EN
Introduction
This pocket guide provides basic information on setting up and using
the UltraView IP PTZ 36X camera. Detailed information on the
cameras can be found in the user manual.
Before you begin
Unpack everything. Check the items for damage, and verify that all
items are included. The camera is shipped with the following items:
Dome camera
User manual
Quick Start Guide
Installation environment
When installing your camera, consider these factors:
• Place the camera in a secure location.
• Ensure that the camera is in a well-ventilated area.
• Do not expose the camera to rain or moisture.
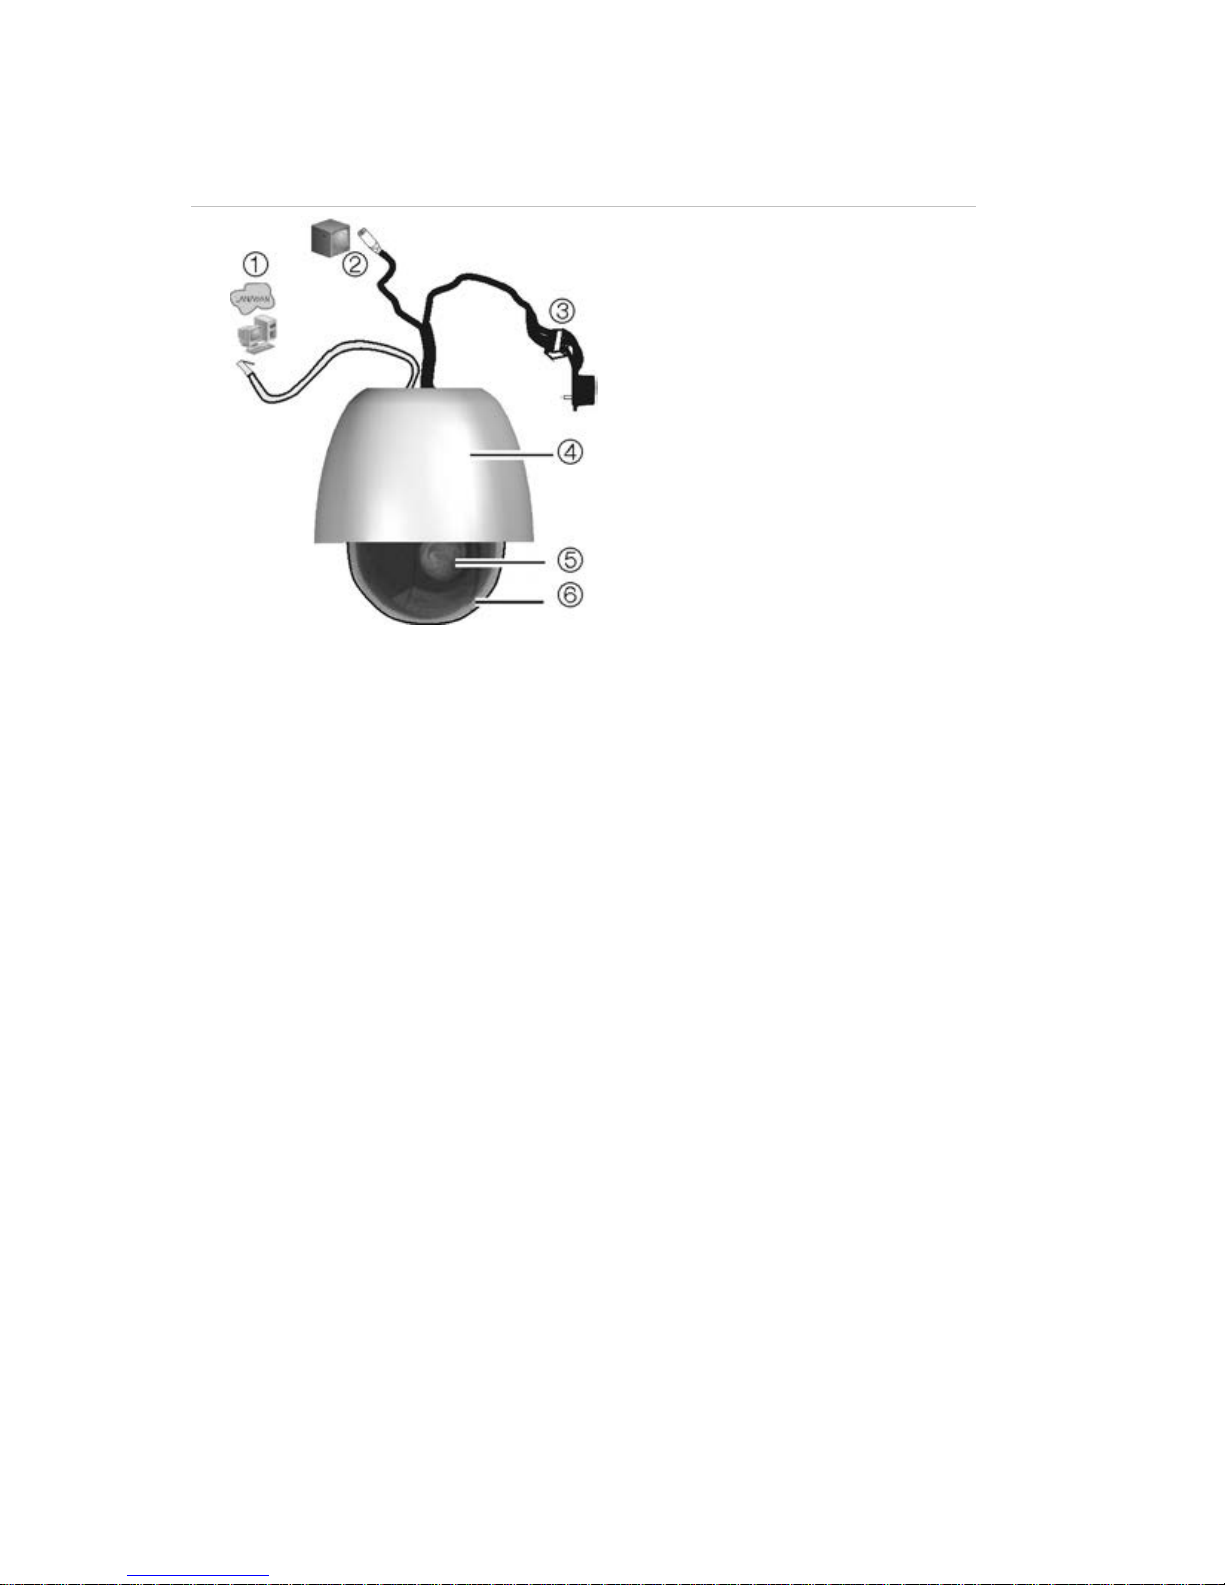
Camera description
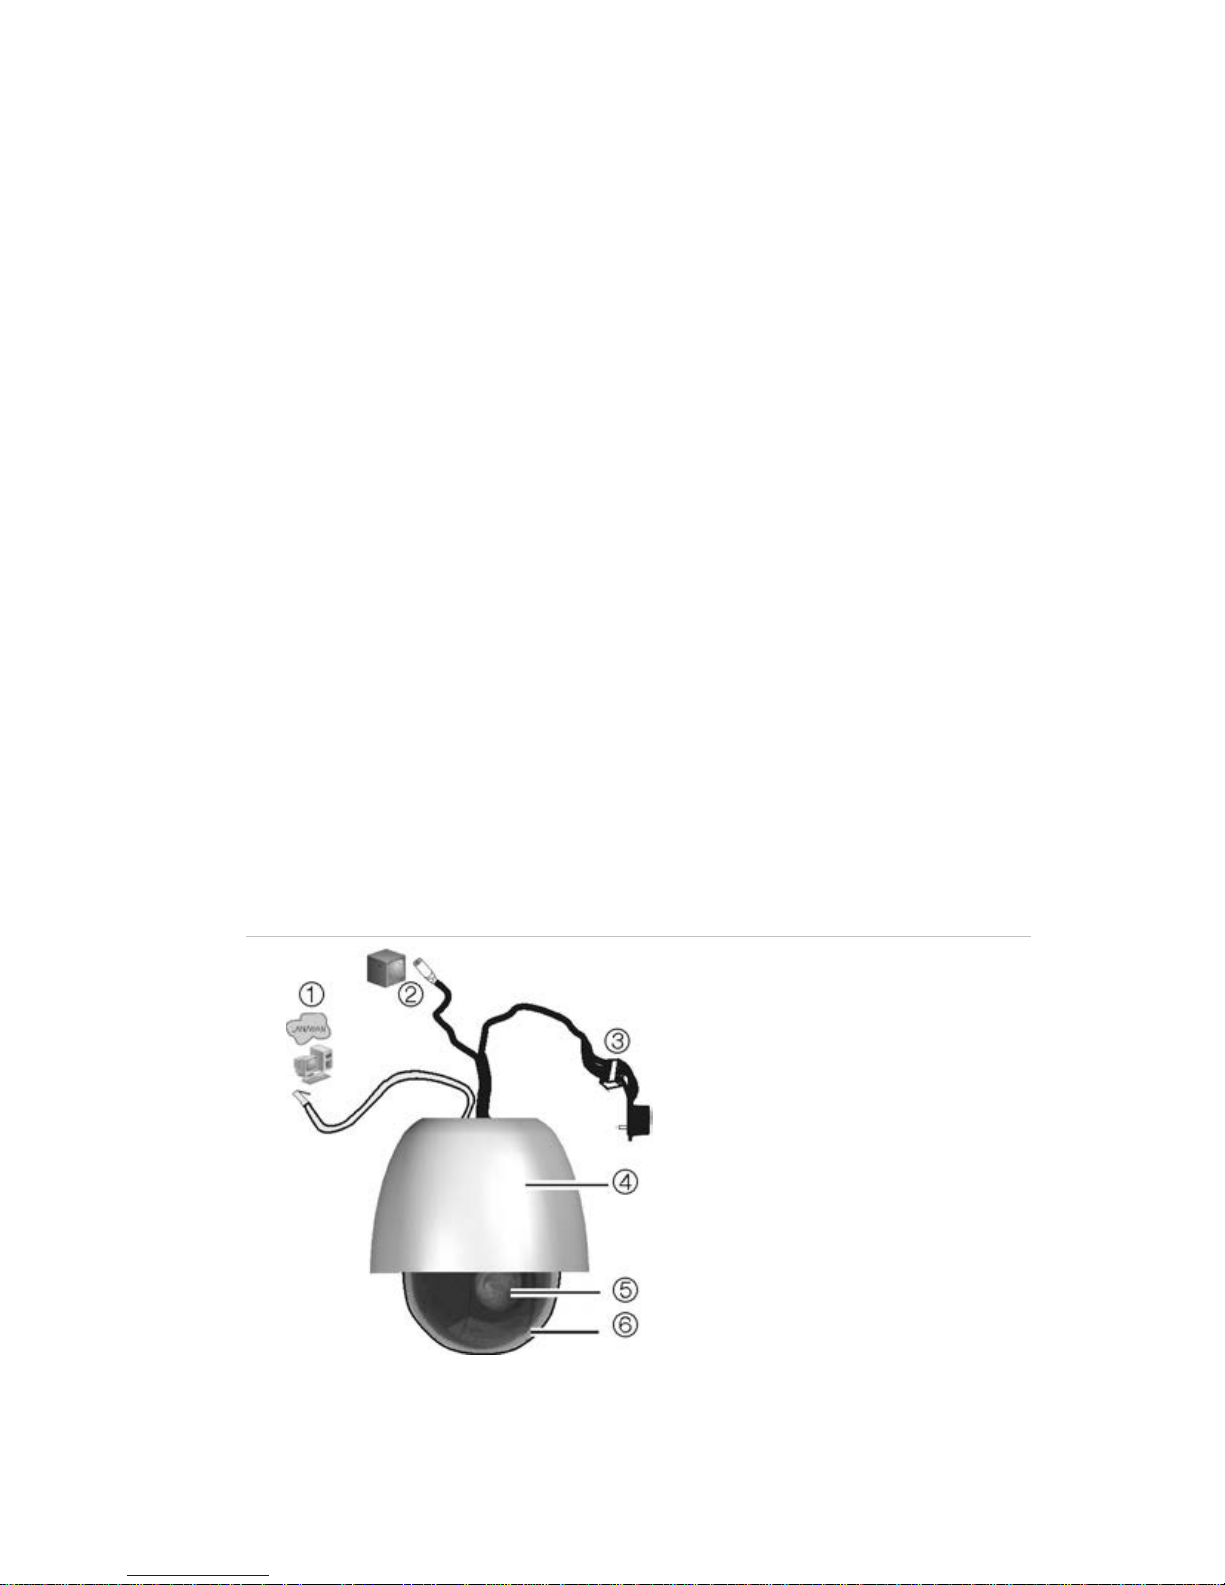
Figure 1: Overview of the dome camera (pendant-mount shown)
1. Ethernet RJ45 connector.
Connect to the network
devices.
2. Video output.
Connect the BNC connector to
a CCTV monitor.
3. Power supply cord.
Connect +24 VAC power
supply.
4. Housing.
5. PTZ module.
6. Bubble.
Page 4
EN 2 UltraView IP PTZ 36X Camera
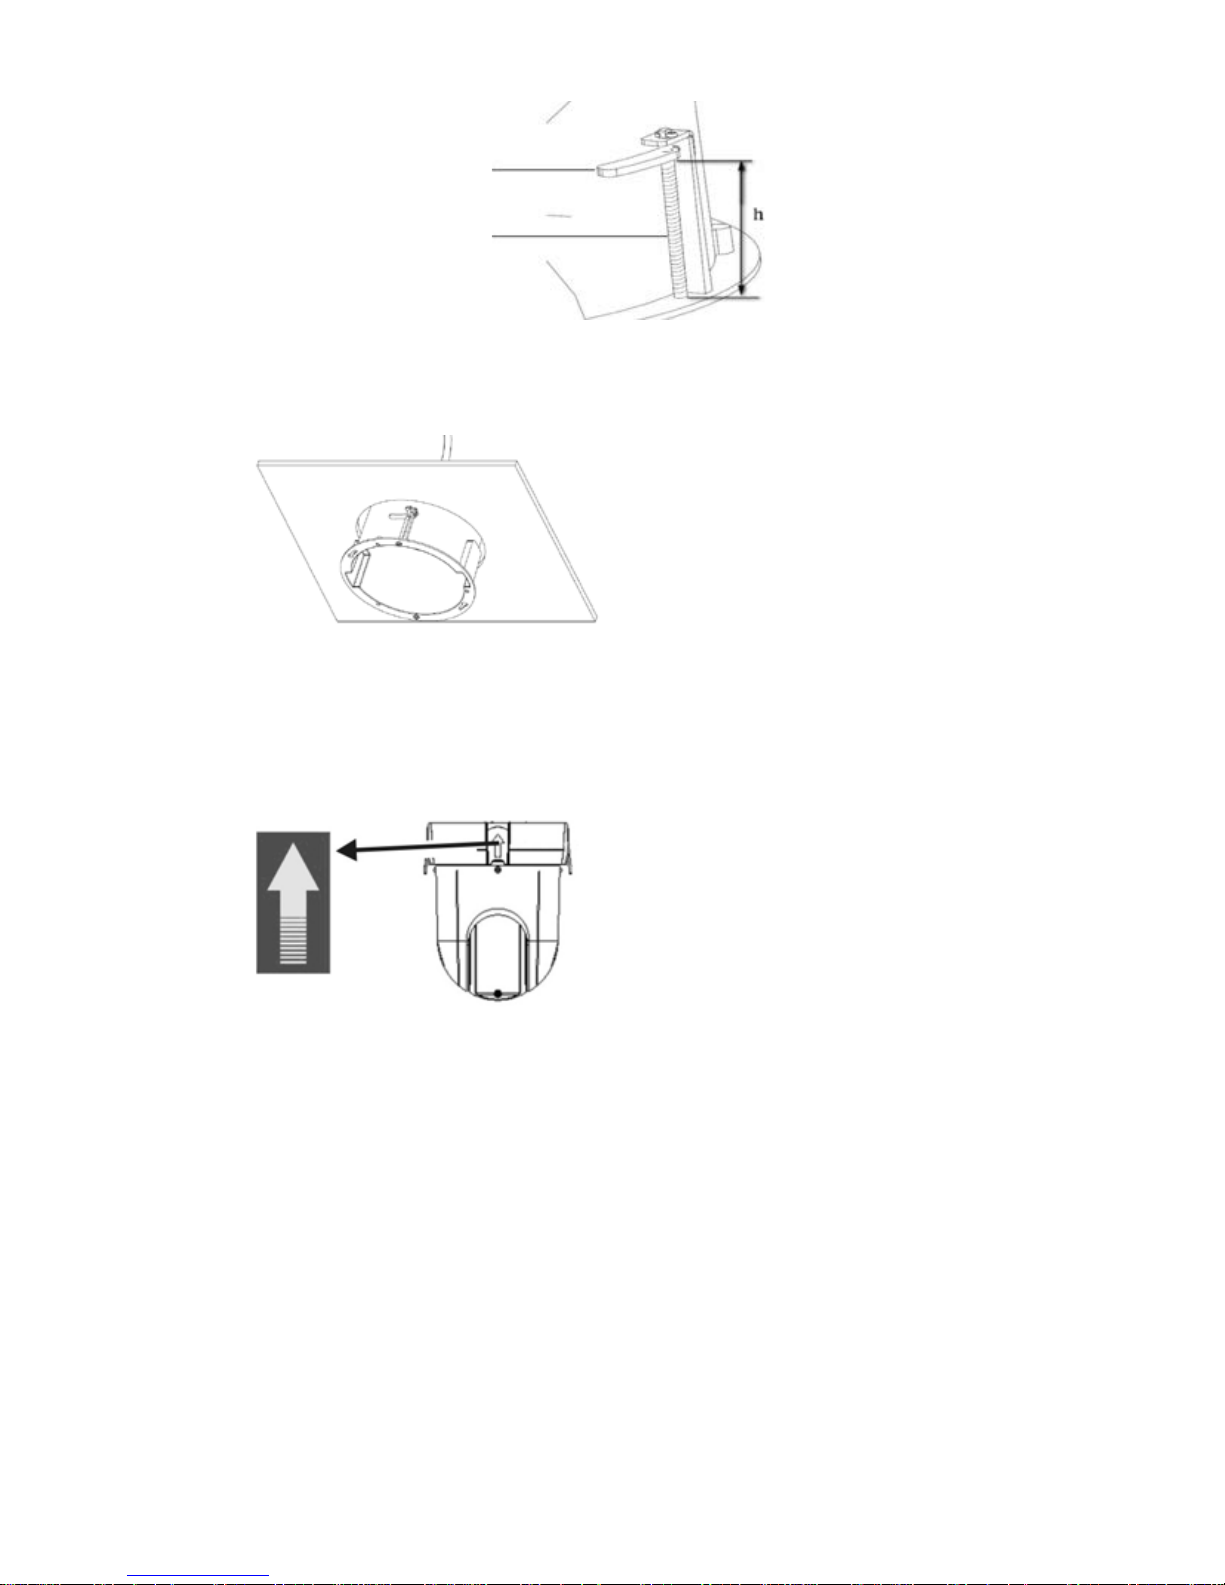
Installing a camera
1. Prepare the mounting surface and install the camera bracket.
2. Unscrew the bubble from the camera and remove the protective
tape from the PTZ module.
3. Press the two tabs on either side of the PTZ module and remove it
from the camera housing. Ensure the module cables still exit from
the cable entry hole in the top of the housing.
Note: If alarm and audio input/output relays are to be used,
connect them to the PCB of the module and route their cables
through the cable entry hole on tom of the housing. See the user
manual for further information on the alarm connections.
4. Install the housing.
Pendant-mount camera:
Attach the camera housing to the bracket using the screws
enclosed with the bracket.
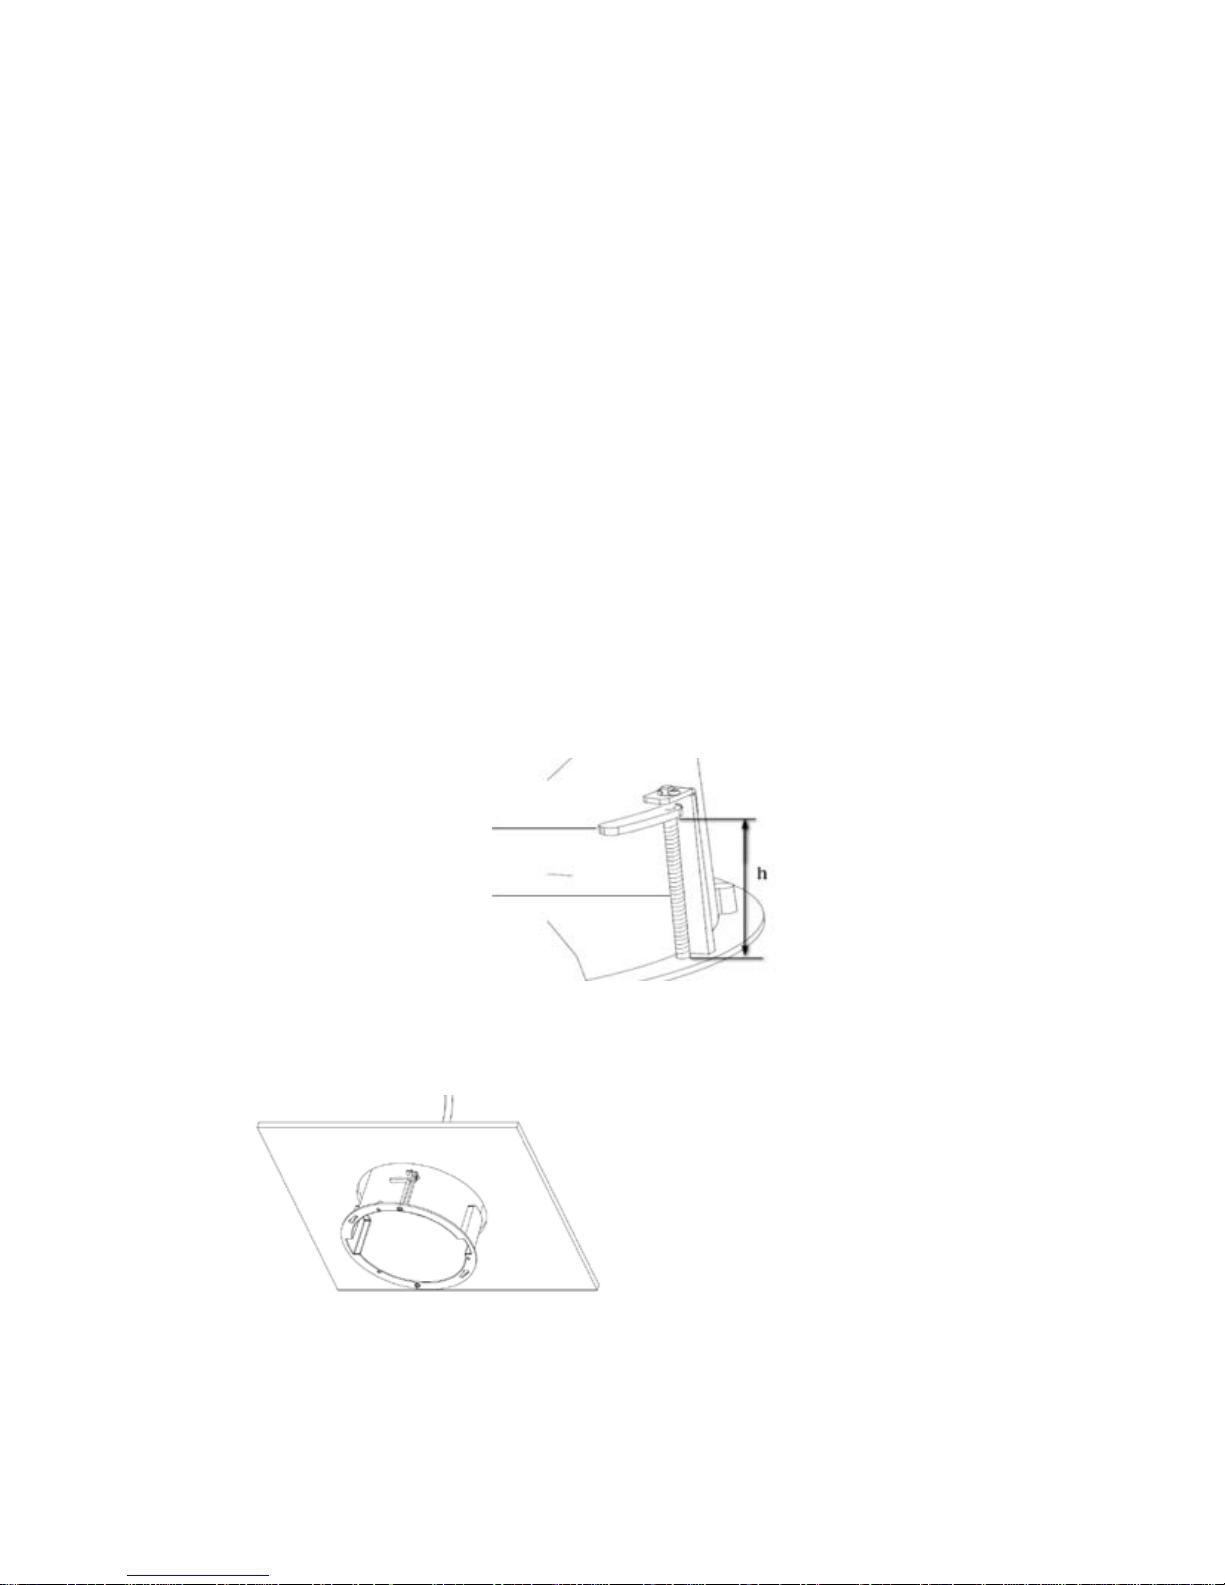
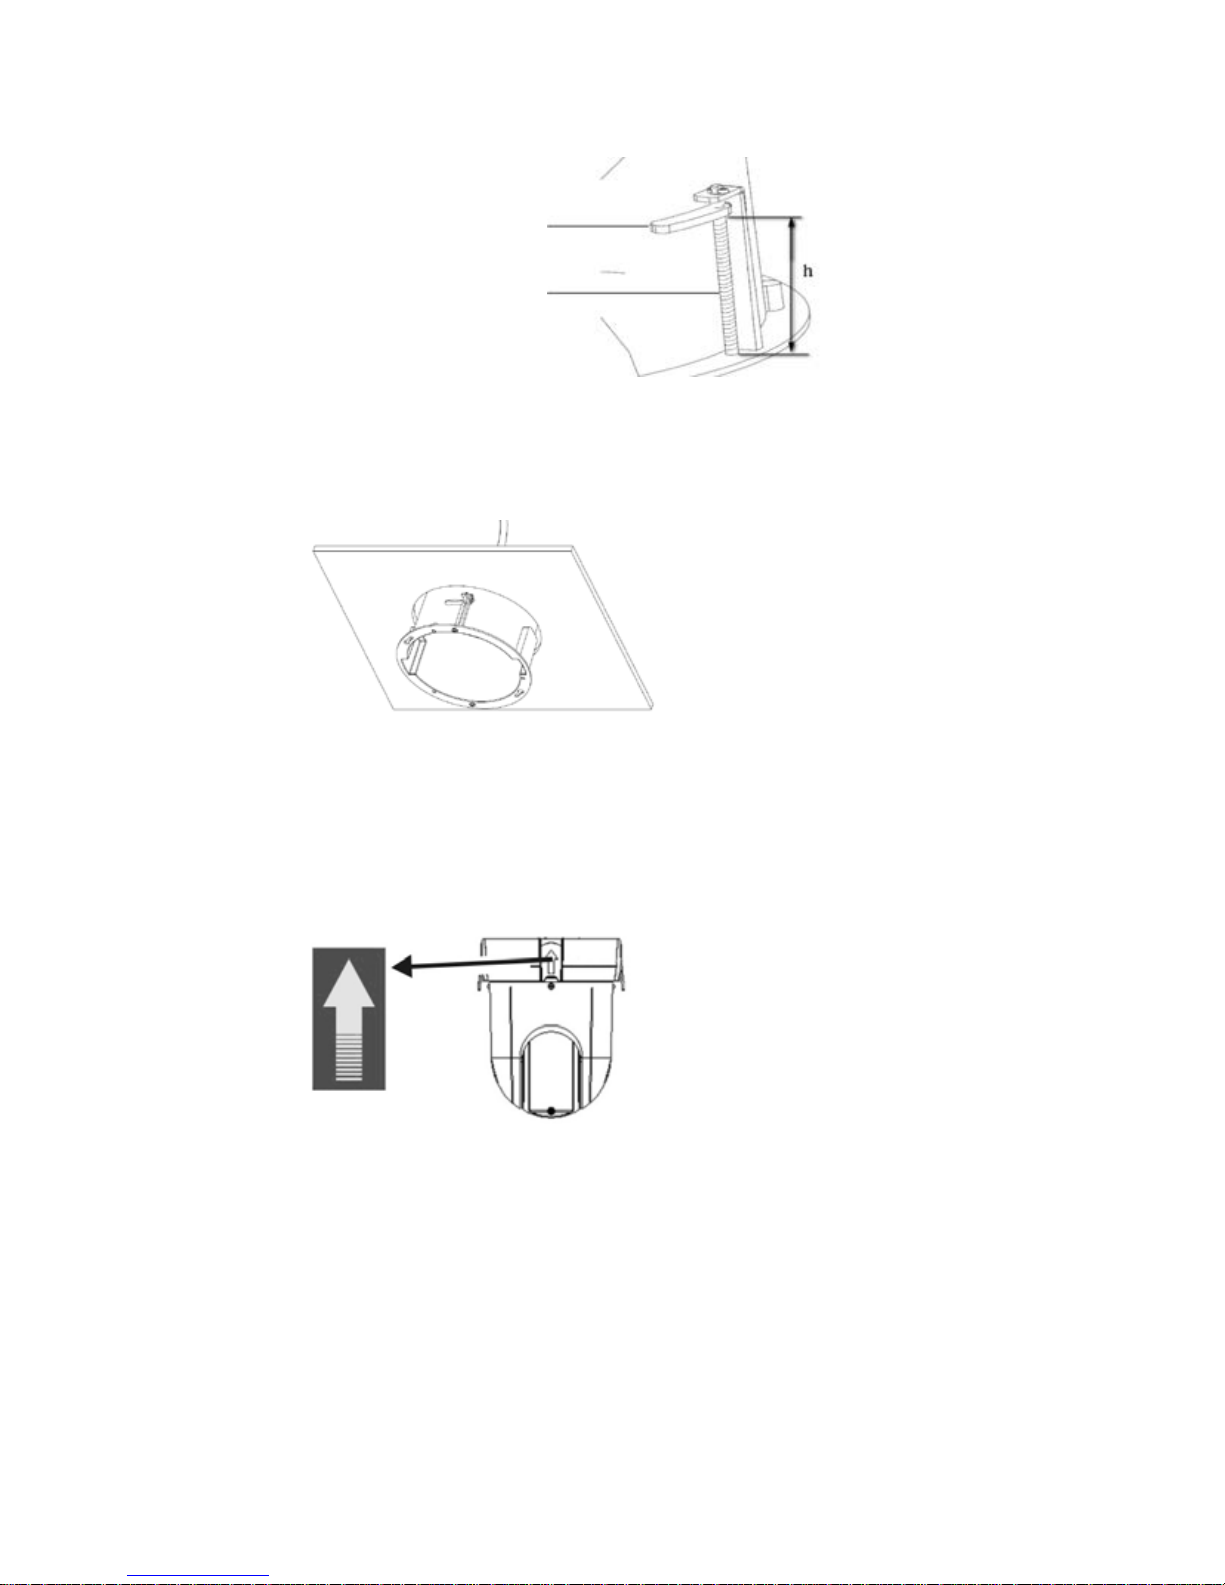
Flush-mount camera:
Adjust the height of the two housing tabs by turning the screw on
which they are attached. The distance (h) of the tabs from the
housing ring must be greater than the thickness of the ceiling.
Housing tab
Screw
Make sure the housing tab is closed and then PUSH the housing
into the pass-through hole. Hold the housing and fix it by screwing
the housing tabs down to the mounting surface
5. Insert the PTZ module into the housing:
Page 5
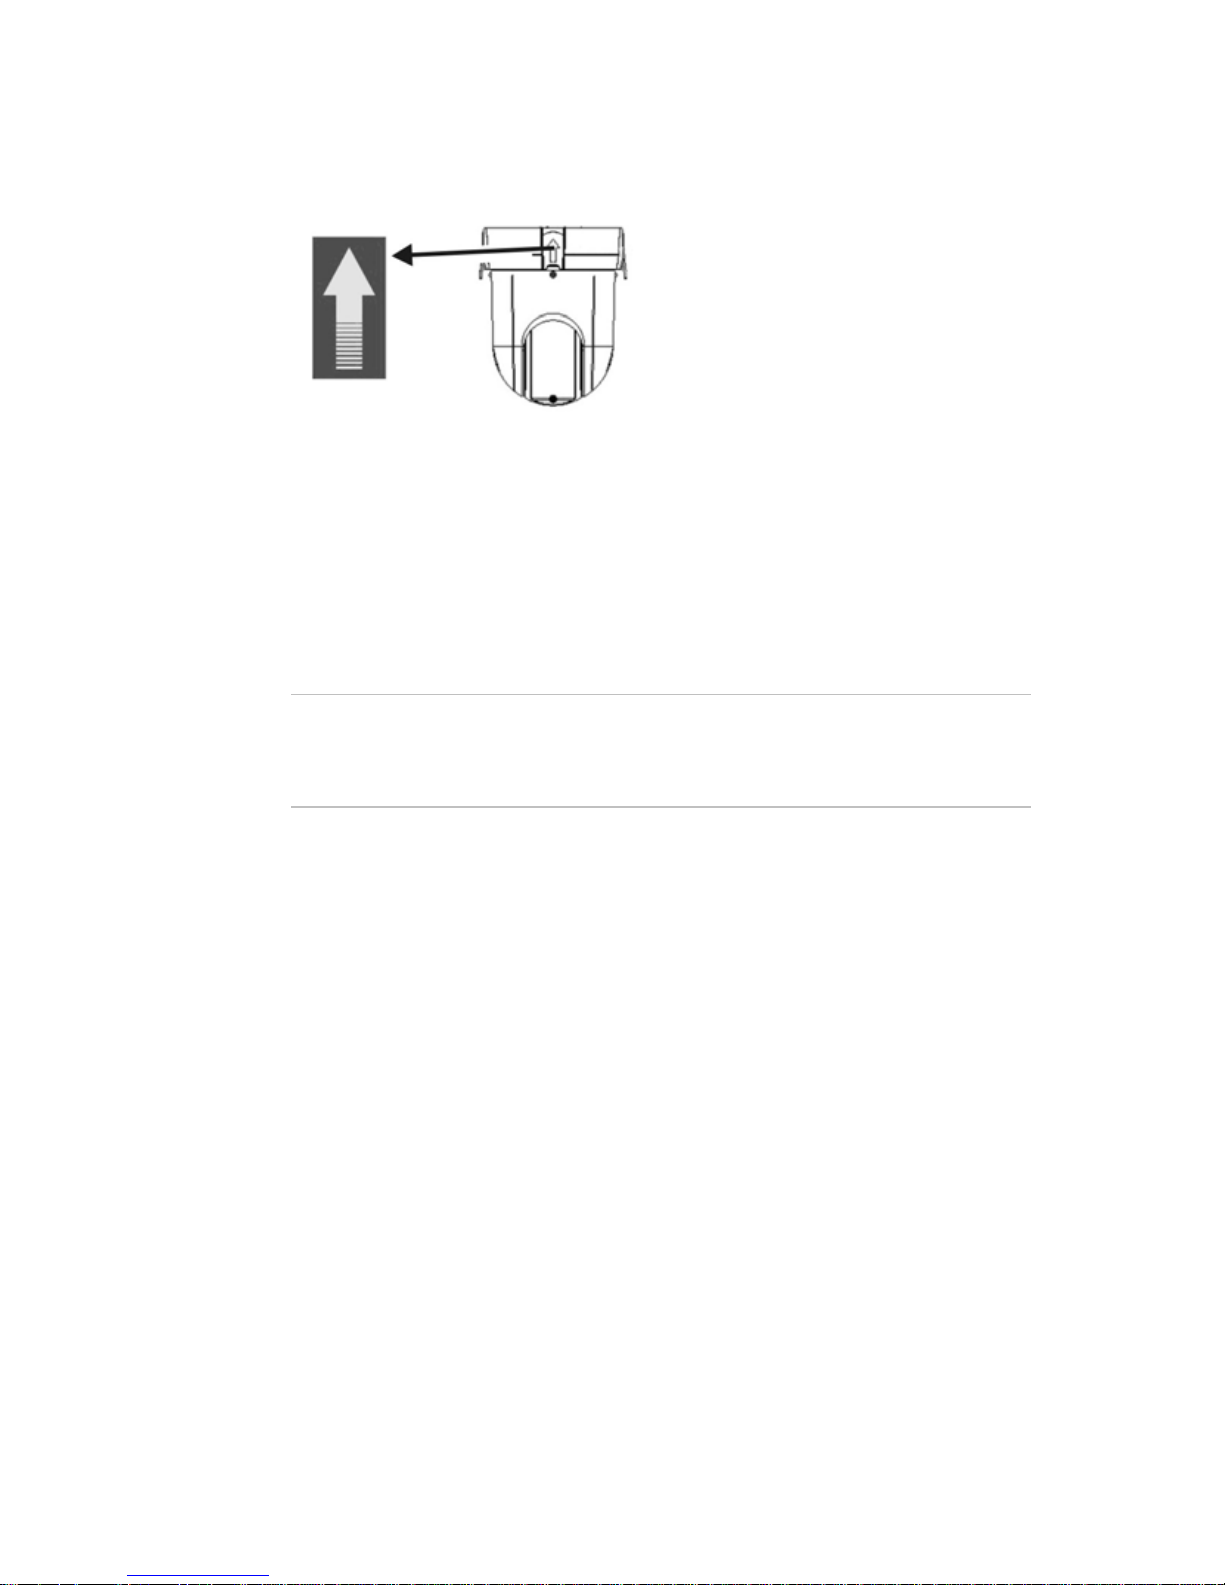
UltraView IP PTZ 36X Camera 3 EN
Position the tabs on the PTZ module by aligning the arrow label on
the module with those on the housing (see below). The module
should firmly snap into position. If using a SDHC card, insert it into
the module before inserting the module into the housing.
6. Re-attach the bubble by screwing it to the housing.
7. Pendant-mount camera only: Route the PTZ module cables
through the bracket.
Flush mount camera only: Install the trim ring. Align the trim ring
to the housing, and insert the fix-pins to the holes. Then rotate the
ring clockwise.
8. Connect the cables (see Figure 1).
Warning: After installation, the PTZ module will perform a PTZ
self-test and initializes with the power on. DO NOT touch and
move the camera while it is self-testing and initializing.
9. Configure the dome camera to suit its location.
Accessing the camera over the internet
Use the Web browser to access and control the camera over the
internet.
Note: Any changes made to the camera’s configuration only apply to
this camera.
Change the administrator password once the set up is complete. Only
authorized users should be able to modify camera settings.
To access the camera online:
1. In the Web browser enter the camera’s IP address (default is
192.168.1.70). The Login dialog box appears.
2. Enter your user name and password as well as the port to be used.
Default user name: admin
Default password: 1234
Page 6
EN 4 UltraView IP PTZ 36X Camera
Default port: 8000
Click OK. The Web browser screen appears in live mode. The live
screen is initially blank.
3. Click the Start Live View button on the top of the screen for
the live mode images to appear on-screen.
4. Right-click Camera 01 to open the pop-up box and select the
desired stream: Main, Sub or Open sound.
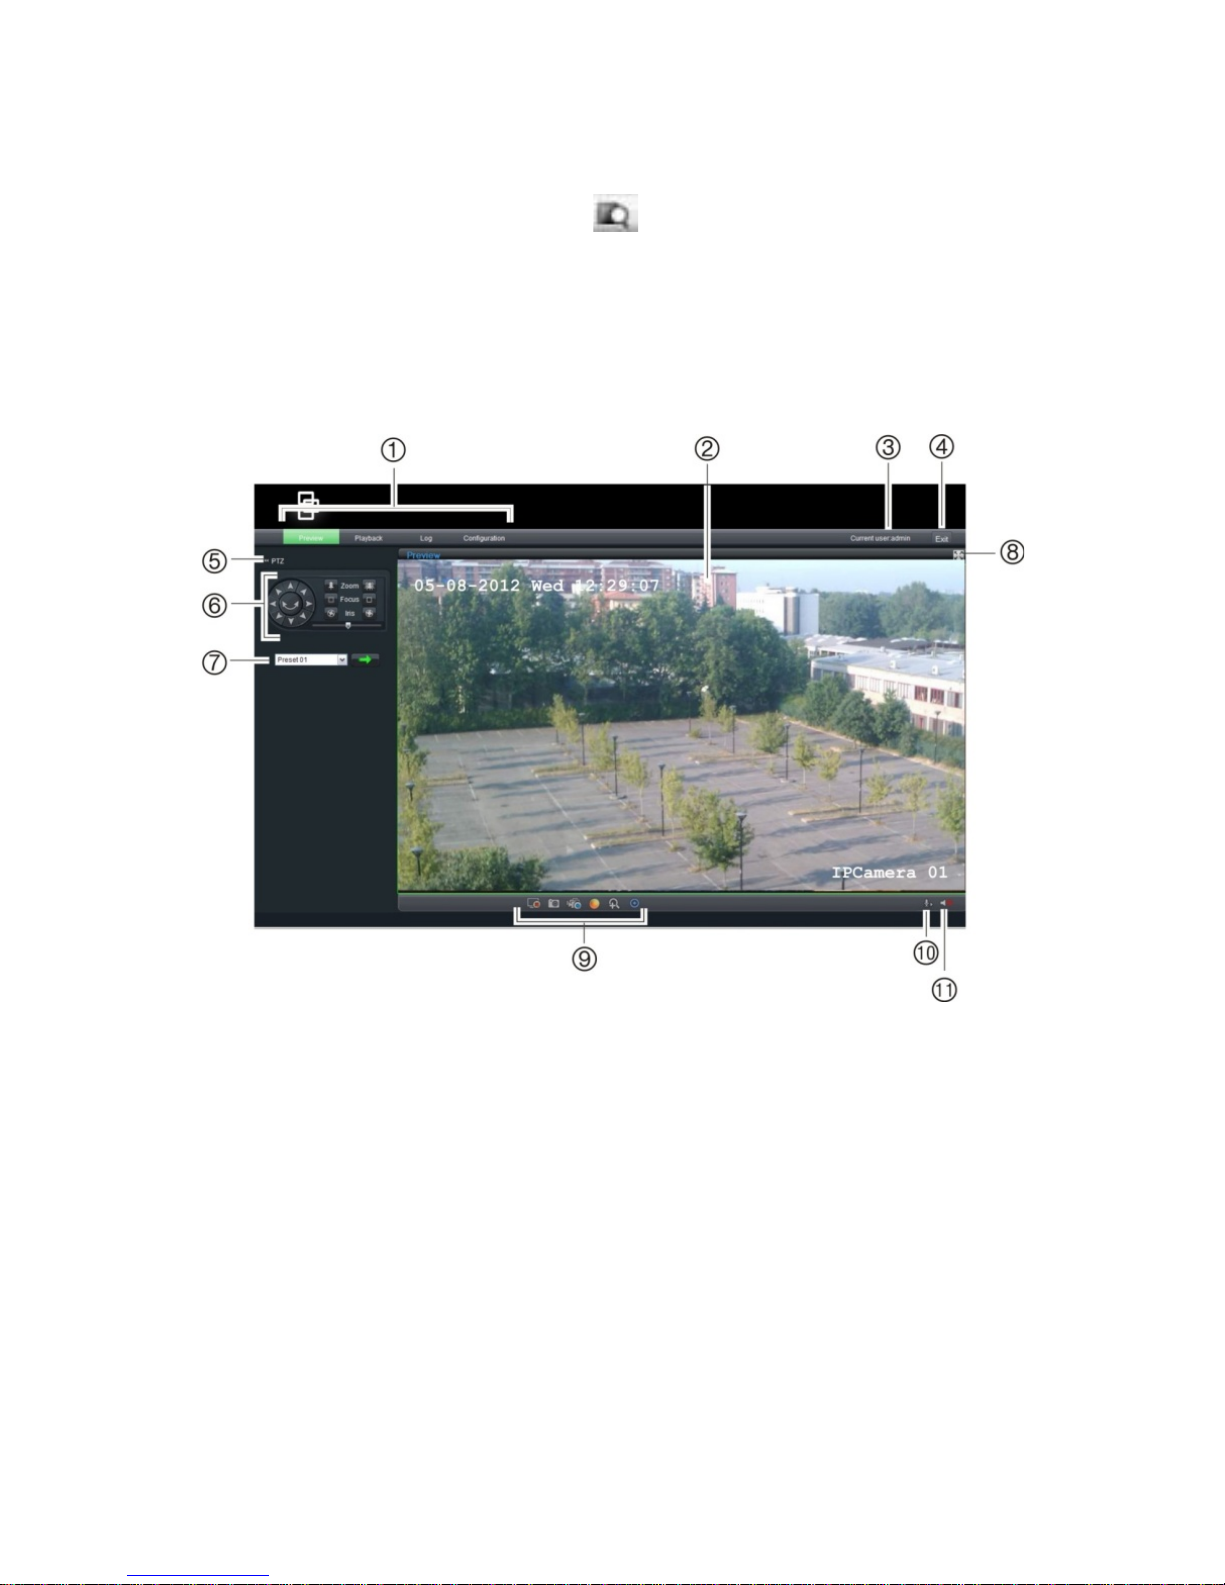
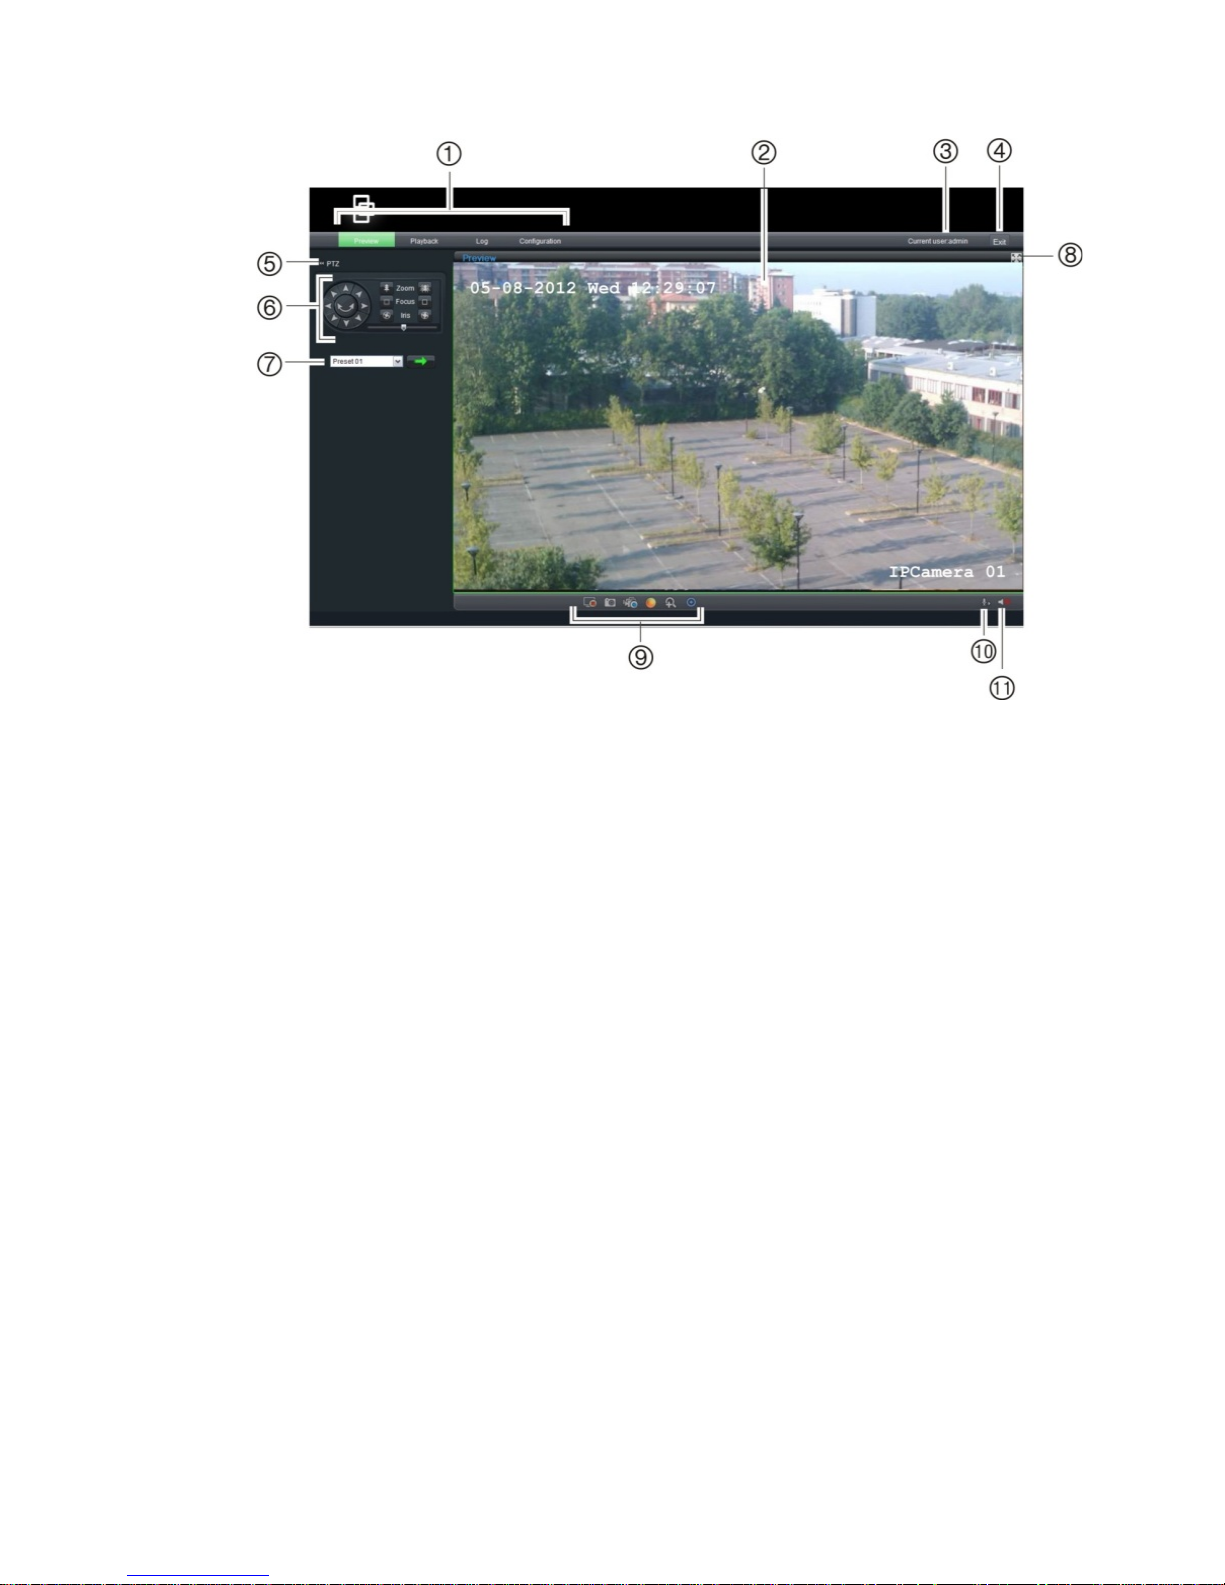
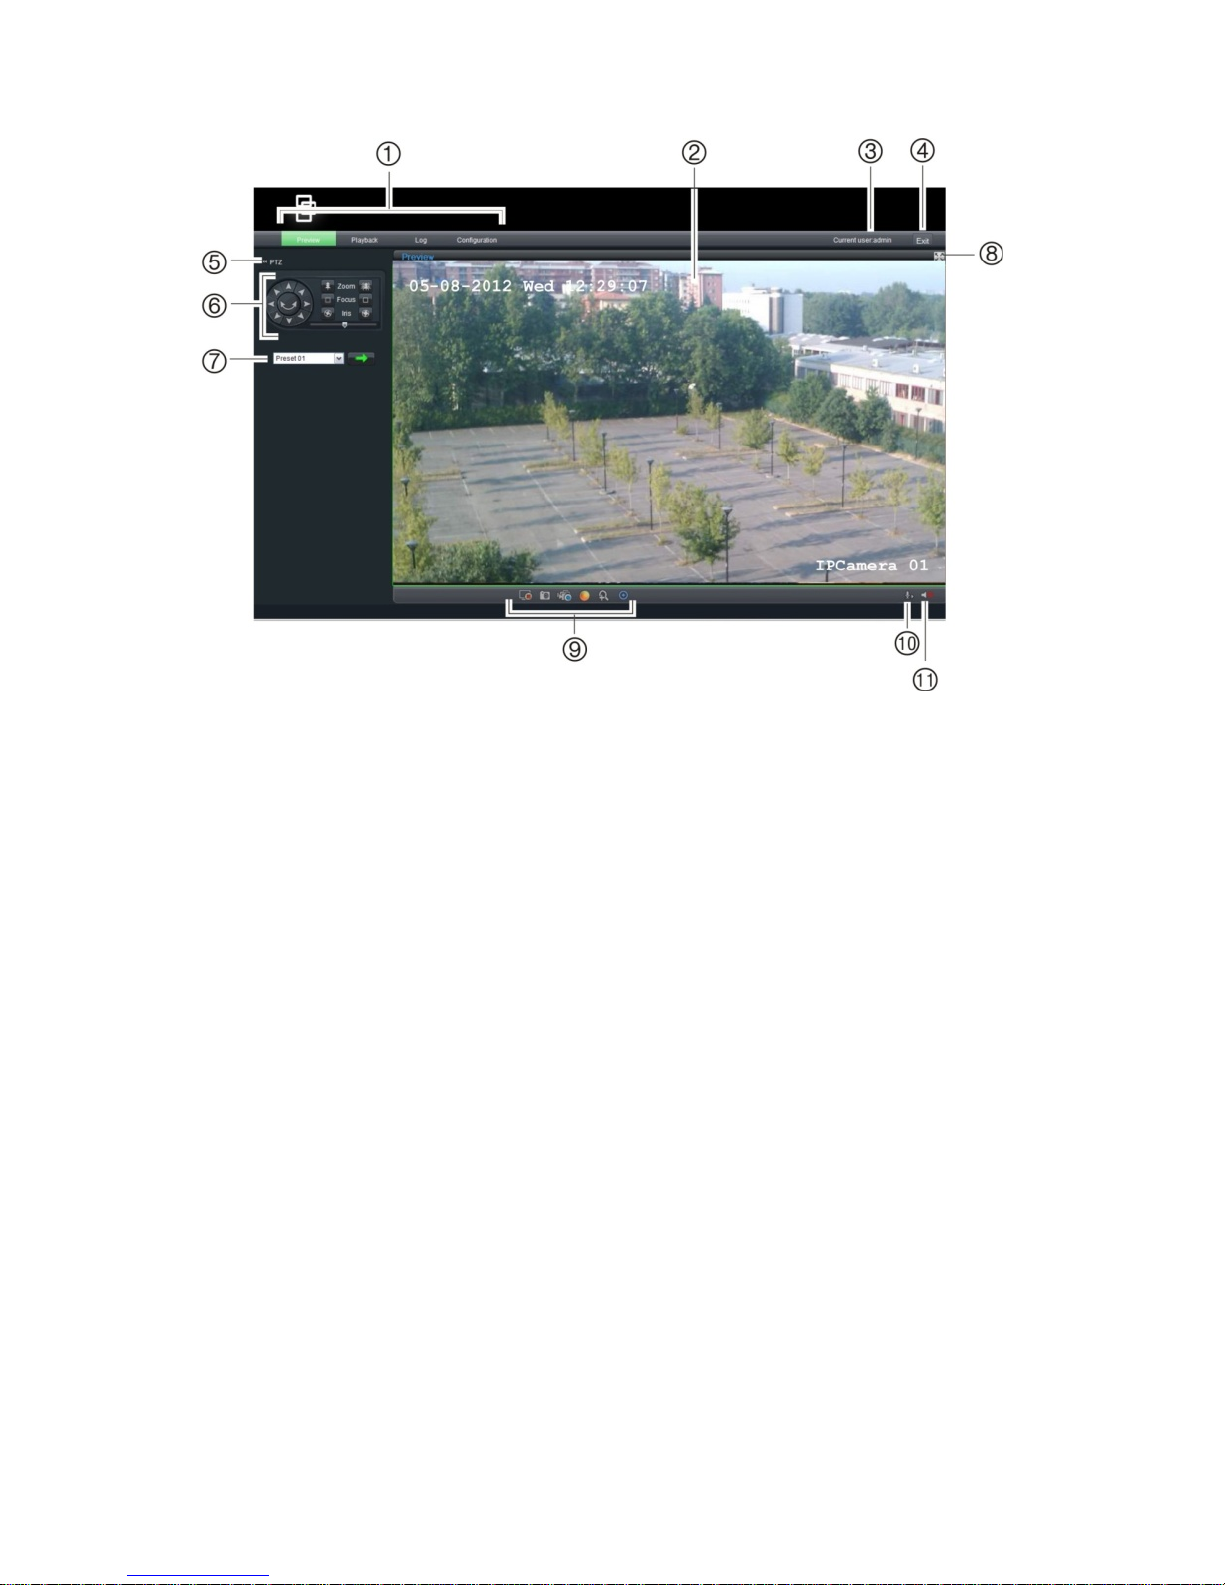
Web browser interface
1.
Menu toolbar select live view,
playback, search event logs
and configure camera over the
internet.
2.
Viewer pane.
3.
Current user
4.
Exit the system.
5.
PTZ button.
6. PTZ control panel
7. Preset selection
8. Full screen
9.
Start live view, record video and
take snapshots.
10. Start/stop bi-directional audio.
11. Turn the audio function on or
off.
Page 7
UltraView IP PTZ 36X Camera 5 EN
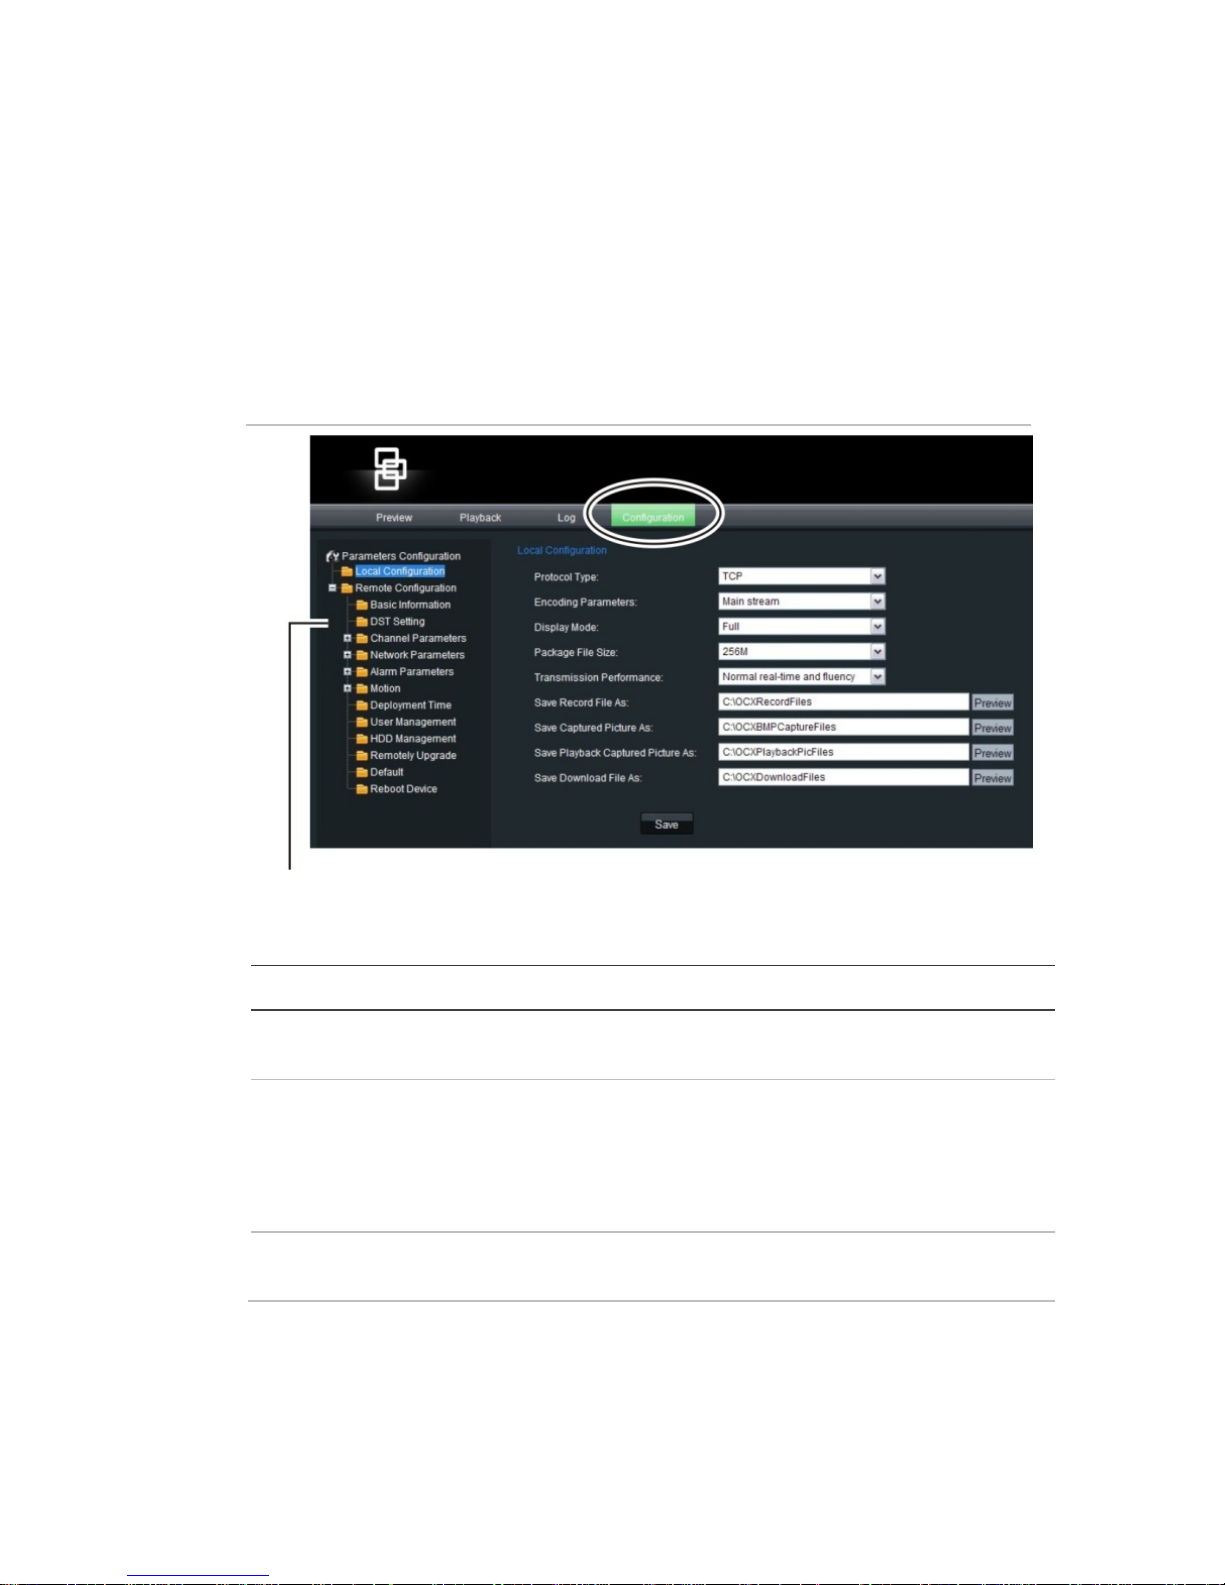
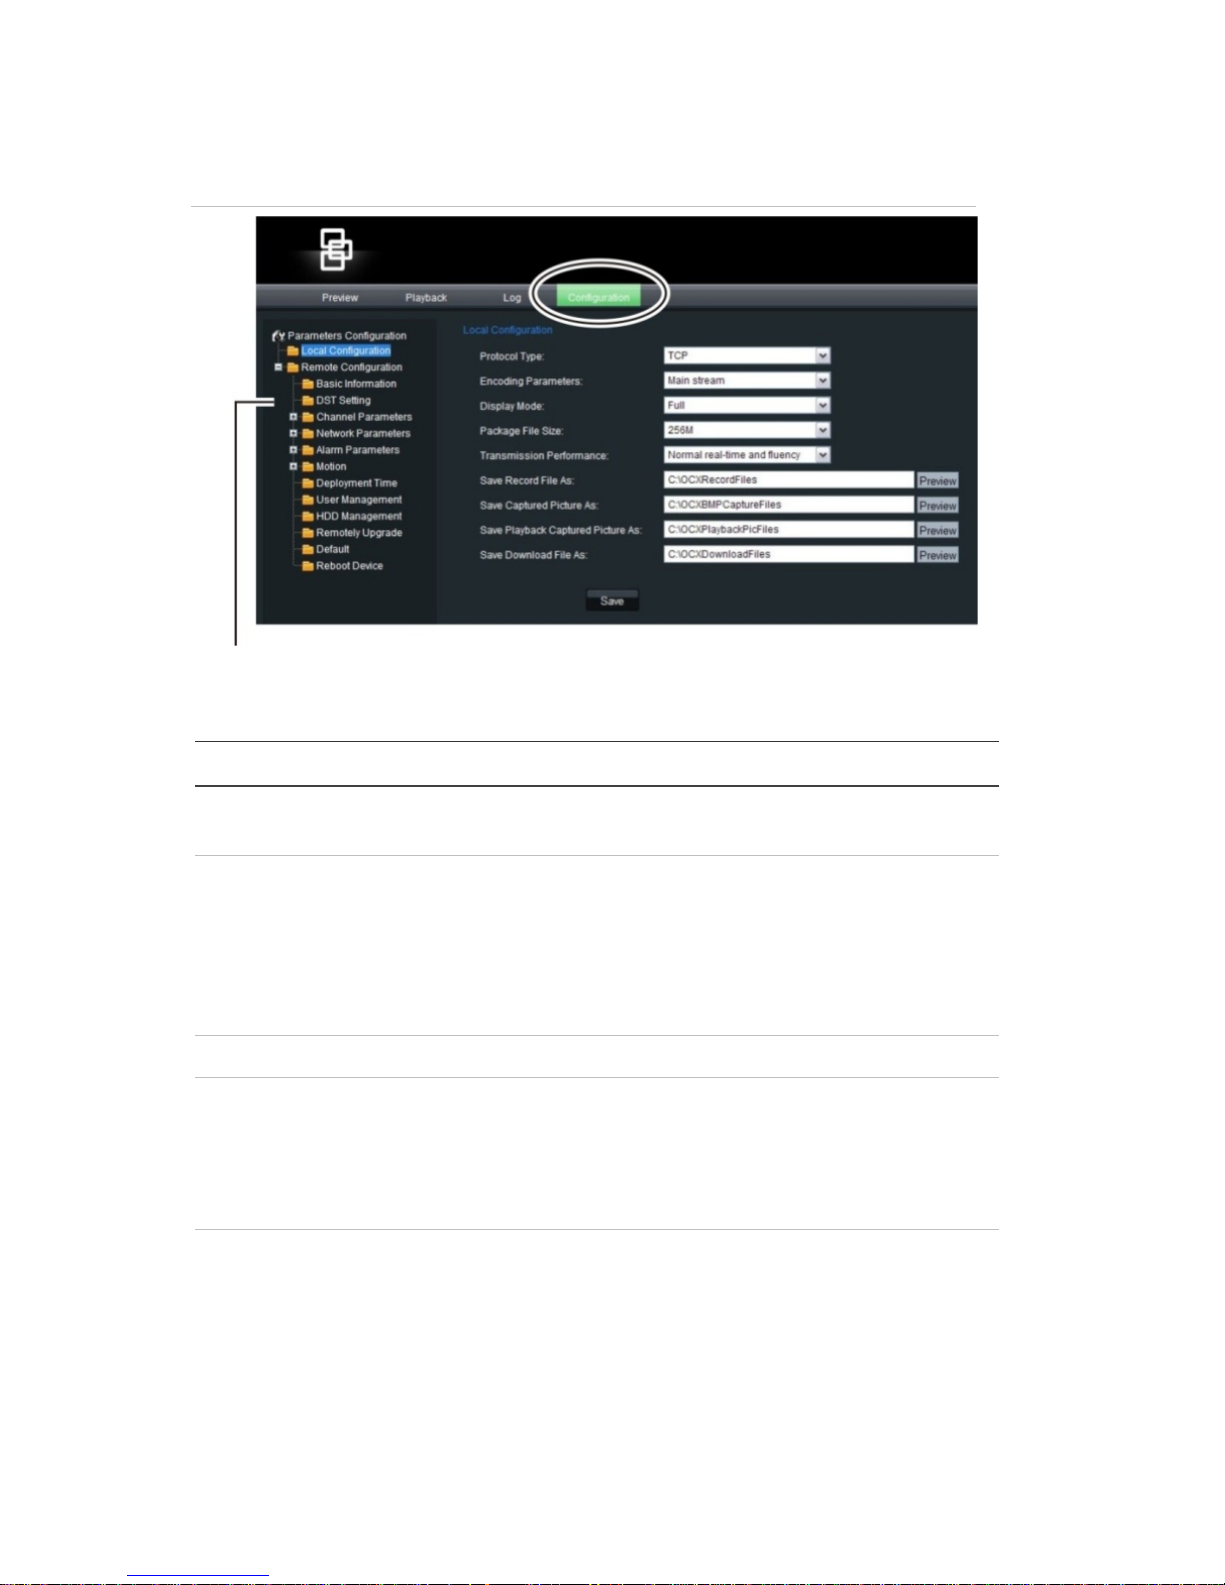
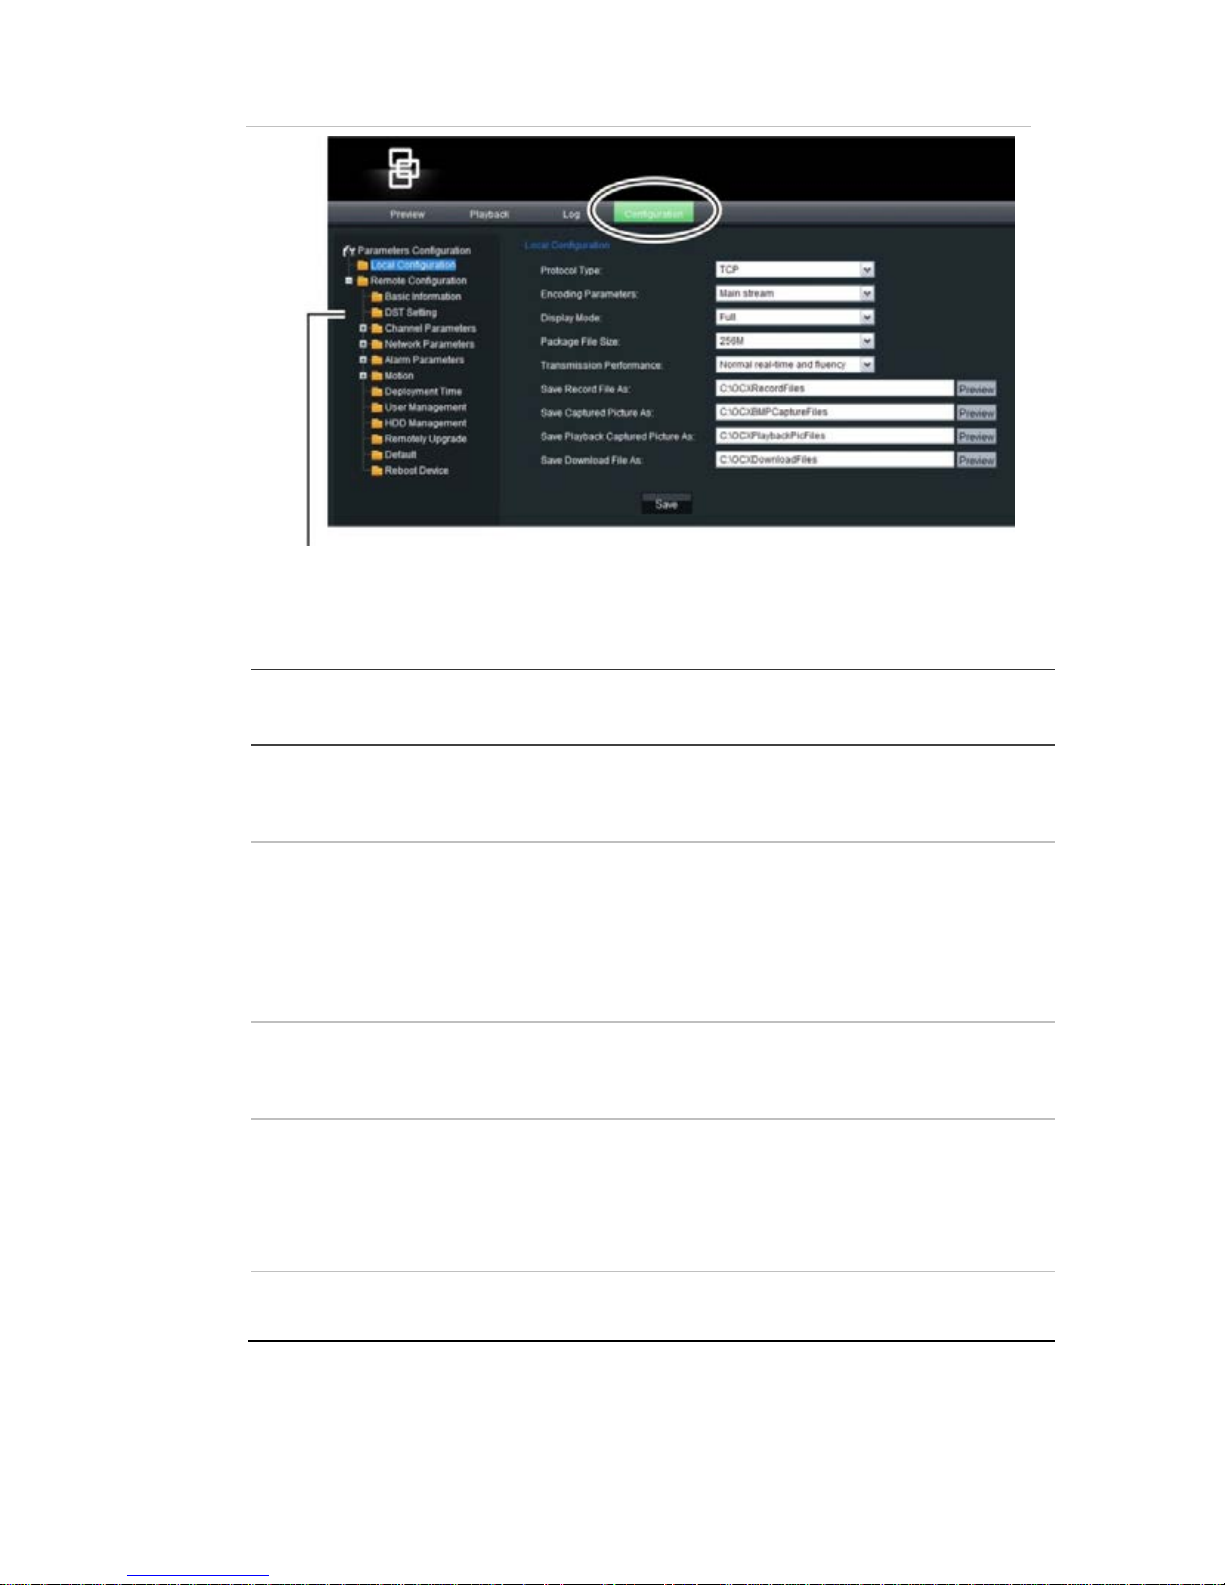
Configuring the camera over the internet
In the camera browser screen, click the Configuration button in the
menu toolbar to access the configuration screens. See Table 1 below
for the list of configuration parameters.
The configuration pane displays the configuration tree with 10
configuration parameter folders. The configuration pane is always
visible. Each folder has a list of subfolders that display the different
configuration screens.
Figure 2: Configuration screen
Configuration pane
Table 1: Overview of the configuration parameter folders
Configuration fo
lder Description
Local configuration
Manages the network type, display mode and
local storage paths.
Basic information
Defines the device name and RS-485 bus ID
as used by the network. It also displays the
MAC address, device type, device SN, current
firmware version, U-Boot version and current
server time
DST time
Defines when daylight saving time starts and
ends.
Page 8

EN 6 UltraView IP PTZ 36X Camera
Configuration fo
lder Description
Channel parameters
Defines the OSD properties of camera
information, recording schedule, recording
settings for alarm events, alarm response and
overlay text.
Network parameters
Defines the network parameters required to
access the camera over the internet.
Alarm parameters
Defines how the camera handles alarms such
as input type, notification of alarms, and
response schedules and duration.
Motion
Defines how the camera moves such as
presets, shadow tours, and privacy masks..
Deployment time
Defines the schedules during which events
can
be registered
User
management Defines who can use the camera, their
passwords and access privileges.
HDD management
Defines how to format the SDD card used in
the camera.
Remote
upgrade Defines how to upgrade the camera’s
firmware.
Default
Restores factory default settings.
Reboot device
Reboots the camera.
Specifications
Operating temperature Pendant housing: -10 to +50 °C
(-14 to +122 °F)
Flush housing: -30 to +65 °C (-22 to +149 °F)
Power supply 24 VAC +/- 4 VAC
Power consumption 30 W (heater on), 15 W (heater off)
Dimensions Pendant housing: Ø 220 × 299 mm
(Ø 8.66 ×10.27 in)
Flush housing : Ø 206 × 241 mm
(Ø 8.11 × 9.49 in.)
Environmental Pendant housing: IP66
Flush housing: IP54
Weight 5 kg (11 lb.)
Page 9

UltraView IP PTZ 36X-Kamera 7 DE
DE
Einführung
Diese Kurzanleitung bietet die grundlegenden Informationen zur
Einrichtung und Verwendung der UltraView IP PTZ 36X camera
Detaillierte Informationen zu den Kameras entnehmen Sie bitte
dem Benutzerhandbuch.
Bevor Sie beginnen
Packen Sie alle Komponenten aus. Überprüfen Sie die einzelnen
Komponenten auf eventuelle Beschädigungen und achten Sie darauf,
dass alle Komponenten geliefert wurden. Die folgenden Teile sind im
Lieferumfang der Kamera enthalten:
Dome
Benutzerhandbuch
Schnellstartanleitung
Installationsumgebung
Beachten Sie beim Installieren der Kamera folgende Faktoren:
• Platzieren Sie die Kamera an einem sicheren Ort.
• Vergewissern Sie sich, dass sich die Kamera an einem gut
belüfteten Ort befindet.
• Setzen Sie die Kamera weder Regen noch Feuchtigkeit aus.
Page 10
DE 8 UltraView IP PTZ 36X-Kamera
Kamerabeschreibung
Abbildung 3: Überblick über den Dome (Darstellung zeigt
abgehängte Montage)
1. Ethernet-RJ45-Anschluss.
Anschluss für Netzwerkgeräte.
2. Videoausgang.
Verbinden des BNCAnschlusses mit einem CCTVMonitor.
3. Netzkabel.
Anschluss an +24 VACStromquelle.
4. Gehäuse.
5. PTZ-Modul.
6. Kuppel.
Installieren der Kamera
1. Bereiten Sie die Montagefläche vor und installieren Sie die
Kamerahalterung.
2. Lösen Sie die Kuppel von der Kamera und entfernen Sie die
Schutzfolie vom PTZ-Modul.
3. Drücken Sie auf die Laschen an beiden Seiten des PTZ-Moduls
und entfernen Sie dieses vom Kameragehäuse. Achten Sie darauf,
dass die Modulkabel weiterhin durch die Kabeleinführungsöffnung
oben im Gehäuse geführt werden.
Hinweis: Bei Verwendung von Alarm- und Audio-Eingangs-/Ausgangsrelais schließen Sie diese an die Leiterplatine
des Moduls an. Führen Sie die Kabel durch die
Kabeleinführungsöffnung oben im Gehäuse. Weitere
Informationen zu Alarmanschlüssen finden Sie im
Benutzerhandbuch auf Seite.
4. Anbringen des Gehäuses.
Abgehängte Montage:
Befestigen Sie das Kameragehäuse mithilfe der mitgelieferten
Schrauben an der Halterung.
Bündige Montage:
Passen Sie die Höhe der beiden Laschen am Gehäuse durch
Drehen ihrer Befestigungsschraube an. Der Abstand (Höhe)
Page 11
UltraView IP PTZ 36X-Kamera 9 DE
der Laschen zum Gehäusering muss größer sein als die
Deckenstärke.
Gehäuselasche
Schraube
Stellen Sie sicher, dass die Gehäuselasche geschlossen ist und
DRÜCKEN Sie das Gehäuse durch die Durchführungsöffnung.
Halten Sie das Gehäuse fest und verschrauben Sie die
Gehäuselaschen mit der Montagefläche.
5. Setzen Sie das PTZ-Modul in das Gehäuse ein:
Setzen Sie die Laschen so am PTZ-Modul an, dass die
Pfeilmarkierung am Modul auf die des Gehäuses ausgerichtet
ist (siehe unten). Das Modul sollte fest einrasten. Legen Sie
eine eventuell vorhandene SDHC-Karte in die Kamera ein,
bevor Sie das PTZ-Modul in das Gehäuse einsetzen.
6. Schrauben Sie die Abdeckung wieder am Gehäuse fest.
7. Nur abgehängte Montage: Führen Sie die Kabel des PTZ-Moduls
durch die Halterung.
Nur bündige Montage: Installieren des Verkleidungsrings. Setzen
Sie den Verkleidungsring auf das Gehäuse und schieben Sie die
Befestigungsstifte in die vorgesehenen Löcher. Drehen Sie
anschließend den Ring im Uhrzeigersinn.
Page 12

DE 10 UltraView IP PTZ 36X-Kamera
8. Schließen Sie die Kabel an (siehe Figure 1).
Warnung: Nach der Installation führt das PTZ-Modul einen
PTZ-Selbsttest durch und initialisiert wird beim Start initialisiert.
Während des Selbsttests und der Initialisierung dürfen Sie die
Kamera NICHT berühren und bewegen.
9. Konfigurieren Sie den Dome entsprechend seinem Einsatzort.
Zugriff auf die Kamera über das Internet
Mit dem Webbrowser können Sie über das Internet auf die Kamera
zugreifen und sie steuern.
Hinweis: Sämtliche Änderungen, die an der Kamerakonfiguration
vorgenommen werden, gelten immer nur für die jeweilige einzelne
Kamera.
Ändern Sie das Administratorpasswort nach erfolgreicher Einrichtung.
Es sollten nur autorisierte Benutzer in der Lage sein, die
Kameraeinstellungen zu ändern.
So erfolgt der Online-Zugriff auf die Kamera:
1. Geben Sie im Webbrowser die IP-Adresse der Kamera ein (der
Standardwert ist 192.168.1.70). Der Anmeldebildschirm wird
angezeigt.
2. Geben Sie Ihren Benutzernamen und das zugehörige Passwort
sowie den zu verwendenden Port ein.
Standardbenutzername: admin
Standardpasswort: 1234
Standardport: 8000
Klicken Sie auf OK. Der Webbrowser-Bildschirm wird im Live-
Modus angezeigt. Der Live-Bildschirm ist anfänglich leer.
3. Klicken Sie auf die Schaltfläche „Live-Ansicht starten“ (Start Live
View) oben am Bildschirm, damit die Bilder im Live-Modus
angezeigt werden.
4. Klicken Sie mit der rechten Maustaste auf Kamera 01, um
das Popup-Fenster anzuzeigen und den gewünschten Stream
auszuwählen: Main-, Sub- oder Open-Sound.
Page 13
UltraView IP PTZ 36X-Kamera 11 DE
Webbrowser-Oberfläche
1.
Menüleiste zum Auswählen
der Live-Ansicht, Wiedergabe,
Suchen nach
Ereignisprotokollen und
Konfigurieren der Kamera
über das Internet
2.
Viewer-Bereich
3.
Current user (Aktueller
Benutzer)
4.
Das System verlassen
5.
Taste PTZ
6. PTZ-Steuerung
7. Preset-Auswahl
8. Full screen (Vollbild)
9. Live-Ansicht starten, Video
aufnehmen und
Schnappschüsse aufnehmen
10. Bi-direktionales Audio
starten/stoppen
11. Audio ein- oder ausschalten
Konfigurieren der Kamera über das Internet
Klicken Sie auf dem Webbrowser-Bildschirm der Kamera in der
Menüleiste auf die Schaltfläche Configuration (Konfiguration),
um den Konfigurationsbildschirm anzuzeigen. Eine Liste der
Konfigurationsparameter finden Sie unter Table 1 auf Seite 5.
Im Konfigurationsbereich wird der K onfiguration sbaum mit
10 Konfigurationspar ameterordnern angezeigt. D er Konfigurat ionsbereich
wird immer angezeigt. Zu jedem Or dner gehört e ine Liste m it
Page 14
DE 12 UltraView IP PTZ 36X-Kamera
Unterordnern, die die unterschiedlichen Konfigurat ionsbildschirme
anzeigen.
Abbildung 4: Konfigurationsbildschirm
Konfigurationsbereich
Tabelle 2: Übersicht der Konfigurationsparameterordner
Konfigurationsordner
Beschreibung
Local configuration
(Lokale Konfiguration)
Verwaltet den Netzwerktyp, den
Anzeigemodus und die lokalen Speicherpfade.
Basic information
(Grundlegende
Informationen)
Legt den vom Netzwerk verwendeten
Namen und die RS485-Bus-ID fest. Es
werden auch die MAC-
Adresse, der Gerätetyp,
die Seriennummer des Geräts, die aktuelle
Firmwareversion, die U-Boot-Version und die
aktuelle Serverzeit angezeigt
DST time (Sommerzeit)
Legt Beginn und Ende der Sommerzeit fest.
Channel parameters
(Kanalparameter)
Legt die Anzeigeeigenschaften der
Kamerainformationen, die Aufnahmezeitpläne
und -einstellungen für Alarmereignisse,
Alarmreaktionen sowie die Textüberlagerung
fest.
Network parameters
(Netzwerkparameter)
Legt die Netzwerkparameter fest, die zum
Zugriff auf die Kamera über das Internet
erforderlich sind.
Page 15

UltraView IP PTZ 36X-Kamera 13 DE
Konfigurationsordner
Beschreibung
Alarm parameters
(Alarmparameter)
Legt fest, wie die Kamera sich bei Alarmen
verhält, z. B. Eingabetyp, Benachrichtigung
von Alarmen sowie Reaktionszeitpläne und dauer.
Bewegung
Legt die Bewegungen der Kamera fest
(Presets, Shadow-Touren, Masken zum
Schutz der Privatsphäre).
Deployment time
(Einsatzzeit)
Legt die Zeitpläne fest, in denen Ereignisse
registriert werden können
Benutzerverwaltung
Legt die möglichen Benutzer der Kamera
sowie deren Passwörter und Zugriffsrechte
fest.
HDD management
(HDD
-Verwaltung)
Legt fest, wie die in der Kamera verwendete
SDD-Karte formatiert wird.
Remote upgrade
(Firmware
-Upgrade)
Legt fest, wie das Upgrade der KameraFirmware erfolgt.
Default
(Standardeinstellung)
Wiederherstellen der Werkseinstellungen.
Reboot device
(Gerät neu starten)
Führt einen Neustart der Kamera durch.
Technische Daten
Betriebstemperatur Hängegehäuse: -10 bis +50 °C
Bündiges Gehäuse: -30 bis +65 °C
Netzteil 24V AC/12V DC
Leistungsaufnahme 30 W (Heizelement an),
15 W (Heizelement aus)
Abmessungen Hängegehäuse: Ø 220 × 299 mm
Bündig montiertes Gehäuse:
Ø 206 × 241 mm
Umgebungsbedingung
en
Hängegehäuse: IP66
Bündig montiertes Gehäuse: IP54
Gewicht 5 kg
Page 16

ES 14 Cámara UltraView IP PTZ 36X
ES
Introducción
Esta guía de bolsillo ofrece la información básica sobre la configuración
y el uso de la UltraView IP PTZ 36X camera IP PTZ 36X. Puede
consultar la información detallada de la cámara en el manual del usuario.
Antes de empezar
Saque todos los elementos del embalaje. Compruebe si existen
daños y asegúrese de que no falta ningún componente. La cámara
se suministra con los siguientes elementos:
Cámara domo
Manual del usuario
Guía de inicio rápido
Entorno de instalación
Cuando instale la cámara, tenga en cuenta los siguientes factores:
• Coloque la cámara en un lugar seguro.
• Asegúrese de que la cámara esté en una zona con buena
ventilación.
• No exponga la cámara a la lluvia ni a la humedad.
Page 17

Cámara UltraView IP PTZ 36X 15 FR
Descripción de la cámara
Figura 5: descripción general de la cámara domo (se muestra el
montaje en suspensión)
1. Conector Ethernet RJ45.
Conectar a los dispositivos de
red.
2. Salida de vídeo.
Conectar el conector BNC a un
monitor CCTV.
3. Cable de la fuente de
alimentación.
Conectar a una fuente de
alimentación de +24 VCA.
4. Una carcasa.
5. Módulo PTZ.
6. Burbuja.
Instalación de la cámara
1. Prepare la superficie de montaje e instale el soporte de la cámara.
2. Destornille la burbuja de la cámara y retire la cinta protectora del
módulo PTZ.
3. Presione las dos lengüetas situadas a ambos lados del módulo
PTZ y retírelo de la carcasa de la cámara. Asegúrese de que los
cables del módulo aún salgan a través del orificio de entrada de
cables de la parte superior de la carcasa.
Nota: si se van a utilizar relés de entrada o salida de alarma y
audio, conéctelos al PCB del módulo y pase los cables a través
del orificio de entrada de cables de la parte superior de la carcasa.
Consulte el manual de usuario para obtener información sobre las
conexiones de alarma.
4. Instale la carcasa.
Cámara de montaje en suspensión:
Fije la carcasa de la cámara al soporte con los tornillos incluidos
con este.
Cámara de montaje empotrado:
Ajuste la altura de las dos lengüetas de la carcasa girando el
tornillo que las sujeta. La distancia (h) de las lengüetas al anillo
de la carcasa debe ser superior al grosor del techo.
Page 18
ES 16 Cámara UltraView IP PTZ 36X
Lengüeta de la
carcasa
Tornillo
Asegúrese de que la lengüeta de la carcasa esté cerrada y
encaje la carcasa en el orificio de paso. Sujete la carcasa y fíjela
atornillando las lengüetas de esta en la superficie de montaje.
5. Inserte el módulo PTZ en la carcasa:
Coloque las lengüetas del módulo PTZ alineando la flecha del
módulo con las de la carcasa (consulte la imagen de abajo). El
módulo debe quedar bien fijo en su posición. si utiliza una tarjeta
SDHC, insértela en el módulo antes de introducirlo en la carcasa.
6. Vuelva a fijar la burbuja atornillándola a la carcasa.
7. Solo para la cámara de montaje en suspensión: Pase los
cables del módulo PTZ a través del soporte.
Solo para la cámara de montaje empotrado: Instale el anillo de
corte. Alinee el anillo de corte con la carcasa e inserte los pernos
de fijación en los orificios. A continuación, gire el anillo en el
sentido de las agujas del reloj.
8. Conecte los cables (consulte la Figure 1).
Page 19
Cámara UltraView IP PTZ 36X 17 FR
Advertencia: tras la instalación, el módulo PTZ llevará a cabo
una autoprueba e inicializará el encendido. NO toque ni mueva
la cámara mientras se realiza la autoprueba y la inicialización.
9. Configure la cámara domo para que se adapte a su ubicación.
Acceso a la cámara a través de internet
Utilice el explorador web para acceder a la cámara y controlarla a
través de Internet.
Nota: los cambios realizados en la configuración de la cámara solo se
aplican a esta cámara.
Cambie la contraseña del administrador cuando finalice la
configuración. Solo los usuarios autorizados deberían poder modificar
la configuración de la cámara.
Para acceder a la cámara en línea:
1. Introduzca la dirección IP de la cámara en el explorador web
(el valor predeterminado es 192.168.1.70). Aparecerá el cuadro de
diálogo Login (Iniciar sesión)
2. Introduzca su nombre de usuario y contraseña así como el puerto
que se debe utilizar.
Nombre de usuario predeterminado: admin
Contraseña predeterminada: 1234
Puerto predeterminado: 8000
Haga clic en OK (Aceptar). La pantalla del explorador web
aparece en modo en directo. La pantalla en directo se encuentra
en blanco al principio.
3. Haga clic en el botón Start Live View (Comenzar Visualización en
directo) en la parte superior de la pantalla para que
aparezcan las imágenes en directo en la pantalla.
4. Haga clic con el botón derecho en Camera 01 (Cámara 01) para
abrir el cuadro emergente y seleccionar la transmisión deseada:
Main (Principal), Sub (Sub) o Open sound (Sonido abierto).
Page 20
ES 18 Cámara UltraView IP PTZ 36X
Interfaz del explorador Web
1.
En la barra de herramientas del
menú, seleccione modo en
directo, reproducir vídeo,
buscar registros de eventos y
configurar la cámara a través
de Internet.
2.
Panel de visualización.
3.
Usuario actual
4.
Salir del sistema.
5.
Botón de PTZ.
6. Panel de control PTZ
7. Selección de ajuste
preconfigurado
8. Pantalla completa
9. Comenzar la vista en directo,
grabar vídeo y realizar
fotografías.
10. Iniciar/detener audio
bidireccional.
11.
Permite encender o apagar el
audio.
Configuración de la cámara a través de internet
En la pantalla del explorador de la cámara, haga clic en el botón
Configuration (Configurar) de la barra de herramientas del menú
para acceder a las pantallas de configuración. Consulte Table 1 en la
página 5 la lista de los parámetros de configuración.
El panel de configuración muestra el árbol de configuración con
10 carpetas de parámetros de configuración. El panel de configuración
siempre está visible. Cada carpeta contiene una lista de subcarpetas
que muestran las distintas pantallas de configuración.
Page 21
Cámara UltraView IP PTZ 36X 19 FR
Figura 6: Pantalla Configuration (Configuración)
Panel de configuración
Tabla 3: descripción de las carpetas de parámetros de
configuración
Carpeta de
configuración
Descripción
Configuración local
Gestiona el tipo de red, el modo de
visualización y las rutas de almacenamiento
local.
Información básica
Define el nombre del dispositivo y el ID
del bus RS-485 como utilizado por la red.
También muestra la dirección MAC, el tipo
de dispositivo, el SN del dispositivo, la versión
actual del firmware, la versión de U-Boot y la
hora actual del servidor
Horario DST (Ajuste
horario de ahorro de
energía)
Define cuándo empieza y cuándo acaba el
aprovechamiento de luz solar.
Parámetros de los
canales
Define las propiedades OSD de la información
de cámara, horario de grabación, parámetros
de grabación para eventos de alarma,
respuesta de alarma y de superposición
de texto.
Parámetros de red Define los parámetros de red requeridos para
acceder a la cámara a través de internet.
Page 22

ES 20 Cámara UltraView IP PTZ 36X
Carpeta de
configuración
Descripción
Parámetros de alarma
Define cómo maneja la cámara el tipo de
entrada, la notificación de alarmas y los
tiempos de respuesta y duración.
Movimiento
Define cómo se desplaza la cámara entre
los valores predeterminados, los shadow
tours (llamados “patterns” en el menú) y
las máscaras de privacidad.
Tiempo de
implementación
Define los horarios en los que se registran los
eventos
Administración de
usuarios
Define quién utiliza la cámara, sus
contraseñas y privilegios de acceso.
Administración del HDD
Define cómo formatear la tarjeta SDD de la
cámara.
Actualización remota
Define cómo actualizar el firmware de la
cámara.
Predeterminado
Restaura los parámetros predeterminados
de fábrica.
Reiniciar dispositivo
Reinicia la cámara.
Especificaciones
Temperatura de
funcionamiento
Carcasa de montaje en suspensión:
De -10 a +50 °C
Carcasa empotrada:
De -30 a +65 °C
Fuente de alimentación 24 VCA +/- 4 VCA
Consumo de energía 30 W (con el calentador encendido),
15 W (con el calentador apagado)
Dimensiones Carcasa de montaje en suspensión:
Ø 220 × 299 mm
Montaje empotrado:
Ø 206 × 241 mm
Medioambiental Carcasa de montaje en suspensión: IP66
Carcasa de montaje empotrado: IP54
Peso 5 kg
Page 23

Cámara UltraView IP PTZ 36X 21 FR
FR
Introduction
Ce guide de poche fournit des informations fondamentales sur
l’installation et l’utilisation de la UltraView IP PTZ 36X camera. Vous
trouverez des informations détaillées sur les caméras dans le manuel
d’utilisation.
Avant de commencer
Déballez tout. Vérifiez que les articles sont tous inclus et qu’ils ne sont
pas endommagés. La caméra est fournie avec les éléments suivants :
Caméra dôme
Manuel d’utilisation
Guide de démarrage rapide
Environnement d’installation
Lorsque vous installez votre caméra, tenez compte des facteurs
suivants :
• Placez la caméra dans un endroit sûr.
• Assurez-vous que la caméra se trouve dans une zone bien
ventilée.
• Evitez d’exposer la caméra à l’humidité.
Page 24

FR 22 Caméra UltraView IP PTZ 36X
Description de la caméra
Figure 7 : presentation de la caméra dôme (montage en
suspension illustré)
1. Connecteur Ethernet RJ45.
Connexion des périphériques
réseau.
2. Sortie vidéo.
Connexion du connecteur BNC
à un écran CCTV.
3. Cordon d’alimentation
électrique.
Connexion d’une alimentation
de +24 Vca.
4. Boîtier.
5. Module PTZ.
6. Bulle.
Installation d’une caméra
1. Préparez la surface de montage et installez le support de la
caméra.
2. Dévissez la bulle de la caméra et retirez la bande de protection du
module PTZ.
3. Appuyez sur les languettes de chaque côté du module PTZ et
retirez celui-ci du boîtier de la caméra. Assurez-vous que les
câbles du module sortent toujours du trou de passage des câbles,
au sommet du boîtier.
Remarque : en cas d’utilisation de relais entrée/sortie audio et
d’alarme, connectez-les à la CCI du module et faites passer leurs
câbles dans le trou de passage des câbles au sommet du boîtier.
Consultez le manuel d’utilisation pour obtenir plus d’informations
sur les connexions d’alarme.
4. Installez le boîtier.
Caméra à montage suspendu :
Fixez le boîtier de la caméra au support à l’aide des vis incluses
avec ce dernier.
Caméra à montage encastré :
Réglez la hauteur des deux languettes du boîtier en faisant tourner
les vis sur lesquelles elles sont fixées. La distance (h) entre les
Page 25

Cámara UltraView IP PTZ 36X 23 FR
languettes et l’anneau du boîtier doit être supérieure à l’épaisseur
du plafond.
Languette du boîtier
Vis
Vérifiez que la languette du boîtier est fermée et POUSSEZ le
boîtier dans l’orifice de passage du boîtier. Maintenez le boîtier
et fixez-le en vissant les languettes sur la surface de montage.
5. Insérez le module PTZ dans le boîtier :
Placez les languettes du module PTZ en alignant la flèche sur
le module avec celle sur le boîtier (voir ci-dessous). Le module
doit s’enclencher et se mettre en place. Si vous utilisez une
carte SDHC, insérez-la dans le module avant d’insérer celui-ci
dans le boîtier.
6. Remettez la bulle en place en la vissant au boîtier.
7. Caméra à montage suspendu uniquement : faites passer les
câbles du module PTZ au travers du support.
Caméra à montage encastré uniquement : installez la garniture.
Alignez la garniture avec le boîtier et insérez les goupilles dans les
trous. Tournez ensuite la garniture dans le sens des aiguilles d’une
montre.
8. Connectez les câbles (voir la Figure 1).
Page 26

FR 24 Caméra UltraView IP PTZ 36X
Avertissement : apres l’installation, le module PTZ effectue un
auto-test de réglage PTZ et s’initialise. NE touchez et ne déplacez
PAS la caméra pendant la période d’auto-test et d’initialisation.
9. Configurez la caméra dôme en fonction de son emplacement.
Accès à la caméra par l’Internet
Le navigateur Web vous permet d’accéder à la caméra par l’Internet
et de la contrôler.
Remarque : les éventuels changements apportés à la configuration
d’une caméra ne s’appliquent qu’à cette caméra.
Modifiez le mot de passe administrateur une fois la configuration
terminée. Seuls les utilisateurs autorisés doivent pouvoir modifier
les paramètres de la caméra.
Pour accéder à la caméra en ligne :
1. Dans le navigateur Web, entrez l’adresse IP de la caméra
(l’adresse par défaut est 192.168.1.70). La boîte de dialogue
de connexion s’affiche.
2. Entrez votre nom d’utilisateur et votre mot de passe, ainsi que le
port à utiliser.
Nom d’utilisateur par défaut : admin
Mot de passe par défaut : 1234
Port par défaut : 8000
Cliquez sur OK. L’écran du navigateur Web s’affiche en mode en
direct. Au début, l’écran en direct est vide.
3. Cliquez sur le bouton Start Live View (Démarrer l’affichage en
direct) en haut de l’écran pour que les images du mode en direct
s’affichent à l’écran.
4. Cliquez avec le bouton droit de la souris sur Camera 01 pour
ouvrir le menu contextuel et sélectionnez le flux requis : Main
(Principal), Sub (Secondaire) ou Open sound (Ouvrir son).
Page 27

Cámara UltraView IP PTZ 36X 25 FR
Interface du navigateur Web
1.
Barre d’outils du menu pour la
sélection de l’affichage en
direct, lecture, recherche dans
les journaux d’événements et
configuration de la caméra sur
Internet.
2.
Volet du visualiseur.
3.
Utilisateur actuel
4.
Quitter le système.
5.
Touche PTZ.
6. Volet de contrôle PTZ
7. Sélection d’une présélection
8. Plein écran
9. Démarrage de l’affichage
en direct, enregistrement
de vidéo et prise de photos.
10. Démarrer/arrêter le son
bidirectionnel.
11. Activer ou désactiver la
fonction audio.
Configuration de la caméra sur Internet
Dans l’écran du navigateur de la caméra, cliquez sur le bouton
Configuration dans la barre d’outils du menu pour accéder aux
écrans de configuration. Consultez le Table 1 en page 5 pour obtenir la
liste des paramètres de configuration.
Le volet de configuration affiche l’arborescence de configuration avec
10 dossiers de paramètres de configuration. Le volet de configuration
est toujours visible. Chaque dossier contient une liste de sous-dossiers
qui affichent les différents écrans de configuration.
Page 28

FR 26 Caméra UltraView IP PTZ 36X
Figure 8 : ecran de configuration
Volet de configuration
Tableau 4 : presentation des dossiers de paramètres de
configuration
Dossier de
configuration
Description
Configuration en local
Gère le type de réseau, le mode d’affichage et
les chemins d’accès de l’espace de stockage
local.
Informations de base
Définit le nom du périphérique et l’ID du bus
RS-485 utilisé par le réseau. Affiche aussi
l’adresse MAC, le type du périphérique, le
NS du périphérique, la version actuelle du
micrologiciel, la version U-Boot et l’heure
actuelle du serveur.
Heure d
’été Définit le début et la fin de l’heure d’été.
Paramètres du canal
Définit les propriétés OSD des informations
de la caméra, le programme d’enregistrement,
les paramètres d’enregistrement pour les
événements d’alarme, la réponse aux alarmes
et le texte superposé.
Paramètres réseau
Définit les paramètres réseau requis pour
accéder à la caméra sur Internet.
Paramètres d
’alarme Définit la façon dont la caméra traite les
alarmes, comme le type d’
entrée, la notification
des alarmes, les réponses programmées et la
durée.
Page 29

Cámara UltraView IP PTZ 36X 27 FR
Dossier de
configuration
Description
Mouvement
Définit la façon dont la caméra se déplace,
y compris les présélections, les suivis et les
masquages.
Temps de déploiement
Définit les plages horaires durant lesquelles
des événements peuvent être enregistrés.
Gestion des utilisateurs
Définit les personnes qui peuvent utiliser la
caméra, leurs mots de passe et leurs droits
d’accès.
Gestion du disque dur
Définit la manière de formater la carte SDD
utilisée dans la caméra.
Mise à niveau à
distance
Définit la manière de mettre à niveau le
micrologiciel de la caméra.
Valeurs par défaut
Rétablit les paramètres par défaut d’usine.
Redémarrer le
périphériqu
e
Redémarre la caméra.
Spécifications
Température de
service
Boîtier suspendu : -10 à +50 °C
Boîtier encastré : -30 à +65 °C
Alimentation électrique 24 Vca +/- 4 Vca
Consommation 30 W (chauffage allumé),
15 W (chauffage éteint)
Dimensions Boîtier suspendu :
Ø 220 × 299 mm (Ø 8,66 × 10,27 po)
Boîtier encastré :
Ø 206 × 241 mm (Ø 8,11 × 9,49 po)
Caractéristiques
environnementales
Boîtier suspendu : IP66
Boîtier encastré : IP54
Poids 5 kg
Page 30

IT 28 Telecamera UltraView IP PTZ 36X
IT
Introduzione
Questa guida rapida contiene informazioni di base sulla configurazione
e l’utilizzo dell’unità UltraView IP PTZ 36X camera. Le informazioni
dettagliate sulle telecamere sono disponibili nel manuale dell’utente.
Prima di iniziare
Estrarre tutti gli elementi dalla confezione. Controllare la presenza di
eventuali danni e verificare che tutti gli elementi siano presenti. La
telecamera è fornita con gli elementi seguenti:
Telecamera dome
Manuale utente
Guida di avvio rapido
Condizioni ambientali per l’installazione
Al momento dell’installazione della telecamera, tenere conto dei fattori
che seguono:
• Posizionare la telecamera in un luogo sicuro.
• Accertarsi che la telecamera sia ubicata in un’area ben ventilata.
• Non esporre la telecamera alla pioggia o all’umidità.
Page 31

Telecamera UltraView IP PTZ 36X 29 IT
Descrizione Telecamera
Figura 9: panoramica della telecamera dome (nell’illustrazione:
montaggio a pendente)
1. Connettore Ethernet RJ45.
Collegare ai dispositivi di rete.
2. Uscita video.
Collegare il connettore BNC a
un monitor TVCC.
3. Cavo di alimentazione.
Collegare all’
alimentatore da 24
VCA.
4. Custodia.
5. Modulo PTZ.
6. Calotta.
Installazione di una telecamera
1. Preparare la superficie di montaggio e installare il supporto della
telecamera.
2. Svitare la calotta dalla telecamera e rimuovere il nastro protettivo
dal modulo PTZ.
3. Premere sulle due linguette ai lati del modulo PTZ e rimuoverlo
dalla custodia della telecamera. Verificare che i cavi del modulo
escano dal foro di ingresso dei cavi nella parte superiore della
custodia.
Nota: se si desidera utilizzare dei relè di ingresso/uscita per
l’allarme e l’audio, collegarli al circuito stampato del modulo e far
passare i cavi attraverso il foro di ingresso dei cavi, nella parte
superiore della custodia. Per ulteriori informazioni sui collegamenti
dell’allarme, consultare il manuale dell’utente.
4. Installazione della custodia.
Telecamera a pendente:
Collegare la custodia della telecamera al supporto utilizzando le
viti fornite insieme al supporto stesso.
Page 32

IT 30 Telecamera UltraView IP PTZ 36X
Telecamera a incasso:
Regolare l’altezza delle due linguette della custodia agendo sulla
vite alla quale sono fissate. La distanza (h) tra le linguette e l’anello
della custodia deve essere superiore allo spessore del soffitto.
Linguetta della
custodia
Vite
Verificare che la linguetta della custodia sia chiusa, quindi
PREMERE la custodia attraverso il foro passante. Reggere la
custodia e fissarla avvitando le linguette verso il basso, in
direzione della superficie di montaggio.
5. Inserire il modulo PTZ nella custodia:
Posizionare le linguette sul modulo PTZ allineando le frecce
presenti sul modulo a quelle presenti sulla custodia (vedere di
seguito). Il modulo deve rimanere fissato saldamente in posizione,
con uno scatto. Se si utilizza una scheda SDHC, inserirla nel
modulo prima di inserire il modulo nella custodia.
6. Fissare nuovamente la calotta avvitandola alla custodia.
7. Soloper il montaggio a pendente: inoltrare i cavi del modulo PTZ
attraverso il supporto.
Page 33

Telecamera UltraView IP PTZ 36X 31 IT
Soloper il montaggio a incasso: installare l’anello. Allineare
l’anello alla custodia, quindi inserire i perni di fissaggio nei fori.
Ruotare l’anello in senso orario.
8. Collegare i cavi (consultare la Figure 1).
Avvertenza: dopo l’installazione, il modulo PTZ eseguirà una
verifica automatica delle funzionalità di brandeggio e verrà
inizializzato all’inserimento dell’alimentazione. NON toccare e
NON muovere la telecamera durante la verifica automatica e
l’inizializzazione.
9. Configurare la telecamera dome in base alla posizione.
Accesso alla telecamera via Internet
Usare il browser web per accedere alla telecamera e controllarla via
Internet.
Nota: eventuali modifiche apportate alla configurazione della
telecamera si applicano solo a questa telecamera.
Modificare la password amministratore al termine della configurazione.
Solo gli utenti autorizzati devono poter modificare le impostazioni della
telecamera.
Per accedere alla telecamera online:
1. Inserire nel browser web l’indirizzo IP della telecamera (il valore
predefinito è 192.168.1.70). Verrà visualizzata la finestra di dialogo
Login.
2. Inserire il nome utente e la password, oltre alla porta da utilizzare.
Nome utente predefinito: admin
Password predefinita: 1234
Porta predefinita: 8000
Fare clic su OK. La schermata del web browser viene visualizzata
in modalità live. La schermata live all’inizio è vuota.
3. Per visualizzare sullo schermo le immagini in modalità live, fare
clic sul pulsante Start Live View [Avvia visualizzazione live],
nella parte superiore della schermata.
4. Fare clic con il pulsante destro del mouse su Camera 01
[Telecamera 01] per aprire il riquadro a comparsa e selezionare lo
Page 34

IT 32 Telecamera UltraView IP PTZ 36X
stream desiderato: Main [Principale], Sub [Secondario] o Open
sound [Audio aperto].
Interfaccia browser web
1.
Barra degli strumenti del
menu per selezionare la vista
live, per la riproduzione, per la
ricerca dei registri degli eventi
e per la configurazione della
telecamera via Internet.
2.
Riquadro visualizzatore.
3.
Utente corrente
4.
Uscire dal sistema.
5.
Pulsante PTZ.
6. Pannello di controllo PTZ
7. Selezione dei preset
8. Schermo intero
9. Avvio della vista live,
registrazione video e
acquisizione di istantanee.
10. Avviare/interrompere l’audio
bidirezionale.
11. Attivare o disattivare la
funzione audio.
Configurazione della telecamera via Internet
Nella schermata del browser della telecamera fare clic sul pulsante
Configuration [Configurazione] nella barra degli strumenti del menu per
accedere alle schermate di configurazione. Per l’elenco dei parametri di
configurazione, consultare la sezione Table 1a pagina 5.
Page 35

Telecamera UltraView IP PTZ 36X 33 IT
Nel riquadro di configurazione viene visualizzata la struttura di
configurazione con 10 cartelle di parametri di configurazione. Il
riquadro di configurazione è sempre visibile. Ciascuna cartella dispone
di un elenco di sottocartelle che consentono di visualizzare le diverse
schermate di configurazione.
Figura 10: schermata di configurazione
Riquadro di configurazione
Tabella 5: panoramica delle cartelle parametri di configurazione
Cartella di
configurazione
Descrizione
Configurazione locale
Gestisce tipo di rete, modalità di visualizzazione
e percorsi di memorizzazione locale.
Informazioni di base
Definisce il nome dispositivo e l’ID del bus
RS-485 utilizzato dalla rete. Visualizza inoltre
indirizzo MAC, tipo dispositivo, numero serie
dispositivo, versione firmware corrente,
versione U-Boot e ora server corrente.
DST time [Ora legale]
Definisce inizio e fine dell’ora legale.
Channel parameters
[Parametri canale]
Consente di definire le proprietà OSD per le
informazioni sulla telecamera, la
programmazione della registrazione, le
impostazioni di registrazione per gli eventi di
allarme, la risposta dell’allarme e il testo in
sovraimpressione.
Page 36

IT 34 Telecamera UltraView IP PTZ 36X
Cartella di
configurazione
Descrizione
Parametri di rete
Consente di definire i parametri di rete
necessari per accedere alla telecamera via
Internet.
Alarm parameters
[Parametri allarme]
Definisce la modalità con cui la telecamera
gestisce allarmi come tipo di ingresso, notifica
di allarmi, programmi di risposta e durata.
Motion [Movimento]
Definisce come si sposta la telecamera, ad
esempio preset, shadow tour e privacy mask.
Tempo
implementazione
Definisce le programmazioni per la
registrazione degli eventi.
Gestione utente
Definisce l’utente autorizzato a utilizzare la
telecamera, le password e i privilegi di
accesso.
Gestione dell
’HDD Definisce come formattare la scheda SDD
usata nella telecamera.
Aggiornamento remoto
Definisce come aggiornare il firmware della
telecamera.
Impostazioni predefinite
Ripristina le impostazioni predefinite.
Riavvia dispositivo
Riavvia la telecamera.
Specifiche tecniche
Temperatura di
funzionamento
Custodia a pendente: da -10 a +50 °C
Custodia a incasso: da -30 a +65 °C
Alimentazione 24 VCA +/- 4 VCA
Consumo 30 W (riscaldatore acceso), 15 W
(riscaldatore spento)
Dimensioni (mm) Custodia a pendente: Ø 220 × 299 mm
Custodia a incasso: Ø 206 × 241 mm
Caratteristiche
ambientali
Custodia a pendente: IP66
Custodia a incasso: IP54
Peso 5 kg
Page 37

UltraView IP PTZ 36X camera 35 NL
NL
Inleiding
In deze beknopte handleiding wordt algemene informatie gegeven over
de installatie en het gebruik van de UltraView IP PTZ 36X camera.
Gedetailleerde informatie over de camera's vindt u in de
gebruikershandleiding.
Voordat u van start gaat
Pak alles uit. Onderzoek de items op schade en controleer of alle
items zijn meegeleverd. De camera wordt geleverd met de volgende
items:
Domecamera
Gebruikershandleiding
Verkorte handleiding
Installatieomgeving
Tijdens het installeren van uw camera moet u rekening houden met het
volgende:
• Zet de camera op een veilige plek neer.
• Zorg dat de camera in een goed geventileerde omgeving staat.
• Stel de camera niet bloot aan regen of vocht.
Page 38

NL 36 UltraView IP PTZ 36X camera
Camerabeschrijving
Afbeelding 11: Overzicht van de domecamera (pendelmontage
wordt getoond)
1. Ethernet RJ45-connector.
Netwerkapparaten aansluiten.
2. Video-uitgang.
De BNC-connector aansluiten
op een CCTV-monitor.
3. Voedingskabel.
Aansluiting voor +24 V
wisselstroom.
4. Behuizing
5. PTZ-module.
6. Bol.
Een camera installeren
1. Bereid het montageoppervlak voor en installeer de camerasteun.
2. Schroef de bol los van de camera en verwijder de beschermtape
van de PTZ-module.
3. Druk op de twee palletjes aan weerszijden van de PTZ-module en
verwijder deze van de camerabehuizing. Zorg ervoor dat de
modulekabels nog steeds uit de kabelopeningen aan de bovenkant
van de behuizing lopen.
Opmerking: Indien ingangs-/uitgangsrelais voor alarm en audio
worden gebruikt, sluit u ze aan op de PCB van de module en leidt
u de kabels door de kabelopening aan de bovenkant van de
behuizing. Zie de gebruikershandleiding voor meer informatie over
de alarmaansluitingen.
4. De behuizing installeren.
Pendelmontage camera:
Bevestig de camerabehuizing aan de steun met de schroeven die
bij de steun zijn geleverd.
Verzonken gemonteerde camera:
Pas de hoogte van de twee palletjes van de behuizing aan door de
schroef waaraan ze zijn bevestigd te verdraaien. De afstand (h)
van de palletjes tot de behuizingring moet groter zijn dan de dikte
van het plafond.
Page 39

UltraView IP PTZ 36X camera 37 NL
Palletjes van de
behuizing
Schroef
Zorg ervoor dat de palletjes van de behuizing zijn gesloten en
DUW vervolgens de behuizing in de opening. Zet de behuizing
vast door de palletjes van de behuizing vast te schroeven op het
montageoppervlak
5. Plaats de PTZ-module in de behuizing:
Plaats de palletjes op de PTZ-module door de pijllabel op de
module uit te lijnen met de pijlen op de behuizing (zie hieronder).
De module moet nu stevig op zijn plaats klikken. Als u
gebruikmaakt van een SDHC-kaart, steekt u deze in de module
voordat u de module in de behuizing plaatst.
6. Plaats de bol weer terug door deze op de behuizing te schroeven.
7. Alleen pendelmontage-camera: Leid de kabels van de PTZmodule door de steun.
Alleen v erzo nk en gemonteerde c amera: Installeer de trimring. Lijn
de trimring uit met de behuizing en steek de bevestigingspinnetjes in
de uitsparingen. Draai vervolgens de ring rechtsom.
8. Sluit de kabels aan (zie Figure 1).
Page 40

NL 38 UltraView IP PTZ 36X camera
Waarschuwing: Na de installatie voert de PTZ-module een
PTZ-zelftest uit en wordt deze geïnitialiseerd tijdens het opstarten.
Raak de camera NIET aan en beweeg deze niet tijdens het
uitvoeren van de zelftest en de initialisatie.
9. Configureer de domecamera voor de juiste locatie.
De camera bedienen via het internet
De webbrowser gebruiken om de camera via internet te bedienen.
Opmerking: Wijzigingen die worden aangebracht in de configuratie
van de camera, gelden alleen voor deze camera.
Wijzig het wachtwoord van de systeembeheerder zodra de installatie is
voltooid. Alleen gemachtigde gebruikers mogen de camera-instellingen
wijzigen.
Ga als volgt te werk om de camera online te bedienen:
1. Voer het IP-adres van de camera in de webbrowser in (standaard
is dit 192.168.1.70). Het dialoogvenster Login (Aanmelden)
verschijnt.
2. Voer uw naam en wachtwoord in, alsmede de poort die moet
worden gebruikt.
Standaard gebruikersnaam: admin
Standaard wachtwoord: 1234
Standaard poort: 8000
Klik op OK (OK). Het venster Web browser (Webbrowser)
verschijnt in de live-weergavemodus. Het live-weergavevenster is
eerst leeg.
3. Klik op de knop Start Live View (Live-weergavemodus starten)
boven aan het scherm om de live-weergavemodus weer te
geven op het scherm.
4. Klik met de rechtermuisknop op Camera 01 om een pop-up te
openen en selecteer de gewenste stream: Main (Hoofd), Sub
(Sub) of Open sound (Open geluid).
Page 41

UltraView IP PTZ 36X camera 39 NL
Webbrowserinterface
1.
Menuwerkbalk voor aan-/
afmelden, live-weergave
selecteren, afspelen,
gebeurtenislogboeken zoeken
en de camera configureren via
internet.
2.
Weergavevenster.
3.
Current user
(Huidige gebruiker)
4.
Sluit het systeem af.
5.
PTZ-toets.
6. PTZ-bedieningspaneel
7. Preset-keuze
8. Volledig scherm
9. Liveweergave starten, video
opnemen en
momentopnamen maken.
10. Bidirectioneel geluid
starten/stoppen.
11. De audiofunctie in- of
uitschakelen.
De camera configureren via internet
Klik in het camerabrowservenster op de knop Configuration
(Configuratie) in de menuwerkbalk om de configuratievensters te
openen. Zie Table 1 op pagina 5 voor een overzicht van de
configuratieparameters.
Het configuratiedeelvenster toont de configuratiestructuur met
10 mappen met configuratieparameters. Het configuratiedeelvenster is
altijd zichtbaar. Elke map beschikt over een lijst van submappen
waarin de verschillende configuratieschermen worden getoond.
Page 42

NL 40 UltraView IP PTZ 36X camera
Afbeelding 12: Configuratiescherm
Configuratiedeelvenster
Tabel 6: Overzicht van de configuratieparametermappen
Configuratiemap
Beschrijving
Lokale configuratie
Beheert het netwerktype, de weergavemodus
en lokale opslagpaden.
Basisinformatie
Definieert de apparaatnaam en RS-485 bus-
ID, zoals deze door het netwerk worden
gebruikt. Tevens worden MAC-adres,
apparaattype, apparaat-SN, huidige
firmwareversie, U-Boot-versie en huidige
servertijd weergegeven.
DST time (Zomertijd)
Definieert wanneer de zomertijd begint en
eindigt.
Kanaalparameters
Hier definieert u schermeigenschappen van de
camera, opnameschema, opname-instellingen
voor alarmgebeurtenissen, alarmreactie en
tekst op videobeelden.
Netwerkparameters
Hier definieert u de netwerkparameters voor
het bedienen van de camera via het internet.
Alarmparameters
Hier definieert u hoe de camera alarmen moet
verwerken, zoals ingangstype, alarmmeldingen
en schema's en duur van de reactie.
Beweging
Definieert hoe de camera beweegt, zoals
presets, schaduwtrajecten en privacymaskers.
Page 43

UltraView IP PTZ 36X camera 41 NL
Configuratiemap
Beschrijving
Implementatietijd
Hiermee worden de schema's gedefinieerd
waarmee gebeurtenissen worden
geregistreerd.
Gebruikersbeheer
Hier definieert u wie de camera mag
gebruiken, hun wachtwoorden en
toegangsrechten.
HDD
-beheer Hier bepaalt u hoe de in de camera gebruikte
SD-kaart moet worden geformatteerd.
Upgrade op afstand
Hier bepaalt u hoe de firmware van de camera
moet worden bijgewerkt.
Default (Standaard)
Hiermee worden de standaardinstellingen
hersteld.
Apparaat opnieuw
opstarten
Hiermee wordt de camera opnieuw opgestart.
Specificaties
Bedrijfstemperatuur Afhangende behuizing:
-10 tot +50 °C
Verzonken behuizing:
-30 tot +65 °C
Voedingseenheid 24 VAC +/- 4 VAC
Stroomverbruik 30 W (verwarming aan),
15 W (verwarming uit)
Afmetingen Afhangende behuizing:
Ø 220 × 299 mm
Verzonken behuizing:
Ø 206 × 241 mm
Omgeving Afhangende behuizing: IP66
Verzonken behuizing: IP54
Gewicht 5 kg (11 lb.)
Page 44

PL 42 Kamery UltraView IP PTZ 36X
PL
Wstęp
Ta kieszonkowa instrukcja zawiera podstawowe informacje na temat
konfigurowania oraz używania UltraView IP PTZ 36X camera. Szczegółowe
informacje na temat kamer można znaleźć w instrukcji obsługi.
Przed rozpoczęciem użytkowania
Rozpakuj całość. Sprawdź, czy poszczególne elementy nie są
uszkodzone i czy nie brakuje żadnego z nich. Kamera jest dostarczana
z następującymi elementami:
Kamera kopułowa
Instrukcja obsługi
Skrócona instrukcja obsługi
Warunki instalacji
Podczas instalacji kamery należy uwzględnić następujące czynniki:
• umieść kamerę w bezpiecznym miejscu,
• upewnij się, że kamera znajduje się w dobrze wentylowanym
pomieszczeniu,
• nie wystawiaj kamery na działanie deszczu ani wilgoci.
Page 45

Kamery UltraView IP PTZ 36X 43 PL
Opis kamery
Rysunek 13: Widok ogólny kamery kopułowej (pokazano kamerę z
mocowaniem wiszącym)
1. Złącze Ethernet RJ45
Podłącz do urządzeń
sieciowych.
2. Wyjście wideo.
Podłącz złącze BNC do
monitora telewizji
przemysłowej.
3. Przewód zasilania.
Podłącz do zasilacza +24 V
(prąd zmienny).
4. Obudowa.
5. Moduł PTZ.
6. Kopuła.
Instalowanie kamery
1. Przygotuj powierzchnię montażową i zamontuj wspornik kamery.
2. Odkręć kopułę kamery i zdejmij taśmę ochronną z modułu PTZ.
3. Wciśnij dwa języczki po obu stronach modułu PTZ i wyjmij go z
obudowy kamery. Sprawdź, czy kable modułu nadal przechodzą
przez otwór kablowy w górnej części obudowy.
Uwaga: Jeśli mają być używane przekaźniki wejściowe/wyjściowe
alarmów i audio, należy je podłączyć do płytki drukowanej modułu i
przeprowadzić ich kable przez otwór kablowy w górnej części
obudowy. Więcej informacji na temat połączeń alarmów można
znaleźć w instrukcji obsługi.
4. Zamontuj obudowę.
Kamera z mocowaniem wiszącym:
Zamocuj obudowę kamery do wspornika za pomocą wkrętów
dostarczonych ze wspornikiem.
Kamera z mocowaniem wtynkowym:
Wyreguluj wysokość dwóch języczków obudowy, obracając śruby,
na których są zamocowane. Odległość (h) języczków od pierścienia
obudowy powinna być większa od grubości płyty sufitowej.
Page 46

PL 44 Kamery UltraView IP PTZ 36X
Języczek obudowy
Śruba
Zamknij języczki obudowy i WCIŚNIJ obudowę w otwór
przelotowy. Przytrzymując obudowę, zamocuj ją przez dociśnięcie
śrubą języczków do powierzchni montażowej
5. Włóż moduł PTZ w obudowę:
Odpowiednio ustaw języczki modułu PTZ, wyrównując strzałkę na
module ze strzałką na obudowie (patrz poniżej). Moduł powinien
zatrzasnąć się na swoim miejscu. Przy korzystaniu z karty SDHC
należy ją włożyć do modułu przed włożeniem modułu w obudowę.
6. Zamocuj kopułę, przykręcając ją do obudowy.
7. Tylko kamera z mocowaniem wiszącym: Poprowadź kable
modułu PTZ przez wspornik.
Tylko kamera z mocowaniem wtynkowym: Zamocuj pierścień
ozdobny. Dopasuj pierścień ozdobny do obudowy i wsuń kołki
ustalające w otwory. Następnie obróć pierścień w prawo.
8. Podłącz kable (patrz Figure 1).
Page 47

Kamery UltraView IP PTZ 36X 45 PL
Ostrzeżenie: Po zainstalowaniu, przy włączonym zasilaniu moduł
PTZ przeprowadza autotest i inicjalizuje się. NIE NALEŻY dotykać
ani poruszać kamery w trakcie autotestu i inicjalizacji.
9. Skonfiguruj kamerę kopułową odpowiednio do lokalizacji.
Dostęp do kamery przez Internet
Dostęp do kamery można uzyskać i nią sterować przez Internet, za
pomocą przeglądarki internetowej.
Uwaga: Zmiany wprowadzone w konfiguracji kamery dotyczą tylko tej
kamery.
Po zakończeniu konfiguracji należy zmienić hasło administratora.
Ustawienia kamery powinni zmieniać tylko autoryzowani użytkownicy.
Aby uzyskać dostęp do kamery online:
1. Wprowadź w przeglądarce internetowej adres IP kamery
(domyślnie jest to 192.168.1.70). Zostanie wyświetlone okno
dialogowe Login (Logowanie).
2. Wprowadź nazwę użytkownika i hasło, a także port, który będzie
używany.
Domyślna nazwa użytkownika: admin
Domyślne hasło: 1 234
Domyślny port: 8 000
Kliknij przycisk OK. Zostanie wyświetlone okno przeglądarki
internetowej w trybie podglądu na żywo. Okno trybu podglądu na
żywo jest początkowo puste.
3. Aby wyświetlić obraz trybu podglądu na żywo, kliknij przycisk
Start Live View (Włącz tryb podglądu na żywo) u góry okna.
4. Kliknij prawym przyciskiem myszy napis Camera 01 (Kamera 01),
aby otworzyć okno podręczne i wybrać odpowiedni strumień: Main
(Główny), Sub (Poboczny) lub Open sound (Otwarty dźwięk).
Page 48

PL 46 Kamery UltraView IP PTZ 36X
Interfejs przeglądarki internetowej
1.
Pasek narzędzi menu do
wybierania podglądu na żywo,
odtwarzania, przeszukiwania
rejestrów zdarzeń i
konfigurowania kamery przez
Internet.
2.
Okienko podglądu.
3.
Current user (Bieżący
użytkownik)
4.
Wyjście z systemu.
5.
Przycisk PTZ.
6. Panel sterowania PTZ
7. Wybór ustawienia
zaprogramowanego
8. Full screen (Pełny ekran).
9. Włączanie trybu podglądu na
żywo, nagrywanie obrazu
wideo i wykonywanie zrzutów
obrazu.
10. Włączanie/zatrzymanie
dźwięku dwukierunkowego.
11. Włączenie lub wyłączenie
funkcji dźwięku.
Konfigurowanie kamery przez Internet
W oknie przeglądarki kamery kliknij przycisk Configuration
(Konfiguracja) na pasku narzędzi, aby wyświetlić okno konfiguracji.
Listę parametrów konfiguracji można znaleźć w sekcji Table 1 na
stronie 5.
W oknie konfiguracji wyświetlane jest drzewo konfiguracji z
10 folderami parametrów konfiguracji. Okno konfiguracji jest zawsze
Page 49

Kamery UltraView IP PTZ 36X 47 PL
widoczne. Każdy folder zawiera listę podfolderów wyświetlających
różne ekrany konfiguracji.
Rysunek 14: Okno konfiguracji
Okno konfiguracji
Tabela 7: Przegląd folderów parametrów konfiguracji
Folder konfiguracji
Opis
Lokalna konfiguracja
Pozwala zarządzać typem sieci, trybem
wyświetlania i ścieżkami lokalnej pamięci
masowej.
Basic information
(Informacje
podstawowe)
Umożliwia określenie nazwy urządzenia i
identyfikatora magistrali RS-485, które są
używane w sieci. Zawiera również informacje
o adresie MAC, typie urządzenia, numerze
seryjnym urządzenia, bieżącej wersji
oprogramowania układowego, wersji U-Boot i
bieżącym czasie serwera.
DST time (Czas letni)
Umożliwia określenie, kiedy zaczyna się i
kończy czas letni.
Channel parameters
(Parametry kanału)
Umożliwia określenie właściwości tekstu
ekranowego z informacjami o kamerze,
harmonogramu nagrywania, ustawień
nagrywania dla zdarzeń alarmów, odpowiedzi
na alarm i tekstu wyświetlanego na obrazie.
Page 50

PL 48 Kamery UltraView IP PTZ 36X
Folder konfiguracji
Opis
Network parameters
(Parametry sieci)
Umożliwia określenie parametrów sieci
wymaganych w celu uzyskania dostępu do
kamery przez Internet.
Alarm parameters
(Parametry alarmów)
Umożliwia określenie sposobu obsługi
alarmów przez kamerę, na przykład typu
wejścia, powiadomienia o alarmach oraz
harmonogramów i czasu trwania odpowiedzi.
Ruch (Motion)
Określa ustawienia ruchu kamery, takie jak
presety, trasy w cieniu i maski prywatności.
Deployment time
(Czas wdrażania)
Umożliwia określenie harmonogramów, dla
których mogą być rejestrowane zdarzenia.
User management
(Zarządzanie
użytkownikami)
Umożliwia określenie użytkowników, którzy
mogą uzyskać dostęp do kamery, ich haseł i
uprawnień.
HDD management
(Zarządzanie pamięcią
masową)
Umożliwia określenie sposobu formatowania
karty SDHC używanej w kamerze.
Remote upgrade
(Uaktualnianie zdalne)
Umożliwia określenie sposobu uaktualniania
oprogramowania układowego kamery.
Domyślne
Powoduje przywrócenie ustawień fabrycznych.
Reboot device
(Ponownie uruchom
urządzenie)
Powoduje ponowne uruchomienie kamery.
Page 51

Kamery UltraView IP PTZ 36X 49 PL
Dane techniczne
Temperatura
robocza
Obudowa z mocowaniem wiszącym:
-10 do +50°C
Obudowa z mocowaniem wtynkowym:
-30 do +65°C
Zasilacz 24 V +/- 4 V (prąd zmienny)
Zużycie energii 30 W (grzałka włączona), 15 W (grzałka
wyłączona)
Wymiary Obudowa z mocowaniem wiszącym:
Ø 220 × 299 mm
Obudowa z mocowaniem wtynkowym:
Ø 206 × 241 mm
Klasa
środowiskowa
Obudowa z mocowaniem wiszącym: IP66
Obudowa z mocowaniem wtynkowym: IP54
Waga 5 kg
Page 52

PT 50 Câmara UltraView IP PTZ 36X
PT
Introdução
Este guia rápido inclui informação básica sobre a configuração e
utilização da UltraView IP PTZ 36X camera. O manual do utilizador
contém informações detalhadas sobre as câmaras.
Antes de começar
Desembale tudo. Inspeccione os itens para detectar eventuais danos e
certifique-se de que todos os itens estão incluídos. A câmara é fornecida
com os itens seguintes:
Câmara dome
Manual do utilizador
Guia Rápido
Ambiente de instalação
Ao instalar a câmara, tenha em atenção os seguintes factores:
• Coloque a câmara num local seguro.
• Certifique-se de que a câmara é colocada num local bem ventilado.
• Não exponha a câmara à chuva ou à humidade.
Page 53

Câmara UltraView IP PTZ 36X 51 PT
Descrição das câmaras
Figura 15: Visão geral da câmara dome (na figura, montagem
suspensa)
1. Conector da porta
Ethernet RJ45. Ligar aos
dispositivos de rede.
2. Saída de vídeo. Ligar o
conector BNC a um monitor
CCTV.
3. Cabo da fonte de alimentação.
Ligar a uma fonte de
alimentação de +24 VAC.
4. Caixa.
5. Módulo PTZ.
6. Globo.
Instalação da câmara
1. Prepare a superfície de montagem e instale o suporte da câmara.
2. Desatarraxe o globo da câmara e retire a fita protectora do
módulo PTZ.
3. Pressione as duas patilhas de amb os os lados do módulo PTZ e
retire-o da caixa da câmara. Certifiq ue-se de que os cabos do módulo
saem do orifício para entrada do s cabos na p arte superior d a caixa.
Nota: Se forem utilizados relés de entrada/saída de alarme e de
áudio, ligue-os à placa de circuito impresso (PCB) do módulo e
passe os respectivos cabos pelo orifício para entrada dos cabos
no topo da caixa. Consulte o manual do utilizador para obter mais
informações sobre as ligações de alarme.
4. Instalar a caixa.
Câmara para montagem suspensa:
Fixe a caixa da câmara ao suporte utilizando os parafusos
fornecidos com o suporte.
Câmara para montagem embutida:
Ajuste a altura das duas patilhas da caixa, rodando para tal o
parafuso ao qual estão fixadas. A distância (h) das patilhas a
partir do anel da caixa deve ser superior à espessura do tecto.
Page 54

PT 52 Câmara UltraView IP PTZ 36X
Patilha da caixa
Parafuso
Certifique-se de que a patilha da caixa está fechada e depois
EMPURRE a caixa para dentro do furo de passagem. Segure na
caixa e fixe-a atarraxando as respectivas patilhas à superfície de
montagem.
5. Introduza o módulo PTZ na caixa.
Posicione as patilhas no módulo PTZ, alinhando a seta no módulo
com as da caixa (consultar a figura em baixo). O módulo deve
encaixar firmemente na devida posição. se for utilizado um cartão
SDHC, insira-o no módulo antes de introduzir o módulo na caixa.
6. Volte a instalar o globo, atarraxando-o à caixa.
7. Só câmara para montagem suspensa: passe os cabos do
módulo PTZ pelo suporte.
Só câmara para montagem embutida: instale o anel de ajuste.
Alinhe o anel de ajuste com a caixa, e insira os pinos de fixação
nos furos. Em seguida, rode o anel no sentido dos ponteiros do
relógio (para a direita).
8. Ligue os cabos (consulte a Figure 1).
Page 55

Câmara UltraView IP PTZ 36X 53 PT
Advertência: após a instalação, o módulo PTZ executará um
auto-teste PTZ e inicializará com a alimentação ligada. NÃO toque
nem desloque a câmara durante o processo de auto-teste e
inicialização.
9. Configure a câmara dome consoante a sua localização.
Acesso à câmara pela internet
Utilize o browser Web para aceder e controlar a câmara pela internet.
Nota: todas as alterações efectuadas na configuração da câmara
aplicam-se apenas a essa câmara.
Altere a password do administrador, assim que a configuração estiver
concluída. Apenas os utilizadores autorizados podem modificar as
definições da câmara.
Para aceder à câmara online:
1. No browser Web, introduza o endereço IP da câmara (a
predefinição é 192.168.1.70). A caixa de diálogo de início de
sessão é apresentada.
2. Introduza o nome de utilizador e a password, bem como a porta a
utilizar.
Nome de utilizador predefinido: admin
Password predefinida: 1234
Porta predefinida: 8000
Clique em OK. O ecrã do browser Web aparece no modo em
directo. O ecrã em directo apresenta-se inicialmente em branco.
3. Clique no botão Start Live View (Iniciar vi sualização e m directo)
na parte superior do ecrã para que apareçam a s imagens em d irecto
no ecrã.
4. Clique com o botão direito em Camera 01 (Câmara 01) para abrir
a caixa instantânea e seleccionar o stream pretendido: Main, Sub
ou Open sound (áudio principal, secundário ou aberto).
Page 56

PT 54 Câmara UltraView IP PTZ 36X
Interface do browser da Web
1.
Barra de ferramentas de
menus para seleccionar a
visualização em directo,
reproduzir, procurar registos
de eventos e configurar a
câmara através da Internet.
2.
Painel do visualizador.
3.
Current user (Utilizador
actual)
4.
Sair do sistema.
5.
Botão PTZ.
6. Painel de controlo PTZ
7. Selecção de predefinições
8. Ecrã total
9. Iniciar a visualização em
directo, gravar vídeo e tirar
instantâneos.
10. Iniciar/parar o áudio
bidireccional.
11. Ligar e desligar a função de
áudio.
Configurar a câmara pela Internet
No ecrã do browser da câmara, clique no botão Configuration
(Configuração) na barra de ferramentas do menu para aceder aos
ecrãs de configuração. Consulte a Table 1 na página nº 5 para ver a
lista dos parâmetros de configuração.
O painel de configuração apresenta a árvore de configuração com
10 pastas de parâmetros de configuração. O painel de configuração
está sempre visível. Cada pasta contém uma lista de subpastas que
apresentam os diferentes ecrãs de configuração.
Page 57

Câmara UltraView IP PTZ 36X 55 PT
Figura 16: Ecrã de configuração
Painel de configuração
Tabela 8: Visão geral das pastas de parâmetros de configuração
Pasta de configuração
Descrição
Local
configuration
(Configuração local)
Efectua a gestão do tipo de rede, do
modo de apresentação e dos caminhos
de armazenamento local.
Basic information
(Informação básica)
Definir o nome do dispositivo e a ID bus
RS-485 conforme utilizados pela rede.
Apresentar também o endereço MAC, o tipo
de dispositivo, o NS do dispositivo, a versão
actual de firmware, a versão de U-Boot e a
hora actual do servidor.
DST setting (Hora de
verão)
Definir o início e o fim da hora de verão.
Channel parameters
(Parâmetros do
canal)
Definir as propriedades OSD (visualização
no ecrã) da informação da câmara, do
agendamento de gravação, das definições de
gravação para eventos de alarme, da resposta
de alarme e da sobreposição de texto.
Network parameters
(Parâmetros de rede)
Definir os parâmetros de rede necessários
para aceder à câmara pela internet.
Alarm parameters
(Parâmetros de alarme)
Definir como a câmara processa os alarmes,
como tipo de entrada, notificação dos alarmes
e agendamentos e duração de resposta.
Page 58

PT 56 Câmara UltraView IP PTZ 36X
Pasta de configuração
Descrição
Motion
(Movimento) Definir a forma como a câmara se movimenta,
como predefinições, shadow tours (rondas
gravadas) e máscaras de privacidade.
Deployment time
(Tempo de atribuição)
Definir os agendamentos durante os quais os
eventos podem ser registados.
Gestão de utilizadores
Definir quem pode utilizar a câmara, as
respectivas passwords e privilégios de acesso.
HDD management
(Gestão do disco rígido)
Define como formatar o cartão SDD utilizado
na câmara.
Remote upgrade
(Actualização remota)
Definir como actualizar o firmware da câmara.
Default (Valor
predefinido)
Restaurar as predefinições de fábrica.
Reboot device
(Reinicializar dispositivo)
Reinicializar a câmara.
Especificações
Temperatura de
funcionamento
Caixa suspensa: -10 to +50 °C
(-14 a +122 °F)
Caixa embutida: -30 a +65 °C
(-22 a +149 °F)
Fonte de alimentação 24 VAC +/- 4 VAC
Consumo de energia 30 W (aquecedor ligado), 15 W (aquecedor
desligado)
Dimensões (mm) Caixa suspensa: Ø 220 × 299 mm
(Ø 8,66 ×10,27 pol.)
Caixa embutida: Ø 206 × 241 mm
(Ø 8,11 × 9,49 pol.)
Informações
ambientais
Caixa suspensa: IP66
Caixa embutida: IP54
Peso 5 kg (11 lb.)
Page 59

Kамерой UltraView IP PTZ 36X 57 RU
RU
Введение
В данном карманном руководстве содержится основная
информация о настройке и использовании камеры UltraView IP
PTZ 36X camera. Подробная информация о камерах содержится в
руководстве пользователя.
Подготовка к использованию
Выньте содержимое упаковки. Убедитесь, что все необходимое
есть в наличии и исправно. Камера поставляется со следующими
компонентами:
Купольная камера
Руководство пользователя
Краткое руководство по запуску
Требования по установке
При установке камеры необходимо учитывать следующие факторы:
• Устанавливайте камеру в безопасном месте.
• Устройство должно быть установлено в зоне с хорошей
вентиляцией.²
• Необходимо защищать устройство от дождя и влаги.
Page 60

EN 58 Kамерой UltraView IP PTZ 36X
Описание камеры
Рис. 17. Вид купольной камеры (подвесной монтаж)
1. Разъем Ethernet RJ45.
Подключение к сетевым
устройствам.
2. Видеовыход.
Подключение разъема BNC к
монитору CCTV.
3. Шнур электропитания.
Подключение к источникам
электропитания +24 В
переменного тока.
4. Корпус.
5. Модуль PTZ.
6. Прозрачный купол.
Установка камеры
1. Подготовьте поверхность для монтажа и установите
кронштейн камеры.
2. Отвинтите крышку колпака от камеры и снимите с модуля PTZ
защитную пленку.
3. Прижмите две планки по бокам модуля PTZ и снимите его с
корпуса камеры. Убедитесь, что кабели модуля выходят из
кабельного входа в верхней части корпуса.
Примечание. Если используются реле сигнализации и
аудиовхода/выхода, подключите их к плате модуля и
пропустите кабели через кабельный вход в верхней части
корпуса. Для получения дополнительной информации по
использованию сигнальных подключений см. руководство
пользователя.
4. Установите корпус.
Подвесной монтаж камеры:
Прикрепите корпус камеры к кронштейну с помощью
прилагаемых винтов.
Page 61

Kамерой UltraView IP PTZ 36X 59 RU
Монтаж камеры заподлицо:
Отрегулируйте две планки корпуса по высоте, поворачивая
крепежные винты. Расстояние (h) между планками и кольцом
корпуса должно быть больше толщины потолка.
Планка корпуса
Винт
Убедитесь, что планка корпуса закрыта, а затем ВТОЛКНИТЕ
корпус в сквозное отверстие. Удерживая корпус, закрепите
его, привинтив планки к монтажной поверхности
5. Вставьте модуль PTZ в корпус:
Правильно установите планки относительно модуля PTZ,
совместив стрелку на нем со стрелкой на корпусе (см. ниже).
Модуль должен быть надежно закреплен. Если используется
карта SDHC, вставьте ее в модуль до его установки в корпус.
6. Снова закрепите купол, привинтив его к корпусу.
7. Только для подвесной камеры: Пропустите кабели модуля
PTZ через кронштейн.
Только при монтаже камеры заподлицо: Установите
кольцо-оправу. Выровняйте его на корпусе и вставьте в
отверстия крепежные штифты. Затем поверните кольцо
по часовой стрелке.
8. Подключите кабели (см. Figure 1).
Page 62

EN 60 Kамерой UltraView IP PTZ 36X
Осторожно! После установки при включении питания модуль
PTZ выполняет самопроверку и инициализируется. НЕЛЬЗЯ
двигать камеру во время выполнения тестов и инициализации
или касаться ее.
9. Настройте купольную камеру в соответствии с ее
местоположением.
Доступ к камере через Интернет
Доступ к камере через Интернет и возможность ее настройки
можно получить с помощью веб-браузера.
Примечание. Любые изменения в настройках камеры
применяются только к данной камере.
После завершения настройки измените пароль администратора.
Изменение параметров настройки камеры разрешено только
авторизованным пользователям.
Получение доступа к камере в интерактивном режиме.
1. Введите в веб-браузере IP-адрес камеры (по умолчанию
192.168.1.70). Появится диалоговое окно входа в систему.
2. Введите имя пользователя, пароль и номер порта.
Имя пользователя по умолчанию: admin
Пароль по умолчанию: 1234
Порт по умолчанию: 8000
Нажмите кнопку OK. Будет открыто окно веб-браузера
в режиме реального времени. Экран «живого» видео
изначально пуст.
3. Нажмите кнопку Start Live View (Запустить режим просмотра
живого видео) в верхней части экрана, чтобы отобразить
в нем изображения в режиме реального времени.
4. Щелкните правой кнопкой мыши пункт (Camera 01)
(Камера 01), чтобы открыть всплывающее окно и выбрать
нужный поток: Main (Основной), Sub (Резервный) или Open
sound (Открытый звук).
Page 63

Kамерой UltraView IP PTZ 36X 61 RU
Интерфейс веб-браузера
1.
Панель инструментов для
выбора «живого» видео,
воспроизведения, поиска по
журналу событий и
настройки камеры через
Интернет.
2.
Панель «Viewer» (Средства
просмотра)
3.
Текущий пользователь
(Current user)
4.
Выход из системы.
5.
Кнопка PTZ.
6. Панель управления PTZ
7. Выбор Preset
(Предварительная
установка)
8. Полноэкранный режим
(Full screen)
9. Запуск «живого» видео,
запись видео и получение
стоп-кадров.
10. Запуск и остановка
двустороннего аудио.
11. Включение или отключение
звука.
Настройка камеры через Интернет
На экране браузера камеры нажмите кнопку Configuration
(Настройка) в панели инструментов меню, чтобы открыть экраны
настройки. Список параметров конфигурации см. в Table 1 на стр. 5.
Page 64

EN 62 Kамерой UltraView IP PTZ 36X
В панели конфигурации отображается дерево с 10 папками
параметров. Панель конфигурации отображается всегда. В
каждой папке есть подпапки с разными экранами конфигурации.
Рисунок 18. Экран конфигурации
Панель конфигурации
Табл. 9. Обзор папок параметров конфигурации
Папка конфигурации
Описание
Local configuration
(Локальная настройка)
Управление типом сети, режимом
отображения и локальными путями
хранения данных.
Basic information
(Базовая информация)
Определение имени устройства и
идентификатором шины RS-485 для
использования в сети. Также
отображаются MAC-адрес, тип устройства,
серийный номер, версия встроенного ПО,
версия загрузчика U-Boot и текущее время
на сервере
DST time (Летнее
время
)
Определение периода действия летнего
времени.
Channel parameters
(Параметры канала)
Определяет свойства экранного меню в
сведениях о камере, расписание записи,
параметры записи для событий тревоги,
ответную реакцию на сигнал тревоги и
наложение текста.
Page 65

Kамерой UltraView IP PTZ 36X 63 RU
Папка конфигурации
Описание
Network parameters
(Сетевые параметры)
Определяет сетевые параметры,
необходимые для доступа к камере
через Интернет.
Alarm parameters
(Параметры тревоги)
Определяет способ обработки камерой
тревог, таких как тип входа, уведомление
о тревоге, а также расписания и
продолжительность отклика.
Motion (Движение)
Определяет движение камеры: заданные
режимы, функция shadow tour и маски
конфиденциальности.
Deployment time
(Время срабатывания)
Установка времени, в течение которого
может выполняться регистрация событий.
User management
(Управление
пользователями)
Определяет, кто может использовать
камеру, их пароли и права доступа.
HDD management
(Управление жестким
диском
)
Определяет способ форматирования
карты SDD, используемой в камере.
Remote upgrade
(Удаленное
обновление
)
Определяет способ обновления ПО
камеры.
Default (По
умолчанию)
Восстановление настроек по умолчанию.
Reboot device
(Перезагрузка
устройства)
Выполняет перезагрузку камеры.
Характеристики
Рабочая температура Корпус для подвесного монтажа:
от -10 до +50 °C (
Корпус для монтажа заподлицо:
от -30 до +65 °C
Электропитание 24 В переменного тока +/-4 В
переменного тока
Потребляемая
мощность
30 Вт (при включенном нагревателе),
15 Вт (при выключенном нагревателе)
Page 66

EN 64 Kамерой UltraView IP PTZ 36X
Габариты Корпус для подвесного монтажа:
Ø 220 × 299 мм
Монтаж заподлицо:
Ø 206 × 241 мм
Параметры
окружающей среды
Корпус для подвесного монтажа: IP66
Корпус для монтажа заподлицо: IP54
Вес 5 кг (11 фунтов)
Page 67

UltraView IP PTZ 36X Kamera 65 TR
TR
Giriş
Bu cep kılavuzu, UltraView IP PTZ 36X camera cihazının kurulumu ve
kullanımı konusunda temel bilgiler sağlar. Kameralarla ilgili ayrıntılı
bilgiye kullanım kılavuzundan ulaşabilirsiniz.
Başlamadan önce
Tüm malzemeleri ambalajından çıkartın. Malzemelerin zarar
görmediğini kontrol edin ve tüm malzemelerin mevcut olduğunu
doğrulayın. Kamera aşağıdaki öğelerle birlikte gönderilir:
Dome kamera
Kullanım kılavuzu
Hızlı Başlangıç Kılavuzu
Kurulum ortamı
Kameranızı kurarken, şu etkenleri göz önüne alın:
• Kamerayı güvenli bir konuma yerleştirin.
• Kameranın, iyi havalandırılan bir alanda olduğundan emin olun.
• Kamerayı yağmura ya da neme maruz bırakmayın.
Page 68

TR 66 UltraView IP PTZ 36X Kamera
Kamera açıklaması
Şekil 19: Dome kamera genel görünümü (sarkık montajlı hali
gösterilmiştir)
1. Ethernet RJ45 konektörü
Ağ cihazlarına bağlayın.
2. Video çıkışı.
CCTV monitörünün BNC
konnektörüne bağlayın.
3. Güç kaynağı kablosu.
+24 VAC güç kaynağına
bağlayın.
4. Muhafaza.
5. PTZ modülü.
6. Dome kamera camı.
Kamera kurulumu
1. Montaj yüzeyini hazırlayın ve kamera bağlantı aparatını monte
edin.
2. Dome kamera camını gevşetin ve koruyucu bandı PTZ
modülünden ayırın.
3. PTZ modülünün her iki yanında bulunan uçlara bastırın ve kamera
muhafazasından ayırın. Modül kablolarının muhafazanın üst
kısmında yer alan kablo giriş deliğinden dışarı çıktığından emin
olun.
Not: Alarm veya ses giriş/çıkış röleleri kullanılacaksa, bunları
modülün PCB'sine bağlayın ve kablolarını; muhafazanın üst
kısmında yer alan kablo giriş deliği içerisine yönlendirin. Alarm
bağlantıları hakkında daha fazla bilgi için kullanım kılavuzuna
bakın.
4. Muhafazayı monte edin.
Sarkık montajlı kamera:
Bağlantı aparatıyla birlikte sağlanan vidaları kullanarak, kamera
muhafazasını bağlantı aparatına bağlayın.
Page 69

UltraView IP PTZ 36X Kamera 67 TR
Yüzey montajlı kamera:
Üzerine bağlandıkları vidayı çevirerek iki adet montaj ucunun
yüksekliğini ayarlayın. Uçların muhafaza kasnağına mesafesi
(y) tavan kalınlığından daha fazla olmalıdır.
Muhafaza ucu
Vida
Muhafaza ucunun kapalı olduğundan emin olun ve ardından,
muhafazayı deliğe BASTIRIN. Muhafazayı tutun ve muhafaza
uçlarını montaj yüzeyine doğru çevirerek takın.
5. PTZ modülünü muhafazaya takın:
Modül üzerindeki ok işaretlerini, muhafazanın üstünde bulunanlarla
hizalayarak (aşağıya bakın) PTZ modülünün üstünde bulunan
çıkıntıları yerleştirin. Modül, yerine rahatlıkla oturmalıdır. Bir SDHC
kartı kullanılıyorsa, modülü muhafazaya takmadan önce, kartı
modüle takın.
6. Dome kamera camını çevirerek yerine takın.
7. Sadece Sarkık montajlı kamera: PTZ modülü kablolarını bağlantı
aparatlarına yönlendirin.
Sadece Yüzey montajlı kamera: Trim halkasını takın. Trim
halkasını muhafazaya hizalayın ve sabitleme pimlerini deliklere
takın. Ardından, halkayı saat yönünde döndürün.
Page 70

TR 68 UltraView IP PTZ 36X Kamera
8. Kabloları bağlayın. (bkz. Figure 1).
Uyarı: Kurulum sonrasında, PTZ modülü kendini test edecek
ve gücün açılması ile başlatılacaktır. Kendini test ederken ve
başlatılırken, kameraya dokunmayın ve kamerayı hareket
ettirmeyin.
9. Kamerayı yerine uyacak şekilde yapılandırın.
Kameraya internet üzerinden erişme
Kameraya internet üzerinden erişmek ve denetlemek için Web
tarayıcısını kullanın.
Not: Söz konusu kameranın yapılandırmasında yapılan tüm
değişiklikler yalnızca bu kameraya uygulanır.
Kurulum tamamlandığında yönetici şifresini değiştirin. Yalnızca yetkili
kullanıcılar kamera ayarlarını değiştirebilmelidir.
Kameraya çevrimiçi erişmek için:
1. Web tarayıcısında, kameranın IP adresini (varsayılan
192.168.1.70) girin. Oturum açma iletişim kutusu görünür.
2. Kullanıcı adınız ve şifreniz ile birlikte, kullanılacak portu girin.
Varsayılan kullanıcı adı: admin
Varsayılan Şifre: 1234
Varsayılan port: 8000
OK (Tamam) düğmesini tıklayın. Web tarayıcısı ekranı canlı
modda görüntülenir. Canlı görünüm ekranı ilk başta boştur.
3. Canlı mod görüntülerinin ekranda görüntülenmesi için ekranın
üst kısmında bulunan Start Live View (Canlı Görünümü Başlat)
düğmesine tıklayın.
4. Açılır pencereyi açmak ve istenilen aktarımı seçmek için
Camera 01 seçeneğine sağ tıklayın: Main (Ana) Sub (Alt)
veya Open sound (Ses açık).
Page 71

UltraView IP PTZ 36X Kamera 69 TR
Web tarayıcı arayüzü
1.
Live view (canlı izle)'yi seçmek,
oynatmak, olay tarihçelerini
araştırmak ve kamerayı internet
üzerinden yapılandırmak için
menü çubuğu.
2.
İzleyici bölmesi.
3.
Geçerli kullanıcı
4.
Sistemden çıkın.
5.
PTZ düğmesi.
6. PTZ kontrol paneli
7. Ön ayar seçimi
8. Tam Ekran
9. Canlı izle'yi başlat, video
kaydet ve anlık görüntü çek.
10. Çift yönlü sesi başlatın/bitirin.
11. Ses fonksiyonunu açar ya da
kapatır.
Kamerayı internet üzerinden yapılandırma
Yapılandırma ekranlarına ulaşmak için, kamera tarayıcısı ekranındaki
menü araç çubuğundan Configuration (Yapılandır) düğmesine
tıklayın. Konfigürasyon parametrelerinin lisesi için, bkz. Table 1
5 Sayfadaki.
Yapılandırma bölmesi, 10 adet yapılandırma parametresi klasörüne
sahip yapılandırma ağacını görüntüler. Yapılandırma bölmesi daima
görünürdür. Her klasör, farklı yapılandırma ekranlarını görüntüleyen bir
alt klasörler listesine sahiptir.
Page 72

TR 70 UltraView IP PTZ 36X Kamera
Şekil 20: Yapılandırma ekranı
Yapılandırma bölmesi
Tablo 10: Yapılandırma parametreleri klasörlerine genel bakış
Yapılandırma klasörü
Açıklama
Yerel konfigürasyon
Ağ türünü, ekran modunu ve yerel depolama
yollarını yönetir.
Temel bilgiler
Cihaz adını ve ağ tarafından kullanılan RS-
485
veri yolu kimliğini tanımlar. Ayrıca, MAC
adreslerini, cihaz tipini, cihaz SN'sini, geçerli
işletme kodu sürümünü, U-Boot sürümünü ve
güncel sunucu zamanını da görüntüler
DST zamanı
Gün ışığından tasarruf etme zamanının ne
zaman başlayıp bittiğini tanımlar.
Kanal parametreleri
(Channel parameters)
Kamera bilgilerinin OSD özelliklerini, kayıt
programını, alarm olaylarının kayıt ayarlarını,
alarm yanıtını ve eklenerek görüntülenecek
metni tanımlar.
Ağ parametreleri
(Network parameters)
Kameraya internet üzerinden erişmek için
gereken ağ parametrelerini tanımlar.
Alarm parametreleri
(Alarm parameters)
Kameranın alarmları nasıl ele alacağını
tanımlar (örneğin; giriş tipi, alarm bildirimi
ve yanıt programları ve süresi).
Motion (Hareket)
Kameranın nasıl hareket ettiğini tanımlar,
örneğin önayarlar, gölge turları ve özel
bölgeler.
Page 73

UltraView IP PTZ 36X Kamera 71 TR
Yapılandırma klasörü
Açıklama
Deployment time
(Konuşlandırma süresi)
Olayların kaydedilebildiği sıradaki programları
tanımlar.
User management
(Kullanıcı yönetimi)
Kamerayı kimlerin kullanabileceğini, bunların
şifrelerini ve erişim haklarını tanımlar.
HDD yönetimi
Kamerada kullanılan SDD kartının nasıl
biçimlendirileceğini tanımlar.
Uzaktan güncelleme
Kameranın işletim kodunun nasıl
güncelleneceğini tanımlar.
Varsayılan
Fabrika varsayılan ayarlarını geri yükler.
Reboot device (Aygıtı
yeniden başlatma)
Aygıtı yeniden başlatır.
Teknik özellikler
Çalışma sıcaklığı Sarkık muhafaza: -10 ila +50°C
(-14 ila +122 °F)
Yüzey muhafazası: -30 ila +65°C
(-22 ila +149°F)
Güç kaynağı 24 VAC +/- 4 VAC
Güç tüketimi 30 W (ısıtıcı açık), 15 W (ısıtıcı kapalı)
Boyutlar (mm) Sarkık muhafaza: Ø 220 × 299 mm
(Ø 8.66 × 10,27 inç)
Yüzey muhafazası: Ø 206 × 241 mm
(Ø 8.11 × 9,49 inç)
Çevresel Sarkık muhafaza: IP66
Yüzey muhafazası: IP54
Ağırlık 5 kg (4,99 kg.)
Page 74

Page 75

Page 76

 Loading...