

Interlogix TVN-7001-32T, TVN-7001-64T, TVN-7001R-16T, TVN-7001R-32T, TVN-7001R-48T Quick Start Guide
...Page 1
TruVision NVR 70 Quick Start
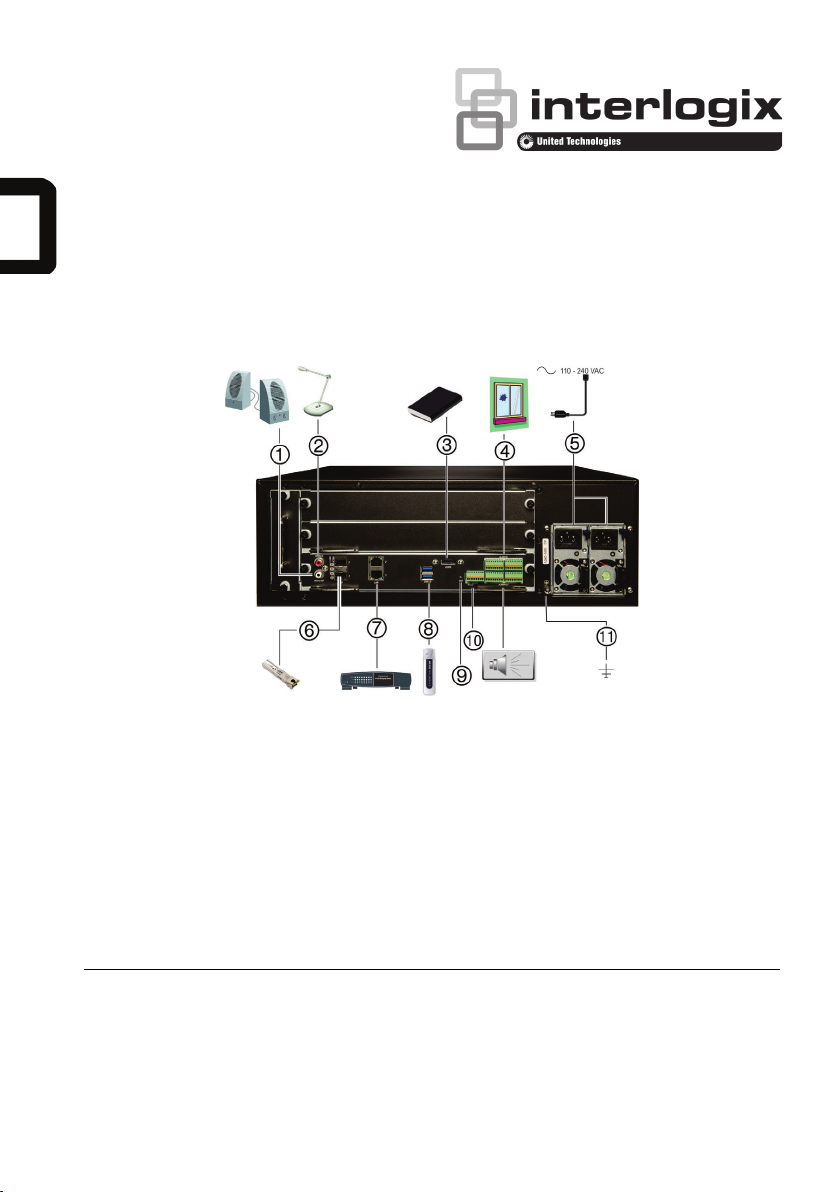
Figure
1. One audio output: Connect to speakers for
7. Eight alarm outputs: Connect physical alarm
11. Ground: Connect to ground.
Guide
1: Back panel connections
audio output.
2. One audio input: Connect a microphone for bidirectional audio (not recorded).
3. eSATA: Connect an optional eSATA drive to
extend the internal storage.
4. 16 alarm inputs: Connect physical alarms such
as detectors, push buttons, etc.
5. Redundancy power supplies (X2): Connect
two PSUs.
6. SFP port: Plug a small form-factor pluggable
transceiver into the port in order to connect fiber
cables.
P/N 1073063A-EN • REV 1.0 • ISS 15JUL15
© 2015 United Technologies Corporation. Interlogix is part of UTC Building & Industrial Systems, a unit of United
Technologies Corporation. All rights reserved.
outputs such as a siren, flash, relay.
8. RS-232 input: Text insertion for point-of-sale and
ATM devices. Also used by technical support.
9. Restart pin hole: Access to the reset buton.
Hold down the reset button for seven seconds to
reset the network settings.
Note: This might cause the cameras to stop
recording and the software to be unabl e to
connect to the recorder.
10. USB 3.0 port (X2): Connect a USB device,
CD/DVD burner or HDD.
Page 2
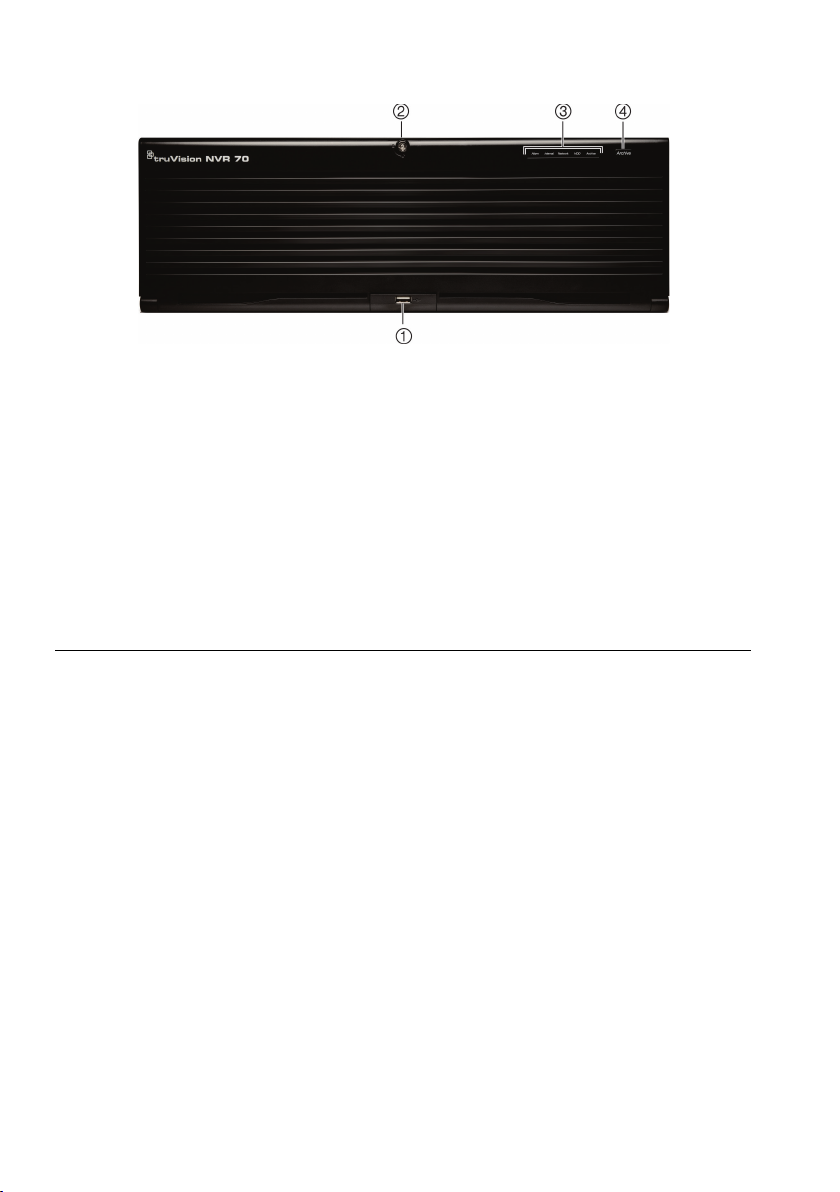
Figure
2: TVN 70 front panel
1 Status LEDs:
state.
Alarm: A blinking RED light indicates that there is
a sensor Alarm In. No light indicates no alarm.
Internal: No light indicates that the recorder is
currently recording video/audio. A blinking RED
light indicates internal health failure.
Network: A steady GREEN light indicates that the
recorder is currently connected to a network. A
blinking RED light indicates that the recorder is
not connected to an y network.
HDD: A steady GREEN light indicates that the
recorder is accessi ng the HDD in read or write
operation. A blinking RED light indicates HDD
failure. No light indicates that the unit is in idle
Archive: A steady GREEN light indicates that
archiving is in progress. No light indicates no
archiving in progress.
2. Front panel lock: You can lock or unlock the
front panel with a key. It provides access to the
HDDs.
3. Archive button: Press once to enter quick
archive mode. Press twice to start archiving. If
the USB stick has an LED, it will flash during
archiving.
4. USB 3.0 port: There is one USB port. Use the
USB port to archive video, upgrade firmware,
use a USB mouse or connect a USB CD/DVD
burner.
Package contents
The TruVision NVR 70 (model TVN 70) is
shipped with the following items:
• Ensure that the unit is in a well-ventilated
area.
• Do not expose the unit to rain or moisture.
• AC power cords
• Place the unit in a secure location.
• Recorder
• Hard drive kits
• CD with software and manuals
• TruVision NVR 70 Quick Start Guide
• TruVision NVR 70 User Manual (on CD)
• TruVision Recorder Operator Guide (on
CD)
Installation environment
Quick install
Recommended steps for setting up the
recorder:
1. Connect all the required devices required
to the back panel of the recorder. See
Figure 1 on page 1
2. Connect the power cords to the unit and
turn on the power.
3. Set up the unit with the required settings
using the setup wizard.
Refer to the user manual for detailed
information, but observe these important
requirements:
2 TruVision NVR 70 Quick Start Guide
Page 3

First-time use
credentials.
The recorder has an express installation
wizard that lets you easily configure basic
recorder settings when first used. It configures
all cameras simultaneously. The configuration
can then be customized as required.
By default, the setup wizard will start once the
recorder has loaded. The wizard walks you
through some of the more important settings
of your recorder.
Select the preferred language for the system
and then enter the administrator password.
The default admin password is 1234. It is
strongly recommended that this password is
changed. The wizard will then guide you
through the menus to set the users, time and
date, HDD management, and recording
configuration.
When all the required changes have been
entered, click Finish to exit the wizard. The
recorder is now ready to use. Recording starts
automatically.
Important: Your TruVision unit is
delivered with default user name and
password credentials for initial access,
easy configuration and auto discovery.
For security reasons, it is highly
recommended to change the default
Operating the recorder
You operate the recorder through a browser
interface, which provides full functionality for
viewing, playback and recorder configuration
from any PC with Internet access. The
browser’s easy-to-use controls give you quick
access to all recorder functions.
You can also use TruVision Navigator or
TVRmobile.
Connect the mouse to the recorder by
plugging the mouse USB connector into the
USB port on the front panel. The mouse is
immediately operational and the pointer
should appear. It lets you navigate and make
changes to settings in the user interface. See
Figure 3 below.
Figure 3: Browser interface (live view
shown)
Web browser control
To access the unit, open a web browser and
enter the IP address assigned to the recorder
as a Web address. In the login screen, enter
the default user ID and password:
• User ID: admin
• Password: 1234
The default values for recorder network
settings are:
• DHCP: Disabled by default.
• IP address - 192.168.1.82
• Subnet mask - 255.255.255.0
• Gateway address - 192.168.1.1
• Ports:
When using the browser:
RTSP port: 554
HTTP port: 80
When using TruNav:
RTSP port: 554
Server/Client software port : 8000
Live view mode
Live mode is the normal operating mode of the
unit where you watch live pictures from the
cameras.
Configuring the recorder
The recorder has a menu structure that allows
you to easily configure the unit’s parameters.
Each submenu displays a screen that lets you
edit a group of settings. Most submenus are
available only to system administrators.
TruVision NVR 70 Quick Start Guide 3
Page 4

Refer to the recorder user manual for detailed
Power supply
Power consumption
(without HDD)
Operating
temperature
Relative humidity
Dimensions
(W x D x H)
445 × 530 × 150 mm
Weight
information on configuring the unit.
To access the menus:
Click Configuration in the menu toolbar. The
menu screen appears. Click the desired
submenu in the submenu panel.
Figure 4: Browser configuration window
Menu window structure:
1. Menu toolbar: Setup options available for
the selected menu function. Move the
mouse over a command button and click to
select it. There are five menu modes: Live
View, Playback, Log Search, and
Configuration.
2. Submenu panel: Submenus for the
selected menu function are displayed. Click
an item to select it.
3. Setup menu: All the details for the
selected submenu are displayed. Click a
field to make changes.
Contact information
For contact information, see
www.interlogix.com or
www.utcfssecurityproducts.eu
(17.51 × 20.86 ×
5.90 in.)
≤ 18 kg (39.68 lb.)
(without HDD)
Specifications
4 TruVision NVR 70 Quick Start Guide
2 × 100 to 240 VAC,
6.3 A, 50 to 60 Hz
<= 70 W
-10 to +55 ºC
(14 to 131 °F)
10 to 90%
 Loading...