


Alliance System
User Manual

Alliance system
ii
User Manual
Copyright © 2012 UTC Fire & Security Americas Corporation, Inc.
Interlogix is part of UTC Climate Controls & Security,
a unit of United Technologies Corporation. All rights reserved.
This document may not be copied or otherwise reproduced, in whole or in part, except as
specifically permitted under US and international copyright law, without the prior written
consent from UTC Fire & Security.
Document number/1040729 Rev E, (October 2012).
Disclaimer THE INFORMATION IN THIS DOCUMENT IS SUBJECT TO CHANGE WITHOUT NOTICE.
UTC FIRE & SECURITY ASSUMES NO RESPONSIBILITY FOR INACCURACIES OR OMISSIONS
AND SPECIFICALLY DISCLAIMS ANY LIABILITIES, LOSSES, OR RISKS, PERSONAL OR
OTHERWISE, INCURRED AS A CONSEQUENCE, DIRECTLY OR INDIRECTLY, OF THE USE
OR APPLICATION OF ANY OF THE CONTENTS OF THIS DOCUMENT. FOR THE LATEST
DOCUMENTATION, CONTACT YOUR LOCAL SUPPLIER OR VISIT US
ONLINE AT WWW.UTCFIREANDSECURITY.COM.
This publication may contain examples of screen captures and reports used in daily operations.
Examples may include fictitious names of individuals and companies. Any similarity to names
and addresses of actual businesses or persons is entirely coincidental.
Trademarks and patents Alliance product and logo are registered trademarks of UTC Fire & Security.
Other trade names used in this document may be trademarks or registered trademarks of the
manufacturers or vendors of the respective products.
Software license agreement IMPORTANT: THIS END-USER LICENSE AGREEMENT (“AGREEMENT”) IS A LEGAL
AGREEMENT BETWEEN UTC FIRE & SECURITY AND YOU. READ THE FOLLOWING
TERMS AND CONDITIONS CAREFULLY BEFORE INSTALLING OR USING THIS SOFTWARE.
THIS AGREEMENT PROVIDES A LICENSE FROM UTC FIRE & ECURITY TO USE THE
SOFTWARE. IT ALSO CONTAINS WARRANTY INFORMATION, DISCLAIMERS, AND LIABILITY
LIMITATIONS. INSTALLING AND/OR USING THE SOFTWARE CONFIRMS YOUR AGREEMENT
TO BE BOUND BY THESE TERMS AND CONDITIONS. IF YOU DO NOT AGREE WITH THESE
TERMS AND CONDITIONS, DO NOT INSTALL OR USE THE SOFTWARE OR, IF ALREADY
INSTALLED, IMMEDIATELY CEASE ALL USE OF THE SOFTWARE AND PROMPTLY
UNINSTALL ALL COMPONENTS OF THE SOFTWARE.
1. License. In this Agreement, you, the purchaser of the rights granted by this Agreement,
are referred to as You or Your, whether an individual or a business entity of any kind. Subject
to the terms and conditions of this Agreement , UTC Fire & Security
grants You a nonexclusive license to use the accompanying software
(including any upgrades, modified versions, updates, additions and copies of the software
furnished to You during the term of the Agreement) (“Software”), and all associated media,
printed materials, and electronic documentation accompanying the Software
(“Documentation”), but only in the country where acquired from your supplier and/or
authorized reseller (“Supplier”). In this Agreement, the Software and Documentation are
referred to as the Licensed Product.
All rights to and in the Licensed Product , including, but not limited to, copyrights, patents,
trademarks, and trade secrets, belong to UTC FIRE & SECURITY, and UTC FIRE & SECURITY
retains title to each copy of the Software. You may only install and use the Software on a single
computer, workstation, or terminal (“Computing Device”) at one time, unless You have purchased
additional copies of the Software, in which case You may install the software on the number
of Computing Devices for which You have purchased copies of the Software. You may not
use the Software over a computer network. You may not transfer or distribute the Licensed
Product to others, in electronic format or otherwise, and this Agreement shall automatically
terminate in the event of such a transfer or distribution. You may not sell, rent, lease, or
sublicense the Software. You may not copy or modify the Licensed Product for any purpose,
including for backup purposes. You may use the original copy of the Software provided to
You for backup purposes. You agree that UTC FIRE & SECURITY at any time, upon reasonable
notice, may audit Your use of the Software for compliance with the terms and conditions of this
Agreement.

2. Term. This Agreement is effective until terminated. You may terminate this Agreement by
uninstalling all components of the Software from all Computing Devices and returning the
Licensed Product to UTC FIRE & SECURITY. UTC FIRE & SECURITY may terminate this Agreement if
you breach any of these terms and conditions. Upon termination of this Agreement for any reason, You
agree to unionist all components of the Software and return the Licensed Product to
UTC FIRE & SECURITY. All provisions of this Agreement relating to (i) disclaimer of warranties; (ii)
limitations on liability, remedies, and damages; and (iii) UTC FIRE & SECURITY’s proprietary rights,
shall survive termination of this Agreement.
3. Object code. The Software is delivered in object code only. You may not alter, merge,
modify, adapt, or translate the Software, nor decompile, disassemble, reverse-engineer, or
otherwise reduce the Software to a human-perceivable form, nor create derivative works or
programs based on the Software.
4. Limited warranty. UTC FIRE & SECURITY warrants that for one (1) year from the date of delivery of
the Licensed Product (Software Warranty Period), the functions contained in the Software will
be fit for their intended purpose as described in the applicable Documentation from
UTC FIRE & SECURITY, and will conform in all material respects to the specifications stated in such
Documentation. UTC FIRE & SECURITY does not warrant that the operation of the Software will be
uninterrupted or error-free. UTC FIRE & SECURITY does warrant that the media on which the
Software is furnished will be free from defects in materials and workmanship under normal
use for a period of thirty (30) days from the date of delivery (Media Warranty Period). Except
as specifically provided therein, any other software and any hardware furnished with or
accompanying the Software is not warranted by UTC FIRE & SECURITY. Your exclusive remedy under
this limited warranty for nonconforming Software shall be repair or replacement of the
Software, in the sole discretion of UTC FIRE & SECURITY. To obtain a repair or replacement of
nonconforming Software, contact UTC FIRE & SECURITY Customer Service toll free at 888-432-7387
or online at ZZZXWFILUHDQGVHFXULW\FRP during the Software Warranty Period.
Your exclusive remedy under this limited warranty for defective media is replacement of the
defective media. To receive replacement media under this limited warranty, return the
defective media to Supplier during the Media Warranty Period, with proof of payment.
iii
EXCEPT AS EXPRESSLY PROVIDED ABOVE, THE LICENSED PRODUCT IS PROVIDED “AS IS”
WITHOUT WARRANTY OF ANY KIND, EITHER EXPRESSED OR IMPLIED, INCLUDING, BUT NOT
LIMITED TO, IMPLIED WARRANTIES OF MERCHANTABILITY OR FITNESS FOR A PARTICULAR
PURPOSE AND, EXCEPT AS EXPRESSLY PROVIDED ABOVE, YOU ASSUME THE ENTIRE RISK AS
TO THE QUALITY AND PERFORMANCE OF THE LICENSED PRODUCT.
5. Limitation of liability. UTC FIRE & SECURITY’S SOLE OBLIGATION OR LIABILITY UNDER THIS
AGREEMENT IS THE REPAIR OR REPLACEMENT OF NONCONFORMING SOFTWARE AND/OR
DEFECTIVE MEDIA ACCORDING TO THE LIMITED WARRANTY ABOVE. IN NO EVENT WILL
UTC FIRE & SECURITY BE LIABLE FOR ANY DAMAGES, WHETHER CONSEQUENTIAL, INCIDENTAL,
OR INDIRECT, NOR FOR ANY LOSS OF DATA, LOSS OF PROFITS, OR LOST SAVINGS, ARISING
OUT OF USE OF OR INABILITY TO USE THE SOFTWARE OR DOCUMENTATION (OR ANY HARDWARE
FURNISHED WITH THE SOFTWARE), EVEN IF UTC FIRE & SECURITY HAS BEEN ADVISED OF THE
POSSIBILITY OF SUCH DAMAGES, NOR FOR ANY CLAIM BY ANY THIRD PARTY.
6. General. Any hardware provided to You by UTC FIRE & SECURITY shall not be exported or
reexported in violation of any export provisions of the United States or any other applicable
jurisdiction. Any attempt to sublicense, assign, or transfer any of the rights, duties, or
obligations hereunder shall be void. This Agreement shall be governed by and interpreted
under the laws of the State of New York, United States of America, without regard to conflicts
of law provisions. You hereby consent to the exclusive jurisdiction of the state and federal
courts located in Multnomah County, Oregon, to resolve any disputes arising under or in
connection with this Agreement, with venue in Portland, Oregon.

Alliance system
iv
User Manual
Restricted rights legend. The Licensed Product is provided with RESTRICTED RIGHTS. In the
event the United States Government or an agency thereof is granted a license, the following
additional terms apply: Restricted Computer Software, as defined in the Commercial
Computer Software–Restricted Rights clause at Federal Acquisition Regulations 52.227-19,
and the restrictions as provided in subparagraphs (c)(1) and (c)(2) thereof; and as applicable,
the Government’s rights to use, modify, reproduce, release, perform, display, or disclose the
Software also are restricted as provided by paragraphs (b)(2) and (b)(3) of the Rights in
Noncommercial Technical Data and Computer Software–Small Business Innovative
Research (SBIR) Program clause at DFARS 252.227-7018.
YOU ACKNOWLEDGE THAT YOU HAVE READ AND UNDERSTAND THIS AGREEMENT
AND AGREE TO BE BOUND BY ITS TERMS. YOU FURTHER AGREE THAT THIS
AGREEMENT IS THE COMPLETE AND EXCLUSIVE STATEMENT OF THE AGREEMENT
BETWEEN YOU AND UTC FIRE & SECURITY, AND SUPERSEDES ANY PROPOSAL
OR PRIOR AGREEMENT, ORAL OR WRITTEN, AND ANY OTHER
COMMUNICATION RELATING TO THE SUBJECT MATTER OF THIS AGREEMENT.
Intended use Use this product only for the purpose it was designed for; refer to the data sheet and user
documentation. For the latest product information, contact your local supplier or visit us online
at ZZZXWFILUHDQGVHFXULW\FRP

Chapter 1. Introduction . . . . . . . . . . . . . . . . . . . . . . . . . . . . . . . . . . . . . . . . . . . . . . . . . . . . . . . . . . . . 1
Alliance system keypads . . . . . . . . . . . . . . . . . . . . . . . . . . . . . . . . . . . . . . . . . . . . . . . . . . . . . . . . . . . . . . . . . . . . . . .
The LCD display. . . . . . . . . . . . . . . . . . . . . . . . . . . . . . . . . . . . . . . . . . . . . . . . . . . . . . . . . . . . . . . . . .
The LEDs . . . . . . . . . . . . . . . . . . . . . . . . . . . . . . . . . . . . . . . . . . . . . . . . . . . . . . . . . . . . . . . . . . . . . . .
User identification . . . . . . . . . . . . . . . . . . . . . . . . . . . . . . . . . . . . . . . . . . . . . . . . . . . . . . . . . . . . . . . . . . .
Pin codes . . . . . . . . . . . . . . . . . . . . . . .
Function access . . . . . . . . . . . . . . . . . . . . . . . . . . . . . . . . . . . . . . . . . . . . . . . . . . . . . . . . . . . . . . . . . .
Alarm groups . . . . . . . . . . . . . . . . . . . . . . . . . . . . . . . . . . . . . . . . . . . . . . . . . . . . . . . . . . . . . . . . . . . . .
Door groups . . . . . . . . . . . . . . . . . . . . . . . . . . . . . . . .
Floor groups . . . . . . . . . . . . . . . . . . . . . . . . . . . . . . . . . . . . . . . . . . . . . . . . . . . . . . . . . . . . . . . . . . . . . .
Duress signal . . . . . . . . . . . . . . . . . . . . . . . . . . . . . . . . . . . . . . . . . . . . . . . . . . . . . . . . . . . . . . . . . . . . . . . . . . . . . . . . .
Opening doors . . . . . . . . . . . . . . . . . . . . . . . . . . . . . . . . . . . . . . . . . . . . . . . . . . . . . . . . . . . . . . . . . . . . . .
Open a door . . .
Arming the system . . . . . . . . . . . . . . . . . . . . . . . . . . . . . . . . . . . . . . . . . . . . . . . . . . . . . . . . . . . . . . . . . . .
Arm the system . . . . . . . . . . . . . . . . . . . . . . . . . . . . . . . . . . . . . . . . . . . . . . . . . . . . . . . . . . . . . . . . . . . . . . . . . . .
Arming conditions and options . . . . . . . . . . . . . . . . . . . . . . . . . . . . . . . . . . . . . . . . . . . . . . . . . . . . . . . . . . . . . . . . . . . .
Disarming your system . . . . . . . . . . . . . . . . . . . . . . . . . . . . . . . . . . . . . . . . . . . . . . . . . . . . . . . . . . . . . . . . . . ... . . . . .
Disarm the system . . . . . . . . . . . . . . . . . . . . . . . . . . . . . . . . . . . . . . . . . . . . . . . . . . . . . . . . . . . . . . . . . . . . . . . . . . . . . . .
Active zo
Types of alarms . . . . . . . . . . . . . . . . . . . . . . . . . . . . . . . . . . . . . . . . . . . . . . . . . . . . . . . . . . . . . . . . .. . . . . .
What to do when an alarm occurs. . . . . . . . . . . . . . . . . . . . . . . . . . . . . . . . . . . . . . . . . . . . . . . . . . . . . . .. . . .
Listing past alarm events . . . . . . . . . . . . . . . . . . . . . . . . . . . . . . . . . . . . . . . . . . . . . . . . . . . . . . . . . . . . . . . . . . . . . . .
nes . . . . . . . . . . . . . . . . . . . . . . . . . . . . . . . . . . . . . . . . . . . . . . . . . . . . . . . . . . . . . . . . . . . . . . . . . . . . . . . . . . .
Local alarm. . . . . . . . . . . . . . . . . . . . . . . . . . . . . . . . . . . . . . . . . . . . . . . . . . . . . . . . . . . . . . . . . . . . . . . . . . . .
Alarm . . . . . . . . . . . . . . . . . . . . . . . . . . . . . . . . . . . . . . . . . . . . . . . . . . . . . . . . . . . . . . . . . . . . . . . . . . . . . . . . . . . . . . . . . .
System alarm. . . . . . . . . . . . . . . . . . . . . . . . . . . . . . . . . . . . . . . . . . . . . . . . . . . . . . . . . . . . . . . . . . . . . . . . . . . . . . . . . . .
Resetting a local alarm. . . . . . . . . . . . . . . . . . . . . .
Resetting a zone In alarm . . . . . . . . . . . . . . . . . . . . . . . . . . . . . . . . . . . . . . . . . . . . . . . . . . . . . . . . . . . . . . . . . . . . . . . . .
Additional information about alarms. . . . . . . . . . . . . . . . . . . . . . . . . . . . . . . . . . . . . . . . . . . . . . . . . . . . . . . . . . . . . . . .
List past alarm events. . . . . .
. . . . . . . . . . . . . . . . . . . . . . . . . . . . . . . . . . . . . . . . . . . . . . . . . . . . . . . . . . . . . . . . . . . . . . . . . . . . . . . .
. . . . . . . . . . . . . . . . . . . . . . . . . . . . . . . . . . . . . . . . . . . . . . . . . . . . . . . . . . . . . . . . . . . . . .
. . . . . . . . . . . . . . . . . . . . . . . . . . . . . . . . . . . . . . . . . . . . . . . . . . . . . . . . . . . . . . .
. . . . . . . . . . . . . . . . . . . . . . . . . . . . . . . . . . . . . .
. . . . . .
. . . . . . . . .
. . . . . . . . . . . . . . . . . . . . . . . . . . . . . . . . . . . . . . . . . . . . . . . . . . . . .
10
10
10
13
13
15
16
16
16
16
18
18
19
20
21
21
v
2
3
4
6
6
6
6
7
7
8
9
9

Alliance System
vi
User Manual
Chapter 2. Alliance system menu . . . . . . . . . . . . . . . . . . . . . . . . . . . . . . . . . . . . . . . . . . . . . . . . . . 23
Alliance system menu . . . . . . . . . . . . . . . . . . . . . . . . . . . . . . . . . . . . . . . . . . . . . . . . . . . . . . . . . . . . .
Access a menu option . . . . . . . . . . . . . . . . . . . . . . . . . . . . . . . . . . . . . . . . . . . . . . . . . . . . . . . . . . . . .
System menu option 1, Panel status. . . . . . . . . . . . . . . . . . . . . . . . . . . . . . . . . . . . . . . . . . . . . . . .
System menu option 2, Active zones . . . . . . . . . . . . . . . . . . . . . . . . . . . . . . . . . . . . . .
System menu option 3, Zones In alarm . . . . . . . . . . . . . . . . . . . . . . . . . . . . . . . . . . . . . . . . . . . . . .
System menu option 4, Bypassed zones . . . . . . . . . . . . . . . . . . . . . . . . . . . . . . . . . . . . . . . . . . . . . . . . . . . . . . . .
System menu option 5, History. . . . . . . . . . . . . . . . . . . . . . . . . . . . . . . . . . . . . . . . . . . . . . . . . . . . .
System menu option 6, Test report . . . . . . . . . . . . . . . . . . . . . . . . . . . . . . . . . . . . . . . . . . . . . . . . . . . . . . . . . . . . .
System menu
System menu option 8, Film counters . . . . . . . . . . . . . . . . . . . . . . . . . . . . . . . . . . . . . . . . . . . . . . .
System menu option 9, List zone names . . . . . . . . . . . . . . . . . . . . . . . . . . . . . . . . . . . . . . . . . . . . . . . . . . . . . . . . .
System menu option 10, Bypass zone . . . . . . . . . . . . . . . . . . . . . . . . . . . . . . . . . . . . . . . . . . . . . . .
System menu option 11, Unbypass zone . . . . . . . . . . . . . . . . . . . . . . . . . . . . . . . . . . . . . . .
System menu option 12, Test zone . . . . . . . . . . . . . . . . . . . . . . . . . . . . . . . . . . . . . . . . . . . . . . . . .
System menu option 13, Start auto disarm test . . . . . . . . . . . . . . . . . . . . . . . . . . . . . . . . . . . . . . . . . . .
System menu option 14, Program users . . . . . . . . . . . . . . . . . . . . . . . . . . . . . . . . . . . . . . . . . . . . . . . . . . . . . . . . .
System menu option 15, Time and date . . . . . . . . . . . . . . . . . . . . . . . . . . . . . . . . . . . . . . . . . . . . .
System menu option 16, Bypass/unbypass RAS/DGP. . . . . . . . . . . . . . . . . .
System menu option 17, Enable/disable service technician. . . . . . . . . . . . . . . . . . . . . . . . . . . . . . . . . . . .
System menu option 18, Reset cameras . . . . . . . . . . . . . . . . . . . . . . . . . . . . . . . . . . . . . . . . . . . . . . . . . . . . . . .
System menu option 20, Door and floor groups . . . . . . . . . . . . . . . . . . . . . . . . . . . . . . . . . . . . . . . . . . . . . . . . .
System menu option 21, Holidays . . . . . . . . . . . . . . . . . . . . . . . . . . . . . . . . . . . . . . . . . . . . . . . . . . . . . . . . . . . . . . .
System menu option 22, O
System menu option 23, Unlock, lock, disable and enable doors . . . . . . . . . . . . . . . . . . . . . . . . . .
System menu option 24, Print history. . . . . . . . . . . . . . . . . . . . . . . . . . . . . . . . . . . . . . . . . . . . . . . .
Programming records.
Door group record – system menu 20 . . . . . . . . . . . . . . . . . . . . . . . . . . . . . . . . . . . . . . . . . . . . . . . .
Holiday record – system menu 21 . . . . . . . . . . . . . . . . . . . . . . . . . . . . . . . . . . . . . . . . . . . . . . . . . . . . . . . . . . . . . . .
option 7, Service menu, menu. . . . . . . . . . . . . . . . . . . . . . . . . . . . . . . . . . . . . . . . . . . . . . . . . .
. . . . . . . . . . . . . . . . .
pen doors . . . . . . . . . . . . . . . . . . . . . . . . . . . . . . . . . . . . . . . . . . . . . . . .
. . . . . . . . . . . . . . . . . . . . . . . . . . . . . . . . . . . . . . . . . . . . . . . . . . . . . . . . . . . . . .
. . . . . . . . . . . . . . . . . . . . . .
. . . . .
24
25
26
27
28
29
30
31
34
36
37
38
40
41
42
44
51
55
56
56
57
58
59
60
61
62
63
65

Chapter 1 Introduction
This chapter provides a description of the Alliance system keypads and defines
their operation. Included are methods for user identification and additional
operational features. The chapter also contains a description of how to arm and
disarm the system, and the system alarm functions.
In this chapter:
Alliance system keypads . . . . . . . . . . . . . . . . . . . . . . . . . . . . . . . . . . . . . . 2
User identification . . . . . . . . . . . . . . . . . . . . . . . . . . . . . . . . . . . . . . . . . . 6
Duress signal . . . . . . . . . . . . . . . . . . . . . . . . . . . . . . . . . . . . . . . . . . . . . . 8
Opening doors. . . . . . . . . . . . . . . . . . . . . . . . . . . . . . . . . . . . . . . . . . . . . . 9
Arming the system. . . . . . . . . . . . . . . . . . . . . . . . . . . . . . . . . . . . . . . . . . 10
Disarming your system . . . . . . . . . . . . . . . . . . . . . . . . . . . . . . . . . . . . . . 13
Active zones. . . . . . . . . . . . . . . . . . . . . . . . . . . . . . . . . . . . . . . . . . . . . . . 15
Types of alarms . . . . . . . . . . . . . . . . . . . . . . . . . . . . . . . . . . . . . . . . . . . . 16
What to do when an alarm occurs . . . . . . . . . . . . . . . . . . . . . . . . . . . . . 18
Listing past alarm events . . . . . . . . . . . . . . . . . . . . . . . . . . . . . . . . . . . . 21
Alliance System
2
User Manual
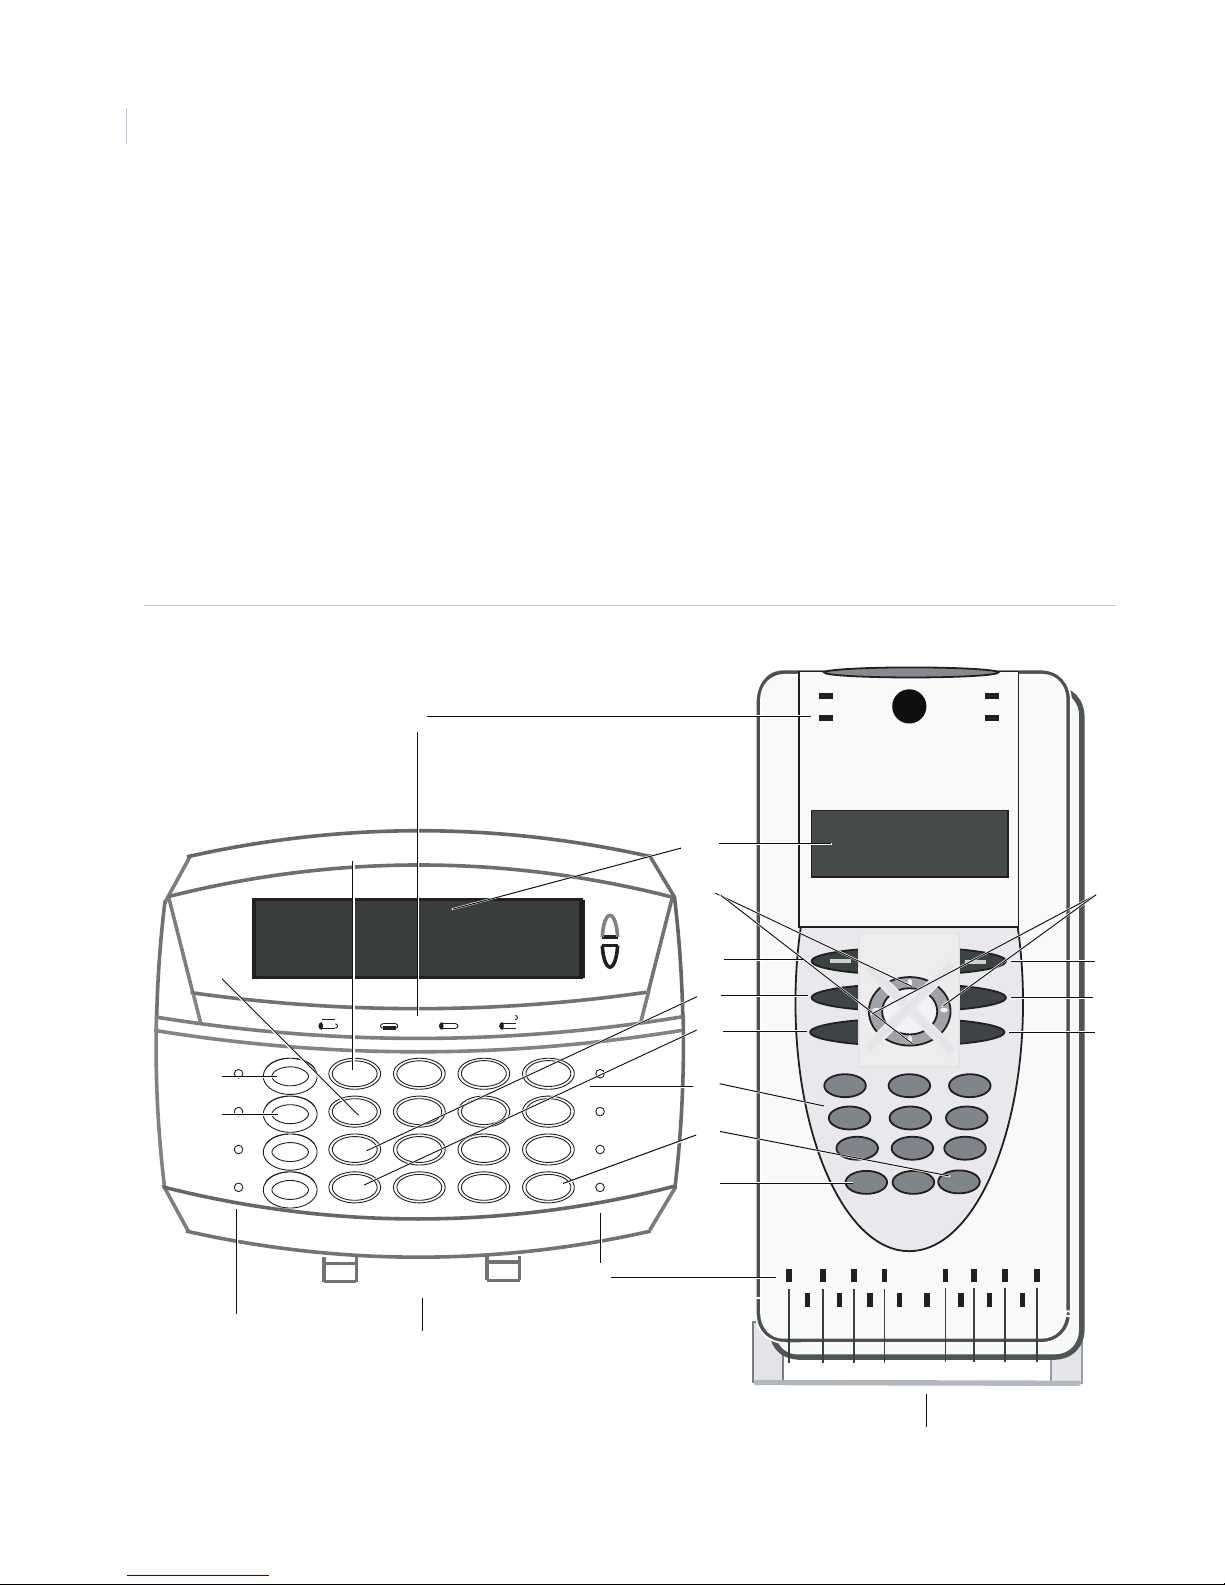
Alliance system keypads
The Alliance system remote arming stations (RAS) keypads (See Figure 1 ) combine sophisticated design with
versatility, making it the leader in its field.
Your system has been programmed to meet your requirements. Therefore, all of the features described in this
guide may not apply to your system. Depending on how the system has been programmed, some of the system
features may not be authorized to all users.
This guide explains how to use the Alliance system if you are responsible for managing the system. This guide
details all the procedure variations, including the different responses from the system.
The terminology used to describe the various parts of your premises or Alliance system has been programmed
specifically for your requirements.
Note: Regularly test your system to ensure that all installed equipment is operating properly.
Figure 1. Alliance system keypads
C
D
E
Power
A
B
L
Fault
K
D
Power
Fault Alar m Acces s
J
I
Clear
F1
F2
F3
F4
Menu
On
Off
4
1
7
*
2
5
8
0
3
6
9
ENTER
H
G
C
ON
OFF
abc
1
jkl mno pqr
4 5 6
stu vwx yz
7 8 9
Menu Enter
def
2 3
0
0
Access
Alarm
CLEAR
OPEN
ghi
N
E
M
B
F
AL-1103 LCD keypad
F
1 2 3 4 5 6 7 8
9 10 11 12 13 14 15 16
AL-111X LCD keypad

System LEDs Used to display system main power, system faults, and alarms.
A
CLEAR Exit the current menu option and return to alarm control prompt.
B
MENU* Display the menu login prompt.
C
Backspace to correct an error.
Scroll backward in the menu.
Bypass/instant Used to bypass active zones when you arm the system and for instant arming.
D
STAY Used when arming the system to autobypass the interior zones and arm all of the perimeter zones
E
Area LED Used to display the status of the areas.
F
ENTER Used when information is to be processed (similar to the Enter key on a computer).
G
H
Alphanumeric buttons Used to enter information and codes
OFF Used after entering your PIN code to tell the system that you want to disarm your areas.
I
ON/NEXT Used after entering you PIN code to tell the system that you want to arm your areas.
J
Up/Down buttons Used to adjust the LCD contrast, beeper tone, and text format.
K
LCD display Used to display messages.
L
OPEN For future use.
M
Left/Right buttons Used to scroll left and right to view the next or previous active zones that can be bypassed.
N
for access.
Scroll forward in the menu.
Display the next items in a menu list .
Update the information displayed.
3
The LCD display
Messages are displayed on the liquid crystal display (LCD) on the keypad. They guide you through the
functions of the Alliance system, such as identifying problems, procedures necessary to rectify problems,
programming functions, and other menu options. The display shows information you have entered on the
keypad:
09:36 19MAR2003
Code:
The first line of the display shows system information and scrolls if there are more characters than can be
displayed. The second line of the display shows instructions and characters you enter on the keypad.

Alliance System
4
User Manual
In some instances there can be insufficient space to display all the text being presented (e.g. a list of areas in the
building).
• If a complete list is displayed on line 1, there is a full stop “.” at the end of the list.
• If the list is incomplete, the text will continue to scroll across the LCD. To jump to the beginning, press
ON/NEXT (see Figure 1 ) on the keypad. The display will update the information at the same time.
• If only part of a name or location is shown, it can be moved left by entering the applicable number
preceding the text, and then pressing ENTER (see Figure 1 ).
• Your system might display a custom message instead of the one shown above if it has been
programmed to do so:
Welcome to the Alliance System
The LEDs
The LEDs on the keypad, together with the information shown on the display, allow you to determine the
system status at a glance.
Area LEDs
One area LED in each of the possible security areas, indicates the status for that area. Table 1 describes the area
LEDs for the AL-1103 keypad.
Table 1. Area LED description AL-1103 keypad
LED Function Description
On The area is unoccupied and armed.
Off The area is occupied and the security system has been set to allow normal access.
Blinking An alarm has occurred in the area while the area was disarmed (LED flashes slow) or armed
(LED flashes fast).
When the AL-111x Remote Arming Stations (RAS) cover is opened or removed and the system is armed, 16
area LEDs are visible (see Figure 1 ). Each LED represents an area, and the indications are as shown in
Tab le 2.
Table 2. Area LED description AL-111x keypad
Red Area is unoccupied and armed.
Red blinking A fault is detected, or when an alarm occurs while disarmed (LED blinks slowly) or armed (LED blinks quickly)
Record the area names on a label inside the cover.
Green Area is disarmed and ready to arm.
Off The corresponding area is disarmed, but not ready to arm

System faults
The arming station keypads display System faults (Ta bl e 3) if the arming station has an LCD fitted and/or
system faults LEDs.
Table 3. System fault LED description
System fault Description
Report fail (FTC) There is a failure in the communications between the control panel and a central station.
RAS fail A Remote Arming Station (RAS) is off-line.
DGP fail A Data Gathering Panel (DGP) is off-line.
Battery fail The auxiliary battery power is low.
Trouble Indicates a trouble in the system (RAS fail, low battery, etc.).
AC fail Indicates an AC power loss.
Line fail Indicates a failure in the telephone line or connection between the control panel and the telephone line.
5

Alliance System
6
User Manual
User identification
Users are identified by user names, number, or personal identification number (PIN) codes. In addition, they
are grouped according to their functions access.
Pin codes
The Alliance system requires unique PIN codes and/or cards that allow a user do specific tasks, such as arm or
disarm the system. The PIN code must be four to ten digits.
When you enter your PIN code on the keypad, each key pressed is indicated by an asterisk (*) on the display. If
you enter the wrong PIN code, or a code/card that is not valid at a particular arming station, the keypad will
beep quickly seven times. Correct a wrong code by pressing CLEAR (see Figure 1 ) and enter the correct
code.
If you access a menu and do not use any keys for two minutes, you will automatically exit from the menu. It is
a good practice to exit the menu using 0+ENTER (see Figure 1 ) or CLEAR rather than the time-out feature
because if someone else uses the menu before it times out, the functions they use will be logged against your
PIN code.
Users can only access the menu options that their PIN code has been authorized to access. When you try to
access an option that you are not authorized to access, the message You are not authorized to
enter displays.
Function access
The Alliance system combines options for alarm and access control. Alarm controls monitor zone inputs and
determine if an alarm should occur when an intruder is detected. Access controls monitor and control access to
the premises.
The following features are used to group functions together and consequently determine which functions a user
can access.:
• Alarm groups
• Door groups
• Floor groups
Alarm groups
Alarm groups contain options available to control the alarm system and perform functions.
There are many alarm groups and each one is assigned specific areas and a specific set of functions. Your user
number is assigned to an alarm group and therefore performs only the functions of that alarm group.
Time zones are allocated to each alarm group. This means that the functions of an alarm group can be further
controlled by the time.
Example: An alarm group for managers allows access to all Alliance system user operations at all times, while
an alarm group for a cleaning company only allows their cards to disarm an area for 1 hour between 17:00 and
23:00.

Door groups
Door groups contain options available to gain access to the premises by controlling doors.
There are up to 128 door groups in your system for controlling access to doors. Each door group is allocated
specific door numbers, and each door number is allotted a time zone (during which you can access the door).
Your user number is assigned to a door group and will therefore access only the doors of that door group during
the specified time zone.
Example: A door group for a night shift worker allows their PIN code to be used to only open a door between
23:00 and 07:00.
Floor groups
There are up to 128 floor groups in your system for controlling access to floors. Each floor group is allocated
specific floor numbers, and each floor number is allotted a time zone (during which you can access the floor).
Your user number is assigned to a floor group and will therefore access only the floors of that floor group
during the specified time zone.
7
Example: A floor group for a night shift worker allows their PIN code to be used to only open a floor between
23:00 and 07:00.

Alliance System
8
User Manual
Duress signal
The duress function activates a silent signal to alert security personnel. For example, if you are asked, under
threat, to breach your system’s security this function lets you do so while at the same time activating the system
duress feature. However, your system must be programmed to use it.
The duress function requires that you use a duress digit in conjunction with your PIN code. The duress digit is
the last digit of you PIN code plus one.
Note: Contact your central station company to ensure that they take no further action if duress was activated under
conditions that are no longer valid (false alarm), and it has been reset.
Example: PIN = 1234 Duress digit = 5 (if the last digit of your PIN code is 9, the duress digit is 0)
To activate duress, do the following:
1. Enter your PIN code without the last digit (1 2 3, in the example above).
Note: Using your PIN code with the duress digit still activates the functions associated with the PIN code.
2. Enter the duress digit (5, in the example above).
3. Press OFF (see Figure 1 )or ON/NEXT (see Figure 1 ) or ENTER (see Figure 1 ).
4. To reset the duress function (turn off the silent signal), enter a valid PIN code.

Opening doors
Use an Alliance system keypad to open a door by entering a door code that is related to your PIN code. It
varies, depending on whether your PIN code has been programmed to allow you to arm/disarm your system, as
well as open doors.
Open a door
To open a door, do the following:
1. The bottom line of the display shows the
access code entry (Figure 2 ).
2. Enter your door code.
Figure 2. Enter Access Code screen
9
Note: In most systems with access control, an “alarm code
prefix” is used. The alarm code prefix is the number
of digits to subtract from the beginning of your full
PIN code to make your door code (this is
programmed by the installer).
Code:
Example: Prefix = 2 Full PIN code = 123456 Door code = 3456
Note: A door code only opens doors programmed for that code (the door group assigned to the user might not allow access to
all doors). If an invalid code is entered, or the code is not valid for the arming station, the keypad sounds seven quick
beeps.
To configure the system, do the following:
1. Press ENTER (see Figure 1 )to only open
the door.
2. Or OFF (Figure 1 ) to disarm the security
and open the door if your full PIN code is
entered.
3. Or ON/NEXT (Figure 1 ) to arm the security
and open the door if your full PIN code is
entered.
4. If the door can only be opened for a preset
time, the shunted code and passcode displays
Figure 3. Enter Access Code screen
(Figure 3 ).
Shunted Zone
Code:
If the door is closed before the end of the maximum open time, the Alliance system removes Shunted Zone
from the display. The keypad sounds the warning buzzer for three seconds to indicate that the door is no longer
shunted.
If the door is not closed at the end of the shunt time, the keypad displays Shunting Ends. The keypad
sounds the warning buzzer for a preset time to let you close the door or re-enter your PIN code to extend the
suppression time.

Alliance System
10
User Manual
Arming the system
Arm your premises, or areas in it, when they are unoccupied. If an event, such as someone forcing a door open,
occurs when the system is armed, it will set off an alarm.
Once you have armed the system, you must leave the area within a preset exit time to avoid setting off an
alarm. All users must be informed of this time limit.
You might not be able to arm specific areas in the premises because:
• Your keypad has been programmed to arm only specific areas in the premises. Make sure you know
which keypad to use if there is more than one present in the premises.
• Your PIN code has been programmed to arm only specific areas of the premises. Make sure you know
which areas you can arm.
You cannot arm an area if it has a zone input device not properly closed (such as magnetic contacts on a door or
window). Before arming, make sure that all doors and windows are properly closed. The keypad sounds seven
quick beeps and displays the message Active On… if a zone input is open.
Arm the system
To arm the system, do the following:
1. The display must show that the system is free
of alarms (Figure 4 ).
2. Enter your PIN code.
3. Press ON/NEXT (see Figure 1 ).
Figure 4. System alarm status
There Are No Alarms In This Area
Code:
4. The result of step 3 depends on whether the
system has been programmed to display a list
of areas assigned to your PIN code.
The AL-1103 indicates successful arming by illuminating an area LED. The AL111x LED goes from green to
red when the arming procedure has been successful.
Arming conditions and options
The Bypass/instant key (see Figure 1 ) provides the ability to bypass active zones and arm the system in
instant mode. Press the MENU * (see Figure 1 )key twice to check for active zones.
The Alliance system presents the bypass option in the following circumstances:
• The user has alarm system Arm/disarm capabilities.
• The user has access to Alliance system menu 10 bypass zone.
• One or more zones are active in the area that the user is attempting to arm. This does not apply to zone
types that do not prevent arming when active.
• No other keypad is currently using the Bypass menu (bypass can only be used by one keypad at a
time).

Bypass an active zone
To Bypass an active zone, do the following:
1. Enter your PIN code to arm the system.
2. The LCD keypad displays a number from 1
to 256 (Figure 5 ).
3. Press the MENU* key (Figure 1 ) to see the
next active zone if more than one active
zones exists.
4. Press the Bypass/instant (Figure 1 ) key
once for each active zone to bypass all active
zones.
5. Press the ENTER (Figure 1 ) key after all
zones are bypassed to finish arming the
system.
11
Figure 5. Display active zones
Active zone 5
NEXY or BYPASS
Instant arm the system
To instant arm the system, do the following:
1. Enter your PIN code.
2. Press Bypass/instant key.
Arming the system in instant mode causes the area entry timer to be ignored, and alarms can occur instantly.
The system generates an alarm the instant the zone is faulted.
STAY arm the system
Areas armed using the STAY key, have no exit delay. All perimeter zones are supervised without delay. To
autobypass the interior zones and arm all of the perimeter zones for access, arm the system using the STAY key
(Figure 1 ). The STAY mode only works when perimeter zones are programmed in the system. Arming an area
using the STAY key eliminates exit delay.
Active Interior zones will be ignored when arming the system in STAY mode.
To arm the system in the STAY mode, do the following:
1. Enter your PIN code.
2. Press STAY key.
Programmed not to display areas assigned to your PIN code
If your system has not been programmed to display the areas assigned to your PIN code, all areas that were
disarmed are now automatically armed provided zone were not programmed for tamper. The display returns to
that shown in System alarm status on page 10. The area LEDs illuminate when the arming procedure is
successful.

Alliance System
12
User Manual
Programmed to display areas assigned to your PIN code
If a list of the areas assigned to your PIN code is displayed, all disarmed areas are listed. For example:
0-ALL 1, Office 2, Boardroom
Enter Area:
Tab le 4 lists the display options.
Table 4. Pin code display options
Option Action
Arm all areas at once and return to the original display Enter 0 and press ENTER (Figure 1 ).
Arm the selected area. If there are more disarmed areas, they
will be displayed.
Exit the menu option and return to the original display. Areas
already armed will stay armed.
Display the next disarmed area in the list . You can then select
an area to be armed, or continue to press ON/NEXT to
continue scrolling.
Enter area number and press ENTER. When finished
arming, press ENTER again.
Press CLEAR (see Figure 1 ).
Press ON/NEXT (see Figure 1 ).

Disarming your system
If the area you want to access is armed, you must first disarm the system before you can access the area without
setting off an alarm. The illuminated (red) area LEDs on the keypad indicates which areas are armed.
On entering the area, the system will allow a preset entry time to disarm the area before an alarm occurs.
If there is an alarm condition when you are disarming the system, the alarm is reset. You must then find out
what caused the alarm and fix it. See Listing past alarm events on page 21 for details on how to get a list of all
the alarms that recently occurred.
You might not be able to disarm specific areas in the premises because:
• Your keypad has been programmed to disarm only specific areas in the premises. Make sure you know
which keypad to use if there is more than one present in the premises.
• Your PIN code has been programmed to disarm only specific areas of the premises. Make sure you
know which areas you can disarm.
Disarm the system
13
If there are no alarms in the area, the display must show:
There Are No Alarms In This Area
Code:
To disarm the system, do the following:
1. Enter your PIN code.
2. Press OFF (Figure 1 ).
3. The result of step 3 depends on whether the system has been programmed to display a list of the areas
assigned to your PIN code.
4. When the disarming procedure has been successful the AL-1103 area LED goes off, and the AL111x
LED goes from red to green. When an area is armed its LED illuminates red.

Alliance System
14
User Manual
Programmed not to display areas assigned to your PIN code
All armed areas are automatically disarmed if your system has not been programmed to display the areas
assigned to your PIN code and the zones were not programmed for tamper. The display returns to that shown
above.When the disarming procedure has been successful the AL-1103 area LED goes off, and the AL111x
LED goes from red to green.
Programmed to display areas assigned to your PIN code
If a list of the areas assigned to your PIN code is displayed, all armed areas are now listed. For example:
0-ALL 1, Office 2, Boardroom
Enter Area:
Tab le 5 lists the display options.
Table 5. Disarm the system display options
Option Action
Disarm all areas at once and return to the original display. Enter 0 and press ENTER (Figure 1 ).
Disarm the selected area. If there are more armed areas, they
will display.
Exit and return to the original display. Areas already disarmed
will stay disarmed.
Display the next armed area in the list. You can then select an
area to be disarmed, or continue to press ON/NEXT to scroll.
Enter area number and press ENTER. When finished
disarming, press ENTER again.
Press CLEAR (see Figure 1 ).
Press ON/NEXT (see Figure 1 ).

Active zones
You cannot arm an area unless all the zones in that area are normal, as an active zone would usually set off an
alarm. For example, all doors and windows must be closed.
If a zone is active while you try to arm or disarm an area, the keypad sounds seven quick beeps and displays the
active zones. You may have the ability to bypass active zones and arm the system.See Arming conditions and
options on page 10 for details.
Active zones are listed according to system programming. If Display Zones is enabled, then one zone and its
description will be displayed at the RAS. Press ON/EXT (see Figure 1 )
next active zone and its description. If Display Zones is disabled, then a list of zone numbers will be displayed
at the RAS. Press the zone number and press ENTER (see Figure 1 ) to see its description.
One at a time:
Active On 6.Front Door
NEXT or ENTER
+MENU* (see Figure 1 ) to see the
15
List of numbers:
Active On 6, 7, 9,
Zone No:
Tab le 6 lists the display options.
Table 6. Active zone display options
Option Action
Update the list of active zones and display the next zones
in the list (if any).
Display the zone name in full. Enter the zone number and press ENTER.
Exit the menu option and return to the original display. Press CLEAR (see Figure 1 ).
Press ON/NEXT.
After determining the active zones, check those zones and correct the problem. Exit this display and try to arm
the system. If you are unable to close the zone, refer to System menu option 10, Bypass zone on page 38.
Note: After trying to correct the problem and being unable to do so, you can press the bypass key to bypass active zones.

Alliance System
16
User Manual
Types of alarms
There are three types of alarms used in the Alliance system.
• Local Alarm
•Alarm
•System Alarm
Local alarm
Local alarms occur when an area is occupied (disarmed). For example, zones with 24-hour security have been
activated such as a fire door being opened. The circumstances that caused a local alarm need to be checked and
rectified by someone on site. The alarm does not need to be reported to a central station.
See What to do when an alarm occurs on page 18 for the procedure to identify, acknowledge, and reset a local
alarm.
Alarm
An alarm occurs when:
• The area is armed and one of its zones has been activated. For example, a door lock has been forced
open causing a siren to sound.
• The area is disarmed and a 24-hour zone was activated. For example, a hold-up button is activated or a
tamper switch is open.
• The exact type of alarm (siren, flashing light, and so forth) depends on how the system has been
programmed.
• The area LEDs on the RAS indicate the areas in alarm.
See What to do when an alarm occurs on page 18 for the procedure to reset an alarm.
System alarm
Alliance defines a system alarm as the state of a security system when an Alliance system device (control
panel, RAS, or DGP) is tampered, stops communicating, or detects a fault condition such as an AC fail or a low
battery.
Examples:
• Alarm equipment interfered with or covers removed (DGP tamper)
• Communications cabling interfered with – cut or shorted (DGP or RAS fail)
• Connections to siren speakers interfered with – cut or shorted (siren fail)
• Telephone line connection lost due to disconnection, short, or other failure (line fault)
• Panel failed to report a pending event to the central station (report failed FTC)
• Power supply interrupted and/or overload and battery problems (AC fail, fuse fail, low battery)
The exact type of alarm depends on how the system has been programmed.

If Latching System Alarms is enabled, then system alarms require an authorized PIN code to reset. If Latching
System Alarms is disabled, then system alarms reset automatically when the alarm condition is no longer
present.
1. Latching System Alarms
Your system has been programmed to respond to a system alarm in one of two ways:
A PIN code, that is authorized to reset system alarms, must be entered to reset a system alarm. The
procedure to identify and reset latching system alarms is the same as described for What to do when an
alarm occurs on page 18.
2. Non-Latching System Alarms
The system alarm resets automatically as soon as the condition causing the alarm is rectified. The
procedure to identify and reset latching system alarms is the same as described for What to do when an
alarm occurs on page 18.
17
 Loading...